Make sure that your local AC mains voltage matches the voltage specified on the name plate on the bottom
panel. In some areas a voltage selector may be provided on the rear panel of the main keyboard unit near
the power cord. Make sure that the voltage selector is set for the voltage in your area. The voltage selector is
set at 240V when the unit is initially shipped. To change the setting use a “minus” screwdriver to rotate the
selector dial so that the correct voltage appears next to the pointer on the panel.
For information on assembling the instrument, refer to the instructions at the end of this manual.
F02 Owner’s Manual
2
The model number, serial number, power requirements, etc., may be
found on or near the name plate, which is at the bottom of the unit.
You should note this serial number in the space provided below and
retain this manual as a permanent record of your purchase to aid
identification in the event of theft.
Model No.
Serial No.
(bottom_en_01)
Le numéro de modèle, le numéro de série, l’alimentation requise, etc.,
se trouvent sur ou près de la plaque signalétique du produit, située
dans la partie inférieure de l’unité. Notez le numéro de série dans
l’espace fourni ci-dessous et conservez ce manuel entant que preuve
permanente de votre achat afin de faciliter l’identification du produit en
cas de vol.
N° de modèle
N° de série
(bottom_fr_01)
El número de modelo, el número de serie, los requisitos de alimentación,
etc. pueden encontrarse en la placa de identificación o cerca de ella.
Esta placa se encuentra en la parte inferior de la unidad. Debe anotar
dicho número en el espacio proporcionado a continuación y conservar
este manual como comprobante permanente de su compra para facilitar
la identificación en caso de robo.
Nº de modelo
Nº de serie
(bottom_es_01)
Die Nummer des Modells, die Seriennummer, der Leistungsbedarf
usw. sind auf dem Typenschild, das sich auf der Unterseite des
Geräts befindet, oder in der Nähe davon angegeben. Sie sollten diese
Seriennummer an der unten vorgesehenen Stelle eintragen und
dieses Handbuch als dauerhaften Beleg für Ihren Kauf aufbewahren,
um im Fall eines Diebstahls die Identifikation zu erleichtern.
Modell Nr.
Seriennr.
(bottom_de_01)
The name plate is located on the bottom of the unit.
La plaque signalétique de ce produit se trouve dans
le bas de l’unité.
La placa del nombre se encuentra en la parte inferior
de la unidad.
Das Namensschild befindet sich an der Unterseite
des Produkts.
F02 Owner’s Manual
3
Information for Users on Collection and Disposal of Old Equipment
This symbol on the products, packaging, and/or accompanying documents means that used electrical and electronic products should
not be mixed with general household waste.
For proper treatment, recovery and recycling of old products, please take them to applicable collection points, in accordance with your
national legislation and the Directives 2002/96/EC.
By disposing of these products correctly, you will help to save valuable resources and prevent any potential negative effects on human
health and the environment which could otherwise arise from inappropriate waste handling.
For more information about collection and recycling of old products, please contact your local municipality, your waste disposal service
or the point of sale where you purchased the items.
[For business users in the European Union]
If you wish to discard electrical and electronic equipment, please contact your dealer or supplier for further information.
[Information on Disposal in other Countries outside the European Union]
This symbol is only valid in the European Union. If you wish to discard these items, please contact your local authorities or dealer and ask for the correct
method of disposal.
(weee_eu_en_01)
Information concernant la Collecte et le Traitement des déchets d’équipements électriques et électroniques.
Le symbole sur les produits, l’emballage et/ou les documents joints signifie que les produits électriques ou électroniques usagés ne doivent pas être
mélangés avec les déchets domestiques habituels.
Pour un traitement, une récupération et un recyclage appropriés des déchets d’équipements électriques et électroniques, veuillez les déposer aux
points de collecte prévus à cet effet, conformément à la réglementation nationale et aux Directives 2002/96/EC.
En vous débarrassant correctement des déchets d’équipements électriques et électroniques, vous contribuerez à la sauvegarde de précieuses
ressources et à la prévention de potentiels effets négatifs sur la santé humaine qui pourraient advenir lors d’un traitement inapproprié des déchets.
Pour plus d’informations à propos de la collecte et du recyclage des déchets d’équipements électriques et électroniques, veuillez contacter votre
municipalité, votre service de traitement des déchets ou le point de vente où vous avez acheté les produits.
[Pour les professionnels dans l’Union Européenne]
Si vous souhaitez vous débarrasser des déchets d’équipements électriques et électroniques veuillez contacter votre vendeur ou fournisseur pour plus d’informations.
[Information sur le traitement dans d’autres pays en dehors de l’Union Européenne]
Ce symbole est seulement valable dans l’Union Européenne. Si vous souhaitez vous débarrasser de déchets d’équipements électriques et électroniques, veuillez
contacter les autorités locales ou votre fournisseur et demander la méthode de traitement appropriée.
(weee_eu_fr_01)
Información para Usuarios sobre Recolección y Disposición de Equipamiento Viejo
Este símbolo en los productos, embalaje, y/o documentación que se acompañe significa que los productos electrónicos y eléctricos
usados no deben ser mezclados con desechos hogareños corrientes.
Para el tratamiento, recuperación y reciclado apropiado de los productos viejos, por favor llévelos a puntos de recolección aplicables,
de acuerdo a su legislación nacional y las directivas 2002/96/EC.
Al disponer de estos productos correctamente, ayudará a ahorrar recursos valiosos y a prevenir cualquier potencial efecto negativo
sobre la salud humana y el medio ambiente, el cual podría surgir de un inapropiado manejo de los desechos.
Para mayor información sobre recolección y reciclado de productos viejos, por favor contacte a su municipio local, su servicio de
gestión de residuos o el punto de venta en el cual usted adquirió los artículos.
[Para usuarios de negocios en la Unión Europea]
Si usted desea deshacerse de equipamiento eléctrico y electrónico, por favor contacte a su vendedor o proveedor para mayor información.
[Información sobre la Disposición en otros países fuera de la Unión Europea]
Este símbolo sólo es válido en la Unión Europea. Si desea deshacerse de estos artículos, por favor contacte a sus autoridades locales y pregunte por el
método correcto de disposición.
(weee_eu_es_01)
Verbraucherinformation zur Sammlung und Entsorgung alter Elektrogeräte
Befindet sich dieses Symbol auf den Produkten, der Verpackung und/oder beiliegenden Unterlagen, so sollten benutzte elektrische Geräte
nicht mit dem normalen Haushaltsabfall entsorgt werden.
In Übereinstimmung mit Ihren nationalen Bestimmungen und den Richtlinien 2002/96/EC bringen Sie alte Geräte bitte zur fachgerechten
Entsorgung, Wiederaufbereitung und Wiederverwendung zu den entsprechenden Sammelstellen.
Durch die fachgerechte Entsorgung der Elektrogeräte helfen Sie, wertvolle Ressourcen zu schützen, und verhindern mögliche negative
Auswirkungen auf die menschliche Gesundheit und die Umwelt, die andernfalls durch unsachgerechte Müllentsorgung auftreten könnten.
Für weitere Informationen zum Sammeln und Wiederaufbereiten alter Elektrogeräte kontaktieren Sie bitte Ihre örtliche Stadt- oder
Gemeindeverwaltung, Ihren Abfallentsorgungsdienst oder die Verkaufsstelle der Artikel.
[Information für geschäftliche Anwender in der Europäischen Unio]
Wenn Sie Elektrogeräte ausrangieren möchten, kontaktieren Sie bitte Ihren Händler oder Zulieferer für weitere Informationen.
[Entsorgungsinformation für Länder außerhalb der Europäischen Union]
Dieses Symbol gilt nur innerhalb der Europäischen Union. Wenn Sie solche Artikel ausrangieren möchten, kontaktieren Sie bitte Ihre örtlichen Behörden oder
Ihren Händler und fragen Sie nach der sachgerechten Entsorgungsmethode.
(weee_eu_de_01)
F02 Owner’s Manual
4
Thank you for choosing the Yamaha Digital Piano.
In order to make the most of the performance potential and features of the instrument, please read the
manuals thoroughly, and keep them in a handy place for later reference.
About the Manuals
This instrument has the following manuals.
Included Manuals
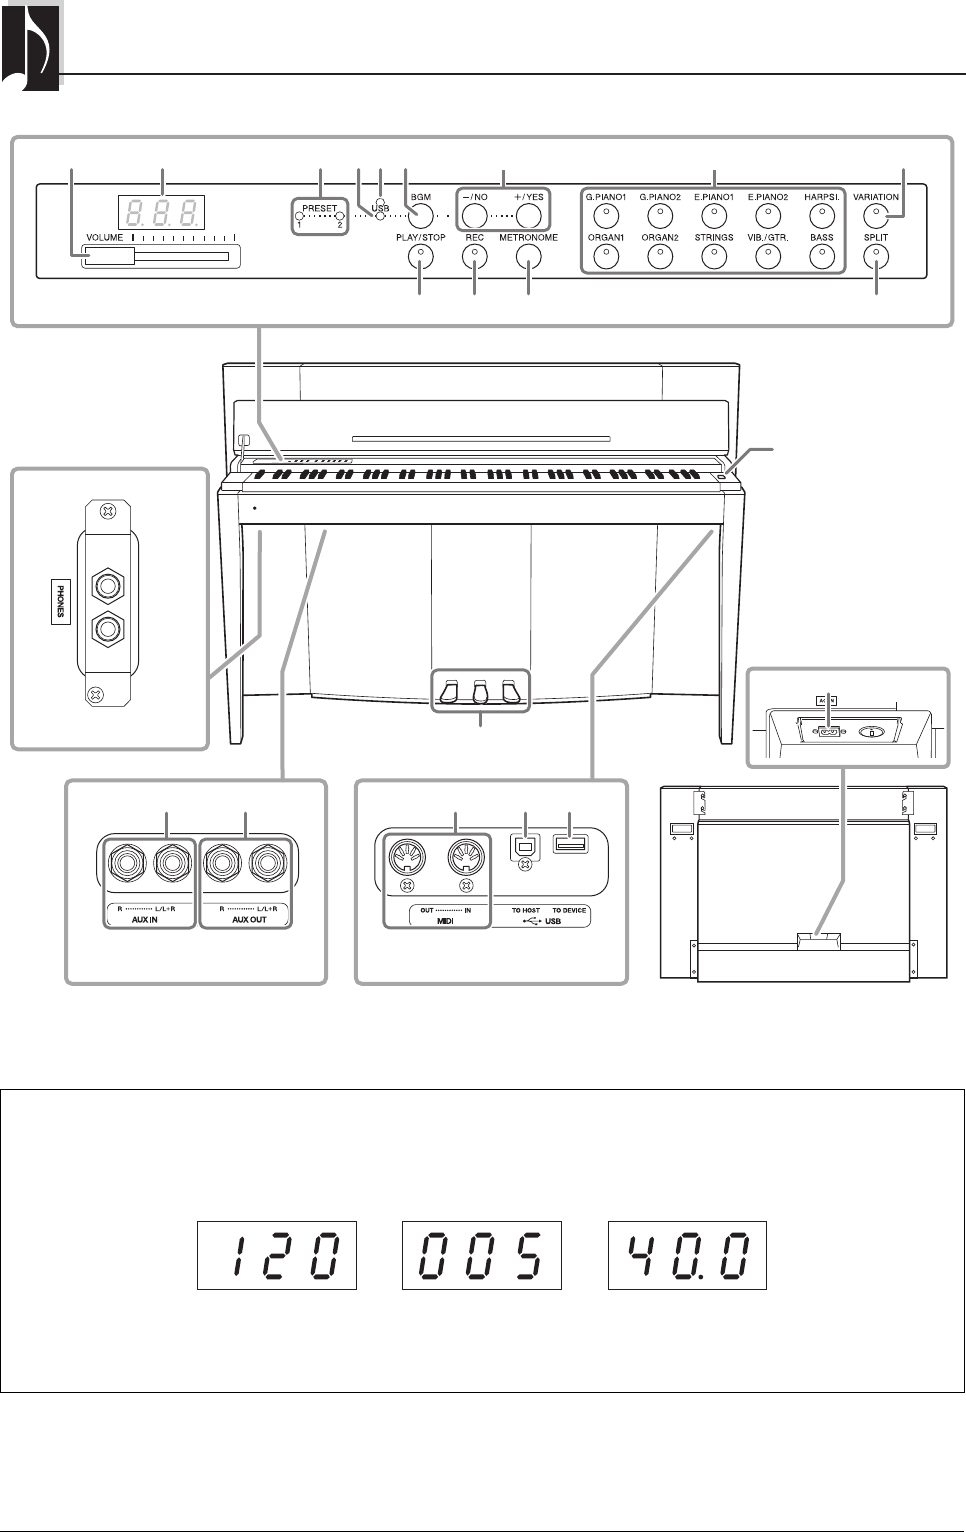
Owner’s Manual (this book)
Explains how to use the instrument.
Online Manuals (PDF)
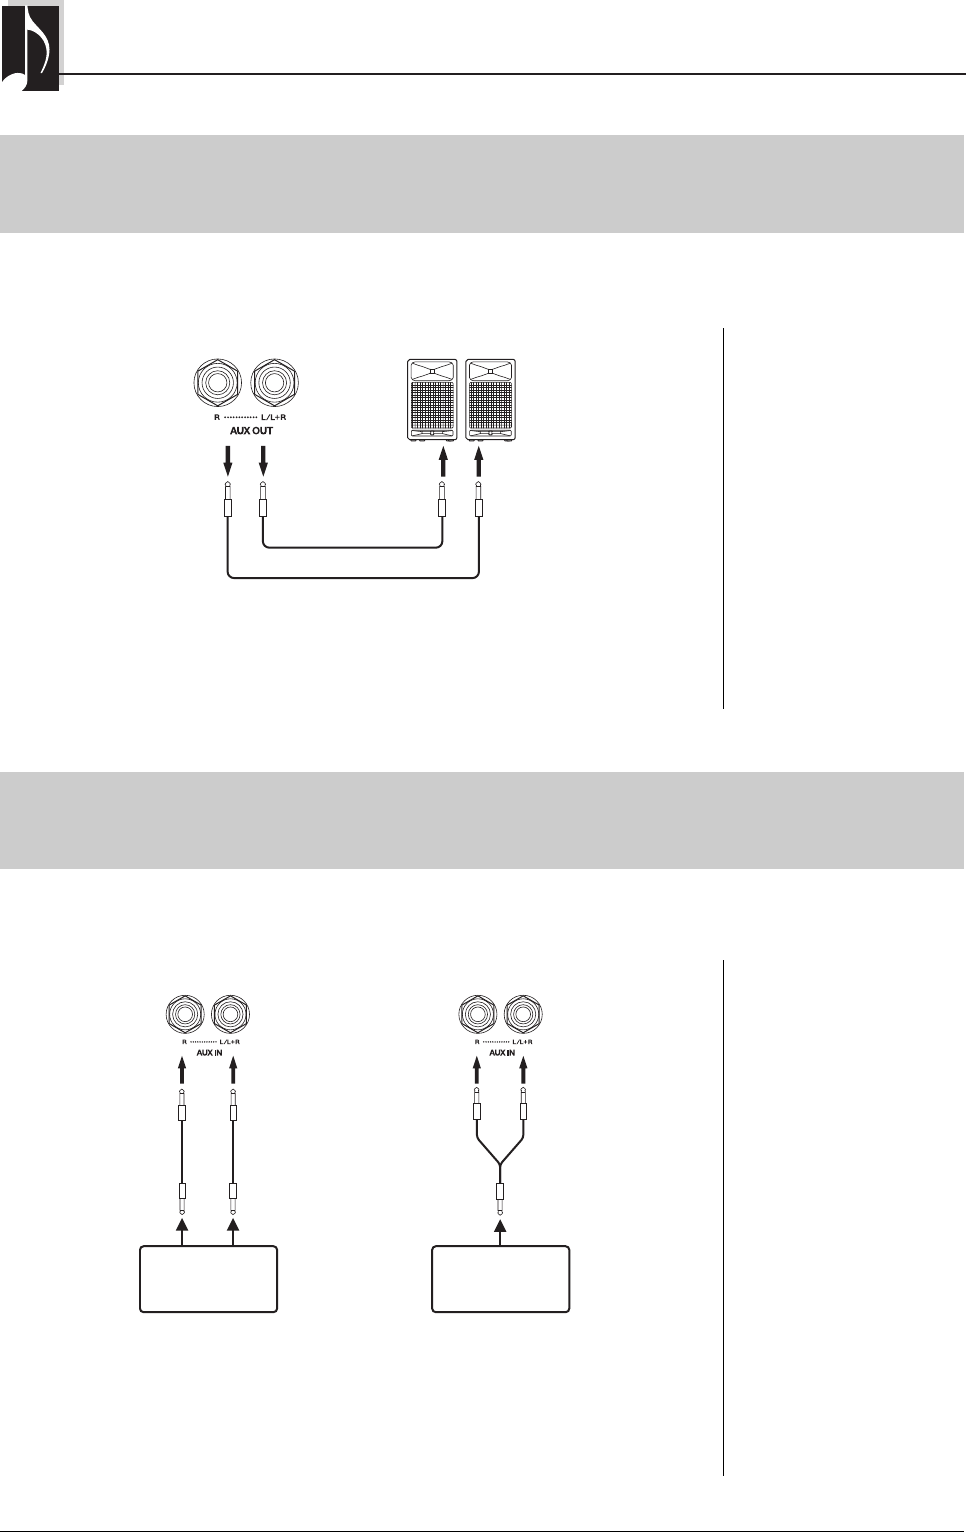
Computer-related Operations
Includes instructions on connecting this instrument to a computer.
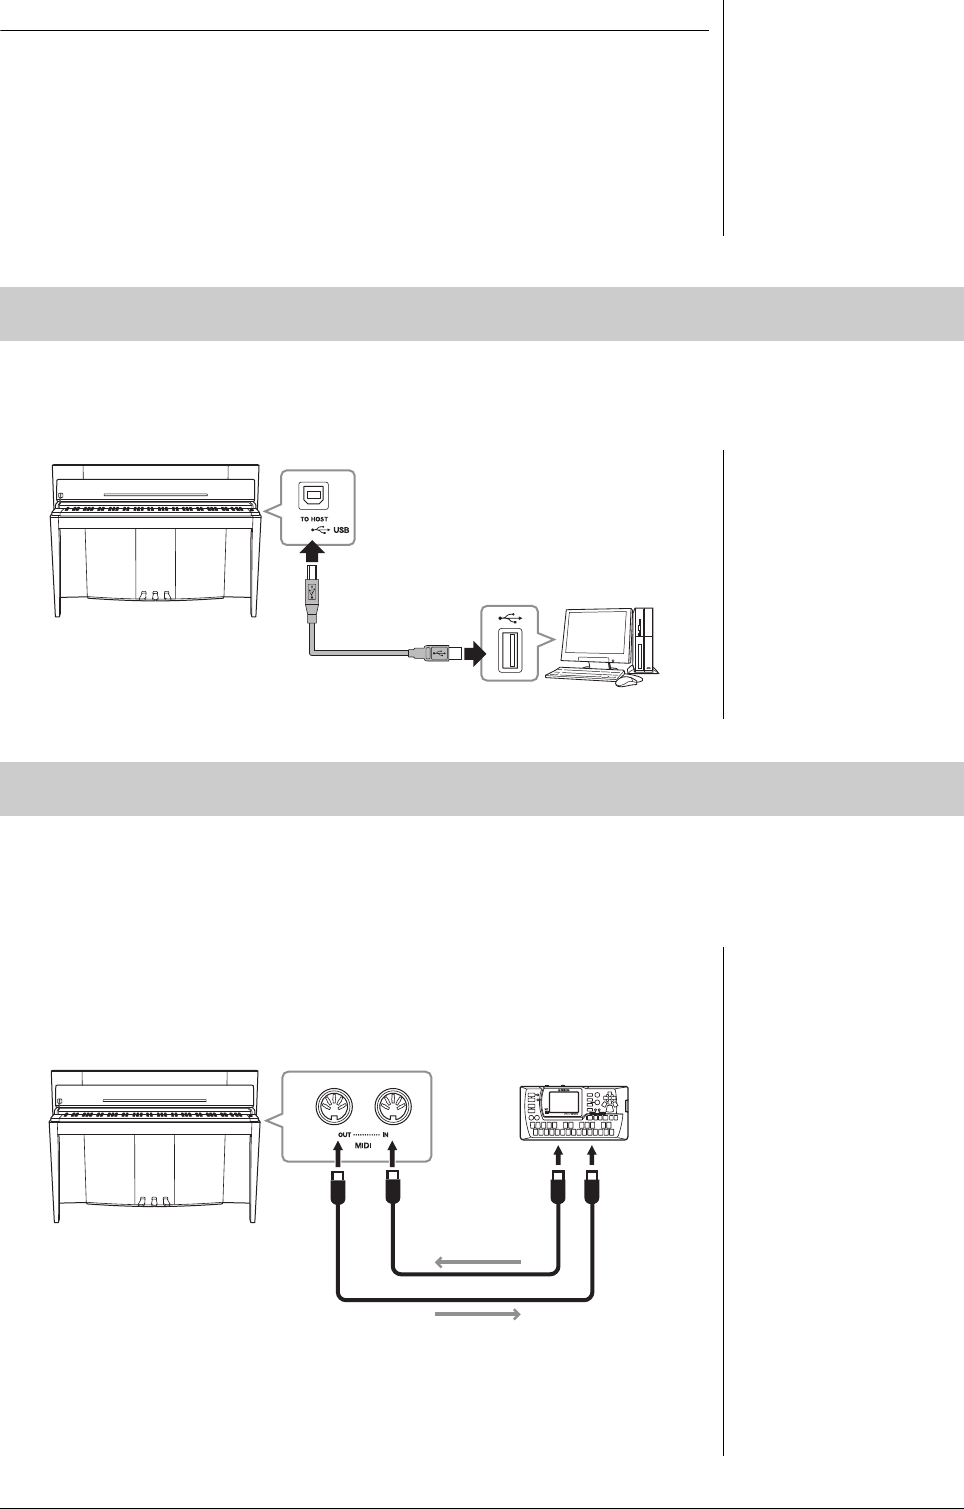
MIDI Reference
Contains the MIDI Data Format and MIDI Implementation chart.
MIDI Basics
Contains basic explanations about MIDI.
To obtain these manuals, access the Yamaha Downloads website, select your country, enter “F02” in the Model Name box,
then click [SEARCH].
Included Accessories
•Owner’s Manual (this book)
•AC Power cord
•Bench
•Online Member Product Registration
*1
*1 You will need the PRODUCT ID on the sheet in order to fill out the User Registration form.
Yamaha Downloads
http://download.yamaha.com/
F02 Owner’s Manual
5
Contents
About the Manuals.......................................................4
Included Accessories....................................................4
15On Green Dolphin Street (N. Washington & B. Kaper) *756
16Over the Rainbow (H. Arlen) *84486
17Smoke Gets in Your Eyes (J. Kern) *97559
18Stella by Starlight (V. Young) *106867
19The Nearness of You (H. Carmichael) *11976106
20You Are Too Beautiful (R. Rodgers)71077
Voice Demo Song List
Voice NameTitleComposer
G. PIANO 1Valse op.34-1 “Valse Brillante”F. F. Chopin
HARPSI.Concerto a cembalo obbligato, 2 violini, viola e continuo No.7, BWV.1058J. S. Bach
ORGAN 1Herr Christ, der ein’ge Gottes-Sohn, BWV.601J. S. Bach
Song Name (Composer)
Scene Title
Home Party
Daytime
Afternoon
Evening
Midnight
Elegant
Upbeat
Ballad
Innocent
Mood Music
Appendix
F02 Owner’s Manual
41
: Yes
—: No
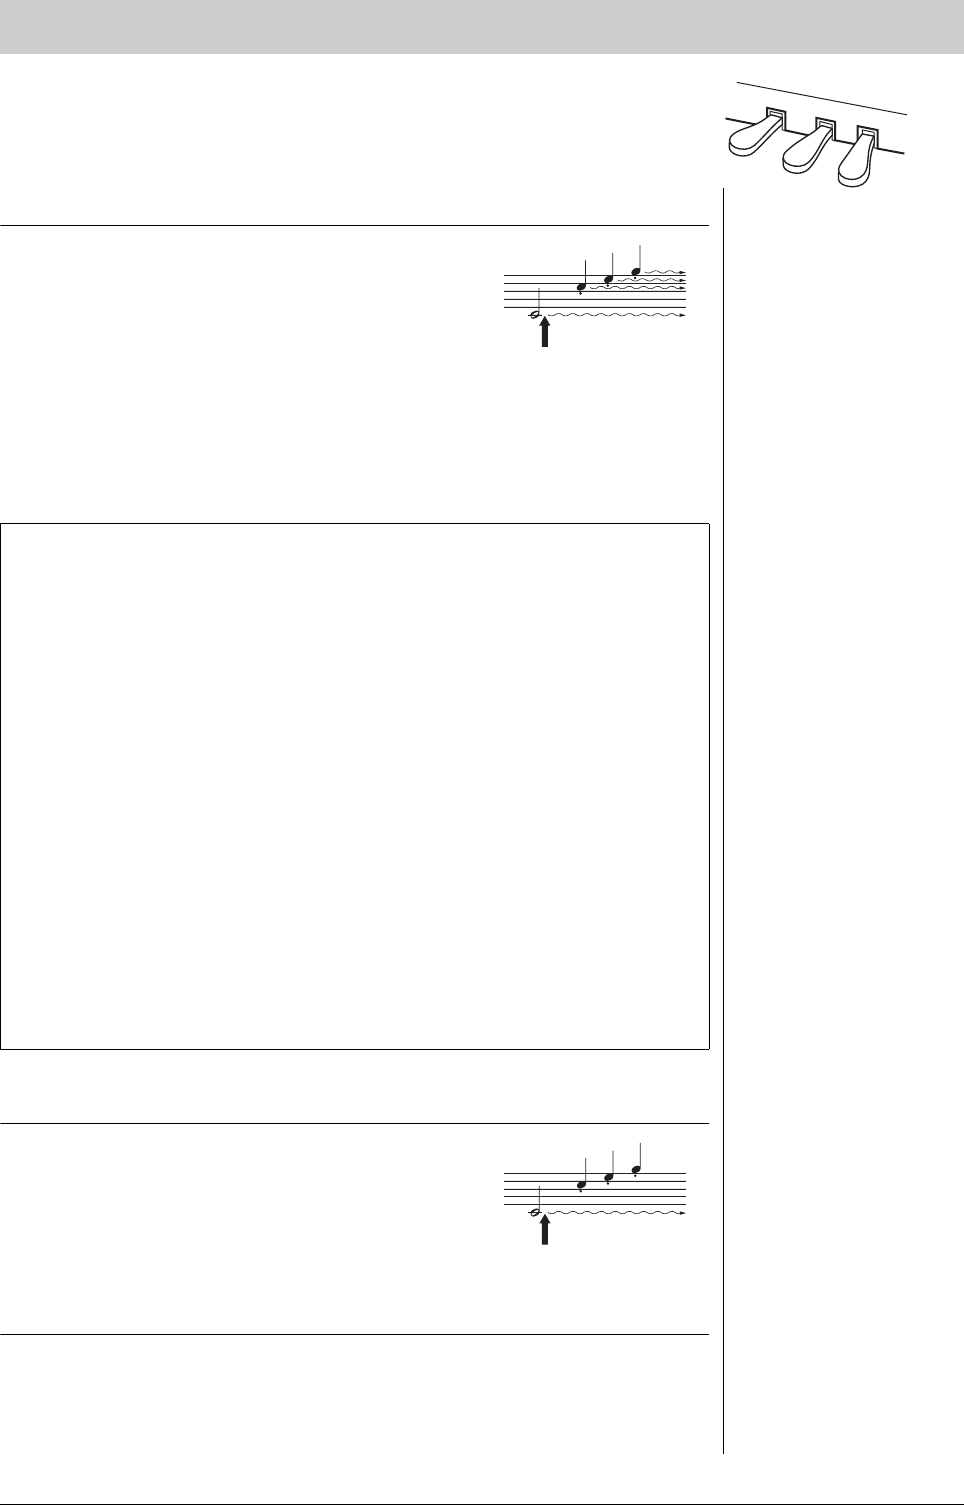
Key-Off Sampling:
Samples of the very delicate noises that are produced when keys are released.
Sustain Sampling:
Samples of the resonance of the soundboard and strings when the damper pedal is pressed.
String Resonance:
Simulated string resonance sound.
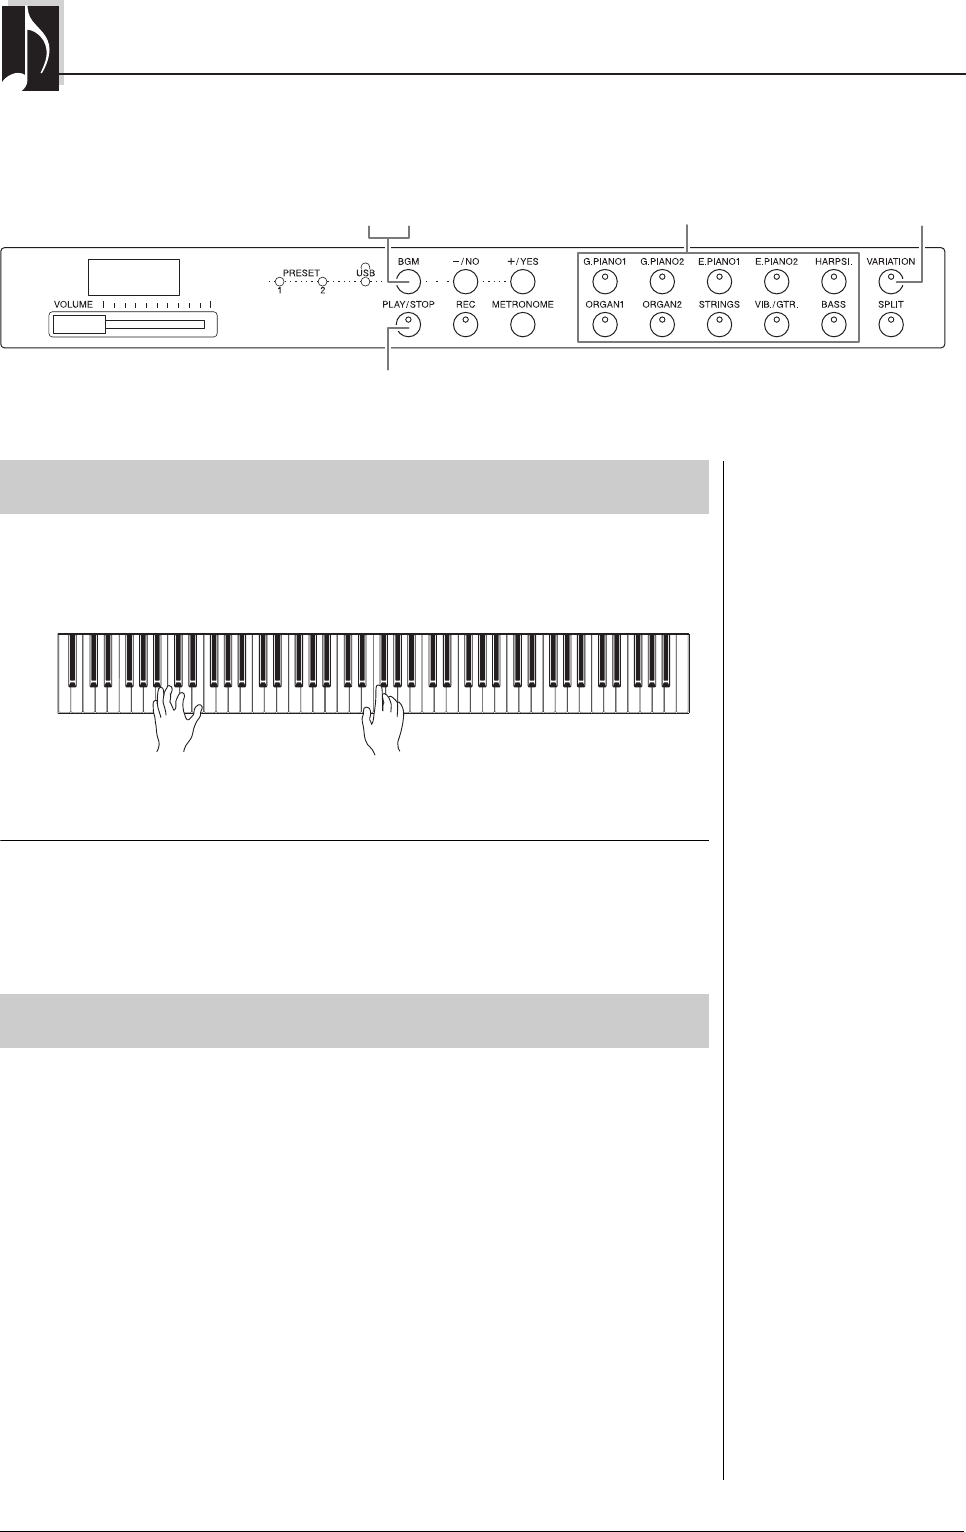
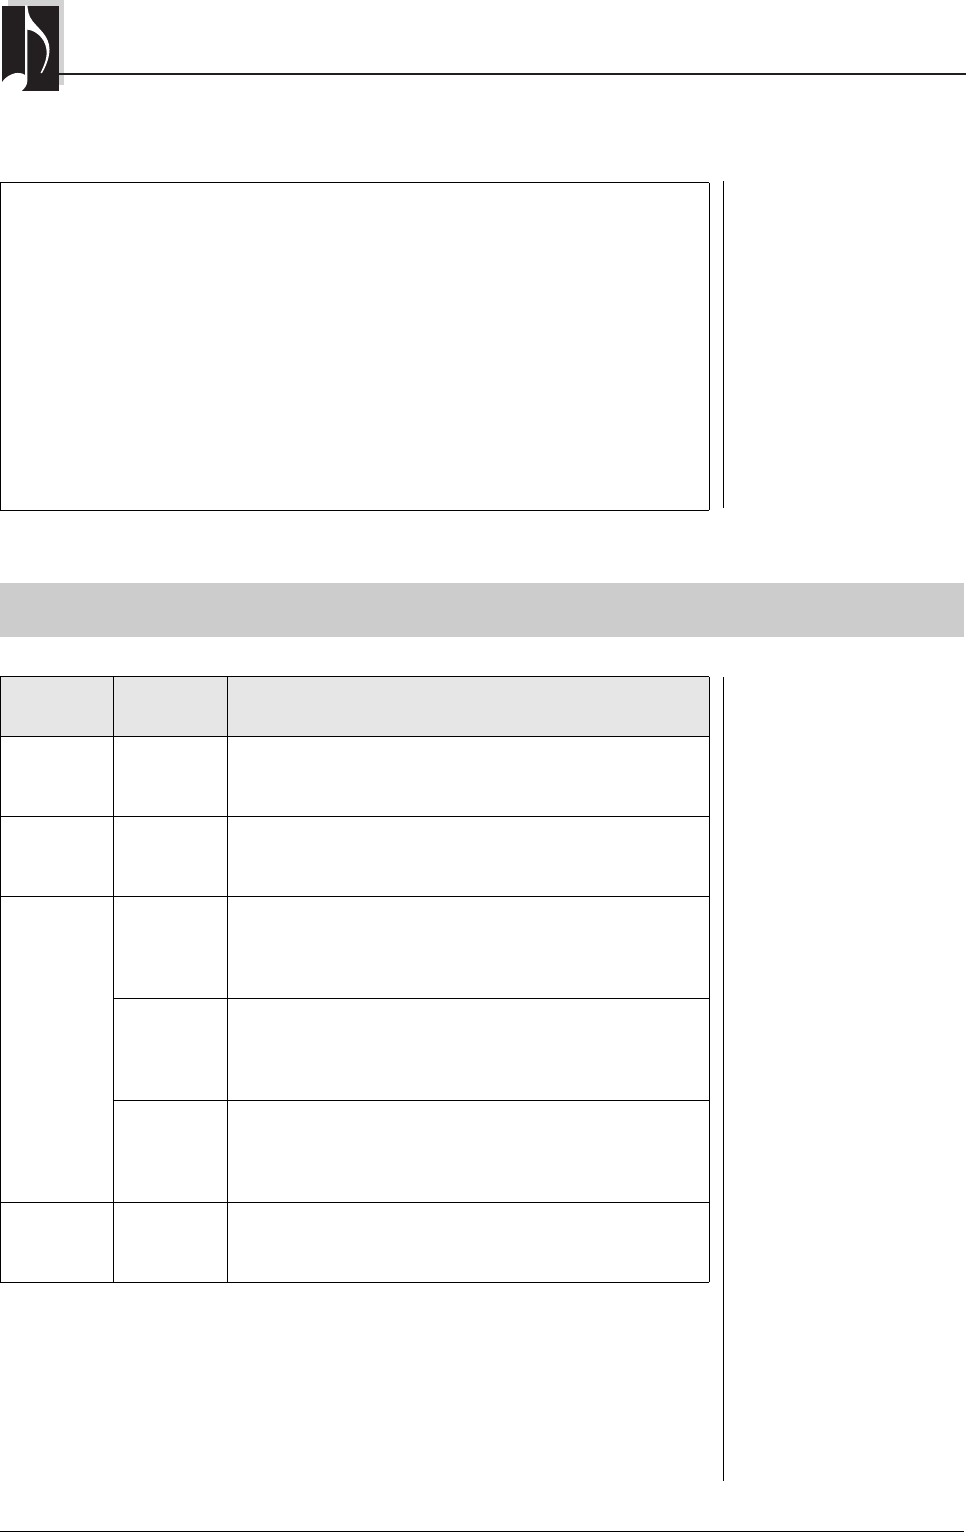
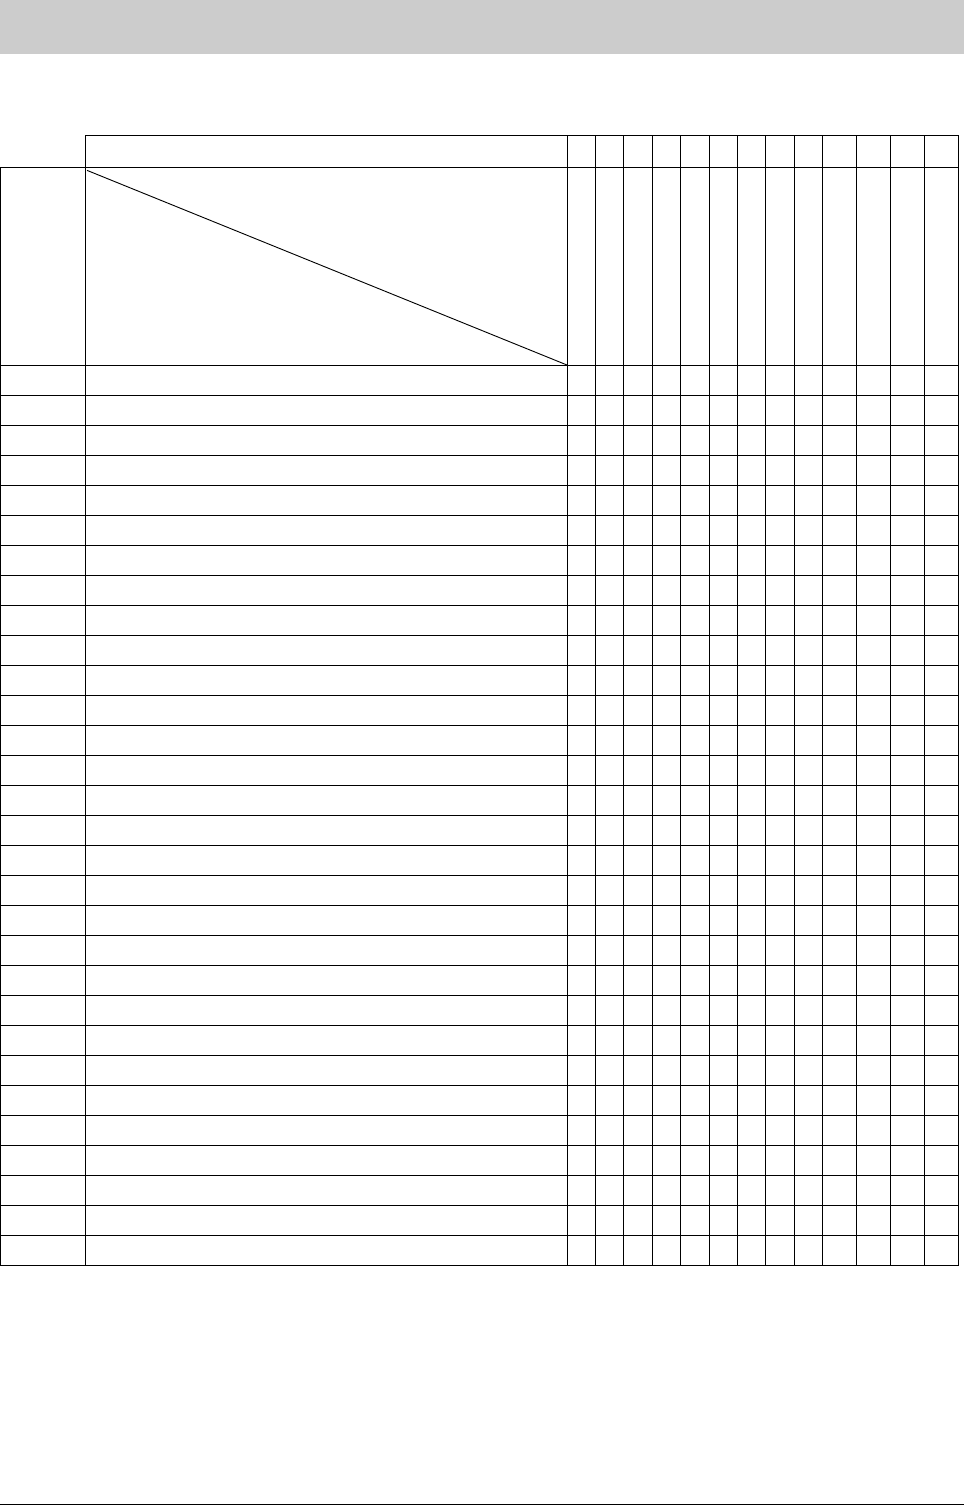
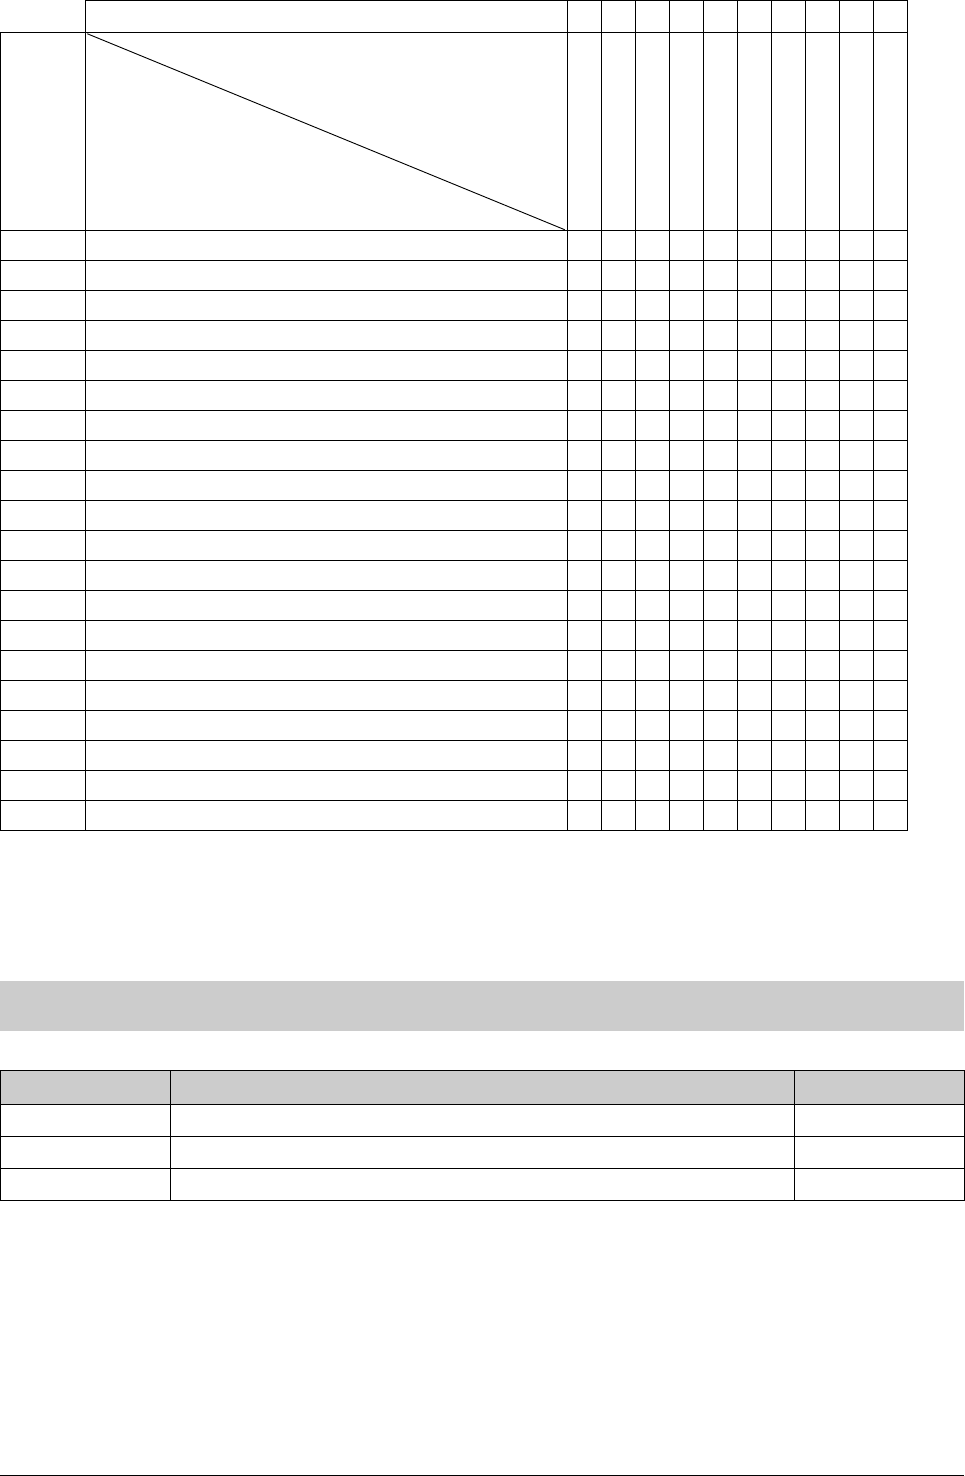
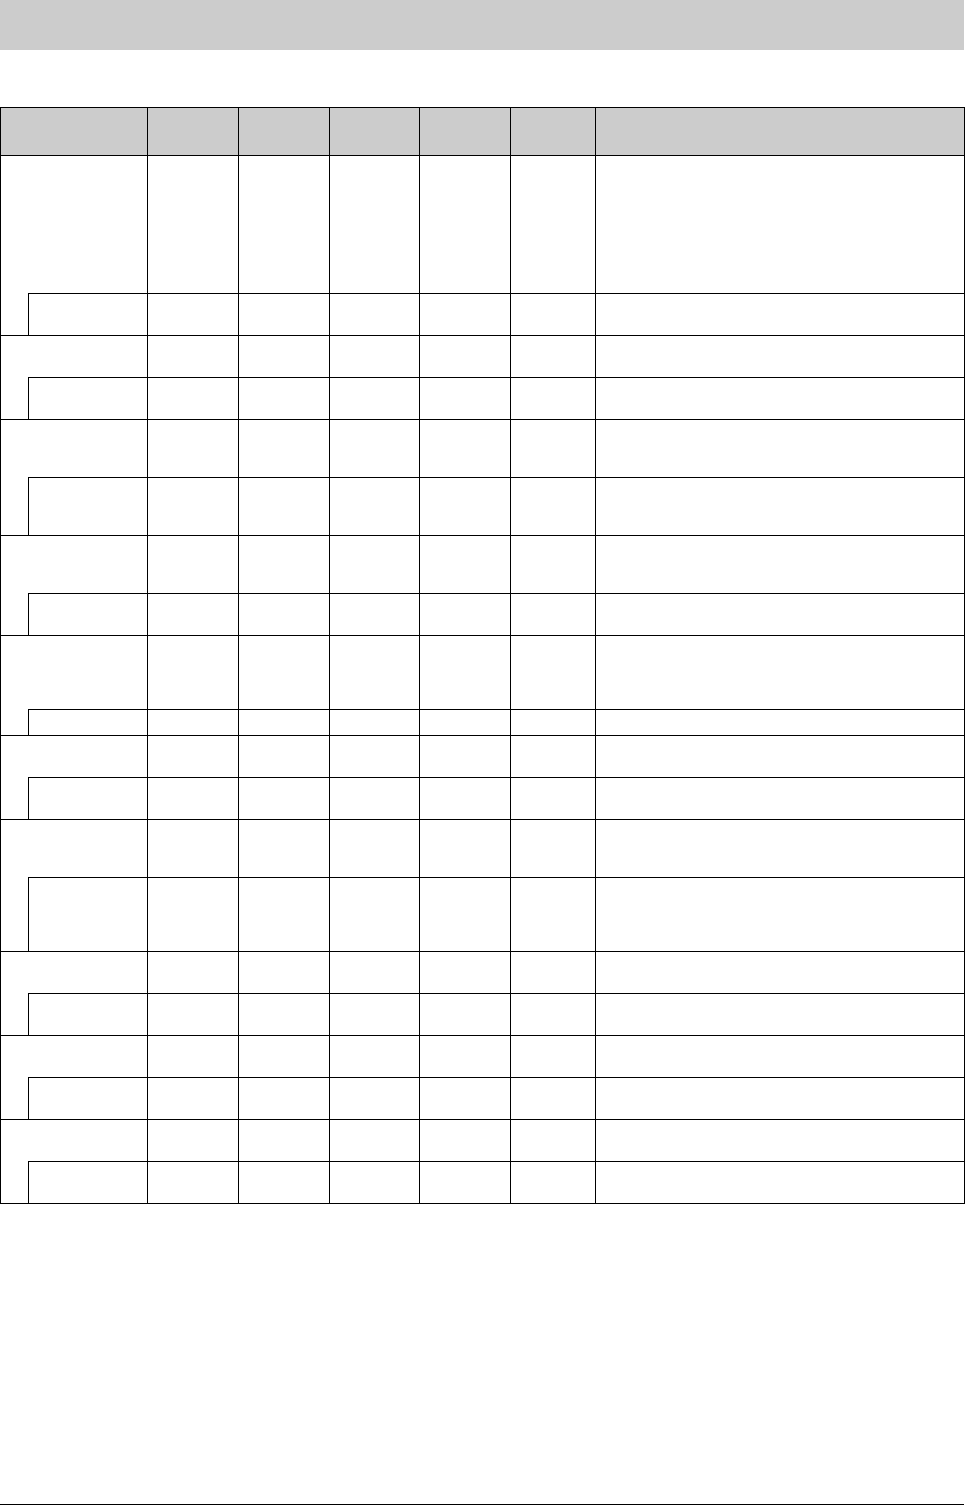
Preset Voice List
Voice Name
To u c h
Response
Stereo
Sampling
Key-Off
Sampling
Sustain
Sampling
String
Resonance
Voice description
G.PIANO 1
This sound was sampled from a concert grand piano. It uses
different samples depending on the strength of your playing and
produces smoother tonal changes. Even the tonal changes
produced by the damper pedal and the subtle sounds of releasing
a key are reproduced. The sympathetic vibration (string
resonance) that occurs among the strings of an acoustic piano
has also been simulated. Suitable not only for classical
compositions but also for piano pieces of any style.
VA RI ATI O N—
Mellow piano sound with gradual attack. Good for quiet and
slow music.
G.PIANO 2———
Spacious and clear piano with bright reverb. Good for popular
music.
VA RI ATI O N
Bright piano sound. Good for clear expression and cutting
through the sound of other instruments in an ensemble.
E.PIANO 1————
An electronic piano sound created by FM synthesis. Extremely
musical response with varying timbre according to keyboard
dynamics. Good for standard popular music.
VA RI ATI O N————
A synth-generated type electronic piano sound often heard in
popular music. Used in the Dual mode it blends well with an
acoustic piano Voice.
E.PIANO 2———
The sound of an electric piano using hammer-struck metallic
tines. Soft tone when played lightly, and an aggressive tone when
played hard.
VA RI ATI O N————
A slightly different electric piano sound often heard in rock and
popular music.
HARPSI.———
The definitive instrument for baroque music. Since harpsichord
uses plucked strings, there is no touch response. There is,
however, a characteristic additional sound when the keys are
released.
VA RI ATI O N———Mixes the same Voice an octave higher for a more brilliant tone.
ORGAN 1————
This is a typical pipe organ sound (8 feet + 4 feet + 2 feet).
Good for sacred music from the Baroque period.
VA RI ATI O N————
This is the organ’s full coupler sound often associated with
Bach’s “Toccata and Fugue.”
ORGAN 2 —————
The sound of a tonewheel type electric organ. Often heard in
jazz and rock music. The rotary speed of the “ROTARY SP”
effect can be switched by using the left pedal.
VARIATION—————
The sound of a tonewheel type electric organ without attacks.
Select the normal or variation Voice depending on the tunes.
The rotary speed of the “ROTARY SP” effect can be switched by
using the left pedal.
STRINGS ———
Stereo-sampled, large-scale strings ensemble with realistic
reverb. Try combining this Voice with piano in the Dual mode.
VA RI ATI O N———
Spacious strings ensemble with a slow attack. Try combining this
Voice with a piano or electric piano in the Dual mode.
VIB./GTR.
———
Vibraphone played with relatively soft mallets. The tone
becomes more metallic the harder you play.
VA RI ATI O N————
Warm and natural-sounding nylon guitar. Enjoy the quiet
ambience of nylon strings.
BASS ————
An upright bass played fingerstyle. Ideal for jazz and Latin
music.
VA RI ATI O N————
Electric bass for a wide range of music styles, jazz, rock, popular,
and more.
Appendix
F02 Owner’s Manual
42
CAUTION
•Assemble the stand on a hard and flat floor with ample space.
•Be careful not to confuse parts, and be sure to install all parts
in the correct orientation. Please assemble the unit in
accordance with the sequence given below.
•Assembly should be carried out by at least two persons.
•Be sure to use only the included screws of the specified sizes.
Do not use any other screws. Use of incorrect screws can
cause damage or malfunction of the product.
•Be sure to tighten all screws upon completing assembly of the
unit.
•To disassemble the unit, reverse the assembly sequence given
below.
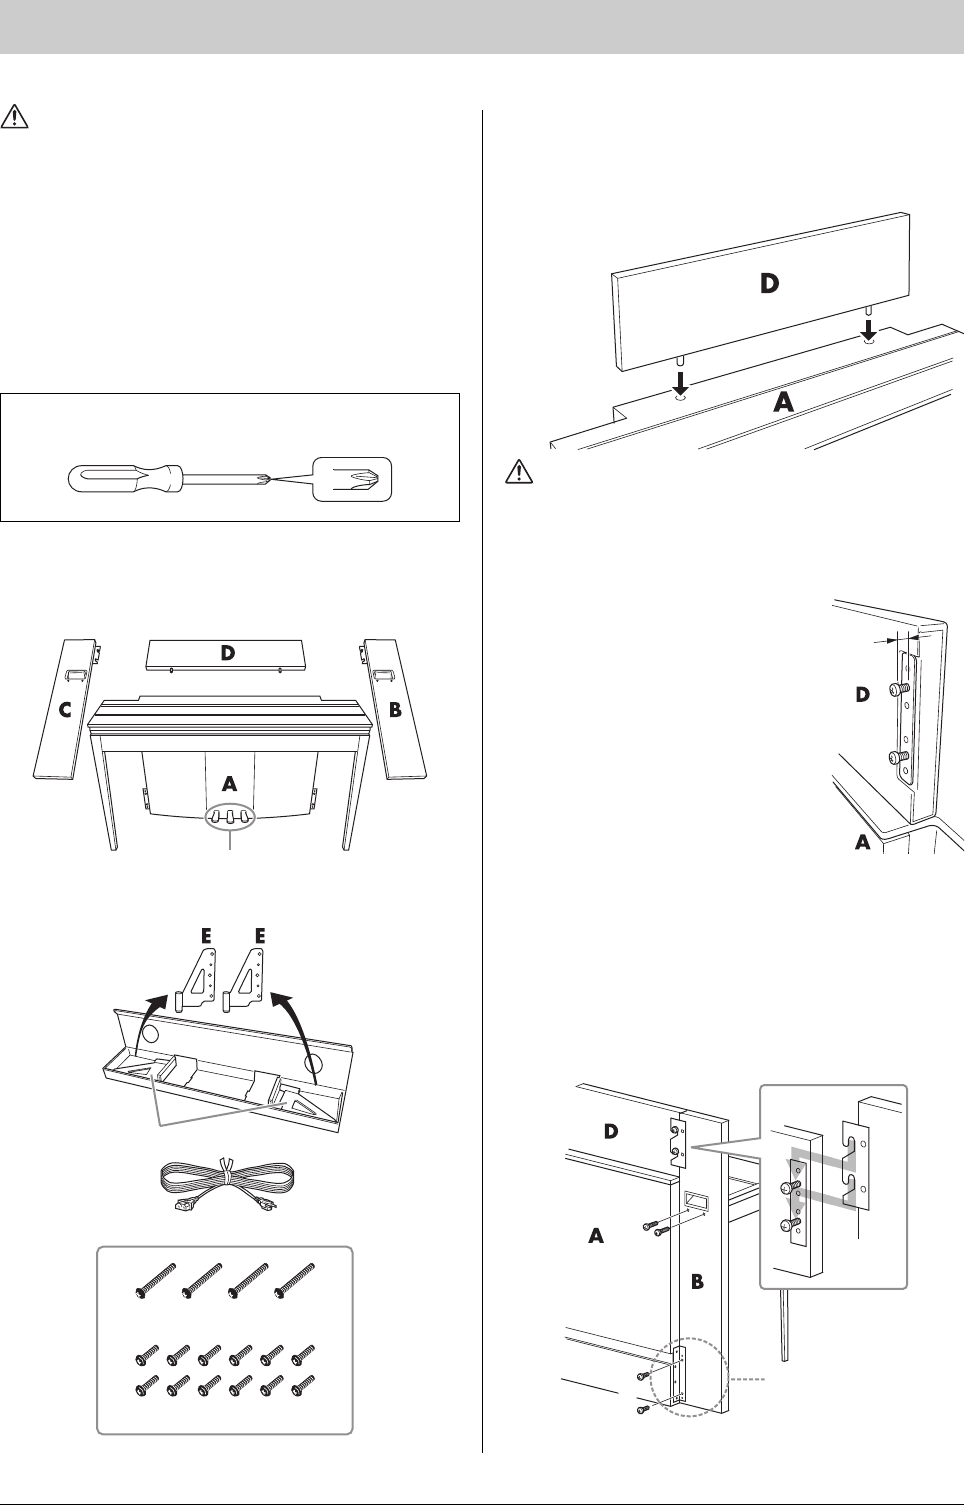
Remove all parts from the package and make sure you
have all of the items. B, C, and D are in a separate packing
carton.
1.Insert part D.
Position part D so that the holes face away from the A.
Then insert the projections on the panel into the holes on
top of part A, as shown in the illustration.
CAUTION
When part D is inserted in part A, do not apply pressure to part D
from the front or rear. Doing so may break the projections
extending from part D, allowing it to fall and be damaged.
2.Install parts B and C
Attach two short screws (6 × 14
mm) to each edge of D using
your fingers so that the screw
threads project about 10 mm
from the surface. Make sure that
the screws will not loosen and
fall out of the holes.
Make sure that the screws you
finger-tightened in step have
not loosened. Then position B’s
handhold toward the rear, and
hook B’s bracket onto the projecting screws as shown in
the illustrations . When doing so, be careful that the
bracket does not scratch D.
Align the holes located under the handhold on B with the
holes on A, then tighten two long screws (6 × 45 mm) to
secure B to A.
Lightly tighten two short screws (6 × 14 mm) into the
bracket on the bottom of A to secure B to A.
Follow the same steps to install part C.
Assembly
Have a Phillips-head (+) screwdriver that will fit the screw size
ready.
Included in the packing pads.
AC power cord
Keyboard stand stabilizers (2)
6 × 45 mm long screws (4)
6 × 14 mm short screws (12)
The pedals are covered with vinyl covers when
shipped from the factory. For optimum use of the
GP Responsive Damper Pedal, we recommend that
you remove the cover from the damper pedal.
10 mm
Position the bracket to the
rear of B.
Appendix
F02 Owner’s Manual
43
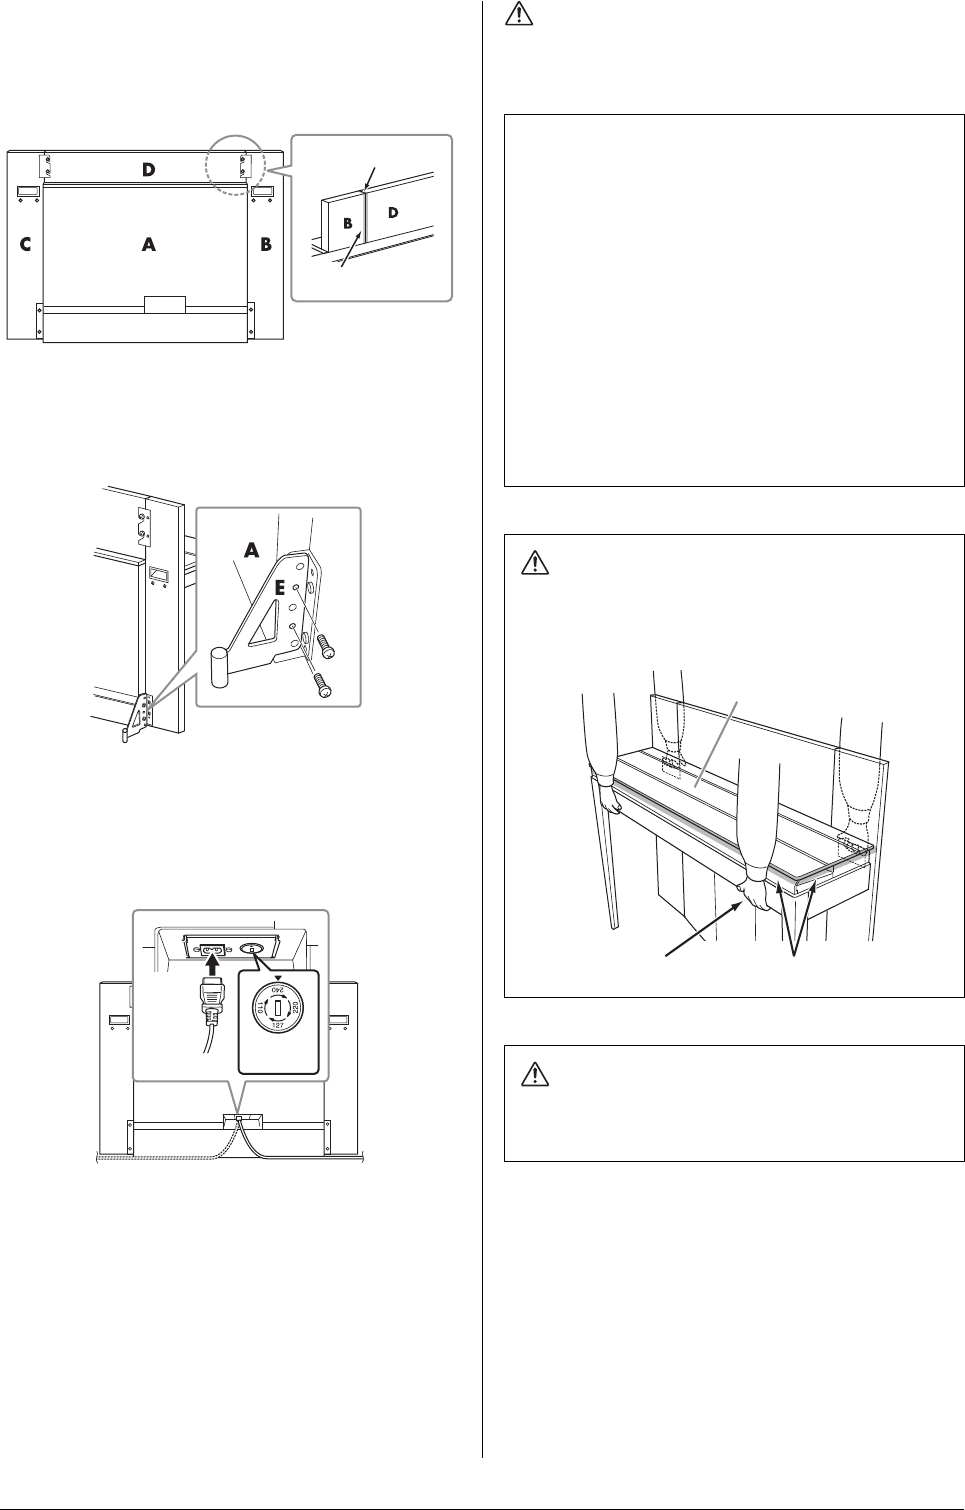
3.Fasten B, C and D securely.
Tighten the screws securely in the order shown in the
illustration. Be careful not to permit misaligned levels on
the front surface, or a gap on the top surface of B, C and
D.
4.Attach part E.
Align the second and fourth holes on E with the bracket
holes on the bottom of A, then secure the bracket using
two short screws (6 × 14 mm).
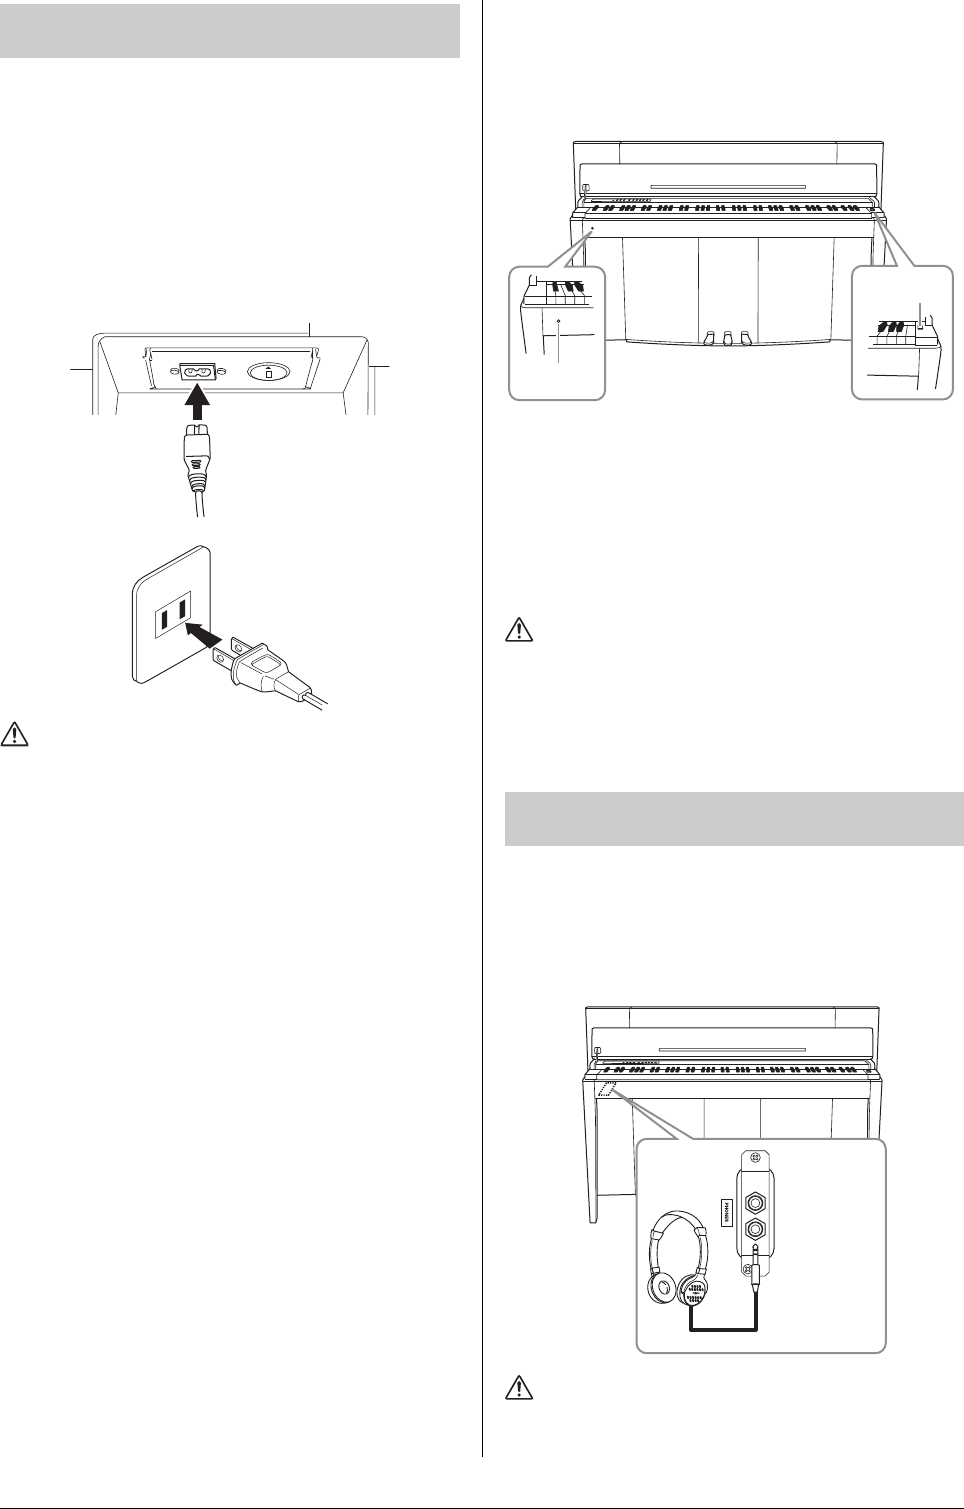
5.Connect the AC power cord.
Insert the AC power cord plug into the AC IN connector
on the rear of A.
For models that feature a voltage selector:
Set the voltage selector to an appropriate voltage.
Voltage Selector
Before connecting the AC power cord, check the setting of the
voltage selector which is provided in some areas. To set the
selector for 110V, 127V, 220V or 240V main voltages, use a
“minus” screwdriver to rotate the selector dial so that the correct
voltage for your region appears next to the pointer on the panel.
The voltage selector is set at 240V when the unit is initially
shipped. After the proper voltage has been selected, connect the
AC power cord to the AC IN and an AC wall outlet. A plug
adaptor may be also provided in some areas to match the pin
configuration of the AC wall outlets in your area.
WARNING
An improper voltage setting can cause serious damage to the
instrument or result in improper operation.
Edges must be flush.
Do not allow a gap.
Voltage
selector
After completing the assembly, please check the
following.
•Are there any parts left over?
→Review the assembly procedure and correct any errors.
•Is the instrument clear of doors and other
movable fixtures?
→Move the instrument to an appropriate location.
•Does the instrument make a rattling noise when
you shake it?
→Tighten all screws.
→Be sure to install the fall-prevention brackets securely.
•If the main unit creaks or is otherwise unsteady
when you play on the keyboard, refer to the
assembly diagrams and retighten all screws.
CAUTION
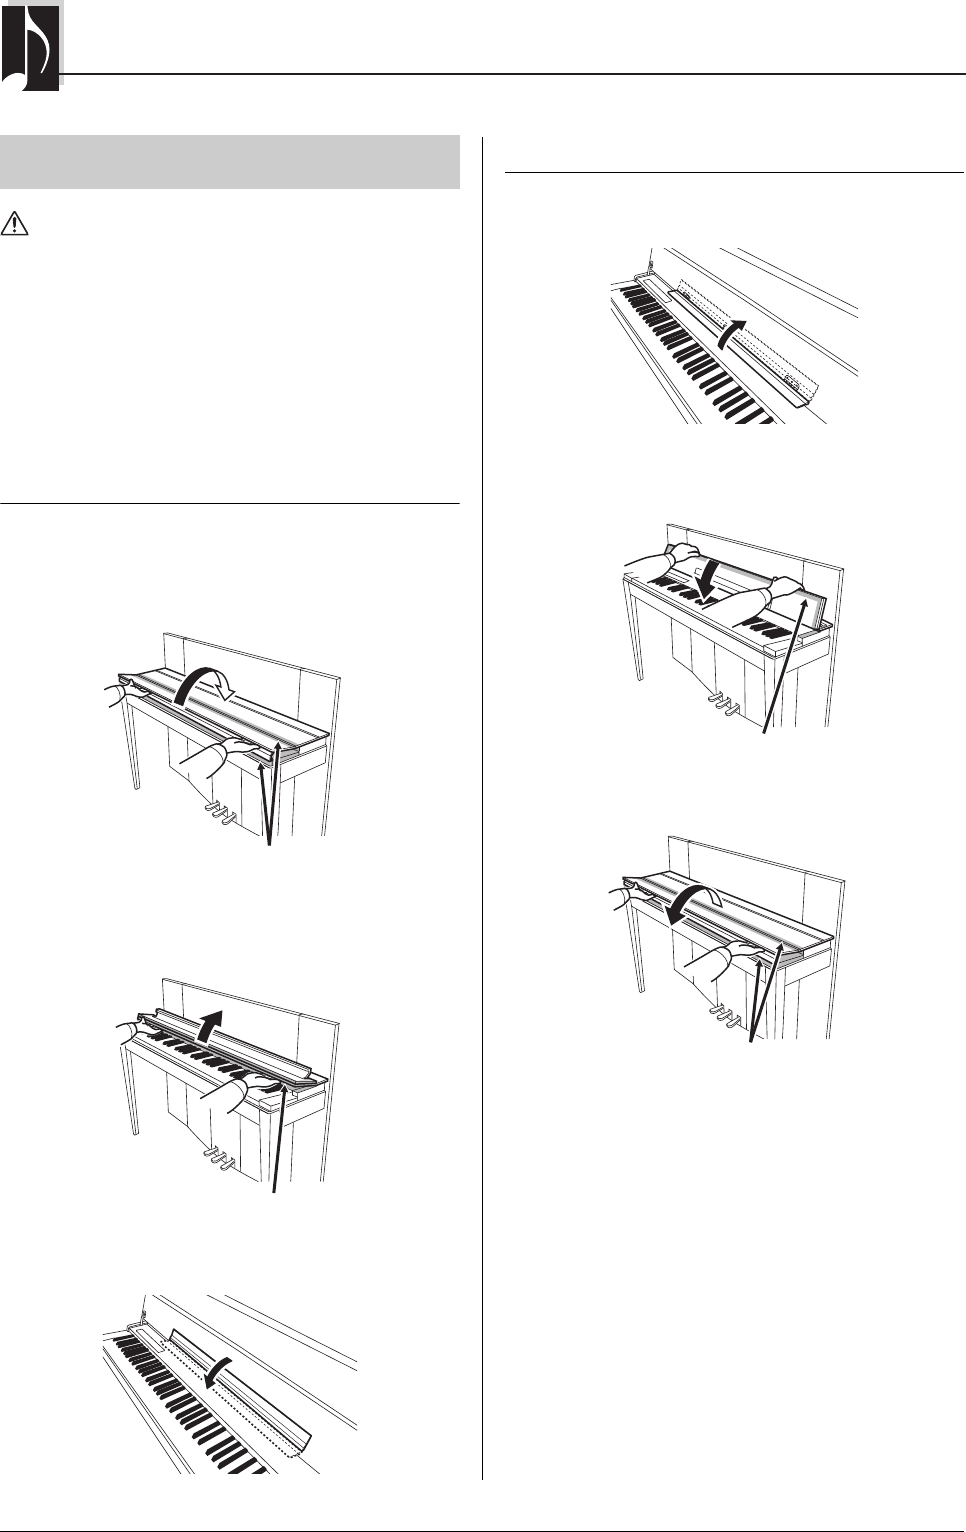
When you move the assembled instrument, be sure to grasp
the handles and the bottom of the keyboard. Do not hold the
key cover. Improper handling can result in damage to the
instrument or personal injury.
CAUTION
If the main unit creaks or is otherwise unsteady when you
play on the keyboard, refer to the assembly diagrams and
retighten all screws.
Hold here.Do not hold here.
Key cover
Appendix
F02 Owner’s Manual
44
Specifications and descriptions in this Owner’s Manual are for information purposes only. Yamaha Corp. reserves the right to change or modify products or specifications at
any time without prior notice. Since specifications, equipment or options may not be the same in every locale, please check with your Yamaha dealer.
Specifications
Size/Weight
Dimensions (W x D x H)
1427mm × 400mm × 995mm
[56-3/16" × 15-3/4" × 39-3/16"]
Dimensions with keyboard stand stabilizers (W × D × H)
*The followings are the titles, credits and copyright notices for seventeen (17) of the 50 Piano Preset Songs (Classic & Jazz) in this instrument:
*La liste suivante répertorie les titres, auteurs et avis de droits d’auteur de dix-sept (17) morceaux parmi les 50 morceaux de piano présélectionnés
(Classic & Jazz) sur l’instrument:
*A continuación se incluyen los títulos, fichas técnicas y avisos de copyright de diecisiete (17) de las 50 melodías predefinidas para piano (clásica y jazz)
de este instrumento:
*Nachfolgend die Titel, Credits und Hinweise zum Urheberrecht für siebzehn (17) der 50 Preset-Songs für Klavier (Klassik & Jazz) in diesem
Rights for the Extended Renewal Term in the U.S. Controlled by
Williamson Music and WB Music Corp. o/b/o The Estate Of Lorenz Hart
International Copyright Secured All Rights Reserved
Appendix
F02 Owner’s Manual
47
*The followings are the titles, credits and copyright notices for three (3) of the 50 Piano Preset Songs in this instrument:
*La liste suivante répertorie les titres, auteurs et avis de droits d’auteur de trois (3) morceaux parmi les 50 morceaux de piano présélectionnés (Classic &
Jazz) sur l’instrument :
*A continuación se incluyen los títulos, fichas técnicas y avisos de copyright de tres (3) de las 50 melodías predefinidas para piano de este instrumento:
* Nachfolgend die Titel, Credits und Hinweise zum Urheberrecht für drei (3) der 50 Preset-Songs für Klavier (Klassik & Jazz) in diesem Instrument:
Composition Title: ON GREEN DOLPHIN STREET
Composer’s Name: Bronislaw Kaper 0372642
Owner’s Name: EMI MUSIC PUBLISHING LTD
Composition Title: EMILY
Composer’s Name: Johnny Mandel 0258202
Owner’s Name: EMI MUSIC PUBLISHING LTD
Composition Title : OVER THE RAINBOW
Composer’s Name: Harold Arlen 0286708
Owner’s Name: EMI MUSIC PUBLISHING LTD
All Rights Reserved, Unauthorized copying, public performance and broadcasting are strictly prohibited.
Tous droits réservés. Toute copie, performance publique ou radiodiffusion non autorisées sont strictement inter
Reservados todos los derechos. Queda terminantemente prohibida toda copia, interpretación o difusión pública no autorizada.
Alle Rechte vorbehalten; Unerlaubte Vervielfältigung, öffentliche Aufführung und/oder Ausstrahlung sind strengstens verboten.
Appendix
F02 Owner’s Manual
48
IMPORTANT NOTICE FOR THE UNITED KINGDOM
Connecting the Plug and Cord
IMPORTANT. The wires in this mains lead are coloured in accordance with the following code:
BLUE : NEUTRAL
BROWN: LIVE
As the colours of the wires in the mains lead of this apparatus may not correspond with the coloured makings identifying the termi-
nals in your plug proceed as follows:
The wire which is coloured BLUE must be connected to the terminal which is marked with the letter N or coloured BLACK.
The wire which is coloured BROWN must be connected to the terminal which is marked with the letter L or coloured RED.
Making sure that neither core is connected to the earth terminal of the three pin plug.
Gebruikershandleiding.com neemt misbruik van zijn services uitermate serieus. U kunt hieronder aangeven waarom deze vraag ongepast is. Wij controleren de vraag en zonodig wordt deze verwijderd.
Product:
Spelregels forum
Om tot zinvolle vragen te komen hanteren wij de volgende spelregels:
lees eerst de handleiding door;
controleer of uw vraag al eerder door iemand anders is gesteld;
probeer uw vraag zo duidelijk mogelijk te stellen;
heeft u een probleem en al geprobeerd om dit op te lossen, vermeld dit erbij aub;
heeft u een oplossing gekregen van een bezoeker dan horen wij dat graag in dit forum;
wilt u een reactie geven op een vraag of antwoord, gebruik dan niet dit formulier maar klik op de knop 'reageer op deze vraag';
uw vraag wordt direct op de website gezet; vermijd daarom persoonlijke gegevens in te vullen;
Belangrijk! Als er een antwoord wordt gegeven op uw vraag, dan is het voor de gever van het antwoord nuttig om te weten als u er wel (of niet) mee geholpen bent! Wij vragen u dus ook te reageren op een antwoord.
Belangrijk! Antwoorden worden ook per e-mail naar abonnees gestuurd. Laat uw emailadres achter op deze site, zodat u op de hoogte blijft. U krijgt dan ook andere vragen en antwoorden te zien.
Abonneren
Abonneer u voor het ontvangen van emails voor uw Yamaha F02 bij:
nieuwe vragen en antwoorden
nieuwe handleidingen
U ontvangt een email met instructies om u voor één of beide opties in te schrijven.
Ontvang uw handleiding per email
Vul uw emailadres in en ontvang de handleiding van Yamaha F02 in de taal/talen: Engels als bijlage per email.
De handleiding is 7,15 mb groot.
U ontvangt de handleiding per email binnen enkele minuten. Als u geen email heeft ontvangen, dan heeft u waarschijnlijk een verkeerd emailadres ingevuld of is uw mailbox te vol. Daarnaast kan het zijn dat uw internetprovider een maximum heeft aan de grootte per email. Omdat hier een handleiding wordt meegestuurd, kan het voorkomen dat de email groter is dan toegestaan bij uw provider.
Uw handleiding is per email verstuurd. Controleer uw email
Als u niet binnen een kwartier uw email met handleiding ontvangen heeft, kan het zijn dat u een verkeerd emailadres heeft ingevuld of dat uw emailprovider een maximum grootte per email heeft ingesteld die kleiner is dan de grootte van de handleiding.
Er is een email naar u verstuurd om uw inschrijving definitief te maken.
Controleer uw email en volg de aanwijzingen op om uw inschrijving definitief te maken
U heeft geen emailadres opgegeven
Als u de handleiding per email wilt ontvangen, vul dan een geldig emailadres in.
Uw vraag is op deze pagina toegevoegd
Wilt u een email ontvangen bij een antwoord en/of nieuwe vragen? Vul dan hier uw emailadres in.