Certain Epic, Era, Camber, Rumor, Stumpjumper FSR and Enduro models are equipped with AUTOSAG, a unique new feature designed to simplify
and speed up the adjustment of air pressure. The AUTOSAG feature automatically determines the correct amount of sag, and eliminates the need to
refer to an air chart to determine the correct pressure based on rider weight. However, the shock still requires compression and rebound adjustment
based on type of terrain and rider weight. Please refer to the compression and rebound charts (page 17) following the setup steps.
NOTE: Shock air pressure can also be set up manually to rider preference.
Step 1: Setting Autosag
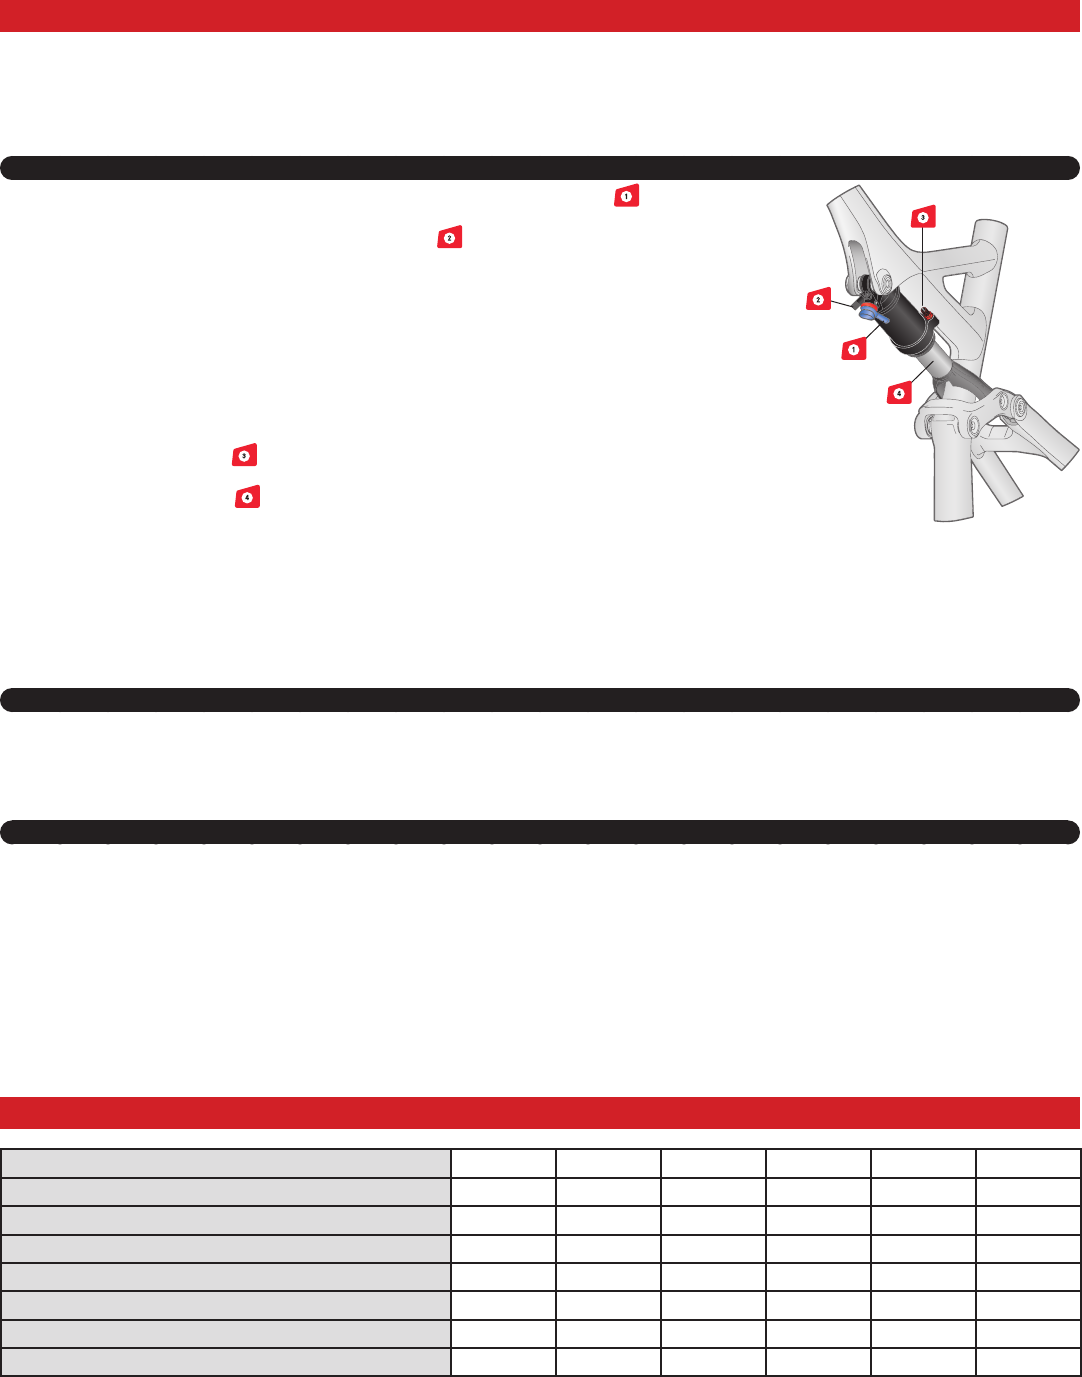
1. Position the shock compression lever or knob (blue) to the full open or off position . Remove the positive
air valve cap (black) and the AUTOSAG valve cap (red).
2. Attach a high-pressure shock pump to the positive air valve
• All models except Epic and Era: inflate to the rider’s weight in pounds (lb) plus 50psi. For kilograms,
multiply by three (e.g. 75kg = 225psi).
• Epic and Era: inflate to the rider’s weight in pounds (lb) plus 100psi. For kilograms, multiply by two +
100psi (e.g. 75kg = 250psi).
NOTE: Do not exceed 350psi before activating the Autosag valve (this is a starting pressure only). After the Autosag is
activated, Fox recommends a maximum working pressure of 300psi when riding.
3. Make sure the rider is wearing all gear that would normally be worn on a ride (shoes, helmet, hydration pack if
used, etc.). Mount the bicycle, prop up against a wall, and sit in the saddle in a normal riding position. Do not
set sag while riding.
4. Press the AUTOSAG valve . Air will release as the suspension settles into its pre-adjusted sag point.
Make sure all the air is out and release the valve.
5. Cycle the shock a few times , then dismount the bicycle.
6. Do not depress the AUTOSAG valve again, otherwise the proper sag setting will be lost, and will require this
procedure to be repeated from step #2.
7. Put the positive air and AUTOSAG valve caps back on.
NOTE: Rider weight in pounds (lb) plus the PSI (depending on model as described above) is the lowest amount of pressure that should be in the shock before
activating AUTOSAG. If the air pressure is too low, the AUTOSAG button may let air out of the negative chamber, which would result in incorrect sag.
NOTE: Sag is measured as the distance between the o-ring and the shock body’s seal, after the rider’s weight has been applied to the bike, with no
bounce. When AUTOSAG is correctly set, sag should measure approximately (20-30% of stroke, depending on riding/terrain experience, i.e travel).
If the rider is approaching 300lbs, AUTOSAG may not function, and sag may exceed the bike’s prescribed amount.
Step 2: Adjusting rebound
Refer to the rebound/compression chart to set the rebound damping (red knob). Rebound damping controls the rate at which the shock returns after it
has been compressed.
Clockwise for slower rebound (slow speed, bigger hits).
Counter-clockwise for faster rebound (higher speeds, small bumps, more traction).
Step 3: Adjusting compression
Refer to the chart to set the compression damping (blue knob).
SPECIALIZED / FOX BRAIN FADE: Controls the inertia valve damping. The blue knob adjusts damping (Race Tune or Trail Tune) from firm
(clockwise) to soft (counter-clockwise) and does NOT completely lock out the shock.
Backing off from full firm can help with tracking in loose terrain conditions while riding off camber sections or climbing. The soft setting can also help
during lengthy downhill or rugged conditions where the rider may want the suspension active at all times.
FOX CTD:Provides varying levels of compression damping, depending on whether the rider is climbing, trail riding or descending.
C (Climb): The firmest low-speed compression setting is activated for maximum pedaling efficiency.
T (Trail): Moderate low-speed compression setting is activated for an optimal blend of pedaling efficiency and bike control on variable terrain.
Factory Series shocks offer three levels of Trail adjust. Performance and Evolution shocks are preset with low-speed compression damping.
D (Descend): Low-speed compression setting optimized for the perfect balance of control and plushness for steep, aggressive descents.
SETUP DATA
DATE
RIDER WEIGHT
FORK PSI
FORK REBOUND DAMPING (# of clicks from full slow)
FORK COMPRESSION DAMPING (# of clicks from full firm)
SHOCK PSI
SHOCK REBOUND DAMPING (# of clicks from full slow)
SHOCK COMPRESSION DAMPING (# of clicks from full firm)
Gebruikershandleiding.com neemt misbruik van zijn services uitermate serieus. U kunt hieronder aangeven waarom deze vraag ongepast is. Wij controleren de vraag en zonodig wordt deze verwijderd.
Product:
Spelregels forum
Om tot zinvolle vragen te komen hanteren wij de volgende spelregels:
lees eerst de handleiding door;
controleer of uw vraag al eerder door iemand anders is gesteld;
probeer uw vraag zo duidelijk mogelijk te stellen;
heeft u een probleem en al geprobeerd om dit op te lossen, vermeld dit erbij aub;
heeft u een oplossing gekregen van een bezoeker dan horen wij dat graag in dit forum;
wilt u een reactie geven op een vraag of antwoord, gebruik dan niet dit formulier maar klik op de knop 'reageer op deze vraag';
uw vraag wordt direct op de website gezet; vermijd daarom persoonlijke gegevens in te vullen;
Belangrijk! Als er een antwoord wordt gegeven op uw vraag, dan is het voor de gever van het antwoord nuttig om te weten als u er wel (of niet) mee geholpen bent! Wij vragen u dus ook te reageren op een antwoord.
Belangrijk! Antwoorden worden ook per e-mail naar abonnees gestuurd. Laat uw emailadres achter op deze site, zodat u op de hoogte blijft. U krijgt dan ook andere vragen en antwoorden te zien.
Abonneren
Abonneer u voor het ontvangen van emails voor uw Specialized FSR - 2015 bij:
nieuwe vragen en antwoorden
nieuwe handleidingen
U ontvangt een email met instructies om u voor één of beide opties in te schrijven.
Ontvang uw handleiding per email
Vul uw emailadres in en ontvang de handleiding van Specialized FSR - 2015 in de taal/talen: Engels als bijlage per email.
De handleiding is 14,03 mb groot.
U ontvangt de handleiding per email binnen enkele minuten. Als u geen email heeft ontvangen, dan heeft u waarschijnlijk een verkeerd emailadres ingevuld of is uw mailbox te vol. Daarnaast kan het zijn dat uw internetprovider een maximum heeft aan de grootte per email. Omdat hier een handleiding wordt meegestuurd, kan het voorkomen dat de email groter is dan toegestaan bij uw provider.
Stel vragen via chat aan uw handleiding
Stel uw vraag over deze PDF
Uw handleiding is per email verstuurd. Controleer uw email
Als u niet binnen een kwartier uw email met handleiding ontvangen heeft, kan het zijn dat u een verkeerd emailadres heeft ingevuld of dat uw emailprovider een maximum grootte per email heeft ingesteld die kleiner is dan de grootte van de handleiding.
Er is een email naar u verstuurd om uw inschrijving definitief te maken.
Controleer uw email en volg de aanwijzingen op om uw inschrijving definitief te maken
U heeft geen emailadres opgegeven
Als u de handleiding per email wilt ontvangen, vul dan een geldig emailadres in.
Uw vraag is op deze pagina toegevoegd
Wilt u een email ontvangen bij een antwoord en/of nieuwe vragen? Vul dan hier uw emailadres in.