Make sure to use both hands when closing or opening the keyboard cover.
* When opening or closing the keyboard cover, take care not to pinch your ngers between the moving part and the piano unit. In places where small
children are present, make sure that an adult provides supervision and guidance.
Opening the Keyboard Cover
Use both hands to lift up the edge of the cover, and push it away from you.
* Do not open the cover with objects (such as paper or metal items)
lying on top. This might cause the objects to be pushed inside the
piano unit, and you may not be able to retrieve them.
Closing the Keyboard Cover
Hold the cover with both hands and gently pull it towards you.
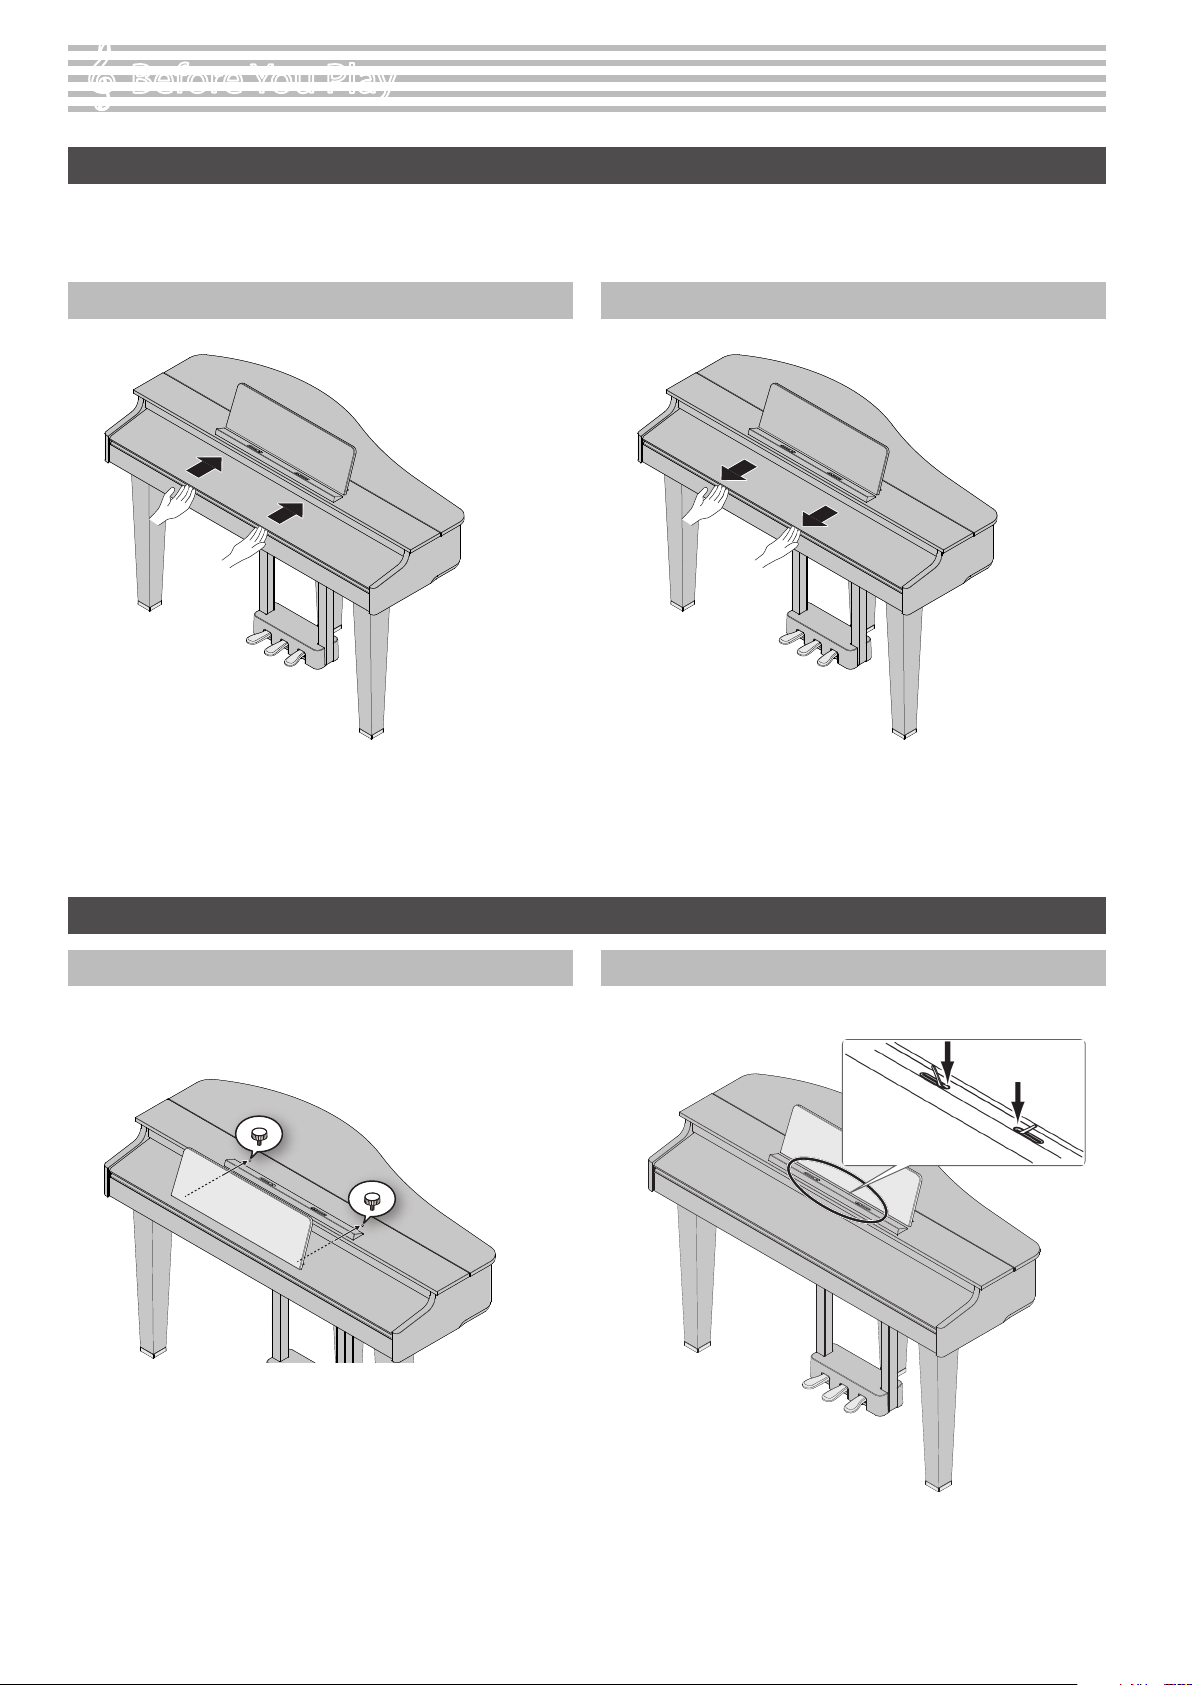
Using the Music Rest
Stabilizing the Music Rest
Considerably loosen the screws that fasten the music rest (so that they
almost come out), and hook the bottom part of the music rest into the gap
between the screws and the piano. While holding the music rest with one
hand, use your other hand to turn the screws and stabilize the music rest.
* When attaching, rmly insert the music rest as far as it can go, and grip it
with your hand so that it doesn’t fall over. Take care not to get your hand
pinched. Be careful not to scratch the body of the piano with the metal parts.
* Do not apply excessive force to the music rest.
* When removing the music rest, loosen the screws while holding it with one
hand. After you remove the music rest, rmly retighten the screws.
Using the Music Holders
You can use the holders to hold pages in place.
When not using the holders, leave them folded down.
Push
5
Before You Play
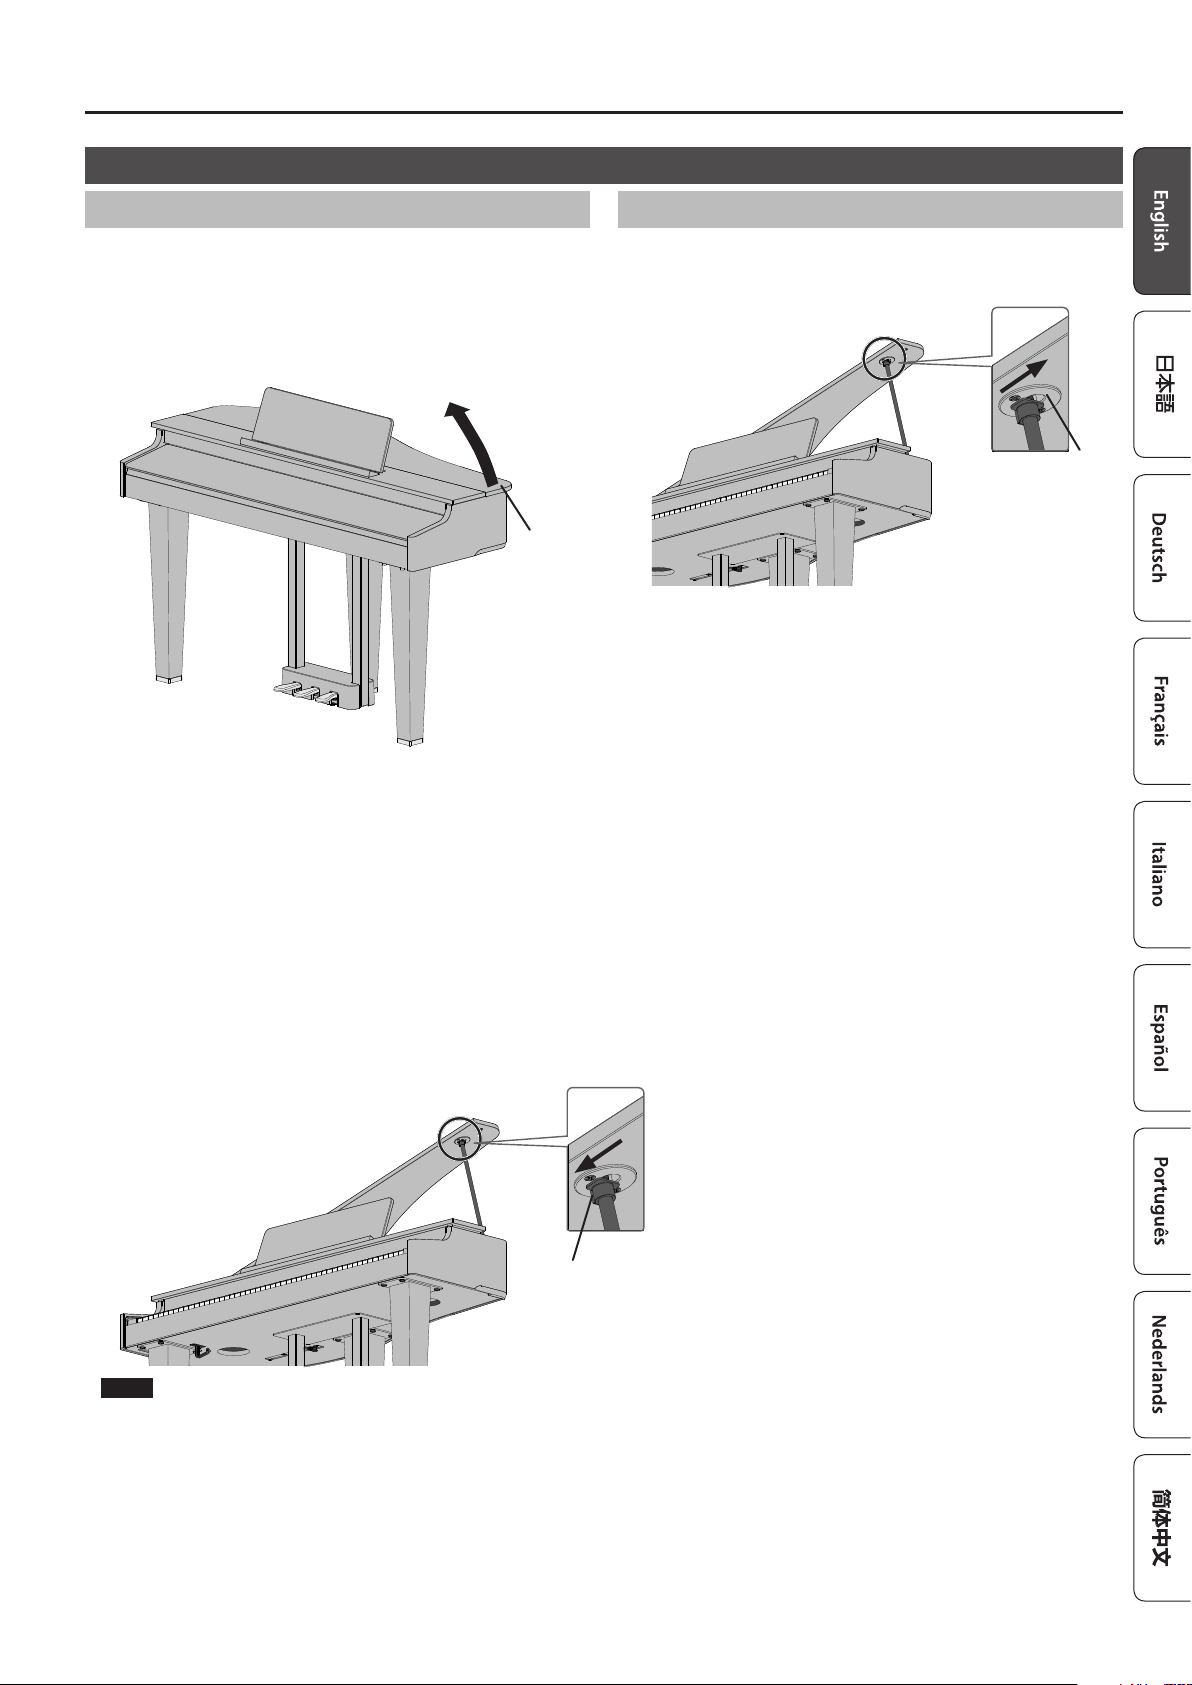
Opening/Closing the Top
Opening the Top
* The top must be opened or closed by an adult.
* When opening the top, take care not to pinch your ngers between
the moving part and the body of the unit. In places where small
children are present, make sure that an adult provides supervision and
guidance.
1. Use both hands to rmly grasp the right side of the top (toward the
high notes: position A in the illustration), and slowly raise it.
A
* When opening the top, take care not to open it too far. An angle of
about 30 degrees is appropriate. Opening the top signicantly beyond
this angle may damage the piano, or cause the top to fall. Before you
open the top, make sure that no one is in the direction toward which
the top opens.
* Do not transport the piano with the top opened. Doing so may cause
the top stick to come out of its socket, allowing the top to fall.
2. Using one hand to support the top, raise the top stick and t it into
its socket.
* When raising the top stick, please be careful not to get your ngers
pinched between the movable part and the panel. In places
where small children are present, make sure that an adult provides
supervision and guidance.
3. Move the tip of the top stick to position B of the socket, locking it
into place.
B
NOTE
The top stick must be locked into the socket to prevent the top from
falling.
Do not release the top until the top stick is completely locked.
Closing the Top
To close the top, reverse the procedure by which you opened it.
1. Move the tip of the top stick to position C of the socket, and release
the lock.
C
2. Lower the top stick while supporting the top with the other hand.
3. Firmly grasp the right side of the top with both hands, and slowly
lower it.
6
Before You Play
6
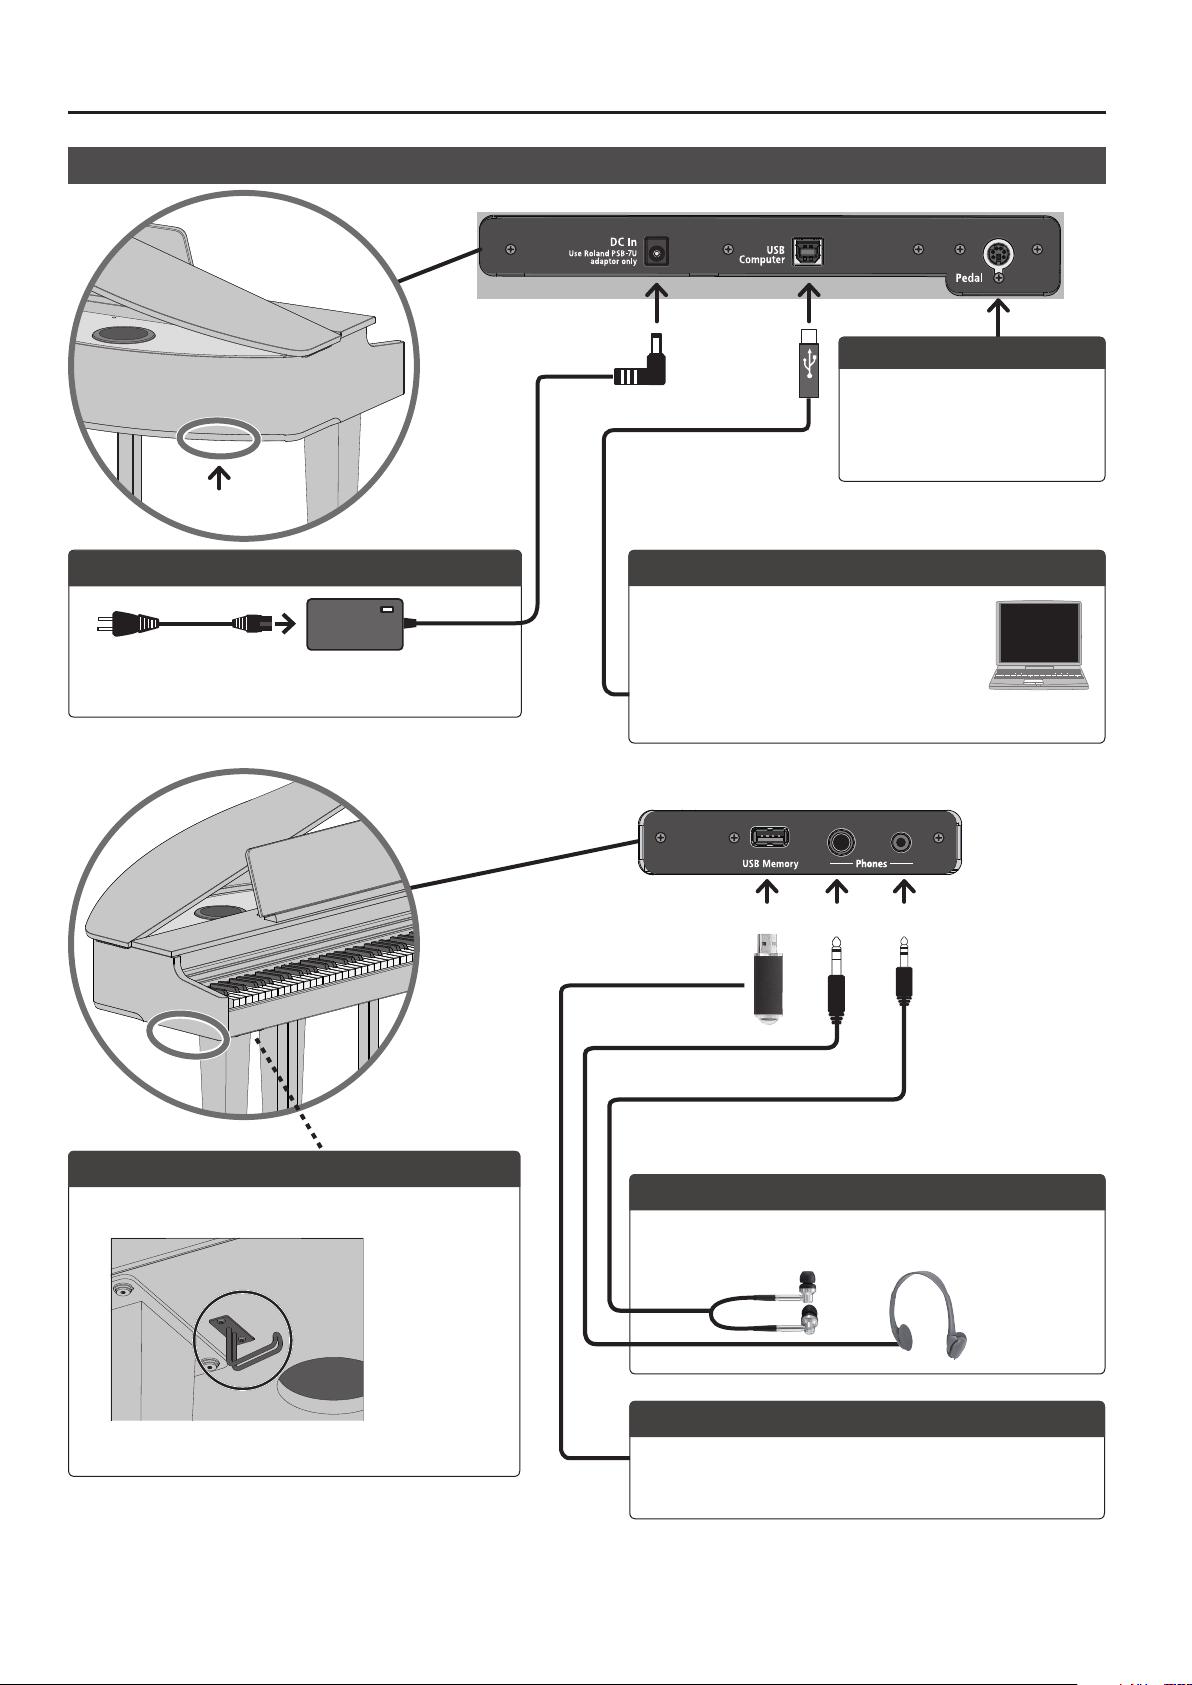
* To prevent malfunction and equipment failure, always turn down the volume, and turn o all the units before making any connections.
* Never turn o the power, disconnect the USB ash drive or unplug the power cord while this instrument is in the middle of an operation (the topmost
three volume indicators blink).
* Never turn o the power or disconnect a USB ash drive or the power cord while the USB ash drive access indicator is blinking.
Connecting Other Devices
DC In jack
Connect the included AC adaptor to this jack.
Stereo mini
plug
USB ash
drive
Stereo 1/4”
phone type
Phones jacks
Connect your headphones here. This piano has two headphone
jacks, so two people can use headphones at the same time.
USB Memory port
Connect a USB ash drive (commercially available) here. You can play
back the songs that you’ve copied to the USB ash drive
(p. 8, p. 10).
USB Computer port
Connect your computer here. Use a USB cable
(commercially available) to make this connection.
If your computer is connected, performance
data can be transferred between the piano and
sequencer software on your computer, allowing
you to produce or edit music.
Power cord
To AC outlet
Pedal jack
Connect the pedal cord for the
dedicated stand here. Refer to the
“Leaet Stand Assembly” for details.
Bottom
Side
Headphone Hook
Whenever you are not using the headphones, you can hang them
on the headphone hook.
* Don’t hang anything other than headphones on this hook, and don’t apply
excessive force to it. Doing so may damage the headphone hook.
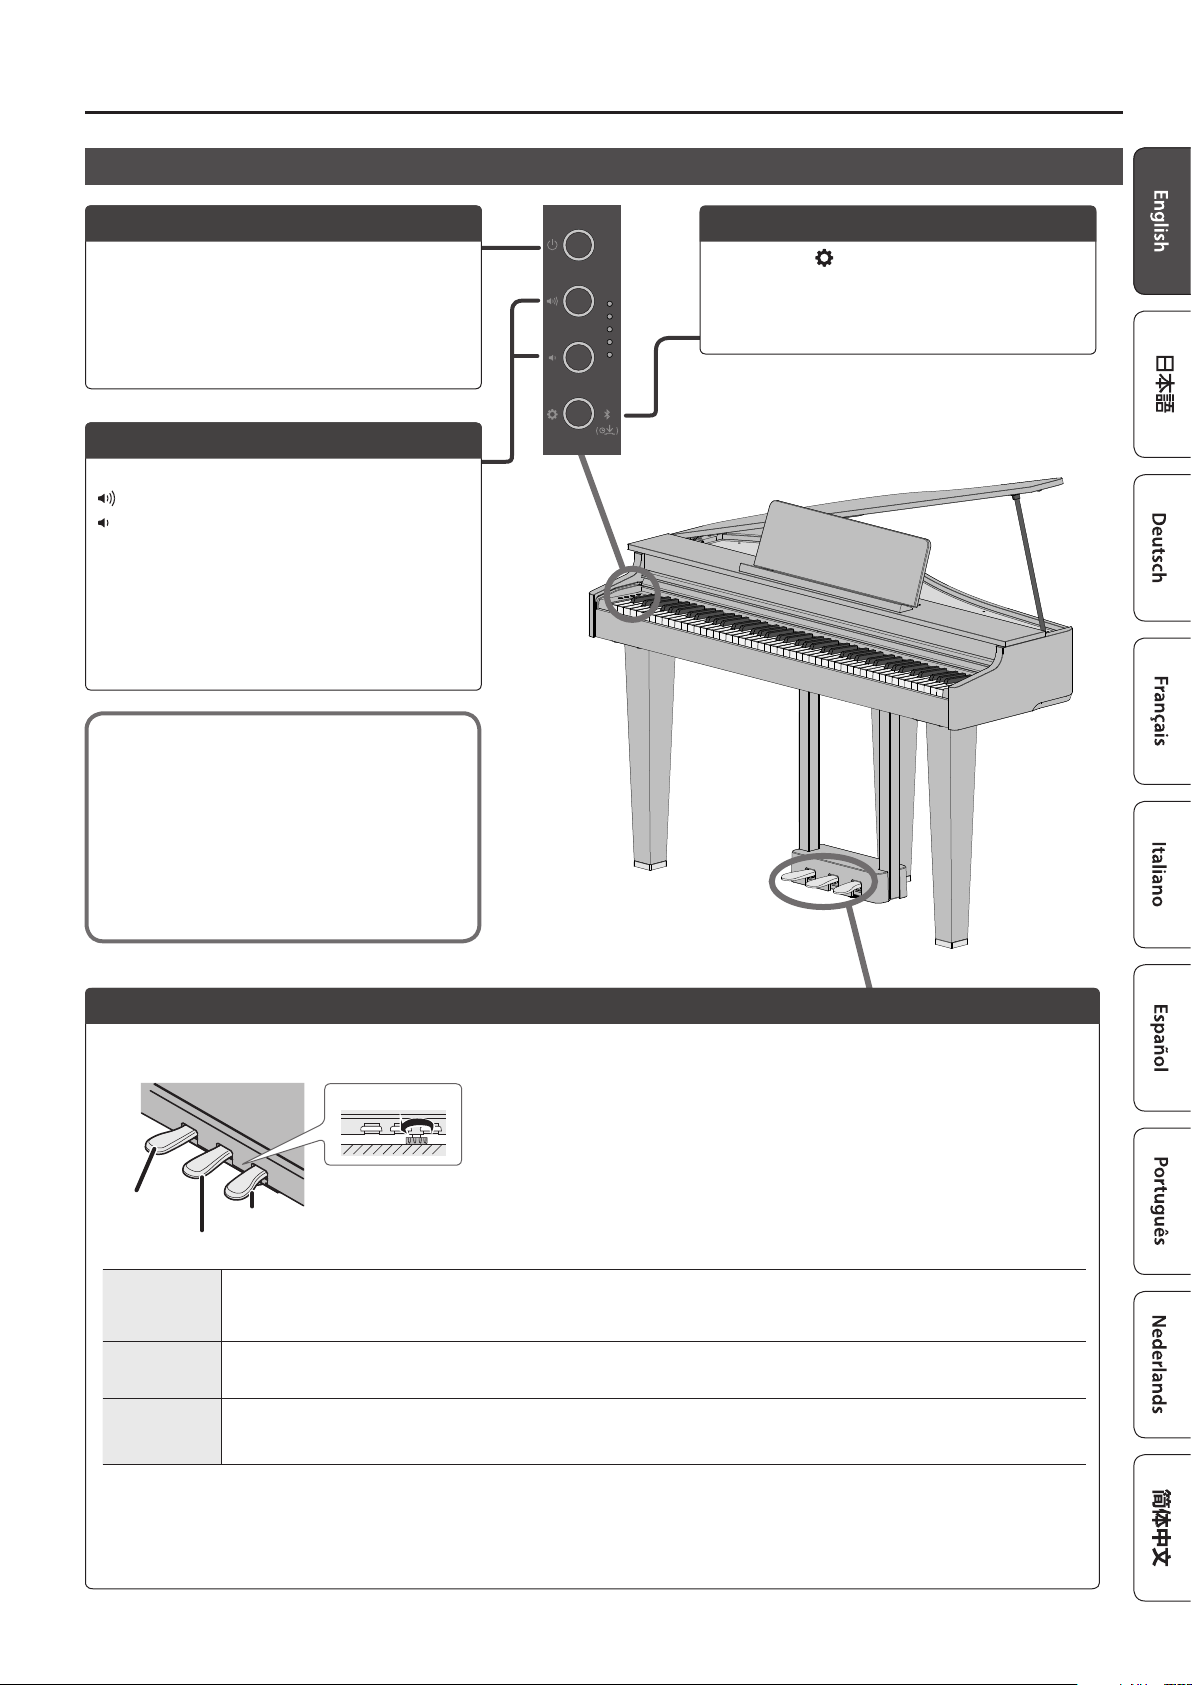
Basic Operations of the GP-3
7
Before You Play
The power to this unit will be turned o automatically
after a predetermined amount of time has passed
since it was last used for playing music, or its buttons
or controls were operated (Auto O function). If you
do not want the power to be turned o automatically,
disengage the Auto O function (p. 3).
¹When the power is turned o, any settings you were editing
will be lost. You must save settings that you want to keep
(p. 11).
¹To restore power, turn the power on again.
Turning the power on/o
Press the [Ā] (power) button to turn on the power.
Long-press the [Ā] (power) button to turn the power o.
* You might hear some sound when switching the unit on/o.
However, this is normal and does not indicate a malfunction.
Adjusting the Volume
Use the two volume buttons to adjust the volume.
[] (volume +) button: raises the volume.
[] (volume -) button: lowers the volume.
These buttons adjust the built-in speaker volume when
you are using the speakers, and the buttons adjust the
headphones volume when headphones are connected.
* The indicators to the right of the buttons light up according to the
volume (more lights = louder volume). When all of the indicators
are lit, the volume is at maximum. When all of the indicators are o,
no sound is heard.
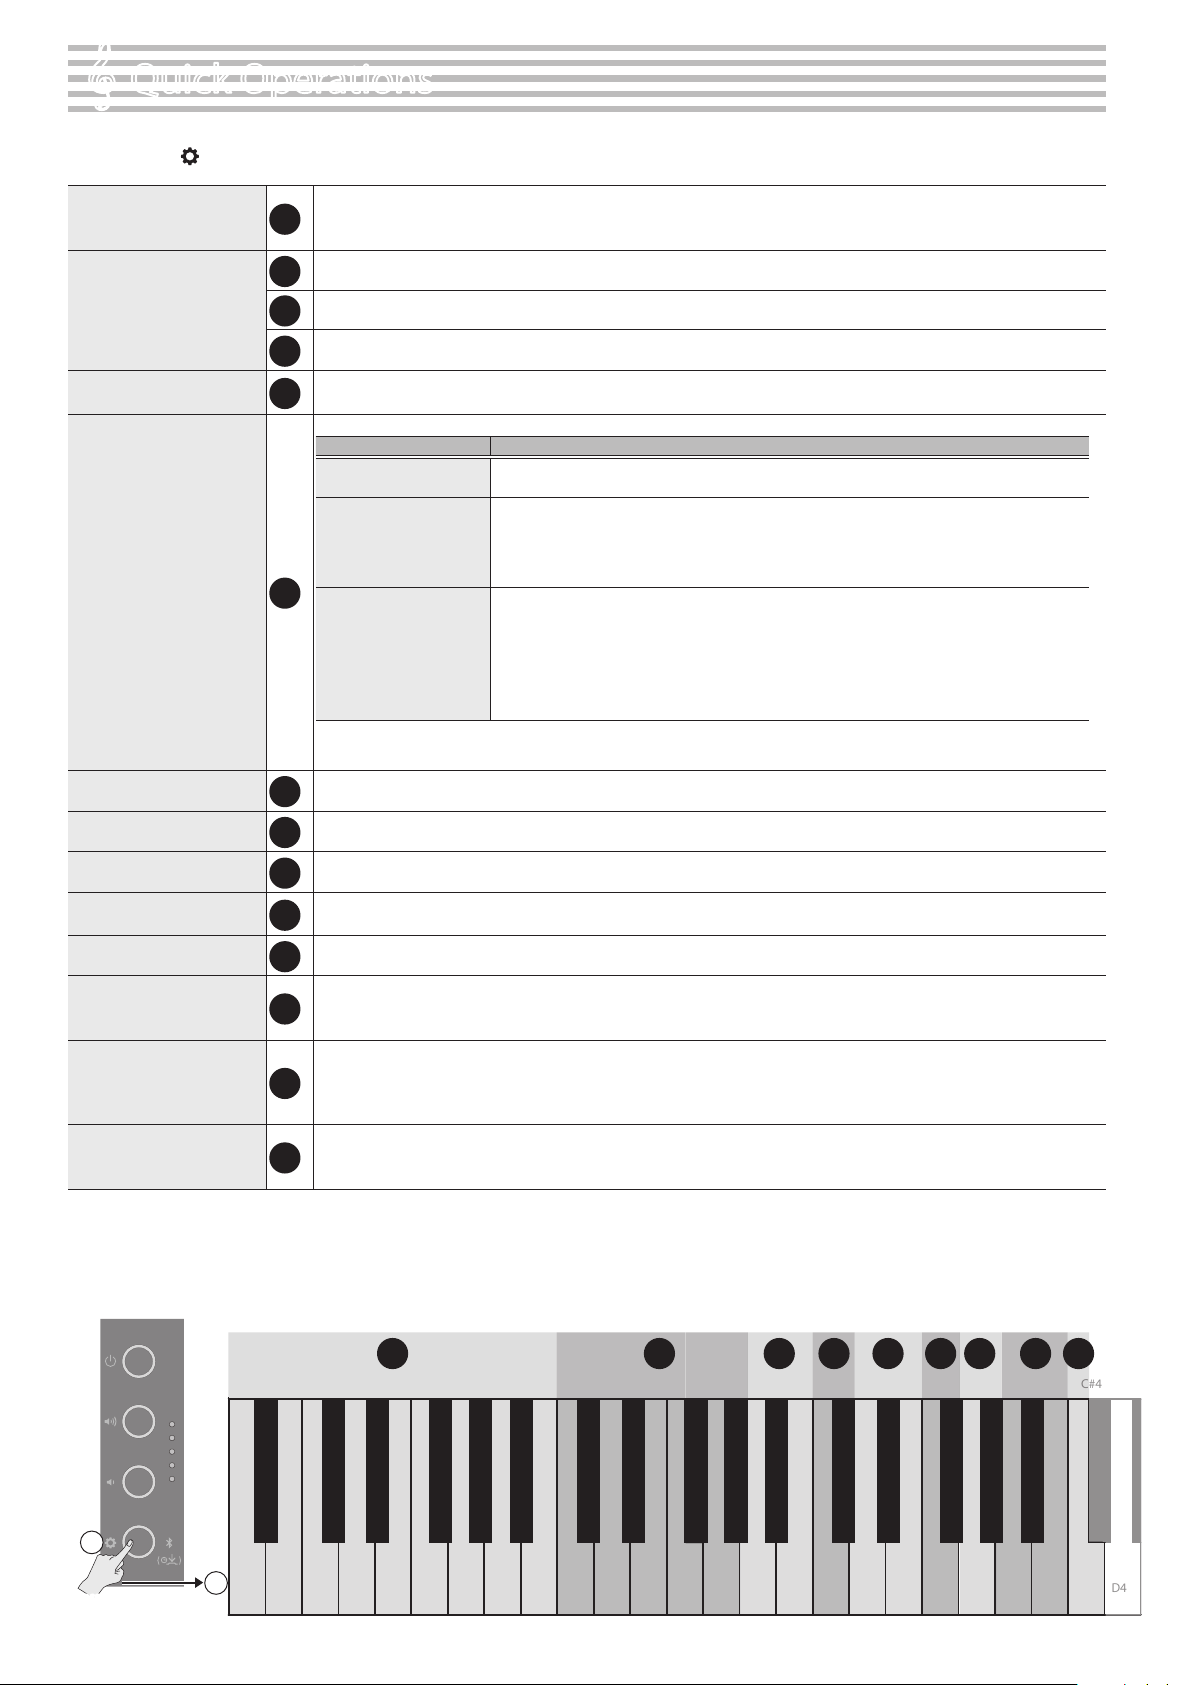
Changing the Settings
Hold down the [] (settings) button and press the keys
to switch between the various functions.
Ø“Quick Operations” (p. 2)
Using the Pedals
By pressing the pedals, you can apply eects to the sound of the piano.
The pedals on Roland pianos work the same as typical grand piano pedals.
Lower the adjuster located under the pedals so that it comes
into contact with the oor. If you’ve placed the piano on a
carpet or similar surface, lower the adjuster so that it presses
somewhat strongly against the oor.
Adjuster
Soft pedal
Sostenuto pedal
Damper pedal
Damper pedal
(right)
While this pedal is held down, the notes sustain without a break in the sound, even if you take your ngers o the keys. The resonance of the sound is aected
by how deeply you press the pedal.
* The higher notes of the piano (from the highest key down around 1½ octaves) linger for a while after you play them even if the pedal is not
pressed, like a grand piano.
Sostenuto pedal
(center)
When you play a note and then press this pedal before releasing the keys, the sound sustains for only those keys.
* This has no eect on notes that you play after pressing the pedal.
Soft pedal
(left)
This pedal is used to make the sound softer. Playing with the soft pedal depressed produces a sound that is not as strong as when otherwise played with the
equivalent strength. The softness of the tone can be varied subtly by the depth to which you press the pedal.
* As this is a rather subtle eect, it may be dicult to notice when playing certain tones or in certain performance situations.
* When operating the pedal, take care not to pinch your ngers between the moving part and the piano unit. In places where small children are present, make sure that
an adult provides supervision and guidance.
8
°Playing the Piano, Listening to Songs and Practicing
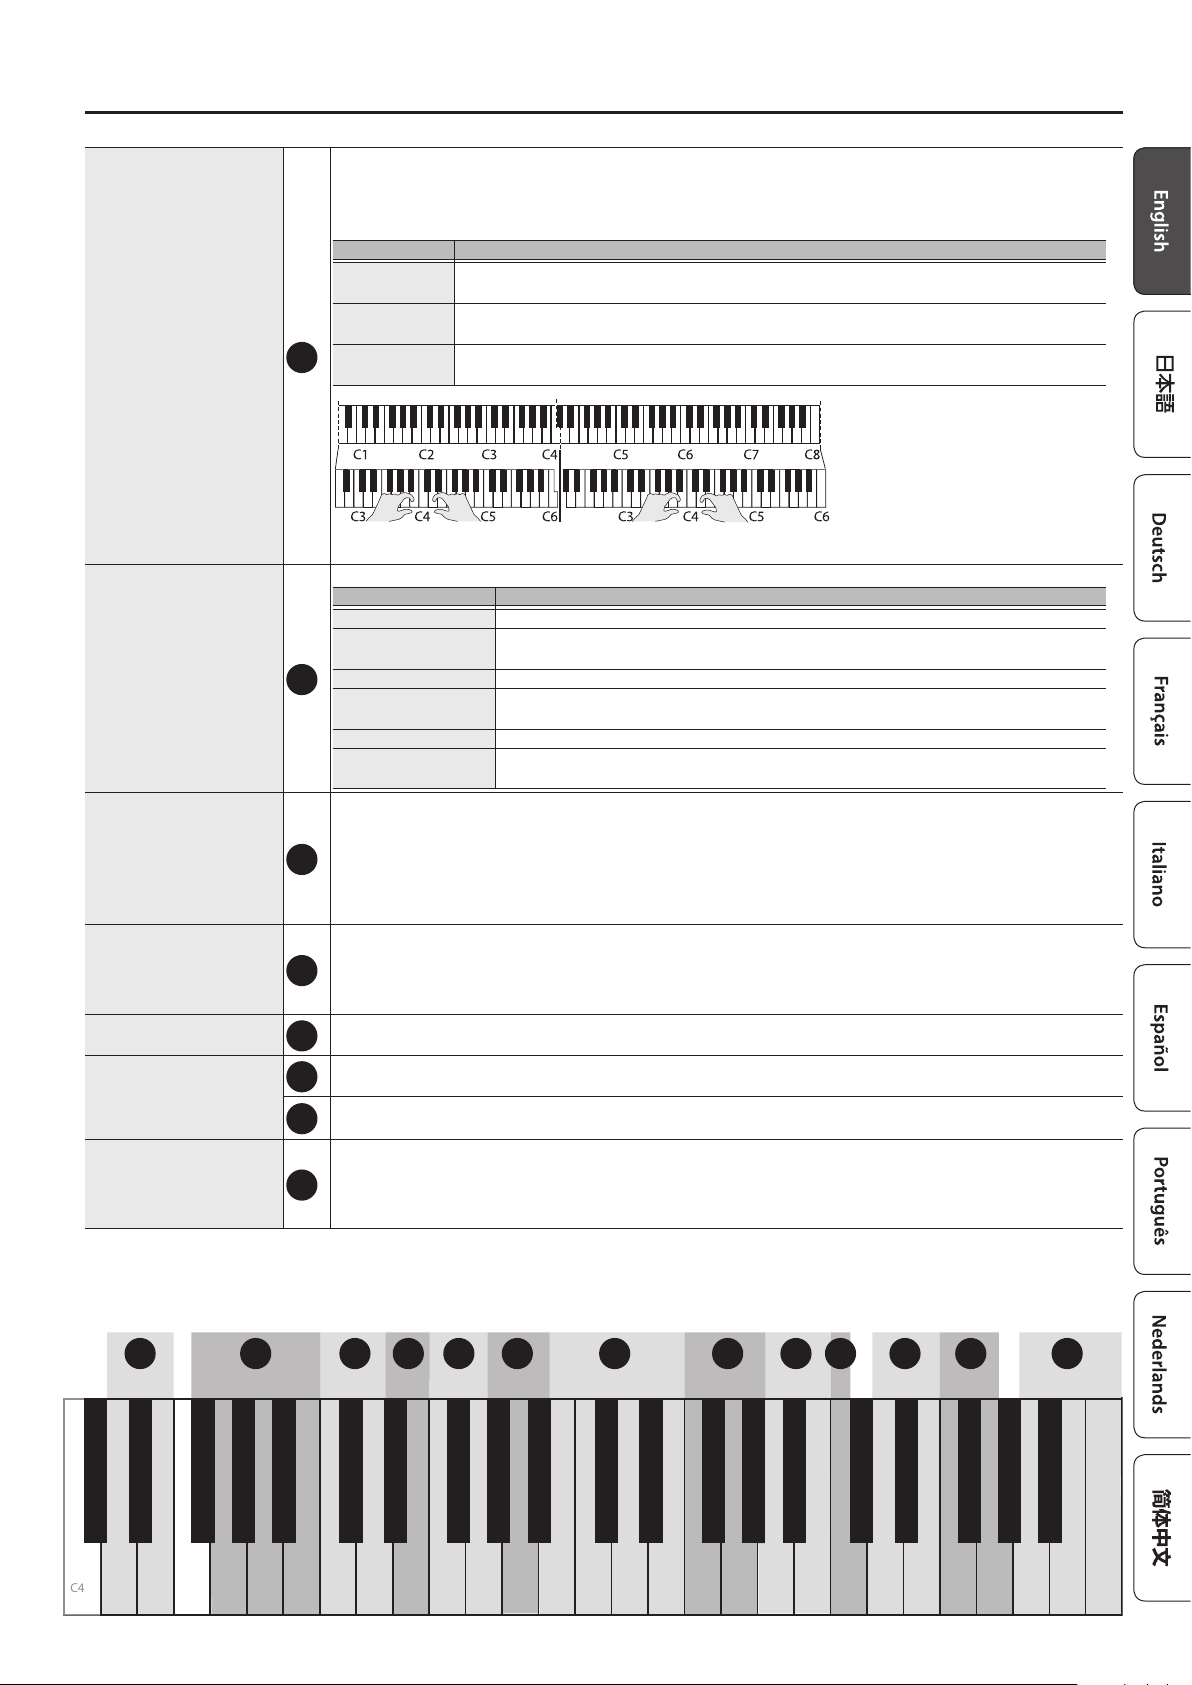
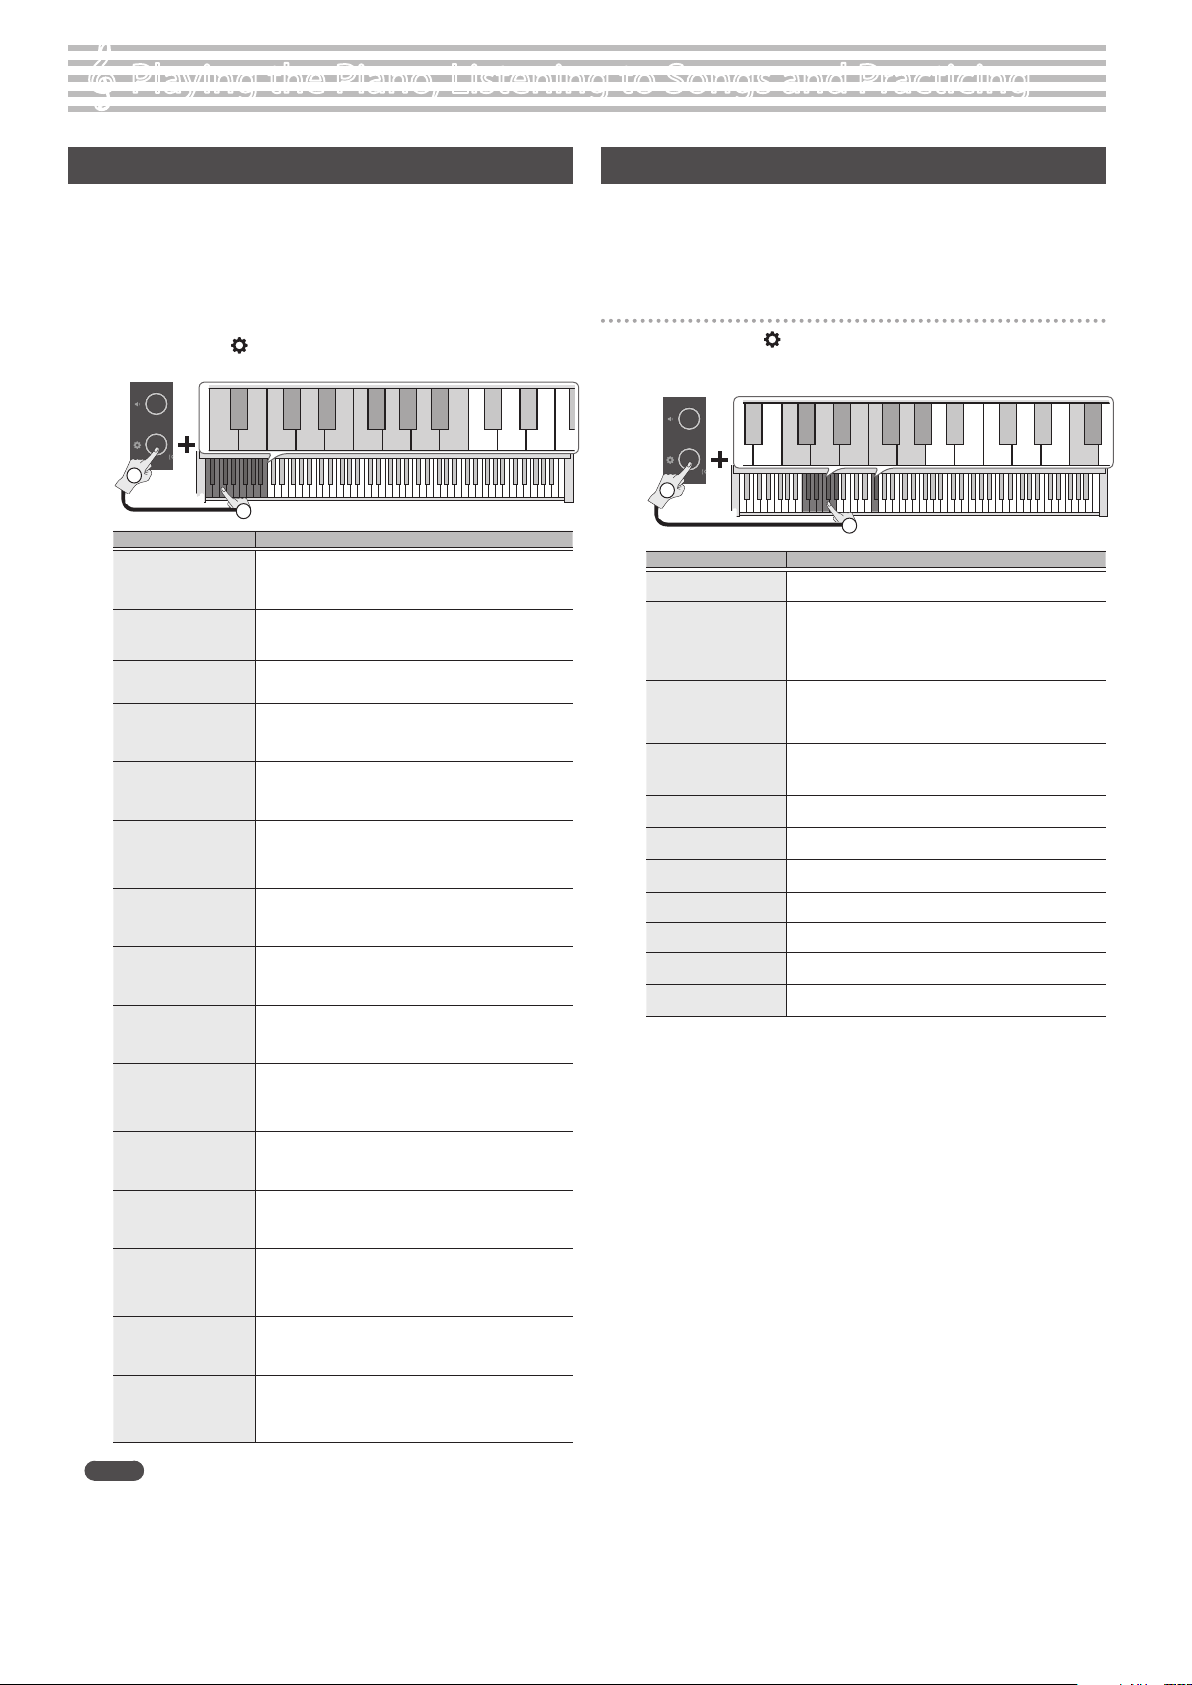
Selecting a Tone
In addition to piano sounds, the piano lets you enjoy performing with
many other sounds.
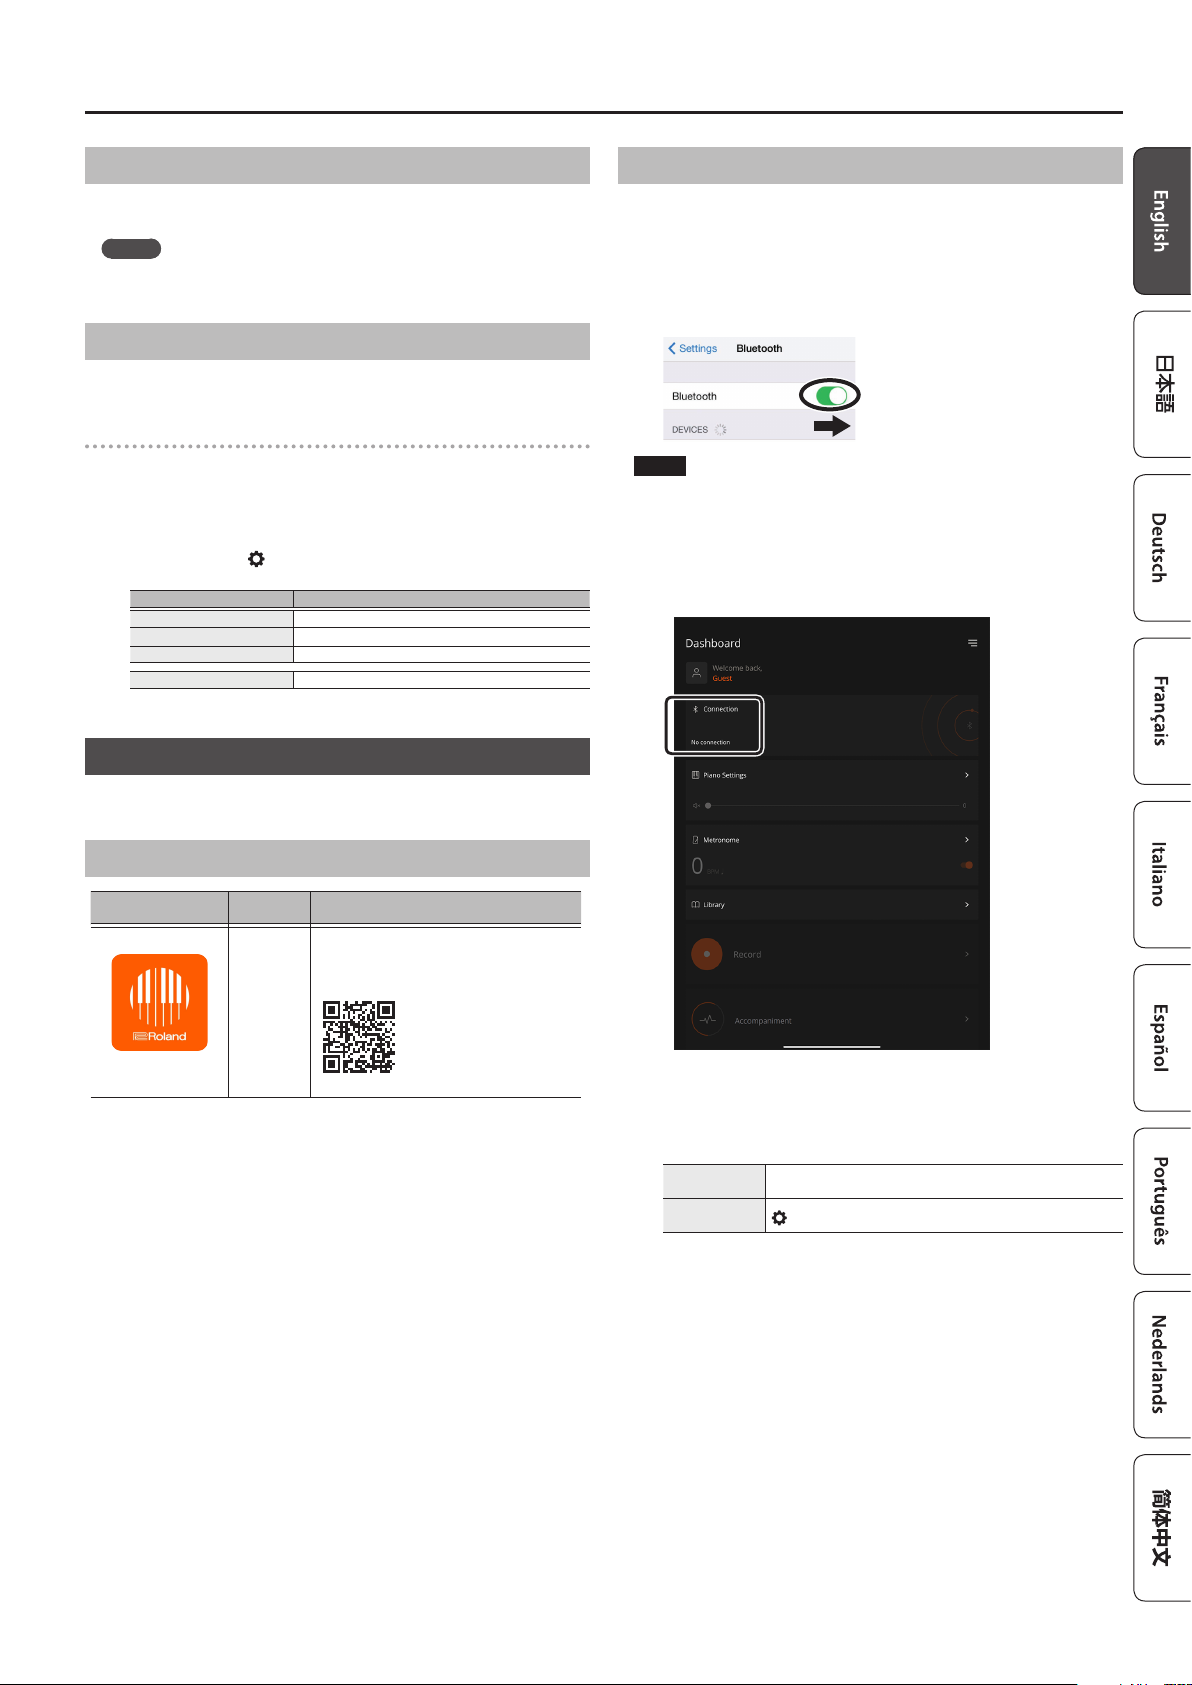
You can also connect the instrument to an app that give you access to even
more tones, such as “Do Re Mi” and GM2 tones.
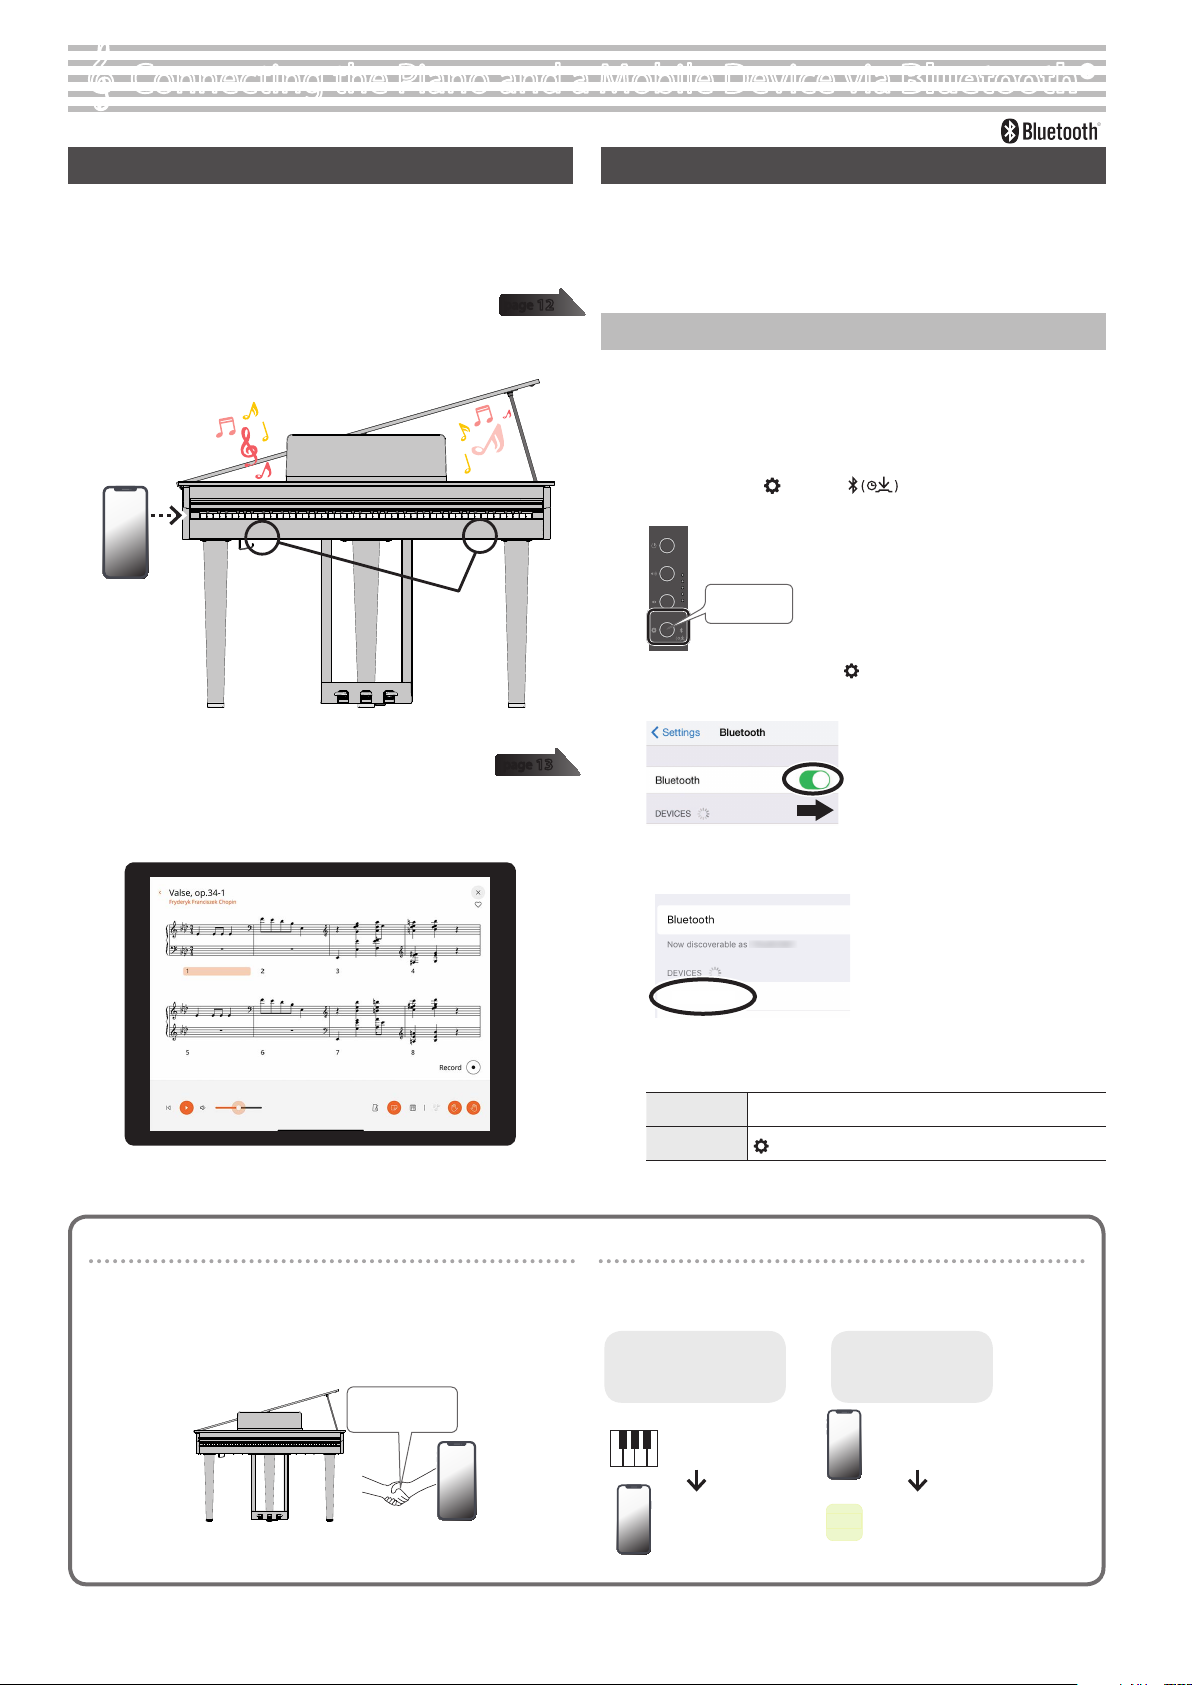
Ø“Connecting the Piano and a Mobile Device via Bluetooth” (p. 12)
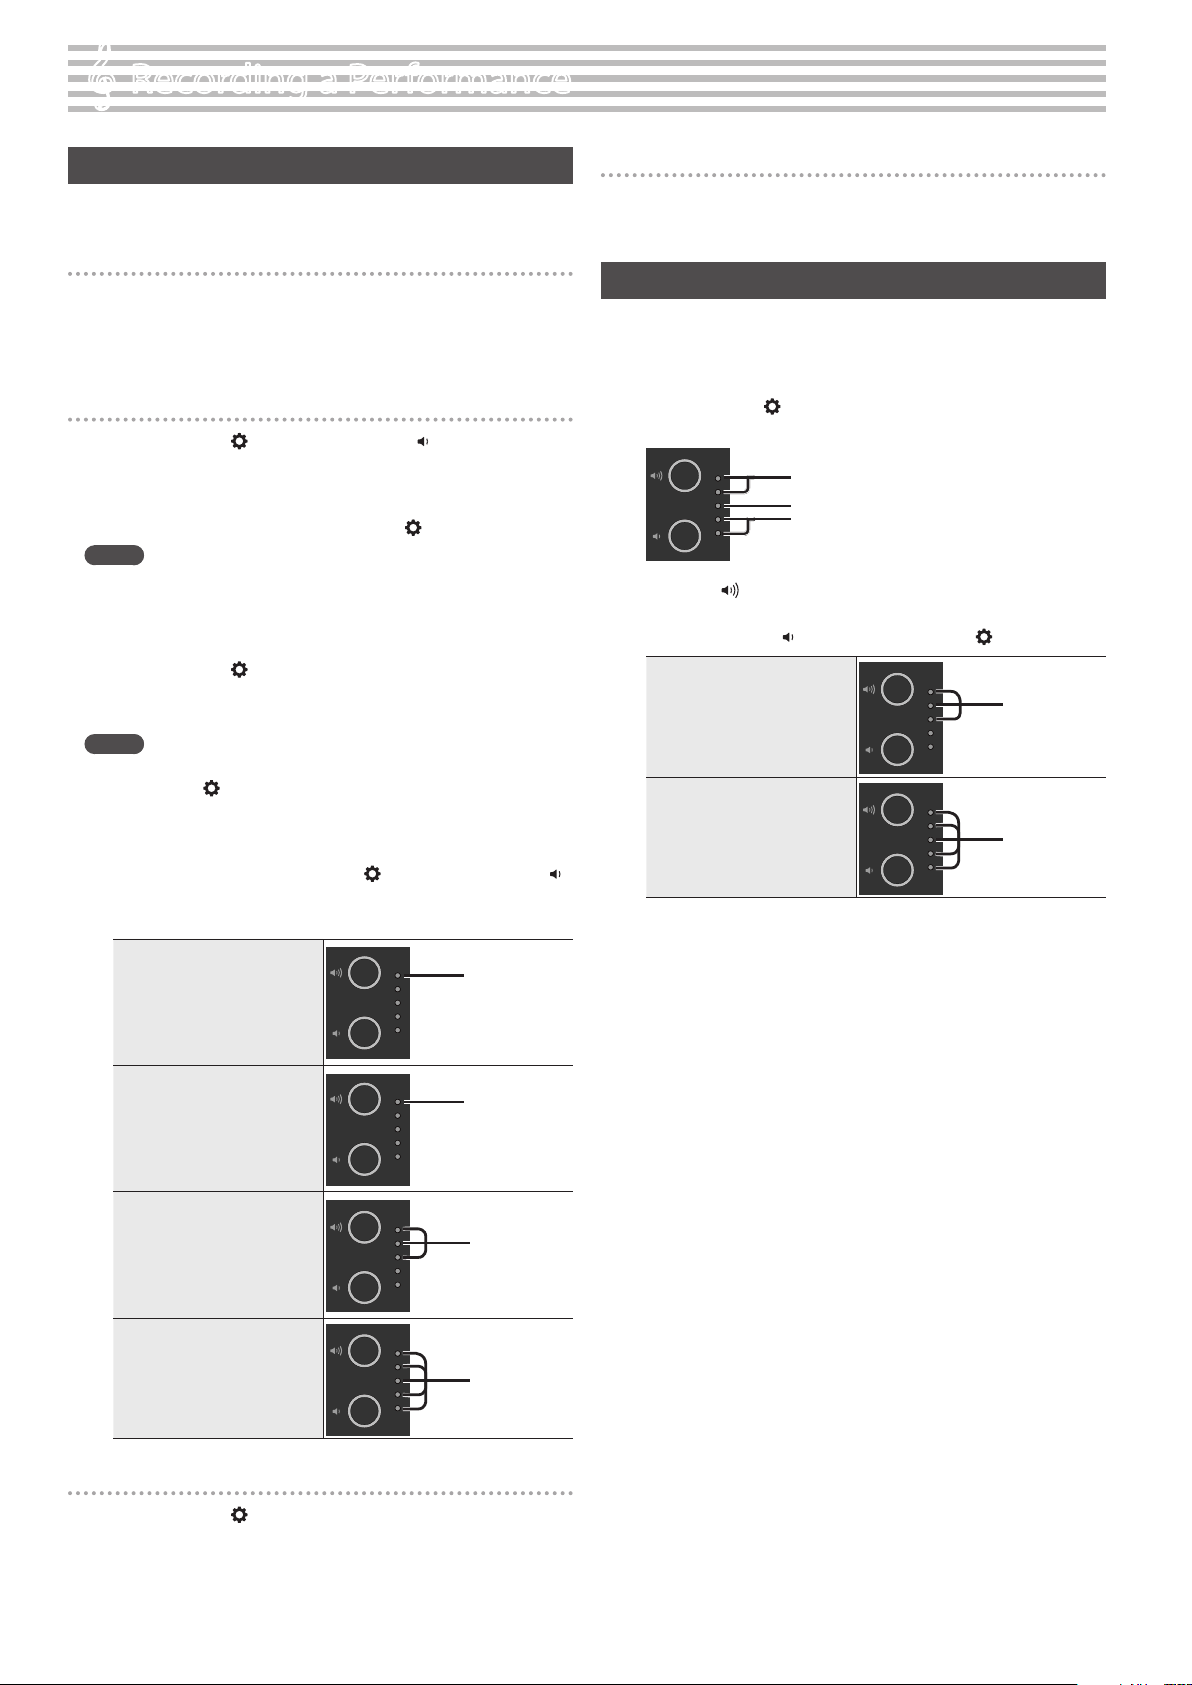
1. Hold down the [] button and play a key from A0 to B1.
This selects the tone corresponding to the key you pressed.
Press and hold
A0B1C1
1
2
Tone NameExplanation
Concert Piano
(A0)
An extravagant concert grand piano. This is the most
recommended piano tone for use in any genre.
Stage Piano
(A#0)
A piano tone that oers easy expressiveness and a
rich reverberating sound when you play strongly.
Recommended for jazz and popular music.
Mellow Piano
(B0)
A grand piano with a calm tone. Recommended for
songs with a soft, relaxed mood.
Bright Piano
(C1)
A grand piano with a brilliant tone. Recommended
for making the piano stand out in an ensemble.
Stage EP
(C#1)
The most popular electric piano tone, featuring a
characteristic tremolo eect. Good for pop music and
ballads.
Pop EP
(D1)
An electric piano with an attack that stands
out, emphasizing the low and high frequencies.
Recommended when performing solos in songs and
similar situations.
Magical Piano
(D#1)
A piano tone with a bright and sparkling feel,
featuring a piano sound plus bell and pad synthesizer
sounds.
Harpsichord
(E1)
A classical instrument sound used in baroque music.
Produces a characteristically delicate sound that’s
made by plucking strings with a plectrum.
Celesta
(F1)
A well-known classical instrument sound used in
Tchaikovsky’s “Nutcracker Suite”. Produces a uniquely
brilliant and pleasant tone that’s like a glockenspiel.
Vibraphone
(F#1)
An instrument that’s a larger version of the
glockenspiel, with a characteristically spacious and
clear tone. Playing in a relaxed way also oers a
sound with variation.
Pipe Organ
(G1)
A pipe organ that’s used in places like churches.
Suitable for playing baroque music.
Combo Jz. Organ
(G#1)
A tonewheel organ. Often used when playing jazz
music.
SymphonicStr1
(A1)
A large string ensemble with a characteristically
warm sound. Can be used for both slow and rapid
passages. Useful in a variety of situations such as
when layered with a piano tone.
Soft Pad
(A#1)
A synthesizer tone with a distinctive spacious sound.
Useful when layered with instruments like piano or
electric piano, giving a quiet warmth to the sound.
Jazz Scat
(B1)
Vocal sounds that can be triggered in four stages
according to how hard you play the keys (Doo,
Doot, Bap and Daw). This lets you enjoy playing
a cappella-style passages with a thick sound.
MEMO
Press two keys at the same time to select two dierent tones that play
together with each press of a key. This function is called “Dual Play”.
Playing Back a Song
Here’s how you can listen to the built-in songs. The built-in songs are
separated into several categories.
ØFor details on the built-in songs, refer to “Internal Song List” (p. 20).
Selecting a category
1. Hold down the [] button and play a key from C2 to G#2, or
from F3 to F#3.
This selects the category corresponding to the key you pressed.
1
F3C2
2
Press and hold
Category nameExplanation
Listening (C2)Piano songs recommended for listening.
Ensemble (C#2)
Famous songs, mainly classical pieces. These include
piano concertos, duets, and jazz arrangements of classical
pieces. Since this collection contains songs that are
challenging to play, they are recommended for those at
intermediate level or above.
Entertainment (D2)
Arrangements of well-known songs from around the
world, including pop, jazz, and children’s songs, in
arrangements that can be enjoyed by a wide range of
people from the beginner to the advanced player.
Do Re Mi Lesson (D#2)
You can use these lessons to learn the basics of music,
by singing solfege along with the songs or practicing
score-reading.
Scales
(E2)Scales in all keys (major scales, minor scales).
Hanon
(F2)Exercises No. 1–20 from Hanon’s “The Virtuoso Pianist”.
Beyer
(F#2)Beyer’s “Vorschule im Klavierspiel” Op.101, No. 1–106.
Burgmüller (G2)Burgmüller’s “25 Études faciles et progressives” Op.100.
Czerny #100 (G#2)Czerny’s “100 Progressive Studies” for piano practice.
USB Memory
(F3)Plays back songs from a USB ash drive. (*1) (*2)
Internal Memory
(F#3)Plays back a song (only one) that’s recorded on the piano.
(*1) The GP-3 can play back data in the following formats.
¹SMF formats 0/1
¹Audio les (WAV 44.1 kHz, 16-bit linear)
¹Audio les (MP3, 44.1 kHz, 64 kbps–320 kbps)
(*2) The song data should be in the root directory of the USB ash
drive.
9
Playing the Piano, Listening to Songs and Practicing
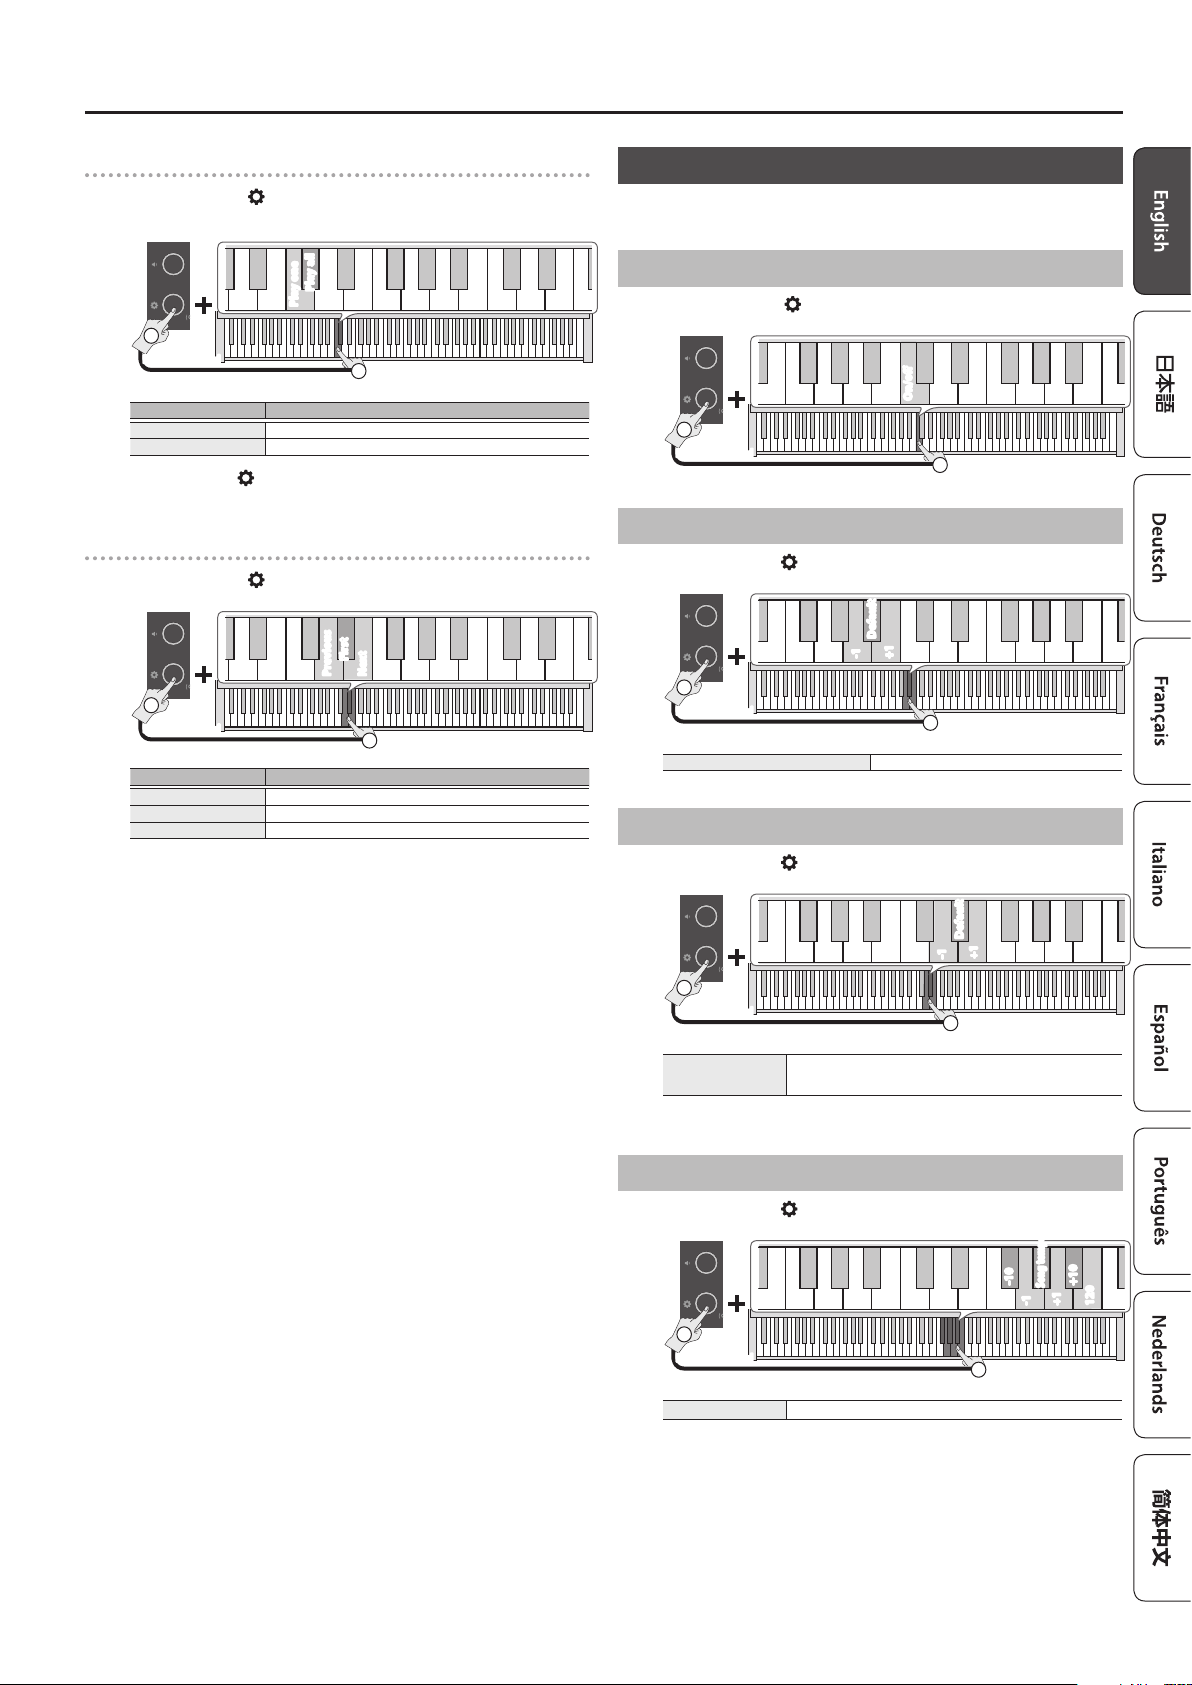
Selecting a playback method
2. Hold down the [] button and play a key from C3 to C#3.
1
2
Play one
Play all
C3
Press and hold
Keys to pressExplanation
Play one song (C3)Plays one song from the given category.
Play all songs (C#3)Plays all songs in the given category.
Hold down the [] button and press the same key again to stop
playback.
Changing songs
3. Hold down the [] button and press a key from D3 to E3.
1
2
Previous
Next
First
C3
Press and hold
Keys to pressExplanation
Previous song (D3)This selects the previous song in the given category.
First song (D#3)This selects the rst song in the given category.
Next song (E3)This selects the next song in the given category.
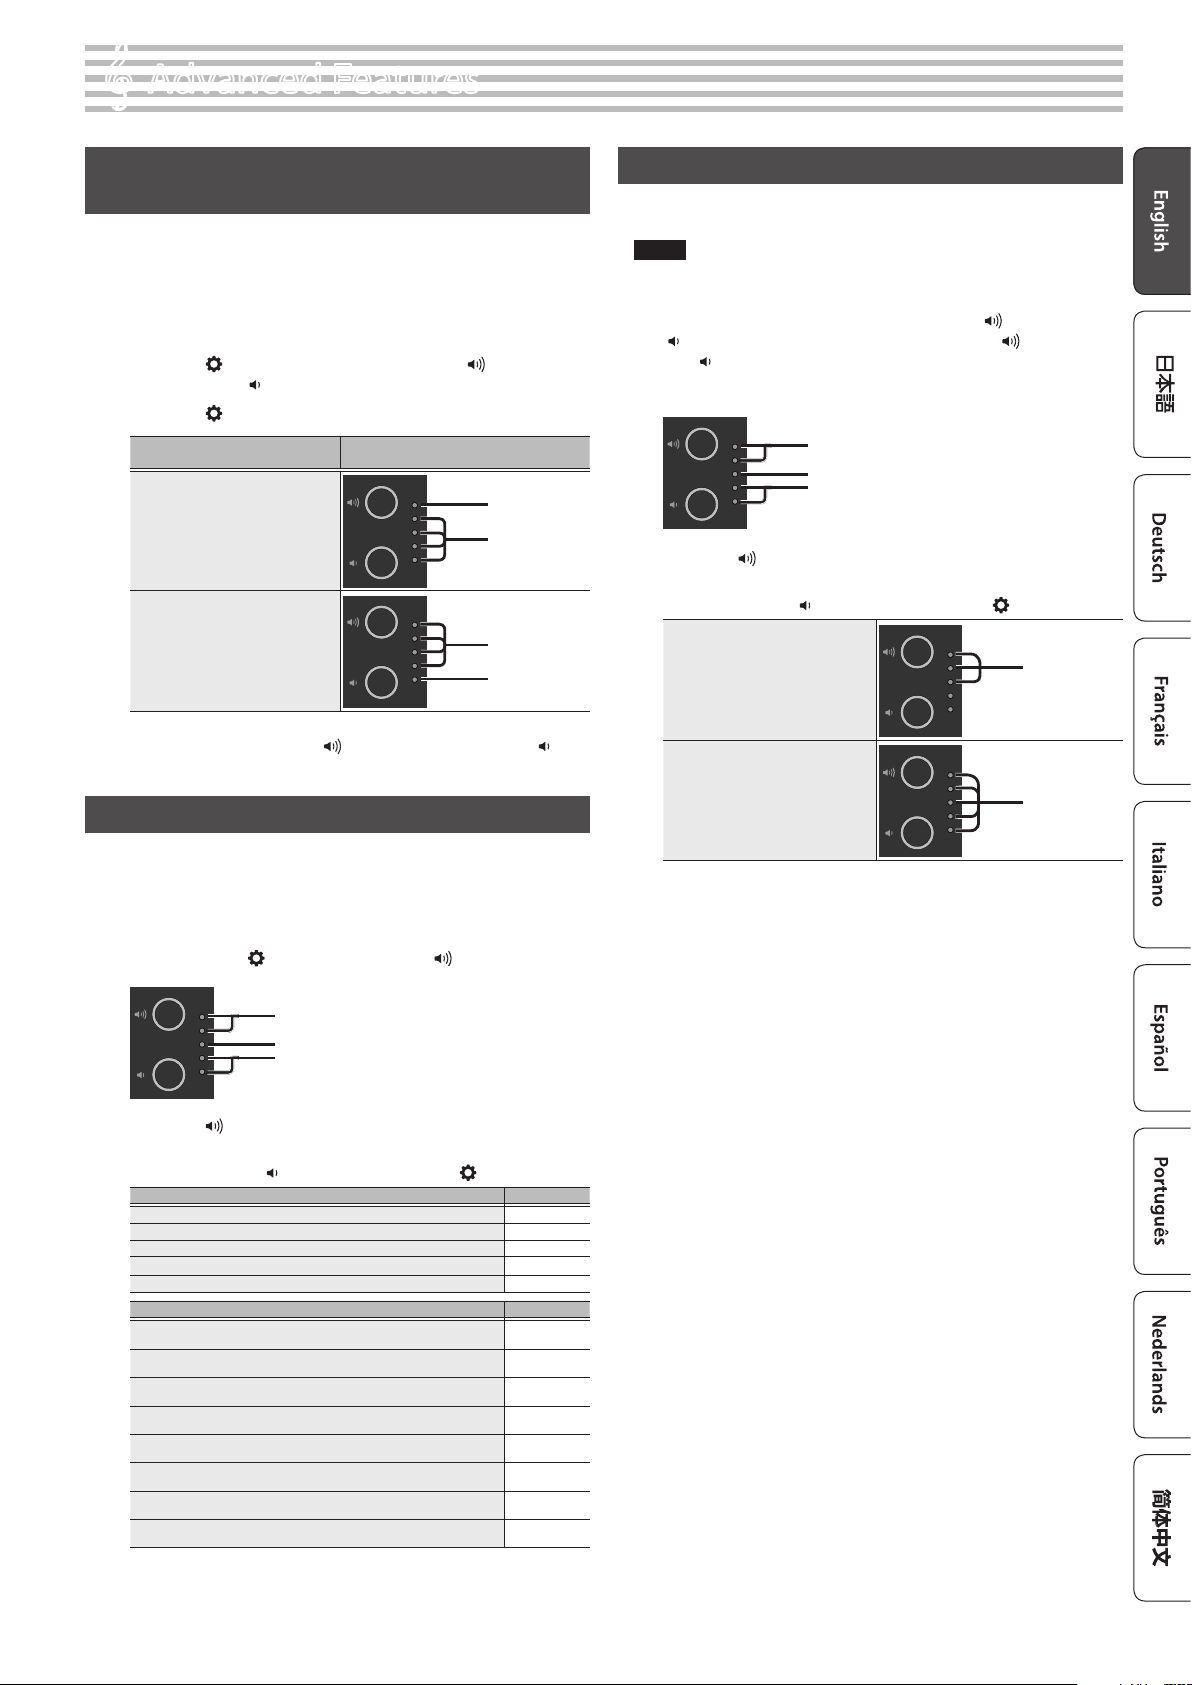
Practicing with the Metronome
You can play while listening to the metronome. The metronome’s tempo
and time signature can be changed.
Start and Stop the Metronome
1. Hold down the [] button and play the C4 key.
1
2
On/o
C4
Press and hold
Changing the Metronome’s Volume
1. Hold down the [] button and play a key from A3 to B3.
1
2
+1
Default
-1
C4
Press and hold
Metronome volume1–10 (default value: 5)
Changing the Time Signature
1. Hold down the [] button and press a key from D4 to E4.
trademarks or trademarks of Roland Corporation in the
United States and/or other countries.
•Company names and product names appearing in this
document are registered trademarks or trademarks of
their respective owners.
19
°Main Specication
Sound generatorPiano Sound: Piano Reality Standard Sound Engine
KeyboardPiano Reality Standard Keyboard (88keys): with Escapement, Ivory Feel, and Dynamic Sensor Acceleration Technology
Bluetooth
Bluetooth Ver 4.2
Supported proles: A2DP (Audio), GATT (MIDI over Bluetooth Low Energy)
Supported codec: SBC (compatible with SCMS-T content protection)
Power SupplyAC Adaptor
Power consumption
10 W (When using the included AC adaptor)
Approximate power consumption when playing the piano at medium volume: 4 W
Power consumption when sound has not been played after power-on: 3 W
Dimensions
Top opened:
1,394 (W) x 698 (D) x 1,214 (H) mm
54-15/16 (W) x 27-1/2 (D) x 47-13/16 (H) inches
Top closed (with music rest):
1,394 (W) x 698 (D) x 1,010 (H) mm
54-15/16 (W) x 27-1/2 (D) x 39-13/16 (H) inches
Weight57.3 kg/ 126 lbs 6 oz
OptionOwner’s Manual, Leaet Stand Assembly, Leaet “USING THE UNIT SAFELY”, AC adaptor, Power cord, Headphone hook
* This document explains the specications of the product at the time that the document was issued. For the latest information, refer to the Roland website.
Model Name and Serial Number
The model name and serial number for this instrument are listed in the following locations.
Gebruikershandleiding.com neemt misbruik van zijn services uitermate serieus. U kunt hieronder aangeven waarom deze vraag ongepast is. Wij controleren de vraag en zonodig wordt deze verwijderd.
Product:
Spelregels forum
Om tot zinvolle vragen te komen hanteren wij de volgende spelregels:
lees eerst de handleiding door;
controleer of uw vraag al eerder door iemand anders is gesteld;
probeer uw vraag zo duidelijk mogelijk te stellen;
heeft u een probleem en al geprobeerd om dit op te lossen, vermeld dit erbij aub;
heeft u een oplossing gekregen van een bezoeker dan horen wij dat graag in dit forum;
wilt u een reactie geven op een vraag of antwoord, gebruik dan niet dit formulier maar klik op de knop 'reageer op deze vraag';
uw vraag wordt direct op de website gezet; vermijd daarom persoonlijke gegevens in te vullen;
Belangrijk! Als er een antwoord wordt gegeven op uw vraag, dan is het voor de gever van het antwoord nuttig om te weten als u er wel (of niet) mee geholpen bent! Wij vragen u dus ook te reageren op een antwoord.
Belangrijk! Antwoorden worden ook per e-mail naar abonnees gestuurd. Laat uw emailadres achter op deze site, zodat u op de hoogte blijft. U krijgt dan ook andere vragen en antwoorden te zien.
Abonneren
Abonneer u voor het ontvangen van emails voor uw Roland GP-3 bij:
nieuwe vragen en antwoorden
nieuwe handleidingen
U ontvangt een email met instructies om u voor één of beide opties in te schrijven.
Ontvang uw handleiding per email
Vul uw emailadres in en ontvang de handleiding van Roland GP-3 in de taal/talen: Engels als bijlage per email.
De handleiding is 4.26 mb groot.
U ontvangt de handleiding per email binnen enkele minuten. Als u geen email heeft ontvangen, dan heeft u waarschijnlijk een verkeerd emailadres ingevuld of is uw mailbox te vol. Daarnaast kan het zijn dat uw internetprovider een maximum heeft aan de grootte per email. Omdat hier een handleiding wordt meegestuurd, kan het voorkomen dat de email groter is dan toegestaan bij uw provider.
Uw handleiding is per email verstuurd. Controleer uw email
Als u niet binnen een kwartier uw email met handleiding ontvangen heeft, kan het zijn dat u een verkeerd emailadres heeft ingevuld of dat uw emailprovider een maximum grootte per email heeft ingesteld die kleiner is dan de grootte van de handleiding.
Er is een email naar u verstuurd om uw inschrijving definitief te maken.
Controleer uw email en volg de aanwijzingen op om uw inschrijving definitief te maken
U heeft geen emailadres opgegeven
Als u de handleiding per email wilt ontvangen, vul dan een geldig emailadres in.
Uw vraag is op deze pagina toegevoegd
Wilt u een email ontvangen bij een antwoord en/of nieuwe vragen? Vul dan hier uw emailadres in.