810867
8
Verklein
Vergroot
Pagina terug
1/16
Pagina verder
18
fig. E
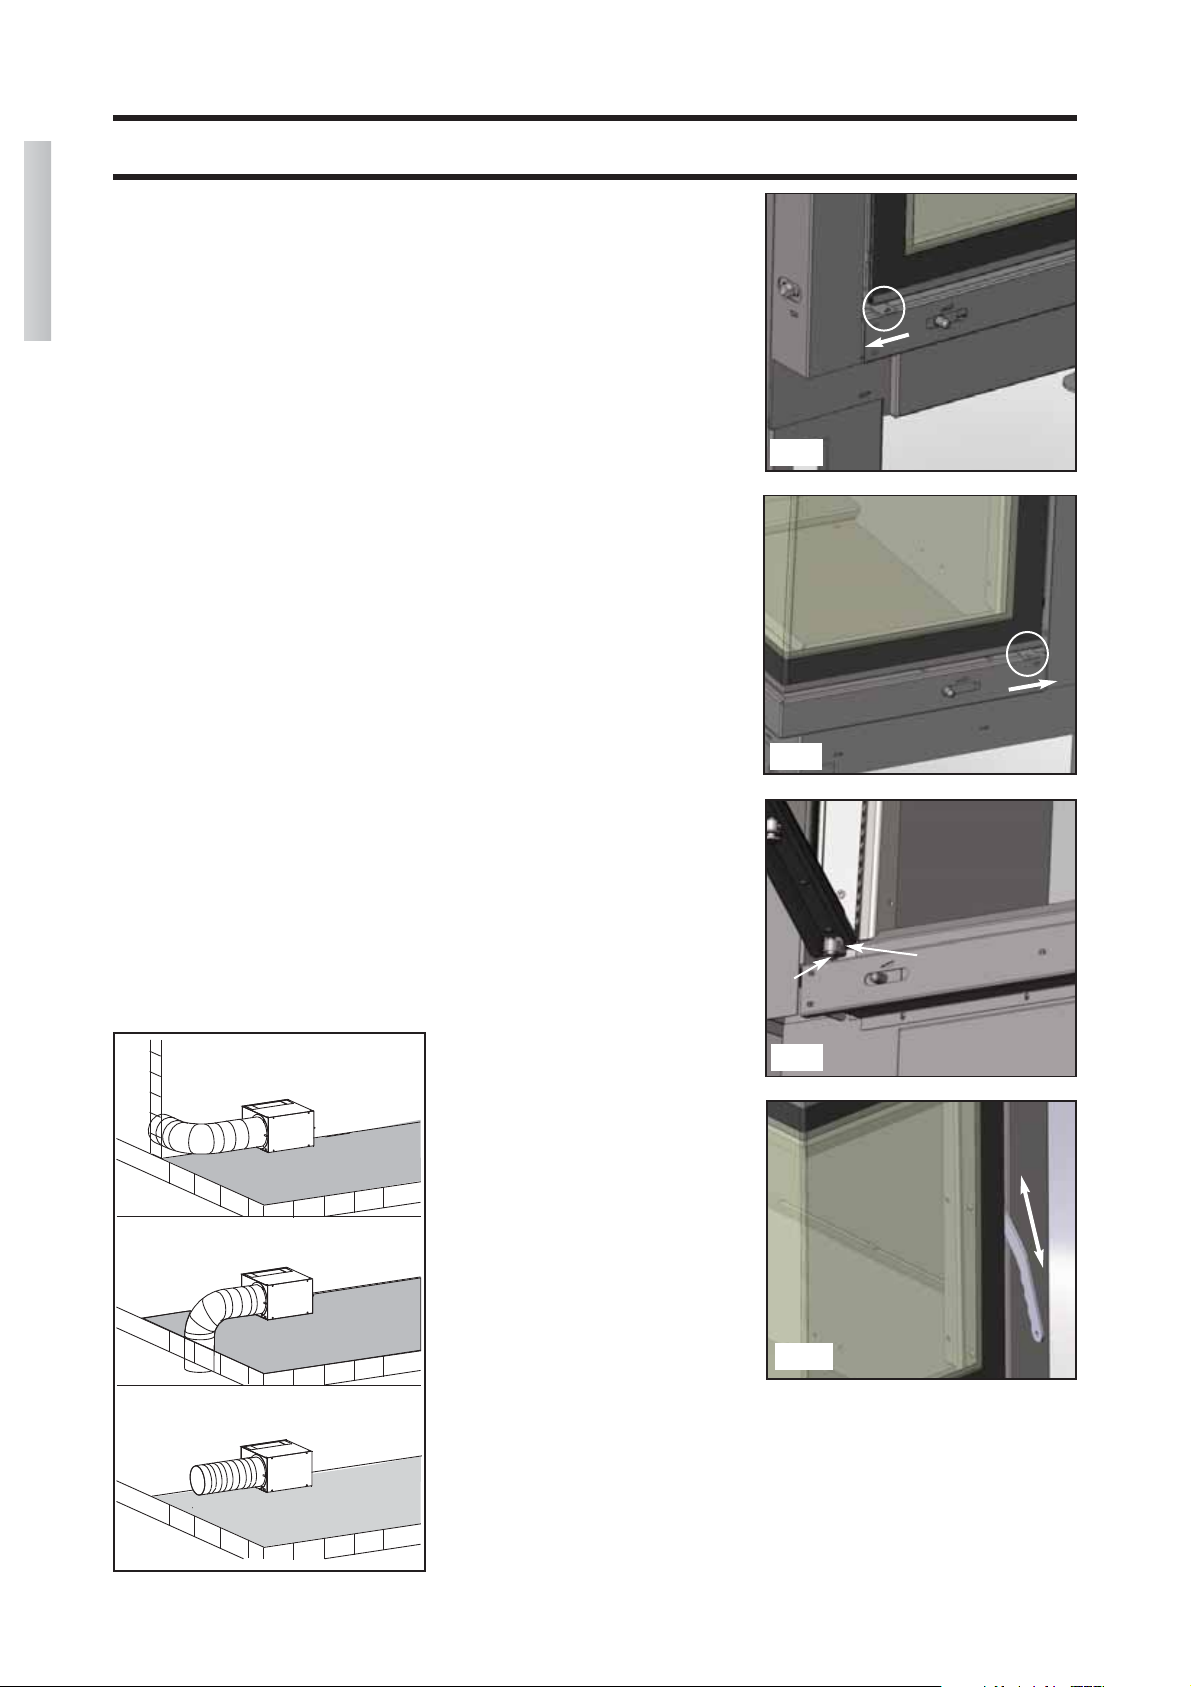
External air inlet (figures E-F-G)
It is absolutely necessary, without
exception, to build a connection to the
outside with a cross-section of 300 cm²
for the proper functioning of the fire-
place.
This connection must link the adju-
stment mechanism outlet located on the
side of the mechanism itself with the
outside.
This can be achieved with a flexible alu-
minium pipe and properly sealing the
points where air leakage could occur.
The Ø20 aluminium pipe can be posi-
tioned independently either to the
right or to the left of the adjustment
mechanism.
It is advisable to place a protection gril-
le on the outer part of the air inlet chan-
nel, nevertheless ensuring that this does
not reduce the cross-section.
The inflow of outside air must be at floor
level (it can not come from above).
.When positioning the outdoor air
damper control cable (4c), make sure
that it does not come into contact with
the hot parts of the fireplace, as this
will damage the plastic sheath.
INSTALLATION INSTRUCTIONS
fig. F
fig. G
ENGLISH
Transporting the fireplace
In order to facilitate transportation, the
fireplace can be made lighter by remo-
ving the following:
- counter weights, cast iron bottom, cast
iron sides, cast iron hearth, the ash pan, the
ash grill made of cast iron, the outer shell.
Dismantling the door
Phase 1 (fig. H-I)
- lower the door to the fully closed
position
- move levers X and X1 towards their
respective jambs.
Phase 2 (fig. L)
- open the door
- loosen safety grub screw Y
- reclose the door
- put levers X and X1 back into their
original positions
Phase 3 (fig. L)
- lift the door up approximately 10 cm
in order to fully unscrew the Allen
screw (Z).
- lower the door until it is in the fully
closed position
- Take care that the door does not come
out of its housing.
- move levers X and X1 towards their
respective jambs again; open the door.
- pull (very carefully) the lower part of
the door towards you, in order to
remove it from its housing.
Cleaning the glass (fig. M)
- Note: before proceeding, move the
two levers, X and X1, towards their
respective jambs.
- open the door and using the appro
priate tool (cold handle supplied)
release the latch plate on the jamb of
the short side of the door (rotate 90°).
- relcose after cleaning, fastening the
latch plate.
X
X1
fig. L
fig. I
ZY
fig. M
fig. H
8

Hulp nodig? Stel uw vraag in het forum

Spelregels

Misbruik melden

Gebruikershandleiding.com neemt misbruik van zijn services uitermate serieus. U kunt hieronder aangeven waarom deze vraag ongepast is. Wij controleren de vraag en zonodig wordt deze verwijderd.

Product:

Bijvoorbeeld antisemitische inhoud, racistische inhoud, of materiaal dat gewelddadige fysieke handelingen tot gevolg kan hebben.

Bijvoorbeeld een creditcardnummer, een persoonlijk identificatienummer, of een geheim adres. E-mailadressen en volledige namen worden niet als privégegevens beschouwd.

Spelregels forum

Om tot zinvolle vragen te komen hanteren wij de volgende spelregels:

Belangrijk! Als er een antwoord wordt gegeven op uw vraag, dan is het voor de gever van het antwoord nuttig om te weten als u er wel (of niet) mee geholpen bent! Wij vragen u dus ook te reageren op een antwoord.

Belangrijk! Antwoorden worden ook per e-mail naar abonnees gestuurd. Laat uw emailadres achter op deze site, zodat u op de hoogte blijft. U krijgt dan ook andere vragen en antwoorden te zien.

Abonneren

Abonneer u voor het ontvangen van emails voor uw Edilkamin Titano Up 2 bij:


U ontvangt een email met instructies om u voor één of beide opties in te schrijven.


Ontvang uw handleiding per email

Vul uw emailadres in en ontvang de handleiding van Edilkamin Titano Up 2 in de taal/talen: Engels als bijlage per email.

De handleiding is 2.56 mb groot.


U ontvangt de handleiding per email binnen enkele minuten. Als u geen email heeft ontvangen, dan heeft u waarschijnlijk een verkeerd emailadres ingevuld of is uw mailbox te vol. Daarnaast kan het zijn dat uw internetprovider een maximum heeft aan de grootte per email. Omdat hier een handleiding wordt meegestuurd, kan het voorkomen dat de email groter is dan toegestaan bij uw provider.

Andere handleiding(en) van Edilkamin Titano Up 2

Edilkamin Titano Up 2 Gebruiksaanwijzing en installatiehandleiding - Italiano - 16 pagina's


Uw handleiding is per email verstuurd. Controleer uw email

Als u niet binnen een kwartier uw email met handleiding ontvangen heeft, kan het zijn dat u een verkeerd emailadres heeft ingevuld of dat uw emailprovider een maximum grootte per email heeft ingesteld die kleiner is dan de grootte van de handleiding.

Er is een email naar u verstuurd om uw inschrijving definitief te maken.

Controleer uw email en volg de aanwijzingen op om uw inschrijving definitief te maken

U heeft geen emailadres opgegeven

Als u de handleiding per email wilt ontvangen, vul dan een geldig emailadres in.

Uw vraag is op deze pagina toegevoegd

Wilt u een email ontvangen bij een antwoord en/of nieuwe vragen? Vul dan hier uw emailadres in.


Info