638065
103
Verklein
Vergroot
Pagina terug
1/140
Pagina verder
98
99
Now you can move the handlebar/stem unit up and down as a whole. Be
sure not to pull out the stem too far. The mark on the stem (max., min.,
max., stop, limit or the like) should always remain within the tube (a). Setting
the stem to a lower position can only add to your safety!
Straighten the handlebars so that they are symmetrical with respect to the
front wheel (b).
Retighten the expander bolt with a torque wrench. Tighten carefully by ap-
proaching the prescribed maximum torque in small steps (0.5 Nm incre-
ments) whilst constantly checking the proper fit of the component. Never
exceed the maximum tightening torque indicated by the manufacturer!
Make sure the stem is firmly fixed by taking the front wheel between your
legs and trying to turn the handlebars and stem relative to the wheel (c). If
there is movement, please increase the tightening torque.
If the handlebars are still too high or too low, you can replace the stem. This
can be quite a big job, as it may mean taking off and remounting all the
fittings on the handlebars. Inform yourself at your bicycle dealer about the
various stem types available. Let the bicycle dealer advise you about the dif-
ferent types of stems and have the stem mounted in the shop.
Never ride a bicycle with a stem drawn out beyond the mark for
the maximum permissible height! Check all bolted connections
and do a brake test before you set off!
Stems come in most different lengths and shaft and binder tube
diameters. If you opt for a stem of inappropriate sizing, handle-
bars and stem may break and result in an accident.
14.2.3 Stems for Threadless Systems, the Aheadset
®
-System
(*Aheadset
®
is a registered trade mark of Dia-Compe)
On bicycles with Aheadset
®
the stem also serves to adjust the initial head-
set bearing pressure. If you change the position of the stem you have to
readjust the bearings (see chapter “Headset”). The vertical setting range is
determined by the intermediate rings, also referred to as spacers (d). In the
case of flip-flop stem models the stem can be mounted the other way round
to achieve a different handlebar height.
This adjustment is a job best left to your bicycle dealer!
a
b
c
d
14.2.4 Adjusting Adjustable Handlebar Systems (A.H.S.)
Check whether the clamping area (a) of the A.H.S. is accurately centred in
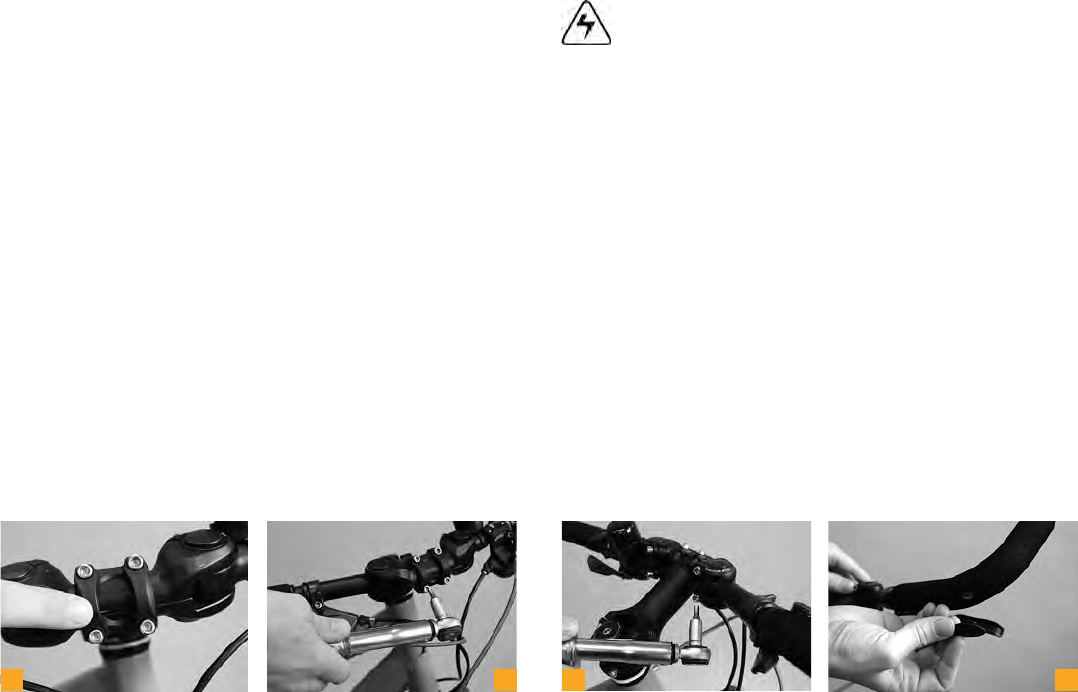
the handlebar clamp of the stem.
Adjust the A.H.S. tilt to your personal needs.
Tighten the handlebar clamping bolt(s) at the stem to the tightening torques
prescribed by the stem manufacturer (b).
Bring the A.H.S. grips into a position that matches your personal needs. To
do so release the clamping bolts at the joint.
After you have found the ideal position for you, retighten the clamping bolts
(c) to a tightening torque of 5.5 Nm.
Adjust the shift/brake levers and grips on the handlebars to your wishes.
Slide the expander cones of the bar ends onto the outer ends of the A.H.S.
Make sure the clamping surfaces are always clean and free of
grease!
Position the bar ends to your personal needs.
Tighten the clamping bolts of the bar ends to a tightening torque of 23 Nm.
Do not forget to insert the according plugs into the ends of the A.H.S. (d).
a
b
c
d
103

Hulp nodig? Stel uw vraag in het forum

Spelregels

Misbruik melden

Gebruikershandleiding.com neemt misbruik van zijn services uitermate serieus. U kunt hieronder aangeven waarom deze vraag ongepast is. Wij controleren de vraag en zonodig wordt deze verwijderd.

Product:

Bijvoorbeeld antisemitische inhoud, racistische inhoud, of materiaal dat gewelddadige fysieke handelingen tot gevolg kan hebben.

Bijvoorbeeld een creditcardnummer, een persoonlijk identificatienummer, of een geheim adres. E-mailadressen en volledige namen worden niet als privégegevens beschouwd.

Spelregels forum

Om tot zinvolle vragen te komen hanteren wij de volgende spelregels:

Belangrijk! Als er een antwoord wordt gegeven op uw vraag, dan is het voor de gever van het antwoord nuttig om te weten als u er wel (of niet) mee geholpen bent! Wij vragen u dus ook te reageren op een antwoord.

Belangrijk! Antwoorden worden ook per e-mail naar abonnees gestuurd. Laat uw emailadres achter op deze site, zodat u op de hoogte blijft. U krijgt dan ook andere vragen en antwoorden te zien.

Abonneren

Abonneer u voor het ontvangen van emails voor uw Winora Algemene bij:


U ontvangt een email met instructies om u voor één of beide opties in te schrijven.


Ontvang uw handleiding per email

Vul uw emailadres in en ontvang de handleiding van Winora Algemene in de taal/talen: Engels als bijlage per email.

De handleiding is 4,57 mb groot.


U ontvangt de handleiding per email binnen enkele minuten. Als u geen email heeft ontvangen, dan heeft u waarschijnlijk een verkeerd emailadres ingevuld of is uw mailbox te vol. Daarnaast kan het zijn dat uw internetprovider een maximum heeft aan de grootte per email. Omdat hier een handleiding wordt meegestuurd, kan het voorkomen dat de email groter is dan toegestaan bij uw provider.

Stel vragen via chat aan uw handleiding

Stel uw vraag over deze PDF

loading

Andere handleiding(en) van Winora Algemene

Winora Algemene Gebruiksaanwijzing - Deutsch - 144 pagina's


Uw handleiding is per email verstuurd. Controleer uw email

Als u niet binnen een kwartier uw email met handleiding ontvangen heeft, kan het zijn dat u een verkeerd emailadres heeft ingevuld of dat uw emailprovider een maximum grootte per email heeft ingesteld die kleiner is dan de grootte van de handleiding.

Er is een email naar u verstuurd om uw inschrijving definitief te maken.

Controleer uw email en volg de aanwijzingen op om uw inschrijving definitief te maken

U heeft geen emailadres opgegeven

Als u de handleiding per email wilt ontvangen, vul dan een geldig emailadres in.

Uw vraag is op deze pagina toegevoegd

Wilt u een email ontvangen bij een antwoord en/of nieuwe vragen? Vul dan hier uw emailadres in.


Info