Belgium, France, Greece, Ireland, Italy, Luxembourg, Portugal, Spain,
Switzerland, UnitedKingdom
I
3+
- 28-30 / 37 mbar
PolandI
3
B/P - 37 mbar
Austria, GermanyI
3
B/P - 50 mbar
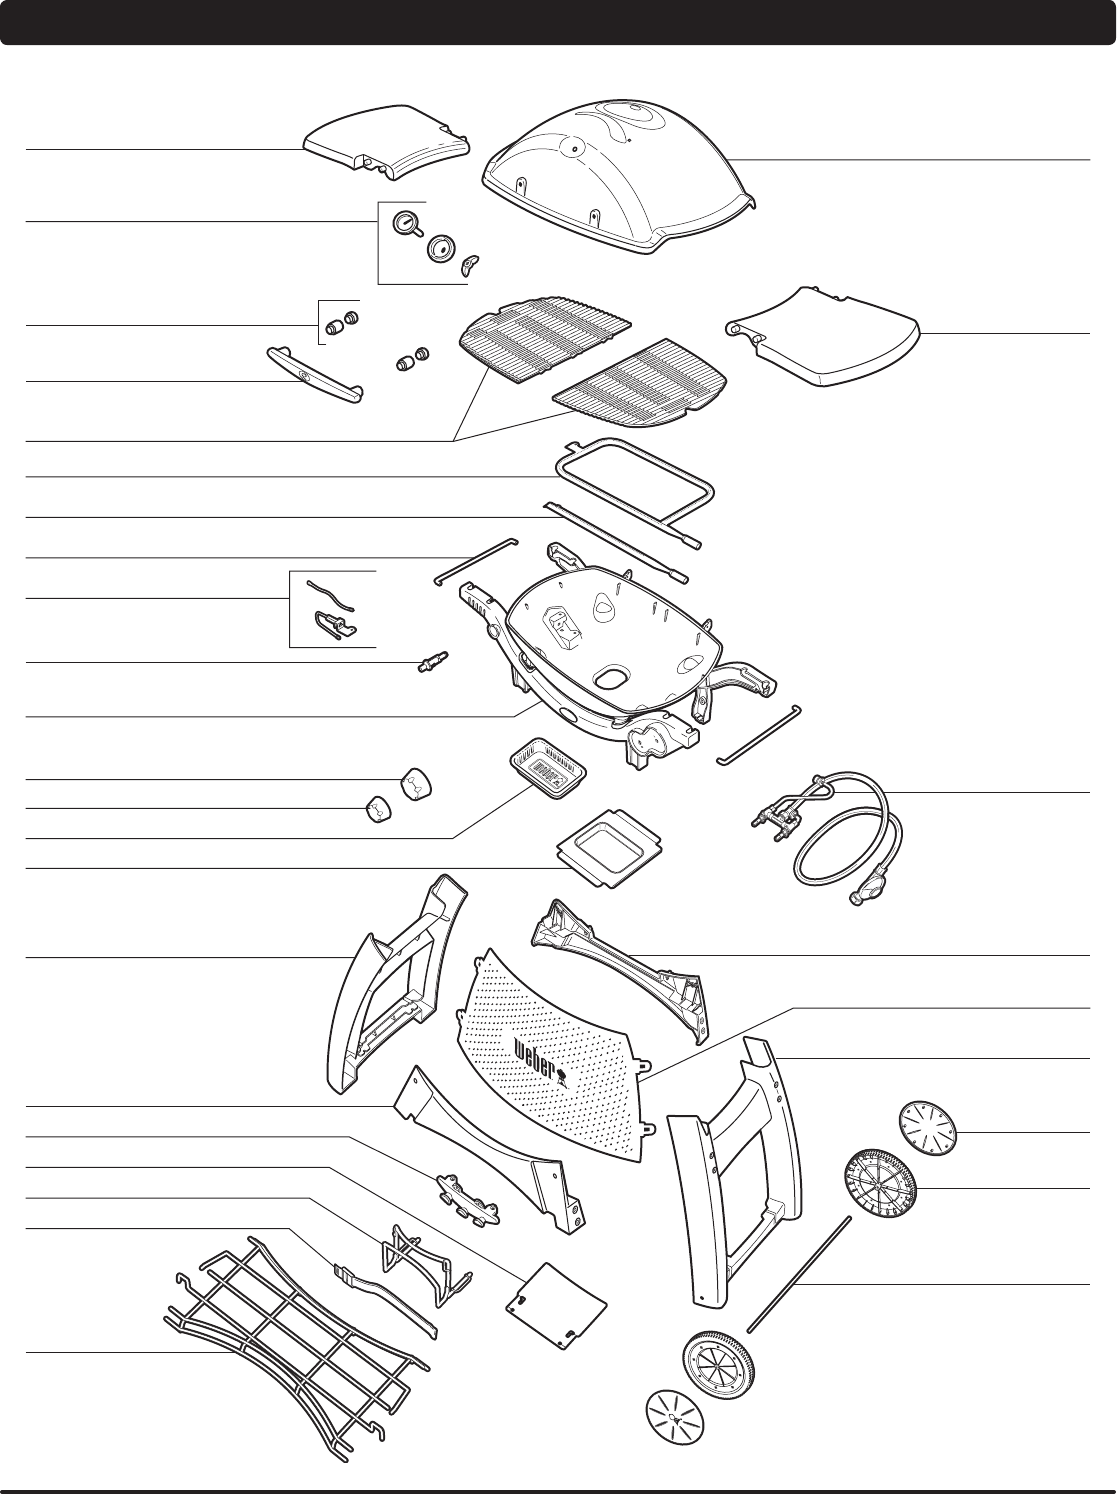
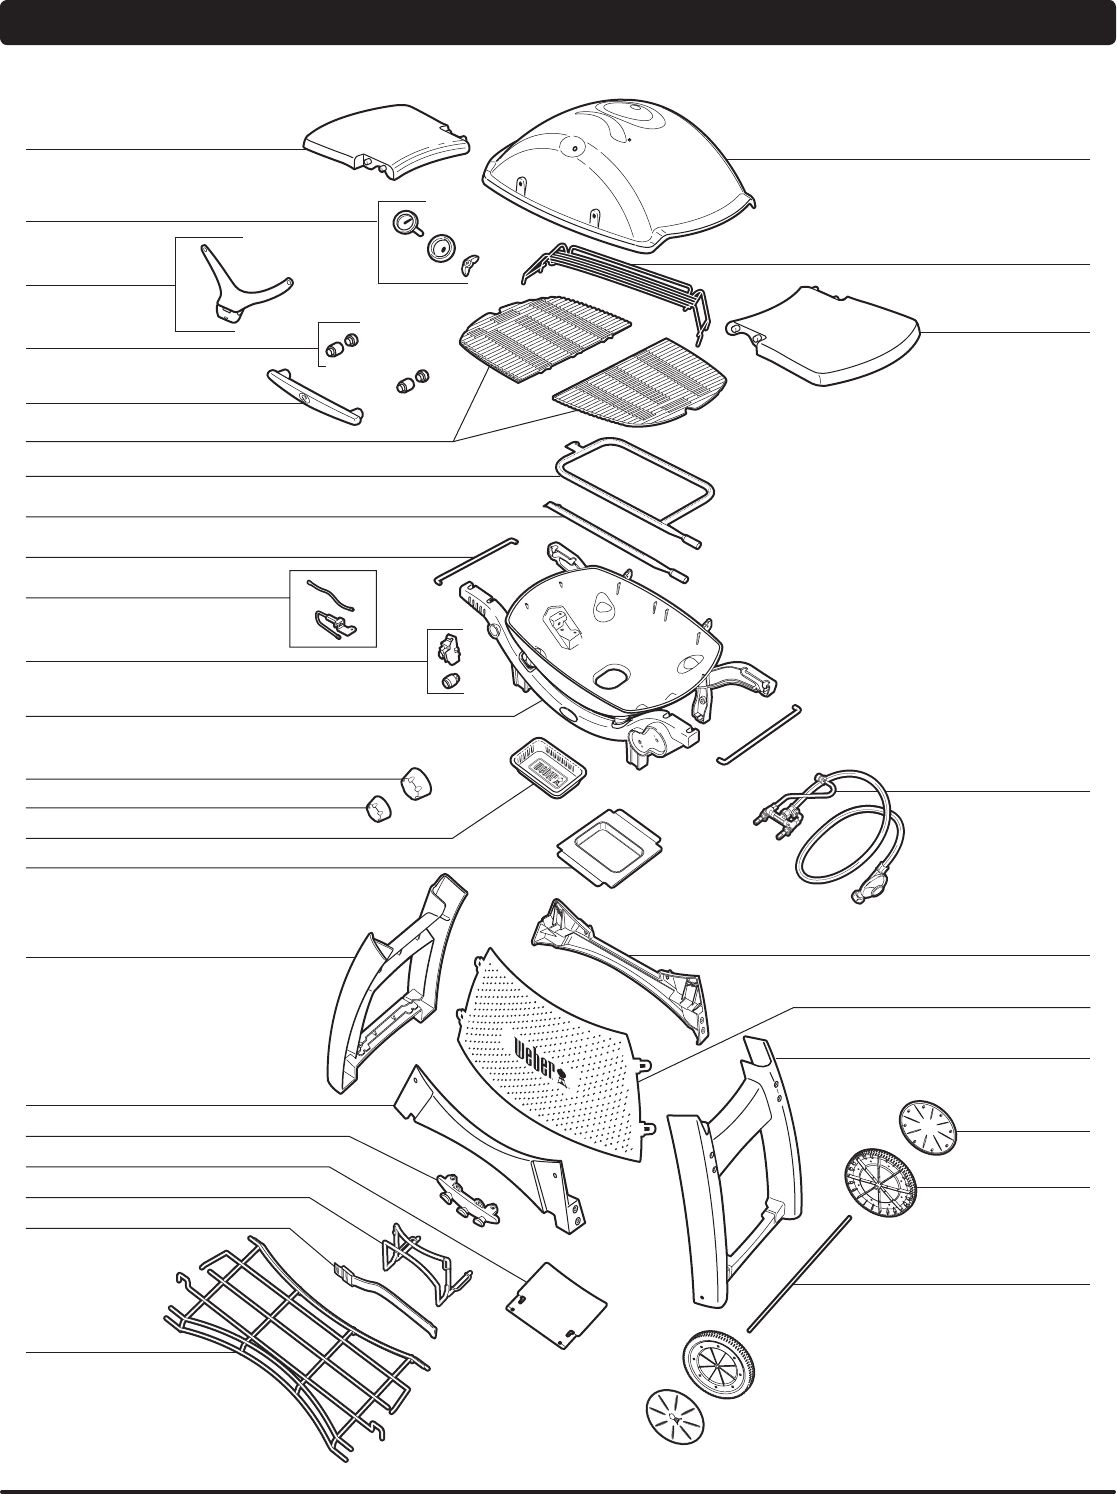
CONSUMPTION DATA
Propane kWButane kWPropane g/hButane g/h
Weber
®
Q
®
30006,16,36434453
Weber
®
Q
®
32006,16,36434453
• If storing the Weber
®
gas barbecue indoors, first
DISCONNECT the gas supply and store the cylinder
outdoors in a well-ventilated space.
• Do not store a disconnected cylinder in a building,
garage, or any other enclosed area.
• If you do not disconnect the cylinder from the Weber
®
gas barbecue, be sure to keep both the barbecue and
the cylinder outdoors in a well-ventilated area.
• Check that the areas under the cookbox and the
removable catch pan are free from debris that might
obstruct the flow of combustion or ventilation air.
• The Weber
®
gas barbecue should be checked for gas
leaks and any obstructions in the burner tubes before
it is used.
• The spider/insect screens should also be checked for
any obstructions.
LPG CYLINDER REQUIREMENTS
• Use only a 3kg-13kg LPG cylinder.
REGULATOR CONNECTIONS &
REQUIREMENTS
• In the United Kingdom, this appliance must be fitted
with a regulator complying with BS 3016, having
a nominal output of 37 millibars. (Supplied with
barbecue.)
• The length of hose must not exceed 1.5 metres.
• Avoid kinking the hose.
• Change the flexible hose when national regulations
stipulate this as a requirement.
• Any parts sealed by the manufacturer must not be
altered by the user.
• Any modification of the appliance may be dangerous.
• Only a nationally approved low-pressure hose and
regulator must be used.
• Replacement pressure regulators and hose
assemblies must be those specified by the outdoor
cooking gas appliance manufacturer.
• Be sure the regulator is mounted with the small vent
hole pointed downward so that it will not collect water.
This vent should be free of dirt, grease, bugs, etc.
WWW.WEBER.COM
®
25
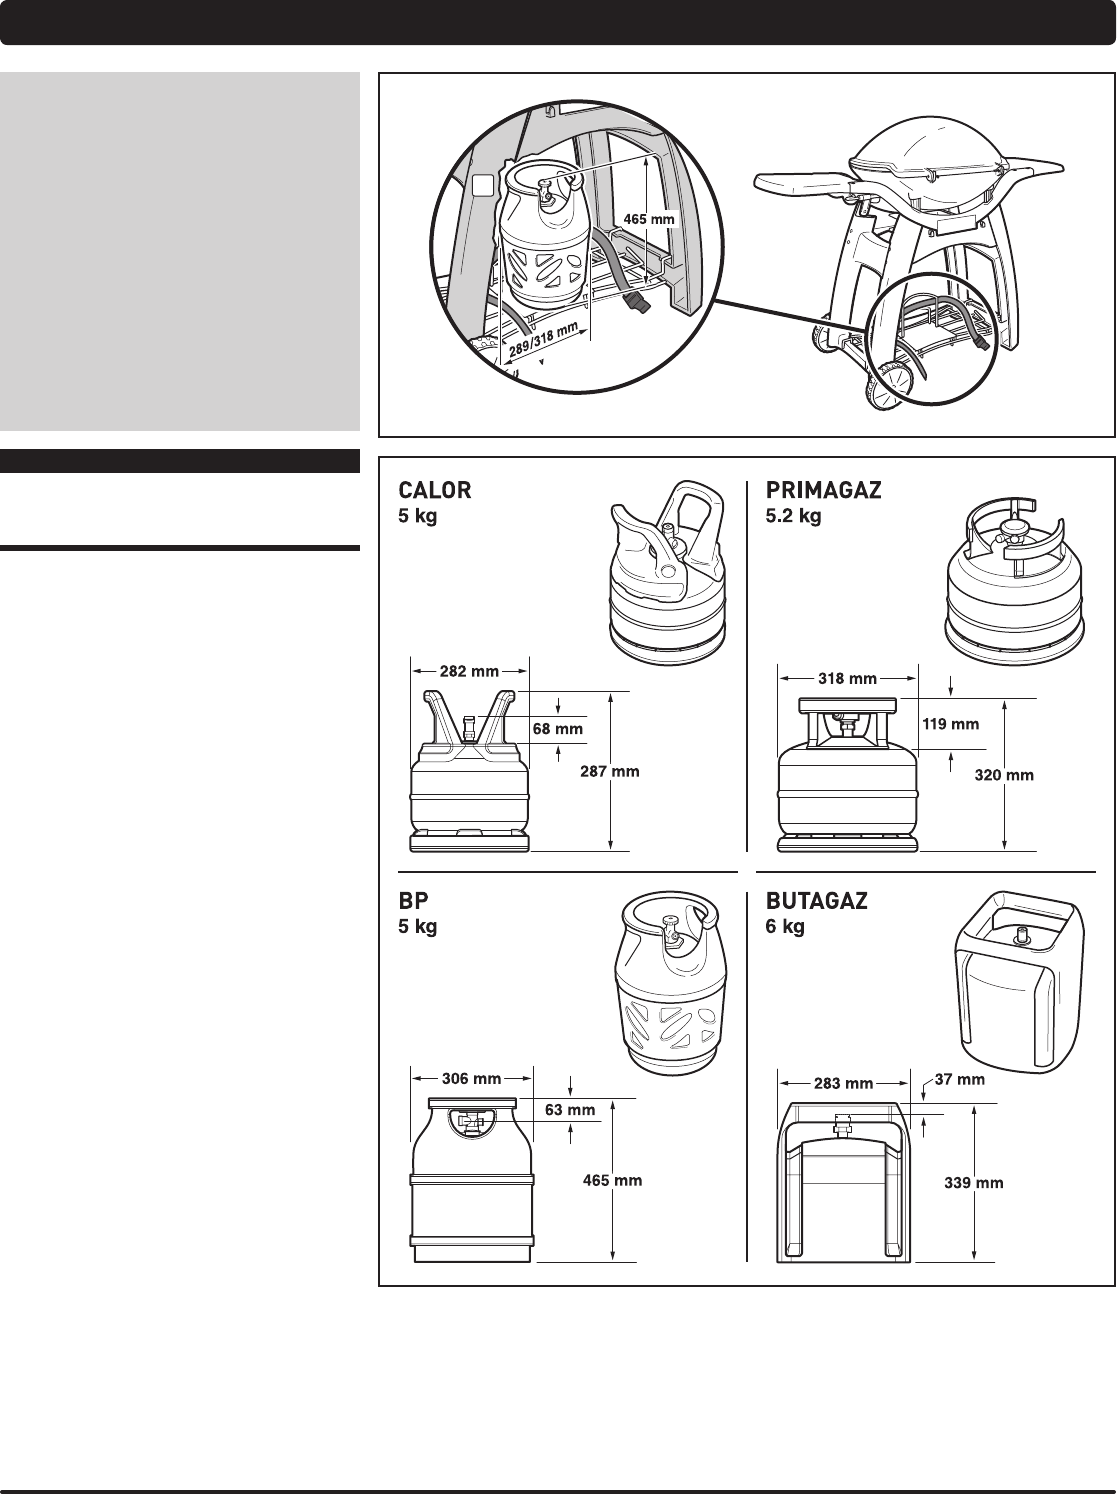
LPG CYLINDER INSTALLATION
1
WHERE DOES THE LPG
CYLINDER GO?
The type and size of cylinder
you purchase will determine
its placement for installation.
There are two installation
options: secured to the
cylinder bracket on the bottom
rack of the cart or placed
on the ground behind the
barbecue.
m DANGER
Do not store an extra (spare) or
disconnected gas supply cylinder under
or near this barbecue.
REQUIREMENTS FOR INSTALLATION
ONCART
The LPG cylinder can be installed on the bottom rack of
cart if the cylinder does not exceed the maximum size
requirements for installation on cart:
Cylinder Capacity:6 kg maximum
Cylinder Height:465 mm maximum
The cylinder must be secured to the cylinder bracket on
the bottom rack of cart using the supplied strap (1).
m WARNING: If the cylinder exceeds the
maximum cylinder size requirements
for installing on the cart, do not
attempt to place or connect the
cylinder on the cart. Place and connect
the cylinder on the ground behind the
barbecue. Failure to do so could cause
damage to the hose resulting in a fire
or explosion, which can cause serious
bodily injury or death, and damage to
property.
Several possible cylinder models approved for installation
on cart are illustrated, with dimensions included.
26 WWW.WEBER.COM
®
LPG CYLINDER INSTALLATION
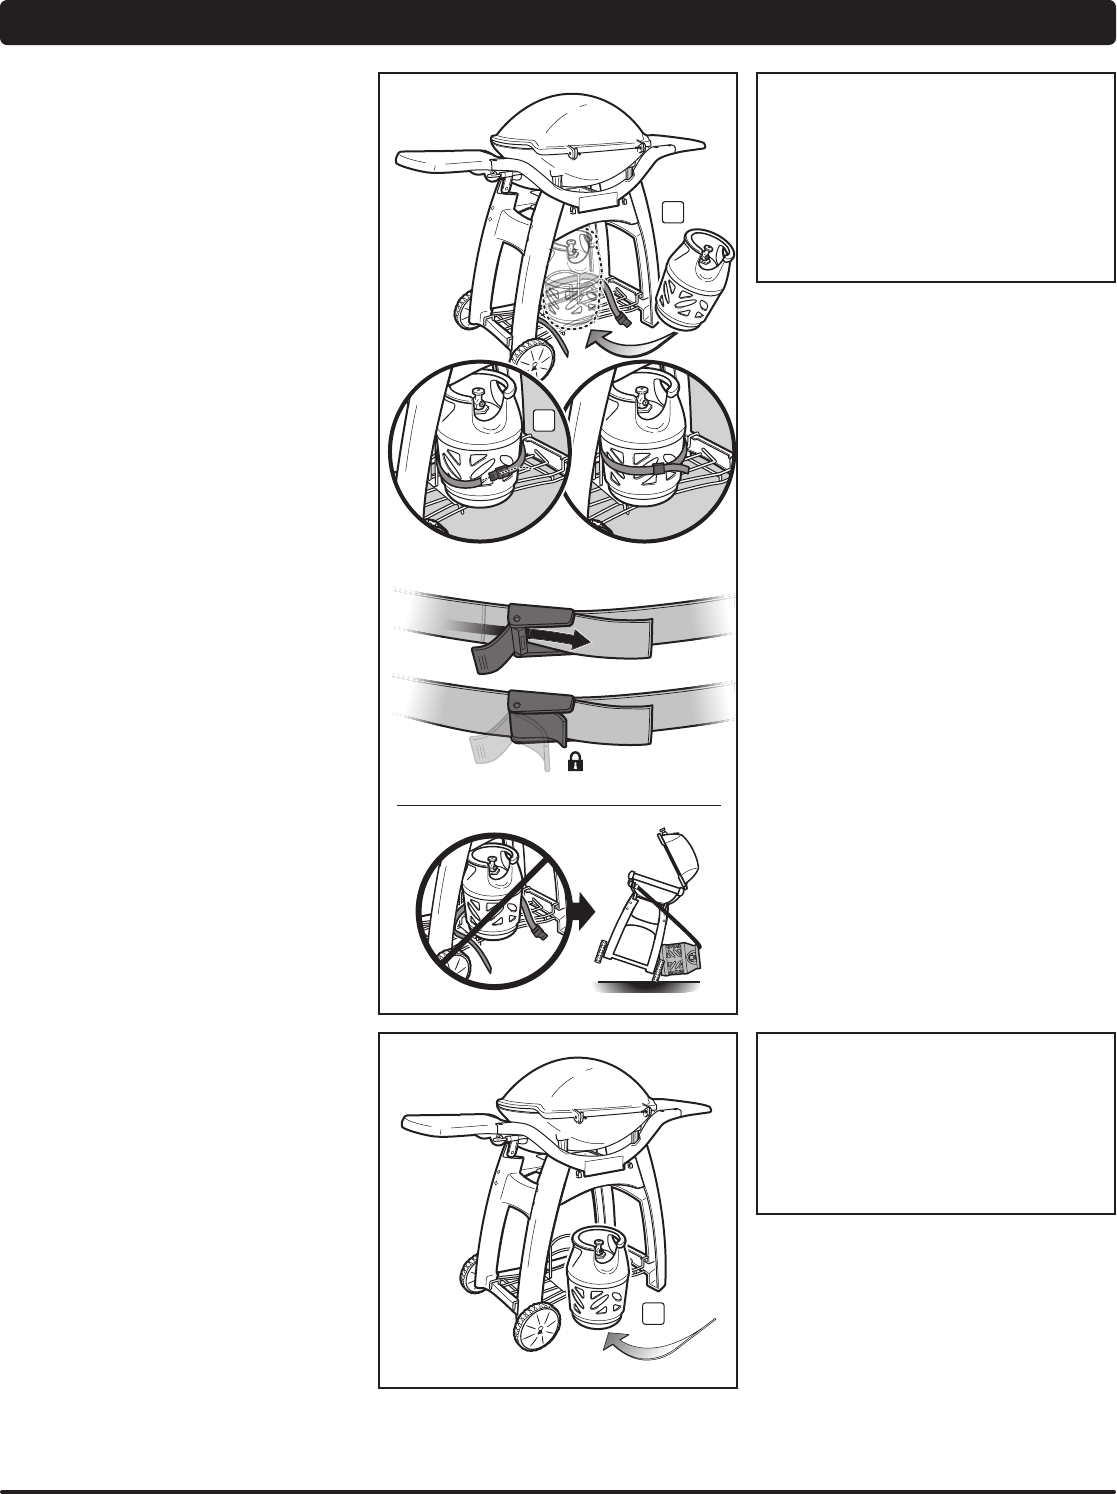
INSTALLATION ON CART
A) Make sure the cylinder rest is installed to prevent
scratching the bottom rack. Lift and place the LPG
cylinder on the cylinder rest (1).
B) Turn the cylinder so the opening of the valve is facing
the right side or back of barbecue.
C) Secure the cylinder to the cylinder bracket using the
cylinder strap (2).
m WARNING: The cylinder must be
secured to the cylinder bracket when
barbecue is in use.
D) Connect the regulator to the cylinder. Refer to
“CONNECTING THE REGULATOR TO THE LPG
CYLINDER.”
Maximum LPG cylinder
capacity when INSTALLED ON
CART under the barbecue is
6kg.
The length of hose must not
exceed 1.5 metres.
REQUIREMENTS FOR INSTALLATION
ONGROUND
If the LPG cylinder you have exceeds the maximum size
requirements for installation on cart, the cylinder must be
placed on the ground behind the barbecue. The maximum
size requirements for cylinders installed on ground are:
Cylinder Capacity:13 kg maximum
Cylinder Height:587 mm maximum
Cylinder Width:306 mm maximum
INSTALLATION ON GROUND
A) Place the LPG cylinder on the ground, behind the
barbecue(3).
B) Turn the cylinder so the opening of the valve is facing
the right side or back of barbecue.
C) Connect the regulator to the cylinder. Refer to
“CONNECTING THE REGULATOR TO THE LPG
CYLINDER.”
Maximum LPG cylinder
capacity when INSTALLED ON
GROUND is 13 kg.
The length of hose must not
exceed 1.5 metres.
3
1
2
WWW.WEBER.COM
®
27
CONNECTING THE REGULATOR
3
8
9
1
2
7
12
10
4
11
6
5
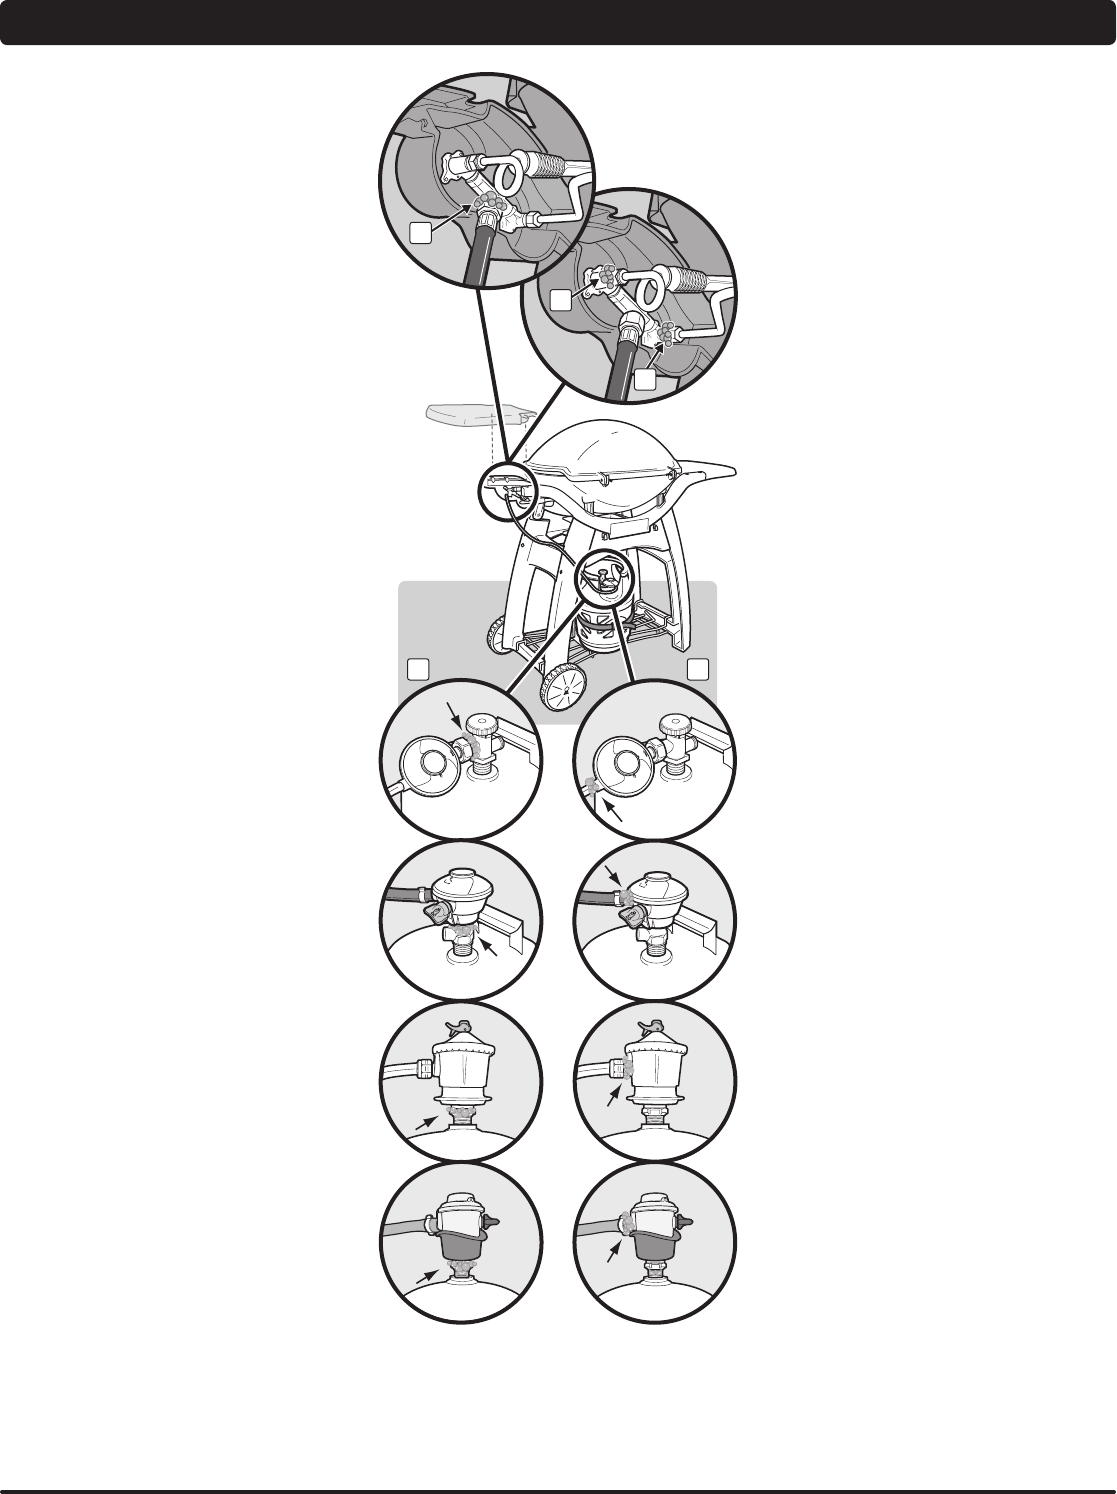
WHAT IS A REGULATOR?
Your Weber
®
gas barbecue
is equipped with a pressure
regulator, which is a device
to control and maintain
uniform gas pressure as gas
is released from the LPG
cylinder.
CONNECTING THE REGULATOR TO THE
LPG CYLINDER
Only use LPG cylinders with a minimum capacity of 3 kg
and a maximum capacity of 13 kg.
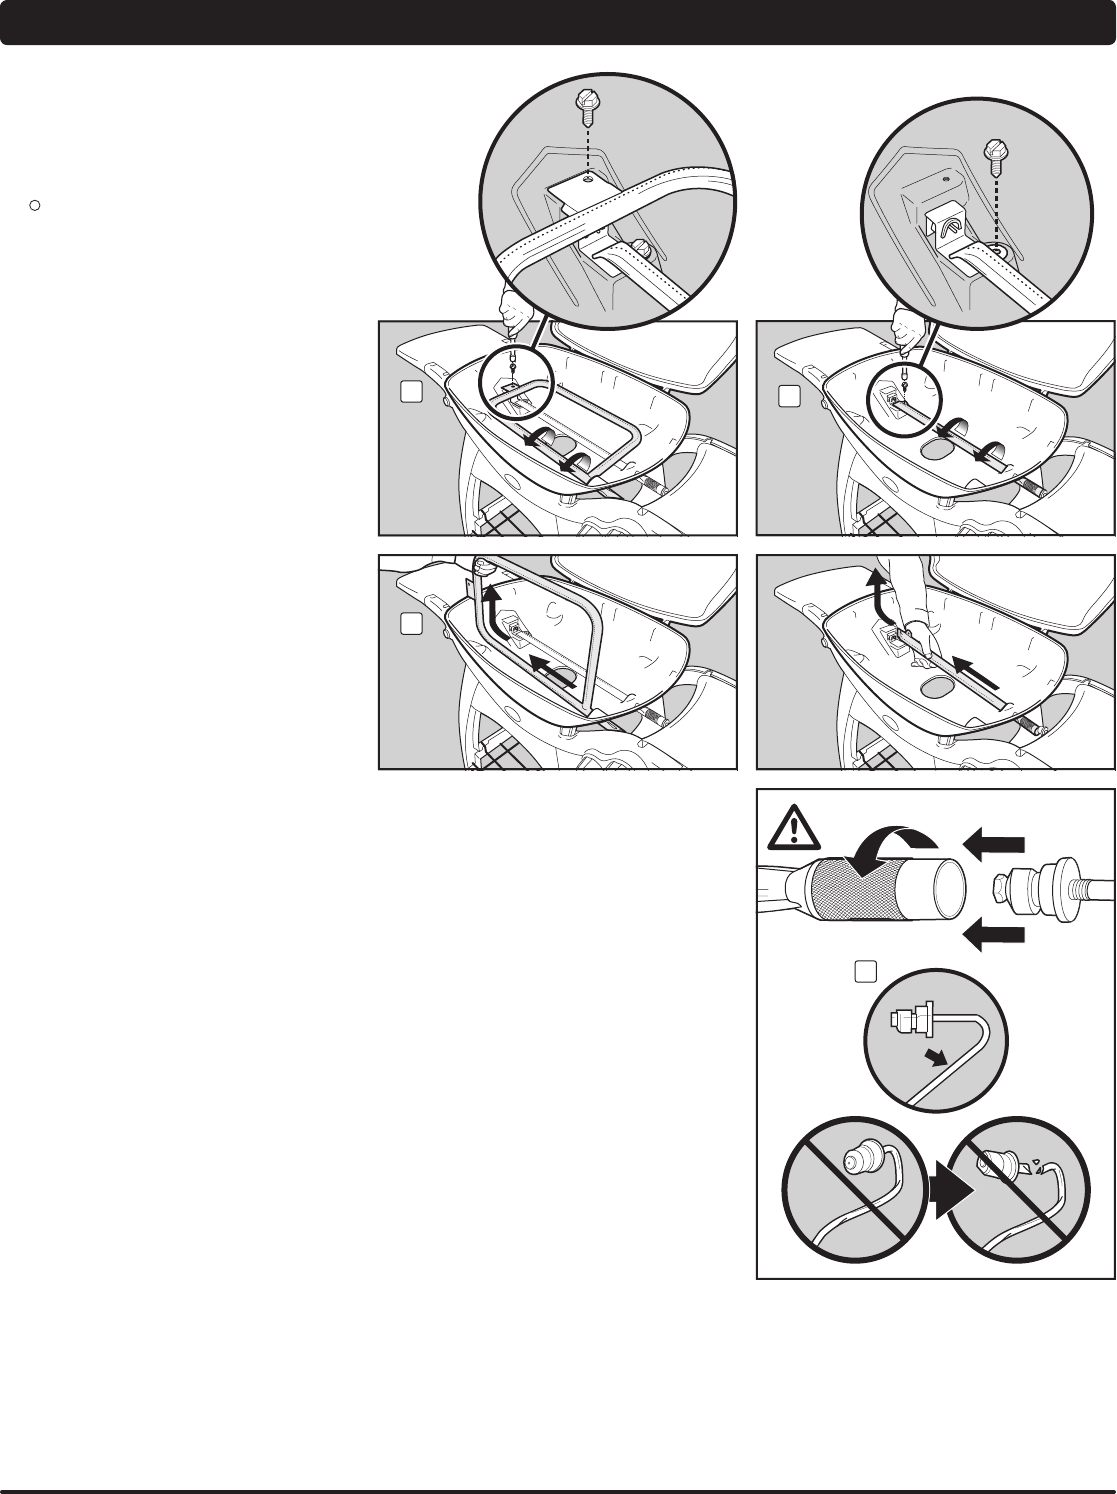
A) Remove screw from right cart leg of cart. Insert hose
retention clip. Reinstall screw.
m WARNING: The hose must be secured
to the cart leg by the hose retention
clip. Failure to do so could cause
damage to hose resulting in a fire or
explosion, which can cause serious
bodily injury or death and damage to
property.
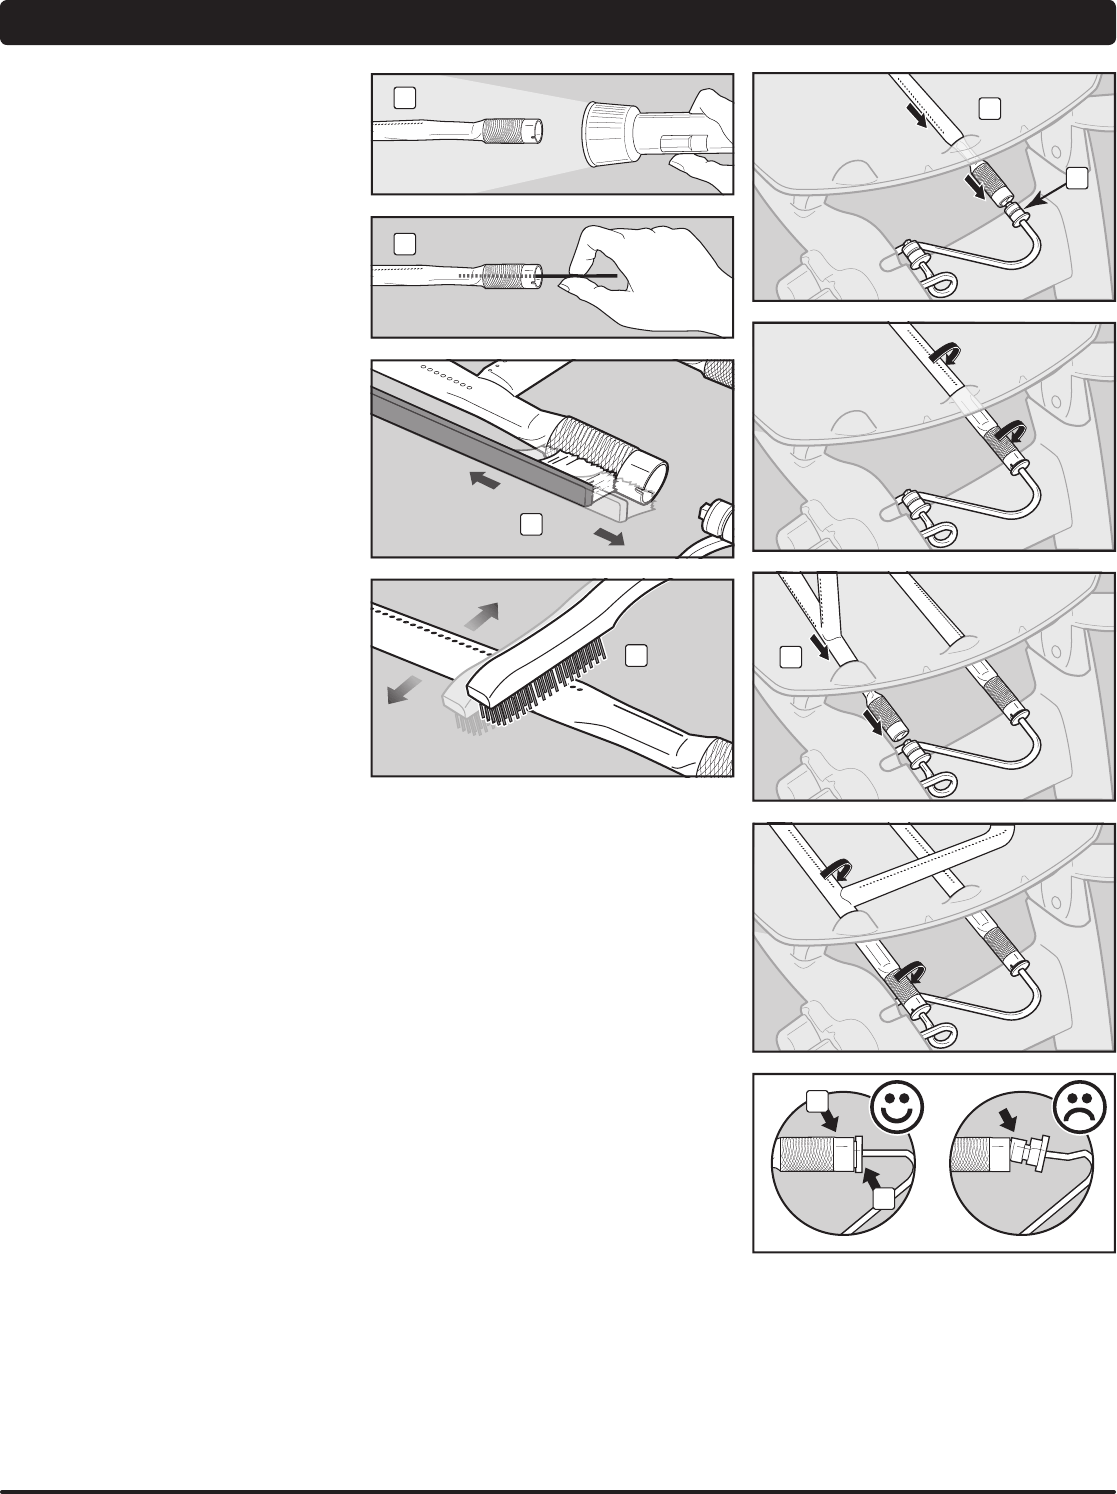
B) Connect regulator to cylinder.
m WARNING: Make sure that the LPG
cylinder or regulator valve is closed.
Some regulators push ON to connect and pull OFF
to disconnect; others have a nut with a left-hand
thread that connects to the cylinder valve. Identify
your regulator type and follow one of the connection
instructions specific to that regulator.
Connect by Turning Clockwise
Screw regulator onto cylinder by turning fitting
clockwise (1). Position the regulator so that the vent
hole (2) faces down.
Connect by Turning Anti-Clockwise
Screw regulator onto cylinder by turning fitting anti-
clockwise (3) (4).
Connect by Turning Lever/Snapping into Position
Turn regulator lever (5) clockwise to the off position.
Push regulator down on cylinder valve until regulator
snaps into position (6).
Connect by Sliding Collar
Make sure regulator lever is in the off position (7)(10).
Slide the collar of the regulator up (8)(11). Push the
regulator down onto the cylinder valve and maintain
pressure. Slide collar down to close (9)(12). If
regulator does not lock, repeat procedure.
Note: The regulator illustrations shown in this manual
may not be similar to the regulator you are using for your
barbecue, due to different country or regional regulations.
28 WWW.WEBER.COM
®
PREPARING TO USE YOUR BARBECUE
WHAT IS A LEAK CHECK?
The fuel system in your
barbecue features
connections and fittings. A
leak check is a reliable way
to make sure that no gas
is escaping from any of the
connections or fittings.
Although all factory-made
connections have been
thoroughly checked for
gas leaks, it’s important to
perform a leak check before
using your barbecue for the
first time, as well as anytime
you disconnect and reconnect
a fitting and each time you
perform routine maintenance.
m DANGER
Do not use an open flame to check for
gas leaks. Be sure there are no sparks or
open flames in the area while you check
for leaks. Sparks or open flames will
result in a fire or explosion, which can
cause serious bodily injury or death and
damage to property.
m WARNING: The gas connections
of your gas barbecue have been
factory-tested. We do, however,
recommend that you leak-check all gas
connections before operating your gas
barbecue.
m WARNING: Perform these leak checks
even if your barbecue was dealer- or
store-assembled.
m WARNING: You should check for gas
leaks every time you disconnect and
reconnect a gas fitting.
NOTE: All factory-made connections have been
thoroughly checked for gas leaks and the burners have
been flame-tested. As a safety precaution, however,
you should check all fittings for leaks before using your
Weber® gas barbecue. Shipping and handling may
loosen or damage a gas fitting.
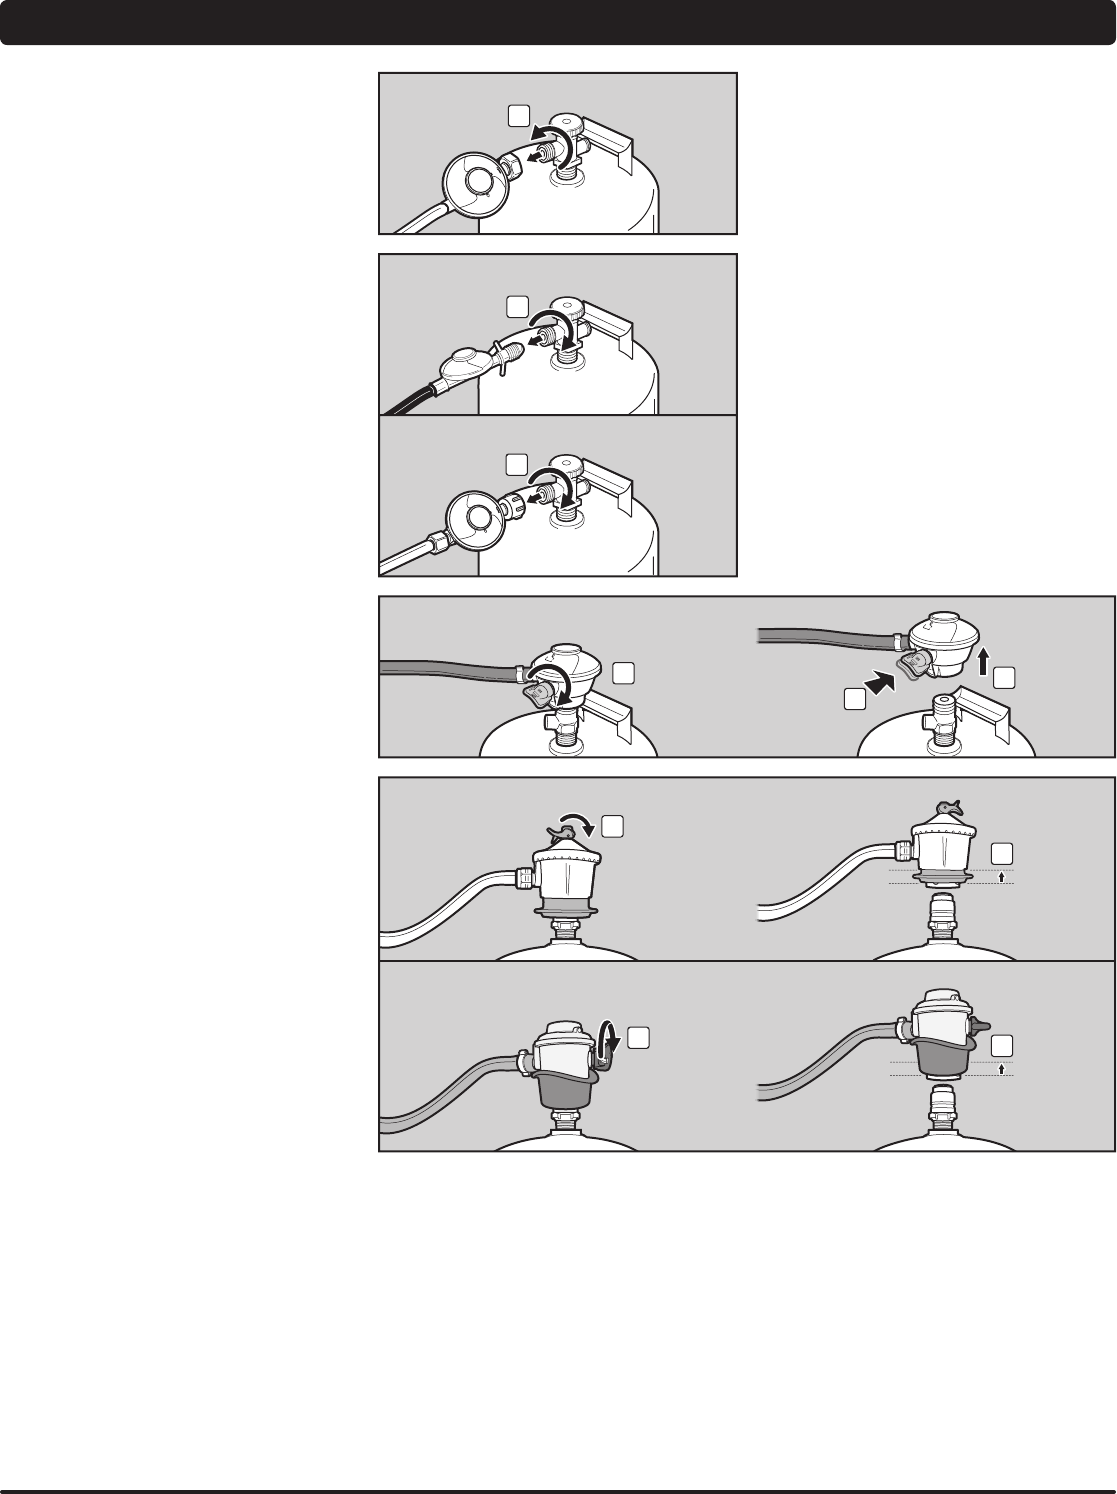
CHECKING FOR GAS LEAKS
You will need: A spray bottle or brush or rag and a soap
and water solution. (You can make your own soap and
water solution by mixing 20% liquid soap with 80% water;
or, you can purchase leak check solution in the plumbing
section of any hardware store.)
A) Make sure ALL burner control knobs are turned off.
Check by pushing burner control knobs in and turning
them clockwise until they stop.
B) Turn gas supply on at source.
Identify your regulator type. Follow the instructions for
that regulator.
Turn Valve
Turn cylinder valve anti-clockwise (1) (2) (3).
Move Lever
Move regulator lever to the on position (4) (5) (6).
m WARNING: Do not ignite burners when
leak-checking.
4
1
2
3
5
6
WWW.WEBER.COM
®
29
PREPARING TO USE YOUR BARBECUE
C) To check for leaks, wet fittings with the soap and water
solution, using a spray bottle, brush or rag. If bubbles
form, or if a bubble grows, there is a leak. Apply the
soap and water solution to the following connections:
a) Manifold-to-regulator hose connection (7).
b) Valve-to-outside burner tube gas line connection
(8).
c) Valve-to-inside burner tube gas line connection
(9).
d) Regulator-to-cylinder connection (10).
e) Regulator hose-to-regulator connection (11).
m WARNING: If there is a leak at
connections (7, 8, 9, 10 or 11), turn
off the gas. DO NOT OPERATE THE
BARBECUE. Contact the Customer
Service Representative in your area
using the contact information on our
web site. Log onto www.weber.com
®
.
D) When leak checking is complete, turn gas supply off at
the source and rinse connections with water.
NOTE: Since some leak test solutions, including soap and
water, may be slightly corrosive, all connections should be
rinsed with water after checking for leaks.
Now you are ready to use your barbecue.
8
9
7
1011
30 WWW.WEBER.COM
®
DISCONNECTING THE REGULATOR
8
7
10
9
1
2
3
4
5
6
DISCONNECTING THE REGULATOR
FROM THE LPG CYLINDER
A) Remove the LPG cylinder by shutting off the gas
supply and disconnecting the hose and regulator
assembly from the cylinder.
m WARNING: Make sure that the cylinder
or regulator valve is closed.
Identify your regulator type. Follow the disconnection
instructions for that regulator.
Disconnect by Turning Anti-Clockwise
Unscrew regulator from cylinder by turning fitting anti-
clockwise (1).
Disconnect by Turning Clockwise
Unscrew regulator from cylinder by turning fitting
clockwise (2) (3).
Disconnect by Turning Lever
Turn regulator lever clockwise (4) to the off position.
Push in on regulator lever (5) until it releases from
cylinder (6).
Disconnect by Sliding Collar
Make sure regulator lever is in the off position
(7)(9). Slide the collar of the regulator up (8)(10) to
disconnect from the cylinder.
B) Exchange empty cylinder for a full cylinder.
REFILLING THE LPG CYLINDER
We recommend that you refill the LPG cylinder before it
is completely empty. To refill, take LPG cylinder to a “Gas
Propane” dealer.
RECONNECTING THE LPG CYLINDER
Refer to “CONNECTING THE REGULATOR TO THE LPG
CYLINDER.”
WWW.WEBER.COM
®
31
SAFETY CHECKS BEFORE USING YOUR BARBECUE
SAFETY FIRST
It’s a good idea to get in
the habit of performing a
few safety checks before
barbecuing.
REMOVABLE CATCH PAN AND
DISPOSABLE DRIP PAN
Your barbecue was built with a grease collection
system, which funnels grease away from food and into a
removable catch pan. For your convenience, you can also
line the removable catch pan with a Weber
®
disposable
drip pan, which will help keep the removable catch pan
cleaner longer.
Cleaning the removable catch pan is just as important as
cleaning the cookbox. Check the removable catch pan
for grease build-up each time you use your barbecue.
Remove excess grease with a plastic scraper (1). Wash
the removable catch pan with warm, soapy water and
rinse with water.
m WARNING: Check the removable catch
pan or disposable drip pan for grease
build-up before each use. Remove
excess grease to avoid a grease fire.
A grease fire can cause serious bodily
injury or damage to property.
m CAUTION: Do not line the cookbox,
removable catch pan or disposable
drip pan with aluminium foil.
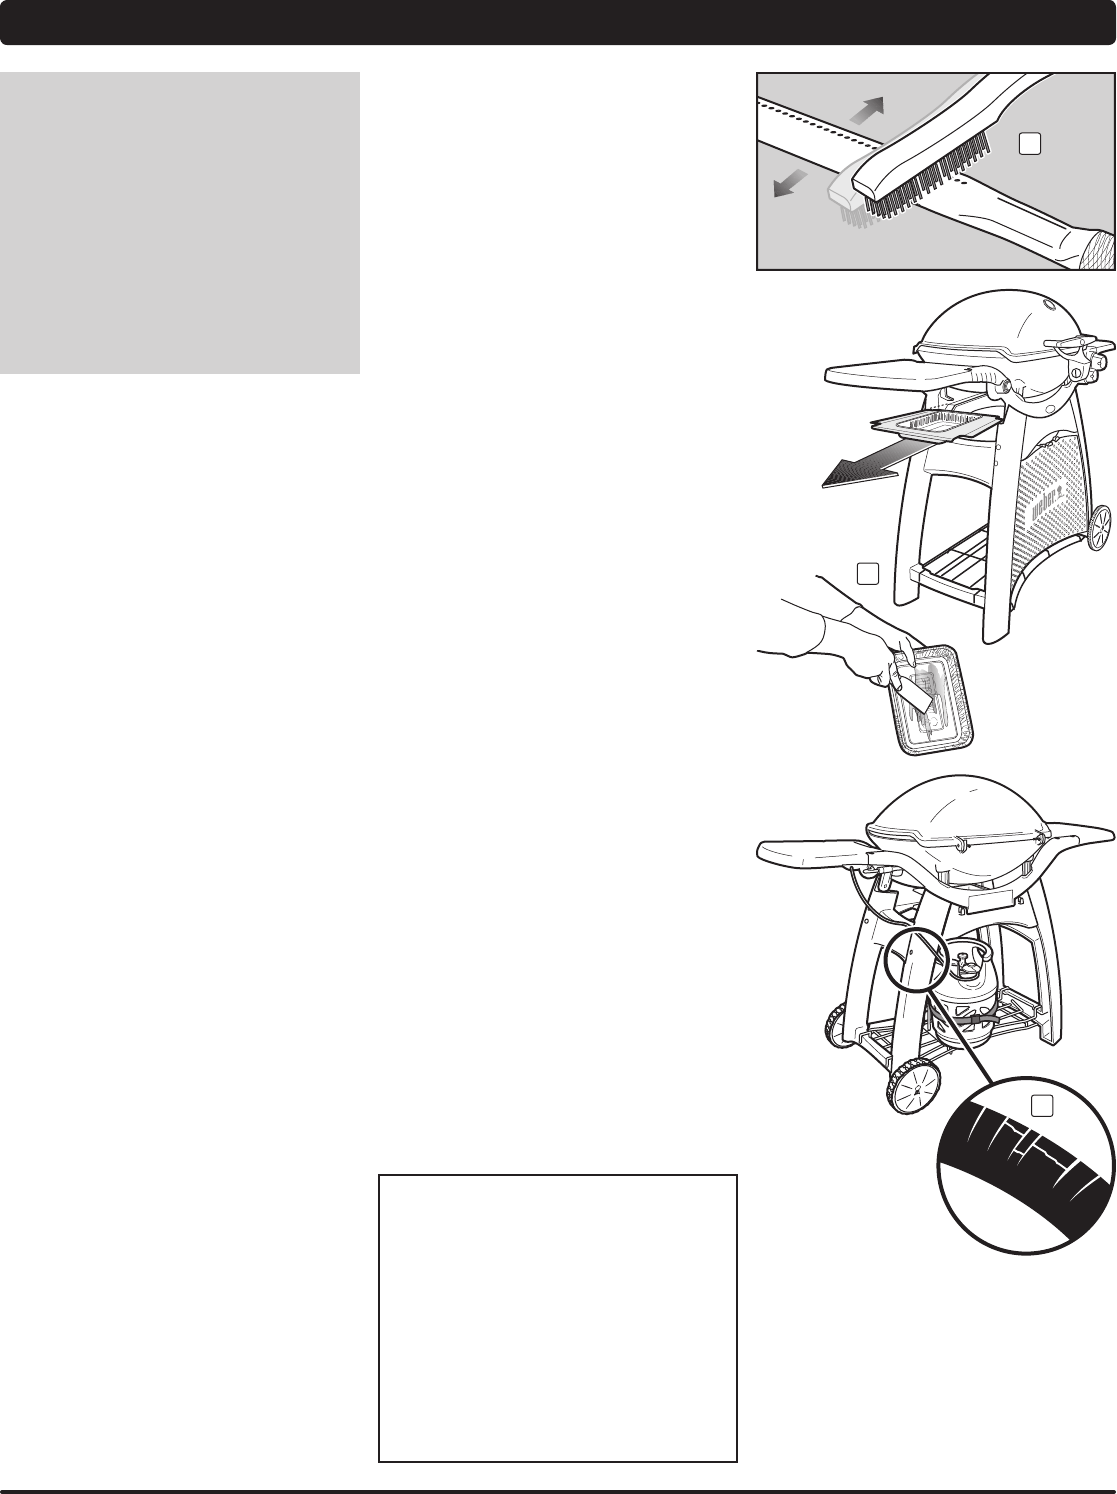
HOSE INSPECTION
The hose should be inspected routinely for any signs of
cracking (2).
m WARNING: Check hose before each
use of barbecue for nicks, cracking,
abrasions or cuts. If the hose is found
to be damaged in any way, do not
use the barbecue. Replace using
only Weber
®
authorised replacement
hose. Contact the Customer Service
Representative in your area using the
contact information on our web site.
Log onto www.weber.com
®
.
Safety must be considered when you are
deciding where to place and operate your
barbecue. Be sure to read the following
warnings before installing or using your
barbecue.
WARNINGS:
m This appliance is intended for outdoor
use only and should never be used
in garages and roofed or enclosed
porches or verandas.
m Your Weber
®
gas barbecue must
never be used under an unprotected
combustible roof or overhang.
m Your Weber
®
gas barbecue is not
intended to be installed in or on
caravans and/or boats.
m Flammable materials should not be
present within approximately 60 cm of
the barbecue. This includes the top,
bottom, back or sides of the barbecue.
m Keep the cooking area clear of
flammable vapours and liquids such as
petrol, alcohol, etc., and combustible
materials.
m This appliance gets very hot. Take
special care when children or elderly
people are present.
m Do not move the appliance when it is
alight.
m Use this barbecue only on a flat and
level surface.
1
2
32 WWW.WEBER.COM
®
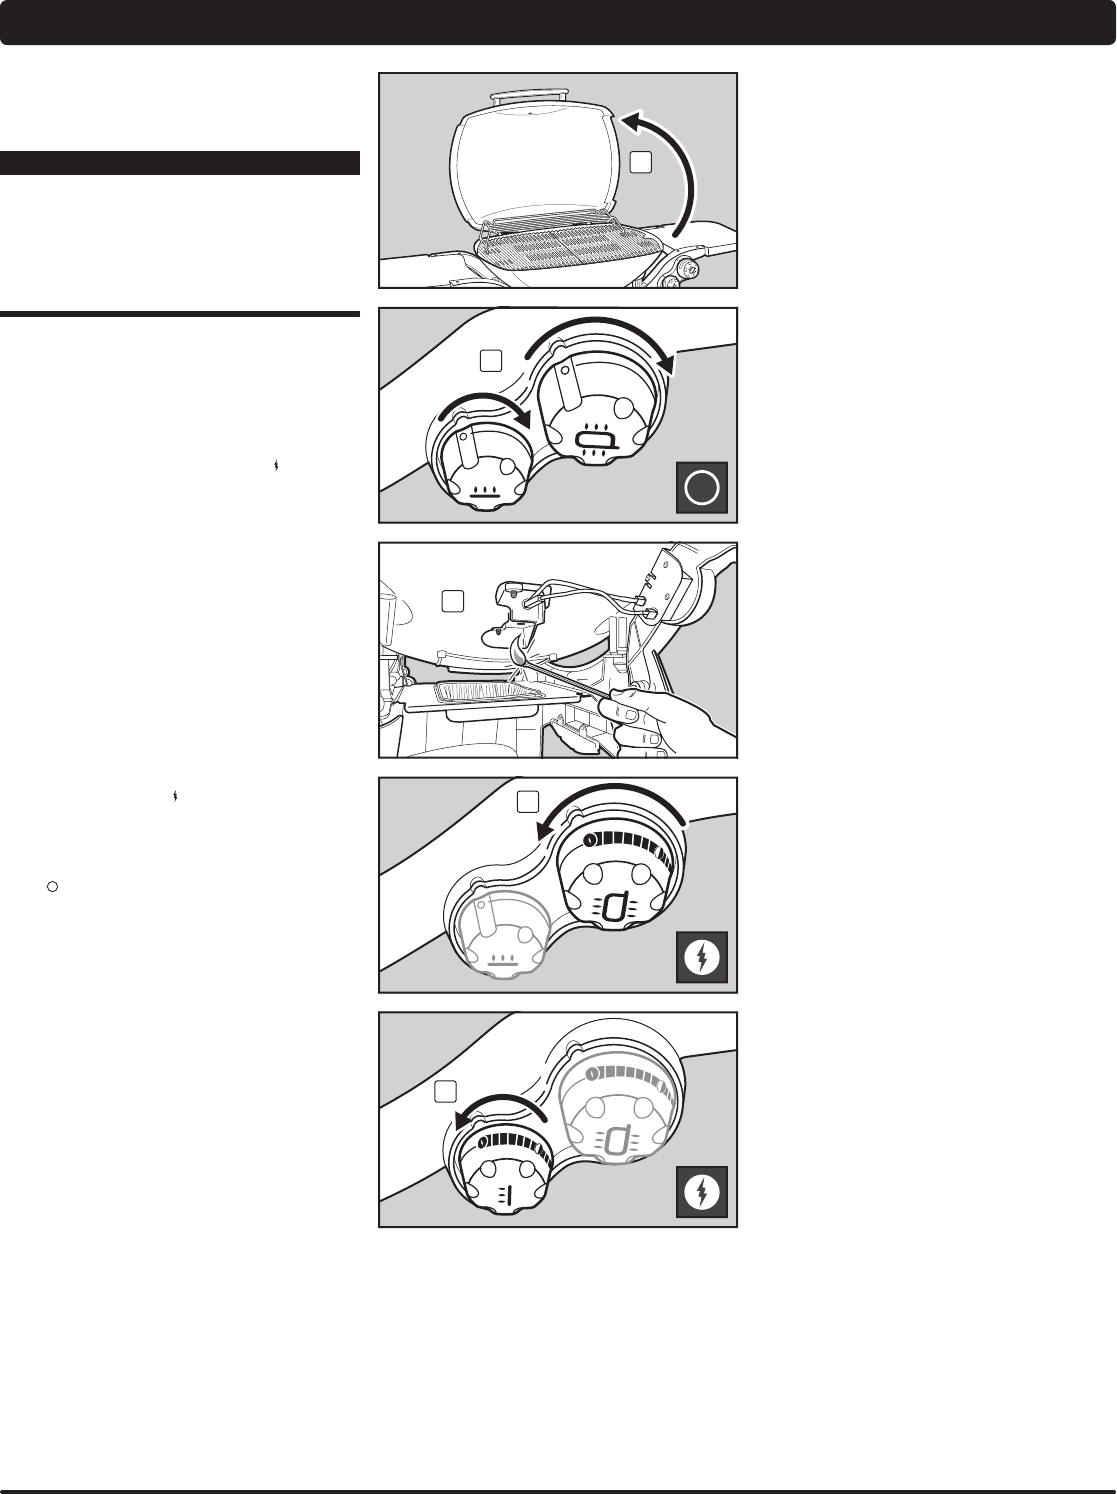
BURNER IGNITION & USAGE
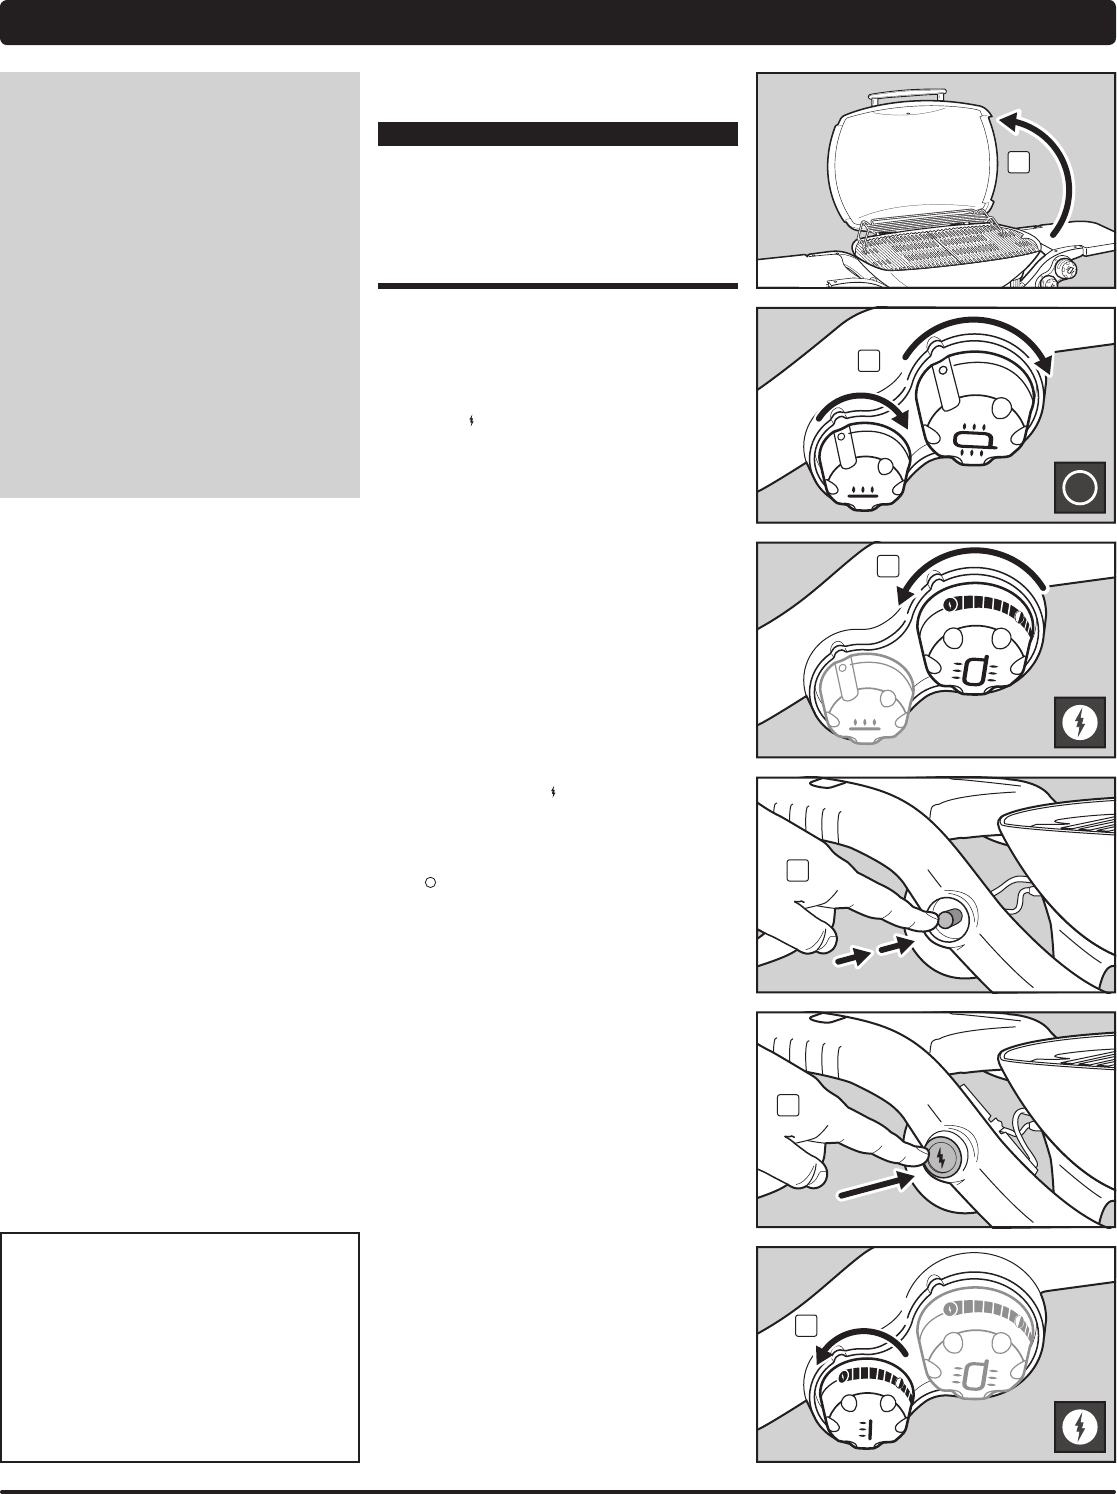
BURNER IGNITION
A) Open the barbecue lid (1).
m DANGER
Failure to open the lid before igniting
the barbecue’s burners, or not waiting
five minutes to allow the gas to clear if
the barbecue does not light, may result
in an explosive flare-up which can cause
serious bodily injury or death.
B) Make sure ALL burner control knobs are turned
off(2). Check by pushing burner control knobs in and
turning them clockwise until they stop.
C) Turn on the cylinder valve using one of the appropriate
options based on your cylinder and regulator type.
D) Light the outside burner by pushing the large burner
control knob in and turning it counterclockwise to
start/high () position (3).
E1) Push the red igniter button several times, so it clicks
each time (4) (Q
®
3000).
OR
E2) Push and hold in the electronic igniter button (5)
(Q
®
3200). You will hear the igniter clicking.
F) Check that the burner is lit by looking through the
cooking grates. You should see a flame.
m WARNING: While igniting the barbecue
or cooking, never lean over open
barbecue.
m WARNING: If the burner fails to ignite
within five seconds, stop, turn the
burner control knob to off and wait
five minutes to allow the gas to clear
before you try again or light with a
match.
G) After the outside burner is lit, you can turn on the
inside burner. Push in the small burner control knob
and turn it to start/high () position (6). The inside
burner will then be ignited by the outside burner.
TO EXTINGUISH BURNER
Push each burner control knob in and turn it clockwise to
the off () position. Turn gas supply off at the source.
1
5
2
3
6
4
METHODS OF BURNER
IGNITION
There are two ways to ignite
the burner. The first is by
using the ignition system
built into your barbecue. The
second is with a match.
Next are the steps for
igniting your barbecue using
the ignition system. On the
following page are steps for
igniting your barbecue with a
match.
Some batteries have a plastic
protective wrap around them.
This plastic must be removed
before you attempt to ignite
your barbecue. Do not
confuse this plastic with the
battery label.
WWW.WEBER.COM
®
33
BURNER IGNITION & USAGE
BURNER IGNITION
Lighting with a Match
A) Open the barbecue lid (1).
m DANGER
Failure to open the lid before igniting
the barbecue’s burners, or not waiting
five minutes to allow the gas to clear if
the barbecue does not light, may result
in an explosive flare-up which can cause
serious bodily injury or death.
B) Make sure ALL burner control knobs are turned
off(2). Check by pushing burner control knobs in and
turning them clockwise until they stop.
C) Turn on the cylinder valve using one of the appropriate
options based on your cylinder and regulator type.
D) Strike a match and put the flame under the matchlight
hole (3). While holding lit match, light the outside
burner by pushing the large burner control knob in and
turning it counterclockwise to start/high () position (4).
E) Check that the burner is lit by looking through the
cooking grates. You should see a flame.
m WARNING: Do not lean over the open
barbecue while igniting. Keep your
face and body at least 30 cm (12 in)
away from the matchlight hole when
lighting the barbecue.
m WARNING: If the burner fails to ignite
within five seconds, stop, turn the
burner control knob to off and wait
five minutes to allow the gas to clear
before you try again or light with a
match.
F) After the outside burner is lit, you can turn on the
inside burner. Push in the small burner control knob
and turn it to start/high () position (5). The inside
burner will then be ignited by the outside burner.
TO EXTINGUISH BURNER
Push each burner control knob in and turn it clockwise to
the off () position. Turn gas supply off at the source.
1
2
5
4
3
34 WWW.WEBER.COM
®
BARBECUING TIPS & HELPFUL HINTS
PREHEATING
Preheating the barbecue before barbecuing is important.
To preheat: Light your barbecue according to the
instructions in this Owner’s Guide; then turn burner(s) to
start/high () position, close the lid, and preheat barbecue.
This will take 10 to 15 minutes depending on conditions
such as air temperature and wind. After preheating, you
can adjust the burner(s) as desired.
m WARNING: Should the burner(s) go out
while barbecue is in operation, turn
burner control knob(s) to off position.
Open the lid and wait five minutes
before attempting to relight barbecue,
using the igniting instructions.
COVERED COOKING
All barbecuing is done with the lid down to provide
uniform, evenly circulated heat. With the lid closed,
the gas barbecue cooks much like a convection oven.
The thermometer in the lid, a feature on some of our
barbecues, indicates the cooking temperature inside the
barbecue. All preheating and barbecuing is done with the
lid down. No peeking — heat is lost every time you lift the
lid.
GREASE COLLECTION SYSTEM
Unique cooking grate design features angled, cast-iron
rails that deflect drippings away from the burner tube(s),
preventing flare-ups that can char food. The remaining
drippings flow into a removable catch pan that slides out
for easy cleaning.
For more barbecuing tips and recipes, visit
www.weber.com
®
.
TIPS & HINTS
• Always preheat the barbecue
before cooking. Set burner(s)
on high heat and close lid;
preheat for 10 to 15 minutes.
• The temperature of your gas
barbecue may run hotter than
normal for the first few uses.
• Recipe barbecuing times are
based on outside temperatures
of 70°F (21°C) and little or no
wind. Allow for more cooking
time on cold or windy days, or
at higher altitudes. Allow for
less cooking time in extremely
hot weather.
• Barbecuing conditions may
require adjustment of the
burner control knobs to
attain the correct cooking
temperatures.
• Sear meats and cook with
the lid down for perfectly
barbecued food every time.
• Crowding food onto a cooking
grate means more time will be
required to cook the food.
• Trim excess fat from steaks,
chops, and roasts, leaving
no more than a scant ¼ inch
(6.4mm) of fat. Less fat makes
clean-up easier, and is a virtual
guarantee against unwanted
flare-ups.
• In general, large pieces of meat
will require more cooking time
per pound (kilo) than small
pieces of meat.
• Some foods, such as a
casserole or thin fish fillets,
will require a container for
barbecuing. Disposable foil
pans are very convenient, but
any metal pan with ovenproof
handles can also be used.
• Foods in containers, such as
baked beans, will require more
time if barbecued in a deep
casserole than in a shallow
baking pan.
• Use tongs rather than a fork for
turning and handling meats to
avoid losing natural juices. Use
two spatulas for handling large
whole fish.
• Always be sure the cookbox and
removable catch pan are clean
and free from debris.
• Do not line the cookbox with
foil. This could prevent the
grease from flowing into the
removable catch pan.
• If an unwanted flare-up should
occur, turn burner(s) off and
move food to another area of
the cooking grate. Any flames
will quickly subside. After
flames subside, relight the
barbecue. NEVER USE WATER
TO EXTINGUISH FLAMES ON A
GAS barbecue.
• Using a timer will help to alert
you when “well done” is about
to become “overdone.”
• A light coating of oil will help
brown your food evenly and
keep it from sticking to the
cooking grate. Always brush
or spray oil onto your food, not
directly onto the cooking grate.
• When using a marinade, sauce
or glaze with a high sugar
content or other ingredients
that burn easily, only brush it
onto the food during the last 5
to 10 minutes of barbecuing.
WWW.WEBER.COM
®
35
BARBECUING TIPS & HELPFUL HINTS
RED MEATThickness / WeightApproximate Total Barbecuing Time
Steak: New York strip, rib-eye, and filet mignon
(tenderloin)
¾ inch thick3 to 5 minutes direct high heat
1 inch thick6 to 8 minutes direct high heat
Steak: Porterhouse and T-bone¾ inch thick4 to 6 minutes direct high heat
1 inch thick8 to 10 minutes direct high heat
Flank Steak1½ to 2 pounds, ¾ inch thick12 to 14 minutes direct high heat
Ground Beef Patty¾ inch thick8 to 10 minutes direct medium heat
Tenderloin3 to 4 pounds25 to 30 minutes sear 10 minutes direct high heat,
and barbecue 15 to 20minutes indirect low heat
PORKThickness / WeightApproximate Total Barbecuing Time
Bratwurst: fresh5 ounce link10 to 15 minutes direct low heat
Chop: boneless or bone in¾ inch thick10 to 15 minutes sear 6 minutes direct high heat,
and barbecue 4 to 8minutes indirect low heat
1¼ to 1½ inches thick14 to 18 minutes sear 8 minutes direct high heat,
and barbecue 6 to 10minutes indirect low heat
Ribs: baby back3 to 4 pounds1 to 1½ hours indirect low heat (with rib rack**)
Ribs: spareribs3 to 4 pounds1 to 1½ hours indirect low heat, 30 minutes bone side down,
then turn every 10 to 15 minutes
Tenderloin1 pound20 to 25 minutes sear 10 minutes direct high heat (turn 3 times),
and barbecue 10 to 15 minutes indirect low heat
POULTRYThickness / WeightApproximate Total Barbecuing Time
Chicken Breast: boneless, skinless6 to 8 ounces12 to 16 minutes direct medium heat
Chicken Pieces: bone in, assorted3 to 6 ounces35 to 45 minutes direct low heat
Chicken: whole4 to 5 pounds1 to 1½ hours indirect medium heat (with roasting rack**)
Cornish Game Hen3 to 4 pounds30 to 35 minutes indirect medium heat (with roasting rack**)
Turkey Breast: bone in5 to 6 pounds1 to 1½ hours indirect low heat
SEAFOODThickness / WeightApproximate Total Barbecuing Time
Fish, Fillet or Steak: salmon, swordfish, and tuna¼ to ½ inch thick6 to 8 minutes direct medium heat
1 to 1¼ inches thick8 to 10 minutes direct medium heat
Fish, Fillet or Steak: halibut and sea bass¼ to ½ inch thick10 to 12 minutes direct medium heat
1 to 1¼ inches thick12 to 14 minutes direct medium heat
Shrimp1½ ounces3 to 5 minutes direct medium heat
VEGETABLESThickness / WeightApproximate Total Barbecuing Time
Asparagus1½ inch diameter3 to 5 minutes direct medium heat
Cornin husk25 to 30 minutes direct medium heat
husked10 to 15 minutes direct medium heat
Mushroomshitake or button8 to 10 minutes direct medium heat
portabello12 to 15 minutes direct medium heat
Onion½ inch slices8 to 12 minutes direct medium heat
Potatowhole45 to 60 minutes indirect low heat
½ inch slices14 to 16 minutes direct medium heat
**Sold separately.
36 WWW.WEBER.COM
®
COOKING METHODS
DIRECT METHOD OR
INDIRECTMETHOD?
The most important thing to know about barbecuing is
which cooking method to use for a specific food, direct or
indirect. The difference is simple. With the direct method,
which is similar to broiling, the food is cooked directly over
the fire. With the indirect method, fire is arranged on either
side of the food. The indirect method is similar to roasting,
but with the added benefits of that grilled texture, flavour,
and appearance you can’t get from cooking with an oven.
Using the right method is the shortest route to great
results—and the best way to ensure safely cooked food.
With each method, you can adjust the burners as desired.
The control settings — HIGH, MEDIUM, LOW, or OFF —
are described in the chart to the right. For example, to
sear steaks, set both burners to HI, then to complete
cooking, set both burners to LOW. For great barbecuing
inspiration, visit www.weber.com/recipes.
COOKING METHOD
AND USES
INSIDE BURNER
CONTROL SETTING
OUTSIDE BURNER
CONTROL SETTING
PREHEAT
HIGHHIGH
DIRECT LOW
Chicken pieces, sausage
LOWLOW
SEARING
Steak and items that require searing
Start by searing thick steaks over
direct high heat...
HIGHHIGH
...finish by cooking over
direct low heat
LOWLOW
INDIRECT
Small whole chicken
OFFMEDIUM
WWW.WEBER.COM
®
37
TROUBLESHOOTING
GENERAL TROUBLESHOOTING
PROBLEMSSOLUTIONS
Burner does not ignite when you push the
igniterbutton.
Be sure that there is gas flow to the burners by attempting to match light your burner. Refer to “BURNER IGNITION—
Lighting with a Match.” If match lighting is successful, the problem lies in the ignition system. Refer to “MAINTAINING
THE PUSH BUTTON IGNITION SYSTEM (Q
®
3000)” or “MAINTAINING THE ELECTRONIC IGNITION SYSTEM
(Q
®
3200).”
Be sure that wires are correctly inserted into terminals on igniter electrode assembly. Check that the wires are
connected to terminals on the push button igniter (Q
®
3000) or the electronic igniter module (Q
®
3200). Refer
to “MAINTAINING THE PUSH BUTTON IGNITION SYSTEM (Q
®
3000)” or “MAINTAINING THE ELECTRONIC
IGNITION SYSTEM (Q
®
3200).”
If a new battery is installed, confirm that battery’s plastic wrapping has been removed. Verify that the battery is in good
condition and has been installed correctly. Refer to “MAINTAINING THE ELECTRONIC IGNITION SYSTEM (Q
®
3200).”
Burners do not ignite.
Burners have a small flickering flame when burner
control knobs are on the high (
) position.
Barbecue temperature only reaches 250° to 300° F
(121° to 149° C) when burner control knobs are on
the high (
) position.
Some countries have regulators with an excess gas flow safety device. The excess gas flow safety device, which
is part of the barbecue-to-cylinder connection, may have been activated. To reset the excess gas flow safety device,
close the cylinder valve and turn all burner control knobs to the off (
) position. Open the barbecue lid. Wait at least
five minutes for the gas to clear before attempting to light the barbecue. SLOWLY turn the cylinder valve until it is
completely open. Waitseveral seconds; then ignite your barbecue. Refer to “MAIN BURNER IGNITION & USAGE.”
Burner does not ignite, or flame is low when
burner control knob is on high (
) position.
Fuel could be low or empty. Refill cylinder.
Fuel hose could be bent or kinked. Straighten fuel hose.
Burner flame pattern is erratic.
Flame is low when burner control knob is on
high(
) position.
Flames do not run the whole length of the
burnertube.
Clean burner ports that run down the entire length of burner tube. Refer to “ANNUAL MAINTENANCE.”
Burners burn with a yellow or orange flame, in
conjunction with the smell of gas.
Inspect spider/insect screens for possible obstructions. (Blockage of holes.) Clean spider/insect screens.
Refer to “ANNUAL MAINTENANCE.”
Experiencing flare-ups.
m CAUTION: Do not line the cookbox
with aluminium foil.
Barbecue must be preheated with all burners on high for 10 to 15 minutes.
Clean the cooking grates thoroughly to remove grease. Refer to “CLEANING THE INSIDE OF THE BARBECUE.”
The cookbox may be dirty and is not allowing grease to flow into removable catch pan. Clean cookbox. Refer to
“CLEANING THE INSIDE OF THE BARBECUE.”
Inside of lid appears to be “peeling.”
(Resembles paint peeling.)
The inside of the lid is cast aluminium. It is not painted. It cannot “peel.” What you are seeing is baked-on grease that
has turned to carbon and is flaking off. THIS IS NOT A DEFECT. Clean thoroughly. Refer to “CLEANING THE INSIDE
OF THE BARBECUE.”
If problems cannot be corrected by using these methods, please contact the Customer Service Representative in your area using the contact information on our
web site. Log onto www.weber.com
®
.
GRILL OUT
®
HANDLE LIGHT TROUBLESHOOTING
PROBLEMSSOLUTIONS
Grill Out
®
Handle Light does not light.If a new battery is installed, confirm that battery’s plastic wrapping has been removed. Verify that the battery is in good
condition and has been installed correctly. Refer to “MAINTAINING THE GRILL OUT
®
HANDLE LIGHT.”
Light will activate only when lid is open and power button is ON. Lift lid to up position and push power button on.
If problems cannot be corrected by using these methods, please contact the Customer Service Representative in your area using the contact information on our
web site. Log onto www.weber.com
®
.
38 WWW.WEBER.COM
®
ANNUAL MAINTENANCE
m DANGER
Failure to correct any problems described
on this page may result in a fire, which
can cause serious bodily injury or death,
and cause damage to property.
KEEPING YOUR
WEBER
®
GAS BARBECUE
IN TIP-TOP SHAPE
To keep your Weber
®
gas barbecue performing as safely
and efficiently as on day one, we strongly recommend
that you inspect and clean the spider/insect screen(s) and
burner tube(s) at least once a year. Below is important
information about these two areas of the barbecue that
should undergo annual maintenance.
If you observe an incorrect flame pattern or blocked
burner port, proceed to the “BURNER TUBE
CLEANING OR REPLACEMENT” instructions on the
following page.
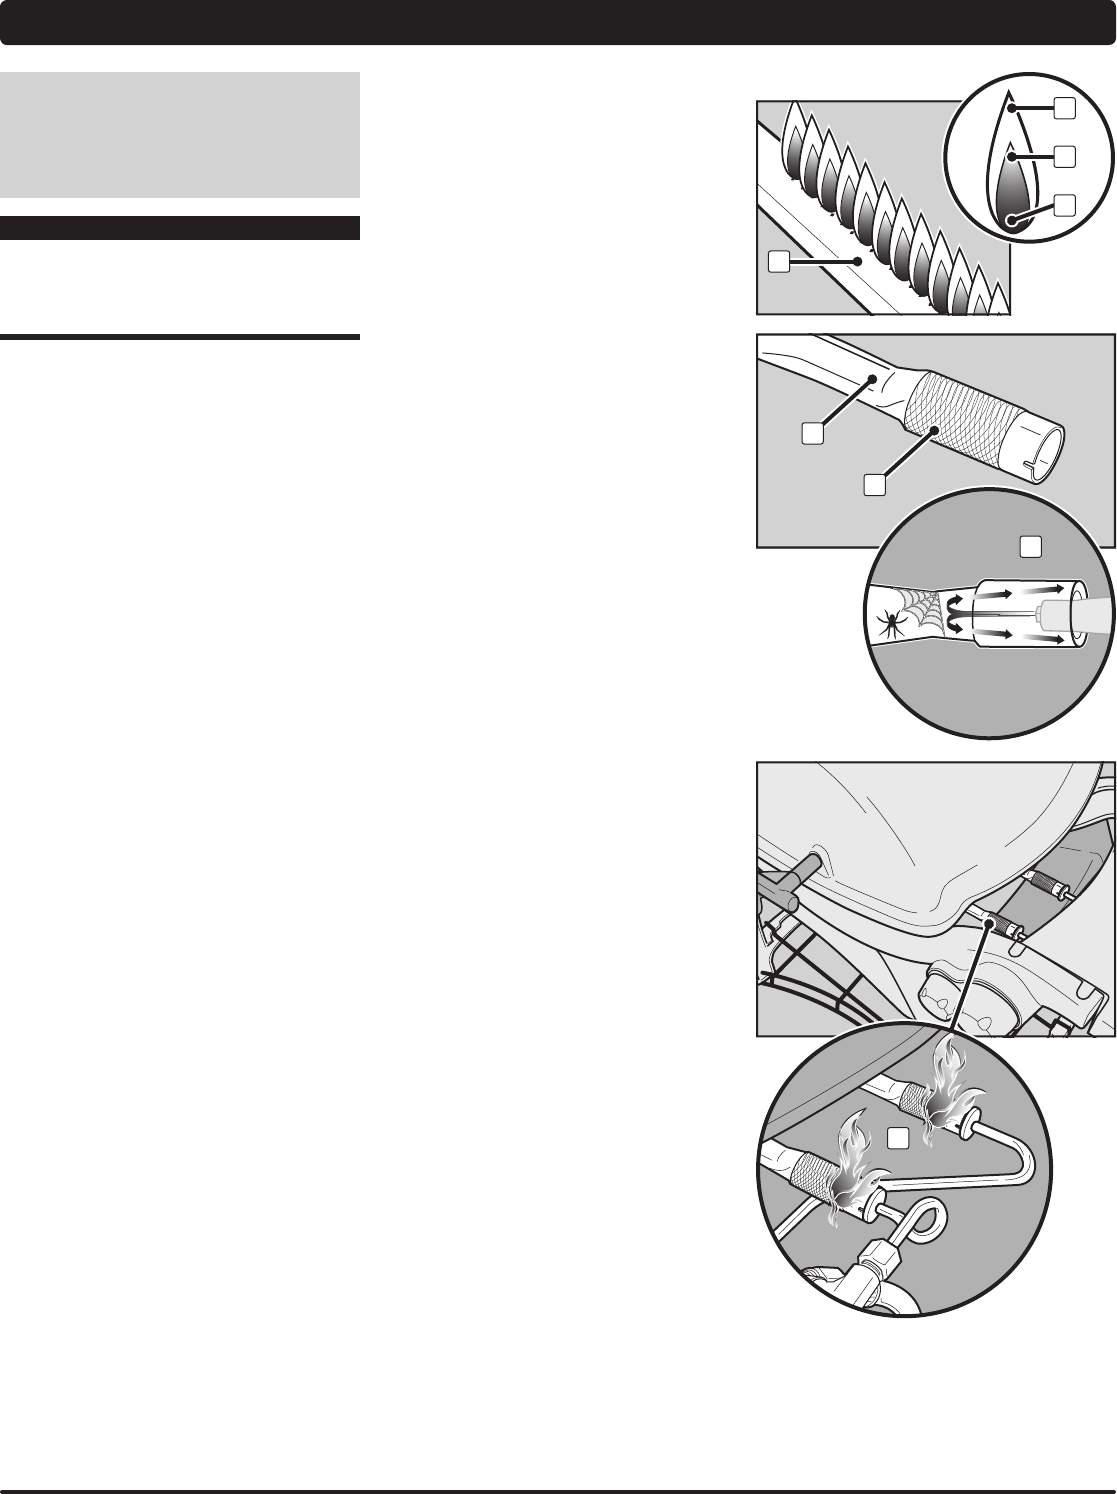
BURNER FLAME PATTERN
The burner tube(s) in your Weber
®
gas barbecue was/
were factory set for the correct air and gas mixture. The
correct flame pattern is shown in illustration and described
below:
• Burner tube(s) (1)
• Tips occasionally flicker yellow (2)
• Light blue (3)
• Dark blue (4)
Check burner flame pattern. If the flames do not match the
above description, it could be an indication that the spider/
insect screen(s) has/have become dirty or blocked.
WEBER
®
SPIDER/INSECT SCREEN(S)
The combustion air opening(s) of the burner tube(s) (5)
is/are fitted with stainless steel screen(s) to help prevent
spiders and other insects from spinning webs and
building nests inside the venturi section (6) of the burner
tube(s). These nests can obstruct the normal gas flow,
and can cause gas to flow back out of the combustion
air opening(s) (7). Symptoms of this kind of obstruction
include the odour of gas in conjunction with burner flames
that appear yellow and lazy. This obstruction could result
in a fire in and around the gas valve(s), causing serious
damage to your barbecue (8).
NOTE: If a spider/insect screen becomes damaged or
cannot be cleaned, please contact the Customer Service
Representative in your area using the contact information
on our web site. Log onto www.weber.com®.
BURNER TUBE PORTS
Over time, from repeated use of the barbecue, the burner
tube ports will become dirty. Blocked and dirty ports can
restrict full gas flow. Following are ways to determine
whether burner tube ports are dirty or blocked.
• Barbecue does not reach desired temperature
• Barbecue heats unevenly
• One or more of the burner(s) do not ignite
6
5
7
8
1
2
3
4
WWW.WEBER.COM
®
39
ANNUAL MAINTENANCE
BURNER TUBE CLEANING OR
REPLACEMENT
Confirm that Barbecue is Off and Cool
A) Turn gas supply off at source and disconnect LPG
cylinder.
B) Check that all burner control knobs are in the off
()position. Check by pushing burner control knobs
in and turning them clockwise until they stop. If they
do not turn, they are already off. If they do turn,
continue turning them clockwise until they stop; then
they are off.
C) Open lid and remove cookbox components.
Remove Burner Tubes
You will need: A 3/8" spanner.
A) Remove the screw that holds the outside burner tube
to the cookbox (1).
B) Rotate the outside burner tube 90°. Slide and lift
burner tube away from valve orifice and remove from
cookbox (2).
C) Repeat this procedure for the inside burner tube (3).
m CAUTION: Care must be taken when
removing or reinstalling burner tubes.
Do not force or bend the gas lines
that connect the control valves to the
burner tubes (4).
4
1
2
3
40 WWW.WEBER.COM
®
Clean Burner Tubes
You will need: A torch, a wire (a straightened-out coat
hanger), a suitable stainless steel bristle brush, and a soft
bristle brush (toothbrush).
A) Look inside each burner tube with a torch(5).
B) Clean any debris or blockage from the inside of the
burner tubes with the wire(6).
C) Check spider/insect screens at the ends of the burner
tubes and clean them using the soft bristle brush(7).
m CAUTION: Do not clean the spider/
insect screens with hard or sharp
tools. Do not dislodge the spider/
insect screens or enlarge the screen
openings.
D) Use the steel bristle brush to clean the outside of the
burner tubes. This is done to make sure all burner
ports (openings) running along the length of the
burner tubes are fully openh.
m CAUTION: Do not enlarge the burner
ports when cleaning.
Reinstall Burner Tubes
You will need: A 3/8" spanner.
A) Carefully slide the inside burner tube back into hole in
right side of cookbox(9), aligning burner tube opening
with valve orifice(10).
B) Reinstall screw that holds the inside burner tube to the
cookbox.
C) Repeat this procedure for the outside burner tube(11).
m CAUTION: The burner tube openings
(12) must be positioned properly over
the valve orifices (13).
m WARNING: You should check for
gas leaks every time you disconnect
and reconnect a gas fitting. Refer to
“CHECKING FOR GAS LEAKS.”
D) Replace cookbox components.
5
6
8
7
11
9
10
12
13
ANNUAL MAINTENANCE
WWW.WEBER.COM
®
41
CLEANING THE OUTSIDE OF THE
BARBECUE
To keep the outside of your barbecue looking its best, use
the following guidelines for safe cleaning.
m WARNING: Turn your Weber
®
gas
barbecue off and wait for it to cool
before cleaning it.
Painted, Enamelled and Plastic Surfaces
Use a warm, soapy water solution to clean outside
surfaces; then rinse with water.
IMPORTANT: Do not use cleaners that contain acid,
mineral spirits, or xylene. Do not use oven cleaner,
abrasive cleansers (kitchen cleansers), cleaners that
contain citrus products, or abrasive cleaning pads on
barbecue or cart surfaces.
Fold-down tables are not to be used as cutting
boards.
CLEANING THE INSIDE OF THE
BARBECUE
To keep your barbecue performing safely and efficiently, it
is important to remove any debris and excess grease that
may have accumulated on the inside of the barbecue. Use
m WARNING: Do not attempt to make any repair to gas-carrying or gas-burning components without
contacting Weber-Stephen Products LLC Customer Service Department. Your actions, if you fail to follow
this product warning, may cause a fire or an explosion resulting in serious personal injury or death and
damage to property.
This symbol indicates that the product cannot be disposed of with household refuse.
For instructions regarding proper disposal of this product in Europe, please visit
www.weber.com
®
, and contact the importer listed for your country. If you do not have internet
access, contact your dealer for the importer’s name, address and telephone number.
When you decide to dispose of or discard your grill, all electrical components (e.g., rotisserie motor, batteries, ignition module, handle lights) must be
removed and disposed of properly according to WEEE. They should be disposed of separately from the grill.
Gebruikershandleiding.com neemt misbruik van zijn services uitermate serieus. U kunt hieronder aangeven waarom deze vraag ongepast is. Wij controleren de vraag en zonodig wordt deze verwijderd.
Product:
Spelregels forum
Om tot zinvolle vragen te komen hanteren wij de volgende spelregels:
lees eerst de handleiding door;
controleer of uw vraag al eerder door iemand anders is gesteld;
probeer uw vraag zo duidelijk mogelijk te stellen;
heeft u een probleem en al geprobeerd om dit op te lossen, vermeld dit erbij aub;
heeft u een oplossing gekregen van een bezoeker dan horen wij dat graag in dit forum;
wilt u een reactie geven op een vraag of antwoord, gebruik dan niet dit formulier maar klik op de knop 'reageer op deze vraag';
uw vraag wordt direct op de website gezet; vermijd daarom persoonlijke gegevens in te vullen;
Belangrijk! Als er een antwoord wordt gegeven op uw vraag, dan is het voor de gever van het antwoord nuttig om te weten als u er wel (of niet) mee geholpen bent! Wij vragen u dus ook te reageren op een antwoord.
Belangrijk! Antwoorden worden ook per e-mail naar abonnees gestuurd. Laat uw emailadres achter op deze site, zodat u op de hoogte blijft. U krijgt dan ook andere vragen en antwoorden te zien.
Abonneren
Abonneer u voor het ontvangen van emails voor uw Weber Q 3000 bij:
nieuwe vragen en antwoorden
nieuwe handleidingen
U ontvangt een email met instructies om u voor één of beide opties in te schrijven.
Ontvang uw handleiding per email
Vul uw emailadres in en ontvang de handleiding van Weber Q 3000 in de taal/talen: Engels als bijlage per email.
De handleiding is 13,62 mb groot.
U ontvangt de handleiding per email binnen enkele minuten. Als u geen email heeft ontvangen, dan heeft u waarschijnlijk een verkeerd emailadres ingevuld of is uw mailbox te vol. Daarnaast kan het zijn dat uw internetprovider een maximum heeft aan de grootte per email. Omdat hier een handleiding wordt meegestuurd, kan het voorkomen dat de email groter is dan toegestaan bij uw provider.
Uw handleiding is per email verstuurd. Controleer uw email
Als u niet binnen een kwartier uw email met handleiding ontvangen heeft, kan het zijn dat u een verkeerd emailadres heeft ingevuld of dat uw emailprovider een maximum grootte per email heeft ingesteld die kleiner is dan de grootte van de handleiding.
Er is een email naar u verstuurd om uw inschrijving definitief te maken.
Controleer uw email en volg de aanwijzingen op om uw inschrijving definitief te maken
U heeft geen emailadres opgegeven
Als u de handleiding per email wilt ontvangen, vul dan een geldig emailadres in.
Uw vraag is op deze pagina toegevoegd
Wilt u een email ontvangen bij een antwoord en/of nieuwe vragen? Vul dan hier uw emailadres in.