Congratulations
Congratulations on your purchase of the Razor binoculars,
we are certain that their innovative, ergonomic design and
tremendous optical performance will win your admiration
and approval.
The Razors feature fully multi-coated optics and phase-corrected,
Silver-coated roof prisms for an unbelievably sharp image in all
lighting conditions. The Razors feature an internal focusing
mechanism, O-rings at all open points, and an Argon-purging
process to completely seal the binoculars, making them
waterproof, dustproof and internally fogproof.
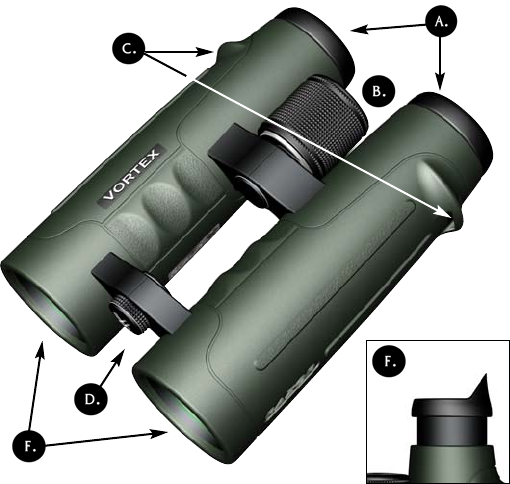
Using
/
Adjusting
the
eyecups
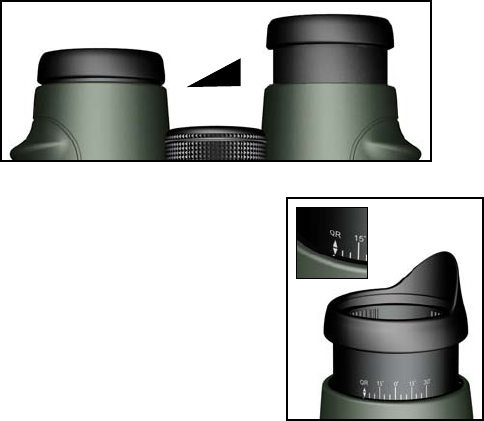
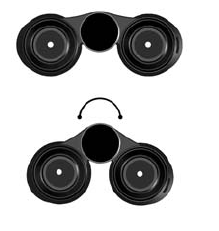
Razor binoculars feature long eye relief with innovative
multi-position retractable eyecups to offer comfortable
viewing for all users - whether you wear eyeglasses or not.
- If you wear eyeglasses/sunglasses, make sure the retractable
eyecups are left twisted in toward the binoculars body
(see
A
above). If the eyecups are twisted out, it will
appear as though you are looking through a tunnel.
- If you do NOT wear eyeglasses or sunglasses, twist the
retractable eyecups to the desired position in order to (cont.)
Keeping
your
lenses
clean
To maintain the optical brilliance of your Razor binoculars,
it is important to keep the lens surfaces free of dirt, oils and
dust. On occasion, the lenses of your binoculars will need to
be cleaned. It is important to recognize that there are some
guidelines to follow when cleaning.
First, be sure the lenses are free of dust or grit before wiping
to prevent any scratching on the glass. Clean by using a can
of pressurized air or a soft camel's hair brush (acrylic optical
brushes are also available and work well).
Second, fog the lenses with your own breath to help clear
the lens of smudges, fingerprints or eyelash oil. Most
importantly, use only a non-abrasive cloth such as the
provided lens cloth, chamois, or silk. Cleaning fluid and
optical paper is also available and can be used as well.
NEVER use facial tissue, heavy cotton or flannel clothing as
such items can scratch your lenses.
Lastly, utilize the rainguard and objective lens caps for extra
protection in the field, and keep your binoculars stored in
their case when not in use.
Caution!
Never look directly into the sun (or any other intensive light
source) while using your Vortex Razor binoculars (or any
binoculars)! This could damage the retina and cornea of your
eyes and even cause blindness!
94