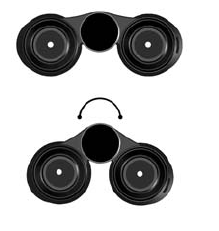
540508
7
Verklein
Vergroot
Pagina terug
1/10
Pagina verder
Adjusting
for
interpupillary
distance
In order to see one singular image,
you must adjust the two barrels
of the binoculars to your
interpupillary distance (the distance
from your left pupil to right).
To do this, turn the barrels of the
binoculars on their central hinge
until you see one singular field of
view with no disturbing shadows.
Focusing
your
binoculars
The Vortex Razor features a large center focus knob, with the
diopter adjustment integrated inside the focus knob. The diopter
adjusts for differences between your individual eyes. The correct
procedure for attaining proper focal balance using the center
focus knob and the diopter is:
a. Adjust the binocular barrels for your interpupillary
distance (see above).
b. With your right eye closed (or with your hand over the
right objective lens), focus your left eye on a distant object
with the center focus wheel until the targeted object is in
sharp focus.
c. Now adjust for your right eye. To do this, pull on the
focus knob until you hear an audible click - the focus wheel
is now adjusting the diopter. Close your left eye (or place
your hand over the left objective lens) and focus your right
eye on that same distant object. Focus until the object is in
sharply focused. Your binoculars should now be adjusted to
provide a clear and comfortable image.
see the full field of view(see
B
below). If you do NOT have
the eyecups positioned correctly, you will note black
"crescents" in your field of view.
Using
the
flared
eyecups
The Razor features inventive flared
rubber eyecups that can be easily
interchanged with the retractable
eyecups. The flared eyecups, which
are not retractable and are meant
to be used only in the “up” position
as shown at right, are useful in
eliminating bothersome lateral light.
To install the eyecups:
1. Remove the retractable eyecups. Twist each eyecup
to the “QR” position and firmly (but easily) pull each
one off the binocular.
2. Place the flared eyecup onto the binocular and line the
QR arrows with the dot on the binocular body (inset image
above). Twist the flared eyecup to lock it into position.
The flare of the eyecup should fit comfortably on the outside
edges of your eyes; adjust the eyecups to the best fit.
58
7

Hulp nodig? Stel uw vraag in het forum

Spelregels

Misbruik melden

Gebruikershandleiding.com neemt misbruik van zijn services uitermate serieus. U kunt hieronder aangeven waarom deze vraag ongepast is. Wij controleren de vraag en zonodig wordt deze verwijderd.

Product:

Bijvoorbeeld antisemitische inhoud, racistische inhoud, of materiaal dat gewelddadige fysieke handelingen tot gevolg kan hebben.

Bijvoorbeeld een creditcardnummer, een persoonlijk identificatienummer, of een geheim adres. E-mailadressen en volledige namen worden niet als privégegevens beschouwd.

Spelregels forum

Om tot zinvolle vragen te komen hanteren wij de volgende spelregels:

Belangrijk! Als er een antwoord wordt gegeven op uw vraag, dan is het voor de gever van het antwoord nuttig om te weten als u er wel (of niet) mee geholpen bent! Wij vragen u dus ook te reageren op een antwoord.

Belangrijk! Antwoorden worden ook per e-mail naar abonnees gestuurd. Laat uw emailadres achter op deze site, zodat u op de hoogte blijft. U krijgt dan ook andere vragen en antwoorden te zien.

Abonneren

Abonneer u voor het ontvangen van emails voor uw Vortex RAZOR bij:


U ontvangt een email met instructies om u voor één of beide opties in te schrijven.


Ontvang uw handleiding per email

Vul uw emailadres in en ontvang de handleiding van Vortex RAZOR in de taal/talen: Engels als bijlage per email.

De handleiding is 0,45 mb groot.


U ontvangt de handleiding per email binnen enkele minuten. Als u geen email heeft ontvangen, dan heeft u waarschijnlijk een verkeerd emailadres ingevuld of is uw mailbox te vol. Daarnaast kan het zijn dat uw internetprovider een maximum heeft aan de grootte per email. Omdat hier een handleiding wordt meegestuurd, kan het voorkomen dat de email groter is dan toegestaan bij uw provider.

Uw handleiding is per email verstuurd. Controleer uw email

Als u niet binnen een kwartier uw email met handleiding ontvangen heeft, kan het zijn dat u een verkeerd emailadres heeft ingevuld of dat uw emailprovider een maximum grootte per email heeft ingesteld die kleiner is dan de grootte van de handleiding.

Er is een email naar u verstuurd om uw inschrijving definitief te maken.

Controleer uw email en volg de aanwijzingen op om uw inschrijving definitief te maken

U heeft geen emailadres opgegeven

Als u de handleiding per email wilt ontvangen, vul dan een geldig emailadres in.

Uw vraag is op deze pagina toegevoegd

Wilt u een email ontvangen bij een antwoord en/of nieuwe vragen? Vul dan hier uw emailadres in.


Info