794169
21
Verklein
Vergroot
Pagina terug
1/42
Pagina verder
2
CONTENTS
SAFETY INSTRUCTIONS 3
OPERATION 4
REMOTE CONTROL & FUNCTIONS 5
WIFI CONTROL 11
FILTERS 21
END OF SEASON 21
START OF SEASON 22
REPLACING THE BATTERIES 22
INSTALLATION GUIDE 22
INSTALLATION OF THE OUTDOOR UNIT 29
STANDARD PIPELINES CONNECTION & AIR PURGING 30
ELECTRICAL WIRING DIAGRAMS 33
TROUBLESHOOTING AND SELF DIAGNOSIS 36
TECHNICAL SPECIFICATION 39
APPENDIX 41
4
Energy Saving and Unit Safety Protection Tips
Do not cover or restrict the airflow from the outlet or inlet grills.
For maximum performance the minimum distance from a wall or objects should be 50cm.
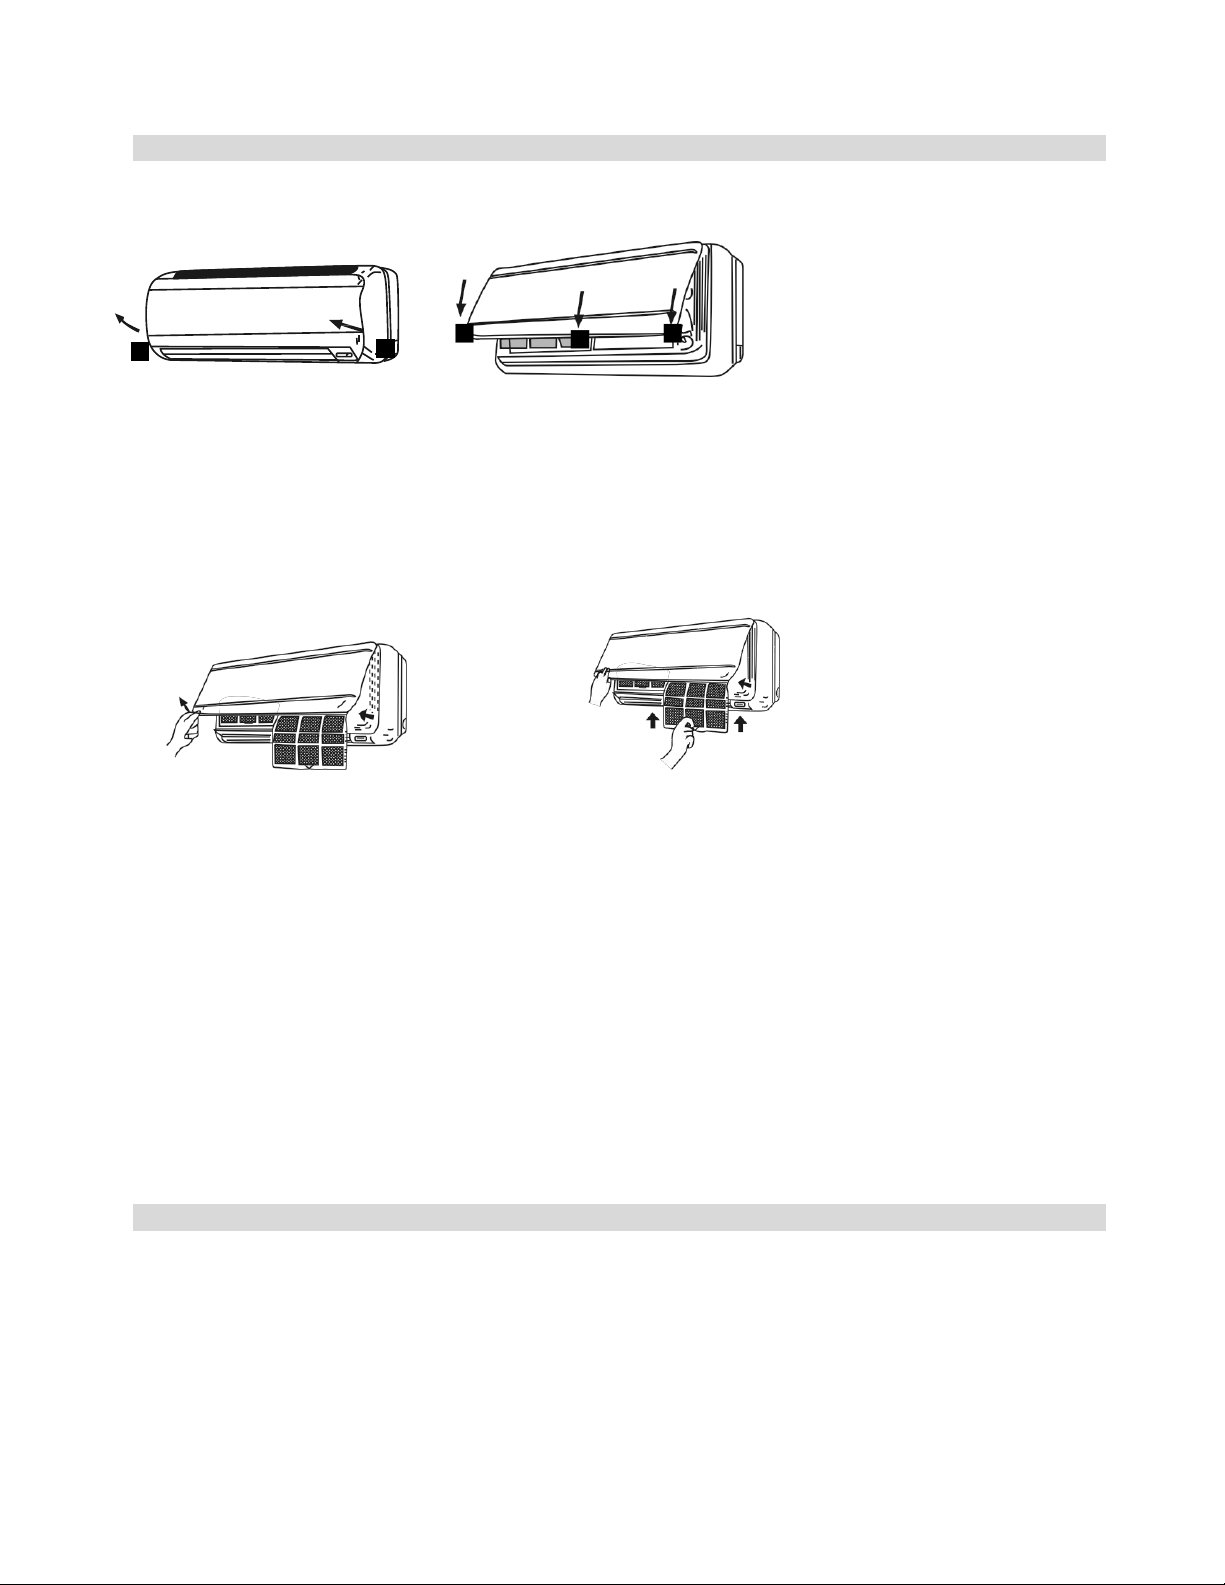
Keep the filters clean. Under normal conditions, filters should only need cleaning once
every four weeks (approximately). Since the filters remove airborne particles, more
frequent cleaning maybe necessary, depending on the air quality.
For the initial startup set the fan speed to maximum and the thermostat to 4-5 degrees
lower than the current temperature. After, set the fan switch to low and set the thermostat
to your desired setting.
To protect the unit we recommend not using the cooling mode when the ambient indoor
temperature is higher than 35.
To protect the unit we recommend not using the heating mode when the indoor ambient
temperature is lower than 7. Performance will be reduced at lower temperatures.
Note the manufacturer operating temperature ranges at the end of this user manual.
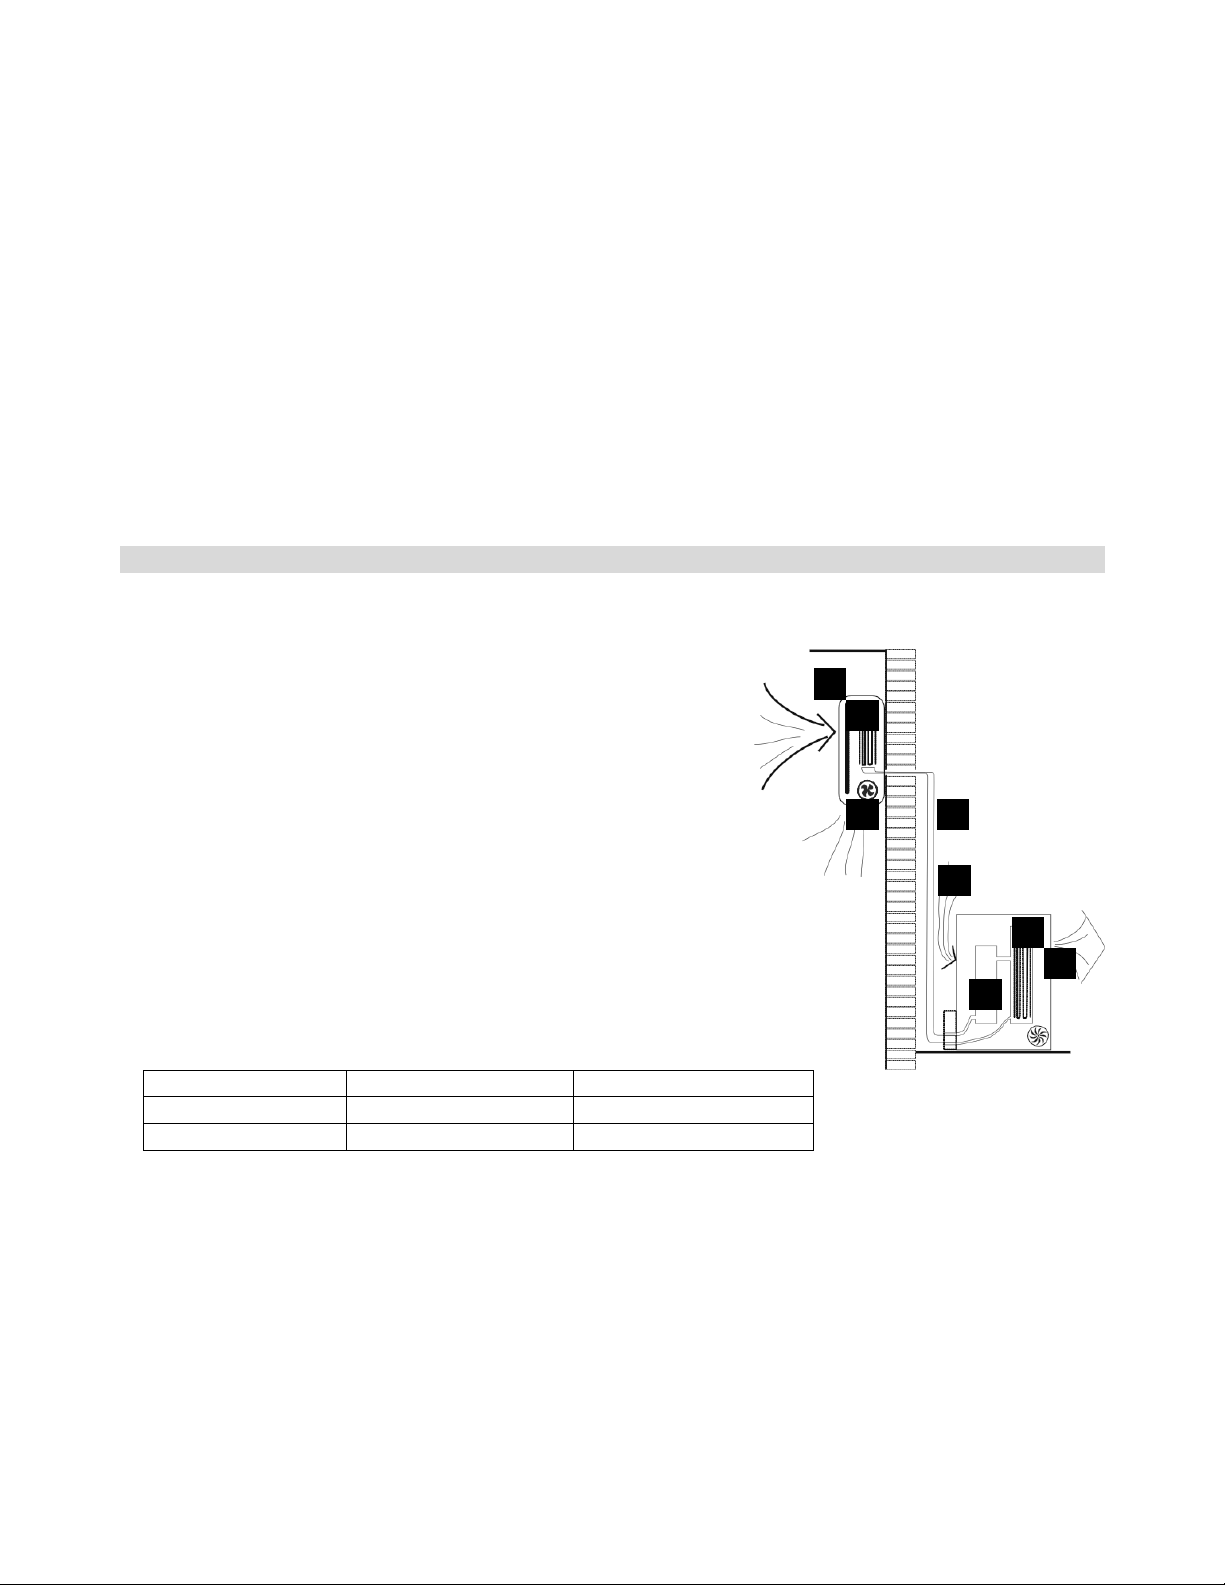
OPERATION
COOLING MODE
The compressor (6) in the external unit compresses the
refrigerant into a high-temperature, high-pressure gas. When
this gas flows along the cooling fins of the condenser (7),
heat is exuded and the gas condenses into a liquid, which is
then led to the evaporator (1) in the indoor unit. The liquid
expands into a gas at a low temperature and low pressure.
This gas absorbs the warmth of the air in the room, and a fan
(3) draws the air through the filter and over the evaporator
(1), blowing the cooled air back into the room. The heat is
moved to the compressor along with the gas. A fan (8) draws
air over the condenser and blows the warm air away.
1. Evaporator
2. Filter
3. Evaporator Fan
4. Gas Line
5. Liquid line
6. Compressor
7. Condenser
8. Condenser Fan
HEAT PUMP MODE
The system operates in reverse: the condenser works as an evaporator, the evaporator as
a condenser: warm air is blown into the room. It is ideal as a maintenance heating when
outside temperature is not too low and when the indoor temperature is more than 7°C.
Dehumidifying
As with cooling, the moisture in the air condenses on the cold evaporator at room
temperature acting as a powerful dehumidifier.
3
1
2
4
5
7
DISPLAY PANEL
Iqool 9/12/18 Iqool24
No.
Display
Function
1
POWER
Illuminated when power is on
2
SLEEP
Illuminated in sleep mode
3
Temp. / Error code
Shows the temperature / error code
4
TIMER
Illuminated when timer is activated
5
RUN
Illuminated when unit is turned on
OUTDOOR UNIT
No.
Description
12
Air outlet grille
13
Outdoor unit rating label
14
Terminal block cover
15
Gas valve
16
Liquid valve
8
FUNCTIONS
COOL
1. Press the MODE button until the COOL indicator appears.
2. Set the desired temperature.
3. Use the FAN button to set the fan speed.
HEAT
1. Press the MODE button until the HEAT indicator appears
2. Set the desired temperature.
3. Use the FAN button to set the fan speed.
FAN MODE
1. Press MODE
button until the FAN indicator appears.
2. The temperature settings are disabled in fan mode.
3. Use the FAN button to set the fan speed, cycling through LOW / MED / HIGH / AUTO.
DEHUMIDIFY
1. Press the MODE
button until the dehumidify indicator appears.
2. The fan speed will always be low in this mode and the FAN button is disabled. In addition
the temperature cannot be adjusted in dehumidifying mode
AUTO MODE
1. Press the MODE button until the AUTO indicator appears.
2. The difference between the set temperature and room temperature determines how the air
conditioner operates: cool, heat, fan or dry. It is not possible to change the temperature in
this mode the unit will operate to achieve best performance. The operation logic is as
below.
Ambient Temperature
Operation Mode
Auto Temperature
˂20°C
Heating
23°C
20°C - 26°C
Dry
18°C
˃26°C
Cool
23°C
3. Use the FAN button to set the fan speed.
TIMER OFF FUNCTION (WHILE THE AIR CONDITIONER IS ON)
1. Press the MODE button until the symbol appears for the operation you want.
2. Set the desired temperature.
3. Use the FAN button to set the fan speed.
4. Press the TIMER button to set the running time required. Use the up and down buttons to
set the running time in 30 minute intervals (max 24 hours). Once the running time has
elapsed, the appliance will switch itself off. To cancel the timer function before the set time
has elapsed, press the TIMER button again.
TIMER ON FUNCTION (WHILE THE AIR CONDITIONER IS IN STANDBY)
1. The appliance is switched off in standby mode
2. Press the TIMER button to set the number of hours until switch on is required. Use the up
and down button set the number of hours in 30 min intervals (max 24 hours). Set the
desired operation, temperature, fan speed. Once the set time has elapsed, the appliance
will switch itself on. To turn off the timer function before the set time has elapsed, press the
TIMER button again.
15
CONNECTING USING CF MODE (QUICK CONNECTION)
1. Ensure that the display on the air conditioner is displaying CF before pressing “Next Step”
(otherwise to change the connection mode: Quickly press the display button on the remote 6
times and wait 10 seconds until CF is displayed)
2. Select your Wifi router from the drop down list and enter the password (Please note the
password is case sensitive) before pressing next.
The app will automatically upload the connection information to the air conditioner, once the
connection is completed, a message will be displayed to confirm. On this page there is the
option to rename the air conditioner to something more relevant.
If the connection fails, please retry the connection, failing this try connecting using the AP mode
connection.
16
CONNECTING USING AP MODE (ALTERNATIVE METHOD)
1. Ensure that the screen on the air conditioner is displaying AP (otherwise to change the
connection mode: Quickly press the display button on the remote 6 times and wait 10
seconds until AP is displayed)
2. Press on the AP Mode button in the top right of the screen to change the app to AP mode
connection.
3. Select your Wifi router from the drop down list and enter the password (Please note the
password is case sensitive) before pressing next.
4. Connect your phone to the wifi network by leaving the app, and connecting to the Wifi
network created by the air conditioner “Smartlife-XXX
5. Reopen the app and click on the “Connect now” button,
17
The app will automatically upload the connection information to the air conditioner, once the
connection is completed, a message will be displayed to confirm. On this page there is the
option to rename the air conditioner to something more relevant.
If the connection fails, please retry the connection, failing this try connecting using the CF mode
connection.
18
CONTROLLING YOUR DEVICE THROUGH THE APP
Now that your air conditioner is linked up to your network, you can control it from your phone.
Select your device in the device list to gain access to the controls for the device.
Use the + and buttons to increase and decrease the desired temperature. The tabs on the
bottom of the screen should be used to change other settings.
Mode: Allows the operating mode to be changed between Feel, Heat, Dry, Cool and Fan.
Speed: Allows the fan speed to be changed between Auto, Low, Medium and High.
Function: Allows the Sleep, Turbo and Eco functions to be activated (See main manual for
description of the operation) and for vertical and horizontal swing on the louvres to be turned on
/ off (Not supported on all units)
19
USING THE TIMER FUNCTION
The timer can be used to either set a time for the air
conditioner to turn on (and specify the settings it will run
with), or a time for the unit to turn off. Multiple timers can
be used together to build a schedule with on and off times.
1. Press the Timer button at the bottom right of the
screen.
2. To set a new timer, press the “Add Timer” button at
the bottom of the screen. If there is a timer already
programmed that you would like to amend, press
and hold the timer which requires amendment.
OFF TIMER:
1. Select Timer Off
2. Set the time the air conditioner should turn off 3.
Select which days the timer should operate
4. Press Save in the top right corner.
ON TIMER:
1. Select Timer On
2. Set the time the air conditioner should turn on
3. Select which days the unit should run on the auto timer.
4. Set the Mode, fan speed, desired temperature and function that the air conditioner
should run with.
5. Press Save in the top right corner.
21
FILTERS
Ensure the power is turned off to the unit before attempting to service the filters.
B C B A
A. B.
Opening the front panel: at the A recesses, pull the front part up with both hands. The front
panel will stay horizontal (at around 90°).
Closing the front panel: press the front part down at the sides at B and in the middle at. Make
sure it is properly clicks into place.
1. Hold the front panel open (or put it in horizontal position) and remove the filter(s).
2. Use a vacuum cleaner to remove dirt. If the dust filter is very dirty, it may be washed in
lukewarm water with a very small amount of neutral detergent. Rinse well and allow to dry
completely (not in direct sunlight or near a source of heat).
3. Keep the front panel open and reinstall the filter(s). Press the panel shut; a click indicates
it is closed properly.
4. Restore the power from the consumer unit and turn the air conditioner on.
Indoor Unit: While the unit is disconnected from power dust regularly with a dry cloth or slightly
damp paper towel. Never use chemicals or solvents. Never spray a liquid in or over the
appliance.
Exterior unit: While the unit is disconnected from power. Remove dirt and keep the air intake
and exhaust openings free of debris, etc. Cleaning with chemicals may cause damage.
END OF SEASON
If the air conditioner is not going to be used for an extended period:
Set in fan mode on a slightly warm day so that the inside of the appliance dries out.
Switch off the power from fuse box and remove the batteries from the remote control.
Clean filters as well
23
This air conditioner contains a refrigerant and can be classified as pressurized equipment.
Therefore always contact an authorized air conditioning engineer for installation and
maintenance of the air conditioner.
The air conditioner must be inspected and serviced on an annual basis by an authorized air
conditioning engineer.
INDOOR UNIT POSITION
The air inlet and outlet vent should be away from any obstruction, ensuring that there is a good
airflow through the whole air-conditioned space. Select a position where the condensing water
can be easily drained out, and the indoor unit can be easily connected to outdoor unit. The wall
where the unit is fixed should be strong enough to withstand the full weight and vibration of the
unit. The unit should be accessible for service maintenance. The height of the installed unit
should be ideally more than 200cm from the floor. The air conditioner must not be installed in a
wet environment such as a bathroom, shower or swimming pool etc.
OUTDOOR UNIT POSITION
A convenient position, dry and well ventilated, outside of direct sunlight or strong winds, which is
not on flood line and where noise and airflow does not cause interference or inconvenience.
Select a location where there are no obstructions to the inlet and outlet vents. The location
should be able to withstand the full weight and vibration of the outdoor unit and permit safe
installation.
Make sure that the outdoor unit is installed in compliance with the installation dimension diagram
with easy maintenance access. Select a place where it is out of reach of children. Do not block
utilities access or fire escapes.
The external unit must be lifted and put in place by two people.
NOTES:
1. Only use a power supply with the correct ratings, making sure the correct sized power cables
are used
2. The appliance shall be installed in accordance with standard wiring regulations by qualified
personnel
3. Only replace fuses according to their printed rating or corresponding pcb boards.
24
RECOMMENDED INSTALLATION SPACING DIAGRAM
25
TOOLS RECOMMENDED FOR INSTALLATION
Electric drill
Screwdrivers
Core hole
Cutter
Number 14 (7mm)
Masonry drill
1.5
inch number
10 screws
roundhead slotted
7
mm wallplugs
Pipe & cable detector
Hammer
Tape measure
Spirit Level
Pencil and chalk
Small
stepladder
Protective glasses
and mask
4
inch plastic ties
26
Also the following
2
inch Pipe clips
Circuit breaker
Garden gloves when lifting the outdoor unit
Dustsheets
Foam Filler
Silicone sealant and gun
27
. Check the area for any
1
hidden wires or pipes.
2
. Mark the right hand
backplate screw
position.
3
. Remove the backplate
and drill a 7mm hole.
4
. Tap home a 7mm
wallplug.
. Screw the backplate
5
to the wall using 1.5
inch number 10
screws.
6
. Check level, mark the
other holes and swing
the backplate away.
7
. Drill the rest of the
holes and tap in
wallplugs
8
. Fix the backplate to
the wall.
9
. Mark the hole centre
make sure the
cutter will clear the
backplate.
10
. Drill the hole at a slight
downward angle. When
you feel the pilot drill exit
the outside wall stop
11
. Finish the hole from
the outside to keep it
clean
12
. Feed the cord and
drain hose carefully
through the wall
28
65
65
21

Hulp nodig? Stel uw vraag in het forum

Spelregels

Misbruik melden

Gebruikershandleiding.com neemt misbruik van zijn services uitermate serieus. U kunt hieronder aangeven waarom deze vraag ongepast is. Wij controleren de vraag en zonodig wordt deze verwijderd.

Product:

Bijvoorbeeld antisemitische inhoud, racistische inhoud, of materiaal dat gewelddadige fysieke handelingen tot gevolg kan hebben.

Bijvoorbeeld een creditcardnummer, een persoonlijk identificatienummer, of een geheim adres. E-mailadressen en volledige namen worden niet als privégegevens beschouwd.

Spelregels forum

Om tot zinvolle vragen te komen hanteren wij de volgende spelregels:

Belangrijk! Als er een antwoord wordt gegeven op uw vraag, dan is het voor de gever van het antwoord nuttig om te weten als u er wel (of niet) mee geholpen bent! Wij vragen u dus ook te reageren op een antwoord.

Belangrijk! Antwoorden worden ook per e-mail naar abonnees gestuurd. Laat uw emailadres achter op deze site, zodat u op de hoogte blijft. U krijgt dan ook andere vragen en antwoorden te zien.

Abonneren

Abonneer u voor het ontvangen van emails voor uw TCL iQool9 bij:


U ontvangt een email met instructies om u voor één of beide opties in te schrijven.


Ontvang uw handleiding per email

Vul uw emailadres in en ontvang de handleiding van TCL iQool9 in de taal/talen: Engels als bijlage per email.

De handleiding is 3.66 mb groot.


U ontvangt de handleiding per email binnen enkele minuten. Als u geen email heeft ontvangen, dan heeft u waarschijnlijk een verkeerd emailadres ingevuld of is uw mailbox te vol. Daarnaast kan het zijn dat uw internetprovider een maximum heeft aan de grootte per email. Omdat hier een handleiding wordt meegestuurd, kan het voorkomen dat de email groter is dan toegestaan bij uw provider.

Stel vragen via chat aan uw handleiding

Stel uw vraag over deze PDF

Uw handleiding is per email verstuurd. Controleer uw email

Als u niet binnen een kwartier uw email met handleiding ontvangen heeft, kan het zijn dat u een verkeerd emailadres heeft ingevuld of dat uw emailprovider een maximum grootte per email heeft ingesteld die kleiner is dan de grootte van de handleiding.

Er is een email naar u verstuurd om uw inschrijving definitief te maken.

Controleer uw email en volg de aanwijzingen op om uw inschrijving definitief te maken

U heeft geen emailadres opgegeven

Als u de handleiding per email wilt ontvangen, vul dan een geldig emailadres in.

Uw vraag is op deze pagina toegevoegd

Wilt u een email ontvangen bij een antwoord en/of nieuwe vragen? Vul dan hier uw emailadres in.


Info