658458
32
Verklein
Vergroot
Pagina terug
1/33
Pagina verder
VoiceWorks
Harmony | Correction | Effects
UUSSEERRSS MMAANNUUAALL
a
IMPORTANT SAFETY INSTRUCTIONS
1 Read these instructions.
2 Keep these instructions.
3 Heed all warnings.
4 Follow all instructions.
5 Do not use this apparatus near water.
6 Clean only with dry cloth.
7 Do not block any ventilation openings.
Install in accordance with the
manufacturer's instructions.
8 Do not install near any heat sources such
as radiators, heat registers, stoves, or
other apparatus (including amplifiers) that
produce heat.
9 Do not defeat the safety purpose of the
polarized or grounding-type plug. A
polarized plug has two blades with one
wider than the other. A grounding type plug
has two blades and a third grounding
prong. The wide blade or the third prong
are provided for your safety. If the provided
plug does not fit into your outlet, consult an
electrician for replacement of the obsolete
outlet.
10 Protect the power cord from being walked
on or pinched particularly at plugs,
convenience receptacles, and the point
where they exit from the apparatus.
11 Only use attachments/accessories
specified by the manufacturer.
12 Unplug this apparatus during lightning
storms or when unused for long periods of
time.
13 Refer all servicing to qualified service
personnel. Servicing is required when the
apparatus has been damaged in any way,
such as power-supply cord or plug is
damaged, liquid has been spilled or
objects have fallen into the apparatus, the
apparatus has been exposed to rain or
moisture, does not operate normally, or
has been dropped.
This equipment should be installed near
the socket outlet and disconnection of the
device should be easily accessible.
Do not install in a confined space.
Do not open the unit - risk of electric shock
inside.
Caution:
You are cautioned that any change or
modifications not expressly approved in this
manual could void your authority to operate
this equipment.
Service
There are no user-serviceable parts inside.
All service must be performed by qualified
personnel.
Warning!
To reduce the risk of fire or electric shock,
do not expose this apparatus to rain or
moisture.
This apparatus must be earthed.
Use a three wire grounding type line cord
like the one supplied with the product.
Be advised that different operating voltages
require the use of different types of line
cord and attachment plugs.
Check the voltage in your area and use the
correct type. See table below:
Voltage Line plug according to standard
110-125V UL817 and CSA C22.2 no 42.
220-230V CEE 7 page VII, SR section
107-2-D1/IEC 83 page C4.
240V BS 1363 of 1984.
Specification for 13A fused
plugs and switched and
unswitched socket outlets.
The lightning flash with an arrowhead
symbol within an equilateral triangle, is
intended to alert the user to the
presence of uninsulated "dangerous voltage"
within the product's enclosure that may be of
sufficient magnitude to constitute a risk of
electric shock to persons.
The exclamation point within an
equilateral triangle is intended to alert
the user to the presence of important
operating and maintenance (servicing)
instructions in the literature accompanying the
product.
b
IMPORTANT SAFETY INSTRUCTIONS
Certificate Of Conformity
TC Electronic A/S, Sindalsvej 34, 8240
Risskov, Denmark, hereby declares on own
responsibility that following products:
VoiceWorks - Harmony, Correction and
Effects Processor
- that is covered by this certificate and
marked with CE-label conforms with
following standards:
EN 60065 Safety requirements for mains
(IEC 60065) operated electronic and
related apparatus for household
and similar general use
EN 55103-1 Product family standard for
audio,video, audio-visual and
entertainment lighting control
apparatus for professional
use. Part 1: Emission.
EN 55103-2 Product family standard for
audio, video, audio-visual and
entertainment lighting control
apparatus for professional
use. Part 2: Immunity.
With reference to regulations in following
directives:
73/23/EEC, 89/336/EEC
Issued in Risskov, 01 - 2003
Mads Peter Lübeck
Chief Executive Officer
EMC / EMI.
This equipment has been tested and found to
comply with the limits for a Class B Digital
device, pursuant to part 15 of the FCC rules.
These limits are designed to provide
reasonable protection against harmful
interference in residential installations. This
equipment generates, uses and can radiate
radio frequency energy and, if not installed and
used in accordance with the instructions, may
cause harmful interference to radio
communications. However, there is no
guarantee that interference will not occur in a
particular installation. If this equipment does
cause harmful interference to radio or television
reception, which can be determined by turning
the equipment off and on. The user is
encouraged to try to correct the interference by
one or more of the following measures:
Reorient or relocate the receiving antenna.
Increase the separation between the
equipment and receiver.
Connect the equipment into an outlet on a
circuit different from that to which the
receiver is connected.
Consult the dealer or an experienced
radio/TV technician for help.
For the customers in Canada:
This Class B digital apparatus complies with
Canadian ICES-003.
Cet appareil numérique de la classe B est
conforme à la norme NMB-003 du Canada.
3
TABLE OF CONTENTS
INTRODUCTION
Table of Contents . . . . . . . . . . . . . . . .3
Text Conventions . . . . . . . . . . . . . . . .3
Introduction . . . . . . . . . . . . . . . . . . . . .5
BASIC OPERATION
Front Panel . . . . . . . . . . . . . . . . . . . . .6
Rear Panel . . . . . . . . . . . . . . . . . . . . .8
Signal Flow . . . . . . . . . . . . . . . . . . . . .9
Applications . . . . . . . . . . . . . . . . . . .10
Preset Handling
Parameter Types . . . . . . . . . . . . . . . .12
Preset Types . . . . . . . . . . . . . . . . . . .12
Global Effect Presets . . . . . . . . . . . .12
Recall . . . . . . . . . . . . . . . . . . . . . . . .12
Edit . . . . . . . . . . . . . . . . . . . . . . . . . .13
Store . . . . . . . . . . . . . . . . . . . . . . . . .13
Preset Backup via MIDI . . . . . . . . . . .13
VOICES & EFFECTS EDIT PARAMETERS
Introduction . . . . . . . . . . . . . . . . . . . .14
Individual Voice Keys . . . . . . . . . . . .14
Harmony Key . . . . . . . . . . . . . . . . . .15
Thicken Key . . . . . . . . . . . . . . . . . . .15
Effects Key . . . . . . . . . . . . . . . . . . . .16
Pitch Correct Key . . . . . . . . . . . . . . .18
SETUP
Introduction . . . . . . . . . . . . . . . . . . . .19
Lead Voice Level/Pan . . . . . . . . . . .19
Input Low Cut . . . . . . . . . . . . . . . . . .19
Dynamics Processing . . . . . . . . . . . .19
EQ . . . . . . . . . . . . . . . . . . . . . . . . . .19
Lead Delay Compensation . . . . . . . .19
Mic Sensitivity . . . . . . . . . . . . . . . . . .19
Output Level/Mode . . . . . . . . . . . . . .19
Sample Rate Selection . . . . . . . . . . .19
Analog/Digital Input Selection . . . . . .19
Global Effects . . . . . . . . . . . . . . . . . .19
Tuning . . . . . . . . . . . . . . . . . . . . . . .19
MIDI Parameters . . . . . . . . . . . . . . . .20
Footswitch . . . . . . . . . . . . . . . . . . . .20
Midi Dump . . . . . . . . . . . . . . . . . . . .20
Erase Song . . . . . . . . . . . . . . . . . . . .20
Restore Factory Preset . . . . . . . . . . .21
Viewing Angle . . . . . . . . . . . . . . . . . .21
SONG MODE
Song Mode . . . . . . . . . . . . . . . . . . . .21
HARMONY AND TUNING
Harmony . . . . . . . . . . . . . . . . . . . . . .22
Harmony Hold . . . . . . . . . . . . . . . . . .22
Harmony Modes . . . . . . . . . . . . . . . .22
Notes Mode . . . . . . . . . . . . . . . . . . .22
Shift Mode . . . . . . . . . . . . . . . . . . . .22
Chord (Chordal) Mode . . . . . . . . . . .22
Scale (Scalic) Mode . . . . . . . . . . . . .23
Diatonic and Chromatic . . . . . . . . . . .24
Just Tuning . . . . . . . . . . . . . . . . . . . .25
SPECIFICATIONS
MIDI Implementation . . . . . . . . . . . . .26
Technical Specifications . . . . . . . . . .29
TEXT CONVENTIONS
Names of front panel controls, and keys are
written in CAPITALS. Parameter names are in
S
MALL CAPITALS. Parameter values are in
underline
. Special notes appear in italic.
Rev 1.06 – SW – V 1.09English Version
Prod. No: E60502401
5
INTRODUCTION
Thank you for purchasing the TC-Helicon VoiceWorks Harmony, Pitch Correction and Effects
processor. Designed for live and recording situations where superior vocals are a must,
this state-of-the-art product creates the world's most natural sounding harmonies while
offering innovative processing for the lead voice as well. VoiceWorks is an end-to-end
solution. The signal path includes a studio-quality mic pre-amp, transparent pitch
correction, superior manual and automatic pitch-shifting, as well as critically-acclaimed TC
Electronic Compression/Gate, EQ, Delay and Reverb. We hope you will enjoy using the
VoiceWorks as much as we enjoyed designing it.
Features:
HybridShift(TM) harmony generation for smooth, natural sound
4 distinct harmony Modes: Scalic, Chordal, Shift and MIDI Notes
Humanization of harmony voices utilizing:
- FlexTime(TM)
- Vibrato
- Inflection - (scoop)
- Pitch randomization
- Portamento
Equal temperament and Just tuning for harmonies
Harmony Hold
(TM)- like a vocal sustain pedal
Scale Based Pitch Correction
Fully adjustable voicing and gender per voice
Lead Voice Thickening - one voice above and one voice below
HIgh Quality Mic Preamp with 48V phantom power
TC Electronic 3-band EQ plus low cut
TC Electronic Compressor/Gate
TC Electronic Reverb/Tap-tempo Delay
Song Mode for live performance lets you save internal
'sequences'- up to 50 songs with 30 presets per song
MIDI CC control over all parameters
MIDI CC 'echo' of all front-panel controls
Please refer to this manual often, as there are many features and variations to explore.
Our website is another good source for applications, support and other user services.
Enjoy!
The TC-Helicon Team
www.tc-helicon.com
6
FRONT PANEL
POWER KEY
On/Off switch for the unit.
Note: In order for SETUP and
current preset parameters to be
saved, the unit must be
powered off using this switch.
Powering down by removing AC
power will result in the loss of
changes to these parameters.
LINE INPUT LEVEL KNOB
Adjusts the Line Input level.
Range: 24dB
INPUT METER
Peak meter shows Input level.
The Meter range is: 0 to -40dB.
INPUT CLIP LED
Indicates that the input level is
too high possibly causing digital
distortion. Reduce the input
level to correct this condition.
OUTPUT CLIP LED
Indicates an internal DSP
overflow. Reduce the overall
level of the harmony voices and
vocal effects to correct this
condition.
MIDI IN LED
Indicates valid incoming MIDI
information.
LCD TEXT DISPLAY
Displays top-level preset
information (preset recall
mode), detailed preset
information (edit menus),
system configuration (setup
menu), song data (song
mode), and any important
status messages or user alerts.
VOICES AND EFFECT KEYS
(GENERAL INFORMATION)
A VoiceWorks preset is made
up of eight audio processing
components represented by
the eight VOICES & EFFECTS
keys. Each key has an LED
that is lit when its component is
enabled in the current preset.
A single click will toggle
(enable or disable) the
corresponding component.
Double clicking on a key will
enter its edit menu.
VOICES AND EFFECT KEYS
(SPECIFICS)
VOICE KEYS (1-4)
On/Off/Edit functions for each
harmony voice. Edit per-voice
harmony parameters.
HARMONY KEY
On/Off/Edit functions for overall
preset harmony settings. Edit
parameters that affect all four
harmony voices.
THICKEN KEY
On/Off/Edit functions for lead
voice thickening.
EFFECTS/TAP TEMPO KEY
On/Off/Edit/Tap functions for
Reverb and Delay. Tap
Tempo is available when
editing specific delay
parameters from the effects
edit menu.
PITCH CORRECT KEY
On/Off/Edit functions for
pitch correction.
7
FRONT PANEL
SONG MODE KEY
Press to enter song mode.
Step through sequenced
presets during live
performance (using a
footswitch or MIDI controller).
SETUP KEY
Press to enter the setup
menu. Setup contains all
global parameters not stored
in individual presets including
parameters relating to EQ,
Comp/Gate, Audio, digital I/O,
MIDI, and footswitch
configuration.
Pressing this key repeatedly
will advance to the first
parameter in the next logical
group of parameters. Use the
ARROW KEYS to access
each individual parameter.
RECALL KEY
Press RECALL from any
menu (edit or setup), or from
song or store mode to return
to top-level preset recall
mode. Press RECALL from
recall mode to recall a preset
(overwriting the current
preset) when the current
preset has been edited or
when previewing a different
preset.
STORE
Press STORE to enter store
mode. Pressing store when
in store mode will store the
current preset to the displayed
location. The STORE key
LED blinks when the current
preset has been edited.
ARROW KEYS
These buttons are used to
navigate through parameters
from the edit menus, the
setup menu, song mode, or
store mode.
Press and hold to quickly
navigate through menus.
In recall mode, pressing up
or down will instantly recall
the next or previous preset.
DATA WHEEL
Edits the value of the current
parameter from any menu or
mode.
In recall mode, turning the
wheel previews presets (top
level preset information is
flashed on the display but
preset data is not loaded until
RECALL is pressed again).
ENTER
Can be used to recall the
current preset in recall mode,
or to store the current preset
in store mode. Parameters
surrounded by triangular
brackets (eg. Midi Dump
<P25>) perform their actions
when the ENTER key is
pressed. The enter key blinks
to indicate a possible action.
BYPASS
Press to toggle (bypass /
unbypass) all effects.
MIC INPUT
Press to select Mic input for
processing (the line input
becomes an AUX input when
the MIC input is enabled)
+48V
Press and hold for 2
seconds to enable +48V
phantom power on the
microphone input.
-20dB
Press to enable a -20dB pad
on the microphone input. If
the Mic Sensitivity (M
ICSENS)
under the setup menu is set
to high
, pressing this button
will change the sensitivity to
normal
and enable the -20dB
pad.
MIC GAIN
Adjusts Mic Input Gain.
Range: 35dB. This in
combination with the -20dB
pad and the M
ICSENS
parameter under the setup
menu provides 65dB range of
gain to accommodate most
microphones in most
recording situations.
8
REAR PANEL
Balanced
Jack
Analog
Outputs
External
Control
MIDI
In, Out, Thru
Balanced
Mic Input
with +48V
Phantom
Power
Digital
S/PDIF
Input/
Output
MIDI Cable
DIN CONNECTOR
5POLE - MALE
45 degrees
DIN CONNECTOR
5POLE - MALE
45 degrees
max. 10m
SHIELDED CABLE (3 or 5 wires + screen)
Note!
The microphone input on the VoiceWorks
has +48V phantom power capability.
Never plug single ended (unbalanced)
microphones or instruments or signal
processors (balanced or unbalanced)
into the mic input if +48V phantom
power is on.
The 1/4” analog Input and Output
connectors on the VoiceWorks are balanced
1/4” jacks.
Optimal connection to balanced equipment
is achieved using balanced cables.
However, if your equipment is NOT
balanced you will generally have no
problems using standard mono-to-mono
cables as illustrated below.
Balanced
Jack
Analog
Input
Mono 1/4” Cable
GND
TIP
TIP
GND
TIP
RING
GND
GND
RING
TIP
TRS (Tip Ring
Sleeve) 1/4”
balanced Cable
Balanced XLR Cable
- 3 Pin Type
9
SIGNAL FLOW
10
APPLICATIONS
Live Setups
Using the VoiceWorks live is like bringing 4 professional backup singers to your gig! You’ve got
several options when it comes to controlling the VoiceWorks Live. For best results you can use (in
various combinations) the Switch-3 footpedal, a MIDI keyboard, a MIDI CC controller, and of course
the controls on the box itself. We’ve provided setup examples below for a few common situations.
Live Setup with a MIDI Keyboard
Connect a microphone to the XLR mic input on
the VoiceWorks and enable MIC input from the
front panel.
Connect the keyboard MIDI Output to the
VoiceWorks MIDI input.
Plug the Switch-3 footpedal into the
VoiceWorks Pedal In jack. This allows foot
control of the Harmony Hold feature as well as
various other VoiceWorks functions. See the
F
OOTSWITCH parameter description in the “Setup”
section of the manual for details.
Connect the VoiceWorks stereo outputs to a
stereo channel (or two mono channels) on
your mixer. For mono operation use the
either of the VoiceWorks outputs and set the
unit to mono operation with the OUTPUT
parameter under the setup menu.
Live Setup with Guitar
Connect a microphone to the XLR mic input on
the VoiceWorks and enable MIC input from the
front panel.
Plug the Switch-3 footpedal into the
VoiceWorks Pedal In jack. Using song mode
you can create sequences of presets to handle
chord changes and then step through them
with the footpedal.
• Connect a guitar to your mixer and enable its
effect send.
Take an effects send from your mixer and
connect it to the VoiceWorks Line input (it acts
as the Aux input when the MIC input is
enabled). Anything connected to the Line input
in this mode can be mixed through the
VoiceWorks’ Reverb and Delay effects.
Connect the VoiceWorks stereo output to a
stereo channel (or two mono channels) on
your mixer. For mono operation use the
either of the VoiceWorks outputs and set the
unit to mono
operation with the OUTPUT
parameter under the setup menu.
11
APPLICATIONS
Computer Based Digital Studio Setup
Digital Studio Setup
Connect a microphone to the XLR mic input
on the VoiceWorks.
Connect the S/PDIF out from your computer
to the S/PDIF in on the VoiceWorks and the
S/PDIF out from VoiceWorks to the S/PDIF
in on your computer.
If you’re recording/sequencing software has
the capability to echo incoming MIDI to MIDI
out (most do), connect the MIDI out of your
controller Keyboard to the MIDI in on your
computer and configure it to pass the
Keyboard’s MIDI messages through to the
VoiceWorks.
Connect the MIDI out from the computer to
the MIDI in on the VoiceWorks.
If your computer has multiple MIDI inputs,
connect the MIDI out from the VoiceWorks
to the extra MIDI in. The VoiceWorks
outputs MIDI when parameters are being
changed so that during a recording session
it is possible to record parameter changes
that you make from the VoiceWorks into
your sequences. The parameter changes
can then be adjusted to perfection in your
sequencer program!
Connect the right and left outputs of the
VoiceWorks to your mixer and monitor in
real time what the VoiceWorks is doing
without dealing with the time delay
associated with routing the signal in and out
of the computer.
Connect the computer stereo audio outputs
to your mixer.
The VoiceWorks’ pristine -128dB EIN (Equivalent Input Noise) mic preamp and 24 bit A/D
conversion alone justifies its place in your Studio rack. The industry’s best sounding pitch correction
and the ability to create harmony vocals with quality good enough to solo in a mix make this unit a
a must-have for anyone working with Vocals. We’ve put together an example setup below for a
basic digital studio setup.
12
PRESET HANDLING
Parameter types
The VoiceWorks has over 100 useful
parameters and a user interface that lets you
view and edit efficiently. Some parameters are
preset based and some are setup based.
Preset parameters are all the parameters
found under the eight Voices & Effects keys.
Each preset has its own set of these
parameters.
Setup parameters are global and do not
change when a different preset is recalled.
Setup parameters are all the parameters found
under the setup menu including Lead input
level and pan, Compression/Gate, and EQ
parameters among many others. If you
change your microphone (or singer!) the
EQ/Compression settings need to only be
adjusted once in the setup menu. If you wish
to backup your setup settings, the VoiceWorks
is able to MIDI dump setup parameters to
sysex for later retrieval.
Preset Types
It’s important to understand the concept of the
current preset versus stored presets.
The current preset is the preset that is always
active in the VoiceWorks. Recalling a preset
copies preset data from one of the 100 stored
presets into the current preset. As you change
the current preset, the underlying stored
presets are not affected until you choose to
store the current preset back to a stored
preset.
When dumping and receiving presets via MIDI,
data is dumped from and received to stored
presets. The current preset remains
untouched. For example, if you are looking at
preset 5 and receive a SYSEX preset to preset
5, it will seem as if nothing has changed. The
preset you are looking at is still the current
preset. Press RECALL to copy the new data
from the stored preset 5 to the current preset.
It is possible to directly receive and dump from
the current preset. Refer to the SYSEX MIDI
documentation available on our website.
When presets are recalled or previewed, the
first line of the LCD display shows the preset
name and the second line displays the
harmony voicings.
See the INDIVIDUAL VOICE KEYS description
for more on Harmony Voicing.
After a few seconds the first line changes to
display the harmony mode, the
root/scale/chord information, or when in
Harmony Notes Mode, the currently detected
notes coming from MIDI.
All presets may be restored to their factory
default from the setup menu.
Global Effect Presets
If you select a preset for the G
LOBAL EFF
parameter in the setup menu, its effect
settings will be used regardless of the current
preset effect settings.
If you store the current preset while a Global
Effect is active, the current preset data will be
stored to the selected preset number, but any
changes to the effect data (which come from
the Global preset) will be stored to the global
preset.
RECALL
Recalling a preset means loading/activating a
stored preset. The stored preset data is
copied into the current preset.
Press RECALL to enter recall mode.
Use the DATA WHEEL to preview presets.
Blinking preset names/information indicates
a previewed preset. Previewing means that
you have not actually loaded the preset.
Press ENTER or RECALL to recall/activate
the currently previewed preset. This
transfers the stored preset to the current
preset.
13
Press any other key at any time during
previewing to return to the currently recalled
preset.
All 100 presets shipped with the VoiceWorks
can be modified or overwritten. You can
always restore a preset to its factory default
from the setup menu.
Edit
To edit preset parameters:
Double click any one of the Voices &
Effects keys.
Tab through the menu of parameters using
the ARROW KEYS. A flashing cursor will
appear over the data that you can edit using
the DATA WHEEL.
STORE
To store a preset:
Press STORE.
You can store to the current location, or you
can select a different location using the
DATA WHEEL.
If you want to change the preset name, use
the ARROW KEYS to step through each
character of the name and use the DATA
WHEEL to edit each character.
When you are ready, press STORE again to
store the preset to the chosen location and
name.
Presets Backup via MIDI
The VoiceWorks allows MIDI dumping of all or
individual presets, all or individual songs and
the VoiceWorks setup parameters.
Connect the VoiceWorks MIDI Out to MIDI
In on either another VoiceWorks or an
external MIDI device.
Enter the setup menu by pressing the
SETUP key and scroll to the MIDIDump
parameter.
Select what you would like to backup using
the DATA wheel. P
n indicates a preset; Sm
indicates a song, and Setup indicates all
setup parameters.
If connected to another VoiceWorks simply
press ENTER and your data will be copied
to the other VoiceWorks.
PRESET HANDLING
If connected to a sequencer, arm it to record
SYSEX data and press ENTER on the
VoiceWorks.
The VoiceWorks is always ready to receive
MIDI System Exclusive Dumps.
Simply connect MIDI Out from the device you
are dumping from to the MIDI In on the
VoiceWorks and send the Sysex dump at any
time.
14
Introduction
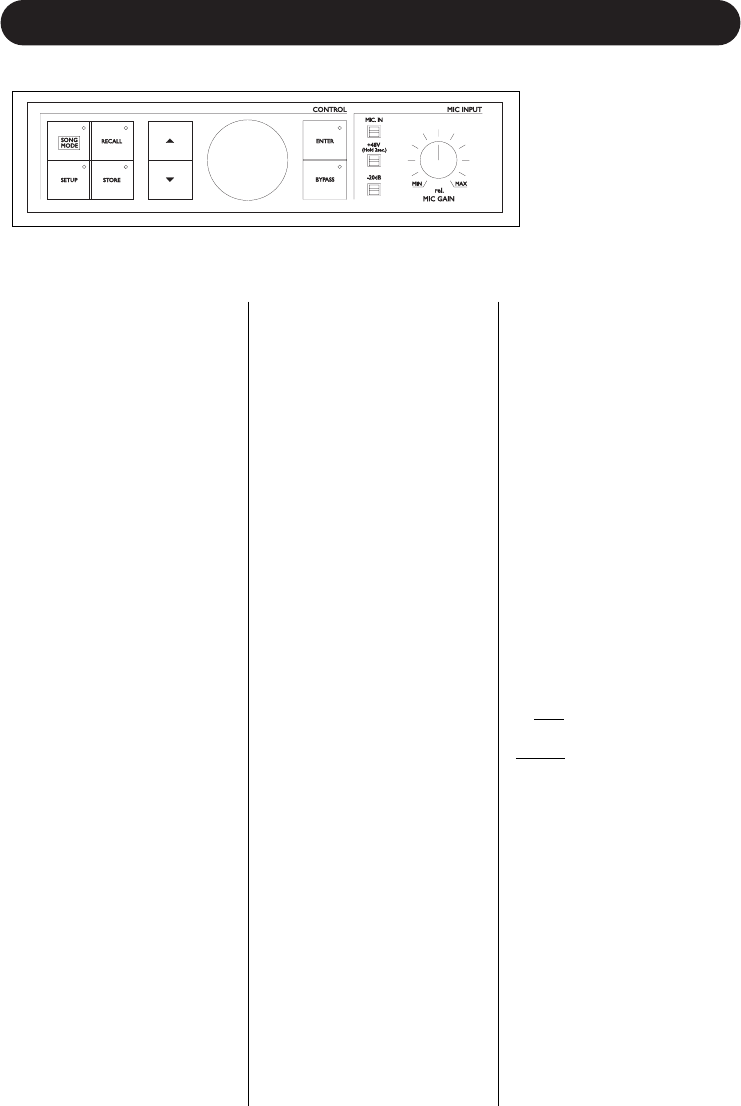
A VoiceWorks Preset is made up of all param-
eters under the eight Voices & Effects keys.
These include INDIVIDUAL VOICES (4), over-
all HARMONY, lead voice THICKENING,
EFFECTS, and PITCH CORRECTION keys.
A single click on a Voices & Effects key will
activate/deactivate its processing, a Double
click will enter its edit menu. Lit key LEDs
indicate that the respective processing is
enabled.
INDIVIDUAL VOICE KEYS
These are the keys with the four human body
icons. They allow the enabling/disabling/editing
of individual harmony voices.
A single click will turn on/off an individual har-
mony voice. Double clicking a key gives
access to the following parameters:
L
EVEL
Sets the output level of the selected voice.
Please note that there is also a master harmo-
ny voice level found under the HARMONY key.
V
OICING
This parameter is used to set the voicing of the
selected voice. This parameter means different
things depending on the harmony mode of the
preset.
Scale Mode Presets
In this mode the Voicing parameter specifies
the interval of the harmony note with respect
to the input note in the scale. The range of val-
ues goes from --8
, which is 2 octaves below
the input note, to ++8
which is two octaves
above the input note, or Cus, which means
custom voicing (See M
AP description). For
example, a setting of +3 will result in a harmo-
ny voice a third above the input voice, related
to the current scale.
Chord Mode Presets
In this mode the Voicing parameter specifies
the relation of the harmony note to the input
note with respect to the current chord. In chord
mode presets, the harmony voices are always
notes in the chord. A setting of Up1
will result
in the harmony voice being the next note
above the input voice in the chord. For
instance if the Chord was C Major and the
input note was an E, an Up1
setting would pro-
duce a G harmony voice, just above the input
E. The range of values goes from Dn5 (Down
5) to U
(unison) to Up6. Additional values are
Rt1 and Rt2 which give the root as the harmo-
ny voice, and Bs1
and Bs2 (bass voicing)
which give the lowest MIDI note received. Rt2
and Bs2 are the higher pitch root and Bass
settings.
Shift Mode Presets
In this mode the voices are shifted relative to
the input note. The values range from -24
semitones to +24 semitones.
Notes Mode Presets
In this mode there is no selectable voicing,
instead you will see the currently decoded
MIDI note for the selected voice.
G
ENDER
This parameter sets the formant of the
Harmony Voice. Use it to alter the character of
the voice ranging from -50
(a big person with a
deep voice) to 0 (no change) to +50
(mice/alien sound).
VIB
Vibrato Style. A list of Vibrato styles based on
the analysis of real singers.
VIB AMT
Vibrato amount. The depth of vibrato applied to
the voice.
PAN
L100 (panned fully left) to R100 (panned fully
right)
MAP
Custom Voice Mapping (Scale Mode Only).
Scale mode harmonies are basically pitch
maps. For each input note in a scale you can
define a resulting harmony note. The
VoiceWorks has pre-defined pitch maps for all
the offered scale roots, types, and intervals.
The Custom voicing feature allows you to cre-
ate your own pitch maps. For example, you
could define a pitch map so that a C input pro-
duces an E output and a D input produces an
A output. The best way to work with custom
voicing is as follows:
For a given harmony voice, select the scale
root, type, and interval that most closely
matches the desired voicing.
Go to the M
AP IN parameter and select the
input note that requires a different harmony
note.
Go to the O
UT
parameter and change the
VOICES & EFFECTS EDIT PARAMETERS
15
harmony note as desired.
Select various other input notes and remap
as desired. Repeat the above steps for each
harmony voice.
The custom map can be transposed under
the Harmony Edit page by changing the
SCALE ROOT.
HARMONY KEY
This key allows the enabling/disabling/editing
of the harmony parameters that affect all 4
harmony voices.
A single click will turn on/off the all harmony
voices. Double clicking gives access to the
following parameters:
H
ARMONY MODE
Change the current harmony mode. Available
parameters: Scale
(Scalic presets), Chord
(Chordal presets), Shift, and Notes (Shift and
Notes presets).
See the “Harmony, and Tuning” section of the
manual for a full description of each harmony
mode.
R
OOT
In Scalic presets this sets the scale root. In
Chordal presets sets the chord root.
S
CALE/CHORD
In Scalic presets this sets the scale type. In
Chordal presets this sets the chord type. (The
Chord will change if incoming MIDI notes are
detected as representing Valid chords).
L
EVEL
Sets the overall harmony voice level.
S
MOOTH
Sets how much of the input pitch nuance is
applied to the output voice. Not applicable to
Shift presets.
L
EAD
This allows turning the lead voice On or Off,
independent of the Lead Level parameter in
the setup menu. This is useful in creating pre-
sets where you want to hear harmony voices
only.
S
TYL
Humanization style. This is a list of humaniza-
tion style types, each made up of a combina-
tion of FlextimeTM based time randomization,
pitch randomization and pitch inflection
(scoop).
STYL AMT
The amount that the humanization style is
applied to the harmony voices.
B
END
Pitch Bend Wheel assignment. Allows assign-
ment of the pitch bend wheel to Pitch (applica-
ble in Notes and Chord harmony modes) or
Gender.
P
ORTA
Portamento. This is defined in milliseconds as
the time to reach a target note when a harmo-
ny voice needs to change pitch.
L
ATCH
When enabled in chordal mode, the last chord
played remains active after the notes have
been released from the MIDI keyboard. When
enabled in Notes mode, the harmony voices
will only respond to MIDI note input when the
number of notes being played equals the har-
mony voices enabled. This ensures logical
voice assignment when voices change.
When Latch is On, the envelope parameters
Attack and Release are not applicable.
A
TK
Sets the envelope attack time for harmony
voices. Available in Notes and Chords mode.
R
EL
Sets the envelope release time for harmony
voices. Available in Notes and Chords mode.
T
UNING
This gives the option of either Equal tempera-
ment, Just intonation, or Barbershop tuning
modes. See the “Harmony, and Tuning” sec-
tion of the manual for a full description of each
tuning mode.
THICKEN KEY (Lead Voice)
This key allows enabling/disabling/editing of
lead voice thickening parameters.
Thickening Block Diagram
VOICES & EFFECTS EDIT PARAMETERS
16
VOICES & EFFECTS EDIT PARAMETERS
EFFECTS Tap tempo KEY
This key allows the enabling/disabling/editing
of the effect parameters and can be used to
tap the tempo of the delay time.
A single click will turn on/off the Reverb/Delay
effects. Double clicking gives access to
parameters related to the Reverb and Delay
effects. Once in this edit menu, double
clicking will advance to the next logical group
of parameters. Pressing ARROW KEYS will
move to the next or previous parameter, and
holding down arrows will quickly scroll through
the parameters.
FX LEVEL
Sets the overall volume of the combined
Reverb and Delay effects.
R
EV/DLY
Reverb/Delay mix.
L
E-REV SND
Lead to Reverb effects send.
H
A-REV SND
Harmony to Reverb effects send.
AU-REV
SND
Auxiliary to Reverb effects send.
L
E-DLY S
ND
Lead to Delay effects send.
H
A-DLY
SND
Harmony to Delay effects send.
AU-DLY SND
Auxiliary to Delay effects send.
DLY2REV SND
Delay output to Reverb effects send.
Effects Block Diagram
LEV
Sets the volume level of the lead voice
thickening effect.
D
ET
Sets the amount of lead voice detuning.
S
PRD
Sets the amount that the detuned voices are
panned. A value of 100%
results in the
detuned voices being hard panned R and L.
A value of 0%
results in the detuned voices
panned to center.
26
MIDI IMPLEMENTATION
Parameter Name Advanced CC# GM-Basic CC# Range / Description
Voice 1 Level 11 46 0-127
Voice 1 Voicing 12 14 Harmony Mode Dependent
Voice 1 Gender 13 29 0-127
Voice 1 Vibrato Style 89 89 0-Number of Styles
Voice 1 Vibrato Amount 90 90 0-100
Voice 1 Pan 16 16 0-127
Voice 1 Active 106 106 0-63 Off, 64-127 On
Voice 2 Level 17 17 0-127
Voice 2 Voicing 18 18 Harmony Mode Dependent
Voice 2 Gender 19 19 0-127
Voice 2 Vibrato Style 92 61 0-Number of Styles
Voice 2 Vibrato Amount 93 62 0-100
Voice 2 Pan 20 20 0-127
Voice 2 Active 107 107 0-63 Off, 64-127 On
Voice 3 Level 21 21 0-127
Voice 3 Voicing 22 22 Harmony Mode Dependent
Voice 3 Gender 23 23 0-127
Voice 3 Vibrato Style 94 88 0-Number of Styles
Voice 3 Vibrato Amount 15 15 0-100
Voice 3 Pan 24 24 0-127
Voice 3 Active 108 108 0-63 Off, 64-127 On
Voice 4 Level 25 25 0-127
Voice 4 Voicing 26 26 Harmony Mode Dependent
Voice 4 Gender 27 27 0-127
Voice 4 Vibrato Style 3 3 0-Number of Styles
Voice 4 Vibrato Amount 105 105 0-100
Voice 4 Pan 28 28 0-127
Voice 4 Active 109 109 0-63 Off, 64-127 On
Harmony Mode 29 Ignored 0-3
Harmony Root 30 30 0-11
Harmony Type 31 31 Harmony Mode Dependent
Harmony Level 35 12 0-127
Harmony Smooth 36 116 0-127
Harmony Lead 37 Ignored 0-63 Off, 64-127 On
Harmony Style 40 Ignored 0-Number of Styles
Harmony Style Amount 41 41 0-127
Harmony Tuning 42 Ignored 0-2
Harmony Portamento 43 84 0-127
Harmony Notes Attack 44 73 0-127
Harmony Notes Release 45 72 0-127
Harmony Latch 95 35 0-63 Off, 64-127 On
Harmony Bypass 110 110 0-63 Off, 64-127 On
Thickening Level 47 Ignored 0-127
Thickening Detune 48 Ignored 0-127
Thickening Spread 49 Ignored 0-127
Thickening Bypass 111 111 0-127
28
MIDI IMPLEMENTATION
Parameter Name Advanced CC# GM-Basic CC# Range / Description
Setup FootSwitch 1 Assign 102 102 0-9
Setup FootSwitch 2 Assign 103 103 0-9
Setup FootSwitch 3 Assignt 104 104 0-9
Bypass All 114 114 0-63 Off, 64-127 On
Harmony Hold CC Control 119 119 0-63 Off, 64-127 On
Global Vibrato 1 1 0-127
Song Step Forward 115 115 >63, Song Steps Forward”
Song Step Backward 9 9 >63, Song Steps Backward”
*S
pecial CC’s (same for both the Advanced and GM-Basic CC maps)
Pitch Correction Scale Notes 118 MSB 0nnopqrsB (Binary Pattern)
nn reserved
o=1 C note on
p=1 C#/Db note on
q=1 D note on
r=1 D#/Eb note on
s=1 E note on
117 LSB 0tuvwxyzB
t=1 F note on
u=1 F#/Gb note on
v=1 G note on
w=1 G#/Ab note on
x=1 A note on
y=1 A#/Bb note on
z=1 B note on
o...z=0 notes off use 0 value
Example Custom Scale Message:
Intended scale: C, E, G, B based on a C root. This scale may be transposed by changing
the scale root.
Message: CC#118, 00010001 (converts to 17 decimal), CC#117, 00010001
(17 decimal)
MIDI Program Change messages result in a Song Number change while in song mode.
In any other mode, MIDI Program Change messages result in a Preset Number change.
Note: To capture the desired correction scale you can change the correction scale from the front
panel and record the MIDI out.
Other MIDI messages:
Program Change: Received/Transmitted. In song mode only received
- changes song number.
Pitch Bend: Received. Controls Pitch or Gender, assignable in preset.
Note On/Off: Received.
29
TECHNICAL SPECIFICATIONS
Digital Inputs and Outputs
Connectors:
Formats:
Sample Rates:
Frequency Response DIO:
Analog Inputs
Connectors, balanced:
Impedance: Balanced/Unbalanced
Line Input Level @ 0 dBFS:
Line Sensitivity @ 12 dB headroom:
Mic. Input Level @ 0 dBFS: Pad Off/On
Mic. Sensitivity @ 12 dB headroom: Pad Off/On
Line, Mic. @ Min gain, Dynamic Range:
NF/Vi @ Max. micamp. gain, Rg = 200 Ohm:
THD:
Line Frequency Response:
Mic. Frequency Response, max gain:
Crosstalk:
A to D Conversion:
A to D Delay:
Analog Outputs
D to A Conversion:
D to A Delay:
Connectors, balanced:
Output Impedance:
Max. Output Level: Balanced/Unbalanced
Output Range:
Dynamic Range:
THD:
Frequency Response:
Crosstalk:
EMC
Complies with:
Safety
Certified to:
Environment
Operating Temperature:
Storage Temperature:
Humidity:
Control Interface
MIDI:
Pedal:
Supplementary
Display:
Dimensions:
Weight:
Mains Voltage:
Power Consumption:
Warranty Parts and labor:
RCA Phono (S/PDIF)
S/PDIF (24 bit), EIAJ CP-340, IEC 958
44.1 kHz, 48 kHz
DC to 22/23.9 kHz ± 0.01 dB @ 44.1/48 kHz
Mic.: XLR, Line: ¼"phone jack
Mic.: 3.6/1.8 kOhm, Line: 21/13 kOhm
24 dBu to 0 dBu
-12 dBu to 12 dBu
-14 dBu/6 dBu to -51 dBu/-31 dBu
-26 dBu/-6 dBu to -63 dBu/-43 dBu
> 92 dB, 20 Hz - 20 kHz
< 2 dB / -127.4 dBu
< -100 dB (0,001 %) @ 1 kHz
+0/-0.1 dB, 20 Hz to 20 kHz
-1.5 dB @ 40 Hz, +0/-0.1 dB (200 Hz to 20 kHz)
<-85 dB, 20 Hz to 20 kHz
24 bit, 128 x oversampling bitstream
0.65/0.70 ms @ S.R. = 48/44.1 kHz
24 bit, 128 x oversampling bitstream
0.63/0.68 ms @ S.R.= 48/44.1 kHz
¼"phone jack
40 Ohm
20 dBu/14 dBu, R-load = 1200 Ohm
Variable up to +20 dBu
> 104 dB, 20 Hz to 20 kHz
<-98 dB (0.0013 %) @ 1 kHz
+0/-0.3 dB, 20 Hz to 20 kHz
<-100 dB, 20 Hz to 20 kHz
EN 55103-1 and EN 55103-2
FCC part 15, Class B, CISPR 22, Class B
IEC 65, EN 60065, UL6500 and CSA E60065
CSA FILE #LR108093
32° F to 122° F (0° C to 50° C)
-22° F to 167° F (-30° C to 70° C)
Max. 90 % non-condensing
In/Out/Thru: 5 Pin DIN
1/4" phone jack
16x 2 character LCD display
19" x 1.75" x 8.2" (483 x 44 x 195 mm)
4.1 lb. (1.85 kg)
100 to 240 VAC, 50 to 60 Hz (auto-select)
<15 W
1 year
Due to continuous development these specifications
are subject to change without notice.
30
PRESET LIST
Mixed Modes
1 Hit Vocals
2 Vibrato Sync
3 Barbershop
4 Church Choir
5 Subtle Lead
6 Solo Vibrato
7 Super Octavs
8 Super Thick
9 Midi Notes
10 Radio Voice
Scale Mode
11 Fat Lead+3rd
12 Fat 3rd +5th
13 Fat-4th +3rd
14 Fat-6th -4th
15 Fat-6th +5th
16 SuperFat 3rd
17 7th chord
18 Jazz Guys
19 WayUp Scale
20 Upper Tight
21 Natural
22 Lower Scale
23 Mixed Quint
24 Scoop Quint
25 Loose Quint
26 Quintet Sprd
27 Kids Backing
28 Two Towers
29 HardCor+Harm
30 MinorCartoon
Chord Mode
31 Four Above
32 Three Above
33 1 Down 2 Up
34 2 Down 1 Up
35 Three Below
36 Four Below
37 3 WayUp+Bass
38 3 Above+Bass
39 1Dn 1Up+Bass
40 2Dn 1Up+Bass
41 3 Down+Bass
42 Mixed ChoirM
43 Mixed ChoirF
44 2 X 2 High
45 2 X 2 Above
46 2 X 2 Near
47 2 X 2 Below
48 2 X 2 Spread
49 Clouds
50 Thick Above
Shift Mode
51 Funky Octavs
52 Gregorians
53 Funky Fifths
54 Doubled Tons
55 Doubled +Vib
56 BigGuysSing
57 DownAnOctave
58 Up An Octave
59 Urban Double
60 Porta-Pitch
Special Effect
61 Giant
62 Helium
63 Dragon Kid
64 Arnold
65 Shout
66 Characters
67 Little Guy
68 Mice
69 Robo Dom7
70 Try 2 Speak
Pitch Correction
71 HardCorrectC
72 MedmCorrectC
73 SoftCorrectC
74 Just Pentatn
75 PentCorrectC
Lead Voice
76 PickYourAge1
77 PickYourAge2
78 Nice Vibrato
79 Soft Vibrato
80 MaturVibrato
Notes Mode
81 ScarBroFair
82 Emotinotes
83 Latched M&F
84 Vox Pad
85 Robot Pong
86 Mono Porta
87 Slap+Midi
88 4notesLatch
89 RoboPad
32

Hulp nodig? Stel uw vraag in het forum

Spelregels

Misbruik melden

Gebruikershandleiding.com neemt misbruik van zijn services uitermate serieus. U kunt hieronder aangeven waarom deze vraag ongepast is. Wij controleren de vraag en zonodig wordt deze verwijderd.

Product:

Bijvoorbeeld antisemitische inhoud, racistische inhoud, of materiaal dat gewelddadige fysieke handelingen tot gevolg kan hebben.

Bijvoorbeeld een creditcardnummer, een persoonlijk identificatienummer, of een geheim adres. E-mailadressen en volledige namen worden niet als privégegevens beschouwd.

Spelregels forum

Om tot zinvolle vragen te komen hanteren wij de volgende spelregels:

Belangrijk! Als er een antwoord wordt gegeven op uw vraag, dan is het voor de gever van het antwoord nuttig om te weten als u er wel (of niet) mee geholpen bent! Wij vragen u dus ook te reageren op een antwoord.

Belangrijk! Antwoorden worden ook per e-mail naar abonnees gestuurd. Laat uw emailadres achter op deze site, zodat u op de hoogte blijft. U krijgt dan ook andere vragen en antwoorden te zien.

Abonneren

Abonneer u voor het ontvangen van emails voor uw TC Helicon Voiceworks bij:


U ontvangt een email met instructies om u voor één of beide opties in te schrijven.


Ontvang uw handleiding per email

Vul uw emailadres in en ontvang de handleiding van TC Helicon Voiceworks in de taal/talen: Engels als bijlage per email.

De handleiding is 1,27 mb groot.


U ontvangt de handleiding per email binnen enkele minuten. Als u geen email heeft ontvangen, dan heeft u waarschijnlijk een verkeerd emailadres ingevuld of is uw mailbox te vol. Daarnaast kan het zijn dat uw internetprovider een maximum heeft aan de grootte per email. Omdat hier een handleiding wordt meegestuurd, kan het voorkomen dat de email groter is dan toegestaan bij uw provider.

Stel vragen via chat aan uw handleiding

Stel uw vraag over deze PDF

Andere handleiding(en) van TC Helicon Voiceworks

TC Helicon Voiceworks Gebruiksaanwijzing - Nederlands - 31 pagina's

TC Helicon Voiceworks Gebruiksaanwijzing - Deutsch - 33 pagina's


Uw handleiding is per email verstuurd. Controleer uw email

Als u niet binnen een kwartier uw email met handleiding ontvangen heeft, kan het zijn dat u een verkeerd emailadres heeft ingevuld of dat uw emailprovider een maximum grootte per email heeft ingesteld die kleiner is dan de grootte van de handleiding.

Er is een email naar u verstuurd om uw inschrijving definitief te maken.

Controleer uw email en volg de aanwijzingen op om uw inschrijving definitief te maken

U heeft geen emailadres opgegeven

Als u de handleiding per email wilt ontvangen, vul dan een geldig emailadres in.

Uw vraag is op deze pagina toegevoegd

Wilt u een email ontvangen bij een antwoord en/of nieuwe vragen? Vul dan hier uw emailadres in.


Info