Ce téléphone convient pour téléphoner à l’intérieur d’un réseau téléphonique. Toute autre utilisa-
tion est considérée comme non conforme à l’usage. Des modifications ou changements effectués
d’un propre gré ne sont pas autorisés. N’ouvrez en aucun cas l’appareil et n’effectuez aucun essai
de réparation vous−même.
1.2Lieu d’installation
Le téléphone est conçu pour fonctionner dans des pièces abritées d’une température de 10 °C
à 30 °C. La base ne doit pas être placée dans des pièces humides comme la salle de bains ou
la buanderie. Evitez toute nuisance par la fumée, la poussière, les tremblements, les produits chi-
miques, l’humidité, la grande chaleur ou l’ensoleillement direct. Posez la base à une distance d’1
m par rapport à d’autres appareils électroniques pour éviter d’éventuelles interactions.
N’utilisez pas le combiné dans des zones exposées aux explosions.
1.3Bloc secteur
N’utilisez que le bloc d’alimentation enfichable fourni avec l’appareil, d’autres pouvant détériorer
votre téléphone. Vous ne devez pas bloquer son accès par des meubles ou autres objets.
1.4Câble de raccordement téléphonique
Lorsque vous remplacez le câble de raccordement fourni avec l’appareil, veillez à une affectation
identique des plots de connexion.
1.5Piles rechargeables
Ne jetez pas les piles dans le feu ou ne les plongez pas dans l’eau.
1.6Panne de courant
En cas de panne de courant, vous ne pouvez pas téléphoner avec cet appareil. Pour les cas d’ur-
gence, ayez à votre disposition un téléphone à fil fonctionnant sans alimentation externe en cou-
rant.
1.7Installations à postes supplémentaires
Vous pouvez raccorder votre téléphone à une installation à postes supplémentaires. Il ne peut
pas être garanti que le téléphone fonctionne avec chaque installation de ce genre.
1.8Remarque relative aux appareils médicaux
N’utilisez pas le téléphone à proximité d’appareils médicaux. Une influence sur les stimulateurs
cardiaques ne peut être totalement exclue. Les téléphones DECT peuvent causer un bourdonne-
ment désagréable dans les prothèses auditives.
1.9Nettoyage et entretien
Nettoyez les surfaces du boîtier avec un chiffon doux et non pelucheux. N’utilisez pas de produits
d’entretien ou de solvants agressifs. Les pieds en caoutchouc de la base ne résistent pas à tous
les produits d’entretien.
1.10Elimination
Le transfert du droit européen dans des lois et règlements nationaux vous obligent à élimi-
ner vos biens de consommation de façon conforme. L’icône ci−contre sur votre
téléphone signifie que les anciens appareils électriques et électroniques doivent
être éliminés séparément des ordures ménagères.
Éliminez les appareils électriques ou électroniques dans le centre de collecte d’un
organisme approprié d’évacuation des déchets.
Éliminez les piles auprès d’un revendeur spécialisé ainsi que dans des centres de
collectes qui tiennent à disposition les collecteurs appropriés correspondants.
Éliminez les matériaux d’emballage conformément au règlement local.
− Mise en service −
29
2Mise en service
2.1Remarques concernant la sécurité
Attention : Avant de mettre votre appareil en service, veuillez lire impérativement les
consignes de sécurité mentionnées au chapitre 1.
2.2Vérifier le contenu de l’emballage
Les éléments suivants font partie de la livraison :
une base avec un bloc d’alimentation
un câble de raccordement téléphonique
quatre combinéshuit piles rechargeables
trois stations de chargement avec trois blocs
d’alimentation
un mode d’emploi
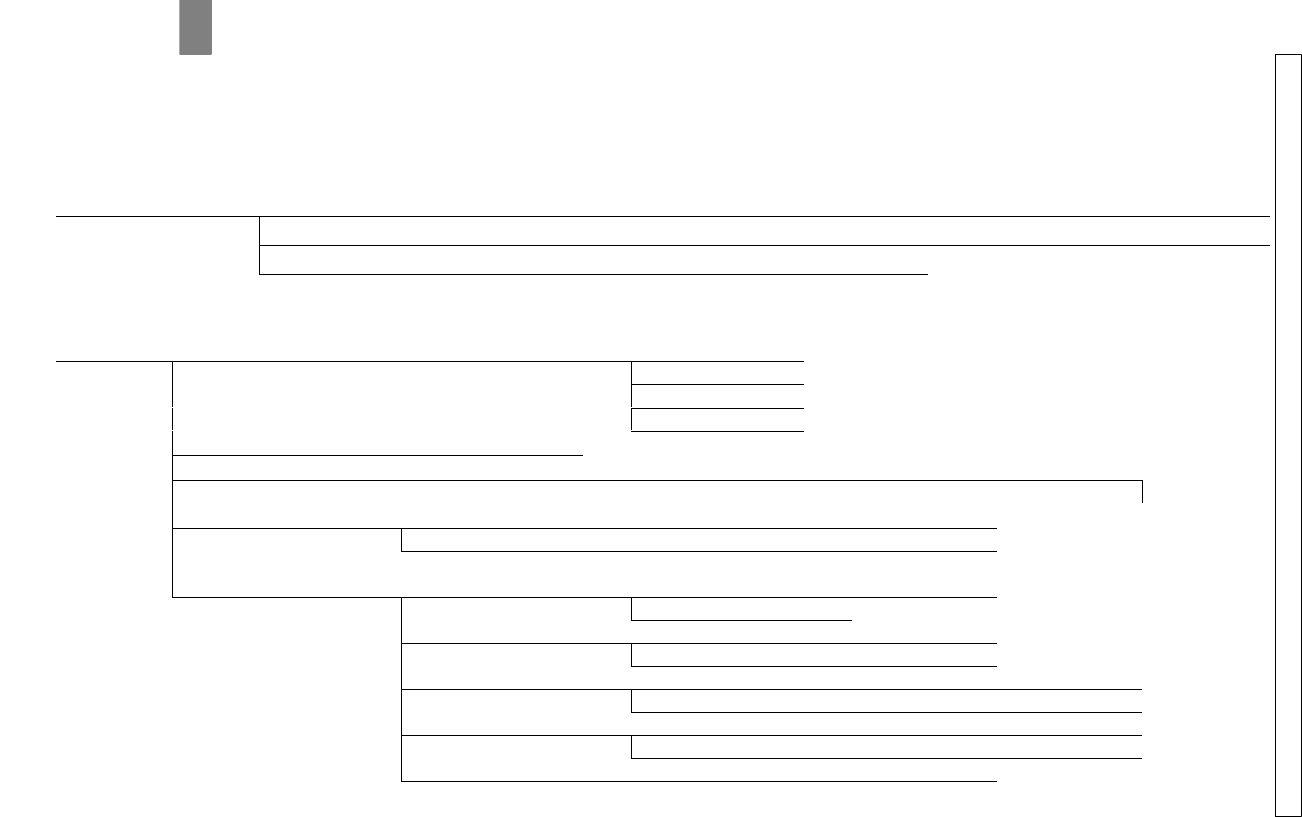
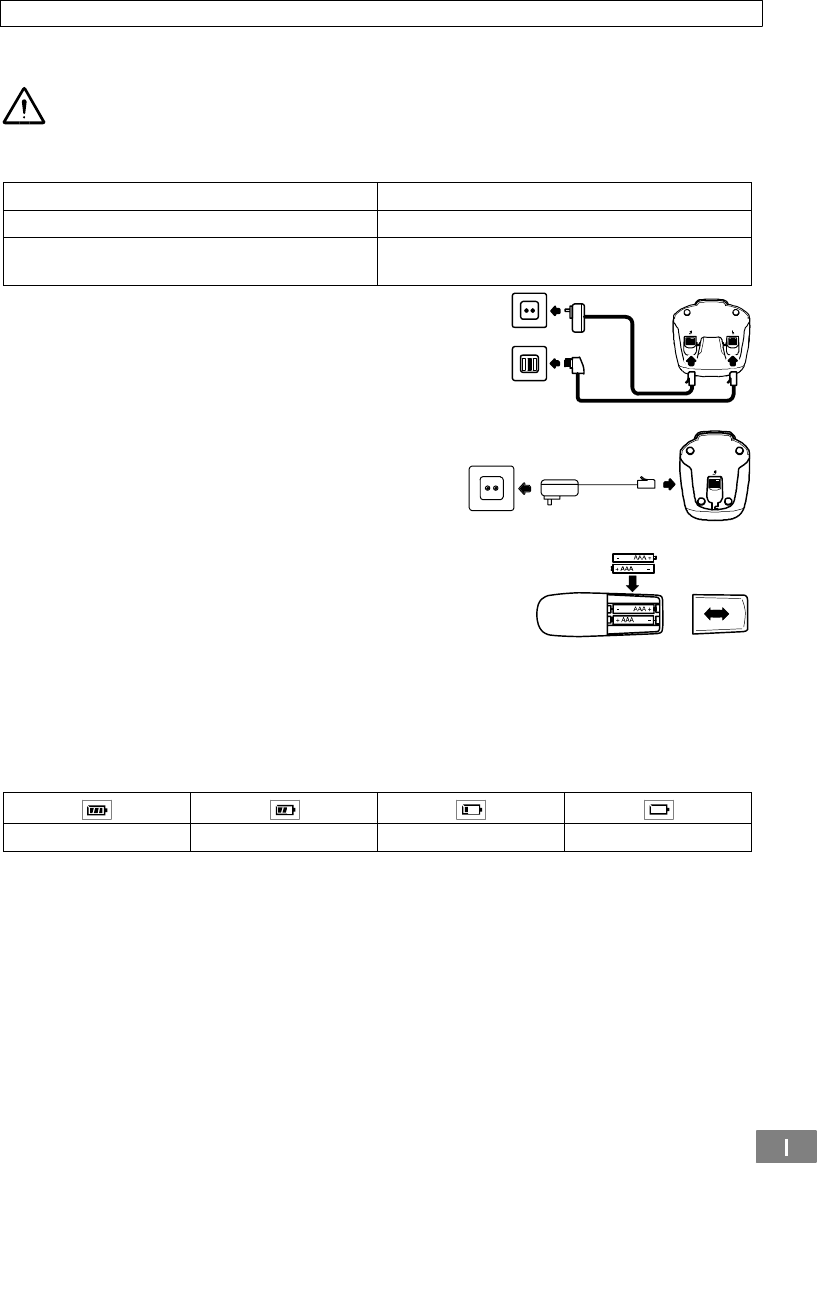
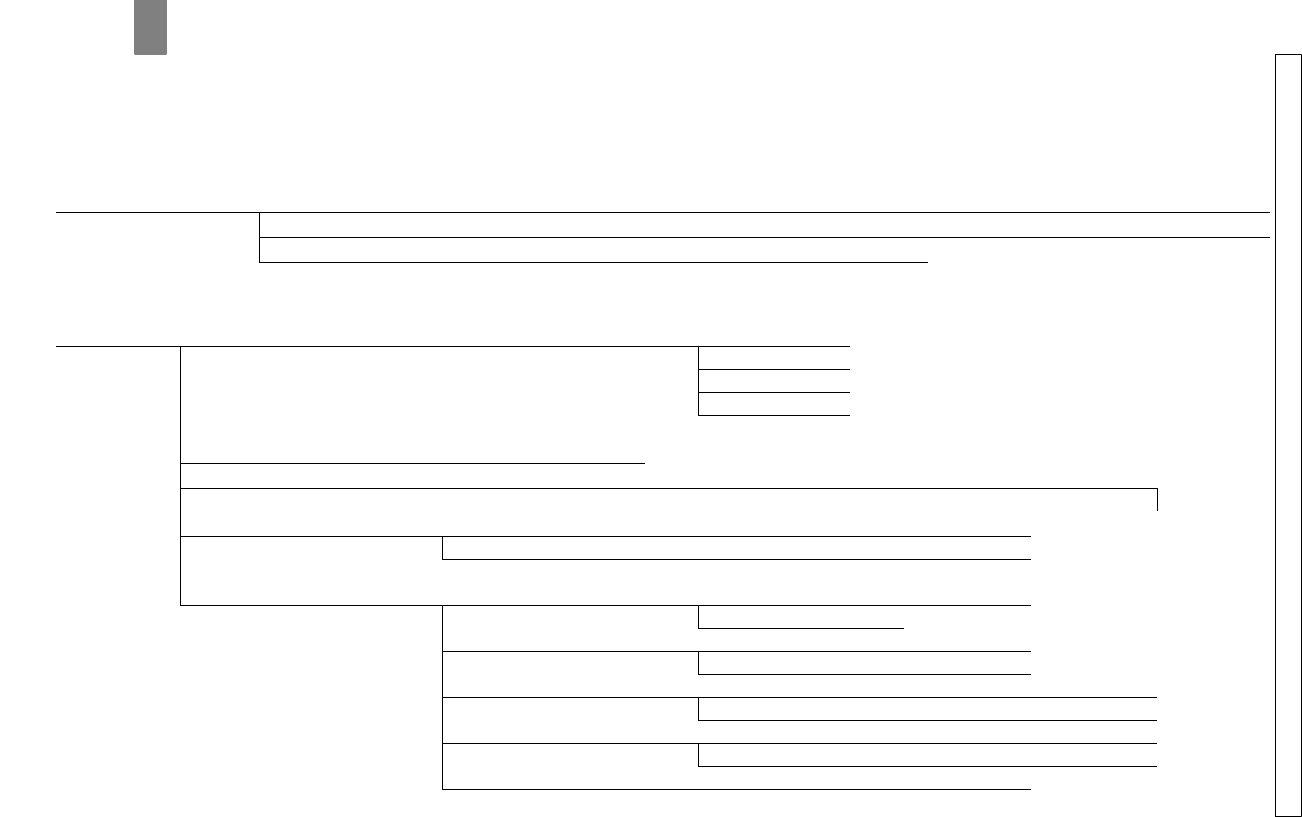
2.3Raccorder la base
Raccordez la base tel que décrit sur le croquis. Pour
des raisons de sécurité, n’utilisez que le bloc d’alimen-
tation et le câble de raccordement contenus dans la li-
vraison. Raccordez toujours le bloc d’alimentation de la
base à une prise de courant 230 V installée de manière
réglementaire.
2.4Branchement de la station de chargement
Raccordez le chargeur tel que représenté sur le cro-
quis. Pour des raisons de sécurité, n’utilisez que le
bloc d’alimentation fourni avec l’appareil.
2.5Placer les piles
Introduisez deux piles rechargeables de type AAA Ni−MH 1,2 V 550
mAh dans le compartiment prévu à cet effet. Veillez à une polarisa-
tion correcte (v. fig.)! Fermez le compartiment à piles.
Important : N’utilisez pas de piles rechargeables d’un autre type !
2.6Chargement des piles
Lors de la première mise en service, posez le combiné sur sa base pendant au moins 14 heures
(écran vers le haut). Le voyant de charge clignote sur la base. Le combiné chauffe lors du charge-
ment. C’est normal et inoffensif. Ne chargez pas le combiné avec des chargeurs d’un autre fabri-
cant. Si les piles ne sont pas chargées correctement, le téléphone peut présenter des dysfonc-
tionnements.
Le niveau actuel de chargement des piles est affiché à l’écran :
PleinMoyenFaibleVide
2.7− Systèmes de numérotation par tonalité (MFV) ou impulsions (IWV)
Vous pouvez raccorder votre téléphone aussi bien à des raccordements analogiques (système
de numérotation par impulsions) qu’à des raccordements numériques (système de numérotation
par tonalité). L’appareil est paramétré en usine sur la numérotation par tonalité. Si votre téléphone
ne fonctionne pas sur votre raccordement, le chapitre 7.3 vous informera de la façon dont vous
pouvez le passer sur le système analogique de numérotation par impulsions.
2.8Fonctionnement sur des installations à postes supplémentaires
Si votre téléphone est raccordé via une installation à postes supplémentaires, vous avez par
exemple la possibilité, par la touche R, de transférer des appels ou d’utiliser le rappel automati-
que. Un temps de flash de 90 ms est nécessaire sur une installation à postes supplémentaires.
Votre revendeur, chez qui vous avez acheté l’installation, vous dira si votre téléphone fonctionne
de manière irréprochable sur celle−ci.
2.9Services supplémentaires de votre opérateur
Votre téléphone SWITEL suppporte les services supplémentaires les plus importants de votre ex-
ploitant de réseau (par ex. le va−et−vient, la signalisation d’appel en instance, la conférence à
trois). Utilisez la touche R pour utiliser cettes services. Contactez votre opérateur pour décon-
necter les services supplémentaires.
TAE−F
230 V
50 Hz
230 V
50 Hz
− Eléments de manipulation −
30
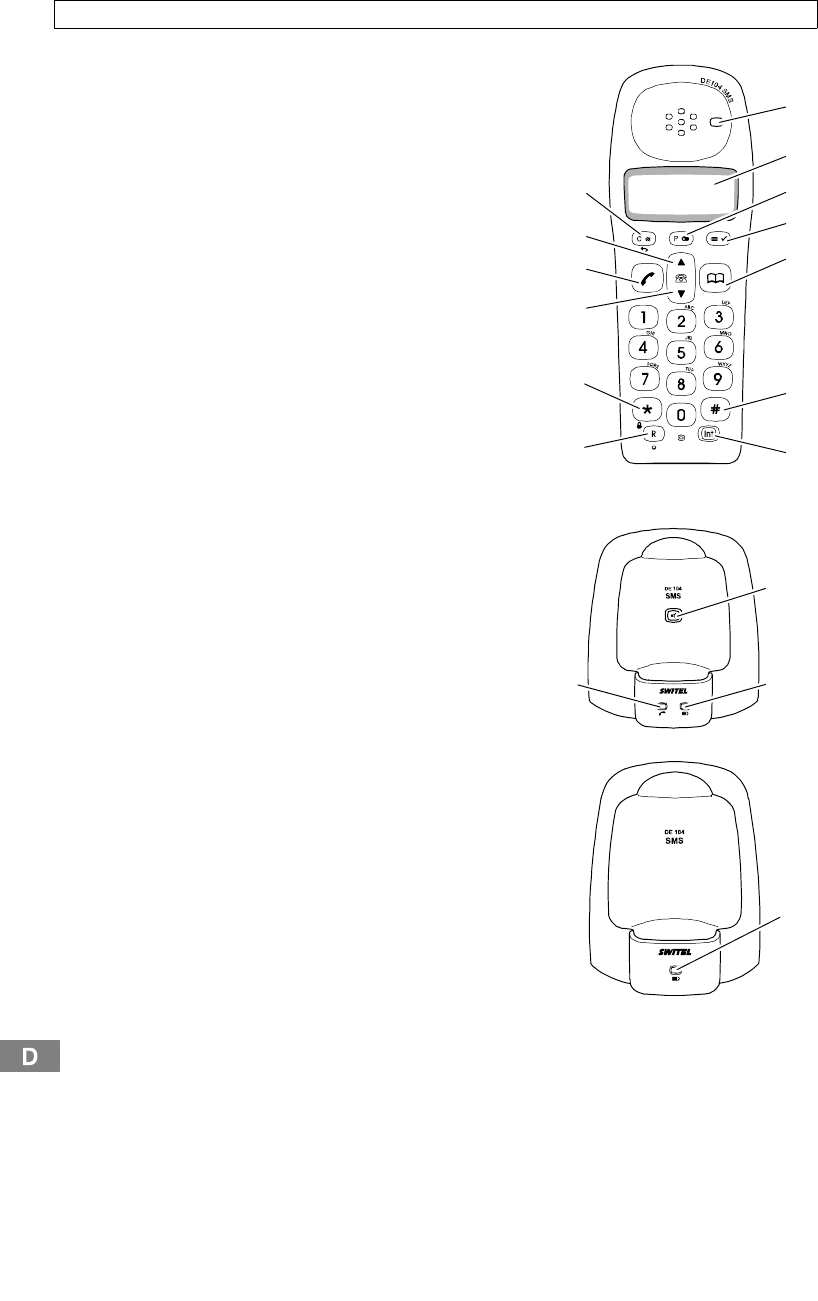
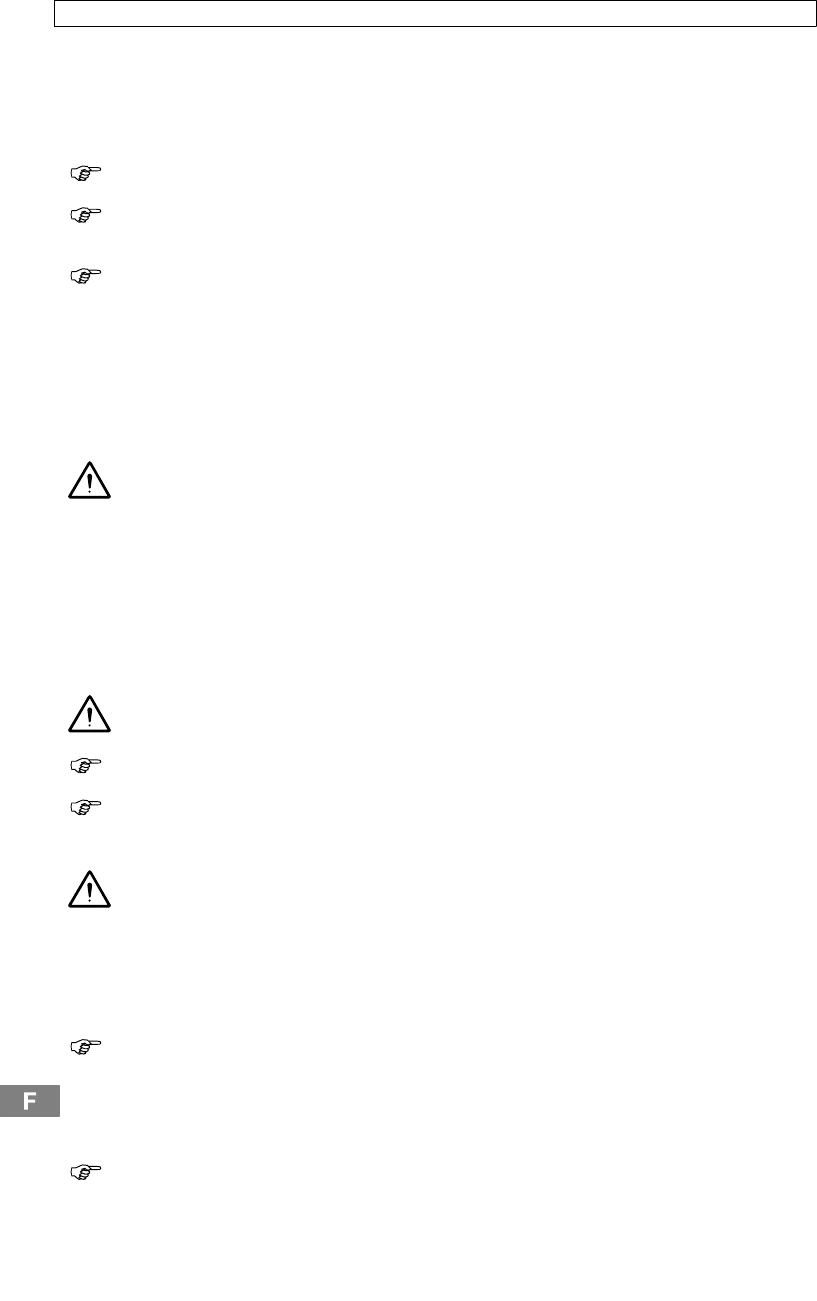
3Éléments de manipulation
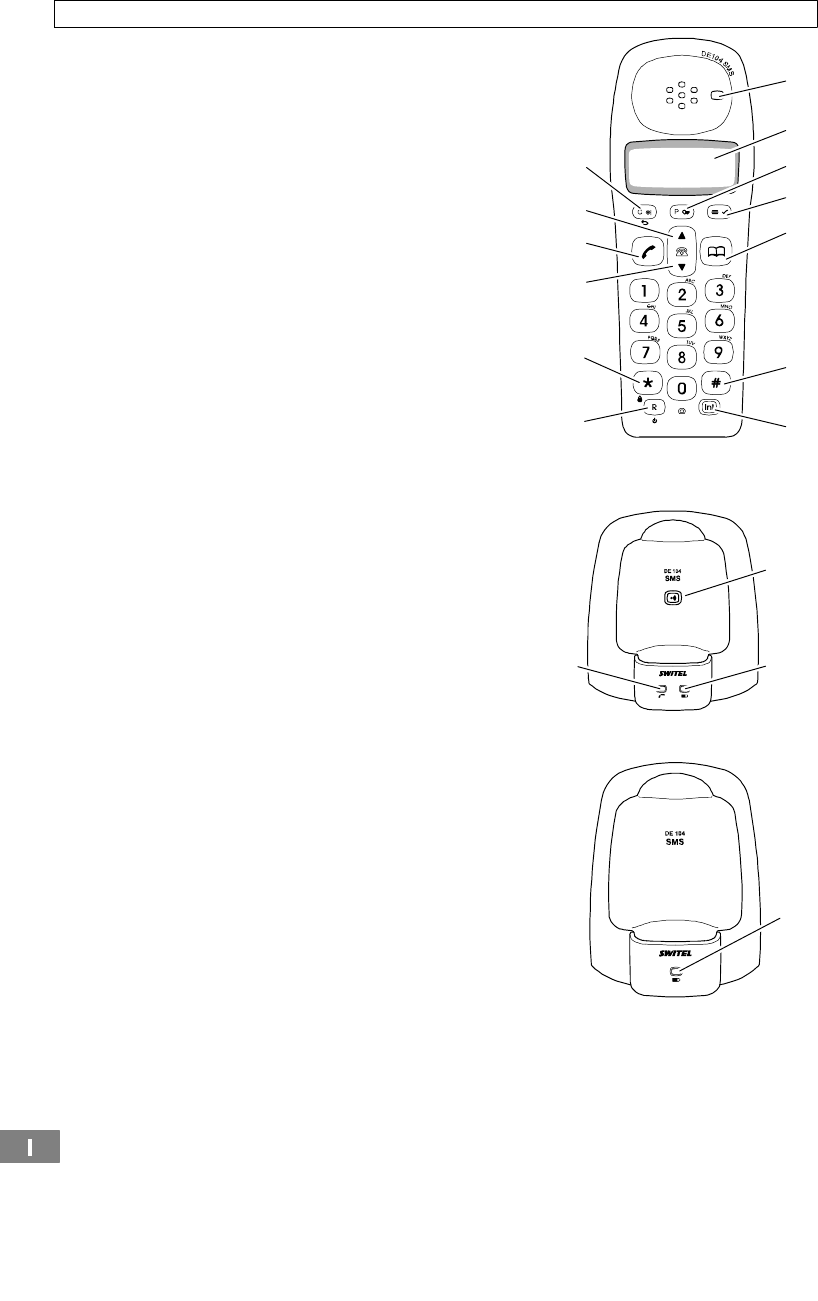
3.1Combiné
1Affichage des communications
2Ecran
3Réglage automatique des derniers
numéros
4Touche menu et
touche OK
5Répertoire
6Touche dièse
(pour les conférences téléphoniques)
7Communications internes et
conférences téléphoniques
8Secret et
effacer/ Retour
9Touche de sélection:
Vers le haut dans le menu
10Touche de communication
11Touche de sélection:
Vers le bas dans le menu
12Verrouillage du clavier (dés) activer
13Touche de signal R (activée/ désactivée)
3.2Base
14Touche de paging
(recherche du combiné)
15 Voyant de contrôle lumineux DEL
16Affichage de communication et de
réseau DEL
3.3Chargeur
17DEL voyant de charge
Vers la représentation suivante :
Pour des raisons de meilleure lisibilité, les touches du téléphone ci−dessous sont représentées
par un contour carré standardisé. C’est pourquoi les icônes des touches utilisés ici diffèrent lé-
gèrement de l’optique de ceux de votre téléphone. Nous garantissons cependant que vous les
reconnaîtrez.
//
/
1
2
3
4
5
6
7
8
9
11
10
12
13
14
15
16
17
− Affichages sur l’écran −
31
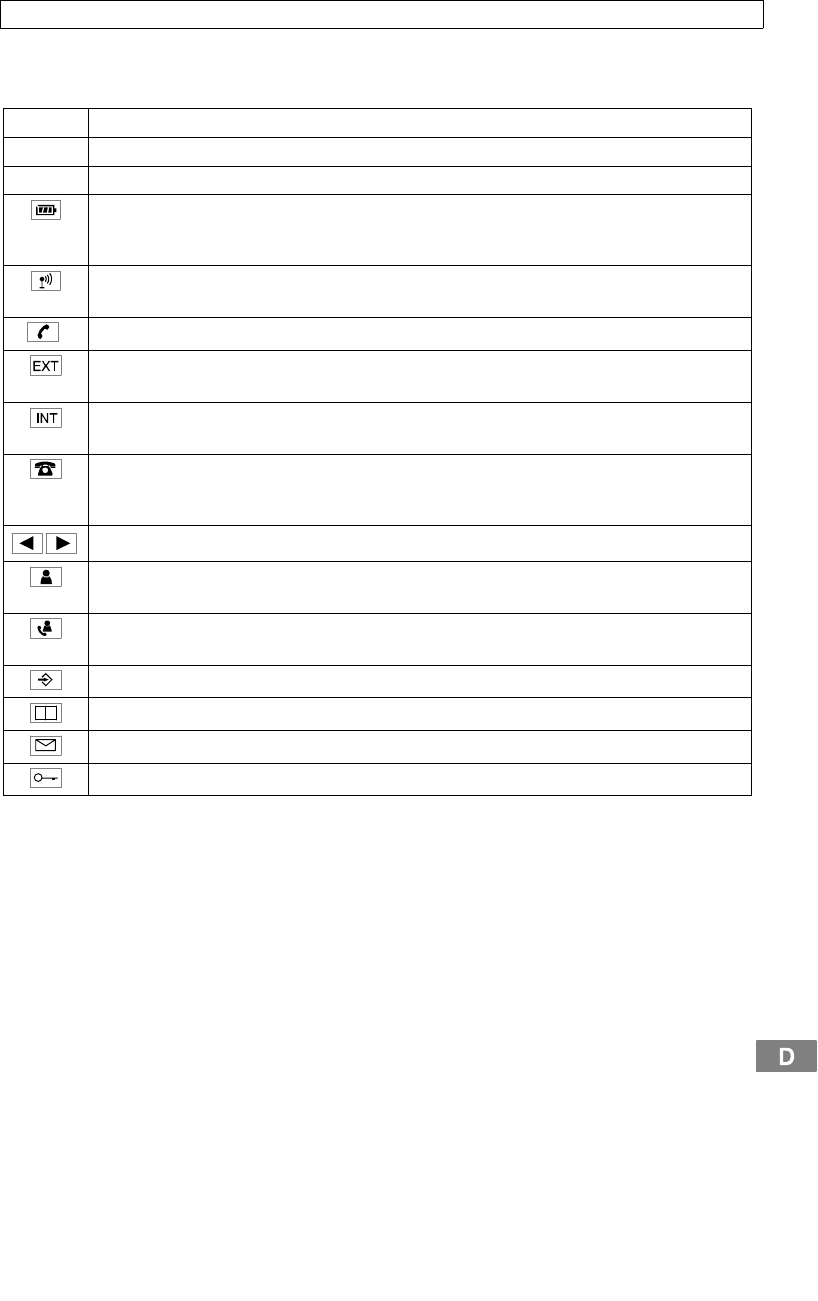
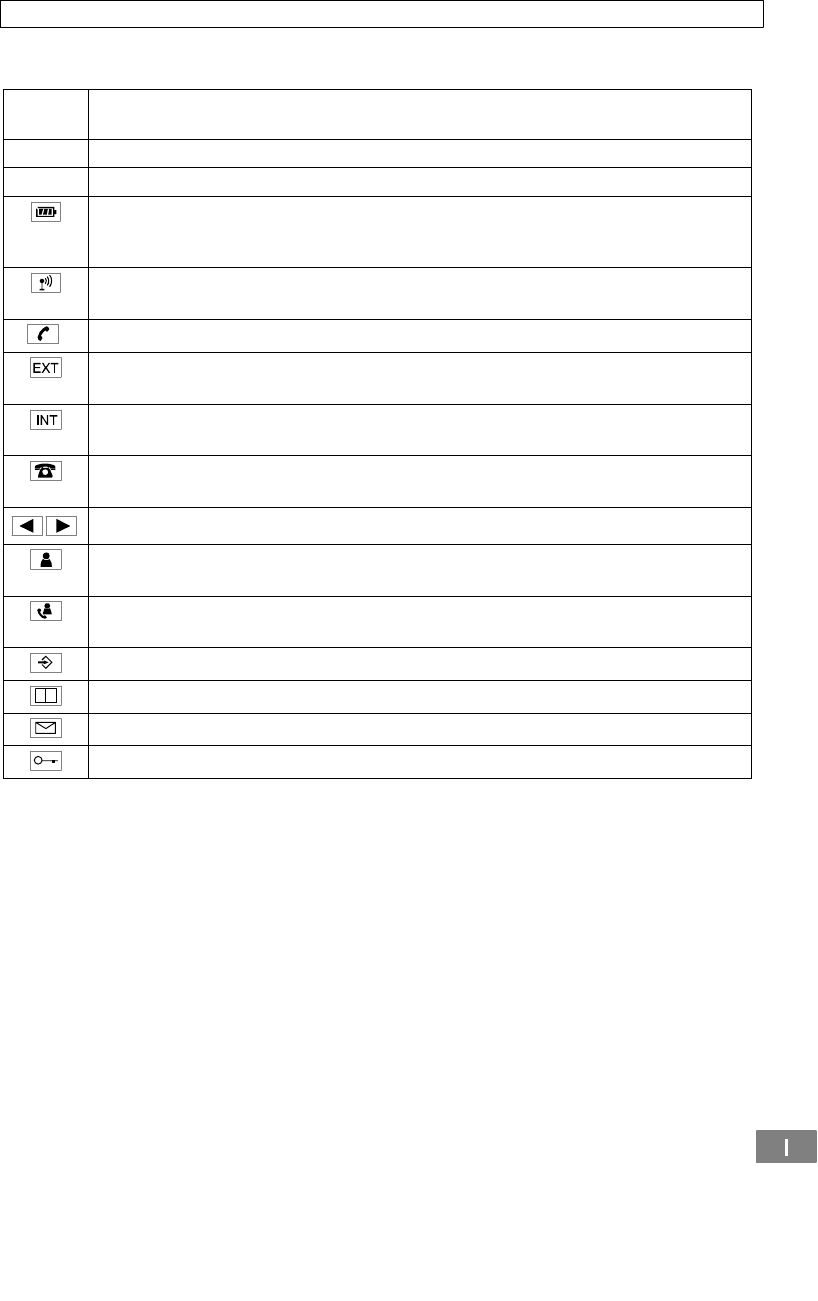
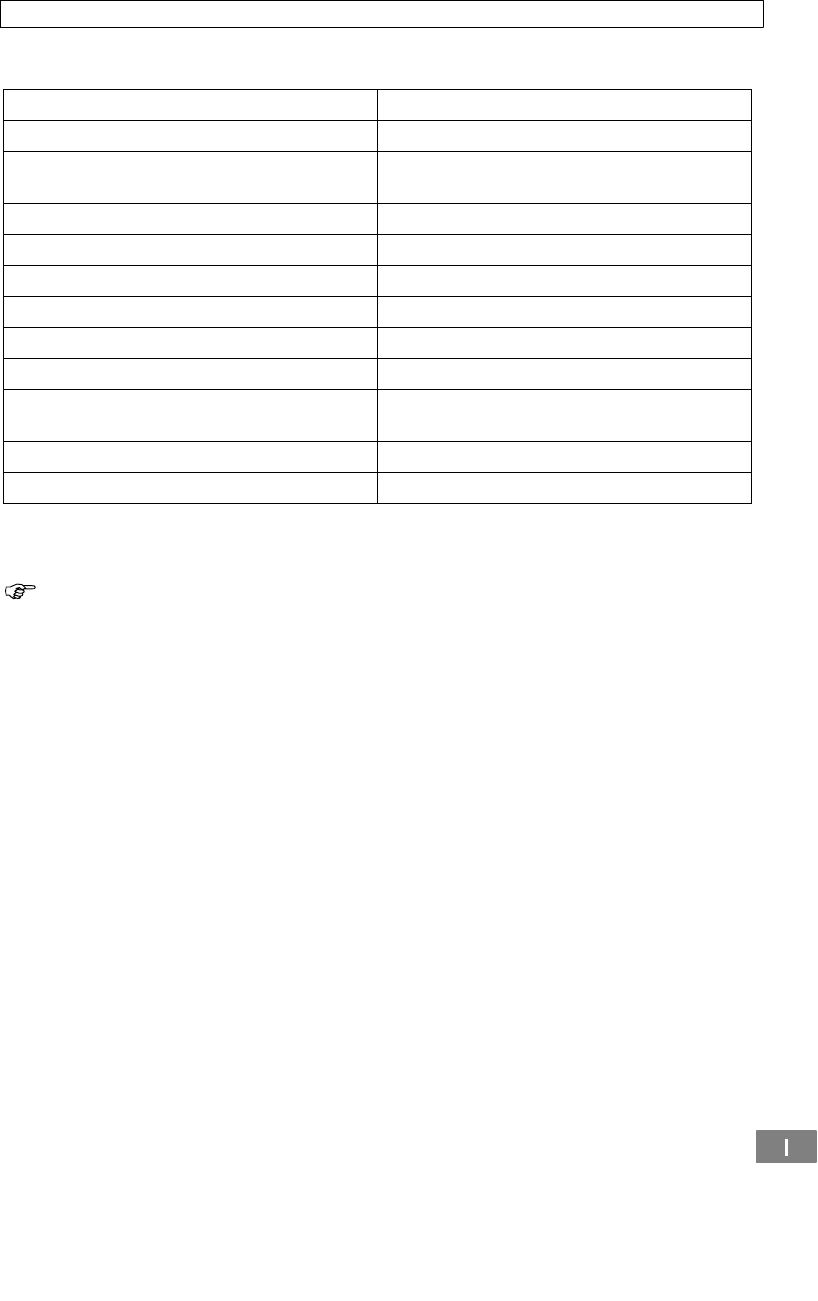
4Affichages sur l’écran
L’écran vous affiche toutes les fonctionnalités importantes avec leurs différents symboles et mes-
sages.
Icône
Description
Affichage de l’heure
Identification du combiné
Allumé en permanence : Affichage de la capacité des piles.
Affichage clignote : Les piles rechargeables doivent être chargées.
Segments continus : Les piles sont entrain de se charger.
La connexion à la base est bonne. Affichage clignote : Vous êtes au−delà de la
portée de la base.
Vous téléphonez.
Allumé en permanence : Vous passez une communication externe.
Affichage clignote : Un appel externe vous parvient.
Allumé en permanence : Vous passez une communication interne.
Affichage clignote : Un appel interne vous parvient.
Allumé en permanence : Vous vous trouvez dans la liste d’appels.
Affichage clignote : Il existe de nouveaux appels dans la liste d’appels.
Le numéro a plus de 12 chiffres.
Ce numéro n’a pas été réceptionné.
Il se trouve dans la liste d’appels.
Ce numéro a été réceptionné.
Il se trouve dans la liste d’appels.
Vous vous trouvez dans le menu principal.
Vous vous trouvez dans le répertoire.
Vous avez un nouveau message (SMS).
Le verrouillage du clavier est activé.
− Téléphoner −
32
5Téléphoner
Pour décrire le fonctionnement de votre nouveau téléphone, vous trouverez ci−dessous un texte
accompagné d’icônes : Si un icône de touche est représenté, cela signifie que vous devez ap-
puyez sur cette touche.
Par ailleurs, ces icônes seront également utilisés :
Entrer des chiffres ou des lettres
2 sec Appuyez 2 secondes sur la touche représentée
Signalisation vocale sur le combiné
Signalisation vocale
sur la base
4
Texte ou icônes sur l’écran
La signalisation vocale sur le combiné et la base ne fonctionne que si vous
ne l’avez pas désactivée auparavant !
5.1Réceptionner un appel
et , Prendre une communication
Terminer une communication
Si le combiné sonne, vous pouvez, en appuyant sur les touches
D ou E, modifier le volume de la sonnerie.
Si la sonnerie du combiné est désactivée, les communications entrantes ne sont signa-
lisées que par l’intermédiaire la base (dans la mesure ou sa sonnerie n’a pas été non
plus désactivée).
5.2Réceptionner deux appels
Des signaux d’avertissement (signalisation d’appel en instance) vous indiquent qu’un autre appel
arrive pendant que vous téléphonez. L’écran vous affiche le numéro du deuxième correspondant.
La séquence de touches suivante vous permet de passer d’un correspondant à l’autre; la liaison
continue d’être maintenue avec chaque correspondant.
, Changer de correspondant
Attention : L’affichage du numéro d’appel, le maintien de communications et la signali-
sation d’appel en instance sont des services confort de votre opérateur. Veuillez lui
demander de plus amples informations.
5.3Appeler un correspondant
Entrer le numéro d’appel (max. 32 chiffres)
Composer le numéro
Au cas où vous vous soyez trompés :
Bref : Efface la dernière saisie.
2 sec Long : Efface tout le numéro.
Vous pouvez également tout d’abord appuyer sur la touche de communication , vous obte-
nez ainsi la tonalité. Entrez ensuite le numéro de téléphone. Une correction des chiffres indivi-
duels n’est toutefois pas possible dans cette forme de saisie des numéros.
− Téléphoner −
33
5.4Pause de numérotation
Dans le cas d’installations à postes supplémentaires, il est nécessaire de composer un certain
numéro (par ex. le 9" ou le 0) pour obtenir la tonalité de ligne principale. Sur les quelques instal-
lations à postes supplémentaires plus anciennes, cela dure quelques instants jusqu’à ce que
vous entendiez la tonalité. Spécialement pour ces installations, après la prise de ligne, vous pou-
vez introduire une pause automatique afin de pouvoir continuer à composer directement le nu-
méro sans devoir attendre la tonalité.
Entre le chiffre de la ligne principale et le numéro, appuyez une fois sur la touche . L’affichage
P" apparaît sur l’écran. Après la prise de ligne, votre téléphone attend 3 secondes pour composer
le numéro d’appel réel.
La pause peut également être enregistrée dans le répertoire lors de la saisie de numé-
ros d’appel.
5.5Touche BIS
Votre téléphone enregistre les 10 derniers numéros composés dans une liste de répétition des
derniers numéros.
Ouvrir la liste de répétion automatique des derniers
numéros (le numéro composé en dernier apparaît à l’écran )
ou , Sélectionnez l’enregistrement et confirmez
Si un numéro est enregistré dans le répertoire, le nom enregistré apparaît à l’écran.
5.5.1Effacer tous les numéros de la liste de répétition automatique des derniers
numéros
Naviguer dans la liste de répétition automatique
des derniers numéros
2 sec , Effacer toute la liste
5.5.2Suppression d’un numéro d’appel issu de la liste de répétition des derniers
numéros
, ou Sélectionner l’enregistrement à effacer
, Effacer un enregistrement individuel
5.6Rappeler les appels manqués
Votre téléphone enregistre les dix derniers appels dans une liste d’appels.
ou Ouvrir la liste d’appels et naviguer dans les
enregistrements mémorisés.
Établir la connexion
5.7Composer des numéros enregistrés du répertoire
Des numéros enregistrés dans le répertoire (v. chap. 8.1) peuvent être appelés rapidement et
facilement.
, ou Ouvrir le répertoire
et sélectionner l’enregistrement
Établir la connexion
Vous pouvez composer un enregistrement du répertoire de façon ciblée en appuyant,
dans la fonction répertoire, sur la touche lettrée qui correspond à l’initiale de l’enregis-
trement. Exemple : Pour le numéro de téléphone de Peter", appuyez 1x sur et
utilisez encore, le cas échéant, les touches ou pour accéder rapidement à
l’enregistrement mémorisé.
− Téléphoner −
34
5.8Réglage du volume sonore de l’écouteur
Vous disposez de 5 niveaux pour régler le volume pendant une communication.
ou Appuyez dessus pendant la communication.
5.9Débrancher le microphone du combiné
Activer / Désactiver
Pendant une communication, vous pouvez brancher et débrancher le micro du combiné. De cette
façon, vous pouvez parler à une tierce personne sans que votre correspondant écoute. Le haut−
parleur du combiné reste toutefois activé ; cela signifie que vous pouvez continuer à écouter votre
correspondant au téléphone!
5.10Affichage de sa durée
16 secondes après le début de votre communication, l’écran passe du numéro composé, le cas
échéant, du numéro entrant sur l’affichage de la durée de la communication (hh−mm−ss).
5.11Verrouillage du clavier
3 sec Activer le verrouillage du clavier
Désactiver le verrouillage du clavier
Lorsque le verrouillage du clavier est activé (v. également chap. 7.4) , vous pouvez continuer de
réceptionner des appels entrants. Le verrouillage reste actif après que vous avez raccroché.
5.12Numérotation par tonalité temporaire
Si vous utilisez votre téléphone avec la numérotation par impulsions, vous n’avez pas besoin de
renoncer aux avantages de la numérotation par tonalité (p. ex. pour la consultation à distance d’un
répondeur).
4 sec Passage au système de numérotation par tonalité (le
temps de la communication)
À son terme, le système passe à la numérotation par impulsions.
5.13Remarques sur la portée
La portée du combiné est d’env. 50 mètres en pièces fermées et d’env. 300 mètres à l’extérieur.
Si la liaison avec la base est bonne, l’icône
h est allumé en permanence sur l’écran.
Si vous vous éloignez trop de la base, le symbole
hclignote et vous entendez des
avertissements sonores. Rapprochez−vous de la base pour ne pas que la communica-
tion soit interrompue.
Si le combiné a perdu la liaison avec la base, le message "BASE 1" apparaît à l’écran.
5.14Chercher le combiné (Paging)
Si vous avez égaré votre combiné, vous pouvez le faire rechercher. Appuyez sur la touche de pa-
ging de la base pour entendre les signaux d’appel de votre combiné pendant 30 secondes. Ap-
puyez à nouveau sur cette touche ou sur la touche de communication du combiné pour terminer
la fonction avant l’expiration des 30 secondes.
Tous les combinés déclarés sur la base sonnent.
ou Termine prématurément le Paging.
5.15Activation / désactivation du combiné
3 sec Activer / Désactiver
− Navigation dans le menu principal −
35
6Navigation dans le menu principal
6.1Naviguer dans le menu
Vous pouvez accéder à toutes les fonctions via différents menus. Le chapitre 7 vous indiquera
comment accéder à la fonction de votre choix
1.Ouvrez le menu désiré ou le répertoire avec la touche adéquate.
2.Sélectionnez le sous−menu désiré avec la touche ou .
3.Ouvrir le sous−menu avec la touche .
4.Sélectionnez la fonction désirée avec la touche ou .
5.Ouvrez la fonction avec la touche .
6.Sélectionnez le réglage désiré avec la touche ou .
7.Entrez des chiffres ou des lettres via le pavé numérique.
8.Confirmez les entrées avec la touche .
9.Avec la touche vous reculez d’une position.
Toute opération est automatiquement interrompue si aucune saisie n’est effectuée pen-
dant 20 secondes.
6.2Signaux d’avertissement
Afin de vous en faciliter sa manipulation, votre téléphone est équipé de divers signaux tels que
signaux de confirmation, de remarque, d’avertissement et autres. Vous pouvez à votre gré activer
ou désactiver certains d’entre eux. Comme par exemple :
SSon des touches : Un son bref confirme que vous avez appuyé sur une touche de
votre combiné.
SSignal sonore d’avertissement pile rechargeable vide :En cas de trop faible
capacité des piles, un signal sonore d’avertissement vous rappelle que vous devez
charger votre combiné.
SSignal sonore d’avertissement de la portée : Si vous vous êtes trop éloigné de la
base, vous entendez un signal sonore d’avertissement.
La structure de menu au chapitre 7. vous informe comment vous pouvez activer ou désactiver
cette fonction.
Il existe encore d’autres signaux qui vous facilitent la navigation dans le menu. Ils ne peuvent pas
être désactivés. Voici les principaux :
SSignal de confirmation : Deux signaux brefs ascendants signalisent que la sai-
sie a réussi.
SSignal sonore d’avertissement : Un long signal aigu que vous entendez après
avoir complètement navigué dans le menu signalise qu’il n’existe plus aucune autre
possibilité de sélection.
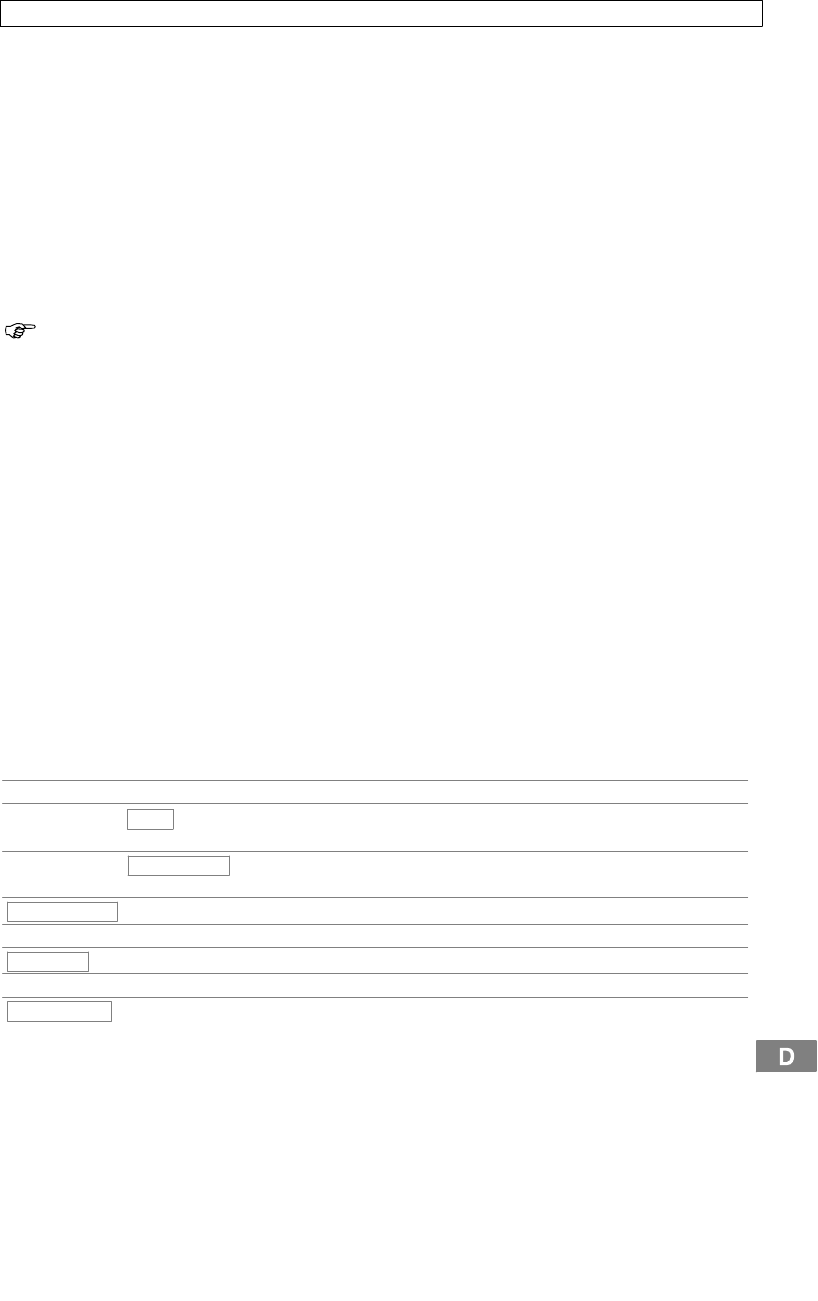
6.3Exemple
L’exemple Écrire des SMS" vous explique de façon plus détaillée comment vous naviguez dans
le menu et les sous−menus et comment vous effectuez des saisies. Pour tous les réglages, procé-
dez comme dans cet exemple.
Ouvrez le menu principal
ou
, SMS−Sélectionner la fonction et confirmer
ou
5
, Sélectionner la fonction et confirmer
(Menu SMS/ Écrire)
66&
, Accepter la demande de saisie
, Entrer le message et confirmer
7/ , Accepter la demande de saisie
, Entrer le numéro et confirmer
8/9
Le message est envoyé
F
− Structure du menu −
36
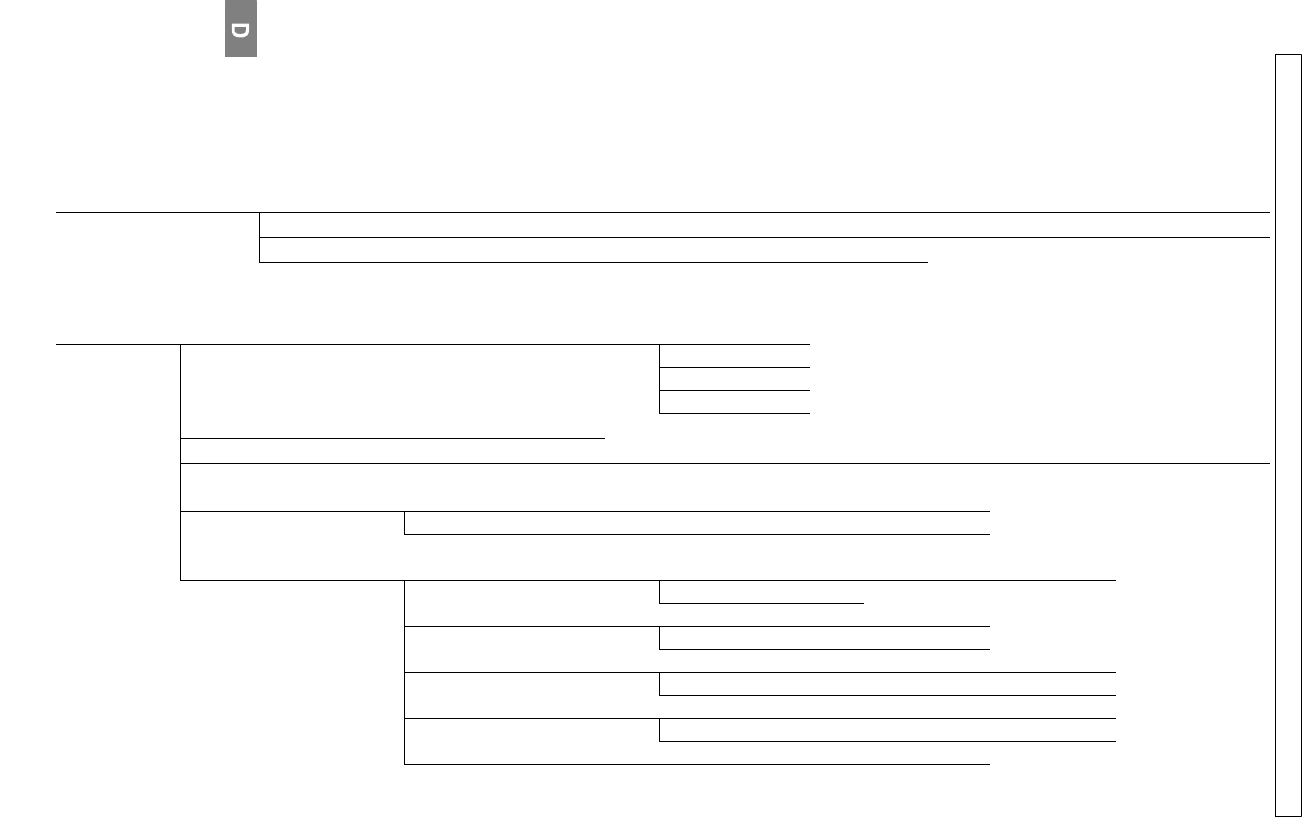
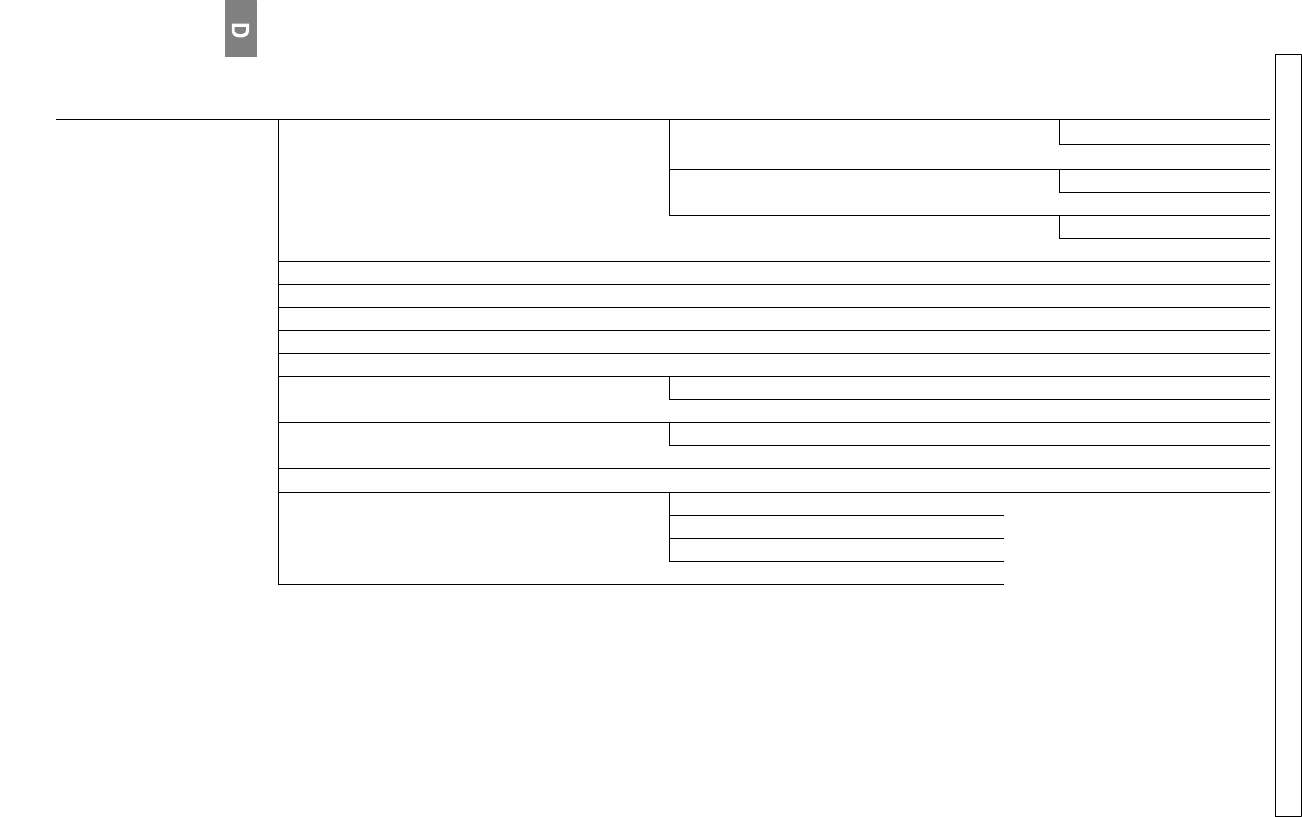
7Structure du menu
Vous accédez au menu principal en appuyant sur la touche . Sélectionnez ensuite avec les touches et le sous−menu désiré et confirmez votre
sélection avec la touche . Ou entrez l’information demandée (les saisies propres sont par la suite imprimées en italique et caractérisées par ). Votre
saisie est généralement confirmée à la fin par un signal sonore .
7.1Le répertoire
REPERTOIREAJOUTERNomNuméroMELODIE 1−5
MODIFIERNom xyNuméro xyMELODIE 1−5
SUPPRIMERNom xyCONFIRMER ?
7.2SMS
SMSRECEPTIONREPONDRE
EFFACER
TRANSFERER
DETAILS
SMS PRIVE
ECRIREMESSAGE ? TexteNUMERO ? Numéro
ENVOI...
EFFACER TOUSRECEPTIONCONFIRMER ?
SMS PRIVECONFIRMER ?
CONFIGURERBIPS ALERTEACTIVE
DESACTIVE
CHOIX SERV.EMISSION 1
EMISSION 2
SERV. RECPT.RECEPTION 1 Numéro
RECEPTION 2 Numéro
SERV. EMIS.EMISSION 1 Numéro
EMISSION 2 Numéro
NUM DE TERMNuméro
F
− Structure du menu −
37
7.3Réglage
REGLAGESVOLUME BASEVOLUME 1
VOLUME 2
VOLUME 3
VOLUME 4
VOLUME 5
VOLUME
COUPE
MELODIE BASEMELODIE 1
MELODIE 2
MELODIE 3
MELODIE 4
MELODIE 5
SUPP COMBINEPIN ?* PIN numéro le combiné
CODE PIN*PIN ? An-
cien PIN
NOUVEAU
PIN
Nouveau PINRETAPER Nou-
veau PIN
NUMEROTA-
TION
FREQ VOCA-
LE
DECIMALE
TOUCHE RREGLAGE 1
REGLAGE 2
REGL DEFAUT**PIN ? PINCONFIR-
MER ?
*Tous les PINs sont paramétrés sur 0000 en usine. Si vous appuyez sur la touche (deux secondes), vous interrompez alors à tout moment la
programmation et retournez dans le mode d’attente.
**Prudence : Tous
les paramétrages sont remis à l’état initial usine ! Tous les enregistrements de la liste sont effacés !
F
− Structure du menu −
38
7.4Combiné
COMBINEBIPSBIP TOUCHEACTIVE
DESACTIVE
BATT FAIBLEACTIVE
DESACTIVE
HORS PORTEEACTIVE
DESACTIVE
VOL SON INTVOLUME 1, 2, 3, 4, 5, VOLUME COUPE
VOL SON EXTVOLUME 1, 2, 3, 4, 5, VOLUME COUPE
MELODIE INTMELODIE 1, 2, 3, 4, 5
MELODIE EXTMELODIE 1, 2, 3, 4, 5
REG HEURE* hh−mm
ALARME*ACTIVE hh−mm
DESACTIVE
RESPONSE AUTO**ACTIVE
DESACTIVE
NOMABC
LANGUE***ENGLISH
FRANCAIS
DEUTSCH
ITALIANO
VERR CLAVIERACTIVE****
*Entrer les heures à 4 chiffres et en format de 24 heures. Exemple : Entrer 17:53 heures comme 1753".
**ACTIVÉ : Vous prenez une communication en retirant le combiné de sa base (réglage usine).
DÉSACTIVÉ : Vous ne pouvez prendre une communication qu’avec la touche .
Leggere attentamente le presenti istruzioni per l’uso.
1.1Impiego conforme agli usi previsti
Il presente apparecchio consente di compiere telefonate nell’ambito di una rete di telecomunica-
zione. Qualsiasi altro impiego è considerato come non conforme agli usi previsti. Non sono con-
sentite modifiche o trasformazioni non autorizzate. Non aprire per nessuna ragione l’apparecchio
autonomamente e svolgere riparazioni di propria iniziativa.
1.2Luogo di installazione
Il telefono è stato progettato per l’uso in ambienti chiusi con una temperatura compresa tra 10 °C
e 30 °C. Si consiglia di evitare l’uso della stazione base in ambienti esposti a umidità come bagno
e locali di lavaggio. Evitare inoltre un’esposizione a fumo, polvere, vibrazioni, sostanze chimiche,
umidità, calore e raggi solari diretti. Posizionare la stazione base con una distanza di 1 m da altre
apparecchiature elettroniche visto che altrimenti si possono verificare interferenze reciproche.
Evitare l’uso dell’unità portatile in aree esposte al rischio di deflagrazione.
1.3Alimentatore di rete
Utilizzare esclusivamente l’alimentatore a spina fornito in dotazione visto che altri alimentatori di
rete potrebbero addirittura danneggiare il telefono. Non ostacolare il libero accesso all’alimenta-
tore a spina con mobili o altri oggetti simili.
1.4Cavo di collegamento telefonico
Osservare un’identica disposizione degli attacchi in caso di sostituzione del cavo di collegamento
telefonico fornito.
1.5Batterie ricaricabili
Non gettare le batterie nel fuoco, né sommergerle in acqua.
1.6Caduta di tensione
In caso di caduta di tensione non è possibile impiegare l’unità per telefonare. Si consiglia di ricor-
rere in caso di emergenza ad un telefono con filo in grado di funzionare anche senza alimenta-
zione elettrica esterna.
1.7Impianti telefonici interni
E’ possibile collegare il telefono ad un impianto telefonico interno. Non è possibile garantire che
il telefono acquistato funzioni in ogni caso con qualsiasi tipo di impianto telefonico interno.
1.8Avvertenza per apparecchiature mediche
Evitare di utilizzare il telefono nelle vicinanze di apparecchiature mediche. Non è possibile esclu-
dere completamente il rischio di un influsso su cardiostimolatori. Telefoni DECT possono causare
un fastidioso ronzio in apparecchi acustici.
1.9Pulizia e cura
Pulire le superfici degli apparecchi con un panno morbido e antipilling. Non utilizzare mai deter-
genti o solventi aggressivi. I piedini in gomma della stazione base non sono resistenti a qualsiasi
detergente.
1.10Smaltimento
La conversione della legislazione europea in leggi e direttive nazionali impone il corretto
smaltimento di beni di consumo. Il simbolo riportato sul telefono e raffigurato qui a lato
indica, che apparecchi usati elettrici ed elettronici e batterie esauste non sono da smaltire
assieme ai normali rifiuti domestici.
Procedere allo smaltimento di apparecchi elettrici o elettronici presso un centro di rac-
colta incaricato con lo smaltimento conforme.
Consegnare batterie ed accumulatori per lo smaltimento presso rivenditori al dettaglio
di batterie o centri di raccolta che mettono a disposizione appositi contenitori.
Smaltireconfezioni ed imballaggi in base a quanto indicato dalle norme in vigore a livello
locale.
− Messa in funzione −
53
2Messa in funzione
2.1Indicazioni di sicurezza
Attenzione: Prima della messa in funzione, leggere attentamente le indicazioni di sicu-
rezza riportate al capitolo 1.
2.2Verificare il contenuto della confezione
La confezione contiene:
una stazione base con alimentatore a spina
un cavo di collegamento telefonico
quattro unità portatiliotto batterie standard ricaricabili
tre stazioni di carica con due l’alimentatori a
spina
un manuale di istruzioni per l’uso
2.3Collegare la stazione base
Procedere al collegamento della stazione base se-
guendo quanto raffigurato sul disegno. Utilizzare per mo-
tivi di sicurezza solo l’alimentatore di rete ed il cavo di col-
legamento telefonico forniti in dotazione. L’alimentatore
di rete della stazione base deve essere collegato ad una
presa elettrica da 230 V installata a regola d’arte.
2.4Collegare la stazione di carica
Procedere al collegamento della stazione di carica se-
guendo quanto raffigurato sul disegno. Si consiglia di utiliz-
zare per motivi di sicurezza soltanto l’alimentatore fornito
in dotazione.
2.5Inserire le batterie
Inserire due batterie del tipo AAA Ni−MH 1,2 V 550 mAh nel vano
batterie aperto. Osservare la corretta polarità (vedifigura)! Chiudere
infine il vano batterie.
Importante: Non utilizzare batterie di tipo diverso!
2.6Caricare le batterie
Posizionare l’unità portatile in sede di prima messa in funzione per minimo 14 ore nella stazione
base (display verso sopra). Presso la stazione base si accende la spia di controllo dello stato di
carica. L’unità portatile si surriscalda durante il processo di carica. Questo è un fenomeno normale
e non pericoloso. Evitare di caricare l’unità portatile con dispositivi di carica differenti o estranei.
L’uso di batterie standard non ricaricate in maniera corretta può causare difetti o guasti al telefono.
Lo stato di carica attuale è visualizzato sul display:
CaricoA metàDeboleScarico
2.7Procedura di selezione a toni (PST) o a impulsi (PSI)
Il telefono è utilizzabile sia per allacciamenti analogici (procedura di selezione a impulsi), sia per
allacciamenti digitali (procedura di selezione a toni). L’impostazione di base dell’apparecchio pre-
vede la procedura di selezione a toni digitale. Nel caso di mancato funzionamento del telefono
presso il proprio collegamento, consultare il capitolo 7.3 per ottenere le indicazioni necessarie alla
selezione della procedura di selezione a impulsi analogica.
2.8Esercizio in impianti telefonici interni
Se il proprio telefono è collegato ad un impianto telefonico interno, si ha per es. modo di usufruire
delle funzioni di trasferimento di chiamata o di richiamata automatica premendo il tasto R. Per
operare in un impianto telefonico interno è necessario impostare un tempo flash di 90 ms. Il riven-
ditore specializzato è in grado di indicare se il telefono acquistato funzionerà senza alcun pro-
blema nel proprio impianto telefonico interno.
2.9Servizi addizionali del proprio gestore di rete telefonica
Il telefono SWITEL supporta i più importanti servizi addizionali del proprio gestore di rete telefo-
nica (per es. funzioni di chiamata in attesa, avviso di chiamata, conferenza a tre). Utilizzare il tasto
R per accedere a questi servizi. Rivolgersi al proprio gestore di rete telefonica per ottenere
l’abilitazione ai servizi addizionali.
TAE−F
230 V
50 Hz
230 V
50 Hz
− Elementi di comando −
54
3Elementi di comando
3.1Unità portatile
1Visualizzazione di chiamata
2Display
3Ripetizione di chiamata
4Tasto menu e
tasto OK
5Rubrica telefonica
6Tasto cancelletto
(per chiamate a conferenza)
7Chiamate interne e
a conferenza
8Funzione di muting e
Cancella / Indietro
9Tasto di selezione:
Verso sopra nel menu
10Tasto di chiamata
11Tasto di selezione:
Verso sotto nel menu
12Attivare / Disattivare il blocco tastiera
13Tasto di segnalazione R (ON / OFF)
3.2Stazione base
14Tasto di ricerca unità portatile
(tasto di paging)
15LED della spia di controllo del processo
di caricamento
16LED della spia di visualizzazione
chiamata e rete
3.3Stazione di carica
17LED di controllo dello stato di carica
Riguardo la seguente modalità di rappresentazione:
Per una migliore leggibilità i tasti del telefono sono raffigurati qui di seguito con un contorno ret-
tangolare uniforme. I simboli dei tasti utilizzati possono pertanto discostarsi leggermente dall’ot-
tica dei tasti del proprio telefono. Ad ogni modo è possibile riconoscere i tasti.
//
/
1
2
3
4
5
6
7
8
9
11
10
12
13
14
15
16
17
− Visualizzazioni di display −
55
4Visualizzazioni di display
Il display indica le funzioni più importanti attraverso simboli e messaggi vari.
Sim-
bolo
Descrizione
Visualizzazione dell’ orario
Identificazione dell’unità portatile
Spia sempre accesa: Indicazione dello stato di carica delle batterie.
Indicazione lampeggia: Procedere al caricamento delle batterie.
Segmenti che scorrono: Batterie in corso di caricamento.
Il collegamento con la stazione base è buono. Indicazione lampeggia: Superata
la portata della stazione base.
Chiamata telefonica in corso.
Spia sempre accesa: Chiamata telefonica esterna in corso.
Indicazione lampeggia: Chiamata telefonica esterna in arrivo.
Spia sempre accesa: Chiamata telefonica interna in corso.
Indicazione lampeggia: Chiamata telefonica interna in arrivo.
Spia sempre accesa: Ci si trova nell’elenco chiamate.
Indicazione lampeggia: Nuove chiamate nell’elenco chiamate.
Il numero di chiamata ha più di 12 cifre.
Non si è risposto al numero di chiamata indicato.
Il numero è riportato nell’elenco chiamate.
Si è risposto al numero di chiamata indicato.
Il numero è riportato nell’elenco chiamate.
Ci si trova nel menu principale.
Ci si trova nella rubrica telefonica.
Presenza di un nuovo messaggio (SMS).
Il blocco tastiera è attivato.
− Compiere telefonate −
56
5Compiere telefonate
Per descrivere il funzionamento del nuovo telefono, nel testo si ricorre all’uso di simboli. La raffigu-
razione di un simbolo di tasto indica che è necessario premere il rispettivo tasto.
In più si ricorre ai seguenti simboli:
Immissione di numeri o lettere
2 sec Premere il tasto raffigurato per 2 secondi
Segnalazione acustica presso l’unità portatile
Segnalazione acustica
presso la stazione base
Testo o simboli sul display
La segnalazione acustica presso unità portatile e stazione base opera solo
se la funzione non è stata precedentemente disattivata!
5.1Ricevere una chiamata
e , Ricevere la chiamata telefonica
Concludere la chiamata
Se l’unità portatile squilla, premendo il tasto
D o E è possibile modificare il volume del segnale di chiamata dell’unità portatile.
Avendo disattivato il segnale di chiamata presso l’unità portatile, le chiamate in arrivo
sono segnalate solo presso la stazione base (purché la segnalazione acustica di chia-
mata non sia stata anche qui disattivata).
5.2Ricevere due chiamate
Dei segnali acustici (avviso di chiamata) indicano la ricezione di una seconda chiamata durante
lo svolgimento della prima telefonata. Sul display viene visualizzato il numero del secondo chia-
mante. La seguente combinazione di tasti consente di passare, in presenza di due interlocutori
di chiamata, da un partner all’altro trattenendo rispettivamente il collegamento con l’altro partner
di chiamata.
, Cambiare il partner di chiamata
Attenzione: La visualizzazione del numero di chiamata, le funzioni di trattenimento e
avviso di chiamata sono servizi a valore aggiunto del proprio gestore di rete telefonica.
Per maggiori dettagli a riguardo, rivolgersi al proprio gestore di rete telefonica.
5.3Condurre chiamate
Immettere un numero di chiamata (max. 32 cifre)
Selezionare un numero di chiamata
Nel caso di inserimento errato:
Breve: Cancella l’ultimo inserimento.
2 sec Lungo: Cancella l’intero numero.
E’ altresì possibile premere prima il tasto di chiamata e ricevere il segnale di linea libera. Inse-
rire quindi il numero telefonico. Con una simile immissione di numeri non è possibile eseguire una
correzione di singole cifre che compongono il numero di chiamata.
5.4Pausa di selezione
In presenza di impianti telefonici interni è necessario selezionare un determinato numero (per es.
9" o 0) prima di ottenere un segnale di libero che indica la disponibilità della linea di collega-
mento di rete. Alcuni impianti telefonici interni di vecchia data richiedono un intervallo di tempo
di poco superiore prima di trasmettere un segnale di libero. In particolare, proprio per questi im-
pianti telefonici interni è possibile prevedere, una volta ottenuta la linea di collegamento di rete,
una pausa automatica che consente di comporre il numero di chiamata desiderato senza dover
necessariamente attendere il segnale di libero.
Premere tra la cifra per il segnale dalla centrale ed il numero di chiamata una volta il tasto .
Sul display viene visualizzato P". In seguito alla disponibilità della linea di collegamento di rete,
il telefono aspetta 3 secondi prima di procedere con la selezione del numero che si desidera chia-
mare.
La pausa è anche programmabile in sede di immissione dei numeri di chiamata nella
rubrica telefonica.
5.5Ripetizione di selezione
Il telefono memorizza gli ultimi 10 numeri di chiamata selezionati in un elenco disponibile per la
funzione di ripetizione di chiamata.
− Compiere telefonate −
57
Aprire l’elenco di ripetizione di chiamata (il
numero di chiamata composto per ultimo appare sul
display)
o , Scegliere la voce e instaurare un collegamento
Se il numero di chiamata è inserito nella rubrica telefonica, sul display appare il nome
rispettivamente memorizzato.
5.5.1Cancellare tutti i numeri di chiamata dall’elenco di ripetizione di chiamata
Passare all’elenco di ripetizione di chiamata
2 sec , Cancellare tutta la lista
5.5.2Cancellare un numero di chiamata dall’elenco di ripetizione di chiamata
, o Selezionare la voce da cancellare
, Cancellare una singola voce
5.6Selezionare numeri di chiamate perse
Il telefono memorizza le ultime dieci chiamate in un elenco chiamate.
o Aprire l’elenco chiamate e scorrere le
voci memorizzate
Selezionare un collegamento
5.7Selezionare numeri di chiamata memorizzati dalla rubrica telefonica
Numeri di chiamata memorizzati nella rubrica telefonica (vedi cap. 8.1) sono disponibili in
maniera rapida e semplice.
, o Aprire la rubrica telefonica e scegliere
una voce dall’elenco telefonico
Selezionare un collegamento
E’ possibile selezionare direttamente le voci presenti nella rubrica telefonica premendo
dopo il richiamo della rubrica telefonica il tasto con la lettera iniziale della voce che si
desidera chiamare. Esempio: Per il numero telefonico di Peter" premere 1x e uti-
lizzare se necessario anche i tasti o per passare rapidamente alla voce me-
morizzata.
5.8Impostare il volume del ricevitore
Il volume è regolabile durante lo svolgimento di una chiamata in cinque livelli.
o Premere con chiamata in corso.
− Compiere telefonate −
58
5.9Silenziamento del microfono nell’unità portatile
Attivare / Disattivare
Con chiamata telefonica in corso è possibile attivare o disattivare il microfono dell’unità portatile.
In tal modo si ci può per es. consultare con una terza persona mentre è in corso una chiamata
con un altro interlocutore che non ha quindi modo di intercettare il parlato. L’altoparlante dell’unità
portatile rimane però attivato; ciò significa che è possibile sentire il partner di chiamata!
5.10Visualizzazione della durata di conversazione
16 secondi dopo l’inizio di una chiamata il display passa automaticamente dalla visualizzazione
del numero di chiamata selezionato o ricevuto alla visualizzazione della durata di conversazione
(hh−mm−ss).
5.11Blocco tastiera
3 sec Attivare il blocco tastiera
Disattivare il blocco tastiera
Con blocco tastiera attivato (vedi anche cap. 7.4) è possibile continuare a ricevere chiamate come
di consueto. Anche dopo aver concluso la chiamata il blocco tastiera continua a essere attivo.
5.12Selezione a toni temporanea
In caso di esercizio del telefono con procedura di selezione a impulsi, non è necessario rinunciare
ai vantaggi della procedura di selezione a toni (per es. per l’interrogazione a distanza di una segre-
teria telefonica).
4 sec Passaggio alla procedura di selezione a toni
(per la durata di una telefonata)
Alla fine della chiamata il telefono passa di nuovo automaticamente alla procedura di selezione
a impulsi.
5.13Indicazioni riguardo la portata
La portata dell’unità mobile è di ca. 50 metri in ambienti chiusi e di ca. 300 metri all’aperto. In pre-
senza di un buon collegamento con la stazione base, sul display è visualizzato costantemente
il simbolo
h.
Nel caso di un allontanamento eccessivo dalla stazione base, il simbolo
h lampeggia
facendo inoltre risuonare un segnale acustico di allarme. Avvicinarsi di nuovo alla sta-
zione base altrimenti la chiamata in corso sarà interrotta.
Nel caso in cui l’unità portatile dovesse aver perso il collegamento con la stazione
base, sul display appare il messaggio BASE 1".
5.14Ricerca dell’unità portatile (funzione di paging)
Con unità portatile fuori posto è possibile cercare ed individuare la posizione dell’apparecchio.
Premere sulla stazione base il tasto di paging e per 60 secondi si avvertono dei segnali acustici
emessi dall’unità portatile. Premere di nuovo il tasto di paging oppure il tasto di chiamata sull’unità
portatile per interrompere la funzione prima del trascorrere dei 60 secondi.
Tutte le unità portatili registrate presso la base iniziano a
squillare.
o Per concludere la funzione di paging prima del decorrere
del tempo impostato.
5.15Attivare/Disattivare l’unità portatile
3 sec Attivare / Disattivare
− Navigazione nel menu principale −
59
6Navigazione nel menu principale
6.1Navigare nel menu
I differenti menu consentono di raggiungere tutte le funzioni del telefono. La navigazione da se-
guire per giungere nella struttura menu è riportata nel capitolo 7.
1.Aprire il menu desiderato o la rubrica telefonica con il rispettivo tasto.
2.Selezionare con il tasto o il sottomenu desiderato.
3.Aprire con il tasto il sottomenu.
4.Selezionare con il tasto o la funzione desiderata.
5.Aprire con il tasto la funzione.
6.Selezionare con il tasto o l’impostazione desiderata.
7.La tastiera consente di immettere numeri o lettere.
8.Confermare con il tasto le immissioni.
9.Con il tasto si torna rispettivamente indietro di un livello.
Ogni procedura è interrotta automaticamente se entro 20 secondi non segue alcuna
immissione.
6.2Segnali acustici
Per facilitare l’esercizio del proprio telefono, l’apparecchio è dotato di diversi suoni di esercizio,
avviso, segnalazione e altri segnali acustici. Per alcuni di questi è possibile compiere un’attiva-
zione / una disattivazione. Ne fanno parte:
SSuono tasti: Ogni volta che si preme un tasto presso l’unità portatile si avverte un
breve suono.
SSuono di avviso Batteria scarica:Un suono di avviso richiama l’attenzione in caso
di capacità di batteria scarsa per consentire il caricamento dell’unità portatile.
SSuono di avviso portata: Il suono di avviso si avverte quando la distanza dalla
stazione base è troppo grande.
Per attivare o disattivare la funzione consultare la struttura di menu riportata al capitolo 7.
Oltre a questi ci sono anche altri suoni che facilitano la navigazione all’interno delle voci di menu.
Non è consentito disattivare questi suoni. Qui di seguito i suoni più importanti:
STono di conferma : Due suoni crescenti e consecutivi indicano la conclusione di
un’operazione di immissione e la rispettiva memorizzazione.
STono d’avviso : Un suono acuto e lungo alla fine di un menu sfogliato in alto o in
basso indica la mancanza di ulteriori voci di selezione.
6.3Esempio
Nell’esempio Scrivere SMS" è spiegata la navigazione all’interno del menu principale e dei sotto-
menu e lo svolgimento di funzioni e immissioni. Si consiglia di seguire quest’esempio per tutte le
altre impostazioni che si desiderano compiere.
Aprire il menu principale
o
, Selezionare la funzione SMS
e confermare
o
8
, Selezionare la funzione e confermare
(menu SMS / Scrivere)
66&&/
, Accettare la richiesta di immissione
, Inserire e confermare il messaggio
/ , Accettare la richiesta di immissione
, Inserire e confermare il numero
8
Procedura di invio in corso
I
− Struttura di menu −
60
7Struttura di menu
Nel menu principale si giunge premendo il tasto . Scegliere quindi con i tasti e il sottomenu desiderato e confermare la selezione con il
tasto . Oppure digitare le informazioni richieste (le immissioni private sono raffigurate qui di seguito in caratteri italici e contrassegnate da ). La propria
immissione è in genere confermata alla fine da un segnale acustico .
Please read this operating instruction manual thoroughly.
1.1Intended use
The telephone is suitable for telephoning within a public telephone network system. Any other use
is considered unintended use. Unauthorised modification or reconstruction is not permitted. Un-
der no circumstances open the device or complete any repair work yourself.
1.2Installation location
The telephone is designed for use indoors in rooms with a temperature range from 10 °C to
30 °C. The base station should not be used in rooms exposed to moisture, such as bathrooms
or laundries. Prevent excessive exposure to smoke, dust, vibration, chemicals, moisture, heat
and direct sunlight. Position the base station with a distance of 1 m to other electronic devices or
there is a risk of mutual disturbance.
Do not use the handset in potentially explosive areas.
1.3Power supply
Only use the power adapter plug supplied because other power supplies could damage the tele-
phone. Ensure access to the power adapter plug is not obstructed by furniture or such.
1.4Telephone connection cable
If the telephone connection cable supplied needs to be replaced, ensure the pin assignment is
identical on the new one.
1.5Rechargeable batteries
Do not throw batteries into a fire or immerse them in water.
1.6Power failure
The telephone cannot be used to make calls in the event of a power failure. Always keep a cord
connected telephone which operates without an external power supply available in case of emer-
gency situations.
1.7Private branch exchanges
The telephone can be connected to a private branch exchange. There is no guarantee that the
telephone will work on every private branch exchange.
1.8Notes on medical equipment
Never use the telephone in the vicinity of medical equipment. It cannot be fully ruled out that they
will not affect heart pacemakers. DECT telephones can cause an unpleasant humming sound in
hearing aids.
1.9Cleaning and upkeep
Clean the housing surfaces with a soft, fluff−free cloth. Never use cleaning agents or aggressive
solvents. The rubber footpads on the base station are not resistant to all cleaning agents.
1.10Disposal
The implementation of European law in national laws and directives obliges you to dispose
of consumable goods appropriately. The adjacent symbol on the telephone indicates that
electrical and electronic apparatus and batteries no longer required must be
disposed of separate from domestic waste.
Electrical and electronic devices must be disposed of at a suitable collection point
provided by the public waste authorities.
Batteries must be disposed of at the point of sale or at the appropriate collection
points provided by the public waste authorities.
Packaging materials must be disposed of according to local regulations.
− Starting Up −
78
2Starting Up
2.1Safety information
Caution: It is essential to read the Safety Information in Chapter 1 before starting up.
2.2Checking the contents of the package
The package contains:
a base station with power adapter plug
a telephone connection cable
four handsetseight rechargeable batteries
three charging stations with three power
adapter plugs
an operating manual
2.3Connecting the base station
Connect the base station as illustrated in the dia-
gram. For reasons of safety, only use the power
adapter plug and telephone connection cable sup-
plied. The power adapter plug from the base station
must always be connected to a properly installed
230 V mains power outlet.
2.4Connecting the charging station
Connect the charging station as illustrated in the dia-
gram. For reasons of safety, only use the power
adapter plug supplied.
2.5Inserting the batteries
Insert two batteries of the type AAA Ni−MH 1.2 V 550 mAh in the bat-
tery compartment after opening it. Pay attention to correct polarity
(refer to Fig.). Close the battery compartment cover.
Important: Do not use any other type of batteries.
2.6Charging the batteries
When preparing to use the handset for the first time, place it in the base station (display facing up-
wards) for at least 14 hours. The charging control lamp on the base station lights up. The handset
warms up during the charging process. This is normal and does not represent a risk. Do not
charge the handset with charging units from other manufacturers. Failure to charge the batteries
properly can lead to telephone malfunction.
The current battery charge status is indicated in the display:
FullHalf emptyLowEmpty
2.7Tone or Pulse dialling mode
The telephone can be connected to both analogue connections (pulse dialling) and digital con-
nections (tone dialling). The equipment is set to Tone dialling mode at the factory. If the telephone
does not work on your telephone connection, refer to Chapter 7.3 to learn how to switch the tele-
phone to analogue, pulse dialling mode.
2.8Operating on private branch exchanges
If your telephone is connected to a private branch exchange, use the R button to implement
the transfer calls or automatic callback functions. When used on a private branch exchange, a Re-
call time of 90 ms must be set. The sales outlet where you purchased the telephone can tell you
whether it will work on your private branch exchange.
2.9Supplementary services from your telephone network provider
The SWITEL telephone supports all major supplementary services offered by the telephone net-
work provider (e.g. brokering, call waiting, three−way conferencing, etc.). Press the R button
to use these services. Please contact the telephone network provider with regard to enabling the
supplementary services.
TAE−F
230 V
50 Hz
230 V
50 Hz
− Operating Elements −
79
3Operating Elements
3.1Handset
1Call indicator
2Display
3Redialling
4Menu button and
OK button
5Phone book
6Hash button (for conference calls)
7Internal and conference calls
8Muting function and delete / back
9Selection button:
Scroll upwards in menu
10Call button
11Selection button:
Scroll downwards in menu
12Key lock off/on
13R−signal button (on/off)
3.2Base station
14Paging button (locate handset)
15LED, charge control lamp
16LED, call and power indicator
3.3Charging station
17LED, charging control lamp
Notes on the depiction of button icons:
In order to read the manual more easily, the telephone buttons are depicted in a standardised
rectangular contour. The appearance of the icons in the buttons, therefore, deviates slightly
from that on the telephone. However, the buttons are clearly recognisable.
///
1
2
3
4
5
6
7
8
9
11
10
12
13
14
15
16
17
− Display Indicators −
80
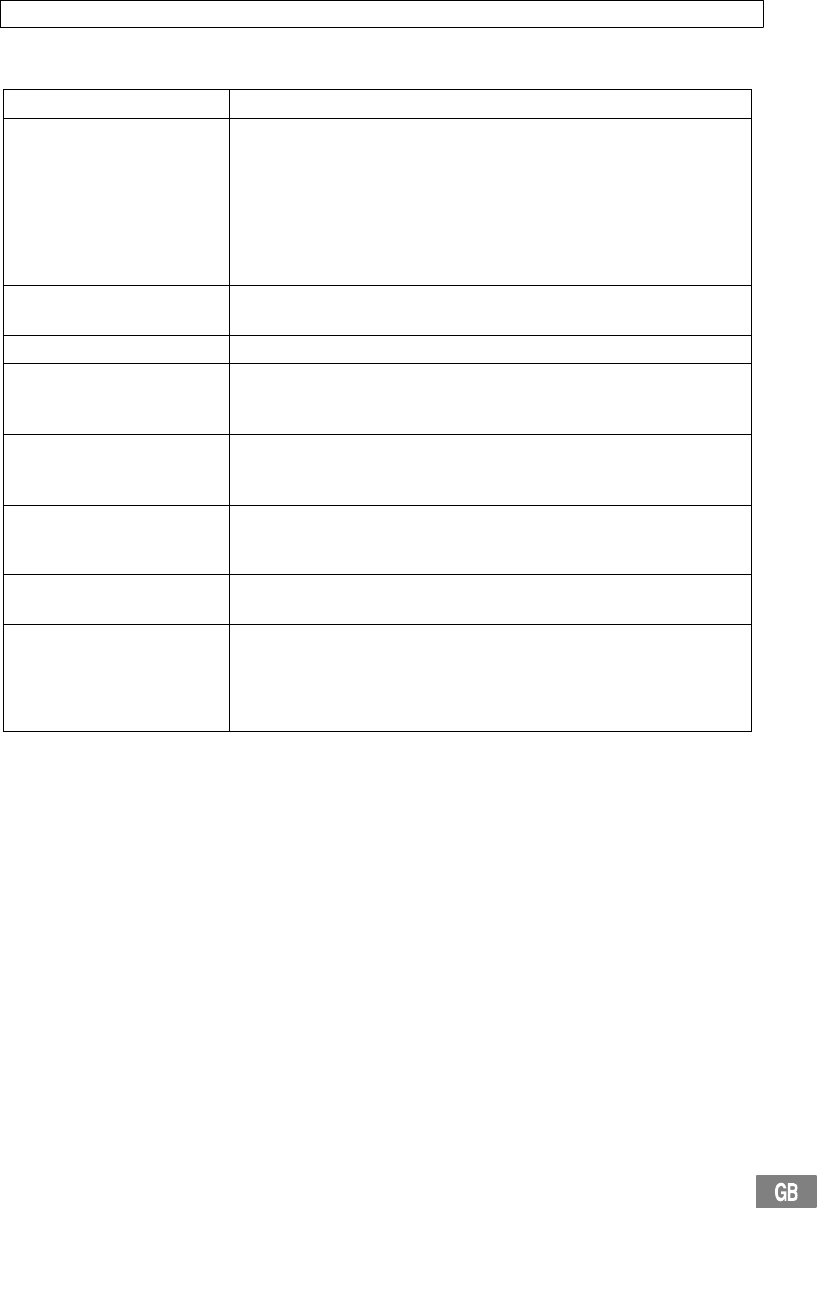
4Display Indicators
The display indicates all the important functions by means of various icons and
messages.
Icon
Description
Time display
Handset identification
Constantly on: Displays battery capacity.
Indicator flashes: Batteries must be charged.
Run−through segments: Batteries are being charged.
The connection to the base station is good.
Indicator flashes: The handset is out of range of the base station.
A call is currently being made.
Constantly on: An external call is currently being made.
Indicator flashes: An external call has been received.
Constantly on: An internal call is currently being made.
Indicator flashes: An internal call has been received.
Constantly on: You have accessed the calls list. The call has not been viewed.
Indicator flashes: There are new calls in the calls list.
The phone number is longer than 12 digits.
This call was not taken.
The number is stored in the calls list.
This call was taken.
The number is stored in the calls list.
You have opened the main menu.
You have opened the phone book.
A new message has been received (SMS).
The key lock is activated.
− Telephoning −
81
5Telephoning
The way in which the telephone is operated is subsequently described by means of text and sym-
bols: If a button is depicted, it means that the respective button must be pressed.
In addition, the following symbols appear:
Enter digits or letters
2 sec Press the button depicted for 2 seconds
Acoustic signal on the handset
Acoustic signal on the base station
40
Text or icon in the display
The ringing signals on the handset and base station only function when they
have not been deactivated beforehand!
5.1Taking a call
and , Take the call
End the call
When the handset is ringing, press the or button to adjust the
ringing volume.
If the ringing tone has been deactivated on the handset, incoming calls are only indica-
ted by the base station (as long as the base ringer has not been deactivated).
5.2Taking two calls
You will hear acoustic signals (call waiting) if a second call is received while you are talking on the
telephone. The number of the second caller appears in the display. Press the buttons below in
the sequence described to switch between the two callers, the connection to the other caller is
put on hold.
, Switch to other caller
Caution: The functions for phone number display, holding calls and call waiting are
supplementary services offered by your telephone network provider. Contact your net-
work provider for further information.
5.3Making a call
Enter the phone number (max. 32 digits)
Dial the phone number
If you enter a wrong digit:
Press briefly: Deletes the last entry
2 sec Press longer: Deletes the entire phone number
It is also possible to press the Call button first to obtain the dialling tone for an outside line.
Then enter the required telephone number. It is not possible to correct wrong digits individually
using this dialling procedure.
5.4Dialling pause
In the case of private branch exchanges, it is necessary to dial a specific number (e.g. 9" or 0")
in order to obtain the dialling tone for an outside line. When using some older private branch ex-
changes, it takes a little time before the dialling tone becomes audible. Particularly in the case of
such private branch exchanges, it is useful to insert an automatic pause after the number for the
outside line so that the number can be dialled in a continuous process without having to wait for
the dialling tone.
Between pressing the number for an outside line and the phone number required, press the
button once. P" appears in the display. After dialling the number for the outside line, the telephone
then waits 3 seconds before dialling the actual phone number.
The pause can also be entered with the phone number in the phone book.
5.5Redialling
The telephone stores the last ten numbers dialled in a redialling list.
Open the redialling list (the last phone number
dialled appears in the display)
or , Select an entry and dial the number
If a phone number has been stored in the phone book, the name associated with it ap-
pears in the display.
− Telephoning −
82
5.5.1Deleting all the numbers from the redialling list
Open the redialling list
2 sec , Delete the entire list
5.5.2Deleting a number from the redialling list
, or Select the entry to be deleted
, Delete the individual entry
5.6Calling back missed calls
The telephone stores the last ten calls in a calls log.
or Open and scroll through the entries stored
Dial the number
5.7Dialling phone numbers stored in the phone book
Phone numbers stored in the phone book (refer to Section 8.1) can be dialled quickly and
easily.
, or Open the phone book and select the phone book entry
Dial the number
Phone book entries can be selected directly by opening the phone book and entering
the first letters of the entry required. Example: To access the number for Peter", for ex-
ample, press once and use the or buttons, if necessary, to select the
stored entry.
5.8Adjusting the receiver volume
The volume can be adjusted to one of five settings during a call.
or Press the button during the call
5.9Muting the microphone in the handset
Switch the function on/off
The handset microphone can be switched on and off during a telephone call. This enables you
to confer with a third party, for example, without the caller being able to hear you. The handset
loudspeaker, however, remains on; i.e. you can still hear the caller.
5.10Talk time display
A few seconds after a call has been taken, the phone number dialled or that of the caller disap-
pears from the display and is replaced by the duration of call (hh−mm−ss).
5.11Key lock
3 sec Activate the key lock function
Deactivate the key lock function
Incoming calls can still be taken as normal even when the key lock is activated (also refer to Sec-
tion 7.4). The key lock function remains active after the call has been ended.
5.12Temporary tone dialling
If you only operate the telephone using the Pulse dialling method, you can still make use of the
advantages of the Tone dialling method (e.g.: remote access of the answering machine).
4 sec Switch to Tone dialling
(for the duration of the call)
When the call is ended, the telephone automatically switches back to Pulse dialling.
5.13Notes on range
The handset has a range of approx. 50 meters in closed rooms and approx. 300 meters outdoors.
In the case of a good connection to the base station, the h icon lights up continuously in the dis-
play.
If the handset is moved too far from the base station, the h icon flashes and acoustic
warning signals are issued. Move towards the base station, otherwise the call will be di-
sconnected.
If the connection to the handset has been lost, the message BASE 1" appears in the
display.
− Telephoning −
83
5.14Searching for the handset (Paging)
If you have misplaced the handset, it can be located easily. Press the Paging button on the base
station; the handset rings for 30 seconds. To terminate the ringing function before the 30 seconds
has elapsed, simply press the Paging button again or the Call button on the handset.
All the handsets registered on the base station ring.
or Ends paging prematurely.
5.15Switching the handset on /off
3 sec Switch on/off
− Navigating in the Main Menu −
84
6Navigating in the Main Menu
6.1Navigating in the menu
All the functions can be accessed via the various menus. Refer to the menu structure in Chapter
7 to find how to access the respective functions.
1.Open the required menu or phone book using the relevant button.
2.Press or to select the required submenu.
3.Press the button to open the submenu.
4.Press or to select the required function.
5.Press the button to open the function.
6.Press or to select the setting required.
7.Enter digits or letters using the relevant digit keys.
8.Press the button to confirm the input.
9.Press the button to move one menu level back.
Every process is automatically cancelled if there is no input within 20 seconds.
6.2Acoustic signals
To simplify operating the telephone, it issues various confirmation, notification, warning and other
acoustic signals. Some of them can be activated or deactivated as required. These include:
SKey beep: A short tone is issued each time a button on the handset is pressed.
SLow battery" warning signal:If the battery capacity is too low, a warning signal is
issued to remind you to charge the handset.
SRange warning signal: This acoustic warning signal is issued when the handset is
moved too far from the base station.
The way to switch the signals on and off is described in the menu structure in
Section 7.4.
Other acoustic signals simplify navigating in the menu. They cannot be deactivated. The most im-
portant of these are:
SConfirmation signal : Two short, ascending acoustic signals are
issued when input is completed successfully.
SNotification signal : A longer, higher acoustic signal is issued on
reaching the end of a menu after scrolling up or down, indicating there are
no further selection options.
6.3Example
Using the example of Writing an SMS", this section explains how to navigate in the main menu
and submenus to complete entries. Proceed as in this example for all the settings.
Open the main menu
or
, Select the SMS submenu and confirm
or
=!3
, Select the required function and confirm
(Menu: SMS / WRITE)
0"
, Confirm the request to enter text
, Enter a message and confirm
, Confirm the request to enter a phone number
, Enter a phone number and confirm
Send process is started
− Menu Structure −
85
7Menu Structure
Access the Main Menu by pressing the button. Then use the and buttons to select the required submenu and confirm your selection by pressing
the button. Or, type in the required information (individual entries are subsequently printed in italics and identified by ). Your entry is normally confirmed
Gebruikershandleiding.com neemt misbruik van zijn services uitermate serieus. U kunt hieronder aangeven waarom deze vraag ongepast is. Wij controleren de vraag en zonodig wordt deze verwijderd.
Product:
Spelregels forum
Om tot zinvolle vragen te komen hanteren wij de volgende spelregels:
lees eerst de handleiding door;
controleer of uw vraag al eerder door iemand anders is gesteld;
probeer uw vraag zo duidelijk mogelijk te stellen;
heeft u een probleem en al geprobeerd om dit op te lossen, vermeld dit erbij aub;
heeft u een oplossing gekregen van een bezoeker dan horen wij dat graag in dit forum;
wilt u een reactie geven op een vraag of antwoord, gebruik dan niet dit formulier maar klik op de knop 'reageer op deze vraag';
uw vraag wordt direct op de website gezet; vermijd daarom persoonlijke gegevens in te vullen;
Belangrijk! Als er een antwoord wordt gegeven op uw vraag, dan is het voor de gever van het antwoord nuttig om te weten als u er wel (of niet) mee geholpen bent! Wij vragen u dus ook te reageren op een antwoord.
Belangrijk! Antwoorden worden ook per e-mail naar abonnees gestuurd. Laat uw emailadres achter op deze site, zodat u op de hoogte blijft. U krijgt dan ook andere vragen en antwoorden te zien.
Abonneren
Abonneer u voor het ontvangen van emails voor uw Switel DE104 bij:
nieuwe vragen en antwoorden
nieuwe handleidingen
U ontvangt een email met instructies om u voor één of beide opties in te schrijven.
Ontvang uw handleiding per email
Vul uw emailadres in en ontvang de handleiding van Switel DE104 in de taal/talen: Duits, Engels, Frans, Italiaans als bijlage per email.
De handleiding is 1,29 mb groot.
U ontvangt de handleiding per email binnen enkele minuten. Als u geen email heeft ontvangen, dan heeft u waarschijnlijk een verkeerd emailadres ingevuld of is uw mailbox te vol. Daarnaast kan het zijn dat uw internetprovider een maximum heeft aan de grootte per email. Omdat hier een handleiding wordt meegestuurd, kan het voorkomen dat de email groter is dan toegestaan bij uw provider.
Stel vragen via chat aan uw handleiding
Stel uw vraag over deze PDF
Uw handleiding is per email verstuurd. Controleer uw email
Als u niet binnen een kwartier uw email met handleiding ontvangen heeft, kan het zijn dat u een verkeerd emailadres heeft ingevuld of dat uw emailprovider een maximum grootte per email heeft ingesteld die kleiner is dan de grootte van de handleiding.
Er is een email naar u verstuurd om uw inschrijving definitief te maken.
Controleer uw email en volg de aanwijzingen op om uw inschrijving definitief te maken
U heeft geen emailadres opgegeven
Als u de handleiding per email wilt ontvangen, vul dan een geldig emailadres in.
Uw vraag is op deze pagina toegevoegd
Wilt u een email ontvangen bij een antwoord en/of nieuwe vragen? Vul dan hier uw emailadres in.