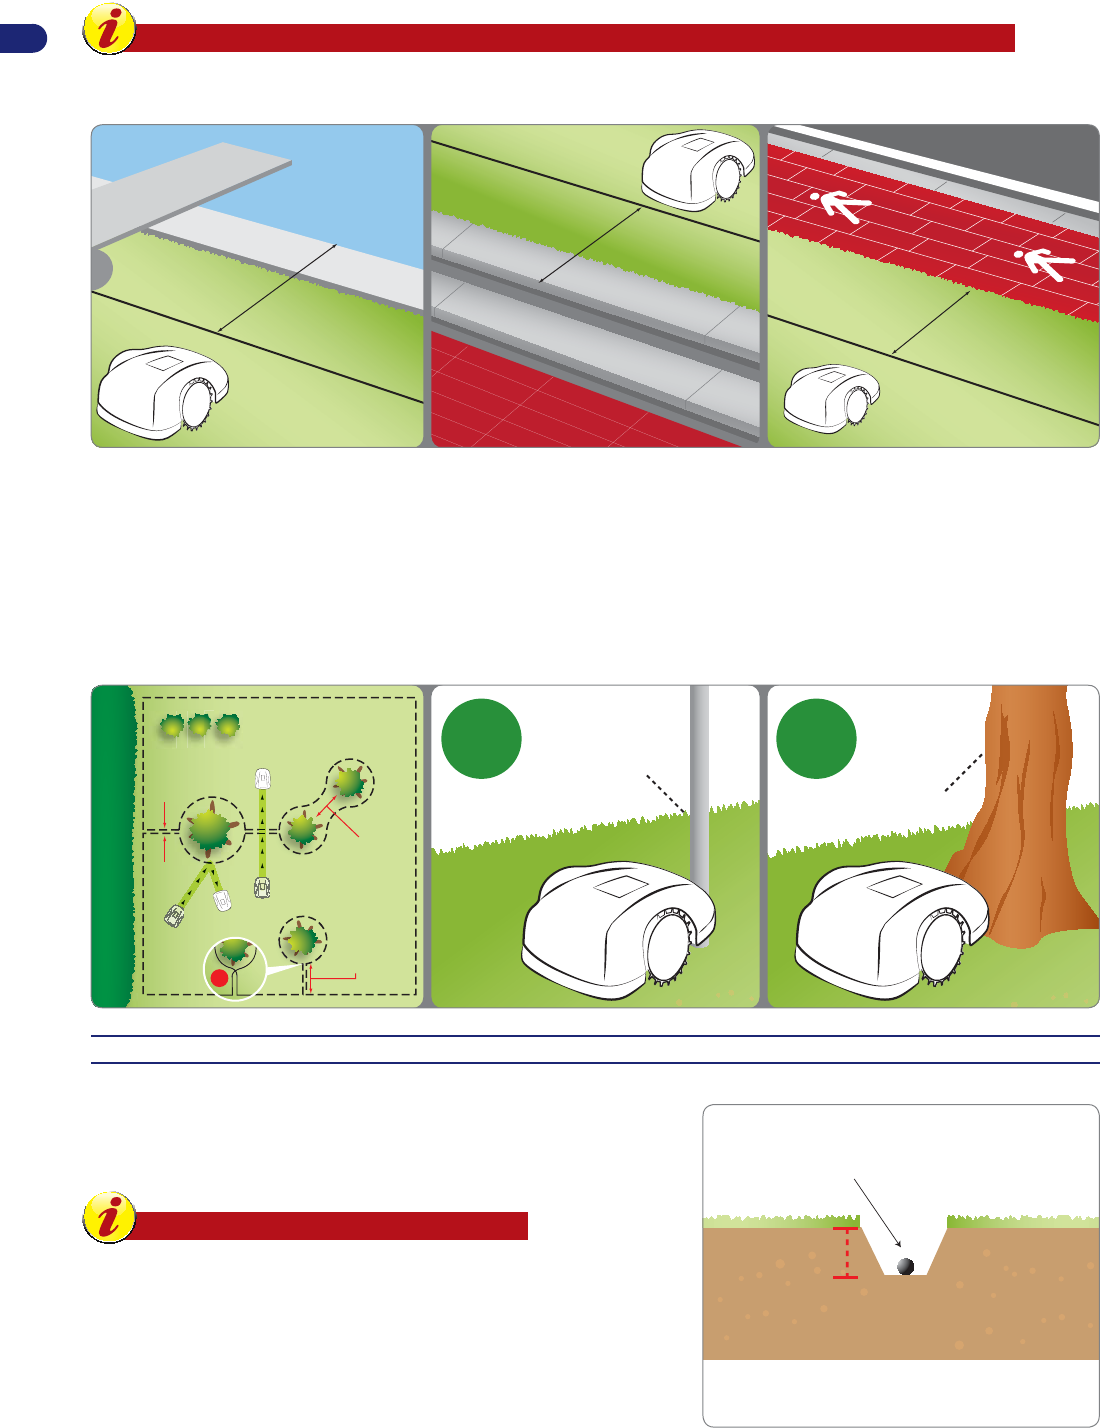
If there is a pool, pond, ravine, ditch, steps or public roads not protected by a wall inside or outside the work area, lay the perimeter wire at least 90
cm (35.43 ") from the edge. To reduce the distance of the perimeter wire for the best set-up and operation of the robot, we recommend installing
an additional fence of at least 15 cm. This will allow laying the perimeter wire at the regular distances described in the previous paragraphs.
Important
Carefully follow the distances and slopes specifi ed in the booklet to guarantee excellent installation and proper functioning
of the robot. Increase the distance by at least 30 cm (11.81 ") in the presence of slopes or slippery ground.
90 cm.
/ 35,44 “
90 cm.
/ 35,44 “
90 cm.
/ 35,44 “
Obstacles resistant to knocks, such as trees, bushes or poles without sharp edges present inside the work area do not need to be delimited. The
robot hits the obstacle and changes direction. If you don’t want the robot to knock into the obstacles and for its safe and silent operation, all the
fi xed obstacles need to be delimited. Slightly sloping obstacles such as fl ower pots, stones or trees with protruding roots must be delimited to
protect the cutting blade and the obstacles themselves.
To mark the boundary of the obstacle, start from the outside point of the perimeter nearest the object to delimit, arrange the perimeter wire so
that it reaches the obstacle, goes around it and then travels back along the previous path, observing the regular distances described in the
previous paragraphs. Overlap the outgoing wire and the incoming wire so that they pass under the same peg, this will allow the robot to go past
the perimeter wire.
For the robot to function correctly, the minimum overlapping length should not be greater than 70 cm (27.56 ") in order to allow the robot to move
regularly.
NO
min. 70 cm
/ 27,56 ”
min. 70 cm
/ 27,56 ”
< 70 cm
/ 27,56 ”
< 70 cm
/ 27,56 ”
0 cm / 0 ”0 cm / 0 ”
plant
pole
OKOK
INSTALLATION OF PERIMETER WIRE
The perimeter wire can be buried or laid on the ground. If you have a
wire trenching machine, it is better to bury the wire for greater protection.
Otherwise, install the wire on the ground with the pegs provided as
described below.
Important
Start laying the perimeter wire from the installation area
of the charging station, leaving a couple of extra meters
so that it can be cut down to size when connecting to the
Gebruikershandleiding.com neemt misbruik van zijn services uitermate serieus. U kunt hieronder aangeven waarom deze vraag ongepast is. Wij controleren de vraag en zonodig wordt deze verwijderd.
Product:
Spelregels forum
Om tot zinvolle vragen te komen hanteren wij de volgende spelregels:
lees eerst de handleiding door;
controleer of uw vraag al eerder door iemand anders is gesteld;
probeer uw vraag zo duidelijk mogelijk te stellen;
heeft u een probleem en al geprobeerd om dit op te lossen, vermeld dit erbij aub;
heeft u een oplossing gekregen van een bezoeker dan horen wij dat graag in dit forum;
wilt u een reactie geven op een vraag of antwoord, gebruik dan niet dit formulier maar klik op de knop 'reageer op deze vraag';
uw vraag wordt direct op de website gezet; vermijd daarom persoonlijke gegevens in te vullen;
Belangrijk! Als er een antwoord wordt gegeven op uw vraag, dan is het voor de gever van het antwoord nuttig om te weten als u er wel (of niet) mee geholpen bent! Wij vragen u dus ook te reageren op een antwoord.
Belangrijk! Antwoorden worden ook per e-mail naar abonnees gestuurd. Laat uw emailadres achter op deze site, zodat u op de hoogte blijft. U krijgt dan ook andere vragen en antwoorden te zien.
Abonneren
Abonneer u voor het ontvangen van emails voor uw Stiga Autoclip 325 bij:
nieuwe vragen en antwoorden
nieuwe handleidingen
U ontvangt een email met instructies om u voor één of beide opties in te schrijven.
Ontvang uw handleiding per email
Vul uw emailadres in en ontvang de handleiding van Stiga Autoclip 325 in de taal/talen: Nederlands, Duits, Engels, Frans, Italiaans, Portugees, Spaans, Pools, Deens, Zweeds, Noors, Fins als bijlage per email.
De handleiding is 112,13 mb groot.
U ontvangt de handleiding per email binnen enkele minuten. Als u geen email heeft ontvangen, dan heeft u waarschijnlijk een verkeerd emailadres ingevuld of is uw mailbox te vol. Daarnaast kan het zijn dat uw internetprovider een maximum heeft aan de grootte per email. Omdat hier een handleiding wordt meegestuurd, kan het voorkomen dat de email groter is dan toegestaan bij uw provider.
Stel vragen via chat aan uw handleiding
Stel uw vraag over deze PDF
Uw handleiding is per email verstuurd. Controleer uw email
Als u niet binnen een kwartier uw email met handleiding ontvangen heeft, kan het zijn dat u een verkeerd emailadres heeft ingevuld of dat uw emailprovider een maximum grootte per email heeft ingesteld die kleiner is dan de grootte van de handleiding.
Er is een email naar u verstuurd om uw inschrijving definitief te maken.
Controleer uw email en volg de aanwijzingen op om uw inschrijving definitief te maken
U heeft geen emailadres opgegeven
Als u de handleiding per email wilt ontvangen, vul dan een geldig emailadres in.
Uw vraag is op deze pagina toegevoegd
Wilt u een email ontvangen bij een antwoord en/of nieuwe vragen? Vul dan hier uw emailadres in.