Robotens ID-nummer er oppgitt på skiltet som er festet på frontpanelet. Basert på ID-nummeret, er det mulig å finne robotens
kommersielle benevnelse i tabellen nederst på siden.
LT
Roboto identificavamo ženklinimas yra pateiktas ant priekinio panelio plokštelės. Ženklinimo pagrindais galima individualizuoti puslapio
apačioje pateiktoje lentelėje,roboto prekinį pavadinimą.
LV
Robota identifikācijas kods ir norādīts uz plāksnītes priekšējā panelī. Pēc šī koda, izmantojot lappuses apakšdaļā izvietoto tabulu, var
noteikt robota komerciālo nosaukumu.
SK
dentifikačné označenie robota je uvedené na štítku, ktorý je pripevnený na čelnom panelu. Podľa označenia je možné identifikovať v
tabuľke v zápätí tejto stránky obchodný názov robota.
1
User’s manual
EN
TABLE OF CONTENTS
General information. ...................................................................................................................................................................2
Purpose of the manual. ...............................................................................................................................................................2
Identifi cation of manufacturer and equipment. ............................................................................................................................2
General description of the appliance...........................................................................................................................................6
Main parts. ..................................................................................................................................................................................7
Packing and unpacking. ..............................................................................................................................................................8
Planning of system installation. ...................................................................................................................................................8
Setting up of the perimeter wire. .................................................................................................................................................9
Re-entry method to the charging station. ..................................................................................................................................10
Setup of the robot’s quick re-entry to the charging station. .......................................................................................................10
Preparation and marking the boundaries of the work areas. .....................................................................................................11
Installation of perimeter wire. ....................................................................................................................................................14
Installation of the charging station and power supply unit.........................................................................................................16
Battery charging on fi rst use. ....................................................................................................................................................17
Adjustment of cutting height. .....................................................................................................................................................17
Use and operation. ....................................................................................................................................................................18
Recommendations for use. .......................................................................................................................................................18
Description of robot commands. ...............................................................................................................................................18
Menu access. ............................................................................................................................................................................18
Automatic return to the charging station. ..................................................................................................................................24
Use of the robot in closed areas with no charging station.........................................................................................................24
Starting the robot without the perimeter wire. ...........................................................................................................................25
Visualising the display during the work phase. .........................................................................................................................26
Prolonged inactivity and restarting. ...........................................................................................................................................26
Battery charging after prolonged inactivity. ...............................................................................................................................27
Part replacement. ......................................................................................................................................................................31
Recommendations for replacing parts. .....................................................................................................................................31
EC declaration of conformity. ...................................................................................................................................................32
Reproduction, even partial, of this document without written permission by the manufacturer is strictly forbidden. The manufacturer assumes a policy of continual improvement and reserves the right to modify this document without
prior notice on condition that the changes do not constitute health and safety risks.
Average recharging time and method1:15 - Automatic
2:00 -
Automatic
3:00 - Automatic
Average operating time (*)Hours0:401:302:303:00
Blade safety stop
Rollover sensorstandard
Handle sensorstandard
Emergency buttonstandard
Equipment and accessories
Perimeter wirem ( ' )100 ( 328 ' )150 ( 491 ' )
Maximum length of perimeter wire
(approximate, calculated based on a regular
perimeter)
m ( ' )400 (1312 ')600 (1968 ' )
6
User’s manual
EN
Fastening pegsNo.100200
Areas managed, including the primary one234
TX-S1 perimeter signal (patented)standard
Rain sensorstandard
Blade modulation and intelligent spiralstandard
Mowed lawn sensor – Self-programming
(patented)
not availablestandard
Acoustic alarmOptionalstandard
Power supply safety box
External box for holding the battery charger
Optional
(*) Depending on the condition of the grass and lawn surface
GENERAL DESCRIPTION OF THE APPLIANCE
The appliance is a robot designed and built to automatically trim grass
in gardens and house lawns at any time of the day or night. It is small,
compact, silent and easy to transport.
Depending on the characteristics of the surface to be trimmed, the robot
can be programmed to work on more than one area: a primary area and
secondary areas (according to the specifi cations of the various models).
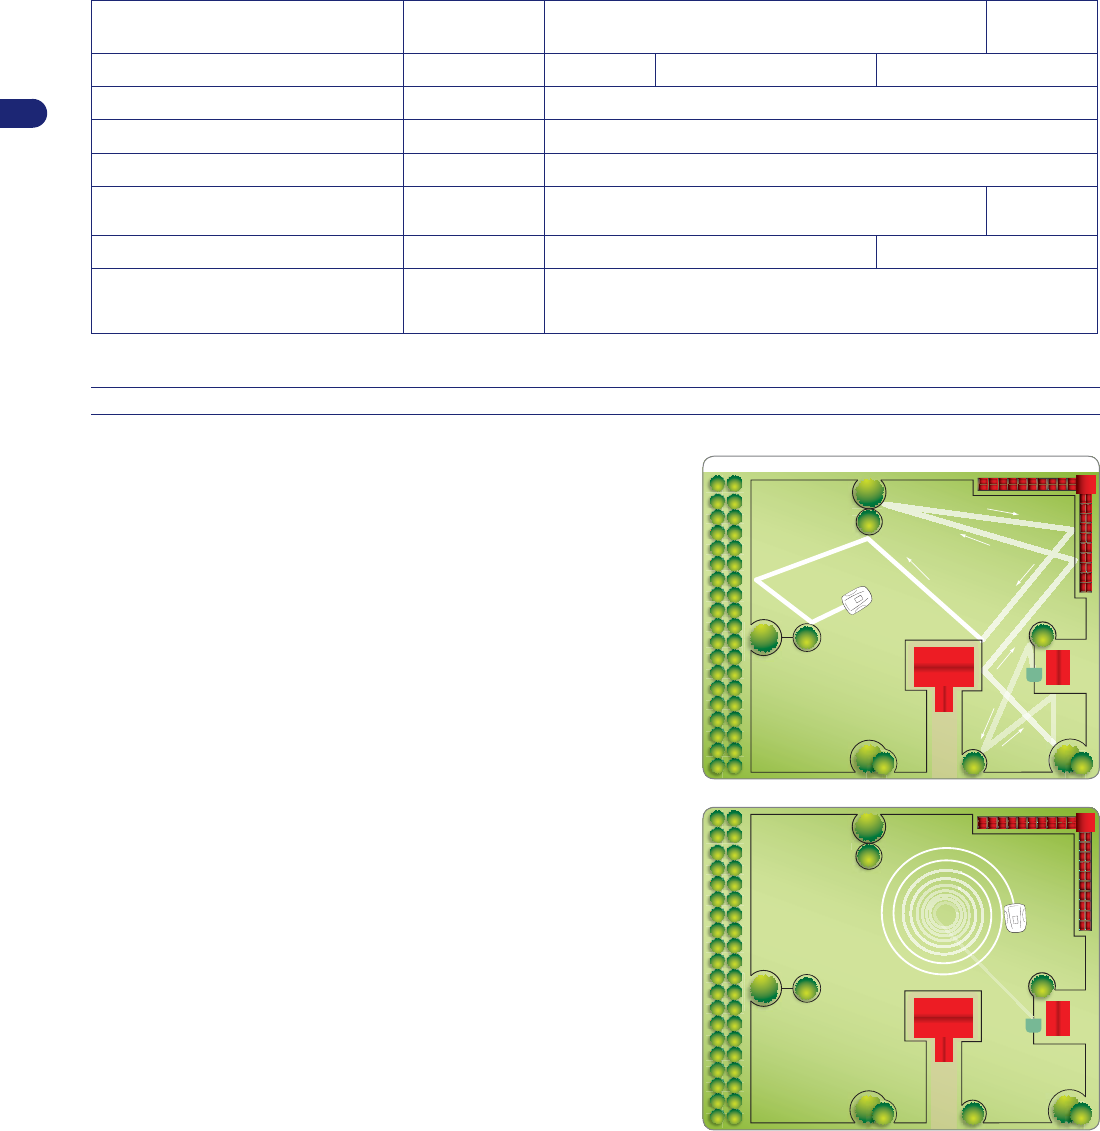
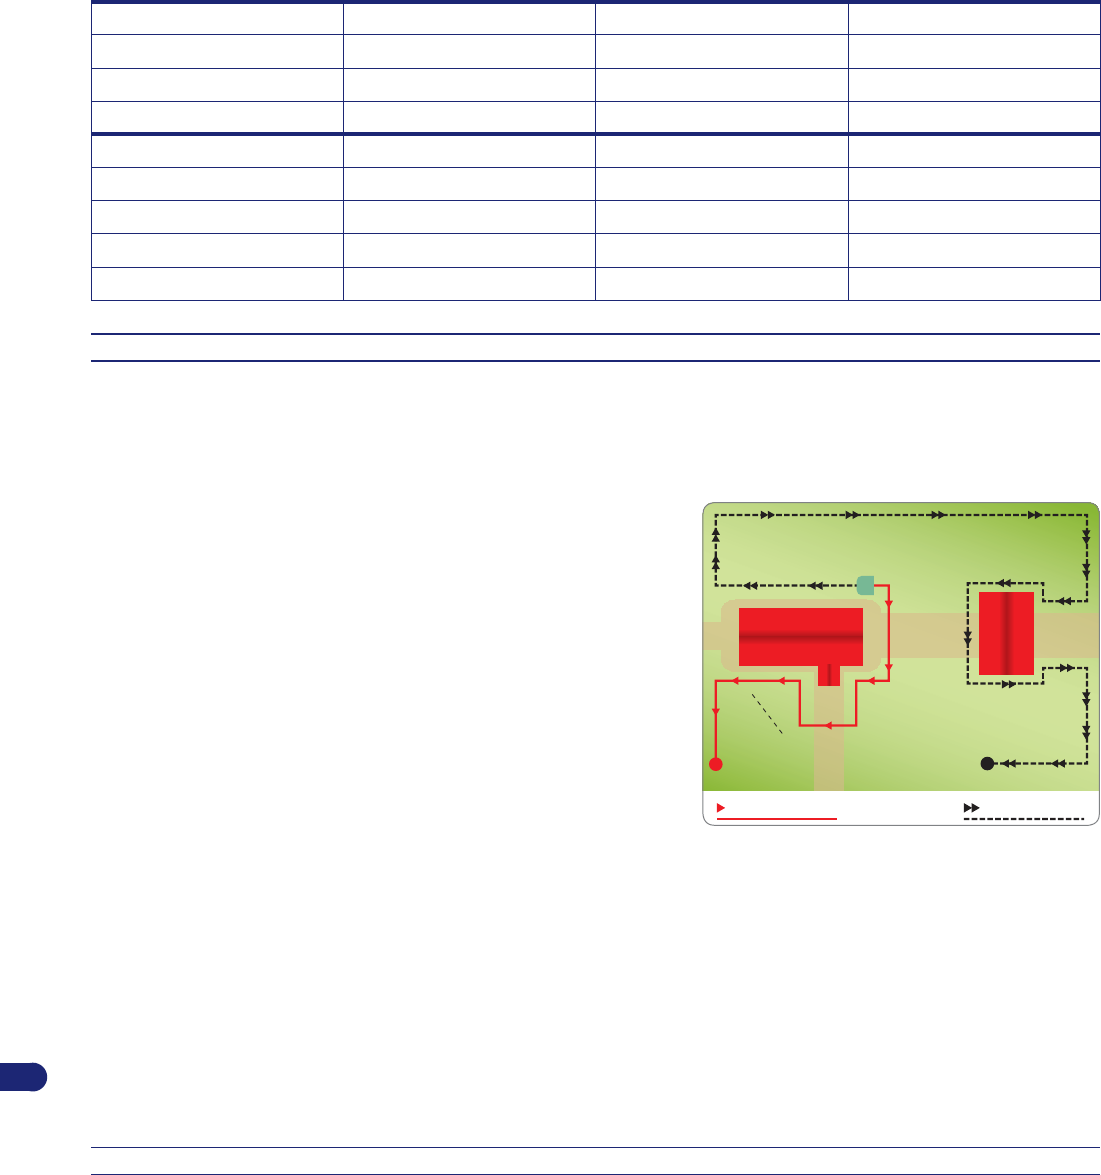
During operation, the robot trims the area marked off by the perimeter wire.
When the robot detects the perimeter wire or encounters an obstacle, it
changes direction in a random manner and starts mowing again in a new
direction.
According to its operating principle random, the robot automatically trims
the entire delimited area of the lawn (see fi gure).
The robot is able to recognise the presence of higher and/or thicker grass
in an area of the garden and to automatically activate, if considered
necessary, the spiral movement for a perfect fi nish. The spiral movement
can also be activated by pressing ENTER/MENU while the robot is mowing.
The lawn surface that the robot is able to trim depends on a series of
factors, such as:
•
model of the robot and type of batteries installed
•
characteristics of the area (irregular perimeters, uneven surfaces,
divided areas, etc.)
•
characteristics of the lawn (type and height of the grass, moisture, etc.)
•
conditions of the blade (level of sharpness, without residuals and
deposits, etc.)
RANDOM OPERATION
7
User’s manual
EN
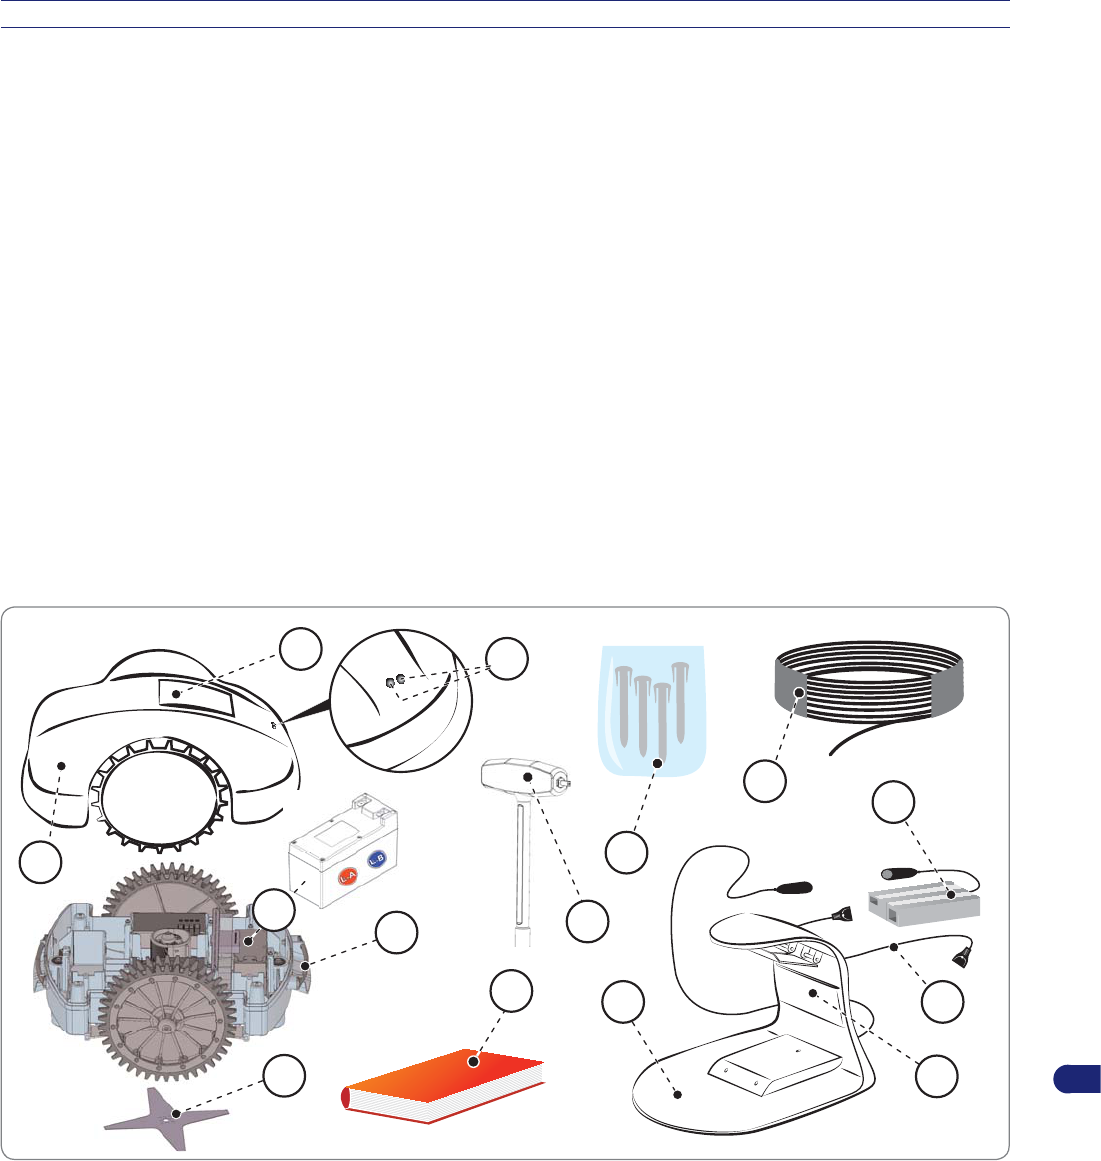
MAIN PARTS
1.
Robot.
2. Keyboard commands: for setting and displaying the operating modes of the robot.
3. Rain sensor: detects rain and commands the robot to return to the charging station.
4. Battery: supplies power to the motors of the blade and drives the wheels. The robot is supplied with one or more lithium batteries located
under the models already assembled in some models.
5. Handle: for lifting and carrying the robot.
6. Cutting blade : cuts the grass already assembled in some models.
7. Perimeter wire coil: cable with special insulation and special features for carrying the signal needed to operate the robot.
8. Pegs : for securing the perimeter wire and the charging station.
9. Power cord for the power supply unit.
10. Power Supply unit : supplies power in low voltage to the batteries.
11. Charging station: for recharging or keeping the robot charged.
12. Transmitter: transmits the signal to the perimeter wire.
13. User manual.
14. Key for adjusting the cutting height.
5
6
13
9
8
14
11
12
10
7
4
1
2
3
8
User’s manual
EN
INSTALLATION
PACKING AND UNPACKING
The equipment is delivered suitably packaged. When unpacking, carefully remove and check the integrity of the parts.
Important
•
Keep the packaging materials for future use.
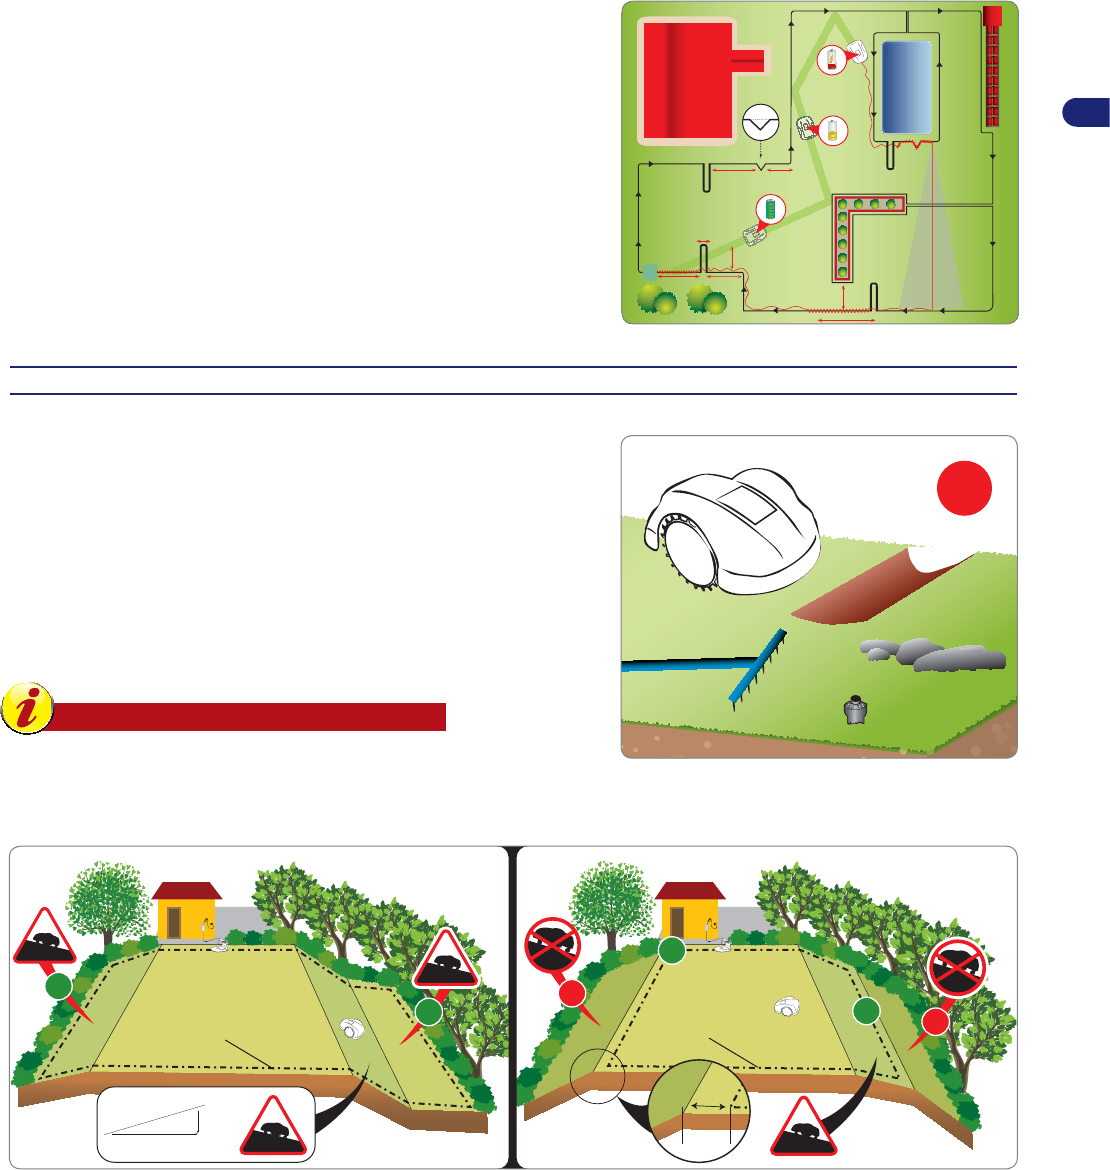
PLANNING OF SYSTEM INSTALLATION
The robot is not diffi cult to install, but requires some preliminary planning in order to fi nd the best area for installing the charging station, power
supply unit and for laying out the perimeter wire.
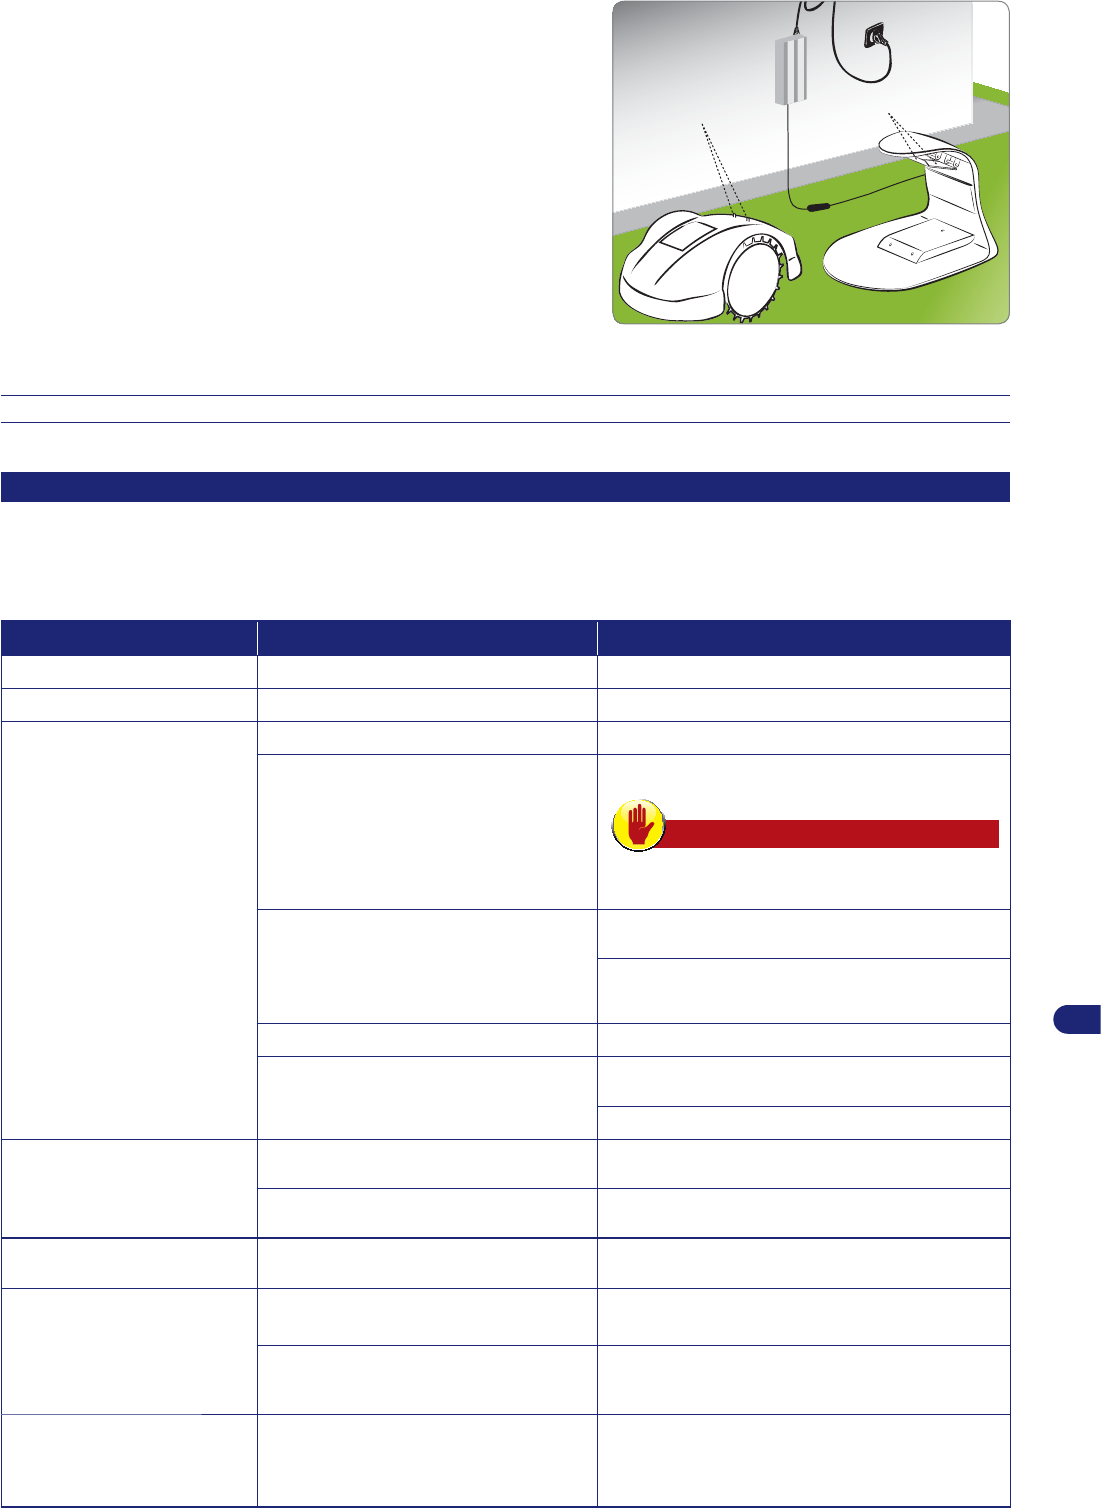
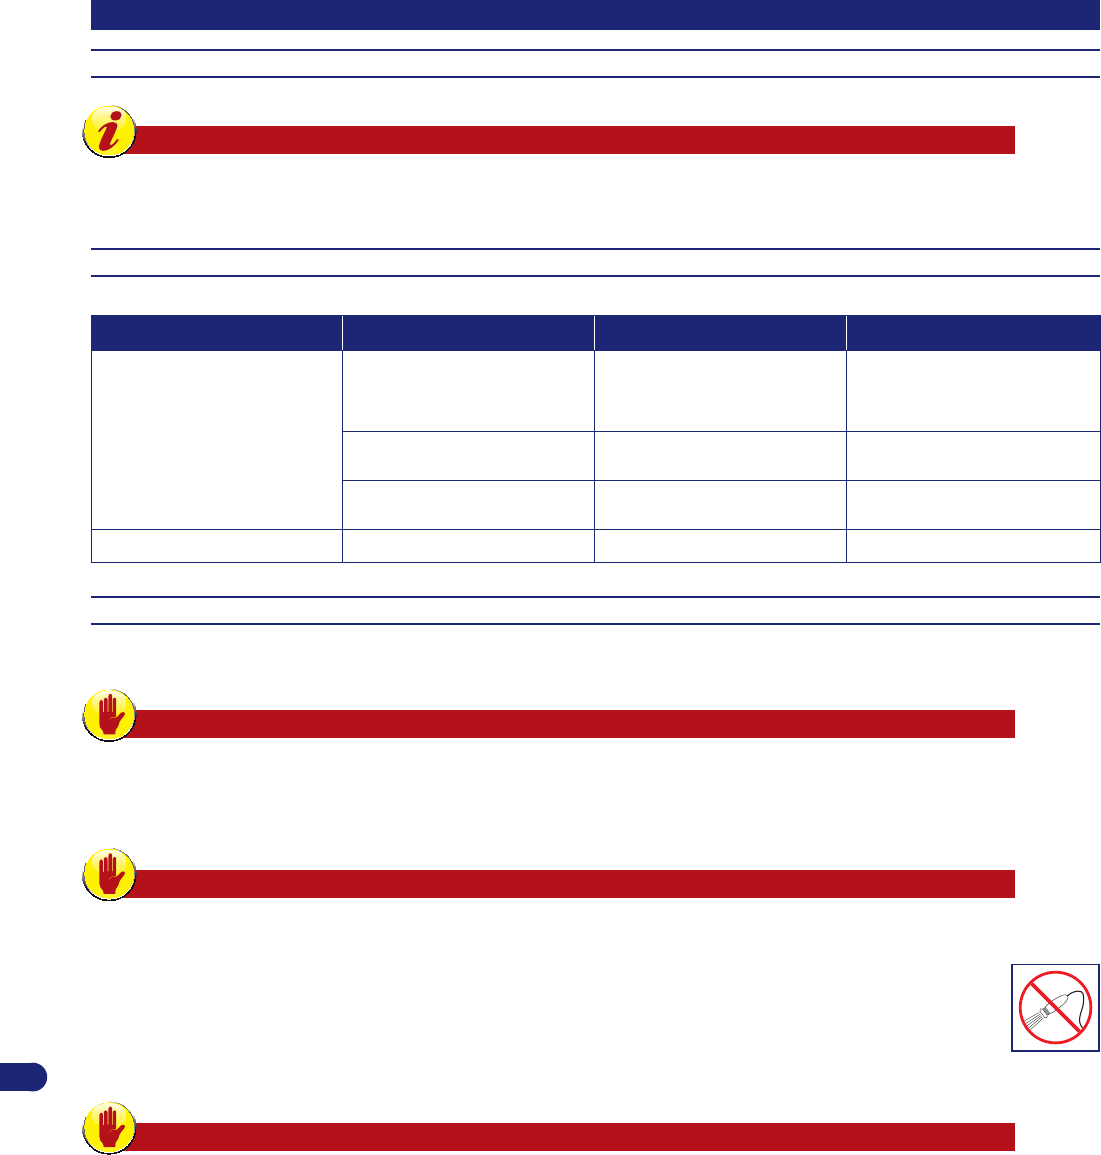
•
The charging station must be positioned on the edge of the lawn,
preferably in the largest area from which other areas of the lawn are
easily accessible. The area where the charging station is installed is
hereinafter referred to as the “Primary Area.”
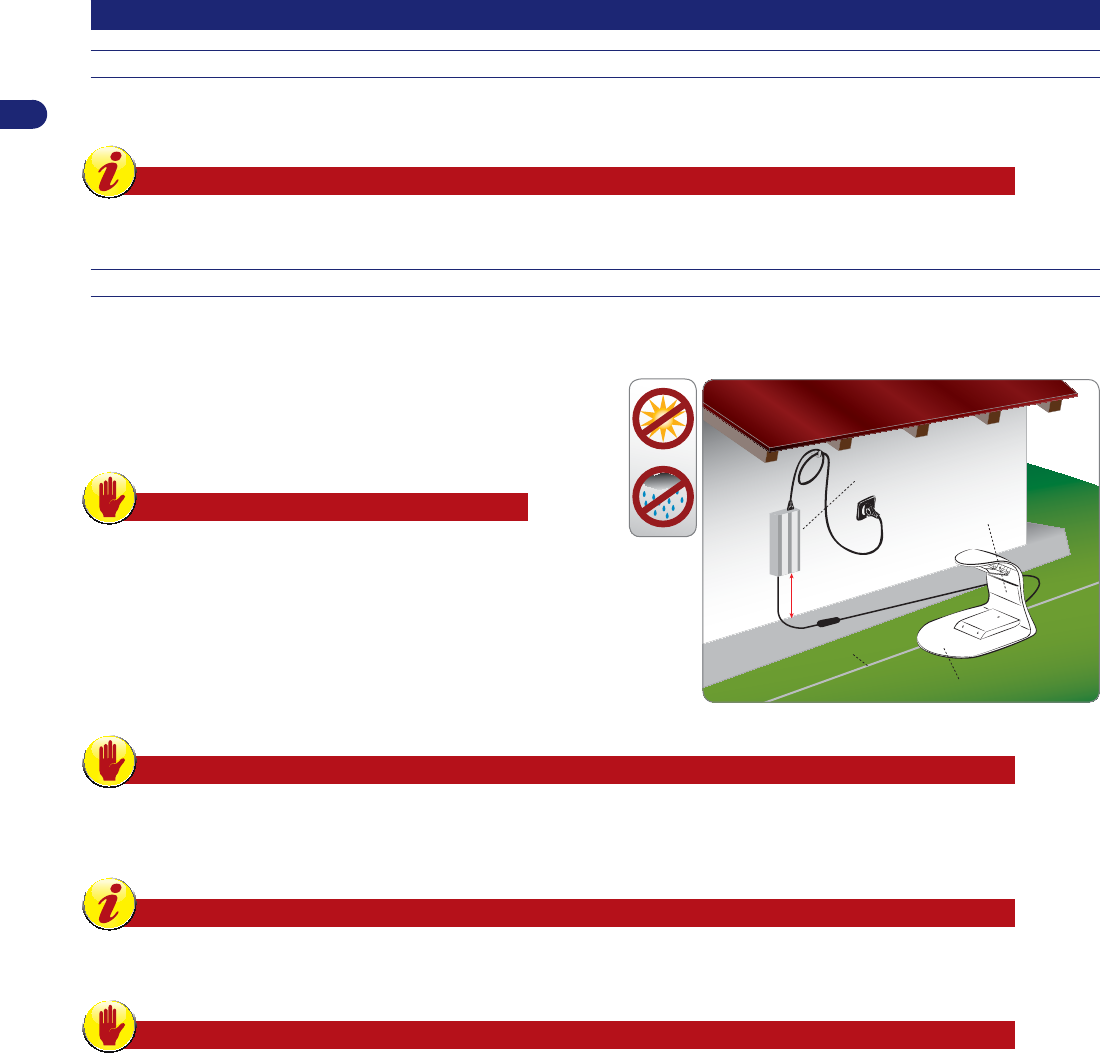
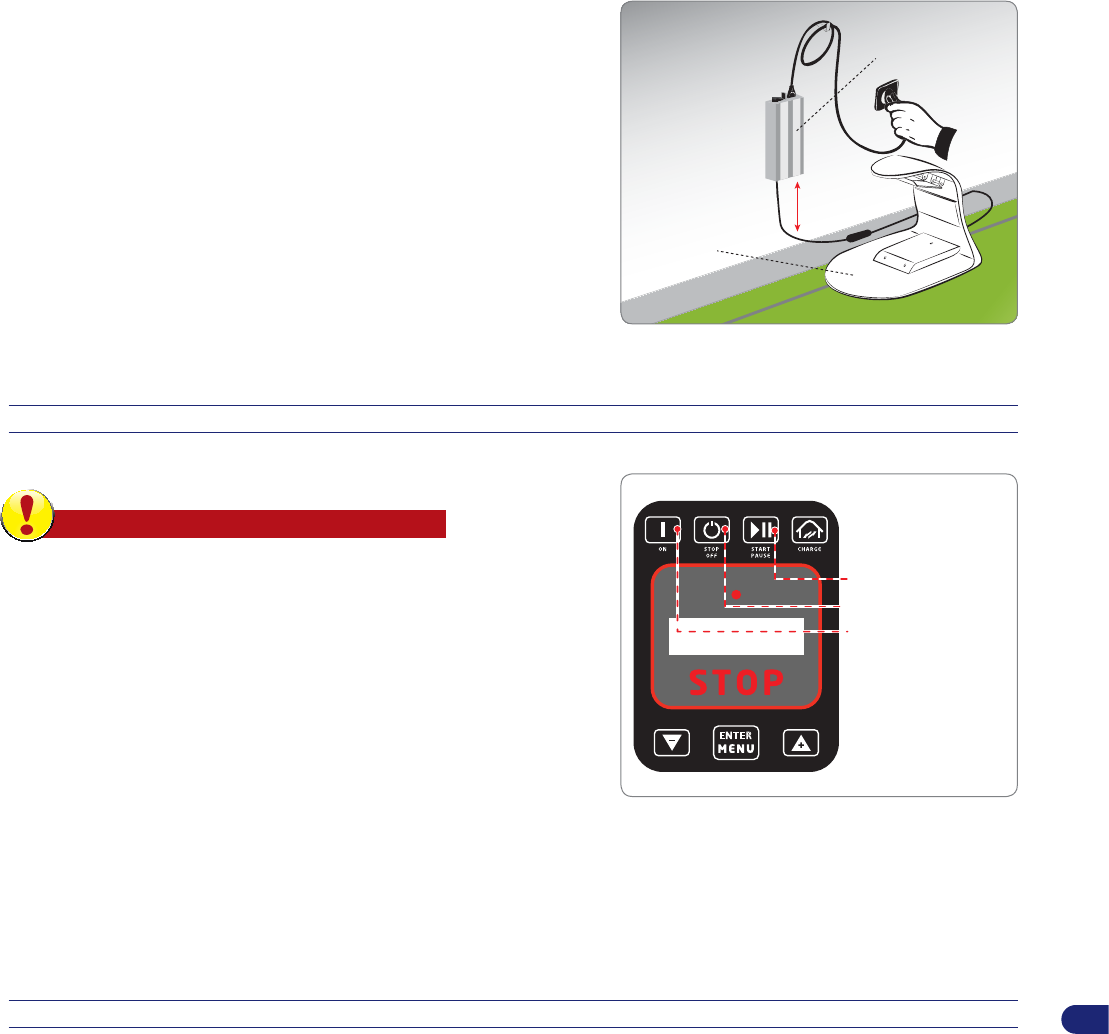
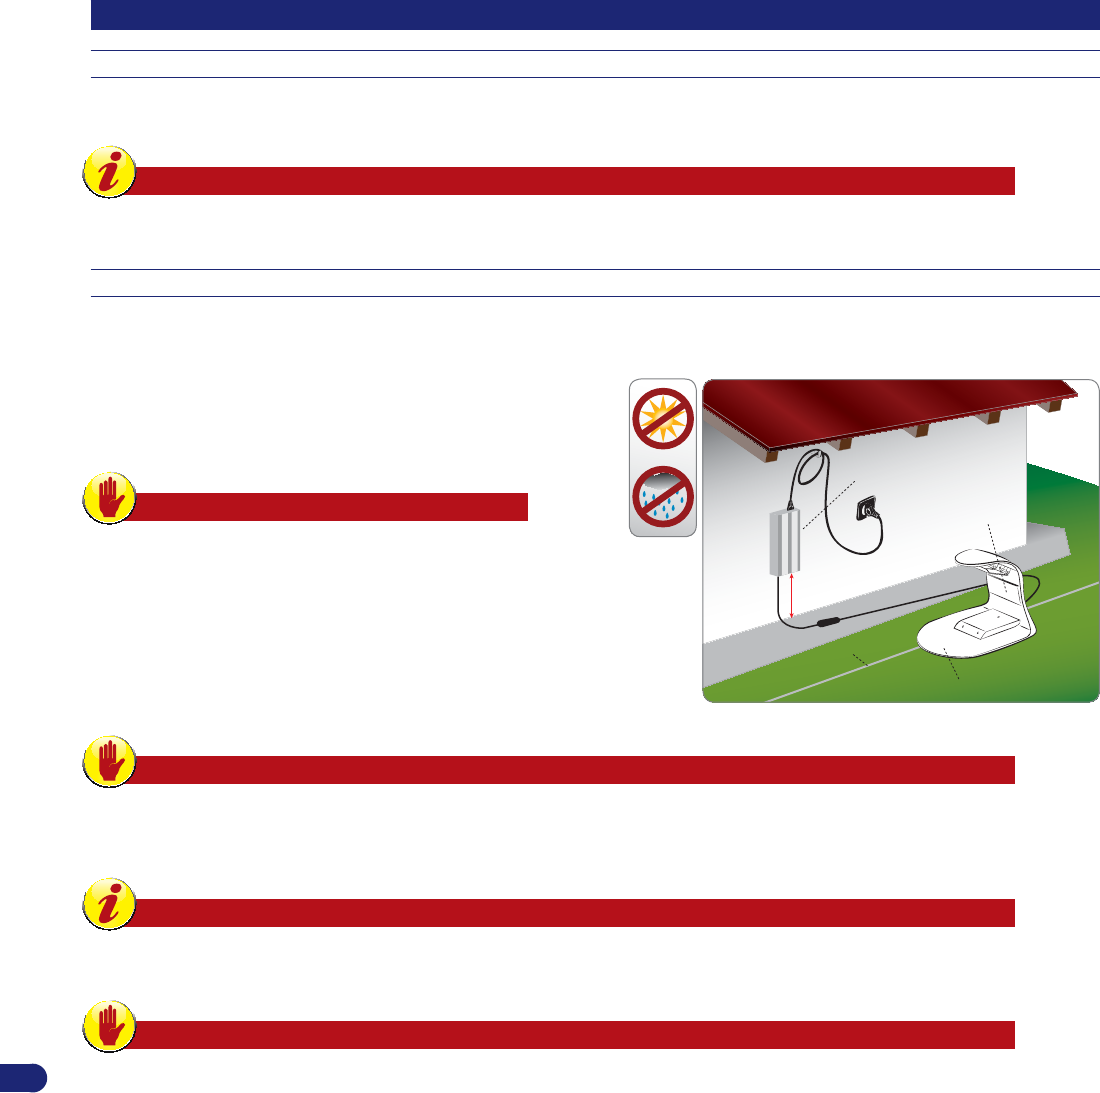
Warning – Caution
Position the power supply unit in an area that cannot be
reached by children. For example, at a height above 160
cm (63 ").
Power supply unit
perimeter wire
charging station
Min. height. 160 cm
/ 63 "
transmitter
Warning – Caution
When connecting the electricity, it is necessary that a power outlet is positioned near the installation area. Make sure the
connection to the mains power complies with the applicable laws. To operate in complete safety, make sure the electrical
system, which is connected to the power supply unit, is equipped with a well-functioning earthing system.
Important
It is advisable to install the unit in a cabinet for electric components (for outdoor or indoor use), equipped with a key lock,
and well-ventilated to maintain a correct air circulation.
Warning – Caution
Make sure only authorised people have access to the power supply.
•
The robot must be able to easily fi nd the charging station at the end of the work cycle, which will also be the starting point for a new work
cycle and for reaching any other work areas, hereinafter referred to as “Secondary Areas.”.
•
Position the charging station according to these rules:
-
On level ground.
-
On compact and stable ground with good drainage.
-
Preferably in the area of the longer lawn.
-
In case of sprinklers, make sure the water jets are not directed inside the charging station.
-
Make sure the entrance of the charging station is positioned as shown in the fi gure, so that the robot can enter it by following the perimeter
wire in a clockwise direction.
-
There must be a straight area of 400 cm (157.48 ") in front of the base.
•
The charging station must be well fastened to the ground. To prevent a small step from forming at the front of the base, position a small
piece of fake grass at its entrance to stop this from occurring. Alternatively, remove part of the grassy surface and install the base fl ush with
the grass.
•
The charging station is connected to the power supply unit via a cord that must move away from the charging station on the outside of the
cutting area.
9
User’s manual
EN
•
Position the power supply unit according to these rules:
-
In a well-ventilated area protected against atmospheric agents and
direct sunlight.
-
Preferably inside your home, a garage or shed.
-
If positioned outdoors, the robot must not be exposed to direct
sunlight and water. Therefore, it must be protected inside a
ventilated box. Do not position in direct contact with the soil or
humid environments.
-
Position it on the outside of the lawn and not inside.
-
Stretch out the excess cord going from the charging station to the
power supply unit. Do not shorten or lengthen the cord.
NONO
OKOK
NONO
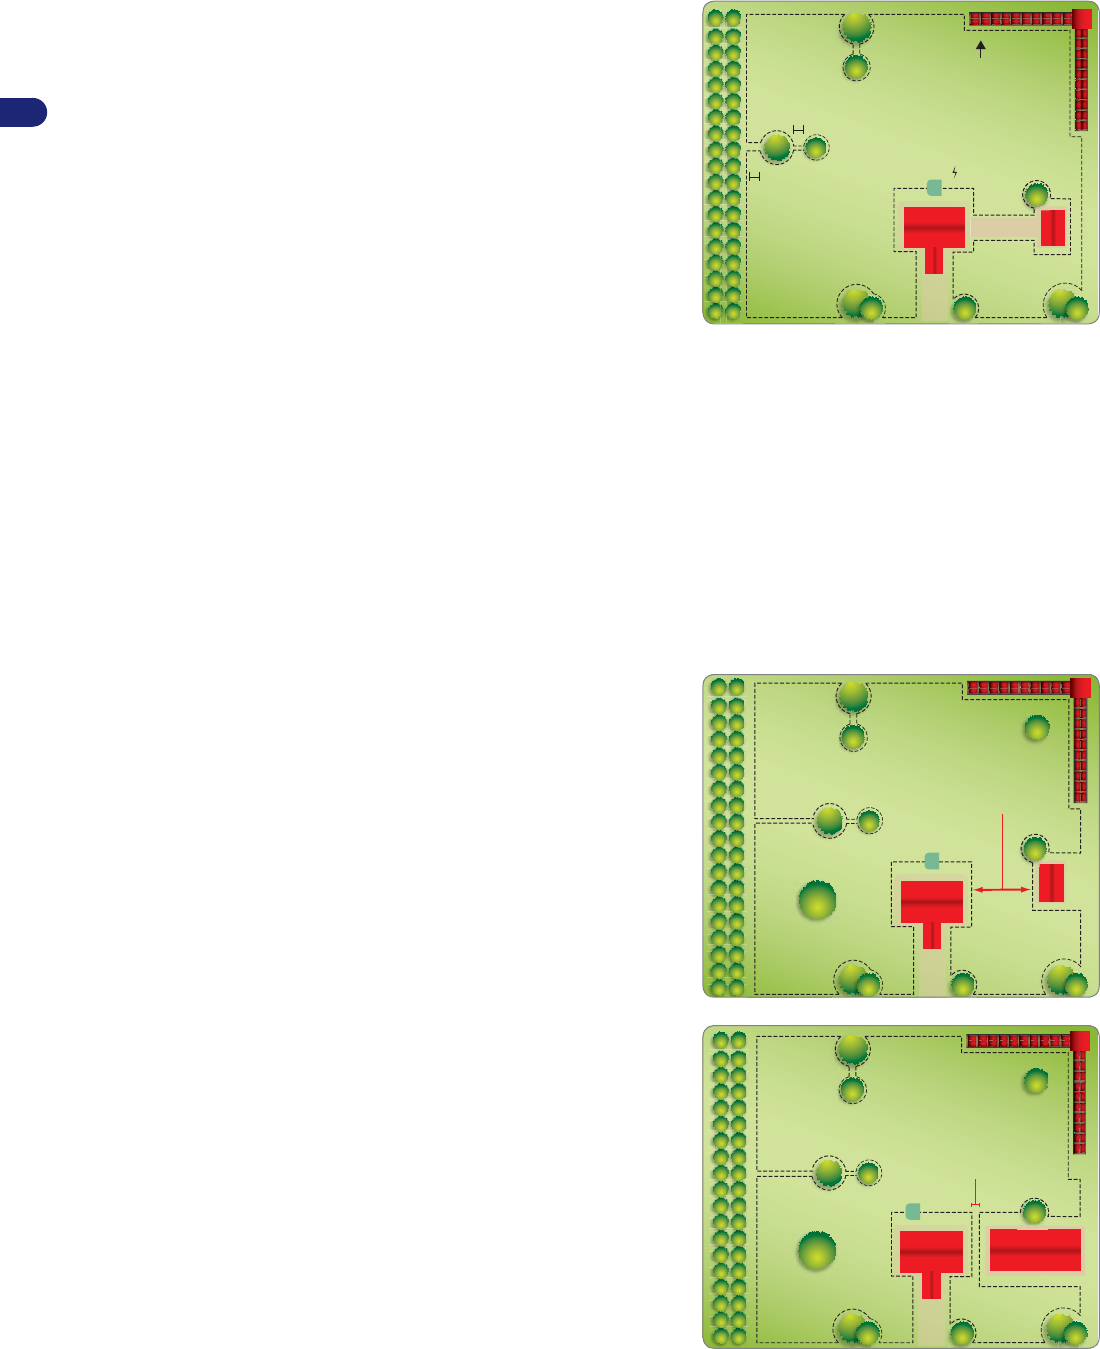
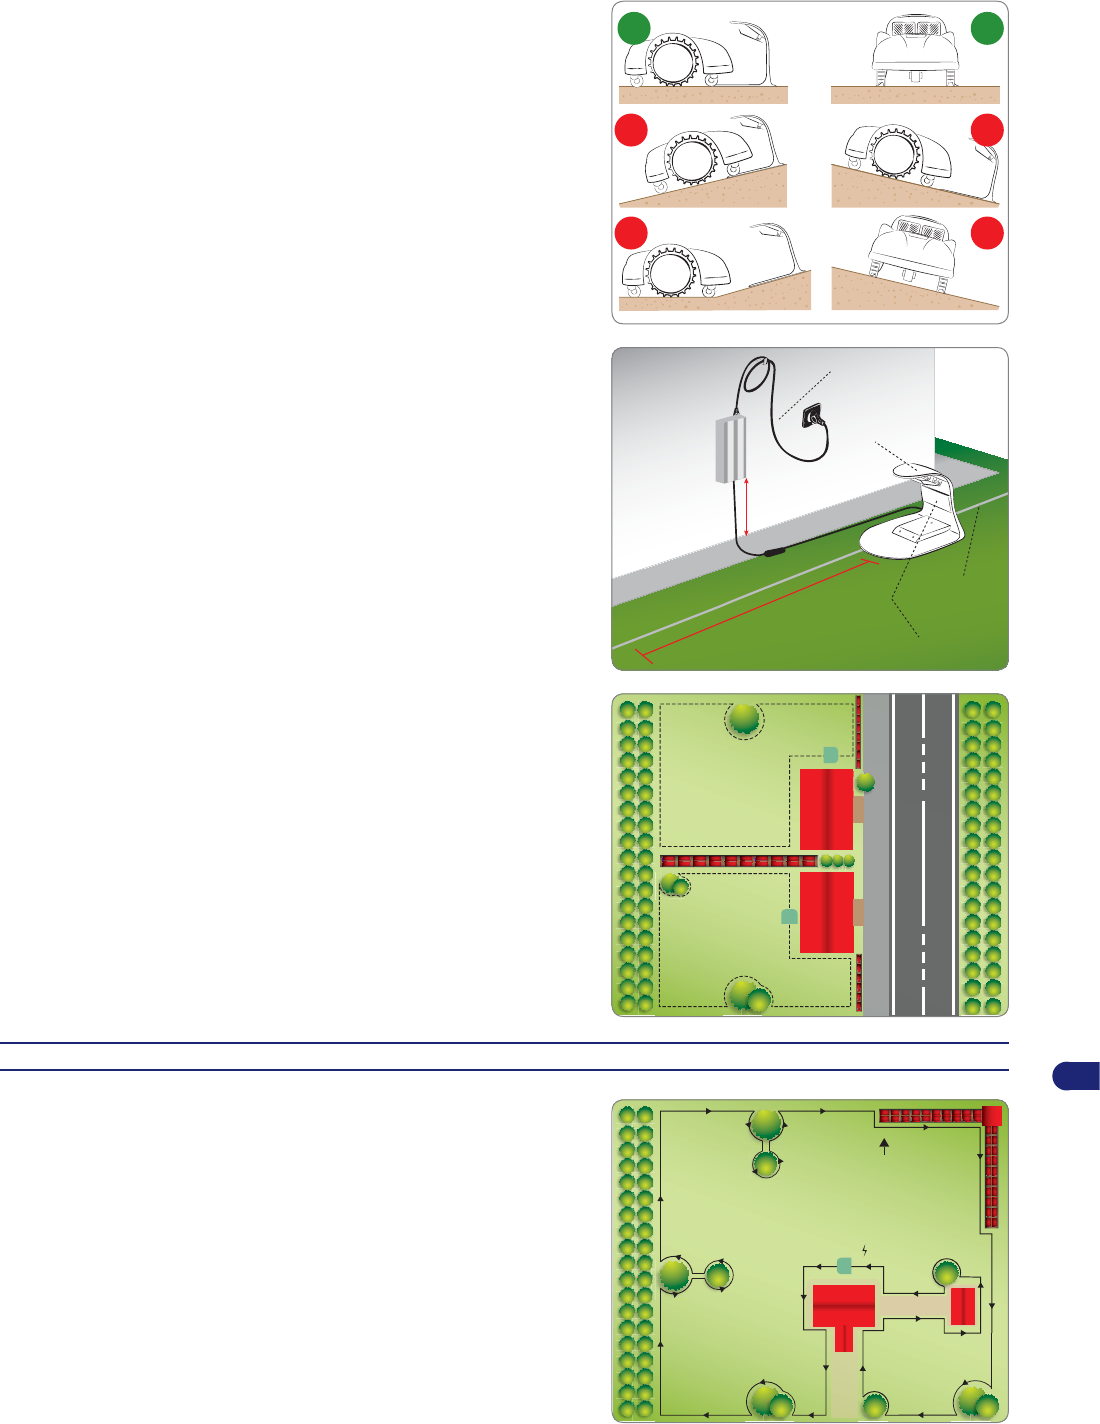
•
The incoming section of the wire must be straight and aligned
perpendicularly to the charging station by at least 200 cm (78.74 in.)
and the outgoing section must move away from the charging station as
shown in the fi gure; this allows the correct re-entry of the robot.
power supply unit
charging station
min height 160 cm
/ 63 "
min. distance
200 cm
/ 78,74 "
perimeter wire
transmitter
If the robot is installed near an area which has another robot (from the
same or another manufacturer), then the transmitter and receiver of the
robot must be modifi ed during installation so that the frequencies of the two
robots do not interfere with other.
SETTING UP OF THE PERIMETER WIRE
Before installing the perimeter wire, it is necessary to check the entire
surface of the lawn. Make any necessary adjustments to the grassy
surface during the laying of the perimeter wire in order to allow the robot
to function correctly.
1. Evaluate the best method for returning to the charging station according
to the instructions described in the chapter “RE-ENTRY METHOD TO
THE CHARGING STATION”.
2. Evaluate whether a special installation of the perimeter wire is
necessary according to the instructions described in the chapter
“SET-UP OF THE ROBOT’S QUICK RE-ENTRY TO THE CHARGING
STATION”.
3. Preparation and defi ning of the work areas.
4. Installation of the perimeter wire.
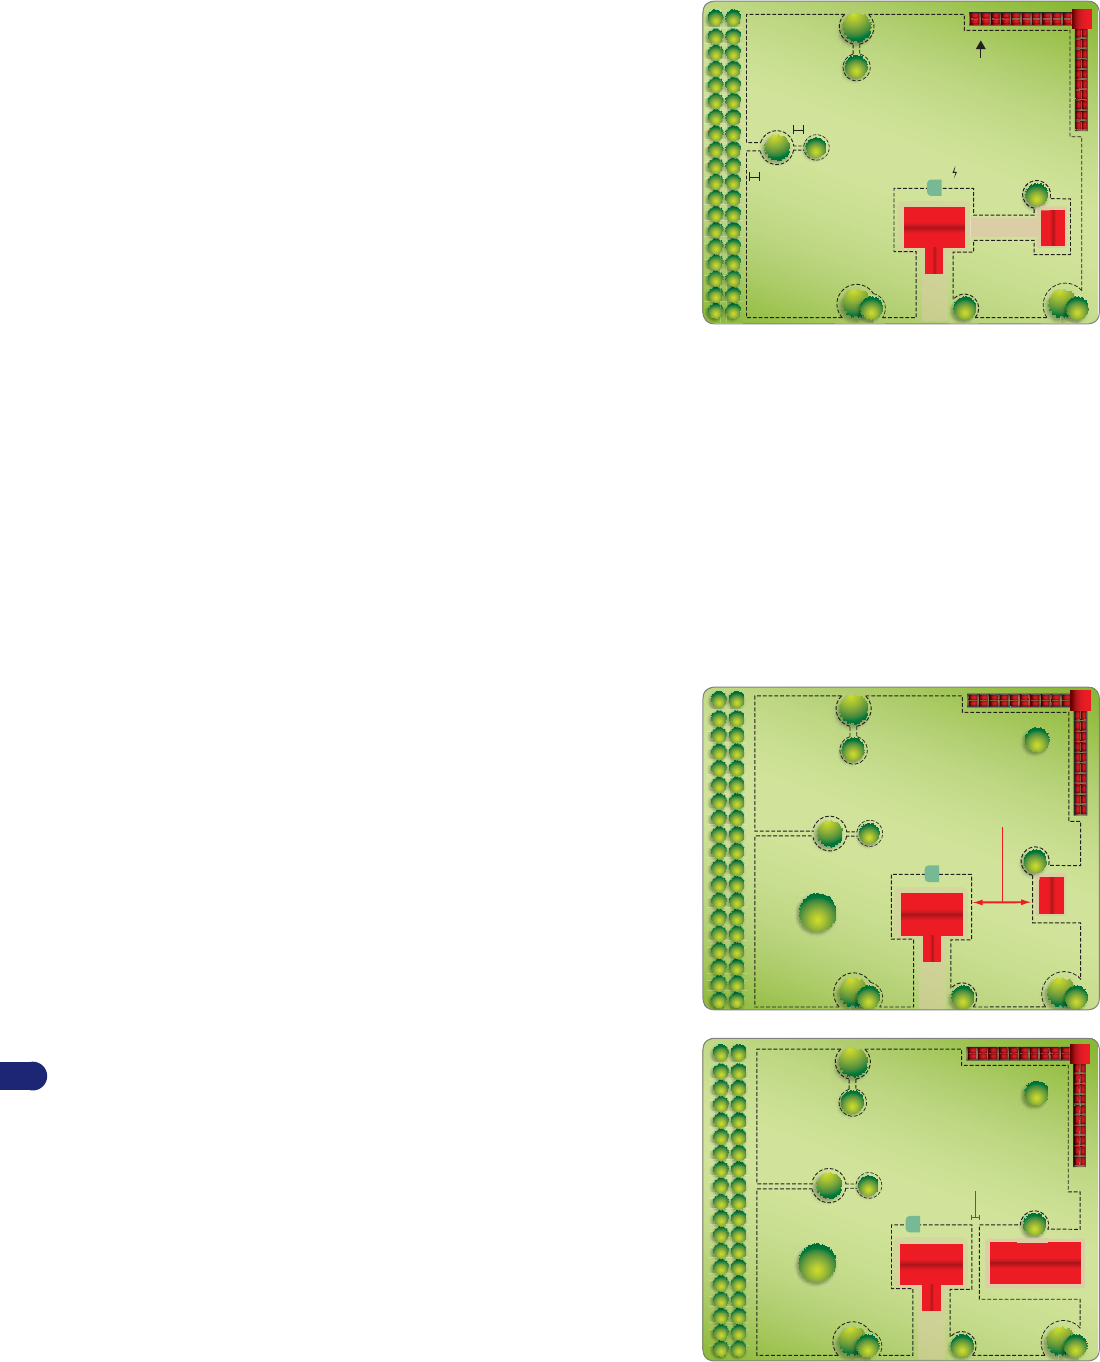
5. Installation of the charging station and power supply unit. When laying
the perimeter wire, respect the installation direction (clockwise) and
the rotation direction around the fl owerbeds (counter-clockwise), As
shown in the fi gure.
24 v
track for laying the perimeter wire
10
User’s manual
EN
RE-ENTRY METHOD TO THE CHARGING STATION
The robot can return to the charging station in two different ways based on
what is set in the user menu under the fi eld “Settings – Re-entry to Base.”
Use the “On the Wire” method only when there are numerous obstacles
inside the garden and near the perimeter wire (within 2 meters). In all other
cases it is better to use the “V-METER” method for the quickest re-entry to
the charging station.
“Follow wire”. This method of re-entry to the charging station commands
the robot to follow the perimeter wire, positioning its wheels on either side
of the wire. If this method is activated, there is no need to prepare the
“Recall on Wire” as described below.
“V-METER”. By setting this method of re-entry to the charging station, the
robot runs along the perimeter wire at an indicative distance ranging from
a few centimetres to one meter (3.2 '), touching it every now and again in
the curved sections until it recognises the “Recall on the Wire” necessary
to properly steer the robot to the charging station or to guide it along narrow
sections. Once the “Recall On the Wire” has been recognised, the robot
will follow the perimeter wire, positioning its wheels on either side of the
wire for a distance of around 10 meters. (33 ').
4-10 mt.
4-10 mt.
2 mt.
step
lower 2 mt.
5 cm.
2 mt.
The “Recall on the wire” not only indicates to the robot that it is near the charging station, but also of a narrow passage or of an arrow for quick
re-entry to the charging station.
As soon as a “Recall” is recognised, the robot will follow the perimeter wire at low speed, and with more precision for around 10 meters (33 '). It
will then return to the “V-Meter” re-entry mode if it does not encounter the charging station or the arrow for quick re-entry.
Follow these instructions to install the “Recall.”
•
The “Recall” is a piece of wire that extends for around 2 m (6.6 ') with a distance of 5 cm (1.96 ") between each wire.
•
The “Recall” must be positioned at a distance of 4 and 10 m. (13.2 - 33 ') in front of the charging the station.
•
The “Recall” must be positioned at a distance of 2 m. (6.6 ') in front of any narrow passages.
•
The “Recall” must be positioned in the section in front of the “Quick Re-entry.”
NB: If the robot does not fi nd the charging station within a certain amount of time, it will follow the perimeter wire in “Follow wire”
mode.
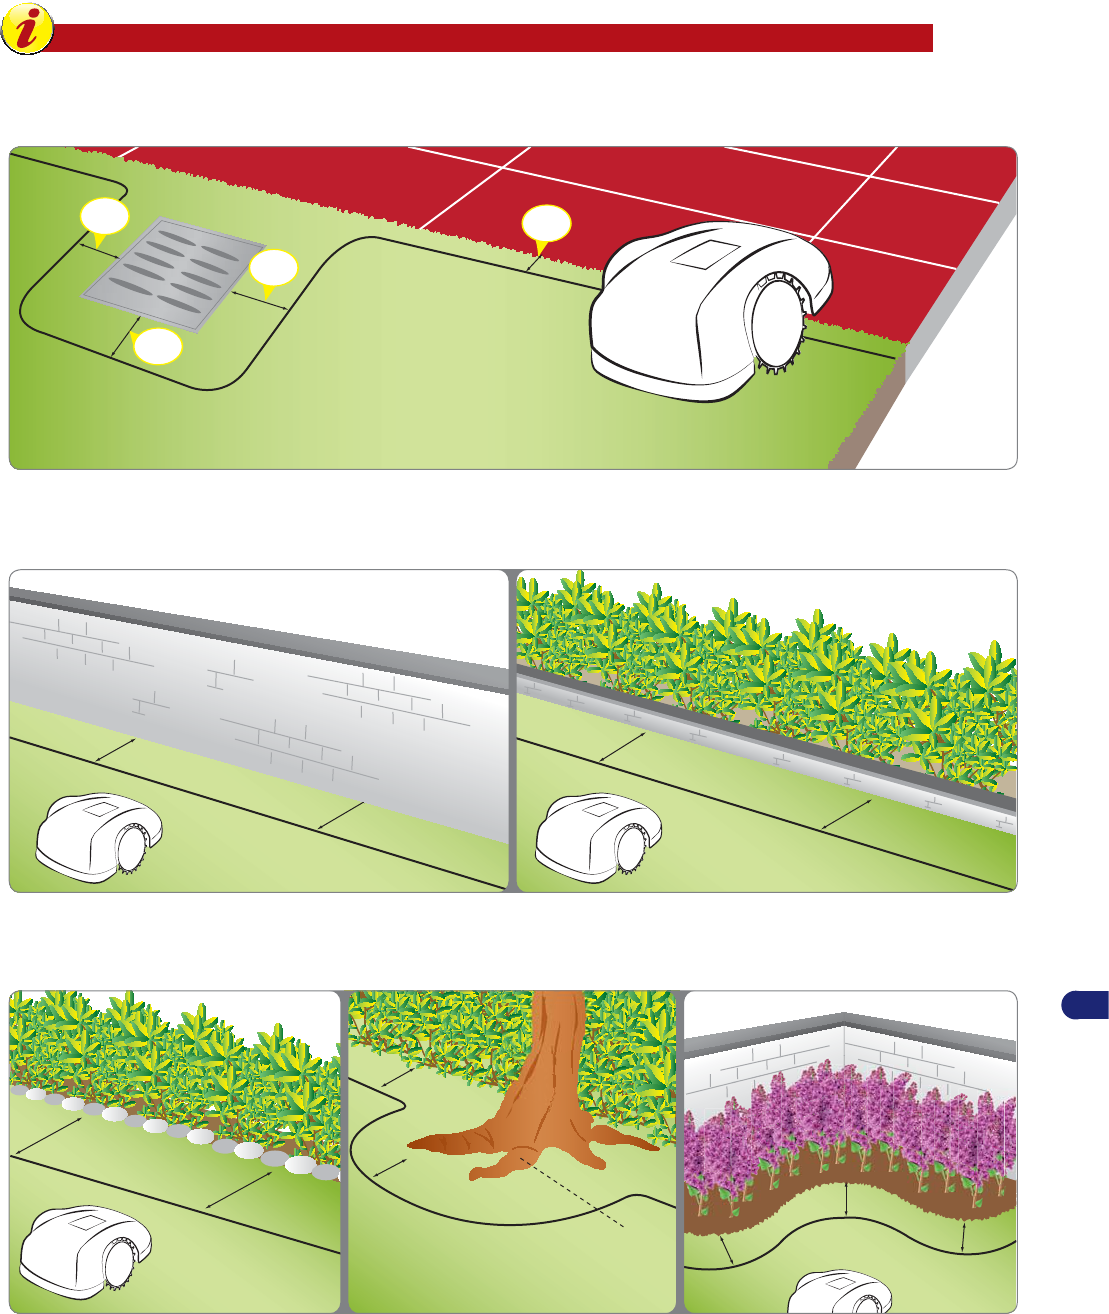
SETUP OF THE ROBOT’S QUICK RE-ENTRY TO THE CHARGING STATION
Quick re-entry requires a special installation of the perimeter wire that allows the robot to reduce the re-entry path to the charging station. This
special installation of the perimeter wire should only be used for gardens where quick re-entry signifi cantly reduces the path and where the
perimeter length is greater than 200 meters.
To setup the quick re-entry, position the perimeter wire on the ground so that it forms a triangle with one side of 50 cm (19.7 ") and the other two
sides of 40 cm (15.75 ") each, as shown in the fi gure.
As the robot heads back to the charging station with the two wheels on either side of the wire, it intercepts this triangle and stops moving. It
then turns approximately 90° towards the inside of the garden and starts moving in the new direction until running into the perimeter wire on the
opposite side.
Arrange the wire for quick re-entry in a point where there is at least 200 cm (78.74 ") of straight wire in front of the station, and at least 150 cm
(59.05 ") of straight wire behind it.
Do not set up the wire along the straight section immediately in front of the charging station or near any obstacles. Make sure there are no
obstacles along the re-entry path that may obstruct the quick re-entry.
Important
An incorrect setup of the robot’s quick re-entry may prevent the robot from returning to the charging station quickly. When
the robot travels along the perimeter to reach a secondary area, it may not detect the quick re-entry setup.
11
User’s manual
EN
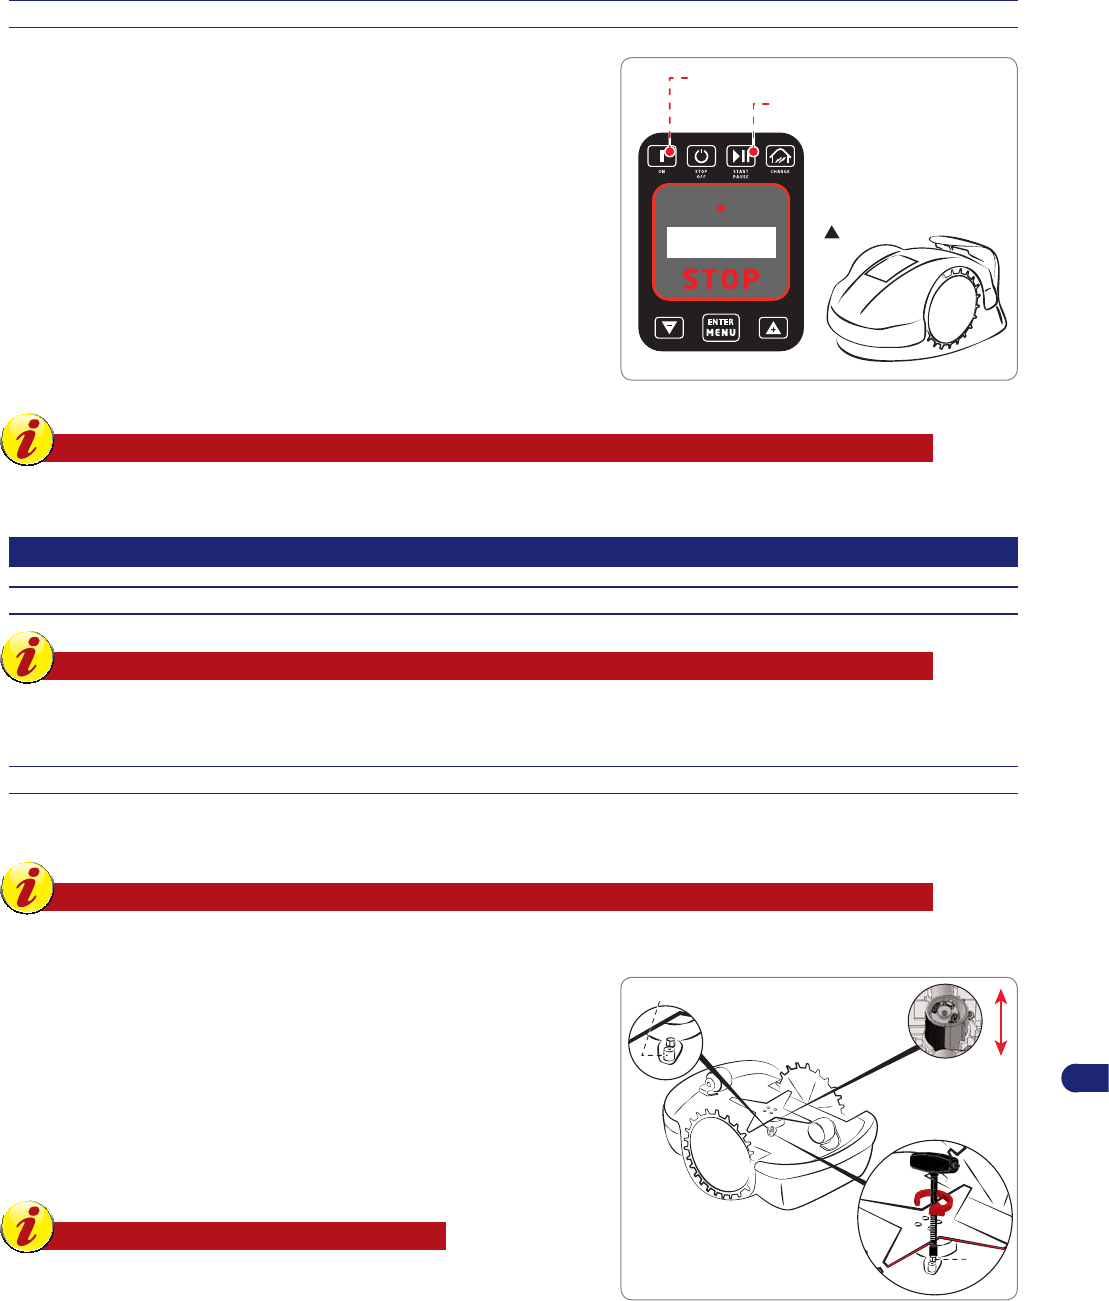
The illustration provides some useful tips on how to correctly setup the
robot for a quick re-entry.
4040
50
step
lower 2 mt.
4-10 mt.min. 150 cm.
(59,05 ")
4-10 mt.
4-10 mt.
2 mt.
5 cm.
2 mt.
PREPARATION AND MARKING THE BOUNDARIES OF THE WORK AREAS
Preparation of the lawn to be mowed
1. Make sure the lawn to be mowed is even and does not contain holes,
stones or other obstacles. If necessary, prepare the lawn by fi lling
in any holes and removing any obstacles. If some obstacles cannot
be removed, it is necessary to properly mark these areas with the
perimeter wire.
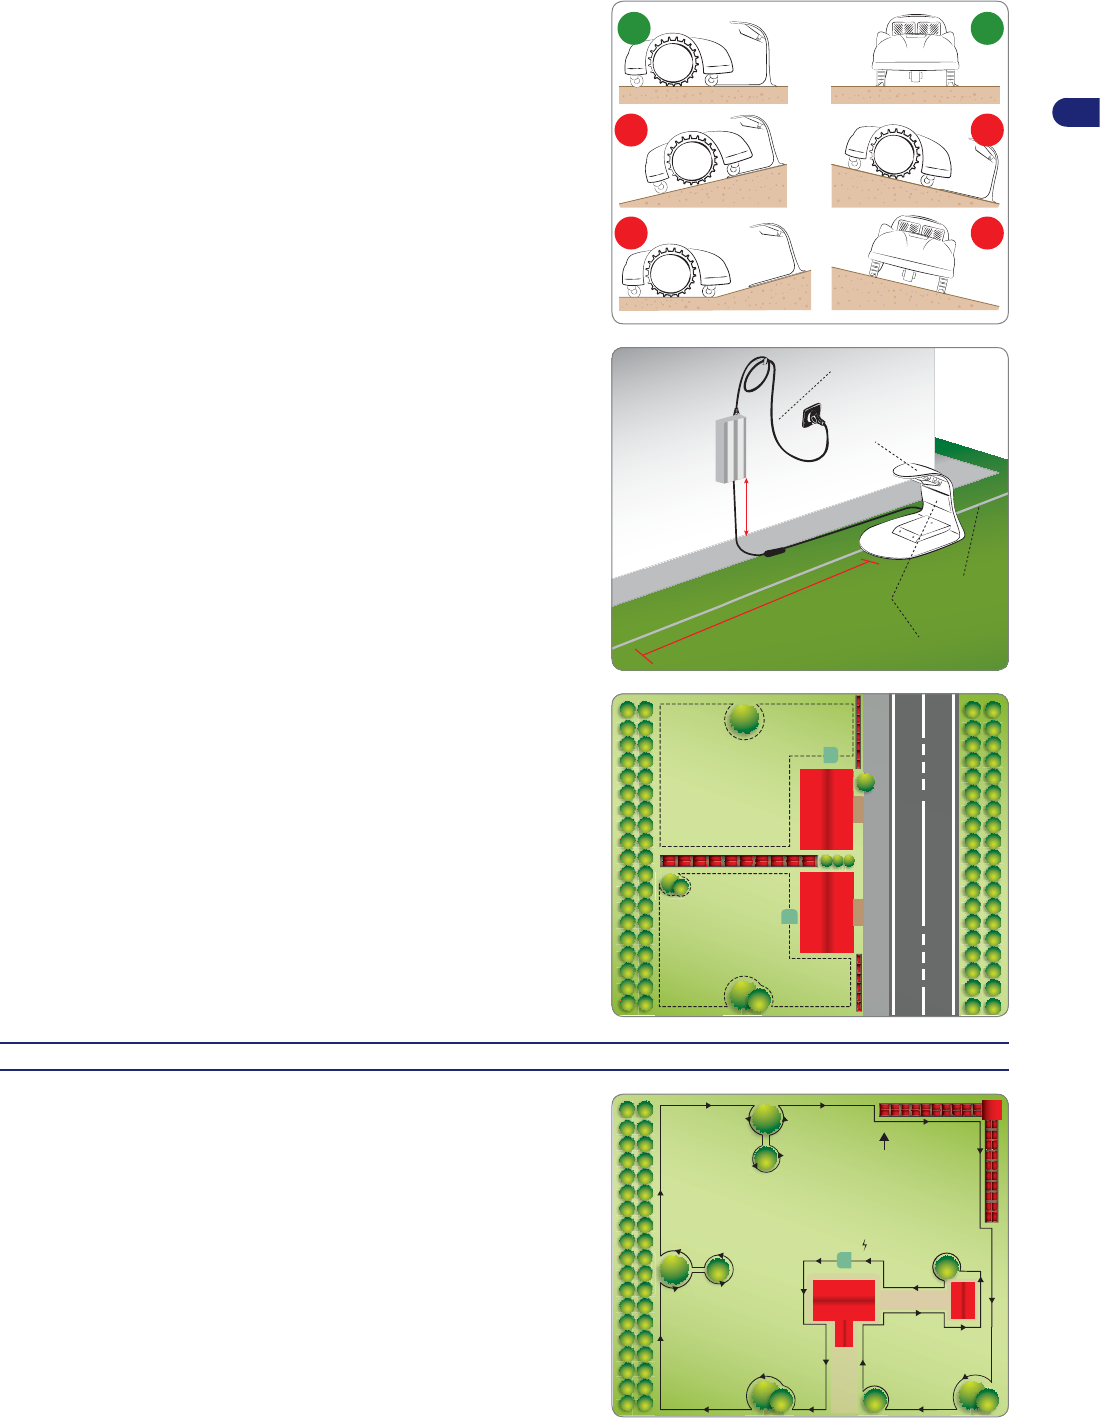
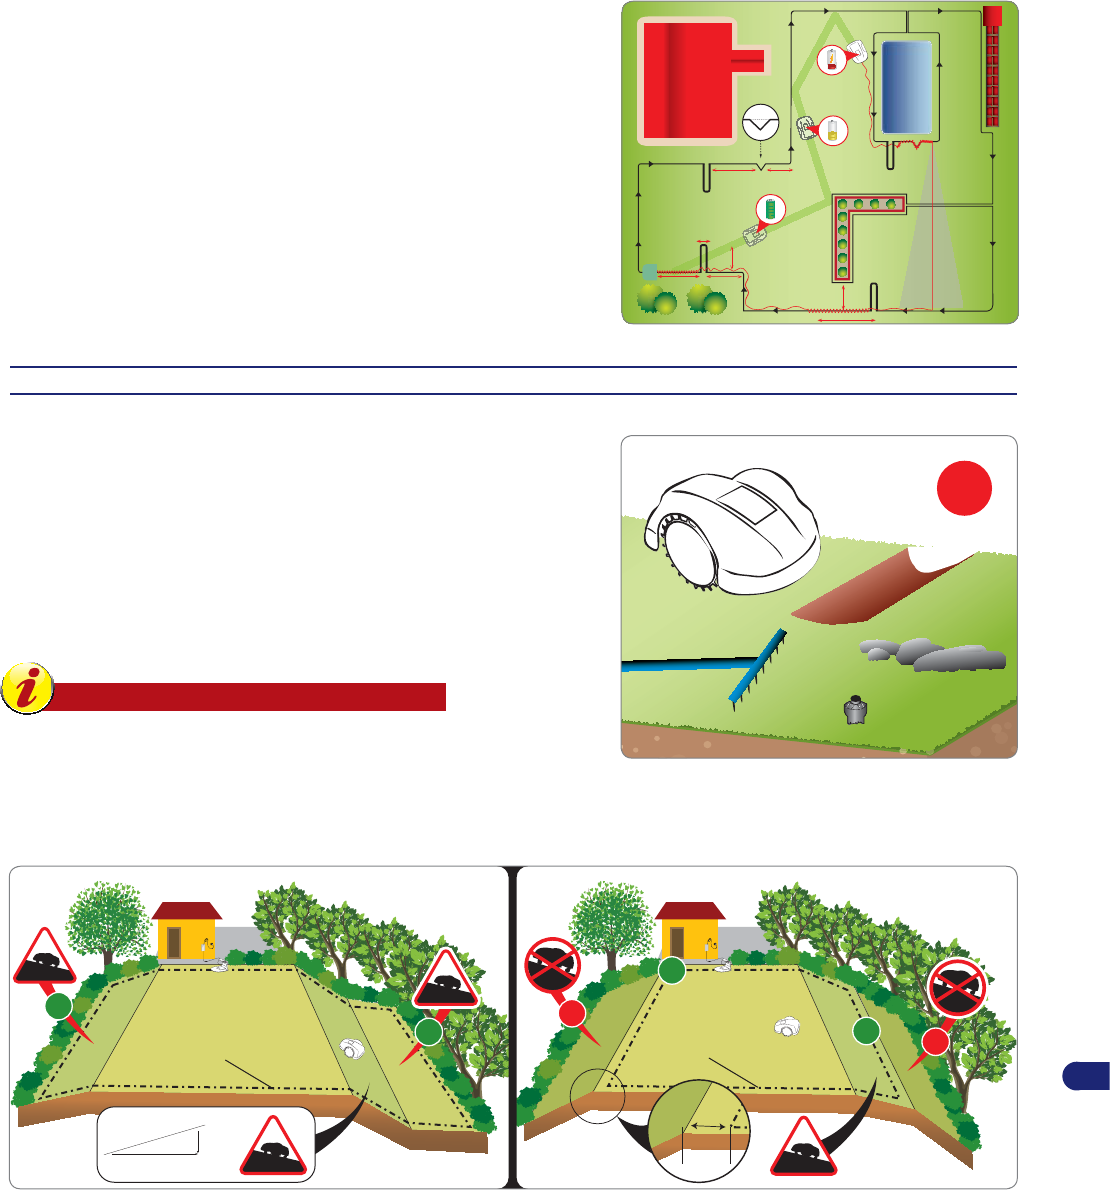
2. Check that no areas of the lawn exceed the allowable slopes (see
“Technical Specifi cations”). When working on slopes, the wheels
may slip when the robot detects the wire, causing it to fall outside the
perimeter.
Important
Areas with slopes greater than those allowed cannot be
mowed with the robot. Therefore, position the perimeter
wire in front of the slope so that it is excluded from the
area to mow.
NO
35 cm
(13,78 ")
21-35%
21-35%
0-20%
100 cm (39,3 ")
35 cm
(13,78 ")
35 %
0-35%
0-20%
0-20%
perimeter wire
perimeter wire
OK
NO
NO
OK
OK
OK
12
User’s manual
EN
Marking the boundary of the work area
3. Check the entire lawn surface and assess whether it is necessary
to divide it into separate work areas as per the rules described here
below. Before installing the perimeter wire, check the entire path to
make this procedure easier. The illustration shows a lawn with the
track for installation of the perimeter wire.
During installation, identify any secondary areas and closed areas. A
secondary area is part of a lawn connected to the primary lawn with
a passage that is diffi cult to reach by the robot's normal movement.
The area must be reachable without any rises or drops greater than
those allowed. Whether a zone is to be defi ned a “secondary area”
also depends on the size of the primary area. The larger the primary
area, the harder it will be to reach narrow passages. More generally,
a passage narrower than 200 cm (78.74 ") is considered a secondary
area. The number of secondary areas managed depends on the
characteristics of the model (See “Technical Specifi cations”).
The minimum passage allowed is 70 cm (27.56 ") from each edge of
the perimeter wire. The perimeter wire must be positioned at a distance
of (to be indicated below) from any objects outside the lawn; therefore,
the total passage available should be 140 cm (55.12 ").
If this passage is very long, the width should not be greater than 70 cm
(27.56 ").
During programming, it is necessary to confi gure the size of the
secondary areas as a percentage of the lawn, and the quickest
direction for reaching it (clockwise or counter-clockwise), as well as
the number of meters of wire needed to reach the secondary area. See
“Programming Mode.”
24 v
Track for laying the perimeter wire
min. 70 cm / 27,56 "min. 70 cm / 27,56 "
min. 70 cm / 27,56 "
If the aforesaid minimum requirements are not met i.e. an area
separated by a rise or drop with characteristics that cannot be
managed by the robot or a passage (corridor) narrower than 70 cm
(27.56 ") from perimeter edge to perimeter edge, then this area of the
lawn is considered a “Closed Area.” To mark a “Closed Area” lay the
outgoing and incoming perimeter wire in the same track at a maximum
distance of 1 cm (0.40 "). In this case, the robot is unable to reach the
area autonomously, and must be managed as described in the chapter
“Management of Closed Areas.” The management of “Closed Areas”
reduces the square meters that can be managed autonomously by
the robot.
corridor with a minimum passage
of 70 cm / 27,56 " from edge to edge.
PRIMARY AREA
SECONDARY AREA
corridor with a passage
< 70 cm / 27,56 "
PRIMARY AREA
CLOSED AREA
13
User’s manual
EN
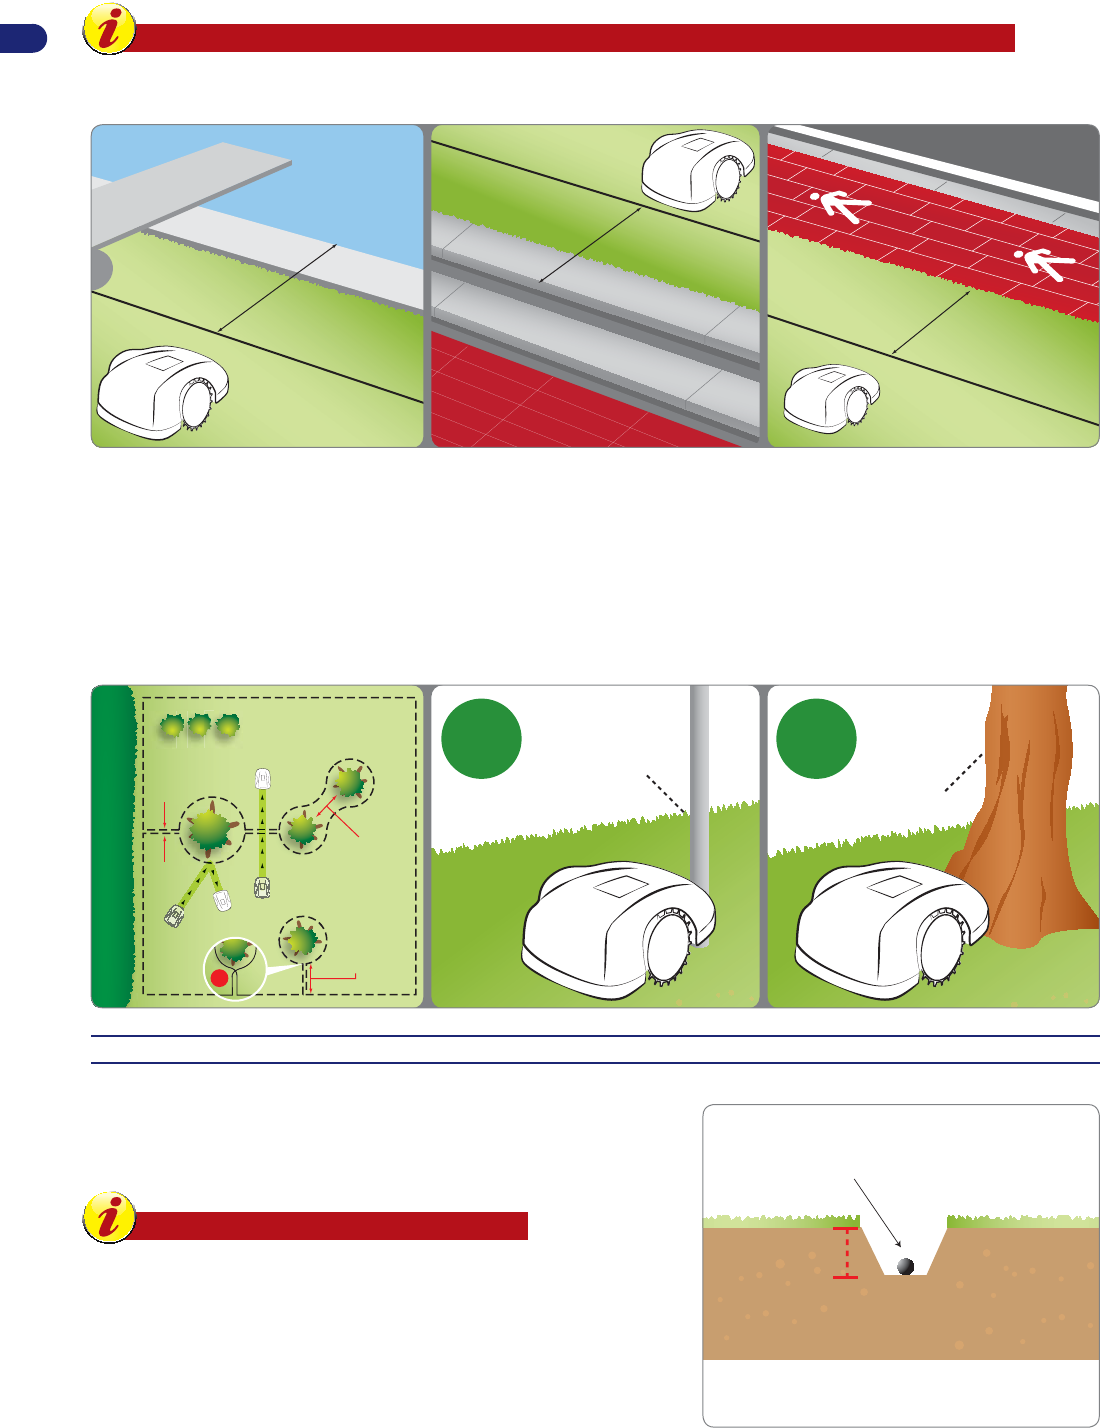
4. If there is a pavement or driveway inside or outside the work area, which is at the same level of the lawn, lay the perimeter wire at a distance
of 5 cm (1.96 ") from the edge of the pavement. The robot will come out slightly from the lawn and all the grass will be mowed. If the pavement
is made of metal or if there is a metal manhole cover, shower plate or electrical wires, lay the perimeter wire at least 30 cm (11.81 ") from the
metal object in order to prevent malfunction of the robot and disturbances on the perimeter wire.
Important
The illustration shows an example of the elements inside and on the perimeter of the work area and the distances to follow
for the correct laying of the perimeter wire. Mark the boundary of elements in iron or other metals (drain covers, electric
connections, etc.) to prevent any interferences to the signal of the perimeter wire.
5 cm
1,97 “
30 cm
11,81 “
30 cm
11,81 “
30 cm
11,81 “
If an obstacle is present inside or outside the work area, such as a kerb or wall, lay the perimeter wire at least 35 cm (13.78 ") from the obstacle.
Increase the distance between the perimeter wire and the obstacle by at least 40 cm (14.75 ") if you want to avoid the robot from bumping into
the obstacle. Any grass close to the edge and outside the defi ned work area can be cut with a grass trimmer or brushcutter.
35 cm.
/13,78 "
35 cm.
/13,78 "
35 cm.
/13,78 "
35 cm.
/13,78 "
If a fl ower bed, hedge, plant with protruding roots, small ditch of 2-3 cm or small kerb of 2-3 cm is present inside or outside the work area, lay the
perimeter wire at least 30 cm (11.81 ") from the obstacle to prevent damage being done to the robot or the obstacle.
Any grass present inside the work area can be cut and fi nished with a grass trimmer or brushcutter.
30 cm.
/11,81”
30 cm.
/11,81”
30 cm.
/11,81”
30 cm.
/11,81”
30 cm.
/11,81”
protruding roots
30 cm.
/ 11,81 “
30 cm.
/ 11,81 “
14
User’s manual
EN
If there is a pool, pond, ravine, ditch, steps or public roads not protected by a wall inside or outside the work area, lay the perimeter wire at least 90
cm (35.43 ") from the edge. To reduce the distance of the perimeter wire for the best set-up and operation of the robot, we recommend installing
an additional fence of at least 15 cm. This will allow laying the perimeter wire at the regular distances described in the previous paragraphs.
Important
Carefully follow the distances and slopes specifi ed in the booklet to guarantee excellent installation and proper functioning
of the robot. Increase the distance by at least 30 cm (11.81 ") in the presence of slopes or slippery ground.
90 cm.
/ 35,44 “
90 cm.
/ 35,44 “
90 cm.
/ 35,44 “
Obstacles resistant to knocks, such as trees, bushes or poles without sharp edges present inside the work area do not need to be delimited. The
robot hits the obstacle and changes direction. If you don’t want the robot to knock into the obstacles and for its safe and silent operation, all the
fi xed obstacles need to be delimited. Slightly sloping obstacles such as fl ower pots, stones or trees with protruding roots must be delimited to
protect the cutting blade and the obstacles themselves.
To mark the boundary of the obstacle, start from the outside point of the perimeter nearest the object to delimit, arrange the perimeter wire so
that it reaches the obstacle, goes around it and then travels back along the previous path, observing the regular distances described in the
previous paragraphs. Overlap the outgoing wire and the incoming wire so that they pass under the same peg, this will allow the robot to go past
the perimeter wire.
For the robot to function correctly, the minimum overlapping length should not be greater than 70 cm (27.56 ") in order to allow the robot to move
regularly.
NO
min. 70 cm
/ 27,56 ”
min. 70 cm
/ 27,56 ”
< 70 cm
/ 27,56 ”
< 70 cm
/ 27,56 ”
0 cm / 0 ”0 cm / 0 ”
plant
pole
OKOK
INSTALLATION OF PERIMETER WIRE
The perimeter wire can be buried or laid on the ground. If you have a
wire trenching machine, it is better to bury the wire for greater protection.
Otherwise, install the wire on the ground with the pegs provided as
described below.
Important
Start laying the perimeter wire from the installation area
of the charging station, leaving a couple of extra meters
so that it can be cut down to size when connecting to the
power unit during the fi nal phase.
Max.
5 cm (1,96 ")
perimeter wire
15
User’s manual
EN
Ground wire
Cut the grass as low as possible with a traditional lawnmower ortrimmer
along the entire path where the cable will be laid.This will make it easier
to lay the wire in contact with the ground, and to prevent it from being cut
by the cutting blade, and then having to join the two ends together as
described below.
1. Position the wire in a clockwise direction along the entire track and
secure it with the pegs supplied (distance of 100÷200 cm (39.37÷78.74 ")
between each peg).
-
When laying the perimeter wire, follow the installation direction
around the fl owerbeds, i.e. a counter-clockwise direction.
-
In straight stretches, secure the wire so that it is taut and remains
fl at against the ground.
-
In curved sections, secure the wire so that it is not twisted, but
curves nicely (radius of 20 cm).
NO
wire fastening pegsperimeter wire
Buried wire
1. Dig the ground in a regular and symmetrical manner with respect to the
line traced on the ground.
2. Position the wire in a clockwise direction along the track at a depth of a
couple of centimetres (around 2÷3 cm (0.7874÷ 1.1811 ")). Do not bury
the wire deeper than 5 cm, so as not to reduce the quality and intensity
of the signal picked up by the robot.
3. During the laying of the wire, it may be necessary to secure it in some
points with the pegs provided in order to hold it in place when covering
with the ground.
4. Cover all the wire with soil and make sure it remains taut in the ground.
PRIMARY AREA
CLOSED AREA
corridor
< 70 cm (27,56 ")
35 cm
(13,78 ")
Max 1 cm
(0,40 ")
NO
Joining of the perimeter wire
Important
A buried wire or a wire laid on the ground can be joined to
other wires having the same characteristics (see fi gure).
When joining the two wires, make sure to use self-sticking
tape (for example, 3M Scotch 23). Do not use insulating
tape or any other type of joining devices (wire terminals,
clamps, etc.).
1
34
2
16
User’s manual
EN
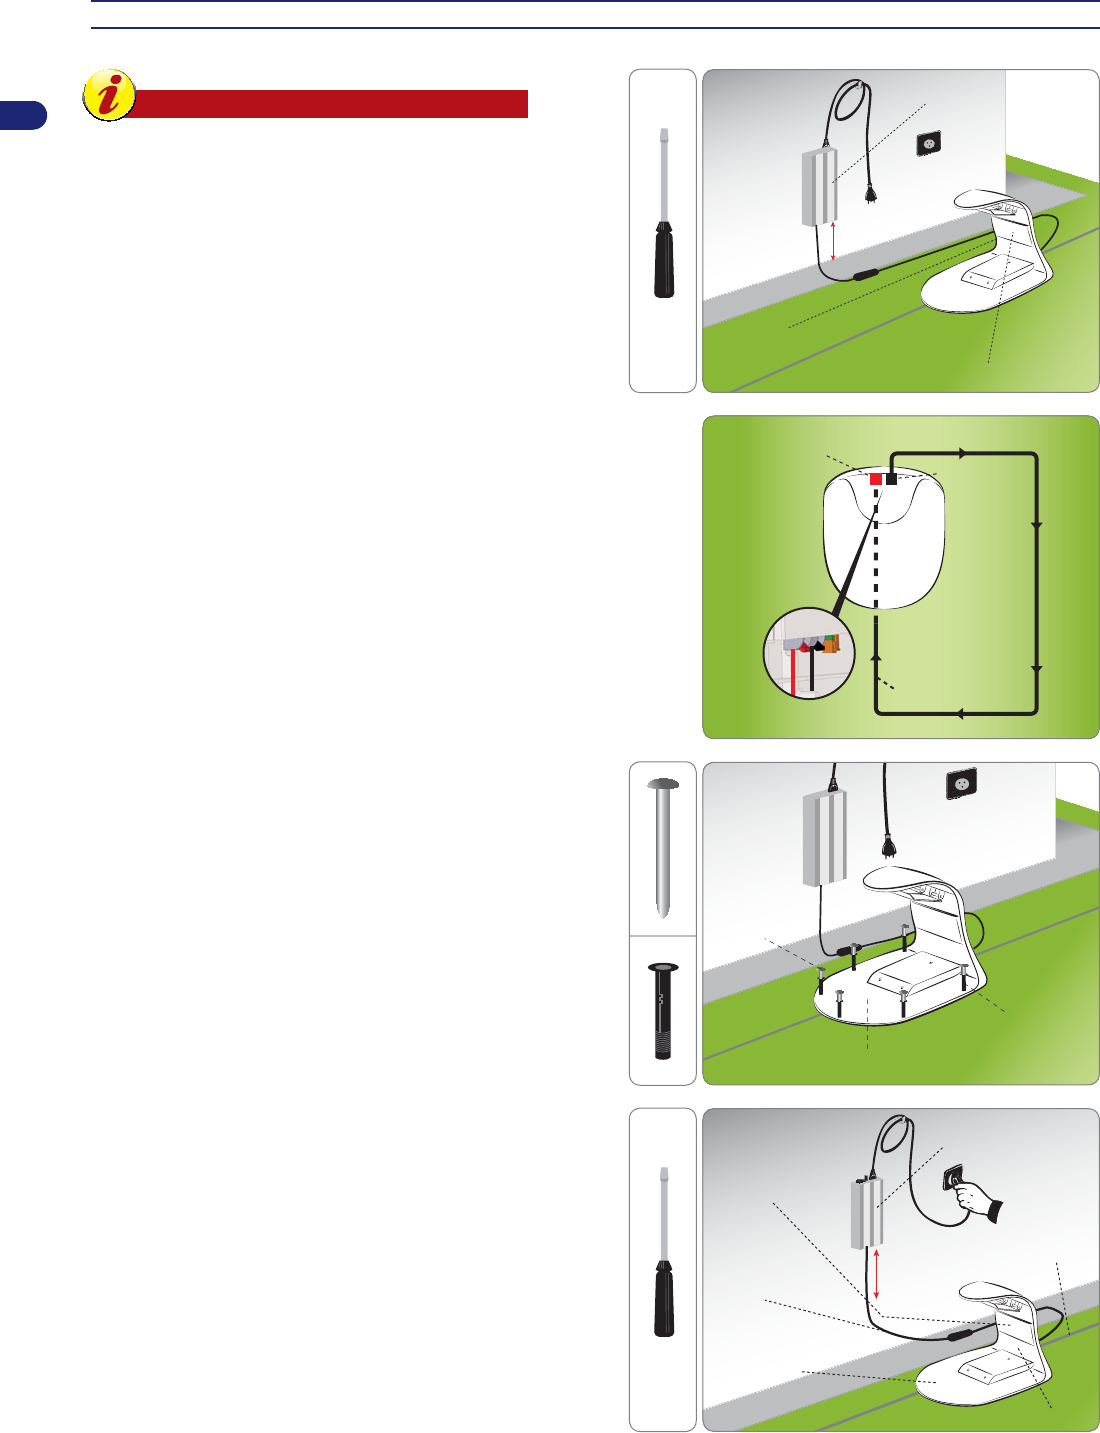
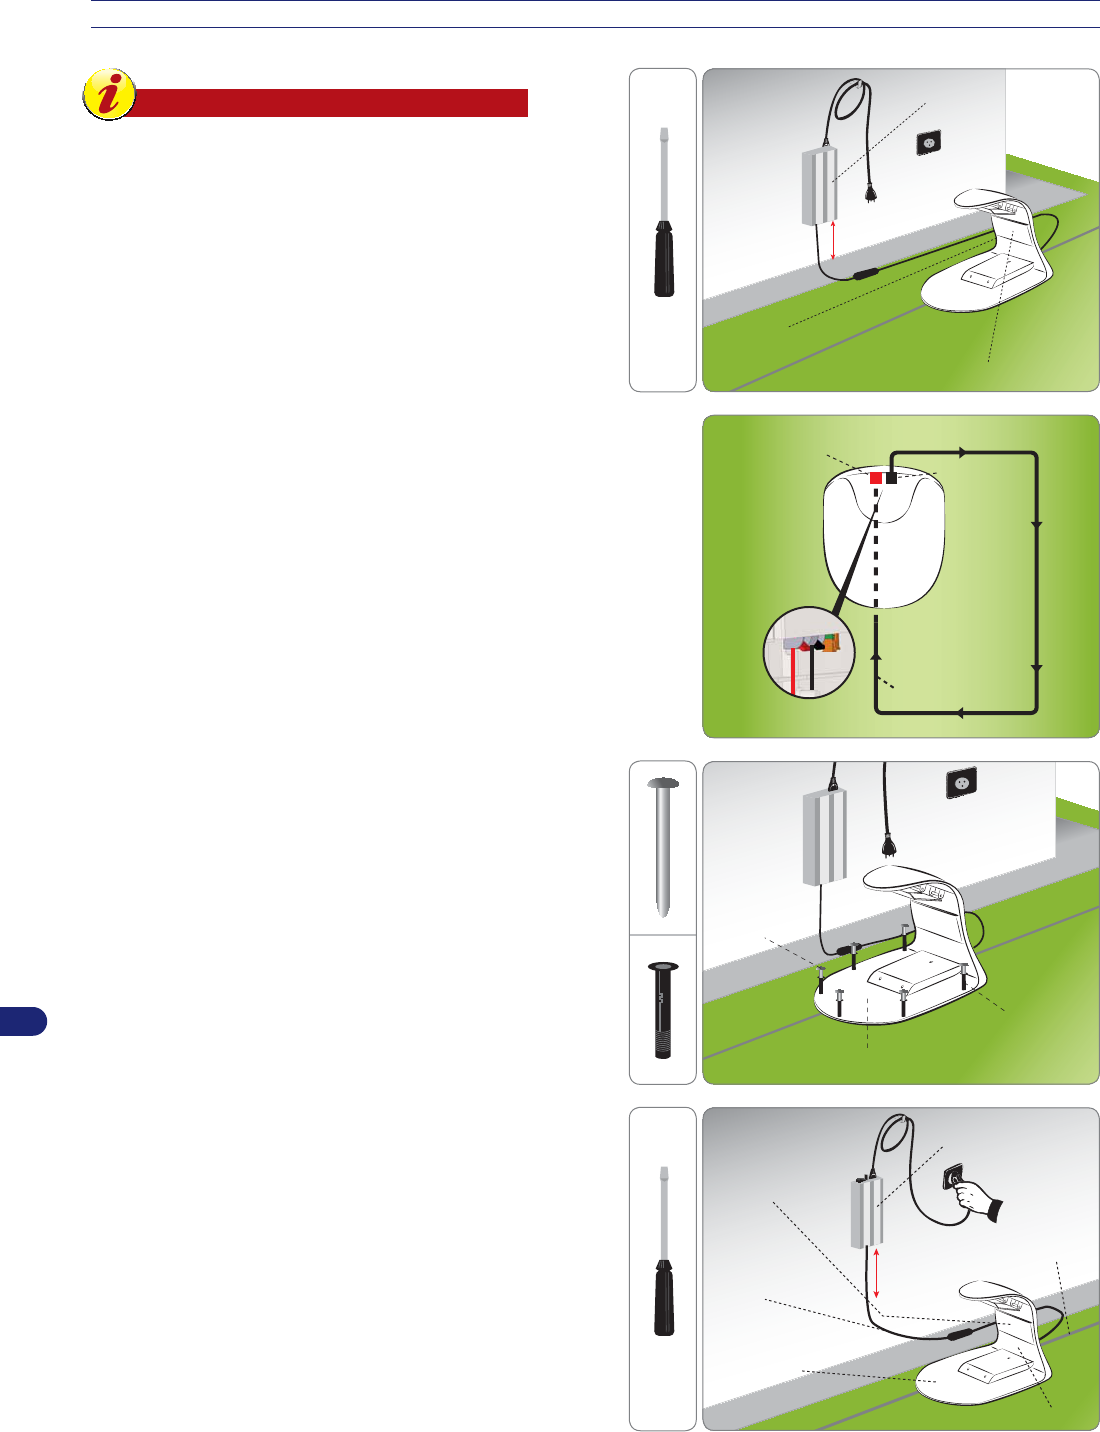
INSTALLATION OF THE CHARGING STATION AND POWER SUPPLY UNIT
Warning – Caution
Before carrying out any operations, disconnect the robot
from the mains power.
Position the power supply unit in an area that cannot be
reached by children. For example, at a height above 160
cm (63 ").
protection(L)
current power supply unit(A)
transmitter(B)
H. min. 160 cm
(63.00 ")
1. Install the power supply unit (A).
2. Remove the protection (L).
3. Position the base in the predefi ned area.
4. Insert the perimeter wire (M) under the base.
5. Connect the two ends of the wire to the terminals of the base.
red terminal
black terminal
perimeter wire (M)
6. Fasten the base (N) to the ground with the pegs (P). If necessary,
secure the base with screw anchors (Q).
pegs (P)
screw anchors (Q)
charging station (N)
7. Connect the power cord (E) of the charging station (N) to the power
supply unit (A).
8. Connect the plug of the power supply unit (A) to the electrical outlet.
9. If the LED of the transmitter fl ashes, the connection is correct.
Otherwise, fi nd the anomaly (see “Troubleshooting Guide”).
10. Replace the protection (L).
current power
supply unit (A)
power cord (E)
Perimeter
wire
charging station (N)
transmitter (B)
H. min. 160 cm
(63.00 ")
protection(L)
17
User’s manual
EN
BATTERY CHARGING ON FIRST USE
1.
Place the robot inside the charging station.
2. Press the ON key.
3. After a few seconds, the “CHARGING” message will appear on the
display.
4. Press the “Start/Pause” key. The “PAUSE” function appears on the
display. The batteries start the charging cycle.
5. At the end of charging, the robot can be programmed for initial start-up
(see “Programming Mode”).
ENTER
“ON” KEY
“START/PAUSE” KEY
Important
On fi rst use, always charge the batteries for at least 4 hours.
ADJUSTMENTS
ADJUSTMENT RECOMMENDATIONS
Important
The user must make any adjustments according to the procedures described in this manual. Do not make any adjustments
which are not expressly indicated in this manual. Any special adjustments, not expressly indicated in this manual, must
only be performed by personnel from the Manufacturer’s authorised service centre.
ADJUSTMENT OF CUTTING HEIGHT
Before setting the cutting height of the blade, make sure the robot is safely off (see “Robot Safety Stop”).
Important
Use protective gloves to prevent injuries to your hands.
1. In models equipped with an antitheft alarm, disable it to prevent
activation. (See “Programming Mode”).
2. Turn over the robot and position it so as not to ruin the hood.
3. Unscrew the screw (C) and turn the bracket (E) in a clockwise direction
with the key provided.
4. Lift or lower the cutting unit (D) to set the desired cutting height. The
value can be measured using the graduated scale found on the key
provided.
Important
Do not use the robot to mow grass which is 1 cm (0.40 ")
higher than the cutting blade. Reduce the cutting height
gradually. It is recommended to reduce the height by at
least 1 cm (0.40 ") every 1-2 days until the ideal height is
reached.
5. Once the adjustment has been made, turn the bracket (E) in a counter-
clockwise direction and tighten the screw (C).
6. Turn the robot back over to its operating position.
(E)
cutting unit (D)
screws (C)
18
User’s manual
EN
USE AND OPERATION
RECOMMENDATIONS FOR USE
Important
-
When using the robot for the fi rst time, it is recommended to carefully read the whole manual and to fully understand
it, especially the safety information.
-
The product must only be used for its intended purpose as described by the Manufacturer. Do not tamper with any
device to obtain different operating performances.
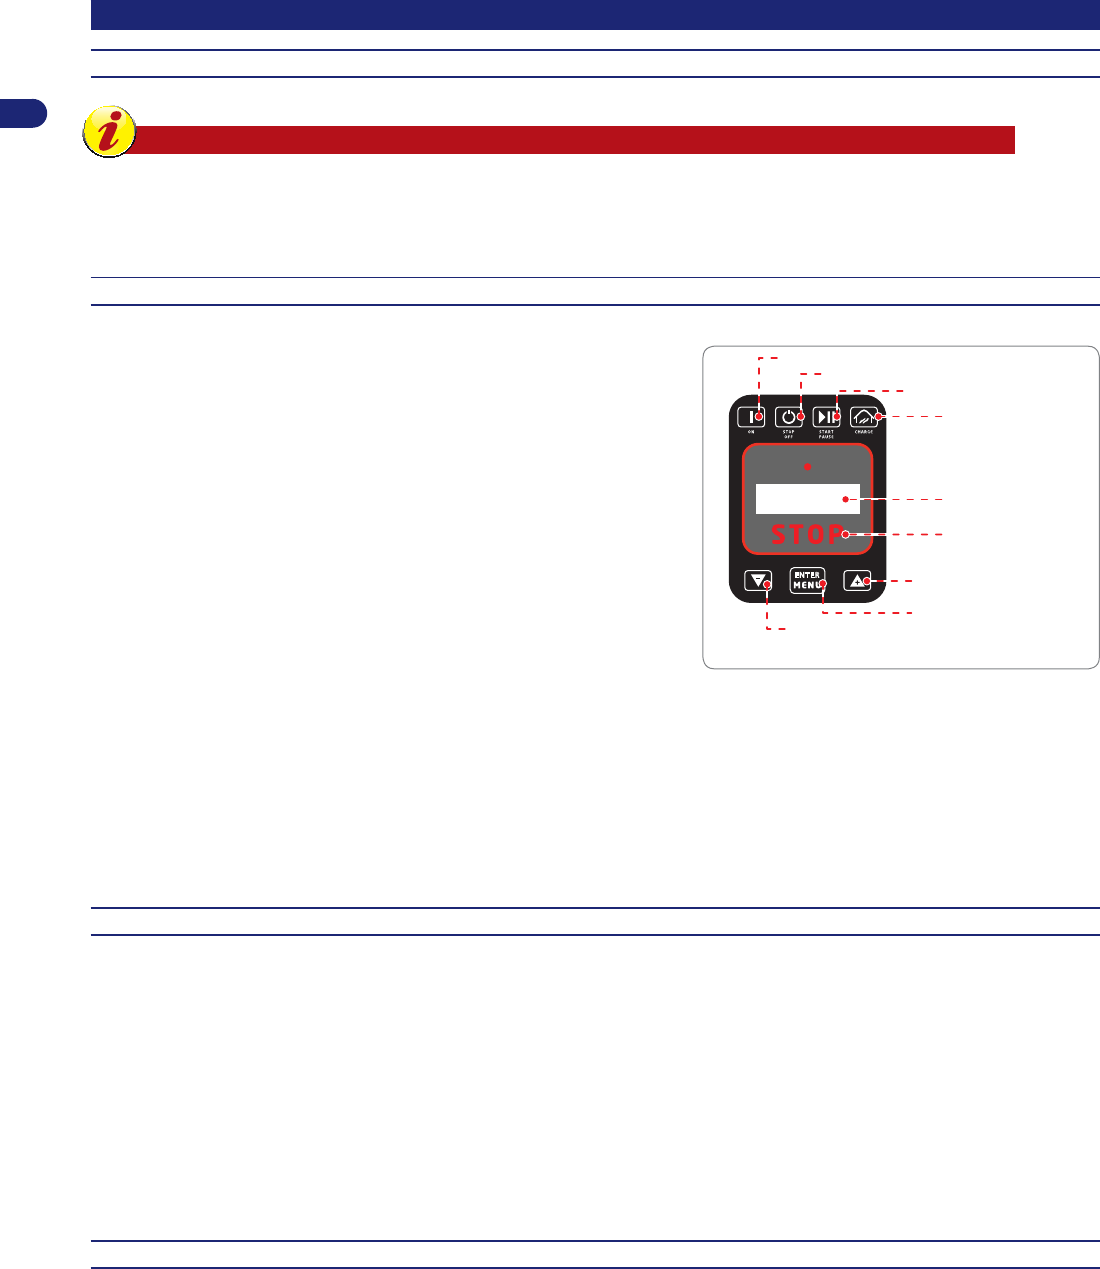
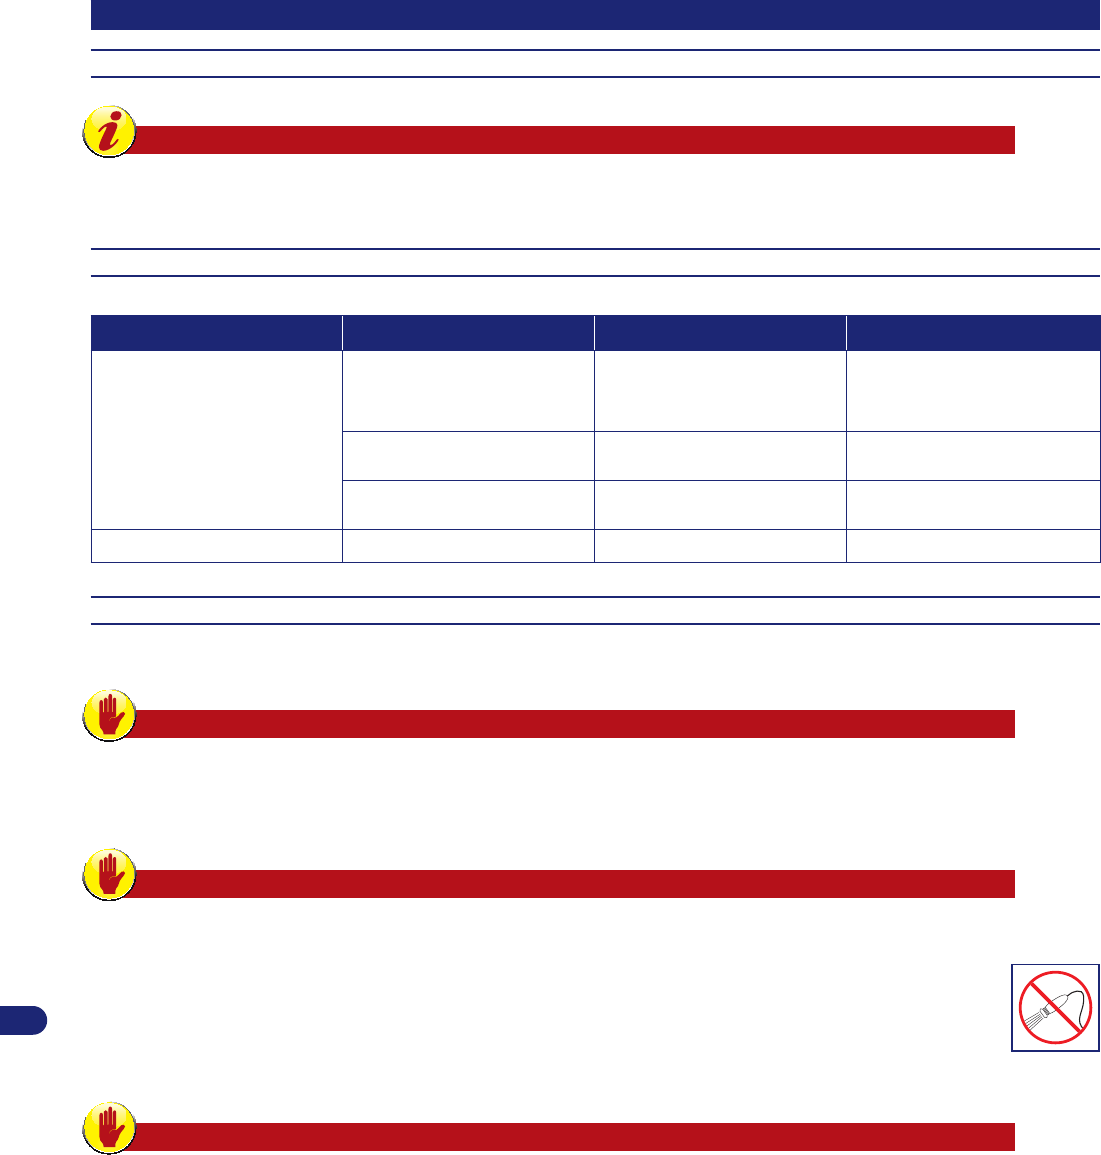
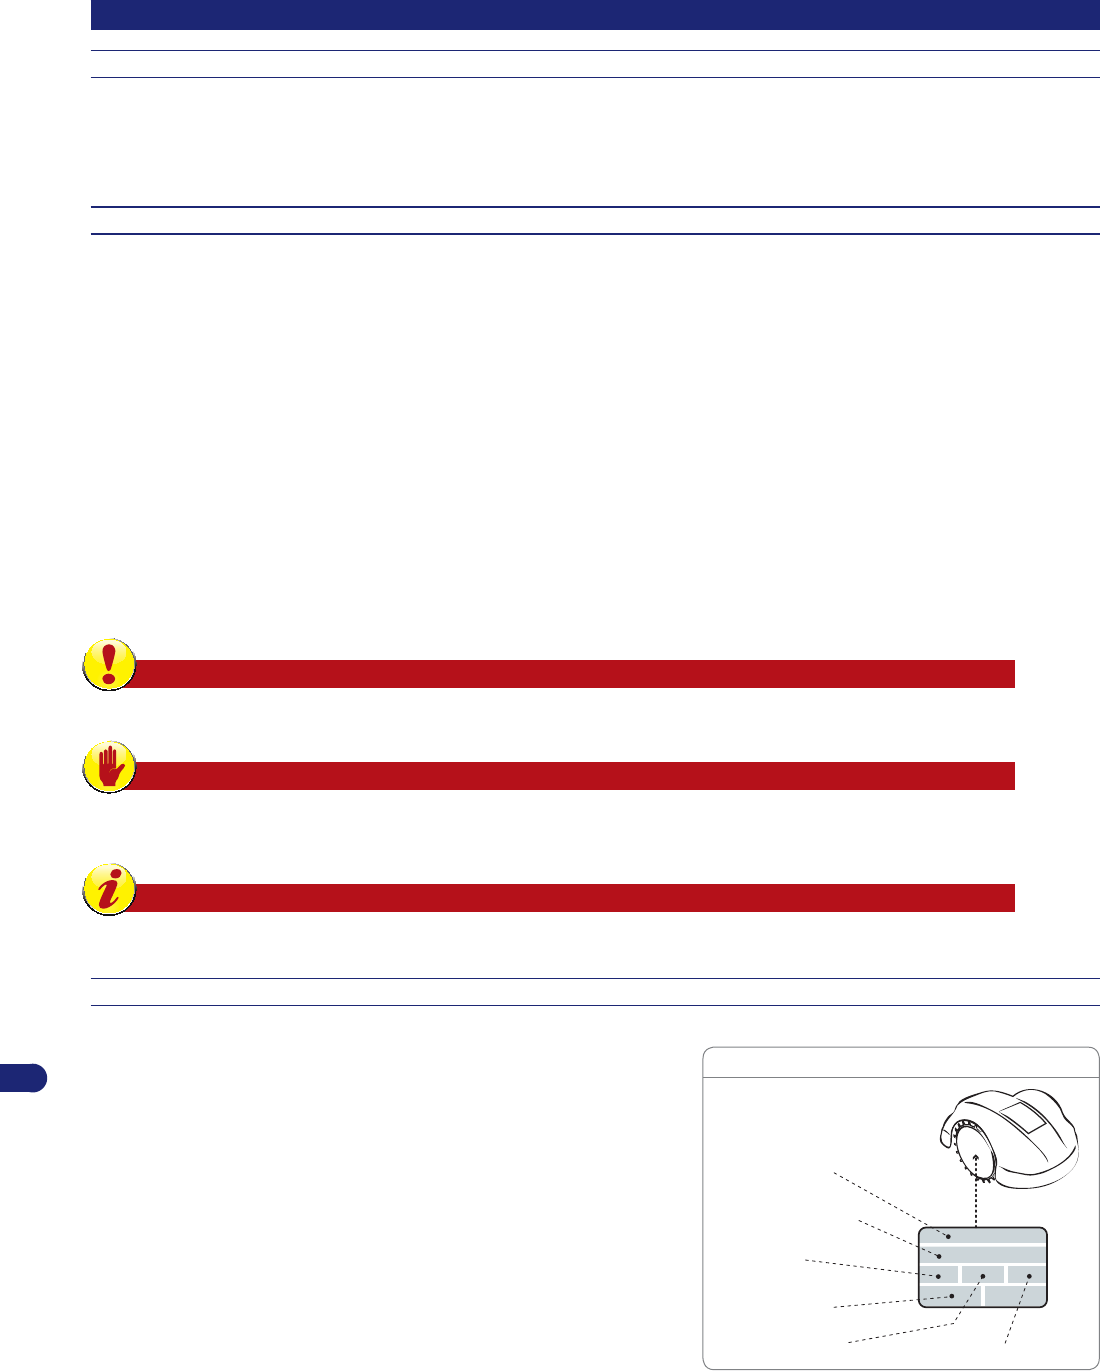
DESCRIPTION OF ROBOT COMMANDS
The illustration shows the position of the control functions on the machine.
A. DISPLAY: lights up to show all the functions.
B. ON: press to turn on the lawnmower.
C. OFF/STOP: press this key to stop the robot, the display turns off.
D. START/PAUSE: press to stop the mower, leaving the display on
“stand-by”; in this way, the mower can be programmed. Press again
to restart the mower. If the key is pressed while the mower is charging,
the mower does not resume working until it is pressed again and the
word “PAUSE” disappears from the display.
E. CHARGE: press this key to allow the mower to return to its station
and, consequently, to start recharging the batteries. If pressed while
the robot is being charged, the robot interrupts the charging cycle and
starts operating again.
ENTER
“ON” KEY (B)
(G) ENTER/MENU KEY
7+,6.(<%2$5',621/<$1(;$03/(
OFF - STOP (C) KEY
CHARGE (E) KEY
“START/PAUSE” KEY (D)
“
– ” (H) KEY
“
+ ” (F) KEY
DISPLAY (A)
STOP KEY (I)
F. “+” KEY: during operation, press this key to restart the blade which was previously stopped. During programming, press this key to increase
the values shown in the menu.
G. ENTER/MENU: during operation, press this key to turn on the spiral function. During programming, press to confi rm and memorise the
selection.
H. “-” KEY: during operation, press to stop the blade. During programming, press to decrease the values shown in the menu.
I. STOP: Press to stop the mower safely. Only use in case of imminent danger and to perform maintenance on the robot.
MENU ACCESS
The robot functions can be programmed via the different functions of each menu. The table reports the list of menus available with the relative
functions.
To program the robot, proceed as follows.
1. Lift the protection guard and press the “ON” key.
2. Enter the password (if prompted) (See “Password Entry”).
3. If the robot is turned on when inside the charging station, after a few seconds the message “CHARGING”appears on the display, then press
the “Start/Pause” key.
4. The “PAUSE” function now appears on the display.
5. Press the “ENTER/MENU” key. This allows entering into programming menu and the “SETTINGS” function appears on the display.
NAVIGATION
Follow these instructions to navigate through the programming menu:
- “+” and “-”: allows scrolling through the menu items in a cyclical manner or changing the value of the function displayed.
- “ENTER/MENU”: moves to the next menu level or confi rms and memorises the value shown in the display and skips to the next function.
- “START/PAUSE”: goes back to the previous menu level until exiting from the programming menu.
- “OFF/STOP”: turns off the robot without confi rming the last function displayed.
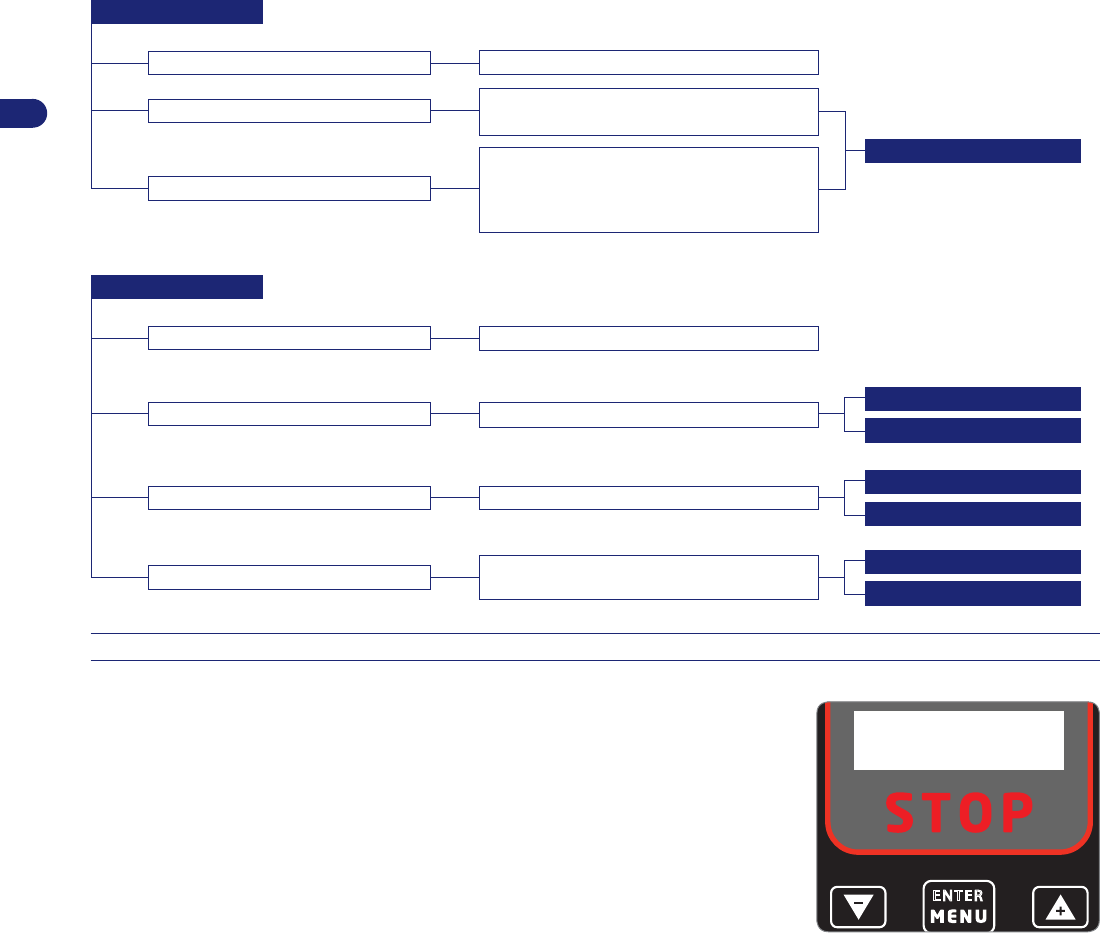
The menu has a tree structure. Follow the introduction summarising the programming functions available. A detailed explanation of each function
is found in the pages following the fl ow diagram.
Some functions are not available on all the models. See the “Technical Specifi cations”.
19
User’s manual
EN
Settings
Schedule
Enable
Disable
Enable
Disable
Enable
Disable
Follow wire
V-Meter
Alarm
Week
Auto setup
Work Schedule 2
Sound
Back to recharge
Date
Time
Enables or disables the acoustic alarm
Allows programming the work days and rest days
Enables or disables the lawn mowed recognition
Determines the second working time of the robot
Allows turning off the sound when the robot is in
the charging station.
Allows selecting the method for the robot’s
return to the charging station
Sets the date
Sets the time
Restart
Pause
Disabled
None
Pair Bluetooth
Pair radio
Rain sensor
Work Schedule 1
Remote control
Determines the behaviour in case of rain
Determines the fi rst working time of the robot
Sets the Remote Control to drive the robot
Secondary areas
Safety
Second. Area 1
Change password
Second. Area 3
Lock Keyboard
Determines the setting for a possible secondary area
1 indicating the size of the area, the distance from
the charging station and the direction to reach it
Allows setting the password
Determines the setting for a possible secondary
area 3
If enabled, prompts for the password to access
the robot functions.
Percentage
Distance
Direction
Second. Area 2
Start password
Determines the setting for a possible secondary
area 2
Determines whether to request the password
upon start-up of the robot
Enable
Enable
Disable
Disable
20
User’s manual
EN
Work mode
Language options
Automatic
Language
No border
Time format
Distance format
Sets the automatic operation of the robot
Sets the language of the user menu
Sets the operation without recognition time of
the perimeter wire. ATTENTION !. Carefully read
this manual before using this function
Sets the format for entering the time
Sets the format for entering the distances when
managing the Secondary areas
Time
Closed area
Date format
Sets a work cycle in a closed area with no
charging station
Sets the format for entering the date
DD/MM/YY
24H
Meters
MM/DD/YY
12H
Feet
SETTINGS – PROGRAMMING MODE
ALARM: (only for some versions, see “Technical Specifi cations") function for enabling or
disabling the antitheft alarm. The password is required to disable the alarm (Default 0000).
•
Disable: Disables or turns off the alarm if it is on. A continuous and descending sound
signals the disabling of the alarm.
•
Enable: Turns the alarm on. If the robot is lifted by its handle, the alarm beeps. A triple
beep signals the enabling of the alarm.
RAIN SENSOR: Function for setting the robot in case of rain.
•
Restart: in case of rain, the robot returns to the station and remains in “charging” mode.
At the end of the charging cycle, the robot only starts mowing again if it has stopped
raining.
•
Disabled: in case of rain, the robot continues to mow.
•
Pause: in case of rain, the robot returns to the station and remains there (in “charging”
mode) until the “Pause” key is pressed.
AUTO SETUP: (only for some versions, see “Technical Specifi cations”), function for
automatically reducing the robot’s mowing time based on the conditions of the lawn.
•
Enable: The robot reduces the working time based on the conditions of the grass. When
the lawn surface is mowed, the machine automatically sets a rest period which delays
subsequent departures from the charging station. However, the robot will operate within
the set working times.
•
Disable: The robot will work according to the set time and until the batteries run out.
ENTER
ALARM:
21
User’s manual
EN
REMOTE CONTROL: (only for some versions, see “Technical Specifi cations).
See the instructions on the remote control / console for the pairing procedure.
SOUND: Allows disabling the acoustic signal when the robot is in the charging station.
BACK TO RECHARGE: Allows selecting the method for the robot’s return to the charging
station.
1. “Follow wire”. The robot returns to the charging station by positioning the wheels on
either side of the perimeter wire.
2. “V-METER”. The robot runs along the perimeter wire at an indicative distance ranging
from a few centimetres to one meter (3.2 '), touching it every now and again in the
curved sections until it recognises the “Recall” to the charging station. Refer to the
“Installation” chapter.
DATE: Function for setting the date.
TIME: Function for setting solar or daylight saving time.
ENTER
DATE DD/MM/YY
MON 00 / 00 / 00
WORK SCHEDULES – PROGRAMMING MODE
WEEK: function for programming the operating days of the robot during the week. The
cursor automatically positions itself under the letter “M” (Monday).
Setting all the days at “1111111” means that the robot will work every day. Setting “0000000”
means that the robot will not work on any day of the week.
-
Value 1 : Robot’s work day.
-
Value 0 : Robot’s rest day.
Important
To get the best out of the robot, it is recommended to program the robot
to work every day.
ENTER
WEEK
MTWTFSS
MON 1111111
WORK SCHEDULE 1: Function for setting the fi rst time of the robot’s working day.
The cursor automatically positions itself in the area under the fi rst time (e.g. 10:00am to
1:00pm). Set the time for the start and end of the work.
Setting the time at “00:00 – 00:00” means that the robot will not work during Work Schedule
1. Once entered. If the entered time is wrong such as if the time overlaps with the working
time 2 or if the starting time is after the end time, the robot beeps and resets the set value.
WORK SCHEDULE 2: Function for setting the second time of the robot’s working day.
Important
If it is necessary to set secondary areas, then it is preferable to program
both work schedules in order to increase the mowing frequency of the
area.
ENTER
WORKING TIME
00 : 00 - 00 : 00
The setting of the time is essential for the robot’s proper functioning. Many parameters infl uence the setting of the work schedules, such as the
number of secondary areas, the number and the power of batteries of the robot, complexity of the lawn, type of grass, etc. Generally, the working
hours must be increased slightly when mowing gardens with secondary areas, with lots of obstacles and complicated areas. Below is a table with
the indicative times for confi guring the robot on fi rst use.
NB. Set all the weekdays at “1” – “Work Days.”
Modelm² (ft²)Time 1Time 2
075BA0150 (1615)11:00 11:4015:00 15:30
075BA0300 (3230)11:00 17:00
075BA0400 (4304)11:00 19:00
075DE0150 (1615)11:00 11:40
075DE0300 (3230)11:00 11:4015:00 15:40
075DE0400 (4304)10:00 16:00
075DE0600 (6460)10:00 19:00
22
User’s manual
EN
075EV0400 (4304)10:00 11:30
075EV0800 (8608)10:00 11:3015:00 16:30
075EV01200 (12912)09:00 21:00
075EV1400 (4304)10:00 11:30
075EV1800 (8608)10:00 11:3015:00 16:30
075EV11200 (12912)10:00 12:0015:00 17:00
075EV11600 (17216)09:00 20:00
075EL0400 (4304)10:00 11:30
075EL0800 (8608)10:00 11:3015:00 16:30
075EL01200 (12912)10:00 12:0015:00 17:00
075EL01800 (19368)09:00 20:00
075EL02200 (23672)08:00 22:00
SECONDARY AREAS – PROGRAMMING MODE
If the area to be mowed includes secondary areas based on the defi nition given in the chapter “Preparation and Marking the Boundaries of the
Work Areas”, then it is necessary to program the secondary areas so the robot knows how to reach them and how many times.
SECONDARY AREA : Function for defi ning the automatic mowing of a secondary area.
-
Percentage: allows setting the dimensions of the secondary area to
be mowed in respect to entire lawn surface. Below is a table to use as
a guide for confi guring a secondary area:
•
20% indicates a very small area.
•
30% Indicates an area which is approximately one third of the entire
garden.
•
50% Indicates an area which is approximately half of the entire
garden.
•
80% Indicates a secondary area which is bigger than the primary
area.
•
100%. The robot will follow the perimeter wire to mow the secondary
area each time it exits the charging station.
primary area
clockwise directionanti-clockwise direction
secondary area 1
(30%, 60MT, clokwise)
secondary area 2
(20%, 30MT, Anti-clokwise)
-
Distance: This allows setting the distance necessary for the robot to reach the internal part of the secondary area following the perimeter
wire. It is recommended to measure half the distance of the secondary area to ensure that the robot starts working inside that area.
-
Direction: Indicates the shortest direction for reaching the secondary area. The direction can be clockwise or counter-clockwise. The robot
exits from the charging station and follows the wire in the indicated direction to reach the secondary area.
SECONDARY AREA 2: Function for defi ning the automatic mowing of secondary area number 2. This setting uses the same confi guration
parameters as those used for secondary area 1.
SECONDARY AREA 3: (only for some versions, see “Technical Specifi cations”). Function for defi ning the automatic mowing of secondary area
number 3. This setting uses the same confi guration parameters as those used for secondary area 1.
SAFETY – PROGRAMMING MODE
CHANGE PASSWORD: function for setting or changing the password.
-
No: the password entered does not need to be changed.
-
Yes: for entering or changing the password which will be used to start the robot and disable the alarm. You will prompted to enter the
following information :
•
Password: Enter the old password (manufacturer’s default 0000).
•
New password: Enter the new password.
•
Repeat password: Enter the new password again.
23
User’s manual
EN
Important
To set or change the password, it is fi rst necessary to enter the previous one and then enter the new one. Upon purchase,
the password entered by the manufacturer consists of four numbers (0000).
Important
When entering the password, you will be prompted to re-enter the password in order to ensure that it has been set correctly.
In order to not forget the password, choose a number combination that is easy to remember.
START PASSWORD: This function allows defi ning whether you want to enter a password each time the robot is turned on after a period of
inactivity (e.g. winter storage).
-
No: There is no need to enter a password each time the robot is turned on. The password will only be required to disable the alarm. The
robot requires the password to confi rm this parameter.
-
Yes: The password will be required each time the robot is started.
OPERATING MODE – PROGRAMMING MODE
Function for setting the operating mode of the robot. The robot automatically returns to “AUTOMATIC” mode when turned off.”
•
Automatic: Normal operating mode. The robot recognises the perimeter wire and returns to the charging station whenever necessary.
•
Closed area: Operating mode in closed areas with no charging station. For the correct use of this mode, refer to “USE OF ROBOT IN
CLOSED AREAS WITH NO CHARGING STATION.”
•
No border: Operating mode without recognition of the perimeter wire. Use in small areas whose whole perimeter is bounded by a wall or
fence at least 15 cm high, without installation of the perimeter wire and under the supervision of the user and with the remote control.
LANGUAGE OPTIONS – PROGRAMMING MODE
LANGUAGE: function for selecting the language to use for the messages and user menu. Scroll through the various options with the “+” or “-”
key and confi rm with “Enter”.
•
DATE FORMAT
•
TIME FORMAT
•
DISTANCE FORMAT
These functions allow personalising the date, time and distance formats.
INITIAL START UP – AUTOMATIC MODE
The automatic cycle is started during the initial start-up or after a period of inactivity.
1. Check that the height of the lawn surface to mow is compatible with the proper functioning of the robot (see “Technical Specifi cations”).
2. Adjust the cutting height as desired (see “Adjustment of Cutting Height).
3. Check that the work area has been correctly marked and that there are no impediments to the regular functioning of the robot as indicated
in the section “Preparation and Marking the Boundaries of the Work Areas” and following sections.
4. Position the robot inside the charging station.
5. Press the ON key and wait a few seconds for the robot to turn on completely.
6. If starting the robot for the fi rst time, it is necessary to program the settings. However, if starting the robot after a long period of inactivity,
check that the programmed functions correspond to the actual condition of the lawn to be mowed (e.g. addition of a pool, plants, etc.) (See
“Programming Mode”).
7. After a few seconds, the message “CHARGING” will appear on the display.
8. The robot starts to mow the lawn according to the modes programmed.
24
User’s manual
EN
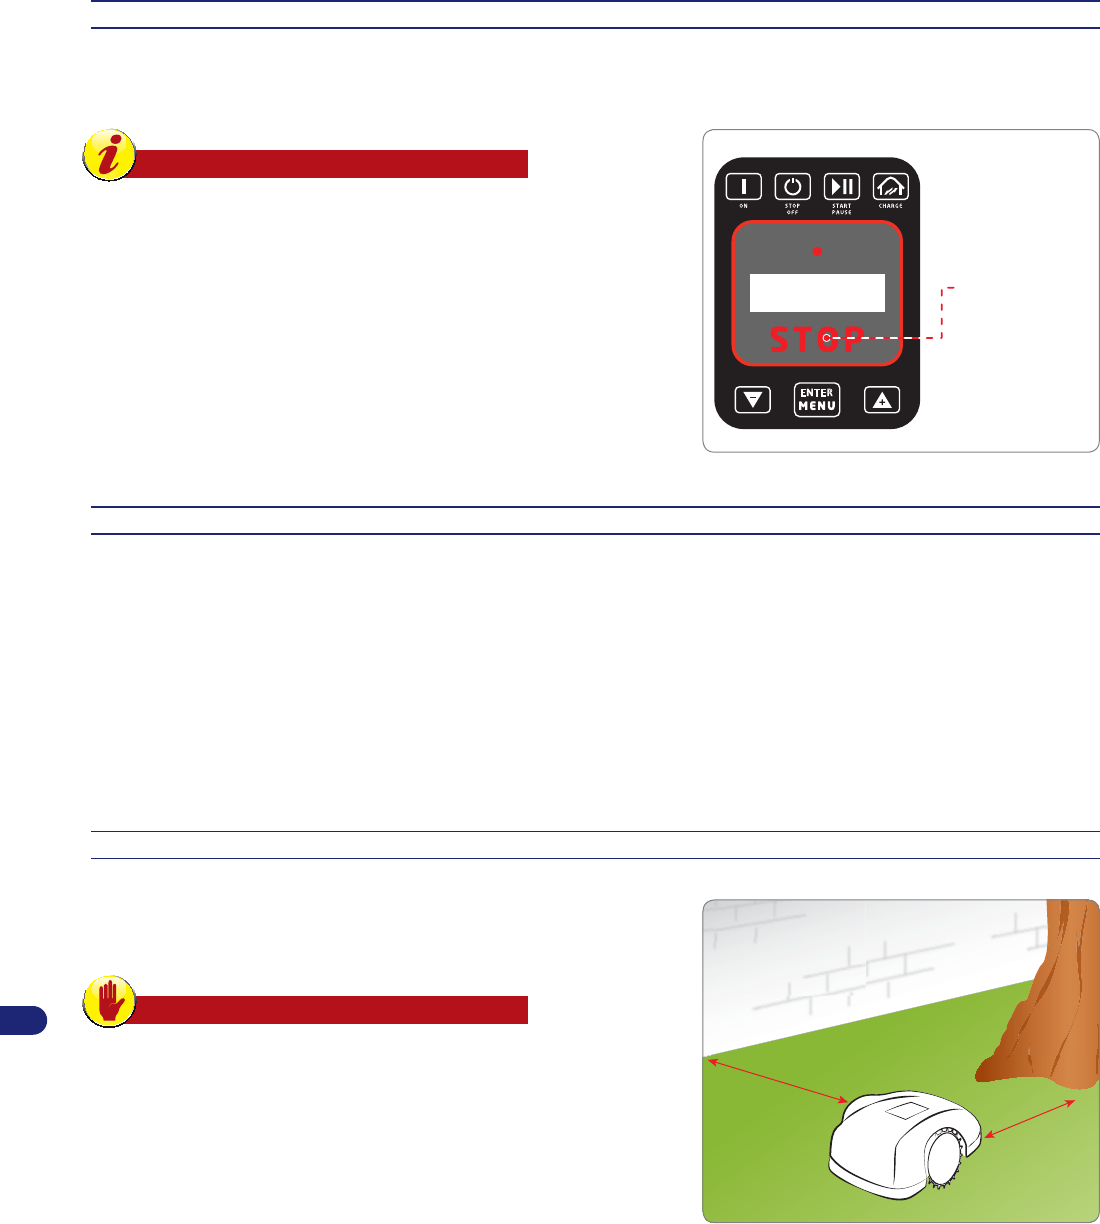
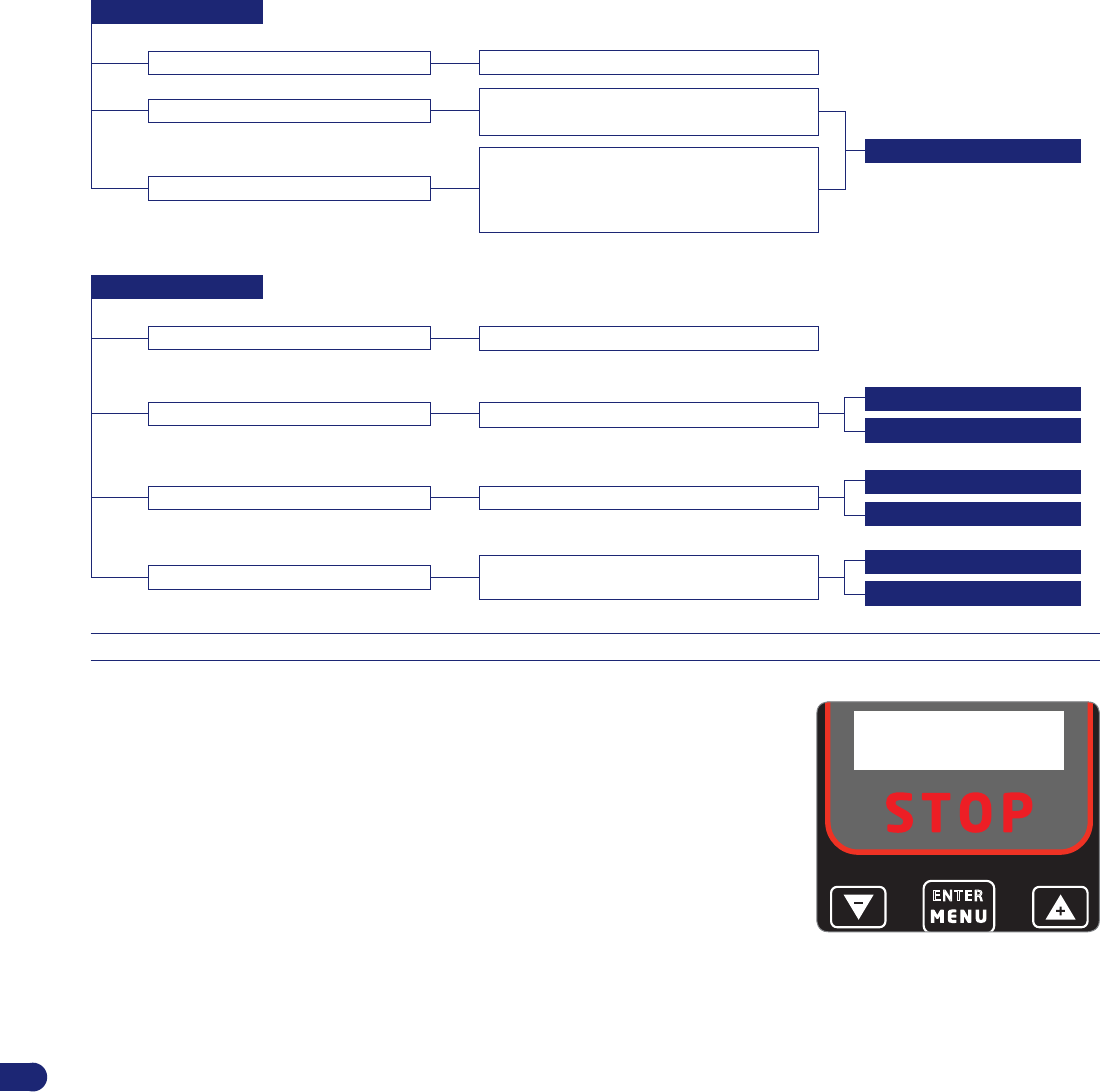
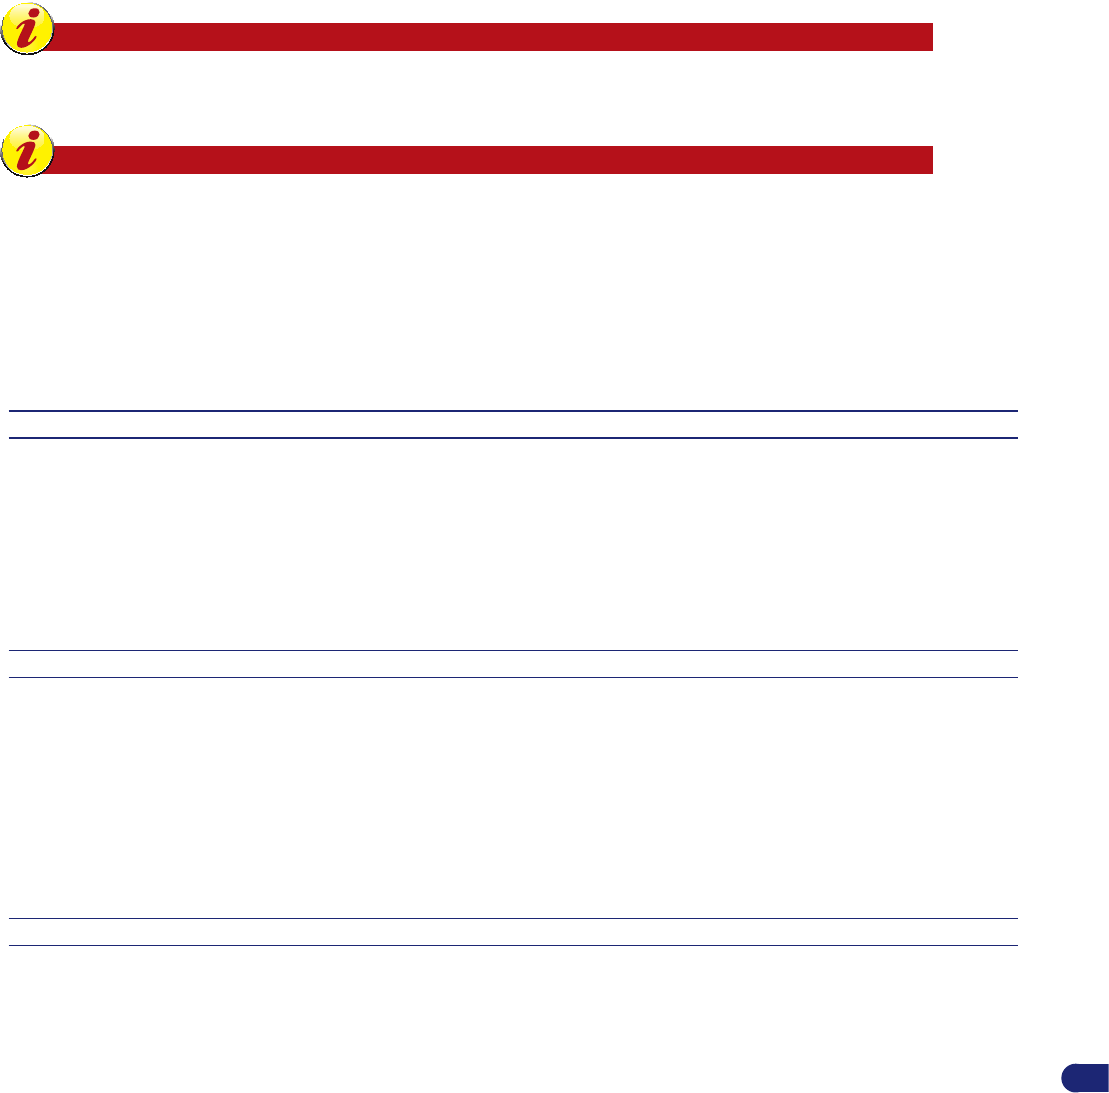
ROBOT SAFETY STOP
During use, it may be necessary to stop the robot. In normal conditions, the robot can be stopped with the “OFF/STOP” key. In case of danger
or when performing any maintenance, it is necessary to stop the robot in safe conditions in order to prevent the blade from accidently starting.
Press the “STOP” key to stop the robot. Press the “STOP” key again to restart the robot.
Important
The robot safety stop is necessary during maintenance
and repairs (for example, replacement and/or recharging
of the battery, blade replacement, cleaning operations,
etc.).
ENTER
“STOP” KEY (A)
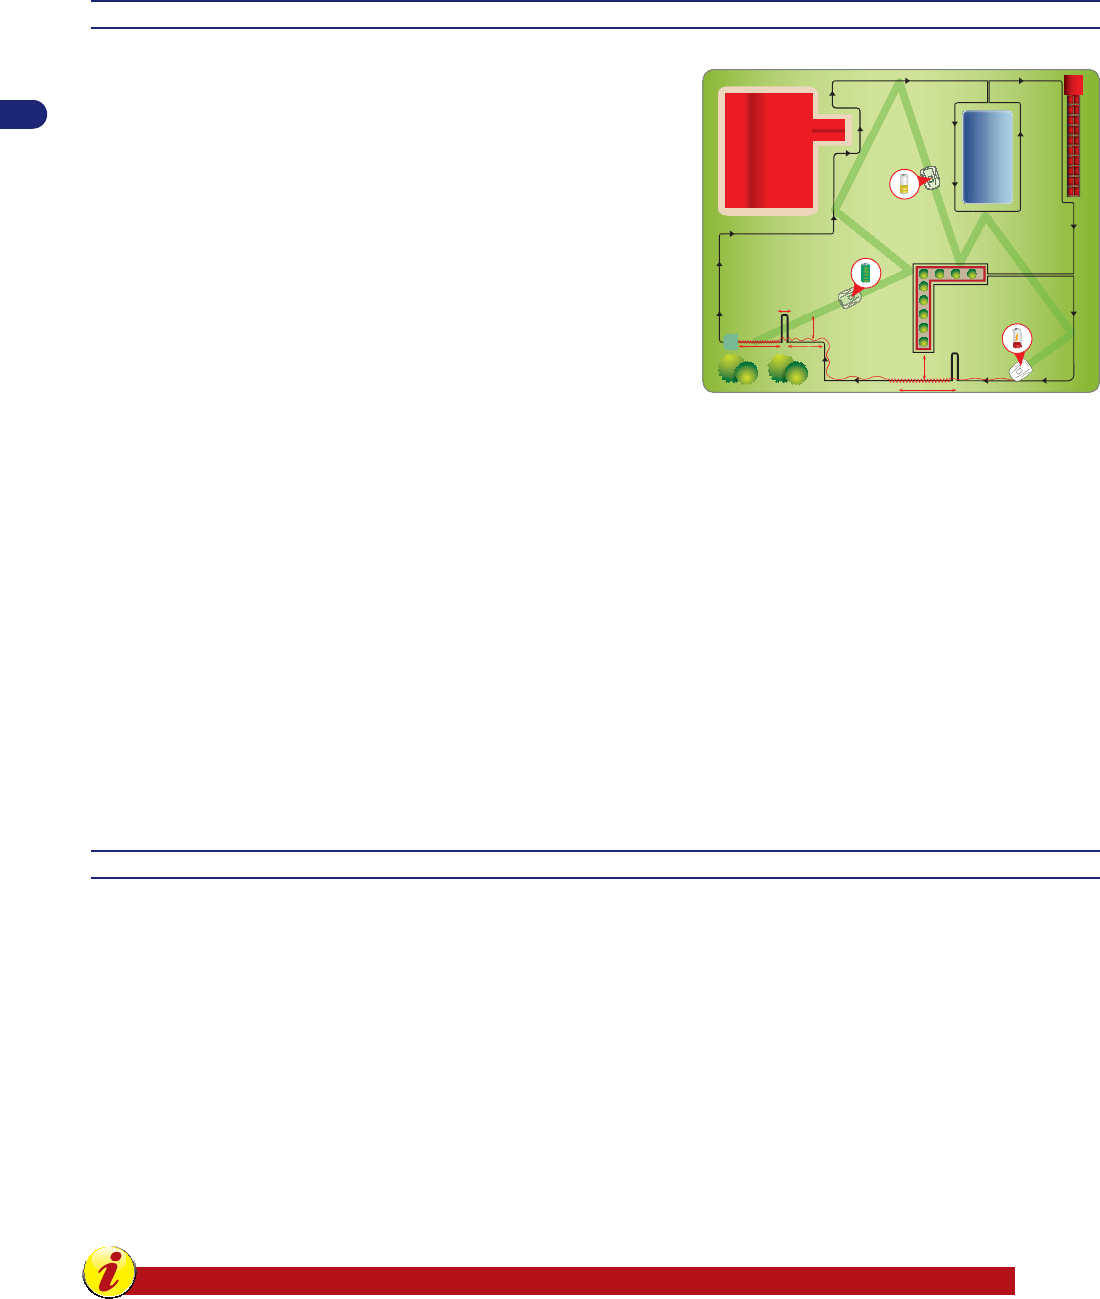
AUTOMATIC RETURN TO THE CHARGING STATION
The robot stops the work cycle if the following conditions are verifi ed.
-
End of working time: At the end of the working time, the robot automatically returns to the charging station and starts operating again
according to what has been programmed (see “Programming Mode”).
-
Rain: In case of rain, the robot automatically returns to the charging station and starts operating again according to what has been
programmed (see “Programming Mode”).
-
Battery to be charged: The robot automatically returns to the charging station.
-
Lawn mowed (only for some versions, see “Technical Specifi cations): If the sensor detects that the lawn has already been mowed, it
automatically returns to the charging station and starts operating again according to what has been programmed (see “Programming Mode”).
USE OF THE ROBOT IN CLOSED AREAS WITH NO CHARGING STATION
The start-up of the robot in “closed area” mode is for mowing closed areas
which are delimited by the perimeter wire and which have no charging
station.
Warning – Caution
Carry the robot using the handle provided. Do not grab the
robot by the body and always use the handle provided.
Position the robot inside the work area at a minimum distance of 100 cm
(39.37 ") from the perimeter wire and from any other obstacle.
min. 100 cm
(39,37 ")
min. 100 cm
(39,37 ")
25
User’s manual
EN
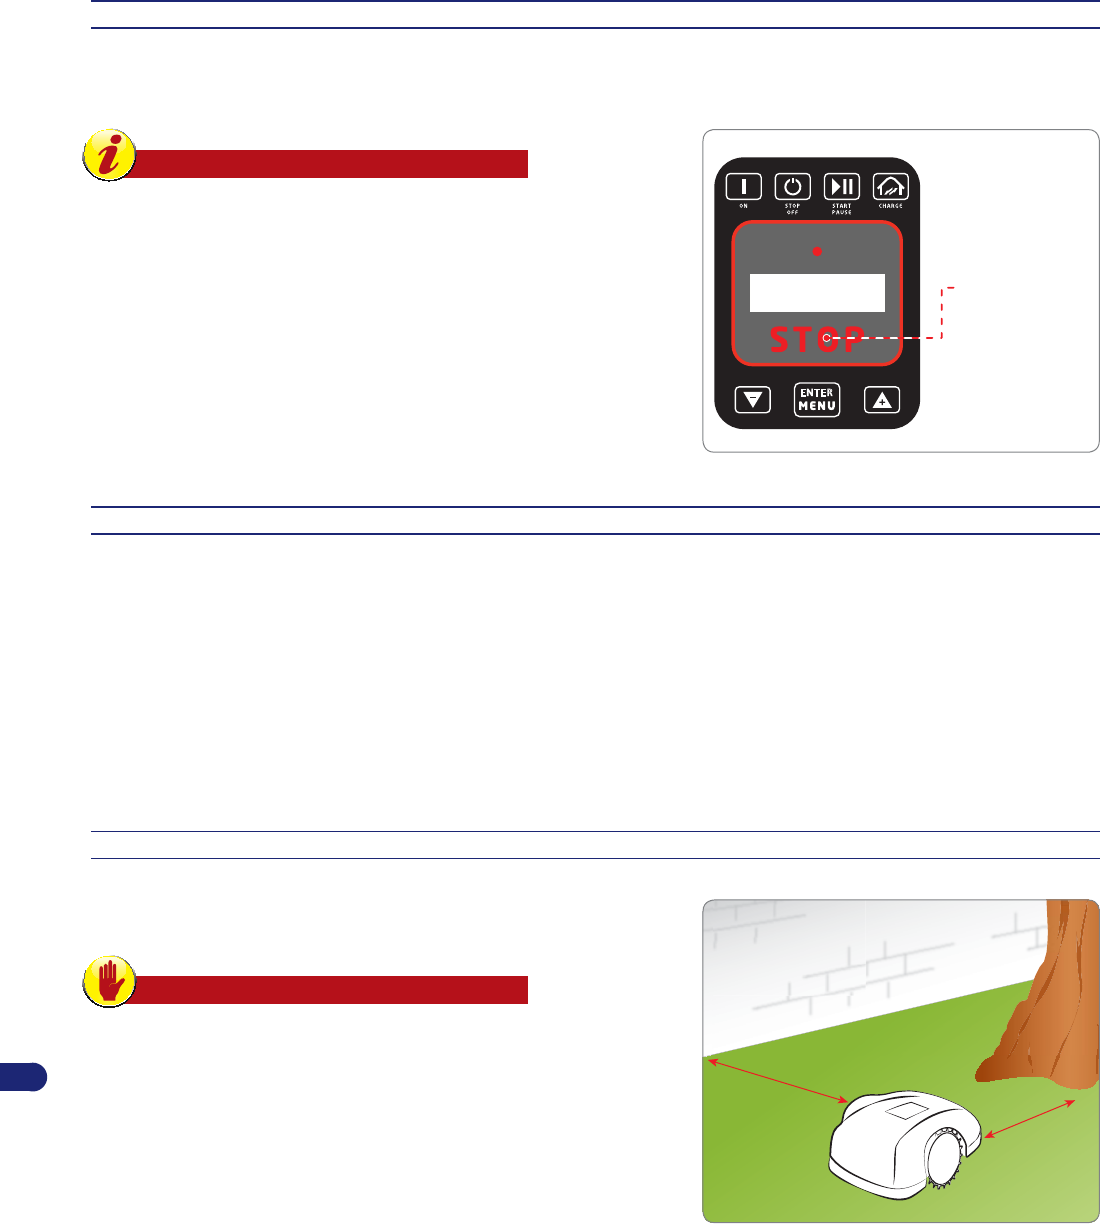
1. Press the ON key.
2. Enter the password (if prompted) (See “Password Entry”).
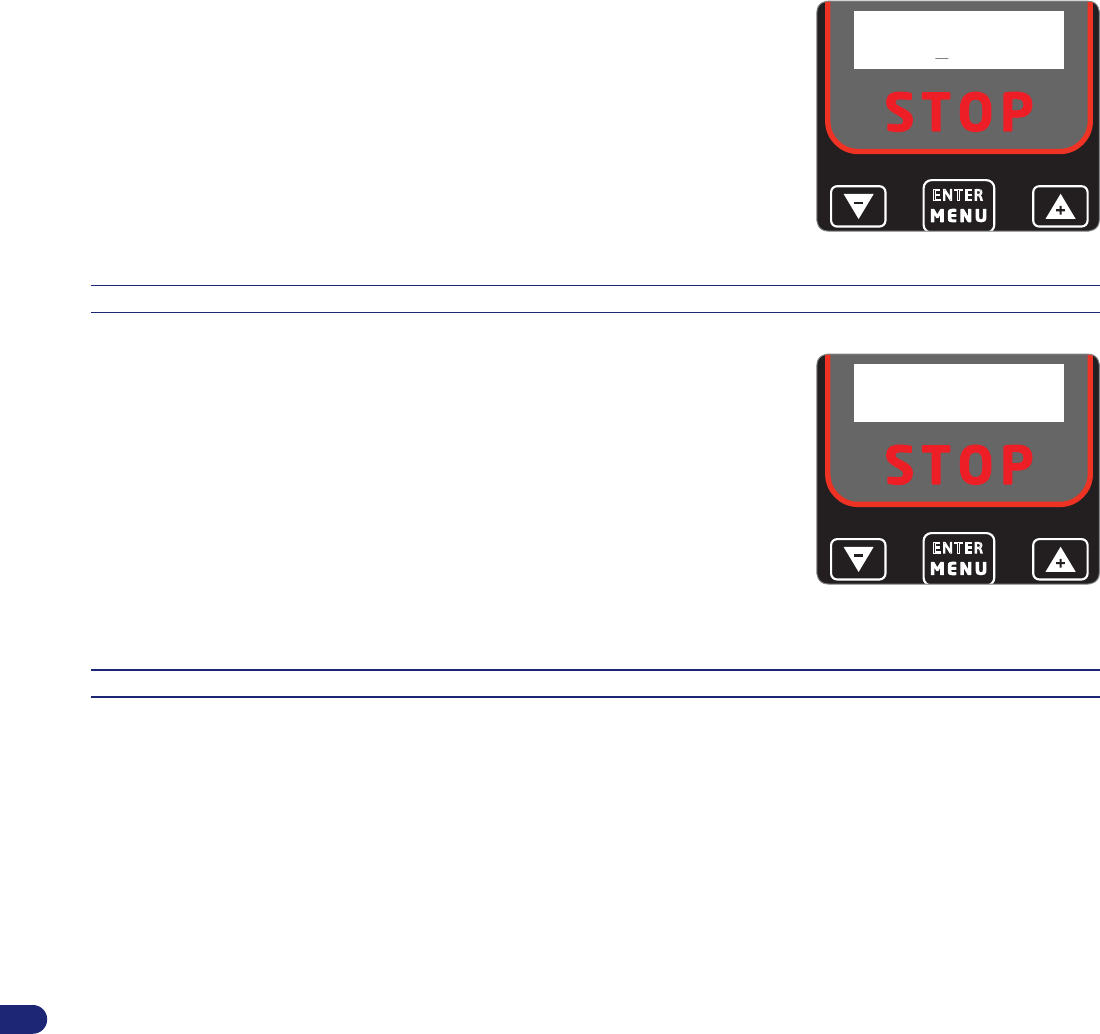
3. The “PAUSE” function appears on the display.
ENTER
PAUSE
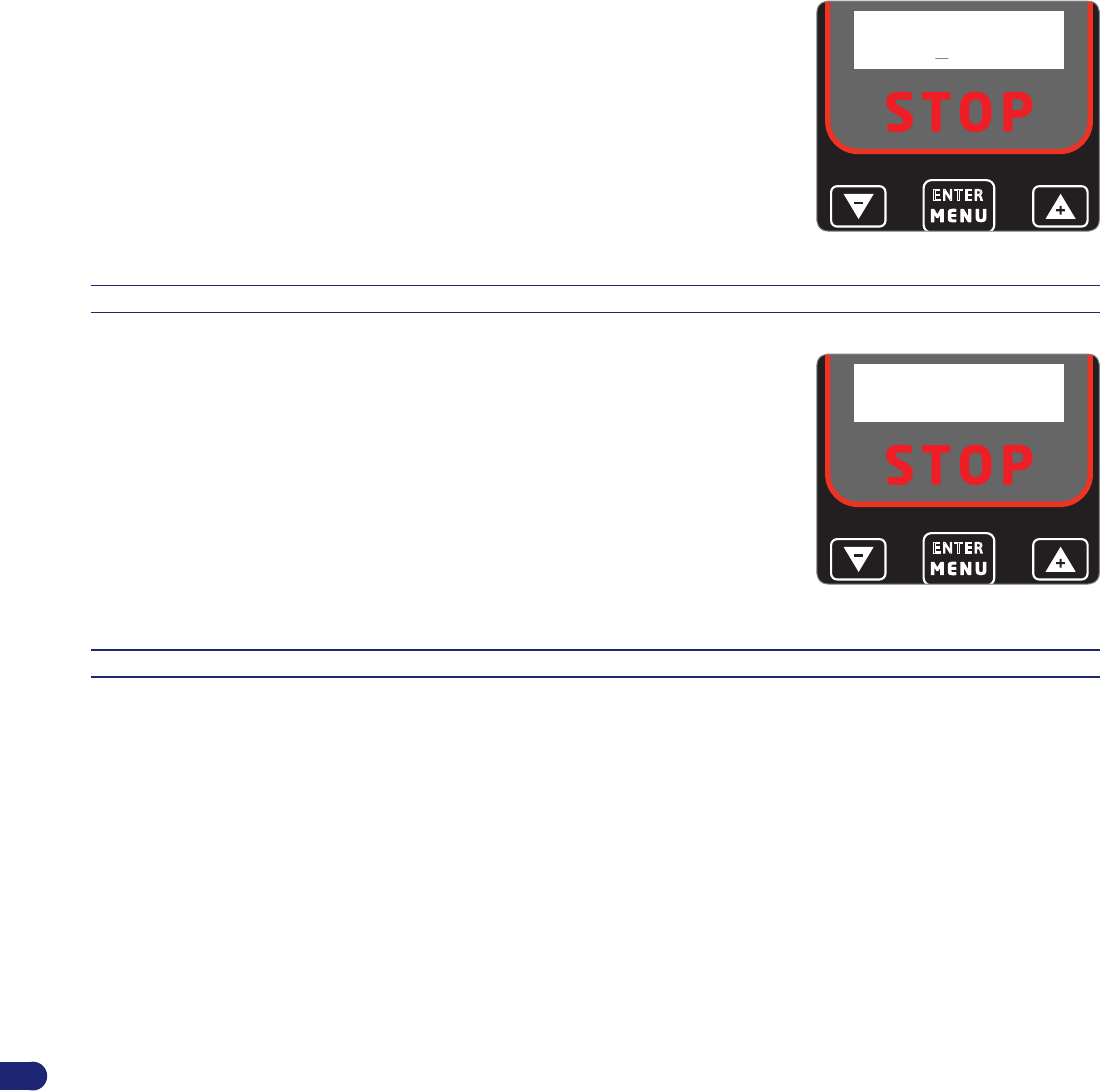
4. Enter into programming mode and select “OPERATING MODE”. Select “CLOSED
AREA” and the words “CLOSED AREA – 60 Min” (default value) will appear on the
display.
5. Press either the “+” or “-” key to set the minutes.
6. Press “Enter” to confi rm.
7. Press the “Start/Pause” key to exit the programming menu and then restart the robot.
After the set time, the robot safely stops next to the perimeter wire.
8. Restore the normal functioning of the robot as described in chapter “INITIAL START
UP – AUTOMATIC MODE”.
ENTER
CLOSED AREA
60 min
STARTING THE ROBOT WITHOUT THE PERIMETER WIRE
This mode can be executed with the remote control to mow areas with boundaries at least 15 cm high.
Important
When using the robot without the perimeter wire, make sure the robot does not run into obstacles, corners or dangerous
objects.
1. Press the ON key.
2. Enter the password (if prompted) (See “Password Entry”).
3. Press “Enter” to enter into programming mode. Scroll through the items until reaching “OPERATING MODE.” Set the option “NO PERIMETER.”
Press either the “+” or “-” key to set the working minutes of the robot.
4. Press “Enter” to confi rm the selection.
5. Press the “Start/Pause” key several times to exit from the menu and restart the robot.
6. Manoeuvre the robot using the remote control.
7. At the end of mowing, press the “OFF/STOP” key to safely stop the robot (see “Robot Safety Stop”)..
Important
It is recommended to move the robot with the remote control when mowing inside a narrow, well-visible area, and to make
sure there are no people or pets next to the operating zones of the robot.
PASSWORD ENTRY
The robot can be protected by a password consisting of four numbers which can be enabled, disabled and personalised by the user (see
“Programming Mode”).
26
User’s manual
EN
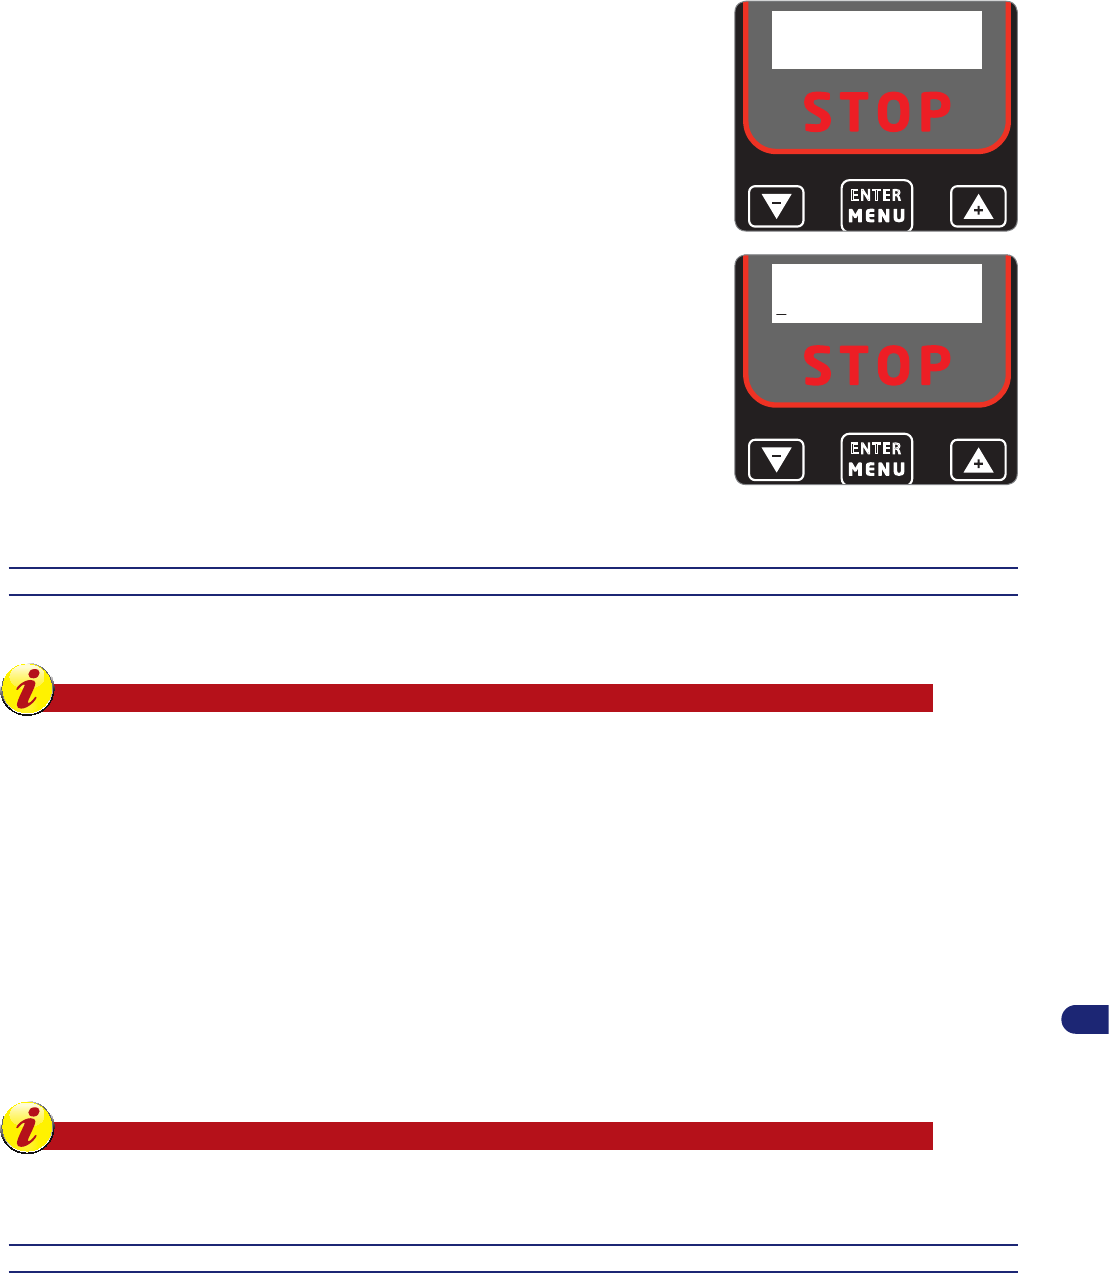
1. On the display appears the message:
2. Press either the “+” or “-” key to set the fi rst number.
3. Press “Enter” to confi rm. The cursor moves to the next position.
4. Repeat the procedure to set all the numbers of the password.
The robot is now ready for use.
ENTER
PASSWORD
0000
VISUALISING THE DISPLAY DURING THE WORK PHASE
While in operation, the following data appears on the display of the robot:
-
left wheel motor speed
-
blade motor speed
-
right wheel motor speed
-
battery voltage
While the robot is charging, the word “CHARGING” appears on the display.
If the robot is outside the working time, the display shows the day and time of the next
scheduled start.
ENTER
Sx=00 La=00 Dx=00
BATTERY 0000
1
PROLONGED INACTIVITY AND RESTARTING
If the robot has not been used for a long period of time, it is necessary to perform a series of operations to guarantee the correct functioning at
the time of reuse.
1. Fully charge the battery before winter storage. Recharge the battery at least once every fi ve months.
2. Have the routine maintenance performed by an authorised dealer. This is essential for keeping the robot in good condition. The assistance
service usually includes the following operations:
•
Total cleaning of the robot, the cutting blade and all the other moving parts.
•
Cleaning of the inside of the robot.
•
Checking of robot functioning.
•
Checking and, if necessary, replacement of any worn parts such as the cutting blade.
•
Checking of the battery capacity.
•
If necessary, the dealer may also load new software.
3. Accurately clean the robot and charging station (see “Robot Cleaning”).
4. Check any worn or damaged components such as the cutting blade and evaluate their replacement.
5. Store the robot in a protected and dry place with an ambient temperature between 10° and 20° C, out of reach of foreign elements (children,
animals, other foreign objects, etc.). Store the robot at a temperature below 20°C in order reduce the automatic discharge of the batteries.
6. Disconnect the power plug from the power supply unit (A).
7. Cover the charging station (C) to prevent any foreign materials from getting inside (leaves, paper, etc.) and for preserving the contact plates.
27
User’s manual
EN
Restarting
Before restarting the robot after a long period of inactivity, proceed as
follows:
1. Connect the plug of the power supply unit (A) to the electrical outlet.
2. Reconnect the main electrical power supply.
3. Position the robot inside the charging station.
4. Press the ON key.
5. Enter the password (if prompted) (See “Password Entry”).
6. After a few seconds, the message “CHARGING” will appear on the
display.
7. The robot is now ready to be used (see “Programming Mode”).
Current power
supplyunit (A)
Charging
station (C)
BATTERY CHARGING AFTER PROLONGED INACTIVITY
Danger - Attention
Do not recharge the robot in explosive and fl ammable
environments.
1. Supply electricity to the charging station and make sure the plates are
clean.
2. Position the robot inside the charging station.
3. Press the “ON” key (A).
4. Enter the password (if prompted) (See “Password Entry”).
5. After a few seconds, the message “CHARGING” will appear on the
display.
6. Press the “Start/Pause” key (B). The batteries start the charging cycle.
7. At the end of the charging cycle (approx. 6 hours), press the “OFF/
STOP” key (C).
8. Store the robot in a protected and dry place with an ambient temperature
between 10° and 20° C, diffi cult to reach by children, animals, other
foreign objects, etc.
ENTER
“START/PAUSE” KEY (B)
“OFF/STOP” KEY (C)
“ON” KEY (A)
OPERATING TIPS
Below are some useful operating tips to follow when using the robot.
-
Even after being suitably informed on the use of the robot, it is always a good idea to simulate some test manoeuvres on fi rst use to identify
the commands and main functions.
-
Check and secure the fastening screws of the main components.
-
Mow the lawn frequently to avoid excessive growth of the grass.
-
Do not use the robot to mow grass which is 1 cm (0.40 ") higher than the cutting blade. In case of high grass, lift the cutting blade and then
lower it gradually on the following days.
-
If the lawn is equipped with an automatic sprinkler system, program the robot to return to the charging system at least one hour before the
sprinklers are turned on.
-
Check the slope of the ground and make sure the maximum values allowed are not exceeded in order to prevent damage to the robot and
the sprinklers.
-
It is recommended to program the robot so that it does not work more than is necessary, also taking into consideration the different growth
rates of the grass in different seasons, so as not to subject it to unnecessary deterioration and reduction of the battery life.
-
When using the robot, make sure the work area is clear of people (in particular, children, the elderly or disabled people) and pets in order to
prevent safety risks. To minimise the chance of injury, program the robot so that it operates at suitable times of the day.
28
User’s manual
EN
ROUTINE MAINTENANCE
MAINTENANCE RECOMMANDATIONS
Important
During maintenance, use personal protection equipment indicated by the Manufacturer, especially when working on the
blade. Before carrying out any type of maintenance, make sure the robot is turned off (see “Robot Safety Stop”).
SCHEDULED MAINTENANCE TABLE
FrequencyPartType of maintenanceReference
Weekly
Blade
Clean and check the effi ciency of
the blade. If the blade is bent or very
worn, replace it
See “Robot Cleaning”
See “Blade Replacement”
Battery charging knobsClean and remove any rust.See “Robot Cleaning”
Contact platesClean and remove any rust.See “Robot Cleaning”
MonthlyRobotClean the robotSee “Robot Cleaning”
ROBOT CLEANING
1.
Stop the robot safely (see “Robot Safety Stop”).
Warning – Caution
Use protective gloves to prevent cutting your hands.
2. Clean all the outside surfaces of the robot with a sponge soaked in warm water and a mild detergent. Squeeze well to remove any excess
water before use.
Warning – Caution
The use of too much water may cause water to penetrate into the device which could damage the electrical parts.
3. Do not use solvents or benzene so as not to damage the painted surfaces and plastic components.
4. Do not wash the inside parts of the robot and do not use jets of pressurised water so as not to damage the electric and
electronic parts.
Warning – Caution
In order to avoid irreversible damage to the electric and electronic components, do not immerse the robot, partially or
completely, in water because it is not watertight.
29
User’s manual
EN
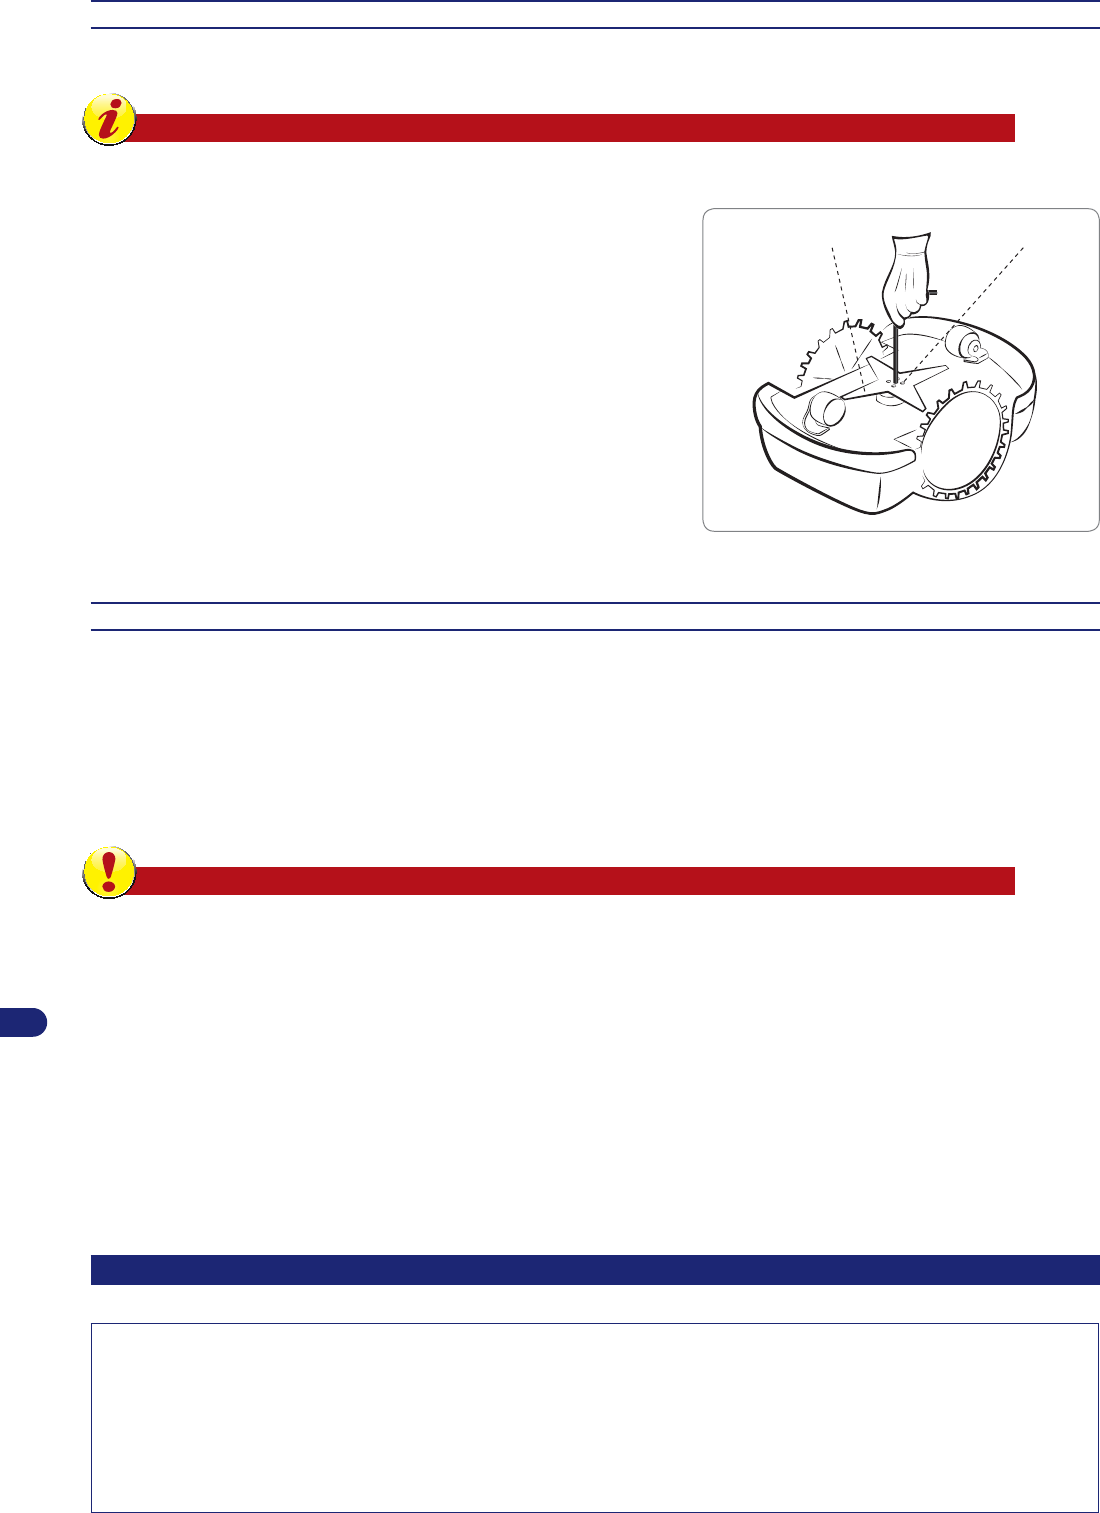
5. Check the lower part of the robot (cutting blade area, and wheels), use
a brush suitable to remove deposits and/or residues that may impede
the proper functioning of the robot.
6. Remove any grass and leaves from the gripping areas of the robot.
7. Clean the knobs of the battery charger (A), the contact plates (B) and
remove any deposits or residuals caused by electric contacts with a
dry cloth and, if necessary, with fi ne sandpaper.
8. Clean the inside of the charging station to remove any accumulated
residuals.
charging knobs (A)
contact plates (B)
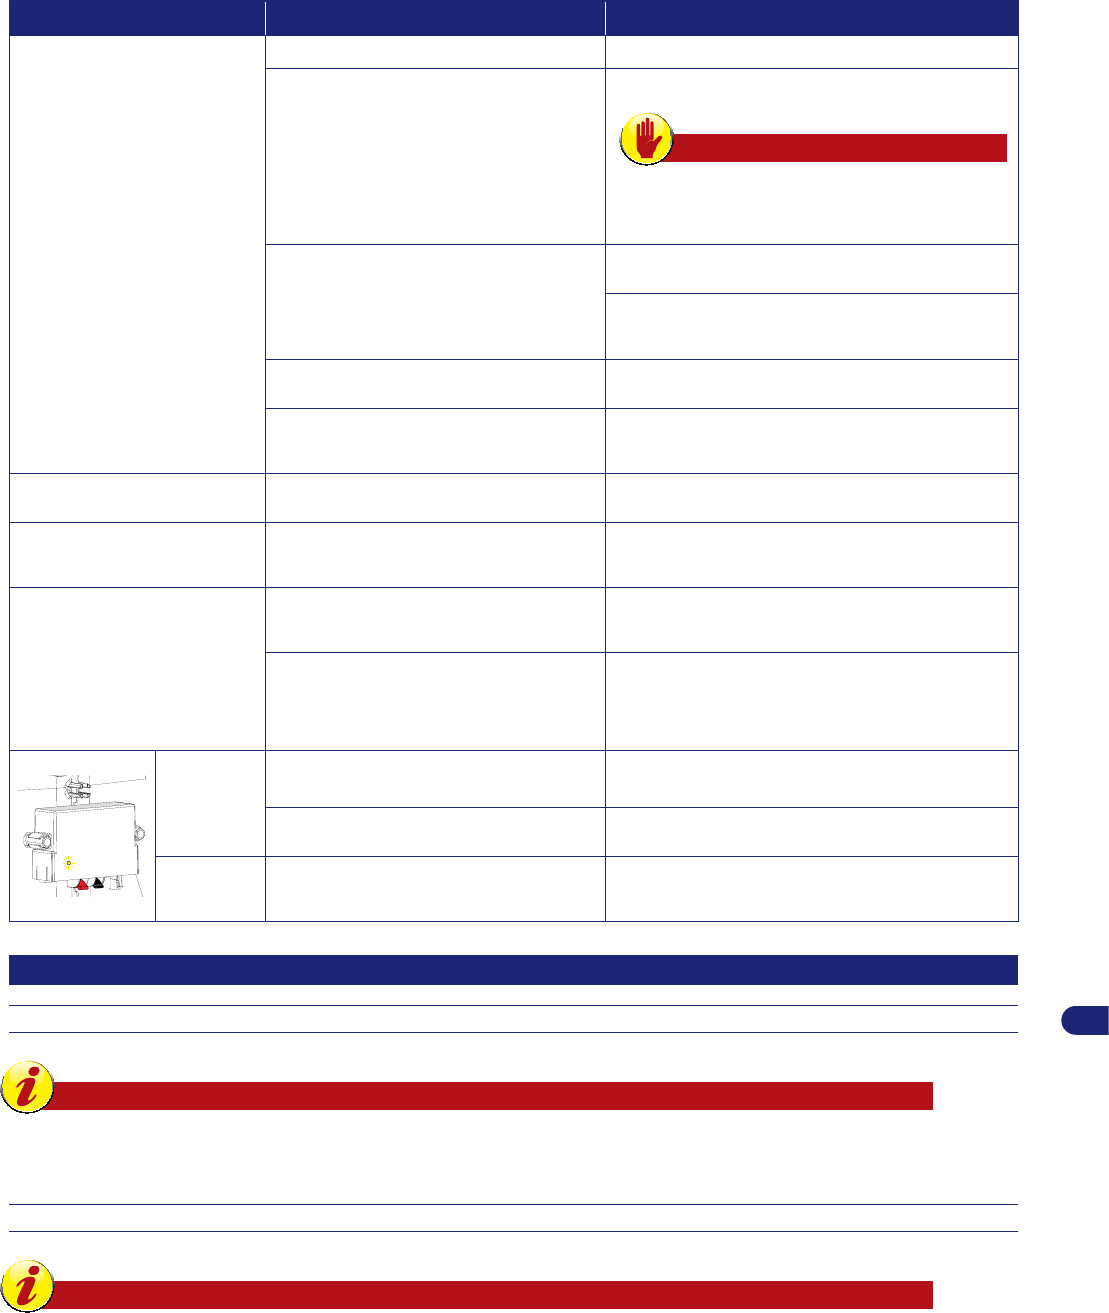
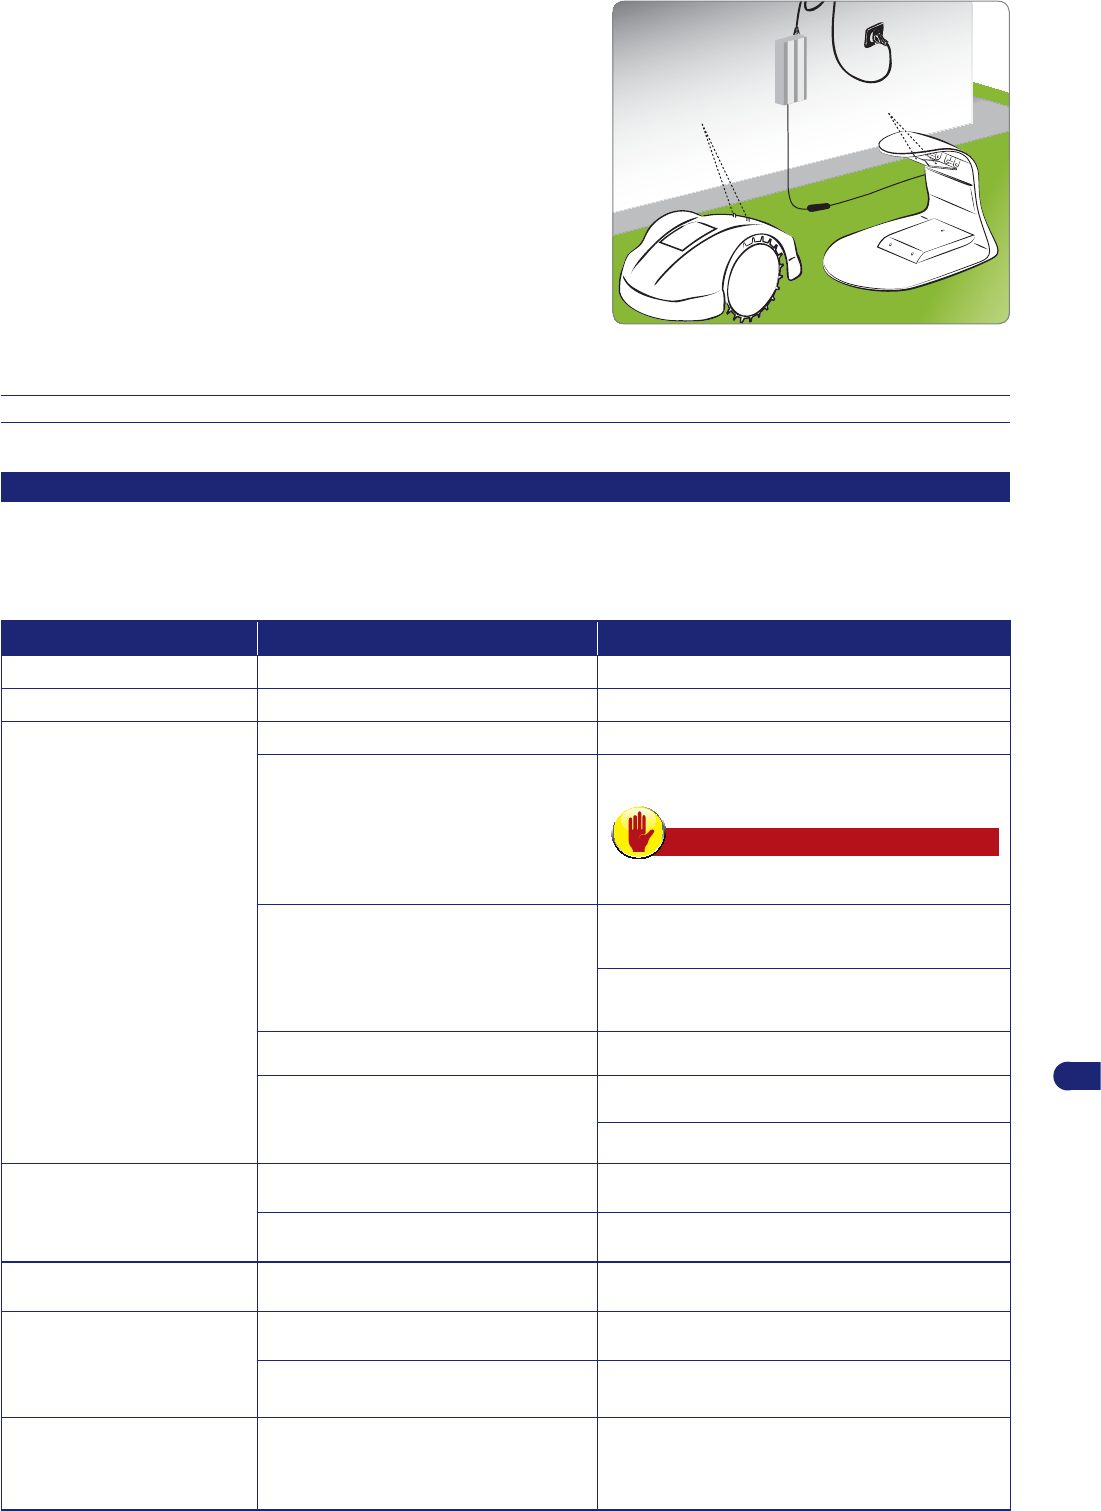
TROUBLESHOOTING
TROUBLESHOOTING GUIDE
The information below is designed to help identify and correct any faults and/or malfunctions which may occur during operation. Some faults can
be fi xed by the user, while others require specifi c technical skills or special expertise and therefore must only be fi xed by qualifi ed personnel with
certifi ed experience in the specifi c fi eld of intervention.
ProblemCauseRemedies
The antitheft alarm continues to
operate
Alarm enabledDisable the alarm (see “Programming Mode”)
The antitheft alarm does not workAlarm disabledEnable the alarm (see “Programming Mode”)
The robot is very noisy
Cutting blade damagedReplace the blade with a new one (see “Blade Replacement”)
Cutting blade clogged by residuals (tape, cords,
plastic fragments, etc.)
Safely stop the robot (see “Robot Safety Stop”). Unclog the
blade
Warning – Caution
Use protective gloves to prevent injuries to your hands
The robot was started in the presence of obstacles
(fallen branches, forgotten objects, etc.)
Stop the robot safely (see “Robot Safety Stop”)
Remove the obstacle and restart the robot (see “Start-up and
manual stopping of the robot (in closed areas)”)
Electric motor failure
Have the motor replaced or repaired by your nearest
authorised service centre
Grass too high
Increase the cutting height (see “Adjustment of cutting height”)
Carry out a preliminary cutting of the area with a normal
lawnmower
The robot does not position itself
correctly inside the charging station
Incorrect positioning of the perimeter wire or power
cord of the charging station
Check the connection of the charging station (see “Installation
of charging station and power supply unit”)
Collapsing of ground next to the charging station
Position the charging station on a fl at and stable surface (see
“Planning of system installation”)
The robot does not behave correctly
around the fl owerbeds
Perimeter wire laid incorrectly
Reposition the perimeter wire correctly (counter-clockwise
direction) (see “Installation of perimeter wire”)
The robot works at the wrong time
Clock was set incorrectlyReset the clock of the robot (see “Programming Mode”)
Working time was set incorrectlyReset the working time (see “Programming Mode”)
The robot does not execute quick
re-entry
Quick re-entry not setup correctly
Check the exact layout of the quick re-entry (see “Layout of the
robot’s quick re-entry to the charging station”)
30
User’s manual
EN
ProblemCauseRemedies
The work area is not completely
mowed
Not enough work hoursExtend the working time (see “Programming Mode”)
Cutting blade clogged with deposits and/or
residuals
Stop the robot safely (see “Robot Safety Stop”)
Warning – Caution
Use protective gloves to prevent injuries to your hands.
Clean the cutting blade
Cutting blade worn out
Replace the blade with an original spare part (see “Blade
replacement”)
Work area too big compared to the actual capacity
of the robot
Adjust the work area (see “Technical specifi cations”)
The batteries are about to run out.
Replace the batteries with original spare parts (see “Battery
replacement”)
The batteries do not charge completely
Clean and remove any rust from the contact points of the
batteries (see “Robot Cleaning”). Recharge the batteries for at
least 12 hours
Secondary area not completely
mowed
Programming error
Correctly program the secondary area (see “Programming
Mode”)
“No Signal” appears on the display
The perimeter wire is not connected correctly
(broken cable, no electrical connection, etc.)
Check the functioning of the electrical power supply, the
correct connection of the power supply unit and of the charging
station (see “Installation of charging station and power supply
unit”)
“Out of border” appears on the
display
Too much slope
Delimit the area with too much slope (see “Planning of system
installation”)
Perimeter wire laid incorrectly
Check that the wire has been installed correctly (too deep,
next to metallic objects, distance between the wire marking the
two elements less than 70 cm, etc.) (see “Planning of system
installation”)
Perimeter wire marking the boundary of the inside
areas (fl owerbeds, bushes, etc.) laid in a counter-
clockwise direction
Reposition the perimeter wire correctly (counter-clockwise
direction) (see “Installation of perimeter wire”)
Overheated power supply unit
Adopt the appropriate measures to reduce the temperature of
the power supply unit (ventilate or modify the installation area,
etc.) (see “Planning of system installation”)
Incorrect wheel transmissionCheck and, if necessary, correctly fasten the wheels
“Blackout” appears on the display
Interruption of the power supply to the transmitterRestart the robot
Overheated power supply unit
Adopt the appropriate measures to reduce the temperature of
the power supply unit (ventilate or modify the installation area,
etc.) (see “Planning of system installation”)
Presence of other installations nearbyContact an authorised Service Centre
Perimeter wire oxidised caused by damage to the
protective sheathing
Contact your nearest authorised service centre to check the
impedance (Ohm) of the perimeter wire
“Wheel error” appears on the display
Ground is uneven or contains obstacles that
prevent movement
Make sure the lawn to be mowed is even and does not contain
holes, stones or other obstacles. Otherwise, fi ll in any holes
and remove any obstacles (see “Preparation and marking the
boundaries of the work areas (primary and secondary areas)”)
Failure of one or both motors that operate the
transmission of the wheels
Have the motor replaced or repaired by your nearest
authorised service centre
“Sync error” appears on the displayThe robot’s receiver does not recognise the signal
Turn the robot off and then turn it back on. If the problem
persists, contact your nearest authorised service centre
31
User’s manual
EN
ProblemCauseRemedies
“Too high grass” or
“Blade Error”appears on the display
Cutting blade damagedReplace the blade with a new one (see “Blade Replacement”)
Cutting blade clogged by residuals (tape, cords,
plastic fragments, etc.)
Stop the robot safely (see “Robot Safety Stop”)
Warning – Caution
Use protective gloves to prevent injuries to your hands
Unclog the blade
The robot was started too close to obstacles (less
But de ce manuel. .......................................................................................................................................................................2
Identifi cation constructeur et appareillage...................................................................................................................................2
Informations sur la sécurité. ......................................................................................................................................................3
Normes de sécurité. ....................................................................................................................................................................3
Équipements de sécurité.............................................................................................................................................................4
Signaux de sécurité.....................................................................................................................................................................4
Emballage et désemballage. .......................................................................................................................................................8
Méthode de rentrée au poste de rechargement. .......................................................................................................................10
Prédisposition de rentrée rapide du robot au poste de rechargement. .....................................................................................10
Préparation et délimitation des aires de travail. .........................................................................................................................11
Installation poste de rechargement et alimentateur. .................................................................................................................16
Rechargement des batteries lors de la première utilisation . ....................................................................................................17
Recommandations pour les réglages........................................................................................................................................17
Réglage hauteur de coupe . ......................................................................................................................................................17
Utilisation et fonctionnement. ..................................................................................................................................................18
Accès aux menus. .....................................................................................................................................................................18
Programmations - modes de programmation............................................................................................................................20
Horaires de travail – Modes de programmation. .......................................................................................................................21
Terrains secondaire – mode de programmation........................................................................................................................22
Sécurité - modes de programmation. ........................................................................................................................................22
Mode d’emploi – modes de programmation. .............................................................................................................................23
Options langue – modes de programmation. ............................................................................................................................23
Mise en service – mode automatique. .....................................................................................................................................23
Arrêt en sécurité du robot..........................................................................................................................................................24
Retour automatique au poste de rechargement........................................................................................................................24
Utilisation du robot dans des zones fermées non équipées d’un poste de rechargement. .......................................................24
Démarrage du robot sans le fi l de délimitation du périmètre.....................................................................................................25
Saisie mot de passe. .................................................................................................................................................................25
Affi chage écran pendant phase de travail. .............................................................................................................................26
Inactivité prolongée et remise en service. .................................................................................................................................26
Rechargement batteries pour inactivité prolongée...............................................................................
Recherche de pannes. ..............................................................................................................................................................29
Pannes, causes et remèdes......................................................................................................................................................29
Remplacement des composants..............................................................................................................................................31
Recommandations pour le remplacement des pièces. .............................................................................................................31
Mise hors service du robot. .......................................................................................................................................................32
Déclaration de conformité. .......................................................................................................................................................32
Toute reproduction, même partielle, de ce document sans l’autorisation écrite du Fabricant est interdite. Le fabricant est engagé dans une politique d’amélioration constante de ses produits et se réserve donc le droit d’apporter
Temps moyen et méthode de Rechargement1:15 - Automatique
2:00 -
Automatique
3:00 - Automatique
Temps de Travail Moyen (*)Heures0:401:302:303:00
Sécurité arrêt lame
Capteur de capotagede série
Capteur manchede série
Bouton d’arrêt d’urgencede série
Équipements et accessoires
Câble périmétralm ( ' )100 ( 328 ')150 ( 491 ')
Longueur maximum câble périmétral
(indicative, calculée sur la base d’un périmètre
régulier)
m ( ' )400 (1312 ')600 (1968 ')
6
Manuel d’emploi
FR
Clous de fi xationn°100200
Zones Gérées, y compris la principale234
Signal périmétral TX-S1 (breveté)de série
Capteur pluiede série
Modulation lame et spirale intelligentede série
Capteur gazon tondu – Auto-programmation
(breveté)
non disponibleDe Série
Alarme sonoreSur demandeDe Série
Box protection alimentation
Box externe pour contenir le chargeur de batterie
Sur demande
(*) En fonction de l’état de l’herbe et du gazon.
DESCRIPTION GÉNÉRALE APPAREILLAGE
L’appareil est un robot conçu et construit pour tondre automatiquement
l’herbe de jardins ou pelouses d’habitations à n’importe quelle heure du
jour et de la nuit. Il est petit, compact, silencieux et facile à transporter.
En fonction des différentes caractéristiques de la surface à tondre, le robot
peut être programmé de façon à travailler sur plusieurs aires : une aire
principale et plusieurs aires secondaires (en fonction des spécifi cités de
chaque modèle).
Lorsqu’il est en marche, le robot effectue la tonte de l’aire délimitée par le
câble périmétral.
Lorsque le robot relève le câble périmétral ou rencontre un obstacle, il
change casuellement de trajectoire et repart dans la nouvelle direction.
En fonction du principe de fonctionnement random, le robot effectue la
tonte automatique et complète de la pelouse délimitée (voir fi gure).
Le robot est en mesure de reconnaître la présence d’herbe plus haute et/
ou plus touffue dans une zone du jardin et d’actionner automatiquement,
s’il le juge nécessaire, le mouvement à spirale pour une fi nition de coupe
parfaite de la pelouse. Le mouvement à spirale peut être également
actionné par l’opérateur à l’aide de la commande ENTRER/MENU pendant
que le robot est en train de tondre.
La surface de pelouse que le robot peut tondre dépend d’une série de
facteurs:
•
modèle du robot et batteries installées
•
caractéristiques de l’aire (périmètres irréguliers, surface non uniforme,
fractionnement de l’aire, etc.)
•
caractéristiques de la pelouse (type et hauteur de l’herbe, humidité,
etc.)
•
conditions de la lame (avec aiguisage plus effi cace, sans résidus ni
incrustations, etc.)
FONCTIONNEMENT RANDOM
7
Manuel d’emploi
FR
ORGANES PRINCIPAUX
1.
Robot.
2. Clavier commandes: sert à établir et à affi cher les modalités de fonctionnement du robot.
3. Capteur pluie: relève la pluie et habilite la rentrée du robot dans le poste de rechargement.
4. Batterie : alimente les moteurs de la lame et d’actionnement des roues. Le robot est fourni avec une ou plusieurs batteries au lithium en
fonction des modèles (déjà montée sur certains modèles).
5. Manche: sert à soulever et à transporter le robot.
6. Lame de coupe : effectue la tonte de la pelouse (déjà montée sur certains modèles).
7. Écheveau câble périmétral: câble avec une isolation spéciale et des caractéristiques particulières pour le transport du signal nécessaire
au fonctionnement du robot.
8. Clous : nécessaires pour fi xer le câble périmétral et le poste de rechargement.
9. Câble d’alimentation pour l’alimentateur.
10. Alimentateur : alimente sous basse tension le poste de rechargement.
11. Poste de rechargement: sert à recharger ou maintenir le robot sous chargement.
12. Transmetteur: transmet le signal au câble périmétral.
13. Manuel d’emploi.
14. Clef pour le réglage de la hauteur de coupe.
5
6
13
9
8
14
11
12
10
7
4
1
2
3
8
Manuel d’emploi
FR
INSTALLATION
EMBALLAGE ET DÉSEMBALLAGE
L’appareil est livré opportunément emballé. Lors de son désemballage, le sortir avec précaution et vérifi er l’intégrité des pièces le composant.
Important
•
Conserver le matériel d’emballage pour toute utilisation future.
PLANIFICATION INSTALLATION ÉQUIPEMENT
L’installation du robot ne comporte pas d’opérations diffi ciles à exécuter mais demande un minimum de planifi cation préliminaire de façon à
défi nir la zone la mieux indiquée pour installer le poste de rechargement, l’alimentateur et pour tracer le parcours du câble périmétral.
•
Le poste de rechargement doit être positionné au bord de la pelouse,
de préférence dans l’aire la plus grande et à partir de laquelle d’autres
zones de pelouse seraient plus faciles d’accès. L’aire où est installé le
poste de rechargement sera ci-après défi nie “Zone Principale”.
Précaution - Avertissement
Positionner l’alimentateur dans une zone à laquelle les
enfants ne peuvent pas avoir accès. Par exemple, à une
hauteur supérieure à 160 cm (63 ").
groupe d’alimentation
câble périmétral
poste de rechargement
H. min. 160 cm 160 cm
/ 63 "
transmetteur
Précaution - Avertissement
Afi n de pouvoir effectuer le branchement électrique, il est nécessaire qu’à proximité de la zone d’installation, il y ait une
prise de courant. Vérifi er que le branchement au réseau d’alimentation soit conforme aux lois en vigueur en la matière.
Pour opérer en toute sécurité, l’installation électrique à laquelle est branché l’alimentateur doit être équipée d’un système
de mise à la terre fonctionnant correctement.
Important
Il est conseillé d’installer le groupe dans une armoire à équipements électriques (pour intérieur ou extérieur) équipée d’une
fermeture à clef et bien aérée pour maintenir une bonne circulation de l’air.
Précaution - Avertissement
Faire en sorte que l’accès à l’alimentateur ne soit permis qu’aux personnes autorisées.
•
À la fi n de chaque cycle de travail, le robot doit pouvoir facilement trouver son poste de rechargement qui sera le point de départ pour un
nouveau cycle de travail et pour atteindre éventuellement d’autres zones de travail, ci-après défi nies “Aires Secondaires”.
•
Positionner le poste de rechargement en respectant les règles suivantes:
-
Zone plate.
-
Terrain compact et stable, en mesure de garantir un bon drainage.
-
De préférence dans la zone la plus grande de la pelouse.
-
Vérifi er que les asperseurs éventuellement présents ne dirigent pas leur jet d’eau à l’intérieur du poste de rechargement.
-
L’entrée du poste de rechargement doit être positionnée comme dans la fi gure pour permettre au robot d’y rentrer en suivant le câble
périmétral dans le sens des aiguilles d’une montre.
-
Avant la base, il doit y avoir 400 cm (157,48 ") rectilignes.
•
Le poste de rechargement doit être bien fi xé au sol. Pour empêcher qu’une marche d’entrée ne se forme à la base, positionner si nécessaire
à son entrée un petit tapis d’herbe artifi cielle pour compenser la marche. Autrement, enlever une partie de la pelouse et installer la base au
ras de l’herbe.
•
Le poste de rechargement est relié à l’alimentateur par un cordon qui doit s’éloigner du poste de rechargement par le côté extérieur de l’aire
de coupe.
9
Manuel d’emploi
FR
•
Positionner l’alimentateur en respectant les règles suivantes:
-
Dans une zone aérée, à l’abri des agents atmosphériques et de la
lumière directe du soleil.
-
De préférence à l’intérieur de l’habitation, d’un garage ou d’une
remise.
-
S’il est placé en extérieur, il ne doit jamais être directement exposé
au soleil et à l’eau : il est donc nécessaire de le protéger à l’intérieur
d’une boîte correctement aérée. Ne jamais le positionner en contact
direct avec le sol ou des endroits humides.
-
Le positionner à l’extérieur de la pelouse et non à l’intérieur.
-
Étendre le cordon en plus qui va du poste de rechargement à
l’alimentateur. Ne pas raccourcir ni allonger le cordon.
NON
OKOK
NON NON
NON
•
La portion de câble en entrée doit être rectiligne et perpendiculairement
alignée au poste de rechargement sur au moins 200 cm (78,74 ") et
la portion en sortie doit s’éloigner du poste de rechargement comme
l’indique la fi gure ; ceci permettra au robot d’entrer correctement.
groupe d’alimentation
poste de rechargement
H. min. 160 cm
/ 63 "
Distance min.
200 cm
78,74 "
câble périmétral
Transmetteur
En cas d’installation du robot près d’une zone où est installé un autre robot
(identique ou d’un autre producteur), il faudra effectuer, lors de l’installation,
une modifi cation au transmetteur et récepteur du robot de sorte que les
fréquences des deux robots ne se dérangent pas réciproquement.
DÉFINITION PARCOURS CÂBLE PÉRIMÉTRAL
Avant de procéder à l’installation du câble périmétral, il est nécessaire
de vérifi er toute la surface de la pelouse. Évaluer toute modifi cation à
apporter à la pelouse ou toute mesure à prendre pendant la pose du câble
périmétral pour le bon fonctionnement du robot.
1. Évaluer quelle méthode de rentrée au poste de rechargement il
est préférable d’utiliser selon les indications décrites au chapitre
“MÉTHODE DE RENTRÉE AU POSTE DE RECHARGEMENT”.
2. Évaluer l’endroit particulier où il serait nécessaire de positionner
le câble périmétral selon les indications décrites au chapitre
“PRÉDISPOSITION DE RENTRÉE RAPIDE DU ROBOT AU POSTE
DE RECHARGEMENT”.
3. Préparation et délimitation aires de travail.
4. Installation câble périmétral.
5. Installation poste de rechargement et alimentateur. Lors de la pose
du câble périmétral, respecter le sens d’installation (sens des aiguilles
d’une montre) et de rotation autour des plates-bandes (sens contraire
à celui des aiguilles d’une montre). Voir fi gure.
24 v
tracé pour poser câble périmétral
10
Manuel d’emploi
FR
MÉTHODE DE RENTRÉE AU POSTE DE RECHARGEMENT
Le robot peut rentrer au poste de rechargement selon deux méthodes
différentes, en fonction de la confi guration du menu utilisateur sous l’entrée
“Confi gurations” - “Rentrée à la Base”. Utiliser la méthode “Sur le câble”
uniquement au cas où il y aurait beaucoup d’obstacles dans le jardin et à
proximité du câble périmétral (inférieur à 2 mètres). Dans tous les autres
cas, il est préférable d’utiliser la méthode “V-METER” pour une rentrée
plus rapide au poste de rechargement.
“PAR LE CABLE”. Cette méthode de rentrée au poste de rechargement
signale au robot qu’il faut qu’il suive le câble périmétral en positionnant
ses roues à cheval sur le câble en question. Si cette méthode est activée,
il n’est pas nécessaire de prédisposer le (“Rappel sur le câble”) ainsi qu’il
est décrit ci-après.
“V-METER”. En confi gurant cette méthode de rentrée au poste de
rechargement, le robot longera le câble périmétral à une distance indicative
qui va de quelques cm à 1 mètre (3.2 ') en allant le toucher de temps à
autre, surtout dans les points non rectilignes, jusqu’à ce qu’il reconnaisse
le “Rappel sur le câble” nécessaire pour diriger correctement le robot au
poste de rechargement ou le guider lorsqu’il parcourt des portions étroites.
Après avoir reconnu le (“Rappel sur le câble”), le robot suivra le câble
périmétral en positionnant ses roues à cheval sur le câble en question sur
une distance de 10 mètres. (33 ').
Passage inférieur
à 2 mètres.
4-10 mt.
4-10 mt.
2 mt.
5 cm.
2 mt.
Le “Rappel sur le câble” signale au robot que nous sommes non seulement à proximité du poste de rechargement mais aussi à proximité d’un
passage étroit ou d’une fl èche pour la rentrée rapide au poste de rechargement.
Dès qu’il reconnaît un “Rappel”, le robot suivra le câble périmétral à vitesse réduite et avec plus de précision sur une distance d’environ 10
mètres (33 '), pour revenir ensuite à la modalité de rentrée à la base “V-Meter” s’il ne rencontre pas le poste de rechargement ou la rentrée
rapide.
Suivre les règles suivantes pour l’installation du “Rappel”.
•
Le “Rappel” est un tronçon de câble qui s’étend dans le jardin sur 2 mètres (6,6 ') et sur une distance d’un câble à l’autre de 5 cm (1,96 ").
•
Le “Rappel” doit être positionné dans la portion qui précède le poste de rechargement entre les 4 et les 10 mètres (13,2 - 33 ").
•
Le “Rappel” doit être positionné dans la portion qui précède les passages étroits inférieurs à 2 mètres (6,6 ").
•
Le “Rappel” doit être positionné dans la portion qui précède les “Rentrées Rapides”.
NB : Si le robot ne parvient pas à rencontrer le poste de rechargement en un certain laps de temps, il suivra le câble périmétral en
modalité “Sur le câble”.
PRÉDISPOSITION DE RENTRÉE RAPIDE DU ROBOT AU POSTE DE RECHARGEMENT
La rentrée rapide est une pose particulière du câble périmétral qui permet au robot de réduire le trajet de rentrée au poste de rechargement.
Utiliser cette pose particulière du câble périmétral uniquement dans les jardins où la rentrée rapide entraîne une réduction effective du trajet et
lorsque la longueur du périmètre est indicativement supérieure à 200 mètres.
Pour installer la rentrée rapide, positionner le câble périmétral sur le terrain de façon à former un triangle ayant un côté de 50 cm (19,7 ") et les
deux côtés de câble périmétral de 40 cm (15,75 ") – voir fi gure.
En rentrant au poste de rechargement, avec les roues à cheval sur le câble, et lorsqu’il intercepte cette forme triangulaire particulière, le robot
interrompt sa marche, se tourne approximativement de 90° vers l’intérieur du jardin et reprend sa marche dans la nouvelle direction jusqu’à ce
qu’il rencontre le câble périmétral du côté opposé.
Confi gurer la rentrée rapide en un point qui serait précédé d’au moins 200 cm (78,74 ") de câble rectiligne et qui serait suivi d’au moins 150 cm
(59,05 ") de câble rectiligne.
La confi guration ne doit pas être effectuée le long de la portion rectiligne qui précède immédiatement le poste de rechargement ou à proximité
d’obstacles. Vérifi er l’absence d’obstacles le long de la trajectoire de rentrée rapide qui pourraient empêcher la rentrée rapide.
Important
La confi guration de rentrée rapide positionnée sur un point non correct pourrait ne pas permettre au robot de rentrer
rapidement au poste de rechargement. Lorsque le robot parcourt le périmètre pour atteindre une aire secondaire, il ne
relève pas la confi guration de rentrée rapide.
11
Manuel d’emploi
FR
L’illustration fournit quelques indications utiles pour installer correctement
la confi guration de rentrée rapide.
4040
50
Passage inférieur
à 2 mètres.
4-10 mt.min. 150 cm.
(59,05 ")
4-10 mt.
4-10 mt.
2 mt.
5 cm.
2 mt.
PRÉPARATION ET DÉLIMITATION DES AIRES DE TRAVAIL
Préparation de la pelouse à tondre
1. Vérifi er que la pelouse à tondre est uniforme et sans trous, cailloux
ou autres obstacles. Si tel n’est pas le cas, effectuer les opérations
d’assainissement qui s’imposent. S’il n’est pas possible d’éliminer
certains obstacles, il est nécessaire de délimiter convenablement les
zones concernées à l’aide du câble périmétral.
2. Vérifi er que toutes les zones de la pelouse ne dépassent par les
pentes admissibles (voir “Données techniques”). Pendant la phase de
travail dans des zones inclinées, lorsque le robot détecte le câble, les
roues pourraient glisser et le faire sortir de l’aire périmétrale.
Important
Les zones qui présentent des pentes supérieures à celles
admissibles ne peuvent pas être tondues avec le robot.
Positionner donc le câble périmétral avant la pente en
excluant de la coupe la zone de pelouse en question.
NON
35 cm
(13,78 ")
21-35%
21-35%
0-20%
100 cm (39,3 ")
35 cm
(13,78 ")
35 %
0-35%
0-20%
0-20%
câble périmétral
câble périmétral
OK
NON
NON
OK
OK
OK
12
Manuel d’emploi
FR
Délimitation aire de travail
3. Vérifi er l’ensemble de la surface de la pelouse et évaluer la nécessité
de la diviser en plusieurs aires de travail séparées selon les critères
décrits ci-après. Avant d’entreprendre les opérations d’installation du
câble périmétral et pour les rendre aisées et faciles à exécuter, il est
conseillé de vérifi er l’ensemble du parcours. L’illustration représente
un exemple de pelouse avec le tracé pour la pose du câble périmétral.
Pendant l’installation de l’équipement, il est nécessaire d’identifi er
les zones secondaires ainsi que les zones fermées éventuelles. Par
aire secondaire, on entend une partie de pelouse reliée à la pelouse
principale par un rétrécissement que le mouvement casuel du robot ne
parvient pas à passer. L’aire doit pouvoir être atteinte sans marches
ni dénivellations dépassant les caractéristiques admises. Si la zone
est défi nie “aire Secondaire”, cela dépend aussi de la dimension de
l’aire primaire. Plus l’aire primaire est grande et plus il sera diffi cile de
passer les passages étroits. En général, un passage inférieur à 200
cm (78,74 ") est à considérer comme une aire secondaire. Le robot
gère un nombre d’aires secondaires en fonction des caractéristiques
du modèle (“Voir Données Techniques”).
Le passage minimum admis est de 70 cm (27,56 ") de câble à câble
périmétral. Le câble périmétral doit être positionné loin (la distance
sera indiquée ci-après) d’éventuels objets extérieurs à la pelouse ;
donc, plus en général, le passage dont nous devons disposer doit au
total être de 140 cm (55,12 ").
Si ce passage est très long, il est préférable que la largeur soit
supérieure à 70 cm (27,56 ").
Pendant la programmation, il est nécessaire de confi gurer les
dimensions des aires secondaires en pourcentage par rapport à la
pelouse ainsi que la direction pour les atteindre plus vite (dans le sens
des aiguilles d’une montre / dans le sens contraire à celui des aiguilles
d’une montre) en plus des mètres de câble nécessaires pour arriver
dans l’aire secondaire. Voir “Modalité de programmation“.
24 v
tracé pour pose du câble périmétral
min. 70 cm / 27,56 "min. 70 cm / 27,56 "
min. 70 cm / 27,56 "
Si les conditions minimales requises décrites plus haut ne sont pas
respectées et donc dans le cas d’une zone séparée par une marche,
par une dénivellation dépassant les caractéristiques du robot ou par
un passage (couloir) d’une largeur inférieure à 70 cm (27,56 ") de
câble à câble périmétral, la zone de pelouse est à considérer comme
une “Aire Fermée”. Pour installer une “Aire Fermée”, poser l’aller et
le retour du câble périmétral dans le même tracé, à une distance
inférieure à 1 cm (0,40 "). Dans ce cas, le robot n’est pas en mesure
d’atteindre la zone de façon autonome. Elle sera donc gérée selon les
instructions fournies au chapitre “Gestion Aires Fermées”. La gestion
des “Aires Fermées” réduit les mètres carrés gérables par le robot de
façon autonome.
couloir de passage minimum
70 cm / 27,56 " de câble à câble.
ZONE PRINCIPALE
ZONE SECONDAIRE
Couloir de passage
< 70 cm / 27,56 "
ZONE PRINCIPALE
ZONE FERMÉE
13
Manuel d’emploi
FR
4. Si à l’intérieur ou à l’extérieur de la zone de travail, il y a une allée ou un carrelage se trouvant au même niveau que la pelouse, positionner le
câble périmétral à 5 cm (1,96 ") du bord du carrelage. Le robot sortira légèrement de la pelouse et toute l’herbe sera tondue. Se le carrelage
est de type métallique ou qu’il y a un caniveau métallique, un receveur de douche ou des fi ls électriques, disposer le câble métallique à 30
cm au moins (11,81 ") afi n d’empêcher que le robot fonctionne mal et que le câble périmétral soit dérangé.
Important
L’illustration montre un exemple d’éléments à l’intérieur et en périphérie de la zone de travail et les distances qui doivent être
respectées pour la pose du câble périmétral. Délimiter tous les éléments en fer ou autre métal (caniveaux, branchements
électriques, etc.) pour éviter toute interférence avec le signal du câble périmétral.
5 cm
1,97 “
30 cm
11,81 “
30 cm
11,81 “
30 cm
11,81 “
Si à l’intérieur ou à l’extérieur de la zone de travail, se trouve un obstacle, par exemple une bordure, une paroi ou un muret, mettre le câble
périmétral à 35 cm (13,78 ") au moins de l’obstacle. Augmenter à 40 cm (15,75 ") au moins la distance entre câble périmétral et obstacle si on
souhaite éviter que le robot ne heurte l’obstacle. La tonte d’herbe se trouvant sur une bordure où on a décidé de ne pas faire passer le robot
pourra être fi nie avec un coupe-bordure ou une débroussailleuse.
35 cm.
/13,78 "
35 cm.
/13,78 "
35 cm.
/13,78 "
35 cm.
/13,78 "
S’il y a à l’intérieur ou à l’extérieur de la zone de travail une plate-bande, une haie, un arbre ayant des racines apparentes, un petit fossé de
2-3 cm ou une petite bordure de 2-3 cm, mettre le câble périmétral à 30 cm (11,81 ") au moins afi n d’empêcher que le robot n’abîme ou ne soit
abîmé par les obstacles présents. La tonte de l’herbe présente dans la zone où on a décidé de ne pas faire passer le robot pourra être fi nie avec
un coupe-bordure ou une débroussailleuse.
30 cm.
/11,81”
30 cm.
/11,81”
30 cm.
/11,81”
30 cm.
/11,81”
30 cm.
/11,81”
racines apparentes
30 cm.
/ 11,81 “
30 cm.
/ 11,81 “
14
Manuel d’emploi
FR
S’il y a à l’intérieur ou à l’extérieur de la zone de travail une piscine, un petit lac, un escarpement, un fossé, une marche pour descendre ou des
routes publiques non protégées par un muret, poser le câble périmétral à au moins 90 cm (35,43 "). Pour réduire la distance du câble périmétral
afi n d’assurer une installation et une opérativité optimale du robot, nous conseillons d’installer une clôture supplémentaire d’au moins 15 cm ;
ceci permettra de poser le câble périmétral selon les distances régulières décrites aux points précédents.
Importante
Le respect rigoureux des distances et des pentes spécifi ées dans le manuel garantit une installation optimale et un bon
fonctionnement du robot. En présence de pentes ou de terrains glissants, augmenter la distance d’au moins 30 cm / 11,81 ".
90 cm.
/ 35,44 “
90 cm.
/ 35,44 “
90 cm.
/ 35,44 “
Si à l’intérieur de la zone de travail, il y a des obstacles qui résistent aux chocs, par exemple arbres, buissons ou poteaux sans angles vifs, il ne
faut pas les délimiter. Le robot heurte l’obstacle et change de direction. Si on préfère que le robot ne heurte pas les obstacles et qu’il fonctionne
sûrement et silencieusement, il est conseillé de délimiter tous les obstacles fi xes. Les obstacles légèrement inclinés tels que pots de fl eurs,
pierres ou arbres à racines apparentes doivent être délimités afi n d’éviter d’endommager la lame de coupe et les obstacles en question.
Pour délimiter l’obstacle, à partir du point du périmètre extérieur le plus proche de l’objet à délimiter, poser le câble périmétral jusqu’à l’obstacle, le
contourner en respectant les distances régulières décrites aux points précédents et remettre le câble le long du parcours précédent. Superposer
le câble d’aller et de retour sous le même clou de sorte que le robot dépasse le câble périmétral.
Pour le bon fonctionnement du robot, la longueur minimum du câble périmétral superposé doit être de 70 cm (27,56 ") pour permettre au robot
de se déplacer normalement.
NON
min. 70 cm
/ 27,56 ”
min. 70 cm
/ 27,56 ”
< 70 cm
/ 27,56 ”
< 70 cm
/ 27,56 ”
0 cm / 0 ”0 cm / 0 ”
arbre
poteau
OKOK
INSTALLATION CÂBLE PÉRIMÉTRAL
Le câble périmétral peut être enterré ou posé au sol. Si on dispose d’une
machine pour poser le câble, il est préférable d’enterrer ce dernier afi n de
mieux le protéger. Différemment, poser le câble au sol à l’aide des clous
prévus à cet effet (voir description ci-après).
Important
Poser le câble périmétral à partir de l’endroit où est
installé le poste de rechargement et en laisser deux bons
mètres pour pouvoir ensuite le couper sur mesure lors de
l’opération fi nale de raccordement au groupe.
Max.
5 cm (1,96 ")
câble périmétral
15
Manuel d’emploi
FR
Fil posé sur le terrain
Couper l’herbe très basse à l’aide d’un coupe-bordure ou d’une
débrousailleuse tout le long du parcours où sera posé le câble. Il sera
ainsi plus facile de poser le câble en contact avec le terrain et d’éviter qu’il
soit rompu par la lame de coupe avant d’être rabouté (voir description ci-
après).
1. Positionner le câble dans le sens des aiguilles d’une montre tout le
long du parcours et le fi xer à l’aide des clous spécialement prévus à
cet effet fournis dans l’équipement [distance entre les clous 100÷200
cm (39,37÷78,74 ")].
-
Lors de la pose du câble périmétral, respecter le sens de rotation
autour des plates-bandes qui devra être contraire à celui des
aiguilles d’une montre.
-
Dans les portions rectilignes, fi xer le câble de sorte qu’il soit tendu
et qu’il adhère bien au sol.
-
Dans les portions non rectilignes, fi xer le câble de sorte qu’il ne
s’entortille pas mais qu’il se courbe régulièrement (rayon 20 cm).
NON
clous de fixation du câblecâble périmétral
Fil enterré
1. Creuser le sol de façon régulière et symétrique par rapport à la ligne
du tracé marqué au sol.
2. Positionner le câble dans le sens des aiguilles d’une montre tout le
long du parcours à une profondeur de quelques centimètres (environ
2÷3 cm (0.7874÷ 1.1811 "). Ne pas enterrer le câble à plus de 5 cm afi n
de ne pas réduire la qualité et l’intensité du signal capté par le robot.
3. Lors de la pose du câble, le bloquer si nécessaire à certains endroits à
l’aide des clous prévus à cet effet pour bien le maintenir en place lors
de la phase de recouvrement.
4. Recouvrir tout le câble et faire en sorte qu’il reste bien tendu sous le
sol.
ZONE PRINCIPALE
ZONE FERMÉE
couloir de passage
< 70 cm(27,56 ")
35 cm
(13,78 ")
Max. 1 cm
(0,40 ")
NON
Jointure du câble périmétral.
Important
Que le câble soit enterré ou posé au sol, le rabouter
si nécessaire avec un autre câble ayant les mêmes
caractéristiques (voir fi gure). On recommande pour ce
faire d’utiliser du ruban auto-agglomérant (par exemple :
3M Scotch 23). Ne pas utiliser de ruban isolant ou un autre
type de jointures (cosses, bornes, etc.).
1
34
2
16
Manuel d’emploi
FR
INSTALLATION POSTE DE RECHARGEMENT ET ALIMENTATEUR
Précaution - Avertissement
Avant d’effectuer une quelconque opération, couper
l’alimentation électrique générale.
Positionner l’alimentateur dans une zone à laquelle les
enfants ne peuvent pas avoir accès. Par exemple, à une
hauteur supérieure à 160 cm (63.00 ").
protection(L)
alimentateur de courant(A)
transmetteur(B)
H. min. 160 cm
(63.00 ")
1. Installer l’alimentateur (A).
2. Démonter la protection (L).
3. Positionner la base dans la zone prédéfi nie.
4. Placer le câble périmétral (M) sous la base.
5. Relier les deux extrémités du câble aux bornes de la base.
borne rouge
borne noire
Câble périmétral (M)
6. Fixer la base (N) au sol à l’aide des clous (P). Si nécessaire, fi xer la
base à l’aide des vis tamponnées (Q).
clous (P)
vis tamponnées (Q)
poste de rechargement (N)
7. Brancher le câble d’alimentation (E) du poste de rechargement (N) à
l’alimentateur (A).
8. Brancher la fi che de l’alimentateur (A) à la prise électrique.
9. Si le voyant du transmetteur clignote, le branchement est correct.
Inversement, il est nécessaire d’identifi er l’anomalie (voir “Recherche
pannes”).
10. Monter la protection (L).
alimentateur
de courant (A)
câble
d’alimentation (E)
câble
périmétral
poste de
rechargement (N)
transmetteur (B)
H. min. 160 cm
(63.00 ")
protection(L)
17
Manuel d’emploi
FR
RECHARGEMENT DES BATTERIES LORS DE LA PREMIÈRE UTILISATION
1.
Placer le robot à l’intérieur du poste de rechargement.
2. Appuyer sur la touche ON.
3. Au bout de quelques secondes, l’écran affi che le message
“RECHARGE”.
4. Appuyer sur la touche “Start/Pause”. L’écran affi che la fonction
“PAUSE”. Les batteries commencent à se recharger.
5. Une fois le rechargement terminé, il est possible de programmer le
robot pour sa mise en service (voir “Modalité de programmation”).
ENTER
TOUCHE “ON”
TOUCHE “START/PAUSE”
Important
Lors du premier rechargement, les batteries doivent rester branchées au moins 4 heures.
RÉGLAGES
RECOMMANDATIONS POUR LES RÉGLAGES
Important
L’utilisateur doit effectuer les réglages en suivant les procédures décrites dans le manuel. N’effectuer aucun réglage qui ne
serait pas expressément indiqué dans le manuel. Tout réglage supplémentaire non expressément indiqué dans le manuel
doit être effectué uniquement par le personnel des Centres d’Assistance Agréés du Fabricant.
RÉGLAGE HAUTEUR DE COUPE
Avant d’établir la hauteur de coupe de la lame, s’assurer que le robot est en arrêt dans des conditions de sécurité (voir “Arrêt du robot dans des
conditions de sécurité”).
Important
Porter des gants de protection pour éviter de se couper.
1. Dans les modèles équipés d’une alarme anti-vol, la désactiver pour ne
pas qu’elle s’enclenche. (Voir “Modalité de programmation”).
2. Capoter le robot et le poser de façon à ne pas abîmer son toit.
3. Dévisser la vis (C) et à l’aide de la clef prévue à cet effet, tourner la
bride (E) dans le sens des aiguilles d’une montre.
4. Soulever ou baisser le dispositif de coupe (D) pour défi nir la hauteur de
coupe souhaitée. La valeur peut être relevée dans l’échelle graduée
positionnée sur la clef fournie dans l’équipement.
Important
Ne pas utiliser le robot pour tondre de l’herbe d’une
hauteur supérieure à 1 cm (0,40 ") par rapport à la lame
de coupe. Réduire graduellement la hauteur de coupe. On
conseille de réduire la hauteur à moins de 1 cm (0,40 ")
tous les 1÷2 jours jusqu’à parvenir à la hauteur idéale.
5. Une fois le réglage terminé, tourner la bride (E) dans le sens contraire
à celui des aiguilles d’une montre et serrer la vis (C).
6. Redresser le robot pour le mettre en position de marche.
(E)
groupe de coupe (D)
vis (C)
18
Manuel d’emploi
FR
UTILISATION ET FONCTIONNEMENT
RECOMMANDATIONS D’UTILISATION
Important
-
À la première utilisation du robot, il est recommandé de lire attentivement l’intégralité du Manuel et de vérifi er de
l’avoir bien compris dans son ensemble, et notamment toutes les informations concernant la sécurité.
-
N’activer que les emplois prévus par le fabricant et ne modifi er aucun dispositif pour obtenir des prestations autres
que celles prévues.
DESCRIPTION COMMANDES ROBOT
L’illustration présente la position des commandes à bord de la machine.
A. ÉCRAN: est lumineux pour affi cher toutes les fonctions.
B. ON: appuyer pour allumer la tondeuse.
C. OFF/STOP: appuyer pour arrêter la tondeuse ; l’écran s’éteint.
D. START/PAUSE: appuyer pour arrêter la tondeuse en laissant l’écran
en “attente” ; dans cette modalité, il est possible de programmer la
tondeuse. En appuyant de nouveau sur la touche, elle permet de
redémarrer le travail. Si on appuie sur cette touche pendant que la
tondeuse est en cours de rechargement, cette dernière ne reprendra
le travail que lorsqu’on appuiera de nouveau sur la touche et que
disparaîtra “Pause” de l’écran.
E. CHARGE: appuyer pour faire revenir la tondeuse à la base et anticiper
ainsi le rechargement des batteries. Si on appuie sur cette touche
pendant que la tondeuse est en cours de rechargement, cette dernière
interrompt le rechargement et reprend son travail.
Zweck des Handbuchs. ...............................................................................................................................................................2
Identifi kation von Hersteller und Gerät. .......................................................................................................................................2
Informationen zur Sicherheit. .....................................................................................................................................................3
Allgemeine Beschreibung des Gerätes. ......................................................................................................................................6
Verpackung und Auspacken........................................................................................................................................................8
Planung der Installation der Anlage. ...........................................................................................................................................8
Den Verlaufs des Begrenzungskabels festlegen.........................................................................................................................9
Rückkehr in die Ladestation. .....................................................................................................................................................10
Suchschleife für die schnelle Rückkehr des Roboters in die Ladestation. ................................................................................10
Vorbereitung und Abgrenzung der Arbeitsbereiche. ..................................................................................................................11
Installation des Begrenzungskabels..........................................................................................................................................14
Installation der Ladestation und des Netzgeräts. ......................................................................................................................16
Aufl aden der Batterien bei der ersten Benutzung. ....................................................................................................................17
Empfehlungen für die Einstellungen. ........................................................................................................................................17
Einstellen der Schnitthöhe. .......................................................................................................................................................17
Gebrauch und Funktionsweise. ...............................................................................................................................................18
Empfehlungen für den Gebrauch. .............................................................................................................................................18
Beschreibung der Bedienelemente des Roboters.....................................................................................................................18
Zugang zu den Menüs. .............................................................................................................................................................18
Sicherheitsstopp des Roboters. ................................................................................................................................................24
Automatische Rückkehr in die Ladestation. ..............................................................................................................................24
Benutzung des Roboters in geschlossenen Flächen ohne Ladestation. ..................................................................................24
Starten des Roboters ohne Begrenzungskabel. .......................................................................................................................25
Eingabe des Passworts.............................................................................................................................................................25
Displayanzeige während der Arbeit...........................................................................................................................................26
Längerer Stillstand und Wiederinbetriebnahme. .......................................................................................................................26
Aufl aden der Batterie bei längerem Stillstand. ..........................................................................................................................27
Empfehlungen für den Gebrauch. ................................................................................................
Empfehlungen für die Wartung. ................................................................................................................................................28
Reinigung des Roboters............................................................................................................................................................28
Störungen, Ursachen und Abhilfen. ........................................................................................................................................29
Auswechseln von Komponenten. ............................................................................................................................................31
Empfehlungen für das Auswechseln von Teilen. .......................................................................................................................31
Auswechseln der Batterien. ......................................................................................................................................................31
Auswechseln der Klinge. ...........................................................................................................................................................32
Stilllegung des Roboters. ..........................................................................................................................................................32
Der auch teilweise Nachdruck dieses Dokuments ohne schriftliche Genehmigung des Herstellers ist verboten.
Der Hersteller bemüht sich um eine ständige Verbesserung und behält sich das Recht vor, dieses Dokument ohne Vorankündigung zu ändern, sofern dies keine Risiken für die Sicherheit mit sich bringt.
Scopo del manuale. ....................................................................................................................................................................2
Identifi cazione costruttore e apparecchiatura. ............................................................................................................................2
Informazioni sulla sicurezza. ......................................................................................................................................................3
Norme per la sicurezza. ..............................................................................................................................................................3
Dotazioni di sicurezza. ................................................................................................................................................................4
Segnali di sicurezza. ...................................................................................................................................................................4
Dati tecnici...................................................................................................................................................................................5
Descrizione generale apparecchiatura........................................................................................................................................6
Organi principali. .........................................................................................................................................................................7
Imballo e disimballo.....................................................................................................................................................................8
Defi nizione percorso fi lo perimetrale. ..........................................................................................................................................9
Metodo di rientro alla stazione di ricarica. .................................................................................................................................10
Predisposizione di rientro veloce del robot alla stazione di ricarica. .........................................................................................10
Preparazione e delimitazione aree di lavoro. .............................................................................................................................11
Installazione fi lo perimetrale......................................................................................................................................................14
Installazione stazione di ricarica e alimentatore........................................................................................................................16
Ricarica batterie al primo uso....................................................................................................................................................17
Raccomandazioni per le regolazioni. ........................................................................................................................................17
Uso e funzionamento. ...............................................................................................................................................................18
Raccomandazioni per l’uso. ......................................................................................................................................................18
Accesso ai menù. ......................................................................................................................................................................18
Impostazioni - modalità di programmazione. ............................................................................................................................20
Orari di lavoro – modalità di programmazione. .........................................................................................................................21
Aree secondarie - modalità di programmazione. ......................................................................................................................22
Sicurezza - modalità di programmazione. .................................................................................................................................22
Modo d’uso - modalità di programmazione. ..............................................................................................................................23
Opzioni lingua - modalità di programmazione. ..........................................................................................................................23
Messa in servizio - modalita’ automatica. .................................................................................................................................23
Arresto in sicurezza del robot....................................................................................................................................................24
Rientro automatico alla stazione di ricarica...............................................................................................................................24
Uso del robot in aree chiuse non dotate di stazione di ricarica. ................................................................................................24
Avviamento robot senza fi lo perimetrale. ..................................................................................................................................25
Visualizzazione display in fase di lavoro. ..................................................................................................................................26
Inattività prolungata e rimessa in servizio. ................................................................................................................................26
Ricarica batterie per inattività prolungata. .................................................................................................................................27
Consigli per l’uso. ......................................................................................................................................................................27
Raccomandazioni per la manutenzione. ...................................................................................................................................28
Tabella intervalli di manutenzione programmata. ......................................................................................................................28
Ricerca guasti. ..........................................................................................................................................................................29
Guasti, cause e rimedi. .............................................................................................................................................................29
Raccomandazioni per la sostituzione parti................................................................................................................................31
Dichiarazione CE di conformità. ..............................................................................................................................................32
È vietata la riproduzione, anche parziale, di questo documento senza l’autorizzazione scritta del Costruttore. Il costruttore è impegnato in una politica di continuo miglioramento e si riserva il diritto di modifi care questo documento
senza l’obbligo di preavviso purché ciò non costituisca rischi per la sicurezza.
Congratulazioni per aver acquistato questo prodotto, che potrà soddisfare le vostre esigenze ed aspettative. Questo progetto nasce da
ZUCCHETTI CENTRO SISTEMI S.p.A. (Azienda certifi cata UNI EN ISO 9001) software house che, dal 1982, ha consolidato la propria attività
e la propria presenza sul mercato internazionale.
Applicare soluzioni informatiche avanzate al settore dell’automazione industriale signifi ca ottimizzare le attività produttive e semplifi care le
procedure di lavoro. É proprio sulla base della costante attività di ricerca dei laboratori ZUCCHETTI che nasce questo prodotto.
SCOPO DEL MANUALE
•
Questo manuale, che è parte integrante dell’apparecchiatura, è stato realizzato dal Costruttore per fornire le informazioni necessarie a
coloro che sono autorizzati ad interagire con essa nell’arco della sua vita prevista.
•
Oltre ad adottare una buona tecnica di utilizzo, i destinatari delle informazioni devono leggerle attentamente ed applicarle in modo rigoroso.
•
Queste informazioni sono fornite dal Costruttore nella propria lingua originale (italiano) e possono essere tradotte in altre lingue per
soddisfare le esigenze legislative e/o commerciali.
•
La lettura di tali informazioni permetterà di evitare rischi alla salute e alla sicurezza delle persone e danni economici.
•
Conservare questo manuale per tutta la durata di vita dell’apparecchiatura in un luogo noto e facilmente accessibile, per averlo sempre a
disposizione nel momento in cui è necessario consultarlo.
•
Alcune informazioni e illustrazioni riportate in questo manuale potrebbero non corrispondere perfettamente a quanto in vostro possesso, ma
ciò non pregiudica la loro funzione.
•
Il Costruttore si riserva il diritto di apportare modifi che senza l’obbligo di fornire preventivamente alcuna comunicazione.
•
Per evidenziare alcune parti di testo di rilevante importanza o per indicare alcune specifi che importanti, sono stati adottati alcuni simboli il
cui signifi cato viene di seguito descritto.
Pericolo - Attenzione
Il simbolo indica situazioni di grave pericolo che, se trascurate, possono mettere seriamente a rischio la salute e la
sicurezza delle persone.
Cautela - Avvertenza
Il simbolo indica che è necessario adottare comportamenti adeguati per non mettere a rischio la salute e la sicurezza delle
persone e non provocare danni economici.
Importante
Il simbolo indica informazioni tecniche di particolare importanza da non trascurare.
IDENTIFICAZIONE COSTRUTTORE E APPARECCHIATURA
La targhetta di identifi cazione raffi gurata è applicata direttamente
sull’apparecchiatura. In essa sono riportati i riferimenti e tutte le indicazioni
indispensabili alla sicurezza di esercizio.
Per qualsiasi esigenza rivolgersi al Servizio Assistenza del Costruttore o
ad uno dei centri autorizzati.
Per ogni richiesta di assistenza tecnica, indicare i dati riportati sulla
targhetta di identifi cazione, le ore approssimative di utilizzo ed il tipo di
difetto riscontrato.
A. Identifi cazione Costruttore.
B. Marcatura CE di conformità.
C. Modello / numero di matricola / anno di costruzione.
D. Dati tecnici.
(C) Anno di costruzione
(C) Modello
(B) Marcatura CE
di conformità
(A) Identificazione costruttore
(D) Dati tecnici
(C) Numero di
matricola
TARGHETTA IDENTIFICATRICE
3
Manuale d’uso
IT
INFORMAZIONI SULLA SICUREZZA
NORME PER LA SICUREZZA
•
Il costruttore, in fase di progettazione e costruzione, ha posto particolare attenzione agli aspetti che possono provocare rischi alla sicurezza
e alla salute delle persone che interagiscono con l’apparecchiatura. Oltre al rispetto delle leggi vigenti in materia, egli ha adottato tutte le
“regole della buona tecnica di costruzione”. Scopo di queste informazioni è quello di sensibilizzare gli utenti a porre particolare attenzione
per prevenire qualsiasi rischio.
•
Al primo uso del robot, si raccomanda di leggere attentamente tutto il manuale e di accertarsi di averlo compreso completamente, in
particolare di aver capito tutte le informazioni che riguardano la sicurezza.
•
Eseguire il sollevamento e la movimentazione rispettando le informazioni riportate direttamente sull’imballo, sull’apparecchiatura e nelle
istruzioni per l’uso fornite dal costruttore.
•
Prestare attenzione al signifi cato dei simboli delle targhette applicate; la loro forma e colore sono signifi cativi ai fi ni della sicurezza. Mantenerle
leggibili e rispettare le informazioni indicate.
•
L’uso del robot rasaerba è consentito solo a persone che ne conoscono il funzionamento e che abbiano letto e compreso quanto descritto
nel manuale.
•
Utilizzare l’apparecchiatura solo per gli usi previsti dal fabbricante. L’impiego dell’apparecchiatura per usi impropri può recare rischi per la
sicurezza e la salute delle persone e danni economici.
•
Prima di usare il robot rasaerba assicurarsi sempre che nel prato non vi siano oggetti (giocattoli, rami, indumenti, ecc.).
•
Durante il funzionamento del robot, per evitare rischi alla sicurezza, assicurarsi che nell’area operativa non vi siano persone (in particolare
bambini, anziani o portatori di handicap) ed animali domestici. Per evitare tale rischio, si consiglia di programmare l’attività produttiva del
robot in orari adeguati.
•
Non permettere mai di sedersi sopra il robot.
•
Non sollevare mai il robot per ispezionare la lama durante il funzionamento.
•
Non introdurre le mani e i piedi sotto l’apparecchiatura quando è in moto, in particolare nella zona delle ruote.
•
Non manomettere, non eludere, non eliminare o bypassare i dispositivi di sicurezza installati.Il mancato rispetto di questo requisito può
recare rischi gravi per la sicurezza e la salute delle persone.
•
Effettuare tutte le operazioni di manutenzione previste dal costruttore. Una buona manutenzione consentirà di ottenere le migliori prestazioni
e una più lunga durata di esercizio.
•
Prima di eseguire gli interventi di manutenzione e regolazione che possono essere eseguiti anche dall’utilizzatore con un minimo di
competenza tecnica, scollegare l’alimentazione elettrica. Egli dovrà comunque predisporre tutte le condizioni di sicurezza necessarie, in
particolare quando si interviene nella parte inferiore del robot rasaerba, seguendo le procedure indicate dal costruttore.
•
Usare le protezioni individuali previste dal Costruttore, in particolare, quando si interviene nella lama di taglio usare i guanti di protezione.
•
Prima di sostituire le batterie smontare sempre la lama.
•
Assicurarsi che eventuali aperture di aereazione dell’alimentatore non siano ostruite da residui.
•
Per non danneggiare i componenti elettrici ed elettronici in modo irreversibile, non lavare il robot con getti d’acqua ad elevata pressione e
non immergerlo, parzialmente o completamente, in acqua in quanto non è a tenuta stagna.
•
Gli operatori, che effettuano interventi di riparazione durante l’arco di vita prevista del robot, devono possedere precise competenze
tecniche, particolari capacità ed esperienze acquisite e riconosciute nel settore specifi co. La mancanza di questi requisiti può causare danni
alla sicurezza e alla salute delle persone.
•
Tutti gli interventi che si devono eseguire nella base di ricarica, devono essere effettuati con la spina di alimentazione disinserita.
•
Sostituire i particolari troppo usurati utilizzando i ricambi originali per assicurare la funzionalità ed il livello di sicurezza previsto.
•
Il robot non può essere usato senza la copertura superiore. Se si presentano dei danneggiamenti meccanici alla stessa, questa deve essere
sostituita.
•
Qualsiasi intervento di manutenzione ordinaria o straordinaria (ad es. sostituzione batterie) deve essere eseguito dall’assistenza autorizzata.
•
La Casa Costruttrice declina qualunque responsabilità qualora si utilizzino ricambi non originali.
•
È assolutamente vietato l’uso e la ricarica del robot in ambienti esplosivi ed in ambienti infi ammabili.
4
Manuale d’uso
IT
DOTAZIONI DI SICUREZZA
1. Paraurti
In caso di urto con un oggetto solido di altezza superiore a 10 cm (3.94 ") il sensore urto è attivato, il robot blocca il movimento in quella direzione
e torna indietro evitando l’ostacolo.
2. Inclinometro
Nel caso in cui il robot lavori in un piano inclinato oltre le specifi che tecniche, o nel caso in cui venga ribaltato, il robot arresta la lama di taglio.
3. Interruttore di arresto di emergenza
Posto sul pannello dei comandi con la scritta STOP di dimensioni maggiori rispetto agli altri comandi presenti sul tastierino. Premendo questo
pulsante durante il funzionamento, il robot rasaerba si fermerà subito e la lama si bloccherà in meno di 2 secondi.
4. Protezione per sovracorrente
Ognuno dei motori (lama e ruote) vengono monitorati continuamente durante il funzionamento in ogni situazione che può portare ad un
surriscaldamento. In caso si verifi chi una sovracorrente nel motore ruote il robot effettua dei tentativi nella direzione opposta. Se la sovracorrente
persiste il robot si ferma segnalando l’errore. Se la sovracorrente si presenta nel motore della lama di taglio vi sono due range di intervento. Se i
parametri rientrano nel primo range il robot effettuerà delle manovre per sgolfare la lama di taglio. Se la sovracorrente è sotto range di protezione
il robot si fermerà segnalando l’errore motore.
5. Sensore assenza di segnale
In caso di assenza del segnale sul cavo perimetrale il robot di arresta automaticamente.
6. Sensore manico
Il robot arresta la lama di taglio se viene sollevato impugnando il manico centralmente.
SEGNALI DI SICUREZZA
Attenzione! non pulire o lavare il
robot con getti d’acqua.
Leggere attentamente le istruzioni
per l’uso e comprenderne il
signifi cato prima di utilizzare il
robot.
Seguire scrupolosamente le
avvertenze e le norme di sicurezza
contenute nelle presenti istruzioni
per l’uso per garantire la sicurezza
e l’effi cienza del robot.
Tenere mani e piedi lontani dalla
lama di taglio. Non infi lare mai le
mani o i piedi sotto la scocca né
avvicinarle al robot in funzione.
Questo prodotto è protetto da
password. Salvare il codice in un
luogo sicuro.
Tenere i bambini, gli animali
domestici e le altre persone a
distanza di sicurezza quando il
robot è in funzione.
Questo prodotto è conforme alle
direttive CE vigenti.
5
Manuale d’uso
IT
INFORMAZIONI TECNICHE
DATI TECNICI
Descrizione
Modello
075BA0075DE0075EV0075EV1075EL0
Massima superfi cie raccomandata che può essere rasata
Robotm2 (sq ')400 ( 4304 )600 ( 6460 )
1200
( 12912 )
1600
( 17216 )
2200
( 23672 )
Caratteristiche
Dimensioni (B x A x P)mm ( ")575x282x438 ( 22,64 x 11,10 x 17,25 " )
(*) In base alle condizioni dell’erba e del manto erboso.
DESCRIZIONE GENERALE APPARECCHIATURA
L’apparecchiatura è un robot progettato e costruito per rasare
automaticamente l’erba di giardini e prati di abitazioni in qualunque ora
del giorno e della notte. E’ piccola, compatta, silenziosa, e facilmente
trasportabile.
In funzione delle diverse caratteristiche della superfi cie da rasare, il robot
può essere programmato in modo da lavorare su più aree: una principale e
più aree secondarie (In base alle specifi che dei diversi modelli).
In fase di esercizio, il robot effettua la rasatura dell’area delimitata dal fi lo
perimetrale.
Quando il robot rileva il fi lo perimetrale o incontra un ostacolo cambia
traiettoria in modo casuale e riparte nella nuova direzione.
In base al principio di funzionamento random, il robot effettua la rasatura
automatica e completa del prato delimitato (vedi fi gura).
Il robot è in grado di riconoscere la presenza di erba più alta e/o più
folta in una zona del giardino ed azionare automaticamente, se lo ritiene
necessario, il movimento a spirale per una perfetta rifi nitura di taglio del
prato. Il movimento a spirale può essere azionato anche dall’operatore
premendo il comando ENTER/MENU mentre il robot sta tagliando.
La superfi cie di prato che il robot può rasare dipende da una serie di fattori:
•
modello del robot e batterie installate
•
caratteristiche dell’area (perimetri irregolari, superfi cie non uniforme,
frazionamento dell’area, ecc.)
•
caratteristiche del prato (tipo e altezza dell’erba, umidità, ecc.)
•
condizioni della lama (con affi latura effi ciente, priva di residui e
incrostazioni, ecc)
FUNZIONAMENTO RANDOM
7
Manuale d’uso
IT
ORGANI PRINCIPALI
1.
Robot.
2. Tastiera comandi: serve per impostare e visualizzare le modalità di funzionamento del robot.
3. Sensore pioggia: rileva la pioggia e abilita il rientro del robot nella stazione di ricarica
4. Batteria : il robot viene fornito con una o più batterie al litio in base ai modelli.
5. Manico: serve per il sollevamento ed il trasporto del robot.
6. Lama di taglio : effettua la rasatura del prato già montata in alcuni modelli.
7. Matassa di fi lo perimetrale: cavo con uno speciale isolamento e con particolari caratteristiche per il trasporto del segnale necessario al
funzionamento del robot.
8. Chiodi : necessari per il fi ssaggio del fi lo perimetrale e della stazione di ricarica.
9. Cavo di alimentazione per l’alimentatore.
10. Alimentatore : alimenta in bassa tensione la stazione di ricarica.
11. Stazione di ricarica: serve per caricare o mantenere in carica il robot.
12. Trasmettitore: trasmette il segnale al fi lo perimetrale.
13. Manuale d’uso.
14. Chiave per la regolazione dell’altezza di taglio.
5
6
13
9
8
14
11
12
10
7
4
1
2
3
8
Manuale d’uso
IT
INSTALLAZIONE
IMBALLO E DISIMBALLO
L’apparecchiatura viene consegnata opportunamente imballata. In fase di disimballo, estrarla con cautela e controllare l’integrità dei componenti.
Importante
•
Conservare il materiale di imballo per utilizzi successivi.
PIANIFICAZIONE INSTALLAZIONE IMPIANTO
L’installazione del robot non comporta interventi di diffi cile esecuzione, ma richiede un minimo di pianifi cazione preliminare in modo da defi nire
la zona migliore per installare la stazione di ricarica, l’alimentatore e per tracciare il percorso del fi lo perimetrale.
•
La stazione di ricarica deve essere posizionata al bordo del prato
preferibilmente nella zona di dimensioni maggiori e dalla quale siano
facilmente raggiungibili eventuali altre zone di prato. L’area dove è
installata la stazione di ricarica è in seguito defi nita “Area Principale”.
Cautela - Avvertenza
Posizionare l’alimentatore in una zona non accessibile ai
bambini. Ad esempio ad un’altezza maggiore di 160 cm.
(63 ").
gruppo alimentatore
trasmettitore
filo perimetrale
stazione di ricarica
H. min. 160 cm
/ 63 "
Cautela - Avvertenza
Per poter effettuare l’allacciamento elettrico, è necessario che in prossimità della zona di installazione sia stata predisposta
una presa di corrente. Assicurarsi che l’allacciamento alla rete di alimentazione sia conforme alle leggi vigenti in materia.
Per operare in completa sicurezza l’impianto elettrico, a cui viene collegato l’alimentatore, deve essere munito di un
impianto di terra correttamente funzionante.
Importante
É consigliabile installare il gruppo in un armadio per componenti elettrici (da esterno o da interno), dotato di chiusura a
chiave e ben areato per mantenere un corretto ricircolo d’aria.
Cautela - Avvertenza
Fare in modo che l’accesso all’alimentatore sia consentito solo alle persone autorizzate.
•
Al termine di ogni ciclo di lavoro il robot deve poter trovare facilmente la stazione di ricarica, la quale sarà il punto di partenza per un nuovo
ciclo di lavoro e per il raggiungimento di eventuali altre zone di lavoro, in seguito defi nite “Aree Secondarie”.
•
Posizionare la stazione di ricarica rispettando le seguenti regole:
-
Zona pianeggiante.
-
Terreno compatto stabile ed in grado di garantire un buon drenaggio.
-
Preferibilmente nella zona di prato di dimensioni maggiori.
-
Accertarsi che gli eventuali irrigatori non dirigano il getto d’acqua all’interno della stazione di ricarica.
-
Il lato di ingresso della stazione di ricarica deve essere posizionato come in fi gura per permettere al robot di rientrarvi seguendo il fi lo
perimetrale in senso orario.
-
Prima della base ci devono essere 400 cm (157,48 ") rettilinei.
•
La stazione di ricarica deve essere ben fi ssata a terra. Evitare che di fronte alla base si formi uno scalino di ingresso eventualmente
posizionando al suo ingresso un piccolo tappetino di fi nta erba per compensare lo scalino di ingresso. In alternativa rimuovere parzialmente
il manto erboso ed installare la base a fi lo d’erba.
•
La stazione di ricarica è collegata all’alimentatore tramite un cordone che deve allontanarsi dalla stazione di ricarica dal lato esterno dell’area
di taglio.
9
Manuale d’uso
IT
•
Posizionare l’alimentatore rispettando le seguenti regole:
-
In una zona areata al riparo dagli agenti atmosferici e dalla luce
diretta del sole.
-
Preferibilmente all’interno dell’abitazione, di un garage o di un
rimessaggio.
-
Se posizionato all’esterno non deve essere esposto al sole diretto e
all’acqua: è quindi necessario proteggerlo all’interno di una scatola
ventilata. Non deve essere posizionato al contatto diretto con il
suolo o con ambienti umidi.
-
Posizionarlo all’esterno del prato e non all’interno.
-
Distendere il cordone in eccesso che dalla stazione di ricarica
raggiunge l’alimentatore. Non accorciare o allungare il cordone.
NONO
OKOK
NONO
•
Il tratto di fi lo in ingresso deve essere rettilineo e perpendicolarmente
allineato alla stazione di ricarica per almeno 200 cm (78,74 ") e il tratto
in uscita deve allontanarsi dalla stazione di ricarica come indicato in
fi gura; questo consente al robot di entrare correttamente.
gruppo alimentatore
stazione di ricarica
trasmettitore
H. min. 160 cm
/ 63 "
Distanza
min. 200 cm
/ 78,74 "
filo perimetrale
In caso di installazione del robot vicino ad un’area in cui è installato un
altro robot (uguale o di un diverso produttore) si dovrà effettuare, in fase
di installazione, una modifi ca al trasmettitore e ricevitore del robot in modo
che le frequenze dei due robot non si disturbino a vicenda.
DEFINIZIONE PERCORSO FILO PERIMETRALE
Prima di procedere all’installazione del fi lo perimetrale è necessario
controllare tutta la superfi cie del prato. Valutare eventuali modifi che da
apportare al manto erboso o accorgimenti da tenere durante la posa del
fi lo perimetrale per il buon funzionamento del robot.
1. Valutare quale metodo di rientro alla stazione di ricarica è preferibile
utilizzare secondo le indicazioni descritte nel capitolo “METODO DI
RIENTRO ALLA STAZIONE DI RICARICA”.
2. Valutare dove sia necessario posizionare una particolare posa
del fi lo perimetrale, secondo le indicazioni descritte nel capitolo
“PREDISPOSIZIONE DI RIENTRO VELOCE DEL ROBOT ALLA
STAZIONE DI RICARICA”.
3. Preparazione e delimitazione aree di lavoro.
4. Installazione fi lo perimetrale.
5. Installazione stazione di ricarica e alimentatore. In fase di posa del fi lo
perimetrale, rispettare il senso di installazione (orario) e di rotazione
attorno alle aiuole (antiorario). Come mostrato in fi gura.
24 v
traccia per posa filo perimetrale
10
Manuale d’uso
IT
METODO DI RIENTRO ALLA STAZIONE DI RICARICA
Il robot può rientrare in stazione di ricarica con due diversi metodi, in base
alla confi gurazione del menu utente sotto la voce “Impostazioni” - “Rientro
in Base”. Utilizzare il metodo “Sul fi lo” solo nei casi in cui vi siano molti
ostacoli interni al giardino e vicini al fi lo perimetrale (inferiore a 2Mt). In tutti
gli altri casi è preferibile utilizzare il metodo “V-METER” per un rientro alla
stazione di ricarica più veloce.
“Sul fi lo”. Questo metodo di rientro alla stazione di ricarica indica al robot
di seguire il fi lo perimetrale, posizionando le ruote a cavallo del fi lo stesso.
Se attivato questo metodo non è necessario predisporre il (“Richiamo sul
fi lo”) cosi come viene descritto in seguito.
“V-METER”. Impostando questo metodo di rientro alla stazione di ricarica,
il robot costeggerà il filo perimetrale ad una distanza indicativa che va da
alcuni cm ad 1Mt (3.2 '), andando di tanto in tanto a toccarlo soprattutto nei
tratti non rettilinei, fino a che non riconosce il “Richiamo sul fi lo” necessario
per direzionare correttamente il robot in stazione di ricarica o a guidarlo nel
percorrere dei tratti stretti. Una volta riconosciuto il (“Richiamo sul fi lo”),
il robot seguirà il fi lo perimetrale posizionando le ruote a cavallo del fi lo
stesso per circa 10 Mt. (33 ').
4-10 mt.
4-10 mt.
2 mt.
passaggio
inferiore a 2 mt.
5 cm.
2 mt.
Il “Richiamo sul fi lo” indica al robot non solo che siamo in prossimità della stazione di ricarica, ma anche di un passaggio stretto o di una freccia
per il rientro veloce alla stazione di ricarica.
Appena viene riconosciuto un “Richiamo”, il robot seguirà il fi lo perimetrale a bassa velocità e con maggior precisione per circa 10 Mt. (33 ') , per
poi tornare alla modalità di rientro in base “V-Meter” se non incontra la stazione di ricarica o il rientro veloce.
Attenersi alle seguenti regole per l’installazione del “Richiamo”.
•
Il “Richiamo” è un spezzone di fi lo che si estende nel giardino per 2 Mt (6,6 ') e con una distanza fra fi lo e fi lo di 5 cm. (1,96 ")
•
Il “Richiamo” deve essere posizionato nel tratto precedente la stazione di ricarica tra i 4 ed i 10 Mt. (13,2 - 33 ").
•
Il “Richiamo” deve essere posizionato nel tratto precedente i passaggi stretti inferiori ad i 2 Mt. (6,6 ').
•
Il “Richiamo” deve essere posizionato nel tratto precedente dei “Rientri Veloci”.
NB: Se il robot non riesce ad incontrare la stazione di ricarica entro un certo lasso di tempo, seguirà il fi lo perimetrale in modalità “Sul
fi lo”.
PREDISPOSIZIONE DI RIENTRO VELOCE DEL ROBOT ALLA STAZIONE DI RICARICA
Il rientro veloce è una particolare posa del fi lo perimetrale che permette al robot di ridurre il tragitto di rientro alla stazione di ricarica. Utilizzare
questa particolare posa del fi lo perimetrale solo nei giardini dove il rientro veloce porta una effettiva riduzione del tragitto e con una lunghezza
di perimetro indicativamente maggiore di 200mt.
Per installare il rientro veloce, posizionare il fi lo perimetrale sul terreno in modo da formare un triangolo con un lato di 50 cm (19,7 ") ed i due lati
di fi lo perimetrale di 40 cm (15,75 ") ciascuno come indicato in fi gura.
Il robot mentre rientra alla stazione di ricarica con le ruote a cavallo del fi lo stesso, quando intercetta questa particolare forma a triangolo,
interrompe la marcia, si gira indicativamente di 90° verso l’interno del giardino e riprende la marcia nella nuova direzione fi no a che non incontra
il fi lo perimetrale nel lato opposto.
Effettuare la predisposizione di rientro veloce in un punto che sia preceduto da almeno 200 cm (78,74 ") di fi lo rettilineo e sia seguito da almeno
150 cm (59,05 ") di fi lo rettilineo.
La predisposizione non deve essere effettuata lungo il tratto rettilineo che precede immediatamente la stazione di ricarica o in vicinanza di
ostacoli. Controllare che lungo la traiettoria di rientro veloce non vi siano ostacoli che possano impedire il rientro veloce.
Importante
La predisposizione di rientro veloce posizionata in un punto non corretto potrebbe non consentire al robot di rientrare
velocemente alla stazione di ricarica. Quando il robot percorre il perimetro per raggiungere un’area secondaria non rileva
la predisposizione di rientro veloce.
11
Manuale d’uso
IT
L’illustrazione fornisce alcune indicazioni utili per installare correttamente
la predisposizione di rientro veloce.
4040
50
4-10 mt.min. 150 cm.
(59,05 ")
4-10 mt.
4-10 mt.
2 mt.
passaggio
inferiore a 2 mt.
5 cm.
2 mt.
PREPARAZIONE E DELIMITAZIONE AREE DI LAVORO
Preparazione del prato da rasare
1. Verifi care che il prato da rasare sia uniforme e privo di buche, sassi
o altri ostacoli. In caso contrario effettuare le necessarie operazioni
di bonifi ca. Qualora non sia possibile eliminare alcuni ostacoli, è
necessario delimitare con il fi lo perimetrale le zone interessate in modo
adeguato.
2. Verifi care che tutte le zone del prato non superino le pendenze
ammissibili (vedi “Dati tecnici”). Durante la fase lavorativa in aree
inclinate, quando il robot rileva il fi lo le ruote potrebbero slittare e farlo
uscire dall’area perimetrale.
Importante
Le zone che presentano pendenze superiori a quelle
ammissibili non possono essere rasate con il robot.
Posizionare quindi il fi lo perimetrale prima della pendenza
escludendo dal taglio quella zona di prato.
NO
35 cm
(13,78 ")
21-35%
21-35%
0-20%
100 cm (39,3 ")
35 cm
(13,78 ")
35 %
0-35%
0-20%
0-20%
OK
NO
NO
OK
filo perimetrale
OK
OK
filo perimetrale
12
Manuale d’uso
IT
Delimitazione area di lavoro
3. Controllare tutta la superfi cie del prato e valutare se è necessario
suddividerla in più aree di lavoro separate secondo i criteri descritti
successivamente. Prima di iniziare le operazioni di installazione del
fi lo perimetrale, per renderle agevoli e di facile esecuzione, si consiglia
di controllare tutto il percorso. L’illustrazione raffi gura un esempio di
prato con la traccia per la posa del fi lo perimetrale.
Durante l’installazione dell’impianto è necessario identifi care
eventuali aree secondarie ed eventuali aree chiuse. Con area
secondaria si identifi ca una parte di prato collegata al prato principale
con una strettoia diffi cilmente raggiungibile tramite il movimento
casuale da parte del robot. L’area deve essere raggiungibile senza
scalini e dislivelli oltre le caratteristiche ammesse. Se la zona è
da defi nirsi “area Secondaria” dipende anche dalla dimensione
dell’area primaria. Più grande è l’area primaria e più diffi cilmente
saranno raggiungibili passaggi stretti. Più in generale un passaggio
inferiore ad i 200 cm (78,74 ") è da considerarsi area secondaria.
Il robot gestisce un numero di aree secondarie in base alle
caratteristiche del modello (“Vedi Dati Tecnici”).
Il passaggio minimo ammesso è di 70 cm (27,56 ") da fi lo a fi lo
perimetrale. Il fi lo perimetrale deve essere posizionato ad una
distanza, che verrà in seguito indicata, da eventuali oggetti esterni
al prato, quindi, più in generale, in totale il passaggio che dobbiamo
avere a disposizione deve essere di 140 cm (55,12 ").
Nel caso in cui questo passaggio sia molto lungo e’ preferibile che la
larghezza sia maggiore di 70 cm (27,56”).
Durante la programmazione è necessario confi gurare le dimensioni
delle aree secondarie in percentuale rispetto al prato e la direzione
per raggiungerle più velocemente (Orario / Antiorario) oltre ad i metri
necessari di fi lo per arrivare nell’area secondaria. Vedi “ Modalità di
programmazione “.
24 v
traccia per posa filo perimetrale
min. 70 cm / 27,56 "min. 70 cm / 27,56 "
min. 70 cm / 27,56 "
Nel caso in cui i requisiti minimi sopra descritti non vengano rispettati
e quindi, una zona separata da uno scalino, da un dislivello oltre le
caratteristiche del robot o da un passaggio (corridoio) di larghezza
inferiore a 70 cm (27,56 ") da fi lo a fi lo perimetrale, la zona di prato
è da considerarsi “Area Chiusa”. Per installare una “Area Chiusa”
posare l’andata ed il ritorno del fi lo perimetrale nello stesso tracciato
ad una distanza inferiore ad 1 cm (0,40 "). In questo caso il robot non
è in grado di raggiungere l’area autonomamente, andrà gestita come
descritto nel capitolo “Gestione Aree Chiuse”. La gestione delle “Aree
Chiuse” riduce i metri quadri gestibili dal robot autonomamente.
corridoio di passaggio
minimo 70 cm / 27,56 " da filo a filo.
AREA PRINCIPALE
AREA SECONDARIA
corridoio di passaggio
< 70 cm / 27,56 "
AREA PRINCIPALE
AREA CHIUSA
13
Manuale d’uso
IT
4. Se all’interno o all’esterno dell’area di lavoro è presente una pavimentazione o un vialetto che si trova allo stesso livello del prato, sistemare
il fi lo perimetrale a 5 cm (1,96 ") dal bordo della pavimentazione. Il robot uscirà leggermente dal prato e tutta l’erba sarà rasata. Se la
pavimentazione è di tipo metallico o se è presente un tombino metallico, un piano doccia o dei cavi elettrici , sistemare il fi lo perimetrale ad
almeno 30 cm (11,81 ") per evitare malfunzionamenti del robot e disturbi sul fi lo perimetrale.
Importante
L’illustrazione raffi gura un esempio di elementi interni e periferici all’area di lavoro e le distanze che devono essere rispettate
per la posa del fi lo perimetrale. Delimitare tutti gli elementi in ferro o altro metallo (tombini, connessioni elettriche, ecc.) per
evitare interferenze al segnale del fi lo perimetrale.
5 cm
1,97 “
30 cm
11,81 “
30 cm
11,81 “
30 cm
11,81 “
Se all’interno o all’esterno dell’area di lavoro è presente un ostacolo , ad esempio un cordolo una parete o un muretto, sistemare il fi lo perimetrale
ad almeno 35 cm (13,78 ") dall’ostacolo. Aumentare ad almeno 40 cm (15,75 ") la distanza tra fi lo perimetrale ed ostacolo se si desidera evitare
che il robot urti l’ostacolo. Il taglio di eventuale erba a ridosso del bordo in cui si è deciso di non far operare il robot potrà essere rifi nita con un
tagliabordi o un decespugliatore.
35 cm.
/13,78 "
35 cm.
/13,78 "
35 cm.
/13,78 "
35 cm.
/13,78 "
Se all’interno o all’esterno dell’area di lavoro è presente un’aiuola, una siepe, una pianta con radici sporgenti, un piccolo fossetto di 2-3 cm o
un piccolo cordolo di 2-3 cm, sistemare il fi lo perimetrale ad almeno 30 cm (11,81 ") per evitare che il robot danneggi o venga danneggiato dagli
ostacoli presenti. Il taglio di eventuale erba presente nell’area in cui si è deciso di non far operare il robot potrà essere rifi nita con un tagliabordi
o un decespugliatore.
30 cm.
/11,81”
30 cm.
/11,81”
30 cm.
/11,81”
30 cm.
/11,81”
30 cm.
/11,81”
radici sporgenti
30 cm.
/ 11,81 “
30 cm.
/ 11,81 “
14
Manuale d’uso
IT
Se all’interno o all’esterno dell’area di lavoro è presente una piscina, laghetto, dirupo, fosso, gradino a scendere, o strade pubbliche non
protette da un muretto sistemare il fi lo perimetrale ad almeno 90 cm (35,43 "). Per ridurre la distanza del fi lo perimetrale al fi ne di una ottimale
installazione ed operatività del robot, consigliamo in questo caso l’installazione di una recinzione supplementare di almeno 15 cm; questo
consentirà di posare il fi lo perimetrale alle distanze regolari descritte nei punti precedenti.
Importante
Il rigoroso rispetto delle distanze e delle pendenze specifi cate nel libretto garantisce un’installazione ottimale ed un buon
funzionamento del robot. In presenza di pendenze o terreni scivolosi aumentare la distanza di almeno 30 cm. / 11,81 ".
90 cm.
/ 35,44 “
90 cm.
/ 35,44 “
90 cm.
/ 35,44 “
Se all’interno dell’area di lavoro sono presenti ostacoli che resistano agli urti, ad esempio alberi, cespugli o pali che non presentino angoli vivi, non
occorre delimitarli. Il robot urta l’ostacolo e cambia direzione. Se si preferisce che il robot non urti contro gli ostacoli e per il suo funzionamento
sicuro e silenzioso, è consigliabile delimitare tutti gli ostacoli fi ssi. Gli ostacoli leggermente inclinati come vasi dei fi ori, pietre o alberi con radici
sporgenti devono essere delimitati al fi ne di evitare eventuali danneggiamenti alla lama di taglio e agli ostacoli stessi.
Per delimitare l’ostacolo, partendo dal punto del perimetro esterno più vicino all’oggetto da delimitare, sistemare il fi lo perimetrale fi no all’ostacolo,
aggirarlo, rispettando le regolari distanze descritte nei punti precedenti, e riportare il cavo lungo il percorso precedente. Sistemare il fi lo di andata
e ritorno sovrapposto sotto lo stesso chiodo, in questo caso il robot oltrepasserà il fi lo perimetrale.
Per il corretto funzionamento del robot la lunghezza minima del fi lo perimetrale sovrapposto deve essere di 70 cm (27,56 ") per permette al
robot di muoversi regolarmente.
NO
min. 70 cm
/ 27,56 ”
min. 70 cm
/ 27,56 ”
< 70 cm
/ 27,56 ”
< 70 cm
/ 27,56 ”
0 cm / 0 ”0 cm / 0 ”
pianta
palo
OKOK
INSTALLAZIONE FILO PERIMETRALE
Il fi lo perimetrale può essere interrato o posato sul terreno. Nel caso in cui
di disponga di un macchinario per la posa del fi lo è preferibile interrarlo
in quanto garantisce una maggior protezione del fi lo stesso. Altrimenti è
necessario posare il fi lo sul terreno con gli appositi chiodi come descritto
in seguito.
Importante
Iniziare la posa del fi lo perimetrale dalla zona di
installazione della stazione di ricarica e lasciarne un paio
di metri in abbondanza per poi tagliarlo a misura nella
fase fi nale di allacciamento al gruppo.
Max.
5 cm (1,96 ")
filo perimetrale
15
Manuale d’uso
IT
Filo posato sul terreno
Tagliare l’erba molto bassa con un tagliabordi o un decespugliatore lungo
tutto il percorso in cui verrà posato il cavo. Sarà cosi più facile sistemare il
cavo a contatto con il terreno ed evitare che venga interrotto dalla lama di
taglio per poi essere giuntato come descritto in seguito.
1. Posizionare il fi lo, in senso orario, lungo tutto il percorso e fi ssarlo con
gli appositi chiodi forniti in dotazione (distanza tra i chiodi 100÷200 cm
(39,37÷78,74 ")).
-
In fase di posa del fi lo perimetrale, rispettare il senso di rotazione
attorno alle aiuole che dovrà essere antiorario.
-
Nei tratti rettilinei fi ssare il fi lo in modo che sia teso e che rimanga
aderente al terreno.
-
Nei tratti non rettilinei, fi ssare il fi lo in modo che non si attorcigli ma
che assuma una curvatura regolare (raggio 20 cm).
NO
chiodi fissaggio filofilo perimetrale
Filo interrato
1. Scavare il terreno in modo regolare e simmetrico rispetto alla linea
della traccia evidenziata sul terreno.
2. Posizionare il fi lo, in senso orario, lungo tutto il percorso alla profondità
di qualche centimetro (circa 2÷3 cm (0.7874÷ 1.1811 "). Non interrare il
fi lo oltre 5 cm per non ridurre la qualità e l’intensità del segnale captato
dal robot.
3. Durante la posa del fi lo, se necessario, bloccarlo in alcuni punti con gli
appositi chiodi per mantenerlo in posizione durante la fase di copertura
con il terreno.
4. Ricoprire tutto il fi lo con il terreno e fare in modo che rimanga teso nel
terreno.
AREA PRINCIPALE
AREA CHIUSA
corridoio di passaggio
< 70 cm (27,56 ")
35 cm
(13,78 ")
Max 1 cm
(0,40 ")
NO
Giunzione fi lo perimetrale.
Importante
Sia in caso di fi lo interrato che di fi lo posato sul terreno,
qualora sia necessario, giuntarlo con dell’altro fi lo di
caratteristiche identiche in modo adeguato (vedi fi gura).
Nella fase di giunzione si raccomanda di utilizzare nastro
di tipo autoagglomerante (ad esempio: 3M Scotch 23). Non
usare nastro isolante o giunzioni di altro tipo (capicorda,
morsetti, ecc.).
1
34
2
16
Manuale d’uso
IT
INSTALLAZIONE STAZIONE DI RICARICA E ALIMENTATORE
Cautela - Avvertenza
Prima di eseguire qualsiasi intervento disattivare
l’alimentazione elettrica generale.
Posizionare l’alimentatore in una zona non accessibile ai
bambini. Ad esempio ad un’altezza maggiore di 160 cm.
(63.00 ").
alimentatore di corrente(A)
trasmettitore(B)
H. min. 160 cm
(63.00 ")
protezione(L)
1. Installare l’alimentatore (A).
2. Smontare la protezione (L).
3. Posizionare la base nella zona predefi nita.
4. Inserire il fi lo perimetrale (M) sotto alla base.
5. Collegare le due estremità del fi lo ai morsetti della base.
morsetto rosso
morsetto nero
lo perimetrale (M)
6. Fissare la base (N) al terreno con i chiodi (P). Se necessario, fi ssare la
base con i tasselli ad espansione (Q).
chiodi (P)
tasselli ad
espansione (Q)
stazione di ricarica (N)
7. Collegare il cavo di alimentazione (E) della stazione di ricarica (N)
all’alimentatore (A).
8. Collegare la spina dell’alimentatore (A) alla presa elettrica.
9. Se il led del trasmettitore lampeggia, il collegamento è corretto. In caso
contrario, è necessario identifi care l’anomalia (vedi “Ricerca guasti”).
10. Montare la protezione (L).
alimentatore
di corrente (A)
cavo
alimentazione (E)
lo
perimetrale
stazione di
ricarica (N)
trasmettitore (B)
H. min. 160 cm
(63.00 ")
protezione(L)
17
Manuale d’uso
IT
RICARICA BATTERIE AL PRIMO USO
1.
Inserire il robot all’interno della stazione di ricarica.
2. Premere il tasto ON.
3. Dopo alcuni secondi sul display compare il messaggio “IN CARICA”.
4. Premere il tasto “Start/Pause”. Sul display compare la funzione
“PAUSA”. Le batterie iniziano il ciclo di ricarica.
5. Al termine della ricarica è possibile programmare il robot per la messa
in esercizio (vedi “Modalità di programmazione”).
ENTER
TASTO “ON”
TASTO “START/PAUSE”
Importante
Le batterie, alla prima ricarica, devono rimanere collegate almeno 4 ore.
REGOLAZIONI
RACCOMANDAZIONI PER LE REGOLAZIONI
Importante
L’utilizzatore deve effettuare le regolazioni secondo le procedure descritte nel manuale. Non effettuare alcun tipo di
regolazione non espressamente indicata nel manuale. Eventuali regolazioni straordinarie, non espressamente indicate nel
manuale, devono essere effettuate solo dal personale dei Centri di Assistenza Autorizzati del Costruttore.
REGOLAZIONE ALTEZZA TAGLIO
Prima di impostare l’altezza di taglio della lama, assicurarsi che il robot sia arrestato in condizioni di sicurezza (vedi “Arresto in sicurezza del
robot”).
Importante
Usare guanti di protezione per evitare pericoli di taglio alle mani.
1. Nei modelli dotati di allarme antifurto disabilitarlo per evitare
l’attivazione. (Vedi “Modalità di programmazione”).
2. Capovolgere il robot e appoggiarlo in modo da non rovinare il cofano
di copertura.
3. Svitare la vite (C) e ruotare con l’apposita chiave la staffa (E) in senso
orario.
4. Sollevare o abbassare il gruppo taglio (D) per defi nire l’altezza di taglio
voluta. Il valore è rilevabile attraverso la scala graduata posizionata
sulla chiave in dotazione.
Importante
Non utilizzare il robot per rasare erba con un’altezza
superiore a 1 cm (0,40 ") rispetto alla lama di taglio.
Ridurre l’altezza di taglio in modo graduale. Si consiglia di
ridurre l’altezza meno di 1 cm (0,40 ") ogni 1÷2 giorni fi no
a raggiungere l’altezza ideale.
5. Al completamento della regolazione, ruotare in senso antiorario la
staffa (E) e serrare la vite (C).
6. Capovolgere il robot in posizione di esercizio.
(E)
gruppo di taglio (D)
vite (C)
18
Manuale d’uso
IT
USO E FUNZIONAMENTO
RACCOMANDAZIONI PER L’USO
Importante
-
Al primo uso del robot, si raccomanda di leggere attentamente tutto il manuale e di accertarsi di averlo compreso
completamente, in particolare di aver capito tutte le informazioni che riguardano la sicurezza.
-
Attuare solo gli usi previsti dal costruttore e non manomettere alcun dispositivo per ottenere prestazioni diverse da
quelle operative.
DESCRIZIONE COMANDI ROBOT
L’illustrazione raffi gura la posizione dei comandi a bordo macchina.
A. DISPLAY: è luminoso per visualizzare tutte le funzioni.
B. ON: premere per accendere il rasaerba.
C. OFF/STOP: premere per arrestare il rasaerba; il display si spegne.
D. START/PAUSE: premere per arrestare il rasaerba, lasciando il display
in “attesa”; in questa modalità è possibile programmare il rasaerba.
Premendolo di nuovo riavvia il lavoro. Premendo il tasto mentre il
rasaerba è in carica, il rasaerba non riprende il lavoro fi ntanto che non
viene premuto nuovamente e scompare “Pause” dal display.
E. CHARGE: premere per far ritornare il rasaerba alla base e anticipare
così la ricarica delle batterie. Se viene premuto mentre il rasaerba è in
ricarica, il rasaerba interrompe la ricarica e riprende il lavoro.
F. TASTO “+”: durante il funzionamento premere per far ripartire la lama precedentemente arrestata. Durante la programmazione premere per
incrementare le voci che il menù propone.
G. ENTER/MENU: durante il funzionamento premere per avviare la funzione spirale. Durante la programmazione premere per confermare e
memorizzare la selezione eseguita.
H. TASTO “-”: durante il funzionamento premere per arrestare la lama. Durante la programmazione premere per decrementare le voci che il
menù propone.
I. STOP: Premere per arrestare il rasaerba in sicurezza. Utilizzare solo in caso di pericolo immediato e per eseguire le operazioni di
manutenzione del robot.
ACCESSO AI MENÙ
Le funzioni del robot possono essere programmate tramite le diverse funzioni di ogni menù. La tabella riporta la lista dei menù disponibili con
le relative funzioni.
Per effettuare la programmazione, procedere nel modo indicato.
1. Sollevare la protezione e premere il tasto “ON”.
2. Inserire la password (se richiesta) (vedi “Inserimento password”).
3. Se il robot viene acceso all’interno della base di ricarica, dopo alcuni secondi, sul display compare il messaggio “IN CARICA”, premere
quindi il tasto “Start/Pause”.
4. Sul display compare la scritta “PAUSA”.
5. Premere il tasto “ENTER/MENU”. Si entra in programmazione menù utente e sul display compare la funzione “IMPOSTAZIONI”.
NAVIGAZIONE
Nel menù utente di programmazione seguire le seguenti istruzioni per la vostra navigazione:
- “+” e “-”: Scorre le voci di menu in modo ciclico o permette di cambiare il valore della funzione mostrata nel display.
- “ENTER/MENU”: Passa al livello di menu successivo o conferma e memorizza il valore mostrato nel display e scorre alla funzione successiva.
- “START/PAUSE”: Passa al livello di menu precedente fi no ad uscire dalla programmazione.
- “OFF/STOP”: Spenge il robot senza confermare l’ultima funzione mostrata nel display.
Il menu è strutturato ad albero. Segue il riepilogo introduttivo alle funzioni di programmazione disponibili; la spiegazione dettagliata di ciascuna
funzione è rimandata alle pagine successive al diagramma di fl usso.
Alcune funzioni non sono disponibili su tutti i modelli. Vedi la tabella dei “Dati Tecnici”.
19
Manuale d’uso
IT
Impostazioni
Orari di lavoro
Abilita
Disabilita
Abilita
Disabilita
Abilita
Disabilita
Sul fi lo
V-Meter
Allarme
Settimana
Autoprogrammazione
Orario Lavoro 2
Suono
Rientro in Base
Data
Ora
Abilita o Disabilita l’allarme sonoro
Regola quali giorni sono lavorativi e quali di riposo
Abilita o Disabilita il riconoscimento del prato
rasato
Determina la seconda fascia oraria entro la quale il robot è abilitato al lavoro
Permette disabilitare il suono quando il robot è
in stazione di ricarica
Permette di decidere il metodo di rientro in
stazione di ricarica
Confi gura la data
Confi gura l’ora
Riavvio
Pausa
Disabilitato
Nessuno
Abbina bluetooth
Abbina radio
Sensore Pioggia
Orario Lavoro 1
Telecomando
Determina il comportamento in caso di pioggia
Determina la prima fascia oraria entro la quale il robot è abilitato al lavoro
Confi gura il Telecomando per guidare il robot
Aree secondarie
Sicurezza
Area second. 1
Cambia password
Area second. 3
Blocco tastiera
Determina la confi gurazione dell’eventuale area
secondaria 1 indicando la dimensione dell’area,
la distanza dalla stazione di ricarica e la direzione
per raggiungerla
Permette di impostare la password
Determina la confi gurazione dell’eventuale area
secondaria 3
Se abilitato richiede la password per accedere
alle funzioni del robot.
Percentuale
Distanza
Direzione
Area second. 2
Password in avvio
Determina la confi gurazione dell’eventuale area
secondaria 2
Determina se richiedere la password
all’accensione del robot
Abilita
Abilita
Disabilita
Disabilita
20
Manuale d’uso
IT
Modo d’uso
Opzioni lingua
Automatico
Lingua
Senza perimetro
Formato Ora
Formato Distanza
Imposta l’uso in automatico del robot
Impostazione lingua del menu utente
Imposta il funzionamento senza il
riconoscimento del fi lo perimetrale.
ATTENZIONE ! Leggere attentamente il manuale
prima di usare questa funzione
Imposta il formato d’inserimento dell’ora
Imposta il formato d’inserimento della distanza
nella gestione delle aree secondarie
Tempo
Area chiusa
Formato Data
Imposta un ciclo di lavoro in un’area chiusa non
dotata di stazione di ricarica
Imposta il formato d’inserimento della data
GG/MM/AA
24H
Metri
MM/GG/AA
12H
Piedi
IMPOSTAZIONI - MODALITÀ DI PROGRAMMAZIONE
ALLARME: (solo per alcune versioni, vedi “Dati tecnici”) funzione per abilitare e disabilitare
l’allarme antifurto. In fase di disattivazione viene richiesta la password del robot (Default di
fabbrica 0000).
•
Disabilita: serve per disattivare o spegnere l’allarme in caso di attivazione. Un suono
continuo e discendente segnala l’avvenuta disattivazione.
•
Abilita: serve per attivare l’allarme. Se il robot viene sollevato con la maniglia, si attiva
l’allarme. Un triplo suono segnala l’avvenuta attivazione.
SENSORE PIOGGIA: Funzione per impostare il robot in caso di pioggia.
•
Riavvio: in caso di pioggia il robot ritorna alla stazione e vi rimane in modalità “ricarica”.
Terminato il ciclo di ricarica il robot riparte e riprende a rasare solo se ha smesso di
piovere.
•
Disabilitato: in caso di pioggia il robot continua a rasare.
•
Pausa: in caso di pioggia il robot ritorna alla stazione e vi rimane (in modalità “ricarica”)
fi no a quando non viene premuto il tasto “Pause”.
AUTOPROGRAMM.: (solo per alcune versioni, vedi “Dati tecnici”) funzione per ridurre
automaticamente il tempo di rasatura del robot in base alla condizioni del prato.
•
Abilita: Il robot riduce il tempo di lavoro in base alle condizioni dell’erba. Quando la
superfi cie del prato risulta rasata, la macchina imposta automaticamente un intervallo di
riposo che ritarda le successive uscite dalla base di ricarica. Il lavoro del robot avverrà
comunque all’interno delle ore di lavoro impostate.
•
Disabilita: Il robot lavorerà rispettando l’orario impostato e fi no a quando le batterie lo
permettono.
ENTER
ALLARME:
21
Manuale d’uso
IT
TELECOMANDO: (solo per alcune versioni, vedi “Dati tecnici”).
Vedi le istruzioni sul telecomando / consolle per la procedura di abbinamento.
SUONO: Permette di disabilitare le informazioni sonore quando il robot è nella stazione di
ricarica.
RIENTRO IN BASE: Permette di decidere il metodo di rientro in stazione di ricarica.
1. “Sul Filo”. Il robot rientra in stazione di ricarica posizionando le ruote a cavallo del fi lo
perimetrale.
2. “V-METER”. Il robot costeggerà il filo perimetrale ad una distanza indicativa che va da
alcuni cm ad 1Mt (3.2 '), andando di tanto in tanto a toccarlo soprattutto nei tratti non
rettilinei, fi no a che non riconosce il “Richiamo” alla stazione di ricarica. Vedi capitolo
“Installazione”.
DATA: Funzione per impostare la data.
ORA: Funzione per impostare l’ora solare o legale.
ENTER
DATA GG/MM/AA
LUN 00 / 00 / 00
ORARI DI LAVORO – MODALITÀ DI PROGRAMMAZIONE
SETTIMANA: funzione per programmare i giorni di esercizio del robot durante la settimana.
Il cursore si posiziona automaticamente sotto la lettera “L” (Lunedì).
Impostando tutti i giorni ad “1111111” signifi ca che il robot lavora tutti i giorni. Impostando
“0000000” signifi ca che il robot non lavora nessun giorno della settimana.
-
Valore 1 : Giorno di lavoro del Robot.
-
Valore 0 : Giorno di riposo del Robot.
Importante
Per sfruttare al meglio le potenzialità si consiglia di programmare il robot
per lavorare tutti i giorni.
ENTER
SETTIM LMMGVSD
LUN 1111111
ORARIO LAVORO 1: Funzione per impostare la prima fascia oraria di esercizio del robot
durante la giornata.
Il cursore si posiziona automaticamente nella zona sotto alla prima fascia oraria (esempio
dalle 10:00 alle 13:00). Impostare l’orario di inizio lavoro e di fi ne lavoro.
Impostando l’orario a “00:00 – 00:00” equivale a non far lavorare il robot durante l’orario di
lavoro 1. Nel caso in cui l’orario inserito sia errato come ad esempio se l’orario si sovrappone
all’orario di lavoro 2 o se l’ora di inizio è successiva all’ora di fi ne, il robot emette un suono
e resetta il valore impostato.
ORARIO LAVORO 2: Funzione per impostare la seconda fascia oraria di esercizio del robot
durante la giornata.
Importante
Nel caso sia necessario impostare le aree secondarie è preferibile
utilizzare nella programmazione entrambi gli orari di lavoro per aumentare
la frequenza di rasatura delle zone.
ENTER
ORARIO DI LAVORO
00 : 00 - 00 : 00
L’impostazione dell’orario di lavoro del robot è fondamentale per il buon funzionamento del prodotto. Molti parametri infl uenzano la confi gurazione
dell’orario di lavoro come ad esempio il numero di aree secondarie, il numero e la potenza di batterie del robot , la complessità del prato, il tipo
di erba etc. etc. In linea generale è necessario aumentare leggermente le ore di lavoro nel caso di giardini con aree secondarie, giardini con
molti ostacoli e nel caso di aree complesse. Segue una tabella indicativa da poter utilizzare per una prima confi gurazione. NB. Impostare i giorni
della settimana tutti ad “1”-“Giorni Operativi”.
Modellom² (ft²)Orario 1Orario 2
075BA0150 (1615)11:00 11:4015:00 15:30
075BA0300 (3230)11:00 17:00
075BA0400 (4304)11:00 19:00
075DE0150 (1615)11:00 11:40
075DE0300 (3230)11:00 11:4015:00 15:40
075DE0400 (4304)10:00 16:00
22
Manuale d’uso
IT
075DE0600 (6460)10:00 19:00
075EV0400 (4304)10:00 11:30
075EV0800 (8608)10:00 11:3015:00 16:30
075EV01200 (12912)09:00 21:00
075EV1400 (4304)10:00 11:30
075EV1800 (8608)10:00 11:3015:00 16:30
075EV11200 (12912)10:00 12:0015:00 17:00
075EV11600 (17216)09:00 20:00
075EL0400 (4304)10:00 11:30
075EL0800 (8608)10:00 11:3015:00 16:30
075EL01200 (12912)10:00 12:0015:00 17:00
075EL01800 (19368)09:00 20:00
075EL02200 (23672)08:00 22:00
AREE SECONDARIE - MODALITÀ DI PROGRAMMAZIONE
Se l’area da rasare prevede delle aree secondarie in base alla defi nizione data nel capitolo “Preparazione e Delimitazione Aree di Lavoro”
è necessario procedere alla programmazione delle aree secondarie per indicare al robot come raggiungere l’area secondaria e con quale
frequenza.
AREA SECONDARIA : Funzione per defi nire la rasatura automatica di un’area secondaria.
-
Percentuale: permette di impostare la dimensione dell’area secondaria
da rasare rispetto a tutta la superfi cie del prato. Segue una tabella da
prendere come riferimento per la confi gurazione.
•
20% Indica una zona molto piccola.
•
30% Indica una zona circa ¹/3 di tutto il giardino.
•
50% Indica una zona circa la metà di tutto il giardino.
•
80% Indica una zona secondaria più grande dell’area primaria.
•
100%. Il robot tutte le volte che esce dalla base di ricarica, seguirà
il fi lo perimetrale per rasare nell’area secondaria.
area principale
direzione orariadirezione antioraria
area secondaria 1
(30%, 60MT, Orario)
area secondaria 2
(20%, 30MT, Antiorario)
-
Distanza: Permette di impostare la distanza necessaria al robot per raggiungere l’interno dell’area secondaria seguendo il fi lo perimetrale.
E’ preferibile prendere come riferimento a metà area secondaria per avere la certezza che il robot inizi il suo lavoro all’interno di quella zona.
-
Direzione: Indica la direzione di marcia più breve per raggiungere l’area secondaria. La direzione può essere Oraria o Antioraria. Il robot
uscito dalla base di ricarica seguirà il fi lo nella direzione indicata per raggiungere la zona secondaria.
AREA SECONDARIA 2: Funzione per defi nire la rasatura automatica dell’area secondaria numero 2. L’impostazione prevede gli stessi parametri
di confi gurazione dell’area secondaria 1.
AREA SECONDARIA 3: (solo per alcune versioni, vedi “Dati tecnici”) Funzione per defi nire la rasatura automatica dell’area secondaria numero
3. L’impostazione prevede gli stessi parametri di confi gurazione dell’area secondaria 1.
SICUREZZA - MODALITÀ DI PROGRAMMAZIONE
CAMBIA PASSWORD: funzione per impostare o modifi care la password.
-
No: serve per non effettuare nessun cambiamento della password precedentemente inserita.
-
Si: serve per inserire o cambiare la password che sarà utilizzata per accendere il robot e per disabilitare l’allarme. In ordine vengono chieste
le seguenti informazioni :
•
Password: Inserire la vecchia password (default del costruttore 0000).
•
Nuova password: Inserire la nuova password.
•
Ripeti passw.: Ripeti l’inserimento della nuova password.
23
Manuale d’uso
IT
Importante
Per impostare o modifi care la password è necessario prima inserire quella precedente e poi procedere all’inserimento
di quella personalizzata. All’atto dell’acquisto, la password inserita dal costruttore è composta da quattro numeri (0000).
Importante
All’atto dell’inserimento viene chiesta la ripetizione della procedura di inserimento password necessaria per avere
la certezza di averla impostata correttamente. Per evitare di dimenticare la password, si consiglia di scegliere una
combinazione di facile memorizzazione.
PASSW. IN AVVIO: Funzione per programmare o meno la richiesta di inserimento password ogni volta che il robot viene spento e riacceso dopo
un periodo di inattività (esempio rimessaggio per stagione invernale).
-
No: Il robot ad ogni accensione, si riavvia ed entra in funzione senza dover inserire la password. La password sarà necessaria solo per
disabilitare l’allarme. Per confermare il parametro il robot richiede la password.
-
Si: Il robot ad ogni accensione, non si riavvia e non entra in funzione fi no a quando non è stata inserita la password.
MODO D’USO - MODALITÀ DI PROGRAMMAZIONE
Funzione per impostare la modalità di funzionamento del robot. Quando il robot viene spento torna automaticamente in modalità “AUTOMATICO”.
•
Automatico: Modalità normale di funzionamento. Il robot riconosce il fi lo perimetrale e torna alla stazione di ricarica quando è necessario.
•
Area Chiusa: Modalità di funzionamento in aree chiuse non dotate di stazione di ricarica. Per il corretto uso vedi “USO DEL ROBOT IN
AREE CHIUSE NON DOTATE DI STAZIONE DI RICARICA.”
•
Senza perimetro: Modalità di funzionamento senza il riconoscimento del fi lo perimetrale. Usare in piccole aree delimitate interamente lungo
tutto il perimetro da un muro o da una staccionata di almeno 15cm senza il fi lo perimetrale installato, sotto sorveglianza del cliente e con il
controllo del telecomando.
OPZIONI LINGUA - MODALITÀ DI PROGRAMMAZIONE
LINGUA: funzione per selezionare la lingua di visualizzazione dei messaggi e del menu utente. Scorrere le varie opzioni con il tasto “+” o “-“ e
confermare con il tasto “Enter”.
•
FORMATO DATA
•
FORMATO ORA
•
FORMATO DISTANZA
Queste funzioni permettono di personalizzare l’impostazione del formato di data, ora e distanza.
MESSA IN SERVIZIO - MODALITA’ AUTOMATICA
L’avviamento del ciclo automatico va effettuato alla prima messa in esercizio oppure dopo un periodo di inattività.
1. Verifi care che il manto erboso del prato da rasare abbia un’altezza compatibile con il corretto funzionamento del robot (vedi caratteristiche
tecniche).
2. Regolare l’altezza di taglio desiderata (vedi regolazione altezza taglio).
3. Verifi care che l’area di lavoro sia stata correttamente delimitata e non presenti intralci al regolare funzionamento del robot come indicato
nella sezione “Preparazione e delimitazione aree di lavoro” e seguenti.
4. Posizionare il robot all’interno della stazione di ricarica.
5. Premere il tasto ON ed attendere alcuni secondi che il robot si accenda completamente.
6. Se il robot viene messo in esercizio per la prima volta, è necessario effettuare la programmazione. Se, invece, il robot viene messo in
esercizio dopo un periodo di inattività, è necessario verifi care che le funzioni programmate corrispondano all’effettivo stato dell’arte della
superfi cie da rasare (es. aggiunta di una piscina, di piante, ecc.) (vedi “Modalità di programmazione” ).
7. Dopo alcuni secondi, sul display compare il messaggio “IN CARICA”.
8. Il robot inizia a rasare il prato secondo le modalità programmate.
24
Manuale d’uso
IT
ARRESTO IN SICUREZZA DEL ROBOT
Durante l’uso del robot può essere necessario arrestare il robot. In condizioni normali il robot si arresta con il tasto “Off/Stop”. In caso di pericolo
o per effettuare la manutenzione è necessario arrestarlo in condizioni di sicurezza per evitare il pericolo di avviamento imprevisto della lama.
Premere il tasto “STOP” per arrestare il robot. Premere nuovamente il tasto “STOP” per ripristinare l’uso del robot.
Importante
L’arresto del robot in condizioni di sicurezza è necessario
per poter effettuare interventi di manutenzione e
riparazione (ad esempio: sostituzione e/o ricarica batterie,
sostituzione lama, operazioni di pulizia, ecc.).
ENTER
TASTO “STOP” (A)
RIENTRO AUTOMATICO ALLA STAZIONE DI RICARICA
Il robot termina il ciclo di lavoro quando si verifi cano le condizioni elencate.
-
Fine orario di lavoro: Al completamento dell’orario di lavoro, il robot rientra automaticamente alla stazione di ricarica e ritornerà a funzionare
secondo le modalità programmate (vedi “Modalità di programmazione”).
-
Pioggia: In caso di pioggia il robot rientra automaticamente alla stazione di ricarica e ritornerà a funzionare secondo le modalità programmate
(vedi “Modalità di programmazione”).
-
Batterie da ricaricare: Il robot rientra automaticamente alla stazione di ricarica.
-
Prato Rasato (solo per alcune versioni, vedi “Dati tecnici): Il sensore rileva il prato rasato, il robot rientra automaticamente alla stazione
di ricarica e ritornerà a funzionare secondo le modalità programmate (vedi “Modalità di programmazione”).
USO DEL ROBOT IN AREE CHIUSE NON DOTATE DI STAZIONE DI RICARICA
L’avviamento in modalità area chiusa del robot va effettuato per rasare
aree chiuse, delimitate da fi lo perimetrale e senza stazione di ricarica.
Cautela - Avvertenza
Trasportare il robot utilizzando l’apposita maniglia.
Evitare di impugnare il robot dalla scocca e usare sempre
l’apposita maniglia.
Posizionare il robot all’interno dell’area di lavoro ad almeno 100 cm (39,37 ")
di distanza dal fi lo perimetrale e da qualsiasi altro ostacolo.
min. 100 cm
(39,37 ")
min. 100 cm
(39,37 ")
25
Manuale d’uso
IT
1. Premere il tasto ON.
2. Inserire la password (se richiesta) (vedi “Inserimento password”).
3. Sul display compare la funzione “PAUSA”.
ENTER
PAUSA
4. Entrare in modalità di programmazione fi no a selezionare il menù “MODO D’USO”.
Doel van de handleiding..............................................................................................................................................................2
Identifi catie fabrikant en toestel...................................................................................................................................................2
Informatie in verband met de veiligheid. ...................................................................................................................................3
Verpakking en uitpakken. ............................................................................................................................................................8
Methode voor terugkeer naar het herlaadstation. .....................................................................................................................10
Predispositie snelle terugkeer van de robot naar het herlaadstation. .......................................................................................10
Voorbereiding en afgrenzing werkzones. ...................................................................................................................................11
Installatie herlaadstation en toevoereenheid.............................................................................................................................16
Batteriijen opladen bij het eerste gebruik. .................................................................................................................................17
Aanbevelingen voor de afstellingen. .........................................................................................................................................17
Gebruik en werking. ..................................................................................................................................................................18
Suggesties voor het gebruik......................................................................................................................................................18
Toegang tot de menu’s. .............................................................................................................................................................18
Secundaire zones - programmeringswijze. ...............................................................................................................................22
Opties taal - programmeringswijze............................................................................................................................................23
Veilig stoppen van de robot. ......................................................................................................................................................24
Automatische terugkeer naar het herlaadstation. .....................................................................................................................24
Gebruik van de robot in gesloten zones zonder herlaadstation. ...............................................................................................24
Opstarten robot zonder perimetrische draad. ...........................................................................................................................25
Visualisatie display tijdens het werken. .....................................................................................................................................26
Langdurige stilstand en weer-in-bedrijfstelling. .........................................................................................................................26
Batterijen opladen voor lange stilstand. ....................................................................................................................................27
Suggesties voor het gebruik......................................................................................................................................................27
Aanbevelingen voor het onderhoud. .........................................................................................................................................28
Tabel intervallen voor geprogrammeerd onderhoud. ................................................................................................................28
Defecten, oorzaken en oplossingen. .......................................................................................................................................29
Suggestie voor de vervanging van onderdelen. ........................................................................................................................31
De robot afdanken.....................................................................................................................................................................32
Eg-verklaring van overeenstemming.......................................................................................................................................32
De reproductie, geheel of gedeeltelijk, van dit document is verboden zonder schriftelijke toestemming van de constructeur. De constructeur zet zich in voor een constante verbetering van het product en behoudt zich het recht
voor om dit document zonder waarschuwing te wijzigen, mits dit geen risico’s voor de veiligheid inhoudt.
Finalidad del manual. ..................................................................................................................................................................2
Identifi cación fabricante y equipo. ...............................................................................................................................................2
Informaciones sobre la seguridad. ............................................................................................................................................3
Normas para la seguridad. ..........................................................................................................................................................3
Equipos de seguridad. ................................................................................................................................................................4
Señales de seguridad. ................................................................................................................................................................4
Datos técnicos.............................................................................................................................................................................5
Descripción general del aparato. ................................................................................................................................................6
Embalaje y desembalaje. ............................................................................................................................................................8
Planifi cación de la instalación del equipo....................................................................................................................................8
Defi nición del recorrido del alambre perimetral...........................................................................................................................9
Método de regreso a la estación de recarga.............................................................................................................................10
Preajuste de regreso veloz del robot a la estación de recarga. ................................................................................................10
Preparación y delimitación de áreas de trabajo. ........................................................................................................................11
Instalación del alambre perimetral. ...........................................................................................................................................14
Instalación de la estación de recarga y alimentador.. ...............................................................................................................16
Recarga de las baterías en primer uso. ....................................................................................................................................17
Recomendaciones para los reglajes. ........................................................................................................................................17
Reglaje de la altura de corte. ....................................................................................................................................................17
Uso y funcionamiento. ..............................................................................................................................................................18
Recomendaciones para el uso..................................................................................................................................................18
Descripción de los mandos del robot. .......................................................................................................................................18
Acceso a los menús. .................................................................................................................................................................18
Confi guraciones - modalidades de programación.....................................................................................................................20
Horario de trabajo – modalidades de programación. ................................................................................................................21
Áreas secundarias - modalidades de programación. ................................................................................................................22
Seguridad - modalidades de programación. .............................................................................................................................22
Modalidades de uso - modalidades de programación. .............................................................................................................23
Opciones idioma - modalidades de programación. ...................................................................................................................23
Puesta en marcha - modalidad automática...............................................................................................................................23
Parada de seguridad del robot. .................................................................................................................................................24
Regreso automático a la estación de recarga...........................................................................................................................24
Uso del robot en áreas cerradas no provistas de estación de recarga. ....................................................................................24
Arranque del robot sin alambre perimetral. ...............................................................................................................................25
Visualización de la pantalla durante el trabajo. .........................................................................................................................26
Inactividad prolongada y restablecimiento de la marcha. .........................................................................................................26
Recarga de baterías por inactividad prolongada. .....................................................................................................................27
Consejos para la utilización. .....................................................................................................................................................27
Recomendaciones para el mantenimiento. ...............................................................................................................................28
Tabla intervalos de mantenimiento programado. ......................................................................................................................28
Localización de averías.............................................................................................................................................................29
Averías, causas y remedios. ....................................................................................................................................................29
Recomendaciones para la sustitución de partes. .....................................................................................................................31
Sustitución de la cuchilla. ..........................................................................................................................................................32
Desguace del robot. ..................................................................................................................................................................32
Declaración de conformidad. ...................................................................................................................................................32
Se prohíbe la reproducción, incluso parcial, de este documento sin la autorización escrita del Fabricante.
El fabricante se compromete a una política de continua mejora y se reserva el derecho de modifi car este documento sin la obligación de aviso previo siempre que esto no suponga riesgos para la seguridad.
Objetivo do manual. ....................................................................................................................................................................2
Identifi cação do fabricante e do aparelho. ..................................................................................................................................2
Informações sobre a segurança. ...............................................................................................................................................3
Normas para a segurança...........................................................................................................................................................3
Acessórios de segurança. ...........................................................................................................................................................4
Sinais de segurança....................................................................................................................................................................4
Dados técnicos............................................................................................................................................................................5
Descrição geral do aparelho. ......................................................................................................................................................6
Embalagem e desembalagem. ...................................................................................................................................................8
Planeamento da instalação do equipamento. .............................................................................................................................8
Defi nição do percurso do fi o perimetral. .....................................................................................................................................9
Sistema de volta à estação de recarga. ....................................................................................................................................10
Predisposição de volta rápida do robot à estação de recarga. .................................................................................................10
Preparação e delimitação das áreas de trabalho.......................................................................................................................11
Instalação do fi o perimetral. ......................................................................................................................................................14
Instalação da estação de recarga e alimentador. .....................................................................................................................16
Recarga de baterias no primeiro uso. .......................................................................................................................................17
Recomendações para as regulações........................................................................................................................................17
Regulação da altura de corte. ...................................................................................................................................................17
Uso e funcionamento. ...............................................................................................................................................................18
Recomendações de uso. ..........................................................................................................................................................18
Descrição dos comandos do robot............................................................................................................................................18
Acesso aos menus. ...................................................................................................................................................................18
Confi guração – modos de programação. ..................................................................................................................................20
Horários de trabalho – modos de programação........................................................................................................................21
Áreas secundárias – modos de programação. .........................................................................................................................22
Segurança – modos de programação. ......................................................................................................................................22
Modo de uso – modos de programação. ..................................................................................................................................23
Opções de língua – modo de programação. .............................................................................................................................23
Colocação em funcionamento – modo automático. ..................................................................................................................23
Paragem do robot em segurança..............................................................................................................................................24
Volta automática à estação de recarga. ....................................................................................................................................24
Uso do robot em áreas fechadas não equipadas com estação de recarga. .............................................................................24
Arranque do robot sem fi o perimetral........................................................................................................................................25
Introdução da palavra-passe.....................................................................................................................................................25
Visualização do ecrã na fase de trabalhoo. ..............................................................................................................................26
Inatividade prolongada e recolocação em funcionamento. .......................................................................................................26
Recarga das baterias por inatividade prolongada.....................................................................................................................27
Conselhos de uso. ....................................................................................................................................................................27
Recomendações para a manutenção. ......................................................................................................................................28
Tabela de intervalos de manutenção programada. ...................................................................................................................28
Limpeza do robot. .....................................................................................................................................................................28
Busca de avarias.......................................................................................................................................................................29
Avarias, causas e soluções. .....................................................................................................................................................29
Troca de componentes. ............................................................................................................................................................31
Recomendações para a troca de partes. ..................................................................................................................................31
Troca das baterias. ...................................................................................................................................................................31
Troca da lâmina. .......................................................................................................................................................................32
Desativação do robot. ...............................................................................................................................................................32
Declaração de conformidade. ..................................................................................................................................................32
É proibida a reprodução, mesmo que parcial, deste documento sem a autorização do Fabricante por escrito.
O fabricante está empenhado numa política de melhoramento contínuo e reserva-se o direito de alterar este documento sem a obrigação de aviso prévio desde que isso não constitua riscos para a segurança.
Formål med håndboken. .............................................................................................................................................................2
Identifi kasjon av produsenten og apparatet. ...............................................................................................................................2
Generell beskrivelse av apparatet...............................................................................................................................................6
Innpakning og utpakking. ............................................................................................................................................................8
Planlegging av anleggets installasjon. ........................................................................................................................................8
Defi nering av kantledningens bane. ............................................................................................................................................9
Metode for å returnere til ladestasjonen....................................................................................................................................10
Oppsett for rask retur av roboten til ladestasjonen. ..................................................................................................................10
Forberedelse og avgrensing av arbeidsområdene.....................................................................................................................11
Installasjon av kantledningen. ...................................................................................................................................................14
Installasjon av ladestasjonen og strømforsyningsenheten........................................................................................................16
Førstegangsbruk av batterilader. ..............................................................................................................................................17
Justering av klippehøyden. .......................................................................................................................................................17
Bruk og funksjon. ......................................................................................................................................................................18
Beskrivelse av robotens betjeninger. ........................................................................................................................................18
Tilgang til menyen. ....................................................................................................................................................................18
Sekundære områder - programmeringsmodus. ........................................................................................................................22
Sikker stans av roboten.............................................................................................................................................................24
Automatisk retur til ladestasjonen. ............................................................................................................................................24
Bruk av roboten i avstengte områder uten ladestasjon. ............................................................................................................24
Oppstart av roboten uten kantledning. ......................................................................................................................................25
Inntasting av passord. ...............................................................................................................................................................25
Fremvisning i displayet under arbeidet. ....................................................................................................................................26
Langvarig inaktivitet og klargjørelse før oppstart. .....................................................................................................................26
Opplading av batteriene for langvarig inaktivitet. ......................................................................................................................27
Anbefalinger for vedlikehold. .....................................................................................................................................................28
Tabell over intervaller for planlagt vedlikehold. .........................................................................................................................28
Rengjøring av roboten...............................................................................................................................................................28
Feil, årsaker og løsninger. ........................................................................................................................................................29
Utskifting av deler......................................................................................................................................................................31
Anbefalinger for utskifting av deler. ...........................................................................................................................................31
Utskifting av batterier.................................................................................................................................................................31
Utskifting av knivblad. ...............................................................................................................................................................32
Deponering av roboten..............................................................................................................................................................32
Det er forbudt å reprodusere (også delvis) dette dokumentet uten å ha mottatt skriftlig tillatelse fra produsenten. Produsenten har forpliktet seg til en policy som innebærer kontinuerlige forbedringer, og forbeholder seg retten til
å endre dette dokumentet uten å være pliktig å gi beskjed på forhånd så langt dette ikke utgjør noen fare for sikkerheten.
plenens utforming (gresstype og høyde, fuktighet, etc.)
•
knivbladets tilstand (godt slipt, uten avleiringer og belegg, etc.)
RANDOM-FUNKSJON
7
Håndbok
NO
HOVEDDELER
1.
Robot.
2. Betjeningstastatur: brukes til å stille inn og fremvise robotens funksjonsmåter.
3. Regnsensor: påviser regn og får roboten til å returnere til ladestasjonen.
4. Batteri : gir strømtilførsel til knivbladets motorer og fremdrift til hjulene. Roboten leveres med ett eller fl ere litiumsbatterier avhengig av
modellene, som allerede er montert på enkelte av dem.
5. Håndtak: brukes for å løfte og forfl ytte roboten.
6. Knivblad : utfører klippingen av plenen og er allerede montert på enkelte modeller.
7. Kveil med kantledning: ledning med en spesiell isolasjon og spesielle egenskaper for å transportere signalet som er nødvendig for at
roboten skal fungere.
8. Plugger : nødvendige for å feste kantledningen og ladestasjonen.
9. Strømledning for strømforsyningen.
10. Strømforsyningsenhet : tilfører lavspenningsstrøm til ladestasjonen.
11. Ladestasjon: brukes til å lade opp roboten eller til å holde den ladet.
12. Sendere: overfører signalet til kantledningen.
13. Håndbok.
14. Nøkkel til å regulere klippehøyden.
5
6
13
9
8
14
11
12
10
7
4
1
2
3
8
Håndbok
NO
MONTERING
INNPAKNING OG UTPAKKING
Apparatet leveres hensiktsmessig innpakket. Ved utpakking skal det tas forsiktig ut, og du skal sjekke at alle komponentene fi nnes og at de er
intakt.
Viktig
•
Oppbevar emballasjen for fremtidig bruk.
PLANLEGGING AV ANLEGGETS INSTALLASJON
Installasjonen av roboten medfører ikke noen inngrep som er vanskelige å utføre, med den krever litt planlegging på forhånd for å defi nere det
beste området for å installere ladestasjonen, strømforsyningsenheten, og for å merke opp kantledningens bane.
•
Ladestasjonen skal være plassert ved plenkanten, fortrinnsvis i det
største området, samtidig som det må være lett å nå fra andre deler
av plenen. Området der ladestasjonen er installert defi neres heretter
som ”hovedområdet”.
Forsiktig - Forholdsregler
Plasser strømforsyningsenheten i et område som er
utenfor barns rekkevidde. For eksempel på en høyde over
160 cm (63 ").
strømforsyningsenhet
sender
kantledning
ladestasjon
H. min. 160 cm
/ 63 "
Forsiktig - Forholdsregler
For å kunne foreta den elektriske tilkoblingen må det ha blitt lagt opp et strømuttak i nærheten av installasjonsområdet.
Forsikre deg om at tilkoblingen til strømnettet gjøres i samsvar med gjeldende regler. For å arbeide i full sikkerhet med
det elektriske anlegget som strømforsyningsenheten skal tilkobles, skal anlegget være utstyrt med et jordingssystem som
fungerer korrekt.
Viktig
Det er tilrådelig å installere enheten i et elektroskap (utendørs eller innendørs) som er utstyrt med nøkkellås, og som er
godt ventilert, slik at man opprettholder korrekt luftsirkulasjon.
Forsiktig - Forholdsregler
Sørg for at kun autoriserte personer har tilgang til strømforsyningsenheten.
•
Roboten må enkelt kunne fi nne tilbake til ladestasjonen når den har avsluttet arbeidssyklusen, og den vil være startpunktet for en ny
arbeidssyklus, og for å nå eventuelle andre arbeidssoner, som heretter defi neres som ”sekundære områder”.
•
Plasser ladestasjonen i henhold til følgende regler:
-
Plant område.
-
Kompakt og stabil fl ate som garanterer god drenering.
-
Fortrinnsvis i det største området av plenen.
-
Forsikre deg om at eventuelle vanningssystemer ikke har vannstrålen rettet mot innsiden av ladestasjonen.
-
Siden med inngangen til ladestasjonen skal være plassert som vist på bildet for å gjøre det mulig for roboten å komme inn ved å følge
kantledningen i klokkens retning.
-
Før ladestasjonen skal det være 400 cm (157,48 ") med rettlinjet strekning.
•
Ladestasjonen skal være godt festet til bakken. Unngå at det danner seg en kant fremfor inngangen til basen ved eventuelt å plassere en
liten kunstgressmatte ved inngangen for å kompensere for kanten. Alternativt kan du delvis fjerne gressdekket og montere basen på linje
med gresskanten.
•
Ladestasjonen er tilkoblet strømforsyningsenheten med en line som skal legges på avstand fra ladestasjonen på utsiden av klippeområdet.
9
Håndbok
NO
•
Plasser strømforsyningsenheten i henhold til følgende regler:
-
På et godt ventilert sted, der den er beskyttet mot meteorologiske
forhold og direkte sollys.
-
Fortrinnsvis på innsiden av huset dit, i garasjen eller i et skur.
-
Hvis den står på utsiden skal den ikke utsettes for direkte sollys
eller vann: det er derfor nødvendig å beskytte den på innsiden av
en ventilert boks. Den skal ikke plasseres slik at den kommer i
direkte kontakt med bakken eller med fuktige omgivelser.
-
Plasser den på utsiden av plenen og ikke på innsiden av den.
-
Strekk ut den overfl ødige linen som går fra ladestasjonen til
strømforsyningsenheten. Linen skal ikke avkortes eller forlenges.
NEINEI
OKOK
NEINEI
•
Den innkommende ledningen skal være rettlinjet og justert perpendikulært
mot ladestasjonen i en seksjon på minst 200 cm (78,74 "), og den
utgående ledningen skal føres bort fra ladestasjonen som indikert i
fi guren. Dette gjør det mulig for roboten å komme inn på korrekt måte.
strømforsyningsenhet
ladestasjon
H. min. 160 cm
/ 63 "
min. avstand
200 cm
/ 78,74 "
kantledning
Sender
Hvis roboten installeres nært et område der en annen robot har blitt
installert (samme modell eller fra en annen produsent), er det nødvendig å
utføre en endring av sender- og mottakerenheten i installasjonsfasen, slik
at frekvensene til de to robotene ikke forstyrrer hverandre.
DEFINERING AV KANTLEDNINGENS BANE
Før kantledningen installeres, er det nødvendig å kontrollere hele plenens
overfl ate. Vurder eventuelle endringer som kan gjøres i gressdekket, eller
andre observasjoner som skal tas i betraktning når kantledningen legges
ut slik at roboten kan fungere som den skal.
1. Vurder hvilken metode for å returnere til ladestasjonen som er best i
følge indikasjonene i kapittelet “METODE FOR Å RETURNERE TIL
LADESTASJONEN”.
2. Vurder hvor det er nødvendig å legge kantledningen på en spesiell
måte, i følge indikasjonene i kapittelet “OPPSETT FOR RASK RETUR
AV ROBOTEN TIL LADESTASJONEN”.
3. Forberedelse og avgrensing av arbeidsområdene.
4. Installasjon av kantledning.
5. Installasjon av ladestasjonen og strømforsyningsenheten. Når
kantledningen legges ut, skal du overholde installasjonsretningen
(med klokken) og rotasjonsretningen rundt blomsterbedene (mot
klokken). Som vist i fi guren.
24 v
oppmerking for legging
av kantledningen
10
Håndbok
NO
METODE FOR Å RETURNERE TIL LADESTASJONEN
Roboten kan bruke to metoder for å returnere til ladestasjonen, avhengig
av konfi gurasjonen av brukermenyen under posten ”Innstillinger”- ”Retur til
basen”. Bruk kun metoden ”på ledningen” i tilfeller der det fi nnes mange
hindringer på innsiden av hagen og nær kantledningen (under 2 m.). I alle
andre tilfeller er det best å bruke metoden ”V-METER” for å få en raskere
retur til ladestasjonen.
“På ledningen”. Denne metoden for å returnere til ladestasjonen får
roboten til å følge kantledningen ved å plassere hjulene på tvers over
den. Hvis denne metoden er aktivert er det ikke nødvendig å klargjøre
(”tilbakekalling på ledningen”) som forklart nedenfor.
“V-METER”. Ved å innstille roboten til denne metoden for å returnere til
ladestasjonen, vil den følge kantledningen med en avstand på mellom
noen cm til 1 m (3,4 ') og berøre den av og til, spesielt på strekningene
som ikke er rette, helt til den gjenkjenner ”tilbakekalling på ledningen”
som er nødvendig for å styre roboten korrekt mot ladestasjonen eller å
hjelpe den til å passere over de smale seksjonene. Når den har gjenkjent
(”tilbakekalling på ledningen”), vil roboten følge kantledningen ved å
plassere hjulene på tvers over den i ca. 10 m. (33 ').
SDVVDVMH
under 2
4-10 mt.
4-10 mt.
2 mt.
5 cm.
2 mt.
”Tilbakekallingen på ledningen” informerer roboten ikke bare om at vi befi nner oss nær ladestasjonen, men også om smale passasjer eller om
en pil for hurtig retur til ladestasjonen.
Så snart ”tilbakekallingen” gjenkjennes, vil roboten følge kantledningen i lav hastighet og med større presisjon ca. 10 m. (33 ') Den vil deretter
gå tilbake til metoden for å returnere med ”V-Meter” hvis den ikke treffer på ladestasjonen eller den raske returruten.
Forhold deg til følgende regler for installering av ”tilbakekallingen”.
•
”Tilbakekallingsledningen” representeres av en ledningsstuss som strekker seg ca. 2 m. (6,6 ') utover i hagen med en avstand på 5 cm
mellom ledningene. (1,96 ").
•
”Tilbakekallingsledningen” skal være plassert med en avstand på 4 og 10 m fra ladestasjonen.
•
”Tilbakekallingsledningen” skal være plassert i seksjoner foran passasjer som er smalere enn 2 m. (201,17 cm.).
•
”Tilbakekallingsledningen” skal være plassert i seksjonen foran de ”raske returene”.
NB: Hvis roboten ikke klarer å fi nne ladestasjonen innen et visst tidsrom, vil den følge kantledningen med metoden ”på ledningen”.
OPPSETT FOR RASK RETUR AV ROBOTEN TIL LADESTASJONEN
Den raske returen innebærer en spesiell måte å legge kantledningen på som gjør det mulig for roboten å redusere lengden på returruten til
ladestasjonen. Bruk kun denne spesielle måten å legge kantledningen på i hager der den raske returen fører til en faktisk reduksjon av rutens
lengde, og som har en omkrets som er anslagsvis lengre enn 200 m.
For å installere den raske returen, plasseres kantledningen på bakken slik at den former et triangel med én side på 50 cm (19,7 ") og to sider
med kantledning på 40 cm (15,75 ") hver, som vist på bildet.
Roboten avbryter fremdriften når den møter på denne spesielle triangelformen og returnerer til ladestasjonen med de to hjulene på tvers
over ledningen. Den vil da snu seg omtrent 90° mot innsiden av hagen, og gjenopptar fremdriften i den nye retningen helt til den treffer på
kantledningen i på motsatt side.
Utfør oppsettet for rask retur på et punkt der det fi nnes minst 200 cm (78,74 ") med rettlinjet ledning foran og minst 150 cm (59,05 ") med rettlinjet
ledning bak.
Oppsettet skal ikke tilrettelegges langs den rette seksjonen like før ladestasjonen eller i nærheten av hindringer. Kontroller at det ikke fi nnes
hindringer langs returruten som kan forhindre den raske returen.
Viktig
Hvis oppsettet for rask retur plasseres på et punkt som er ukorrekt, vil dette kunne forhindre roboten i å returnere raskt til
ladestasjonen. Når roboten følger kanten for å nå et sekundært område vil den ikke påvise oppsettet for rask retur.
11
Håndbok
NO
Illustrasjonen gir enkelte nyttige indikasjoner for å installere oppsettet for
rask retur på korrekt måte.
4040
50
SDVVDVMH
under 2
4-10 mt.min. 150 cm.
(59,05 ")
4-10 mt.
4-10 mt.
2 mt.
5 cm.
2 mt.
FORBEREDELSE OG AVGRENSING AV ARBEIDSOMRÅDENE
Forberedelse av plenen som skal klippes
1. Kontroller at plenen som skal klippes er jevn og uten hull, steiner eller
andre hinder. I motsatt fall skal du foreta de nødvendige utbedringene.
Hvis det ikke er mulig å fjerne noen av hindringene, er det nødvendig
å avgrense de involverte områdene med kantledning på en passende
måte.
2. Kontroller at ingen av områdene på plenen har en helling som
overskrider maksgrensen (se “Tekniske data”). Når roboten arbeider i
skråninger og påviser ledningen kan hjulene begynne å spinne slik at
roboten går utenfor det avgrensede området.
Viktig
Områdene som har hellinger som er brattere enn det
tillatte kan ikke klippes med roboten. Plasser derfor
kantledningen foran skråningen slik at dette området
ekskluderes fra klippingen.
NEI
35 cm
(13,78 ")
21-35%
21-35%
0-20%
100 cm (39,3 ")
35 cm
(13,78 ")
35 %
0-35%
0-20%
0-20%
kantledning
kantledning
OK
OK
OK
OK
NEI
NEI
12
Håndbok
NO
Avgrensing av arbeidsområdet
3. Kontroller hele plenoverfl aten og vurder om det er nødvendig å dele
den opp i fl ere separate arbeidsområder i henhold til kriteriene som er
beskrevet nedenfor. Før du begynner å installere kantledningen, er det
tilrådelig å kontrollere hele banen for å gjøre installeringen enkel og
hendig. Illustrasjonen viser et eksempel på en plen med oppmerking
der kantledningen skal legges ned.
Under installasjonen av anlegget er det nødvendig å identifi sere
eventuelle sekundære områder og eventuelle avstengte områder.
Med sekundært område menes en del av plenen som kun er
sammenkoblet med hovedplenen via en trang passasje som det vil
være vanskelig for roboten å nå frem til tilfeldig. Området skal være
lett å nå, uten trappetrinn, og uten høydeforskjeller som overskrider
de tillatte verdiene. Om området skal defi neres som ”sekundært
område” avhenger også av størrelsen på hovedområdet. Dess større
hovedområdet er, desto vanskeligere vil det bli å nå områdene med
smale passasjer. Mer generelt, vil en passasje som er smalere enn 200
cm (78,74 ") kunne betraktes som sekundært område. Hvor mange
sekundære områder roboten kan håndtere, avhenger av modellen (“se
tekniske data”).
Min. tillatt passasje er på 70 cm (27,56 ") fra kantledning til kantledning.
Kantledningen skal plasseres med en spesifi kk avstand (som defi neres
senere) fra eventuelle gjenstander utenfor plenen, og mer generelt må
det derfor være tilgjengelig en passasje på totalt 140 cm (55,12 ").
Hvis denne passasjen er svært lang, bør den være bredere enn 70
cm (27,56 ").
Under programmeringen er det nødvendig å konfi gurere størrelsen
på de sekundære områdene prosentvis i forhold til plenen, retningen
for å nå dem fortest mulig (med/mot klokken), i tillegg til antall meter
med ledning som er nødvendig for å nå det sekundære området. Se
”Programmeringsmodus”.
24 v
oppmerking for legging av kantledningen
min. 70 cm / 27,56 "min. 70 cm / 27,56 "
min. 70 cm / 27,56 "
Hvis minimumskravene beskrevet ovenfor ikke overholdes og et
område avskilles med et trappetrinn eller en høydeforskjell som
overskrider robotens maksverdier, eller av en passasje (korridor) som
er smalere enn 70 cm (27,56 ") fra ledning til kantledning, skal denne
sonen av plenen anses som ”avstengt område”. For å installere et
”avstengt område” skal du legge utgående ledning og returledningen
på samme oppmerking med en avstand på under 1 cm (0,40 "). I
dette tilfellet er roboten ikke i stand til å nå området på egen hånd,
og situasjonen må håndteres som forklart i kapittelet ”Håndtering
av avstengte områder”. Defi neringen av de ”avstengte områdene”
reduserer antall kvadratmeter som styres selvstendig av roboten.
korridor for passasje med minst
70 cm fra ledning til ledning.
HOVEDOMRÅDE
SEKUNDÆRT OMRÅDE
korridor for passasje
< 70 cm / 27,56 "
HOVEDOMRÅDE
AVSTENGT OMRÅDE
13
Håndbok
NO
4. Hvis det fi nnes et steindekke eller en sti som er på samme nivå som plenen innenfor eller utenfor arbeidsområdet, skal kantledningen legges
5 cm (1,96 ") fra kanten på steindekket. Roboten vil bevege seg litt utenfor plenen, og alt gresset vil bli klippet. Hvis det fi nnes metallfl ater,
et kumlokk av metall, en dusjplate eller elektriske ledninger, skal kantledningen legges med en avstand på minst 30 cm (11,81 ") for å unngå
funksjonsfeil på roboten og dårlig signal på kantledningen.
Viktig
Illustrasjonen viser et eksempel med elementer på innsiden og i utkanten av arbeidsområdet og avstandene som må
overholdes når kantledningen legges ut. Avgrens alle elementer av jern eller annet metall (kumlokk, elektriske tilkoblinger,
etc.) for å unngå interferens med signalet til kantledningen.
5 cm
1,97 “
30 cm
11,81 “
30 cm
11,81 “
30 cm
11,81 “
Hvis det fi nnes en hindring på innsiden eller utsiden av arbeidsområdet, for eksempel kantstein, en vegg, eller en mur, skal kantledningen legges
med en avstand på minst 35 cm (13,78 ") fra hindringen. Øk avstanden mellom kantledningen og hindringen med minst 40 cm (15,75 ") hvis du
vil unngå at roboten støter mot hindringer. Man kan eventuelt klippe gresset langs kanten der man har bestemt at roboten ikke skal arbeide med
en kantklipper eller en hekksaks.
35 cm.
/13,78 "
35 cm.
/13,78 "
35 cm.
/13,78 "
35 cm.
/13,78 "
Hvis det fi nnes et blomsterbed, en hekk, en plante med utstikkende røtter, en liten grøft på 2-3 cm eller en kantstein på 2-3 cm, på innsiden eller
utsiden av arbeidsområdet, skal kantledningen legges med en avstand på minst 30 cm (11,81 ") for å unngå at roboten skader eller blir skadet av
hindringene. Man kan eventuelt klippe gresset i området der man har bestemt at roboten ikke skal arbeide med en kantklipper eller en hekksaks.
30 cm.
/11,81”
30 cm.
/11,81”
30 cm.
/11,81”
30 cm.
/11,81”
30 cm.
/11,81”
utstikkende røtter
30 cm.
/ 11,81 “
30 cm.
/ 11,81 “
14
Håndbok
NO
Hvis det fi nnes et basseng, en dam, en skrent, en grøft, et trappetrinn som går nedover, eller offentlige veier som ikke er beskyttet av en mur, på
innsiden eller på utsiden av arbeidsområdet, skal kantledningen legges med en avstand på minst 90 cm (35,43 "). For å redusere kantledningens
avstand for å få en optimal installasjon og drift av roboten, anbefaler vi i dette tilfellet å installere en ekstra inngjæring på minst 15 cm; dette vil
gjøre det mulig å legge kantledningen med de avstandene som er beskrevet i punktene ovenfor.
Viktig
Hvis man overholder avstandene og hellingene som er spesifi sert i håndboken omhyggelig, vil dette garantere en optimal
installasjon og at roboten fungerer som den skal. I skråninger eller på glatt terreng skal avstanden økes med minst 30 cm / 11,81".
90 cm.
/ 35,44 “
90 cm.
/ 35,44 “
90 cm.
/ 35,44 “
Hvis det fi nnes hindringer som tåler støt på innsiden av arbeidsområdet, for eksempel trær, heller eller stolper, som ikke har hjørner, er det ikke
nødvendig å avgrense dem. Roboten vil støte mot hindringen og endre retning. Hvis man foretrekker at roboten ikke støter mot hindringene, og at
den skal fungere sikkert og stillegående, er det tilrådelig å avgrense alle hindringer som står fast. Hindringer med litt helling, som blomsterkrukker,
steiner eller trær med utstikkende røtter, må være avgrenset for å unngå eventuelle skader på knivbladet og også på hindringene.
For å avgrense hindringen, starter man med å legge kantledningen fra omkretsens ytterste punkt som er nærmest gjenstanden som skal
avgrenses, og helt frem til hindringen. Legg ledningen rundt hindringen med avstandene som er beskrevet i punktene ovenfor, og før den tilbake
langs den forrige banen. Legg utgående ledning og returledningen over hverandre under samme plugg. I dette tilfellet vil roboten passere over
kantledningen.
For at roboten skal fungere korrekt må minimumslengden til kantledningen som ligger over den andre være 70 cm (27,56 ") for å gjøre det mulig
for roboten å bevege seg normalt.
NEI
min. 70 cmmin. 70 cm
< 70 cm< 70 cm
0 cm0 cm
plante
stolpe
OKOK
INSTALLASJON AV KANTLEDNINGEN
Kantledningen kan graves ned eller legges på marken. Hvis du har en
maskin til å legge ut ledningen, bør den graves ned da dette garanterer
en bedre beskyttelse av selve ledningen. I motsatt fall er det nødvendig
å legge ledningen på bakken med de tilhørende pluggene som forklart
nedenfor.
Viktig
Begynn med å legge kantledningen fra installasjonssonen
til ladestasjonen og la det ligge igjen et par meter ekstra
slik at den kan tilpasses til slutt når den kobles til enheten.
Max.
5 cm (1,96 ")
kantledning
15
Håndbok
NO
Ledning som er lagt på bakken
Klipp gresset svært lavt med en kantklipper eller en hekksaks langs hele
banen der ledningen skal legges. På denne måten vil det bli lettere å
plassere ledningen i kontakt med bakken og unngå at den blir avbrutt av
knivbladet slik at den deretter må sammenkobles som forklart nedenfor.
1. Plasser ledningen i klokkens retning langs hele banen, og fest den
med de medfølgende pluggene (avstanden mellom pluggene skal
være på 100-200 cm (39,37÷78,74 ")).
-
Når kantledningen legges ut, skal du overholde rotasjonsretningen
rundt blomsterbedene som må være mot klokken.
-
På de rette strekningene skal ledningen festes slik at den er stram
og blir liggende tett til bakken.
-
På strekningene som ikke er rettlinjet, skal ledningen festes slik at
den ikke krøller seg, men legges i en jevn bue (radius på 20 cm).
NEI
plugger for festing av ledningenkantledning
Nedgravd ledning
1. Grav opp bakken på en jevn og symmetrisk måte ved å følge den
oppmerkede linjen på bakken.
2. Plasser ledningen i retning med klokken, langs hele banen, med en
dybde på noen centimeter (ca. 2-3 cm (0.7874÷ 1.1811"). Grav ikke
ledningen ned mer enn 5 cm for å unngå å redusere kvaliteten og
intensiteten på signalet som fanges opp av roboten.
3. Når ledningen legges ut, kan den om nødvendig blokkeres på enkelte
punkter med pluggene slik at den holdes i posisjon når den tildekkes
av jord.
4. Dekk hele ledningen med jord, og pass på at den ligger stramt nede
i jorden.
HOVEDOMRÅDE
AVSTENGT OMRÅDE
korridor for passasje
< 70 cm (27,56 ")
35 cm
(13,78 ")
Maks. 1 cm
(0,40 ")
NEI
Sammenkobling av kantledningen.
Viktig
Både med nedgravd ledning og med ledning som legges
på bakken, skal du ved behov koble den med en annen
kabel som har identiske egenskaper på en passende måte
(se fi guren). I sammenkoblingsfasen er det tilrådelig å
bruke selvfestende tape (for eksempel: 3M Scotch 23).
Bruk ikke isolasjonstape eller andre typer koblinger
(kabelender, klemmer etc.).
1
34
2
16
Håndbok
NO
INSTALLASJON AV LADESTASJONEN OG STRØMFORSYNINGSENHETEN
Forsiktig - Forholdsregler
For du foretar noen form for inngrep skal du frakoble
hovedstrømmen.
Plasser strømforsyningsenheten i et område som er
utenfor barns rekkevidde. For eksempel på en høyde over
160 cm (63.00 ").
beskyttelse(L)
strømforsyningsenhet(A)
sender(B)
H. min. 160 cm
(63.00 ")
1. Monter strømforsyningsenheten (A).
2. Ta av beskyttelsen (L).
3. Plasser basen i det forhåndsdefi nerte området.
4. Før kantledningen (M) inn under basen.
5. Tilkoble ledningens to ender til kabelklemmene ved basen.
rød klemme
svart klemme
kantledning (M)
6. Fest basen (N) til bakken med pluggene (P). Om nødvendig, fest
basen med ekspansjonspluggene (Q).
plugger (P)
ekspansjonsplugger (Q)
ladestasjon (N)
7. Tilkoble ladestasjonens (N) strømledning (E) til strømforsyningsenheten
(A).
8. Koble strømforsyningsenhetens støpsel (A) til strømuttaket.
9. Hvis senderens LED-lys blinker er tilkoblingen korrekt. I motsatt fall, er
det nødvendig å fi nne feilen (se ”Feilsøking”).
10. Sett på beskyttelsen (L).
strømforsyningsenhet (A)
strømledning (E)
kantledning
ladestasjon (N)
sender (B)
H. min. 160 cm
(63.00 ")
beskyttelse(L)
17
Håndbok
NO
FØRSTEGANGSBRUK AV BATTERILADER
1.
Sett roboten inn i ladestasjonen.
2. Trykk på ON-knappen.
3. Etter noen sekunder vises meldingen ”CHARGING” i displayet.
4. Trykk på knappen “Start/Pause”. I displayet vises nå funksjonen
“PAUSE”. Batteriene begynner ladesyklusen.
5. Når oppladingen er fullført er det mulig å programmere roboten for
oppstart (se ”Programmeringsmodus”).
ENTER
21.1$33
67$573$86(.1$33
Viktig
Batteriene skal forbli tilkoblet i minst 4 timer første gang de lades.
JUSTERINGER
JUSTERINGSANVISNINGER
Viktig
Brukeren skal foreta justeringene i henhold til prosedyrene som er beskrevet i håndboken. Du skal ikke foreta noen form
for justering som ikke er uttrykkelig indikert i håndboken. Eventuelle ekstraordinære justeringer som ikke er uttrykkelig
indikert i håndboken, skal kun utføres av teknikere fra produsentens autoriserte servicesenter.
JUSTERING AV KLIPPEHØYDEN
Før du innstiller knivbladets klippehøyde, skal du forsikre deg om at roboten er stanset på en sikker måte (se “Sikker stans av roboten”).
Viktig
Bruk vernehansker slik at du ikke risikerer å kutte hendene.
1. På modellene som er utstyrt med tyverialarm må denne deaktiveres for
å unngå at den blir aktivert. (Se ”Programmeringsmodus”).
2. Snu roboten opp ned og støtt den slik at du ikke ødelegger dekselet.
3. Skru løs skruen (C) og vri braketten (E) i retning med klokken med en
passende nøkkel.
4. Løft eller senk klippeenheten (D) for å defi nere ønsket klippehøyde.
Verdien kan avleses på skalaen som fi nnes på den medfølgende
nøkkelen.
Viktig
Bruk ikke roboten til å klippe gress som er mer enn 1 cm
(0,40 ") høyere enn knivbladet. Reduser klippehøyden
gradvis. Det anbefales å redusere høyden minst 1 cm
(0,40 ") hver 1-2 dag helt til man oppnår ideell klippehøyde.
5. Vri braketten (E) i retning mot klokken, og stram skruen når justeringen
er fullført.
6. Snu roboten tilbake til arbeidsstilling.
(E)
klippeenhet (D)
skrue (C)
18
Håndbok
NO
BRUK OG FUNKSJON
BRUKSANVISNINGER
Viktig
-
Ved førstegangsbruk av roboten, anbefaler vi at du leser nøye hele håndboken og forsikrer deg om at du har forstått
absolutt alt, spesielt sikkerhetsinformasjonen.
-
Bruk apparatet kun til de formål som er forutsett av produsenten og tukle ikke med noen anordninger for å endre
ytelsen i forhold til den operative ytelsen.
BESKRIVELSE AV ROBOTENS BETJENINGER
Illustrasjonen viser betjeningenes plassering på maskinen.
A. DISPLAY: er opplyst for å vise alle funksjonene.
B. ON: trykkes for å slå på gressklipperen.
C. OFF/STOP: trykkes for å stanse gressklipperen; displayet slår seg av.
D. START/PAUSE: trykkes for å slå av gressklipperen, og gjør at displayet
blir satt på ”venter”; i denne modusen er det mulig å programmere
gressklipperen. Ved å trykke den en gang til omstartes arbeidet.
Ved å trykke på knappen mens gressklipperen står på lading, vil
gressklipperen ikke fortsette arbeidet før knappen trykkes inn på nytt
og ”pause” forsvinner fra displayet.
E. CHARGE: trykkes for å få gressklipperen til å returnere til basen
for å fremskynde oppladingen av batteriene. Hvis den trykkes når
gressklipperen er på lading, vil gressklipperen avbryte oppladingen og
gjenoppta arbeidet.
ENTER
"ON" (B) KNAPP
ENTER/MENU (G) KNAPP
7(*1,1*(1$97$67$785(7(5.81(7(.6(03(/
OFF - STOP (C) KNAPP
CHARGE (E) KNAPP
"START/PAUSE" (D) KNAPP
“ – ” (H) KNAPP
“ + ” (F) KNAPP
DISPLAY (A)
STOP (I) KNAPP
F. “+” KNAPP: under drift kan du trykke denne knappen for å starte opp igjen knivbladet som ble stoppet tidligere. Under programmeringen
brukes den til å bla oppover i menypostene.
G. ENTER/MENU: under drift trykkes denne knappen for å starte spiralfunksjonen. Under programmeringen trykkes den for å bekrefte og lagre
det valgte alternativet.
H. “-” KNAPP: under drift trykker du denne knappen for å stanse kniven. Under programmeringen brukes den til å bla nedover i menypostene.
I. STOP: Trykkes for å stanse gressklippen på en sikker måte. Skal kun brukes ved øyeblikkelig fare og for å foreta vedlikeholdsoperasjoner
på roboten.
TILGANG TIL MENYEN
Robotens funksjoner kan programmeres med de ulike valgene i hver meny. Tabellen viser en liste over tilgjengelige menyer med respektive
funksjoner.
For å foreta programmeringen, gjør du som forklart nedenfor.
1. Løft opp beskyttelsen og trykk på knappen “ON”.
2. Tast inn passordet (hvis du blir spurt om det) (se “Inntasting av passord”).
3. Hvis roboten startes på innsiden av ladestasjonen, vil meldingen “CHARGING”, komme opp etter noen sekunder, trykk deretter på knappen
”Start/Pause”.
4. I displayet vises nå funksjonen “PAUSE”.
5. Trykk på knappen “ENTER/MENU”. Du kommer inn i programmeringsmenyen og i displayet vises funksjonen “SETTINGS”.
NAVIGERING
Følg instruksjonene nedenfor for å navigere i brukermenyen for programmering:
- “+” e “-”: Blar i menyposten på en syklisk måte, eller gjør det mulig å endre verdien til funksjonen som fremvises i displayet.
- “ENTER/MENU”: Går videre til neste menynivå eller bekrefter og lagrer verdien som fremvises i displayet, og blar videre til neste funksjon.
- “START/PAUSE”: Går tilbake til forrige menynivå helt til du kommer ut av programmeringsmodusen.
- “OFF/STOP”: Slår roboten av uten å bekrefte siste funksjon som er fremvist i displayet.
Menyen er hierarkisk strukturert. Den følger den innledende oversikten over tilgjengelige programmeringsfunksjoner; den detaljerte forklaringen
av hver enkelt funksjon er henvist til de påfølgende sidene til fl ytdiagrammet.
Enkelte funksjoner er ikke tilgjengelige på alle modellene. Se tabellen ”tekniske data”.
19
Håndbok
NO
Settings
Schedule
Enable
Disable
Disable
Enable
Enable
Disable
Follow wire
Bounce on wire
Alarm
Week
Auto setup
Work schedule 2
Sound
Back to recharge
Date
Time
Aktivere eller deaktivere den akustiske alarmen
Regulerer hvilke dager som er arbeidsdager og hvilke dager som er hviledager
Aktivere eller deaktivere gjenkjenning av klippet
plen
Avgjør det andre tidsrommet som roboten er aktivert til å arbeide i
Gjør det mulig å deaktivere lyden når roboten er
i ladestasjonen
Gjør det mulig å avgjøre returmetode til
ladestasjonen
Konfi gurerer datoen
Konfi gurerer tiden
Restart
Pause
Disable
None
Pair bluetooth
Pair radio
Rain sensor
Work Schedule 1
Remote control
Fastsetter oppførselen ved regn
Avgjør det første tidsrommet som roboten er aktivert til å arbeide i
Konfi gurasjon av fjernkontrollen som styrer roboten
Secondary areas
Safety
Secondary Area 1
Change password
Secondary Area 3
lock keyboard
Fastsetter konfi gurasjonen av et eventuelt
sekundært område 1 ved å indikere områdets
størrelse, avstanden til ladestasjonen, og riktig
retning for å nå den.
Gjør det mulig å innstille passordet
Fastsetter konfi gurasjonen av et eventuelt
sekundært område 3
Hvis passordet er aktivert forespørres det for å
få tilgang til robotens funksjoner.
Percentage
Distance
Direction
Secondary Area 2
Start password
Fastsetter konfi gurasjonen av et eventuelt
sekundært område 2
Fastsetter om passordet skal forespørres for å
starte roboten
Enable
Enable
Disable
Disable
20
Håndbok
NO
Work mode
Language options
Automatic
Language
No border
Time format
Distance format
Innstiller roboten til automatisk bruk
Innstilling av språk i brukermenyen
Innstiller funksjonen uten gjenkjenning av
kantledningen. ADVARSEL!
Les håndboken grundig før du bruker denne
funksjonen
Stiller formatet for inntasting av tiden
Stiller formatet for inntasting av avstanden for
håndtering av sekundære områder
Time
Closed area
Date format
Innstiller en arbeidssyklus i et avstengt område
uten ladestasjon
Stiller formatet for inntasting av datoen
DD/MM/ÅÅ
24H
Meters
DD/MM/ÅÅ
12H
Feet
INNSTILLINGER - PROGRAMMERINGSMODUS
ALARM: (kun for enkelte versjoner, se ”tekniske data”) funksjon for å aktivere og deaktivere
alarmen tyverialarm. Når alarmen deaktiveres blir du bedt om robotens passord (fabrikkstilt
til 0000).
•
Disable: brukes til å deaktivere eller slå av alarmen hvis den er på. En kontinuerlig lyd
som gradvis blir lavere varsler at deaktiveringen er gjennomført.
•
Enable: brukes for å aktivere alarmen. Hvis roboten blir løftet etter håndtaket, aktiveres
alarmen. Et lydsignal høres tre ganger for å varsle om at den har blitt aktivert.
RAIN SENSOR: Funksjon for å innstille roboten for regn.
•
Restart: ved regn returnerer roboten til stasjonen og forblir i ”lademodus”. Når robotens
ladesyklus er avsluttet fortsetter den med å klippe, men kun hvis det har sluttet å regne.
•
Disabled: roboten fortsetter å klippe selv om det regner.
•
Pause: roboten returnerer til ladestasjonen og forblir der (i ”lademodus”) helt til man
trykker på ”pause”-knappen.
AUTO SETUP: (kun for enkelte versjoner, se ”Tekniske data”) funksjon som reduserer
robotens klippetid automatisk avhengig av plenens forfatning.
•
Enable: Roboten reduserer arbeidstiden avhengig av gressets forfatning. Når
gressoverfl aten er klippet, vil maskinen automatisk legge inn et hvileintervall som
forsinker de påfølgende turene fra ladestasjonen. Roboten vil likevel utføre arbeidet
innenfor de innstilte arbeidstidene.
•
Disable: Roboten vil arbeide i henhold til den innstilte tiden så lenge batteriene tillater
det.
ENTER
ALARM:
21
Håndbok
NO
REMOTE CONTROL: (kun for enkelte versjoner, se ”Tekniske data”).
Se instruksjonene på fjernkontrollen/konsollen for synkroniseringsprosedyren.
SOUND: Gjør det mulig å deaktivere lydsignalene når roboten er i ladestasjonen.
BACK TO RECHARGE: Gjør det mulig å fastsette returmetoden til ladestasjonen.
1. “FOLLOW WIRE”. Roboten returnerer til ladestasjonen ved å plassere hjulene på tvers
over kantledningen.
2. “V-METER”. Roboten vil følge kantledningen med en omtrentlig avstand på mellom
noen cm til 1 m (3,2 '), og berøre den av og til, spesielt på strekningene som ikke er rette,
helt til den gjenkjenner ”tilbakekallingen” til ladestasjonen. Se kapittelet ”Installasjon”.
DATE: Funksjon for å innstille datoen.
TIME: Funksjon for å innstille lokal eller legal tid.
ENTER
DATE DD/MM/YY
MON 00 / 00 / 00
ARBEIDSTIDER – PROGRAMMERINGSMODUS
WEEK: funksjon for å programmere robotens driftsdager for hele uken. Markøren plasseres
automatisk på bokstaven “M” (mandag).
Når alle dagene stilles til “1111111” betyr dette at roboten skal arbeide alle dagene. Hvis de
stilles til “0000000” betyr dette at roboten ikke vil arbeide noen av ukedagene.
-
Verdi 1 : Robotens arbeidsdag.
-
Verdi 0 : Robotens hviledag.
Viktig
For å utnytte robotens potensial maksimalt er det tilrådelig å programmere
roboten til å arbeide alle dager.
ENTER
WEEK
MTOTFLS
MAN 1111111
WORK SCHEDULE 1: Funksjon for å innstille robotens første arbeidsøkt for dagen.
Markøren plasserer seg automatisk i området under den første arbeidsøkten (eksempel fra
10:00 til 13:00). Innstill tid for begynnelse og slutt på arbeidsøkten.
Hvis tiden stilles til “00:00 – 00:00” betyr dette at roboten ikke skal arbeide under arbeidsøkt
1. Hvis den innstilte tiden er feil, som for eksempel hvis tiden overlapper arbeidstid 2, eller
hvis starttiden kommer etter sluttiden, vil roboten avgi et lydsignal og nullstille den innstilte
verdien.
WORK SCHEDULE 2: Funksjon for å innstille robotens andre arbeidsøkt for dagen.
Viktig
Hvis det skulle bli nødvendig å innstille de sekundære områdene, er det
å foretrekke å bruke begge arbeidsøktene i programmeringen for å øke
hyppigheten for klipping av disse områdene.
ENTER
WORK SCHEDULE
00 : 00 - 00 : 00
Innstillingen av robotens arbeidsøkt er grunnleggende for at produktet skal fungere som det skal. Mange parameter påvirker konfi gurasjonen av
arbeidsøkten, som for eksempel antall sekundære områder, antall batterier i roboten og batteristyrken, hvor kompleks plenen er, type gress etc.
Generelt sett er det nødvendig å øke arbeidsøktene litt hvis hagene har sekundære områder, mange hindringer eller komplekse områder. Følg
den veiledende tabellen for å foreta den første konfi gurasjonen. NB. Still alle ukedagene til “1”-“operative dager”.
Modellm² (ft²)Tid 1Tid 2
075BA0150 (1615)11:00 11:4015:00 15:30
075BA0300 (3230)11:00 17:00
075BA0400 (4304)11:00 19:00
075DE0150 (1615)11:00 11:40
075DE0300 (3230)11:00 11:4015:00 15:40
075DE0400 (4304)10:00 16:00
075DE0600 (6460)10:00 19:00
22
Håndbok
NO
075EV0400 (4304)10:00 11:30
075EV0800 (8608)10:00 11:3015:00 16:30
075EV01200 (12912)09:00 21:00
075EV1400 (4304)10:00 11:30
075EV1800 (8608)10:00 11:3015:00 16:30
075EV11200 (12912)10:00 12:0015:00 17:00
075EV11600 (17216)09:00 20:00
075EL0400 (4304)10:00 11:30
075EL0800 (8608)10:00 11:3015:00 16:30
075EL01200 (12912)10:00 12:0015:00 17:00
075EL01800 (19368)09:00 20:00
075EL02200 (23672)08:00 22:00
SEKUNDÆRE OMRÅDER - PROGRAMMERINGSMODUS
Hvis området som skal klippes har sekundære områder iht. defi nisjonen i kapittelet “Forberedelse og avgrensing av arbeidsområdene”, er det
nødvendig å foreta en programmering av de sekundære områdene for å instruere roboten om hvordan den kan nå det sekundære området og
med hvilken hyppighet.
WORK SCHEDULE 1: Funksjon for å fastsette den automatiske klippingen av et sekundært område.
-
Percentage: gjør det mulig å defi nere størrelsen på det sekundære
området som skal klippes i forhold til hele plenoverfl aten. Nedenfor
følger en tabell som skal brukes som referanse for konfi gurasjonen.
•
20% Indikerer et svært lite område.
•
30% Indikerer et område som opptar ca. ¹/3 av hele hagen.
•
50% Indikerer et område som opptar ca. halvparten av hagen.
•
80% Indikerer et sekundært område som er større enn
hovedområdet.
•
100%. Roboten vil følge kantledningen for å klippe det sekundære
området hver gang den kjører ut fra ladestasjonen.
hovedområde
retning med klokkenretning mot klokken
sekundært område 1
(30%, 60 m, med klokken)
sekundært område 2
(20%, 30 m, mot klokken)
-
Distance: Gjør det mulig å stille avstanden for å nå innsiden av det sekundære området når roboten følger kantledningen. Det er å foretrekke
å bruke midten på det sekundære området som referanse for å være sikker på at roboten begynner arbeidet sitt på innsiden av det området.
-
Direction: Angir den korteste kjøreretningen for å nå det sekundære området. Retningen kan være med klokken eller mot klokken. Når
roboten har kjørt ut fra ladestasjonen vil den følge ledningen i den indikerte retningen for å nå det sekundære området.
SECONDAY AREA 2: Funksjon som fastsetter den automatiske klippingen av det sekundære området 2. Innstillingen har de samme
konfi gurasjonsparametrene som det sekundære området 1.
SECONDAY AREA 3: (kun for enkelte versjoner, se ”Tekniske data”) Funksjon for å fastsette den automatiske klippingen av det sekundære
området 3. Innstillingen har de samme konfi gurasjonsparametrene som det sekundære området 1.
SIKKERHET - PROGRAMMERINGSMODUS
CHANGE PASSWORD: funksjon for å innstille eller endre passordet.
-
Nei: brukes for ikke å foreta endringer av passordet som ble fastsatt tidligere.
-
Ja: brukes for å inntaste eller endre passordet som skal brukes for å starte roboten eller for å deaktivere alarmen. I rekkefølge forespørres
følgende opplysninger:
•
Password: Tast inn det gamle passordet (fabrikkstilt til 0000).
•
New password: Tast inn nytt passord.
•
Repeat password: Gjenta inntastingen av det nye passordet.
23
Håndbok
NO
Viktig
For å innstille eller endre passordet er det nødvendig å først taste inn det forrige passordet og deretter det egendefi nerte.
Når roboten blir kjøpt, består passordet som er defi nert av produsenten av fi re nummer (0000).
Viktig
Under inntastingen, blir du bedt om å gjenta prosedyren for inntasting av passord for å forsikre deg om at du har tastet det
inn korrekt. For å unngå å glemme passordet, er det tilrådelig å velge en kombinasjon som er lett å huske.
START PASSWORD: Funksjon for å programmere (eller ikke) forespørselen om passord hver gang roboten blir slått av eller på etter en periode
med inaktivitet (for eksempel hvis den settes bort for vintersesongen).
-
Nei: Roboten omstartes og begynner å fungere uten at man taster inn passordet hver gang den blir startet. Passordet vil kun være nødvendig
for å deaktivere alarmen. For å bekrefte parameteren ber roboten om passordet.
-
Ja: Roboten omstarter seg ikke og begynner ikke å fungere før passordet har blitt tastet inn hver gang den blir startet.
BRUKSMÅTE - PROGRAMMERINGSMODUS
Funksjon for å innstille robotens funksjonsmåte. Når roboten blir slått av går den automatisk tilbake til ”AUTOMATMODUS”.
•
Automatic: Modus for normal funksjon. Roboten gjenkjenner kantledningen og returnerer til ladestasjonen ved behov.
•
Closed area: Funksjonsmodus i avstengte områder uten ladestasjon. For korrekt bruk se ”BRUK AV ROBOTEN I AVSTENGTE OMRÅDER
UTEN LADESTASJON”.
•
No border: Funksjonsmåte uten gjenkjenning av kantledningen. Skal brukes i mindre områder som er fullstendig avgrenset av en mur eller
av en hekk som er minst 15 cm rundt hele omkretsen, uten at en kantledning er installert, mens kunden overvåker den og styrer den med
fjernkontrollen.
SPRÅKALTERNATIVER - PROGRAMMERINGSMODUS
LANGUAGE: funksjon for å velge språket for fremvisning av meldingene og brukermenyen. Bla i de ulike alternativene med knappene “+” eller
“-“ og bekreft med knappen ”Enter”.
•
DATE FORMAT
•
TIME FORMAT
•
DISTANCE FORMAT
Disse funksjonene gjør det mulig å egendefi nere innstillingen av datoformatet, tiden og avstanden.
OPPSTART - AUTOMATMODUS
Den automatiske syklusen skal startes ved den første oppstarten, eller etter en periode med inaktivitet.
1. Kontroller at gressdekket som skal klippes har en høyde som er kompatibel med roboten slik at den kan fungere korrekt (se tekniske
egenskaper).
2. Juster til ønsket klippehøyde (se justering av klippehøyde).
3. Kontroller at arbeidsområdet har blitt korrekt avgrenset og at det ikke fi nnes elementer som kan forhindre roboten i å fungere normalt, som
indikert i avsnittet ”Forberedelse og avgrensing av arbeidsområdene” og påfølgende avsnitt.
4. Plasser roboten i ladestasjonen.
5. Trykk inn knappen ON og vent i noen sekunder til roboten starter fullstendig.
6. Hvis roboten blir oppstartet for første gang, er det nødvendig å programmere den. Hvis den derimot startes etter en lang periode med
inaktivitet, er det nødvendig å kontrollere at de programmerte funksjonene samsvarer med den faktiske tilstanden til overfl aten som skal
klippes (f.eks. tillegg av et basseng, planter etc.) (se ”Programmeringsmodus”).
7. Etter noen sekunder vises meldingen ”CHARGING” i displayet.
8. Roboten begynner å klippe plenen iht. de programmerte metodene.
24
Håndbok
NO
SIKKER STANS AV ROBOTEN
Det kan oppstå behov for å stanse roboten under bruk. Under normale forhold stanses roboten med ”Off/Stop”-knappen. Ved fare, eller for å
foreta vedlikehold, er det nødvendig å stanse den på en sikker måte for å unngå å risikere at knivbladet plutselig starter. Trykk på knappen
“STOP” for å stanse roboten. Trykk en gang til på knappen “STOP” for å sette roboten i gang igjen.
Viktig
Det er nødvendig å stanse roboten på en sikker måte
for å kunne utføre vedlikeholdsinngrep og reparasjoner
(for eksempel: utskifting og/eller lading av batteriene,
utskifting av knivbladet, rengjøring etc.).
ENTER
"STOP"-KNAPP (A)
AUTOMATISK RETUR TIL LADESTASJONEN
Roboten avslutter arbeidssyklusen når følgende forhold fi nner sted.
-
Arbeidsøkten er avsluttet: Når arbeidsøkten er avsluttet, returnerer roboten automatisk til ladestasjonen, og den vil fortsette arbeidet iht.
de programmerte metodene (se ”Programmeringsmodus”).
-
Regn: Hvis det begynner å regne, returnerer roboten automatisk til ladestasjonen, og den vil fortsette arbeidet iht. de programmerte
metodene (se ”Programmeringsmodus”).
-
Batteriene må lades: Roboten returnerer automatisk til ladestasjonen.
-
Plenen er ferdigklippet (kun for enkelte versjoner, se ”Tekniske data”): Sensoren påviser at plenen er klippet, og roboten returnerer
automatisk til ladestasjonen. Den vil fortsette arbeidet iht. de programmerte metodene (se ”Programmeringsmodus”).
BRUK AV ROBOTEN I AVSTENGTE OMRÅDER UTEN LADESTASJON
Roboten skal startes med metoden for avstengte områder når den skal
klippe avstengte områder som er avgrenset med kantledning uten
ladestasjon.
Forsiktig - Forholdsregler
Bruk håndtaket til å forfl ytte roboten. Unngå å ta tak i
robotens ramme, og bruk alltid håndtaket.
Plasser roboten inne på området med en avstand på minst 100 cm (39,37 ")
fra kantledningen og andre hindringer.
min. 100 cm
(39,37 ")
min. 100 cm
(39,37 ")
25
Håndbok
NO
1. Trykk på ON (A)-knappen.
2. Tast inn passordet (hvis du blir spurt om det) (se “Inntasting av passord”).
3. I displayet vises nå funksjonen “PAUSE”.
ENTER
PAUSE
4. Gå inn i programmeringsmodus og bla til du kommer til “BRUKSMÅTE”. Velg ”AVSTENGT
OMRÅDE”. I displayet vil det stå ”AVSTENGT OMRÅDE - 60 min” (fabrikkstilt verdi).
5. Bruk knappene “+”, “-” til å stille minuttene.
6. Trykk på knappen “Enter” for å bekrefte.
7. Trykk på knappen “Start/Pause” helt til du kommer ut av programmeringsmodusen slik
at du kan starte roboten. Når den innstilte tiden er utløpt, vil roboten stanse på en sikker
måte i nærheten av kantledningen.
8. Gjenopprett normal funksjon av roboten som forklart i kapittelet ”OPPSTART -
AUTOMATMODUS”.
ENTER
CLOSED AREA
60 min
OPPSTART AV ROBOTEN UTEN KANTLEDNING
Denne funksjonen kan brukes med fjernkontrollen for å klippe avgrensede områder med en minimumshøyde på 15 cm.
Viktig
Når roboten brukes uten kantledning, er det tilrådelig å passe på at roboten ikke støter mot hindringer, kanter eller farlige
gjenstander for å forhindre skader eller brudd.
1. Trykk på ON (A)-knappen.
2. Tast inn passordet (hvis du blir spurt om det) (se “Inntasting av passord”).
3. Trykk på knappen “Enter” for å gå inn i programmeringsmodus. Bla i postene til du kommer til ”BRUKSMÅTE”. Velg alternativet ”UTEN
KANTLEDNING”. Bruk knappene “+”, “-” til å stille antall minutter som roboten skal arbeide.
4. Trykk på knappen “Enter” for å bekrefte valget.
5. Trykk på knappen “Start/Pause” helt til du kommer ut av menyen slik at du kan starte roboten.
6. Styr roboten med fjernkontrollen.
7. Når klippingen er avsluttet, trykker du på knappen “Off/ Stop” for å stanse roboten på en sikker måte (se ”Sikker stans av roboten”).
Viktig
Det er tilrådelig å styre roboten med fjernkontrollen for å foreta klipping av et lite område. Området skal være godt synlig,
og du må passe på at det ikke fi nnes personer eller husdyr i nærheten av robotens operative sone.
INNTASTING AV PASSORD
Det er mulig å passordbeskytte roboten med et passord bestående av fi re siffer som brukeren kan aktivere, deaktivere og egendefi nere (se
”Programmeringsmodus”).
26
Håndbok
NO
1. I displayet vises meldingen:
2. Bruk knappene “+”, “-” til å stille det første sifferet.
3. Trykk på knappen “Enter” for å bekrefte. Markøren fl ytter seg til neste posisjon.
4. Gjenta prosedyren for å stille alle passordets nummer.
Roboten er nå klar til bruk.
ENTER
PASSWORD
0000
FREMVISNING I DISPLAYET UNDER ARBEIDET
Displayet viser følgende opplysninger mens gressklipperen arbeider:
-
motorhastighet venstre hjul
-
motorhastighet knivblad
-
motorhastighet høyre hjul
-
batterispenning
Når gressklipperen står på lading vises meldingen “CHARGING” i displayet.
Hvis gressklipperen er i status utenfor arbeidsøkten, fremviser displayet dag og tid for start
av neste økt.
ENTER
1
Sx=00 La=00 Dx=00
BATTERY 0000
LANGVARIG INAKTIVITET OG KLARGJØRELSE FØR OPPSTART
Ved langvarig inaktivitet av roboten, er det nødvendig å foreta en rekke operasjoner for å garantere at den fungerer korrekt når den skal tas i
bruk igjen.
1. Lad batteriet helt opp før det settes bort for vinteren. Lad batteriet minst hver 5. måned.
2. Utfør det planlagte vedlikeholdet hos en autorisert forhandler. Dette er en nødvendig forholdsregel for å holde roboten i god stand. Vanligvis
inngår følgende arbeid i servicen:
•
Total rengjøring av robotens chassis, knivbladet og alle andre bevegelige deler.
•
Innvendig rengjøring av roboten.
•
Kontroll av robotens funksjon.
•
Kontroll og, om nødvendig, utskifting av slitte deler som for eksempel knivbladet.
•
Kontroll av batteriets kapasitet.
•
Ved behov kan forhandleren også installere den nye programvaren.
3. Rengjør nøye roboten og ladestasjonen (se “Rengjøring av roboten”).
4. Kontroller komponenter som eventuelt kan være slitt eller skader, som for eksempel knivbladet, og vurder om det er behov for utskifting.
5. Oppbevar roboten på et beskyttet og tørt sted, med passende romtemperatur på mellom 10-25 °C, som ikke er lett å få tilgang til for
uvedkommende (barn, dyr, andre fremmedlegemer etc.). Oppbevar roboten ved en temperatur som er under 20 °C for å begrense utladingen
Identifi ering av tillverkaren och apparaten. .................................................................................................................................2
Allmän beskrivning av apparaten. ...............................................................................................................................................6
Packa och packa upp. .................................................................................................................................................................8
Planering och installation av anläggningen. ................................................................................................................................8
Defi nition av omkretstrådens bana..............................................................................................................................................9
Tillbakagångsmetod till laddningsstationen. ..............................................................................................................................10
Förberedelse för snabb tillbakagång av roboten till laddningsstationen. ..................................................................................10
Förberedelse och begränsning av arbetsområdet. ....................................................................................................................11
Installation av omkretstråd. .......................................................................................................................................................14
Installation av laddningsstation och nätaggregat. .....................................................................................................................16
Laddning av batteri vid nästa användning.................................................................................................................................17
Rekommendationer för inställningarna. ....................................................................................................................................17
Reglering av klipphöjden. ..........................................................................................................................................................17
Drift och funktion. ......................................................................................................................................................................18
Rekommendationer för användningen. .....................................................................................................................................18
Beskrivning av robotens reglage. ..............................................................................................................................................18
Åtkomst till menyerna. ...............................................................................................................................................................18
Sekundära områden - programmeringsläge. ............................................................................................................................22
Säkert stopp av roboten. ...........................................................................................................................................................24
Automatisk tillbakagång till laddningsstationen. ........................................................................................................................24
Användning av roboten i stängda områden utan laddningsstation. ..........................................................................................24
Start av roboten utan omkretstråd.............................................................................................................................................25
Displayens visning under arbetet. .............................................................................................................................................26
Långvarigt stillastående och idriftsättning. ................................................................................................................................26
Laddning av batteri efter ett långvarigt stillastående. ................................................................................................................27
Rekommendationer för underhållet. ..........................................................................................................................................28
Tabell över planerade underhållsintervaller. ..............................................................................................................................28
Rengöring av roboten................................................................................................................................................................28
Fel, orsaker och åtgärder. .........................................................................................................................................................29
Byte av komponenter. ...............................................................................................................................................................31
Rekommendationer för byte av delar. .......................................................................................................................................31
Byte av batterier. .......................................................................................................................................................................31
Byte av blad. .............................................................................................................................................................................32
Bortskaffande av roboten. .........................................................................................................................................................32
Försäkran om överensstämmelse. ..........................................................................................................................................32
En reproduktion av det här dokumentet är förbjuden, även delvis, utan en skriftlig tillåtelse från tillverkaren.
Tillverkaren följer en praxis för en kontinuerlig förbättring och förbehåller sig rätten att ändra på det här dokumentet utan en föregående underrättelse på villkor att detta inte innebär risker för säkerheten.
Formålet med manualen. ............................................................................................................................................................2
Identifi kation af fabrikant og apparat. ..........................................................................................................................................2
Oplysninger om sikkerhed. ........................................................................................................................................................3
Generel beskrivelse af apparatet. ...............................................................................................................................................6
Vigtigste dele. ..............................................................................................................................................................................7
Pakning og udpakning.................................................................................................................................................................8
Planlægning af installationen. .....................................................................................................................................................8
Bestemmelse af kantledningens rute. .........................................................................................................................................9
Metoder for tilbagevenden til ladestationen. .............................................................................................................................10
Opstilling for hurtig tilbagevenden til ladestationen. ..................................................................................................................10
Forberedelse og afgrænsning af arbejdsområderne. .................................................................................................................11
Installation af kantledningen......................................................................................................................................................14
Installation af ladestation og strømforsyning. ............................................................................................................................16
Opladning af batterierne første gang. .......................................................................................................................................17
Tips til justeringerne. .................................................................................................................................................................17
Justering af klippehøjde. ...........................................................................................................................................................17
Brug og vedligeholdelse. ..........................................................................................................................................................18
Tips til brugen. ...........................................................................................................................................................................18
Beskrivelse af betjeningerne i robotten. ....................................................................................................................................18
Adgang til menuerne. ................................................................................................................................................................18
Navigering i menuen. ................................................................................................................................................................18
Sekundære områder - programmering......................................................................................................................................22
Sikkerhedsstandsning af robotten. ............................................................................................................................................24
Automatisk tilbagevenden til ladestationen. ..............................................................................................................................24
Anvendelse af robotten i lukkede områder uden ladestation. ...................................................................................................24
Start af robotten uden kantledning. ...........................................................................................................................................25
Indtastning af adgangskode. .....................................................................................................................................................25
Meddelelser på displayet under arbejdet. .................................................................................................................................26
Langvarig stilstand og efterfølgende ibrugtagning. ...................................................................................................................26
Opladning af batterierne ved langvarig stilstand. ......................................................................................................................27
Tips til brugen. ...........................................................................................................................................................................27
Tips til vedligeholdelsen. ...........................................................................................................................................................28
Terminer for planlagt vedligeholdelse........................................................................................................................................28
Rengøring af robotten. ..............................................................................................................................................................28
Fejl, årsager og løsninger. ........................................................................................................................................................29
Udskiftning af delene. ...............................................................................................................................................................31
Tips til udskiftningen af delene. .................................................................................................................................................31
Udskiftning af batterierne. .........................................................................................................................................................31
Udskiftning af klingen. ...............................................................................................................................................................32
Bortskaffelse af robotten. ..........................................................................................................................................................32
Det er forbudt at gengive dette dokument eller dele heraf uden skriftlig tilladelse fra fabrikanten.
Fabrikanten bestræber sig på at føre en politik kendetegnet ved løbende forbedringer og forbeholder sig derfor ret til at ændre dette dokument uden forudgående varsel, forudsat at dette ikke udgør en risiko for sikkerheden.
græsplænens karakteristika (græssets type og højde, fugtighed osv.)
•
klingens tilstand (om den er slebet effektivt, fri for snavs og afl ejringer
osv.)
ARBEJDE EFTER PRINCIPPET OM TILFÆLDIG FUNKTION
7
Brugermanualen
DA
VIGTIGSTE DELE
1.
Robot.
2. Betjeningstastatur: Bruges til at indstille og få fremvist robottens forskellige funktionsmåder.
3. Regnsensor: Detekterer regn og aktiverer robottens tilbagevenden til ladestationen.
4. Batteri : Forsyner motorerne for hhv. klinge og hjul med strøm. Robotten leveres med et eller fl ere lithiumbatterier, som i nogle modeller er
monteret i forvejen.
5. Håndtag: Bruges til at løfte og transportere robotten.
6. Klinge : Klipper græsset på plænen (er monteret i forvejen i nogle modeller).
7. Rulle med kantledning: Denne specielt isolerede ledning med særlige egenskaber transporterer et signal, der er nødvendigt for at få
robotten til at fungere.
8. Søm : De bruges til at fastgøre kantledningen såvel som ladestationen.
9. Strømforsyningskabel.
10. Strømforsyning : Forsyner ladestationen med lavspænding.
11. Ladestationen: Bruges til at oplade robottens batteri eller til at holde det opladet.
12. Sender: Sender signalet til kantledningen.
13. Brugsanvisning.
14. Nøgle til justering af klippehøjde.
5
6
13
9
8
14
11
12
10
7
4
1
2
3
8
Brugermanualen
DA
INSTALLATION
PAKNING OG UDPAKNING
Apparatet leveres i en passende emballage. Ved udpakningen tages apparatet forsigtigt ud af emballagen, hvorefter integriteten af komponenterne
kontrolleres.
Vigtigt
•
Emballagematerialet bør opbevares til senere brug.
PLANLÆGNING AF INSTALLATIONEN
Installationen af robotten omfatter ikke indgreb, der er vanskelige at udføre, men kræver ikke desto mindre en vis forudgående planlægning med
henblik på at fi nde frem til det bedste sted til at installere ladestationen og at bestemme kantledningens rute.
•
Ladestationen skal placeres i udkanten af græsplænen, og fortrinsvis
i et større område, hvorfra det er let at nå frem til andre områder af
græsplænen. Det område, hvor ladestationen er installeret, benævnes
i det følgende ”hovedområdet”.
Forsigtig - Advarsel
Strømforsyningen skal placeres på et sted, der er
utilgængeligt for børn. F.eks. i en højde af mere end 160
cm (63 ").
Strømforsyningsenhed
kantledning
ladestationen
Sender
H. min. 160 cm
/ 63 "
Forsigtig - Advarsel
For at kunne udføre den elektriske tilslutning er det nødvendigt, at der er etableret en stikkontakt i installationsområdet.
Tilslutningen til elektricitetsnettet skal fi nde sted i overensstemmelse med den gældende lovgivning på området. For
at være fuldstændigt sikkert skal den elektriske installation, som strømforsyningen sluttes til, være forsynet med et
jordingsanlæg, der fungerer upåklageligt.
Vigtigt
Det anbefales, at enheden installeres i et kabinet for elektriske komponenter (til udendørs eller indendørs brug), som bør
kunne låses og være passende ventileret for at opretholde en korrekt luftcirkulation.
Forsigtig - Advarsel
Sørg for, at kun autoriserede personer har adgang til kabinettet.
•
Når den enkelte arbejdsopgave er gennemført, skal robotten nemt kunne fi nde frem til ladestationen, som vil være udgangspunktet for en ny
arbejdsopgave og for at nå frem til andre arbejdsområder, der i det følgende benævnes ”sekundære områder”.
•
Ladestationen skal placeres i overensstemmelse med følgende krav:
-
Området skal være fl adt.
-
Jordbunden skal være stabil og i stand til at sikre en god afvanding.
-
Ladestationen skal helst installeres i det største græsområde.
-
Det er nødvendigt at sikre sig, at eventuelle sprinklere til kunstvanding ikke sender vandstråler ind i den indre del af ladestationen.
-
Ladestationens indgangsside skal placeres som vist i fi gur for at gøre det muligt for robotten at vende tilbage til ladestationen ved at følge
kantledningen i retningen ”med uret”.
-
Umiddelbart foran ladestationen skal der være en retlinjet strækning på mindst 400 cm (157 ").
•
Ladestationen skal være stabilt fastgjort til jorden. Sørg for, at der ikke opstår et indgangstrin foran ladestationen, f.eks. ved at placere en
kunstgræsmåtte ved stationens indgang for at kompensere for indgangstrinnet. Alternativt fjernes en del af græstørven, og ladestationen
installeres i græshøjde.
•
Ladestationen er tilsluttet strømforsyningen via en ledning, som skal ud af ladestationen fra ydersiden af det område, der skal klippes.
9
Brugermanualen
DA
•
Strømforsyningen skal placeres i overensstemmelse med følgende
krav:
-
I et ventileret område, der er beskyttet mod vejrlig og direkte sollys.
-
Helst inde i en bygning, f.eks. en garage eller et skur.
-
Hvis strømforsyningen placeres udendørs, må den ikke udsættes
for direkte sollys eller vand. Den skal derfor beskyttes inde i en
ventileret boks. Den må i øvrigt ikke placeres i direkte kontakt med
jordbunden eller med fugtige omgivelser.
-
Den skal placeres uden for græsplænen, og ikke inde på plænen.
-
Den overskydende del af kablet, der forbinder ladestationen med
strømforsyningen, skal strækkes ud. Kablet må hverken afkortes
eller forlænges.
NEJ
OKOK
NEJNEJ
NEJ
•
Ved indgangen af ladestationen skal kablet være retlinjet og skal være
placeret vinkelret på ladestationen over en længde på mindst 200 cm
(79 ’’); udgangsstykket skal forlade ladestationen som vist i fi guren,
hvilket vil gøre det muligt for robotten at komme korrekt ind.
strømforsyningsenhed
ladestation
H. min. 160 cm
/ 63 "
Afstand min.
200 cm
/ 78,74 "
kantledning
Sender
Hvis robotten installeres tæt på et område, hvor der er installeret en anden
robot (identisk eller af andet fabrikat), er det nødvendigt under installationen
at foretage en modifi kation i robottens sender og modtager for at undgå, at
de frekvenser, der bruges af robotterne, forstyrrer hinanden.
BESTEMMELSE AF KANTLEDNINGENS RUTE
Inden kantledningen installeres er det nødvendigt at kontrollere hele
overfl aden af græsplænen. For at få en velfungerende robot skal det
overvejes, om det kan være på sin plads at foretage ændringer i græstørven
eller tage forholdsregler under placering af kantledningen.
1. Vurdér, hvilken metode der er at foretrække for at få robotten til at
vende tilbage til ladestationen (se anvisningerne i afsnittet ”METODER
FOR TILBAGEVENDEN TIL LADESTATIONEN”).
2. Vurdér, om det kan være nødvendigt at anvende en særlig opstilling
af kantledningen (se anvisningerne i afsnittet ”OPSTILLING FOR
HURTIG TILBAGEVENDEN TIL LADESTATIONEN”).
3. Forberedelse og afgrænsning af arbejdsområderne.
4. Installation af kantledningen.
5. Installation af ladestation og strømforsyning. Husk, at kantledningen
skal placeres i retningen ”med uret”, hvorimod retningen skal gå ”mod
uret” omkring bede. Se fi gur.
24 v
spor til placering af kantledning
10
Brugermanualen
DA
METODER FOR TILBAGEVENDEN TIL LADESTATIONEN
Robotten kan vende tilbage til ladestationen ved hjælp af to forskellige
metoder afhængigt af konfi gurationen i brugermenuen under ”Indstillinger”
- ”Tilbagevenden”. Metoden ”Langs ledningen” bør kun anvendes, når
der er mange hindringer inde i haven og i nærheden af kantledningen
(under 2 m). I alle de andre tilfælde er det at foretrække at bruge metoden
”V-METER” for at vende hurtigere tilbage til ladestationen.
“Følg kabel”. Når robotten vender tilbage til ladestationen ifølge denne
metode, følger robotten kantledningen med hjulene på hver side af
ledningen. Når denne metode er aktiveret, er det ikke nødvendigt at
placere ”tilbagekaldelsen” på ledningen som forklaret nedenfor.
“V-METER”. Når det vælges at vende tilbage til ladestationen ved hjælp
af denne metode, vil robotten køre langs kantledningen i en given afstand,
som kan variere fra nogle cm til 1 m (3,2 '), og vil engang imellem berøre
kantledningen (især på strækninger, der ikke er retlinjede), indtil den
genkender en ”tilbagekaldelse” på ledningen, der er nødvendig for at føre
robotten korrekt tilbage til ladestationen eller styre den, når den kører over
smalle strækninger. Så snart robotten genkender ”tilbagekaldelsen” på
ledningen, vil den placere hjulene på hver side af kantledningen og vil følge
den i ca. 10 m (33 ').
Gennemgang
under 2 m
4-10 mt.
4-10 mt.
2 mt.
5 cm.
2 mt.
”Tilbagekaldelsen” på ledningen bruges til at fortælle robotten ikke kun, at den er i nærheden af ladestationen, men også i nærheden af en smal
gennemgang eller en pil til hurtig tilbagevenden til ladestationen.
Så snart robotten genkender en ”tilbagekaldelse”, vil den følge kantledningen i en lav hastighed og med større nøjagtighed i ca. 10 m (33 '). Hvis
den derefter ikke møder ladestationen eller den hurtige tilbagevenden, vil den skifte tilbage til metoden ”V-Meter”.
Nedenstående anvisninger skal følges ved installering af ”tilbagekaldelsen”.
•
”Tilbagekaldelsen” er et stykke ledning, der strækker sig 2 m (6,6 ') ud i haven med en afstand fra tråd til tråd på ca. 5 cm (ca. 2 ").
•
”Tilbagekaldelsen” skal placeres i strækningen foran ladestationen i en afstand af mellem 4 og 10 m (13,2 - 33 ').
•
”Tilbagekaldelsen” skal i placeres i strækningen foran gennemgange, der er smallere end 2 m (6,6 ').
•
”Tilbagekaldelsen” skal placeres i strækningerne foran en hurtig tilbagevenden.
OBS! Hvis det ikke lykkes for robotten af møde ladestationen inden for et vist tidsrum, vil den følge kantledningen ifølge metoden
”langs ledningen”.
OPSTILLING FOR HURTIG TILBAGEVENDEN TIL LADESTATIONEN
Hurtig tilbagevenden består i en særlig opstilling af kantledningen, der gør det muligt for robotten at køre en kortere vej tilbage til ladestationen.
Denne særlige opstilling af kantledningen bør kun anvendes i haver, hvor den hurtige tilbagegang medfører en reel afkortning af ruten, og når
omkredsen er længere end ca. 200 m.
For at installere den hurtige tilbagevenden placeres kantledningen på jorden på en sådan måde, at der dannes en trekant med én af siderne på
50 cm (ca. 20 ") og med to sider på 40 cm (ca. 16 ") bestående af kantledning som vist i fi gur.
Når robotten på sin vej tilbage til ladestationen med hjulene på hver side af kantledningen møder denne særlige form for trekant, standser den
sin bevægelse, vender med ca. 90° mod indersiden af haven og begynder at køre i den nye retning, indtil den møder kantledningen på den
modsatte side.
Opstillingen for hurtig tilbagevenden skal anvendes på et sted, der kommer efter mindst 200 cm (ca. 79 ") retlinjet ledning, og som efterfølges af
mindst 150 cm (ca. 59 ") retlinjet ledning.
Opstillingen må ikke udføres på det retlinjede stykke, der befi nder sig umiddelbart foran ladestationen, eller i nærheden af forhindringer.
Kontrollér, at der langs strækningen for hurtig tilbagevenden ikke befi nder sig forhindringer, som kunne umuliggøre en sådan tilbagevenden.
Vigtigt
Hvis opstillingen for hurtig tilbagevenden placeres på et uegnet sted, vil dette kunne forhindre, at robotten vender hurtigt
tilbage til ladestationen. Når robotten kører langs kanten for at nå frem til et sekundært område, detekterer den ikke
opstillingen for hurtig tilbagevenden.
11
Brugermanualen
DA
Figuren giver nogle nyttige oplysninger om, hvordan opstillingen for hurtig
tilbagevenden installeres korrekt.
4040
50
Gennemgang
under 2 m
4-10 mt.min. 150 cm.
(59,05 ")
4-10 mt.
4-10 mt.
2 mt.
5 cm.
2 mt.
FORBEREDELSE OG AFGRÆNSNING AF ARBEJDSOMRÅDERNE
Forberedelse af græsplænen
1. Kontrollér, at plænen, hvor græsset skal klippes, er jævn og uden
huller, sten og andre forhindringer. Er dette ikke tilfældet, foretag da
de nødvendige forbedringer. Hvis nogle af forhindringerne ikke kan
fjernes, skal de pågældende områder afgrænses hensigtsmæssigt
med kantledning.
2. Kontrollér, at eventuelle skråninger i plænen ikke overstiger det
maksimalt tilladte (se ”Tekniske data”). Når robotten under sit arbejde
på skråninger detekterer ledningen, ville hjulene kunne glide og få
robotten til at komme ud af det afgrænsede område.
Vigtigt
Områder med skråninger, der overstiger det tilladte, kan
ikke klippes med robotten. Kantledningen skal derfor
placeres foran skråningen for at udelukke det pågældende
område på græsplænen fra klipningen.
NEJ
35 cm
(13,78 ")
21-35%
21-35%
0-20%
100 cm (39,3 ")
35 cm
(13,78 ")
35 %
0-35%
0-20%
0-20%
kantledning
kantledning
OK
OK
OK
OK
NEJ
NEJ
12
Brugermanualen
DA
Afgrænsning af arbejdsområdet
3. Kontrollér hele overfl aden af græsplænen og vurdér, om det kan være
nødvendigt at opdele den i fl ere særskilte arbejdsområder efter de
kriterier, der er beskrevet nedenfor. For at gøre det lettere at udføre
installationen anbefales det at kontrollere hele strækningen, inden man
går i gang med at installere kantledningen. Figuren viser et eksempel
på græsplæne med et spor, der viser placeringen af kantledningen.
Under installationen er det nødvendigt at identifi cere eventuelle
sekundære områder og eventuelle lukkede områder. Ved sekundært
område forstås en del af græsplænen, der er forbundet med
hovedplænen via en indsnævring, som robotten kan have svært
ved at nå frem til ved vilkårlig bevægelse. Det skal være muligt at
nå frem til området uden trin og højdeforskelle ud over de tilladte
grænser. Hvorvidt et område defi neres ”sekundært” afhænger også
af størrelsen af det primære område. Jo større det primære område
er, desto vanskeligere vil det være at nå frem til smalle gennemgange.
Mere generelt skal en gennemgang under 200 cm (ca. 79 ") betragtes
som sekundært område. Robotten kan håndtere et antal sekundære
områder afhængigt af modellens egenskaber (se ”Tekniske data”).
Den smalleste tilladte gennemgang er på 70 cm (ca. 27,6 ") mellem
kantledning og kantledning. Da kantledningen skal placeres i en vis
afstand (som er angivet nedenfor) fra eventuelle genstande uden for
plænen, skal vi have en gennemgang til rådighed på i alt 140 cm (ca.
55 ").
Når denne gennemgang er meget lang, skal bredden helst være større
end 70 cm (ca. 27,6 ").
Under programmeringen er det nødvendigt at konfi gurere dels
størrelsen i procent af de sekundære områder i forhold til græsplænen,
og dels retningen (med eller mod uret) for at nå frem til disse hurtigst
muligt, og desuden det antal meter kantledning, der skal bruges til at
nå frem til det sekundære område. Se ”Programmering”.
24 v
Spor for placering af kantledningen
min. 70 cm / 27,56 "min. 70 cm / 27,56 "
min. 70 cm / 27,56 "
Hvis de minimumskrav, der er beskrevet ovenfor, ikke er opfyldt
(f.eks. et område adskilt af et trin, en højdeforskel ud over robottens
egenskaber eller en gennemgang smallere end 70 cm (ca. 27,6 ")
mellem kantledning og kantledning), skal det pågældende område
på plænen betragtes som ”lukket område”. For at installere et ”lukket
område” placeres frem- og returledningen i den samme strækning i en
afstand af under 1 cm (0,40 "). I så fald vil robotten ikke være i stand til
selvstændigt at nå frem til området, som skal håndteres som beskrevet
i afsnittet ”Håndtering af lukkede områder”. Håndteringen af lukkede
områder reducerer automatisk det antal kvadratmeter, som robotten
kan håndtere selvstændigt.
minimumsgennemgang 70 cm / 27,56 "
mellem kantledning og kantledning.
HOVEDOMRÅDE
SEKUNDÆRT OMRÅDE
gennemgang
< 70 cm / ca. 27,56 "
HOVEDOMRÅDE
LUKKET OMRÅDE
13
Brugermanualen
DA
4. Hvis der inden eller uden for arbejdsområdet fi ndes en gulvbelægning eller en sti i samme niveau som græsplænen, skal kantledningen
placeres 5 cm (ca. 2 ") fra gulvets kant. På denne måde vil robotten stikke en smule ud af græsplænen, og alt græsset vil blive klippet. Hvis
gulvet er af metal, eller hvis der fi ndes en metalrist, en brusefl ade eller elektriske kabler, skal kantledningen placeres mindst 30 cm (ca. 12 ")
fra disse for at forhindre funktionsfejl i robotten og forstyrrelser i kantledningen.
Vigtigt
Figuren viser et eksempel på elementer inden og uden for arbejdspladsen og de afstande, der skal overholdes ved placering
af kantledningen. Samtlige elementer af jern eller andre metaller (riste, elektriske forbindelser osv.) skal afgrænses for at
undgå forstyrrelser af signalet i kantledningen.
5 cm
1,97 “
30 cm
11,81 “
30 cm
11,81 “
30 cm
11,81 “
Hvis der inden eller uden for arbejdsområdet fi ndes forhindringer, f.eks. en kantsten, en væg eller en mur, skal kantledningen placeres mindst
35 cm (ca. 14 ") fra forhindringen. For at undgå, at robotten støder mod forhindringen, kan afstanden mellem kantledning og forhindring øges til
mindst 40 cm (ca. 16 "). Hvis der er græs tæt på den kant, hvor det blev besluttet ikke at lade robotten køre, vil dette græs kunne færdigklippes
ved hjælp af en trimmer eller en buskrydder.
35 cm.
/13,78 "
35 cm.
/13,78 "
35 cm.
/13,78 "
35 cm.
/13,78 "
Hvis der inden eller uden for arbejdsområdet fi ndes et bed, en hæk, et træ med rødder, der stikker ud af jorden, en lille grøft på 2-3 cm eller en lille
kantsten på 2-3 cm, skal kantledningen placeres mindst 30 cm (ca. 12 ") fra disse forhindringer for at undgå, at de beskadiges af robotten, eller
at robotten selv beskadiges. Hvis der er græs i det område, hvor det blev besluttet ikke at lade robotten køre, vil dette græs kunne færdigklippes
ved hjælp af en trimmer eller en buskrydder.
30 cm.
/11,81”
30 cm.
/11,81”
30 cm.
/11,81”
30 cm.
/11,81”
30 cm.
/11,81”
udstående rødder
30 cm.
/ 11,81 “
30 cm.
/ 11,81 “
14
Brugermanualen
DA
Hvis der inden eller uden for arbejdsområde fi ndes et svømmebassin, en dam, en afgrund, en grøft, et nedadgående trin eller en offentlig vej, der
ikke er beskyttet af en mur, skal kantledningen placeres mindst 90 cm (ca. 35 ’’) fra disse. For at reducere kantledningens afstand med henblik
på en optimal installation og en velfungerende robot, anbefaler vi i så fald at opsætte en ekstra indhegning på mindst 15 cm; dette vil gøre det
muligt at placere kantledningen i de korrekte afstande, der er beskrevet ovenfor.
Vigtigt
En nøje overholdelse af de afstande og skråninger, der er angivet i manualen, sikrer en optimal installation og en
velfungerende robot. Hvis der er skråninger, eller hvis jordbunden er glat, skal afstanden øges med mindst 30 cm / ca. 12 ".
90 cm.
/ 35,44 “
90 cm.
/ 35,44 “
90 cm.
/ 35,44 “
Hvis der inden for arbejdsområdet fi ndes forhindringer, som kan tåle sammenstød, som f.eks. træer, buske eller pæle uden skarpe kanter, er
det ikke nødvendigt at afgrænse dem. Robotten vil støde mod forhindringen og skifte retning. Hvis det foretrækkes, at robotten ikke støder
mod forhindringer, og for en sikker og støjsvag funktion af robotten i øvrigt, kan det anbefales at afgrænse alle de jordfaste forhindringer.
Forhindringer, der er en smule skrå, såsom blomsterkasser, store sten eller træer med udstående rødder, skal de afgrænses for at undgå mulige
skader på klingen og på selve forhindringerne. For at afgrænse en forhindring starter man fra det sted på den ydre kontur, der befi nder sig
tættest på den genstand, som skal afgrænses. Herfra føres kantledningen frem til forhindringen, derefter går man rundt om forhindringen under
hensyntagen til de korrekte afstande, der er beskrevet ovenfor, og til sidst føres ledningen tilbage til den oprindelige strækning. Fremledningen
med den overlappende tilbageledning skal placeres under det samme søm - på denne måde vil robotten køre over kantledningen.
For at sikre en korrekt funktion af robotten skal den overlappende kantledning have en længde på mindst 70 cm (ca. 27,6 "), hvilket vil gøre det
muligt for robotten at bevæge sig frit.
NEJ
min. 70 cm
/ 27,56 ”
min. 70 cm
/ 27,56 ”
< 70 cm
/ 27,56 ”
< 70 cm
/ 27,56 ”
0 cm / 0 ”0 cm / 0 ”
træ
pæl
OKOK
INSTALLATION AF KANTLEDNINGEN
Kantledningen kan enten nedgraves eller lægges på jorden. Hvis man
råder over en maskine til placering af ledningen, foretrækkes det at
nedgrave den, da ledningen herved får en bedre beskyttelse. Ellers
skal ledningen lægges på jorden ved hjælp af de medfølgende søm som
beskrevet nedenfor.
Vigtigt
Placeringen af kantledningen startes på det sted, hvor
ladestationen er installeret. Husk at lade kantledningen
være et par ekstra meter længere på dette sted - ledningen
vil kunne klippes i den rigtige længde senere, når den
tilsluttes enheden.
Max.
5 cm (1,96 ")
kantledning
15
Brugermanualen
DA
Kantledning lagt på jorden
Klip græsset meget kort langs hele den strækning, hvor ledningen skal
placeres, ved hjælp af en trimmer eller en buskrydder. På denne måde
bliver det nemmere at placere kablet i kontakt med jorden og undgå, at
det bliver brudt af klingen (kablet kan sammenføjes igen som beskrevet
nedenfor).
1. Placér ledningen i retningen ”med uret” over hele strækningen og
fastgør den med de medfølgende søm (afstanden mellem sømmene
skal være fra 100 til 200 cm (ca. 40 til 80 ")).
-
Husk, at placeringen af ledningen omkring bede skal ske i retningen
”mod uret”.
-
I retlinjede strækninger skal ledningen fastgøres på en sådan
måde, at den bliver spændt og helt tæt på jorden.
-
I strækninger, der ikke er retlinjede, skal ledningen fastgøres på
en sådan måde, at den ikke bliver snoet, men derimod antager en
jævn krumning (radius 20 cm).
NEJ
søm til fastgørelse af kantledningkantledning
Nedgravet kantledning
1. Grav i jorden regelmæssigt og symmetrisk i forhold til det spor, der er
fremhævet på jorden.
2. Placér ledningen i retningen ”med uret” langs hele strækningen i en
dybde af ca. 2 til 3 cm (0,8 til 1,20 "). Ledningen må ikke nedgraves
dybere end 5 cm for ikke at forringe kvaliteten og styrken af det signal,
der modtages af robotten.
3. Under placering af ledningen skal denne om nødvendigt fastgøres
nogle steder ved hjælp af de medfølgende søm, således at den bliver
på plads, når den senere dækkes med jorden.
4. Dæk hele ledningen med jord og sørg for, at den forbliver spændt inde
i jorden.
HOVEDOMRÅDE
LUKKET OMRÅDE
gennemgang
< 70 cm (27,56 ")
35 cm
(13,78 ")
Max. 1 cm
(0,40 ")
NEJ
Sammenføjning af kantledningen.
Vigtigt
Uanset om kantledningen er nedgravet eller lagt på jorden,
kan den om nødvendigt forbindes med en anden ledning
med samme egenskaber, når dette blot gøres ordenligt
(se fi gur). For at isolere sammenføjningen anbefales det
at bruge selvvulkaniserende tape (f.eks. 3M Scotch 23).
Der må ikke bruges andre typer tape eller forbindelser
(klemmer, kabelsko osv.).
1
34
2
16
Brugermanualen
DA
INSTALLATION AF LADESTATION OG STRØMFORSYNING
Forsigtig - Advarsel
Den elektriske strøm skal altid slukkes på installationens
hovedkontakt, inden man går i gang med at foretage et
hvilket som helst indgreb.
Strømforsyningen skal placeres på et sted, der er
utilgængeligt for børn. F.eks. i en højde af mere end 160
cm. (63,00 ").
beskyttelsesskærm(L)
strømforsyning(A)
sender(B)
H. min. 160 cm
(63.00 ")
1. Installér strømforsyningen (A).
2. Fjern beskyttelsesskærmen (L).
3. Placér ladestationen på det valgte sted.
4. Indsæt kantledningen (M) under ladestationen.
5. Forbind ledningens to ender til klemmerne på ladestationen.
rød klemme
sort klemme
Kantledning (M)
6. Fastgør ladestationen (N) til jorden ved hjælp af sømmene (P).
Ladestationen kan om nødvendigt fastgøres med ekspansions-
rawlplugs.
søm (P)
ekspansions-rawlplugs (Q)
ladestation (N)
7. Forbind ladestationens (N) forsyningskabel (E) til strømforsyningen
(A).
8. Slut strømforsyningens stik (A) til stikkontakten.
9. Hvis lysdioden i senderen blinker, er forbindelsen korrekt gennemført.
Er dette ikke tilfældet, skal fejlen fi ndes (se ”Fejlfi nding”).
10. Montér beskyttelsesskærmen (L).
strømforsyning (A)
forsyningskabel (E)
kantledning
ladestation (N)
sender (B)
H. min. 160 cm
(63.00 ")
beskyttelsesskærm(L)
17
Brugermanualen
DA
OPLADNING AF BATTERIERNE FØRSTE GANG
1.
Anbring robotten i ladestationen.
2. Tryk på ”ON”-knappen.
3. Efter et par sekunder kommer meddelelsen ”OPLADER” frem på
displayet.
4. Tryk på knappen ”Start/Pause”. Meddelelsen ”PAUSE” kommer frem
på displayet. Batteriernes opladningsproces starter.
5. Når opladningen er gennemført, kan robotten programmeres til kørslen
(se ”Programmering”).
ENTER
“ON” KNAPPEN
KNAP “START/PAUSE”
Vigtigt
Når batterierne oplades for første gang, skal de forblive tilsluttet i mindst 4 timer.
JUSTERINGER
TIPS TIL JUSTERINGERNE
Vigtigt
Brugeren skal foretage justeringerne i henhold til de fremgangsmåder, der er beskrevet i manualen. Der må under ingen
omstændigheder udføres justeringer, der ikke er udtrykkeligt angivet i manualen. Eventuelle ekstra justeringer, der ikke er
udtrykkeligt angivet i manualen, må kun udføres af personalet på et servicecenter, der er godkendt af fabrikanten.
JUSTERING AF KLIPPEHØJDE
Inden justeringen af klingens klippehøjde udføres, skal man sikre sig, at robotten er standset i sikkerhedsmæssigt forsvarlig tilstand (se
”Sikkerhedsstandsning af robotten”).
Vigtigt
Brug sikkerhedshandsker for at undgå risiko for snitsår på hænderne.
1. I modeller udstyret med tyverialarm skal alarmen deaktiveres for at
undgå, at den går i gang (se ”Programmering”).
2. Vend robotten om og læg den ned forsigtigt, så at beskyttelseshjelmen
ikke beskadiges.
3. Skru skruen (C) af og drej beslaget (E) ”med uret” ved hjælp af den
medfølgende nøgle.
4. Løft eller sænk skæreaggregatet (D) for at opnå den ønskede
klippehøjde. Værdien kan ses på skalaen på den medfølgende nøgle.
Vigtigt
Robotten må ikke bruges til at klippe græs, der er mere
end 1 cm (0,40 ") højere end klingens højde. Klippehøjden
skal reduceres gradvist. Det anbefales at reducere højden
med mindre end 1 cm (0,40 ") hver dag eller hver anden
dag, indtil den ønskede højde er nået.
5. Når justeringen er færdiggjort, drejes beslaget (E) ”mod uret” og
skruen (C) strammes igen.
6. Vend robotten om igen i dens arbejdsstilling.
(E)
skæreaggregat (D)
skrue (C)
18
Brugermanualen
DA
BRUG OG VEDLIGEHOLDELSE
TIPS TIL BRUGEN
Vigtigt
-
Når robotten skal tages i brug for første gang, anbefales det, at brugeren læser hele manualen grundigt og sørger for
at forstå den fuldt ud, og ikke mindst sørger for at forstå alle oplysningerne vedrørende sikkerheden.
-
Apparatet må kun anvendes til de formål, der er angivet af fabrikanten, og ingen anordning må manipuleres med
henblik på at opnå andre resultater end dem, der svarer til almindelig funktion.
BESKRIVELSE AF BETJENINGERNE I ROBOTTEN
Figuren viser placeringen af de betjeninger, der fi ndes ombord på robotten.
A. DISPLAY: Displayet er belyst og kan vise alle funktionerne.
B. ON: Tryk på denne knap for at tænde for plæneklipperen.
C. OFF/STOP: Tryk på denne knap for at stoppe plæneklipperen -
displayet slukker.
D. START/PAUSE: Tryk for at standse på plæneklipperen og efterlade
displayet i standby - i denne funktionsmåde er det muligt at
programmere plæneklipperen. Ved at trykke på knappen igen, starter
arbejdet på ny. Når der trykkes på denne knap, mens plæneklipperen
er under opladning, vil den først genstarte sit arbejde, når der trykkes
på knappen igen og ”Pause” forsvinder fra displayet.
E. CHARGE: Ved tryk på denne knap vender plæneklipperen tilbage til
ladestationen, og genopladningen af batterierne starter tidligere. Når
der trykkes på denne knap, mens plæneklipperen er under opladning,
afbrydes opladningen og robotten begynder sit arbejde igen.
ENTER
"ON"-KNAPPEN (B)
KNAP "ENTER/MENU" (G)
7(*1,1*(1$)7$67$785(7(5.81(7(.6(03(/2
KNAP "OFF - STOP" (C)
KNAP "CHARGE" (E)
KNAP "START/PAUSE" (D)
KNAP “
– ” (H)
KNAP “
+ ” (F)
DISPLAY (A)
"STOP"-KNAPPEN (I)
F. KNAPPEN “+”: Når der trykkes på denne knap, mens robotten arbejder, er det muligt at genstarte en klinge, som var stoppet. Ved tryk på
denne knap under programmeringen øges værdierne i menuen.
G. ENTER/MENU: Når der trykkes på denne knap, mens robotten kører, starter ”spiralfunktionen”. Ved tryk på denne knap under
programmeringen bekræftes og gemmes det indtastede valg.
H. KNAP “-”: Når der trykkes på denne knap, mens robotten kører, standser klingen. Ved tryk på denne knap under programmeringen
reduceres værdierne i menuen.
I. STOP: Når der trykkes på denne knap, standser plæneklipperen i sikkerhedsmæssigt forsvarlig tilstand. Brug denne knap kun i tilfælde af
overhængende fare og til at udføre vedligeholdelse af robotten.
ADGANG TIL MENUERNE
Robottens funktioner kan programmeres ved hjælp af de forskellige funktioner i hver menu. Tabellen viser en liste over de tilgængelige menuer
og deres funktioner.
For at udføre programmeringen går man frem som forklaret nedenfor.
1. Løft beskyttelsespladen og tryk på ”ON”-knappen.
2. Indtast adgangskoden (når dette kræves), se ”Indtastning af adgangskode”.
3. Hvis robotten tændes, mens den sidder i ladestationen, vises meddelelsen ”OPLADER” på displayet efter et par sekunder. Tryk derefter på
knappen ”Start/Pause” .
4. Meddelelsen ”PAUSE” kommer frem på displayet.
5. Tryk på knappen ENTER/MENU . På denne måde kommer man ind i brugerprogrammeringsmenuen, og displayet viser funktionen ”INDSTILLINGER”.
NAVIGERING I MENUEN
For at navigere rundt i brugerprogrammeringsmenuen er der følgende muligheder:
- “+” og “-”: Skifter cyklisk mellem menupunkterne eller gør det muligt at ændre værdien af den funktion, der vises på displayet.
- “ENTER/MENU”:
Skifter til næste menuniveau eller bekræfter og gemmer den værdi, der vises på displayet, og går videre til den efterfølgende funktion.
- “START/PAUSE”: Skifter til det foregående menuniveau, indtil den forlader programmeringen.
- “OFF/STOP”: Slukker for robotten uden at bekræfte den sidste funktion, der vises på displayet.
Menuen er struktureret som et træ. Det følgende er en sammenfatning af de tilgængelige programmeringsfunktioner; en detaljeret forklaring af
de enkelte funktioner fi ndes på siderne efter fl owdiagrammet.
Nogle funktioner er ikke tilgængelige i alle modeller. Se tabel ”Tekniske data”.
19
Brugermanualen
DA
Indstillinger
Arbejdsskema
Aktivér
Kobl fra
Aktivér
Kobl fra
Aktivér
Kobl fra
Følg kabel
V-Meter
Alarm
Uge
Auto indstilling
Arb. skema 2
Lyd
Retur til lader
Dato
Klokkeslæt
Aktiverer eller deaktiverer den akustiske alarm
Bruges til at programmere arbejdsdage og hviledage.
Aktiverer eller deaktiverer genkendelsen af en
færdigklippet græsplæne.
Bestemmer det andet tidsrum, inden for hvilket robotten er aktiveret til at arbejde.
Gør det muligt at slå lyden fra, mens robotten
sidder i ladestationen.
Gør det muligt at vælge den metode, der skal
bruges til at vende tilbage til ladestationen.
Konfi gurerer datoen
Konfi gurerer uret
Start igen
Pause
Koblet fra
Ingen
Kobl bluetooth
Kobl til radio
Regnsensor
Arb. skema 1
Fjernbetjening
Bestemmer opførslen i tilfælde af regn
Bestemmer det første tidsrum, inden for hvilket robotten er aktiveret til at arbejde.
Konfi gurerer fjernbetjeningen til styring af obotten.
Sek.omraader
Sikkerhed
Sek.omraader 1
Skift adg.kode
Sek.omraader 3
Bloker tastatur
Bestemmer konfi gurationen af et eventuelt
sekundært område 1 med angivelse af områdets
areal, afstanden fra ladestationen og retningen til
at nå frem til det.
Gør det muligt at angive adgangskoden
Bestemmer konfi gurationen af et eventuelt
sekundært område 3.
Når låsen er aktiveret, kræves der adgangskode
for at få adgang til robottens funktioner.
Procent
Afstand
Retning
Sek.omraader 2
Start kodeord
Bestemmer konfi gurationen af et eventuelt
sekundært område 2.
Bestemmer, om robotten skal spørge om
adgangskode, når den tændes.
Aktivér
Aktivér
Kobl fra
Kobl fra
20
Brugermanualen
DA
Arbejdstilstand
Sprogvalg
Automatisk
Sprog
Uden omkreds
Tidsformat
Afstandsformat
Konfi gurerer robottens funktionsmåde som automatisk.
Konfi gurerer brugermenuens sprog
Konfi gurerer arbejdet uden genkendelse af
kantledningen. ADVARSEL!
Læs manualen grundigt, inden denne funktion
anvendes.
Indstiller formatet for indtastning af tiden
Konfi gurerer formatet for indtastning af afstande
ved håndtering af sekundære områder.
Tid
Lukket omraade
Datoformat
Konfi gurerer arbejdsopgaver på et lukket
område uden ladestation.
Konfi gurerer formatet for indtastning af datoen
DD/MM/ÅÅ
24T
Meter
MM/DD/ÅÅ
12T
Fod
INDSTILLINGER - PROGRAMMERING
ALARM: (fi ndes kun i nogle versioner, se ”Tekniske data”). Aktiverer og afbryder
tyverialarmen. For at afbryde alarmen bliver man bedt om at indtaste adgangskoden til
robotten (adgangskoden ved leveringen er 0000).
•
Kobl fra: Bruges til at deaktivere eller slukke for alarmen, når den er aktiveret. Den
gennemførte deaktivering bekræftes med en vedvarende tone, der bliver lavere og
lavere.
•
Aktivér: Bruges til at aktivere alarmen. Hvis robotten løftes gennem håndtaget,
aktiveres alarmen. Et tredobbelt signal bekræfter den gennemførte aktivering.
REGNSENSOR: Med denne funktion bestemmes robottens opførsel i regnvejr.
•
Start igen: I tilfælde af regnvejr vender robotten tilbage til stationen og går i gang med
opladningen. Når batteriet er opladet, begynder robotten at klippe, hvis det er holdt op
med at regne.
•
Koblet fra: I tilfælde af regnvejr fortsætter robotten med at klippe.
•
Pause: I tilfælde af regnvejr vender robotten tilbage til stationen og går i gang med
opladningen, indtil der trykkes på knappen ”Pause”.
AUTO INDSTILLING: (fi ndes kun i nogle versioner, se ”Tekniske data”). Denne funktion
reducerer robottens klippetid automatisk som følge af græsplænens tilstand.
•
Aktivér: Robotten reducerer arbejdstiden afhængigt af græssets tilstand. Når
græsplænens overfl ade er klippet, starter maskinen automatisk en hvilepause, der
forsinker de efterfølgende afgange fra ladestationen. Robottens arbejde vil dog stadig
fi nde sted inden for de indstillede arbejdstider.
•
Kobl fra: Robotten vil arbejde i overensstemmelse med den indstillede tid, og indtil
batteriernes tilstand tillader det.
ENTER
ALARM:
21
Brugermanualen
DA
FJERNBETJENING: (fi ndes kun i nogle versioner, se ”Tekniske data”).
For synkroniseringsproceduren, se vejledningen på fjernbetjeningen / konsollen.
LYD: Gør det muligt at deaktivere de akustiske meddelelser, mens robotten sidder i
ladestationen.
RETUR TIL LADER: Gør det muligt at vælge den metode, der skal bruges til at vende
tilbage til ladestationen.
1. “FØLG KABEL”. Robotten vender tilbage til ladestationen ved at placere hjulene på
hver side af kantledningen.
2. “V-METER”. Robotten kører langs kantledningen i en given afstand, som kan variere
fra nogle cm til 1 m (3,2 '), og vil engang imellem berøre kantledningen (især på
strækninger, der ikke er retlinjede), indtil den genkender ”tilbagekaldelsen” til stationen.
Se afsnit: ”Installation”.
DATO: Bruges til at indstille datoen.
KLOKKESLAET: Bruges til at vælge vinter- eller sommertiden.
ENTER
DATO DD/MM/ÅÅ
MAN 00 / 00 / 00
ARBEJDSTIDER - PROGRAMMERING
UGE: Bruges til at programmere de ugedage, hvor robotten skal arbejde. Markøren placeres
automatisk under bogstavet “M” (Mandag).
Når alle dage er indstillet på “1111111” arbejder robotten hver dag. Når indstillingen er
“0000000” arbejder robotten ikke på nogen af ugedagene.
-
Værdien 1: Dag, hvor robotten arbejder.
-
Værdien 0: Dag, hvor robotten holder stille.
Vigtigt
For at udnytte mulighederne bedst muligt anbefales det at programmere
robotten til at arbejde hver dag.
ENTER
UGE
MTOTFLS
MAN 1111111
ARB. SKEMA 1: Her indstilles det første tidsrum, inden for hvilket robotten skal arbejde den
pågældende dag.
Markøren placeres automatisk i feltet under det første tidsrum (f.eks. fra 10:00 til 13:00).
Indtast start- og sluttidspunktet for arbejdet.
Når tidsrummet indstilles som ”00:00 – 00:00”, arbejder robot slet ikke under arbejdstiden
1. Hvis der indtastes en ugyldig tid (f.eks. hvis den overlapper arbejdstiden 2, eller hvis
sluttidspunktet er tidligere end starttidspunktet), nulstilles tiden og robotten udsender et
lydsignal.
ARB. SKEMA 2: Her indstilles det andet tidsrum, inden for hvilket robotten skal arbejde den
pågældende dag.
Vigtigt
Når det er nødvendigt at indstille de sekundære områder, er det at
foretrække, at der under programmeringen anvendes begge arbejdstider,
således at områderne klippes hyppigere.
ENTER
ARB. SKEMA
00 : 00 - 00 : 00
Indstillingen af arbejdstiderne er af afgørende betydning for at få et velfungerende produkt. Konfi gurationen af arbejdstiderne afhænger af
mange parametre, såsom antallet af sekundære områder, antallet og styrken af batterierne i robotten, plænens kompleksitet osv. Generelt vil det
være nødvendigt at udvide en smule arbejdstiden, når der skal klippes græs i haver med sekundære områder, i haver med mange forhindringer
eller i komplicerede områder. Tabellen nedenfor giver et vejledende eksempel på værdier, som kan anvendes i forbindelse med den første
konfi guration. OBS! Indstil alle ugedagene på ”1” (arbejdsdage).
Modelm² (ft²)Driftstid 1Driftstid 2
075BA0150 (1615)11:00 11:4015:00 15:30
075BA0300 (3230)11:00 17:00
075BA0400 (4304)11:00 19:00
075DE0150 (1615)11:00 11:40
075DE0300 (3230)11:00 11:4015:00 15:40
075DE0400 (4304)10:00 16:00
075DE0600 (6460)10:00 19:00
22
Brugermanualen
DA
075EV0400 (4304)10:00 11:30
075EV0800 (8608)10:00 11:3015:00 16:30
075EV01200 (12912)09:00 21:00
075EV1400 (4304)10:00 11:30
075EV1800 (8608)10:00 11:3015:00 16:30
075EV11200 (12912)10:00 12:0015:00 17:00
075EV11600 (17216)09:00 20:00
075EL0400 (4304)10:00 11:30
075EL0800 (8608)10:00 11:3015:00 16:30
075EL01200 (12912)10:00 12:0015:00 17:00
075EL01800 (19368)09:00 20:00
075EL02200 (23672)08:00 22:00
SEKUNDÆRE OMRÅDER - PROGRAMMERING
Hvis det område, hvor græsset skal klippes, omfatter sekundære områder ifølge defi nitionen i afsnittet ”Forberedelse og afgrænsning af
arbejdsområderne”, er det nødvendigt at programmere de sekundære områder for at fortælle robotten, hvordan den kan nå frem til disse
områder og hvor hyppigt.
SEK.OMRAADE : Med denne funktion er det muligt at defi nere den automatiske klipning af et sekundært område.
-
Procentdel: Gør det muligt at indstille den afstand, som robotten skal
tilbagelægge for at nå frem til indersiden af et sekundært område ved at
følge kantledningen. Det foretrækkes at tage midten af det sekundære
område som referencepunkt for at sikre sig, at robotten begynder sit
arbejde inde i dette område.
•
20% angiver et meget lille område.
•
30% angiver et område, der er ca. 1/3 af hele haven.
•
50% angiver et område, der er ca. halvt så stort som hele haven.
•
80% angiver et sekundært område, der er større end hovedområdet.
•
100%. Hver gang robotten forlader ladestationen, vil den følge
kantledningen for at klippe i det sekundære område.
Hovedområde
retning “med uret”retning “mod uret”
sekundært område 1
(30%, 60 m, med uret)
sekundært område 2
(20%, 30 m, mod uret)
-
Afstand: Gør det muligt at indstille den afstand, som robotten skal tilbagelægge for at nå frem til indersiden af et sekundært område ved at
følge kantledningen. Det foretrækkes at tage midten af det sekundære område som referencepunkt for at sikre sig, at robotten begynder sit
arbejde inde i dette område.
-
Retning: Angiver den korteste kørselsretning til at nå frem til det sekundære område. Retningen kan være med eller mod uret. Når robotten
forlader ladestationen, vil den følge kantledningen i den angivne retning for at nå frem til det sekundære område.
SEK. OMRAADE 2: Med denne funktion er det muligt at defi nere den automatiske klipning af det sekundære område 2. Konfi gurationsparametrene
er de samme som parametrene for det sekundære område 1.
SEK. OMRAADE 3: (fi ndes kun i nogle versioner, se ”Tekniske data”). Med denne funktion er det muligt at defi nere den automatiske klipning af
det sekundære område 3. Konfi gurationsparametrene er de samme som parametrene for det sekundære område 1.
SIKKERHED - PROGRAMMERING
SKIFT ADG.KODE: Gør det muligt at angive eller ændre en adgangskode.
-
Nej: Den tidligere indtastede adgangskode ændres ikke.
-
Ja: Bruges til at indtaste eller ændre den adgangskode, der kræves for at tænde for robotten og for at deaktivere alarmen. Brugeren bliver
bedt om at indtaste følgende oplysninger i rækkefølge:
•
Kodeord: Indtast den gamle adgangskode (adgangskoden ved leveringen er 0000).
•
Nyt kodeord: Indtast den nye adgangskode.
•
Gentag kodeord: Indtast den nye adgangskode en gang til.
23
Brugermanualen
DA
Vigtigt
For at angive eller ændre en adgangskode er det nødvendigt først at indtaste den tidligere adgangskode; derefter vil det
være muligt at indtaste den brugerdefi nerede adgangskode. Ved leveringen består adgangskoden af fi re tal (0000).
Vigtigt
Ved indtastning af adgangskoden vil brugeren blive bedt om at gentage proceduren for at sikre sig, at adgangskoden er
blevet indtastet korrekt. For ikke at glemme adgangskoden bør man vælge en kombination, der er let at huske.
START KODEORD: Med denne funktion er det muligt at vælge eller fravælge, om der skal kræves indtastning af adgangskoden, hver gang
robotten tændes efter en stilstandsperiode (f.eks. vinteropbevaring).
-
Nej: Hver gang, robotten tændes, starter den og begynder sit arbejde uden indtastning af adgangskoden. Adgangskoden vil kun være
nødvendig for at deaktivere alarmen. For at bekræfte parameteren beder robotten om adgangskoden.
-
Ja: Hver gang, robotten tændes, vil den først starte og begynde sit arbejde efter indtastning af adgangskoden.
FUNKTIONSMÅDER - PROGRAMMERING
Bruges til at indstille robottens funktionsmåde. Når robotten slukkes, skifter den automatisk til funktionsmåden ”AUTOMATISK”.
•
Automatisk: Dette er den normale funktionsmåde. Robotten genkender kantledningen og vender tilbage til ladestationen, når det er
nødvendigt.
•
Lukket område: Funktionsmåde til lukkede områder uden ladestation. Til en korrekt brug, se venligst ”ANVENDELSE AF ROBOTTEN I
LUKKEDE OMRÅDER UDEN LADESTATION”.
•
Uden omkreds: Funktionsmåde uden genkendelse af kantledningen. Anvendes i små områder, der langs hele kanten afgrænses af en væg
eller en indhegning på mindst 15 cm uden installation af kantledning, under brugerens tilsyn og med styring via fjernbetjeningen.
SPROGINDSTILLINGER - PROGRAMMERING
SPROG: Bruges til at vælge sproget til fremvisning af meddelelserne og på brugermenuen. Bladr gennem de forskellige muligheder ved hjælp
af knappen ”+” eller ”-” og bekræft med knappen ”ENTER”.
•
DATOFORMAT
•
TIDSFORMAT
•
AFSTANDSFORMAT
Disse funktioner gør det hhv. muligt at defi nere formatet for dato, tid og afstande.
IBRUGTAGNING - AUTOMATISK FUNKTIONSMÅDE
Den automatiske funktionsmåde skal startes den første gang, robotten tages i brug, eller efter en stilstandsperiode.
1. Kontrollér, at højden af græsset på plænen, der skal klippes, er forenelig med en korrekt funktion af robotten (se ”Tekniske data”).
2. Justér den ønskede klippehøjde (se ”Justering af klippehøjde”).
3. Kontrollér, at arbejdsområdet er blevet korrekt afgrænset og ikke er til hinder for robottens normale funktion, se ”Forberedelse og afgrænsning
af arbejdsområderne” og efterfølgende afsnit.
4. Anbring robotten i ladestationen.
5. Tryk på ”ON”-knappen og vent et par sekunder, indtil robotten er fuldstændigt tændt.
6. Hvis robotten tages i brug for første gang, er det nødvendigt at udføre programmeringen. Hvis den derimod tages i brug efter en
stilstandsperiode, er det nødvendigt at kontrollere, at de programmerede funktioner stadig svarer til de faktiske forhold ved den overfl ade,
der skal klippes (f.eks. tilføjelse af et svømmebassin, træer osv.) - se ”Programmering”.
7. Efter et par sekunder kommer meddelelsen ”OPLADER” frem på displayet.
8. Robotten begynder at klippe plænen i overensstemmelse med de programmerede funktioner.
24
Brugermanualen
DA
SIKKERHEDSSTANDSNING AF ROBOTTEN
Mens robotten er i brug, kan det være nødvendigt at standse den. Under normale forhold kan robotten standses ved hjælp af knappen ”OFF/
STOP”. I tilfælde af fare, eller når der skal udføres vedligeholdelse, skal robotten standses i sikkerhedsmæssigt forsvarlig tilstand for at undgå
risikoen for utilsigtet start af klingen. Tryk på ”STOP”-knappen for at standse robotten. Tryk igen på ”STOP”-knappen for at genetablere brugen
af robotten.
Vigtigt
Sikkerhedsstansningen af robotten er nødvendig for at
kunne udføre vedligeholdelses- og reparationsarbejde
(f.eks. udskiftning og/eller genopladning af batterierne,
udskiftning af klingen, rengøring osv.).
ENTER
"STOP"-KNAPPEN (A)
AUTOMATISK TILBAGEVENDEN TIL LADESTATIONEN
Robotten afslutter en arbejdsopgave, når en af nedenstående betingelser er til stede.
-
Arbejdstidens ophør: Så snart arbejdstiden er ophørt, vender robotten automatisk tilbage til ladestationen, hvorefter den vil vende tilbage
til arbejdet i overensstemmelse med de programmerede funktioner (se ”Programmering”).
-
Regn: I tilfælde af regn vender robotten automatisk tilbage til ladestationen, hvorefter den vil vende tilbage til arbejdet i overensstemmelse
med de programmerede funktioner (se ”Programmering”).
-
Batterierne skal oplades: Robotten vender automatisk tilbage til ladestationen.
-
Færdigklippet græsplæne (kun for nogle versioner, se ”Tekniske data”): Når sensoren detekterer, at plænen er færdigklippet, vender
robotten automatisk tilbage til ladestationen, hvorefter den vil vende tilbage til arbejdet i overensstemmelse med de programmerede
funktioner (se ”Programmering”).
ANVENDELSE AF ROBOTTEN I LUKKEDE OMRÅDER UDEN LADESTATION
Start af robotten i funktionsmåden til lukkede områder skal fi nde sted for at
klippe lukkede områder, der er afgrænset af kantledning, og hvor der ikke
er nogen ladestation.
Forsigtig - Advarsel
Robotten skal transporteres ved hjælp af sit håndtag.
Undgå at tage fat i robotten på stellet, og anvend altid
håndtaget.
Placér robotten inde i arbejdsområdet i en afstand af mindst 100 cm (ca. 39 ")
fra kantledningen og en hvilken som helst forhindring.
min. 100 cm
(39,37 ")
min. 100 cm
(39,37 ")
25
Brugermanualen
DA
1. Tryk på ”ON”-knappen.
2. Indtast adgangskoden (når dette kræves), se ”Indtastning af adgangskode”.
3. På displayet vises funktionen ”PAUSE”.
ENTER
PAUSE
4. Aktivér programmeringstilstanden og vælg menuen ”FUNKTIONSMÅDER”. Vælg
Valmistajan ja laitteiston tunnistus. .............................................................................................................................................2
Turvallisuuteen liittyvää tietoa. ..................................................................................................................................................3
Turvallisuuteen liittyvät määräykset. ...........................................................................................................................................3
Pakkaus ja pakkauksesta purkaminen. .......................................................................................................................................8
Rajakaapelin reitin määärittäminen. ............................................................................................................................................9
Valmistelu robotin nopeaa palaamista varten latausasemaan. .................................................................................................10
Työalueiden valmistelu ja rajoitus. .............................................................................................................................................11
Latausaseman ja laturin asentaminen. .....................................................................................................................................16
Akkujen lataaminen ensimmäisen käytön yhteydessä. .............................................................................................................17
Säätöihin liittyvät suositukset. ...................................................................................................................................................17
Käyttö ja toiminta. .....................................................................................................................................................................18
Käyttöön liittyviä suosituksia. ....................................................................................................................................................18
Robotin käyttö suljetuilla alueilla, joita ei ole varustettu latausasemalla. ..................................................................................24
Robotin käynnistys ilman rajakaapelia. .....................................................................................................................................25
Pitkät toimettomuusjaksot ja käyttöönotto. ................................................................................................................................26
Akkujen lataaminen pitkän toimettomuusjakson vuoksi. ...........................................................................................................27
Huoltoon liittyviä suosituksia. ....................................................................................................................................................28
Viat, syyt ja korjaustoimenpiteet. .............................................................................................................................................29
Osien vaihtaminen.....................................................................................................................................................................31
Suosituksia osien vaihtamiseen. ...............................................................................................................................................31
Robotin käytöstä poistaminen. ..................................................................................................................................................32
Tämän asiakirjan myös osittainen kopiointi on kielletty ilman valmistajan myöntämää kirjallista lupaa.
Tuotteiden jatkuvaan parantamiseen tähtäävän politiikan nojalla, valmistaja pidättää oikeuden muuttaa tätä ilman erillistä ilmoitusta, elleivät kyseiset muutokset aiheuta vaaraa terveydelle.
Käytä valmistajan suosittelemia henkilönsuojaimia ja erityisesti kun leikkuuterään liittyviä toimenpiteitä suoritetaan, käytä suojakäsineitä.
•
Irrota terä aina ennen akkujen vaihtoa.
•
Varmista, ettei laturin mahdollisissa tuuletusaukoissa ole tukkivia jäämiä.
•
Estääksesi sähköisten ja elektronisten osien vahingoittamista korjaamattomaksi, älä pese robottia vesisuihkulla äläkä upota sitä kokonaan
tai osittain veteen, sillä se ei ole vesitiivis.
•
Käyttäjillä, jotka suorittavat korjaustoimenpiteitä robotin elinkaaren aikana on oltava määrätty tekninen pätevyys ja alaan liittyvä ja todistettu
tuntemus. Näiden vaatimusten puuttuminen voi aiheuttaa vahinkoja henkilöiden turvallisuudelle ja terveydelle.
•
Kaikki toimenpiteet on suoritettava latausalustalla ja virtapistoke irti kytkettynä.
•
Vaihda liian kuluneet osat käyttämällä alkuperäisiä varaosia, jotta määrätty toiminta ja turvataso voitaisiin taata.
•
Robottia ei voi käyttää ilman yläkuorta. Jos siinä esiintyy mekaanisia vahinkoja, se tulee vaihtaa.
•
Kaikki säännölliset- tai ylimääräiset huoltotoimenpiteet (esimerkiksi akkujen vaihtaminen) on suoritettava valtuutetussa huollossa.
•
Valmistaja kieltäytyy kaikesta vastuusta, mikäli alkuperäisiä varaosia ei ole käytetty.
•
Robotin käyttö ja lataus on ehdottomasti kielletty räjähtävissä ja tulenaroissa ympäristöissä.
4
Käyttöopas
FI
TURVAVARUSTEET
1. Puskurit
Puskuritunnistimien ansiosta jos robotti kohtaan korkeudeltaan vähintään 10 cm:n esteen, se pysähtyy ja palaa takaisin välttäen näin esteeseen
törmäämistä.
2. Kallistusmittari
Jos robotti työskentelee kaltevilla mailla, ylittäen määrätyt tekniset ominaisuudet tai jos se kaatuu kumoon, robotti pysäyttää leikkuuterän.
3. Hätäpysäytyspainike
Ohjauspaneelille asetettu ja muihin näppäimistöllä oleviin painikkeisiin nähden suurempi painike, jossa lukee STOP. Painamalla tätä painiketta
toiminnan aikana ruohonleikkuurobotti pysähtyy välittömästi ja terä pysähtyy alle 2 sekunnissa.
4. Ylivirtasuojaus
Molempia moottoreita (terä ja pyörät) valvotaan toiminnan aikana jatkuvasti kaikissa tilanteissa, jotka voivat aiheuttaa niiden ylikuumenemisen.
Jos pyörien moottorissa esiintyy ylivirta, robotti yrittää toimia vastakkaiseen suuntaan. Jo ylivirta jatkuu, robotti pysähtyy ja ilmoittaa virheestä. Jos
ylivirta esiintyy leikkuuterän moottorissa, käytettävissä on kaksi eri toimintatapaa. Jos parametrit kuuluvat ensimmäiseen toimintatapaan, robotti
suorittaa liikkeitä leikkuuterän vapauttamiseksi. Jos ylivirta on alle robotin suoja-alueen, robotti pysähtyy ja ilmoittaa moottorissa syntyneestä
virheestä.
5. Signaali puuttuu -anturi
Jos signaali katoaa rajakaapelista, robotti pysähtyy automaattisesti.
6. Kahvan anturi
Robotti pysäyttää leikkuuterän, jos sitä nostetaan keskellä olevasta kahvasta.
TURVAMERKIT
Huomio! Älä puhdista tai pese
robottia vesisuihkeilla.
Lue käyttöohjeet huolella ja
ymmärrä niiden merkitys ennen
robotin käyttöä.
Noudata huolellisesti tässä
käyttöohjeessa annettuja
varoituksia ja turvamääräyksiä,
jotta robotin turvallisuus ja
tehokkuus voitaisiin taata.
Pidä kädet ja jalat poissa
leikkuuterästä. Älä koskaan laita
käsiä tai jalkoja rungon alle äläkä
aseta niitä käynnissä olevan
robotin lähelle.
Tätä tuotetta suojataan
salasanalla. Tallenna koodi
turvalliseen paikkaan.
Pidä lapsia, kotieläimiä ja muita
henkilöitä turvaetäisyydellä
käynnissä olevasta robotista.
Tämä tuote on yhdenmukainen
voimassa olevien EY-direktiivien
kanssa.
5
Käyttöopas
FI
TEKNISET TIEDOT
TEKNISET TIEDOT
Kuvaus
Malli
075BA0075DE0075EV0075EV1075EL0
Maksimaalinen leikkuupinta-ala
Robottim2 (sq ')400 ( 4304 )600 ( 6460 )
1200
( 12912 )
1600
( 17216 )
2200
( 23672 )
Ominaisuudet
Mitat (l x k x s)mm ( ")575x282x438 ( 22,64 x 11,10 x 17,25 " )
On seuraavien direktiivien oleellisten vaatimusten mukainen:
Pienjännitedirektiivi 2006/95 CE - Sähkömagneettinen yhteensopivuus 2004/108/CE - Äänitaso konedirektiivin mukaan 2006/42 CE
Bernini Fabrizio - Terranuova B.ni 01/10/2012
(Toimitusjohtaja)
1
Návod k použití
CS
OBSAH
Základní informace. .....................................................................................................................................................................2
Identifi kace výrobce a zařízení....................................................................................................................................................2
Informace týkající se bezpečnosti. ............................................................................................................................................3
Bezpečnostní pokyny. .................................................................................................................................................................3
Bezpečnostní výbava. .................................................................................................................................................................4
Bezpečnostní symboly. ...............................................................................................................................................................4
Technické informace. ..................................................................................................................................................................5
Technické parametry. ..................................................................................................................................................................5
Základní popis zařízení. ..............................................................................................................................................................6
Hlavní součásti. ...........................................................................................................................................................................7
Obal a rozbalení. .........................................................................................................................................................................8
Vymezení dráhy obvodového drátu. ...........................................................................................................................................9
Metoda návratu do nabíjecí stanice. .........................................................................................................................................10
Příprava pro rychlý návrat robotické sekačky do nabíjecí stanice. ...........................................................................................10
Příprava a vymezení pracovních ploch. .....................................................................................................................................11
Instalace nabíjecí stanice a jednotky napájecího zdroje. ..........................................................................................................16
Nabíjení akumulátorů při prvním použití. ..................................................................................................................................17
Doporučení pro nastavení. ........................................................................................................................................................17
Nastavení výšky sekání. ...........................................................................................................................................................17
Použití a údržba. ........................................................................................................................................................................18
Doporučení pro použití. .............................................................................................................................................................18
Popis ovládacích prvků robotické sekačky. ...............................................................................................................................18
Přístup do menu. .......................................................................................................................................................................18
Pohyb v menu. ..........................................................................................................................................................................18
Nastavení - programovací režim. ...............................................................................................
...............................................20
Pracovní rozvrhy - programovací režim. ...................................................................................................................................21
Vedlejší plochy - programovací režim. ......................................................................................................................................22
Bezpečnost - programovací režim. ...........................................................................................................................................22
Provozní režim - programovací režim. ......................................................................................................................................23
Možnosti volby jazyka - programovací režim. ...........................................................................................................................23
Uvedení do provozu - automatický režim. .................................................................................................................................23
Automatický návrat do nabíjecí stanice.....................................................................................................................................24
Použití robotické sekačky na uzavřených plochách nevybavených nabíjecí stanicí. ................................................................24
Uvedení robotické sekačky do činnosti bez obvodového drátu. ...............................................................................................25
Zobrazení na displeji během pracovní činnosti. ........................................................................................................................26
Dlouhodobá nečinnost a opětovné uvedení do provozu. ..........................................................................................................26
Nabíjení akumulátorů kvůli dlouhodobější nečinnosti. ..............................................................................................................27
Rady pro použití. .......................................................................................................................................................................27
Doporučení pro údržbu. ............................................................................................................................................................28
Problémy, jejich příčiny a způsoby jejich odstranění. ...........................................................................................................29
Vyřazení robotické sekačky z provozu. .....................................................................................................................................32
Prohlášení o shodě. ..................................................................................................................................................................32
Je zakázána reprodukce tohoto dokumentu, a to i částečná, bez písemné autorizace Výrobce.
Výrobce usiluje o aplikaci politiky neustálého zlepšování a vyhrazuje si právo na změnu tohoto dokumentu bez povinnosti předběžného upozornění za předpokladu, že tato změna nepředstavuje rizika pro bezpečnost.
Je ve shodě se základními požadavky níže uvedených směrnic:
Směrnice o Nízkém napětí 2006/95/CE - Směrnice o Elektromagnetické kompatibilitě 2004/108/CE - Hluk šířený vzduchem podle Směrnice o
strojních zařízeních 2006/42/CE
Bernini Fabrizio - Terranuova B.ni 01/10/2012
(Jednatel)
1
Instrukcja obsługi
PL
SPIS TREŚCI
Informacje ogólne. .......................................................................................................................................................................2
Cel instrukcji obsługi. ..................................................................................................................................................................2
Identyfi kacja producenta i urządzenia. ........................................................................................................................................2
Informacje dotyczące bezpieczeństwa. .....................................................................................................................................3
Urządzenia zabezpieczające robota. ..........................................................................................................................................4
Znaki ostrzegające przed niebezpieczeństwem..........................................................................................................................4
Informacje techniczne. ................................................................................................................................................................5
Dane techniczne. ........................................................................................................................................................................5
Ogólny opis urządzenia...............................................................................................................................................................6
Główne mechanizmy. ..................................................................................................................................................................7
Pakowanie i rozpakowywanie. ....................................................................................................................................................8
Określenie trasy kabla obwodowego. .........................................................................................................................................9
Metoda powrotu do stacji ładującej. ..........................................................................................................................................10
Przygotowanie szybkiego powrotu robota do stacji ładującej. ..................................................................................................10
Przygotowanie i odgraniczanie stref pracy. ................................................................................................................................11
Instalacja kabla obwodowego. ..................................................................................................................................................14
Instalacja stacji ładującej i zasilacza. ........................................................................................................................................16
Ładowanie akumulatorów przy pierwszym użyciu. ................................................................................................................... 17
Zalecenia dotyczące regulacji. ..................................................................................................................................................17
Regulacja wysokości ścinania...................................................................................................................................................17
Użytkowanie i praca. .................................................................................................................................................................18
Zalecenia dotyczące użytkowania.............................................................................................................................................18
Opis komend robota. .................................................................................................................................................................18
Dostęp do menu. .......................................................................................................................................................................18
Rozkład pracy – tryby programowania. .....................................................................................................................................21
Strefy drugorzędne - tryb programowania.................................................................................................................................22
Bezpieczeństwo - tryb programowania. ....................................................................................................................................22
Sposób użytkowania - tryb programowania. .............................................................................................................................23
Wprowadzenie do użytkowania – tryb automatyczny. ...............................................................................................................23
Automatyczny powrót do stacji ładującej. .................................................................................................................................24
Użytkowanie robota w strefach zamkniętych niewyposażonych w stacjęładującą. ............................................................... 24
Uruchomienie robota bez kabla obwodowego. .........................................................................................................................25
Wizualizacja wyświetlacza w fazie pracy. .................................................................................................................................26
Przedłużony czas nieaktywności i ponowne wprowadzenie do użytku. ....................................................................................26
Ponowne ładowanie akumultora po długim okresie nieaktywności...........................................................................................27
Wskazówki dotyczące użytkowania. .........................................................................................................................................27
Zalecenia co do konserwacji. ....................................................................................................................................................28
Awarie, ich przyczyny i środki zaradcze. ................................................................................................................................29
Wymiana części składowych. ...................................................................................................................................................31
Zalecenia co do wymiany części. ..............................................................................................................................................31
Zabronione jest powielanie, również częściowe, tego dokumentu bez pisemnego upoważnienia Producenta. Producent zobowiązuje się do wprowadzania ciągłych ulepszeń i zastrzega sobie prawo do dokonywania modyfi kacji
Namen priročnika. .......................................................................................................................................................................2
Identifi kacija proizvajalca in stroja. ..............................................................................................................................................2
Podatki o varnosti. ......................................................................................................................................................................3
Splošen opis stroja. .....................................................................................................................................................................6
Glavni deli. ..................................................................................................................................................................................7
Embalaža in odstranjevanje embalaže. ......................................................................................................................................8
Določitev poteka omejitvenega kabla..........................................................................................................................................9
Način vrnitve k polnilni postaji. ..................................................................................................................................................10
Priprava hitre vrnitve robota k polnilni postaji............................................................................................................................10
Priprava in določitev meja delovne površine. .............................................................................................................................11
Montaža polnilne postaje in napajalnika. ..................................................................................................................................16
Prva uporaba polnilnika baterije. ...............................................................................................................................................17
Priporočila za nastavitve. ..........................................................................................................................................................17
Uporaba in delovanje. ...............................................................................................................................................................18
Priporočila za uporabo. .............................................................................................................................................................18
Opis komand robota. .................................................................................................................................................................18
Dostop do menijev. ....................................................................................................................................................................18
Urnik dela – načini programiranja. ............................................................................................................................................21
Sekundarna območja – načini programiranja............................................................................................................................22
Zaščita – nač
ini programiranja. .................................................................................................................................................22
Uporaba – načini programiranja. ...............................................................................................................................................23
Jezikovne možnosti – načini programiranja. .............................................................................................................................23
Začetek obratovanja – avtomatski način. ..................................................................................................................................23
Avtomatska vrnitev k polnilni postaji. ........................................................................................................................................24
Uporaba robota v zaprtih območjih brez polnilne postaje. ........................................................................................................24
Zagon robota brez omejitvenega kabla. ....................................................................................................................................25
Zaslonski prikaz v fazi obratovanja. ..........................................................................................................................................26
Daljše obdobje mirovanja in ponovna uporaba. ........................................................................................................................26
Polnjenje baterij po daljši neuporabi. ........................................................................................................................................27
Priporočila za uporabo. .............................................................................................................................................................27
Redno vzdrževanje. ...................................................................................................................................................................28
Priporočila za vzdrževanje. .......................................................................................................................................................28
Razpredelnica s podatki o intervalih programiranega vzdrževanja. ..........................................................................................28
Okvare, vzroki in rešitve. ..........................................................................................................................................................29
Priporočila za zamenjavo delov. ................................................................................................................................................31
Izjava o skladnosti. ....................................................................................................................................................................32
Brez pisne odobritve proizvajalca je prepovedano vsako, tudi delno reproduciranje tega dokumenta.
Proizvajalec zasleduje politiko konstantnega izboljševanja in si pridružuje pravico do spreminjanja tega dokumenta brez predhodne najave, če s tem seveda ne ogroža varnosti.
Skladna je z bistvenimi zahtevami naslednjih direktiv:
Direktiva o nizki napetosti 2006/95 CE - Elektromagnetna ustreznost 2004/108 CE - Hrup, ki se prenaša po zraku, v skladu z Direktivo o strojih
2006/42 CE
Bernini Fabrizio - Terranuova B.ni 01/10/2012
(Generalni direktor)
1
Vartotojo vadovas
LT
SANTRAUKA
Bendra informacija. .....................................................................................................................................................................2
Gamintojo identifi kavimas ir prietaisai. ........................................................................................................................................2
Saugumo informacija. .................................................................................................................................................................3
Saugumo normos. .......................................................................................................................................................................3
Pagrindiniai organai. ...................................................................................................................................................................7
Įpakavimas ir išpakavimas. .........................................................................................................................................................8
Įrangos suplanavimas ir instaliavimas.........................................................................................................................................8
Darbo zonų paruošimas ir apribojimas.......................................................................................................................................11
Įkrovimo stoties instaliavimas ir maitinimo blokas. ....................................................................................................................16
Pjovimo aukščio reguliavimas. ..................................................................................................................................................17
Naudojimas ir veikimas.............................................................................................................................................................18
Roboto komandų aprašymas. ...................................................................................................................................................18
Priėjimas prie meniu..................................................................................................................................................................18
Nustatymai - programavimo būdai. ...........................................................................................................................................20
Antrinės zonos – programavimo būdas.....................................................................................................................................22
Saugumas - programavimo būdai. ............................................................................................................................................22
Naudojimo būdas – programavimo režimas..............................................................................................................................23
Kalbų pasirinktys. ......................................................................................................................................................................23
Roboto naudojimas uždarose zonose, kuriose nėra įdiegta įkrovimo stotis..............................................................................24
Roboto paleidimas zonose be perimetrinio laido. .....................................................................................................................25
Displėjaus vizualizavimas darbo metu. .....................................................................................................................................26
Ilgas nenaudojimas ir sugrąžinimas prie darbo. ........................................................................................................................26
Suprogramuotos priežiūros operacijų lentelė. ...........................................................................................................................28
Gedimai, priežastys ir pataisymai. ...........................................................................................................................................29
Rekomendacijos dalių pakeitimui. .............................................................................................................................................31
Yra draudžiama net dalina šio dokumento reprodukcija be Gamintojo suteiktos pasirašytos autorizacijos
Gamintojas yra pritaikęs nuolatinio atnaujinimo politiką ir pasilieka sau teisę pakeisti šį dokumentą be išankstesnio privalomo įspėjimo, kadangi tai nėra susiję su saugos rizikomis.
Naudokite Gamintojo numatytas individualias saugos priemones ypač, kai reikia dirbti su pjovimo peiliu, dėvėkite apsaugines pirštines.
•
Prieš pakeičiant baterijas visada išmontuokite peilį.
•
Užsitikrinkite, kad maitinimo galimos oro ventiliacinės angos nebūtų užteršos.
•
Tam, kad nepataisomai nesugadinti elektros ir elektroninių komponentų, neplaukite roboto vandens srove su dideliu slėgimu ir nepanardinkite
jo nei dalinai nei pilnai vandenyje, kadangi prietaisas nenumatytas mirkymui.
•
Operatoriai atliekantys taisymo operacijas roboto numatytu naudojimo periodu, turi turėti atitinkamas technines kompetencijas, ypatingus
pajėgumus ir patirties pripažintos specifi niame sektoriuje. Šių reikalavimų neturėjimas gali sudaryti nuostolių asmenų saugumui ir sveikatai.
•
Visos operacijos, kurias reikia atlikti pagrindo pakrovime, turi būti atliekamos su atjungtu elektros aprūpinimo kištuku.
•
Pakeiskite per daug susidėvėjusias dalis naudojant originalias atsargines detales, tuo užtikrinant tinkamą veikiamumą ir numatytą saugos
lygį.
•
Robotas negali būti naudojamas be viršutinio gaubto. Jeigu būtų pastebimi jo paties mechaniniai sugadinimai, gaubtas turi būti pakeičiamas.
•
Bet kokia kazdieninė arba ypatinga priežiūra (pvz. baterijos pakeitimas) turi būti atliekami autorizuotame paslaugų centre.
•
Gamintojas atmeta bet kokią atsakomybę neoriginalių detalių naudojimo atveju.
•
Yra griežtai draudžiamas roboto naudojimas ir pakrovimas sprogiose degiose aplinkose.
4
Vartotojo vadovas
LT
SAUGOS ĮRANGA
1. Buferiai
Atsitrenkimo atveju su kietuoju objektu aukštesniu nei 10 cm (3.94 ") smūgio jutiklis yra aktyvus, robotas blokuoja judėjimąį tą kryptį ir grįžta
atgal taip išvengiant kliūties.
2. Inklinometras
Atveju, kai robotas dirba šlaituotoje vietoje viršyjant numatytas specifi nes technikas, arba tuo atveju, kai yra apverčiamas, robotas sustabdo
pjovimo peilį.
3. Avarinio sustabdymo jungiklis
Jungiklis randasi ant komandų panelio su užrašu STOP didesnio dydžio už kitas komandas esančias ant mygtukinės. Paspaudžiant šį mygtuką
veikimo metu, žolės pjovimo robotas iš karto sustos ir peilis užsiblokuos bent per 2 sekundes.
4. Apsauga nuo perkrovos
Kiekvienas iš variklių (peilis ir ratai) yra pastoviai prižiūrimi veikimo metu kiekvienoje situacijoje, kuri gali išprovokuoti perkaitimą. Atveju, jeigu
pasireikštų perkrovimas ratų varikliui robotas atlieka bandymus priešinga eigos kryptimi. Jeigu perkrovimas tęsiasi robotas sustoja pažymint
klaidą. Jeigu perkrovimas pasireiškia ant pjovimo peilio variklio, yra dvi įsiterpimo ribos. Jeigu parametrai įeina į pirmą ribą robotas atliks
manevrus pjovimo peiliui atblokuoti. Jeigu perkrovimas yra žemiau apsaugos ribos robotas sustos žymint variklio klaidą.
5. Signalo nebuvimo jutiklis
Atveju, kai nėra perimetrinio laido signalo robotas sustoja automatiškai.
6. Rankenos jutiklis
Robotas sustabdo peilį, jeigu yra sukeliamas suimant už rankenos centralizuotai.
SAUGOS ŽENKLAI
Dėmesio! Nevalykite ir neplaukite
roboto vandens srove.
Atidžiai perskaitykite naudojimo
instrukcijas ir supraskite reikšmę
prieš naudojant robotą.
Atidžiai sekite įspėjimus ir saugos
normas pateiktas šiose naudojimo
instrukcijose tuo siekiant užtikrinti
saugumą ir roboto efektyvumą.
Rankas ir pėdas laikykite toli
nuo pjovimo peilio. Nekiškite
rankų arba kojų po korpusu ir
nepriartinkite prie veikiančio
roboto.
Šis produktas yra apsaugotas
slaptažodžiu. Kodą saugokite
saugioje vietoje.
Vaikus ir naminius gyvūnus ir kitus
asmenis laikykite saugiu atstumu,
kai robotas veikia.
Šis produktas atitinka vyraujančias
CE direktyvas.
5
Vartotojo vadovas
LT
TECHNINĖ INFORMACIJA
TECHNINIAI DUOMENYS
Aprašymas
Modelis
075BA0075DE0075EV0075EV1075EL0
Maksimalus rekomenduojamas paviršius, kurį galima pjauti
Robotasm2 (sq ')400 ( 4304 )600 ( 6460 )
1200
( 12912 )
1600
( 17216 )
2200
( 23672 )
Charakteristikos
Matmenys (B x A x P)mm ( ")575x282x438 ( 22,64 x 11,10 x 17,25 " )
Svoris įsk. robotą. Baterijakg1111,311,6
Pjovimo aukštis (Min-Max)mm ( ")20-65 ( 0,79-2,56 ")
Greitas sugrįžimas – yra specialus perimetrinio laido ištiesimas, kuris leidžia robotui sutrumpinti kelią sugrįžimui įįkrovimo stotį. Šį specialų
perimetrinio laido tiesimo būdą reikia atlikti tik tuose soduose, kuriuose greitas sugrįžimas iš tikro sumažina kelią ir su perimetro ilgiu apytikriai
didesniu nei 200mt.
Norint instaliuoti greitą sugrįžimą, perimetrinį laidą ant dirvožemio ištieskite tokiu būdu, kad susiformuotų trikampis su 50 cm(19,7 ") šonu ir
dvejais perimetriniais šonais 40 cm(15,75 ") kiekvienas, kaip nurodyta paveikslėlyje.
Robotas sugįžtant įįkrovimo stotį su ratais ant laido to paties ruožo, kai atseka šią ypatingą trikampio formą, nutraukia eigą, apsisuka apytikriai
90° sodo vidaus link ir sugrįžta prie naudos eigos iki kol nesutinka perimetrinio laido priešingoje pusėje.
Greito sugįžimo nustatymą atlikite, tokiame taške, priešais kurį būtų bent 200 cm(78,74 ") tiesaus laido ir būtų sekamas bent 150 cm(59,05 ")
ištiesto laido.
Nustatymas neturi būti atliekamas išilgai ištiesto ruožo, kuris randasi iš karto prieš įkrovimo stotį arba netoli sutinkamų kliūčių. Patikrinkite, kad
išilgai sugrįžimo trajektorijoje nebūtų kliūvinių galinčių sutrukdyti greitą sugįžimą.
Svarbu
Greito sugrįžimo nustatymas netaisyklingame taške gali neleisti robotui greitai sugrįžti įįkrovimo stotį. Kai robotas perbėga
perimetrą tam, kad pasiektų antrinę zoną neatseka greito sugrįžimo nustatymo.
11
Vartotojo vadovas
LT
Iliustracija pateikia kai kuriuos naudingus nurodymus taisyklingam greito
sugrįžimo nustatymo instaliavimui.
4040
50
4-10 mt.min. 150 cm.
(59,05 ")
4-10 mt.
4-10 mt.
2 mt.
7DNHOLVPDçHVQLV
nei 2 mt.
5 cm.
2 mt.
DARBO ZONŲ PARUOŠIMAS IR APRIBOJIMAS
Pjaunamos vejos paruošimas
1. Patikrinkite, kad reikiama nupjauti pieva būtų lygi ir be duobių, akmenų
arba kitokių kliūčių. Skirtingu atveju atlikite reikalingas situacijos
pagerinimo operacijas. Tuo atveju, kai yra neįmanoma pašalinti
visų kliūčių yra būtina nustatyti apribojimus su perimetriniu laidu
interesuotose zonose.
2. Patikrinkite, kad visose vejos zonose šlaitai neviršytų leistino
nuolaidumo (žiūrėti “Techniniai duomenys”). Darbo fazės metu
šlaituotose vietose, kai robotas atranda laidą, ratai galėtų paslysti ir
išvesti robotą iš perimetrinės zonos. Jeigu dirvožemio sąlygos yra
tinkamos (kompaktiškas, be per dideliųįdubų ir t.t.).
Svarbu
Zonos su šlaitais didesniais nei yra leistina negali būti
pjaunamos naudojant robotą. Taigi pastatykite perimetrinį
laidą prieš šlaitą atmetant neįskaitant tos zonos
pjaunamos pievos.
NE
35 cm
(13,78 ")
21-35%
21-35%
0-20%
100 cm (39,3 ")
35 cm
(13,78 ")
35 %
0-35%
0-20%
0-20%
perimetrinis laidas
perimetrinis laidas
OK
NE
NE
OK
OK
OK
12
Vartotojo vadovas
LT
Darbo zonos apribojimas
3. Patikrinkite visą vejos paviršių ir įvertinkite ar yra būtina suskirstyti
jąį daugiau nei vieną darbo zoną atskirtas laikantis toliau aprašytų
kriterijų. Prieš pradedant perimetrinio laido instaliavimo operacijas
siekiant pagerinti ir palengvinti įvykdymą, patariama patikrinti visą
jo eigą. Iliustracijoje pavaizduota vejos pavyzdys su žymėjimais
perimetrinio laido tiesimui.
Įrangos instaliavimo metu yra būtina identifi kuoti galimas antrines
zonas ir galimas uždaras zonas. Antrine zona yra identifi kuojama
vejos dalis prijungta prie pagrindinės vejos su susiaurintu ruožu,
kuris yra sunkiai prieinamas naudojant atsitiktinį roboto judėjimą.
Zona turi būti prienanama be laiptelių ir nelygumų viršijančių leistinas
charakteristikas. Jeigu zona turi vadintis “Antrinė zona” tai priklauso
taip pat nuo pirminės zonos dydžio. Kuo didesnė yra pirminė zona
ir tuo sunkesni bus priėjimai siaurose perėjose. Kuo bendrumoje
praėjimas yra mažesnis nei 200 cm (78,74 ") turi būti laikoma antrine
zona. Robotas valdo tiek antrinių zonų, kiek priklauso atsižvelgiant į
modelį (“Žiūrė
ti Techniniai Duomenys”).
Mažiausias leistinas takelis yra 70 cm (27,56 ") nuo perimetrinio laido.
Perimetrinis laidas turi būti ištiesiamas tokiu atstumu, kuris toliau
bus nurodytas dėl pievai nepriklausančių objektų, taigi subendrinant
bendro praėjimo, kurį reikia turėti turi būti 140 cm (55,12 ").
Tuo atveju, kai šis perėjimas yra labai ilgas paratiama, kad jo protis
būtų didesnis nei 70 cm (27,56 ").
Programavimo metu būtina sukonfi gūruoti antrinių zonų dydžius
procentiškai atsižvelgiant į vejos plotą ir norimą greičiausiai pasiekti
kryptį (pagal laikrodį/prieš laikrodį) apart reikiamo ilgio laidą norint
pasiekti antrinę zoną. Žiūrėti “ Programavimo režimas “.
24 v
ç\PēVSHULPHWULQLRODLGRWLHVLPXL
min. 70 cm / 27,56 "min. 70 cm / 27,56 "
min. 70 cm / 27,56 "
Tuo atveju, kai nėra laikomasi aukščiau nurodytų reikalavimų ir taigi
viena zona atskirta laipteliu su nelygumu viršijančiu leistinas roboto
charakteristikas arba vienoje perėjimo pusėje (koridoriuje) su mažesniu
plotu nei 70 cm (27,56 ") nuo perimetrinio laido, pievos zona yra
laikoma “Uždara zona”. Tam, kad instaliuoti “Uždarą zoną” nustatykite
perimetrinio laido ėjimą ir grįžimąį tas pačias žymes atstumu mažesniu
nei 1 cm (0,40 "). Tokiu atveju robotas negali savarankiškai pasiekti
zoną, turės būti valdoma, kaip yra aprašyta skyriuje “Uždarų zonų
valdymas”. “Uždarų zonų” valdymas sumažina roboto savarankiškai
valdomus kvadratinius metrus.
0LQLPDOXVSHUēMLPRWDNHOLV
70 cm / 27,56 " nuo laido.
3$*5,1',1Ē=21$
$175,1Ē=21$
3HUēMLPRWDNHOLV
< 70 cm / 27,56 "
3$*5,1',1Ē=21$
8æ'$5$=21$
13
Vartotojo vadovas
LT
4. Jeigo darbo zonos viduje ir išorėje yra ištiestas grindinys arba takelis tame pačiame pievos lygyje, sutvarkykite perimetrinį laidą 5 cm (1,96
") nuo grindinio krašto. Robotas lengvai išieis iš pievos ir visa žolė bus nupjauta. Jeigu grindys yra padengtos metalo medžiaga arba, jeigu
yra metalo šulinys, dušo padėkas arba elekros laidai, sutvarkykite perimetrinį laidą bent 30 cm (11,81 ") atstumu tam, kad būtų išvengiamas
robotas blogas veikimas ir trukdžiai ant perimetrinio laido.
Svarbu
Iliustracija pavaizduoja vidinių ir periferinių elementų darbo zonų pavyzdžius ir atstumus, kurių turima laikytis tiesiant
perimetrinį laidą. Apribokite visus metalinius arba kitokio metalo elementus (šuliniai, elektros sujungimai ir t.t) tuo siekiant
išvengti trukdžių perimetrio laido signalui.
5 cm
1,97 “
30 cm
11,81 “
30 cm
11,81 “
30 cm
11,81 “
Jeigu vidinėje ir išorinėje darbo zonoje yra pastebima kliūtis, pavyzdžiui užtvara arba siena, sutvarkykite perimetrinį laidą bent 35 cm (13,78 ")
nuo kliūties. Padidinkite bent jau 40 cm (15,75 ") atstumą tarp perimetrinio laido ir kliūties, jeigu norite išvengti, ka drobotas užkliūtų už kliūvinio.
Galimos žolės nupjovimas prie kraštų, kuriuose buvo nuspręsta nedirbti su robotu, žolė galės būti apdailinta krašų krūmapjove arba krūmapjove.
35 cm.
/13,78 "
35 cm.
/13,78 "
35 cm.
/13,78 "
35 cm.
/13,78 "
Jeigu darbo zonos viduje arba išorėje randasi gėlynas, gyvatvorė, augalas su išsikišusiomis šaknimis, mažas 2-3 cm griovelis arba 2-3 cm
jungtis, sutvarkykite perimetrinį laidą bent 30 cm (11,81 "), kad išvengiant, kad robotas sugadintų arba būtų sugadintas esančių kliūčių. Galimos
žolės nupjovimas zonoje, kuriuoje buvo nuspręsta nedirbti su robotu, žolė galės būti apdailinta krašų krūmapjove arba krūmapjove.
30 cm.
/11,81”
30 cm.
/11,81”
30 cm.
/11,81”
30 cm.
/11,81”
30 cm.
/11,81”
LåVLNLåĕåDNQ\V
30 cm.
/ 11,81 “
30 cm.
/ 11,81 “
14
Vartotojo vadovas
LT
Jeigu darbo zonos viduje arba išorėje yra baseinas, erežėlis, skardis, griovys, sodas su dideliu šlaitu arba neapsaugoti trovele viešieji keliai,
sutvarkykite perimetrinį laidą bent 90 cm (35,43 "). Tam, kad sumažinti atstumą nuo perimetrinio laido iki optimalios roboto instaliacijos ir
operatyvumo, tokiu atveju patariame pasirūpinti papildoma aptvara bent 15 cm aukščio; tai suteiks galimybę sumontuoti perimetrinį laidą pagal
ankstesniuose punktuose aprašytas taisykles.
Svarbu
Griežtas atstumų ir šlaitų nurodytų knygelėje laikymąsis užtikrina optimalų roboto instaliavimą ir veikimą. Esant šlaitams
arba slidžiam dirvožemiui padidinkite atstumą bent 30 cm. / 11,81".
90 cm.
/ 35,44 “
90 cm.
/ 35,44 “
90 cm.
/ 35,44 “
Jeigu darbo zonos viduje yra atsparios smūgiams kliūtys pavyzdžiui medžiai, krūmai arba stulpai, kurie neturi smailių kampų, nėra būtina juos
pašalinti. Robotas atsitrenkia į kliūtį ir pakeičia kryptį. Jeigu pageidaujama, kad robotas neatsitrenktųį kliūtis ir dėl jo gero bei tylaus veikimo, yra
patartina apriboti visas pastovias kliūtis. Lengvai pakreipę kliūtys, kaip gėlių vazos, akmenys arba medžiai su išsikišusiomis šaknimis turi būti
apriboti tam, kad išvengti pjovimo peilio ir tų pačių kliūčių sugadinimų.
Norint apriboti kliūtį, pradedant nuo išorinio perimetro taško, kuris randasi arčiausiai apribojamos kliūties, sutvarkykite perimetrinį laidą iki kliūties,
apveskite jį laikantis reguliarių aprašytų atstumų ankstesniuose taškuose ir nuveskite ilgą laidą pagal ankstesnę eigą. Sutvarkykite eigos į priekį
ir atgal laidą uždėkite jį po pačia vinimi, tokiu atveju robotas pereis perimetrinį laidą.
Norint išgauti taisyklingą roboto veikimą, minimalus perimetrinio laido užtiesto ilgis turi būti mažiausiai 70 cm (27,56 ") tokiu būdu leidžiant robotui
reguliariai judėti.
NE
min. 70 cm
/ 27,56 ”
min. 70 cm
/ 27,56 ”
< 70 cm
/ 27,56 ”
< 70 cm
/ 27,56 ”
0 cm / 0 ”0 cm / 0 ”
augalas
stulpas
OKOK
PERIMETRINIO LAIDO INSTALIAVIMAS
Perimetrinis laidas gali būti ištiestas po žeme arba ant dirvožemio. Tuo
atveju, kai yra naudojamasi laido tiesimo įranga patariama laidą tiesti
po žeme, kadangi tai užtikrina to paties laido didesnę apsaugą, Kitokiu
atveju yra būtina ištiesti laidą ant dirvožemio su tam tikromis vinimis, kaip
aprašyta toliau.
Svarbu
Perimetrinio laido tiesimą pradėkite nuo įkrovimo stoties
instaliavimo zonos ir palikite pilnus keletą metrų, kuriuos
vėliau nupjausite pagal išmatavimą galitunėje fazėje
prijungiant prie grupės.
Max.
5 cm (1,96 ")
perimetrinis laidas
15
Vartotojo vadovas
LT
Laidas ištiestas ant dirvožemio
Nupleikite labai žemai žolę naudojantis krūmapjove arba kraštų
krūmapjove išilgai visos eigos, kurioje bus ištiestas laidas. Tokiu būdu bus
lengviau ištiesti laidą kontaktuojant su dirvožemiu ir išvengiant, kad jis būtų
nupjaunamas pjovimo peilio ir vėliau naujai prijungtas, kaip yra aprašyta
toliau.
1. Pastatykite laidą pagal laikdodžio rodyklę išilgai visos eigos
ir pritvirtinkite naudojantis pateiktomis vinimis (atstumas tarp
vinių100÷200 cm (39,37÷78,74“)).
-
Perimetrinio laido tiesimo metu, laikykites sukimosi aplink gėlynus
krypties, kuri turės būti prieš laikrodžio rodyklę.
-
Tiesiuose ruožuose prifi ksuokite laidą tokiu būdu, kad jis išliktų
prigludęs prie dirvožemio.
-
Nelygiuose ruožuose, prifi ksuokite laidą tokiu būdu, kad jis
nesusisuktų, bet išgautų reguliarų išlinkimą (spindulys 20 cm).
laido fiksavimo vinysperimetrinis laidas
NE
Laidas ištiestas po žeme
1. Iškaskite dirvožemį reguliaru ir simetriniu būdu laikantis ant dirvožemio
pažymėtos linijos žymės.
2. Ištieskite laidą pagal laikrodžio rodyklę išilgai visos eigos kelių
centimetrų gylyje (apie 2÷3 cm (0.7874÷ 1.1811 “). Nedėkite laido
giliau nei 5 cm tokiu būdu nesumažinant roboto tiekiamo signalo
intensyvumo.
3. Laido tiesimo metu yra būtina jį užblokuoti kai kuriuose punktuose
tam skirtomis vinimis, kad dirvožemio uždengimo fazės metu jis išliktų
pozicijoje.
4. Uždenkite visa laidą dirvožemiu ir pasirūpinkite, kad jis išliktų tiesus
žemėje.
3$*5,1',1Ē=21$
8æ'$5$=21$
SHUēMLPRWDNHOLV
< 70 cm (27,56 ")
35 cm
(13,78 ")
Max 1 cm
(0,40 ")
NE
Perimetrinio laido sujungimas.
Svarbu
Tiek ištiesto po žeme laido atveju, tiek ant dirvožemio,
bet kokiu atveju esant reikalingumui prijungti jį prie kito
laido su tokiomis pačiomis charakteristikomis tinkamu
būdu (žiūrėti paveikslėlį). Sujungimo fazės metu yra
patariama naudoti rišamos juostelės tipą (pvz: 3M Scotch
23). Nenaudokite izoliacinės juostelės arba kitokio tipo
jungčių (terminalų, gnybtų ir t.t.).
1
34
2
16
Vartotojo vadovas
LT
ĮKROVIMO STOTIES INSTALIAVIMAS IR MAITINIMO BLOKAS
Atsargiai - Įspėjimas
Prieš atliekant bet kokią operaciją atjunkite generalinį
elektros maitinimą.
Pastatykite įkroviklį vaikams neprieinamoje zonoje.
Pavyzdžiui didesniame nei 160 cm aukštyje. (63.00 ").
srovės maitinimo blokas(A)
siųstuvas(B)
H. min. 160 cm
(63.00 ")
apsauga(L)
1. Instaliuoti maitinimo bloką (A).
2. Išmontuoti apsaugą (L).
3. Pastatyti bazę nustatytoje zonoje.
4. Įstatyki perimetrinį laidą (M) po baze.
5. Sujungti du laido galus prie bazės gnybtų.
raudonas gnybtas
juodas gnybtas
Perimetrinis laidas (M)
6. Prifi ksuoti bazę (N) prie dirvožemio su vinimis (P). Jeigu reikia,
prifi ksuokite bazę su kištukais prie išlėtimo (Q).
vinys (P)
išsiplėčiantys
kištukai (Q)
įkrovimo stotis (N)
7. Prijungti įkrovimo stoties (N) maitinimo laidą (E) prie maitinimo bloko
(A).
8. Prijunkti maitinimo kištuką (A) prie elektros lizdo.
9. Jeigu siųstuvo led mirksi, sujungimas yra taisyklingas. Skirtingu atveju,
reikia identifi kuoti anomaliją (žiūrėti “Gedimų paieška”).
10. Sumontuoti apsaugą (L).
srovės maitinimo blokas (A)
maitinimo laidas (E)
perimetrinis
laidas
įkrovimo
stotis (N)
siųstuvas (B)
H. min. 160 cm
(63.00 ")
apsauga(L)
17
Vartotojo vadovas
LT
BATERIJOS ĮKROVIMAS PIRMAM NAUDOJIMUI
1.
Įstatykite robotąįįkrovimo stoties vidų.
2. Paspausti mygtuką ON.
3. Po kelių sekundžių ant displėjaus atsiranda žinutė “ CHARGING ”.
4. Paspausti mygtuką “Start/Pauzė”. Ant dispėjaus atsiranda funkcija
“PAUSĖ”. Baterijos pradeda įkrovimo ciklą.
5. Įkrovimo pabaigoje galima suprogramuoti robotą darbui (žiūrėti
“Programavimo Modalumas”).
ENTER
MYGTUKAS “ON”
MYGTUKAS “START/PAUSE”
Svarbu
Pirmą kartą kraunamos baterijos, turi išlikti prijungtos bent 4 valandas.
REGULIAVIMAI
REKOMENDACIJOS REGULIAVIMAMS
Svarbu
Vartotojas turi atlikti reguliavimus pagal vadovėlyje aprašytas procedūras. Neatlikite jokio tipo reguliavimų, kurios nebuvo
pateiktos vadovėlyje. Galimi ypatingi reguliavimai neaprašyti instrukcijų vadovėlyje, turi būti atliekami tik Gamintojo
Autorizuotų Paslaugų Centruosuose specializuoto personalo.
PJOVIMO AUKŠČIO REGULIAVIMAS
Prieš nustatant pjovimo peilio aukšį, užsitikrinkite, kad robotas būtų sustojęs saugiomumo sąlygomis (žiūrėti “Roboto saugus sustabdymas”).
Svarbu
Dėvėkite apsaugines pirštines, kad išvengtumėte pavojaus įsipjauti rankas.
1. Modeliuose, kuriuose yra įdiegtas signalizacija, nuaktyvinkite ją norint
išvengti jos įsijungimo. (Žiūrėti “Programavimo Būdas”).
2. Apverskite robotą ir pastatykite jį taip, kad nesusigadintų uždengimo
gaubtas.
3. Atveržkite varžtą (C) ir sukite tam skirtu raktu kilpą (E) pagal laikrodžio
rodyklę.
4. Sukelkite arba nuleiskite pjovimo grupę (D) norint nustatyti
pageidaujamą pjovimo aukštį. Vertė yra nustatoma laipsnine skale,
kuri randasi po pateiktu raktu.
Svarbu
Nenaudokite roboto žolei pjauti su aukščiu didesniu nei
1 cm (0,40 ") atsižvelgiant į pjovimo peilį. Pjovimo aukštį
sumažinkite laipsniškai. Patariama sumažinti aukštį bent
1 cm (0,40 ") kas 1÷2 dienas iki kol bus pasiekiamas
idealus aukštis.
5. Pabaigus reguliavimą, sukite kilpą laikrodžio kryptimi (E) ir priveržkite
varžtą (C).
6. Apverskite rotobąį darbinę poziciją.
(E)
SMRYLPRJUXSē'
YDUçWDV&
18
Vartotojo vadovas
LT
NAUDOJIMAS IR VEIKIMAS
REKOMENDACIJOS NAUDOJIMUI
Svarbu
-
Pirmam roboto naudojimui patariame atidžiai perskaityti visą vadovėlį ir užsitikrinti, kad jis buvo pilnai suprastas
ypatingai, kad buvo gerai suprasta informacija susijusi su saugumu.
-
Pritaikykite tik gamintojo numatytą naudojimo paskirtį ir nepakeiskite jokio įtaiso norint išgauti paskirtis skirtingas
nuo operatyvinių.
ROBOTO KOMANDŲ APRAŠYMAS
Iliustracija pavaizduoja komandų poziciją ant mašinos.
A. DISPĖJUS: yra šviečiantis visų funkcijų vizualizavimui.
B. ON: paspauskite norint įjungti žoliapjovę.
C. OFF/STOP: Paspauskite norint išjungti žoliapjovę; displėjus išsijungia.
D. START/PAUSE: paspauskite norint sustabdyti žoliapjovę, paliekant
displėjų “laukimo būsenoje”; šiame modalume yra įmanoma
suprogramuoti žoliapjovę. Paspaudžiant dar kartą naujai paleidžia
darbą. Paspaudžiant mygtuką tuo metu, kai žoliapjovė yra įkrovimo
fazėje nesugrįžta prie darbo iki kol nėra paspaudžiamas naujai ir
neišnyksta užrašas “Pause” nuo displėjaus.
E. CHARGE: paspauskite, kad sugrąžinti žoliapjovęį bazę ir tokiu būdu
iš anksto įkrauti baterijas. Jeigu yra paspaudžiamas kai žoliapjove
randasi įkrovimo būsenoje, žoliapjovė sustabdo įkrovimo procesą ir
Informācija par iekārtas ražotāju. ................................................................................................................................................2
Informācija par drošību. .............................................................................................................................................................3
Drošības noteikumi. ....................................................................................................................................................................3
Drošības aprīkojums. .................................................................................................................................................................4
Drošības zīmes. .........................................................................................................................................................................4
Galvenās sastāvdaļas. ................................................................................................................................................................7
Iepakojums un izpakošana..........................................................................................................................................................8
Iekārtas montāžas plānošana. ....................................................................................................................................................8
Perimetra kabeļa maršruta plānošana. .......................................................................................................................................9
Ceļa sagatavošana robota ātrai atgriešanai uzlādes stacijā. ....................................................................................................10
Darba zonu sagatavošana un norobežošana. ...........................................................................................................................11
Uzlādes stacijas un barošanas avota uzstādīšana. ..................................................................................................................16
Akumulatoru uzlāde pirms pirmās izmantošanas reizes. ..........................................................................................................17
Lietošana un darbība. ...............................................................................................................................................................18
Robota komandu apraksts. .......................................................................................................................................................18
Darba stundas - programmēšanas režīms. ..............................................................................................................................21
Papildu zonas - programmēšanas režīms. ...............................................................................................................................22
Automātiskā atgriešanās uzlādes stacijā. .................................................................................................................................24
Robota izmantošana slēgtajās zonās, kas nav aprīkotas ar uzlādes stacijām. ........................................................................24
Robota iedarbināšana bez perimetra kabeļa. ........................................................................................................................... 25
Informācijas uz displeja attēlošana darba laikā.........................................................................................................................26
Ilgstoša dīkstāve un ievade ekspluatācijā.................................................................................................................................26
Akumulatoru uzlādēšana pēc ilgstošas dīkstāves. ...................................................................................................................27
Bojājumi, cēloņi un risinājumi. .................................................................................................................................................29
Asmens maiņa. .........................................................................................................................................................................32
Šīs dokumentācijas reproducēšana, tai skaitā daļēja, bez ražotāja rakstiskas atļaujas ir aizliegta.
Sakarā ar to, ka ražotājs nepārtraukti uzlabo savu produkciju, viņš patur tiesības veikt izmaiņas šajā dokumentācijā bez iepriekšēja brīdinājuma, ar nosacījumu, ka šīs izmaiņas nav saistītas ar drošības riskiem.
Izmērītā skaņas intensitātedB(A)72 (Maks.) − 65 (zāliena uzturēšana)
Aizsardzības pakāpe pret ūdens iekļūšanuIPIP21
Elektriskie raksturojumi
Barošanas bloks (uz litija akumulatora bāzes)
Iekārta ir sertifi cēta atbilstoši Meanwell Nr.
E307078 - Klase 2 (Vin 90 - 264V maiņstr.)
AC strāva (tip.) 1,2A/115Vac 0,7A/230Vac -
ieejas frekvenču diapazons 47 - 63Hz
Klase 1 (Vin 90-295 V maiņstr.
47/63Hz) AC strāva (tip.) 2
A/115 V maiņstr. 1 A/230 V
maiņstr.
Akumulatoru un lādētāja veids
Litija jonu akumulatorsV-A25.2V – 1x2.3Ah
25.2V –
2x2.3Ah
25.2V – 6.9Ah
Akumulatoru lādētājsV-A29.3 V līdzstr. - 2.3 Ah
29.3 V līdzstr.
- 2.3 Ah
29.3 V līdzstr. - 5.0 Ah
Uzlādēšanas vidējais laiks un režīms1:15 - automātiskais
2:00 -
automātiskais
3:00 - automātiskais
Vidējais darbības ilgums (*)Stundas0:401:302:303:00
Asmens drošības bremze
Apgāšanās devējsstandartaprīkojums
Roktura devējsstandartaprīkojums
Avārijas pogastandartaprīkojums
Piederumi un papildaprīkojums
Perimetra kabelism ( ' )100 ( 328 ')150 ( 491 ')
Perimetra kabeļa maksimālais garums
(aptuvena vērtība, kas aprēķināta uz pareizas
formas perimetra pamata)
m ( ' )400 (1312 ')600 (1968 ')
6
Lietošanas rokasgrāmata
LV
Nostiprinātājkniedessk.100200
Vadāmas zonas, ieskaitot galveno234
Perimetra signāls TX-S1 (patentēts)standartaprīkojums
Lietus devējsstandartaprīkojums
Asmens modulācija un viedā spirālestandartaprīkojums
Nopļauta zāliena devējs – Pašprogrammējamais
(patentēts)
Nav pieejams
standartaprīkojums
Skaņas signālspēc pasūtījumastandartaprīkojums
Barošanas bloka aizsargkaste
akumulatoru lādētāja ārējā kaste
pēc pasūtījuma
(*) Atkarībā no zāles stāvokļa un zāles segas.
IERĪCES VISPĀRĪGS APRAKSTS
Ierīce ir robots, kas paredzēts automātiskai zāles pļaušanai dārzos un
dzīvojamo zonu zālienos jebkurā dienas vai nakts stundā. Tas ir neliels,
kompakts, kluss un viegli transportējams.
Atkarībā no dažādiem pļaujamo virsmu raksturojumiem, robotu var
ieprogrammēt tā, lai tas strādātu vairākās zonās: vienā galvenajā un
vairākās papildu zonās (atkarīgs no konkrēta modeļa raksturojumiem).
Darba laikā robots pļauj zonu, kas ierobežota ar perimetra kabeli.
Robotam sasniedzot perimetra kabeli vai saskaroties ar šķērsli, tas
nejaušā veidā maina trajektoriju un virzās jaunā virzienā.
Darbojoties nejaušā veidā, robots automātiski veic pļaušanu un pārklāj
ierobežotu zāliena da
ļu (sk. attēlu).
Robots spēj atklāt dārza vietas ar augstāku un/vai biezāku zāles segumu
un automātiski ieslēgt, ja tas to uzskatīs par nepieciešamu, spirālveida
kustību, lai pilnībā nopļautu zāli zālienā. Spirālveida kustību var ieslēgt arī
operators, nospiežot pogu ENTER/MENU, kamēr robots pļauj zāli.
Zāliena laukums, kuru var nopļaut robots, ir atkarīgs no vairākiem
faktoriem:
•
robota modelis uz uzstādītie akumulatori
•
apgabala raksturojumi (nepareizas formas perimetri, nelīdzenas
virsmas, zonu izvietojums utt.)
•
zāliena raksturojumi (zāles veids un augstums, mitrums utt.)
•
asmens stāvoklis (labi uzasināts, bez netīrumiem utt.)
1(-$8ä6'$5%ĥ%$65(æĥ06
7
Lietošanas rokasgrāmata
LV
GALVENĀS SASTĀVDAĻAS
1.
Robots.
2. Pogu panelis: to izmanto robota darbības režīmu iestatīšanai un attēlošanai.
3. Lietus devējs: atklāj lietu un liek robotam atgriezties uzlādes stacijā.
4. Akumulators : nodrošina asmens un riteņu motoru barošanu. Robots tiek piegādāts ar vienu vai vairākiem litija jonu akumulatoriem (atkarīgs
no modeļa), kas dažos modeļos jau ir uzstādīti.
5. Rokturis: izmanto robota pacelšanai un transportēšanai.
6. Griezējasmens : nodrošina zāliena pļaušanu, dažos modeļos jau ir uzstādīts.
7. Perimetra kabeļa šķetere: kabelis ar speciālu izolāciju un īpašiem raksturojumiem, kas paredzēts robota darbībai nepieciešama signāla
pārraidei.
8. Kniedes : nepieciešami perimetra kabeļa un uzlādes stacijas stiprināšanai.
9. Barošanas avota elektrības vads.
10. Barošanas avots : nodrošina uzlādes stacijas zemsprieguma barošanu.
11. Uzlādes stacija: izmanto robota akumulatora uzlādēšanai un uzturēšanai.
12. Raidītājs: nodod signālu perimetra kabelim.
13. Lietošanas rokasgrāmata.
14. Pļaušanas augstuma regulēšanas atslēga.
5
6
13
9
8
14
11
12
10
7
4
1
2
3
8
Lietošanas rokasgrāmata
LV
UZSTĀDĪŠANA
IEPAKOJUMS UN IZPAKOŠANA
Piegādes laikā ierīce ir daļēji iepakota. Izpakošanas laikā uzmanīgi izņemiet sastāvdaļas un pārbaudiet to integritāti.
Svarīgi
•
Saglabājiet iepakojuma materiālu, lai to turpmāk varētu izmantot.
IEKĀRTAS MONTĀŽAS PLĀNOŠANA
Robota salikšana neietver grūti veicamus darbus, bet pirms tās ir jāsaplāno tādas lietas kā uzlādes stacijas un barošanas avota optimāla
montāžas vieta, kā arī perimetra kabeļa izvietojuma noteikšana.
•
Uzlādes stacija ir jānovieto zāliena malā, vēlams to uzstādīt zonā ar
lielu laukumu, no kuras var viegli sasniegt citas zāliena daļas. Zonā,
kurā ir uzstādīta uzlādes stacija, turpmāk tekstā ir apzīmēta kā
“galvenā zona”.
Piesardzība - Brīdinājums
Uzstādiet barošanas avotu zonā, kas nav pieejamā
bērniem. Piemēram, uzstādiet to augstumā virs 160 cm.
(63 ").
barošanas bloks
raidītājs
perimetra kabelis
uzlādes stacija
Min. augst. 160 cm
/ 63 "
Piesardzība - Brīdinājums
Lai ierīci varētu pieslēgt elektrībai, uzstādīšanas vietas tuvumā ir jābūt elektrības rozetei. Pārliecinieties, ka savienojums
ar elektrības tīklu atbilst spēkā esošu noteikumu prasībām. Lai pārliecinātos, ka jūs strādājat pilnīgi drošos apstākļos,
elektroietaisei, pie kuras ir paredzēts pieslēgt barošanas avotu, jābūt aprīkotai ar efektīvu zemējumu.
Svarīgi
Iesakām uzstādīt šo bloku elektriskajiem komponentiem paredzētajā skapī (kas paredzēts uzstādīšanai ārā vai telpās), kas
aprīkots ar slēdzeni un ir labi vedināts, nodrošinot pareizu gaisa cirkulāciju.
Piesardzība - Brīdinājums
Sekojiet tam, lai barošanas avotam varētu piekļūt tikai pilnvarotas personas.
•
Pēc katra darba cikla paveikšanas robotam ir jābūt spējīgam viegli atrast uzlādes staciju, kurā sāksies jaunais darba cikls un darbs citās
darba zonās, kas turpmāk ir apzīmētas kā “papildu zonas”.
•
Centieties izvietot uzlādes staciju vietā, kas atbilst šādiem raksturojumiem:
-
Līdzena virsma.
-
Stabila un blīva virsma ar labām drenāžas spējām.
-
Vēlams, lai tā būtu liela izmēra zāliena daļa.
-
Pārliecinieties, ka ūdens smidzinātāji, kas var būt uzstādīti zālienā, nelaista ūdeni virsū uzlādes stacijai.
-
Uzlādes stacijas ieejas pusei ir jābūt izvietotai, kā parādīts attēlā, lai ļautu robotam ieiet tajā, sekojot perimetra kabelim pulksteņrādītāja
virzienā.
-
Pirms bāzes jābūt 400 cm (157,48 ") garam taisnam gabalam.
•
Uzlādes stacijai jābūt piestiprinātai pie zemes. Izvairieties no tā, ka bāzes priekšpusē pie ieejas veidojas „pakāpiens“, nepieciešamības
gadījumā izvietojot pie ieejas mākslīgas zāles paklāju, lai kompensētu radušos pakāpienu. Alternatīvs risinājums ir daļēji noņemt zāles
segu un uzstādīt bāzi vienā līmenī ar zāli.
•
Uzlādes stacija ir savienota ar barošanas avotu ar kabeli, kas iziet no uzlādes stacijas puses, kas atrodas tālāk no pļaušanas zonas.
9
Lietošanas rokasgrāmata
LV
•
Centieties izvietot barošanas avotu vietā, kas atbilst šādiem
raksturojumiem:
-
Izvietojiet to labi vedināmā vietā, kas aizsargāta no atmosfēras
parādībām un no tiešiem saules stariem.
-
Vēlams izvietot to mājoklī, garāžā vai glabātavā.
-
Izvietojot to ārā, tai jābūt aizsargātai no tiešiem saules stariem un
ūdens: tāpēc šajā gadījumā tā ir jāuzstāda kastē ar ventilāciju. To
nedrīkst izvietot tiešā saskarē ar augsni vai mitrās vietās.
-
Izvietojiet to ārpus zāliena, nevis zāliena robežās.
-
Attiniet tāda garuma kabeli, kas nepieciešams, lai uzlādes staciju
savienotu ar barošanas avotu. Nesaīsiniet un nepagariniet kabeli.
1Ď1Ď
OKOK
1Ď1Ď
•
Ieejas troses gabalam jābūt taisnam un perpendikulāram attiecībā pret
uzlādes staciju vismaz 200 cm (78,74 ") garumā un izejas gabalam ir
jāiziet no uzlādes stacijas, kā parādīts attēlā; tas palīdzēs robotam
pareizi ieiet stacijā.
barošanas bloks
uzlādes stacija
Raidītājs
Min. augst. 160 cm
/ 63 "
Min. attālums
min. 200 cm
/ 78,74 "
perimetra kabelis
Gadījumā, ja robots tiek uzstādīts blakus zonai, kurā ir uzstādīts cits
robots (tāds pats vai cita ražotāja robots), uzstādīšanas laikā ir jānoregulē
robota raidītājs un uztvērējs, lai abu robotu frekvences netraucētu viena
otrai.
PERIMETRA KABEĻA MARŠRUTA PLĀNOŠANA
Pirms perimetra kabeļa uzstādīšanas ir jāpārbauda visa zāliena virsma.
Apsveriet izmaiņas, kas var būt nepieciešamas zāles segai, kā arī faktorus,
kas jāņem vērā perimetra kabeļa ierīkošanas laikā, lai nodrošinātu robota
pareizu darbību.
1. Nosakiet, kāda robota atgriešanās metode uzlādes stacijā ir jāizmanto,
sekojot norādījumiem nodaļā “ATGRIEŠANĀS METODE UZLĀDES
STACIJĀ”.
2. Nosakiet, kur ir jāizvieto perimetra kabelis, sekojot norādījumiem,
kas izklāstīti nodaļā “UZLĀDES STACIJAS SAGATAVOŠANA, KAS
NODROŠINA ĀTRU ROBOTA ATGRIEŠANOS”.
3. Darba zonu sagatavošana un norobežošana.
4. Perimetra kabeļa ierīkošana.
5. Uzlādes stacijas un barošanas avota uzstādīšana. Perimetra kabeļa
ierīkošanas laikā ievērojiet montāžas virzienu (pulksteņrādītāja
virzienā) un griešanos virzienu apkārt dobēm (pretēji pulksteņrādītāja
virzienam). Kā parādīts attēlā.
24 v
SHULPHWUDNDEHƀD
LHUĦNRåDQDVPDUåUXWV
10
Lietošanas rokasgrāmata
LV
ATGRIEŠANĀS METODE UZLĀDES STACIJĀ
Robots var atgriezties uzlādes stacijā divos dažādos veidos, balstoties uz
konfi gurāciju lietotāja izvēlnē punktā “Iestatījumi” - “Atgriešanās bāzē”.
Izmantojiet metodi “Izmantojot kabeli” tikai tajos gadījumos, ja dārzā
ir ļoti daudz šķēršļu, kas atrodas blakus perimetra kabelim (tuvāk par 2
m). Visos pārējos gadījumos iesakām izmantot metodi “V-METER”, kas
nodrošina ātrāku atgriešanos uzlādes stacijā.
“On the wire”. Šajā atgriešanās metodē robots seko perimetra kabelim,
uzbraucot ar riteņiem uz šī kabeļa. Ja ir ieslēgta šī metode, nav jāveic
turpmāk aprakstītie sagatavošanas darbi (“Atgriešanās, izmantojot
kabeli”).
“V-METER”. Ja ir iestatīta šī atgriešanās metode, robots pārvietosies
gareniski perimetra kabelim aptuvenā attālumā, kas var būt no dažiem
centimetriem līdz 1 m (3,2 '), laiku pa laikam pieskaroties tam, it
īpaši apgabalos, kuriem nav taisnstūra forma, kamēr tas nesasniedz
“Atgriešanos, izmantojot kabeli”, kas pareizi virzīs robotu uzlādes stacijas
virzienā vai vadīs to cauri šauriem apgabaliem. Pēc (“Atgriešanos,
izmantojot kabeli”) sasniegšanas, robots apmēram 10 metrus (33 ') sekos
perimetra kabelim, uzbraucot uz tā ar riteni.
4-10 m
4-10 m
2 m
(MDNDV
åDXUăNDSDUP
5 cm
2 m
“Atgriešanās, izmantojot kabeli” paziņo robotam ne tikai to, ka uzlādes stacija ir tuvumā, bet arī palīdz pārvietoties šaurās ejās vai ātri atgriezties
uzlādes stacijā.
Uzreiz pēc “Atgriešanās” signāla saņemšanas, robots apmēram 10 metrus (33 ') ar zemu ātrumu un lielāku precizitāti sekos perimetra kabelim
un pēc tam atgriezīsies režīmā “V-Meter”, ja tas neatradīs uzlādes staciju vai ātras atgriešanās ceļu.
Ierīkojot “Atgriešanās” ceļu, ievērojiet turpmāk izklāstītos noteikumus.
•
“Atgriešanās” ceļš ir kabeļa gabals, kura garums dārzā sasniedz 2 m (6,6 ') ar attālumu starp kabeļiem 5 cm. (1,96 ").
•
“Atgriešanās” ceļam jābūt izvietotam no 4 līdz 10 m (13,2 - 33 ') attālumā no uzlādes stacijas.
•
“Atgriešanās” ceļam jābūt izvietotam no 2 m (6,6 ') attālumā no šaurām ejām.
•
“Atgriešanās” ceļam jābūt izvietotam pirms “ātras atgriešanās ceļam”.
IEVĒROJIET: Ja robots nespēj atrast uzlādes staciju noteiktā laika periodā, tas sekos perimetra kabelim režīmā “Izmantojot kabeli”.
CEĻA SAGATAVOŠANA ROBOTA ĀTRAI ATGRIEŠANAI UZLĀDES STACIJĀ
Ātra atgriešanās ir īpašs perimetra kabeļa izvietošanas veids, kas ļauj robotam saīsināt atgriešanās trajektoriju uzlādes stacijā. Izmantojiet šādu
perimetra kabeļa ierīkošanas veidu tikai dārzos, kuros ātra atgriešanās nodrošina reālu trajektorijas garuma samazināšanu un ir paredzēta
apgabaliem, kuru perimetra garums pārsniedz 200 m.
Lai ierīkotu ātru atgriešanos, uzstādiet perimetra kabeli apgabalā tā, lai izveidotos trijstūris ar 50 cm (19,7 ") malu un divām perimetra 40 cm
(15,75 ") kabeļa malām, kā parādīts attēlā.
Braucot uzlādes stacijas virzienā robota riteņi ir uz kabeļa un kad tas krusto šo īpašo trijstūra veidu, tas pārtrauc kustību, pagriežas apmēram
par 90° dārza iekšpusē un atsāk kust
ību jaunajā virzienā, kamēr nesasniedz perimetra kabeli pretējā pusē.
Sagatavojiet ātru atgriešanos vietā, pirms kuras ir vismaz 200 cm (78,74 ") garš taisns kabeļa gabals un pēc kura ir vismaz 150 cm (59,05 ")
garš taisns kabeļa gabals.
To nedrīkst ierīkot taisnajā gabalā, kas atrodas tieši pirms uzlādes stacijas, kā arī šķēršļu tuvumā. Pārbaudiet, vai visāātras atgriešanās
trajektorijas garumā nav šķēršļu, kas var traucēt veikt ātru atgriešanos.
Svarīgi
Nepareizs ātra atgriešanās izvietojums var izraisīt to, ka robots ātri atgriežas uzlādes stacijā. Pārvietojoties gareniski
perimetram un nonākot papildu zonā, robots neatrod ātras atgriešanās vietu.
11
Lietošanas rokasgrāmata
LV
Attēlā ir sniegti daži lietderīgi padomi par pareizu ātras atgriešanās pareizu
ierīkošanu.
4040
50
4-10 mmin. 150 cm
(59,05 ")
4-10 m
4-10 m
2 m
(MDNDVåDXUăND
par 2 m
5 cm
2 m
DARBA ZONU SAGATAVOŠANA UN NOROBEŽOŠANA
Pļaujamā zāliena sagatavošana
1. Pārbaudiet, vai pļaujamais zāliens ir līdzens un ka tajā nav bedru,
akmeņu vai citu šķēršļu. Ja šķēršļi ir, tad attīriet teritoriju. Ja dažus
šķēršļus neizdodas novākt, tie ir piemērotā veidā jānorobežo ar
perimetra kabeli.
2. Pārbaudiet, vai nevienā zālienā daļā nav pārsniegts maksimālais
pieļaujamais slīpums (sk. nodaļu “Tehniskie dati”). Ja robots strādā
zonā ar slīpu virsmu, tad nonākot līdz kabelim, riteņi var izslīdēt un
robots var aizbraukt prom no perimetra zonas.
Svarīgi
Apgabalus, kuros virsmas slīpums pārsniedz maksimālo
pieļaujamo robežvērtību, nevar nopļaut ar robotu. Šajā
gadījumā novietojiet perimetra kabeli pirms slīpas zonas,
izslēdzot to no pļaujamā zāliena apgabala.
1Ď
35 cm
(13,78 ")
21-35%
21-35%
0-20%
100 cm (39,3 ")
35 cm
(13,78 ")
35 %
0-35%
0-20%
0-20%
OK
1Ď
1Ď
OK
perimetra kabelis
OK
OK
perimetra kabelis
12
Lietošanas rokasgrāmata
LV
Darba zonas norobežošana
3. Pārbaudiet visu zāliena zonu un novērtējiet, vai tā ir jāsadala vairākās
atsevišķās darba zonās, izmantojot zemāk izklāstītos kritērijus. Pirms
perimetra kabeļa ierīkošanas un lai atvieglotu šo operāciju, iesakām
pārbaudīt visu maršrutu. Attēlā ir parādīts zāliena piemērs un ir
norādīts ierīkota perimetra kabeļa maršruts.
Iekārtas uzstādīšanas laikā ir jānosaka, vai būs jāveido papildu zonas
un slēgtas zonas. Papildu zona ir tāda zāliena daļa, kas savienota ar
galveno zāliena zonu ar šauru ceļu, kurā robotam, nejaušas kustību
dabas dēļ, ir gr
ūti nokļūt. Starp šīm zonām nedrīkst būt pakāpienu un
tām jābūt vienā līmenī, ņemot vērā pieļaujamos nelīdzenumus. To, vai
zona ir defi nējama kā “papildu zona”, ir atkarīgs arī no pamatzonas
izmēriem. Jo lielāks ir pamatzonas laukums, jo grūtāk ir nokļūt šaurās
ejās. Vispārīgā gadījumā, ja eja ir šaurāka par 200 cm (78,74 "), to
uzskata par papildu zonu. Papildu zonas skaits, ko ir spējīgs apstrādāt
robots, ir atkarīgs no modeļa raksturojumiem (sk. nodaļu “Tehniskie
dati”).
Minimālais pieļaujamais attā
lums starp perimetra kabeļiem ir 70 cm
(27,56 "). Perimetra kabelis ir jāuzstāda zemāk norādītajā attālumā no
priekšmetiem, kas atrodas ārpus zāliena, tāpēc vispārīgā gadījumā
kopējais pieejamais ejas platums nedrīkst būt mazāks par 140 cm
(55,12 ").
Gadījumā, ja šī eja ir ļoti gara, ir ieteicams, ka tās platums ir lielāks
par 70 cm (27,56 ").
Programmēšanas laikā ir jānorāda papildu zonu izmēri procentos
attiecībā pret zālienu un virzieni, kuros jāpārvietojas, lai tās pēc iespējas
ātrāk sasniegtu (pulkste
ņrādītāja virzienā / pretēji pulksteņrādītāja
virzienam) kā arī kabeļa garums metros, ar kuru var nokļūt papildu
zonā. Sk. nodaļu “Programmēšanas režīms“.
24 v
SHULPHWUDNDEHƀD
LHUĦNRåDQDVPDUåUXWV
min. 70 cm / 27,56 "min. 70 cm / 27,56 "
min. 70 cm / 27,56 "
Gadījumā, ja augstāk aprakstītās minimālās prasības netiek ievērotas
un, līdz ar to, zona ir atdalīta ar pakāpienu vai līmeņu starpība
pārsniedz robota raksturojumus, vai arī ejas (ceļa) platums starp
perimetra kabeļiem ir mazāks par 70 cm (27,56 ") šāda zāliena zona
tiek uzskatīta par “slēgto zonu”. Lai ierīkotu “slēgtās zonas”, ielieciet
kabeli virzienos turp un atpakaļ mazāk kā1 cm (0,40 ") attālumā viena
no otra. Šajā gadījumā robots nevarēs pats sasniegt šo zonu, tā tiek
kontrolēta saskaņā ar norādījumiem nodaļā “Slēgto zonu vadība”.
“Slēgto zonu” izmantošana ļauj samazināt robota apstrādājamo zāles
laukumu.
PLQLPăODLVHMDVSODWXPVVWDUS
NDEHƀLHP70 cm / 27,56 "
*$/9(1Ă=21$
PAPILDU ZONA
ejas platums
< 70 cm / 27,56 "
*$/9(1Ă=21$
6/Ď*7Ă=21$
13
Lietošanas rokasgrāmata
LV
4. Ja darba zonā vai ārpus tās ir ceļa segums vai ietve, kas atrodas vienā līmenī ar zālienu, izvietojiet perimetra kabeli 5 cm (1,96 ") attālumā
no ceļa seguma malas. Robots varēs viegli iziet no zāliena un visa zāle būs nopļauta. Ja izmanto metāla ceļa segumu vai, ja ir metāla tekne,
dušas paliktnis vai elektriskie vadi, izvietojiet perimetra kabeli vismaz 30 cm (11,81 ") attālumā, lai nodrošinātu robota pareizu darbību un
izvairītos no perimetra kabeļa traucējumiem.
Svarīgi
Attēlā ir redzams darba zonas iekšējo un perifērijas elementu piemērs un attālumi, kuri jāievēro perimetra kabeļa
ierīkošanas laikā. Ierobežojiet visus dzelzs vai citu metālu elementus (teknes, elektriskie savienotāji u.c.), lai izvairītos no
traucējumu radīšanas perimetra kabelim.
5 cm
1,97 “
30 cm
11,81 “
30 cm
11,81 “
30 cm
11,81 “
Ja darba zonā vai ārpus tās ir šķērslis, piemēram, apmale, siena vai barjera, izvietojiet perimetra kabeli vismaz 35 cm (13,78 ") attālumā no
šķēršļa. Vismaz par 40 cm (15,75 ") palieliniet attālumu starp perimetra kabeli un šķērsli, ja vēlaties izvairīties no robota un šķēršļa sadursmes.
Zāli, kas palika pie tās malas, pie kuras nolēmāt izmantot robotu, var nopļaut ar trimeri vai krūmgriezi.
35 cm.
/13,78 "
35 cm.
/13,78 "
35 cm.
/13,78 "
35 cm.
/13,78 "
Ja darba zonā vai ārpus tās ir dobe, žogs, augs, kura saknes atrodas virs zemes, neliela 2-3 cm tekne vai neliela 2-3 cm apmale, izvietojiet
perimetra kabeli vismaz 30 cm (11,81 ") attālumā, lai izvairītos no tā, ka robots nodara vai gūst bojājumus šķēršļu dēļ. Zāli, kas palika tajā zonā,
kurā nolēmāt izmantot robotu, var nopļaut ar trimeri vai krūmgriezi.
30 cm.
/11,81”
30 cm.
/11,81”
30 cm.
/11,81”
30 cm.
/11,81”
30 cm.
/11,81”
saknes virs zemes
30 cm.
/ 11,81 “
30 cm.
/ 11,81 “
14
Lietošanas rokasgrāmata
LV
Ja darba zonā vai ārpus tās ir baseins, dīķis, šķērslis, stāva krauja, bedre, lejupejošs pakāpiens vai publiskais ceļš, kas nav izsargāts ar barjeru,
izvietojiet perimetra kabeli vismaz 90 cm (35,43 ") attālumā. Lai samazinātu perimetra kabeļa garumu, optimizējot ierīkošanu un robota darba
raksturojumus, iesakām šajā gadījumā uzstādīt vismaz 15 cm augstu papildu iežogojumu; tas ļaus izvietot perimetra kabeli, ievērojot augstāk
izklāstītos norādījumus.
Svarīgi
Rokasgrāmatā norādīto maksimālo slīpumu ievērošana nodrošina optimālu uzstādīšanu un robota labu funkcionēšanu.
Uz slīpām un slidenām virsmām palieliniet attālumu vismaz par 30 cm / 11,81".
90 cm.
/ 35,44 “
90 cm.
/ 35,44 “
90 cm.
/ 35,44 “
Ja darba zonā ir šķēršļi, kas var izturēt triecienus, piemēram, koki, krūmi vai stabi bez asām malām, tie nav jānorobežo. Pēc saduršanās ar
šķērsli robots izmainīs kustības virzienu. Ja vēlaties, ka robots darbojas bez sadursmēm ar šķēršļiem, kā arī tā drošai un klusai darbībai, ir
ieteicams norobežot visus nekustīgus šķēršļus. Šķēršļi, kuru mala ir mazliet noliekta, piemēram, puķu vāzes, akmeņi vai koki, kuru saknes ir virs
zemes, ir jānorobežo, lai izvairītos no asmens un šo priekšmetu bojājumiem.
Lai norobežotu šķērsli, sāciet ar ārējo perimetra punktu, kas atrodas vistuvāk norobežojamajam priekšmetam, ierīkojiet perimetra kabeli līdz
šķērslim un apkārt tam, ievērojot iepriekšējos punktos norādītos attālumus, un pēc tam izvietojiet kabeli atbilstoši paredzētajam maršrutam.
Izvietojiet kabeļa posmus virzienā turp un atpakaļ vienu virs otra zem vienas un tās pašas kniedes, šajā gadījumā robots pārbrauks pāri
perimetra kabelim.
Lai nodrošinātu robota pareizu darbību, perimetra kabelim jāpārklājas vismaz 70 cm (27,56 ") garumā, kas ļaus robotam pareizi pārvietoties.
1z
min. 70 cm
/ 27,56 ”
min. 70 cm
/ 27,56 ”
< 70 cm
/ 27,56 ”
< 70 cm
/ 27,56 ”
0 cm / 0 ”0 cm / 0 ”
augs
stabs
OKOK
PERIMETRA KABEĻA IERĪKOŠANA
Perimetra kabeli var ierakt vai izvietot uz zemes virsmas. Gadījumā, ja jums
ir aprīkojums kabeļu ieklāšanai, ieteicams ierakt kabeli, jo tas nodrošinās
labāku kabeļa aizsardzību. Vai arī kabeli var izvietot uz zemes virsmas,
izmantojot speciālas kniedes, kā aprakstīts zemāk.
Svarīgi
Sāciet perimetra kabeļa ierīkošanu zonā, kurā ir uzstādīta
uzlādes stacija un atstājiet pāris metrus, lai pēc tam
kabeli varētu saīsināt līdz nepieciešamajam garumam,
pieslēdzot to pie bloka.
Maks.
5 cm (1,96 ")
perimetra kabelis
15
Lietošanas rokasgrāmata
LV
Kabeļa uzstādīšana uz zemes virsmas
Ļoti zemu nopļaujiet zāli, izmantojot trimeri vai krūmgriezi gar visam kabeļa
ierīkošanas maršrutam. Tas palīdzēs izvietot kabeli tā, lai tas pieskartos
zemei un lai tas netiktu pārgriezts ar asmeni, pēc tam tas būs jāsavieno,
kā aprakstīts turpmāk.
1. Izvietojiet kabeli pulksteņrādītāja virzienā gar visam maršrutam
un piestipriniet to, izmantojot speciālas kniedes, kas iekļautas
komplektācijā (attālums starp kniedēm 100÷200 cm (39,37÷78,74")).
-
Perimetra kabeļa ierīkošanas laikā ievērojiet griešanās virzienu
apkārt dobēm, kuram jābūt pretēji pulksteņrādītāja virzienam.
-
Taisnos posmos piestipriniet kabeli tā, lai tas būtu nospriegots un
piegulētu pie zemes.
-
Posmos, kas nav taisni, piestipriniet kabeli tā, lai tas nesatītos un
lai tam būtu vienmērīgs izliekums (20 cm rādiuss).
1Ď
NDEHƀDVWLSULQăåDQDVNQLHGHVperimetra kabelis
Kabea ierakšana
1. Vienmērīgi un simetriski uzrociet zemi atbilstoši maršrutam, kas
atzīmēts uz zemes.
2. Ierīkojiet kabeli pulksteņrādītāja virzienā gareniski maršrutam dažu
centimetru dziļumā (apmēram 2÷3 cm (0.7874÷ 1.1811 "). Neierociet
kabeli vairāk kā uz 5 cm, lai nesamazinātu signāla kvalitāti un spēku,
ko uztver robots.
3. Kabeļa ierīkošanas laikā nepieciešamības gadījumā nostipriniet
to dažos punktos ar speciālām kniedēm, lai turētu to nekustīgu
ierakšanas laikā.
4. Pārklājiet visu kabeli ar zemi un pārliecinieties, kas tas paliek
nospriegots.
*$/9(1Ă=21$
6/Ď*7Ă=21$
ejas platums
< 70 cm (27,56 ")
35 cm
(13,78 ")
Maks. 1 cm
(0,40 ")
1z
Perimetra kabeļa savienošana.
Svarīgi
Gan tajā gadījumā, ja kabelis ir ierakts, gan ja tas
ir uzstādīts uz zemes virsmas, nepieciešamības
gadījumā savienojiet to ar citu kabeli ar tādiem pašiem
raksturojumiem, ievērojot savienošanas norādījumus (sk.
attēlu). Savienošanas laikā iesakām izmantot pašlīmējošu
Tootja ja seadme identifi tseerimine. ............................................................................................................................................2
Informatsioon ohutuse kohta. ....................................................................................................................................................3
Seadme üldine kirjeldus. .............................................................................................................................................................6
Peamised osad. ..........................................................................................................................................................................7
Pakend ja lahtipakkimine. ...........................................................................................................................................................8
Süsteemi paigaldamise planeerimine. ........................................................................................................................................8
Perimetraaljuhtme tee määratlemine. .........................................................................................................................................9
Tööala ettevalmistamine ja piiritlemine. .....................................................................................................................................11
Laadimisjaama ja toiteploki paigaldamine.................................................................................................................................16
Aku laadimine esmakordsel kasutamisel. .................................................................................................................................17
Kasutamine ja töötamine. .........................................................................................................................................................18
Roboti kasutamine suletud aladel,kus ei ole laadimisjaama. ....................................................................................................24
Roboti käivitamine ilma perimetraaljuhtmeta. ...........................................................................................................................25
Ekraani kuvamine töö ajal. ........................................................................................................................................................26
Pikem tööpaus ja viimine tööseisu. ...........................................................................................................................................26
Aku laadimine pikemaks tööpausiks. ........................................................................................................................................27
Rikked, põhjused ja parandamine. ..........................................................................................................................................29
Soovitused osade vahetamiseks...............................................................................................................................................31
Käesoleva dokumendi paljundamine, ka osaline, ilma tootjapoolse kirjaliku loata, on keelatud.
Tootja tegeleb pideva täiustamise poliitikaga ja jätab endale õiguse muuta käesolevat dokumenti ilma etteteatamiskohustuseta tingimusel, et see ei kujuta ohtu ohutusele.
Gebruikershandleiding.com neemt misbruik van zijn services uitermate serieus. U kunt hieronder aangeven waarom deze vraag ongepast is. Wij controleren de vraag en zonodig wordt deze verwijderd.
Product:
Spelregels forum
Om tot zinvolle vragen te komen hanteren wij de volgende spelregels:
lees eerst de handleiding door;
controleer of uw vraag al eerder door iemand anders is gesteld;
probeer uw vraag zo duidelijk mogelijk te stellen;
heeft u een probleem en al geprobeerd om dit op te lossen, vermeld dit erbij aub;
heeft u een oplossing gekregen van een bezoeker dan horen wij dat graag in dit forum;
wilt u een reactie geven op een vraag of antwoord, gebruik dan niet dit formulier maar klik op de knop 'reageer op deze vraag';
uw vraag wordt direct op de website gezet; vermijd daarom persoonlijke gegevens in te vullen;
Belangrijk! Als er een antwoord wordt gegeven op uw vraag, dan is het voor de gever van het antwoord nuttig om te weten als u er wel (of niet) mee geholpen bent! Wij vragen u dus ook te reageren op een antwoord.
Belangrijk! Antwoorden worden ook per e-mail naar abonnees gestuurd. Laat uw emailadres achter op deze site, zodat u op de hoogte blijft. U krijgt dan ook andere vragen en antwoorden te zien.
Abonneren
Abonneer u voor het ontvangen van emails voor uw Stiga Autoclip 325 bij:
nieuwe vragen en antwoorden
nieuwe handleidingen
U ontvangt een email met instructies om u voor één of beide opties in te schrijven.
Ontvang uw handleiding per email
Vul uw emailadres in en ontvang de handleiding van Stiga Autoclip 325 in de taal/talen: Nederlands, Duits, Engels, Frans, Italiaans, Portugees, Spaans, Pools, Deens, Zweeds, Noors, Fins als bijlage per email.
De handleiding is 112,13 mb groot.
U ontvangt de handleiding per email binnen enkele minuten. Als u geen email heeft ontvangen, dan heeft u waarschijnlijk een verkeerd emailadres ingevuld of is uw mailbox te vol. Daarnaast kan het zijn dat uw internetprovider een maximum heeft aan de grootte per email. Omdat hier een handleiding wordt meegestuurd, kan het voorkomen dat de email groter is dan toegestaan bij uw provider.
Stel vragen via chat aan uw handleiding
Stel uw vraag over deze PDF
Uw handleiding is per email verstuurd. Controleer uw email
Als u niet binnen een kwartier uw email met handleiding ontvangen heeft, kan het zijn dat u een verkeerd emailadres heeft ingevuld of dat uw emailprovider een maximum grootte per email heeft ingesteld die kleiner is dan de grootte van de handleiding.
Er is een email naar u verstuurd om uw inschrijving definitief te maken.
Controleer uw email en volg de aanwijzingen op om uw inschrijving definitief te maken
U heeft geen emailadres opgegeven
Als u de handleiding per email wilt ontvangen, vul dan een geldig emailadres in.
Uw vraag is op deze pagina toegevoegd
Wilt u een email ontvangen bij een antwoord en/of nieuwe vragen? Vul dan hier uw emailadres in.