15
System components
IS 3180, IS 3360 IS 3360 ECO,
IS 345, IS 345 MX Highbay
Standard installation
Installation in ceiling box
Basic element
Concealed wiring
Surface wiring
Plug-in terminals
Fitting the sensor cover
Fitting the shrouds
Screwing on the lens
Twilight setting (2 – 2000 lux)
Time setting (5 sec. – 15 min.)
Fitting the decorative faceplate
Drainage hole for wall installation
(open if necessary)
Drainage hole for ceiling installation
(open with a 5 mm drill if necessary)
IS 3180
Lens rotates for selecting basic settings:
8 m max. or 20 m max.
Lens slides for adjusting reach:
4 – 8 m or 8 – 20 m)
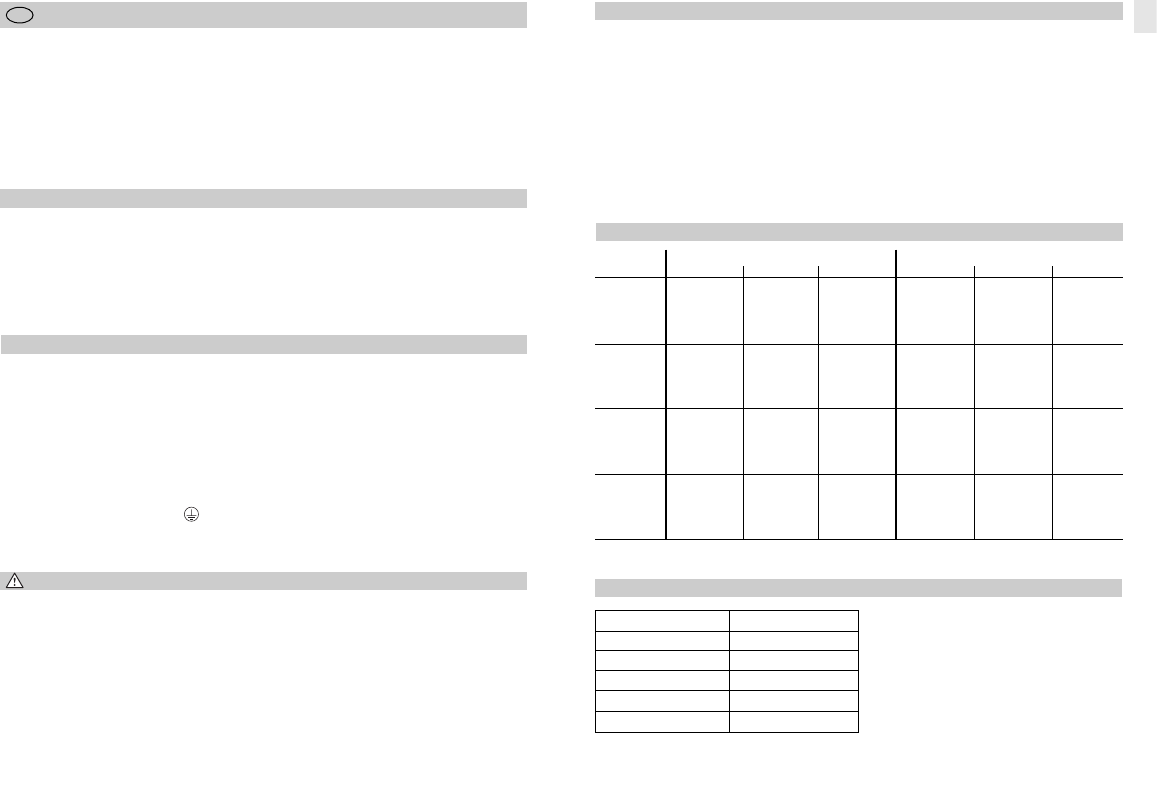
Mounting
height Setting level radially Setting level tangentially radially tangentially
1.5 m
2.0 m
2.5 m
3.0 m
8
–
–
–
20
8
–
–
–
20
8
–
–
–
20
8
–
–
–
20
5 m
6 m
7 m
8 m
12 m
5 m
6 m
7 m
10 m
20 m
6 m
8 m
10 m
13 m
20 m
8 m
9 m
12 m
17 m
20 m
2.5 m
2.5 m
3.0 m
3.0 m
4.5 m
2.5 m
3.0 m
3.5 m
4.0 m
4.5 m
3.0 m
4.0 m
5.0 m
5.0 m
4.0 m
4.0 m
4.5 m
5.0 m
4.0 m
4.0 m
4
–
–
–
8
4
–
–
–
8
4
–
–
–
8
4
–
–
–
8
3 m
5 m
6 m
7 m
9 m
4 m
5 m
6 m
8 m
8 m
5 m
7 m
8 m
9 m
10 m
5 m
6 m
8 m
10 m
13 m
2.0 m
2.5 m
3.0 m
3.0 m
3.5 m
3.0 m
3.0 m
3.0 m
3.0 m
3.5 m
3.0 m
3.5 m
3.5 m
4.0 m
3.5 m
3.0 m
3.0 m
4.0 m
4.5 m
5.5 m
Reaches for IS 3180
20 m lens 8 m lens
The unit is equipped with pyro sensors that
detect the invisible heat emitted from moving
objects (people, animals etc.). The heat detect-
ed in this way is electronically converted into
a signal that switches 'ON' connected loads
(e.g. a light). The built-in red LED also lights up.
The sensor does not detect heat radiated from
behind obstacles, such as walls or panes of
glass. Heat radiation of this type will therefore
not activate a light.
Principle
14
Installation instructions
Dear Customer,
GB
Safety warnings
■ Disconnect the power supply before at-
tempting any work on the sensor!
■ The electrical connection lead must be
dead during installation. Therefore, switch
off the power first and use a voltage tester
to make sure the wiring is off circuit.
■ Installing the sensor involves work on the
mains power supply. This work must there-
fore be carried out professionally in accord-
ance with applicable national wiring regula-
tions and electrical operating conditions.
(
D
-VDE 0100,
A
-ÖVE-EN 1,
-SEV 1000)
■ Only select time and twilight setting with the
lens in place.
Congratulations on purchasing your new
STEINEL infrared sensor and thank you for the
confidence you have shown in us. You have
chosen a high-quality product that has been
manufactured, tested and packed with the
greatest care.
Please familiarise yourself with these instruc-
tions before attempting to install the sensor
because prolonged reliable and trouble-free
operation will only be ensured if it is fitted
properly.
We hope your new infrared sensor brings you
lasting pleasure.
The site of installation should be at least 50 cm
away from another light because heat radiated
from it may activate the system.
An optional corner wall mount (product no.
648015 black or 648114 white) is available for
installing the sensor on internal and external
corners.
The mains lead consists of a 3 phase cable.
L = Phase
N = Neutral conductor
PE = Protective-earth conductor
If the rubber seal is damaged, the cable entry
openings must be sealed with an M 16 or M 20
(at least IP 54) double seal cable gland.
A condensation hole is indicated next to the
rubber seal. This must be opened if necessary.
Installation
Reaches for IS 345 MX Highbay
Mounting height Reach
12 m 30 m x 4
10 m 25 m x 4
8 m 20 m x 4
6 m 15 m x 4
4 m 10 m x 4
GB