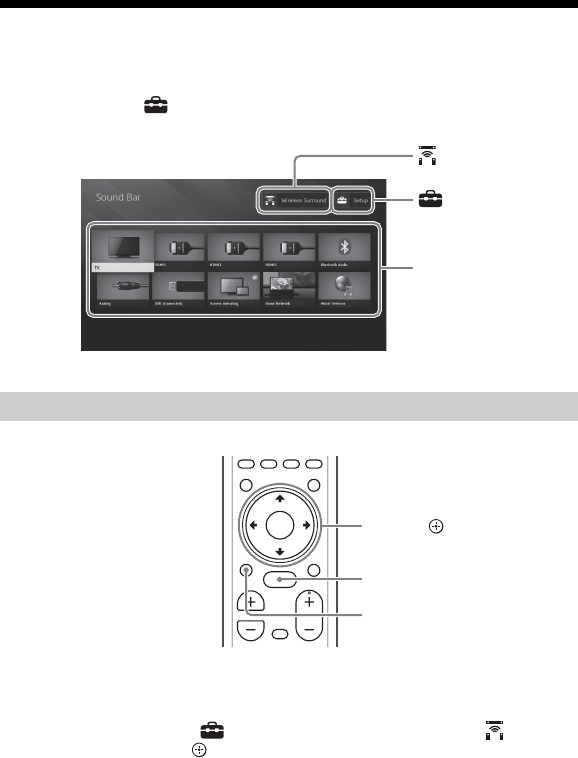
630807
5
Verklein
Vergroot
Pagina terug
1/84
Pagina verder
Sound Bar
Operating Instructions
HT-NT5
2
GB
Do not install the appliance in a
confined space, such as a bookcase or
built-in cabinet.
To reduce the risk of fire, do not cover
the ventilation opening of the appliance
with newspapers, tablecloths, curtains,
etc.
Do not expose the appliance to naked
flame sources (for example, lighted
candles).
To reduce the risk of fire or electric
shock, do not expose this appliance to
dripping or splashing, and do not place
objects filled with liquids, such as vases,
on the appliance.
The unit is not disconnected from the
mains as long as it is connected to the
AC outlet, even if the unit itself has been
turned off.
As the main plug is used to disconnect
the unit from the mains, connect the
unit to an easily accessible AC outlet.
Should you notice an abnormality in the
unit, disconnect the main plug from the
AC outlet immediately.
Do not expose batteries or appliances
with battery-installed to excessive heat,
such as sunshine and fire.
Indoor use only.
Recommended cables
Properly shielded and grounded cables
and connectors must be used for
connection to host computers and/or
peripherals.
For the Bar Speaker
The nameplate is located on the bottom
of the Bar Speaker.
For the customers in Europe
Notice for customers: the
following information is only
applicable to equipment sold in
countries applying EU directives.
This product has been manufactured by
or on behalf of Sony Corporation, 1-7-1
Konan Minato-ku Tokyo, 108-0075
Japan. Inquiries related to product
compliance based on European Union
legislation shall be addressed to the
authorized representative, Sony
Belgium, bijkantoor van Sony Europe
Limited, Da Vincilaan 7-D1, 1935
Zaventem, Belgium. For any service or
guarantee matters, please refer to the
addresses provided in the separate
service or guarantee documents.
Hereby, Sony Corp., declares that this
equipment is in compliance with the
essential requirements and other
relevant provisions of Directive 1999/5/
EC.
For details, please access the following
URL:
http://www.compliance.sony.de/
This product is intended to be used in
the following countries.
AT, BE, BG, HR, CY, CZ, DK, EE, FI, FR, DE,
GR, HU, IS, IE, IT, LV, LI, LT, LU, MT, NL,
NO, PL, PT, RO, SK, SI, ES, SE, CH, GB, AL,
BA, MK, MD, RS, ME, TR, Kosovo
5150-5350 MHz band is restricted to
indoor operations only.
This equipment has been tested and
found to comply with the limits set out
in the EMC regulation using a
connection cable shorter than 3 meters.
WARNING
3
GB
Disposal of Old
Electrical &
Electronic
Equipment
(Applicable in the
European Union
and other
European
countries with
separate collection systems)
This symbol on the product or on its
packaging indicates that this product
shall not be treated as household waste.
Instead it shall be handed over to the
applicable collection point for the
recycling of electrical and electronic
equipment. By ensuring this product is
disposed of correctly, you will help
prevent potential negative
consequences for the environment and
human health, which could otherwise
be caused by inappropriate waste
handling of this product. The recycling
of materials will help to conserve natural
resources. For more detailed
information about recycling of this
product, please contact your local Civic
Office, your household waste disposal
service or the shop where you
purchased the product.
Disposal of waste
batteries (applicable
in the European Union
and other European
countries with
separate collection
systems)
This symbol on the battery or on the
packaging indicates that the battery
provided with this product shall not be
treated as household waste.
On certain batteries this symbol might
be used in combination with a chemical
symbol. The chemical symbols for
mercury (Hg) or lead (Pb) are added if
the battery contains more than 0.0005%
mercury or 0.004% lead.
By ensuring these batteries are
disposed of correctly, you will help
prevent potentially negative
consequences for the environment and
human health which could otherwise be
caused by inappropriate waste handling
of the battery. The recycling of the
materials will help to conserve natural
resources.
In case of products that for safety,
performance or data integrity reasons
require a permanent connection with an
incorporated battery, this battery
should be replaced by qualified service
staff only.
To ensure that the battery will be
treated properly, hand over the product
at end-of-life to the applicable
collection point for the recycling of
electrical and electronic equipment.
For all other batteries, please view the
section on how to remove the battery
from the product safely. Hand the
battery over to the applicable collection
point for the recycling of waste
batteries.
For more detailed information about
recycling of this product or battery,
please contact your local Civic Office,
your household waste disposal service
or the shop where you purchased the
product.
4
GB
Table of Contents
Supplied Accessories .................... 6
Guide to Parts and Controls ..........7
About the Home Menu ................12
Connecting and Preparation
Connection for Viewing Copyright-
protected 4K Content ............ 15
Mounting the Unit on a Wall ....... 17
Attaching the Grille Frame ...........18
Connecting to a Wired
Network .................................19
Connecting to a Wireless
Network ................................. 21
Listening to the Sound
Listening to the TV .......................23
Listening to the Connected
Device ....................................23
Listening to Music on a USB
Device ................................... 24
Selecting the Sound Effect
Setting the Sound Effect that is
Tailored to Sound Sources
(SOUND FIELD) ...................... 26
Enjoying Clear Sound with Low
Volume at Midnight
(NIGHT) ...................................27
Making Dialogues Clearer
(VOICE) ...................................27
Adjusting the Volume of the
Subwoofer ............................ 28
Adjusting the Delay Between the
Picture and Sound ................ 28
Listening to Music/Sound
with the BLUETOOTH Function
Listening to Music from a Mobile
Device ................................... 30
Listening to Sound of the
Connected TV or Device from
Headphones or Speakers ......33
Enjoying with the Network
Function
Listening to Music on your PC via a
Home Network ...................... 35
Listening to Music on Music
Services ................................. 36
Listening to Music on the Mobile
Device with SongPal ..............37
Using Google Cast ...................... 38
Connecting the SongPal Link-
Compatible Device
(Wireless Multi Room/Wireless
Surround) .............................. 38
Displaying the Screen of the Mobile
Device on a TV
(MIRRORING) .........................40
Using the Various Functions/
Settings
Performing the Wireless Connection
of the Subwoofer (LINK) ....... 42
Playing Compressed Audio Files
with Upscaling to Near Hi-
Resolution Sound Quality ..... 43
Enjoying Multiplex Broadcast Sound
(AUDIO) ................................. 43
Deactivating Buttons on
the Unit ................................. 44
Changing the Brightness of the
Front Panel Display and
BLUETOOTH Indicator
(DIMMER) .............................. 44
Basic
connections and
preparation
Startup Guide
(separate
document)
5
GB
Saving Power in Standby
Mode .....................................45
Sending the Remote Signal to the
TV via the Unit .......................46
Using the Control for HDMI
Function .................................46
Using the “BRAVIA” Sync
Function .................................48
Using the Setup Display ..............50
Options Menu List .......................58
Troubleshooting
Troubleshooting ..........................59
Resetting the System ..................67
Additional Information
Specifications ..............................68
Playable Types of Files ................70
Supported Input Audio
Formats ...................................71
Supported Input Video
Formats .................................. 72
On BLUETOOTH
Communication ..................... 73
END USER LICENSE
AGREEMENT .......................... 74
Precautions .................................. 78
Index ............................................82
6
GB
Supplied Accessories
•Bar Speaker (1)
Grille frame (1)
Wall mounting brackets (2), Screws (2),
Grille frame support hook (2)
•Subwoofer (1)
Remote control (1)
• R03 (size AAA) batteries (2)
• Optical digital cable (1)
•Startup Guide (1)
Operating Instructions (1)
7
GB
Guide to Parts and Controls
Details are omitted from the illustrations.
Front
Remote control sensor
Front panel display
BLUETOOTH indicator (blue)
– Flashes quickly in blue: During
pairing standby status
– Flashes in blue: BLUETOOTH
connection is being attempted
– Lights in blue: BLUETOOTH
connection has been established
 (power) button
Turns on the system or sets it to
standby mode.
INPUT button (page 12, 23)
PAIRING button (page 30)
VOL +/– buttons
N-Mark (page 31)
When using the NFC function, touch
your NFC-compatible device to the
mark.
(USB) port
Unit (Bar Speaker)
8
GB
Rear
LAN(100) port
TV IN (OPTICAL) jack
ANALOG IN jack
HDMI IN 3 jack
Compatible with HDCP 2.2.
HDMI IN 2 jack
Compatible with HDCP 2.2.
HDMI IN 1 jack
Compatible with HDCP 2.2.
HDMI OUT (TV (ARC)) jack
Compatible with HDCP 2.2.
9
GB
Power indicator
– Lights in red: The subwoofer is in
standby mode
– Flashes in green: While
attempting link connection
– Lights in green: The subwoofer is
connected to the system with the
link function
 (power) button
Turns on the subwoofer or sets it
to standby mode.
LINK button (page 42)
Ventilation holes
For safety, do not block the
ventilation holes.
Subwoofer
10
GB
INPUT +/– (page 12, 23)
(power)
Turns on the system or sets it to
standby mode.
DISPLAY
Displays playback information on
the TV screen.
CLEAR AUDIO+ (page 26)
SOUND FIELD (page 26)
VOICE (page 27)
NIGHT (page 27)
DIMMER (page 44)
Color buttons
Shortcut keys for selecting items
on some menus.
MIRRORING (page 40)
PAIRING (page 30)
OPTIONS (page 28, 58)
BACK (page 12)
/// (page 12)
(enter) (page 12)
HOME (page 12)
 (muting)
Turns off the sound temporarily.
(volume) +/–
Adjusts the volume.
SW (subwoofer volume) +/–
Adjusts the volume of the
subwoofer.
Remote Control
11
GB
Playback operation buttons
/ (rewind/fast forward)
Searches backward or forward.
/ (previous/next)
Selects the previous/next
chapter, track, or file.
(play)
Starts or re-starts playback
(resume play).
(pause)
Pauses or re-starts playback.
(stop)
Stops playback.
RX/TX (receiver/transmitter)
(page 34)
AUDIO (page 43)
12
GB
About the Home Menu
You can display the home menu on the TV screen by connecting the system and TV
with the HDMI cable (not supplied). From the home menu, you can set the various
settings by selecting [Setup] or select the input or service that you want to watch
from the input list.
1 Press HOME.
The home menu appears on the TV screen.
2 Press /// to select [Setup], an item on the input list, or [Wireless
Surround], then press .
The selected input, setup display, or setting display for the wireless
surround function appears on the TV screen.
To return to the previous screen, press BACK.
Using the Home Menu
[Setup]
Input list
[Wireless Surround]
HOME
BACK
///, (enter)
13
GB
Input list
[Setup]
See “Using the Setup Display” (page 50).
[Wireless Surround]
Displays the setting display for the wireless surround function that allows
you to use the wireless speakers (not supplied) as the surround speakers of
the system. Perform the setting by following the on-screen instructions.
Tip
You can also select the input by pressing INPUT +/– repeatedly.
Input name Explanation
[TV] Outputs the TV sound. (page 23)
[HDMI1] Outputs the sound of device that is connected to the HDMI IN 1
jack. (page 23)
[HDMI2] Outputs the sound of device that is connected to the HDMI IN 2
jack. (page 23)
[HDMI3] Outputs the sound of device that is connected to the HDMI IN 3
jack. (page 23)
[Bluetooth Audio] Outputs the sound of device that is connected with the
BLUETOOTH function. (page 30)
[Analog] Outputs the sound of device that is connected to the ANALOG IN
jack.
[USB] Outputs music or plays back photo files stored on a connected
USB device. (page 24)
[Screen mirroring] Displays the screen of the mobile device on the TV screen.
(page 40)
[Home Network] Outputs music or plays back photo files on the device that is
connected via the network. (page 35)
[Music Services] Uses music services on the Internet. (page 36)
14
GB
In these Operating Instructions, the operations are described as steps that are
operated on the home menu displayed on the TV screen by using the remote control
while the system and TV are connected with the HDMI cable (not supplied).
The operating steps that select items on the TV screen by using /// and are
simplified in the following way.
Example: Select [Setup] from the home menu.
The operation that selects an item by pressing /// and is expressed as
“select.”
Example: Select [Network Settings] - [Internet Settings] - [Wired Setup] on the
home menu.
When repeating the operation that selects an item by pressing /// and , the
selected items are linked with “-.”
Tips
You can use the buttons on the unit if they have the same or similar names as those on
the remote control.
Characters in brackets [ ] appear on the TV screen. Characters in quotes “ ” appear in the
front panel display.
About the Steps Description
15
GB
Connecting and Preparation
Connection for Viewing
Copyright-protected 4K
Content
To view copyright-protected 4K content
and listen to sound from the system,
connect the TV and device to the system
via an HDCP2.2-compatible HDMI jack.
You can only view copyright-protected
4K content through the HDCP2.2-
compatible HDMI jack connection.
1 Check which HDMI input jack on
your TV is compatible with
HDCP2.2.
Refer to the operating instructions
of the TV.
2 Connect the HDCP2.2-compatible
HDMI input jack on the TV and
HDMI OUT jack on the unit with
the HDMI cable (not supplied).
TV connection is completed.
Connecting and Preparation
Connecting a 4K TV and 4K
Device
HDCP2.2-
compatible
HDMI jack
Blu-ray Disc™ player, cable box, or
satellite box, etc.
HDCP2.2-
compatible
HDMI jack
TV
HDMI cable (not supplied)
Premium High Speed HDMI Cable with
Ethernet that supports 18Gbps is
recommended.
16
GB
3 Connect the HDCP2.2-compatible
HDMI output jack of the 4K device
and HDMI IN jack of the unit with
the HDMI cable (not supplied).
Refer to the operating instructions
of the 4K device to check that the
HDMI OUT jack of the 4K device is
compatible with HDCP2.2.
4K device connection is completed.
4 Play copyright-protected 4K
content.
The image appears on the TV screen
and the sound is output from the
system.
Tip
You can connect the 4K device to any of
HDMI IN 1, HDMI IN 2, or HDMI IN 3 jack
because all jacks are compatible with
HDCP2.2.
If your TV’s HDCP2.2-compatible HDMI
IN jack is not compatible with ARC, the
TV sound is not output from the system.
In this case, connect the optical output
jack of the TV and the TV IN (OPTICAL)
jack on the unit with the optical digital
cable (supplied).
When the TV’s HDMI Jack is
not Labeled with ARC
HDCP2.2-
compatible
HDMI jack
Blu-ray Disc player, cable box, or satellite
box, etc.
HDCP2.2-
compatible
HDMI jack
TV
HDMI cable (not supplied)
Premium High Speed HDMI Cable with
Ethernet that supports 18Gbps is
recommended.
Optical digital cable (supplied)
17
GB
Connecting and Preparation
Mounting the Unit on a
Wall
You can mount the unit on a wall.
Prepare screws (not supplied) that are
suitable for the wall material and
strength. As a plasterboard wall is
especially fragile, attach the screws
securely in the wall beam. Install the
speakers horizontally, hung by screws in
studs in a continuous flat section of the
wall.
Have the installation done by a Sony
dealer or licensed contractor and pay
special attention to safety during the
installation.
Sony shall not be held responsible for
accidents or damage caused by improper
installation, insufficient wall strength,
improper screw installation or natural
disaster, etc.
1 Fix the wall mounting brackets
(supplied) to the bracket fixing
holes on the bottom of the unit
with the screws (supplied) so that
the surface of each wall mounting
bracket is as shown in the
illustration.
Fix the two wall mounting brackets
to the left and right fixing holes on
the bottom of the unit.
2 Prepare screws (not supplied) that
are suitable for the holes on the
wall mounting bracket.
Notes
Screw (supplied)
Wall mounting brackets (supplied)
Hole on the wall mounting bracket
4mm
More than 30 mm
4.2 mm
10 mm
18
GB
3 Fasten the screws in the wall.
The screw should protrude as
illustration.
4 Hang the holes of the mounting
bracket on the screws.
Align the holes at of the mounting
bracket with the screws, then hang
the unit on the two screws.
Attaching the Grille
Frame
You can protect the speakers by
attaching the supplied grille frame.
We recommend that you use the unit
without attaching the grille frame if you
will be listening to High-Resolution
Audio.
Attach the grille frame parallel to
the front panel.
Attach the grille frame right-side up.
Tips
The grille frame is fixed by a magnet.
Attach the grille frame leaving a space
from the end of the Bar Speaker.
920 mm
8 mm to
9mm
Approx.
2mm
Approx. 4 mm
19
GB
Connecting and Preparation
Attach the grille frame support hook to
the grille frame to prevent the grille
frame from falling.
1 Insert the grille frame support
hook into the hook on the grille
frame, then lift it up.
2 Attach the grille frame to the Bar
Speaker.
Connecting to a Wired
Network
Prepare the network by connecting the
system and PC to your home network
with a LAN cable.
The following illustration is the example
for connection of the system and PC to
your home network.
The server needs to be connected to the
same network as that of the system.
Tip
We recommend that you use a shielded
straight interface cable (not supplied).
Attaching the Grille Frame
When Mounting on a Wall
Connecting to a PC or Router
with a LAN Cable
Note
Internet
LAN cable
(not supplied)
Server
Router
Modem
20
GB
1 Press HOME.
The home menu appears on the TV
screen.
2 Select [Setup] from the home
menu.
The setup display appears on the TV
screen.
3 Select [Network Settings] -
[Internet Settings] - [Wired Setup].
4 Select [Auto].
The system starts network settings
and the network setting status
appears.
Press / to browse information,
and then press .
5 Select [Save & Connect].
The system starts connecting to the
network. For details, refer to the
messages that appear on the TV
screen.
1 Press HOME.
The home menu appears on the TV
screen.
2 Select [Setup] from the home
menu.
The setup display appears on the TV
screen.
3 Select [Network Settings] -
[Internet Settings] - [Wired Setup].
4 Select [Manual].
5 Perform the setting by following
the on-screen instructions.
The system starts network settings
and the network setting status
appears.
Press / to browse information,
and then press .
6 Select [Save & Connect].
The system starts connecting to the
network. For details, refer to the
messages that appear on the TV
screen.
Connecting by Obtaining
the Network Information
Automatically
Connecting by Using a
Fixed IP Address
21
GB
Connecting and Preparation
Connecting to a Wireless
Network
Prepare the network by connecting the
system and PC to your wireless LAN
router.
The server needs to be connected to the
same network as that of the system.
When your wireless LAN router (access
point) is Wi-Fi Protected Setup (WPS)-
compatible, you can easily set the
network settings with the WPS button.
1 Press HOME.
The home menu appears on the TV
screen.
2 Select [Setup] from the home
menu.
The setup display appears on the TV
screen.
3 Select [Network Settings] -
[Internet Settings] - [Wireless
Setup] - [Wi-Fi Protected Setup™
(WPS)].
4 Select [Start].
5 Press the WPS button on the
access point.
The system starts connecting to the
network.
If your wireless LAN router (access point)
is not compatible with Wi-Fi Protected
Setup (WPS), check the following
information in advance.
– The network name (SSID)*
_____________________________________
– The security key (password)**
_____________________________________
* SSID (Service Set Identifier) is a name that
identifies a particular access point.
**This information should be available
from a label on your wireless LAN router/
access point, from the operating
instructions, from the person who set up
your wireless network, or from the
information provided by your Internet
service provider.
1 Press HOME.
The home menu appears on the TV
screen.
2 Select [Setup] from the home
menu.
The setup display appears on the TV
screen.
3 Select [Network Settings] -
[Internet Settings] - [Wireless
Setup].
The list of the network name
appears on the TV screen.
4 Select the desired network name
(SSID).
5 Enter the security key (or
passphrase) using the software
keyboard, and then select [Enter].
The system starts connecting to the
network.
Note
Connecting with the WPS
Button
Connecting by Selecting the
Network Name (SSID)
22
GB
Select [New connection registration] -
[Manual registration] in step 4 of
“Connecting by Selecting the Network
Name (SSID)”and follow the on-screen
instructions.
Select [New connection registration] in
step 4 of “Connecting by Selecting the
Network Name (SSID)” and select [(WPS)
PIN Method].
SongPal app can connect the system to
the same wireless network as that of the
mobile device. For details, follow the
instruction of the app or refer to the
following URL.
http://info.songpal.sony.net/help/
Connecting by Using a Fixed
IP Address
Connecting by Using a PIN
Code
Connecting by SongPal
23
GB
Listening to the Sound
Listening to the TV
1 Press HOME.
The home menu appears on the TV
screen.
2 Select [TV] on the home menu.
3 Select the program using the TV’s
remote control.
The selected TV program appears
on the TV screen and the TV sound
is output from the system.
4 Adjust the volume.
Adjust the volume by pressing
+/– on the remote control.
Adjust the subwoofer volume by
pressing SW +/– on the remote
control (page 28).
Tip
You can select [TV] by pressing INPUT +/
on the remote control.
Listening to the
Connected Device
1 Press HOME.
The home menu appears on the TV
screen.
2 Select the input that the desired
device is connected on the home
menu.
The image of the selected device
appears on the TV screen and the
sound is output from the system.
If you select [Analog], the home
menu is displayed on the TV screen.
3 Adjust the volume.
Adjust the volume by pressing
+/– on the remote control.
Adjust the subwoofer volume by
pressing SW +/– on the remote
control (page 28).
Tip
You can select the input by pressing INPUT
+/– on the remote control.
You can change the input name of
[HDMI1], [HDMI2], or [HDMI3] that is
displayed on the home menu.
1 Press HOME.
The home menu appears on the TV
screen.
2 Put the cursor on [HDMI1],
[HDMI2], or [HDMI3] on the home
menu, then press OPTION.
The options menu appears on the
TV screen.
3 Select [Input Label].
Listening to the Sound
Changing the Input Name
Displayed on the Home
Menu
24
GB
4 Select the input name.
You can select the input name from
the following.
•[BD Player]
•[DVD Player]
•[Cable Box]
[Satellite]
•[GAME]
•[PC]
5 Press to complete.
Tip
When you change the input name, the
displayed icon is also changed
automatically.
Listening to Music on a
USB Device
You can play music/photo files stored
on a connected USB device.
For playable types of files, see “Playable
Types of Files” (page 70).
1 Connect the USB device to the
(USB) port.
2 Press HOME.
The home menu appears on the TV
screen.
3 Select [USB (Connected)] from
the home menu.
4 Select [Music] - folder on which
songs are stored - song.
The selected song is played and
sound is output from the system.
5 Adjust the volume.
Adjust the volume by pressing
+/– on the remote control.
Adjust the subwoofer volume by
pressing SW +/– on the remote
control (page 28).
Do not remove the USB device during
operation. To avoid data corruption or
damage to the USB device, turn the system
Note
25
GB
Listening to the Sound
off before connecting or removing the USB
device.
Tip
You can perform various operations from
the options menu (page 58).
You can play photo files stored on a
connected USB device.
For playable types of files, see “Playable
Types of Files” (page 70).
Select [
Photo] - folder on which
photos are stored - photo in step 4.
The selected photo appears on the TV
screen.
Tip
You can perform various operations from
the options menu (page 58).
Viewing Photos on a USB
Device
26
GB
Setting the Sound Effect
that is Tailored to Sound
Sources (SOUND FIELD)
You can easily enjoy pre-programmed
sound effects that are tailored to
different kinds of sound sources.
1 Press SOUND FIELD.
The sound field menu appears on
the TV screen.
2 Press the button repeatedly to
select the desired sound field.
When using the wireless multi room or
wireless surround function, the sound field
function is not available.
Tips
You can select [ClearAudio+] by pressing
CLEAR AUDIO+ on the remote control.
You can select the sound field from the
options menu (page 58).
Selecting the Sound Effect
Sound field Explanation
[ClearAudio+]
The appropriate
sound setting is
automatically
selected for the
sound source.
[Movie]
Sound effects are
optimized for
movies. This mode
replicates the
density and rich
expanse of sound.
[Music]
Sound effects are
optimized for music.
SOUND FIELD
CLEAR AUDIO+
[Sports]
Commentary is clear,
cheers are heard as
surround sound, and
sounds are realistic.
[Game
Studio]
Sound effects are
optimized for game
play.
[Standard]
Sound effects are
optimized for the
individual source.
Note
Sound field Explanation
27
GB
Selecting the Sound Effect
Enjoying Clear Sound
with Low Volume at
Midnight (NIGHT)
Sound is output at low volume with
minimum loss of fidelity and clarity of
dialogue.
1 Press NIGHT.
The night mode appears on the TV
screen.
2 Press the button repeatedly to
select the night mode.
Tip
You can select [Night] from the options
menu (page 58).
Making Dialogues
Clearer (VOICE)
1 Press VOICE.
The voice mode appears on the TV
screen.
2 Press the button repeatedly to
select the voice mode.
Tip
You can select [Voice] from the options
menu (page 58).
Mode Explanation
[On] Activates the night
mode function.
[Off] Deactivates the night
mode function.
NIGHT
Mode Explanation
[Up Off] Standard
[Up 1] Dialogue is easily
heard by enhancing
dialogue range.
[Up 2] Dialogue range is
enhanced, and
dialogue sound may
be easy to hear for the
elderly.
VOICE
28
GB
Adjusting the Volume of
the Subwoofer
The subwoofer is designed for playback
of bass or low frequency sound.
Press SW (subwoofer volume) +/–
to adjust the volume of the
subwoofer.
When the input source does not contain
much bass sound, such as in TV programs,
the bass sound from the subwoofer may
be difficult to hear.
Adjusting the Delay
Between the Picture and
Sound
When the sound does not match the
pictures on the TV screen, you can
adjust the delay between the picture
and sound.
The setting method differs depending
on the input.
1 Press OPTIONS.
“SYNC” appears in the front panel
display.
2 Press or
The adjusting time appears in the
front panel display.
3 Adjust the delay using /, then
press .
You can adjust from 0 msec to
300 msec in 25 msec increments.
4 Press OPTIONS.
The options menu in the front panel
display turns off.
Note
SW +/–
When Watching the TV
OPTIONS
///,
29
GB
Selecting the Sound Effect
1 Press OPTIONS.
The options menu appears on the
TV screen.
2 Select [A/V SYNC].
3 Adjust the delay using /, then
press .
You can adjust from 0 msec to
300 msec in 25 msec increments.
When Watching Another
Device
30
GB
Listening to Music from
a Mobile Device
You can listen to music stored on a
mobile device such as a smartphone or
tablet via a wireless connection by
connecting the system and the mobile
device with the BLUETOOTH function.
When connecting to the mobile device
with the BLUETOOTH function, you can
operate by simply using the supplied
remote control without turning the TV
on.
1 Press PAIRING.
The system enters the pairing
mode, “BT” appears in the front
panel display, and the BLUETOOTH
indicator flashes quickly.
2 Turn on the BLUETOOTH function,
and then select “HT-NT5” after
searching for it on the mobile
device.
If a Passkey is requested, enter
“0000.”
3 Make sure that the BLUETOOTH
indicator on the unit lights in blue.
A connection between the system
and mobile device has been
established.
4 Start audio playback with the
music app on the connected
mobile device.
Sound is output from the unit.
5 Adjust the volume.
Adjust the volume by pressing
+/– on the remote control.
Adjust the subwoofer volume by
pressing SW +/– on the remote
control (page 28).
You can play or pause the content
by using the playback operation
buttons on the remote control.
Listening to Music/Sound with the
BLUETOOTH Function
INPUT +/–
PAIRING
SW +/–
HOME
+/–
Playback
operation buttons
RX/TX
Listening to Music by Pairing
with a Mobile Device
31
GB
Listening to Music/Sound with the BLUETOOTH Function
To check the connection status of
the BLUETOOTH function
Tips
Once the BLUETOOTH connection is
established, an indication recommending
which application to download will be
displayed according to what device you
have connected.
Following the instructions displayed, an
application called SongPal, which will
enable you to operate this system, can be
downloaded.
Refer to “Listening to Music on the Mobile
Device with SongPal” (page 37) for details
on SongPal.
Perform pairing for the second and
subsequent mobile devices.
To cancel pairing, press HOME.
1 Turn the BLUETOOTH function of
the mobile device to on.
2 Press INPUT +/– repeatedly to
display “BT” in the front panel
display.
The input changes to [Bluetooth
Audio] automatically, then the
system automatically reconnects to
the mobile device it was most
recently connected to.
3 Make sure that the BLUETOOTH
indicator lights in blue.
A connection between the system
and mobile device has been
established.
4 Start audio playback with the
music app on the connected
mobile device.
Sound is output from the unit.
5 Adjust the volume.
Adjust the volume by pressing
+/– on the remote control.
Adjust the subwoofer volume by
pressing SW +/– on the remote
control (page 28).
You can play or pause the content
by using the playback operation
buttons on the remote control.
To disconnect the mobile device
Perform any of the following items.
Disable the BLUETOOTH function on
the mobile device.
Press PAIRING on the remote control.
Turn off the system or mobile device.
If “BT” does not appear in the front panel
display by pressing INPUT +/– in step 2 of
“Listening to Music from the Paired Mobile
Device,” press RX/TX on the remote control
once.
Tip
When the connection is not established,
select “HT-NT5” on the mobile device.
By holding an NFC-compatible mobile
device such as a smartphone or tablet
near the N mark on the unit, the system
is turned on automatically, then pairing
Status BLUETOOTH indicator
During pairing
standby status
Flashes quickly in blue
Connection is
being
attempted
Flashes in blue
Connection has
been
established
Lights in blue
Not connected
Off
Listening to Music from the
Paired Mobile Device
Note
Connecting to a Mobile
Device by One-Touch
Function (NFC)
32
GB
and BLUETOOTH connection are
performed automatically.
1 Turn on the NFC function of the
mobile device.
2 Touch the N mark on the unit with
the mobile device.
Keep touching until the mobile
device vibrates and message
appears on the mobile device.
Follow the on-screen instructions to
complete pairing of the unit and
mobile device.
3 Make sure that the BLUETOOTH
indicator lights in blue.
A connection between the system
and mobile device has been
established.
4 Start audio playback with the
music app on the connected
mobile device.
Sound is output from the system.
5 Adjust the volume.
Adjust the volume by pressing
+/– on the remote control.
Adjust the subwoofer volume by
pressing SW +/– on the remote
control (page 28).
You can play or pause the content
by using the playback operation
buttons on the remote control.
To stop playback by One-touch
function
Touch the N mark on the unit with the
mobile device again.
Depending on your device, you may need
to perform the following items on your
mobile device in advance.
– Turn on the NFC function.
Download the “NFC Easy Connect”
application from Google Play™ and
start the application. (The application
may not be available in some countries/
regions.) For details, refer to the
operating instructions of your device.
This feature does not work with
BLUETOOTH-compatible headphones or
speakers. To listen to sound using a
BLUETOOTH-compatible headphones or
speakers, see “Listening to Sound of the
Connected TV or Device from
Headphones or Speakers” (page 33).
• [Bluetooth Mode] is changed to [Receiver]
automatically when making BLUETOOTH
connection with the One-touch function.
Even if the One-touch function is
canceled, the [Bluetooth Mode] setting
remains as [Receiver]. For details about
[Bluetooth Mode], see [Bluetooth
Settings] (page 53).
Compatible devices
Smartphones, tablets, and music players
with the NFC function built-in
(OS: Android™ 2.3.3 or later, excluding
Android 3.x)
BLUETOOTH indicator
Notes
33
GB
Listening to Music/Sound with the BLUETOOTH Function
Listening to Sound of the
Connected TV or Device
from Headphones or
Speakers
You can listen to sound of the
connected TV or device from
BLUETOOTH-compatible headphones
or speakers by connecting it with the
BLUETOOTH function.
Tip
When using wireless speakers
manufactured by Sony (not supplied) as
the surround speakers for the system,
see “Adding Rear Speakers (Wireless
Surround)” (page 39).
1 Press HOME.
The home menu appears on the TV
screen.
2 Select [Setup] from the home
menu.
The setup display appears on the TV
screen.
3 Select [Bluetooth Settings] -
[Bluetooth Mode] - [Transmitter].
The system enters BLUETOOTH
transmission mode.
4 Set the BLUETOOTH-compatible
headphones or speaker to the
pairing mode.
Refer to the operating instructions
of the headphones or speaker for
pairing method.
5 Select the name of the
headphones or speaker from the
[Device List] in [Bluetooth
Settings].
When the BLUETOOTH connection
is established, [Bluetooth device is
connected.] appears. (The
connected device name also
appears.)
If you cannot find name of your
headphones or speaker in [Device
List], select [Scan].
6 Return to the home menu and
select the desired input.
The image of the selected input
appears on the TV screen, “BT TX”
appears in the front panel display,
then the sound is output from the
headphones or speaker.
No sound is output from the
system.
For selecting input, see “Using the
Home Menu” (page 12).
7 Adjust the volume.
Adjust the volume level of the
headphones or speaker first. When
connected with headphones or
speakers, the volume level of the
headphones or speaker can be
controlled with VOL +/– on the unit
and +/– on the remote control.
To cancel pairing
Cancel pairing of the headphones or
speaker in step 4.
To remove a registered device
from the device list
1 Follow steps 1 to 5 of “Listening to
Sound by Pairing with Headphones or
Speakers.”
2 Select the name of the headphones
or speaker, and then press OPTIONS.
3 Select [Remove].
4 Follow the on-screen instructions to
delete the desired headphones or
speaker from the device list.
Listening to Sound by Pairing
with Headphones or Speakers
34
GB
1 Press HOME.
The home menu appears on the TV
screen.
2 Select the desired input.
For selecting input, see “Using the
Home Menu” (page 12).
3 Set the BLUETOOTH function of
the headphones or speaker to on.
4 Press RX/TX on the remote
control.
[Bluetooth Mode] is set to
[Transmitter] and “BT TX” appears in
the front panel display.
The system automatically
reconnects to the headphones or
speaker it was most recently
connected to, then the sound is
output from the headphones or
speaker.
No sound is output from the
system.
5 Adjust the volume.
Adjust the volume level of the
headphones or speaker. You can
also adjust volume level of the
headphones or speaker with +/–
on the remote control.
To disconnect the headphones or
speaker
Perform any of the following items.
– Disable the BLUETOOTH function on
the headphones or speaker.
–Press RX/TX.
– Turn off the system, or the
headphones or speaker.
– Select the device name of the
connected headphones or speaker
from [Setup] - [Bluetooth Settings] -
[Device List].
• You may not be able to adjust the
volume level depending on the
BLUETOOTH-compatible headphones
or speaker.
• [Screen mirroring], [Bluetooth Audio],
and Home Theatre Control function
are disabled when [Bluetooth Mode]
is set to [Transmitter].
• When input of [Bluetooth Audio] or
[Screen mirroring] is selected, you
cannot set [Bluetooth Mode] to
[Transmitter]. You cannot switch it
with RX/TX on the remote control
neither.
You can register up to 9 BLUETOOTH
devices. If a 10th BLUETOOTH device is
registered, the least recently
connected BLUETOOTH device will be
replaced by the new one.
The system can display up to 15
detected BLUETOOTH device in the
[Device List].
You cannot change the sound effect
or settings in the options menu while
transmitting sound to the
BLUETOOTH-compatible headphones
or speaker.
Some content may not be output due
to content protection.
Playback of audio/music on the
BLUETOOTH device is delayed
compared to that on the unit due to
the characteristics of BLUETOOTH
wireless technology.
• You can enable or disable the
reception of AAC or LDAC audio from
the BLUETOOTH device (page 53).
Listening to Sound with
Paired Headphones or
Speakers
About the Connection of the
Headphones or Speaker
35
GB
Enjoying with the Network Function
Listening to Music on
your PC via a Home
Network
You can play music files stored on your
PC via your home network.
Music files can be played by operating
on the on-screen display (OSD) of the
system or dedicated app SongPal on a
mobile device such as a smartphone or
tablet.
1 Connect the system to a network.
See “Connecting to a Wired
Network” (page 19) and
“Connecting to a Wireless Network
(page 21).
2 Connect the PC to a network.
For details, refer to the operating
instructions of the PC.
3 Set the PC.
To use the PC on your home
network, you need to set the PC as
the server. For details, refer to the
operating instructions of the PC.
Tip
See [Setup] - [Network Settings] -
[Network Connection Status] when
checking the network connection status.
1 Press HOME.
The home menu appears on the TV
screen.
2 Select [Home Network] from the
home menu.
The device name on your home
network appears on the TV screen.
3 Select the desired device -
[Music] - folder on which songs
are stored - song.
The selected song is played and
sound is output from the system.
4 Adjust the volume.
Adjust the volume by pressing
+/– on the remote control.
Adjust the subwoofer volume by
pressing SW +/– on the remote
control (page 28).
Tips
You can view photos stored on the PC
by selecting
[Photo] in step 3.
You can perform various operations from
the options menu (page 58).
Enjoying with the Network
Function
Preparing the Home
Network
Listening to Music on a PC
PC
Wireless LAN router
36
GB
You can play music files stored on the
PC by operating the dedicated app
SongPal that is downloaded to a mobile
device such as a smartphone or tablet.
For details of SongPal, see “What You
can Do with SongPal” (page 37) or the
following URL.
http://info.songpal.sony.net/help/
Listening to Music on
Music Services
You can listen to music services offered
on the Internet with this system. To use
this function, the system must be
connected to the Internet.
1 Press HOME.
The home menu appears on the TV
screen.
2 Select [Music Services] from the
home menu.
The music services list appears on
the TV screen.
3 Select the desired music service.
The guide for enjoying the music
service appears on the TV screen.
Follow the guide to enjoy the music
services.
Tip
You can update the service provider list by
pressing OPTIONS and selecting [Update
Services] in step 2 .
Listening to Music on a PC by
Using SongPal
PC
Wireless LAN router
Smartphone or
tablet
37
GB
Enjoying with the Network Function
Listening to Music on the
Mobile Device with
SongPal
SongPal is an application for controlling
compatible Sony audio devices using
your smartphone/iPhone.
Search for SongPal at Google Play or the
App Store and download it onto your
smartphone/iPhone.
For details about SongPal, refer to the
following URL.
http://info.songpal.sony.net/help/
Downloading SongPal on to your
smartphone/iPhone provides the
following.
Sound settings of the system
You can easily customize your sound, or
use the [ClearAudio+] setting
recommended by Sony.
Music service
You can configure the initial settings to
use music services*.
* Depending on the country and region,
music services and their period of
availability may differ.
An update of the device may be required.
When using Google Cast™ on music
service, see “Using Google Cast”
(page 38).
Enjoying music on your home
network
You can play music stored in your PC or
home network server over your
network.
Enjoying music on the USB device
You can play music on a device
connected to the (USB) port on the
unit.
What you can control with SongPal varies
depending on the connected device. The
specification and design of the application
may change without notice.
1 Download the free SongPal app to
the mobile device.
2 Connect the system and mobile
device with the BLUETOOTH
function (page 30) or network
function (page 19).
3 Start SongPal.
4 Operate by following the SongPal
screen.
Before using SongPal, be sure to set the
[Bluetooth Mode] to [Receiver] (page 53).
Use SongPal of the latest version.
Tips
You can connect the system and mobile
device with the NFC function (page 31).
When connecting with the network
function, connect the mobile device to
the same network as that of the system.
What You can Do with
SongPal
Note
Using SongPal
Notes
38
GB
Using Google Cast
Google Cast allows you to select music
content from the Google Cast-enabled
app and play back on the unit.
Google Cast requires the initial setup
using SongPal.
1 Download the free SongPal app to
the mobile device.
2 Connect the device by Wi-Fi to the
same network as that of the
system (page 21).
3 Start SongPal, select the system,
and tap [Settings] - [Google Cast] -
[Learn how to Cast].
4 Check the operation and Google
Cast-enabled apps, and download
the app.
5 Start the Google Cast-enabled
app, tap the cast button, and
select the system.
6 Select and play music on the
Google Cast-enabled app.
The music is played on the system.
You cannot use Google Cast while “google
cast updating” is shown on the front panel
display of the unit. Wait until the update is
complete, and then try again.
Connecting the SongPal
Link-Compatible Device
(Wireless Multi Room/
Wireless Surround)
You can enjoy music in any room or
listen to music in surround sound by
using the system with the SongPal Link-
compatible wireless speaker.
You can listen to your music stored in
your PCs or smartphones and
furthermore, music from network
services, in different rooms with
ultimate sound quality.
You can operate with the SongPal app
that is installed on a smartphone/
iPhone. To use multiple SongPal-
compatible devices, connect them to
the same wireless LAN.
To perform setting on SongPal
Perform the setting by following the
help on SongPal.
Tip
For details about SongPal, see “What You
can Do with SongPal” (page 37).
Note
Listening to the Same Music
in Different Rooms (Wireless
Multi Room)
39
GB
Enjoying with the Network Function
You can add wireless speakers
manufactured by Sony (not supplied) as
the surround speakers of the system.
Use the same model for the two wireless
speakers.
For details about applicable speakers,
refer to the following URL.
http://sony.net/nasite/
The wireless surround function will be
available with the system version
M34.R.2000 or later and the wireless
speaker version 2.00 or later. If you
cannot set the wireless surround
function, version of the system or wireless
speaker may not be the latest version. To
check the system version information,
see [System Information] (page 56). For
details about the updating method of the
system, see [Software Update] (page 51).
For details about the updating method of
the wireless speaker, refer to the
operating instructions of the wireless
speaker.
The software of the wireless speaker is
not updated automatically when using
the wireless surround function. To
update, cancel the wireless surround
function and connect the wireless
speaker to the internet.
When using the wireless surround
function, the wireless LAN function is not
available. Connect to the network with a
wired LAN.
When using the wireless surround
function, the Screen mirroring function
(page 40) is not available.
When using the wireless surround
function, you cannot set [
Bluetooth
Mode
] to [Transmitter] (page 53).
When using the wireless surround
function, [
Bluetooth Codec - LDAC]
(page 53) is not available.
To perform the setting on the
system
1 Install the applicable speakers,
and turn them on.
2 Press HOME.
The home menu appears on the TV
screen.
3 Select [Setup] from the home
menu.
The setup display appears on the TV
screen.
4 Select [Wireless Surround
Settings].
5 Perform the setting by following
the on-screen instructions.
Tip
You can display the setting display for the
wireless surround function by selecting
[Wireless Surround] on the home menu.
To perform the setting on
SongPal
1 Install the applicable speakers,
and turn them on.
Adding Rear Speakers
(Wireless Surround)
Notes
40
GB
2 Select the system on SongPal,
then perform the setting by
following the instructions on
SongPal.
The SongPal settings are effective with the
SongPal version 4.0 or later. For details
about SongPal downloading, see “Using
SongPal” (page 37).
To cancel the wireless surround
function
Select [Setup] - [Wireless Surround
Settings] - [Stop Wireless Surround] on
the home menu.
Displaying the Screen of
the Mobile Device on a TV
(MIRRORING)
[Screen mirroring] is a function to
display the screen of a mobile device on
the TV by Miracast technology.
The system can be connected directly
with a Screen mirroring-compatible
device (e.g. smartphone, tablet). You
can enjoy using the display screen of the
device on your large TV screen. No
wireless router (or access point) is
required to use this feature.
1 Press MIRRORING.
2 Follow the on-screen instructions
on the TV screen.
Activate the Screen mirroring
function from your mobile device.
The screen of the mobile device
appears on the TV screen.
Tips
• You can select [Screen mirroring] from the
home menu in step 1.
You can improve the playback stability by
setting [Screen mirroring RF Setting]
(page 56).
When using Screen mirroring, the quality
of picture and sound may sometimes be
Note
Notes
MIRRORING
HOME
BACK
41
GB
Enjoying with the Network Function
deteriorated due to interference from
other networks.
Depending on the usage environment,
the quality of the picture and sound may
be deteriorated.
Some network functions may not be
available during Screen mirroring.
Make sure that your device is compatible
with Miracast. Connectivity with all
Miracast compatible devices is not
guaranteed.
Press HOME or BACK.
Canceling Screen Mirroring
42
GB
Performing the Wireless
Connection of the
Subwoofer (LINK)
Perform the wireless connection of the
subwoofer again for a better
connection.
1 Press HOME.
The home menu appears on the TV
screen.
2 Select [Setup] from the home
menu.
The setup display appears on the TV
screen.
3 Select [System Settings] -
[Wireless Subwoofer Connection]
- [Link].
The [Link] screen appears on the TV
screen.
4 Press LINK on the rear of the
subwoofer.
The power indicator of the
subwoofer flashes in green.
Proceed to the next step within 1
minute.
5 Select [Start].
The link setting starts.
To return to the previous display,
select [Cancel].
6 Complete the link setting by
following the on-screen message.
The power indicator of the
subwoofer lights in green.
If the message [Cannot set Link.] appears,
follow the on-screen instructions.
When [Bluetooth Mode] is set to
[Transmitter] and the BLUETOOTH device
is connected to the system, the wireless
subwoofer connection cannot be
established.
Using the Various Functions/
Settings
LINK
Power indicator
Notes
43
GB
Using the Various Functions/Settings
Playing Compressed
Audio Files with
Upscaling to Near Hi-
Resolution Sound Quality
DSEE HX upscales existing sound
sources to near hi-resolution sound
quality, and it makes you feel as if you
are in a recording studio or at a concert.
This function is only available when
[Music] is selected as the sound field
(page 26).
1 Press HOME.
The home menu appears on the TV
screen.
2 Select [Setup] from the home
menu.
The setup display appears on the TV
screen.
3 Select [Audio Settings] - [DSEE
HX].
4 Select [On].
This function works with 2-channel digital
input signals of 44.1 kHz or 48 kHz.
This function does not work when
[Analog] is selected.
Enjoying Multiplex
Broadcast Sound (AUDIO)
You can enjoy multiplex broadcast
sound when the system receives a
Dolby Digital multiplex broadcast signal.
1 Press AUDIO.
The audio signal appears in the front
panel display.
2 Press the button repeatedly to
select the desired audio signal.
To receive a Dolby Digital signal, you
need to connect a TV or other devices to
the TV IN (OPTICAL) jack with the optical
digital cable (supplied).
If your TV’s HDMI IN jack is compatible
with the Audio Return Channel function
(page 47), you can receive a Dolby Digital
signal via HDMI cable.
Notes
Audio signal Explanation
“MAIN” Sound of the main
language will be
output.
“SUB” Sound of the sub
language will be
output.
“MN/SB” Mixed sound of both
the main and sub
languages will be
output.
Notes
AUDIO
44
GB
Deactivating Buttons on
the Unit
You can deactivate buttons on the unit
for preventing misoperation, such as
child mischief (Child lock function).
Press VOL –, VOL +, and VOL – in order
while pressing and holding INPUT on
the unit.
“LOCK” appears in the front panel
display, and buttons on the unit do not
work.
You can only operate the unit by using
the remote control.
Press VOL –, VOL +, and VOL – in order
while pressing and holding INPUT on
the unit.
“UNLCK” appears in the front panel
display, and the child lock function is
canceled.
(power) is not locked with the child lock
function.
Changing the Brightness
of the Front Panel
Display and BLUETOOTH
Indicator (DIMMER)
You can change the brightness of the
front panel display and BLUETOOTH
indicator.
1 Press DIMMER.
The display mode appears in the
front panel display.
2 Press the button repeatedly to
select the desired display mode.
Canceling the Child Lock
Function
Note
Mode Explanation
“BRIGHT” The front panel display
and BLUETOOTH
indicator light brightly.
“DARK” The front panel display
and BLUETOOTH
indicator light darkly.
“OFF” The front panel display
is turned off.
DIMMER
45
GB
Using the Various Functions/Settings
The front panel display is turned off when
“OFF” is selected. It turns on automatically
when you press any button, then turns off
again if you do not operate the system for
about 10 seconds. However, in some cases,
the front panel display may not turn off. In
this case, the brightness of the front panel
display is same as “DARK.”
Saving Power in Standby
Mode
Check that you have made the following
settings:
– [Bluetooth Standby] is set to [Off]
(page 53).
– [Standby Through] is set to [Off]
(page 54).
– [Quick Start/Network Standby] is set
to [Off] (page 55).
– [Remote Start] is set to [Off] (page 56).
Note
46
GB
Sending the Remote
Signal to the TV via the
Unit
When the unit obstructs the remote
control sensor of the TV, the TV remote
control may not work. In that case,
enable the IR repeater function of the
system.
You can control the TV with the remote
control of the TV by sending the remote
signal from the rear of the unit.
1 Press HOME.
The home menu appears on the TV
screen.
2 Select [Setup] from the home
menu.
The setup display appears on the TV
screen.
3 Select [System Settings] - [IR-
Repeater].
The [IR-Repeater] screen appears
on the TV screen.
4 Select [On].
Be sure to check that the remote control
of the TV cannot control the TV, and then
set [IR-Repeater] to [On]. If it is set to [On]
when the remote control can control the
TV, appropriate operation may not be
obtained because of the interference
between the direct command from the
remote control and the command via the
unit.
On some TVs, this function may not work
correctly. In this case, place the unit
slightly further away from the TV.
Using the Control for
HDMI Function
Connecting a device such as a TV or Blu-
ray Disc recorder compatible with the
Control for HDMI function* by HDMI
cable enables you to easily operate the
device by a TV remote control.
The following functions can be used
with the Control for HDMI function.
• System Power Off function
• System Audio Control function
•Audio Return Channel
• One-Touch Play function
• Remote Easy Control
• HDMI Standby Through power saving
setting
These functions may work with devices
other than those manufactured by Sony,
but operation is not guaranteed.
* Control for HDMI is a standard used by
CEC (Consumer Electronics Control) for
allowing HDMI (High-Definition
Multimedia Interface) devices to control
each other.
Turn [System Settings] - [HDMI Settings]
- [Control for HDMI] on the system to
[On] (page 54). The default setting is
[On].
Enable the Control for HDMI function
settings for the TV and other device
connected to the system.
Tip
If you enable the Control for HDMI
("BRAVIA" sync) function when using a TV
manufactured by Sony, the Control for
HDMI function of the system is also
enabled automatically. When settings are
Notes
Note
Preparing to Use the Control
for HDMI Function
47
GB
Using the Various Functions/Settings
completed, “DONE” appears in the front
panel display.
When you turn off the TV, the system
and the connected device will turn off
automatically.
Set [System Settings] - [HDMI Settings] -
[Standby Linked to TV] on the system to
[On] or [Auto] (page 54). The default
setting is [Auto].
The connected device may not turn off
depending on the status of the device.
If you turn on the system while you are
watching the TV, the TV sound will be
output from the speakers of the system.
The volume of the system can be
adjusted using the TV’s remote control.
If the TV sound was output from the
speakers of the system the previous
time you watched the TV, the system
will be turned on automatically when
you turn on the TV again.
Operations can also be made by the
TV’s menu. For details, refer to the
operating instructions of your TV.
Sound is only output from the TV if other
than [TV], [HDMI1], [HDMI2] or [HDMI3]
input is selected when using the Twin
Picture function on the TV. When you
disable the Twin Picture function, the
sound is output from the system.
• The number for the system’s volume level
is displayed on the TV screen depending
on the TV. The volume number displayed
on the TV may differ from the number on
the front panel display of the system.
Depending on the settings of the TV, the
System Audio Control function may not
be available. For details, refer to the
operating instructions of your TV.
If the system is connected to a TV’s
HDMI IN jack compatible with Audio
Return Channel, you can listen to TV
sound from the speakers of the system
without connecting an optical digital
cable.
On the system, turn [System Settings] -
[HDMI Settings] - [Audio Return
Channel] to [Auto] (page 54). The
default setting is [Auto].
If the TV is not compatible with Audio
Return Channel, the optical digital cable
(supplied) needs to be connected (refer to
the supplied Startup Guide).
When you play content on a device (Blu-
ray Disc recorder, “PlayStation
®
4,” etc.)
connected to the system, the system
and TV are turned on automatically, the
input of the system is switched to the
input for the device played, and sound is
output from the speakers of the system.
If [System Settings] - [HDMI Settings] -
[Standby Through] on the system is set to
[On] or [Auto] and the TV sound was
output from the speakers of the TV the
previous time you watched the TV, the
system does not turn on and the sound
and picture are output from the TV even if
device content is played (page 54).
Depending on the TV, the beginning part
of content being played may not play
correctly.
System Power Off Function
Note
System Audio Control
Function
Notes
Audio Return Channel
Note
One-Touch Play Function
Notes
48
GB
You can operate the system by selecting
the system from the TV’s Sync Menu.
This function can be used if the TV
supports the Sync Menu. For details,
refer to the operating instructions of
your TV.
In the TV’s link menu, the system is
recognized by the TV as “Player.”
Some operations may not be available
with some TVs.
HDMI Standby Through power saving
setting (page 54) is a function that
allows you to enjoy the sound and
picture of a connected device without
turning on the system.
Set [System Settings] - [HDMI Settings] -
[Standby Through] to [Auto] (page 54).
The default setting is [Auto].
If the picture of a device connected to the
system is not displayed on the TV, set
[Standby Through] to [On]. If you connect a
TV other than those manufactured by
Sony, we recommend you to select this
setting.
Using the “BRAVIA” Sync
Function
In addition to the Control for HDMI
function, you can also use the following
functions on devices compatible with
the “BRAVIA” sync function.
• Scene Select function
• Home Theatre Control
Echo Canceling function
•Language Follow
These functions are proprietary functions
of Sony. This function cannot operate with
products other than those manufactured
by Sony.
The sound field of the system is
automatically switched according to the
TV’s Scene Select function settings. For
details, refer to the operating
instructions of your TV.
Set the sound field to [ClearAudio+]
(page 26).
When using a TV compatible with the
Home Theatre Control function, setting
the system, setting the sound field
settings, input switching, etc. can be
done without switching the TV input.
This function can be used when the TV is
connected to the Internet. For details,
refer to the operating instructions of
your TV.
Remote Easy Control
Notes
HDMI Standby Through
Power Saving Setting
Note
Note
Scene Select Function
Home Theatre Control
Function
49
GB
Using the Various Functions/Settings
Echo is reduced when you use Social
Viewing function such as Skype while
watching TV programs. This function
can be used if the TV supports Social
Viewing function. For details, refer to
the operating instructions of your TV.
If the input of the system is [HDMI1],
[HDMI2] or [HDMI3] when using the Social
Viewing function, the input is
automatically changed to [TV]. Sound of
the Social Viewing and TV program is
output from the speakers of the system.
Sound is only output from the speaker of
the TV if the input of the system is other
than [TV], [HDMI1], [HDMI2] or [HDMI3]
when using the Social Viewing function.
This function cannot be used when sound
is output from the TV.
When you change the language for the
on-screen display of the TV, the
system’s on-screen display language is
also changed.
• Use a Premium High Speed HDMI
Cable with Ethernet that supports
18Gbps or High Speed HDMI Cable
with Ethernet. If you use a standard
HDMI cable, 1080p, 3D, and 4K content
may not be displayed properly.
• Use an HDMI-authorized cable.
• Use a Sony High Speed HDMI Cable
with Ethernet with the Type Logo.
• We do not recommend using an
HDMI-DVI conversion cable.
Audio signals (sampling frequency, bit
length, etc.) transmitted from an HDMI
jack may be suppressed by the
connected device.
Sound may be interrupted when the
sampling frequency or the number of
channels of audio output signals from
the playback device is switched.
When [TV] input is selected, video
signals via one of the HDMI IN 1/2/3
jacks selected last time are output
from the HDMI OUT (ARC) jack.
This system supports “TRILUMINOS,”
ITU-R BT.2020, HDR (High Dynamic
Range), 3D, and 4K transmission.
Echo Canceling Function
Notes
Language Follow
Notes on HDMI connections
50
GB
Using the Setup Display
You can make various adjustments to items such as picture and sound.
The default settings are underlined.
1 Press HOME.
The home menu appears on the TV screen.
2 Select [Setup] from the home menu.
The setup display appears on the TV screen.
3 Select the setting item.
Setting item Explanation
[Software Update] Updates the software of the system. (page 51)
[Screen Settings] Makes the screen settings according to the type of TV. (page 51)
[Audio Settings] Makes the audio settings according to the type of connection
jacks. (page 52)
[Bluetooth
Settings]
Makes detailed settings for the BLUETOOTH function. (page 53)
[Wireless Surround
Settings]
Makes setting for the wireless surround function. (page 54)
[System Settings] Makes the system-related settings. (page 54)
[Network Settings] Makes detailed settings for the Internet and home network.
(page 56)
[Input Skip
Setting]
Sets the input skip setting for each input. (page 56)
[Easy Setup] Re-runs the Easy Setup to make the basic settings. (page 57)
[Resetting] Resets the system to the factory default settings. (page 57)
51
GB
Using the Various Functions/Settings
By updating your software to the latest
version, you can take advantage of the
newest functions.
For information about update functions,
visit the following website:
www.sony.eu/support
An Internet environment is necessary to
perform updates via Internet.
During a software update, “UPDT”
appears in the front panel display. After
the update is complete, the system
automatically reboots. While the
updating operation is in progress, do not
turn on or off the system or operate the
system or TV. Wait for the software
update to complete.
Set [Auto Update] to [On] when you want
to perform software updates
automatically (page 55). Software update
may be performed even if you select [Off]
in [Auto Update] depending on the details
of the updates.
[Update via Internet]
Updates the system’s software using
the available network. Follow the
instructions on the screen. Make sure
network is connected to the Internet.
[Update via USB Memory]
Updates software using USB memory.
Make sure that the software update
folder is correctly named “UPDATE.”
[TV Type]
[16:9]: Select this when connecting to a
wide-screen TV or a TV with a wide-
mode function.
[4:3]: Select this when connecting to a
4:3 screen TV without a wide-mode
function.
[Output Video Resolution]
[Auto]: Outputs video signal according
to the resolution of the TV or connected
device.
[480i/576i]*, [480p/576p]*, [720p],
[1080i], [1080p]: Outputs video signal
according to the selected resolution
setting.
* If the color system of the playback
content is NTSC, the video signals
resolution can be converted to [480i] and
[480p] only.
[24p Output]
[Network content 24p Output]
This function sets the signals output
from the HDMI OUT (ARC) jack on the
system when using the Screen mirroring
function with 1080/24p contents.
[Auto]: Outputs 24p video signals only
when you connect a 1080/24p-
compatible TV via an HDMI connection
and the [Output Video Resolution] is set
to [Auto] or [1080p].
[Off]
: Select this when your TV is not
compatible with 1080/24p video
signals.
[4K Output]
[Auto1]: Outputs 2K video signals during
Screen mirroring and 4K video signals
during photo playback when connected
to a 4K-compatible device
manufactured by Sony.
[Auto2]: Outputs 4K video signals
during 24p content playback with
Screen mirroring or photo playback
when you connect a 4K/24p-compatible
device.
[Off]: Turns off the function.
If your device manufactured by Sony is
not detected when [Auto1] is selected, the
setting will have the same effect as
[Auto2] setting.
[Network content 24p Output] in [24p
Output] needs to be set appropriately for
[Auto2].
[Software Update]
Notes
[Screen Settings]
Notes
52
GB
[YCbCr/RGB (HDMI)]
[Auto]: Automatically detects the type
of external device, and then switches to
the matching color setting.
[YCbCr (4:2:2)]: Outputs YCbCr 4:2:2
video signals.
[YCbCr (4:4:4)]: Outputs YCbCr 4:4:4
video signals.
[RGB]: Select this when connecting to a
device with an HDCP compliant DVI jack.
[Video Direct]
You can disable the On-Screen Display
(OSD) of the system when [HDMI1],
[HDMI2] or [HDMI3] input is selected.
This function is useful when playing a
game, you can fully enjoy the game’s
screen.
[On]: Disables the OSD. Information will
not display on the TV screen and the
OPTIONS and DISPLAY buttons will not
work.
[Off]
: Displays information on the TV
screen only when you change the
settings, such as when selecting the
sound field.
[SBM] (Super Bit Mapping)
[On]: Smooths the gradation of video
signals output from the HDMI OUT (ARC)
jack.
[Off]: Select this if video signals are
distorted or color is unnatural.
[DSEE HX]
This function is only available when
[Music] is selected as the sound field.
[On]
: Upscales the audio file to a High-
Resolution Audio file and reproduces
the clear high-range sound which is
often lost (page 43).
[Off]: Off
[Audio DRC]
You can compress the dynamic range of
the sound track.
[Auto]
: Automatically compresses
sound encoded in Dolby TrueHD.
[On]: The system reproduces the sound
track with the kind of dynamic range
that the recording engineer intended.
[Off]: No compression of dynamic
range.
[Attenuation settings - Analog]
Distortion may occur when you listen to
a device connected to the ANALOG IN
jacks. You can prevent distortion by
attenuating the input level on the
system.
[On]
: Attenuates the input level. The
output level will decrease at this setting.
[Off]: Normal input level.
[Audio Output]
You can select the output method used
for audio signal output.
[Speaker]: Outputs multi-channel sound
from the system’s speakers only.
[Speaker + HDMI]
: Outputs multi-
channel sound from the system’s
speakers and 2-channel linear PCM
signals from the HDMI OUT (ARC) jack.
[HDMI]: Outputs sound from the HDMI
OUT (ARC) jack only. Sound format
depends on the connected device.
When [Control for HDMI] is set to [On]
(page 54), [Audio Output] is set to
[Speaker + HDMI] automatically and this
setting cannot be changed.
Audio signals are not output from the
HDMI OUT (ARC) jack when [Audio
Output] is set to [Speaker + HDMI] and
[HDMI1 Audio Input Mode] (page 55) is set
to [TV]. (Europe models only)
[Audio Settings]
Notes
53
GB
Using the Various Functions/Settings
[Bluetooth Mode]
You can enjoy content from a
BLUETOOTH device by using this system
or listen to sound from this system by
using BLUETOOTH-compatible
headphones or speaker.
[Receiver]
: This system is in receiver
mode, which enables it to receive and
output audio from the BLUETOOTH
device.
[Transmitter]: This system is in
transmitter mode, which enables it to
send audio to the BLUETOOTH-
compatible headphones or speaker. If
you switch the input of the system, “BT
TX” appears on the front panel display.
[Off]: The BLUETOOTH function is turned
off and you cannot select the [Bluetooth
Audio] input.
You can connect to a BLUETOOTH device
by using the One-touch function even if
you have set [Bluetooth Mode] to [Off].
[Device List]
Displays a list of paired and detected
BLUETOOTH devices (SNK device) when
[Bluetooth Mode] is set to [Transmitter].
[Bluetooth Standby]
You can set the [Bluetooth Standby] so
that the system can be turned on by a
BLUETOOTH device even when the
system is in standby mode. This
function is only available when you set
[Bluetooth Mode] to [Receiver] or
[Transmitter].
[On]
: The system turns on automatically
when you request a BLUETOOTH
connection from a paired BLUETOOTH
device.
[Off]: Off
[Bluetooth Codec - AAC]
This function is only available when you
set [Bluetooth Mode] to [Receiver] or
[Transmitter].
[On]
: Enable AAC codec.
[Off]: Disable AAC codec.
You can enjoy high-quality sound if AAC
is enabled and your device supports AAC.
When connecting BLUETOOTH-
compatible headphones or speakers, this
setting cannot be changed.
[Bluetooth Codec - LDAC]
This function is only available when you
set [Bluetooth Mode] to [Receiver] or
[Transmitter].
[On]
: Enable LDAC codec.
[Off]: Disable LDAC codec.
You can enjoy more high-quality sound if
LDAC is enabled and your device supports
LDAC.
When connecting BLUETOOTH-
compatible headphones or speakers, this
setting cannot be changed.
[Wireless Playback Quality]
You can set the transmission data rate
of LDAC playback. This function is only
available when you set [Bluetooth
Mode] to [Transmitter] and [Bluetooth
Codec - LDAC] to [On].
[Auto]: The data transfer rate is
automatically changed depending on
the environment. If audio playback is
unstable in this mode, use the other
three modes.
[Sound Quality]: The highest bit rate is
used. Sound is sent in a higher quality;
however, audio playback sometimes
may become unstable when the link
quality is not good enough.
[Standard]
: The middle bit rate is used. It
balances both sound quality and
playback stability.
[Bluetooth Settings]
Note
Notes
Notes
54
GB
[Connection]: Stability is prioritized.
Sound quality may be reasonable and
connection status will most likely be
stable. If the connection is unstable, this
setting is recommended.
This setting is for using wireless
speakers (not supplied) as the surround
speakers of the system. For details, see
“Adding Rear Speakers (Wireless
Surround)” (page 39).
[OSD Language]
You can select the language you want
for the system on-screen display.
[Wireless Subwoofer Connection]
You can perform wireless connection of
the subwoofer again. For details, see
“Performing the Wireless Connection of
the Subwoofer (LINK)” (page 42).
[IR-Repeater]
[On]: Remote signals for the TV are sent
from the rear of the Bar Speaker
(page 46).
[Off]
: Turns off the function.
For details, see “Performing the
Wireless Connection of the Subwoofer
(LINK)” (page 42).
[HDMI Settings]
[Control for HDMI] (page 46)
[On]
: The Control for HDMI function is
enabled. Devices connected with an
HDMI cable can control each other.
[Off]: Off
[Standby Linked to TV] (page 47)
This function is available when you set
[Control for HDMI] to [On].
[Auto]: If the input of the system is
[TV], [HDMI1], [HDMI2], [HDMI3], or
[Screen mirroring], the system turns
off automatically when you turn off
the TV.
[On]: The system turns off
automatically when you turn off the TV
regardless of the input.
[Off]: The system does not turn off
when you turn off the TV.
•[Audio Return Channel] (page47)
Set this function when the system is
connected to a TV’s HDMI IN jack that
is compatible with Audio Return
Channel. The function is available
when you set [Control for HDMI] to
[On].
[Auto]
: You can listen to TV sound
from the speakers of the system.
[Off]: Use this setting when an optical
digital cable is connected.
[Standby Through] (page 48)
This function is available when you set
[Control for HDMI] to [On].
[Auto]: Signals are output from the
system’s
HDMI OUT (ARC) jack when
the TV is turned on while the system is
not turned on. The system standby
power consumption can be reduced
more than when set to [
On].
[
On]: Signals are always output from
the system’s
HDMI OUT (ARC) jack
when the system is not turned on. If
you connect a TV other than those
manufactured by Sony, we
recommend that you select this
setting.
[
Off]: Signals are not output from the
system’s
HDMI OUT (ARC) jack when
the system is not turned on. Turn on
the system to enjoy on the TV content
of a device connected to the system.
The system standby power
consumption can be reduced more
than when set to [
On].
[Wireless Surround
Settings]
[System Settings]
55
GB
Using the Various Functions/Settings
[HDMI1 Audio Input Mode] (Europe
models only)
You can select the audio input of the
device that is connected to the HDMI
IN 1 jack.
[HDMI1]: The sound of the device that
is connected to the HDMI IN 1 jack is
input from the HDMI IN 1 jack.
[TV]: The sound of the device that is
connected to the HDMI IN 1 jack is
input from the TV IN (OPTICAL) jack.
•[HDMI Signal Format]
When you display High-Quality 4K
format* with the HDMI input, perform
this setting.
[Standard format]
: Standard format
for normal use.
[Enhanced format]: High-Quality HDMI
format. Set only when using capable
devices.
• Select [Enhanced format] only when the
connected device and TV support High-
Quality 4K* format.
Depending on the TV, the TV setting
may be required. Refer to the operating
instructions of the TV.
The picture may not be displayed
properly if this setting is changed. In this
case, change this setting to [Standard
format].
When watching 4K picture with High-
Quality*, use a Premium High Speed
HDMI cable that supports speeds of 4K
60p 18Gbps.
* 4K 60p 4:4:4, 4:2:2, 4K 60p 4:2:0 10
bit, etc. For details, see “Supported
Input Video Formats” (page 72).
[Quick Start/Network Standby]
[On]: Shortens the startup time from
standby mode. You can operate the
system quickly after turning it on.
[Off]
: Off
[Auto Standby]
[On]: Turns on the [Auto Standby]
function. When you do not operate the
system for about 20 minutes, the
system enters standby mode
automatically.
[Off]: Off
[Auto Display]
[On]: Automatically displays
information on the TV screen when
changing the audio signals, picture
mode, etc.
[Off]: Displays information only when
you press DISPLAY.
[Software Update Notification]
[On]: Sets the system to inform you of
latest software version information
(page 51).
[Off]: Off
[Auto Update Settings]
[Auto Update]
[On]: Software update is automatically
executed between 2 a.m. and 5 a.m.
local time in the selected [Time Zone]
while this system is not in use. If you
select [Off] in [Quick Start/Network
Standby], software update is performed
after you turn off the system.
[Off]
: Off
[Time Zone]
Select your country/region.
Software update may be performed even
if you select [Off] in [Auto Update]
depending on the details of the updates.
Software update is performed
automatically within 11 days of a new
software release.
[Device Name]
You can change the name of this system
according to your preference so that it is
more recognizable when using the
[Bluetooth Audio] or [Screen mirroring]
function. The name is also used with
other networks, such as the home
network. Follow on-screen instructions
Notes
Notes
56
GB
and use the software keyboard to enter
the name.
[System Information]
You can display the system’s software
version information and the MAC
address.
[Software License Information]
You can display the Software License
Information.
[Internet Settings]
Connect the system to the network
beforehand.
[Wired Setup]: Select this when you
connect to a broadband router using a
LAN cable. When you select this setting,
the wireless LAN function of the system
is disabled automatically.
[Wireless Setup]: Select this when you
use the built-in Wi-Fi function of the
system to connect to a wireless
network.
Tip
For further details, visit the following
website and check the FAQ:
www.sony.eu/support
[Network Connection Status]
Displays the current network
connection status.
[Network Connection Diagnostics]
You can run the network diagnostic to
check if the network connection has
been made properly.
[Screen mirroring RF Setting]
If you use multiple wireless systems,
such as a wireless LAN, the wireless
signals may be unstable. In this case,
playback stability may be improved by
setting the priority radio frequency
channel for Screen mirroring.
[Auto]: Normally select this. The system
automatically selects the best channel
for Screen mirroring.
[CH 1]/[CH 6]/[CH 11]: The selected
channel is prioritized for Screen
mirroring connection.
[Connection Server Settings]
Sets whether or not to display the
connected home network server.
[Auto Home Network Access
Permission]
[On]: Allows automatic access from a
newly detected home network
controller.
[Off]: Off
[Home Network Access Control]
Displays a list of home network
controller-compatible products and sets
whether or not to accept commands
from the controllers in the list.
[External Control]
[On]
: Allows the home automation
controller to operate this system.
[Off]: Off
[Remote Start]
[On]: Allows you to turn on the system
by a device linked via a network when
the system is in standby mode.
[Off]
: The system cannot be turned on
by a device linked via a network.
The skip setting is a convenient feature
that allows you to skip unused inputs
when selecting a function by pressing
INPUT +/–.
[Do not skip]: The system does not skip
the selected input.
[Skip]: The system skips the selected
input.
[Network Settings]
[Input Skip Setting]
57
GB
Using the Various Functions/Settings
When you press INPUT +/– during the
home menu is displayed, input icon
appears dimmed if it has been set to [Skip].
Tip
You can perform [Input Skip Setting] from
the options menu (page 58).
Run [Easy Setup] to make the basic
initial settings and the basic network
settings for the system. Follow the on-
screen instructions.
[Reset to Factory Default Settings]
You can reset the system settings to the
factory default by selecting the group of
settings. All the settings within the
group will be reset.
[Initialize Personal Information]
You can erase your personal
information stored on the system.
If you dispose, transfer or resell this
system, please delete all Personal
Information for security purposes. Please
take appropriate measures such as logging
out after using a network service.
Note
[Easy Setup]
[Resetting]
Note
58
GB
Options Menu List
Various settings and playback operations are available by pressing OPTIONS. The
available items differ depending on the situation.
Item Explanation
[A/V SYNC] Adjusts the time gap between picture and sound. Sound output can be
delayed (page 28).
[Sound Field] Changes the sound field setting (page 26).
[Night] Selects the night mode (page 27).
[Voice] Selects the voice mode (page 27).
[Input Skip Setting] Skips unused inputs when selecting a function by pressing INPUT +/–
(page 56).
[Input Label] Changes the input name of [HDMI1]. [HDMI2], or [HDMI3] that is
displayed on the home menu (page 23).
[Repeat Setting] Sets repeat playback.
[Play/Stop] Starts or stops playback.
[Play from start] Plays the item from the beginning.
[Shuffle Setting] Sets shuffle playback.
[Add Slideshow BGM] Registers music files on the USB memory as slideshow background
music (BGM).
[Slideshow] Starts a slideshow.
[Slideshow Speed] Changes the slideshow speed.
[Slideshow Effect] Sets the effect when playing a slideshow.
[Slideshow BGM] [Off]: Turns off the function.
[My Music from USB]: Sets the music files registered in [Add
Slideshow BGM].
[Change Display] Switches between [Grid View] and [List View].
[Rotate Left] Rotates the photo counterclockwise by 90 degrees.
[Rotate Right] Rotates the photo clockwise by 90 degrees.
[View Image] Displays the selected picture.
59
GB
Troubleshooting
Troubleshooting
If you experience any of the following
difficulties while using the system, use
this troubleshooting guide to help
remedy the problem before requesting
repairs. Should any problem persist,
consult your nearest Sony dealer.
Be sure to bring both your unit and
subwoofer, even if it seems as though
only one has a problem, when you
request to repair.
The system does not power up.
Check that the AC power cord (mains
lead) is connected securely.
Disconnect the AC power cord (mains
lead) from the wall outlet (mains),
and then reconnect after several
minutes.
The system does not turn on even
when the TV is turned on.
Set [System Settings] - [HDMI
Settings] - [Control for HDMI] to [On]
(page 54). The TV must support the
Control for HDMI function (page 46).
For details, refer to the operating
instructions of your TV.
Check the speaker settings of the TV.
The system power syncs with the
speaker settings of the TV. For details,
refer to the operating instructions of
your TV.
If the sound was output from the
speakers of the TV the previous time,
the system does not turn on even
when the TV is turned on.
The system turns off when the TV is
turned off.
Check the setting of [System Settings]
- [HDMI Settings] - [Standby Linked to
TV] (page 54). When [Standby Linked
to TV] is set to [On], the system turns
off automatically when you turn off
the TV regardless of the input.
The system does not turn off even
when the TV is turned off.
Check the settnig of [System Settings]
- [HDMI Settings] - [Standby Linked to
TV] (page 54). To turn the system off
automatically regardless of the input
when you turn off the TV, set
[Standby Linked to TV] to [On]. The TV
must support the Control for HDMI
function (page 46). For details, refer
to the operating instructions of your
TV.
There is no picture or the picture is
not output correctly.
Select the appropriate input
(page 12).
While pressing and holding INPUT,
press VOL +, VOL –, VOL + on the unit
in order to set the video output
resolution setting to the lowest level.
When there is no picture from the
connected device or the picture from
the connected device is not output
correctly, set [System Settings] -
[HDMI Settings] - [HDMI Signal
Format] to [Standard format]
(page 54).
There is no picture when you make
an HDMI cable connection.
If you connect a device supporting
HDCP 2.2 be sure to connect the
device to the HDMI IN jack and the TV
to the HDMI OUT jack of the system.
The system is connected to an input
device that is not HDCP (High-
Troubleshooting
Power
Picture
60
GB
bandwidth Digital Content
Protection) compliant. In this case,
check the specifications of the
connected device.
Disconnect the HDMI cable, then
connect it again. Make sure that the
cable is firmly inserted.
3D content from the HDMI IN 1/2/3
jack do not appear on the TV screen.
Depending on the TV or video device,
3D content may not appear. Check
the supported HDMI video format
(page 72).
4K content from the HDMI IN 1/2/3
jack do not appear on the TV screen.
Depending on the TV or the video
device, 4K content may not appear.
Check the video capability and
settings of your TV and video device.
Use a Premium High Speed HDMI
Cable with Ethernet that supports
18Gbps or High Speed HDMI Cable
with Ethernet.
An image is not displayed on the
entire TV screen.
Check the setting of [TV Type] in
[Screen Settings] (page 51).
The aspect ratio on the media is fixed.
Images from the HDMI jack is
distorted.
Video from the device connected to
the HDMI jack may be distorted. If this
happens, set [Video Direct] to [On]
(page 52).
Picture and sound are not output
from the TV when the system is not
turned on.
Set on the system [System Settings] -
[HDMI Settings] - [Control for HDMI]
to [On], and then set [Standby
Through] to [Auto] or [On] (page 54).
Turn on the system, and then switch
the input to that for the device
playing.
If connected to devices other than
those manufactured by Sony that
support the Control for HDMI
function, set [System Settings] -
[HDMI Settings] - [Standby Through]
to [On] (page 54).
No TV sound is output from the
system.
Check the type and connection of the
HDMI cable, optical digital cable, or
analog audio cable that is connected
to the system and the TV (refer to the
supplied Startup Guide).
When the system is connected with a
TV compatible with Audio Return
Channel, make sure the system is
connected to an ARC-compatible
HDMI input terminal of the TV (refer to
the supplied Startup Guide). If sound
is still not output or if sound is
interrupted, connect the optical
digital cable (supplied) and set on the
system [System Settings] - [HDMI
Settings] - [Audio Return Channel] to
[Off] (page 54).
If your TV is not compatible with
Audio Return Channel, connect the
optical digital cable (supplied) (refer
to the supplied Startup Guide). If the
TV is not compatible with Audio
Return Channel, TV sound will not be
output from the system even if the
system is connected to the TV’s HDMI
IN jack.
If sound is not output from the
system even if the system and TV are
connected by optical digital cable or if
the TV does not have an optical
digital sound output jack, connect an
analog audio cable (not supplied) and
set on the system [System Settings] -
[HDMI Settings] - [Audio Return
Channel] to [Off] (page 54).
Switch input of the system to [TV]
(page 12).
Sound
61
GB
Troubleshooting
Increase the volume on the system or
cancel muting.
If sound of a cable TV (CATV) box/
satellite tuner connected to the TV is
not output, connect the device to a
HDMI IN jack of the system and switch
input of the system to the input for
the connected device (HDMI IN 1/2/3)
(refer to the supplied Startup Guide).
Depending on the order in which you
connect the TV and the system, the
system may be muted and “MUTING
is displayed on the front panel display
of the system. If this happens, turn on
the TV first, then the system.
Set the speakers setting of the TV
(BRAVIA) to Audio System. Refer to
the operating instructions of your TV
regarding how to set the TV.
Picture and sound are not output
from the TV when the system is not
turned on.
Set on the system [System Settings] -
[HDMI Settings] - [Control for HDMI]
to [On], and then set [Standby
Through] to [Auto] or [On] (page 54).
Turn on the system, and then switch
the input to that for the device
playing.
If connected to devices other than
those manufactured by Sony that
support the Control for HDMI
function, set [System Settings] -
[HDMI Settings] - [Standby Through]
to [On] (page 54).
The sound is output from both the
system and the TV.
Mute the sound of the system or the
TV.
The TV sound from this system lags
behind the image.
Set [A/V SYNC] to 0 msec if it is set to
the range between 25 msec and 300
msec (page 28).
No sound or only very low-level
sound of the device connected to
the system is heard.
Press + on the remote control and
check the volume level (page 10).
Press or + on the remote control
to cancel the muting function
(page 10).
Make sure the input source is
selected correctly. You should try
other input sources by pressing
INPUT +/– on the remote control
several times (page 12).
Check that all the cables and cords of
the system and the connected device
are firmly inserted.
When you play content compatible
with copyright protection technology
(HDCP), it may not be output from the
system.
Set [System Settings] - [HDMI
Settings] - [HDMI Signal Format] to
[Standard format] (page 54).
No sound or only very low-level
sound is heard from the subwoofer.
Press SW + on the remote control
to increase the subwoofer volume
(page 28).
Make sure that the power indicator
on the subwoofer is lit in green. If not,
see “No sound is heard from the
subwoofer.” (page 64).
The subwoofer is for reproducing
bass sound. In the case of input
sources that contain very little bass
sound components (i.e., a TV
broadcast), the sound from the
subwoofer may be difficult to hear.
The surround effect cannot be
obtained.
Depending on the input signal and
the sound field setting, surround
sound processing may not work
effectively. The surround effect may
be subtle, depending on the program
or disc.
62
GB
To play multi-channel audio, check
the digital audio output setting on
the device connected to the system.
For details, refer to the operating
instructions supplied with the
connected device.
The USB device is not recognized.
Try the following:
Turn the system off.
Remove and reconnect the USB
device.
Turn the system on.
Make sure that the USB device is
securely connected to the (USB)
port (page 24).
Check to see if the USB device or a
cable is damaged.
Make sure that the USB device is on.
If the USB device is connected via a
USB hub, disconnect it and connect
the USB device directly to the system.
BLUETOOTH connection cannot be
completed.
Make sure that the BLUETOOTH
indicator of the unit is lit (page 31).
Make sure the BLUETOOTH device to
be connected with is turned on and
the BLUETOOTH function is enabled.
Bring this system and the
BLUETOOTH device closer together.
Pair this system and the BLUETOOTH
device again. You may need to cancel
the pairing with this system using
your BLUETOOTH device first.
Pairing information may be deleted.
Perform pairing operation again
(page 30).
Pairing cannot be achieved.
Bring this system and the
BLUETOOTH device closer together.
Make sure this system is not receiving
interference from a wireless LAN
device, other 2.4 GHz wireless
devices, or a microwave oven. If a
device that generates
electromagnetic radiation is nearby,
move the device away from this
system.
You cannot use the NFC function.
The NFC function does not work with
BLUETOOTH-compatible headphones
or speaker. To listen to sound using a
BLUETOOTH-compatible headphones
or speaker, see “Listening to Sound of
the Connected TV or Device from
Headphones or Speakers” (page 33).
No sound is output from the
connected BLUETOOTH device.
Make sure that the BLUETOOTH
indicator of the unit is lit (page 31).
Bring this system and the
BLUETOOTH device closer together.
If a device that generates
electromagnetic radiation, such as a
wireless LAN device, other
BLUETOOTH devices, or a microwave
oven is nearby, move the device away
from this system.
Remove any obstacle between this
system and the BLUETOOTH device or
move this system away from the
obstacle.
Reposition the connected
BLUETOOTH device.
Switch the wireless LAN frequency of
any nearby Wi-Fi router or PC to
5GHz range.
Increase the volume on the
connected BLUETOOTH device.
USB Device Connection
Mobile Device Connection
63
GB
Troubleshooting
BLUETOOTH connection cannot be
completed.
Make sure that the BLUETOOTH
indicator of the unit is lit (page 7).
Make sure the BLUETOOTH device to
be connected with is turned on and
the BLUETOOTH function is enabled.
Bring this system and the
BLUETOOTH device closer together.
Pair this system and the BLUETOOTH
device again. You may need to cancel
the pairing with this system using
your BLUETOOTH device first.
Pairing information may be deleted.
Perform pairing operation again
(page 30).
Pairing cannot be achieved.
Bring this system and the
BLUETOOTH device closer together.
Make sure this system is not receiving
interference from a wireless LAN
device, other 2.4 GHz wireless
devices, or a microwave oven. If a
device that generates
electromagnetic radiation is nearby,
move the device away from this
system.
You cannot use the NFC function.
The NFC function does not work with
BLUETOOTH-compatible headphones
or speaker. To listen to sound using a
BLUETOOTH-compatible headphones
or speaker, see “Listening to Sound of
the Connected TV or Device from
Headphones or Speakers” (page 33).
No sound is output from the
connected BLUETOOTH device.
Make sure that the BLUETOOTH
indicator of the unit is lit (page 31).
Bring this system and the
BLUETOOTH device closer together.
If a device that generates
electromagnetic radiation, such as a
wireless LAN device, other
BLUETOOTH devices, or a microwave
oven is nearby, move the device away
from this system.
Remove any obstacle between this
system and the BLUETOOTH device or
move this system away from the
obstacle.
Reposition the connected
BLUETOOTH device.
Switch the wireless LAN frequency of
any nearby Wi-Fi router or PC to
5GHz range.
Increase the volume on the
connected BLUETOOTH device.
Set [Wireless Playback Quality] to
[Connection] (page 53).
The system cannot connect to the
network.
Check the network connection
(page 19) and the network settings
(page 56).
You cannot connect your PC to the
Internet after [Wi-Fi Protected
Setup™ (WPS)] is performed.
The wireless settings of the router
may change automatically if you use
the Wi-Fi Protected Setup function
before adjusting the settings of the
router. In this case, change the
wireless settings of your PC
accordingly.
The system cannot connect to the
network or the network connection
is unstable.
Make sure the wireless LAN router is
on.
Headphones or Speaker
Connection via BLUETOOTH
Wired LAN Connection
Wireless LAN Connection
64
GB
Check the network connection
(page 21) and the network settings
(page 56).
Depending on the usage
environment (including the wall
material), radio wave reception
conditions, or obstacles between the
system and the wireless LAN router,
the possible communication distance
may be shortened. Move the system
and the wireless LAN router closer to
each other.
Devices that use a 2.4 GHz frequency
band, such as a microwave,
BLUETOOTH, or digital cordless
device, may interrupt
communication. Move the unit away
from such devices, or turn off such
devices.
The wireless LAN connection may be
unstable depending on the usage
environment, especially while using
the BLUETOOTH function of the
system. In this case, adjust the usage
environment.
The wireless LAN function is not
available when using the wireless
surround function.
The wireless router you want is not
shown in the wireless network list.
Press BACK to return to the previous
screen, and try [Wireless Setup] again
(page 21). If the wireless router you
want is still not detected, select [New
connection registration] from the
network list, then select [Manual
registration] to input a network name
(SSID) manually.
No sound is heard from the sub-
woofer.
If the power indicator on the
subwoofer does not light, try the
following.
– Make sure the AC power cord
(mains lead) of the subwoofer is
connected properly.
–Press (power) of the subwoofer
to turn on the power.
If the power indicator on the
subwoofer flashes slowly in green or
lights in red, try the following.
– Move the subwoofer to a location
near the unit so that the power
indicator on the subwoofer lights in
green.
– Follow the steps in “Performing the
Wireless Connection of the
Subwoofer (LINK)” (page 42).
If the power indicator on the
subwoofer flashes in red, press
(power) of the subwoofer to turn off
the power and check whether the
ventilation opening of the subwoofer
is blocked or not.
The subwoofer is designed for
playback of bass sound. When the
input source does not contain much
bass sound, as is the case with most
TV programs, the bass sound may not
be audible.
Press SW + on the remote control
to increase the volume of the
subwoofer (page 28).
Set the night mode to [Off]. For
details, see “Enjoying Clear Sound
with Low Volume at Midnight
(NIGHT)” (page 27).
Sound skips or has noise.
If there is a device nearby that
generates electromagnetic waves,
such as a wireless LAN or a
microwave oven in use, locate the
system apart from it.
Subwoofer
65
GB
Troubleshooting
If there is an obstacle between the
unit and the subwoofer, move or
remove it.
Locate the unit and the subwoofer as
close as possible.
Switch the wireless LAN frequency of
any nearby Wi-Fi router or PC to
5GHz range.
Switch the network connection of the
TV or Blu-ray Disc Player from
wireless to wired.
No sound or only very low-level
sound is heard from the wireless
speaker.
Depending on the input signal, a
surround effect with presence may
not be obtained. Depending on the
program or disc, audio signals for the
surround channels are output at a
very low level.
When you play content compatible
with copyright protection technology
(HDCP, SCMS-T, etc.), it may not be
output from the system.
Check the surround speakers
connection on [Wireless Surround
Settings] - [Surround Speaker
Connection Check].
Adjust the volume level of the
surround speakers on [Wireless
Surround Settings] - [Surround
Speaker Setting].
The sound is delayed behind the
picture.
When using the wireless surround
function, the sound may be delayed.
The system cannot connect to the
network.
The wireless LAN function is not
available when using the wireless
surround function. Connect to the
network via wired LAN.
The wireless speakers cannot be
connected to the system.
Update the software version of the
system and wireless speakers to the
latest version.
The remote control of this system
does not function.
Point the remote control at the
remote control sensor on the unit
(page 7).
Remove any obstacles in the path
between the remote control and the
system.
Replace both batteries in the remote
control with new ones, if they are
weak.
Make sure you are pressing the
correct button on the remote control.
TV remote control does not work.
This problem might be solved by
enabling the IR repeater function
(page 54).
The Control for HDMI function does
not work properly.
Check the connection with the
system (refer to the supplied Startup
Guide).
Enable the Control for HDMI function
on the TV. For details, refer to the
operating instructions of your TV.
Wait a while, and then try again. If
you unplug the system, it will take a
while before operations can be made.
Wait for 15 seconds or longer, and
then try again.
Make sure the devices connected to
the system support the Control for
HDMI function.
Enable the Control for HDMI function
on the devices connected to the
Wireless Surround
Remote Control
Others
66
GB
system. For details, refer to the
operating instructions of your device.
The type and number of devices that
can be controlled by the Control for
HDMI function is restricted by the
HDMI CEC standard as follows:
– Recording devices (Blu-ray Disc
recorder, DVD recorder, etc.): up to
3 devices
– Playback devices (Blu-ray Disc
Player, DVD player, etc.): up to 3
devices
– Tuner-related devices: up to 4
devices
– Audio system (receiver/
headphone): up to 1 device (used by
this system)
“PRTCT,” “PUSH” and “POWER”
flash alternately in the front panel
display.
Press (power) to turn off the
system. After the indicator
disappears, disconnect the AC power
cord (mains lead) and make sure
nothing is obstructing the ventilation
holes of the system.
“BT TX” appears in the front panel
display.
Press RX/TX on the remote control to
switch [Bluetooth Mode] to
[Receiver]. “BT TX” appears if
[Bluetooth Mode] is set to
[Transmitter] (page 53). When you
press RX/TX on the remote control,
[Bluetooth Mode] is switched to
[Receiver] and the selected input
appears in the front panel display.
Sensors of the TV do not work
properly.
The unit may block some sensors
(such as the brightness sensor), the
remote control receiver of your TV or
the emitter for 3D glasses (infrared
transmission) of a 3D TV that supports
the infrared 3D glass system, or
wireless communication. Move the
unit away from the TV within a range
that allow those parts to operate
properly. For the locations of the
sensors and remote control receiver,
refer to the operating instructions
supplied with the TV.
Wireless functions (wireless LAN,
BLUETOOTH, or subwoofer) are
unstable.
Do not place metal objects other than
a TV around the system.
Music that you are not familiar with
is played suddenly.
The pre-installed sample music may
have been played. Press INPUT on the
unit to stop playback.
(power) does not work.
The system may be in demo mode. To
cancel demo mode, press and hold
(power) and INPUT on the unit for
more than 5 seconds.
67
GB
Troubleshooting
Resetting the System
If the system still does not operate
properly, reset the system as follows.
1 Press HOME.
The home menu appears on the TV
screen.
2 Select [Setup] from the home
menu.
The setup display appears on the TV
screen.
3 Select [Resetting] - [Reset to
Factory Default Settings].
4 Select the menu item you want to
reset.
5 Select [Start].
To cancel resetting
Select [Cancel] in step 5.
By resetting, the link with the subwoofer
may be lost. In this case, perform
“Performing the Wireless Connection of
the Subwoofer (LINK)” (page 42).
Note
68
GB
Specifications
Amplifier section
POWER OUTPUT (rated)
Front L + Front R:
50 W + 50 W (at 8 ohms, 1 kHz, 1%
THD)
POWER OUTPUT (reference)
Front L/Front R speaker blocks: 75 W
(per channel at 8 ohms, 1 kHz)
Front tweeter L/Front tweeter R
speaker blocks: 35 W (per channel at
4 ohms, 10 kHz)
Top tweeter L/Top tweeter R speaker
blocks: 25 W (per channel at 4 ohms,
20 kHz)
Inputs
HDMI IN 1/2/3*
ANALOG IN
TV IN (OPTICAL)
Outputs
HDMI OUT (TV (ARC))*
* HDMI IN 1/2/3 and HDMI OUT (TV (ARC))
jacks support HDCP 2.2 protocol. HDCP
2.2 is newly enhanced copyright
protection technology that is used to
protect content such as 4K movies.
HDMI Section
Connector
Type A (19pin)
USB section
(USB) port:
Type A (For connecting USB
memory, memory card reader,
digital still camera)
LAN section
LAN(100) terminal
100BASE-TX Terminal
Wireless LAN section
Communication system
IEEE 802.11 a/b/g/n
Frequency band
2.4 GHz, 5 GHz
BLUETOOTH section
Communication system
BLUETOOTH Specification version 4.1
Output
BLUETOOTH Specification Power
Class 1
Maximum communication range
Line of sight approx. 30 m
1)
Maximum number of devices to be
registered
9 devices
Frequency band
2.4 GHz band (2.4 GHz - 2.4835 GHz)
Modulation method
FHSS (Freq Hopping Spread Spectrum)
Compatible BLUETOOTH profiles
2)
A2DP 1.2 (Advanced Audio Distribution
Profile)
AVRCP 1.5 (Audio Video Remote
Control Profile)
Supported Codecs
3)
SBC
4)
, AAC
5)
, LDAC
Transmission range (A2DP)
20 Hz - 40,000 Hz (LDAC sampling
frequency 96 kHz with 990 kbps
transmission)
20 Hz - 20,000 Hz (Sampling frequency
44.1 kHz)
1)
The actual range will vary depending on
factors such as obstacles between
devices, magnetic fields around a
microwave oven, static electricity,
cordless phone use, reception
sensitivity, the operating system,
software applications, etc.
2)
BLUETOOTH standard profiles indicate
the purpose of BLUETOOTH
communication between devices.
3)
Codec: Audio signal compression and
conversion format
4)
Abbreviation for Subband Codec
5)
Abbreviation for Advanced Audio
Coding
Additional Information
Bar Speaker (SA-NT5)
69
GB
Additional Information
Front L/Front R speaker block section
Speaker system
3-way speaker system, Acoustic
suspension
Speaker
Woofer: 60 mm cone type
Tweeter: 14 mm soft dome type × 2
General
Power requirements
220 V - 240 V AC, 50 Hz/60 Hz
Power consumption
On: 50 W
Standby mode: 0.5 W or less (For
details on the setting, see page 45)
[Quick Start/Network Standby] is set to
[Off] (default setting): 3 W
[Quick Start/Network Standby] is set to
[On] (all wired network ports
connected, all wireless network ports
activated): 7 W
Dimensions* (approx.) (w/h/d)
1,080 mm × 58 mm × 127 mm
(without grille frame, without wall
mounting brackets)
1,080 mm × 64 mm × 127 mm
(with grille frame, without wall
mounting brackets)
1,080 mm × 135 mm × 80 mm
(without grille frame, with wall
mounting brackets)
1,080 mm × 135 mm × 80 mm
(with grille frame, with wall mounting
brackets)
* Not including projection portion
Mass (approx.)
3.2 kg (without grille frame)
Compatible iPod/iPhone models
The compatible iPod/iPhone models are as
follows. Update your iPod/iPhone with the
latest software before using with the
system.
BLUETOOTH technology works with:
iPhone 6s Plus/iPhone 6s/iPhone 6 Plus/
iPhone 6/iPhone 5s/iPhone 5c/iPhone 5/
iPhone 4s/iPhone 4
iPod touch (6th generation)/iPod touch
(5th generation)
POWER OUTPUT (reference)
130 W (at 4 ohms, 100 Hz)
Speaker system
Subwoofer speaker system, Bass
reflex
16 cm cone type
Power requirements
220 V - 240 V AC, 50 Hz/60 Hz
Power consumption
On: 25 W
Standby mode: 0.5 W or less
Dimensions (approx.) (w/h/d)
190 mm × 382 mm × 386 mm (not
including projection portion)
Mass (approx.)
8.1 kg
Communication system
Wireless Sound Specification version
2.0
Frequency band
2.4 GHz (2.4000 GHz - 2.4835 GHz)
Modulation method
Pi/4 DQPSK
Design and specifications are subject to
change without notice.
Subwoofer (SA-WNT5)
Wireless transmitter/
receiver section
70
GB
Playable Types of Files
Music
Photo
1)
The system can play “.mka” files. These
files cannot be played on a home
network server.
2)
The system may not play this file format
on a home network server.
3)
The system does not play this file
format on a home network server.
4)
The system does not play DST encoded
files.
5)
The system does not play animated
PNG or animated GIF files.
6)
The system does not play 16bit BMP
files.
7)
The system does not play Lossless
coded files.
Some files may not play depending on
the file format, the file encoding, the
recording condition, or the home network
server condition.
Some files edited on a PC may not play.
Fast forward or fast reverse may not be
available with some files.
• The system does not play coded files such
as DRM.
The system can recognize the following
files or folders in USB devices:
up to folders in the 9th layer (including
the root folder)
up to 500 files/folders in a single layer
The system can recognize the following
files or folders stored in the home
network server:
up to folders in the 19th layer
up to 999 files/folders in a single layer
Some USB devices may not work with this
system.
The system can recognize Mass Storage
Class (MSC) devices (such as flash
memory or an HDD), Still Image Capture
Devices (SICDs), and 101-key keyboards.
Codec Extension
MP3 (MPEG-1 Audio
Layer III)
1)
.mp3
AAC/HE-AAC
1),2)
.m4a, .aac
3)
,
.mp4, .3gp
WMA9 Standard
2)
.wma
WMA10 Pro
7)
.wma
LPCM
1)
.wav
FLAC
2)
.flac, .fla
Dolby Digital
1),3)
.ac3
DSF
2)
.dsf
DSDIFF
2),4)
.dff
AIFF
2)
.aiff, .aif
ALAC
2)
.m4a
Vorbis .ogg
Monkey’s Audio .ape
Format Extension
JPEG .jpeg, .jpg, .jpe
PNG
5)
.png
GIF
5)
.gif
BMP
3),6)
.bmp
Notes
71
GB
Additional Information
Supported Input Audio Formats
Audio formats supported by this system are as follows.
: Supported format.
–: Unsupported format.
The HDMI IN 1/2/3 jacks do not support audio format that contains copy protections, such
as Super Audio CD or DVD-Audio.
Format Function
“HDMI1”
“HDMI2”
“HDMI3”
“TV”
(DIGITAL IN)
LPCM 2ch 
LPCM 5.1ch
LPCM 7.1ch
Dolby Digital 
Dolby TrueHD, Dolby Digital Plus
DTS 
DTS-ES Discrete 6.1, DTS-ES Matrix 6.1 
DTS96/24 
DTS-HD High Resolution Audio
DTS-HD Master Audio
DTS-HD LBR
DSD
Note
72
GB
Supported Input Video Formats
Video formats supported by this system are as follows.
: Recommended/ : Supported/–: Unsupported
All HDMI IN and HDMI OUT jacks support bandwidth up to 18Gbps, HDCP 2.2, ITU-R
BT.2020 wide color spaces, and HDR (High Dynamic Range) contents pass-through.
HDCP 2.2 is newly enhanced copyright protection technology that is used to protect
content such as 4K movies.
ITU-R BT.2020 color space is new wider color standard that is defined for ultra-high
definition television systems.
HDR is an emerging video format that can display a wider range of brightness levels.
Premium High Speed HDMI Cable with Ethernet that supports 18Gbps is recommended.
Format
Frame Rate Color Space
HDMI cable HDMI Signal Format
Premium
High Speed
HDMI Cable
with Ethernet
High Speed
HDMI Cable
with Ethernet
Enhanced Normal
4096/3840 ×
2160p 4K
50/59.94/
60 Hz
RGB
YCbCr444/
422
YCbCr420
23.98/24/25/
29.97/30 Hz
RGB
YCbCr444/
422
1920 × 1080p
23.98/24/25/
30/50/59.94/
60 Hz
1920 × 1080i
50/59.94/
60 Hz
1280 × 720p
23.98/24/
29.97/30/50/
59.94/60 Hz
720 × 480p 59.94/60 Hz
720 × 576p 50 Hz
640 × 480p 59.94/60 Hz RGB
73
GB
Additional Information
On BLUETOOTH
Communication
BLUETOOTH devices should be used
within approximately 10 meters (33 feet)
(unobstructed distance) of each other.
The effective communication range may
become shorter under the following
conditions.
When a person, metal object, wall or
other obstruction is between the
devices with a BLUETOOTH connection
Locations where a wireless LAN is
installed
Around microwave ovens that are in use
Locations where other electromagnetic
waves occur
BLUETOOTH devices and wireless LAN
(IEEE 802.11 b/g/n) use the same
frequency band (2.4 GHz). When using
your BLUETOOTH device near a device
with wireless LAN capability,
electromagnetic interference may occur.
This could result in lower data transfer
rates, noise, or inability to connect. If this
happens, try the following remedies:
Use this system at least 10 meters
(33 feet) away from the wireless LAN
device.
Turn off the power to the wireless LAN
device when using your BLUETOOTH
device within 10 meters (33 feet).
Install this system and BLUETOOTH
device as closer to each other as
possible.
The radio waves broadcast by this system
may interfere with the operation of some
medical devices. Since this interference
may result in malfunction, always turn off
the power on this system and
BLUETOOTH device in the following
locations:
In hospitals, on trains, in airplanes, at
gas stations, and any place where
flammable gasses may be present
Near automatic doors or fire alarms
This system supports security functions
that comply with the BLUETOOTH
specification to ensure secure connection
during communication using BLUETOOTH
technology. However, this security may
be insufficient depending on the setting
content and other factors, so always be
careful when performing communication
using BLUETOOTH technology.
Sony cannot be held liable in any way for
damages or other loss resulting from
information leaks during communication
using BLUETOOTH technology.
BLUETOOTH communication is not
necessarily guaranteed with all
BLUETOOTH devices that have the same
profile as this system.
BLUETOOTH devices connected with this
system must comply with the
BLUETOOTH specification prescribed by
the Bluetooth SIG, Inc., and must be
certified to comply. However, even when
a device complies with the BLUETOOTH
specification, there may be cases where
the characteristics or specifications of the
BLUETOOTH device make it impossible to
connect, or may result in different control
methods, display or operation.
Noise may occur or the audio may cut off
depending on the BLUETOOTH device
connected with this system, the
communications environment, or
surrounding conditions.
If you have any questions or problems
concerning your system, please consult
your nearest Sony dealer.
74
GB
END USER LICENSE
AGREEMENT
IMPORTANT:
BEFORE USING THE SOFTWARE, PLEASE
READ THIS END USER LICENSE
AGREEMENT (“EULA”) CAREFULLY. BY
USING THE SOFTWARE YOU ARE
ACCEPTING THE TERMS OF THIS EULA. IF
YOU DO NOT ACCEPT THE TERMS OF
THIS EULA, YOU MAY NOT USE THE
SOFTWARE.
This EULA is a legal agreement between
you and Sony Corporation (“SONY”).
This EULA governs your rights and
obligations regarding the SONY
software of SONY and/or its third party
licensors (including SONY’s affiliates)
and their respective affiliates
(collectively, the “THIRD-PARTY
SUPPLIERS”), together with any
updates/upgrades provided by SONY,
any printed, on-line or other electronic
documentation for such software, and
any data files created by operation of
such software (collectively, the
“SOFTWARE”).
Notwithstanding the foregoing, any
software in the SOFTWARE having a
separate end user license agreement
(including, but not limited to, GNU
General Public license and Lesser/
Library General Public License) shall be
covered by such applicable separate
end user license agreement in lieu of
the terms of this EULA to the extent
required by such separate end user
license agreement (“EXCLUDED
SOFTWARE”).
SOFTWARE LICENSE
The SOFTWARE is licensed, not sold. The
SOFTWARE is protected by copyright
and other intellectual property laws and
international treaties.
COPYRIGHT
All right and title in and to the
SOFTWARE (including, but not limited
to, any images, photographs,
animation, video, audio, music, text and
“applets” incorporated into the
SOFTWARE) is owned by SONY or one or
more of the THIRD-PARTY SUPPLIERS.
GRANT OF LICENSE
SONY grants you a limited license to use
the SOFTWARE solely in connection with
your compatible device (“DEVICE”) and
only for your individual, non-
commercial use. SONY and the THIRD-
PARTY SUPPLIERS expressly reserve all
rights, title and interest (including, but
not limited to, all intellectual property
rights) in and to the SOFTWARE that this
EULA does not specifically grant to you.
REQUIREMENTS AND
LIMITATIONS
You may not copy, publish, adapt,
redistribute, attempt to derive source
code, modify, reverse engineer,
decompile, or disassemble any of the
SOFTWARE, whether in whole or in part,
or create any derivative works from or of
the SOFTWARE unless such derivative
works are intentionally facilitated by the
SOFTWARE. You may not modify or
tamper with any digital rights
management functionality of the
SOFTWARE. You may not bypass,
modify, defeat or circumvent any of the
functions or protections of the
SOFTWARE or any mechanisms
operatively linked to the SOFTWARE.
You may not separate any individual
component of the SOFTWARE for use on
more than one DEVICE unless expressly
authorized to do so by SONY. You may
not remove, alter, cover or deface any
trademarks or notices on the
SOFTWARE. You may not share,
distribute, rent, lease, sublicense,
assign, transfer or sell the SOFTWARE.
75
GB
Additional Information
The software, network services or other
products other than SOFTWARE upon
which the SOFTWARE’S performance
depends might be interrupted or
discontinued at the discretion of the
suppliers (software suppliers, service
suppliers, or SONY). SONY and such
suppliers do not warrant that the
SOFTWARE, network services, contents
or other products will continue to be
available, or will operate without
interruption or modification.
USE OF SOFTWARE WITH
COPYRIGHTED MATERIALS
The SOFTWARE may be capable of
being used by you to view, store,
process and/or use content created by
you and/or third parties. Such content
may be protected by copyright, other
intellectual property laws, and/or
agreements. You agree to use the
SOFTWARE only in compliance with all
such laws and agreements that apply to
such content. You acknowledge and
agree that SONY may take appropriate
measures to protect the copyright of
content stored, processed or used by
the SOFTWARE. Such measures include,
but are not limited to, counting the
frequency of your backup and
restoration through certain SOFTWARE
features, refusal to accept your request
to enable restoration of data, and
termination of this EULA in the event of
your illegitimate use of the SOFTWARE.
CONTENT SERVICE
PLEASE ALSO NOTE THAT THE
SOFTWARE MAY BE DESIGNED TO BE
USED WITH CONTENT AVAILABLE
THROUGH ONE OR MORE CONTENT
SERVICES (“CONTENT SERVICE”). USE OF
THE SERVICE AND THAT CONTENT IS
SUBJECT TO THE TERMS OF SERVICE OF
THAT CONTENT SERVICE. IF YOU
DECLINE TO ACCEPT THOSE TERMS,
YOUR USE OF THE SOFTWARE WILL BE
LIMITED. You acknowledge and agree
that certain content and services
available through the SOFTWARE may
be provided by third parties over which
SONY has no control. USE OF THE
CONTENT SERVICE REQUIRES AN
INTERNET CONNECTION. THE CONTENT
SERVICE MAY BE DISCONTINUED AT ANY
TIME.
INTERNET CONNECTIVITY AND
THIRD PARTY SERVICES
You acknowledge and agree that access
to certain SOFTWARE features may
require an Internet connection for which
you are solely responsible. Further, you
are solely responsible for payment of
any third party fees associated with your
Internet connection, including but not
limited to Internet service provider or
airtime charges. Operation of the
SOFTWARE may be limited or restricted
depending on the capabilities,
bandwidth or technical limitations of
your Internet connection and service.
The provision, quality and security of
such Internet connectivity are the sole
responsibility of the third party
providing such service.
EXPORT AND OTHER
REGULATIONS
You agree to comply with all applicable
export and re-export restrictions and
regulations of the area or country in
which you reside, and not to transfer, or
authorize the transfer, of the SOFTWARE
to a prohibited country or otherwise in
violation of any such restrictions or
regulations.
HIGH RISK ACTIVITIES
The SOFTWARE is not fault-tolerant and
is not designed, manufactured or
intended for use or resale as on-line
control equipment in hazardous
environments requiring fail-safe
performance, such as in the operation
of nuclear facilities, aircraft navigation
or communication systems, air traffic
76
GB
control, direct life support machines, or
weapons systems, in which the failure
of the SOFTWARE could lead to death,
personal injury, or severe physical or
environmental damage (“HIGH RISK
ACTIVITIES”). SONY, each of the THIRD-
PARTY SUPPLIERS, and each of their
respective affiliates specifically disclaim
any express or implied warranty, duty or
condition of fitness for HIGH RISK
ACTIVITIES.
EXCLUSION OF WARRANTY ON
SOFTWARE
You acknowledge and agree that use of
the SOFTWARE is at your sole risk and
that you are responsible for use of the
SOFTWARE. The SOFTWARE is provided
“AS IS,” without warranty, duty or
condition of any kind.
SONY AND EACH OF THE THIRD-PARTY
SUPPLIERS (for purposes of this Section,
SONY and each of the THIRD-PARTY
SUPPLIERS shall be collectively referred
to as “SONY”) EXPRESSLY DISCLAIM ALL
WARRANTIES, DUTIES OR CONDITIONS,
EXPRESS OR IMPLIED, INCLUDING, BUT
NOT LIMITED TO, THE IMPLIED
WARRANTIES OF MERCHANTABILITY,
NONINFRINGEMENT AND FITNESS FOR A
PARTICULAR PURPOSE. SONY DOES NOT
WARRANT OR MAKE ANY CONDITIONS
OR REPRESENTATIONS (A) THAT THE
FUNCTIONS CONTAINED IN ANY OF THE
SOFTWARE WILL MEET YOUR
REQUIREMENTS OR THAT THEY WILL BE
UPDATED, (B) THAT THE OPERATION OF
ANY OF THE SOFTWARE WILL BE
CORRECT OR ERROR-FREE OR THAT ANY
DEFECTS WILL BE CORRECTED, (C) THAT
THE SOFTWARE WILL NOT DAMAGE ANY
OTHER SOFTWARE, HARDWARE OR
DATA, (D) THAT ANY SOFTWARE,
NETWORK SERVICES (INCLUDING THE
INTERNET) OR PRODUCTS (OTHER THAN
THE SOFTWARE) UPON WHICH THE
SOFTWARE’S PERFORMANCE DEPENDS
WILL CONTINUE TO BE AVAILABLE,
UNINTERRUPTED OR UNMODIFIED, AND
(E) REGARDING THE USE OR THE
RESULTS OF THE USE OF THE SOFTWARE
IN TERMS OF ITS CORRECTNESS,
ACCURACY, RELIABILITY, OR
OTHERWISE.
NO ORAL OR WRITTEN INFORMATION
OR ADVICE GIVEN BY SONY OR AN
AUTHORIZED REPRESENTATIVE OF
SONY SHALL CREATE A WARRANTY,
DUTY OR CONDITION OR IN ANY WAY
INCREASE THE SCOPE OF THIS
WARRANTY. SHOULD THE SOFTWARE
PROVE DEFECTIVE YOU ASSUME THE
ENTIRE COST OF ALL NECESSARY
SERVICING, REPAIR OR CORRECTION.
SOME JURISDICTIONS DO NOT ALLOW
THE EXCLUSION OF IMPLIED
WARRANTIES, SO THESE EXCLUSIONS
MAY NOT APPLY TO YOU.
LIMITATION OF LIABILITY
SONY AND EACH OF THE THIRD-PARTY
SUPPLIERS (for purposes of this Section,
SONY and each of the THIRD-PARTY
SUPPLIERS shall be collectively referred
to as “SONY”) SHALL NOT BE LIABLE FOR
ANY INCIDENTAL OR CONSEQUENTIAL
DAMAGES FOR BREACH OF ANY
EXPRESS OR IMPLIED WARRANTY,
BREACH OF CONTRACT, NEGLIGENCE,
STRICT LIABILITY OR UNDER ANY OTHER
LEGAL THEORY RELATED TO THE
SOFTWARE, INCLUDING, BUT NOT
LIMITED TO, ANY DAMAGES ARISING
OUT OF LOSS OF PROFITS, LOSS OF
REVENUE, LOSS OF DATA, LOSS OF USE
OF THE SOFTWARE OR ANY ASSOCIATED
HARDWARE, DOWN TIME AND USER’S
TIME, EVEN IF ANY OF THEM HAVE BEEN
ADVISED OF THE POSSIBILITY OF SUCH
DAMAGES. IN ANY CASE, EACH AND ALL
OF THEIR AGGREGATE LIABILITY UNDER
ANY PROVISION OF THIS EULA SHALL BE
LIMITED TO THE AMOUNT ACTUALLY
PAID FOR THE PRODUCT. SOME
JURISDICTIONS DO NOT ALLOW THE
EXCLUSION OR LIMITATION OF
INCIDENTAL OR CONSEQUENTIAL
77
GB
Additional Information
DAMAGES, SO THE ABOVE EXCLUSION
OR LIMITATION MAY NOT APPLY TO
YOU.
AUTOMATIC UPDATE FEATURE
From time to time, SONY or the THIRD-
PARTY SUPPLIERS may automatically
update or otherwise modify the
SOFTWARE, including, but not limited
to, for purposes of enhancement of
security functions, error correction and
improvement of functions, at such time
as you interact with SONY’s or third
parties’ servers, or otherwise. Such
updates or modifications may delete or
change the nature of features or other
aspects of the SOFTWARE, including,
but not limited to, functions you may
rely upon. You acknowledge and agree
that such activities may occur at SONY’s
sole discretion and that SONY may
condition continued use of the
SOFTWARE upon your complete
installation or acceptance of such
update or modifications. Any updates/
modifications shall be deemed to be,
and shall constitute part of, the
SOFTWARE for purposes of this EULA. By
acceptance of this EULA, you consent to
such update/modification.
ENTIRE AGREEMENT, WAIVER,
SEVERABILITY
This EULA and SONY’s privacy policy,
each as amended and modified from
time to time, together constitute the
entire agreement between you and
SONY with respect to the SOFTWARE.
The failure of SONY to exercise or
enforce any right or provision of this
EULA shall not constitute a waiver of
such right or provision. If any part of this
EULA is held invalid, illegal, or
unenforceable, that provision shall be
enforced to the maximum extent
permissible so as to maintain the intent
of this EULA, and the other parts will
remain in full force and effect.
GOVERNING LAW AND
JURISDICTION
The United Nations Convention on
Contracts for the International Sale of
Goods shall not apply to this EULA. This
EULA shall be governed by the laws of
Japan, without regards to conflict of
laws provisions. Any dispute arising out
of this EULA shall be subject to the
exclusive venue of the Tokyo District
Court in Japan, and the parties hereby
consent to the venue and jurisdiction of
such courts.
EQUITABLE REMEDIES
Notwithstanding anything contained in
this EULA to the contrary, you
acknowledge and agree that any
violation of or non-compliance with this
EULA by you will cause irreparable harm
to SONY, for which monetary damages
would be inadequate, and you consent
to SONY obtaining any injunctive or
equitable relief that SONY deems
necessary or appropriate in such
circumstances. SONY may also take any
legal and technical remedies to prevent
violation of and/or to enforce this EULA,
including, but not limited to, immediate
termination of your use of the
SOFTWARE, if SONY believes in its sole
discretion that you are violating or
intend to violate this EULA. These
remedies are in addition to any other
remedies SONY may have at law, in
equity or under contract.
TERMINATION
Without prejudice to any of its other
rights, SONY may terminate this EULA if
you fail to comply with any of its terms.
In case of such termination, you must
cease all use, and destroy any copies, of
the SOFTWARE.
AMENDMENT
SONY RESERVES THE RIGHT TO AMEND
ANY OF THE TERMS OF THIS EULA AT ITS
78
GB
SOLE DISCRETION BY POSTING NOTICE
ON A SONY DESIGNATED WEB SITE, BY
EMAIL NOTIFICATION TO AN EMAIL
ADDRESS PROVIDED BY YOU, BY
PROVIDING NOTICE AS PART OF THE
PROCESS IN WHICH YOU OBTAIN
UPGRADES/UPDATES OR BY ANY OTHER
LEGALLY RECOGNIZABLE FORM OF
NOTICE. If you do not agree to the
amendment, you should promptly
contact SONY for instructions. Your
continued use of the SOFTWARE after
the effective date of any such notice
shall be deemed your agreement to be
bound by such amendment.
THIRD-PARTY BENEFICIARIES
Each THIRD-PARTY SUPPLIER is an
express intended third-party beneficiary
of, and shall have the right to enforce,
each provision of this EULA with respect
to the SOFTWARE of such party.
Should you have any questions
concerning this EULA, you may contact
SONY by writing to SONY at applicable
contact address of each area or country.
Copyright © 2014 Sony Corporation.
Precautions
On safety
Should any solid object or liquid fall into
the system, unplug the system and have
it checked by qualified personnel before
operating it any further.
Do not climb on the unit and subwoofer,
as you may fall down and injure yourself,
or system damage may result.
On power sources
Before operating the system, check that
the operating voltage is identical to your
local power supply. The operating voltage
is indicated on the nameplate at the
bottom of the unit.
If you are not going to use the system for
a long time, be sure to disconnect the
system from the wall outlet (mains). To
disconnect the AC power cord (mains
lead), grasp the plug itself; never pull the
cord.
One blade of the plug is wider than the
other for the purpose of safety and will fit
into the wall outlet (mains) only one way.
If you are unable to insert the plug fully
into the outlet, contact your dealer.
AC power cord (mains lead) must be
changed only at a qualified service shop.
On heat buildup
Although the system heats up during
operation, this is not a malfunction. If you
continuously use this system at high
volume, the system temperature at the
rear and bottom rises considerably. To
avoid burning yourself, do not touch the
system.
On placement
Do not place the system near heat
sources or in a place subject to direct
sunlight, excessive dust, or mechanical
shock.
Do not place anything at the rear of the
unit and subwoofer that might block the
ventilation holes and cause malfunctions.
79
GB
Additional Information
Do not place metal objects other than a
TV around the system. Wireless functions
may be unstable.
• If the system is being used in combination
with a TV, VCR, or tape deck, noise may
result and picture quality may suffer. In
such a case, place the system away from
the TV, VCR, or tape deck.
• Use caution when placing the system on a
surface that has been specially treated
(with wax, oil, polish, etc.), as staining or
discoloration of the surface may result.
Take care to avoid any possible injury
from the corners of the unit and
subwoofer.
Keep 3 cm or more space under the unit
when you hang it on a wall.
The speakers of this system are not of
magnetically shielded type. Do not place
magnetic cards on the system or near it.
On handling the subwoofer
Do not place your hand into the slit of the
subwoofer when lifting it. The speaker
driver may be damaged. When lifting it,
hold the bottom of the subwoofer.
On operation
Before connecting other devices, be sure
to turn off and unplug the system.
If you encounter color irregularity
on a nearby TV screen
Color irregularities may be observed on
certain types of TV sets.
If color irregularity is observed...
Turn off the TV set, then turn it on again
after 15 to 30 minutes.
If color irregularity is observed
again...
Place the system further away from the TV
set.
On cleaning
Clean the system with a soft, dry cloth. Do
not use any type of abrasive pad, scouring
powder, or solvent such as alcohol or
benzine.
If you have any question or problem
concerning your system, please consult
your nearest Sony dealer.
Disclaimer regarding services
offered by third parties
Services offered by third parties may be
changed, suspended, or terminated
without prior notice. Sony does not bear
any responsibility in these sorts of
situations.
Notes on updating
This system allows you to update the
software automatically when connected to
the Internet via a wired or wireless
network.
You can add new features and use the
system with more convenience and safety
by updating the system.
If you do not want to update automatically,
you can disable the function by using
SongPal installed on your smartphone or
tablet. However, the system may update
the software automatically for reasons
such as safety, even if this function is
disabled. You can also update the software
using the settings menu when this function
is disabled. Refer to “Using the Setup
Display” (page 50) for details.
You may not use the system while the
software is being updated.
80
GB
This system incorporates Dolby* Digital
and the DTS** Digital Surround System.
* Manufactured under license from Dolby
Laboratories.
Dolby and the double-D symbol are
trademarks of Dolby Laboratories.
**For DTS patents, see http://
patents.dts.com. Manufactured under
license from DTS Licensing Limited. DTS,
DTS-HD, the Symbol, & DTS and the
Symbol together are registered
trademarks of DTS, Inc. © DTS, Inc. All
Rights Reserved.
The BLUETOOTH
®
word mark and logos are
registered trademarks owned by Bluetooth
SIG, Inc. and any use of such marks by Sony
Corporation is under license. Other
trademarks and trade names are those of
their respective owners.
This system incorporates High-Definition
Multimedia Interface (HDMI™) technology.
The terms HDMI and HDMI High-Definition
Multimedia Interface, and the HDMI Logo
are trademarks or registered trademarks of
HDMI Licensing LLC in the United States
and other countries.
The N Mark is a trademark or registered
trademark of NFC Forum, Inc. in the United
States and in other countries.
Android and Google Play are trademarks of
Google Inc.
Google Cast and the Google Cast badge
are trademarks of Google Inc.
“Xperia” is a trademark of Sony Mobile
Communications AB.
Apple, the Apple logo, iPhone, iPod, iPod
touch, and Retina are trademarks of Apple
Inc., registered in the U.S. and other
countries. App Store is a service mark of
Apple Inc.
“Made for iPod,” and “Made for iPhone”
mean that an electronic accessory has
been designed to connect specifically to
iPod or iPhone, respectively, and has been
certified by the developer to meet Apple
performance standards. Apple is not
responsible for the operation of this device
or its compliance with safety and
regulatory standards. Please note that the
use of this accessory with iPod or iPhone
may affect wireless performance.
“BRAVIA” logo is a trademark of Sony
Corporation.
“ClearAudio+” is a trademark of Sony
Corporation.
“PlayStation
®
” is a registered trademark of
Sony Computer Entertainment Inc.
MPEG Layer-3 audio coding technology
and patents licensed from Fraunhofer IIS
and Thomson.
Windows Media is either a registered
trademark or trademark of Microsoft
Corporation in the United States and/or
other countries.
This product is protected by certain
intellectual property rights of Microsoft
Corporation. Use or distribution of such
technology outside of this product is
prohibited without a license from Microsoft
or an authorized Microsoft subsidiary.
Opera® Devices SDK from Opera Software
ASA. Copyright 1995-2015 Opera Software
ASA. All rights reserved.
Wi-Fi®, Wi-Fi Protected Access®, Wi-Fi
Alliance® and Wi-Fi CERTIFIED Miracast®
are registered trademarks of Wi-Fi Alliance.
Wi-Fi CERTIFIED™, WPA™, WPA2™, Wi-Fi
Protected Setup™ and Miracast™ are
trademarks of Wi-Fi Alliance.
Copyrights and Trademarks
81
GB
Additional Information
LDAC™ and LDAC logo are trademarks of
Sony Corporation.
LDAC is an audio coding technology
developed by Sony that enables the
transmission of High-Resolution (Hi-Res)
Audio content, even over a Bluetooth
connection. Unlike other Bluetooth
compatible coding technologies such as
SBC, it operates without any down-
conversion of the Hi-Res Audio content*,
and allows approximately three times
more data** than those other technologies
to be transmitted over a Bluetooth wireless
network with unprecedented sound
quality, by means of efficient coding and
optimized packetization.
* excluding DSD format contents
**in comparison with SBC (Subband
Coding) when the bitrate of 990 kbps
(96/48 kHz) or 909 kbps (88.2/44.1 kHz) is
selected
This product contains software that is
subject to the GNU General Public License
(“GPL”) or GNU Lesser General Public
License (“LGPL”). These establish that
customers have the right to acquire,
modify, and redistribute the source code of
said software in accordance with the terms
of the GPL or the LGPL.
For details of the GPL, LGPL and other
software licenses, please refer to [Software
License Information] in [System Settings] of
the [Setup] menu on the product.
The source code for the software used in
this product is subject to the GPL and LGPL,
and is available on the Web. To download,
please access the following:
URL:
http://oss.sony.net/Products/Linux
Please note that Sony cannot answer or
respond to any inquiries regarding the
content of this source code.
“DSEE HX” is a trademark of Sony
Corporation.
DLNA™, the DLNA Logo and DLNA
CERTIFIED™ are trademarks, service marks,
or certification marks of the Digital Living
Network Alliance.
“TRILUMINOS” and “TRILUMINOS” logo are
a registered trademark of Sony
Corporation.
This product incorporates Spotify software
which is subject to 3rd party licenses found
here*:
https://developer.spotify.com/esdk-
third-party-licenses/
Spotify and Spotify logos are trademarks of
the Spotify Group.*
* Depending on the country and region,
this function may not be available.
All other trademarks are trademarks of
their respective owners.
82
GB
Index
Numerics
24p Output 51
4K Output
51
A
Attenuation settings - Analog 52
Audio DRC
52
Audio Output
52
Audio Return Channel
54
Audio Settings
52
Auto Display
55
Auto Home Network Access
Permission
56
Auto Standby
55
Auto Update
55
Auto Update Settings
55
B
Bluetooth Codec - AAC 53
Bluetooth Codec - LDAC
53
Bluetooth Mode
53
Bluetooth Settings
53
Bluetooth Standby
53
C
Connection Server Settings 56
Control for HDMI
54
D
Device List 53
Device Name
55
DSEE HX
52
E
Easy Setup 57
External Control
56
G
Google Cast 38
H
HDMI
YCbCr/RGB (HDMI)
52
HDMI Settings
54
HDMI Signal Format
55
HDMI1 Audio Input Mode
55
Home Network Access Control
56
I
Initialize Personal Information 57
Input Skip Setting
56
Internet Settings
56
IR-Repeater
54
M
Multiplex broadcast sound 43
N
Network 19, 40
Network Connection Diagnostics
56
Network Connection Status
56
Network content 24p Output
51
Network Settings
56
NFC
31
O
OSD Language 54
Output Video Resolution
51
P
PRTCT 66
Q
Quick Start/Network Standby 55
R
Remote control 10
Remote Start
56
Reset to Factory Default Settings
57
Resetting
57
S
SBM 52
Screen mirroring RF Setting
56
Screen Settings
51
Slideshow
58
Software License Information
56
Software Update
51
Software Update Notification
55
83
GB
SongPal 37
Sound field
58
Standby Through
54
System Information
56
System Settings
54
T
Time Zone 55
TV Type
51
U
Update 51
V
Video Direct 52
W
Wireless Multi Room 38
Wireless Playback Quality
53
Wireless Subwoofer Connection
54
Wireless Surround
39
©2016 Sony Corporation Printed in Malaysia 4-586-136-73(1)
The software of this system may be updated in the future. To find out details on any available
updates, please visit the following URL.
www.sony.eu/support
5

Hulp nodig? Stel uw vraag in het forum

Spelregels

Misbruik melden

Gebruikershandleiding.com neemt misbruik van zijn services uitermate serieus. U kunt hieronder aangeven waarom deze vraag ongepast is. Wij controleren de vraag en zonodig wordt deze verwijderd.

Product:

Bijvoorbeeld antisemitische inhoud, racistische inhoud, of materiaal dat gewelddadige fysieke handelingen tot gevolg kan hebben.

Bijvoorbeeld een creditcardnummer, een persoonlijk identificatienummer, of een geheim adres. E-mailadressen en volledige namen worden niet als privégegevens beschouwd.

Spelregels forum

Om tot zinvolle vragen te komen hanteren wij de volgende spelregels:

Belangrijk! Als er een antwoord wordt gegeven op uw vraag, dan is het voor de gever van het antwoord nuttig om te weten als u er wel (of niet) mee geholpen bent! Wij vragen u dus ook te reageren op een antwoord.

Belangrijk! Antwoorden worden ook per e-mail naar abonnees gestuurd. Laat uw emailadres achter op deze site, zodat u op de hoogte blijft. U krijgt dan ook andere vragen en antwoorden te zien.

Abonneren

Abonneer u voor het ontvangen van emails voor uw Sony HT-NT5 bij:


U ontvangt een email met instructies om u voor één of beide opties in te schrijven.


Ontvang uw handleiding per email

Vul uw emailadres in en ontvang de handleiding van Sony HT-NT5 in de taal/talen: Engels als bijlage per email.

De handleiding is 1,26 mb groot.


U ontvangt de handleiding per email binnen enkele minuten. Als u geen email heeft ontvangen, dan heeft u waarschijnlijk een verkeerd emailadres ingevuld of is uw mailbox te vol. Daarnaast kan het zijn dat uw internetprovider een maximum heeft aan de grootte per email. Omdat hier een handleiding wordt meegestuurd, kan het voorkomen dat de email groter is dan toegestaan bij uw provider.

Stel vragen via chat aan uw handleiding

Stel uw vraag over deze PDF

Andere handleiding(en) van Sony HT-NT5

Sony HT-NT5 Snelstart handleiding - Nederlands, Deutsch - 2 pagina's


Uw handleiding is per email verstuurd. Controleer uw email

Als u niet binnen een kwartier uw email met handleiding ontvangen heeft, kan het zijn dat u een verkeerd emailadres heeft ingevuld of dat uw emailprovider een maximum grootte per email heeft ingesteld die kleiner is dan de grootte van de handleiding.

Er is een email naar u verstuurd om uw inschrijving definitief te maken.

Controleer uw email en volg de aanwijzingen op om uw inschrijving definitief te maken

U heeft geen emailadres opgegeven

Als u de handleiding per email wilt ontvangen, vul dan een geldig emailadres in.

Uw vraag is op deze pagina toegevoegd

Wilt u een email ontvangen bij een antwoord en/of nieuwe vragen? Vul dan hier uw emailadres in.


Info