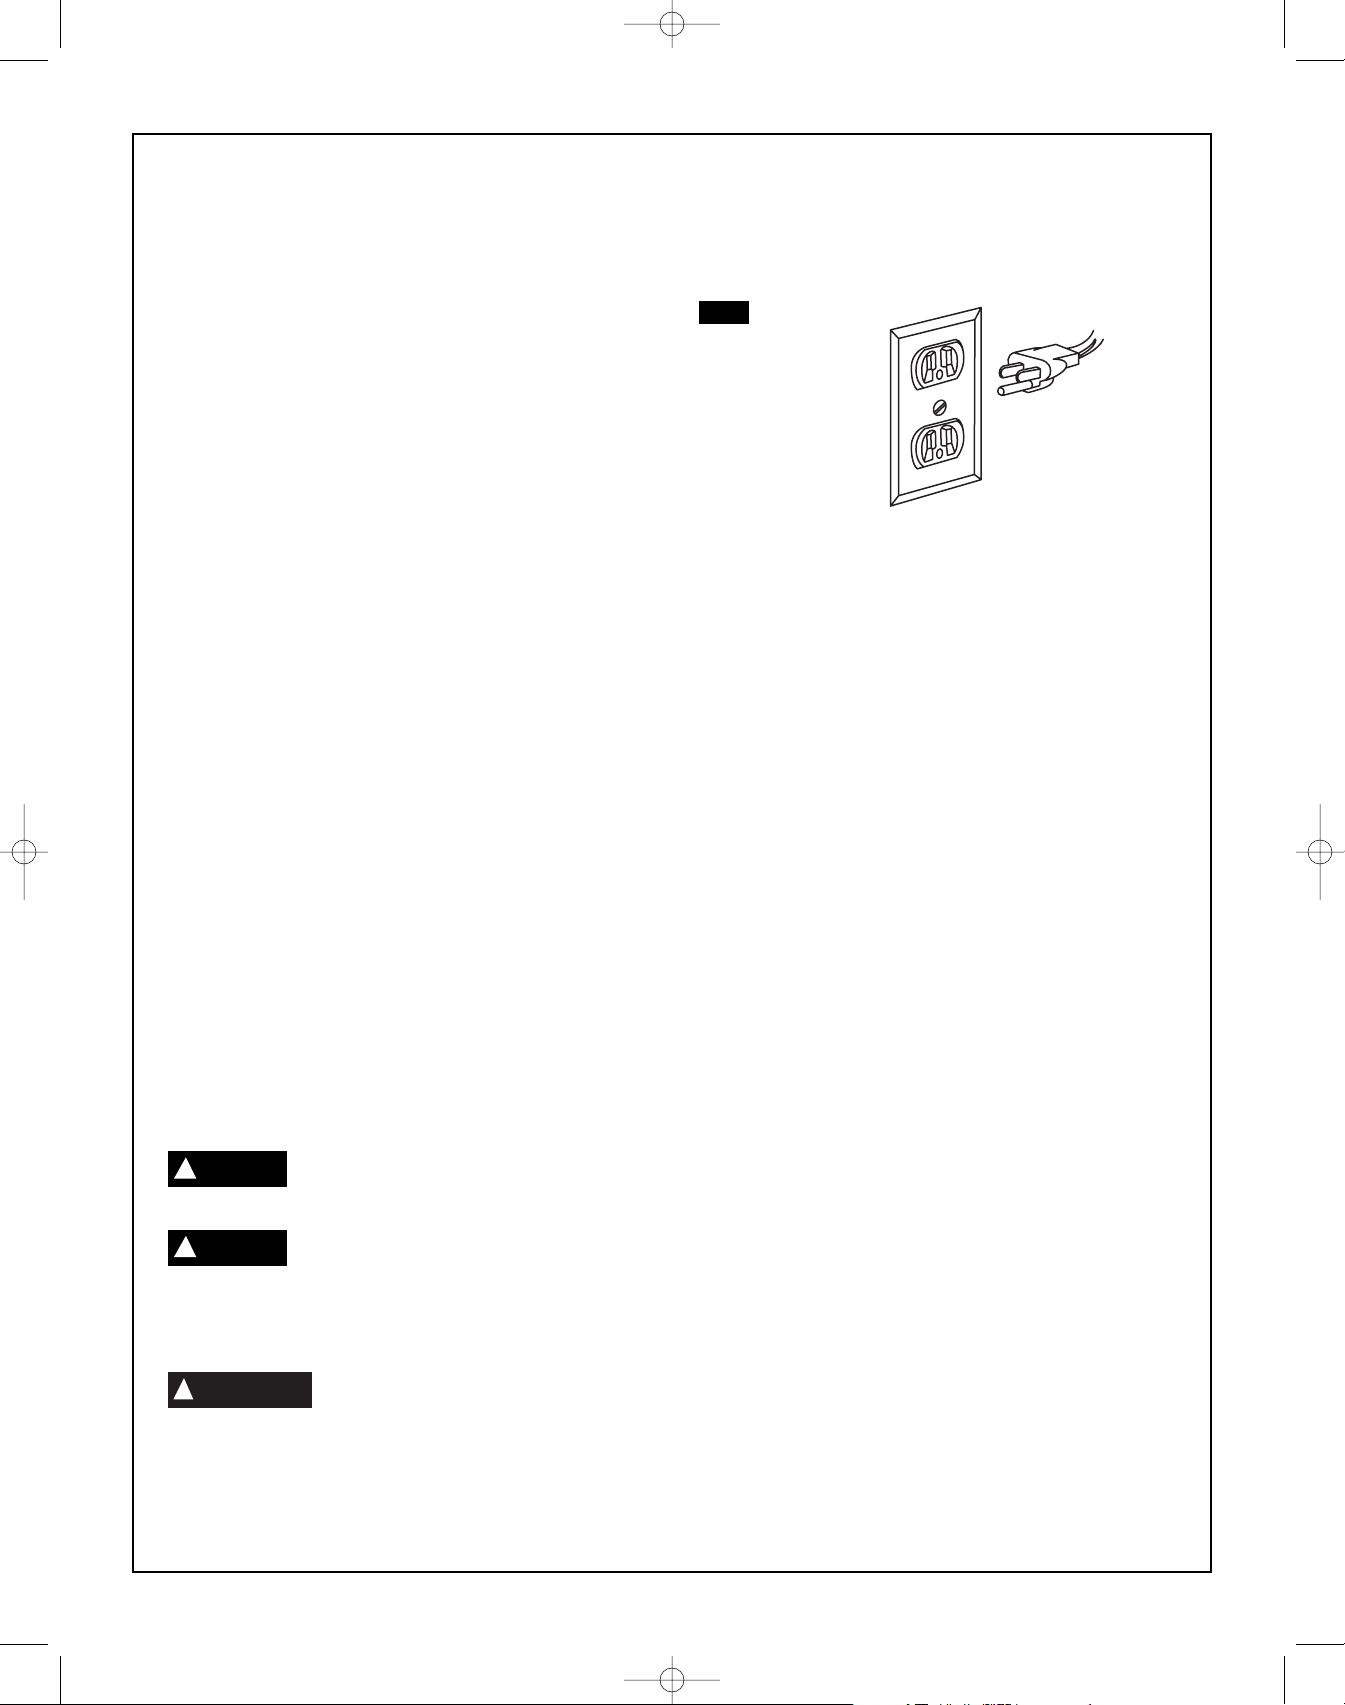
saque siempre el enchufe de la fuente de alimentación cuando
no se esté utilizando la herramienta.
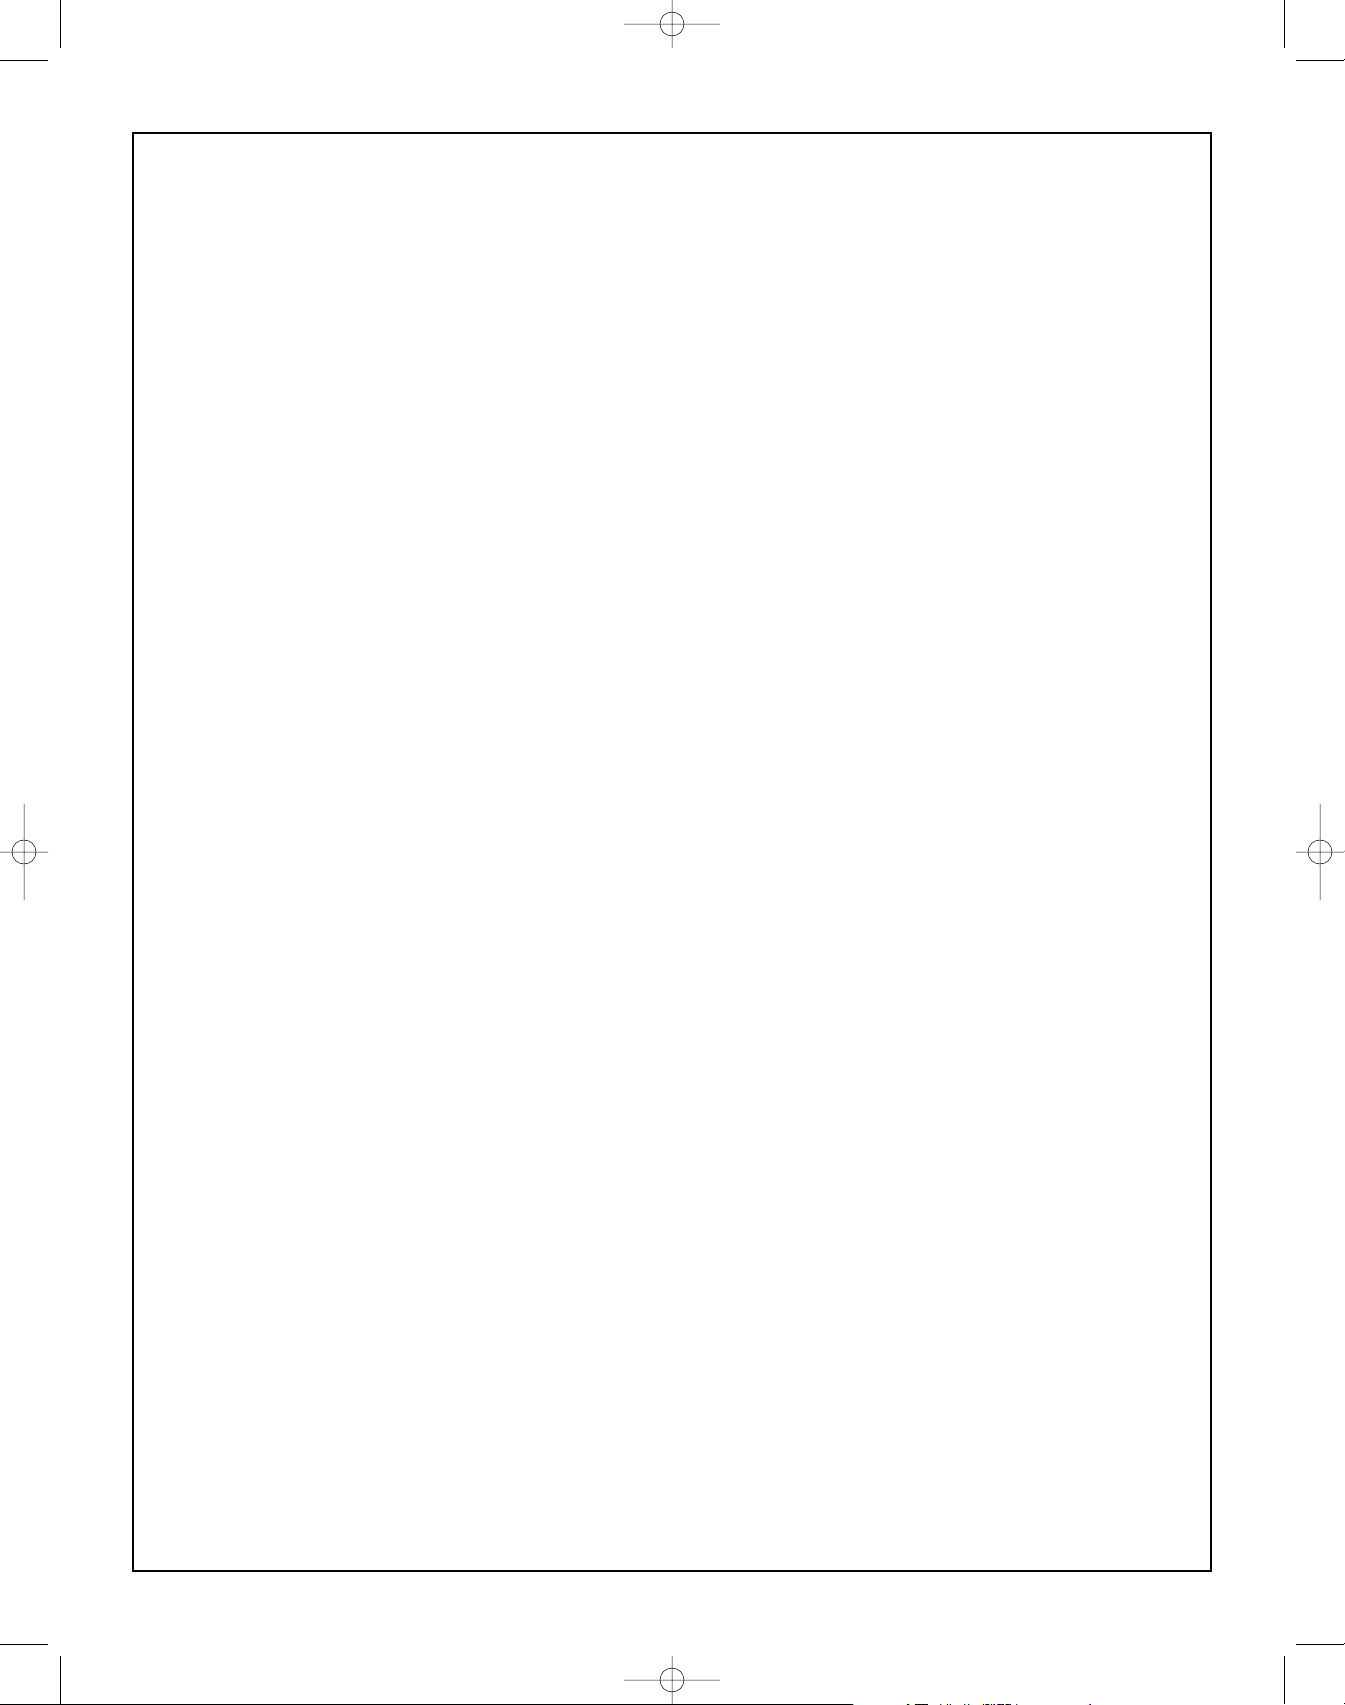
La sierra de contornear motorizada modelo 3335-01 se envía
completa en una caja de cartón.
1. Desempaquetado y comprobación del contenido. Separe todas
las “piezas sueltas” de los materiales de empaquetamiento y
compruebe cada artículo con la “Tabla de piezas sueltas”, para
asegurarse de que no falte ningún artículo antes de desechar
cualquier material de empaquetamiento.
Si falta alguna pieza, no intente utilizar la
sierra de contornear, enchufar el cable de
alimentación o poner el interruptor en la posición de encendido
hasta que las piezas que falten se hayan obtenido y se hayan
instalado correctamente.
Tabla de piezas sueltas
Artículo Descripción Cant.
ASierra de contornear con luz incorporada ........................1
BHoja con pasador extra ....................................................1
CLlave Allen (4 mm) ..........................................................1
DGuía de utilización ............................................................1
NOTA: NO se suministran herrajes para montar esta sierra de
contornear en un banco de trabajo o en un juego de patas.
2. Si lo desea, puede aplicar una capa de cera en pasta a la mesa
para permitir que la pieza de trabajo se deslice fácilmente por la
superficie de la mesa. Limpie completamente la mesa con un
paño limpio y seco.
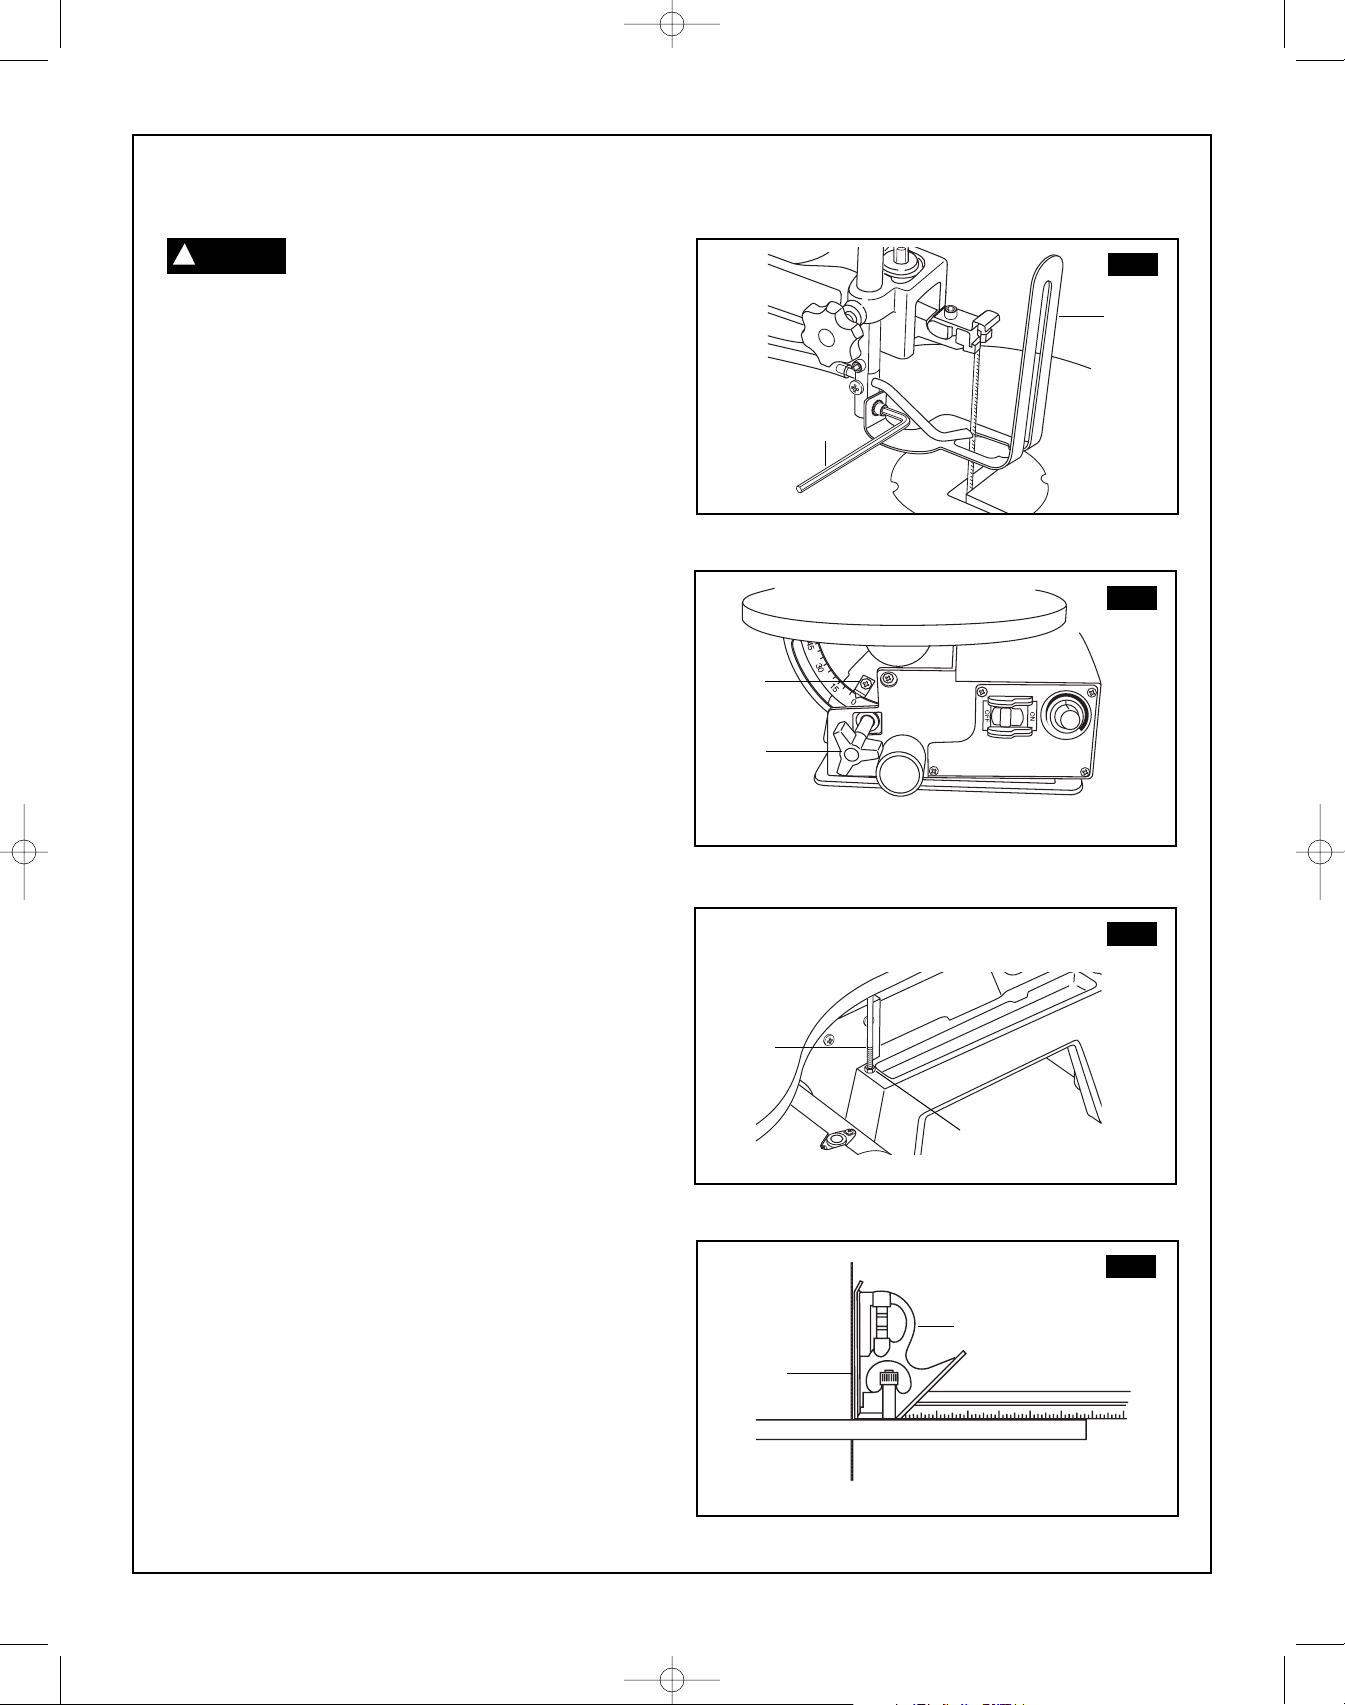
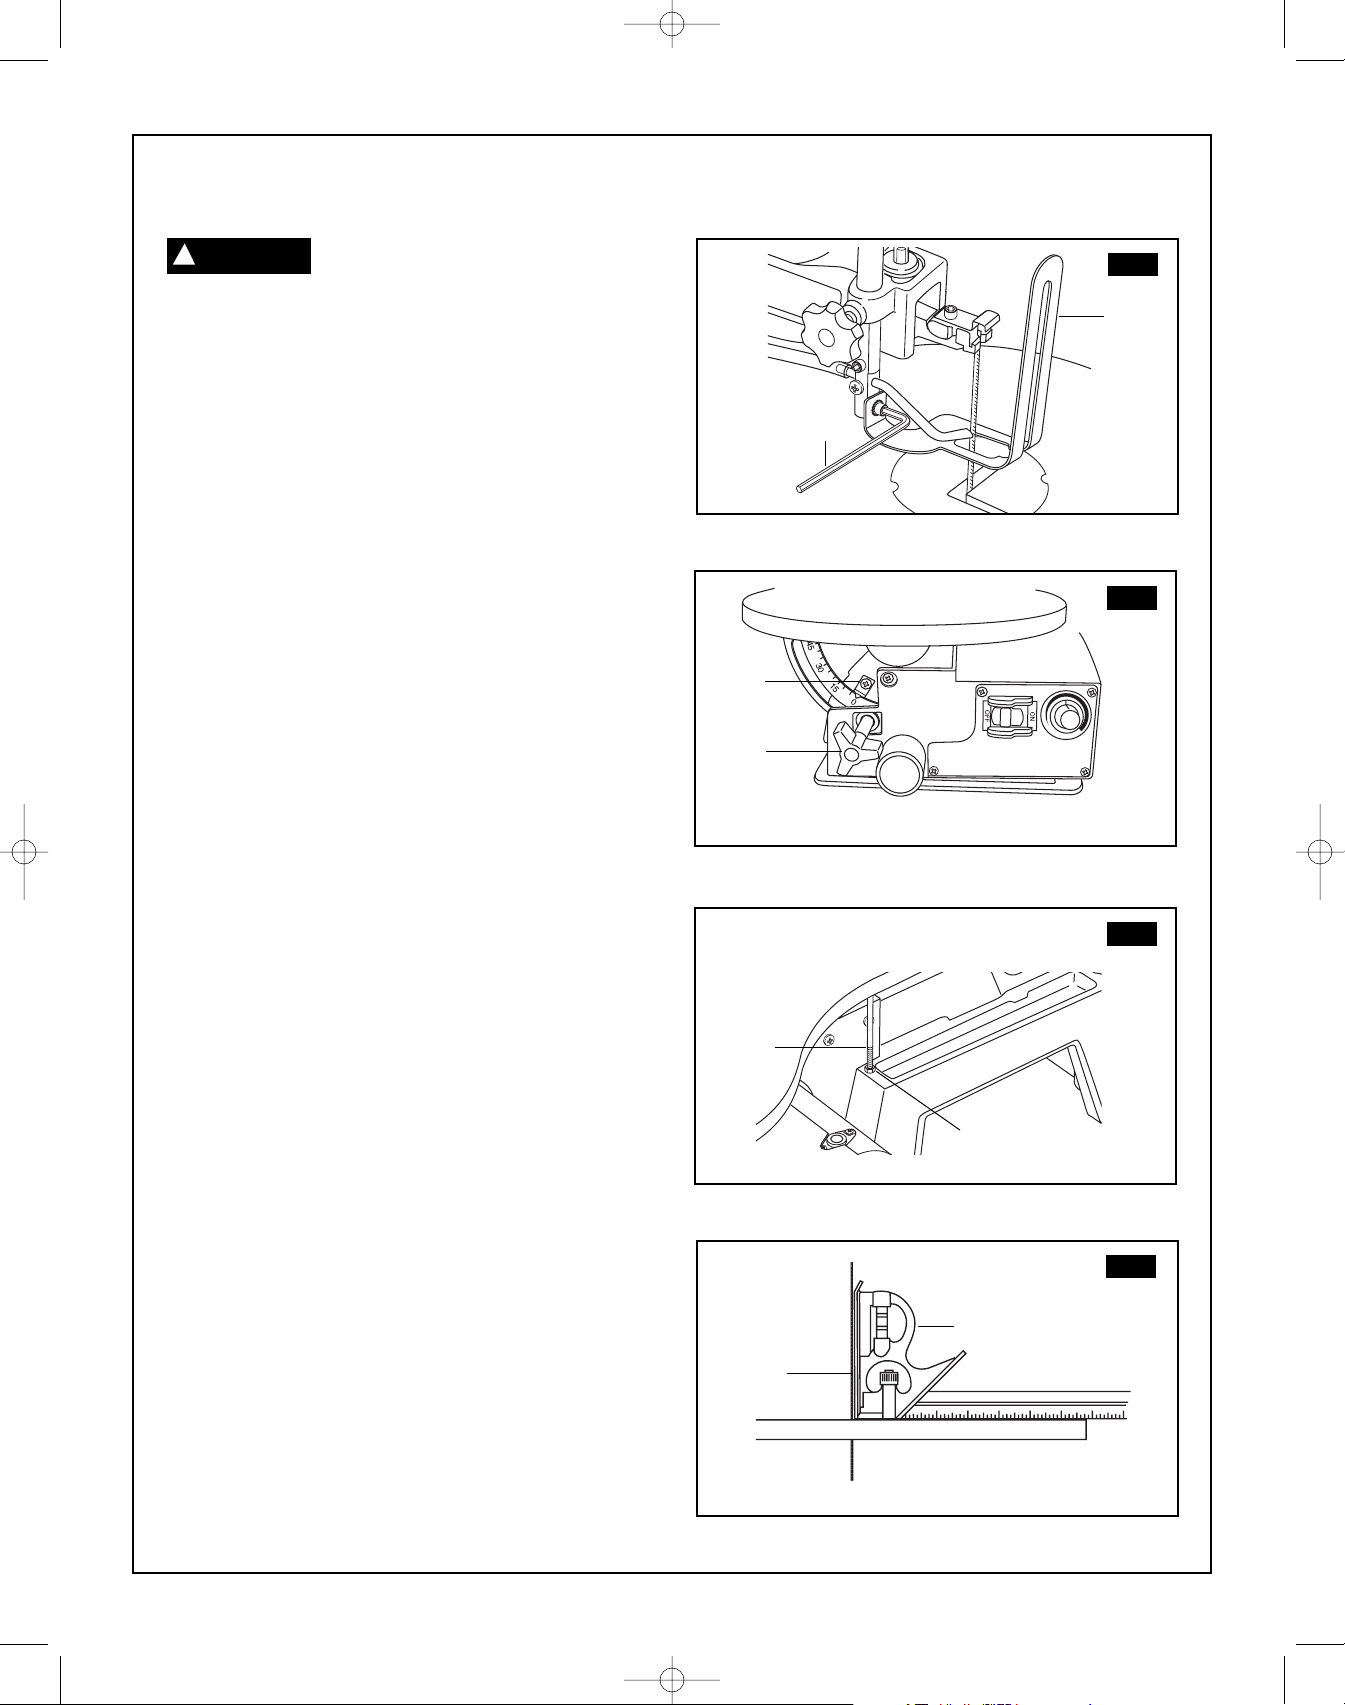
LA ESCUADRA DE COMBINACIÓN DEBE ESTAR ALINEADA
Compruebe su precisión de la manera que se ilustra a continuación.
Desempaquetado y comprobación del contenido
Herramientas necesarias
ADVERTENCIA
!
ADVERTENCIA
!
ESCUADRA DE COMBINACIÓNNO DEBE HABER HOLGURA NI SUPERPOSICIÓN CUANDO SE VOLTEE LA
ESCUADRA SOBRE LA POSICIÓN MARCADA CON UNA LÍNEA DE PUNTOS
TRACE UNA LÍNEA
RECTA EN LA TABLA
ALO LARGO DE
ESTE BORDE
BORDE RECTO DE LA TABLA
DE 3/4 DE PULGADA (19 mm) DE GROSOR:
ESTE BORDE DEBE SER
PERFECTAMENTE RECTO
DESTORNILLADOR PHILLIPS
FIG. 1
A
FIG. 2
B
C
D
SM 2610957121 05-08 6/5/08 7:35 AM Page 40
41.
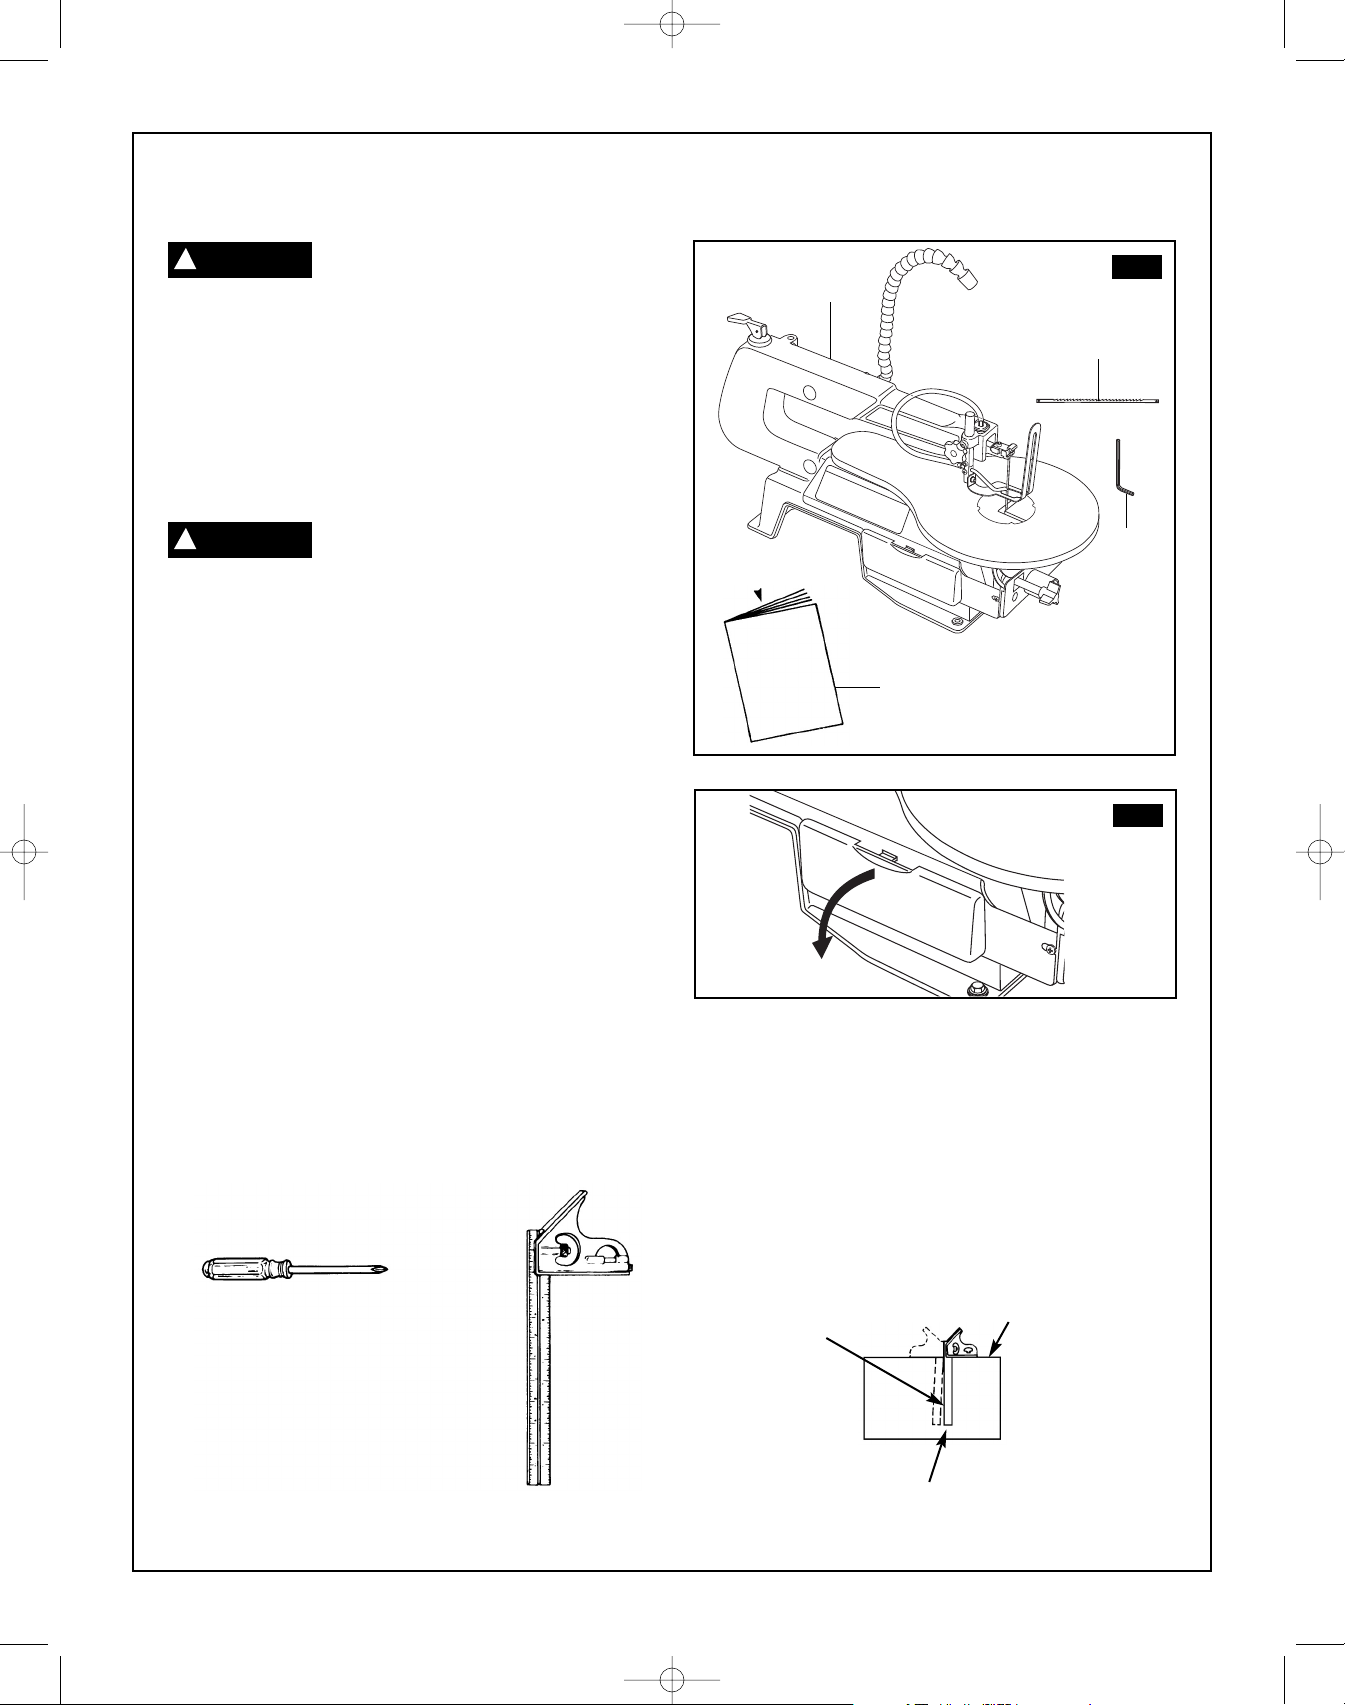
Familiarización con la sierra de contornear
2
1
7
6
4
9
5
3
1
8
10
11
12
13
14
15
16
17
1Cubiertas de cojinete de goma
2Palanca tensora de la hoja
3Luz
4Pomo de fijación del pie del protector de la
hoja
5Soplador de aserrín
6Pie del protector de la hoja
7Mesa
8Portahoja inferior y tornillo
9Pomo de fijación de la mesa/bisel
10 Escala e indicador de ángulo/bisel
11 Base
12 Área de almacenamiento
13 Portahoja superior y tornillo
14 Inserto de la mesa
15 Orificio de recolección de polvo
16 Interruptor de encendido y apagado
17 Dial de control de velocidad
18 Tornillo de ajuste de la mesa
18
SM 2610957121 05-08 6/5/08 7:35 AM Page 41
42.
Ensamblaje y ajustes
Desconecte el enchufe de la fuente de
alimentación antes de hacer cualquier
ensamblaje o ajuste, o cambiar accesorios. Dichas medidas de
seguridad preventivas reducen el riesgo de arrancar la
herramienta accidentalmente.
Instrucciones de ensamblaje
No se requiere ensamblaje. Antes de hacer ajustes, puede que
quiera montar la sierra de contornear en una superficie estable.
Consulte “Montaje de la sierra en un banco de trabajo”.
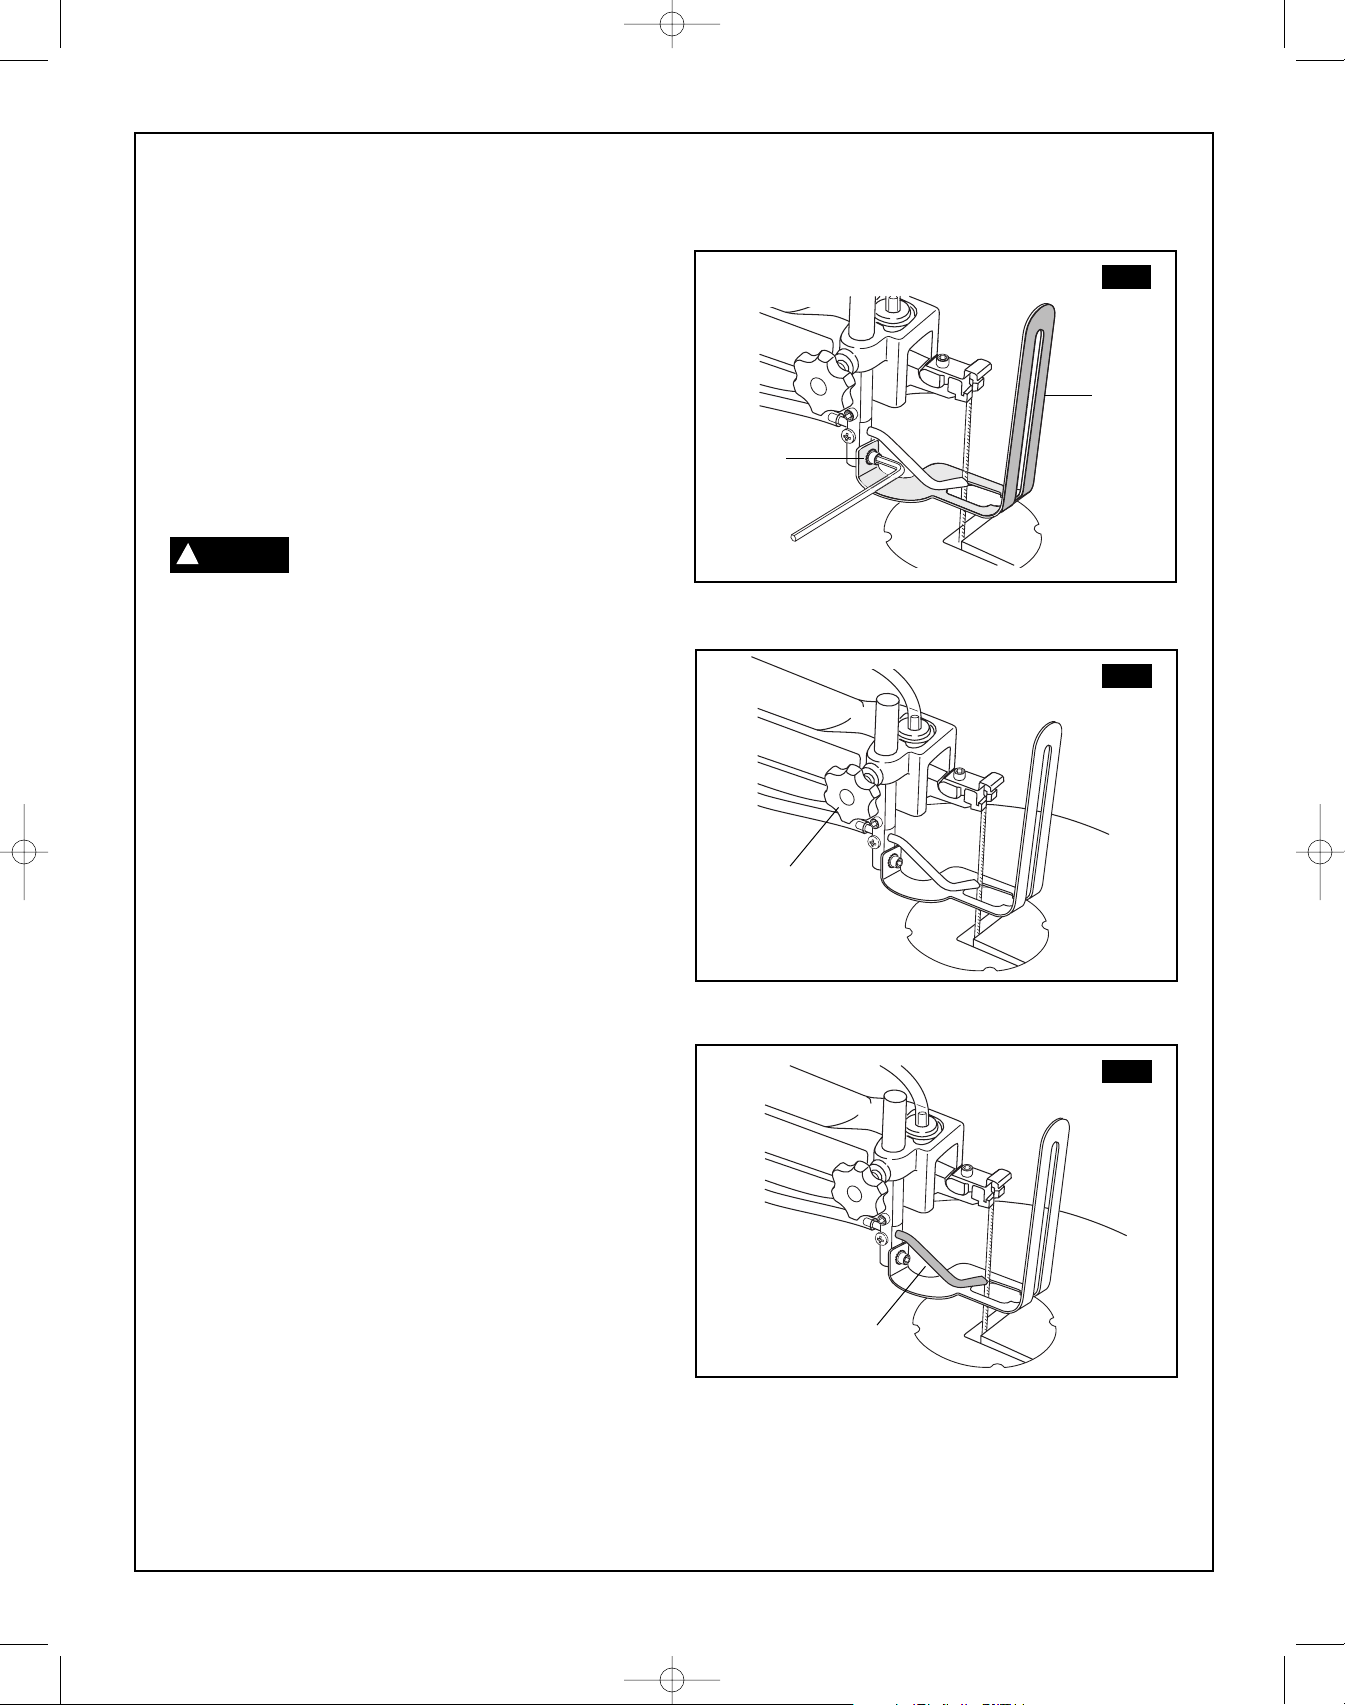
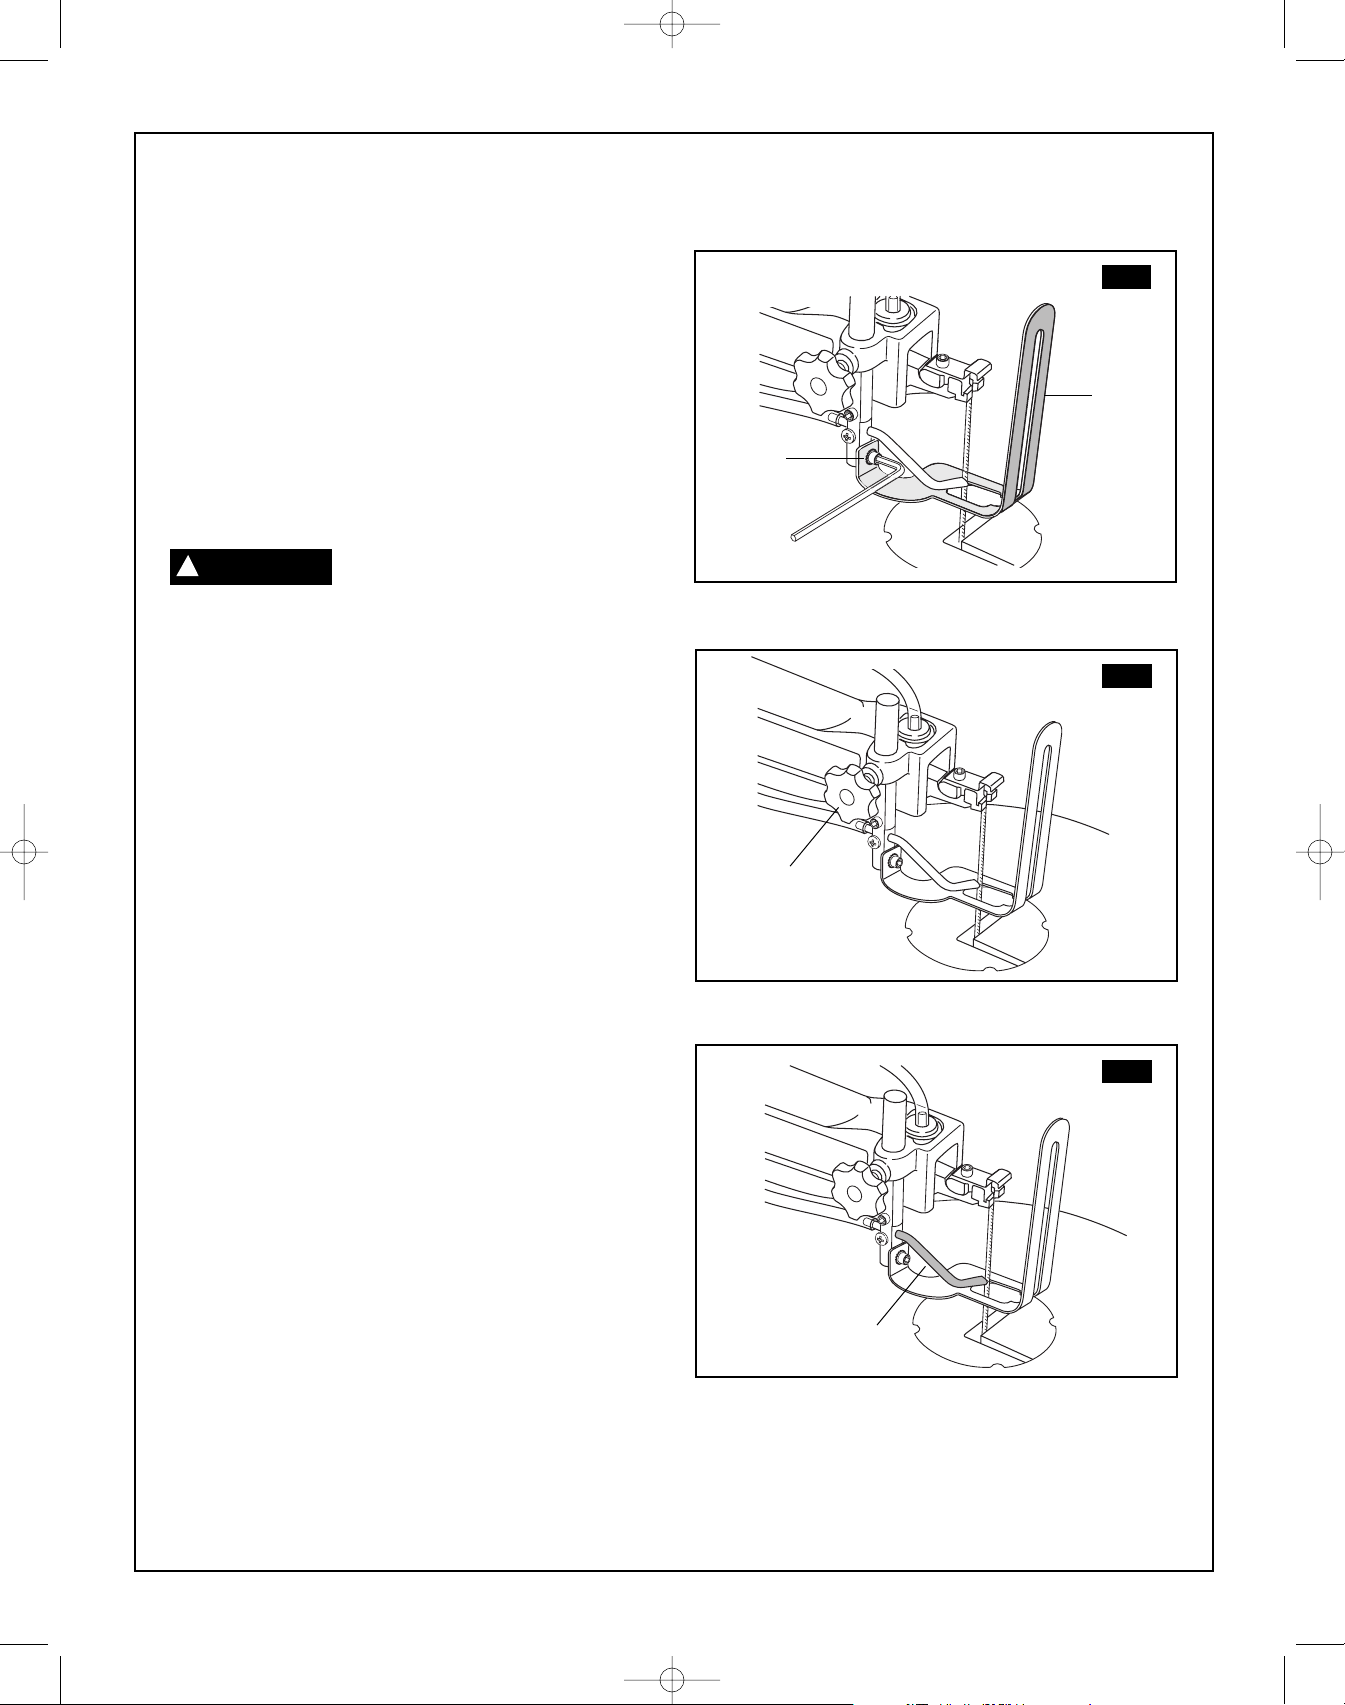
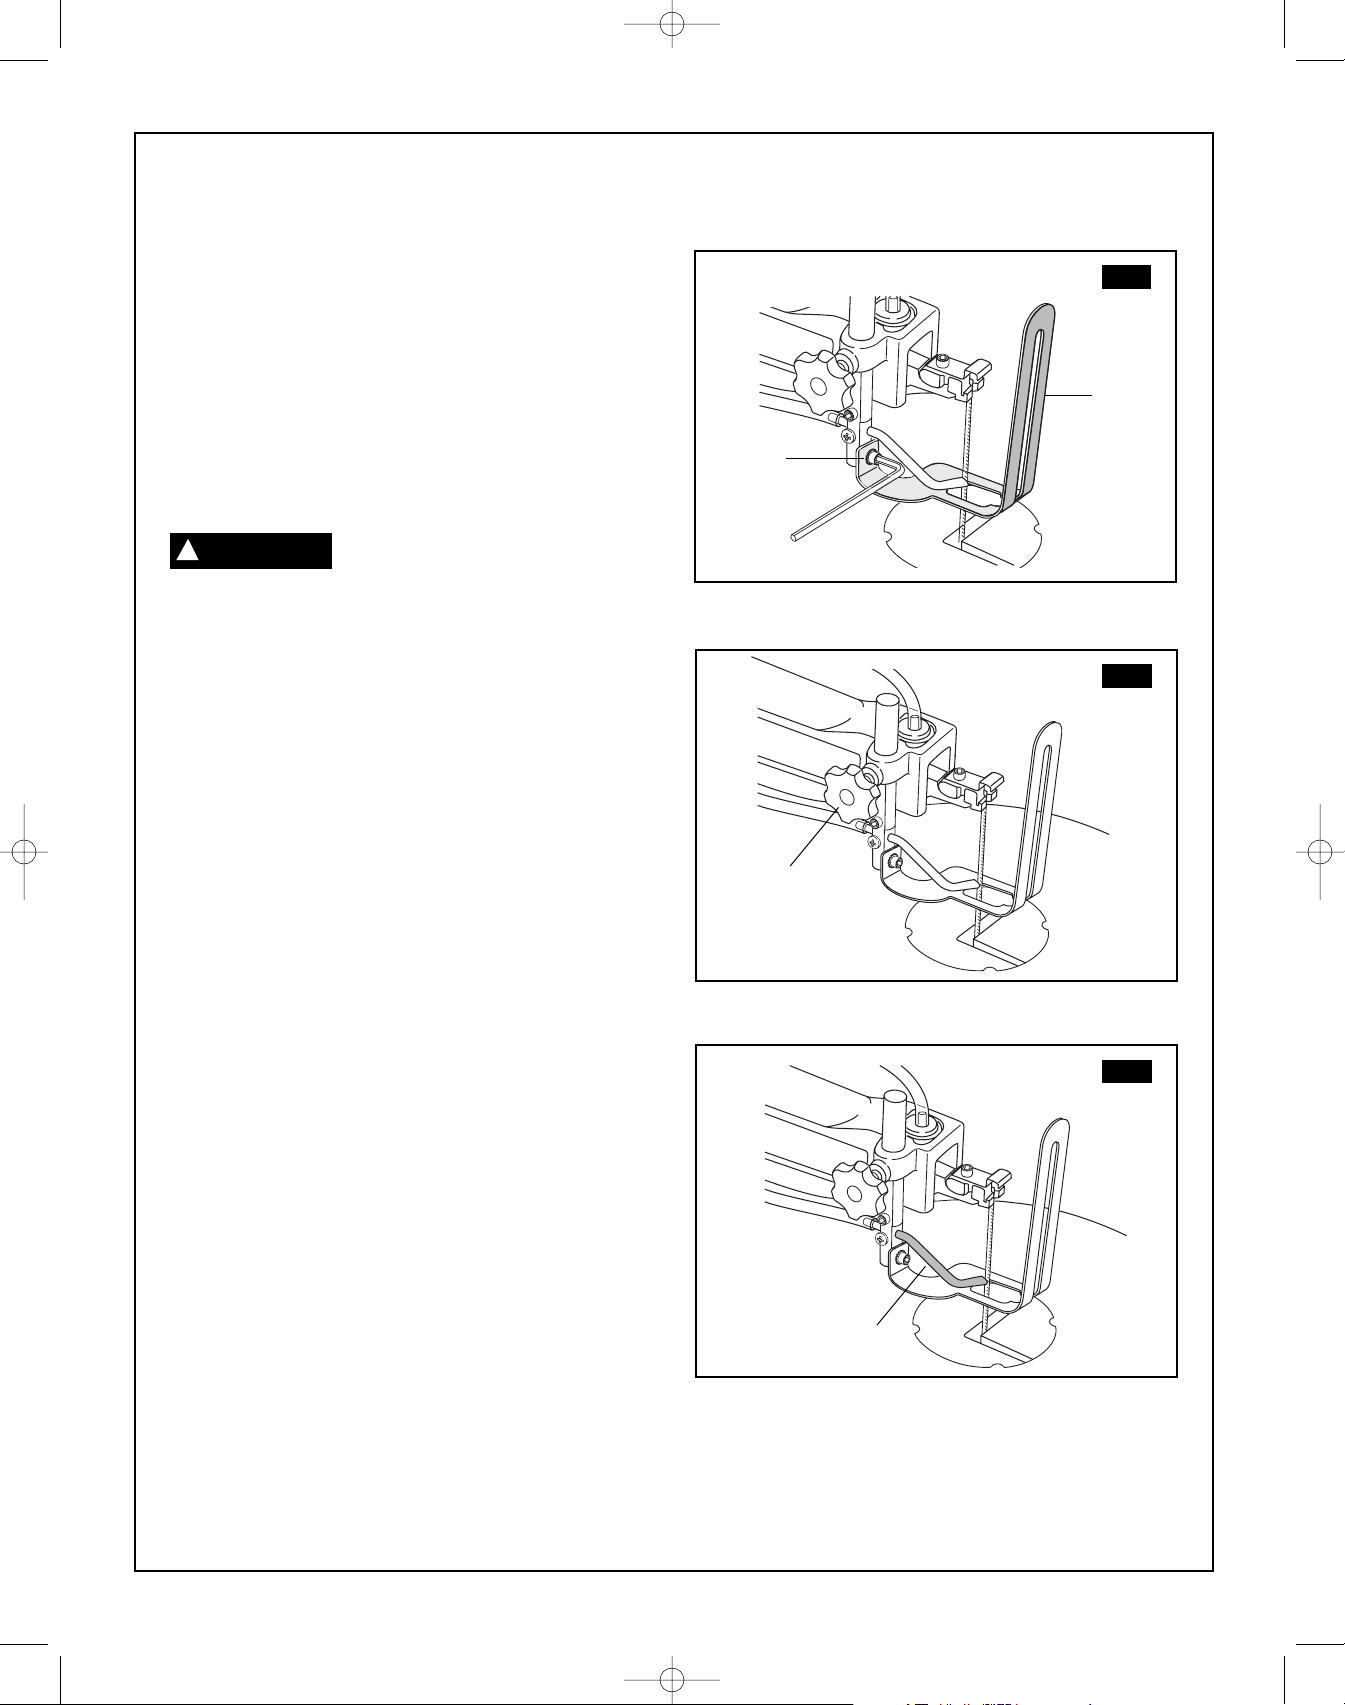
Alinee el indicador de bisel
(Fig. 3-6)
El indicador de bisel se ha ajustado en la fábrica. Se debe
comprobar de nuevo antes de utilizarlo, para asegurarse de que el
funcionamiento sea óptimo.
1. Retire el pie del protector de la hoja (1) utilizando la llave
hexagonal (2) para aflojar el tornillo.
2. Afloje el pomo de fijación de bisel de la mesa (3) ymueva la
mesa hasta que esté aproximadamente en ángulo recto con la
hoja.
3. Afloje la tuerca de fijación (5) ubicada en el tornillo de ajuste de
la mesa (6), situado debajo de la mesa, girándola en sentido
contrario al de las agujas del reloj. Baje el tornillo de ajuste de
la mesa girándolo en el sentido de las agujas del reloj.
4. Utilice una escuadra de combinación (7) para ajustar la mesa
exactamente a 90°respecto a la hoja (8).Si hay espacio entre
la escuadra y la hoja, ajuste el ángulo de la mesa hasta que se
elimine el espacio libre.
5. Bloquee el pomo de fijación de bisel de la mesa ubicado debajo
de la mesa (3) para impedir el movimiento.
6. Apriete el tornillo de ajuste ubicado debajo de la mesa hasta que
la punta del tornillo toque la mesa. Apriete la tuerca de fijación.
7. Afloje el tornillo (4) que sujeta el indicador de la escala de bisel
yposicione el indicador a 0°. Apriete el tornillo.
8. Instale el pie del protector de la hoja (1) utilizando la llave
hexagonal (2),de manera que el pie descanse en posición plana
contra la mesa. Apriete el tornillo.
Nota: Evite dejar el borde de la mesa contra la parte de arriba del
motor, ya que esto podría causar ruido cuando la sierra esté
funcionando.
FIG. 3
2
FIG. 4
1
2
FIG. 5
FIG. 6
1
4
3
6
5
7
8
ADVERTENCIA
!
SM 2610957121 05-08 6/5/08 7:35 AM Page 42
43.
Ensamblaje y ajustes
Montaje de la sierra en un banco de trabajo
Antes de utilizar la sierra, se debe montar firmemente en un banco
de trabajo u otro armazón rígido.
Utilice la base de la sierra para marcar y pretaladrar los agujeros
de montaje. Si la sierra se va a utilizar en una sola ubicación,
sujétela permanentemente a la superficie de trabajo, utilizando
tornillos para madera si se va a montar en madera. Use pernos,
arandelas y tuercas si la sierra se va a montar en metal.
Para reducir el ruido y las vibraciones, instale una almohadilla de
espuma blanda (no suministrada) entre la sierra de contornear y
el banco de trabajo.
Para reducir el riesgo de lesiones:
•Cuando transporte la sierra, sosténgala cerca del cuerpo para
evitar lesiones en la espalda. Doble las rodillas cuando levante
la sierra.
•Transporte la sierra por la base. No la transporte por el cable de
alimentación.
•Sujete firmemente la sierra en una posición en la que la gente
no se pueda parar, sentar o caminar detrás de ella. Los
residuos lanzados por la sierra podrían lastimar a las personas
que estén de pie, sentadas o caminando detrás de ella.
•Sujete firmemente la sierra sobre una superficie firme y
nivelada en la que no pueda oscilar y haya espacio adecuado
para manejar y soportar apropiadamente la pieza de trabajo.
Ajuste del pie del protector de la hoja (Fig. 7 y 8)
Cuando realice cortes en ángulo, el pie del protector de la hoja se
debe ajustar de manera que esté paralelo a la mesa y descanse en
posición plana sobre la pieza de trabajo.
1.Para ajustar el pie del protector de la hoja, afloje el tornillo(2),
incline el pie(1)de manera que esté paralelo a la mesa y apriete
el tornillo.
2.Afloje el pomo de ajuste de la altura(3)para subir o bajar el pie
hasta que descanse justo en la parte de arriba de la pieza de
trabajo. Apriete el pomo.
No se requiere ensamblaje. Antes de realizar ajustes, puede que
quiera montar la sierra de contornear en una superficie estable.
Consulte “Montaje de la sierra en un banco de trabajo”.
Ajuste del soplador de polvo (Fig. 9)
Para obtener los mejores resultados, el tubo del soplador de polvo
(4)se debe ajustar para dirigir el aire tanto hacia la hoja como
hacia la pieza de trabajo.
FIG. 7
1
1
FIG. 8
3
FIG. 9
4
2
ADVERTENCIA
!
SM 2610957121 05-08 6/5/08 7:35 AM Page 43
44.
Ensamblaje y ajustes
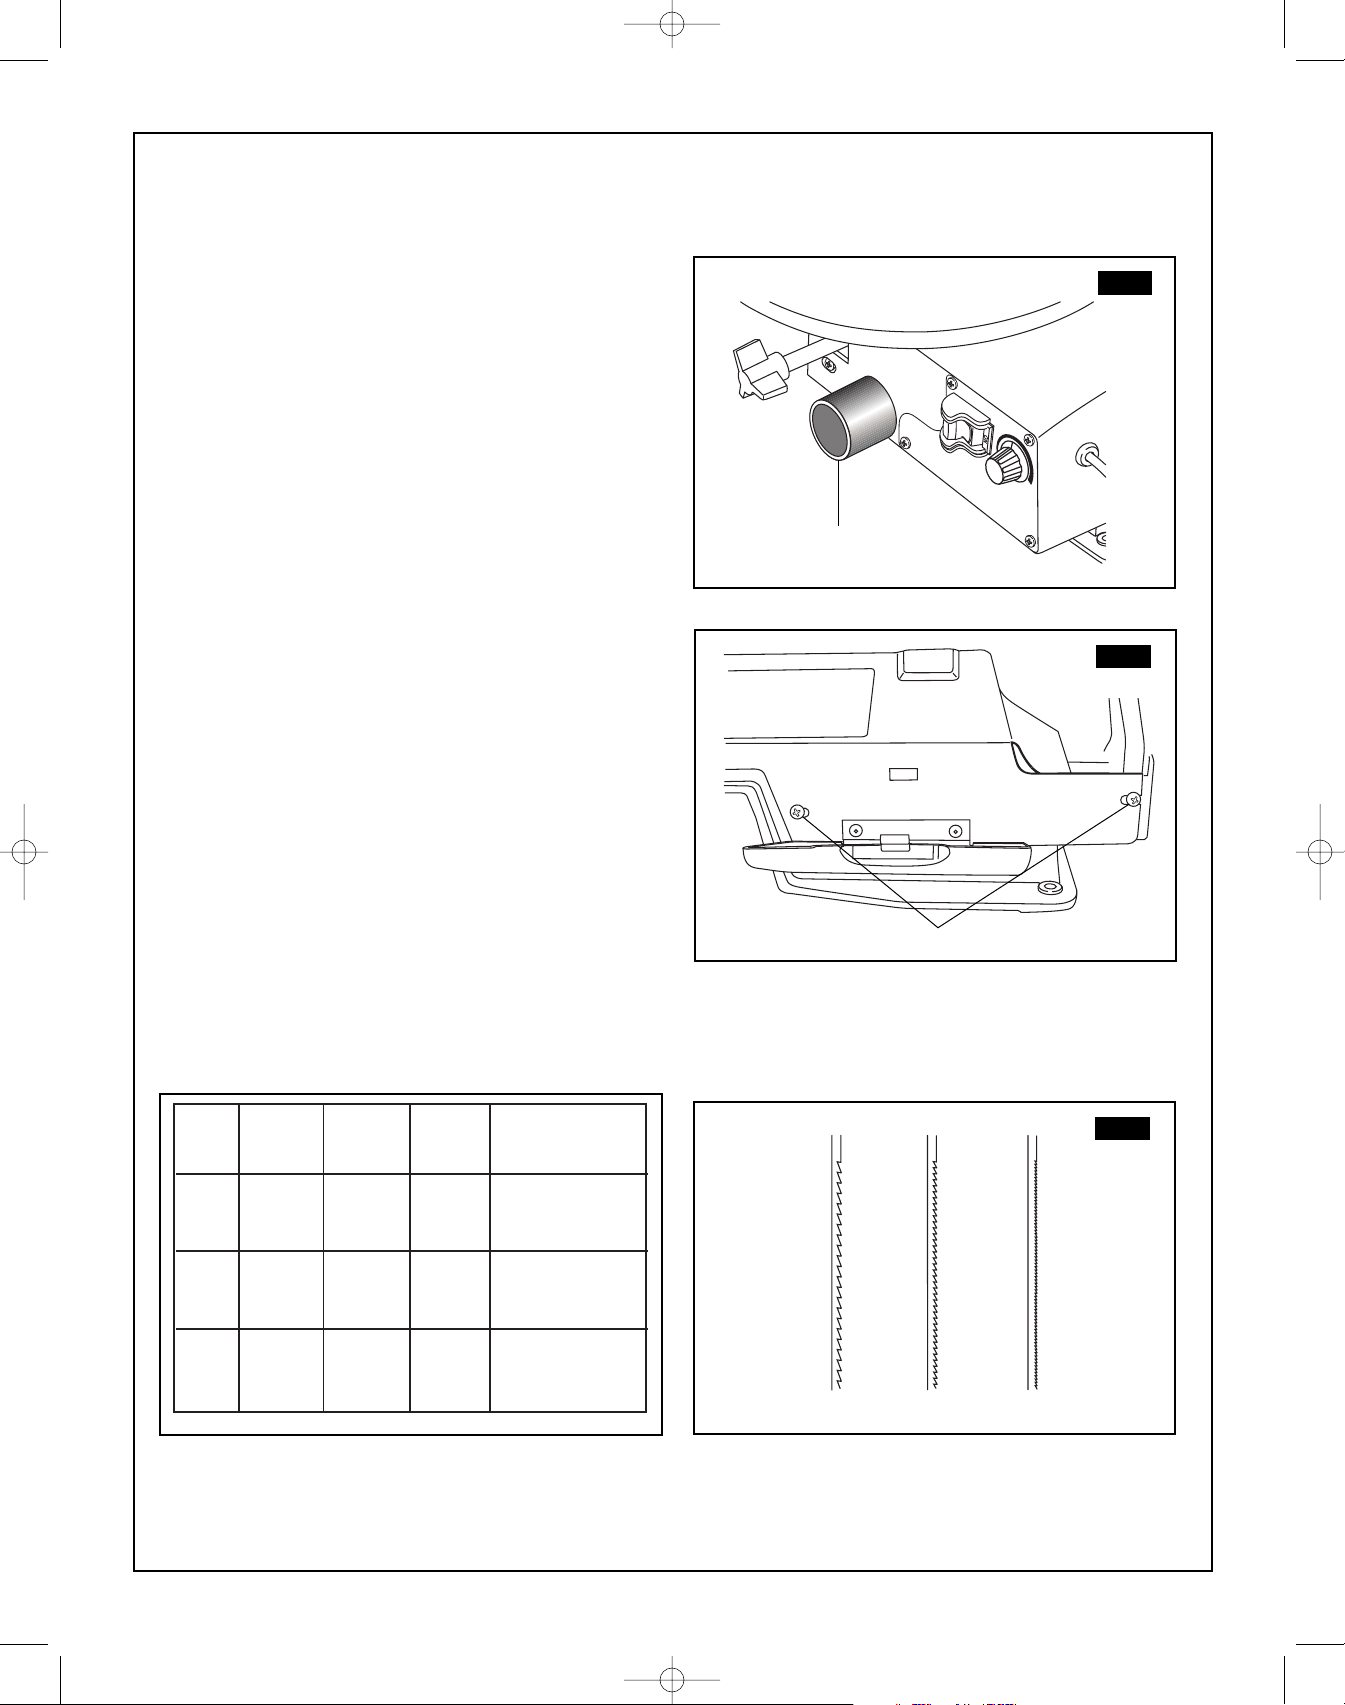
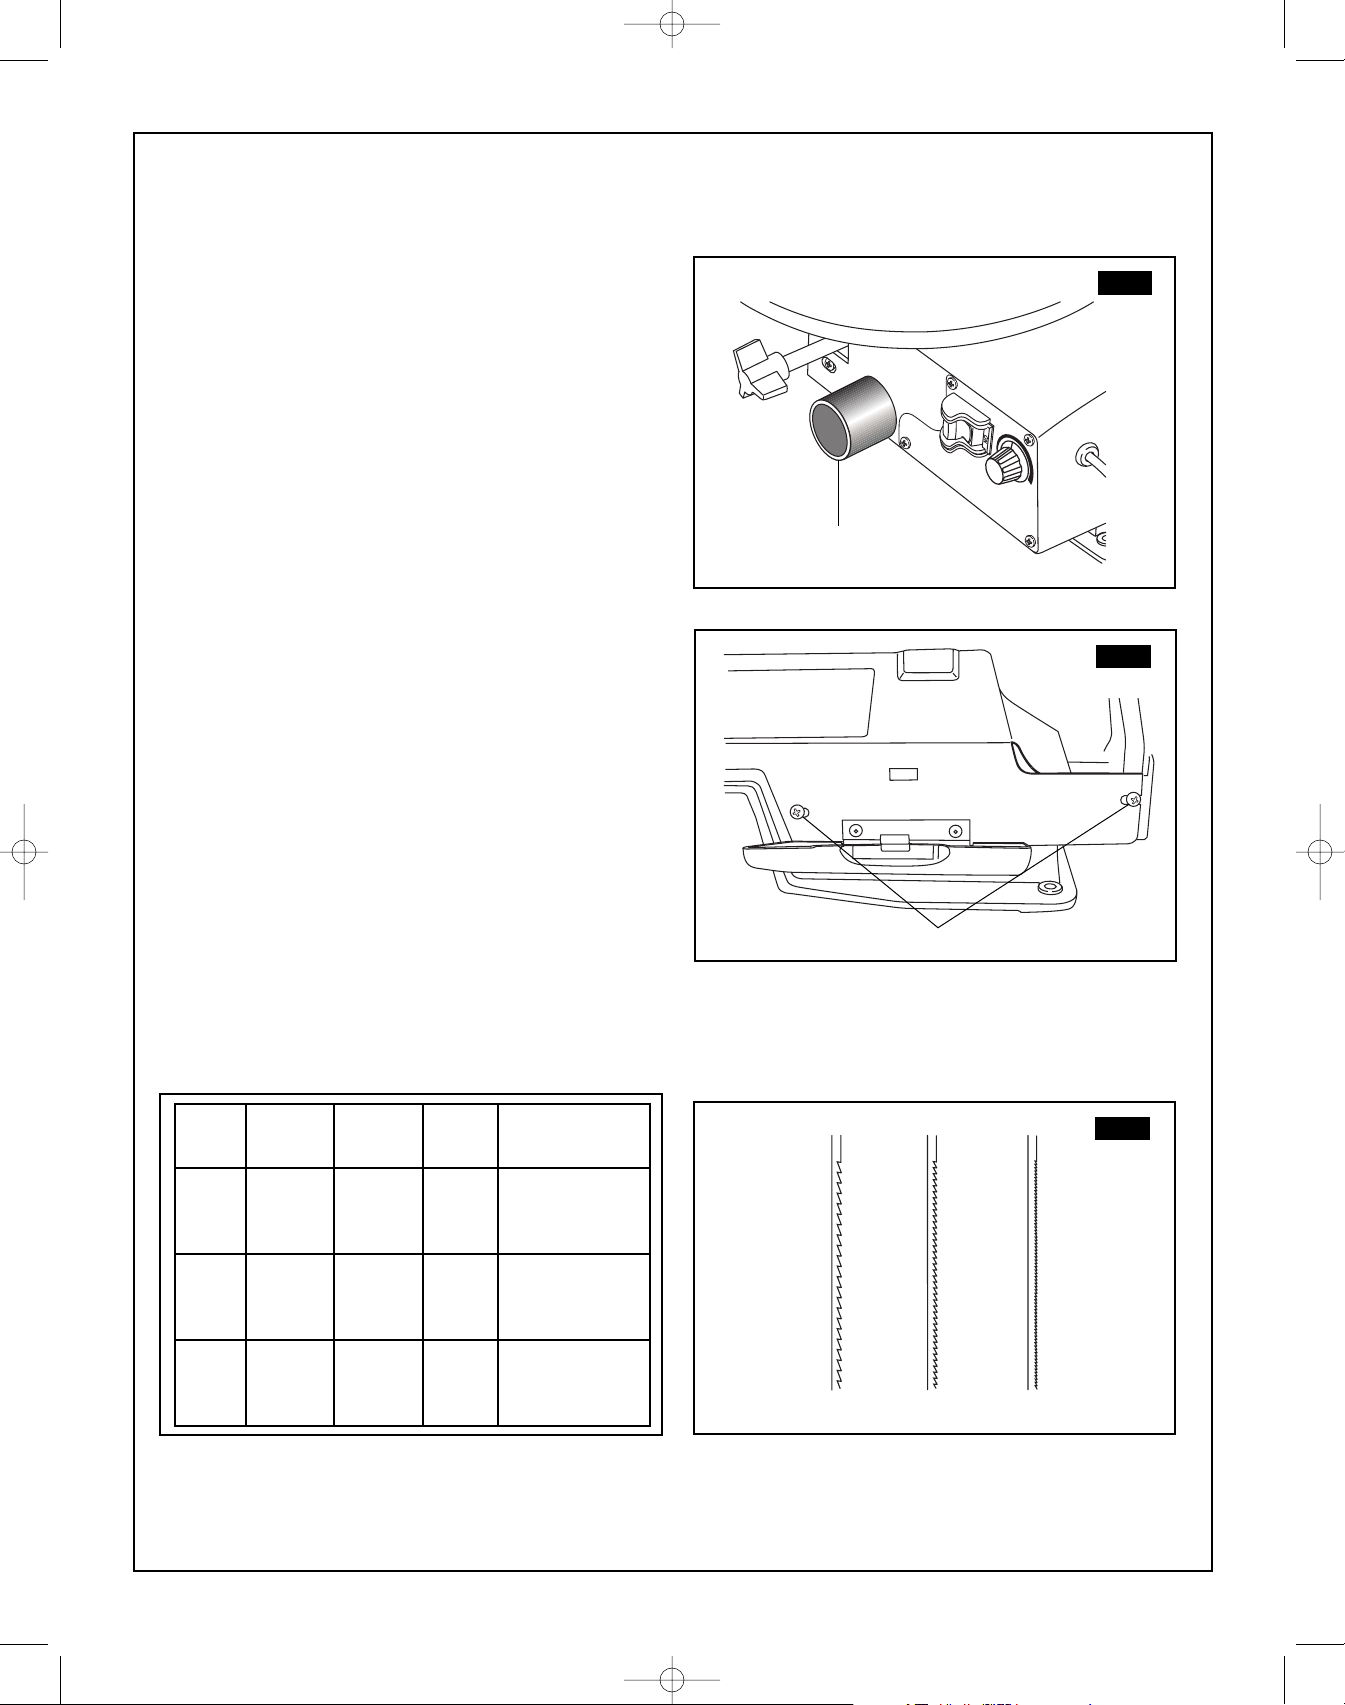
Orificio de recolección de polvo (Fig. 10 y 11)
Esta sierra de contornear permite que se conecte una manguera
oun accesorio de aspiración (no suministrados) al conducto para
polvo (1).
Sise produce una acumulación excesiva de aserrín dentro de la
base, use una aspiradora para desechos mojados y secos o saque
manualmente el aserrín retirando los tornillos (2) yla placa
metálica del lado izquierdo de la sierra. Reinstale la placa metálica
ylos tornillos antes de arrancar la sierra. Esto hará que la sierra
corte eficientemente en todo momento.
Selección de la hoja (Fig. 12)
Esta sierra de contornear acepta hojas de cinco pulgadas de
longitud tanto de extremo con pasador como de extremo liso, con
una amplia variedad de grosores y anchos de hoja. El tipo de
material y las complejidades de las operaciones de corte deter-
minarán el número de dientes por pulgada. Seleccione siempre
las hojas más estrechas para realizar cortes de curvas
complicadas (radios cerrados y curvas cerradas) y las hojas más
anchas para realizar operaciones de corte recto y de curvas
grandes. La siguiente tabla representa sugerencias para diversos
metales. Cuando compre hojas, consulte la parte de atrás del
paquete para informarse sobre el mejor uso de las hojas en
diversos materiales. Use esta tabla como ejemplo, pero la práctica
ysu propia preferencia personal serán el mejor método de
selección.
Cuando escoja una hoja, use hojas estrechas muy finas para
hacer cortes de contorneo en madera de 1/4 de pulgada de grosor
omenos.
Utilice hojas más anchas para materiales más gruesos, pero esto
reducirá la capacidad para cortar curvas cerradas.
Nota: Las hojas más delgadas tendrán más posibilidades de
desviarse cuando se corten ángulos que no sean perpendiculares
ala mesa.
FIG. 10
1
2
FIG. 11
10 - 1515 - 2830 - 48
FIG. 12
Dientes/
pulgada
DPP
Anchura
de la hoja
en pulgadas
Grosor
de la hoja
en pulgadas
CPM
de la hojaMaterial cortado
10-150,1100,018500-1 200
Curvas medianas en
madera, metal blando y
madera dura de 1/4 de
pulgada a 1-3/4 pulgadas
15-280,055-0,1100,010-0,018800-1 700
Curvas pequeñas en
madera, metal blando y
madera dura de 1/8 de
pulgada a 1-1/2 pulgadas
30-480,024-0,0410,012-0,019VaríanMetales no ferrosos y
maderas duras usando
velocidades muy lentas
SM 2610957121 05-08 6/5/08 7:35 AM Page 44
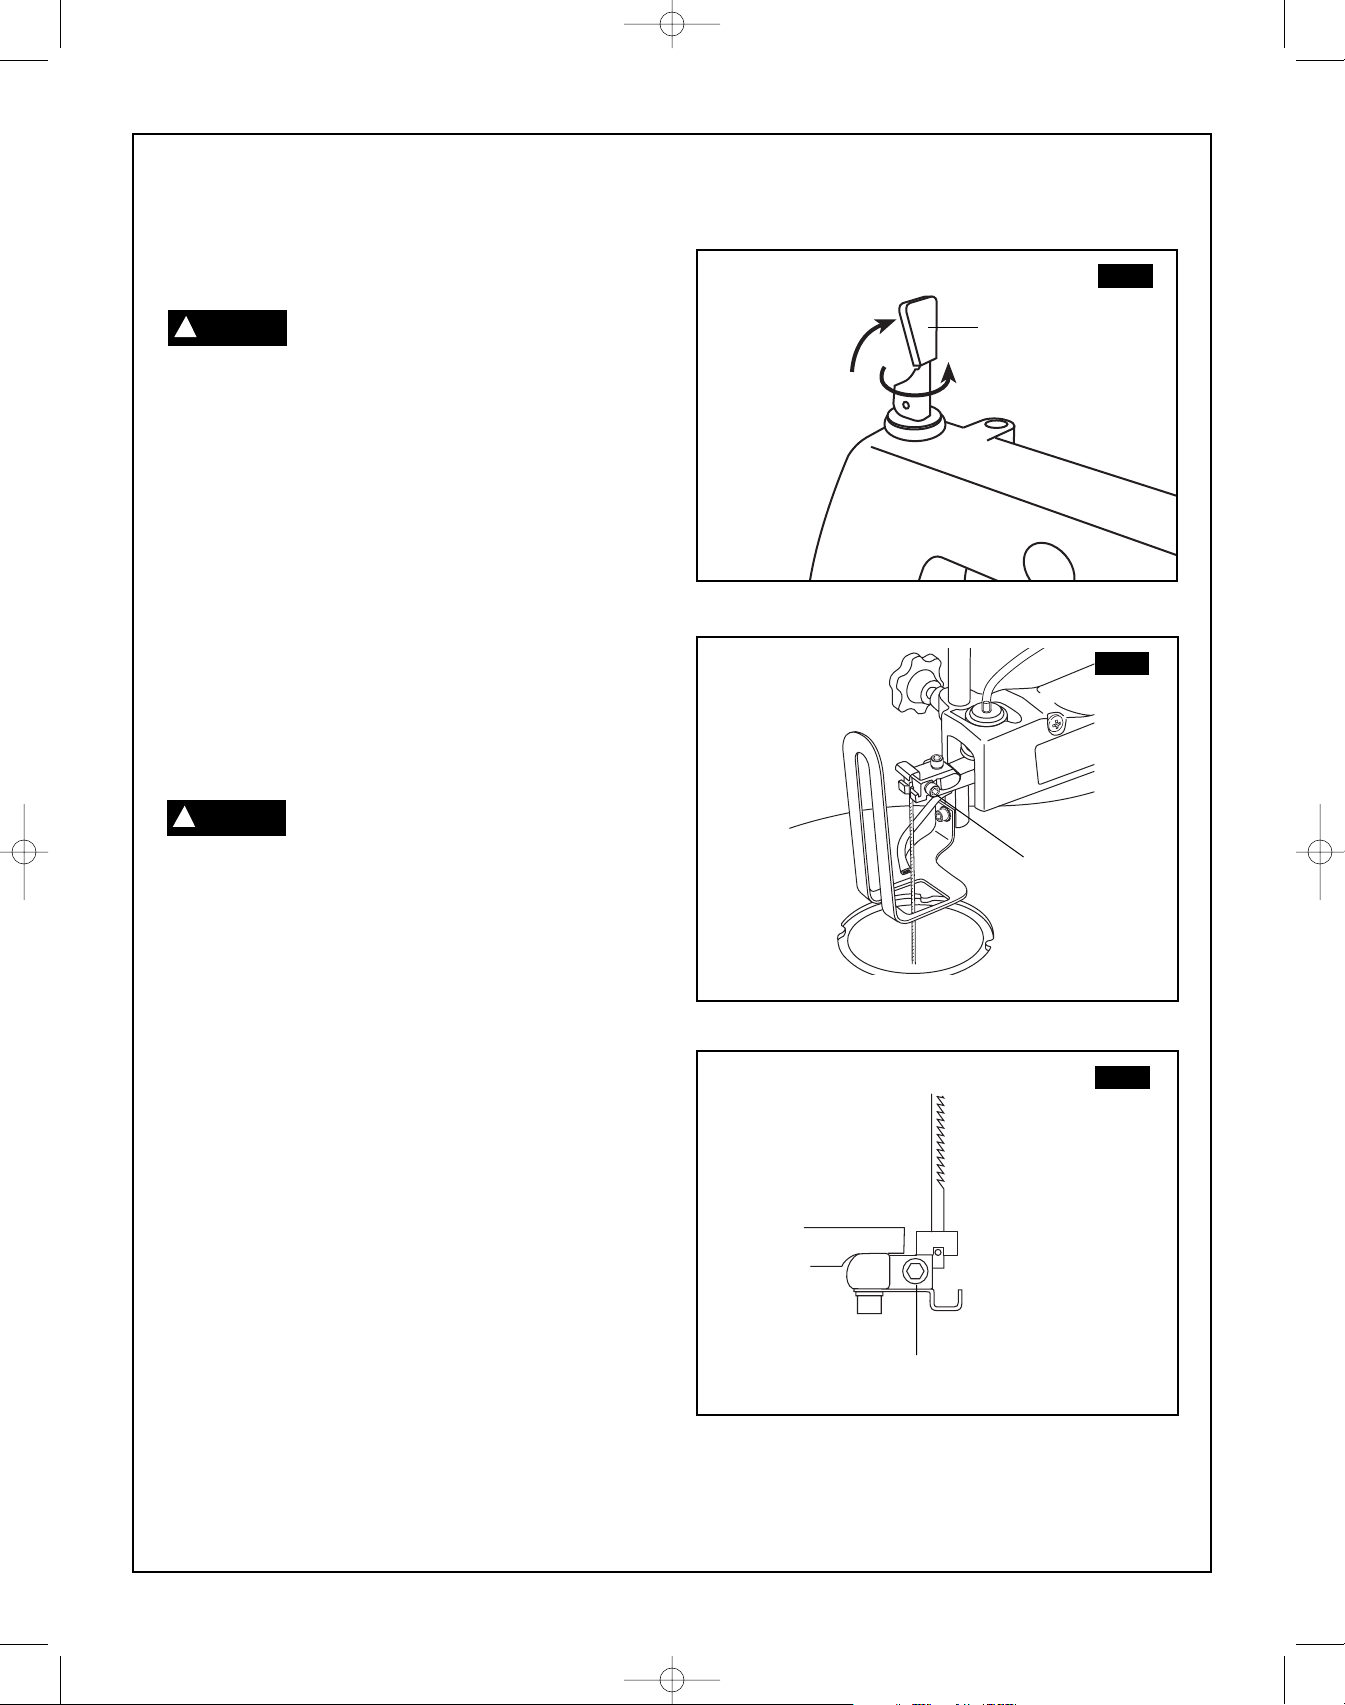
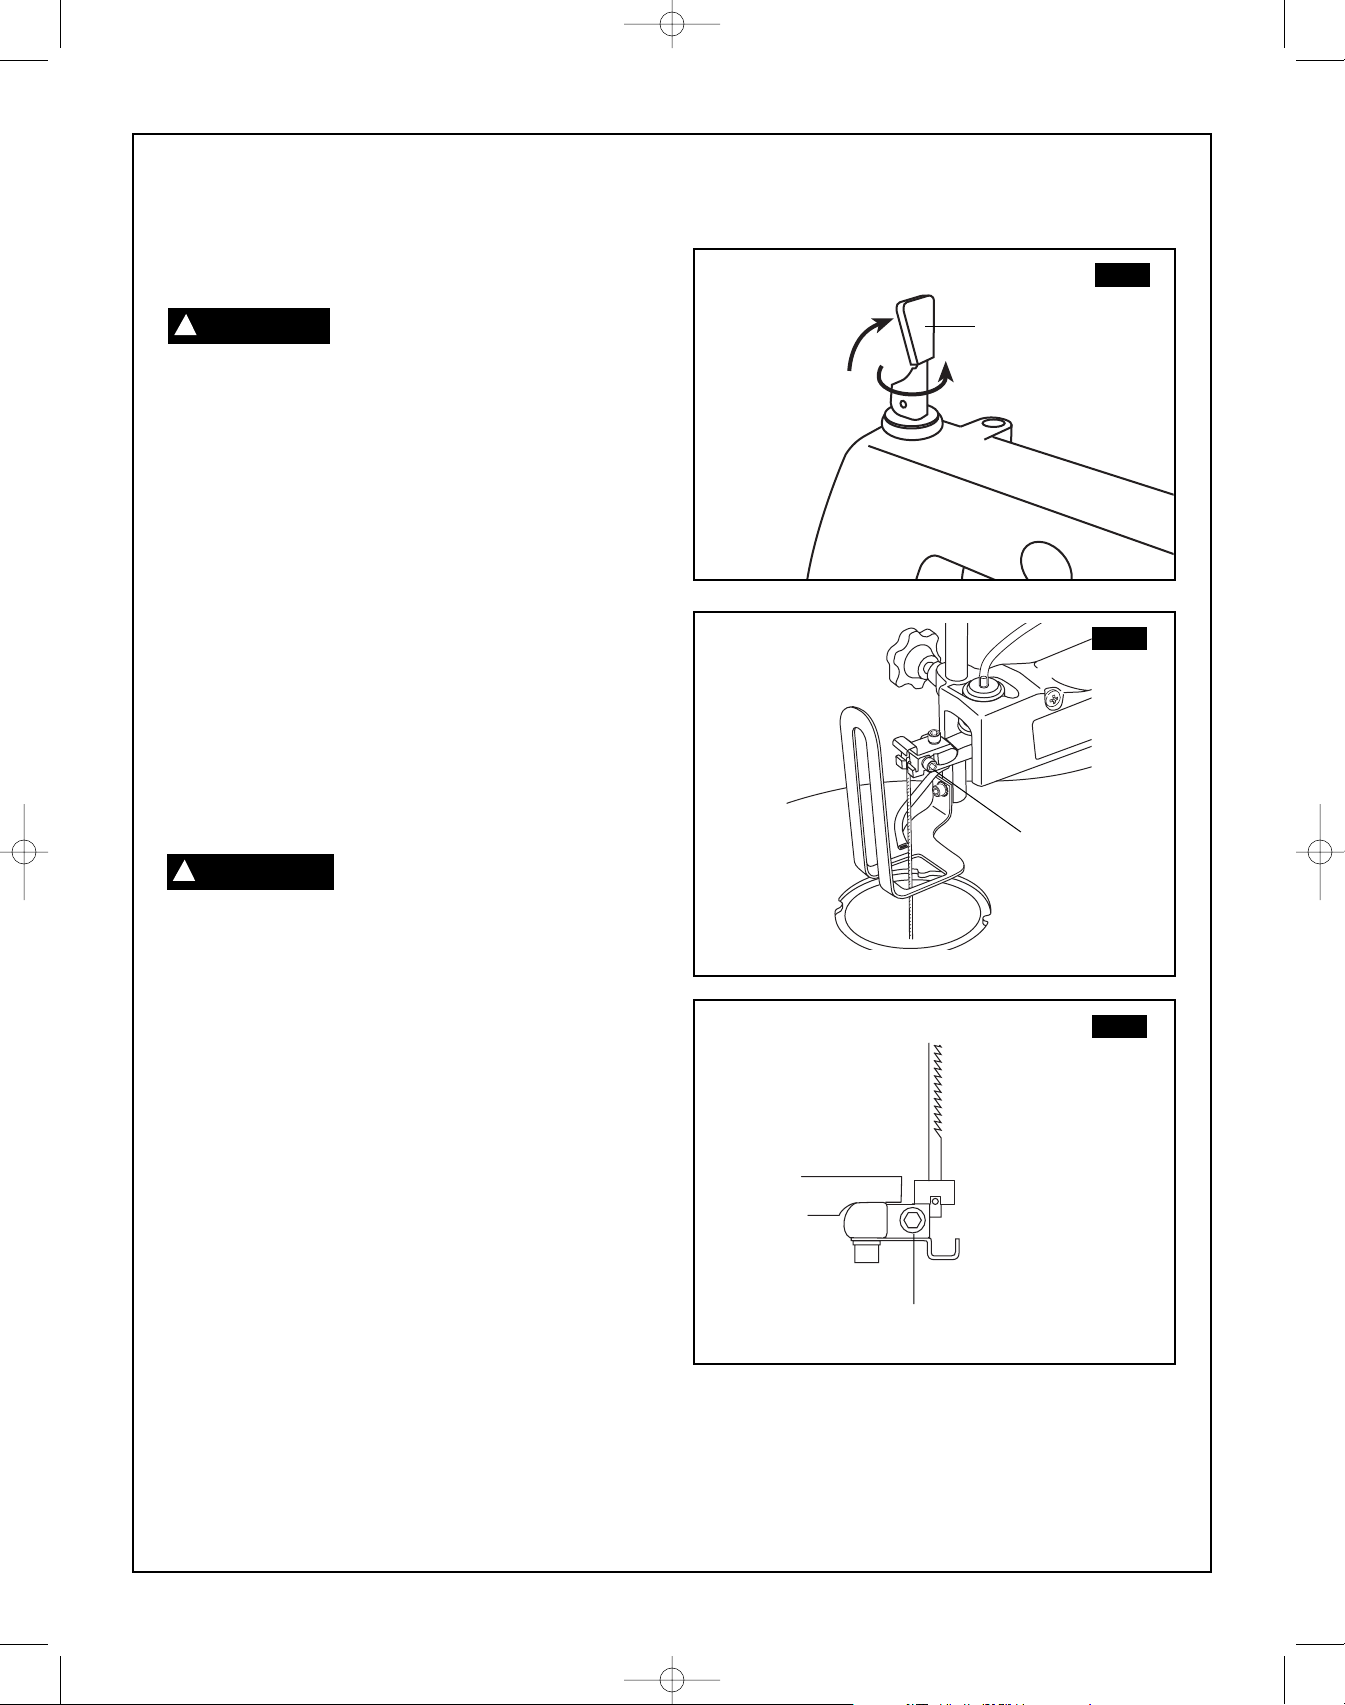
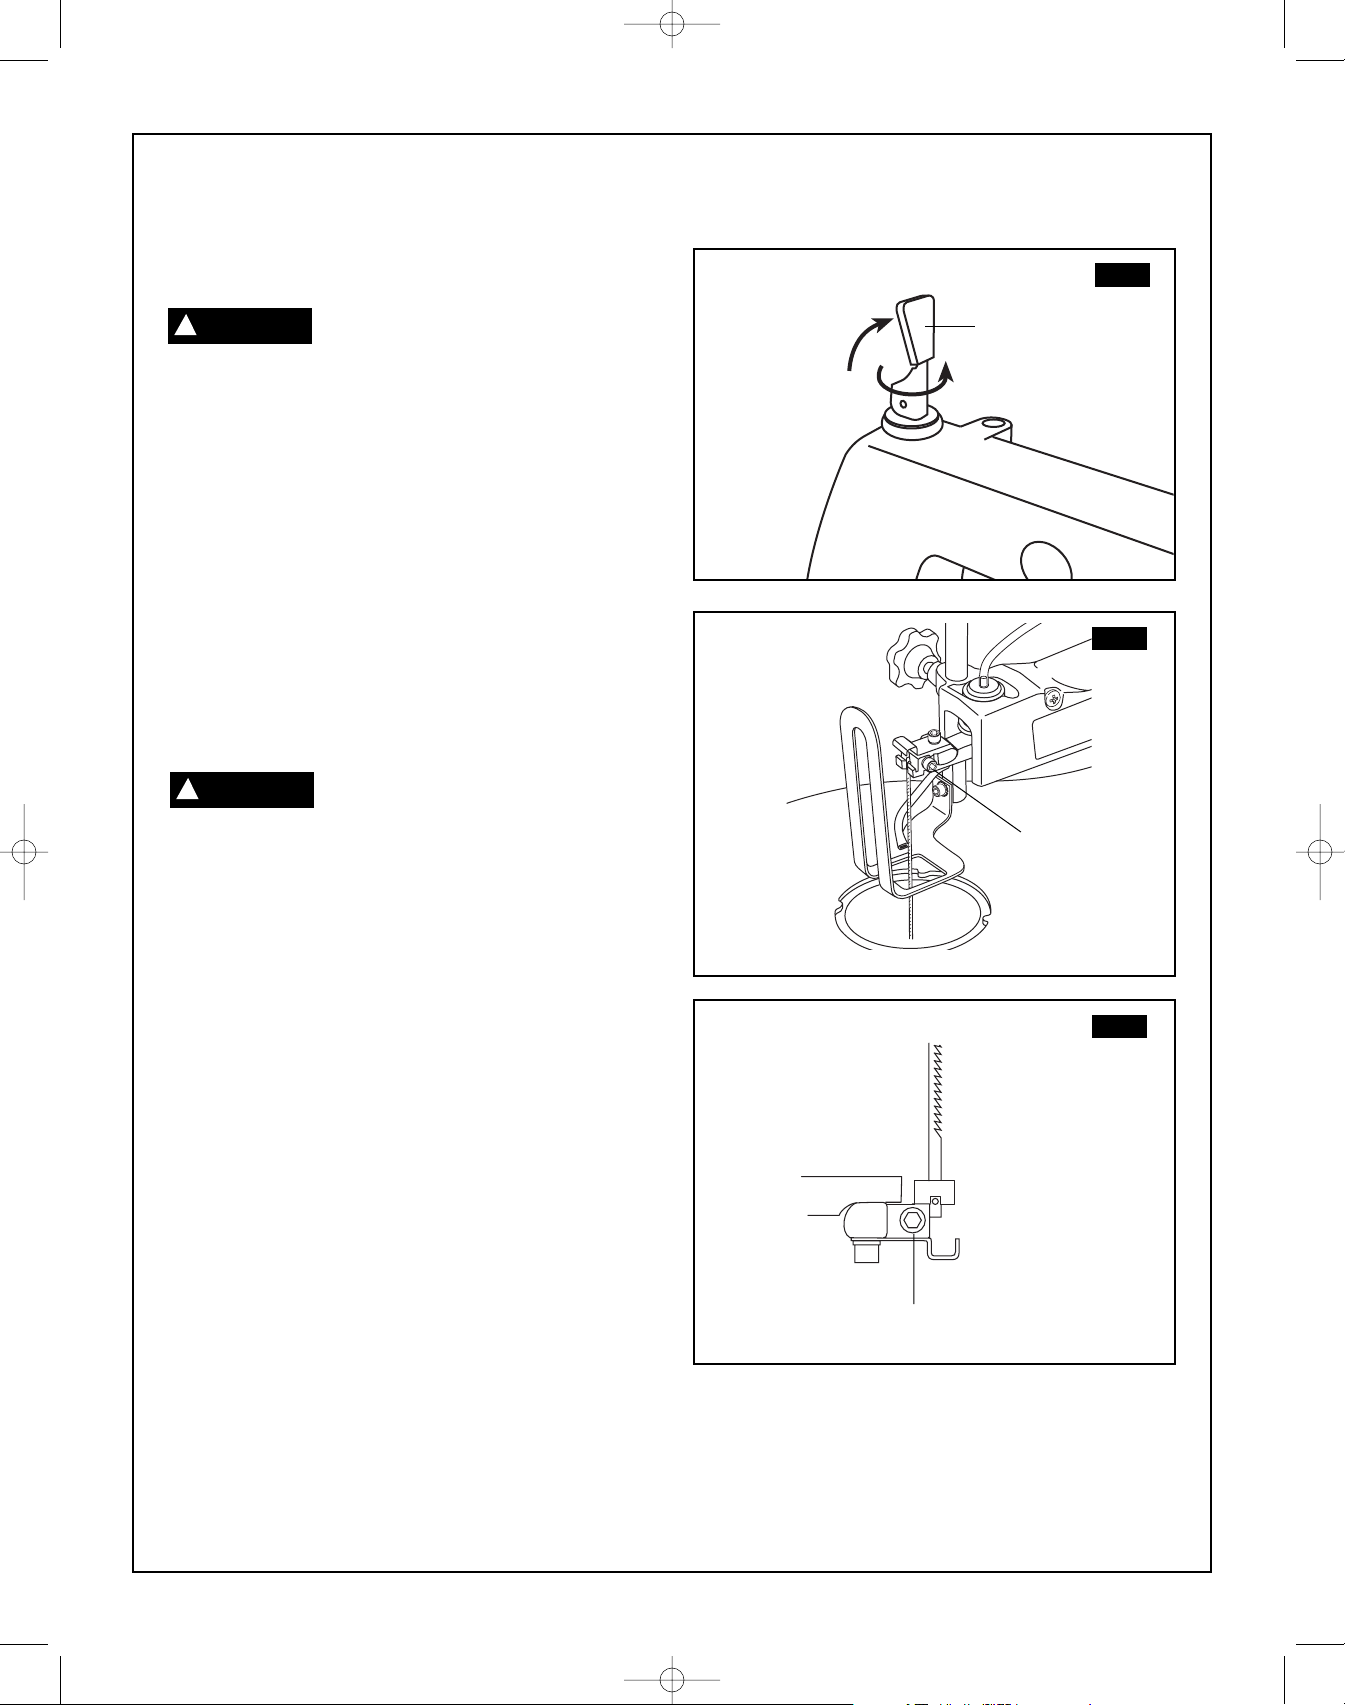
Remoción e instalación de la hoja
(Fig. 13-15)
Para reducir el riesgo de lesiones, APAGUE
siempre la sierra y desconecte el enchufe
del tomacorriente antes de retirar o reinstalar la hoja.
Esta sierra utiliza hojas tanto de extremo con pasador como de
extremo liso. Las hojas de extremo con pasador son más gruesas
para brindar estabilidad y permitir un ensamblaje más rápido.
Permiten cortar más rápidamente en una variedad de materiales.
Nota: Cuando instale hojas de extremo con pasador, la ranura
ubicada en el portahoja debe ser ligeramente más ancha que el
grosor de la hoja. Después de instalar la hoja, el mecanismo
tensor de la hoja la mantendrá en su sitio.
1.Suelte la tensión de la hoja levantando la palanca tensora de
liberación rápida (1)(Fig. 13).
2.Retire el inserto de la mesa. Haga palanca cuidadosamente
hacia arriba en el inserto de la mesa y retírelo.
3.Afloje el tornillo del portahoja superior (2)yel tornillo del
portahoja inferior (3).Empuje hacia abajo sobre el portahoja
superior para retirar la hoja de dicho portahoja. Retire la hoja
del portahoja inferior.
Instale la hoja con los dientes orientados
hacia abajo. Si la hoja se instala con los
dientes orientados hacia arriba, la pieza de trabajo tenderá a tirar
hacia arriba de la mesa y causará vibraciones o una posible
pérdida de control de la pieza de trabajo.
4.Para instalar la hoja, engánchela en el entrante del portahoja
inferior.
5.Mientras empuja hacia abajo sobre el portahoja superior,
inserte la hoja en la ranura del portahoja.
6.Apriete los tornillos de los portahojas superior e inferior.
7.Para tensar la hoja, mueva la palanca tensora de liberación
rápida (1) hasta la posición hacia “abajo”. A medida que baje la
palanca, se aplicará tensión a la hoja. Asegúrese de que la hoja
esté ubicada apropiadamente en los portahojas. Gire el pomo
tensor de la hoja una vuelta completa adicional en el sentido de
las agujas del reloj. Esta cantidad de presión de la hoja debería
dar buenos resultados para la mayoría de las operaciones de
corte.
ATENCIÓN: Mover la palanca hacia abajo debería requerir
solamente una presión firme y moderada. Si se necesita una
presión fuerte, la hoja está demasiado apretada. Reduzca la
tensión girando la palanca tensora de liberación rápida en sentido
contrario al de las agujas del reloj de una a dos vueltas y reajuste
luego la palanca tensora a la posición hacia “abajo”. Si la palanca
tensora está en la posición hacia “abajo” y la hoja está demasiado
floja, se puede aumentar la tensión dejando la palanca tensora
“abajo” y girándola en el sentido de las agujas del reloj justo hasta
que se sienta que se elimina la flojedad de la hoja. Una vez hecho
esto, gire la palanca tensora UNA vuelta completa en el sentido de
las agujas del reloj. Esta cantidad de presión de la hoja debería dar
buenos resultados para la mayoría de las operaciones de corte y
la mayoría de las hojas.
Cuando se haya ajustado apropiadamente la tensión de la hoja, se
debe poder levantar la palanca tensora de liberación rápida, retirar
einstalar la hoja, bajar la palanca y restablecer la tensión original
de la hoja.
8.Acople a presión el inserto de la mesa de vuelta en su sitio.
45.
Ensamblaje y ajustes
ADVERTENCIA
!
PRECAUCIÓN
!
FIG. 13
FIG. 14
1
2
3
FIG. 15
SM 2610957121 05-08 6/5/08 7:35 AM Page 45
Recomendaciones para cortar
Una sierra de contornear es básicamente una máquina cortadora
de curvas. También se puede utilizar para realizar operaciones de
corte recto o de corte en bisel o en ángulo. Sírvase leer y entender
las siguientes instrucciones antes de intentar utilizar la sierra.
1. Cuando haga avanzar la pieza de trabajo hacia la hoja, no la
fuerce contra la hoja. Esto podría causar desviación de la hoja.
Deje que la sierra corte el material guiando la pieza de trabajo
hacia la hoja a medida que ésta corta.
2. Los dientes de la hoja cortan material SOLAMENTE en la carrera
descendente.
3. Guíe lentamente la madera hacia la hoja, ya que los dientes de
la hoja son muy pequeños y quitan madera sólo en la carrera
descendente.
4. Hay una curva de aprendizaje para cada persona que utilice esta
sierra. Durante ese período de tiempo, cabe esperar que
algunas hojas se rompan, hasta que usted aprenda a utilizar la
sierra.
5. Los mejores resultados se pueden lograr cuando se corte
madera de una pulgada de grosor o menos.
6. Cuando corte madera de más de una pulgada de grosor, guíe la
madera muy, muy lentamente hacia la hoja y tenga cuidado
adicional de no doblar o torcer la hoja mientras esté cortando,
con el fin de prolongar al máximo la duración de la hoja.
7. Los dientes de las hojas de sierra de contornear se desgastan
ylas hojas se deben reemplazar frecuentemente para lograr
los mejores resultados de corte. Generalmente, las hojas de
sierra de contornear permanecen afiladas durante un período
de media hora a dos horas de corte.
8. Para lograr cortes precisos, esté preparado para compensar la
tendencia de la hoja a seguir la veta de la madera mientras
realiza el corte.
9. Esta sierra de contornear está diseñada principalmente para
cortar madera o productos de madera. Para cortar metales
preciosos y no ferrosos, el interruptor de control variable debe
estar ajustado a velocidades muy lentas.
10. Cuando escoja una hoja, utilice hojas estrechas muy finas para
realizar cortes de contorneo en madera delgada de 1/4 de
pulgada de grosor o menos. Utilice hojas más anchas para
materiales de mayor grosor, pero esto reducirá la capacidad
para cortar curvas cerradas.
11. Las hojas se desgastan más rápidamente cuando se corta
madera contrachapada o tablero de aglomerado muy abrasivo.
La realización de cortes en ángulo en maderas duras desgasta
las hojas más rápidamente.
12. Utilice siempre el pie del protector de la hoja para mantener la
pieza de trabajo contra la mesa. El pie se debe ajustar justo por
encima de la pieza de trabajo para tener una tolerancia de
contorneo libre, dejando una holgura de no más de 1/16 de
pulgada entre el pie y la pieza de trabajo.
Operaciones básicas de la sierra de contornear
46.
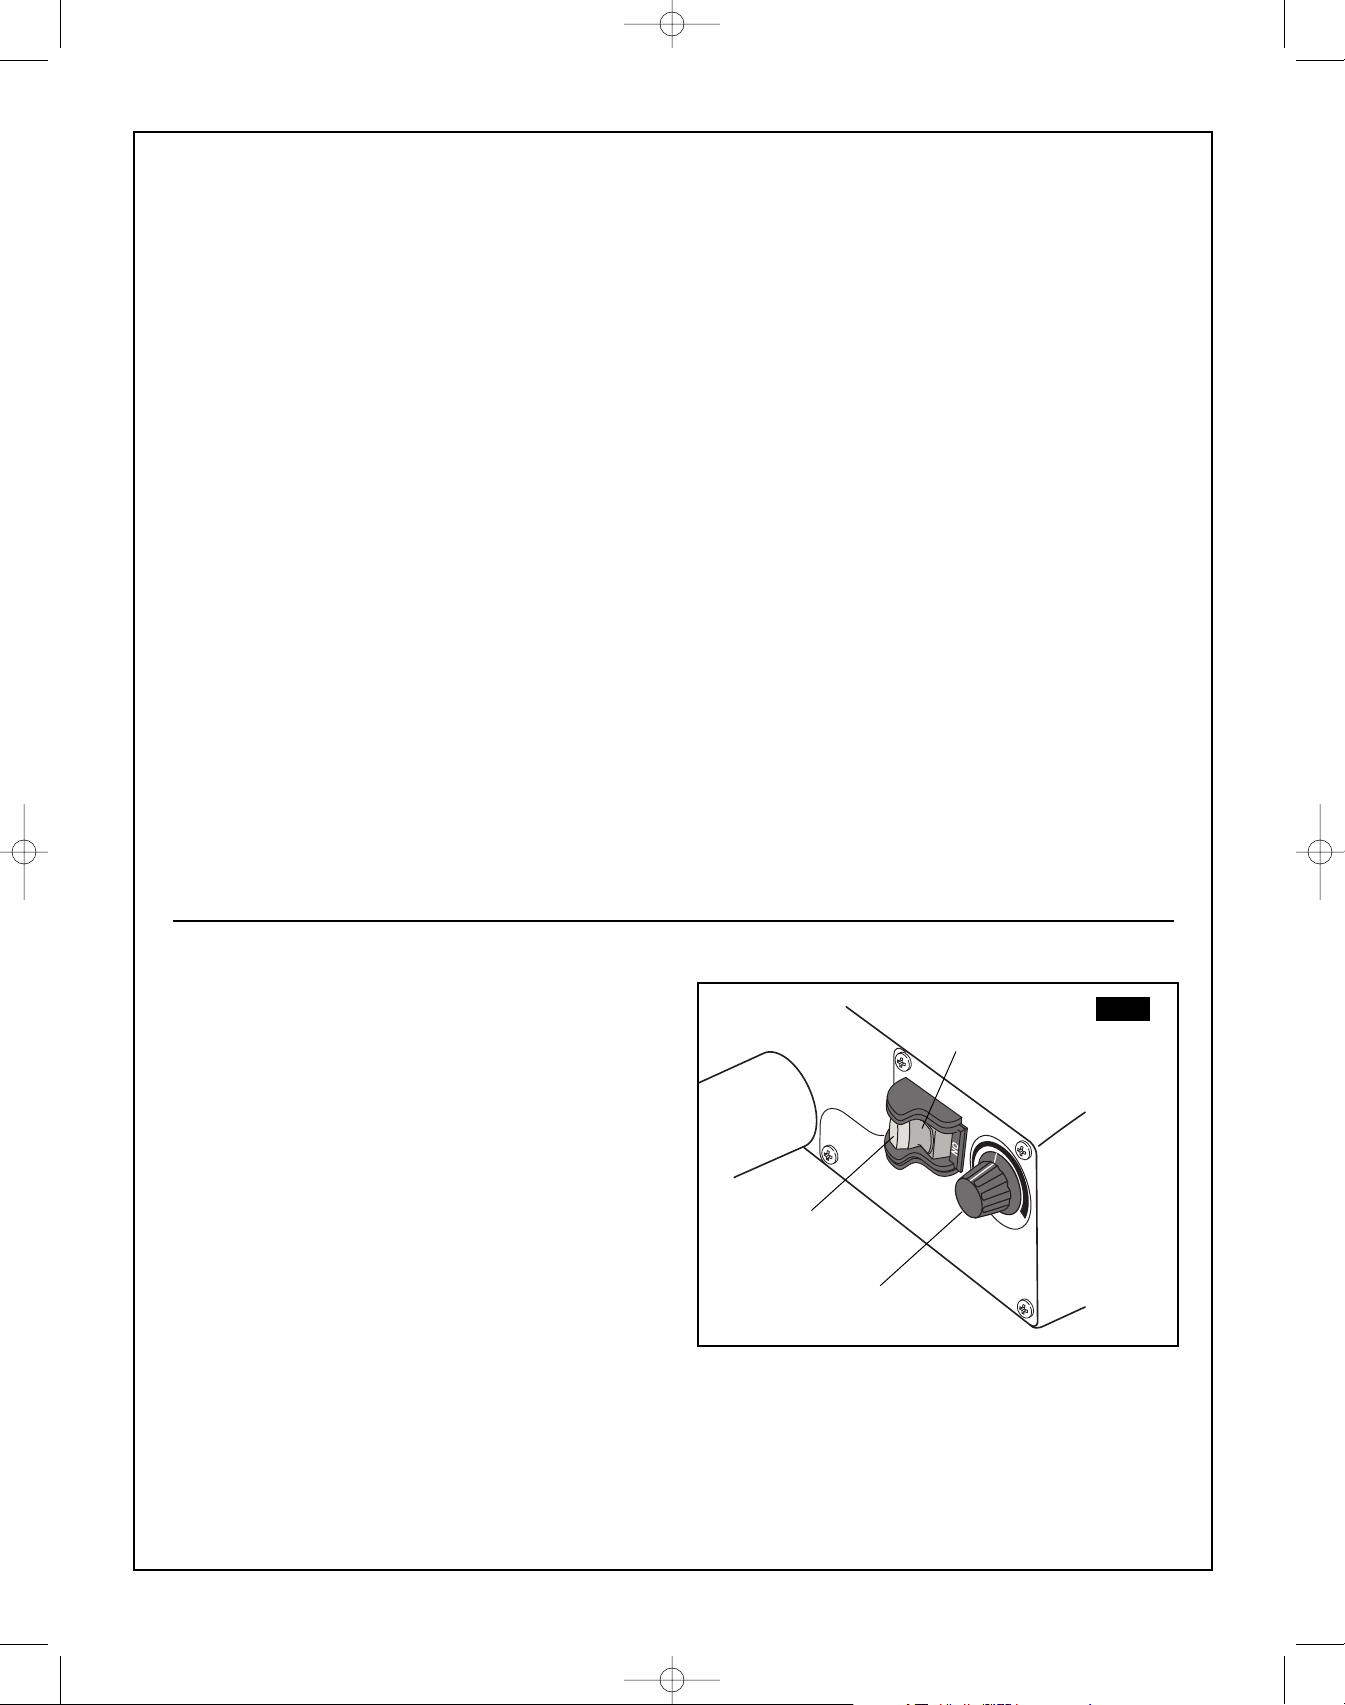
Interruptor de ENCENDIDO y APAGADO (Fig. 16)
1. Para ENCENDER la sierra, mueva el interruptor (1)hasta la
posición de ENCENDIDO.
2. Para APAGAR la sierra, mueva el interruptor hasta la posición
de APAGADO.
3. Para bloquear el interruptor en la posición de APAGADO:
a. Espere hasta que la sierra se haya detenido por
completo.
b. Retire la llave de seguridad (2)de la carcasa del
interruptor. Guarde la llave de seguridad en un lugar
seguro.
4. Para desbloquear el interruptor y ENCENDER la sierra, inserte
la llave de seguridad en el interruptor y mueva el interruptor
hasta la posición de ENCENDIDO.
Dial de velocidad variable (Fig. 16)
1. Esta sierra está equipada con un dial de velocidad variable (3).
La velocidad de carrera de la hoja se puede ajustar simplemente
girando el dial.
Para aumentar la velocidad, gire el dial (3) en el sentido de las
agujas del reloj.
Para reducir la velocidad, gire el dial (3) en sentido contrario al de
las agujas del reloj.
2
FIG. 16
1
3
SM 2610957121 05-08 6/5/08 7:35 AM Page 46
Operaciones básicas de la sierra de contornear
Para evitar lesiones por causa de arran-
ques accidentales, ponga siempre el
interruptor en la posición de APAGADO y desenchufe la sierra
de contornear antes de transportar la herramienta, reemplazar
la hoja o hacer ajustes.
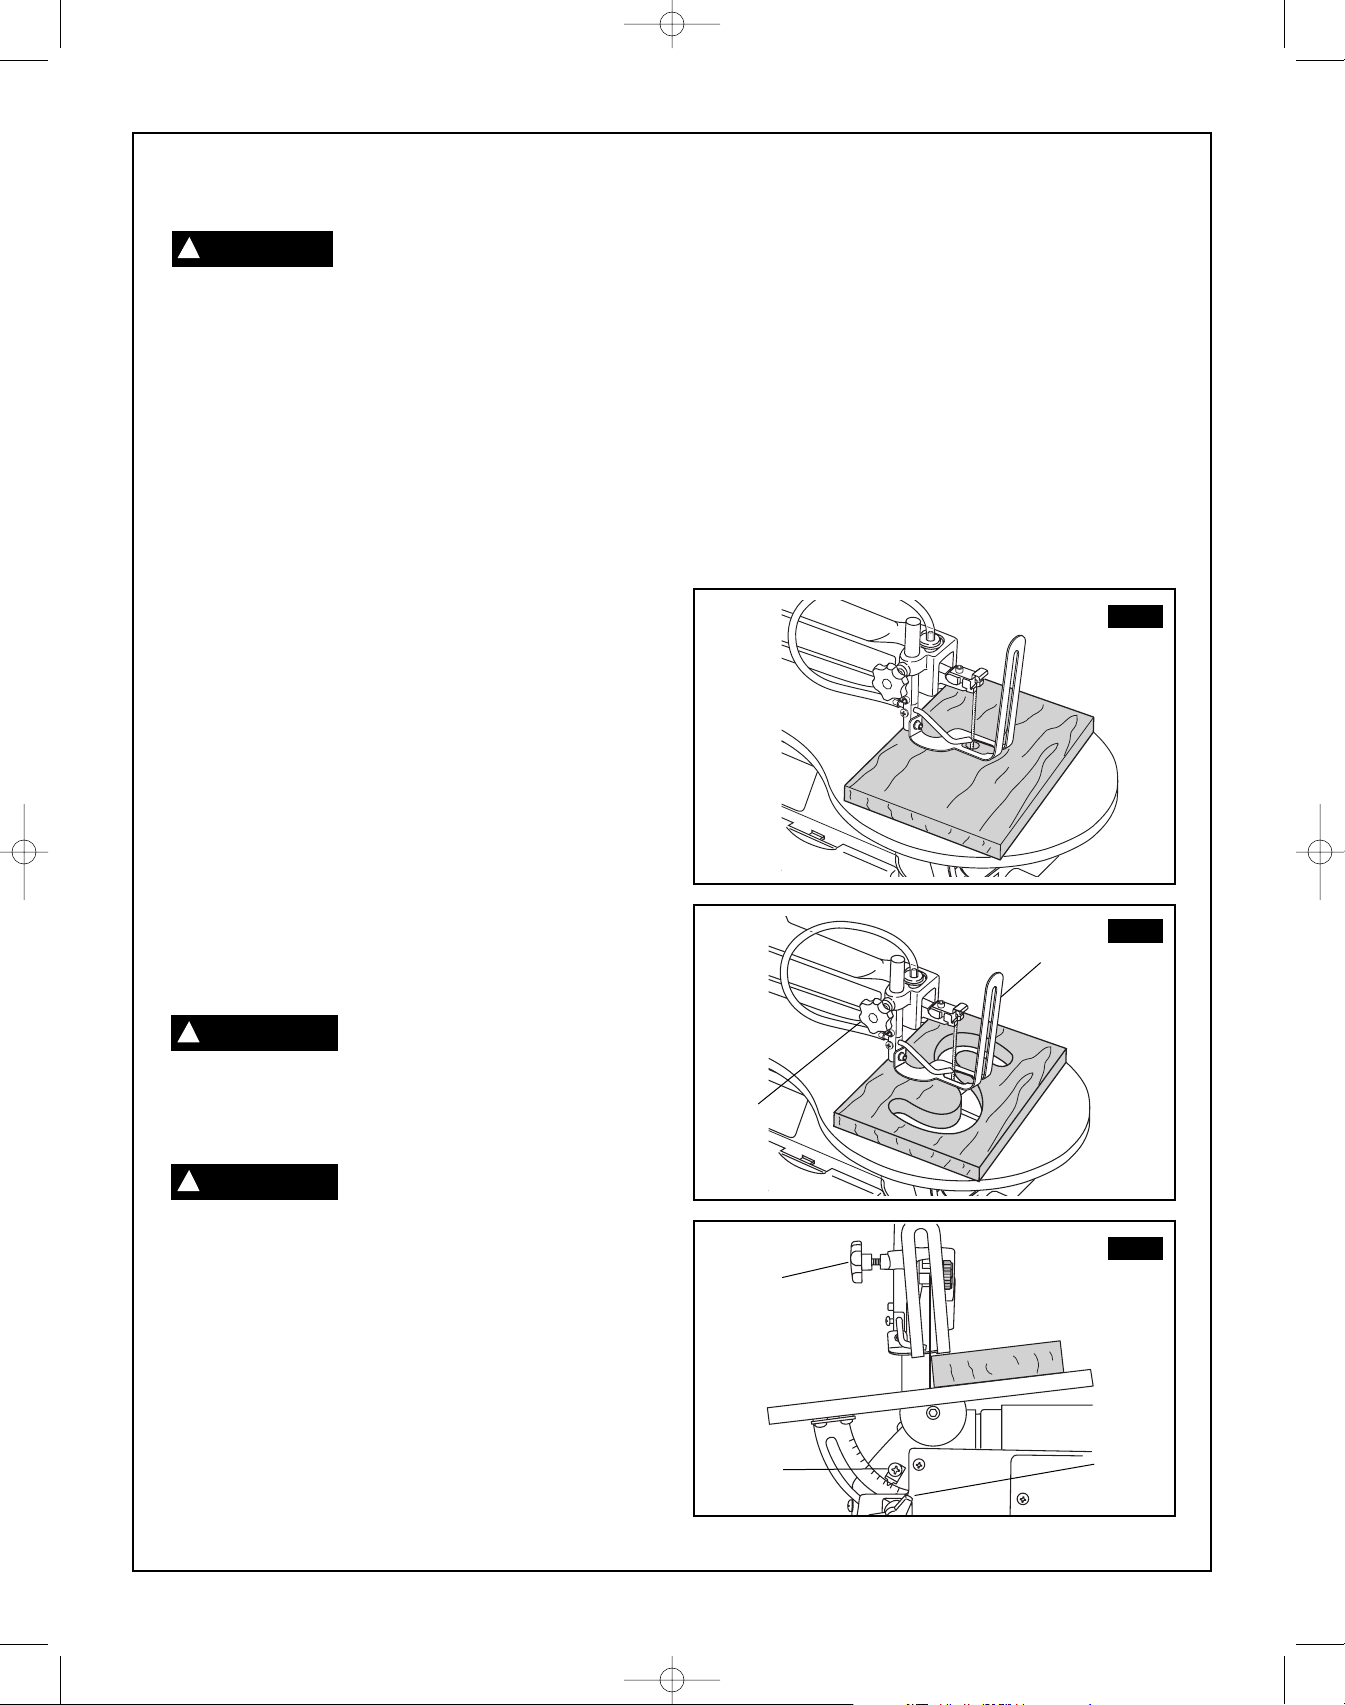
Realización de cortes interiores (Fig. 17)
1. Ponga el diseño en la pieza de trabajo. Taladre un agujero de
1/4 de pulgada en la pieza de trabajo.
2. Retire la hoja. Consulte “Remoción e instalación de la hoja”.
3. Coloque la pieza de trabajo sobre la mesa de la sierra, con el
agujero ubicado en la pieza de trabajo sobre el agujero de
acceso ubicado en la mesa.
4. Instale una hoja a través del agujero ubicado en la pieza de
trabajo.
5. Siga los pasos 3-7 bajo “Corte a pulso”.
6. Cuando haya acabado de hacer los cortes de contorneo
interiores, simplemente APAGUE la sierra de contornear.
Desenchufe la sierra antes de retirar la hoja del portahoja.
Retire la pieza de trabajo de la mesa.
Realización de cortes a pulso (Fig. 18)
1. Ponga el diseño deseado en la pieza de trabajo o sujete
firmemente el diseño a la pieza de trabajo.
2. Suba el pie del protector de la hoja (1)aflojando el pomo de
ajuste de la altura (2).
3. Posicione la pieza de trabajo contra la hoja y coloque el pie del
protector de la hoja contra la superficie superior de la pieza de
trabajo.
4. Sujete firmemente el pie del protector de la hoja (1)apretando
el pomo de ajuste de la altura (2).
5. Retire la pieza de trabajo de la hoja antes de ENCENDER la
sierra de contornear.
Para evitar una elevación incontrolable de
la pieza de trabajo y reducir la rotura de
hojas, no ponga el interruptor en la posición de encendido
mientras la pieza de trabajo esté contra la hoja.
6. Haga avanzar lentamente la pieza de trabajo hacia la hoja,
guiando y presionando la pieza de trabajo hacia abajo contra la
mesa.
No fuerce el borde de avance de la pieza
de trabajo hacia la hoja. La hoja se
desviará, reduciendo la precisión del corte, y se podría romper.
7. Cuando se haya completado el corte, mueva el borde de salida
de la pieza de trabajo más allá del pie del protector de la hoja.
Ponga el interruptor en la posición de APAGADO.
Realización de cortes en ángulo (cortes en bisel)
(Fig. 19)
1. Ponga el diseño en la pieza de trabajo o sujételo firmemente a
la pieza de trabajo.
2. Mueva el pie del protector de la hoja hasta la posición más alta
aflojando el pomo de ajuste de la altura (3).Reapriete el pomo.
3. Incline la mesa hasta el ángulo deseado aflojando el mango de
fijación de bisel de la mesa (4)ymoviendo la mesa hasta el
ángulo apropiado, utilizando la escala de grados y el indicador
(5).
4. Apriete el mango de fijación de bisel de la mesa (4).
5. Afloje el tornillo del protector de la hoja e incline dicho protector
hasta el mismo ángulo que la mesa. Reapriete el tornillo del
protector de la hoja. Consulte “Ajuste de la abrazadera de
sujeción”.
6.Posicione la pieza de trabajo en el lado derecho de la hoja. Baje
elpie del protector de la hoja contra la superficie aflojando el
pomo de ajuste de la altura. Reapriete el pomo.
7. Siga los pasos 5–7 bajo “Corte a pulso”.
2
FIG. 18
1
45
30
15
3
FIG. 19
4
5
FIG. 17
ADVERTENCIA
!
PRECAUCIÓN
!
PRECAUCIÓN
!
47.
SM 2610957121 05-08 6/5/08 7:35 AM Page 47
48.
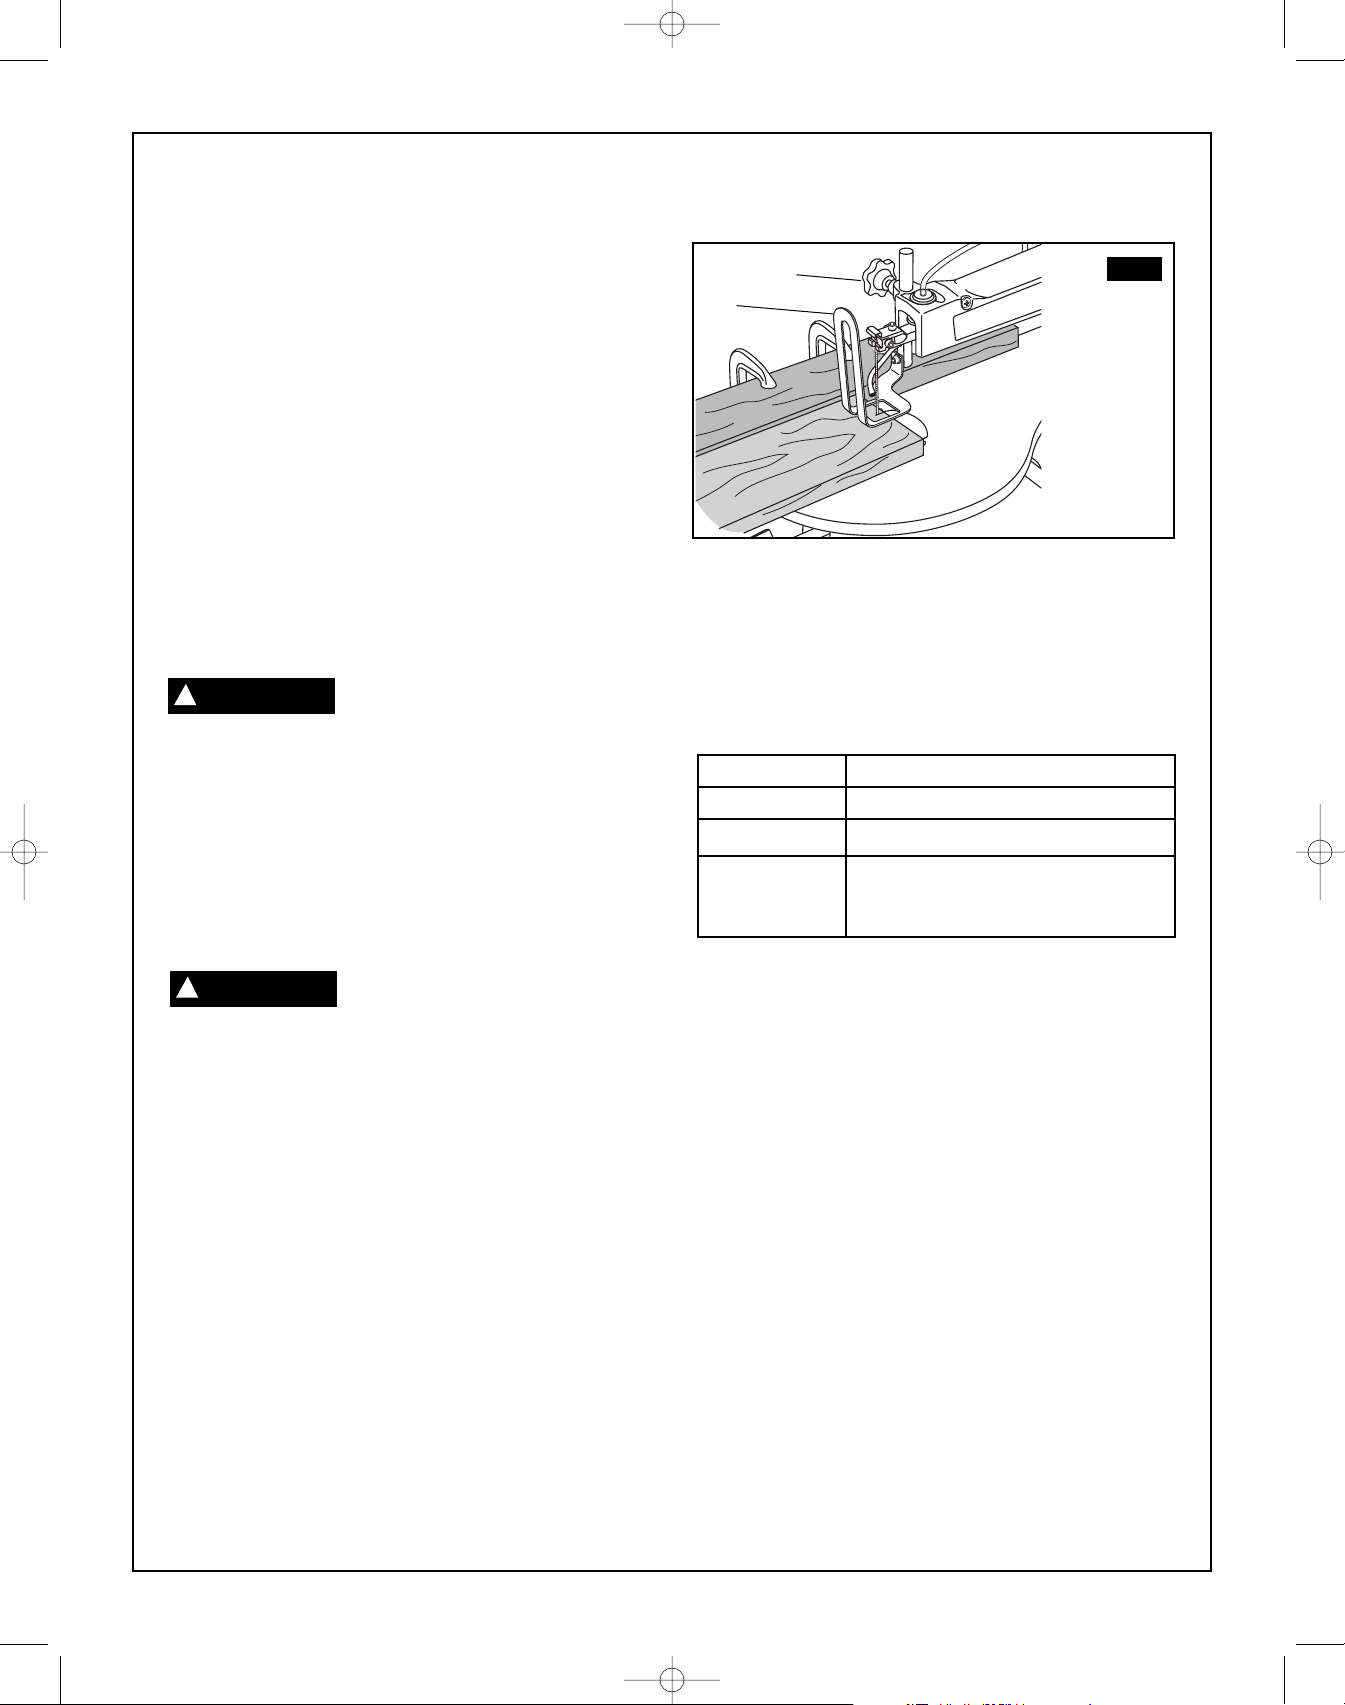
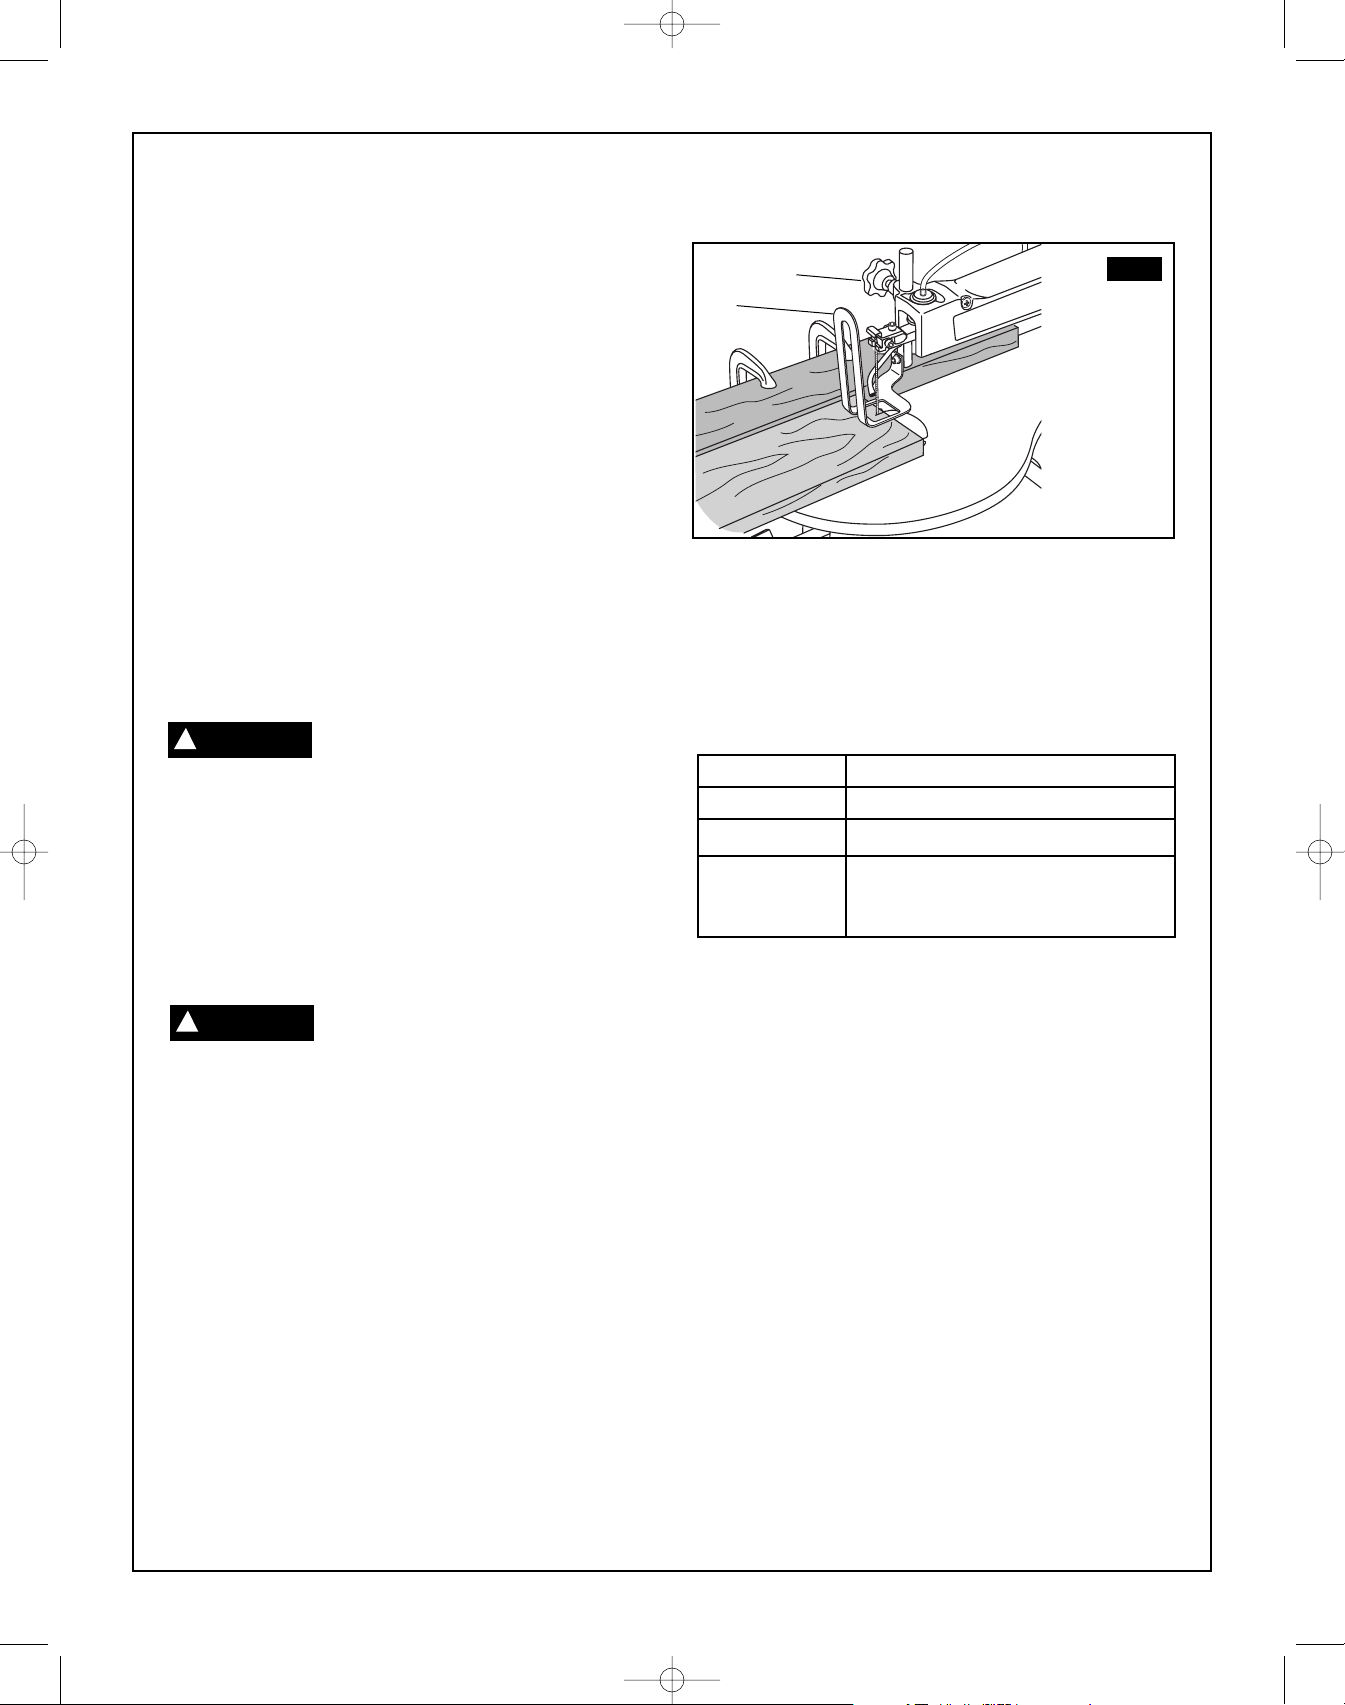
Realización de cortes al hilo o en línea recta
(Fig. 20)
1. Suba el pie del protector de la hoja (1)aflojando el pomo de
ajuste de la altura (2).
2. Mida desde la punta de la hoja hasta la distancia deseada.
Posicione una tabla de borde recto paralela a la hoja a esa
distancia.
3. Sujete la tabla de borde recto a la mesa usando abrazaderas.
4. Compruebe de nuevo las mediciones que haya hecho,
utilizando la pieza de trabajo que vaya a cortar y asegúrese de
que la tabla de borde recto esté segura.
5. Posicione la pieza de trabajo contra la hoja y coloque el pie del
protector de la hoja contra la superficie superior de la pieza de
trabajo.
6. Sujete firmemente el pie del protector de la hoja en su sitio
apretando el pomo de ajuste de la altura.
7. Retire la pieza de trabajo de la hoja antes de ENCENDER la
sierra de contornear.
Para evitar la elevación incontrolable de la
pieza de trabajo y reducir la rotura de
hojas, no ponga el interruptor en la posición de encendido
mientras la pieza de trabajo esté contra la hoja.
8. Posicione la pieza de trabajo contra la tabla de borde recto
antes de que el borde de avance de la pieza de trabajo toque
contra la hoja.
9. Haga avanzar lentamente la pieza de trabajo hacia la hoja,
guiando la pieza de trabajo contra la tabla de borde recto y
presionando la pieza de trabajo hacia abajo contra la mesa.
No fuerce el borde de avance de la pieza de
trabajo hacia la hoja. La hoja se desviará,
reduciendo la precisión del corte, y se podría romper.
10. Cuando haya completado el corte, mueva el borde de salida de
la pieza de trabajo más allá del pie del protector de la hoja.
Ponga el interruptor en la posición de APAGADO.
11. El máximo corte al hilo que se puede realizar en esta sierra es
de 16 pulgadas.
Operaciones básicas de la sierra de contornear
1
FIG. 20
2
PRECAUCIÓN
!
PRECAUCIÓN
!
Herramientas necesarias
CantidadDescripción
2Abrazaderas en C pequeñas
1Regla o cinta de medir
1Pedazo recto de madera de desecho de
12 pulgadas (de un grosor que coincidida
con el de la pieza de trabajo)
SM 2610957121 05-08 6/5/08 7:35 AM Page 48
49.
Mantenimiento
Para reducir el riesgo de lesiones, ponga el
interruptor en la posición de APAGADO y
saque el enchufe del tomacorriente de la fuente de
alimentación antes de hacer mantenimiento de la sierra de
contornear o lubricarla.
GENERAL
Sople frecuentemente todo el polvo que se haya acumulado
dentro del motor.
Una capa ocasional de cera en pasta aplicada a la mesa de
trabajo permitirá que la madera que se esté cortando se
deslice suavemente por la superficie de trabajo.
Ciertos agentes limpiadores y solventes
dañan las piezas de plástico, incluyendo:
gasolina, tetracloruro de carbono, solventes de limpieza
clorados, amoníaco y detergentes domésticos que contienen
amoníaco. Si se evita el uso de estos y otros tipos de agentes
limpiadores, se minimiza la probabilidad de que se produzcan
daños.
Para evitar el riesgo de descargas eléc-
tricas o incendio, si el cable de alimen-
tación está desgastado, cortado o dañado de alguna manera,
haga que lo reemplacen inmediatamente.
Todas las reparaciones, eléctricas o mecá-
nicas, deben ser intentadas únicamente por
personal de reparación capacitado. Póngase en contacto con el
Centro de Servicio de Fábrica Skil más cercano, la Estación de
Servicio Skil Autorizada más cercana u otro servicio de
reparaciones competente. Utilice únicamente piezas de repuesto
Skil; cualquier otra pieza podría crear un peligro.
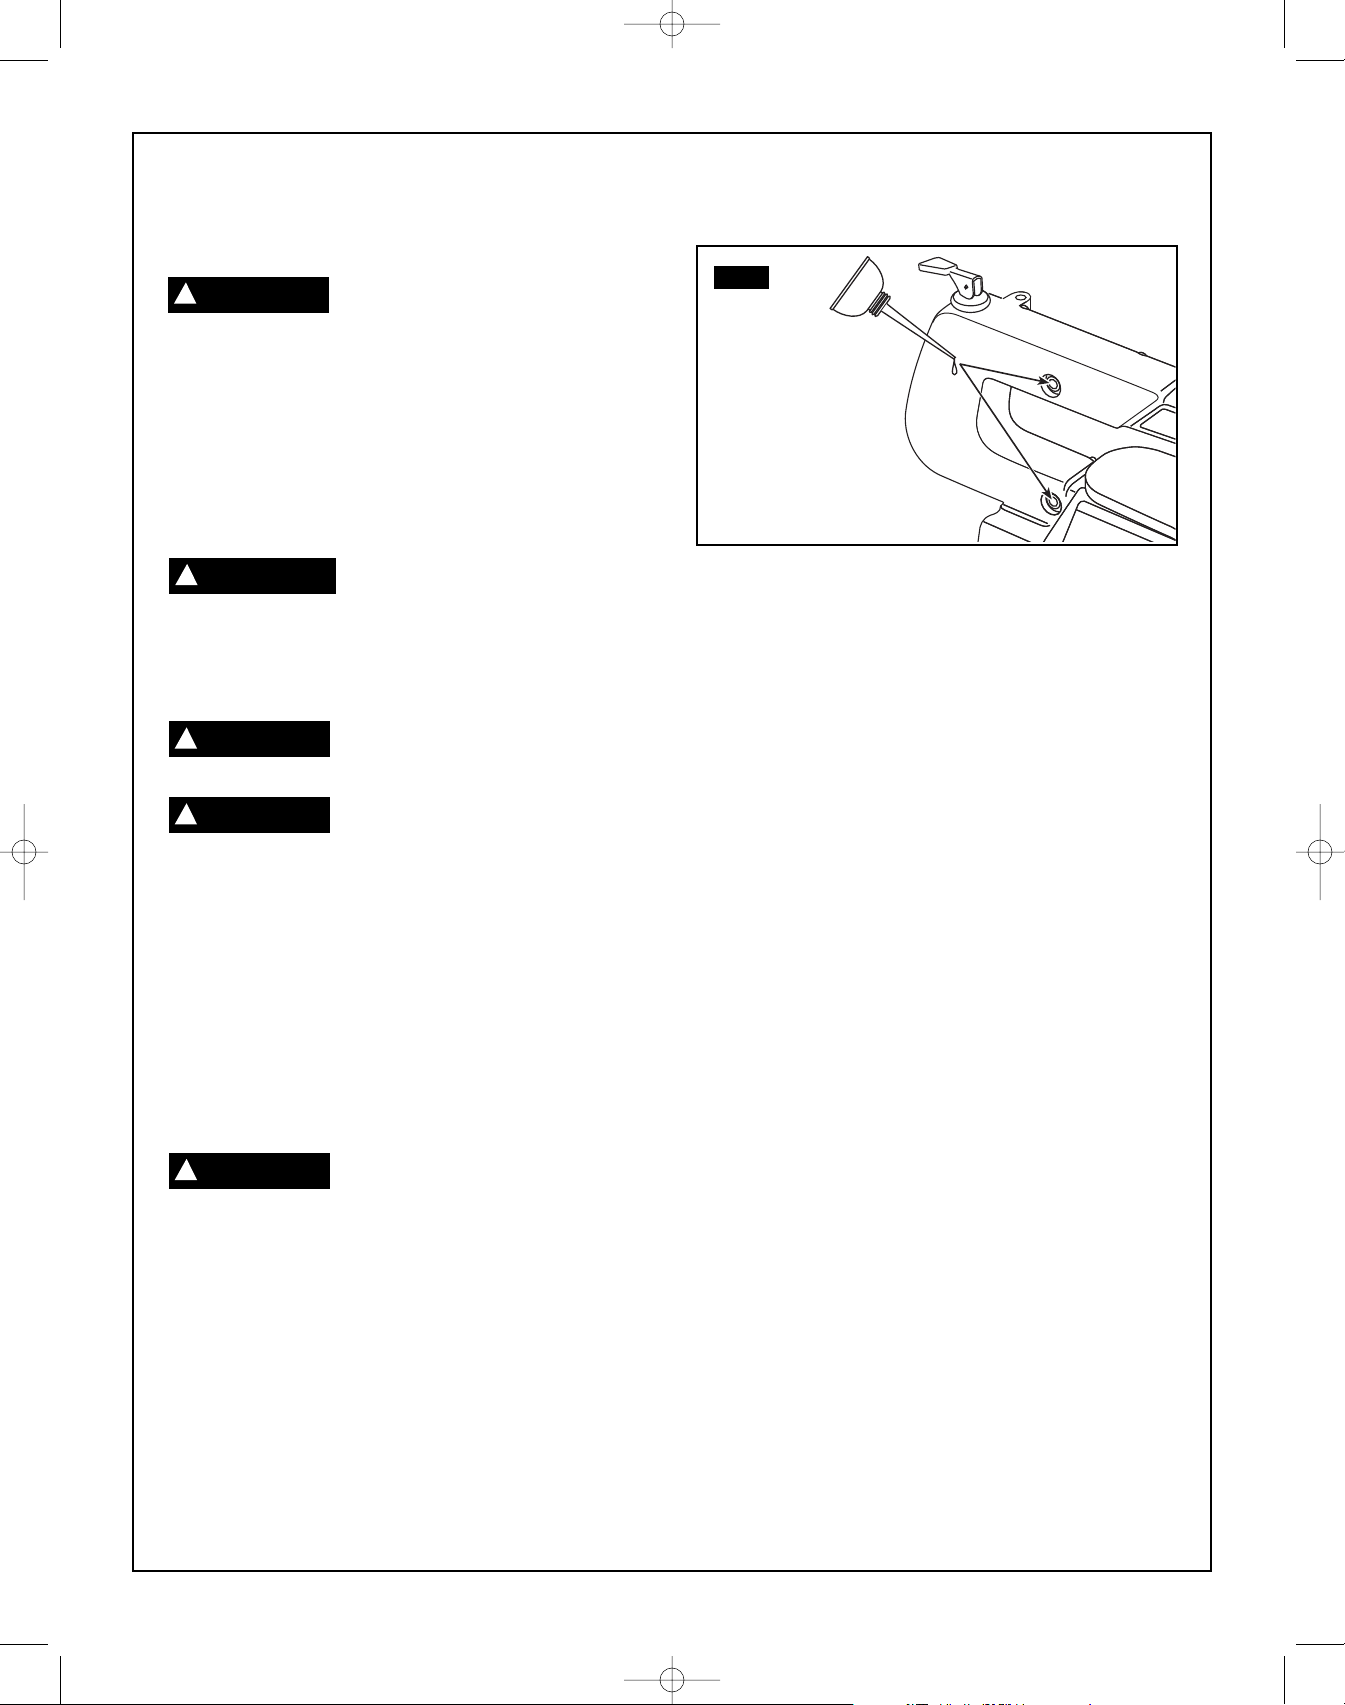
Lubricación
COJINETES DEL BRAZO
Lubrique los cojinetes del brazo con aceite después de 10 horas
de uso. Relubríquelos después de cada 50 horas de uso o cuando
se oiga un chirrido procedente de los cojinetes.
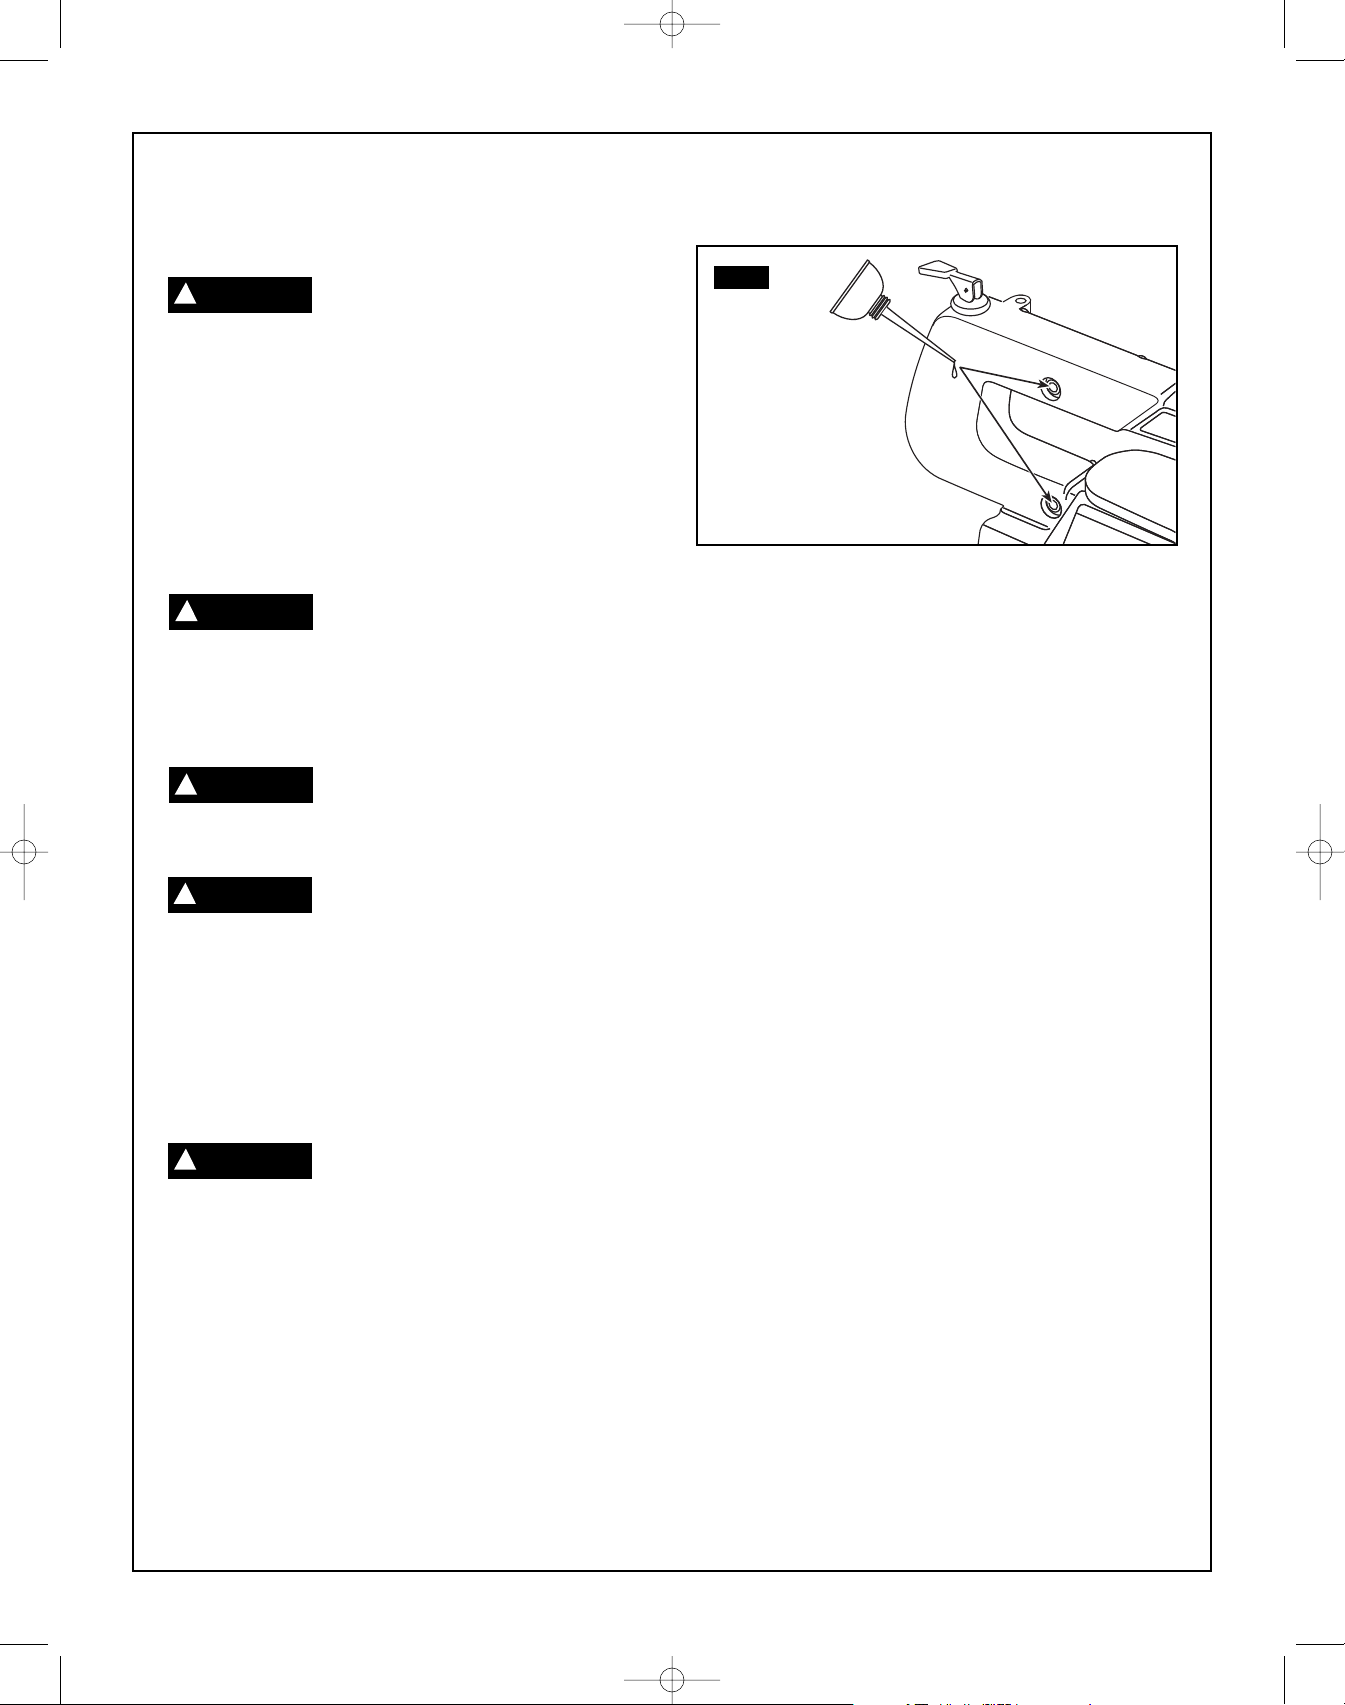
PARA LUBRICAR LOS COJINETES
1. Retire las dos cubiertas de cojinete de goma.
2. Voltee la sierra sobre uno de sus lados de la manera que se
muestra en la ilustración (Fig. 21).
3. Aplique un chorro abundante de aceite SAE 20 alrededor del
extremo del eje y el cojinete de bronce.
4. Deje que el aceite empape los cojinetes toda la noche en estas
condiciones.
5. Al día siguiente, repita el procedimiento que antecede para el
lado opuesto de la sierra.
Utilice únicamente accesorios recomendados. Siga las instruc-
ciones que acompañan a los accesorios. El uso de accesorios
incorrectos puede causar peligros. Consulte la página 44 para
obtener detalles sobre los accesorios recomendados.
Mantenimiento de la sierra de contornear
Localización y reparación de averías
ADVERTENCIA
!
FIG. 21
ADVERTENCIA
!
ADVERTENCIA
!
PRECAUCIÓN
!
Apague el interruptor (posición “OFF”) y
saque siempre el enchufe de la fuente de
energía antes de localizar y reparar averías.
AVERIA: LA SIERRA NO ARRANCA
PROBLEMA1. El cordón de energía no está enchufado.
2. El fusible o el cortacircuito ha saltado.
3. Cordón dañado.
4.Interruptor quemado
REMEDIO1. Enchufe la sierra.
2. Cambie el fusible o reajuste el cortacircuito que
ha saltado.
3. Haga cambiar el cordón en un Centro de servicio
Skil autorizado o en una Estación de servicio Skil
autorizada.
4. Haga cambiar el interruptor en un Centro de ser
vicio Skil autorizado o en una Estación de servicio
Skil autorizada.
AVERIA: LA HOJA NO ALCANZA TODA SU VELOCIDAD
PROBLEMA1. Cordón de extensión demasiado ligero o
demasiado largo.
2. Voltaje de red bajo.
REMEDIO1. Sustitúyalo con un cordón adecuado.
2. Póngase en contacto con la compañía eléctrica.
ADVERTENCIA
!
SM 2610957121 05-08 6/5/08 7:35 AM Page 49
50.
Notes
SM 2610957121 05-08 6/5/08 7:35 AM Page 50
51.
Notes
SM 2610957121 05-08 6/5/08 7:35 AM Page 51
2610957121 05/08Printed in China
L
LI
IM
MI
IT
TE
ED
D W
WA
AR
RR
RA
AN
NT
TY
Y O
OF
F S
SK
KI
IL
L C
CO
ON
NS
SU
UM
ME
ER
R P
PO
OR
RT
TA
AB
BL
LE
E,
, B
BE
EN
NC
CH
HT
TO
OP
P A
AN
ND
D H
HD
D A
AN
ND
D S
SH
HD
D H
HE
EA
AV
VY
Y D
DU
UT
TY
Y P
PO
OW
WE
ER
R T
TO
OO
OL
LS
S
Robert Bosch Tool Corporation ("Seller") warrants to the original purchaser only, that all SKIL consumer portable, benchtop and HD and SHD Heavy Duty power tools will be free from
defects in material or workmanship for a period of one year from date of purchase. SKIL Benchtop and consumer portable power tool models will be free from defects in material or work-
manship for a period of ninety days if the tool is used for professional use.
SELLER’S SOLE OBLIGATION AND YOUR EXCLUSIVE REMEDY under this Limited Warranty and, to the extent permitted by law, any warranty or condition implied by law, shall be the
repair or replacement of parts, without charge, which are defective in material or workmanship and which have not been misused, carelessly handled, or misrepaired by persons other than
Seller or Authorized Service Station. To make a claim under this Limited Warranty, you must return the complete product, transportation prepaid, to any SKIL Factory Service Center or
Authorized Service Station. For Authorized SKILPower Tool Service Stations, please visit www.skil.com or call 1-877-SKIL-999 (1-877-754-5999).
THIS LIMITED WARRANTY DOES NOT APPLY TO ACCESSORY ITEMS SUCH AS CIRCULAR SAW BLADES, DRILL BITS, ROUTER BITS, JIGSAW BLADES, SANDING BELTS, GRINDING
WHEELS AND OTHER RELATED ITEMS.
ANY IMPLIED WARRANTIES SHALL BE LIMITED IN DURATION TO ONE YEAR FROM DATE OF PURCHASE. SOME STATES IN THE U.S.,SOMECANADIAN
PROVINCESDO NOT ALLOW LIMITATIONS ON HOW LONG AN IMPLIED WARRANTY LASTS, SO THE ABOVE LIMITATION MAY NOT APPLY TO YOU.
INNOEVENTSHALLSELLERBELIABLEFORANYINCIDENTALORCONSEQUENTIALDAMAGES(INCLUDING BUT NOT LIMITED TO LIABILITY FOR LOSS OF PROFITS) ARISINGFROM
THESALEORUSEOFTHISPRODUCT.SOMESTATESINTHEU.S. AND SOME CANADIAN PROVINCESDONOTALLOWTHEEXCLUSIONORLIMITATIONOFINCIDENTALORCON-
THISLIMITEDWARRANTYGIVESYOUSPECIFICLEGALRIGHTS,ANDYOUMAYALSOHAVEOTHERRIGHTSWHICHVARYFROMSTATETOSTATE IN THE U.S., PROVINCE TO
PROVINCE IN CANADA AND FROM COUNTRY TO COUNTRY.
THIS LIMITED WARRANTY APPLIES ONLY TO PRODUCTS SOLD WITHIN THE UNITED STATES OF AMERICA, CANADA AND THE COMMONWEALTH OF PUERTO RICO. FOR WARRAN-
TY COVERAGE WITHIN OTHER COUNTRIES, CONTACT YOUR LOCAL SKIL DEALER OR IMPORTER.
G
GA
AR
RA
AN
NT
TI
IE
E L
LI
IM
MI
IT
TÉ
ÉE
E D
DE
ES
S O
OU
UT
TI
IL
LS
S É
ÉL
LE
EC
CT
TR
RI
IQ
QU
UE
ES
S G
GR
RA
AN
ND
D P
PU
UB
BL
LI
IC
C S
SK
KI
IL
L P
PO
OR
RT
TA
AT
TI
IF
FS
S,
, D
DE
E T
TA
AB
BL
LE
E E
ET
T P
PO
OU
UR
R U
US
SA
AG
GE
E I
IN
ND
DU
US
ST
TR
RI
IE
EL
L H
HD
D E
ET
T S
SH
HD
D
Robert Bosch Tool Corporation (le « Vendeur ») garantit à l'acheteur initial seulement que tous les outils électriques grand public SKIL portatifs, de table et pour usage industriel HD et SHD
seront exempts de vices de matériau ou de façon pendant une période d'un an depuis la date d'achat. Les modèles d'outils électriques grand public SKIL portatifs et de table seront exempts
de vices de matériau ou de façon pendant une période de quatre-vingt-dix jours si l'outil est utilisé professionnellement.
LA SEULE OBLIGATION DU VENDEUR ET LE SEUL RECOURS DE L’ACHETEUR sous la présente garantie limitée, et dans la mesure où la loi le permet sous toute garantie ou condition
implicite qui en découlerait, sera l’obligation de remplacer ou réparer gratuitement les pièces défectueuses en termes de matériau ou de façon, pourvu que lesdites défectuosités ne soient
pas attribuables à un usage abusif ou à quelque réparation ou altération bricolée par quelqu’un d’autre que le Vendeur ou le personnel d’une station-service agréée. En cas de réclamation
sous la présente garantie limitée, l’acheteur est tenu de renvoyer l’outil complet en port payé à un centre de service-usine SKIL ou une station-service agréée. Pour trouver les coordonnées
de la station-service agréée SKIL la plus proche, veuillez visiter www.skil.com ou téléphoner au 1-877-SKIL-999 (1-877-754-5999).
LA PRÉSENTE GARANTIE NE S’APPLIQUE PAS AUX ACCESSOIRES TELS QUE LAMES DE SCIE CIRCULAIRE, MÈCHES DE PERCEUSES, FERS DE TOUPIES, LAMES DE SCIES SAUTEUSES,
COURROIES DE PONÇAGE, MEULES ET AUTRES ARTICLES DU GENRE.
TOUTE GARANTIE IMPLICITE SERA LIMITÉE À UNE DURÉE À UN AN À COMPTER DE LA DATE D’ACHAT. COMME CERTAINS ÉTATS AMÉRICAINS ET CERTAINES PROVINCES CANADI-
ENNES N’ADMETTENT PAS LE PRINCIPE DE LA LIMITATION DE LA DURÉE DES GARANTIES IMPLICITES, IL EST POSSIBLE QUE LES LIMITATIONS CI-DESSUS NE S’APPLIQUENT PAS
À VOTRE CAS.
EN AUCUN CAS LE VENDEUR NE SAURAIT ÊTRE TENU POUR RESPONSABLE DES INCIDENTS OU DOMMAGES INDIRECTS (INCLUANT, MAIS NE SE LIMITANT PAS AUX PERTES DE
PROFITS) CONSÉCUTIFS À LA VENTE OU À L’USAGE DE CE PRODUIT. COMME CERTAINS ÉTATS AMÉRICAINS ET CERTAINES PROVINCES CANADIENNES N’ADMETTENT PAS LE
PRINCIPE DE LA LIMITATION OU DE L’EXCLUSION DES DOMMAGES INDIRECTS ET SECONDAIRES, IL EST POSSIBLE QUE LES LIMITATIONS OU EXCLUSIONS CI-DESSUS NE S’AP-
PLIQUENT PAS À VOTRE CAS.
CETTE GARANTIE LIMITÉE VOUS DONNE DES DROITS PRÉCIS, ET VOUS POUVEZ ÉGALEMENT AVOIR D'AUTRES DROITS QUI VARIENT D'UN ÉTAT À L'AUTRE AUX ÉTATS-UNIS, D'UNE
PROVINCE À L'AUTRE AU CANADA, ET D'UN PAYS À L'AUTRE.
CETTE GARANTIE LIMITÉE S'APPLIQUE UNIQUEMENT AUX OUTILS VENDUS AUX ÉTATS-UNIS D'AMÉRIQUE, AU CANADA ET DANS LE COMMONWEALTH DE PORTO RICO. POUR
CONNAÎTRE LA COUVERTURE DE GARANTIE DANS LES AUTRES PAYS, CONTACTEZ VOTRE IMPORTATEUR OU REVENDEUR SKIL LOCAL.
G
GA
AR
RA
AN
NT
TÍ
ÍA
A L
LI
IM
MI
IT
TA
AD
DA
A P
PA
AR
RA
A H
HE
ER
RR
RA
AM
MI
IE
EN
NT
TA
AS
S M
ME
EC
CÁ
ÁN
NI
IC
CA
AS
S P
PO
OR
RT
TÁ
ÁT
TI
IL
LE
ES
S D
DE
E C
CO
ON
NS
SU
UM
MO
O,
, D
DE
E B
BA
AN
NC
CO
O Y
Y D
DE
E S
SE
ER
RV
VI
IC
CI
IO
O P
PE
ES
SA
AD
DO
O H
HD
D y
y S
SH
HD
D D
DE
E S
SK
KI
IL
L
Robert Bosch Tool Corporation ("el Vendedor") garantiza, únicamente al comprador original, que todas las herramientas mecánicas portátiles de consumo, de banco y de servicio pesado
HD y SHD de SKIL estarán libres de defectos de material o de fabricación durante un período de un año a partir de la fecha de compra. Los modelos de herramientas mecánicas de banco
y portátiles de consumo de SKIL estarán libres de defectos de material o de fabricación durante un período de noventa días si la herramienta se emplea para uso profesional.
LA ÚNICA OBLIGACIÓN DEL VENDEDOR Y EL RECURSO EXCLUSIVO QUE USTED TIENE bajo esta Garantía Limitada y, hasta donde la ley lo permita, bajo cualquier garantía o condición
implícita por ley, consistirá en la reparación o sustitución sin costo de las piezas que presenten defectos de material o de fabricación y que no hayan sido utilizadas incorrectamente, mane-
jadas descuidadamente o reparadas incorrectamente por personas que no sean el Vendedor o una Estación de servicio autorizada. Para efectuar una reclamación bajo esta Garantía Limitada,
usted debe devolver el producto completo, con el transporte prepagado, a cualquier Centro de servicio de fábrica SKIL o Estación de servicio SKIL autorizada. Para localizar Estaciones de
servicio autorizadas de herramientas mecánicas SKIL, sírvase visitar www.skil.com o llame al 1-877-SKIL-999 (1-877-754-5999).
ESTA GARANTÍA LIMITADA NO SE APLICA A ARTÍCULOS ACCESORIOS TALES COMO HOJAS PARA SIERRAS CIRCULARES, BROCAS PARA TALADROS, BROCAS PARA FRESADORAS,
HOJAS PARA SIERRAS DE VAIVÉN, CORREAS PARA LIJAR, RUEDAS DE AMOLAR Y OTROS ARTÍCULOS RELACIONADOS.
TODAS LAS GARANTÍAS IMPLÍCITAS TENDRÁN UNA DURACIÓN LIMITADA A UN AÑO A PARTIR DE LA FECHA DE COMPRA. ALGUNOS ESTADOS DE LOS EE.UU. Y ALGUNAS PROVIN-
CIAS CANADIENSES NO PERMITEN LIMITACIONES EN CUANTO A LA DURACIÓN DE UNA GARANTÍA IMPLÍCITA, POR LO QUE ES POSIBLE QUE LA LIMITACIÓN ANTERIOR NO SEA
APLICABLE EN EL CASO DE USTED.
EL VENDEDOR NO SERÁ RESPONSABLE EN NINGÚN CASO DE NINGÚN DAÑO INCIDENTAL O EMERGENTE (INCLUYENDO PERO NO LIMITADO A RESPONSABILIDAD POR PÉRDIDA
DE BENEFICIOS) QUE SE PRODUZCA COMO CONSECUENCIA DE LA VENTA O UTILIZACIÓN DE ESTE PRODUCTO. ALGUNOS ESTADOS DE LOS EE.UU. Y ALGUNAS PROVINCIAS CANA-
DIENSES NO PERMITEN LA EXCLUSIÓN O LIMITACIÓN DE LOS DAÑOS INCIDENTALES O EMERGENTES, POR LO QUE ES POSIBLE QUE LA LIMITACIÓN O EXCLUSIÓN ANTERIOR NO
SEA APLICABLE EN EL CASO DE USTED.
ESTA GARANTÍA LIMITADA LE CONFIERE A USTED DERECHOS LEGALES ESPECÍFICOS Y ES POSIBLE QUE USTED TAMBIÉN TENGA OTROS DERECHOS QUE VARÍAN DE ESTADO A
ESTADO EN LOS EE.UU., DE PROVINCIA A PROVINCIA EN CANADÁ Y DE PAÍS EN PAÍS.
ESTA GARANTÍA LIMITADA SE APLICA SÓLO A LOS PRODUCTOS VENDIDOS EN LOS ESTADOS UNIDOS DE AMÉRICA, CANADÁ Y EL ESTADO LIBRE ASOCIADO DE PUERTO RICO.
PARA COBERTURA DE GARANTÍA EN OTROS PAÍSES, PÓNGASE EN CONTACTO CON SU DISTRIBUIDOR O IMPORTADOR LOCAL DE SKIL.
Exportado por: Robert Bosch Tool Corporation Mt. Prospect, IL 60056-2230, E.U.A.
Importado a México por: Robert Bosch, S.A. de C.V., Calle Robert Bosch No. 405, Zona Industrial, Toluca, Edo. de México, C.P. 50070, Tel. (722) 2792300
Gebruikershandleiding.com neemt misbruik van zijn services uitermate serieus. U kunt hieronder aangeven waarom deze vraag ongepast is. Wij controleren de vraag en zonodig wordt deze verwijderd.
Product:
Spelregels forum
Om tot zinvolle vragen te komen hanteren wij de volgende spelregels:
lees eerst de handleiding door;
controleer of uw vraag al eerder door iemand anders is gesteld;
probeer uw vraag zo duidelijk mogelijk te stellen;
heeft u een probleem en al geprobeerd om dit op te lossen, vermeld dit erbij aub;
heeft u een oplossing gekregen van een bezoeker dan horen wij dat graag in dit forum;
wilt u een reactie geven op een vraag of antwoord, gebruik dan niet dit formulier maar klik op de knop 'reageer op deze vraag';
uw vraag wordt direct op de website gezet; vermijd daarom persoonlijke gegevens in te vullen;
Belangrijk! Als er een antwoord wordt gegeven op uw vraag, dan is het voor de gever van het antwoord nuttig om te weten als u er wel (of niet) mee geholpen bent! Wij vragen u dus ook te reageren op een antwoord.
Belangrijk! Antwoorden worden ook per e-mail naar abonnees gestuurd. Laat uw emailadres achter op deze site, zodat u op de hoogte blijft. U krijgt dan ook andere vragen en antwoorden te zien.
Abonneren
Abonneer u voor het ontvangen van emails voor uw Skil 3335-01 bij:
nieuwe vragen en antwoorden
nieuwe handleidingen
U ontvangt een email met instructies om u voor één of beide opties in te schrijven.
Ontvang uw handleiding per email
Vul uw emailadres in en ontvang de handleiding van Skil 3335-01 in de taal/talen: Engels, Frans, Spaans als bijlage per email.
De handleiding is 3,82 mb groot.
U ontvangt de handleiding per email binnen enkele minuten. Als u geen email heeft ontvangen, dan heeft u waarschijnlijk een verkeerd emailadres ingevuld of is uw mailbox te vol. Daarnaast kan het zijn dat uw internetprovider een maximum heeft aan de grootte per email. Omdat hier een handleiding wordt meegestuurd, kan het voorkomen dat de email groter is dan toegestaan bij uw provider.
Stel vragen via chat aan uw handleiding
Stel uw vraag over deze PDF
Uw handleiding is per email verstuurd. Controleer uw email
Als u niet binnen een kwartier uw email met handleiding ontvangen heeft, kan het zijn dat u een verkeerd emailadres heeft ingevuld of dat uw emailprovider een maximum grootte per email heeft ingesteld die kleiner is dan de grootte van de handleiding.
Er is een email naar u verstuurd om uw inschrijving definitief te maken.
Controleer uw email en volg de aanwijzingen op om uw inschrijving definitief te maken
U heeft geen emailadres opgegeven
Als u de handleiding per email wilt ontvangen, vul dan een geldig emailadres in.
Uw vraag is op deze pagina toegevoegd
Wilt u een email ontvangen bij een antwoord en/of nieuwe vragen? Vul dan hier uw emailadres in.