voltage due to lightning, etc.) or if it is operated incorrectly, it may
malfunction.
If such a problem occurs, do the following:
1Set the system to the stand-by mode and turn the power on
again.
2
If the system is not restored in the previous operation, unplug and
plug in the subwoofer/amplifier unit, and then turn the power on.
Note:
If neither operation above restores the system, clear all the memory
by resetting it.
"Clearing all the memory (reset)
1Press the ON/STAND-BY button to enter the power stand-by
mode.
2
While pressing down the button and the FUNCTION button,
press the ON/STAND-BY button until "SYS RESTORE" appears.
Caution:
When you reset, all data is deleted and the settings return to the
default. (DVD initial settings are retained.)
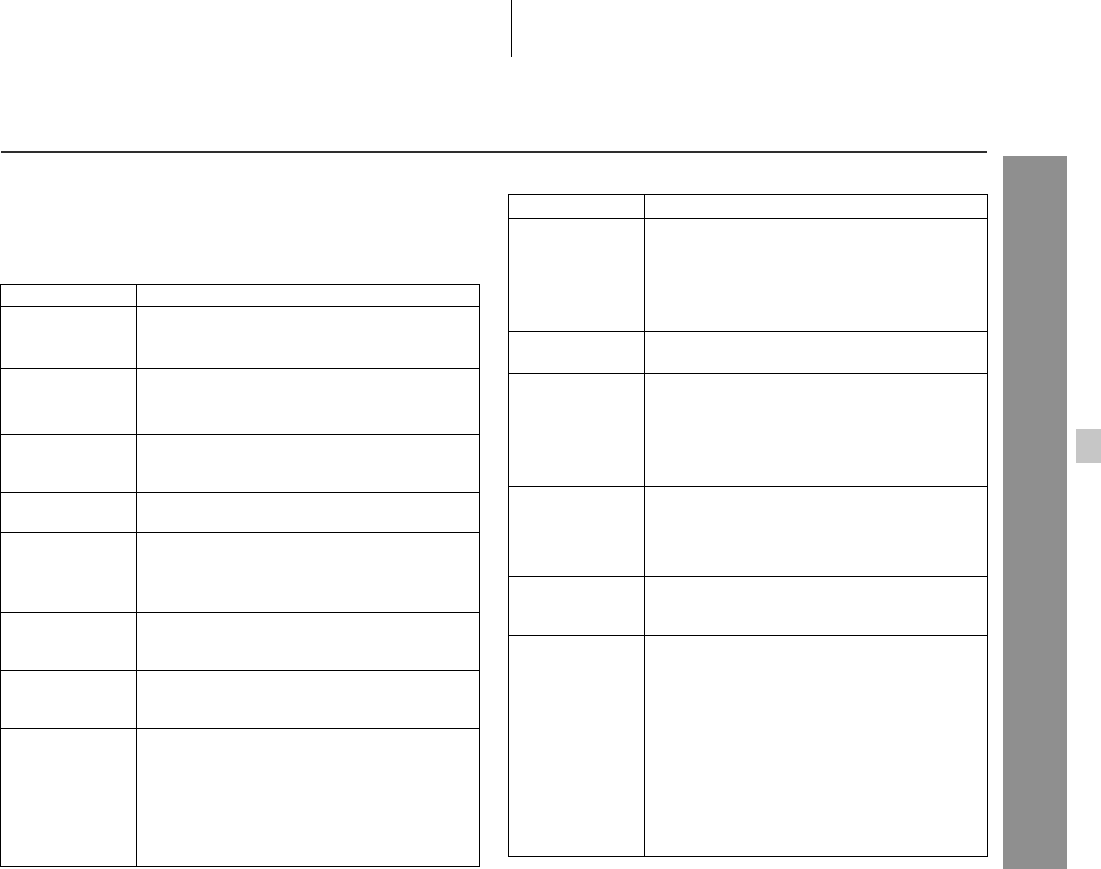
SymptomPossible cause
The radio makes
unusual noises
continuously.
!Is the system placed near the TV or comput-
er?
!Is the FM antenna or AM loop antenna
placed properly? Move the antenna away
from the AC power cord if it's located nearby.
The preset chan-
nel cannot be re-
called.
!Did you remove the plug from the wall jack,
or did a power failure occur?
Set the channel again.
SymptomPossible cause
The remote con-
trol does not op-
erate.
!Is the battery polarity correct?
!Are the batteries dead?
!Is the distance or angle incorrect?
!Are there any obstructions in front of the
main unit?
!Is the remote control sensor exposed to
strong light (inverter fluorescent light, direct
sunlight, etc.)?
!Is the remote control for another equipment
used simultaneously?
The system can-
not be turned on
with the remote
control.
!Is the AC power cord of the subwoofer/am-
plifier unit plugged in?
!Are the batteries inserted?
65
HT-X1
References
Maintenance
"Cleaning the laser pickup lens
In order to ensure proper operation of the DVD player, preventative
maintenance (cleaning of the laser pickup lens) should be per-
formed periodically. Lens cleaners are commercially available. Con-
tact your local DVD software dealer for options.
"Cleaning the cabinet
Periodically wipe the cabinet with a soft cloth and a diluted soap
solution, then with a dry cloth.
Caution:
!Do not use chemicals for cleaning (gasoline, paint thinner, etc.).
It may damage the cabinet finish.
!Do not apply oil to the inside of each component as this may
cause malfunctions.
"Care of discs
Discs are fairly resistant to damage, however mistracking can occur
due to an accumulation of dirt on the disc surface. Follow the guide-
lines below for maximum enjoyment from your disc collection and
player.
!Do not write on either side of the disc, particularly the non-label
side from which signals are read. Do not mark this surface.
!Keep your discs away from direct sunlight, heat, and excessive
moisture.
!Always hold the discs by the edges. Fingerprints, dirt, or water on
the discs can cause noise or mistracking. If a disc is dirty or does
not play properly, clean it with a soft, dry cloth, wiping straight out
from the center, along the radius.
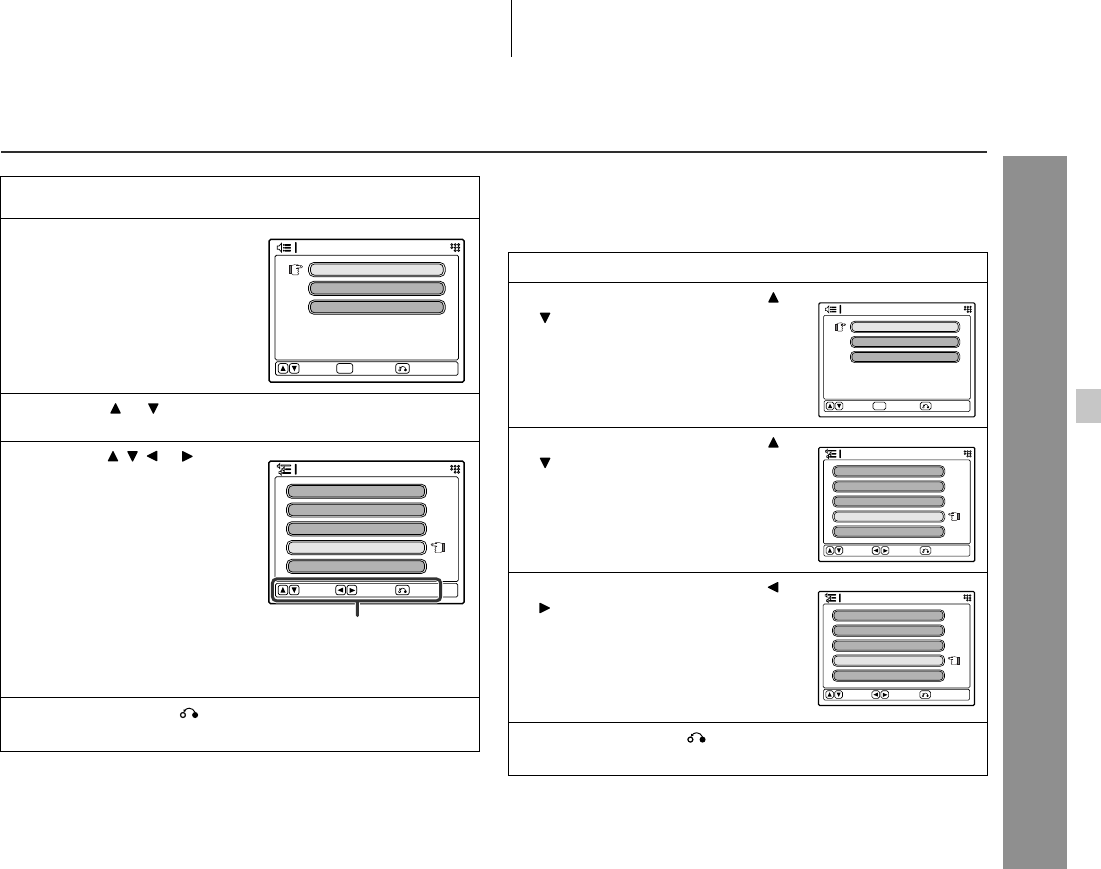
Error indicators and warnings
When you load an unplayable disc or fail to perform operations
properly, the following messages are displayed on the TV screen.
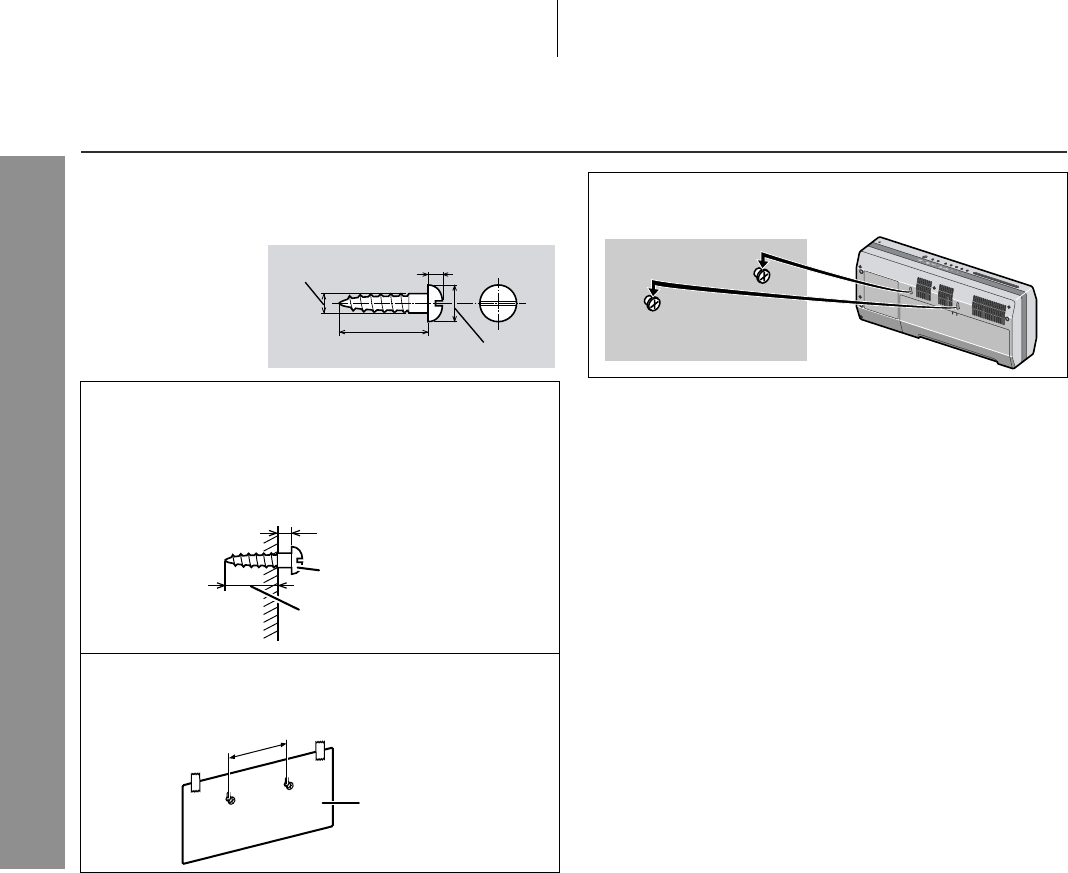
Optional accessory
Use only the specified optional accessory to operate this product
properly.
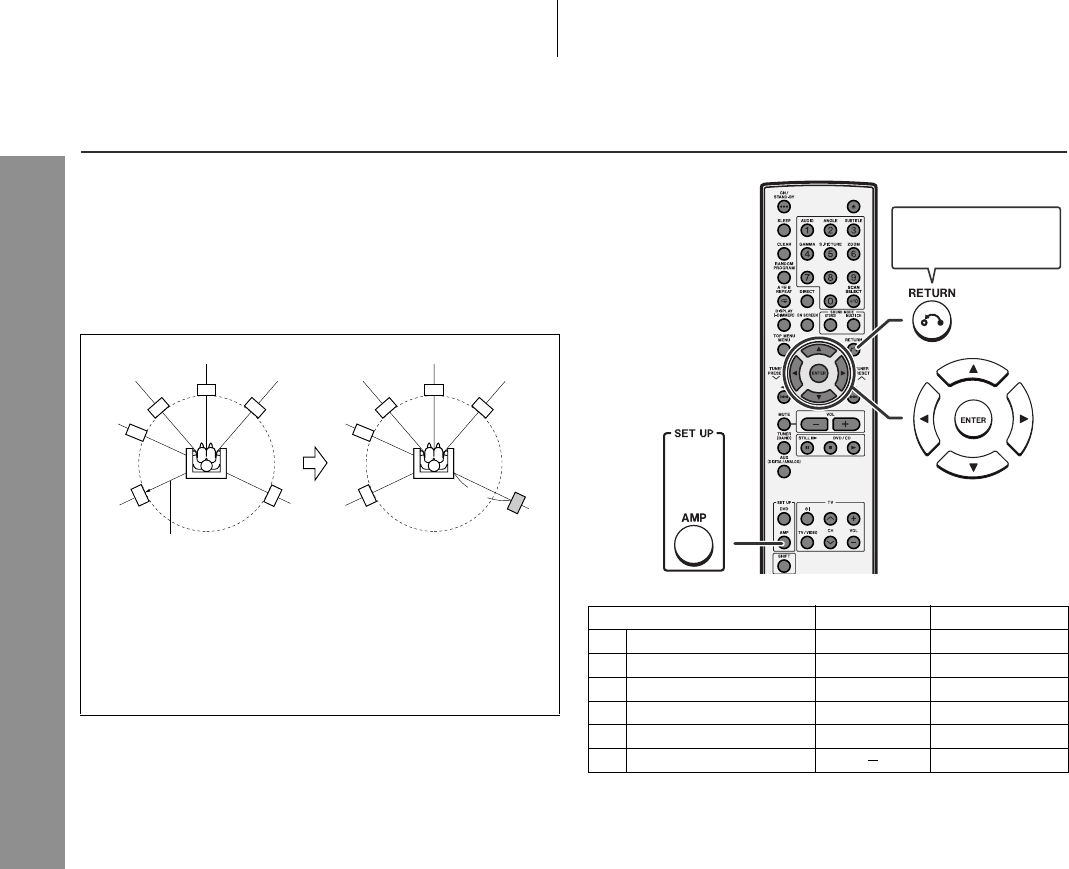
For speaker installation, read instructions supplied with stands.
!Since the disc insertion slot fac-
es upward, dust may accumu-
late on it. Clean it with a cotton
swab, etc.
NOYES
Correct
TV screenMeaning
The disc cannot be played with this
system or it is loaded in an incor-
rect way.
The region number of the DVD is
neither "1" nor "ALL".
The disc does not support the oper-
ation described in this operation
manual.
FLOOR SPEAKER STAND
Model: AD-AT11ST
Disc Error
Wrong Region
66
HT-X1
References
Specifications
As part of our policy of continuous improvement, SHARP reserves
the right to make design and specification changes for product
improvement without prior notice. The performance specification fig-
ures indicated are nominal values of production units. There may be
some deviations from these values in individual units.
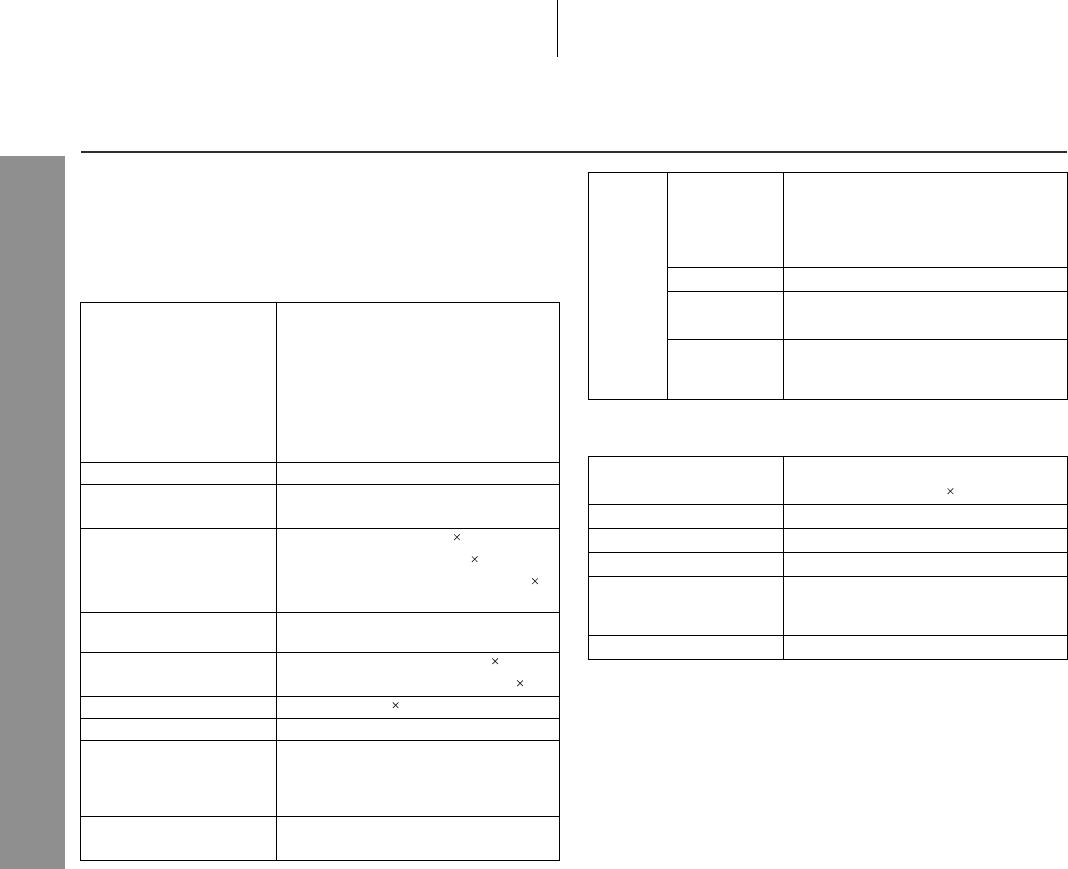
"Main unit
"Front speakers
DimensionsIncluding the stand
Width: 17" (430 mm)
Height: 7-5/8" (192 mm)
Depth: 4" (100 mm)
Excluding the stand
Width: 17" (430 mm)
Height: 6-3/4" (171 mm)
Depth: 3-1/2" (88 mm)
Weight4.9 lbs. (2.2 kg)
Frequency rangeFM: 87.5 - 108 MHz
AM: 530 - 1,720 kHz
Video output terminalsVideo output: RCA type 1
S-video output: S-terminal 1
Component video output: RCA type 3
(Y/PB/PR)
Audio output terminalHeadphones: 16 - 50 ohms
(recommended: 32 ohms)
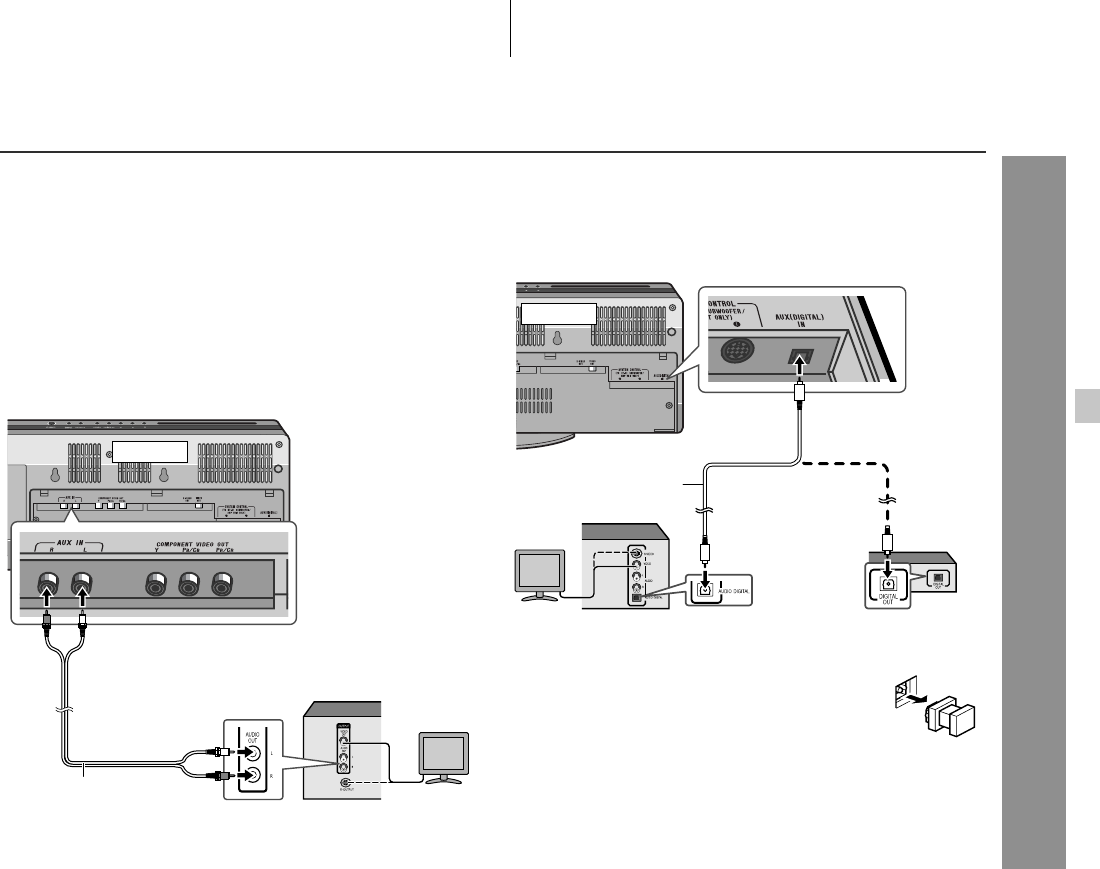
Audio input terminalsAudio input (AUX): RCA type 2
Optical digital input: Square type 1
Other terminalSystem control 2
Signal systemNTSC color
Supported disc typesDVD (region number 1 or ALL),
DVD-R/RW (video mode),
DVD+R/RW (video mode), audio CD,
CD-R, CD-RW
Video signalHorizontal resolution: 500 lines
S/N ratio: 70 dB
Audio
signal
Frequency
characteris-
tics
Linear PCM DVD:
4 Hz to 22 kHz (sampling rate: 48 kHz)
4 Hz to 44 kHz (sampling rate: 96 kHz)
CD: 4 Hz to 20 kHz
S/N ratioCD: 96 dB (1 kHz)
Dynamic
range
Linear PCM DVD: 95 dB
CD: 94 dB
Total har-
monic distor-
tion ratio
0.006 % maximum
TypeFull range system (magnetic shield)
3-1/8" (8 cm) speaker 1
Maximum input power100 W
Rated input power50 W
Impedance4 ohms
DimensionsWidth: 4-1/8" (105 mm)
Height: 8-1/8" (205 mm)
Depth: 4-1/8" (105 mm)
Weight2.0 lbs. (0.9 kg)/each
67
HT-X1
References
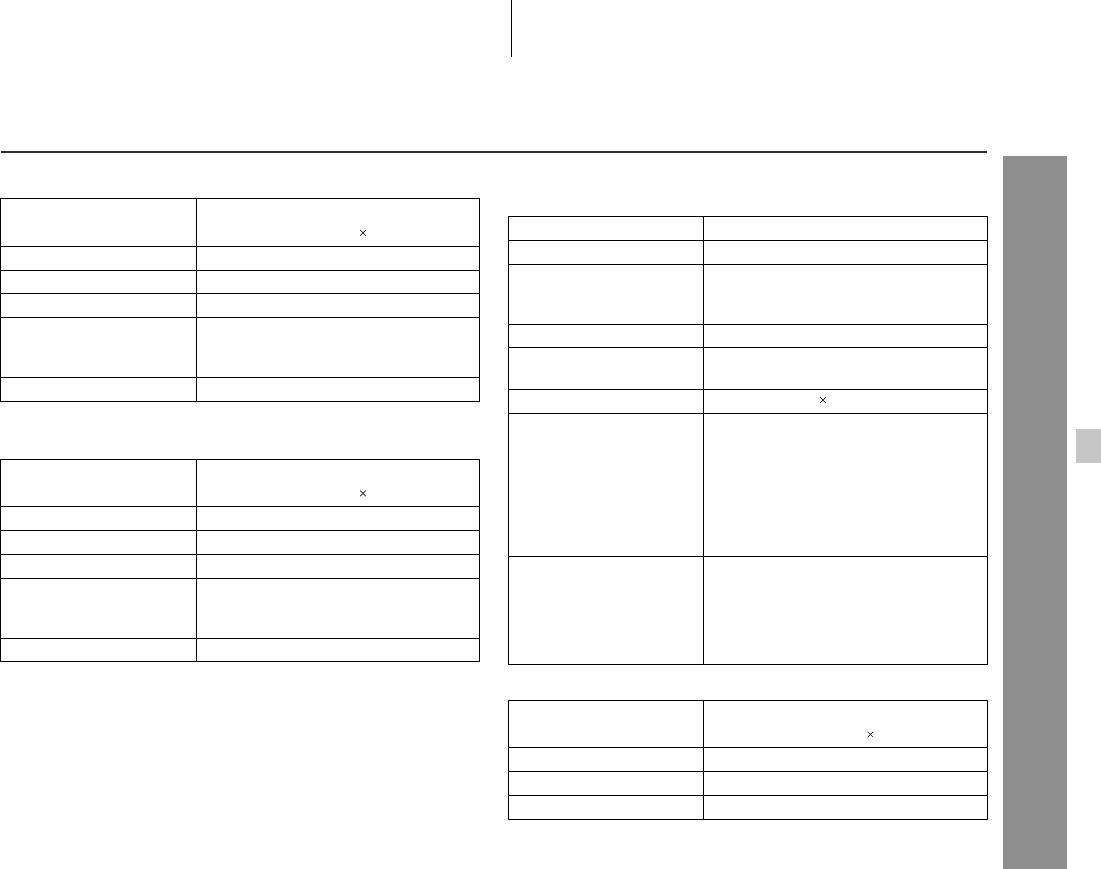
"Surround speakers
"Center speaker
"Subwoofer/amplifier unit
Amplifier:
Subwoofer:
TypeFull range system
3-1/8" (8 cm) speaker 1
Maximum input power100 W
Rated input power50 W
Impedance4 ohms
DimensionsWidth: 4-1/8" (105 mm)
Height: 8-1/8" (205 mm)
Depth: 4-1/8" (105 mm)
Weight1.7 lbs. (0.75 kg)/each
TypeFull range system (magnetic shield)
3-1/8" (8 cm) speaker 1
Maximum input power100 W
Rated input power50 W
Impedance4 ohms
DimensionsWidth: 7-1/4" (185 mm)
Height: 4-7/8" (123 mm)
Depth: 4-1/2" (115 mm)
Weight2.0 lbs. (0.9 kg)
Power sourceAC 120 V, 60 Hz
Power consumption208 W
DimensionsWidth: 7-7/8" (200 mm)
Height: 15" (380 mm)
Depth: 17-1/2" (443 mm)
Weight23.2 lbs. (10.5 kg)
Speaker terminalsFront speakers, center speaker and
surround speakers: more than 4 ohms
Other terminalsSystem control 2
Power output (FTC)50 watts minimum RMS per channel
into 4 ohms from 150 Hz to 20 kHz,
10% total harmonic distortion
Subwoofer:
50 watts minimum RMS into 4 ohms
from 20 Hz to 150 Hz, 10% total
harmonic distortion
Rated power outputFront: 50 W + 50 W, Center: 50 W,
Surround: 50 W + 50 W
(4 ohms at 1 kHz, 10 % T.H.D.)
Subwoofer: 50 W
(4 ohms at 100 Hz, 10 % T.H.D.)
TypeBass reflex, 1 way system
6-1/2" (16 cm) woofer 1
Maximum input power100 W
Rated input power50 W
Impedance4 ohms
SHARP ELECTRONICS CORPORATION
Sharp Plaza, Mahwah, New Jersey 07430-2135
SHARP CORPORATION
9906
Printed in China
TINSEA050SJZZ
05B N HK 1
SHARP ELECTRONICS CORPORATION
Sharp Plaza, Mahwah, New Jersey 07430-2135
SHARP CORPORATION
9906
CONSUMER LIMITED WARRANTY
SHARP ELECTRONICS CORPORATION warrants to the first consumer purchaser that this Sharp brand product (the “Product”), when shipped in its original con-
tainer, will be free from defective workmanship and materials, and agrees that it will, at its option, either repair the defect or replace the defective Product or part thereof
with a new or remanufactured equivalent at no charge to the purchaser for parts or labor for the period(s) set forth below.
This warranty does not apply to any appearance items of the Product nor to the additional excluded item(s) set forth below nor to any Product the exterior of which has
been damaged or defaced, which has been subjected to improper voltage or other misuse, abnormal service or handling, or which has been altered or modified in
design or construction.
In order to enforce the rights under this limited warranty, the purchaser should follow the steps set forth below and provide proof of purchase to the servicer.
The limited warranty described herein is in addition to whatever implied warranties may be granted to purchasers by law. ALL IMPLIED WARRANTIES INCLUDING
THE WARRANTIES OF MERCHANTABILITY AND FITNESS FOR USE ARE LIMITED TO THE PERIOD(S) FROM THE DATE OF PURCHASE SET FORTH BELOW.
Some states do not allow limitations on how long an implied warranty lasts, so the above limitation may not apply to you.
Neither the sales personnel of the seller nor any other person is authorized to make any warranties other than those described herein, or to extend the duration of any
warranties beyond the time period described herein on behalf of Sharp.
The warranties described herein shall be the sole and exclusive warranties granted by Sharp and shall be the sole and exclusive remedy available to the purchaser.
Correction of defects, in the manner and for the period of time described herein, shall constitute complete fulfillment of all liabilities and responsibilities of Sharp to the
purchaser with respect to the Product, and shall constitute full satisfaction of all claims, whether based on contract, negligence, strict liability or otherwise. In no event
shall Sharp be liable, or in any way responsible, for any damages or defects in the Product which were caused by repairs or attempted repairs performed by anyone
other than an authorized servicer. Nor shall Sharp be liable or in any way responsible for any incidental or consequential economic or property damage. Some states
do not allow the exclusion of incidental or consequential damages, so the above exclusion may not apply to you.
THIS WARRANTY GIVES YOU SPECIFIC LEGAL RIGHTS. YOU MAY ALSO HAVE OTHER RIGHTS WHICH VARY FROM STATE TO STATE.
Model Specific Section
Your Product Model Number & Description:
(Be sure to have this information available when you need service for your Product.)
Warranty Period for this Product:One (1) year parts and labor from the date of purchase.
Additional Item(s) Excluded from Warranty Coverage (if any):Non-functional accessories, supplies, and consumable items.
Where to Obtain Service:At a Sharp Authorized Servicer located in the United States.
To find a location of the nearest Sharp Authorized Servicer, call Sharp toll free at 1-800-BE-SHARP.
What to do to Obtain Service:Ship prepaid or carry in your Product to a Sharp Authorized Servicer.
Be sure to have Proof of Purchase available. If you ship the Product, be sure it is insured and
packaged securely.
TO OBTAIN SUPPLY, ACCESSORY OR PRODUCT INFORMATION, CALL 1-800-BE-SHARP.
Gebruikershandleiding.com neemt misbruik van zijn services uitermate serieus. U kunt hieronder aangeven waarom deze vraag ongepast is. Wij controleren de vraag en zonodig wordt deze verwijderd.
Product:
Spelregels forum
Om tot zinvolle vragen te komen hanteren wij de volgende spelregels:
lees eerst de handleiding door;
controleer of uw vraag al eerder door iemand anders is gesteld;
probeer uw vraag zo duidelijk mogelijk te stellen;
heeft u een probleem en al geprobeerd om dit op te lossen, vermeld dit erbij aub;
heeft u een oplossing gekregen van een bezoeker dan horen wij dat graag in dit forum;
wilt u een reactie geven op een vraag of antwoord, gebruik dan niet dit formulier maar klik op de knop 'reageer op deze vraag';
uw vraag wordt direct op de website gezet; vermijd daarom persoonlijke gegevens in te vullen;
Belangrijk! Als er een antwoord wordt gegeven op uw vraag, dan is het voor de gever van het antwoord nuttig om te weten als u er wel (of niet) mee geholpen bent! Wij vragen u dus ook te reageren op een antwoord.
Belangrijk! Antwoorden worden ook per e-mail naar abonnees gestuurd. Laat uw emailadres achter op deze site, zodat u op de hoogte blijft. U krijgt dan ook andere vragen en antwoorden te zien.
Abonneren
Abonneer u voor het ontvangen van emails voor uw Sharp HTX1 bij:
nieuwe vragen en antwoorden
nieuwe handleidingen
U ontvangt een email met instructies om u voor één of beide opties in te schrijven.
Ontvang uw handleiding per email
Vul uw emailadres in en ontvang de handleiding van Sharp HTX1 in de taal/talen: Engels als bijlage per email.
De handleiding is 3,45 mb groot.
U ontvangt de handleiding per email binnen enkele minuten. Als u geen email heeft ontvangen, dan heeft u waarschijnlijk een verkeerd emailadres ingevuld of is uw mailbox te vol. Daarnaast kan het zijn dat uw internetprovider een maximum heeft aan de grootte per email. Omdat hier een handleiding wordt meegestuurd, kan het voorkomen dat de email groter is dan toegestaan bij uw provider.
Stel vragen via chat aan uw handleiding
Stel uw vraag over deze PDF
Uw handleiding is per email verstuurd. Controleer uw email
Als u niet binnen een kwartier uw email met handleiding ontvangen heeft, kan het zijn dat u een verkeerd emailadres heeft ingevuld of dat uw emailprovider een maximum grootte per email heeft ingesteld die kleiner is dan de grootte van de handleiding.
Er is een email naar u verstuurd om uw inschrijving definitief te maken.
Controleer uw email en volg de aanwijzingen op om uw inschrijving definitief te maken
U heeft geen emailadres opgegeven
Als u de handleiding per email wilt ontvangen, vul dan een geldig emailadres in.
Uw vraag is op deze pagina toegevoegd
Wilt u een email ontvangen bij een antwoord en/of nieuwe vragen? Vul dan hier uw emailadres in.