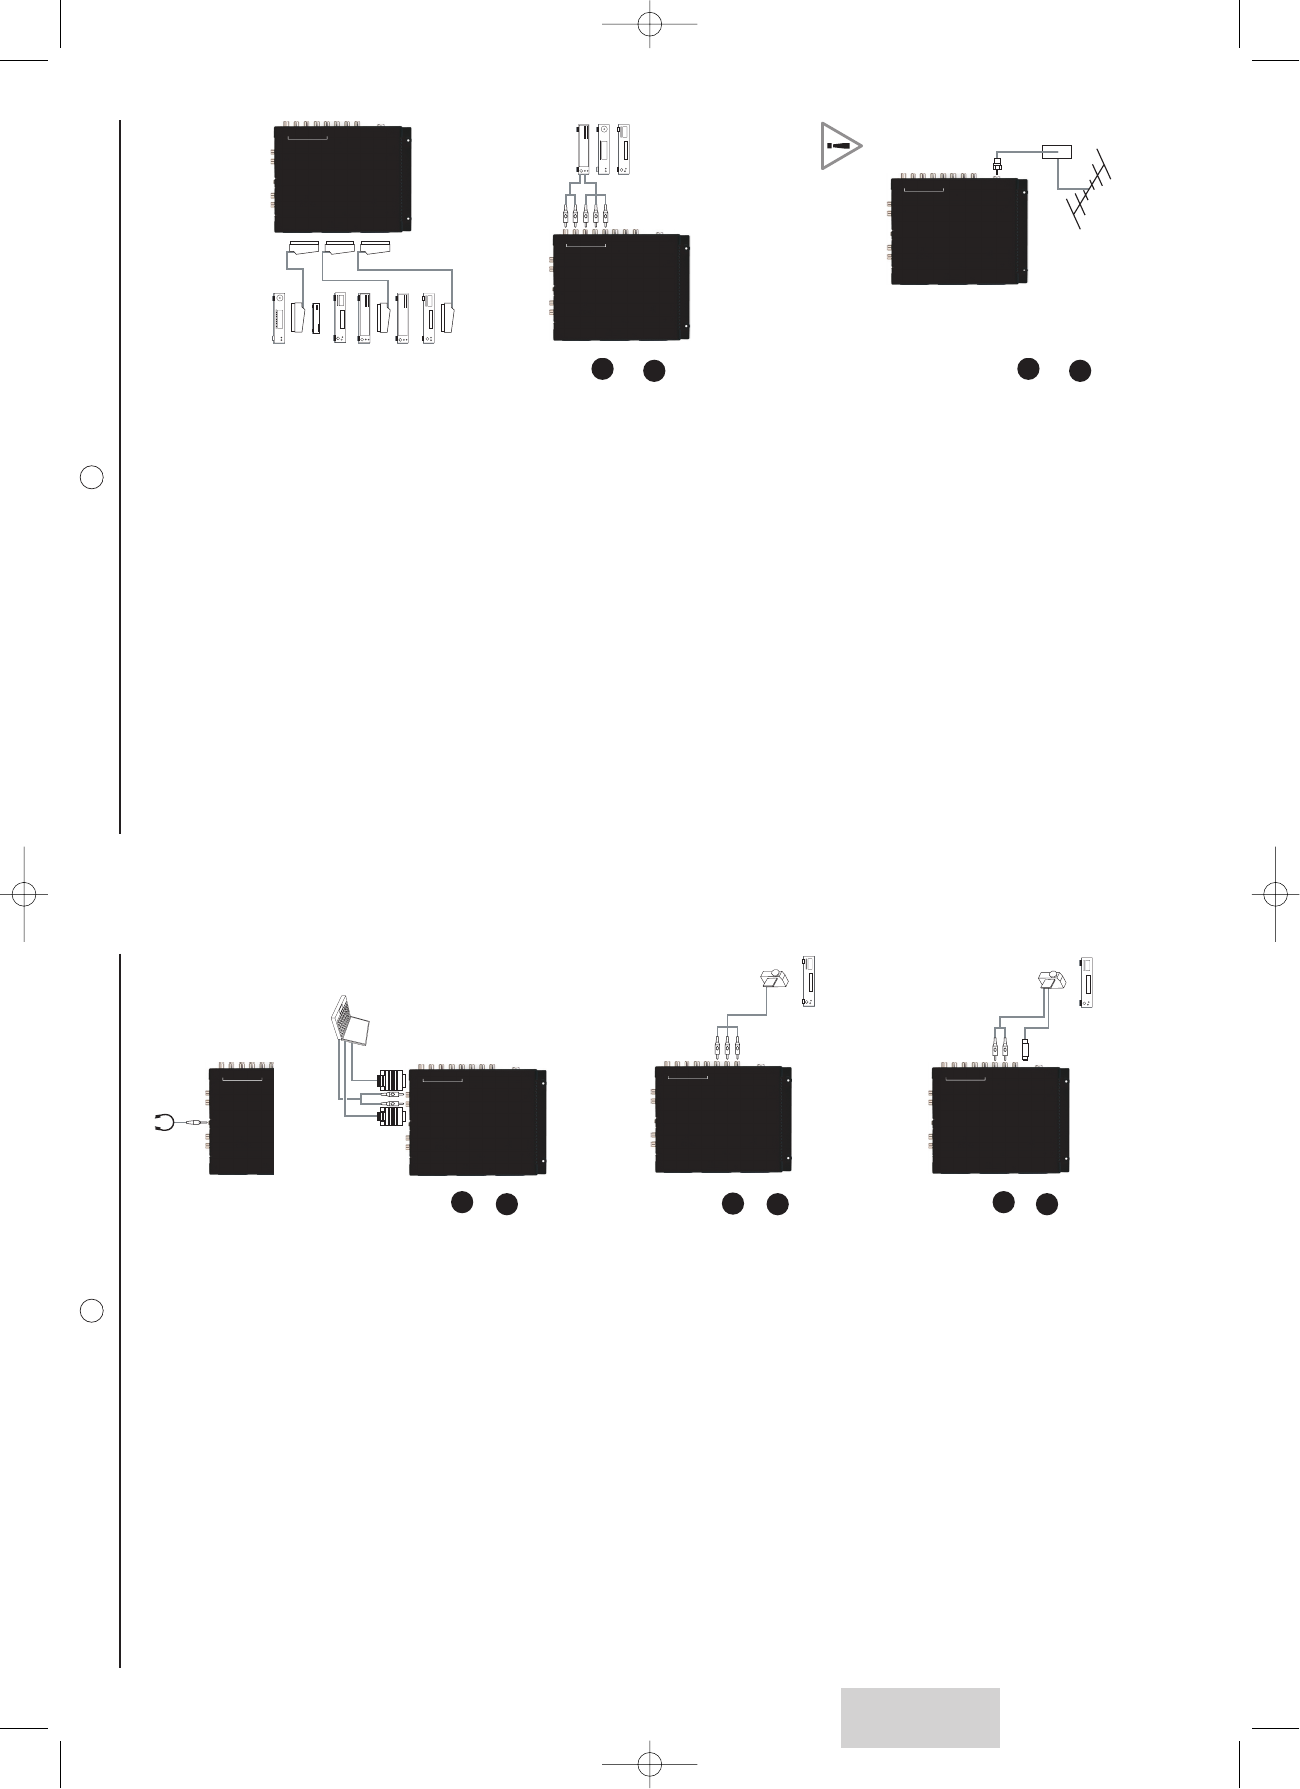
33459
8
Verklein
Vergroot
Pagina terug
1/12
Pagina verder
1. Important safety information
1.1. Safety
Respect all maintenance advice, safety precautions and instructions recommended in this user booklet for your
safety and to prolong the working life of the equipment.
Definitions
CAUTION
The exclamation mark within a triangle is intended to tell the user about important operating and ser-
vicing instructions.
WARNING
The lightning flash with an arrowhead within a triangle is intended to tell the user that parts inside
the product are an electric shock hazard.
Safety regulations
This LCD TV is a class 1 appliance; it MUST be connected to an electrical wall socket equipped
with an earth.
This LCD TV is designed to function:
with a 220-240 V, 50 Hz, AC (alternating current) network,
at an ambient temperature between +5°C and +35°C,
in areas with humidity less than 85%.
This LCD TV uses high voltages. Never attempt to access the interior of the device.
Only suitably qualified persons are authorised to do this.
Do not open or dismantle this product, as this will expose you to risk of electrocution.
Damage:
Never use your TV if it is damaged in any way. If you break the LCD glass, avoid any contact with
bare hands. Always place your TV on a flat level surface avoiding anywhere that may be subject to
vibrations.
Weather:
It is advisable to unplug the power supply, and the aerial antenna during an thunder storm.
Moisture:
Do not allow your TV to be exposed to rain, moisture and dust. If any liquid is spilt into your TV it
can cause serious damage. If you spill any liquid into your TV switch it off at the mains immediate-
ly. Contact your store.
Interference:
Do not place your TV on or near appliances, which may cause electromagnetic interference. If you
do, it may adversely affect the working of the unit, and cause a distorted picture or sound.
Temperature:
Avoid extremes of temperature, either hot or cold, place your TV well away from heat sources such
as radiators or gas/electric fire.
Ventilation:
The TV must be well ventilated. Do not cover your TV or position in a small confined space. It is
recommended that you leave a 10cm gap all around your TV.
Covers:
Do not remove any fixed covers as this may expose dangerous voltage.
Standby:
Do not leave your TV in standby for long periods of time e.g. while on holiday.
2
TABLE OF CONTENTS
1. Important safety information 2
1.1. Safety 2
1.2. Maintenance 3
2. Overview of the LCD TV 4
2.1. Unpacking 4
2.2. Inserting the remote control batteries 4
2.3. Connecting power 5
3. First installation 5
3.1. Product functions 5
4. Remote control 7
5. Getting started 8
5.1 Basic connections 8
5.1.1. RF IN port 9
5.1.2. COMPONENT port 9
5.1.3. SCART ports 9
5.1.4. AV4S input 10
5.1.5. AV4 input 10
5.1.6. MULTIMEDIA port 10
5.1.7. HEADPHONE port 10
5.1.8. Hi-Fi OUTPUT port 11
6. Inserting memory flash cards 11
7. Using the OSD menus 12
7.1. Changing picture settings 12
7.2. Changing PC settings 13
7.2.1 PC mode 13
7.3. Changing audio settings 14
7.3.1. Advanced settings 14
7.4. Changing system settings 15
7.4.1. Protection 15
7.5. Channel search 16
7.5.1. Auto search 16
7.5.2. Manual search 16
7.5.3. Program edit 17
7.5.4. Sort 17
7.6. Source edit 18
7.6.1. Scart sources auto 18
7.6.2. Naming 18
7.6.3. Source enable/disable 19
7.6.4. Video noise reduction 19
7.6.5. PIP/PAP 19
8. Diagnosing trouble shooting 20
9. Technical characteristics 21
1
ENGLISH
Anglais LU 27 A5.qxd 15/12/2004 10:08 Page 1
2. Overview of the LCD TV
Congratulations on purchasing the SAGEM AXIUM
TM
HD-L27 LCD colour television. This product has been desi-
gned to provide you with a rich audio and video experience, along with ease of use and convenient connection.
This television enables you to watch aerial or cable free to view television channels, connect a VCR, digital Set
Top Box, and a decoder or DVD player to watch your favourite movies, or connect a computer to use the display
as a monitor.You can also use the television set like a graphics memory card and display your digital photographs.
The TV is equipped with convenient control buttons located on the side panel and a handy remote control to let
you adjust the TV settings and customize the TV preferences through an easy-to-use menu displayed on the
screen.
2.1. Unpacking
When you unpack this LCD TV, make sure the box contains the following items:
If any of these items appears to be missing or damaged, please contact your vendor or authorized service per-
sonnel for assistance.
2.2. Inserting the remote control batteries
Insert the two AAA batteries provided into the remote control as described below:
Do not mix old and new batteries or batteries of different types together.
Do not short-circuit, disassemble, heat or fire batteries.
Remove the batteries to avoid damage from possible battery leakage if you anticipate that the remote
control will not be used for an extended period of time.
Please handle the remote control with care. Avoid dropping it, getting it wet, or placing it in direct sun
light, near a heater or in an area of high humidity.
43
Batteries:
Please use only suitable batteries that complies with the manufacturer's specifications (see § 9.
"technical specifications"). When defective or completely used, pay particular attention to
environmental matters and throw them in places provided for this effect in accordance to the current
regulations.
Batteries are easily swallowed by young children. Do not allow young children to play with remote
control unit.
Screen Burn:
ATTENTION! Please note that some programs are broadcast with a logo that will appear in the cor-
ner of your TV screen. Some of these logos can be very bright and may cause damage by perma-
nently making the logo on the screen. To prevent this, avoid leaving channels displaying a logo for
prolonged periods of time, particularly when the TV is not being watched.
Only use suitable batteries that comply with the maker's specifications (see § 2.2).
the batteries supplied are not rechargeable;
pay particular attention to environmental matters;
take the defective or used batteries to the places provided for this effect in accordance with
current regulations; never throw them in the dustbin.
1.2. Maintenance
Before doing anything, disconnect the mains lead from the wall socket.
Clean the cabinet using a soft, slightly damp cloth and a non-abrasive and non- wax detergent.
Never use Benzene, alcohol or petroleum-based cleaning products as these could damage the finish.
Clean the screen carefully using a soft, damp cloth lightly impregnated with a soap solution.
The display of your LCD TV is a very performing but delicate part. Touching it can harm the
internal electronic components and damage pixels. In order to keep initial performance of
your Sagem LCD TV as long as possible, avoid touching the screen.
SAGEM AXIUM
TM
HD-L27 LCD Colour Television
Remote control
Batteries AAA (*2)
User manual
Power cord
RF cable
1
Pull the latch on the battery
compartment, cover the rear
of the remote control and
remove the cover.
3
2
Replace the cover and make
sure that snaps are securely
back into place.
Insert the two supplied batte-
ries. Check the + and - ends
of the batteries before inser-
ting them in the compartment.
Anglais LU 27 A5.qxd 15/12/2004 10:08 Page 3
Rear View
6
2.3. Connecting power
Connect the supplied power cord to the AC IN connector on the rear of your TV.
Connect the other end of the power cord to an earth power outlet.
3. First installation
3.1. Product functions
The following section describes the various functions of the LCD TV. Please take a few moments to get used to
the product and its control panel before using it.
Front View
5
ENGLISH
MENU
SD/MMCSMMS
CF
Pr-
Pr+
+
-
2
9
8
7
3
4
5
6
1 1
Parts Function
1 Speakers Produces stereo and Virtual Dolby Surround sound.
2 Turns power on or off.
3 Pr-/Pr+ Increases or decreases program numbers.
4 Increases or decreases the volume.
5 MENU Turns the On-screen Display (OSD) menu on or off.
6 Press each time you want to switch between TV and Source inputs.
7 CF card slot Insert a CF card in this slot.
8 SD/MMC,MS slot Insert an SD/MMC or MS card in this slot.
9 SM card slot Insert an SM card in this slot.
+
-
ANT
AV4 /S
AV4/CVBS
R
L
Y
Pb/Cb
Pr/Cr
R
RL R
HEADPHONE
L
L
PC/DVI
AUDIO
IN
H
D
T
V
S
C
A
R
T
1
S
C
A
R
T
2
S
C
A
R
T
3
HI-FI
OUTPUT
7
8
5
4
3
2
1
6
Connectors Function
1 ANT Connect your Roof antenna or coaxial cord from local TV service provider.
2 AV4/S, R/L Connect the S-Video and (R/L) audio.
3 AV4/CVBS, R/L Connect the video composite and audio (R/L) (Same as AV4S)
4 Component, R/L Connect the audio and component video output (progressive or interlaced)
connectors of your A/V device, including High Definition devices such as dedica-
ted set top boxes.
5 PC/DVI, R/L Connect the audio outputs and VGA or DVI output of your PC or HDTV decoder.
6 HEADPHONE Connect your external headphones.
7 Hi-Fi OUTPUT Connect an external amplifier with extra speakers.
8 SCART1, SCART2,
SCART3
Connect the SCART output of your A/V device.
FIRST INSTALLATION
LANGUAGE
COUNTRY
AUTO SEARCH
B/G
PR: 1
FREQUENCY: 45.00MHz
NO
UK
ENGLISH
: SELECT : ADJUST
: EXIT OSD
MENU
Option Function
LANGUAGE Select your language.
COUNTRY Select your country.
AUTO SEARCH
Launch Auto search by pressing .
Anglais LU 27 A5.qxd 15/12/2004 10:08 Page 5
5. Getting started
Please refer to the following sections for detailed instructions about connecting the audio/video (AV) device of your
choice to your LCD TV and view your favorite programs or movies. These sections describe the procedure
required to set up your TV for easy and convenient viewing.
5.1 Basic connections
The SAGEM AXIUM
TM
HD-L27 LCD Television provides multiple input and output ports to enable you to connect
different types of A/V devices such as an antenna or cable TV line, a VCR /DVD player, cable or satellite Set Top
Boxes (HDTV compliant), or even a PC (HDTV compliant).
You can also use the LCD TV as a flash memory card reader and view your digital photographs directly on the TV
without requiring a PC connection.
The back panel of the LCD TV provides input and output connectors to make these connections possible. The
following sections discuss the various ports and the type of A/V devices that can be connected to your TV.
Notes:
Refer to these notes before connecting any audio/video equipment to this TV.
Refer to the manuals of your stereo amplifier, or other equipment as necessary.
Disconnect all equipment from the power outlets. Connect the equipment to the power outlets only after you have
completed connecting everything. Never make or change connections with equipment connected to a power outlet.
Connect a DVD player directly to the TV. For example, do not connect a DVD player to a VCR, and then connect the
VCR to your TV. This type of connection could distort both the picture and the sound. Your VCR might also have a
copy protection system, which could result in a distorted DVD image.
Set the stereo system to the correct source if your LCD TV is also connected to a stereo system.
You only need one audio connection and one video connection between your TV and other audio/video equipment
(e.g. DVD player, VCR, Camcorder). This means that you may not use all the connectors on the TV for a basic
installation.
If you plan to watch TV with VCR off, connect a coaxial cable to the VCR's TUNER IN connector and to the ANT con-
nector on your LCD TV. This allows you to watch channels on the TV normally when the VCR is off.
The existing connection possibilities determine the picture quality (decreasingly from top level to lowest quality:
Progressive Scan Component Video, Interlaced Component Video, RGB Scart, S-Video and Composite Video). The
selection of your video support should be carefully examined according to the expected quality.
8
4. Remote control
7
30
29
28
27
26
25
23
24
22
21
20
19
17
18
16
15
14
13
12
11
10
9
7
6
5
4
3
2
1
8
Key Function
1 POWER Turns power on or commands stand-by mode
2 COMPONENT source select Select interlaced or progressive component source
3 PC / DVI (HDTV)source select Select VGA or DVI source
4
Program
Program + / - select
5 VOL + - Volume + / -
6
JUMP TO PREVIOUS PRO-
GRAM
Switches to the previously viewed program
7 TXT HOT KEYS Select group of pages in teletext mode
8 TXT INDEX Teletext Index
9 TXT REVEAL Teletext Reveal - Display hidden data
10 TXT ZOOM HOLD Teletext Zoom and Hold
11 EXIT Menu Exit from the menu
12 ARROW KEYS
Press the up, down, left,
Right arrow keys to scroll,
Through the OSD menu options.
13 MENU Displays the OSD menu
14 TIMER Off Timer
15 3D AUDIO SELECT Selects Virtual Dolby Surrond (360° sound mode)
16
SOUND Select Mono / Stereo
17
PIP/PAP POSITION
PIP/PAP SWAP
PIP/PAP SUB SOURCE
PIP / PAP select
PIP picture position
Swap Main and sub source in PIP / PAP
PIP / PAP sub source select
Active PIP / PAP display
18
CARD READER SELECT Card Reader - Select the CARD READER function
from video or graphic source.
CARD READER PREVIEW /
FULL
Card Reader - Active the Photo preview / Photo full
screen display.
CARD READER ROTATE Card reader - Rotate photo
CARD READER AUTOPLAY Active automatic Photo card reader viewing
19 VIDEO MODE Select video mode settings
20 AUDIO Smart Volume Select AI Audio Smart Volume
21 DISPLAY INFORMATION Display information
22
DAY / NIGHT DISPLAY MODE Select back light Bright/Day/Night mode for the
display.
23 TXT PAGE Teletext page down and up
24 TELETEXT select TELETEXT ON / OFF.
25 1XX CHANNELS SELECT -/-- Channel numbers higher or equal to 100
26 NUMBER KEYS 1 to 9 and 0 number keys
27 SCART source select Select Scart1 to Scart3 sources
28 VIDEO TV/AV/S Source select Select TV, AV4 and AV4S source
29 Format Screen format select
30 MUTE Loudspeaker mute
If sunlight shines directly on the remote sensor, the operation of the remote control may become unstable,
and the effective range will be shorter.
Do not hit or violently shake the remote control.
Never expose the remote control to high temperature or humidity.
If the remote control is not used for an extended period of time, remove the batteries to prevent damage
or injury from possible battery leakage.
ANT
AV4/S
AV4/CVBS
R
L
Y
Pb/Cb
Pr/Cr
R
RL R
HEADPHONE
L
L
PC/DVI
AUDIO
IN
H
D
T
V
S
C
A
R
T
1
S
C
A
R
T
2
S
C
A
R
T
3
HI-FI
OUTPUT
Anglais LU 27 A5.qxd 15/12/2004 10:08 Page 7
10
5.1.4. AV4S input
The AV4S port has been provided to enable you to connect to devices with S-Video output such as DVD players,
digital cameras, and so on. This port produces high picture quality. AN A/V device can be connected to this port
as follows:
Using an S-Video cable, connect the video (AV4S) connector on the TV to
the corresponding S-Video output connector of your A/V device.
Using an audio cable, connect the audio (L, R) connector on the TV to the
corresponding audio output connector of your A/V device.
5.1.5. AV4 input
The AV4 port supports composite video and provides good quality video. To connect an A/V device such as a
VCR, VCD player, or DVD player, do the following:
Using a composite video cable, connect the video (AV4) connector on the
TV to the video output connector of your A/V device.
Using an audio cable, connect the audio (L, R) connector on the TV to the
corresponding audio output connector of your A/V device.
5.1.6. MULTIMEDIA port
Connect your LCD TV to a PC or laptop computer with the VGA port or DVI port, to use the LCD TV as a moni-
tor for your PC. To connect to a PC/Laptop, do the following:
Connect the DVD or PC laptop or HDTV SetTop Box to the DVI port, or
connect the PC laptop to the VGA port.
Connect the Line out audio output of your PC to the PC AUDIO IN connec-
tor of the TV.
Note: This Multimedia port is fully compliant with external devices which can
manage High Definition Video such as, for instance, HDTV Set Top Boxes.
5.1.7. HEADPHONE port
The HEADPHONE port allows you to connect headphones to your LCD TV.
5.1.1. RF IN port
The RF IN port is provided to directly connect analog cable TV, satellite or an antenna as follows:
Connect one end of a 75
W
coaxial cable to the ANT connector on the rear
panel of the TV.
Connect the other end of this cable to the connector as shown below on
the right. You may also need to use a cable adapter to connect to the wall
socket, depending on your installation.
If you have subscribed to a cable TV system using pay TV signals requiring a Set
Top Box to view all channels, connect the ANT connector to the Set Top Box's
ANTENNA OUT connector,
5.1.2. COMPONENT port
The COMPONENT port lets you connect your TV to high quality video equipment such as a DVD player, or HDTV
Set Top Boxes. This port consists of audio (L/R) and component video (YCbCr or YPbPr) connectors and
provides the highest picture quality. To connect your A/V device to this port, do the following:
Using a component video cable, connect the video (YCbCr or YPbPr)
connector on the TV to the corresponding video output connector of your
A/V device.
Using an audio cable, connect the audio (L/R) connector on the TV to
the corresponding audio output connector of your A/V device.
5.1.3. SCART ports
The LCD TV has three ports for connecting up to three SCART A/V devices with the LCD TV :
SCART 1 and 2 (input-oputput) are designed for Set Top Boxes, DVD players,
games consoles or any devices producing RGB signal.
SCART 2 has the same use as SCART 1, but is the only part for Syster/Canal+
terrestrial decoder (France)
SCART 3 is only designed for VCR and other VHS/S-VHS devices such as cam-
corders.
For all these ports, use classic SCART cable (not given)
9
ENGLISH
1
ANT
AV4/S
AV4/CVBS
R
L
Y
Pb/Cb
Pr/Cr
R
RL R
HEADPHONE
L
L
PC/DVI
AUDIO
IN
H
D
T
V
S
C
A
R
T
1
S
C
A
R
T
2
S
C
A
R
T
3
HI-FI
OUTPUT
2
It is strongly recommended that you connect the antenna using a 75
W
coaxial cable to get optimum
picture and sound quality.
1
ANT
AV4/ S
AV4/ CV BS
R
L
Y
Pb/Cb
Pr/Cr
R
RL R
HEADPHONE
L
L
PC/DVI
AUDIO
IN
H
D
T
V
S
C
A
R
T
1
S
C
A
R
T
2
S
C
A
R
T
3
HI-FI
OUTPUT
DVD
VHS
VIDEO RECORDER
DVD
DIGITAL DECODER
2
ANT
AV4/ S
AV4/CVBS
R
L
Y
Pb/Cb
Pr/Cr
R
RL R
HEADPHONE
L
L
PC/DVI
AUDIO
IN
H
D
T
V
S
C
A
R
T
1
S
C
A
R
T
2
S
C
A
R
T
3
HI-FI
OUTPUT
VHS
DIGITAL DECODER
DVD
DVD
OR
OR
OR
DVD
DIGITAL DECODER
DVD
C+ DECODER
VIDEO RECORDER
1
ANT
AV4/ S
AV4/CVBS
R
L
Y
Pb/Cb
Pr/Cr
R
RL R
HEADPHONE
L
L
PC/DVI
AUDIO
IN
H
D
T
V
S
C
A
R
T
1
S
C
A
R
T
2
S
C
A
R
T
3
HI-FI
OUTPUT
OR
DVD
DVD
DIGITAL CAMERAS
2
1
ANT
AV4/ S
AV4/CVBS
R
L
Y
Pb/Cb
Pr/Cr
R
RL R
HEADPHONE
L
L
PC/DVI
AUDIO
IN
H
D
T
V
S
C
A
R
T
1
S
C
A
R
T
2
S
C
A
R
T
3
HI-FI
OUTPUT
OR
DVD
DVD
DIGITAL CAMERAS
2
1
ANT
AV4/ S
AV4/CVBS
R
L
Y
Pb/Cb
Pr/Cr
R
RL R
HEADPHONE
L
L
PC/DVI
AUDIO
IN
H
D
T
V
S
C
A
R
T
1
S
C
A
R
T
2
S
C
A
R
T
3
HI-FI
OUTPUT
DVI D
VGADVI
OR
2
L
Y
Pb/Cb
Pr/Cr
R
RL R
HEADPHONE
L
L
PC/DVI
AUDIO
IN
H
D
T
V
A
R
T
2
S
C
A
R
T
3
HI-FI
OUTPUT
Anglais LU 27 A5.qxd 15/12/2004 10:08 Page 9
7. Using the OSD menus
The On-Screen Display (OSD) menu system provides a quick and simple method to adjust your LCD TV settings.
This chapter describes how to change each of the available settings.
OSD menus can be viewed using both the remote control and the control buttons on the front panel as shown in
the following table:
7.1. Changing picture settings
This menu allows you to modify the settings of your image definition by adjusting them or to use pre-defined
settings.
The following options are available from the Picture menu:
12
5.1.8. Hi-Fi OUTPUT port
Use the Hi-Fi OUTPUT port to connect your LCD TV to an external audio amplifier with external speakers and
enjoy better sound quality.
In this case, you must turn off your internal speakers of the LCD TV (See § 7.3.1.).
6. Inserting memory flash cards
The LCD TV also provides a memory flash card reader function to enable you to view digital images directly on
the screen without requiring a PC to read the card contents. The TV supports CF, SD/MMC, MS, and SM card for-
mats. Insert the memory card in the appropriate memory card slot as shown in the illustration:
Note: Please refer to Remote Control Chapter for Picture Show navigation.
CAUTION: Do not handle or remove the memory card as long as the hourglass is flashing on the screen.
11
HI-FI SYSTEM
ANT
AV4 /S
AV4/CVBS
R
L
Y
Pb/Cb
Pr/Cr
R
RL R
HEADPHONE
L
L
PC/DVI
AUDIO
IN
H
D
T
V
S
C
A
R
T
1
S
C
A
R
T
2
S
C
A
R
T
3
HI-FI
OUTPUT
SD/MMCSMMS
CF
SD/MMCSMMS
CF
SD/MMCSMMS
CF
SD/MMCSMMS
CF
Inserting a CompactFlash card
Inserting a Memory Stick
Inserting a SmartMedia card
Inserting a Secure Digital/MultiMediaCard
Remote Control Front Panel Control Action
MENU MENU Press to enter in the OSD menus.
Press again to return to the previous menu or to exit OSD menus if the
current menu is the main one.
or
Pr+ or Pr- Move up and down in the OSD menus.
or
VOL+ or VOL- Press to change values in the OSD menus.
EXIT MENU Press to quit the OSD menus.
BRIGHTNESS
CONTRAST
COLOUR
TINT
SHARPNESS
VIDEO MODE
COLOUR TEMPERATURE
NEUTRAL
USER
0........................
........................
........................
........................
........................
0
50
50
50
: SELECT : ADJUST
: EXIT OSD
MENU
Option Function
BRIGHTNESS Adjusts the levels of light on your screen. It should be used in conjunction with the Contrast option.
CONTRAST Adjusts the difference between the dark and light levels on your display. It should be used in conjunction
with the Brightness option.
COLOUR Changes the dominant colour intensity on your screen. Adjust this setting until the colours on the screen (for
example, flesh tones) look natural.
TINT Changes the colour balance. Adjust this setting so that the colours (for example, flesh tones) on the screen
are neither too green or too magenta.
SHARPNESS Adjusts the sharpness levels on your screen.
VIDEO MODE The following options are available:
NEUTRAL, CINEMA, SPORT, STUDIO, USER, PC, MULTIMEDIA
COLOUR TEMPERATURE This function allows you to adjust the colour balance.
3 levels: cool, neutral or warm
Anglais LU 27 A5.qxd 15/12/2004 10:08 Page 11
14
7.3. Changing audio settings
The Audio menu enables you to configure the volume, treble, and bass of the audio output.
Use the slider bars to adjust these settings.
7.3.1. Advanced settings
As the following shows the advanced settings events:
SPEAKERS VOL.
TREBLE
BASS
BALANCE
HEADPHONE/HIFI VOL.
ADVANCED SETTINGS
25........................
........................
........................
........................
........................
0
50
50
50
: SELECT : ADJUST
: EXIT OSD
MENU
Option Function
SPEAKERS VOLUME Adjusts the overall volume of the speakers.
TREBLE Adjust the high frequency.
BASS Adjust the low frequency.
BALANCE Balances the volume of the left and right speakers.
HEADPHONE/HIFI VOL. Adjusts the overall volume of the headphone and Hi-Fi.
ADVANCED SETTINGS Allows you to set further settings in your taste.
SPEAKERS
AUDIO MODE
LOUDNESS
AUTO VOLUME CONTROL
VIRTUAL DOLBY SURROUND
STEREO
: SELECT : ADJUST
: RETURN
MENU
On
On
On
On
Option Function
SPEAKERS Turns speakers ON or OFF
AUDIO MODE Choose MONO, STEREO.
LOUDNESS Switches the bass boost ON/OFF.
AUTO VOLUME CONTROL Adjusts the suitable volume from the input signal.
VIRTUAL DOLBY SURROUND Turns the Virtual Dolby Surround (360° sound mode) ON or OFF.
7.2. Changing PC settings
This option allows you to adjust the source coming from your VGA or DVI port.
7.2.1 PC mode
13
ENGLISH
BRIGHTNESS
CONTRAST
COLOUR
TINT
SHARPNESS
VIDEO MODE
PC MODE
COLOUR TEMPERATURE
NEUTRAL
USER
0........................
........................
........................
........................
........................
0
50
50
50
: SELECT : ADJUST
: EXIT OSD
MENU
RED
GREEN
BLUE
H. POSITION
V. POSITION
PHASE
AUTO
CLOCK
........................
........................
........................
45
50
50
: SELECT : ADJUST
: EXIT OSD
........................
45
........................
0
........................
5
........................
50
MENU
O
ff
Option Function
RED To adjust the colour.
GREEN To adjust the colour
BLUE To adjust the colour
H. POSITION
Press to move the picture to the left and to move it to the right.
V. POSITION
Press or to move the picture to the top or bottom.
PHASE This enables finer synchronization with your computer's graphics card. When an unstable or flashing page
occurs, use this tuning.
CLOCK Modifies the data display frequency so that it corresponds to the frequency of your computer’s graphics
card.
AUTO on/off carries out automatic tuning.
Anglais LU 27 A5.qxd 15/12/2004 10:08 Page 13
7.5. Channel search
This menu allows you to install TV channels by automatic or manual searching.
It also gives you the possibilities to manage the list of channels.
7.5.1. Auto search
Launch auto search by pressing .
7.5.2. Manual search
16
COUNTRY
AUTO SEARCH
MANUAL SEARCH
SORT
B/GB/G
PR: 1 FREQUENCY: 55.25MHZ
PROGRAM EDIT
UK
NO
: SELECT : ADJUST
: EXIT OSD
MENU
Option Function
COUNTRY Choose your country.
AUTO SEARCH Automatically scans for available channels.
MANUAL SEARCH Search manually the available channels by user's setting (See § 7.5.2.).
PROGRAM EDIT Enables you to modify or disable channels from the list of channels (See § 7.5.3.).
SORT Enables you to sort or delete channels on the channel list (See § 7.5.4.).
PROGRAM NUMBER
LAUNCH SEARCH
SAVE
NAME
B/G
1
: SELECT : ADJUST
: RETURN
125.25MHZ
MENU
FREQUENCY
O
ff
Option Function
PROGRAM NUMBER
Press - / or +/ to select a channel number.
FREQUENCY Press key number to change the frequency for the channel.
LAUNCH SEARCH Start searching the channels.
NAME Press to start naming.
Press to choose characters and numbers.
Press to select next character.
Press Menu to exit.
SAVE Save your settings.
15
7.4. Changing system settings
This menu allows you to make some adjustments such as choosing your preferences for certain functions.
The following options are available from the System menu:
7.4.1. Protection
Your LCD TV is delivered with the code 0000.
CURRENT TIME
WAKE UP STATUS
WAKE UP TIME
LANGUAGE
SLEEP TIMER
M
ENGLISH
12:00:00
12:00
: SELECT : ADJUST
: EXIT OSD
PROTECTION
MENU
O
ff
Option Function
CURRENT TIME To adjust the current time. Select this option and press to increment the hour field.
Press to increment the minute field.
WAKE UP STATUS Enables and disables the TV On Timer.
WAKE UP TIME Enables you to set a time for the TV to power on. Select this option and press to increment the hour
field. Press to increment the minute field.
SLEEP TIMER Enables you to set a time that will elapse before the TV turns off. Options are from 0 (_ _ M) to 90 M in ten
minute increments.
LANGUAGE Changes the OSD display language. The following options are available:
English, French, German, Italian, Dutch.
PROTECTION Enables parents to prevent children from turning the TV on (see § 7.4.1.). This code is a four digit one. Your
TV will ask you this code on each power on.
CHANGE PASSWORD
CHILD LOCK
FACTORY PRESET
NO
: SELECT : ADJUST
: RETURN
MENU
O
ff
PASSWORD
: 0-9
PASSWORD
: 0-9
PASSWORD
: 0-9
RIGHT WRONG
Option Function
CHANGE PASSWORD Insert a new code.
Corfirm a new code.
CHILD LOCK Once activated, each time you turn on the product, you will have to enter this code (A, B C).
FACTORY PRESET Reset all settings.
A
B C
Anglais LU 27 A5.qxd 15/12/2004 10:08 Page 15
1817
ENGLISH
7.6. Source edit
7.6.1. Scart sources auto
If the function is enabled, the wake up of your SCART connected device will wake up the TV, or switch to the
adapted SCART. If the function is disabled you have to operate manually.
7.6.2. Naming
Press to start naming.
Press to choose characters and numbers.
Press to select next digit
Press Menu to exit and save.
SCART SOURCES AUTO
NAMING
SOURCE ENABLE/DISABLE
PIP/PAP
VIDEO NOISE REDUCTION
: SELECT : ADJUST
: EXIT OSD
MENU
O
ff
Option Function
SCART SOURCE AUTO When the position is on, the LCD TV wake up is driven by the AV device connected to one of the SCART
plugs.
NAMING Rename these ports (see § 7.6.2.).
SOURCE ENABLE/DISABLE Some sources can be disabled. When disabled, they can no longer be selected with P+/P- (see § 7.6.3.).
VIDEO NOISE REDUCTION Puts a Video Noise Reduction filter (see Chap 7.6.4.)
PIP/PAP Enables configuration of the PIP/PAP mode. In PIP mode, one picture is displayed in full screen mode, while
another picture is displayed in a window.
SCART1
SCART2
SCART3
AV4-S
COMPONENTCOMPONENT
VGA
DVI
AV4
SCART1
SCART2
SCART3
AV
SVIDEO
YPBPR
VGA
DVI
: SELECT : ADJUST
: RETURN
MENU
7.5.3. Program edit
7.5.4. Sort
Select a channel in the list with .
Move this channel with .
Validate with
.
You can delete the channel, after selecting it, by pressing the MENU button.
PROGRAM NUMBER
FINE TUNE
SKIP
SAVE
B/G
NO
VIDEO NOISE REDUCTION
1
55.25MHZ
: SELECT : ADJUST
: RETURN
MENU
O
ff
Option Function
PROGRAM NUMBER Press - / or +/ to select a channel number.
FINE TUNE Press - / or +/ to adjust the frequency for the channel.
The colour point helps you to obtain the best results:
– red : bad
– yellow : middle
– green : good
SKIP Select YES to Skip the channel from the channel list.
VIDEO NOISE REDUCTION Enables you to set Noise Reduction. Video Noise Reduction reduces the screen noise that comes from
video. Choose OFF, LOW, MIDDLE and HIGH can decrease the screen noise. It may cause freeze-frame
by choosing the MIDDLE or HIGH function.
SAVE Save your settings.
1. TF1
2. FR2
3. FR3
5.
6.
7.
8.
4.
9.
10.
11.
13.
14.
15.
16.
12.
: SELECT : ADJUST
: RETURN
MENU
1. TF1
2. FR2
3. FR3
5.
6.
7.
8.
4.
9.
10.
11.
13.
14.
15.
16.
12.
: SELECT : ADJUST
: DELETE
MENU
Anglais LU 27 A5.qxd 15/12/2004 10:08 Page 17
8. Diagnosing trouble shooting
No power
Make sure the TV and the power cord are connected correctly.
Check if you pressed POWER on the remote control unit. If the indicator on the front panel is red, press
POWER on the remote control or the front panel.
LCD TV does not operate
External influences such as lightning or static electricity may cause improper operation. In this case, operate
The unit after first turning on the power, or unplugging the AC cord and plugging it in again after 1 or 2 minutes.
Power is cut off suddenly
Check if the off timer or sleep timer are set.
The unit's internal temperature has increased. Remove any objects blocking the vents and clean them to
remove dust.
Remote control unit does not operate
Check if the batteries are inserted with the polarity (+,-) correctly aligned.
Check if the batteries are discharged. Please replace with new batteries.
Make sure that you do not use the remote control under strong or fluorescent lighting.
Check if there is a fluorescent light illuminated near the remote control sensor.
The path of the remote control beam may be blocked; please make sure the path is clear and that the remote control
is aimed at the remote control sensor on the TV.
No RF TV reception (or no reception above CH13)
RF Cord TV is connected improperly or not connected; please check all the RF connections.
The TV service is interrupted; please contact your operator.
Picture is cut off/with side bar screen.
Check if the image position is correct.
Check if the screen mode adjustments such as picture size are made correctly.
Strange colour, light colour, or colour misalignment
Is the room too bright? The picture may look dark in a room that is too bright.
Check the input signal setting.
Poor or no picture
Is the TV station experiencing problems? Try another channel.
The RF TV signal may be scrambled or encoded. Please contact your local cable operator.
Is the connection to other components correct? (See Basic connections on page 9.)
Has the setup been done correctly after connection?
Is the correct input selected?
Check if a non-compatible signal is being used as the input signal.
No sound
Is the volume too low?
The MUTE button may have been pressed, try pressing this button again.
Check that the internal speakers have been enabled. See § 7.3.1.
Teletext not working
The channel may have stopped broadcasting teletext; please try another channel.
Digital photo "card error"
Check the compatibility of your card. See § 6.
Check that the card has been inserted correctly.
Card not formatted: Format your photograph card using your digital camera.
2019
7.6.3. Source enable/disable
Once the source is removed from this menu, they will no longer be accessible from the keys 2, 3, 27, 28, of the
remote control.
7.6.4. Video noise reduction
Select the level of video noise reduction.
7.6.5. PIP/PAP
PIP
PIP POSITION
PIP/PAP SOURCE
PAP
PIP SCREEN FORMAT
16/9
SWAP
4
YPBPR
: SELECT : ADJUST
: RETURN
MENU
O
ff
O
ff
On
Option Function
PIP Enables and disables PIP (Picture-in-Picture) mode. In PIP mode, one picture is displayed in full screen
mode, while another picture is displayed in a window.
PIP POSITION Enables you to set the position of the PIP window on the screen.
PIP/PAP SOURCE Select the source for the secondary image in the PIP mode.
If you are watching as primary image a video image coming from either Scart1, Scart2, Scart3, AV,
S-video, or YPbPr, then the secondary image can only be a multimedia image coming from either VGA or
DVI. And vice versa.
PAP Enables and disables PAP (Picture-And-Picture) mode. In PAP mode, the screen is divided into two equal
parts with a picture on each side. The same restriction on video sources is applicable for PAP.
SWAP Swaps the PIP image with the full screen image. You can also press Swap on the remote control to swap
the images.
PIP SCREEN FORMAT Allows you to select the full-screen picture mode.
The following options are available: 4:3, 16/9, STRETCH, 14/9, SUBTITLES, CINEMA, FULL SCREEN.
: SELECT : ADJUST
: RETURN
SCART1
SCART2
SCART3
AV4-S
COMPONENTCOMPONENT
AV4
MENU
O
ff
O
ff
O
ff
O
ff
O
ff
O
ff
: SELECT : ADJUST
: RETURN
SCART1
SCART2
SCART3
AV4-S
COMPONENTCOMPONENT
AV4
MENU
O
ff
O
ff
O
ff
O
ff
O
ff
O
ff
Anglais LU 27 A5.qxd 15/12/2004 10:08 Page 19
NOTES
2221
ENGLISH
PICTURE
Screen size: diagonale (cm / inch) 69/27
Category: 16/9
Resolution: 1280 x 720 (WXGA)
Reception / Video
Tuner synthesis: one PLL synchronous demodulation
Frequency range: 45,5 - 861,25 MHz
Reception Norm: Pan European (LL'/BG/I/DKK')
Program number: 128
Video standard: PAL / SECAM
Added Video standard via scart and av4: NTSC 3.58 / 4.43
Added Video standard via av4: Pal 60Hz
Noise reduction: yes
De-interlacer: 3D motion adaptative
Sound
RF demodulation system: AM/FM/A2/NICAM BG-L-
DK/NICAM I
Power: 2x12 W RMS
Loudspeakers built in: 2x1
Surround: VIRTUAL DOLBY SURROUND
Rear connectors
Antenna Input:
Scart 1: CVBS / RGB / S-VIDÉO - Audio
Scart 2: CVBS / RGB / S-VIDÉO - Audio
Scart 3: CVBS / S-VIDÉO - Audio
AV4: CVBS (1x RCA)
AV4S: SVIDEO (1x MiniDin)
AV4/AV4S Audio: audio stereo (2xRCA)
AV5: YPbPr progressive /interlaced ( 3xRCA)
AV5 audio: audio stereo (2xRCA)
PC VGA: VGA
PC/HDTV DVI: DVI with HDCP
PC Audio: audio stereo (2xRCA)
Hifi Output: audio stereo (2xRCA)
Headphone output: audio stereo (jack 3,5mm)
Right and left sides
Control buttons: 7 ( stand-by, P+ P-, V+ V-, Menu, AV)
Photo card readers: Memory stick, SD Card, MMC and
Smart media Card, Compact Flash, Micro Drive
General data
Power supply: AC 220-240 V 50Hz
Consomption: 130W ( 2,5W in stand-by)
Size (W x H x D) in mm: 880x538x270
Packaging size (WxHxD) in mm: 980x645x385
Weight : Net / Gross in kg: 18/22
Accessories
Instruction booklet( languages ): Fr, All, Gb, It, Nl
Power cord: yes (EU, UK, IT)
RF cord: yes
Remote control: 46 keys + 8 keys under door
Batteries: 2xAAA
Stand: yes
Wall mountig: option (WESA compliant)
Norms
EMC (Electromagnetic Compatibility)
EN55020 : 2002
EN55013 : 2001
EN55024 : 09.1998 + A1 : 10.2001 +A2 : 01.2003
EN55022 : 1998 + A1 : 2000 + A2 : 2003
EB61000-3-2 : 2000
EN61000-3-3 : 1995 + A1 : 2001
Electrical safety
EN60065 : 2002
CEI60065 : 2001
9. Technical characteristics
Anglais LU 27 A5.qxd 15/12/2004 10:08 Page 21
NOTES
24
NOTES
23
Anglais LU 27 A5.qxd 15/12/2004 10:08 Page 23
8

Hulp nodig? Stel uw vraag in het forum

Spelregels

Misbruik melden

Gebruikershandleiding.com neemt misbruik van zijn services uitermate serieus. U kunt hieronder aangeven waarom deze vraag ongepast is. Wij controleren de vraag en zonodig wordt deze verwijderd.

Product:

Bijvoorbeeld antisemitische inhoud, racistische inhoud, of materiaal dat gewelddadige fysieke handelingen tot gevolg kan hebben.

Bijvoorbeeld een creditcardnummer, een persoonlijk identificatienummer, of een geheim adres. E-mailadressen en volledige namen worden niet als privégegevens beschouwd.

Spelregels forum

Om tot zinvolle vragen te komen hanteren wij de volgende spelregels:

Belangrijk! Als er een antwoord wordt gegeven op uw vraag, dan is het voor de gever van het antwoord nuttig om te weten als u er wel (of niet) mee geholpen bent! Wij vragen u dus ook te reageren op een antwoord.

Belangrijk! Antwoorden worden ook per e-mail naar abonnees gestuurd. Laat uw emailadres achter op deze site, zodat u op de hoogte blijft. U krijgt dan ook andere vragen en antwoorden te zien.

Abonneren

Abonneer u voor het ontvangen van emails voor uw Sagem AXIUM_HDL27 bij:


U ontvangt een email met instructies om u voor één of beide opties in te schrijven.


Ontvang uw handleiding per email

Vul uw emailadres in en ontvang de handleiding van Sagem AXIUM_HDL27 in de taal/talen: Engels als bijlage per email.

De handleiding is 0,7 mb groot.


U ontvangt de handleiding per email binnen enkele minuten. Als u geen email heeft ontvangen, dan heeft u waarschijnlijk een verkeerd emailadres ingevuld of is uw mailbox te vol. Daarnaast kan het zijn dat uw internetprovider een maximum heeft aan de grootte per email. Omdat hier een handleiding wordt meegestuurd, kan het voorkomen dat de email groter is dan toegestaan bij uw provider.

Stel vragen via chat aan uw handleiding

Stel uw vraag over deze PDF

Andere handleiding(en) van Sagem AXIUM_HDL27

Sagem AXIUM_HDL27 Gebruiksaanwijzing - Nederlands - 12 pagina's

Sagem AXIUM_HDL27 Gebruiksaanwijzing - Deutsch - 12 pagina's

Sagem AXIUM_HDL27 Gebruiksaanwijzing - Français - 12 pagina's

Sagem AXIUM_HDL27 Gebruiksaanwijzing - Italiano - 12 pagina's

Sagem AXIUM_HDL27 Gebruiksaanwijzing - Português - 12 pagina's

Sagem AXIUM_HDL27 Gebruiksaanwijzing - Espanôl - 12 pagina's

Sagem AXIUM_HDL27 Gebruiksaanwijzing - Svenska - 12 pagina's


Uw handleiding is per email verstuurd. Controleer uw email

Als u niet binnen een kwartier uw email met handleiding ontvangen heeft, kan het zijn dat u een verkeerd emailadres heeft ingevuld of dat uw emailprovider een maximum grootte per email heeft ingesteld die kleiner is dan de grootte van de handleiding.

Er is een email naar u verstuurd om uw inschrijving definitief te maken.

Controleer uw email en volg de aanwijzingen op om uw inschrijving definitief te maken

U heeft geen emailadres opgegeven

Als u de handleiding per email wilt ontvangen, vul dan een geldig emailadres in.

Uw vraag is op deze pagina toegevoegd

Wilt u een email ontvangen bij een antwoord en/of nieuwe vragen? Vul dan hier uw emailadres in.


Info