574285
34
Verklein
Vergroot
Pagina terug
1/41
Pagina verder
Declaration of Conformity
This device complies with part 15 of the FCC rules. Operation is subject to the following
conditions:
This device may not cause harmful interference.
This device must accept any interference received, including interference that may
cause undesired operation.
Trademark Recognition
Windows, Windows 98, Windows 2000, Windows ME, Windows XP are registered
Trademarks of the Microsoft Corporation of the U.S. registered in the USA and other
countries. Windows in an abbreviated term referring to the Microsoft Windows Operation
System. Adobe is a trademark of Adobe Corporation. Ulead is the trademark of Ulead
Systems, Inc.,.
Other companies or product names are trademarks or registered trademarks of the
respective companies.
Safety & Handling Precautions
Camera Information
Do not take apart or attempt to service the camera yourself.
Do not expose the camera to moisture, or extremes in temperature.
Let the camera warm up when moving from a cold to a warm temperature.
Do not touch the lenses of the camera.
Do not expose the lens to direct sunlight for extended periods.
Battery Information
Turn off the camera before installing or removing batteries.
Use only AA NiMH batteries or CRV3 Lithium battery.
Always replace batteries with two new or freshly charged batteries.
Do not use batteries that are leaking, corroded, or damaged.
Do not attempt to recharge non-rechargeable batteries.
When charging rechargeable batteries, use a battery charger specifically designed
for the type of battery. If the charger is designed to accommodate multiple battery
types, be sure to adjust its settings to match the type of battery you are recharging.
Download all pictures and remove the batteries from the camera if you are going to
store the camera for extended periods.
Downloaded from www.Manualslib.com manuals search engine
Playback on TV...................................................................................................................... 14
Display Image Properties...................................................................................................... 15
Deleting Images ..................................................................................................................... 16
Deleting Single Image in QuickView............................................................................... 16
Deleting Single Image in Playback ................................................................................. 16
Deleting All Images ......................................................................................................... 17
Formatting Memory Card or Internal Memory................................................................. 17
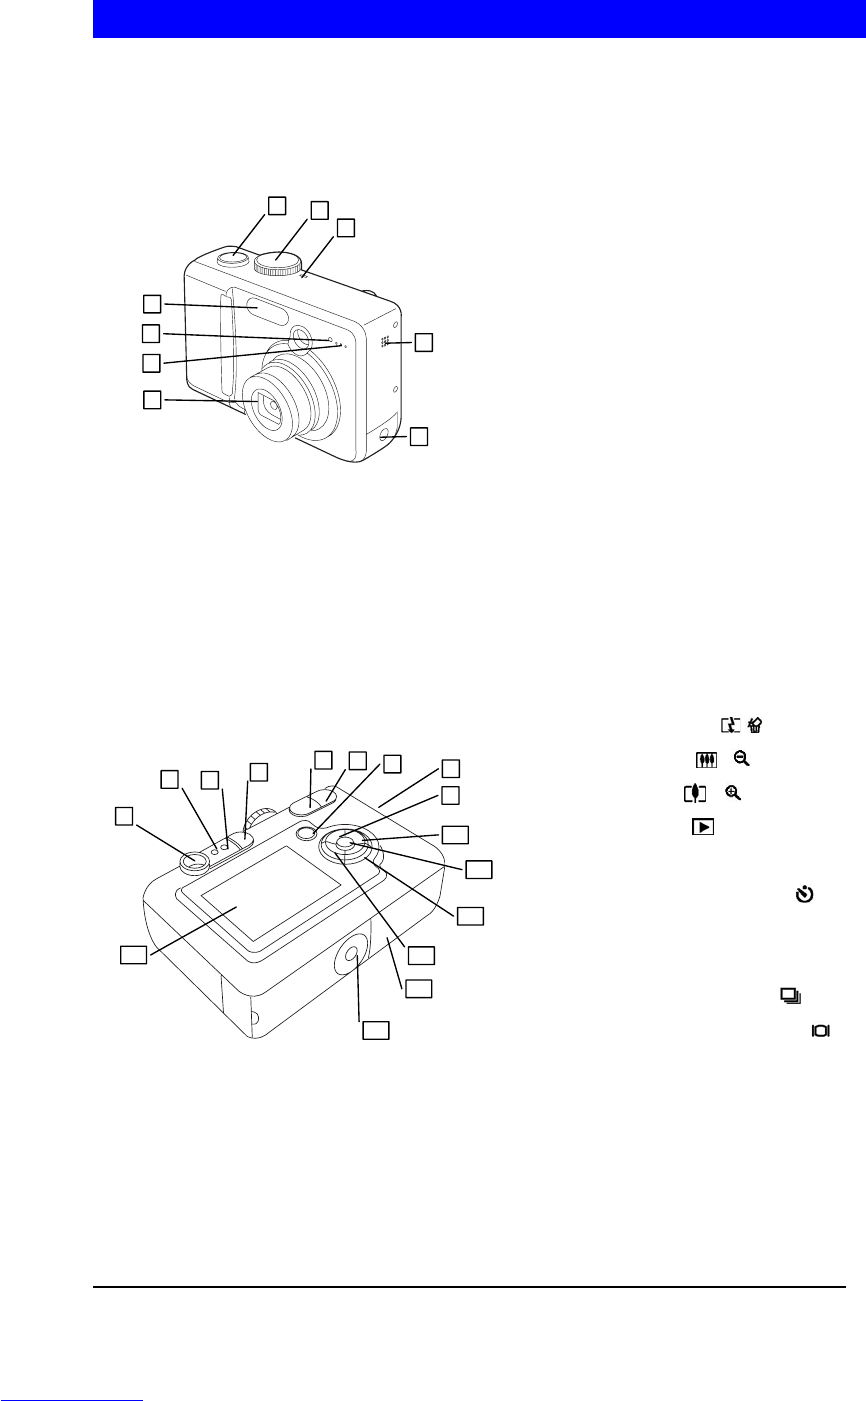
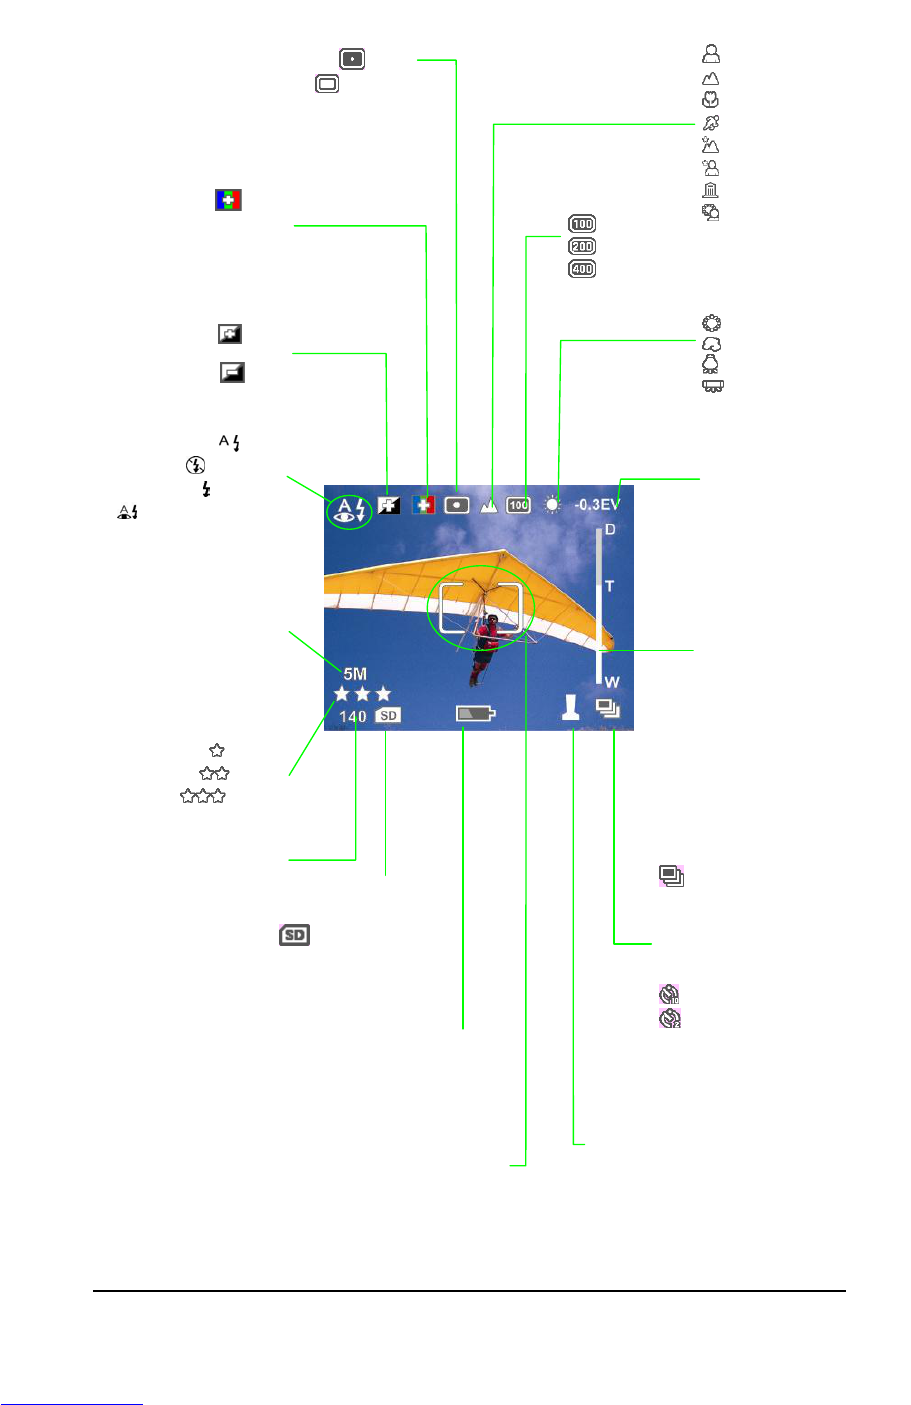
Settings Capture Mode ......................................................................................................... 18
Switching LCD Off between Shots.................................................................................. 18
Setting LCD Off When Camera Power On ..................................................................... 18
Setting Flash ................................................................................................................. 19
Setting Drive Mode ......................................................................................................... 19
Setting Auto Focus (AF) Selection.................................................................................. 20
Setting Image Resolution................................................................................................ 20
Setting Image Quality...................................................................................................... 21
Setting Exposure Compensation .................................................................................... 21
Setting White Balance..................................................................................................... 21
ISO Speed ..................................................................................................................... 22
Setting Auto-Exposure (AE) Metering ........................................................................... 22
Setting Sharpness ......................................................................................................... 22
Setting Color Mode ....................................................................................................... 23
Setting DPOF Print ................................................................................................................ 24
Setting DPOF for Printing a Single Image ...................................................................... 24
Setting DPOF for Printing All Images in the Memory .................................................... 24
Setting Protect Image .......................................................................................................... 25
Move Images from Internal Memory to Card ..................................................................... 26
Camera Setup......................................................................................................................... 27
Factory Default Settings.................................................................................................. 27
Reset Camera Settings................................................................................................... 28
Setting Digital Zoom........................................................................................................ 28
Setting Camera Sound Volume....................................................................................... 29
Setting Image Storage .................................................................................................... 29
Setting Date Stamp......................................................................................................... 30
Setting Customize........................................................................................................... 31
Software Installation ............................................................................................................ 32
Installation Software/Hardware Driver ............................................................................ 32
Automatic Installation ......................................................................................... 32
Custom Installation ............................................................................................. 33
Dowloading & Transfering Files to Computer ................................................................. 33
How to dowload Pictures via Ulead Photo Explorer ..................................................... 34
Troubleshooting ................................................................................................................... 35
Specification ......................................................................................................................... 36
Downloaded from www.Manualslib.com manuals search engine
1
Unpack Your Camera
Package Contents
1. Digital Camera
2. Wrist Strap
3. USB Cable
4. AV Cable
5. 2 AA Batteries
6. Software CD containing
-Camera Driver for Windows 98SE
-Ulead Photo Explorer
-Ulead Video Studio
-Adobe Acrobat Reader
-Owners Manual (PDF)
7. Quick Start Guide
Optional Accessories
Tripod
AC adapter (3V, 2.5 A, center positive)
SD/MMC card
System Requirements
For optimal use of this camera, your computer should have the following minimum system
requirements:
PC Pentium processor
Microsoft Windows XP/2000/ME/98SE
128 MB RAM
90 MB of hard drive space
USB interface
CD-ROM drive
VGA monitor
Important Notes:
- Due to varying compatibility among USB HUBS, compatibility is not guaranteed.
- Due to varying compatibility among USB interface cards, compatibility is not
guaranteed.
Downloaded from www.Manualslib.com manuals search engine
2
Getting Acquainted with Your Camera
Congratulations on your purchase of this digital camera. Your digital camera has been
designed with a 5 Mega Pixels CCD image sensor and 3X optical zoom lens which allow you
to quickly and easily take high quality digital pictures.
Top & Front View
1. Shutter button
2. Mode Dial Switch
3. Power LED
4. Flash
5. Self-timer LED
6. Microphone
7. 3X Optical Zoom Lens
8. DC-in Jack, USB/AV connector
compartment
9. Speaker
Rear & Bottom View
1. Viewfinder
2. AF LED (green)
3. Flash LED (red)
4. Flash/Delete button (
/ )
5. Zoom-out button (
, )
6. Zoom-in button (
, )
7. Playback button (
)
8. Strap eyelet
9. Up-arrow/Self-timer button (c/
)
10. Right-arrow button (f)
11. <Menu/OK> button (OK)
12. Down-arrow/Burst button (d/
)
13. Left-arrow/LCD on-off button (e/
)
14. Battery/Memory card compartment
15. Tripod socket
16. LCD Monitor
1
2
4
5
3
8
9
7
6
1
2
3
4
5
6
7
8
9
10
11
12
13
14
16
15
Downloaded from www.Manualslib.com manuals search engine
3
LCD Monitor Display
Image Qualit
y
Good
Bette
r
Best
(P.21)
Total/Remaining Shots
(P.6)
Memory SD/MMC Card
(no icon)
Not installed
installed
(P.6)
Zoom Level Indicator
(P.28)
Drive Mode
Burst (continuous shots)
(no icon) Single
(P. 19)
Self-timer
(no icon) Off
10 seconds
2 seconds
(
.11
)
Flash Mode
Auto
Flash Of
f
Flash On
Red-eye Reduction
(P
.19
)
Color Mode
Vivid
Black & White
Sepia
(P
.23
)
ISO Speed
(no icon)Auto
100
200
400
(P.22)
Scene Mode
(no icon) Full Auto
Portrait
Landscape
Close-up
Sport
Night Landscape
Night Portrait
Museum
Backlight
(P.8-9)
Auto-Exposure (AE) Metering
(no icon)
Center-weighted
Spo
t
Average
(P.22)
Auto-Focus (AF) Zone
Single-zone
Multi-zone
(P.20)
White Balance
(no icon) Auto
Sunny
Cloudy
Tungsten
Fluorescent
(P.21)
EV Compensation
–2.0EV to +2.0EV
@ 0.3EV Step
(P.21)
Sharpness
High
(no icon) Medium
Lo
w
(P.22)
Low Battery Alert
(P.6)
Image Resolution
5M (2560x1920)
5M 3:2 (2560x1712)
3M (2048x1536)
2M (1600x1200)
VGA (640x480)
(P.20)
Date Stamp
Off
Year-Month-Date
Month-Date-Year
Date-Month-Year
(P. 30)
Downloaded from www.Manualslib.com manuals search engine
29
Setting Camera Sound Volume
The volume level of this camera can be set to High, Low and Off.
1 Press <Menu/OK> button.
2 Select “SETUP” Menu by pressing Up/Down ( / ) arrow
button.
3 Press <Menu/OK> button
4 Press Up/Down ( / ) arrow button to select “CAMERA
SOUNDS”.
5 Press <Menu/OK> button.
6 Select the desired sound level and press <Menu/OK> button to
setup.
Setting Image Storage
This camera allows you to download images to either internal memory or card as memory
storage.
1 Press <Menu/OK> button.
2 Move highlight to “SETUP” Menu by pressing Up/Down
(
/ ) arrow button.
3 Press <Menu/OK> button.
4 Press Up/Down ( / ) arrow button to select “IMAGE
STORAGE”. Press <Menu/OK> button.
5 Select “AUTO” to save the images into SD/MMC card.
Select “INTERNAL” to save the images into the internal
memory. Press <Menu/OK> button to apply the settings. A “Reading Memory Card…
or a “Reading Internal Memory…” will be on the LCD display.
Downloaded from www.Manualslib.com manuals search engine
34

Hulp nodig? Stel uw vraag in het forum

Spelregels

Misbruik melden

Gebruikershandleiding.com neemt misbruik van zijn services uitermate serieus. U kunt hieronder aangeven waarom deze vraag ongepast is. Wij controleren de vraag en zonodig wordt deze verwijderd.

Product:

Bijvoorbeeld antisemitische inhoud, racistische inhoud, of materiaal dat gewelddadige fysieke handelingen tot gevolg kan hebben.

Bijvoorbeeld een creditcardnummer, een persoonlijk identificatienummer, of een geheim adres. E-mailadressen en volledige namen worden niet als privégegevens beschouwd.

Spelregels forum

Om tot zinvolle vragen te komen hanteren wij de volgende spelregels:

Belangrijk! Als er een antwoord wordt gegeven op uw vraag, dan is het voor de gever van het antwoord nuttig om te weten als u er wel (of niet) mee geholpen bent! Wij vragen u dus ook te reageren op een antwoord.

Belangrijk! Antwoorden worden ook per e-mail naar abonnees gestuurd. Laat uw emailadres achter op deze site, zodat u op de hoogte blijft. U krijgt dan ook andere vragen en antwoorden te zien.

Abonneren

Abonneer u voor het ontvangen van emails voor uw Rollei Prego da5 bij:


U ontvangt een email met instructies om u voor één of beide opties in te schrijven.


Ontvang uw handleiding per email

Vul uw emailadres in en ontvang de handleiding van Rollei Prego da5 in de taal/talen: Engels als bijlage per email.

De handleiding is 6,19 mb groot.


U ontvangt de handleiding per email binnen enkele minuten. Als u geen email heeft ontvangen, dan heeft u waarschijnlijk een verkeerd emailadres ingevuld of is uw mailbox te vol. Daarnaast kan het zijn dat uw internetprovider een maximum heeft aan de grootte per email. Omdat hier een handleiding wordt meegestuurd, kan het voorkomen dat de email groter is dan toegestaan bij uw provider.

Stel vragen via chat aan uw handleiding

Stel uw vraag over deze PDF

Uw handleiding is per email verstuurd. Controleer uw email

Als u niet binnen een kwartier uw email met handleiding ontvangen heeft, kan het zijn dat u een verkeerd emailadres heeft ingevuld of dat uw emailprovider een maximum grootte per email heeft ingesteld die kleiner is dan de grootte van de handleiding.

Er is een email naar u verstuurd om uw inschrijving definitief te maken.

Controleer uw email en volg de aanwijzingen op om uw inschrijving definitief te maken

U heeft geen emailadres opgegeven

Als u de handleiding per email wilt ontvangen, vul dan een geldig emailadres in.

Uw vraag is op deze pagina toegevoegd

Wilt u een email ontvangen bij een antwoord en/of nieuwe vragen? Vul dan hier uw emailadres in.


Info