Before using this unit, carefully read “USING THE UNIT SAFELY” and “IMPORTANT NOTES” (leaet “USING THE UNIT SAFELY” and Owner’s Manual p. 37 and p. 38). After reading, keep the
document(s) where it will be available for immediate reference.
Here’s What You Can Do
Having Fun Playing the Piano
˙
Playing Various Tones
In addition to grand piano tones for use in concerts, this instrument features a wide range of built-in instrument tones. Use these tones
as you like according to the song you’re playing and the mood. You can also play two tones layered together to discover your own
favorite original combinations.
˙
Listening to and Practicing with the Built-in Songs
This piano comes with built-in songs that are well-known in a variety of genres from classical to jazz, as well as songs for practicing and
more. You can use these built-in songs as examples when you practice. A built-in metronome is also available to help develop your
sense of rhythm when you play.
˙
Recording Your Performance
You can record your own keyboard performance, and then play it back to hear how you did. By listening back to what you played on
the spot, you can improve what you did for the next time, or copy your performance to a USB ash drive as a song.
Adjusting the Piano
˙
Changing the playing feel (key touch)
You can adjust the how the keyboard feels (the key touch) when you play, according to your tastes.
˙
Making the pitch match other instruments
When playing in an ensemble or similar situations, you can adjust the reference pitch of this piano to match its tuning with other
instruments (master tuning).
˙
Creating Your Own Piano Tone (Piano Designer)
Adjusts the dierent elements of the grand piano sound, letting you customize the piano sound as you like.
˙
Registering your favorite settings (Registration)
You can register your customized settings and then instantly switch between settings for each song or for dierent players.
More Ways to Further Enjoy This Instrument
˙
Playing music through the piano’s speakers (Bluetooth® Audio)
You can connect your smartphone or tablet to this instrument and listen to your favorite songs through the piano’s speakers. This lets
you “play along” with the performances of the musicians you admire.
˙
Connecting to an app to enjoy various added features (via Bluetooth MIDI)
By connecting this piano to an app, you can select even more varied tones, discover new music via Roland Cloud, and use features such
as digital sheet music to assist you when you practice... all of which lets you experience a new world of piano performance.
This app lets you view sheet music in digital form, practice
songs as if you were playing a game, or keep a record of
your practicing.
Downloading the app
Download the app for your smartphone or tablet for use with the piano.
Roland Piano App
Owner’s Manual
2
° Contents
Sound generatorPiano Sound: Piano Reality Modeling Concert Sound Engine (compatible with Piano Reality Ambience)
KeyboardPiano Reality Hybrid Concert Keyboard (88keys): with Escapement, Ebony/Ivory Feel, Dynamic Sensor Acceleration Technology and Haptic Key Vibration
Bluetooth
Bluetooth Ver 4.2
Supported proles: A2DP (Audio), GATT (MIDI over Bluetooth Low Energy)
Supported codec: SBC (compatible with SCMS-T content protection)
Power SupplyAC Adaptor
Power consumption
33 W (When using the included AC adaptor)
Approximate power consumption when playing the piano at medium volume: 23 W
Power consumption when sound has not been played after power-on: 21 W
Dimensions
Top opened (with music rest)
1,445 (W) x 1,501 (D) x 1,787 (H) mm
56-15/16 (W) x 59-1/8 (D) x 70-3/8 (H) inches
Top closed (with music rest):
1,440 (W) x 1,501 (D) x 999 (H) mm
56-3/4 (W) x 59-1/8 (D) x 39-3/8 (H) inches
Weight169.0 kg/372 lbs 10 oz
AccessoriesOwner’s Manual, “Roland Piano Masterpieces”, Leaet “Leaet Stand Assembly”, Leaet “USING THE UNIT SAFELY”, Power cord, Maintenance set, Key cover, Caster cups,
Headphone hook, Cord clamps
* This document explains the specications of the product at the time that the document was issued. For the latest information, refer to the Roland website.
The metronome or rhythm plays 6/8 as 2/2, 9/8 as 3/4, and 12/8 as
4/4.
13
° Listening to Songs
Playing Back a Song
Here’s how you can listen to the built-in songs. You can listen to these
internal songs as models for your own playing, or practice one hand at a
time along with them.
Ø“Internal Song List” (p. 35)
Category list
CategoryExplanation
Listening
Piano’s
internal
song
Piano songs recommended for listening
Ensemble (*)
Famous songs, mainly classical pieces. These include
piano concertos, duets, and jazz arrangements of classical
pieces. Since this collection contains songs that are
challenging to play, they are recommended for those at
intermediate level or above.
Entertainment (*)
Arrangements of well-known songs from around the
world, including pop, jazz, and children’s songs, in
arrangements that can be enjoyed by a wide range of
people from the beginner to the advanced player.
Do Re Mi Lesson
(*)
You can use these lessons to learn the basics of music,
by singing solfege along with the songs or practicing
score-reading.
Scales (*)Scales in all keys (major scales, minor scales)
HanonThe Virtuoso Pianist No.1–20
BeyerVorschule im Klavierspiel Op.101 No.1–106
Burgmüller25 Études faciles et progressives Op.100
Czerny100100 Übungsstücke Op.139
USB MemorySongs saved on a USB ash drive
Internal MemorySongs saved in internal memory
(*)Songs corresponding to the included collection of scores, “Roland Piano Masterpieces”.
1. Press the [] button.
The Song screen appears.
Category
TempoTime signatureMeasure
Song name
2. Press the [–] [+] buttons to select a song category.
3. Press the [] button.
4. Press the [–] [+] buttons to select a song within a category.
MEMO
If you decide to select a dierent song category, press the []
button.
5. Press the [ò] button.
The songs plays back, with the [] button blinking in time with the
tempo.
6. To stop the song, press the [ò] button once again.
The [ò] button goes dark.
7. To exit song settings, press the [] button.
The [] button goes dark.
Changing how songs play back
Operation
Playing back individual
performance parts
The built-in songs consist of three parts (right-hand, left-hand,
accompaniment), and you can play back just the part(s) that you
want to hear.
* Some songs don’t have a left-hand part or an accompaniment
part. In this case, you can’t select the corresponding part.
1. Press the [] button.
2. Press the [–] [+] buttons to select the part that
you want to mute.
3. Press the [] button.
The selected part is muted.
4. Press the [ò] button.
Only the selected part(s) song play back.
Changing the song
tempo
1. Press the [] button and then press the [–] [+]
buttons.
MEMO
Long-press the [–] [+] buttons to return to the default
tempo value.
Playing back the song
at a constant tempo
This is convenient when you want to practice along with the song
playback.
1. While holding down the [ò] buttons, press
the [] button.
The message “Tempo Mute On” appears, and the song
plays back at a xed tempo. Press and hold down the
[ò] button again, and then press the [] button to
return to the original tempo (the message “Tempo Mute
O” appears).
Selecting the measure
to play back
1. Follow steps 1–4 in “Playing Back a Song”
(p. 13).
2. Press the [ö/ù] button
The measure screen appears.
3. Press the [–] [+] buttons to select how many
measures to play.
4. Press the [ò] button.
The song plays from the specied measure.
MEMO
¹ Press the [ô] button to select the beginning of the
song.
¹ Press the [] button to return to the song select
screen.
Sounding a count
before the song plays
1. While holding down the [] button, press the
[ò] button.
The metronome button blinks in time with the tempo.
Playing all songs in the
selected category
1. While holding down the [] button, press the
[ò] button.
The [ò] button blinks, and the songs in the selected
category play back in order.
Playing back in a
dierent key
1. Press the [] button.
The [] button is lit, and the piano is in function mode.
2. Press the [–] [+] buttons to access the “Song
Transpose” screen.
3. Press the [] button.
4. Press the [–] [+] buttons to select how far
the pitch is to be transposed (the number of
semitones).
5. Press the [ò] button.
The song playback is transposed.
14
Listening to Songs
Operation
Playing songs from a
folder on a USB ash
drive
1. Press the [] button.
2. Press the [–] [+] buttons to display “USB Flash
Drive”.
3. Press the [] button.
Enter the folder
a. Press the [–] [+] buttons to select the desired folder.
b. Press the [] knob to conrm.
Exit the folder
a. Press the [–] [+] buttons to select “Up”.
b. Press the [] knob to conrm.
4. Press the play/stop button. The songs on the
USB ash drive begin playing back.
15
° Recording Your Performance
Recording Your Keyboard Performance
You can record your own keyboard performance, and then play it back to
hear how you did.
Getting Ready to Record
1. Select the tone that you want to play.
2. You can sound the metronome if you like.
Set the metronome’s tempo and time signature. The metronome
setting is stored in the song, and you can use the same settings
during playback.
3. Press the [ó] button.
The [ó] button lights, the [ò] button blinks, and the piano enters
record-standby mode.
If you decide to cancel recording, press the [ó] button once again.
Starting/Stopping Recording
4. Press the [ò] button.
After a one-measure count, recording starts, and the [ó] button and
[ò] button are both lit. The performance is saved automatically.
MEMO
You can also start recording by playing the keyboard instead of
pressing the [ò] button. In this case, a count is not sounded.
5. To stop recording, press the [ò] button once again.
Recording stops.
Listening to the Recorded Performance
6. Press the [ò] button.
After you record, the newly recorded song is selected.
The recorded song starts playing back.
Deleting a Saved Song
You can delete a song that you saved.
MEMO
¹You can also delete a recorded song by holding down the [ó]
button and pressing the [] button.
¹If you want to delete all songs that have been saved to internal
memory, initialize the memory (“Initializing the Memory
(Format Media)” (p. 24)).
1. Press the [] button.
The [] button is lit, and the piano is in function mode.
2. Press the [–] [+] buttons to access the “Delete Song” screen.
3. Press the [] knob to conrm.
The Delete Song screen appears.
4. Press the [–] [+] buttons to select the media where the data is
saved, and press the [] knob to conrm.
5. Press the [–] [+] buttons to select the song to delete, and press
the [] knob to conrm.
A conrmation message appears.
If you decide to cancel, press the [] button.
6. Press the [–] [+] buttons to select “Yes”, and press the []
button to execute.
The deletion is executed.
* Never turn o the power or disconnect the USB ash drive while
the screen indicates “Executing...”.
* Never turn o the power, disconnect the USB ash drive or
unplug the power cord while the indicator of GP-9 shows that an
operation is in progress.
Managing songs you recorded
Operation
Renaming a
recorded song
You can rename a saved song.
1. Press the [] button.
The [] button is lit, and the piano is in function mode.
2. Press the [–] [+] buttons to access the “Rename Song”
screen, and press the [] button to conrm.
3. Press the [–] [+] buttons to select the media that
contains the song you want to rename, and press the
[] button to conrm.
4. Press the [–] [+] buttons to select the song that you
want to rename, and press the [] button to conrm.
Rename the song.
Select the character
which you want to
change
Press the [–] [+] buttons
Change the character
Press the [] button
(conrm)ÓPress the [–] [+] buttons
(edit character)ÓPress the [] button (back)
Insert one characterPress the [ò] button
Delete one characterPress the [ó] button
6. Press the [–] [+] buttons to select µ on the right side
of the screen, and press the [] button to execute.
A conrmation message appears.
7. Press the [–] [+] buttons to select “Yes”, and press the
[] button to execute.
The song is renamed.
* Never turn o the power, disconnect the USB ash drive or
unplug the power cord while the screen indicates “Executing...”.
8. Press the [] button.
You exit function mode.
Copying a
recorded song
Songs that have been saved in internal memory can be copied to USB
ash drive. Alternatively, songs stored on a USB ash drive can be copied
to internal memory.
1. Press the [] button.
The [] button is lit, and the piano is in function mode.
2. Press the [–] [+] buttons to access the “Copy Song”
screen, and press the [] button to conrm.
3. Press the [–] [+] buttons to select the copy source
and destination media, and press the [] knob to
conrm.
4. Press the [–] [+] buttons to select the song that you
want to copy.
If you decide to cancel, press the [] button.
5. Press the [] button.
The copy is executed.
* Never turn o the power, disconnect the USB ash drive or
unplug the power cord while the screen indicates “Executing...”.
6. Press the [] button.
You exit function mode.
16
Recording Your Performance
Advanced Recording Methods
Recording Your Performance One Hand at a Time
By recording your left-hand performance
to the Left part and your right-hand
performance to the Right part, you can
record each hand of your performance
separately.
Getting ready to record
1. Select the tone that you want to play.
2. You can sound the metronome if you like.
Set the metronome’s tempo and time signature. The metronome
setting is stored in the song, and you can use the same settings
during playback.
3. Press the [ó] button.
The [ó] button lights, the [ò] button blinks, and the piano enters
record-standby mode.
If you decide to cancel recording, press the [ó] button once again.
4. Press the [] button, press the [–] [+] buttons to select the
part that you don’t want to record, and then press the []
button to make it go dark.
Only the part that you’re recording will blink.
MEMO
If you don’t select a part at this time, your performance is recorded to
the following parts.
Performing with one tone“Right” part
Playing dierent tones with the left
and right hand (Split Play)
The left-hand tone is the “Left” part, and the
right-hand tone is the “Right” part
Performing with two tones layered
(Dual Play)
The tone 1 is the “Right” part, and the tone 2
is the “Accomp” part
Starting/stopping recording
5. Press the [ò] button.
After a one-measure count, recording starts, and the [ó] button and
[ò] button are both lit. The performance is saved automatically.
MEMO
You can also start recording by playing the keyboard instead of
pressing the [ò] button. In this case, a count is not sounded.
6. To stop recording, press the [ò] button once again.
Recording stops.
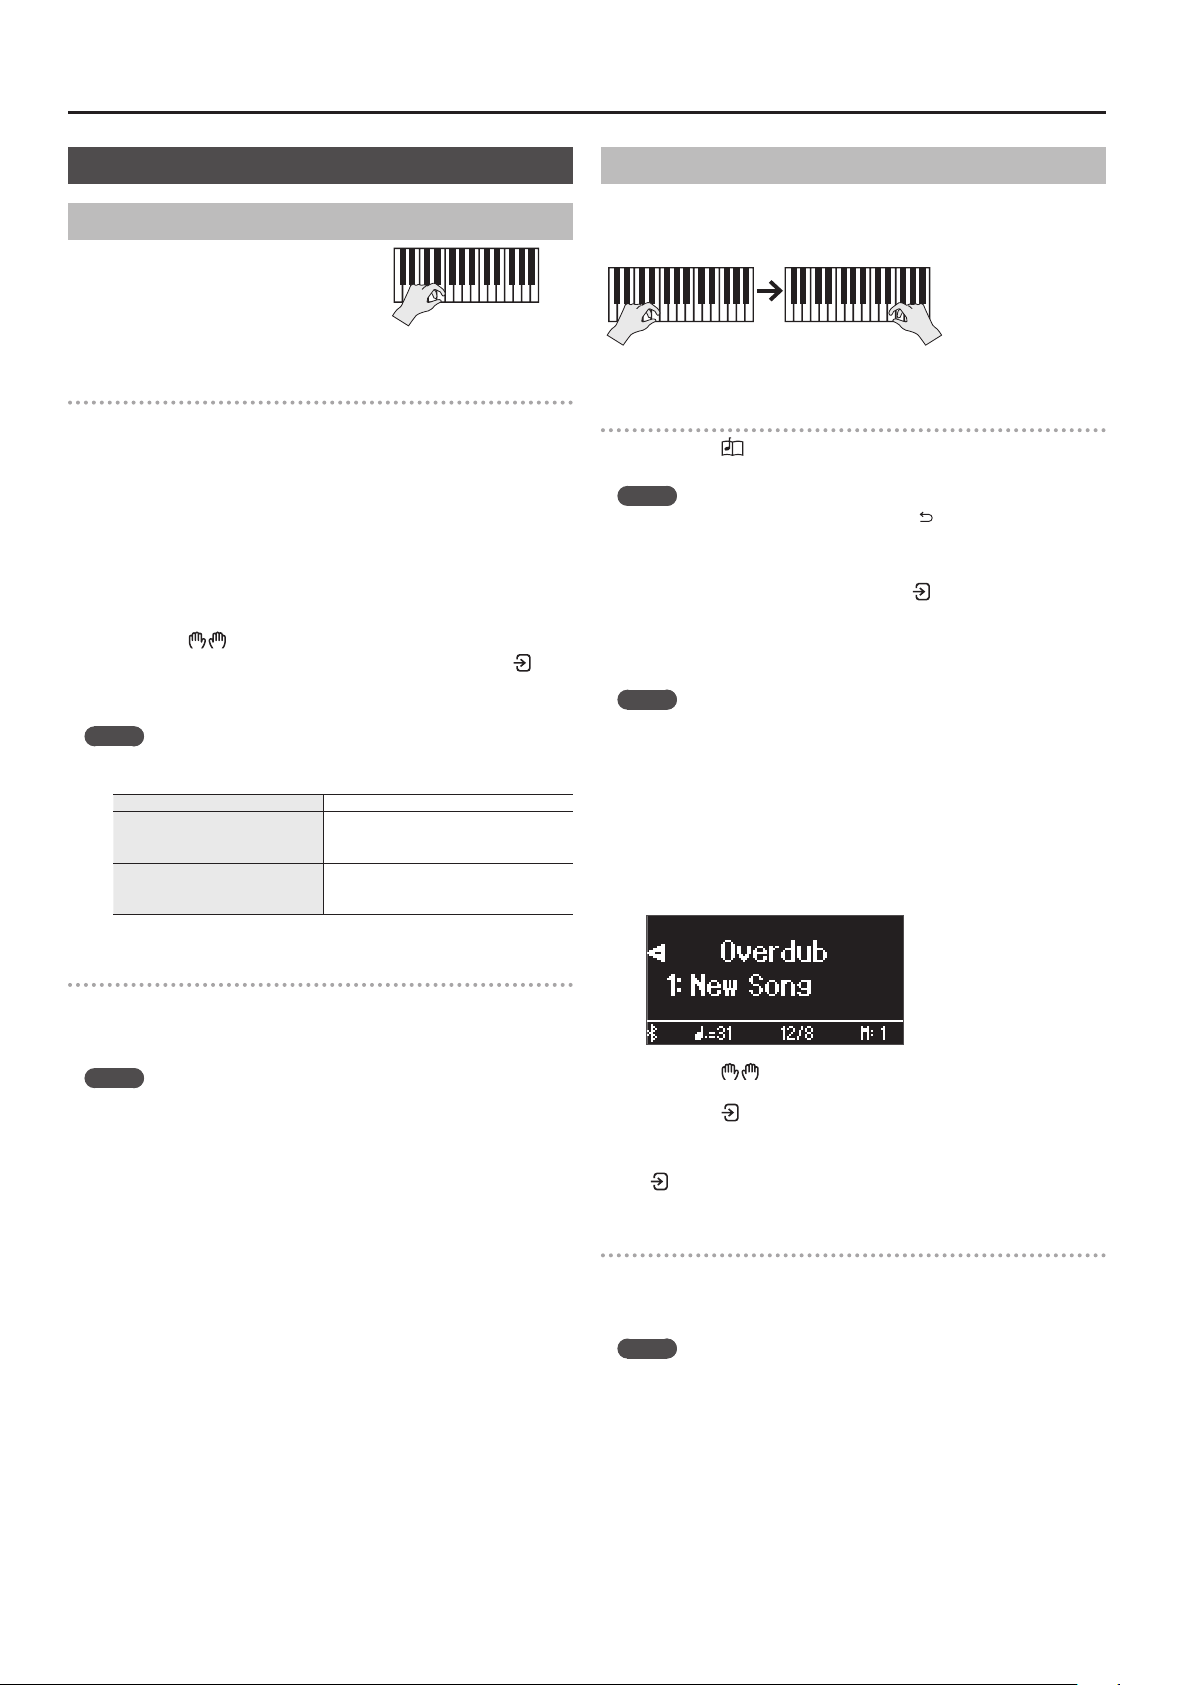
Overdubbing a Recorded Performance
After recording one hand of your performance, you can overdub-record
the performance of the other hand.
You can also overdub-record onto a built-in song.
Left (or right) partRight (or left) part
Getting ready to record
1. Press the [] button.
The Song screen appears.
MEMO
If the measure screen appears, press the [] button to return to the
song-select screen.
2. Press the [–] [+] buttons to select the category of the song that
you want to overdub, and press the [] button to conrm.
3. Press the [–] [+] buttons to select the song that you want to
overdub.
You can select songs within the category.
MEMO
If you’re recording your performance along with a built-in song, you
can x the tempo of the built-in song (p. 13).
4. Press the [ó] button.
The [ó] button lights, the [ò] button blinks, and the piano enters
record-standby mode.
If you decide to cancel recording, press the [ó] button once again.
5. Press the [–] [+] buttons to access the “Overdub” screen.
The song of step 3 is selected.
6. Press the [] button. If a part that you don’t want to record
is blinking, press the [–] [+] buttons to select the part, and
press the [] button to make it go dark.
Only the part that you’re recording will blink.
If you select a part that is already recorded (lit) and then press the
[] button to make it blink, that part will be overwrite-recorded.
Starting/stopping recording
7. Press the [ò] button.
After a one-measure count, recording starts, and the [ó] button and
[ò] button are both lit. The performance is saved automatically.
MEMO
You can also start recording by playing the keyboard instead of
pressing the [ò] button. In this case, a count is not sounded.
8. To stop recording, press the [ò] button once again.
Recording stops.
Left (or right) part
17
Recording Your Performance
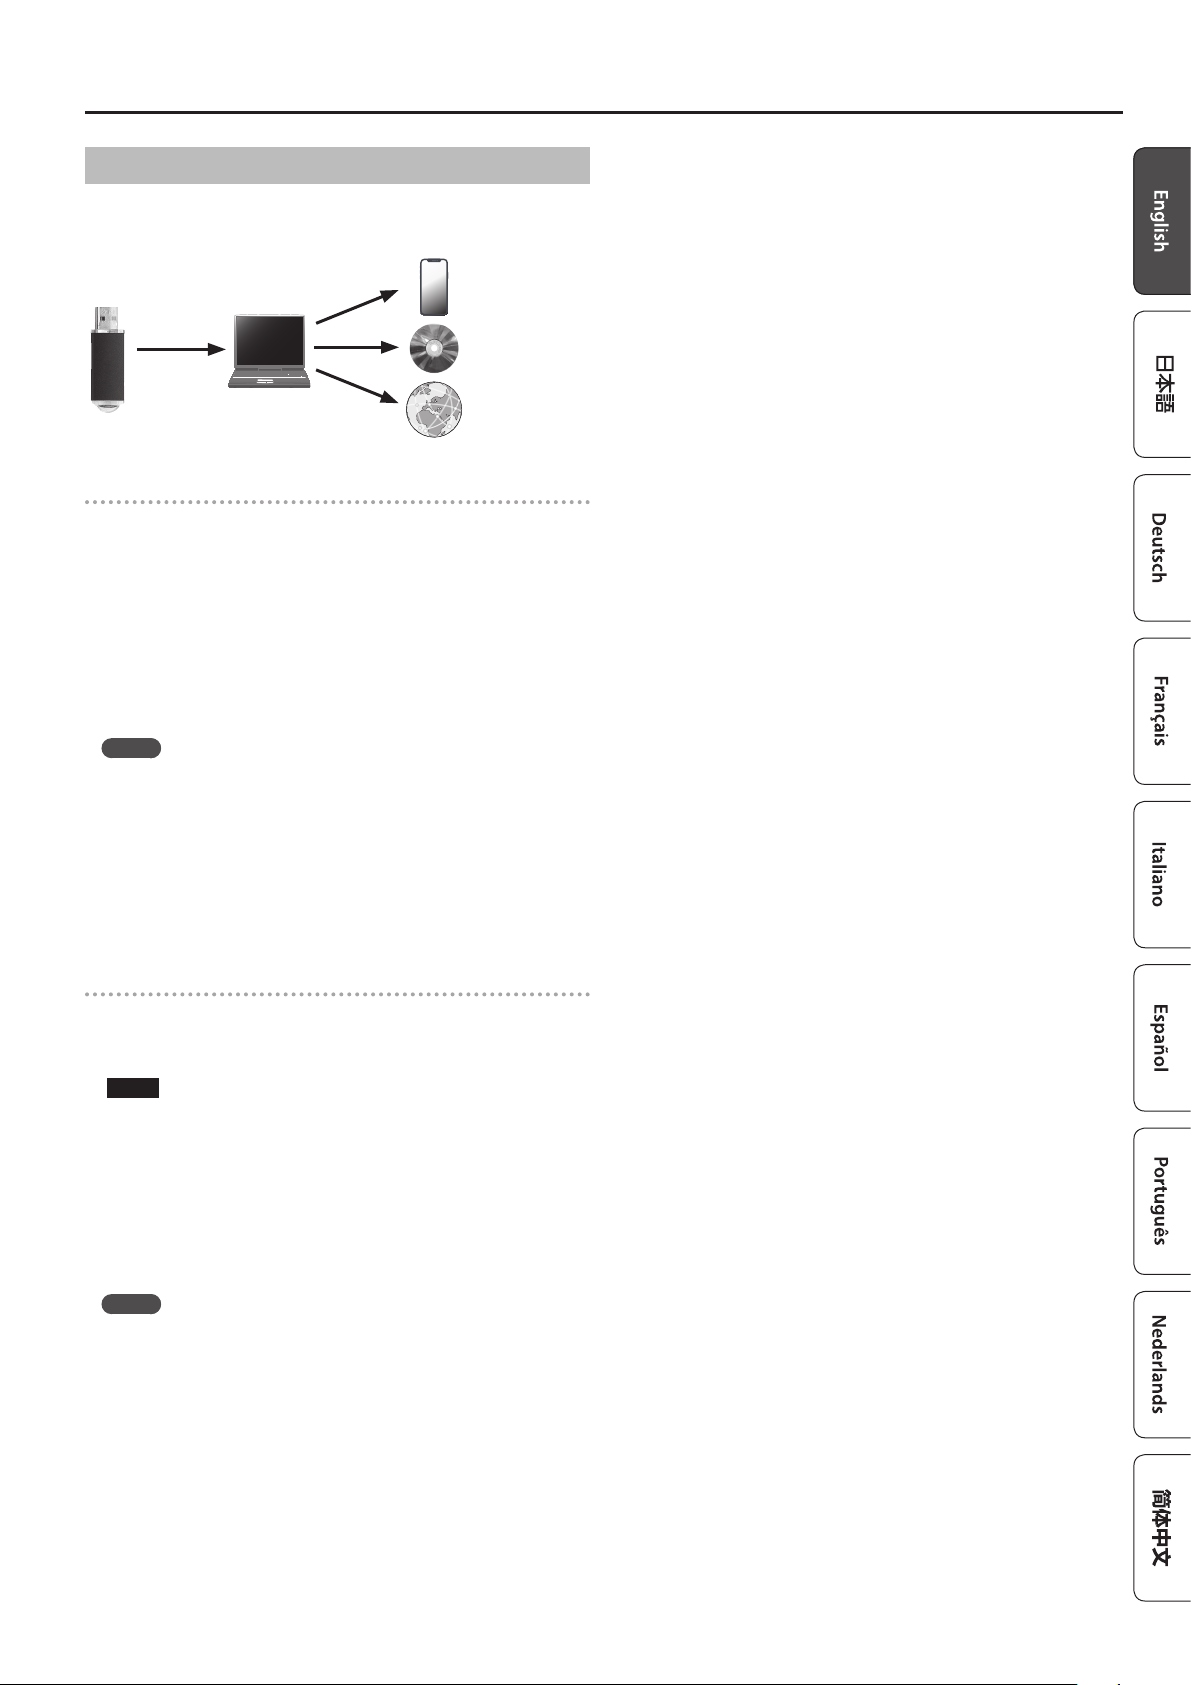
Recording Audio to USB Flash Drive
If you audio-record your performance, you’ll be able to listen to it on your
computer or audio player, use it to create a music CD, or publish it on the
internet.
Getting ready to record
1. Connect your USB ash drive to the USB Memory port.
* Audio data can’t be saved in the piano’s internal memory.
* Never turn o the power or disconnect the USB ash drive while
the screen indicates “Executing...”.
* Never turn o the power or disconnect a USB ash drive or the
power cord while the USB ash drive access indicator is blinking.
2. Select the tone that you want to play.
3. Hold down the [ó] button and press the [–] [+] buttons to
select “Audio”.
MEMO
You can also specify this via the Function mode “Recording Mode”
setting (p. 26).
4. Press the [ó] button.
The [ó] button lights, the [ò] button blinks, and the piano enters
record-standby mode.
If you decide to cancel recording, press the [ó] button once again.
5. You can sound the metronome if you like.
Starting/stopping recording
6. Press the [ò] button.
Recording starts, and the [ó] button and [ò] button are lit. The
performance is saved automatically.
NOTE
Never turn o the power or disconnect the USB ash drive during
recording.
7. To stop recording, press the [ò] button once again.
Recording stops.
* Never turn o the power or disconnect the USB ash drive while
the screen indicates “Executing...”.
* Never turn o the power or disconnect a USB ash drive or the
power cord while the USB ash drive access indicator is blinking.
MEMO
¹You can delete the song that you recorded (p. 15).
¹You can rename the song that you recorded (p. 15).
18
This piano lets you adjust various elements of the sound, so you can personalize the piano tone to your taste.
This function is called “Piano Designer”.
MEMO
The process of creating your own piano tone can also be done
using touch operations on the dedicated app.
Ø“Using the Piano with an App” (p. 21)
Adjusting the Sound of the Overall Piano
App “Piano Designer”
ItemsValueExplanation
Master Tuning415.3 Hz–466.2 Hz
(default value: 442.0 Hz)
When playing in an ensemble with other instruments, you can adjust the reference pitch of this piano so that you will harmonize
correctly with the other instruments. The reference pitch is usually expressed as the frequency that is heard when you play the
middle A (A4) note. The action of matching the reference pitch to other instruments is called “tuning”.
Temperament
You can play classical styles such as Baroque using historic temperaments (tuning methods).
Most modern songs are composed for and played in equal temperament, the most common tuning in use today. But at one time, there were a wide variety of
other tuning systems in existence. By playing in the temperament that was in use when a composition was created, you can experience the sonorities of chords
originally intended for that song.
Equal
(default setting)
This temperament divides the octave into twelve equal steps. It is the temperament that is most commonly used on today’s
pianos. Every interval has the same slight amount of dissonance.
Just MajorIn these temperaments, the primary triads are perfectly consonant. It is unsuited to playing melodies and cannot be transposed,
but is capable of beautiful sonorities. The Just tunings dier from major and minor keys.
Just Minor
PythagoreanThis tuning, devised by the philosopher Pythagoras, eliminates dissonance in fourths and fths. Although triadic chords are
slightly dissonant, this tuning is suitable for songs that have a simple melody.
Kirnberger IKirnberger I. As in the Just temperaments, the primary triads are consonant in this tuning. Beautiful sonorities are obtained when
playing songs that are written in keys appropriate for this tuning.
Kirnberger IIKirnberger II. This is a revision of Kirnberger I that reduces the limitations on the usable keys.
Kirnberger III
Kirnberger III. This is an improvement of the Meantone and Just tunings that provides a high degree of freedom of modulation.
Performances are possible in all keys. Since the resonance diers depending on the key, chords played in this temperament
resonate in diverse ways when compared to equal temperament.
Meantone
This temperament slightly narrows the fth relative to Just temperaments. While the Just temperaments contains two
types of whole tone (major whole tone and minor whole tone), meantone temperament uses only one type of whole tone
(mean whole tone). Transposition within a limited range of keys is possible.
Werckmeister
Werckmeister. This temperament consists of eight perfect fths and four narrowed fths. Performances are possible in all keys.
Since the resonance diers depending on the key, chords played in this temperament resonate in diverse ways when compared
to equal temperament.
ArabicThis tuning is suitable for the music of Arabia.
Temperament keyC–B
(default value: C)
This sets the primary key of the temperament. When playing with tuning other than equal temperament, you need to specify the
temperament key for tuning the song to be performed (that is, the note that corresponds to C for a major key or to A for a minor
key). If you choose an equal temperament, there’s no need to select a temperament key.
° Creating Your Own Piano Tone (Piano Designer)
1. Press the [] button.
2. Press the [–] [+] buttons to access the screen of the item that
you want to adjust.
3. Press the [] knob to conrm.
4. Press the [–] [+] buttons to select the value.
5. To exit the settings, press the [] button.
The [] button goes dark.
19
Creating Your Own Piano Tone (Piano Designer)
Editing the Grand Piano Tone
You can adjust various aspects of the grand piano’s tone, including the string and pedal resonances, and the sound of the hammers striking the strings.
* Only tones belonging to the “Grand” group can be adjusted.
1. Press the [] button.
2. Press the [–] [+] buttons to access the “Piano Tone Edit” screen.
3. Press the [] knob to conrm.
4. Press the [–] [+] buttons to access the screen of the item that
you want to adjust.
5. Press the [] button to conrm, and press the [–] [+] buttons
to select the value of the setting.
6. When you are nished editing the piano tone, press []
button.
A conrmation message appears.
If you decide to cancel, press the [] button.
7. Press the [–] [+] buttons to select “Yes”, and press the []
button to execute.
The Grand Piano tone settings are saved.
ItemsValueExplanation
Piano Tone Edit
Lid0–6 (default value: 4)
Adjusts the extent to which the top lid of the grand piano is open.
The sound will become more mellow as you close the top lid of the piano in the screen.
The sound will become brighter as you open the top lid of the piano in the screen.
Key O NoiseO, 1–10
(default value: 3)
Adjusts the action noise that is heard when you release a key.
Higher settings produce a louder action noise.
Hammer Noise-5–0–+5
(default value: 0)
Adjusts the sound produced when the hammer of an acoustic piano strikes the string.
Higher settings will produce a louder sound of the hammer striking the string.
Duplex ScaleO, 1–10
(default value: 2)
Adjusts the sympathetic vibrations of an acoustic piano’s Duplex Scale.
Higher settings will make the sympathetic vibration louder.
The Duplex Scale is a system of sympathetically vibrating strings sometimes included in grand pianos.
These sympathetically vibrating strings are not struck directly with hammers, but sound by vibrating in sympathy
with the vibrations of other strings. By resonating with the overtones, these strings add richness and brilliance to the
sound. These sympathetic strings are added only to the high register above approximately C4. Since they do not have
a damper (a mechanism that stops them from sounding), they will continue sounding even after you play a note and
then release it to stop the sound of the string that was actually struck.
Full Scale String Res.O, 1–10
(default value: 4)
Adjusts the resonant sound of an acoustic piano (the sound produced by the strings of previously-pressed keys
vibrating in sympathy with newly played notes, or the sound of other strings vibrating in sympathy with the notes you
play while pressing the damper pedal). Higher settings produce louder sympathetic resonance.
Key O ResonanceO, 1–10
(default value: 3)
Adjusts the resonance of the subtle sounds that occur when a key of an acoustic piano is released.
A higher value produces a larger tonal change during the decay.
Cabinet ResonanceO, 1–10
(default value: 4)
Adjusts the body resonance of the grand piano itself.
Higher values will produce a larger body resonance.
Soundboard Type1–5 (default value: 1)Selects how the soundboard of the acoustic piano will resonate.
You can choose from ve dierent types of resonance.
Damper ModelingO, 1–10
(default value: 5)
Adjusts the damper noise of the acoustic piano sound (the sound of the damper releasing the strings when you press
the damper pedal).
Soft Pedal1–10 (default value: 2)Adjusts the depth of the eect that occurs when you press the soft pedal. With higher values, the change will be
greater.
Single Note Tuning
(*)
-50.0–0–+50.0
(per key)
Adjusts the tuning of each individual key. For example, you can adjust the width of stretched tuning, which tunes the
higher register slightly higher and the lower register slightly lower.
Single Note Volume
(*)-50–0 (per key)Adjusts the volume of each key. Lower settings decrease the volume.
Single Note
Character (*)-5–0–+5 (per key)
Adjusts the tonal character of each key. Higher settings produce a harder sound, and lower settings produce a softer
tone.
* The result of this eect will dier depending on the pitch range.
Reset SettingResets the “Piano Tone Edit” settings of the selected tone to their factory settings.
Single Note settings (*)
1. Select the Single Note settings screen, and press the [] button to
conrm.
2. Press the key on the keyboard that you want to select, and press the
[–] [+] buttons to edit the value.
3. Press the [] button to exit the screen of that item.
20
° Connecting the Piano and a Mobile Device via
Bluetooth®
Here’s What You Can Do
Bluetooth functionality creates a wireless connection between a mobile
device such as a smartphone or tablet (subsequently referred to as “mobile
device”) and the piano, letting you do the following.
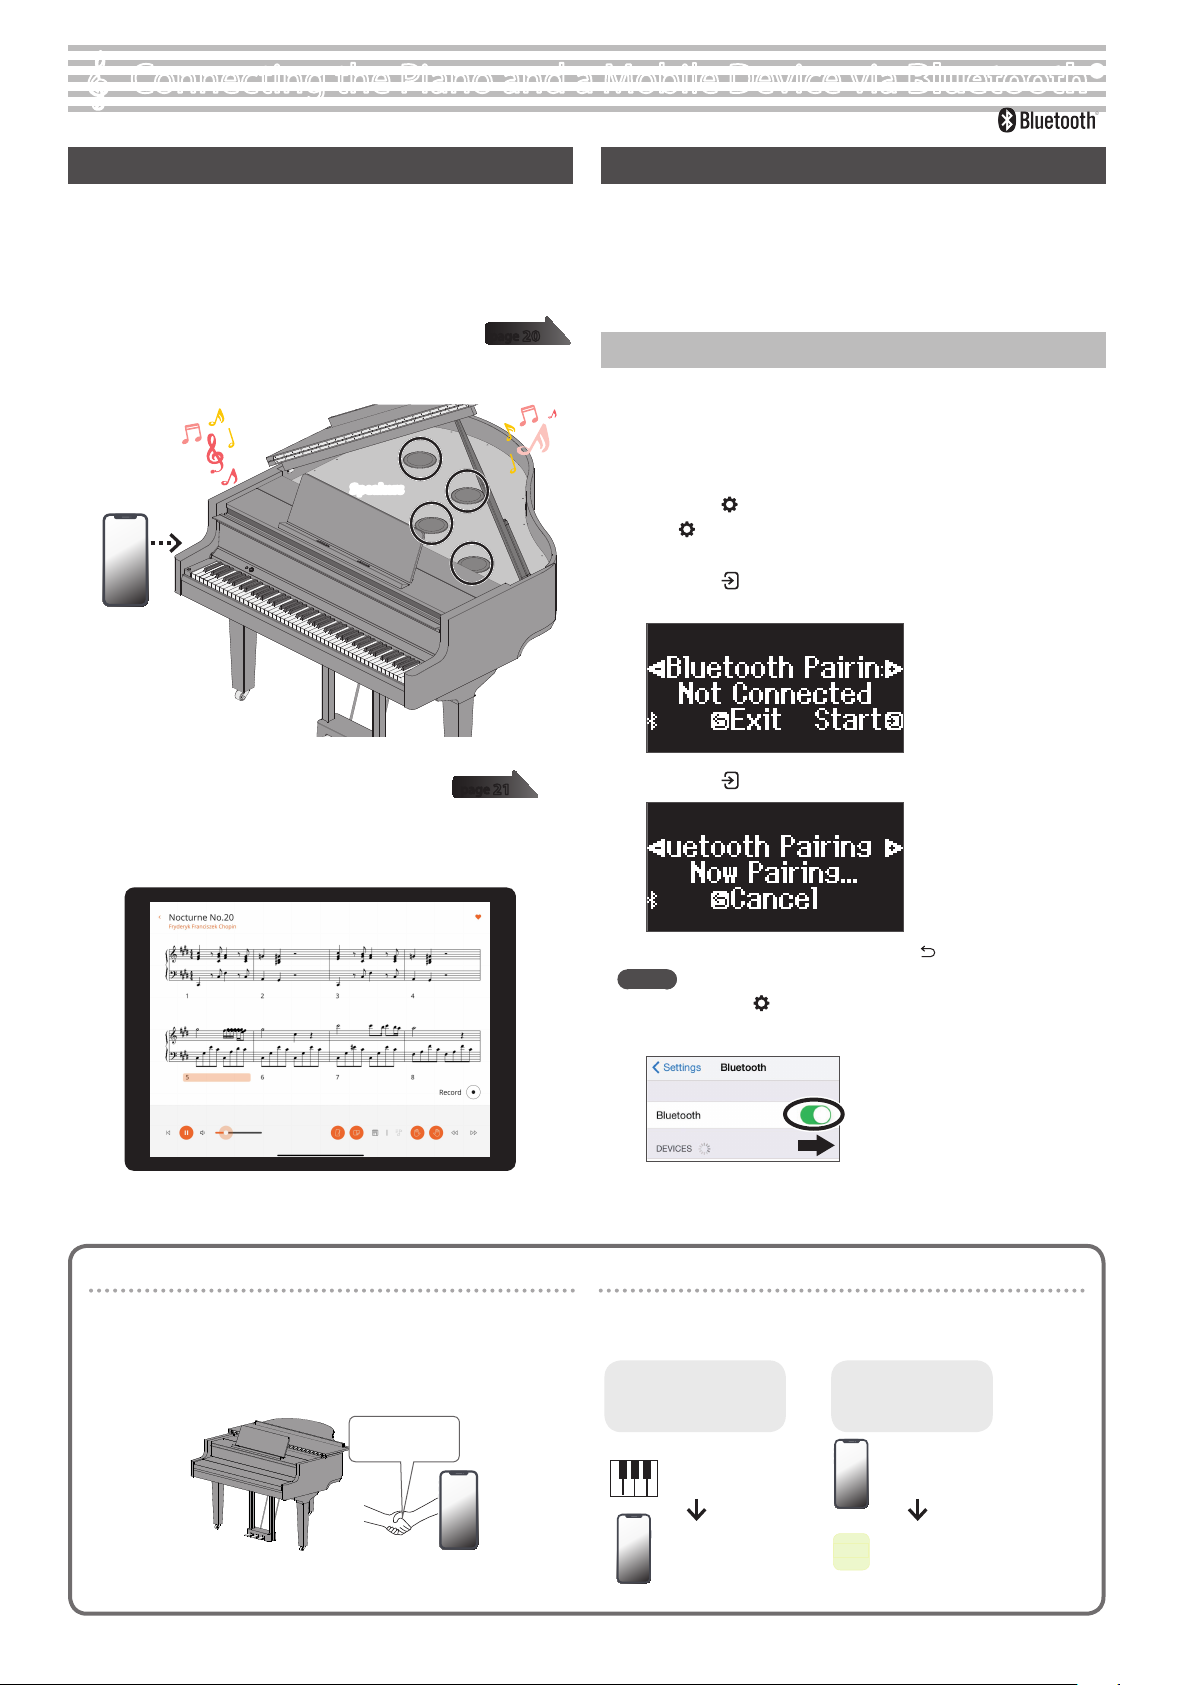
ÓPlay Music Through the Piano’s Speakers
Music data stored on your mobile device can be played wirelessly through
the piano’s speakers.
Speakers
ÓUsing the Piano with an App
Install the app (“Roland Piano App” by Roland) on your mobile device to
exchange data with the piano.
Play Music Through the Piano’s Speakers
Here’s how to congure the settings so that music data saved on your
mobile device can be played wirelessly through the piano’s speakers.
* Once a mobile device has been paired with the piano, there is no need
to pair again. Refer to “Connecting an Already-Paired Mobile Device”
(p. 21).
Initializing the Settings (Pairing)
This example shows how to congure the settings for iOS/iPadOS devices.
If you are using an Android device, refer to the instructions for settings in
the owner’s manual that came with your mobile device.
1. Place the mobile device that you want to connect near the
piano.
2. Press the [] button.
The [] button is lit, and the piano is in function mode.
3. Press the [–] [+] buttons to access the “Bluetooth” screen, and
press the [] button to conrm.
The following screen appears.
4. Press the [] knob to begin pairing.
If you decide to cancel pairing, press the [] button.
MEMO
Long-press the [] button to start pairing immediately.
5. Turn on the Bluetooth function of the mobile device.
page 20
page 21
App “Roland Piano App”
Pairing
To use Bluetooth, you must rst “pair” the piano with your mobile
device to create a one-to-one connection between them.
“Pairing” is the procedure of registering (mutually authenticating) your
mobile device with the piano.
Pair the devices by following the steps shown for each function.
Pairing
The pairing process
Separate pairing is required for “playing music through the piano’s
speakers” and for “using the piano with an app”. Note that these
processes are dierent.
Playing music through
the piano’s speakers
Using the piano with
an app
Settings on the piano
Settings on the mobile deviceSettings on the App
App
Settings on the mobile device
21
Connecting the Piano and a Mobile Device via Bluetooth®
6. Tap “GP-9 Audio” that appears in the mobile device’s
Bluetooth “DEVICES” eld.
The piano and mobile device are paired. When pairing is completed,
a display like the following appears.
Mobile device“GP-9 Audio” is added in the “My Devices” eld
Piano
The screen indicates “Completed”, and “AUDIO” is shown beside
the Bluetooth symbol
7. Press the piano’s [] button to exit function mode.
Pairing is complete.
Playing back audio
When you play back music data on the mobile device, the sound is heard
from the piano’s speakers.
MEMO
To adjust the volume of the audio, make adjustments on your mobile
device. If this does not produce the desired volume, you can adjust
the piano’s settings.
Ø“Adjusting the Volume of Bluetooth Audio (Bluetooth Volume)” (p. 25)
Connecting an Already-Paired Mobile Device
1. Turn on the Bluetooth function of the mobile device.
The piano and mobile device are connected wirelessly.
* If the above step does not establish a connection, tap
“GP-9 Audio” that is shown in the “DEVICES” eld of the mobile
device.
Using the Piano with an App
Apps You Can Use with This Piano
App nameSupported OSExplanation
Roland Piano App
iOS/iPadOS/
Android
This app lets you view sheet music in
digital form, practice
songs as if you were
playing a game, or keep a
record of your practicing.
Piano Designer
iOS/iPadOS/
Android
This app lets you customize the piano
sound to your taste. You
can use the “Piano
Designer” (p. 18) to adjust
the various elements of
the sound via
touch-based editing
within the app.
* Apps can be downloaded from the App Store (iOS/iPadOS products) or
from Google Play (Android products).
* In addition to the above, you can also use music apps (such as Garage
Band) that are compatible with Bluetooth MIDI.
* The information provided about apps made by Roland was current
when this manual was published. For the latest information, refer to the
Roland website.
Making the Settings (Pairing)
You can make settings for using the piano together with an app that’s
installed on your mobile device. This shows the steps for using the
“Roland Piano App” app with the iPad as an example.
* In the case of “using the piano with an app”, settings on the piano are
not necessary. Perform operations in the app to pair it with the piano.
1. Turn on the Bluetooth function of the mobile device.
NOTE
Even if the “DEVICES” eld shows the name of the device you’re using
(such as “GP-9 MIDI”), do not tap it.
2. Start the app that you installed on your mobile device.
3. Tap “Connection” at the top of the app screen, and tap
“Connect to Piano”.
“GP-9 MIDI” is shown in the app screen.
4. Tap “GP-9 MIDI” (the name of the unit that you’re using).
The piano and mobile device are paired. When pairing is completed,
a display like the following appears.
Mobile device“GP-9 MIDI” is added in the “My Devices” eld
Piano
The “MIDI” is shown beside the Bluetooth symbol
This completes the settings.
22
Connecting the Piano and a Mobile Device via Bluetooth®
1 Make sure that the piano’s Bluetooth function is
“On”
1. Press the piano’s [] button.
The [] button is lit, and the piano is in function mode.
2. Press the [–] [+] buttons to access the “Bluetooth” screen,
and press the [] knob to conrm.
You enter the Bluetooth setting screen.
3. Press the [–] [+] buttons to access the “Bluetooth On/O”
screen, and press the [] button to conrm.
4. Press the [–] [+] buttons to select “On”.
The piano’s Bluetooth function turns on.
5. Press the [] button.
The [] button goes dark, and you exit function mode.
2 Exit all apps on your mobile device
Closing the app
1. Swipe up from the bottom of the home screen, stopping
your nger around the middle of the screen. Next, swipe the
app screen up.
* The method for closing apps may dier depending on your mobile device.
Use the method that’s appropriate for your device to close the apps.
3 If already paired, cancel pairing, and turn o the
Bluetooth function
Clearing the pairing
1. In the mobile device’s screen, tap the “i” located beside
“Connected”, and tap “Forget This Device”.
GP-9 MIDI
2. Turn the Bluetooth switch o.
4 Restart your mobile device
5 Perform the pairing procedure of p. 21 from step
1
MEMO
If you’ve checked these points and the problem still occurs, please refer to
the Roland support website.
https://www.roland.com/support/
If Pairing Doesn’t Work
If the pairing process shown in “Using the Piano with an App” (p. 21) is not successful, try steps 1–4 as shown below.
If you have more than one piano
When pairing with a mobile device in a situation where there are
multiple pianos, such as in a music classroom, you can assign an ID
to each piano.
Assigning an ID
When you make this setting, an ID number is added to the end of
the device name that’s shown on the mobile device.
(such as “GP-9 Audio 1” “GP-9 MIDI 1”)
1. Press the [] (Function) button.
2. Press the [–] [+] buttons to access the “Bluetooth” screen, and
press the [] knob to conrm.
3. Press the [–] [+] buttons to select “Bluetooth ID”.
4. Press the [] button to conrm, and press the [–] [+] buttons
to change the number.
IDExplanation
0–99Set to “0”: “ GP-9 Audio” “GP-9 MIDI” (default setting)
Set to “1”: “GP-9 Audio 1” “GP-9 MIDI 1”
* If you are pairing in an environment where there are multiple
pianos, we recommend that you turn on the power of the
mobile device and only those pianos that you want to pair
(turn o the power of other devices).
23
° Convenient Functions
Loading/Saving Your Favorite Settings and Piano
Setups
You can save your favorite settings or the piano’s setup to a USB ash drive,
or load these settings that are saved to a USB ash drive into the piano.
* Settings can be loaded only into another piano of the same model.
Piano settings that are saved
SettingPage
Speaker volumep. 8
Headphone volumep. 8
Ambience Typep. 9
Ambience Depthp. 9
Key Touchp. 11
Brilliancep. 9
Master Tuningp. 18
Temperamentp. 18
Temperament Keyp. 18
Hammer Responsep. 11
Piano Tone Editp. 19
Volume Limitp. 27
* For the favorite settings that are saved, refer to the list of favorite
settings as shown in “Settings Saved Even If the Power Is Turned O”
(p. 3).
Saving Your Favorite Settings and Piano Setups
(Registration Export/Piano Setup Export)
1. Connect your USB ash drive to the USB Memory port.
2. Press the [] button.
The [] button is lit, and the piano is in function mode.
3. Press the [–] [+] buttons to show either the “Registration
Export” or “Piano Setup Export” screen, and then press the
[] button to conrm.
The Registration or Piano Setup Export screen appears.
4. Edit the name of the registration or the piano setup.
Select the character which
you want to changePress the [–] [+] buttons
Change the characterPress the [] button (conrm)Ópress the [–] [+]
buttons (edit character)Ópress the [] button (back)
Insert one characterPress the [ò] button
Delete one characterPress the [ó] button
5. Press the [–] [+] buttons to select µ on the right side of the
screen, and press the [] button to execute.
The settings are saved.
NOTE
Never turn o the power, disconnect the USB ash drive or unplug
the power cord while the screen indicates “Executing...”.
6. Press the [] button to exit function mode.
The [] button goes dark.
* Never turn o the power, disconnect the USB ash drive or
unplug the power cord while the indicator of GP-9 shows that an
operation is in progress.
Loading Your Favorite Settings and Piano Setups
(Registration Import/Piano Setup Import)
1. Connect your USB ash drive to the USB Memory port.
2. Press the [] button.
The [] button is lit, and the piano is in function mode.
3. Press the [–] [+] buttons to show either the “Registration
Import” or “Piano Setup Import” screen, and then press the
[] button to conrm.
The Registration or Piano Setup Import screen appears.
4. Press the [–] [+] buttons to select either Registration Import or
Piano Setup Import.
5. Press the [] button to conrm.
A conrmation message appears.
If you decide to cancel, press the [] button.
6. Press the [–] [+] buttons to select “Yes”, and press the []
button to execute.
This loads the settings.
NOTE
Never turn o the power, disconnect the USB ash drive or unplug
the power cord while the screen indicates “Executing...”.
7. Press the [] button to exit function mode.
The [] button goes dark.
* Never turn o the power, disconnect the USB ash drive or
unplug the power cord while the indicator of GP-9 shows that an
operation is in progress.
* When you load favorite settings (registration) for which the
start-up settings have been changed, the unit switches to those
settings right after the power is turned on.
24
Convenient Functions
Initializing the Memory (Format Media)
Here’s how to erase all of the les that you saved in internal memory or on
a USB ash drive (commercially available).
NOTE
¹When you initialize, all registrations or les that you saved in
internal memory or on a USB ash drive are lost.
¹If you want settings other than the memory settings to be
returned to their factory-set state, execute a Factory Reset (p. 24).
1. If you want to initialize a USB ash drive, connect the USB ash
drive to the USB Memory port.
2. Press the [] button.
The [] button is lit, and the piano is in function mode.
3. Press the [–] [+] buttons to access the “Format Media” screen,
and then press the [] button to conrm.
The Format Media screen appears.
If you decide to cancel, press the [] button.
4. Press the [–] [+] buttons to select the media (Internal Memory
or USB Memory) that you want to format.
5. Press the [] button to conrm.
A conrmation message appears.
If you decide to cancel, press the [] button.
6. Press the [–] [+] buttons to select “Yes”, and press the []
button to execute.
This formats the media.
NOTE
Never turn o the power, disconnect the USB ash drive or unplug
the power cord while the screen indicates “Executing...”.
7. Press the [] button to exit function mode.
The [] button goes dark.
* Never turn o the power, disconnect the USB ash drive or
unplug the power cord while the indicator of GP-9 shows that an
operation is in progress.
Restoring the Factory Settings (Factory Reset)
Here’s how to restore all registrations and internally saved settings to the
factory-set condition. This function is called “Factory Reset”.
NOTE
Factory Reset erases all settings that you have stored, and returns them to
the factory-set condition. For details on the settings that are reset, refer to
“Settings Saved Even If the Power Is Turned O” (p. 3).
MEMO
Executing this function does not erase the les in internal memory or on a
USB ash drive (commercially available). If you want to erase all les from
internal memory or from a USB ash drive, refer to (“Initializing the Memory
(Format Media)” (p. 24)).
1. Press the [] button.
The [] button is lit, and the piano is in function mode.
2. Press the [–] [+] buttons to access the “Factory Reset” screen,
and then press the [] button.
A conrmation message appears.
If you decide to cancel, press the [] button.
3. Press the [–] [+] buttons to select “Yes”, and press the []
button to execute.
This performs the factory reset.
NOTE
Never turn o the power, disconnect the USB ash drive or unplug
the power cord while the screen indicates “Executing...”.
4. When the display indicates “Power o, then on”, turn the
power o and then on again.
* Never turn o the power, disconnect the USB ash drive or
unplug the power cord while the indicator of GP-9 shows that an
operation is in progress.
25
° Conguring the Various Settings
Function Mode
Basic Settings in Function Mode
1. Press the [] button.
The [] button is lit, and the piano is in function mode.
2. Press the [–] [+] buttons to access the screen of the item you want to set.
3. Press the [] knob to conrm.
* Depending on the item you select, there might be another screen for selecting additional items.
4. Press the [–] [+] buttons to select the value.
5. Press the [] button to exit function mode.
The [] button goes dark.
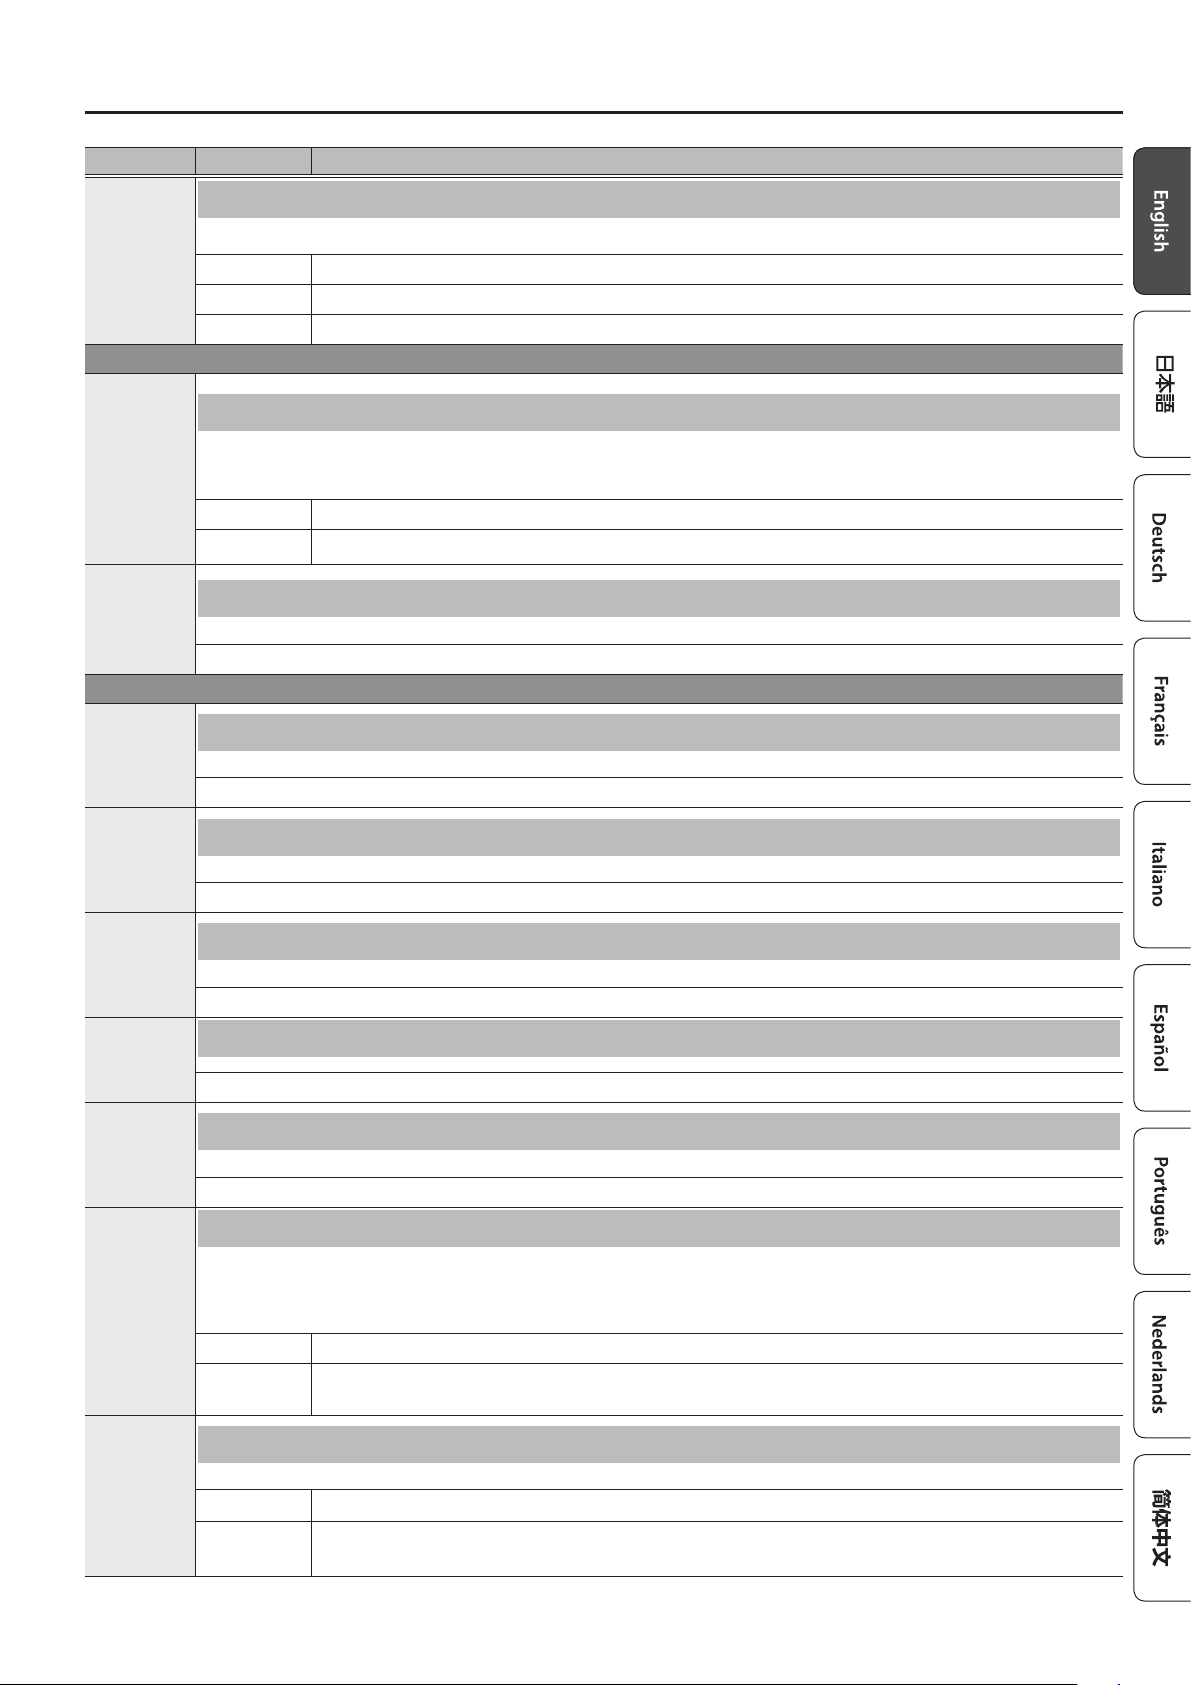
IndicationValueExplanation
Bluetooth-related settings
Bluetooth
Bluetooth On/O
Turning the Bluetooth Function On/O (Bluetooth On/O)
If the Bluetooth function is on, you’ll be able to wirelessly connect the piano and your mobile device, so that music played back from the mobile
device can be heard through the piano’s speakers, or so that you can use the piano with an app (p. 20).
On, O (default value: On)
Bluetooth PairingPerform the pairing to wirelessly connect the piano and mobile device for “Playing Music Through the Piano’s Speakers” (p. 20).
Bluetooth Volume
Adjusting the Volume of Bluetooth Audio (Bluetooth Volume)
This is the volume setting for playing music from your mobile device through the piano’s speakers (p. 21).
0–10 (default value: 4)
Bluetooth ID
If you are using the Bluetooth function in a location where there are multiple pianos, you can assign a separate ID to each piano (p. 22).
0–99 (default value: 0)
Song playback settings
Song Transpose
Transposing the Pitch of the Song Playback (Song Transpose)
You can transpose the song playback in semitone steps (p. 13).
-12–0–+12 (default value: 0)
Song Volume SMF
Adjusting the Song (SMF) Volume (Song Volume SMF)
This setting adjusts the the volume of the song that is played back while you play the keyboard. This adjusts the volume of the song (SMF data) that is played back.
0–10 (default value: 10)
Song Volume
Audio
Adjusting the Song (Audio) Volume (Song Volume Audio)
This setting adjusts the the volume of the song that is played back while you play the keyboard. This adjusts the volume of the song (audio data) that is played back.
0–10 (default value: 7)
Input Volume
Adjusting the Volume of an Audio Playback Device (Input Volume)
This setting adjusts the the volume of the song that is played back while you play the keyboard. You can adjust the volume of an audio playback device that’s connected to
the Input jacks.
0–10 (default value: 7)
USB Audio Input
Vol.
Adjusting the Volume from Your Computer (USB Audio Input Volume)
When using a computer that’s connected to the USB COMPUTER port to play back audio, adjust the volume using the computer.
0–10 (default value: 7)
26
Conguring the Various Settings
IndicationValueExplanation
SMF Play Mode
Specifying the Keyboard Tone for Song (SMF) Playback (SMF Play Mode)
This setting species the tone that you play on the keyboard while a song is playing back. Normally you will use the “Auto-Select” setting.
This determines whether the setting that is most suitable for the internal song or most suitable for external data is selected when you play back a song whose le format is
SMF.
MEMO
You can also switch the SMF Play Mode by holding down the [ò] button and pressing the [–] [+] buttons.
* If the SMF playback mode is set to “External” some eects are not applied to the sound, meaning that the tonal character might dier from when you usually play the
keyboard.
Auto-Select
(default setting)Either “Internal” or “External” is selected automatically depending on the song that you play back.
InternalWhen you play back a song, the tone that you play from the keyboard changes to the tone that is saved in the song.
This is recommended when you play back an internal song or a song that you recorded on this piano.
ExternalThe tone that you play from the keyboard does not change when you play back a song.
This is recommended when you play back external data such as commercially available music data.
Recording-related settings
Recording Mode
This piano lets you record in two dierent modes. You can choose whether to record as SMF or as audio.
MEMO
You can also switch recording modes by holding down the [ó] button and pressing the [–] [+] buttons.
SMF
(default setting)
Your performance is recorded to “Internal Memory” and played back on the piano. You can overdub your left-hand performance onto your right-hand
performance, and then listen to the playback of both hands together (p. 27).
AudioYour performance is recorded to a USB ash drive as audio data. You can listen to your recorded piano performance on a computer or audio player,
use it to create a CD, or publish it on the internet (p. 17).
Delete SongDeletes a song that was saved in the piano’s internal memory or on a USB ash drive (p. 15).
Rename SongRenames a saved song (p. 15).
Copy SongSongs that have been saved in internal memory can be copied to USB ash drive. Alternatively, songs stored on a USB ash drive can be copied to internal memory (p. 15).
Count-in Measure
You can change the number of measures that are sounded as a count before song playback or recording begins.
1 Measure, 2 Measures (default value: 1 Measure)
Pedal-related settings
Damper Pedal Part
Changing How the Pedal Eects Are Applied (Damper Pedal Part)
When you depress the right pedal while the piano is in Dual Play or Split Play mode, the pedal eect is applied to both tones (p. 10). Use this setting to select the tone to
which the eect is applied.
Right & Left
(default setting)All enabled
RightApplied only to the Tone 1 (in dual mode)/Right-hand Tone (in split mode)
LeftApplied only to the Tone 2 (in dual mode)/Left-hand Tone (in split mode)
Center Pedal
Changing How the Pedals Work (Center Pedal)
When you turn on the power, the center pedal functions as the sostenuto pedal (p. 8). You can change the function of the pedal to a variety of other operations. By
assigning a function to the pedal, you can instantly change a setting by pressing the pedal while you perform.
Sostenuto
(default setting)The pedal functions as a sostenuto pedal.
Play / StopThe pedal has the same function as the [ò] button.
LayerPressing the pedal will layer on Tone 2, used for Dual Play.
* This is available only when using Dual Play.
Left Pedal
Changing the Eect of the Pedal (Left Pedal)
When you turn on the power, the left pedal functions as a soft pedal (p. 8). You can change the function of the pedal to a variety of other operations. By assigning a
function to the pedal, you can instantly change a setting by pressing the pedal while you perform.
Soft
(default setting)The pedal functions as a soft pedal.
Play / StopThe pedal has the same function as the [ò] button.
LayerPressing the pedal will layer on Tone 2, used for Dual Play.
* This is available only when using Dual Play.
27
Conguring the Various Settings
IndicationValueExplanation
Reg. Pedal Shift
Using the Pedal to Switch Between Registrations (Reg. Pedal Shift)
You can use the pedal to switch between the registrations (p. 11). This lets you switch to the next registration by depressing the pedal.
* The pedal function settings are prioritized as follows: “Reg. Pedal Shift”Ó“Center Pedal/Left Pedal”.
O (default setting)The registration doesn’t change when you depress the pedal.
Left PedalThe left pedal (soft pedal) is used to switch between registrations. When doing so, you can’t use the Left Pedal settings when assigned.
Center PedalThe center pedal (sostenuto pedal) is used to switch between registrations. When doing so, you can’t use the Center Pedal settings when assigned.
MIDI-related settings
Local Control
Preventing Doubled Notes When Connected to a Sequencer (Local Control)
When you have a MIDI sequencer connected via USB, set this parameter to Local O.
Since most sequencers have their Thru function turned on, notes you play on the keyboard may be sounded in duplicate, or get dropped. To prevent this, you can enable
the “Local O” setting so that the keyboard and internal sound generator will be disconnected.
On (default setting)Local Control is on. The keyboard is connected to the internal sound generator.
OLocal Control is o.
The keyboard is disconnected from the internal sound generator. Playing the keyboard will not produce sound.
This setting species the MIDI channel on which the unit will transmit. This unit will receive all sixteen channels (1–16).
O, 1–16 (default value: 1)
Overall operation settings
Language
Changing the Language Displayed in the Screen (Language)
You can change the language that is displayed in the screen.
English, Japanese, Chinese (default value: English)
Display Contrast
Adjusting the Brightness of the Display (Display Contrast)
You can adjust the brightness of the piano’s display.
1–10 (default value: 5)
Screen Saver
Specifying the Time Until the Operating Panel Is Dimmed (Screen Saver)
If no operations are performed for a specic length of time, the operating panel’s button LEDs and display are dimmed. You can specify the time until they are dimmed.
Adjusting the Haptic Key Vibration (Haptic Key Vibration)
When a tone in the “Grand” group is selected, this simulates the way in which the keyboard vibrates when you play an acoustic piano. If headphones are connected,
this function turns o. If you want the haptic key vibration characteristic of an acoustic piano to be added even when using headphones, set “Eect When Headphones
Plugged” to “Eective”.
* When you switch the eect to “Eective” while using headphones, the haptic key vibration generator produces a slight sound resembling that of a real piano, even
when you’re listening to your playing via headphones.
Vibration LevelO, Small, Standard, Large, Extra Large (default value: Standard)
Eect When
Headphones
Plugged
Ineective, Eective (default value: Ineective)
Auto-Power O
When Keyboard
Cover is Closed
Turning O the Power When You Close the Keyboard Cover (Power O by the Lid)
You can choose whether the power turns o when you close the keyboard cover.
Eective
(default setting)The power turns o when you close the keyboard cover.
Ineective
The power does not turn o when you close the keyboard cover. To turn o the power, press the [Ā] button.
* If Auto O is specied, the power automatically turns o when a certain length of time has elapsed after you stop playing or operating the
instrument.
28
Conguring the Various Settings
IndicationValueExplanation
Speaker Auto
Mute
Outputting Sound from Both Headphones and the Built-in Speakers (Speaker Auto Mute)
By factory default, the built-in speakers are set not to make sound when you connect a pair of headphones into the Phones jack. By changing the settings, you can make
sound come from both the headphones and the built-in speakers.
* Changing the setting to “O” also changes the tonal character of the sound you hear in your headphones.
OSound comes from both headphones and built-in speakers.
On (default setting)Sound comes only from headphones.
Auto O
Making the Power Automatically Turn o After a Time (Auto O)
With the factory settings, the unit’s power automatically switches o after you stop playing or operating the unit for the amount of time you set. (This is the factory default
setting.)
If you don’t want the power to turn o automatically, change the “Auto O” setting to “O”.
You can save your favorite settings or the piano’s setup to a USB ash drive, or load these settings that are saved to a USB ash drive into the piano (p. 23).
* Settings can be loaded only into another piano of the same model.
Registration
Import
Piano Setup
Export
Piano Setup
Import
Format MediaAll les saved in the piano’s internal memory or on a USB ash drive (commercially available) can be deleted (p. 24).
Factory ResetHere’s how to restore all registrations and internally saved settings to the factory-set condition (p. 24).
Version
Displays the version of the unit’s system program.
If a new system program becomes available, it can be used to update your piano. For details, refer to the following URL.
http://www.roland.com/support/ Enter the model name Ó refer to “Updater and Driver”
29
Conguring the Various Settings
Keyboard Mode
Basic Settings in Keyboard Mode
1. Press the [] button.
The [] button is lit, and the piano is in keyboard mode.
2. Press the [–] [+] buttons to access the screen of the item you want to set.
3. Press the [] knob to conrm.
4. Press the [–] [+] buttons to select the value.
5. Press the [] button to exit keyboard mode.
The [] button goes dark.
IndicationValueExplanation
Keyboard-related settings
Keyboard Mode
WholeThe same keyboard setting as a conventional acoustic piano.
Split
Playing Dierent Tones with the Left and Right Hand (Split Play)
You can perform using dierent tones in the left and right regions of the keyboard, divided at a specic note. This function is called “Split Play” (p. 9).
PointSelect the location (key) where the sound changes as you go from lower notes to higher notes.
* The key (split point) that you choose is included in the left-side key range.
BalanceSelects the volume balance between the left-side and right-side tones.
Left ShiftShifts the pitch of the notes you play in the left hand, up or down in octaves.
Right ShiftShifts the pitch of the notes you play in the right hand, up or down in octaves.
Dual
Layering Two Tones (Dual Play)
You can play two tones simultaneously from a single key. This function is called “Dual Play” (p. 10).
BalanceChanging the volume balance of the two tones
Tone1 ShiftShifts the pitch of tone 1, up or down in octaves.
Tone2 ShiftShifts the pitch of tone 2, up or down in octaves.
Twin Piano
Dividing the Keyboard for Two People (Twin Piano)
You can divide the keyboard into left and right areas so that two people can play the same range of pitches. One person can play a model
performance, and the other person can practice along with that model performance. You can also change the way (Mode) in which notes are
sounded in Twin Piano.
* If you select a tone from the “Grand” group, it sounds dierent than usual.
Twin Piano Mode
Pair
(default setting)
Notes played in the right zone are louder in the right speaker; notes played in the left zone are louder in the
left speaker.
IndividualNotes played in the right area are heard only from the right speaker; notes played in the left area are heard
only from the left speaker. When using headphones, you won’t be able to hear the other person’s playing.
Kbd Transpose
The keyboard can be transposed in semitone steps.
When accompanying a vocal, or when performing as a singer-instrumentalist, you can transpose the pitch to match the singer’s pitch range without changing the
ngering of your keyboard playing.
-6–0–+5 (default value: 0)
Key Touch
You can change the playing feel (touch) of the keyboard. The default value of 50 provides a key touch that is closest to that of an acoustic piano. Higher settings make the
keyboard feel heavier. With the “Fix”, notes sound at a xed volume regardless of how strongly you play the keyboard.
Fix, 1–100 (default value: 50)
Hammer
Response
Adjusts the time from when you play the key until the piano sound is heard. Higher values produce a greater delay.
O, 1–10 (default value: 1)
30
° Troubleshooting
ProblemItems to checkCause/ActionPage
Problems with the piano’s sound
No sound
Is the volume turned down?Raise the volume.p. 8
Could headphones or an adaptor plug be inserted in the
Phones jack?
If headphones or an adaptor plug are inserted in the headphones jack, sound is not
output from the speakers.–
If you want sound to be produced from headphones or external speakers, is the device connected correctly?p. 5
Could the “Local Control” setting be turned “O”?In function mode, turn the “Local Control” setting “On”.p. 27
Pitch of the keyboard or song is
incorrect
Could you have made Transpose settings?Disable the transpose features in the “Kbd Transpose” and “Song Transpose” settings
of Function mode.
p. 11,
p. 25
Is the Master Tune setting appropriate?When shipped from the factory, the reference pitch is set to “442.0 Hz”. Check the
“Master Tuning” setting of the Piano Designer function.p. 18
Is the setting for the Temperament correct?When shipped from the factory, the tuning is set to “Equal temperament”. Check the
“Temperament” setting of the Piano Designer function.p. 18
Is the Single Note Tuning setting appropriate?Check the Piano Designer function’s “Single Note settings”.p. 19
Sounds are heard twice
(doubled) when the keyboard
is played
Could “Dual Play” be specied, so that two tones are
layered?Select “Keyboard Mode” in Function mode, and change “Dual” to “Whole”.p. 29
Could the piano be connected to an external sequencer?
If you don’t want the piano to be played from another sound module, set your music
production software’s “soft thru” setting to “O”.–
If the function mode “Local Control” setting is “On”, turn the “Local Control” setting
“O”.p. 27
Reverberation remains even if
you defeat the Ambience eect
This simulates the depth and ambience of the acoustic
piano’s sound, and is not a malfunction. Even if the
Ambience eect is o, the acoustic piano’s own resonance
remains.
You can also reduce the resonance by lowering the “Cabinet Resonance” value of the
Piano Designer function.p. 19
The sound of the higher notes
suddenly changes from a certain
key
This simulates the characteristics of an acoustic piano, and is not a malfunction.
The sound will change where there is a change in the number of strings per key or a transition from wound strings to unwound strings.–
When you press a key, the sound
of a note you didn’t press is also
faintly heard
In some cases, a note you play might cause a dierent note
(whose frequency is an integer multiple of the rst note)
to resonate, producing the sensation that the sound has
changed; this is not a malfunction.
Lower the Piano Designer’s “Full Scale String Res.” value, or turn it o.p. 19
A buzz or vibration occurs when
you play the keyboard
This feature simulates the vibration that occurs when
you play the keyboard of an acoustic piano; it is not a
malfunction.
You can eliminate the keyboard vibration by turning the “Haptic Key Vibration”
setting o in function mode.p. 27
High-pitched ringing is heard
If you don’t hear it through headphones:
It may be that the piano has malfunctioned. Contact either the dealer where you purchased your instrument, or Roland Support.
If you also hear it through headphones:
To decrease the metallic ringing, adjust the following settings.
¹Ambience Depth (p. 9)
¹Piano Designer “Full Scale String Res.” (p. 19)
–
Low notes sound wrong, or are
buzzy
Could the volume be set to maximum?If the volume is at the maximum, the sound might be distorted depending on how
you play the piano. If this occurs, lower the volume.p. 8
If you also hear it through headphones:
It may be that the piano has malfunctioned. Contact either the dealer where you purchased your instrument, or Roland Support.
If you don’t hear it through headphones:
Objects near the piano are resonating because of the high volume of sound coming from the speakers. You can take the following measures to
minimize resonances.
¹Keep the volume down.
¹Locate the speakers 10–15 cm (4–6 inch) away from walls or other surfaces.
¹Move away from the objects that are resonating.
–
Noise is sometimes heard when
you change the master tuning or
temperament while piano sound
is being produced
Due to how the sound engine is structured, you might hear noise with grand piano tones if you change the master tuning or temperament
while sound is being produced. This is not a malfunction.–
The sound is heard dierently
depending on the tone settings
When using “Dual play” which layers two tones, or “Split play” which produces dierent tones in the left-hand and right-hand, the sound might
be heard dierently depending on the specic combination. For some combinations, the eect is not applied to the left-hand tone or to tone 2,
but this is not a malfunction.
–
31
Troubleshooting
ProblemItems to checkCause/ActionPage
Problems with the pedals
Pedal does not work, or is
“stuck”
Is the pedal connected correctly?Check the pedal jack located on the back of the piano.p. 5
Could you have disconnected or connected the pedal cord
while the power was on?
If you disconnect the pedal cord while the piano is powered-on, the pedal eect
might remain applied. Connect or disconnect the pedal cord while the piano is
powered o.
–
Could you have changed the way in which the pedal eect
is applied?
If the right pedal part is set to “Right” it applies only to the right-hand tone; if set to
“Left”, it applies only to the left-hand tone.p. 26
Could Twin Piano be turned on?If Twin Piano is on, the right pedal will aect only the right-hand keyboard zone and
the left pedal will aect only the left-hand keyboard zone.p. 29
Could you have changed the function of the pedal?
If the function of the sostenuto pedal (center pedal) or the soft pedal (left pedal)
have been changed, they will not operate as the sostenuto pedal or the soft pedal.
Restore the settings of the “Center Pedal” and “Left Pedal”.
p. 26
Are you operating the pedals correctly?Check whether the operations are correct.p. 8
Problems with song playback
Only the sound of a particular
instrument in a song does not
play
When you press the [] button, are there parts (Right,
Left, Accomp) that are unlit in the screen?
Parts that are not shown in the screen do not sound. Select an unlit part to highlight
it so that it produces sound.p. 13
Song volume is inaudible or
too lowCould the song volume be set too low?Depending on the data format of the song, raise the “Song Volume SMF” or “Song
Volume Audio” value.p. 25
Changing the “Song Volume”
does not change the volume.Could the SMF Play Mode be set to “Internal”?Set the SMF Play Mode to “External”.p. 26
The selected sound changes
when you play back a songCould the SMF Play Mode be set to “Internal”?Set the SMF Play Mode to “External”.p. 26
Can’t play back a song saved in
USB ash driveIs the le extension “.WAV” or “.MP3” or “.MID”?This piano can play back three types of le: WAVE format or MP3 format audio les,
and MIDI les.p. 13
Names of songs saved on the
USB ash drive do not appear in
the screen
Is the le extension “.MID”? Could the song name
information in the le be blank or consist only of spaces?
Song names can be shown in the screen only for les that have a “.MID” extension.
If the song name information in the le is blank or consists only of spaces, the song
name is not shown in the piano screen.
p. 13
Problems with recording
Can’t recordWhen you press the [] button, is the part to be
recorded blinking in the screen?Select the part in the screen that you want to record, so that it blinks.p. 16
Can’t record audioIs a USB ash drive connected to the USB Memory port?Audio recording cannot be performed unless a USB ash drive is connected.p. 17
Volume diers between
recording and playbackCould the song volume be set too low?Depending on the data format of the song, raise the “Song Volume SMF” or “Song
Volume Audio” value.p. 25
The tonal character of the piano
changes when you record
Could you be recording with a tone that you created in
Piano Designer?
Some of the Piano Designer settings might not be reproduced when you play back
a song.–
Could you be playing back a song that you audio-recorded
to an USB ash drive?
If you want to record with the same tonal character as when you play the keyboard,
record your performance as SMF.–
Other problems
Even though you’re using
headphones to mute the sound,
a thumping sound is heard
when you play the keyboard
The keyboard of this piano is designed to simulate the mechanism of an acoustic piano. Even on an acoustic piano, a thumping sound is actually
being produced when you press a key. Such sounds do not indicate a malfunction.–
Marks appear on the cloth
portion of the piano
If your hands or feet, or other objects, touch the cloth portion located around the music rest or near your feet, the cloth might be wrinkled,
causing it to appear marred or discolored, but this does not aect the performance of the unit.–
Power turns o on its own
Could you have made settings so that the power
automatically turns o when the piano has not been used
for a time?
If you don’t need the power to turn o automatically, turn the Auto O setting “O”.p. 28
Power does not turn onIs the power cord connected correctly?p. 5
The buttons of the operating
panel do not work
Could you have enabled the “Panel Lock” setting to
prevent inadvertent operation?Disengage the “Panel Lock” setting.p. 3
Is the panel wet?Thoroughly wipe o any moisture on the panel before using this instrument.p. 7
Did you come into contact with the touch switches when
you turned on the power?Try turning the power o and then on again.p. 7
The volume level of the unit
connected to Input jack is too
low
Could the volume of the connected device be turned down?–
Is the input volume too low?p. 25
32
° Error Messages
IndicationMeaning
Error 2
An error occurred during writing. The USB ash drive may be corrupted.
Insert other USB ash drive and try again. Alternatively, you can initialize the USB ash drive (“Initializing the Memory (Format Media)” (p. 24)).
The internal memory might be damaged. Format the internal memory (“Initializing the Memory (Format Media)” (p. 24)).
Error 10
No USB ash drive is inserted.
Insert the USB ash drive and try again.
The internal memory might be damaged. Format the internal memory (“Initializing the Memory (Format Media)” (p. 24)).
Error 11There is not sucient free memory in the save destination.
Either insert other USB ash drive or delete unneeded les and try again (“Deleting a Saved Song” (p. 15)).
Error 14
An error occurred during reading. The USB ash drive may be corrupted.
Insert other USB ash drive and try again. Alternatively, you can initialize the USB ash drive (“Initializing the Memory (Format Media)” (p. 24)).
The internal memory might be damaged. Format the internal memory (“Initializing the Memory (Format Media)” (p. 24)).
Error 15The le is unreadable. The data format is not compatible with the unit.
Error 18This audio format is not supported.
Use an WAV format (44.1 kHz, 16-bit linear) or MP3 format audio le.
Error 30Internal memory capacity of the unit is full.
Error 40The unit cannot deal with the excessive MIDI data sent from the external MIDI device.
Reduce the amount of MIDI data sent to the unit.
Error 43A MIDI transmission error has occurred.
Check the connected MIDI device.
Error 51There may be a problem with the system.
Repeat the procedure from the beginning. If this message still displays after you have tried several times, contact Roland as shown below.
Error 65The USB Memory port was subjected to excessive current.
Make sure that there is no problem with the USB ash drive, then turn the power o, then on again.
When you need repair service, access this URL and nd your nearest Roland Service Center or
authorized Roland distributor in your country.
https://roland.cm/service
Roland Service Centers and Distributors
Roland Service Centers and Distributors
When you need repair service, access this URL and nd your nearest Roland Service Center or authorized Roland distributor in
your country.
https://roland.cm/service
Roland Service Centers and Distributors
Roland Service Centers and Distributors
When you need repair service, access this URL and nd your nearest
Roland Service Center or authorized Roland distributor in your country.
Gebruikershandleiding.com neemt misbruik van zijn services uitermate serieus. U kunt hieronder aangeven waarom deze vraag ongepast is. Wij controleren de vraag en zonodig wordt deze verwijderd.
Product:
Spelregels forum
Om tot zinvolle vragen te komen hanteren wij de volgende spelregels:
lees eerst de handleiding door;
controleer of uw vraag al eerder door iemand anders is gesteld;
probeer uw vraag zo duidelijk mogelijk te stellen;
heeft u een probleem en al geprobeerd om dit op te lossen, vermeld dit erbij aub;
heeft u een oplossing gekregen van een bezoeker dan horen wij dat graag in dit forum;
wilt u een reactie geven op een vraag of antwoord, gebruik dan niet dit formulier maar klik op de knop 'reageer op deze vraag';
uw vraag wordt direct op de website gezet; vermijd daarom persoonlijke gegevens in te vullen;
Belangrijk! Als er een antwoord wordt gegeven op uw vraag, dan is het voor de gever van het antwoord nuttig om te weten als u er wel (of niet) mee geholpen bent! Wij vragen u dus ook te reageren op een antwoord.
Belangrijk! Antwoorden worden ook per e-mail naar abonnees gestuurd. Laat uw emailadres achter op deze site, zodat u op de hoogte blijft. U krijgt dan ook andere vragen en antwoorden te zien.
Abonneren
Abonneer u voor het ontvangen van emails voor uw Roland GP-9 bij:
nieuwe vragen en antwoorden
nieuwe handleidingen
U ontvangt een email met instructies om u voor één of beide opties in te schrijven.
Ontvang uw handleiding per email
Vul uw emailadres in en ontvang de handleiding van Roland GP-9 in de taal/talen: Engels als bijlage per email.
De handleiding is 4.97 mb groot.
U ontvangt de handleiding per email binnen enkele minuten. Als u geen email heeft ontvangen, dan heeft u waarschijnlijk een verkeerd emailadres ingevuld of is uw mailbox te vol. Daarnaast kan het zijn dat uw internetprovider een maximum heeft aan de grootte per email. Omdat hier een handleiding wordt meegestuurd, kan het voorkomen dat de email groter is dan toegestaan bij uw provider.
Uw handleiding is per email verstuurd. Controleer uw email
Als u niet binnen een kwartier uw email met handleiding ontvangen heeft, kan het zijn dat u een verkeerd emailadres heeft ingevuld of dat uw emailprovider een maximum grootte per email heeft ingesteld die kleiner is dan de grootte van de handleiding.
Er is een email naar u verstuurd om uw inschrijving definitief te maken.
Controleer uw email en volg de aanwijzingen op om uw inschrijving definitief te maken
U heeft geen emailadres opgegeven
Als u de handleiding per email wilt ontvangen, vul dan een geldig emailadres in.
Uw vraag is op deze pagina toegevoegd
Wilt u een email ontvangen bij een antwoord en/of nieuwe vragen? Vul dan hier uw emailadres in.