7. Make sure that all parts are tightened before you use the treadmill. Note: If there is a thin sheet of clear
plastic on the hood decal or the “ComforTrack” decal, remove it. Keep the included allen wrench in a secure
place. The allen wrench is used to adjust the walking belt (see page 24). To protect the floor or carpet from
damage, place a mat under the treadmill.
5. Insert two Handrail Bushings (75) into the right Upright
(69). Turn the Handrail Bushings so they fit against the
Upright with the thick sides of the Bushings facing the
centre of the treadmill as shown in the inset drawing.
Insert two Handrail Bolts (78) with Handrail Washers
(77) into the Handrail Bushings (75), the right Upright
(69), and the right Handrail Spacer (65). Lift up the right
Handrail (66) to align the Bolts with the holes in the
Handrail. Next, thread the Bolts into the Handrail (66).
Do not tighten the Bolts yet.
Attach the left Handrail (not shown) in the same way.
Tighten all four Handrail Bolts (78).
5
78
77
75
Thick
Side
69
66
65
75
77
6. Look at the Endcap (58). If the left or right foot on the
Endcap does not touch the floor, the included thick
base pads should be attached to the treadmill as de-
scribed below.
Refer to assembly step 3. Lower the treadmill frame
and the Uprights (69) as shown. If the left foot of the
Endcap (58) was off the ground, remove the two Base
Pads (99) from the right Upright (69). Attach the in-
cluded Thick Base Pads (not shown) to the Upright. If
the right side of the Endcap was off the ground, attach
the Thick Base Pads to the left Upright.
Note: If either side of the Endcap (58) lifts off the floor
when the treadmill is used, attach the Thick Base Pads
as described.
58
Right
Foot
Left
Foot
6
22
7
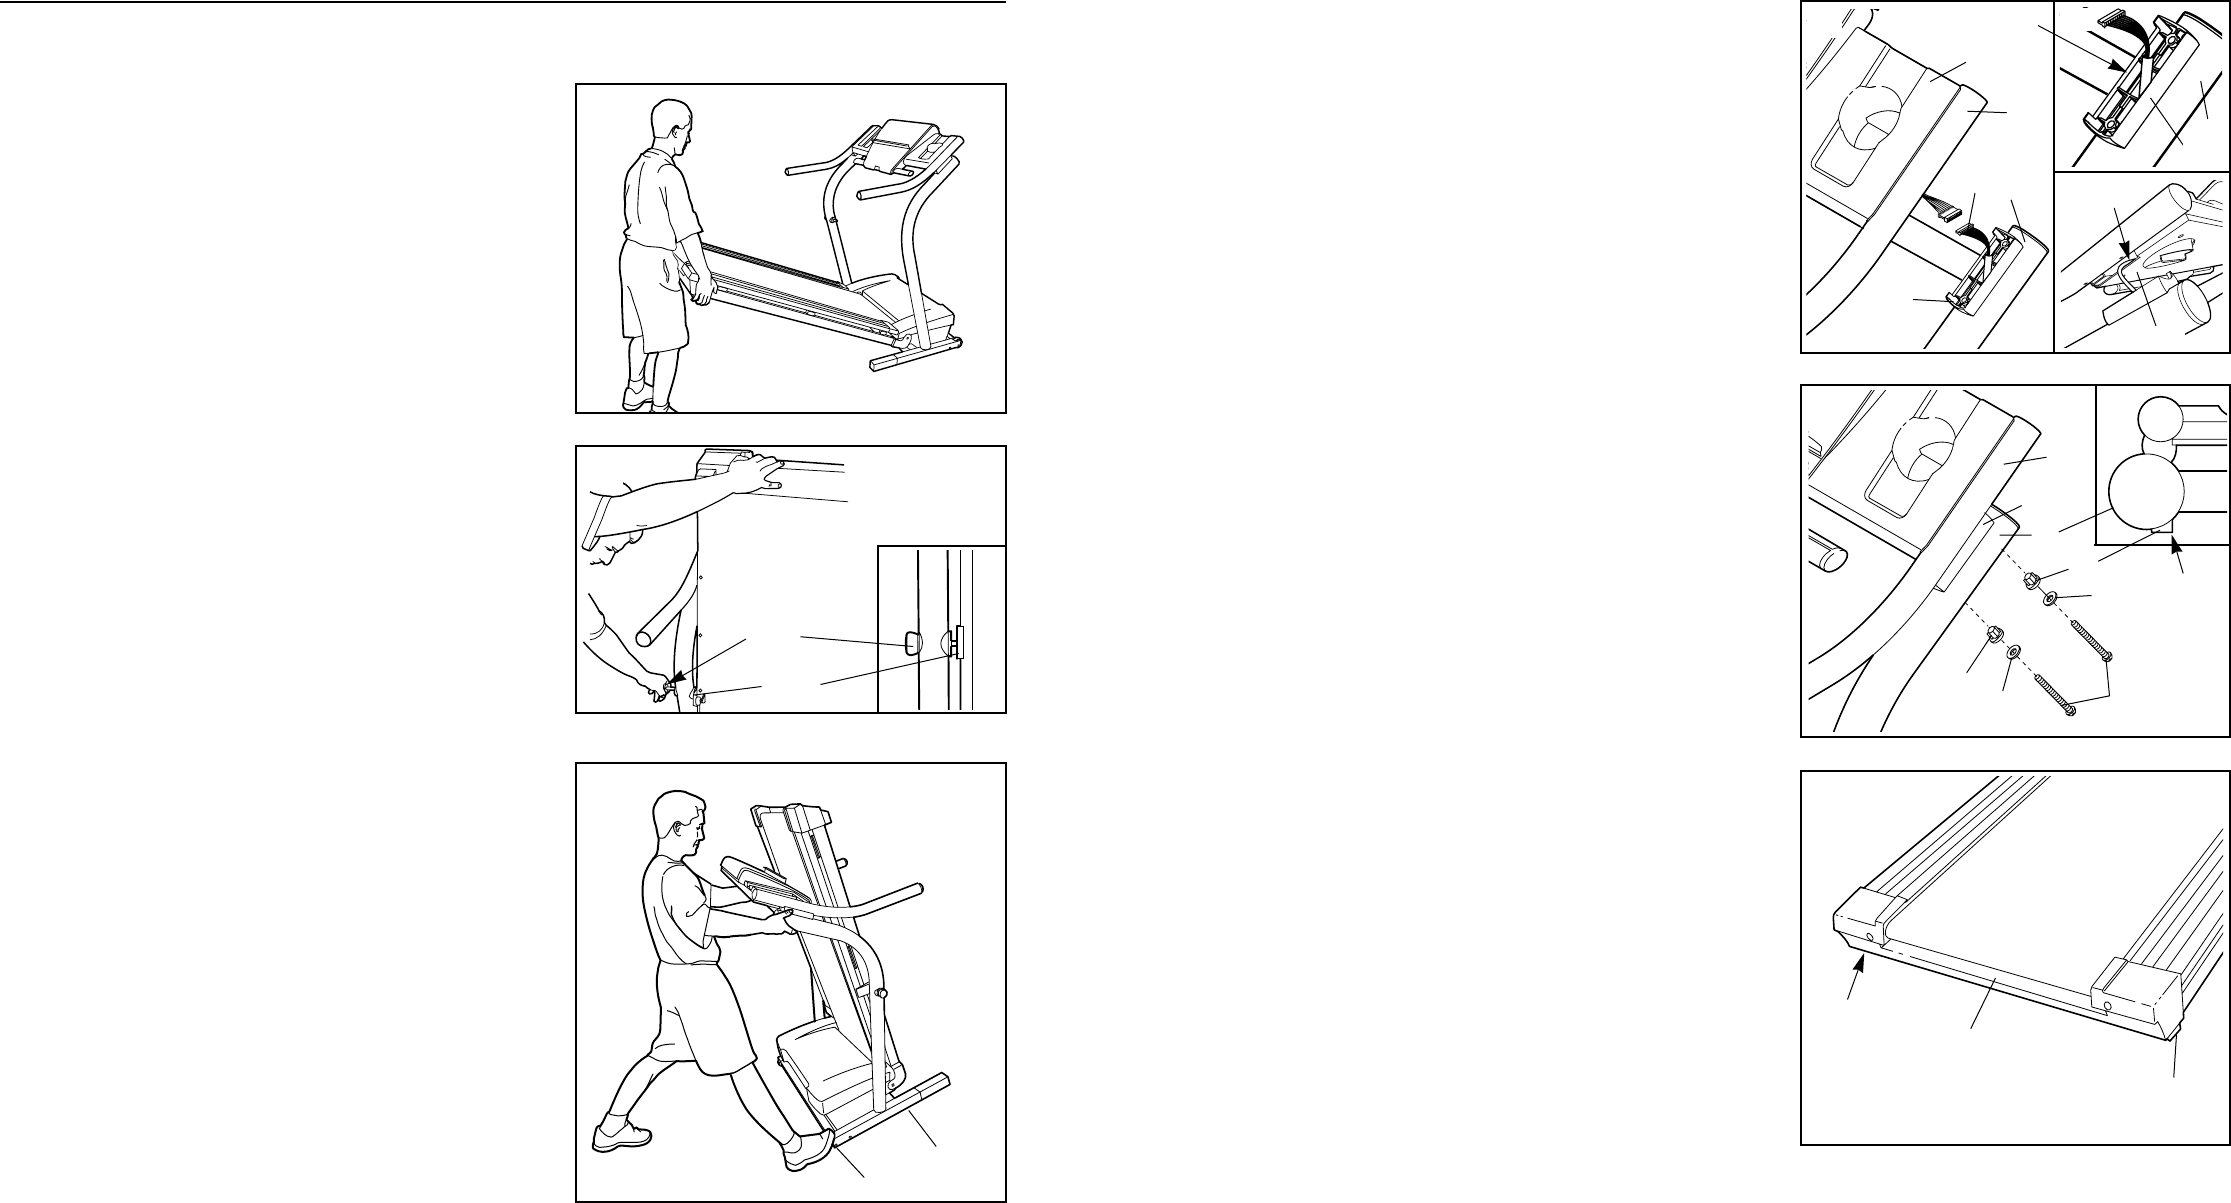
HOW TO FOLD AND MOVE THE TREADMILL
HOW TO FOLD THE TREADMILL FOR STORAGE
Before folding the treadmill, adjust the incline to the
lowest position. If this is not done, the treadmill may be per-
manently damaged. Remove the key and unplug the power
cord. CAUTION: You must be able to safely lift 20 kg in
order to raise, lower, or move the treadmill.
1. Hold the treadmill with your hands in the locations shown
at the right. CAUTION: To decrease the possibility of in-
jury, bend your legs and keep your back straight. As
you raise the treadmill, make sure to lift with your legs
rather than your back. Raise the treadmill about halfway
to the vertical position.
2. Move your right hand to the position shown and hold the
treadmill firmly. Using your left hand, pull the latch knob to
the left and hold it. Raise the treadmill until the latch pin is
aligned with the hole in the catch. Insert the latch pin into
the catch. Make sure that the latch pin is fully inserted
into the catch.
To protect the floor or carpet from damage, place a
mat under the treadmill. Keep the treadmill out of
direct sunlight. Do not leave the treadmill in the stor-
age position in temperatures above 29° Celsius.
HOW TO MOVE THE TREADMILL
Before moving the treadmill, convert the treadmill to the stor-
age position as described above. Make sure that the pin
on the lock knob is inserted into the slot in the catch.
1. Hold the handrails as shown and place one foot against a
wheel.
2. Tilt the treadmill back until it rolls freely on the front wheels.
Carefully move the treadmill to the desired location. Never
move the treadmill without tipping it back. To reduce
the risk of injury, use extreme caution whilst moving
the treadmill. Do not attempt to move the treadmill
over an uneven surface.
3. Place one foot on the base, and carefully lower the tread-
mill until it is resting in the storage position.
HOW TO LOWER THE TREADMILL FOR USE
1. Refer to drawing 2 above. Hold the upper end of the treadmill with your right hand as shown. Using your left
hand, pull the lock knob to the left and hold it. Pivot the treadmill down until the frame is past the pin on the lock
knob. Note: You may need to push the handrail to the side slightly.
2. Refer to drawing 1 above. Hold the treadmill firmly with both hands, and lower the treadmill to the floor.
CAUTION: To decrease the possibility of injury, bend your legs and keep your back straight.
Base
Front Wheels
1
Knob
Catch
2
4. Place one of the Handrail Spacers (65) on the right
Upright (69) as shown, with the cutout turned toward the
treadmill (see inset drawing A). Pull the Upright Wire
Harness (98) up through the Handrail Spacer. Place the
other Handrail Spacer on the left Upright (not shown).
Have a second person hold the Handrails (66) near the
Uprights (69) as shown. Connect the Upright Wire
Harness (98) to the wires extending from the right
Handrail. Insert the connectors and the Upright Wire
Harness (98) into the hole in the Console Base (81) (see
inset drawing B).
Be careful not to pinch the Wire Harness (98) as you set
the Handrails (66) on the Handrail Spacers (65).
4
98
69
66
81
65
69
65
81
98
A
B
Cutout