SETTINGS
11
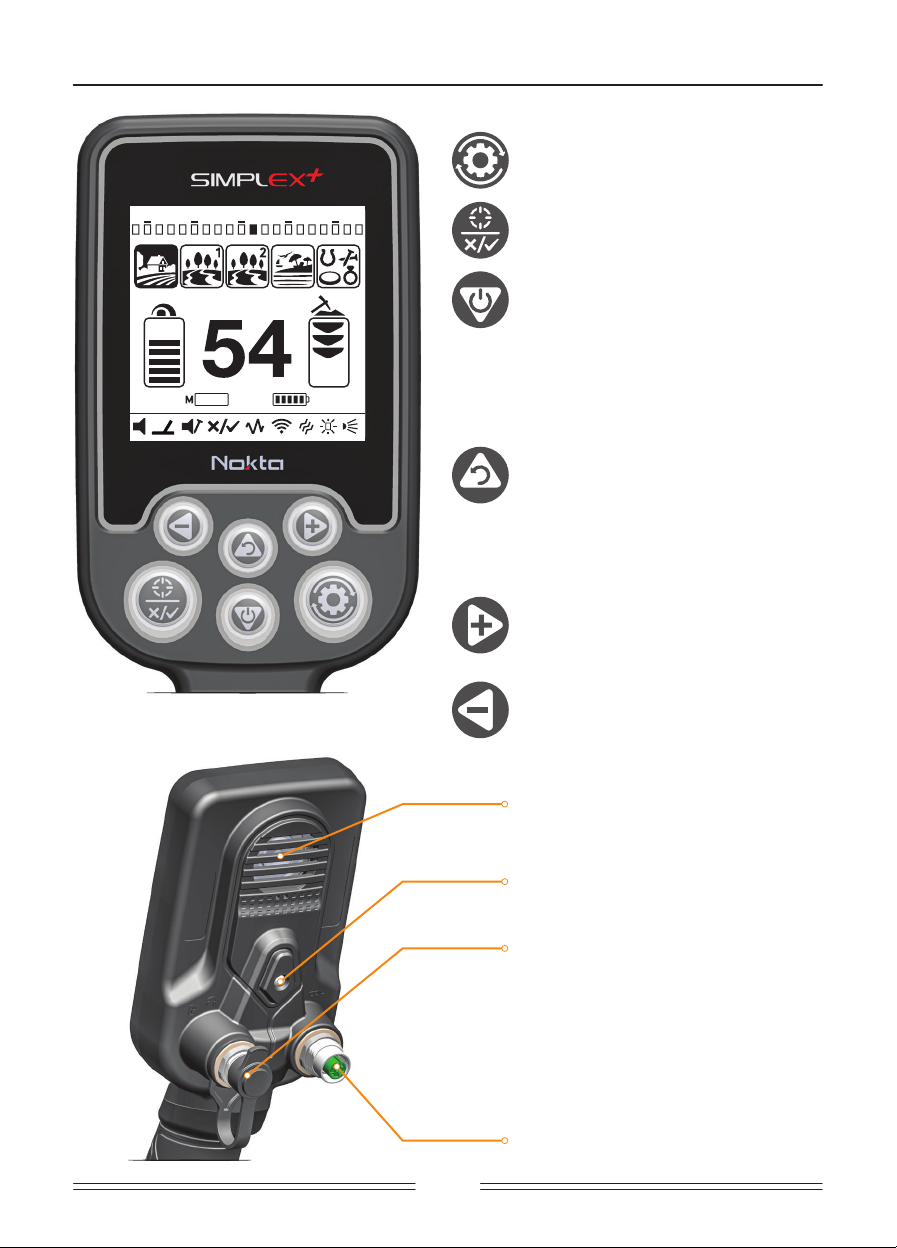
Push the settings button
is pressed, the volume
bar located at the bottom of
Each time you press
be selected and its value will
the value using the plus
T
settings button
the settings bar
out and the
NOTE: Notch discrimination is
volume setting is
appears in place
V
This control allows you to increase or decrease the device's volume based on your preference and
environment
minus (-) buttons. When you turn off and on the device, it will
This setting is common to all modes; changes will tak
When you plug
will show
Because the volume level affects po
necessary.
Ground Balance
SIMPLEX+ is designed to
terrains.
extra depth and st
Ground balance can be performed in two ways with the SIMPLEX+: Aut
When ground balancing
automatically regardless
Automatic Ground Balance
Automatic ground balance is performed as follows in all search modes:
1. Find a spot where there is no metal.
2. After selecting the
button and start pumping the
down to 3 cm
3. Continue until
it usually takes about 2-4 pumps for
4.
Upon completion of
to ground balance
ground balance is
In general, the
5. If you cannot ground balance, in other w ords, if no beep sound is produced, it means that either the
ground is t oo conductiv e or not miner alized or there is a t arget right belo w the search coil. In such a
case, retry ground balance at a diff erent spot.
NO TE: If the ground miner alization is t oo lo w , aut omatic ground balance may f ail t o w or k in other modes
except for the Beach mode.
Manual Ground Balance
Allo ws you t o manually modify the ground balance v alue. It is not pref erred mostly because it t ak es time.
Ho w e v er , it is the pref erred option in cases where aut omatic ground balance cannot be performed or fine
tuning is necessary for the aut omatic ground balance v alue.
SIMPLEX+ is designed t o allo w for aut omatic ground balancing con v eniently on any type of ground.
Ho w e v er , the ground may not be suit able for aut omatic ground balancing in some cases and the
de vice cannot ground balance on such grounds. F or inst ance, w et beach sand, soils cont aining alk ali
or salty w at er , tr ashy sit es, ploughed fields, highly miner alized grounds and grounds with v ery lo w
miner alization are not suit able for aut omatic ground balance. In such t err ains, you can aut o ground
balance in the Beach mode and then switch t o other modes or try manual ground balancing. Ho w e v er ,
manual ground balance requires a skill which de v elops o v er time through pr actice.
T o perform manual ground balance:
1) Find a clear spot without met als and select ground balance from settings.
2) You need t o list en t o the sounds coming from the ground in order t o perform manual ground balance.
Pump the search coil up and do wn from about 1 5-20 cm (~6''- 8'') abo v e the ground do wn t o 3 cm (~1'')
off the ground with smooth mo v ements and k eeping it par allel t o the ground.
If the sound gets higher when lifting off the search coil abo v e the ground, the ground balance v alue is
t oo lo w , in other w ords, the eff ect from the ground is negativ e and the ground balance v alue needs t o
be increased by using the plus ( + ) butt on. On the other hand, if the sound gets higher when lo w ering
the search coil t o the ground, the ground balance v alue is t oo high, in other w ords, the eff ect from the
ground is positiv e and the ground balance v alue needs t o decreased by using the minus ( - ) butt on.
3)
The ground bala nce v alue w ill be sho wn on the displa y and remai n the re for a mome nt. You can return t o
the ground balance screen b y selectin g ground ba lance fro m the settin gs menu aga in if the sc re en switche s.
Manual ground balance functions within the r ange of 0-99.9. Press plus (+) or minus (-) butt ons t o
increase or decrease the ground balance v alue, respectiv ely. If the butt ons are pressed once at a time,
the v alues count one by one and if they are held do wn, the v alues will change quickly.
4) R epeat the abo v e procedure until the sound heard from the ground is eliminat ed.
The sound may not be eliminat ed complet ely in some areas. In these cases, list en t o the sounds produced
when mo ving the search coil t o w ards and a w ay from the ground t o check if the ground balance is correct.
If there is no diff erence betw een the tw o sounds then the ground balance is set properly.
IMPOR T ANT! Experienced det ect orists adjust the ground balance setting t o a slightly positiv e response
(w eak but audible sound is produced when mo ving the search coil closer t o ground). This method may
produce f a v or able results for experienced users in cert ain fields where small t argets are searched for .
IMPOR T ANT! If the de vice receiv es a lot of noise and/or emits f alse signals and you cannot eliminat e it
by reducing the sensitivity, first set your sensitivity back t o its original le v el. Then increase the ground
balance v alue betw een 90.1 - 91.0 one by one until the noise is eliminat ed. As the ground balance v alue
is increased, the de vice' s sensitivity t o high conductiv e (silv er , copper etc.) coins will decrease.
Ground Balance V alue
Ground balance v alue pro vides information about the ground you are searching on. Some typical ground
types are as follo ws:
0-25 Wet salt w at er or w et alk ali soils
25-50 Wet salt w at er and w et alk ali soils co v ered with dry layers
50-70 R egular , lo w-quality soils
70-90 Highly magnetic soils, magnetit e or maghemit e and similar highly miner alized soils,
black sand.
Iron V olume
It adjusts or turns off the v olume of the lo w iron t one. It consists of 3 le v els and can be adjust ed
using the plus (+) and minus (-) butt ons.
As you lo w er the iron v olume, the audio response v olume the de vice produces for f errous met als will
decrease. When the iron audio is turned off , the de vice will det ect f errous t argets, the T arget ID will
be displayed on the screen but the de vice will not produce any w arning t one.
Iron v olume setting cannot be used in the All Met al and Beach modes and thus cannot be select ed.
Iron v olume adjustment applies t o the select ed search mode only. The change does not aff ect the other
modes.
Threshold
In the All Met al mode, search is performed with a continuous humming sound in the
back ground, also ref erred t o as the threshold sound. The loudness of this hum directly impacts the
det ection depth of smaller and deeper t argets and it is adjust ed by the threshold setting. If the
threshold is set t oo high, a w eak t arget signal may not be heard. On the contr ary, if the threshold is
t oo lo w , you giv e up the depth adv ant age this setting off ers. In other w ords, w eak signals of smaller
or deeper t argets may be missed. It is recommended for a v er age users t o lea v e this setting at its
def ault v alue and for experienced users t o adjust t o the highest le v el where they can still hear the
w eak t arget signals.
In the All Met al mode, the threshold setting for each sensitivity le v el is optimized t o pro vide the best
performance on diff erent t err ains. You can adjust the threshold setting betw een -50 +50 based on
ground conditions. Threshold adjustment applies t o that sensitivity setting only, it will not adjust the
threshold at other sensitivity le v els.
Notch Discrimination
Use the notch discrimination setting t o eliminat e un w ant ed met als from det ection such as tr ash.
SIMPLEX+ has 20 pix els or "notches" of discrimination, sho wn under the T ARGET ID scale with small bo x es.
Each bo x represents a group of 5 IDs (01-0 5, 06-10, 11-1 5 and so on). Any combination of these bo x es can
be reject ed or accept ed based upon your pref erence. The bo x es reject ed will be highlight ed in black.
Notch discrimination can be used in 2 diff erent w ays in the SIMPLEX+: Aut omatic or Manual.
Aut omatic:
1. Press the settings butt on and then select notch discrimination in the settings bar .
2. Swing the search coil o v er the met al you w ant t o eliminat e. The bo x that represents the group of IDs
for that met al will be highlight ed in black.
3. Press the confirm butt on.
Manual:
1.
Press the sett ings butt on and then sele ct notc h di scri minat i on i n t he sett ing s bar . An X and a c heck ma r k
will appear on screen along wi th a small arro w c ursor u nderne ath the ID ba r a t t he t op of t he scree n.
2. Mo v e the arro w cursor using the plus (+) and minus (-) butt ons and select the bo x that includes the ID
you w ant t o eliminat e.
3. Press the confirm butt on. The bo x will be highlight ed in black.
T o giv e an ex ample; let' s say you w ant t o reject a met al with 27 ID . Select the notch discrimination setting
in the settings bar . The cursor will appear under the first bo x. Using the plus (+) butt on and by counting
in multiples of 5, mo v e the cursor t o the 6th bo x which represents IDs betw een 26-30. Push the confirm
butt on once. The bo x as w ell as the X icon on screen will be highlight ed in black. Aft er this, the de vice will
not pro vide any audio response for met als with 26-30 ID .
The cursor will appear where you last left it the next time you use the notch discrimination setting.
In the notch discrimination setting, all the group of IDs you turned off will be sho wn with the X and the
ones that are not turned off will be sho wn with the check mar k.
You can turn off multiple bo x es aut omatically or manually.
T o turn back on the IDs, either select the turned off bo x with the help of the plus (+) and minus (-) butt ons
or swing the search coil o v er the met al you reject ed before and press the confirm butt on.
Frequency Shift
It is used t o eliminat e the electromagnetic int erf erence that the de vice receiv es from another
det ect or which oper at es in the same frequency r ange nearby or from the surroundings. If t oo
much noise is receiv ed when the search coil is lift ed in the air , this may be caused by the local
electromagnetic signals or excessiv e gain settings.
T o eliminat e the noise caused by electromagnetic int erf erence, try shifting the frequency first before lo w ering
the sensitivity t o obt ain maximum depth performance. Frequency shift consists 3 small st eps (F1-F2-F3).
Def ault setting is F2 which is the centr al frequency. The select ed frequency will be highlight ed in black.
T o shift the frequency, aft er selecting the frequency shift in the settings menu, use the plus (+) and the
minus (-) butt ons.
IMPOR T ANT! Frequency shift may impair performance. Therefore, it is suggest ed that you do not shift
the frequency unless it is necessary.
Wireless Connection
It is used t o turn on and off the wireless headphones connection and t o change the channel.
Aft er choosing the wireless connection setting in the settings bar , you can change the channels betw een
1-5 or you can complet ely turn the wireless connection off by choosing the 0 position.
F or more det ailed info about the wireless headphones, please read the instructions included with the
headphones.
Vibr ation
This f eature pro vides f eedback t o the user by producing a vibr ation eff ect when a t arget is det ect ed.
It can be used independently or t ogether with the audio response. When audio response is disabled, all
responses during t arget det ection are pro vided t o the user as vibr ation only.
When the vibr ation is turned on, the de vice pro vides short vibr ation signals upon t arget det ection. The
magnitude of the vibr ation eff ect can v ary according t o the depth of the t arget and the swinging speed.
This setting is common in all search modes.
T o turn on or off the vibr ation, aft er selecting vibr ation in the settings menu, use the plus (+) and the
minus (-) butt ons.
Vibr ation may not be f elt in the All Met al mode with w eak signals; it will be f elt as the signal gets stronger .
In other w ords, vibr ation does not st art at the depth where the audio t ones are heard but at a lesser
depth. Therefore, if you are det ecting with vibr ation only and audio t ones are off , you can miss w eak er
and deeper signals.
NO TE: The vibr ation setting alw ays comes in off position when de vice is turned off and on again.
Brightness
It enables you t o adjust display backlight le v el according t o your personal pref erence. It r anges betw een
0-4 and A1-A4. At 0 le v el, the backlight is off . When set betw een A1-A4, it lights up only for a short period
of time when a t arget is det ect ed or while na vigating the menu and then it goes off . At 1-4 le v els, it will
be continuously lit. The continuous oper ation of the backlight will aff ect po w er consumption, which is not
recommended.
The backlight setting is rest ored t o the final sa v ed setting when the de vice is turned off and on again.
This setting is common in all modes; change made in any mode also applies t o the other modes.
LED Flashlight
It is the headlight used for lighting the area you are scanning while det ecting at night or in dar k
locations. T o turn on or off the LED flashlight, aft er selecting it in the settings menu, use the plus (+) and
the minus (-) butt ons. LED flashlight does not oper at e when the de vice is off . It is recommended t o turn
it on only when necessary since its oper ation consumes extr a batt ery po w er .
PINPOINT
Pinpoint is t o find the cent er or the ex act location of a det ect ed t arget.
SIMPLEX+ is a motion det ect or . In other w ords, you are required t o mo v e the search coil o v er the t arget
or the t arget o v er the search coil in order for the de vice t o det ect the t arget. The pinpoint mode is a
non-motion mode. The de vice continues t o giv e a signal when the search coil is k ept st ationary o v er
the t arget.
When the pinpoint butt on is pressed and held do wn, a gr aphics consisting of a dot surrounded by 4
circles will appear in the middle of the screen. As the t arget is approached, the circles will disappear one
by one and when the cent er of the t arget is reached, only the dot will be left on screen. In the pinpoint
mode, the signal t one increases in pitch and v olume as the search coil approaches the t arget. In this
mode, the de vice does not discriminat e or giv e t arget IDs.
T o perform pinpoint:
1) Aft er a t arget is det ect ed, mo v e the search coil aside where
there is no t arget response and push the pinpoint butt on.
2) K eep the butt on pressed do wn and bring the search coil closer t o
the t arget slo wly and par allel t o the ground.
3) Signal sound becomes stronger and changes in pitch while getting
closer t o the t arget cent er and the circles st art disappearing in the
pinpoint gr aphics.
4) Mar k the position which pro vides the loudest sound using a t ool
or your foot.
5) R epeat the abo v e procedure by changing your direction 90°.
A ctions t o be performed from a couple of diff erent directions will
narro w the t arget area and pro vide you with the most ex act det ails
of the t arget location.
NO TE: Inexperienced users may put the search coil on the ground,
press the pinpoint butt on and then scan o v er the t arget until they
get experienced t o perform the abo v e pinpointing method.
MUTE FUNCTION
When needed, press the pinpoint butt on once t o mut e your det ect or without going int o settings.
T o unmut e, press any butt on.
LARGE OR NEAR-SURF A CE T ARGETS
T argets which are near the surf ace may giv e multiple diff erent signals t o the de vice. If you suspect a
t arget near the surf ace, lift the search coil and swing it more slo wly until a single signal is receiv ed.
F ALSE SIGNALS AND REASONS
Sometimes, the de vice may produce signals which are similar t o a t arget signal although no met al
t arget is present. There are v arious reasons for the f alse signals receiv ed by the de vice. The
most common ones are ground miner alization or rocks with high miner al cont ent, surrounding
electromagnetic signals, oper ation of another nearby det ect or , rust ed or corroded iron or foil in the
soil or sensitivity v alue set t oo high.
You can see the miner alization le v el of the ground by follo wing the magnetic miner alization indicat or
on the screen and adjust the sensitivity accordingly.
IMPOR T ANT! If the de vice receiv es a lot of noise and/or emits f alse signals and you cannot eliminat e it
by reducing the sensitivity, first set your sensitivity back t o its original le v el. Then increase the ground
balance v alue betw een 90.1 - 91.0 one by one until the noise is eliminat ed. As the ground balance v alue
is increased, the de vice' s sensitivity t o high conductiv e (silv er , copper etc.) coins will decrease.
Surrounding electromagnetic signals can be eliminat ed by reducing the gain. If another det ect or
is oper ating nearby, you may att empt t o shift the frequency or perform your search at a dist ance
where no int erf erence occurs.
MA GNETIC MINERALIZA TION INDIC A T OR
The Magnetic Miner alization Indicat or consists of 5 le v els. The indicat or bars do not rise at lo w miner al
le v els during search and at st art up. In areas where the magnetic miner al le v el is high, the indicat or
bars will rise according t o the int ensity. This measurement can be summarized as the le v el of magnetic
property and int ensity of the ground.
This measurement is import ant from tw o aspects. First, on grounds with high magnetic miner alization,
search depth is lo w and users should be a w are of this f act. Second, magnetic miner alization is a
property which is particularly seen with miner alized rocks and this measurement plays an import ant
role for the de vice t o eliminat e the f alse signals produced by these rocks.
ROCKS AND SEARCHING IN ROCKY TERRAINS
Challenging ground conditions arise especially when conductivity and magnetic properties of the
ground are t oo int ense. Oper ation of the de vice o v er such ground is made possible by selecting the
best oper ating mode, sensitivity and ground balance settings.
St ones and rocks or ca vities inside the ground are as import ant as the ground itself in regards t o the
search and t arget det ection quality.
Hot rocks are classified as negativ e or positiv e based on their ID being lo w or high in comparison t o
the ID of the soil they are in. One or both of the types may be present in a field. The negativ e and
positiv e eff ects mentioned here will only be v alid if ground balancing is properly done on the existing
ground. Otherwise, soil itself will not act diff erently from hot rocks in t erms of ID .
P ositiv e rocks act just lik e met al and produce a met al sound. In the All Met al mode they produce a
“zip zip” sound when the search coil is mo v ed o v er them. If the signal is strong enough, the de vice
may produce an ID for these rocks. Negativ e rocks in the All Met al mode, produce a long “boing”
sound when the search coil is mo v ed o v er them. The de vice does not giv e an ID for these rocks
e v en if the signal is strong.
P ositiv e rocks pro vide a typical met al sound in discrimination modes. Negativ e rocks do not pro vide
a sound in discrimination modes (except for r are cases of f alse signals).
Therefore, you can mak e a decision by list ening t o the audio responses produced by the de vice in
the field. If you receiv e a met al sound, it means that you either det ect ed a positiv e rock or a piece of
met al. If you receiv e a strong signal and a st able ID , you can distinguish if the det ect ed t arget is a
rock or met al by checking the ID . Ho w e v er , remember that w eak signals may produce diff erent IDs
and met als under rocks may produce diff erent met al signals. Therefore, the most appropriat e action
is t o dig up when a met al signal is receiv ed.
MET ALS UNDER ROCKS
SIMPLEX+ increases the possibility of det ecting met al t argets under miner alized rocks through the
proper adjustment of your settings. The combined eff ect creat ed by the rock and met al t ogether
is lo w er than the eff ect that the met al creat es by itself and the displayed ID will be diff erent than
the met al' s expect ed ID . The displayed ID is formed by the combination of rock and met al t ogether
and gets closer t o the ID of the rock if the size of the met al is smaller in relation t o the rock. K eep
in mind that met als under hot rocks will ne v er appear with their o wn met al ID . F or inst ance, a gold
piece under a brick may produce an iron t one and ID .
R emember this v ery simple principle as it will sa v e you lots of time: “If the t arget you det ect is not
a st one, it can be met al”.
The k ey t o det ecting t arget s und er m in er alize d rocks, particularly w hen po sitiv e rocks a re in q uestion , is
t he kno wledge of t he m axim um ID v a lue produced b y t he s urroun ding positiv e rocks. If y ou are pe rformin g
a s ea rch in the A ll Met a l mode , monit or t he ID p roduce d by th e de v ice. If t he ID pro v id ed by yo ur d e vi ce is
clo se t o t he rock a nd iron zon e, it is quit e pos sible t ha t you de t ect e d a t arget under t he ro ck.
If the hot rocks in your search area t end t o giv e high IDs, then the chances of missing the signals of
small met als underneath will be high as w ell.
DETECTION ON THE BEA CH AND UNDER W A TER
SI M P L E X + i s a w a t e r p r o o f m e t a l d e t e ct o r . T hi s p r o v i d e s c o n v e n i e n t d e t e c t i o n u n d e r w at e r a n d o n t he b e a c h.
As explained before, salt w at er and alk ali grounds are significantly conductiv e and cause eff ects similar
t o iron in det ect ors. SIMPLEX+' s Beach mode is specially designed for such conditions. You can perform
your search easily using the Beach mode without requiring any special settings.
Beach mode is ideal for salty w et beach sand. You can use the other modes while performing search
o v er dry beach sand.
You should consider the follo wing while performing search o v er w et beach sand or underw at er:
1) When you swing the search coil o v er the holes you dig in w et beach sand, you can receiv e met al
signals, this is a normal condition.
2) The search coil may giv e f alse signals when going int o and coming out of the w at er so please try
t o k eep the coil either in or out of the w at er .
3) While det ecting on w et beach sand, a v oid rubbing or hitting the search coil on the ground. Otherwise,
the de vice may giv e f alse signals.
4) When going from w et sand t o dry sand or from dry sand t o w et sand while det ecting on the beach,
the de vice may emit f alse signals. Ground balance the det ect or aft er you switch from one another .
5) If you cannot aut o ground balance on w et sand and/or in salt w at er , try manual ground balancing.
If you still cannot ground balance, set the ground balance v alue t o 00.0 manually.
P ay att ention t o the it ems belo w aft er using the de vice especially under salty w at er:
1 . Wash the syst em bo x, shaft and the coil with t ap w at er and be sure no salt w at er is left in the
connect ors.
2. Do not use any chemicals for cleaning and/or for any other purposes.
3. Wipe the screen and the shaft dry with a soft, non-scr atch cloth.
CHECK COIL ICON
It indicat es an int erruption in the search coil tr ansmitt er signal. The search coil connect or
may be unatt ached, loose or disconnect ed. If you o wn another det ect or with the same coil
connect or , please be sure that you ha v e not att ached the wrong coil by mist ak e. If none of
the abo v e exists, the search coil or its cable may ha v e a def ect. If the issue continues when
you change the search coil, there may be an issue in the coil control circuit.
SA VE AND F A CT OR Y DEF A UL TS
SIMPLEX+ will sa v e all settings aut omatically once you turn your det ect or off and on again except
for ground Balance, threshold, frequency shift and LED flashlight on/off .
T o re v ert back t o f act ory def aults please follo w the st eps belo w:
* T urn the det ect or on by pressing the po w er butt on.
* Once the SIMPLEX+ logo appears on the screen, press and hold do wn the Settings and
Pinpoint/Confirm butt on simult aneously until 3 short beeps are heard.
SOFTW ARE UPD A TE
SIMPLEX+ has softw are updat e capability. All softw are updat es made aft er the de vice is released t o
the mar k et will be announced on the product' s w eb page along with updating instructions.
Syst em V ersion Information:
The softw are v ersion of the SIMPLEX+ will be displayed at the bott om of the screen each time you
turn the det ect or on.
90.0
10 30 50 70 90
L1 L2 L3 L4
H1 H2 H3 H4