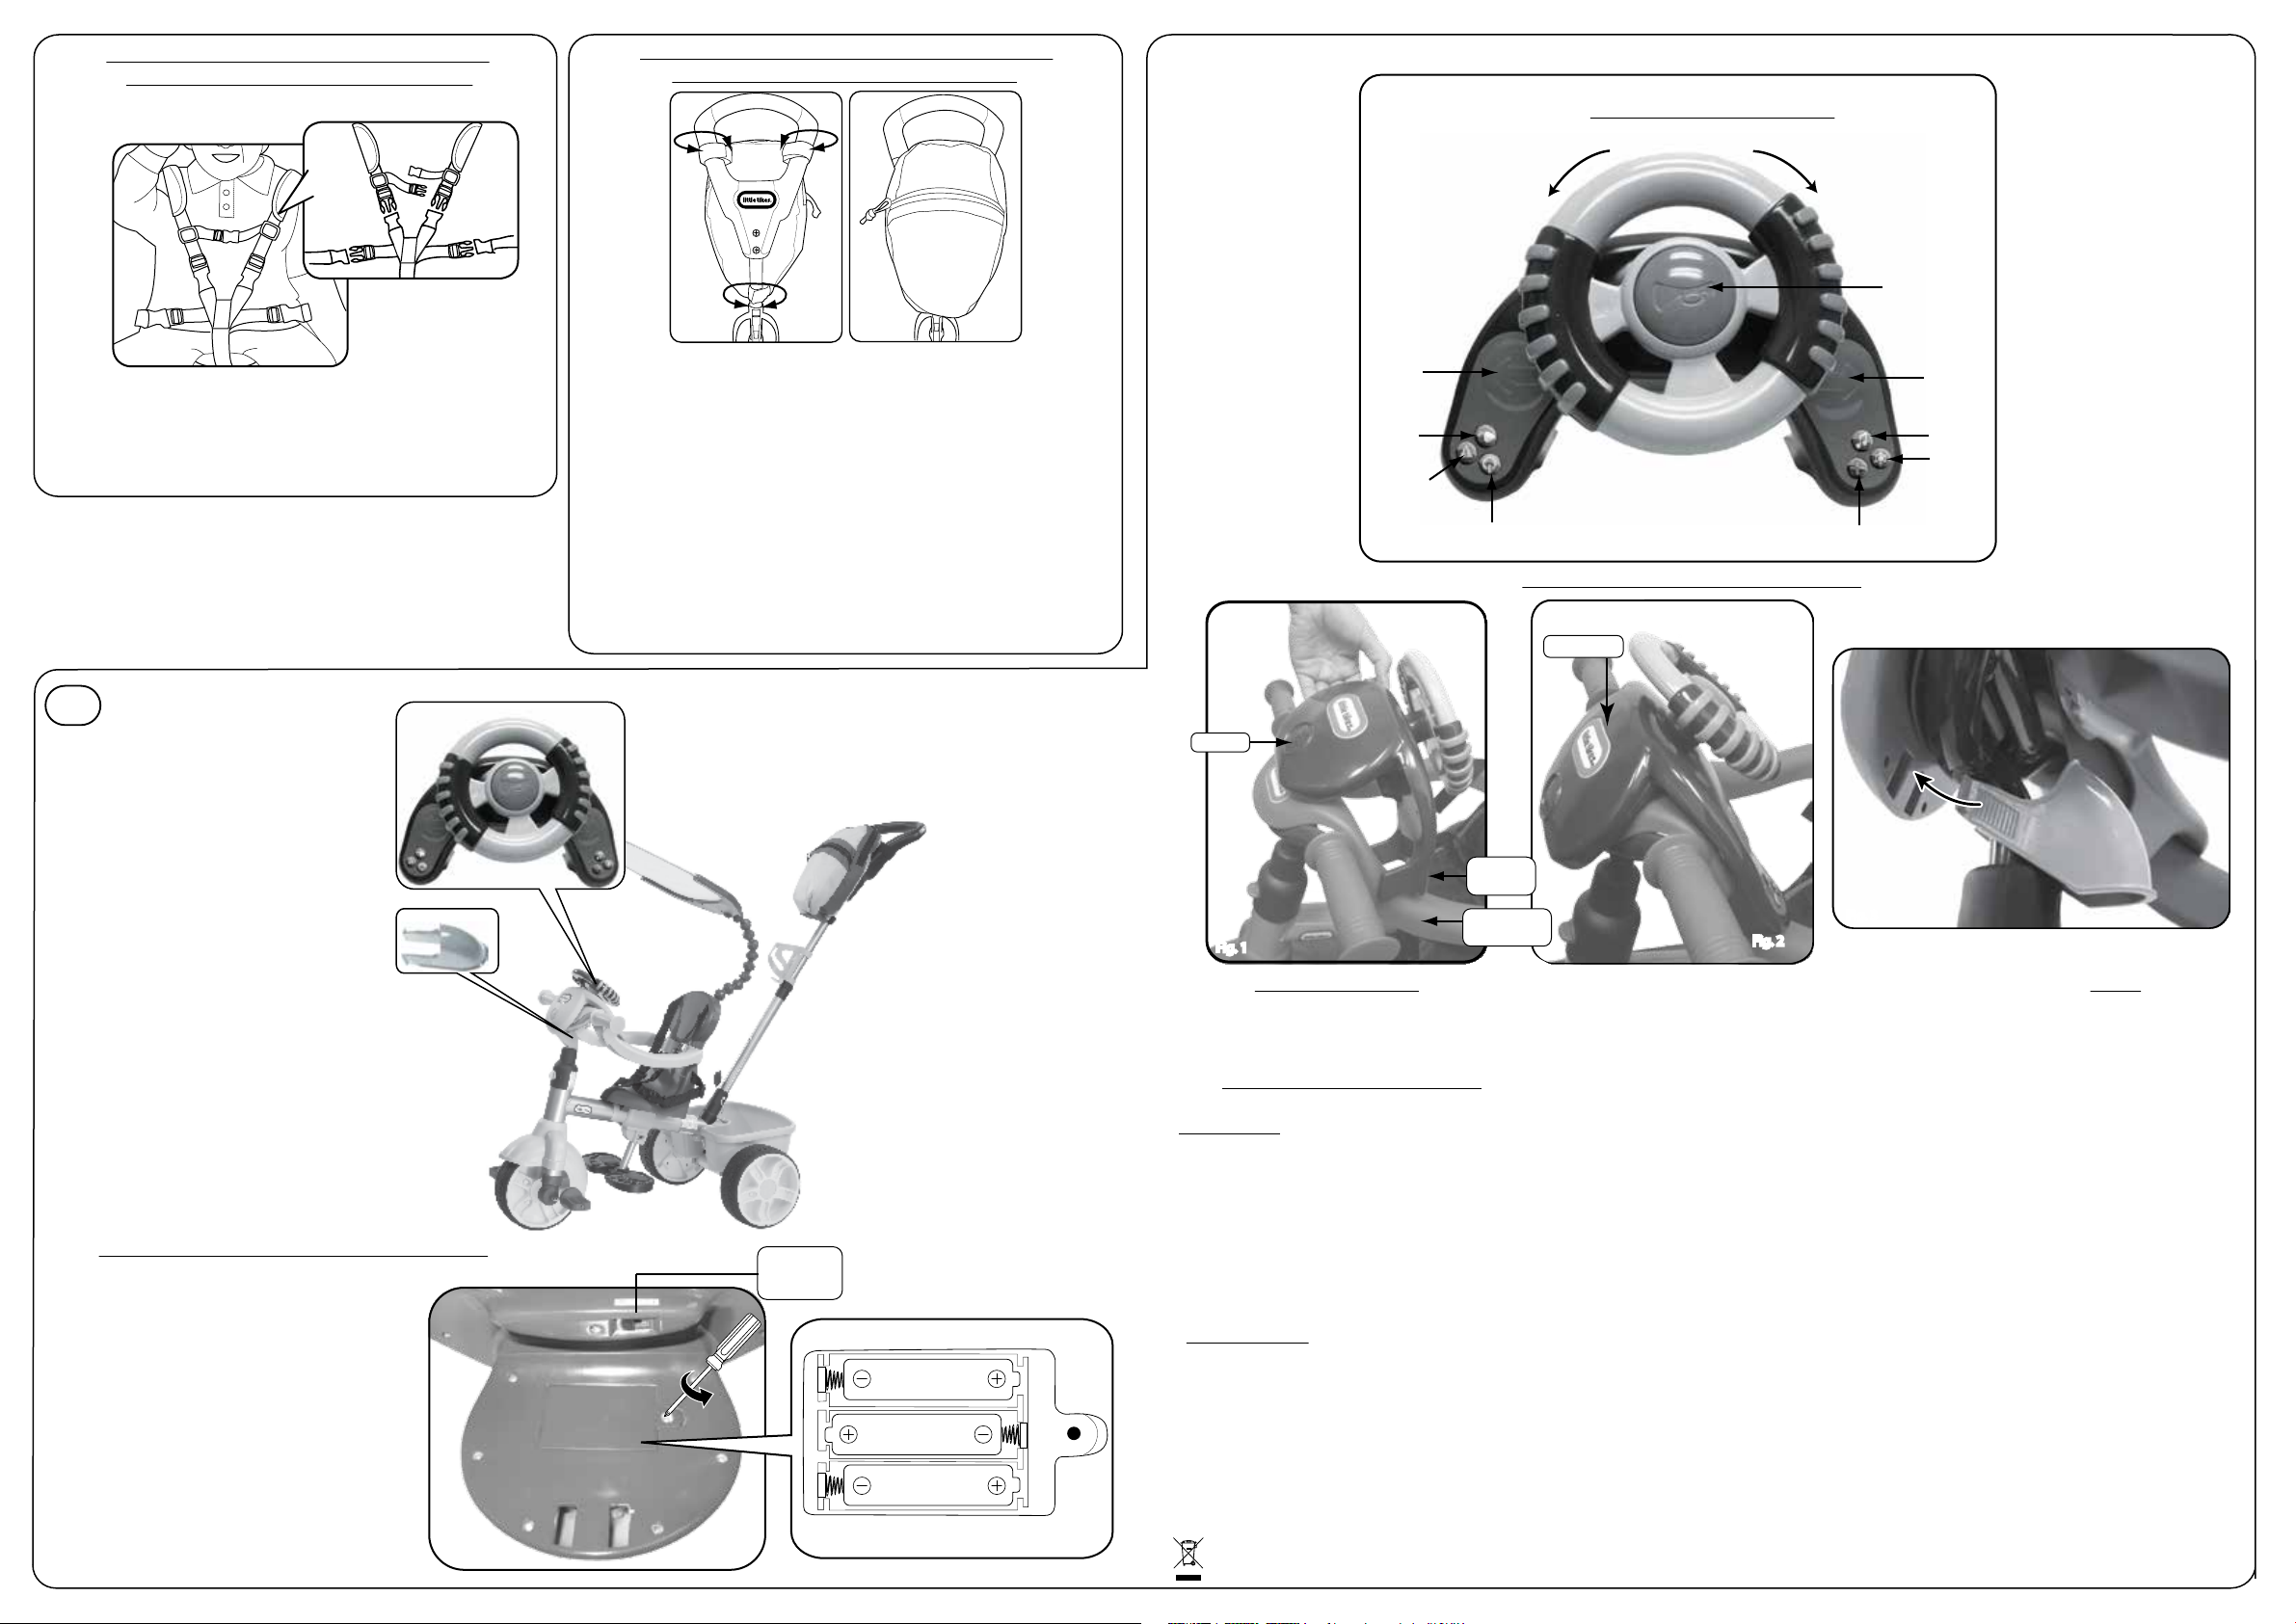
1. Using a Phillips screwdriver (not included) remove the
screw and battery compartment
cover from the underside of the Dashboard.
2. Install three (3) fresh AAA alkaline batteries (not
included) making sure the (+) and (-)
ends face the proper direction as indicated inside the
battery compartment.
3. Replace the compartment cover and tighten the screw.
NOTE: Before storing the Dashboard, remove the batteries to
prevent leakage and possible damage to the unit.
DASHBOARD BATTERY INSTALLATION
1.5V AAA/LR03
1.5V AAA/LR03
1.5V AAA/LR03
OFF/ON
SWITCH
1 Discover Sounds® Dash
1 Dash Clamp
Once assembled, turn the steering wheel left or right to engage the turn signals, press the horn to honk, or press the remaining buttons for cool sound eects or a jaunty tune.
INSTALLING DASHBOARD ONTO TRIKE
1. Place Dashboard over Trike handlebar assembly, making sure U-Shaped Brackets are positioned over the Protective Safety Bar on both sides. (Fig. 1)
2. Press down on Dashboard until it snaps into place onto top of handlebar assembly and Protective Safety Bar. (Fig. 2)
3. Position the Dashboard Clamp around the Handlebar Tube. (Fig. 3)
4. Squeeze the tabs on the Dashboard Clamp together to snap them into the openings on the underside of the Dashboard. (Fig. 3)
NOTE: To remove the Dashboard, squeeze the tabs on the Dashboard Clamp together, remove the Clamp, then remove the Dashboard by lifting it upward. The Dashboard can be attached to
the Trike only when the Protective Safety Bar is in place.
Fig. 3Fig. 3
Fig. 1Fig. 1
SPEAKER
PRESS DOWN
Fig. 2 Fig. 2
HORN
CAR ENGINE SOUNDSMEDIC SIREN SOUNDS
LIGHTS SONGS
WARNING
SOUND AND
LIGHTS
LEFT
TURN
SIGNAL
RIGHT
TURN
SIGNAL
DASHBOARD FEATURES
ACTIVATES LEFT
TURN SIGNAL
LIGHTS & SOUND
ACTIVATES RIGHT
TURN SIGNAL
LIGHTS & SOUND
POLICE
SIREN
SOUNDS
• Use alkaline batteries for best performance and longer life.
• Use only the type battery recommended for the unit.
• Batteries should be replaced only by an adult.
• Insert batteries with the correct polarity ( + and – ).
• Do not mix old and new batteries.
• Do not mix alkaline, standard (carbon-zinc), or rechargeable (nickel-cadmium) batteries.
• Do not short-circuit batteries.
• When not used for an extended time, remove batteries to prevent possible leakageand damage to the unit.
• Do not mix rechargeable and non-rechargeable batteries.
• Rechargeable batteries are to be removed from the toy before charging.
• Rechargeable batteries are to be recharged only under adult supervision.
• Do not recharge non-rechargeable batteries.
• Exhausted batteries are to be removed from the toy.
• Do not dispose of batteries in re as they may leak or explode.
NOTE: This equipment has been tested and found to comply with the limits for a Class B digital device, pursuant to Part 15 of the FCC Rules. These limits are designed to provide reasonable protection against harmful
interference in a residential installation. This equipment generates, uses and can radiate radio frequency energy and, if not installed and used in accordance with the instructions, may cause harmful interference to radio
communications. However, there is no guarantee that interference will not occur in a particular installation. If this equipment does cause harmful interference to radio or television reception, which can be determined by
turning the equipment o and on, the user is encouraged to try to correct the interference by one or more of the following measures:
• Reorient or relocate the receiving antenna.
• Increase the separation between the equipment and receiver.
• Connect the equipment into an outlet on a circuit dierent from that to which the receiver is connected.
• Consult the dealer or an experienced radio/TV technician for help.
This device complies with Part 15 of the FCC Rules. Operation is subject to the following two conditions: (1) This device may not cause harmful interference, and (2) this device must accept any interference received, including
interference that may cause undesired operation.
Caution: Modications not authorized by the manufacturer may void users authority to operate this device.
CAN ICES-3 (B)/NMB-3(B)
‘Let’s care for the environment!’
The wheelie bin symbol indicates that the product must not be disposed of with other household waste. Please use designated collection points or recycling facilities when disposing of the item.
Do not treat old batteries as household waste. Take them to a designated recycling facility.
SAFE BATTERY USAGE
FCC COMPLIANCE
U-SHAPED
BRACKET
PROTECTIVE
SAFETY BAR
DiscoverSounds® Dash CONTINUED
Place child in the Seat. Snap the Seat Belt Buckles together as shown.
Mettez l’enfant sur le siège. Attachez les boucles de la ceinture de sécurité, tel que montré.
Coloque al niño en el sillín. Abroche las hebillas del arnés como se muestra en la imagen.
Das Kind in den Sitz setzen. Die Schnallen des Sicherheitsgurtes wie dargestellt zusammenstecken.
Laat uw kind plaatsnemen op het zadel. Bevestig de gespen van de veiligheidsriemen zoals weergegeven.
Umieść dziecko w siedzisku. Zatrzaśnij razem sprzączki pasów jak pokazano na rysunku.
SEAT BELT • CEINTURE DE SÉCURITÉ • HEBILLAS DEL ARNÉS
SICHERHEITSGURTES • VEILIGHEIDSRIEMEN • PASÓW
Wrap the two Velcro® Straps on the upper portion of the Travel Pack around the Push Handle of the Trike. Close the singular Velcro® Strap around the telescopic bar.
Enroulez les deux courroies en Velcro®/MD sur la partie supérieure du sac de voyage autour de la poignée du tricycle. Enroulez la bande de Velcro®/MD simple autour
de la barre télescopique.
Pase las dos tiras de Velcro® en la parte superior de la mochila de viaje alrededor del mango de empuje del triciclo. Cierre la única correa de Velcro® alrededor de la
barra telescópica.
Die beiden Klettverschlussbänder oben an der Stautasche um den Schiebegri des Dreirads wickeln. Das einzelne Klettband um die Teleskopstange schließen.
Wikkel de twee klittenbanden aan de bovenkant van de reistas om de duwsteun van de driewieler. Maak het klittenband aan de onderkant vast aan de verstelbare
stang.
Owiń dwa paski Velcro® na górnej części torby podróżnej wokół rączki do popychania trójkołowca. Zamknij pojedynczo pasek Velcro® wokół teleskopowej rurki.
NOTE: Travel Pack can be attached to the front or back of the Push Handle! The Travel Pack may obstruct the Bottle Holder when the Trike is in Stage 1, 2 & 3.
REMARQUE : le sac de voyage peut gêner le porte-bouteille lorsque le tricycle est au stade 1, 2 & 3.
NOTA: La mochila de viaje puede obstruir el portabotella cuando el triciclo está en la etapa 1, 2 & 3.
BITTE BEACHTEN: Die Stautasche könnte die Flaschenhalterung behindern, wenn das Dreirad der Stufe 1 , 2 & 3 entsprechend eingestellt ist.
OPMERKING: de reistas kan de essenhouder in de weg zitten als de driewieler zich in fase 1, 2 & 3 bevindt.
UWAGA: Torba podróżna może blokować uchwyt na butelkę gdy pojazd jest zmontowany w ustawieniu 1, 2 & 3.
TRAVEL PACK • SAC DE VOYAGE • MOCHILA DE VIAJE
STAUTASCHE • REISTAS • TORBA PODRÓŻNA
ENG
IMPORTANT NOTE: PROTECTIVE SAFETY BAR CAN BE INSTALLED WHEN SEAT IS IN POSITION #1 ONLY.
Gebruikershandleiding.com neemt misbruik van zijn services uitermate serieus. U kunt hieronder aangeven waarom deze vraag ongepast is. Wij controleren de vraag en zonodig wordt deze verwijderd.
Product:
Spelregels forum
Om tot zinvolle vragen te komen hanteren wij de volgende spelregels:
lees eerst de handleiding door;
controleer of uw vraag al eerder door iemand anders is gesteld;
probeer uw vraag zo duidelijk mogelijk te stellen;
heeft u een probleem en al geprobeerd om dit op te lossen, vermeld dit erbij aub;
heeft u een oplossing gekregen van een bezoeker dan horen wij dat graag in dit forum;
wilt u een reactie geven op een vraag of antwoord, gebruik dan niet dit formulier maar klik op de knop 'reageer op deze vraag';
uw vraag wordt direct op de website gezet; vermijd daarom persoonlijke gegevens in te vullen;
Belangrijk! Als er een antwoord wordt gegeven op uw vraag, dan is het voor de gever van het antwoord nuttig om te weten als u er wel (of niet) mee geholpen bent! Wij vragen u dus ook te reageren op een antwoord.
Belangrijk! Antwoorden worden ook per e-mail naar abonnees gestuurd. Laat uw emailadres achter op deze site, zodat u op de hoogte blijft. U krijgt dan ook andere vragen en antwoorden te zien.
Abonneren
Abonneer u voor het ontvangen van emails voor uw Little tikes 634826C Trike bij:
nieuwe vragen en antwoorden
nieuwe handleidingen
U ontvangt een email met instructies om u voor één of beide opties in te schrijven.
Ontvang uw handleiding per email
Vul uw emailadres in en ontvang de handleiding van Little tikes 634826C Trike in de taal/talen: Nederlands, Duits, Engels, Frans, Spaans, Pools als bijlage per email.
De handleiding is 2.4 mb groot.
U ontvangt de handleiding per email binnen enkele minuten. Als u geen email heeft ontvangen, dan heeft u waarschijnlijk een verkeerd emailadres ingevuld of is uw mailbox te vol. Daarnaast kan het zijn dat uw internetprovider een maximum heeft aan de grootte per email. Omdat hier een handleiding wordt meegestuurd, kan het voorkomen dat de email groter is dan toegestaan bij uw provider.
Stel vragen via chat aan uw handleiding
Stel uw vraag over deze PDF
Uw handleiding is per email verstuurd. Controleer uw email
Als u niet binnen een kwartier uw email met handleiding ontvangen heeft, kan het zijn dat u een verkeerd emailadres heeft ingevuld of dat uw emailprovider een maximum grootte per email heeft ingesteld die kleiner is dan de grootte van de handleiding.
Er is een email naar u verstuurd om uw inschrijving definitief te maken.
Controleer uw email en volg de aanwijzingen op om uw inschrijving definitief te maken
U heeft geen emailadres opgegeven
Als u de handleiding per email wilt ontvangen, vul dan een geldig emailadres in.
Uw vraag is op deze pagina toegevoegd
Wilt u een email ontvangen bij een antwoord en/of nieuwe vragen? Vul dan hier uw emailadres in.