15375
137
Verklein
Vergroot
Pagina terug
1/192
Pagina verder
Detailed guide / Record mode/ 135
2. the shutter speed dial (1.16) also to its A position
(1.16 a).
• In the viewfinder/monitor screen this mode is
displayed by P (2.1.1 a).
What to do next:
3. Aim at your subject with the rectangle (autofocus
metering area 2.1.30/31) and press the shutter
release button (1.13) to its pressure point.
• The shutter speed (2.1.18) and aperture (2.1.20)
are set automatically and displayed in the view-
finder/monitor (in white). In addition, the indica-
tion of the possibility to use the program shift
function also appears
a
(2.1.21, see next sec-
tion).
If even the fully opened or closed aperture in
conjunction with the slowest or fastest shutter
speed results in under or over exposure, this is
indicated by red values.
If the automatically set pair of values for the intended
composition appears appropriate:
4. press the shutter release button all the way down
to take the photograph.
If not, you can change the pair of values before press-
ing the shutter release button:
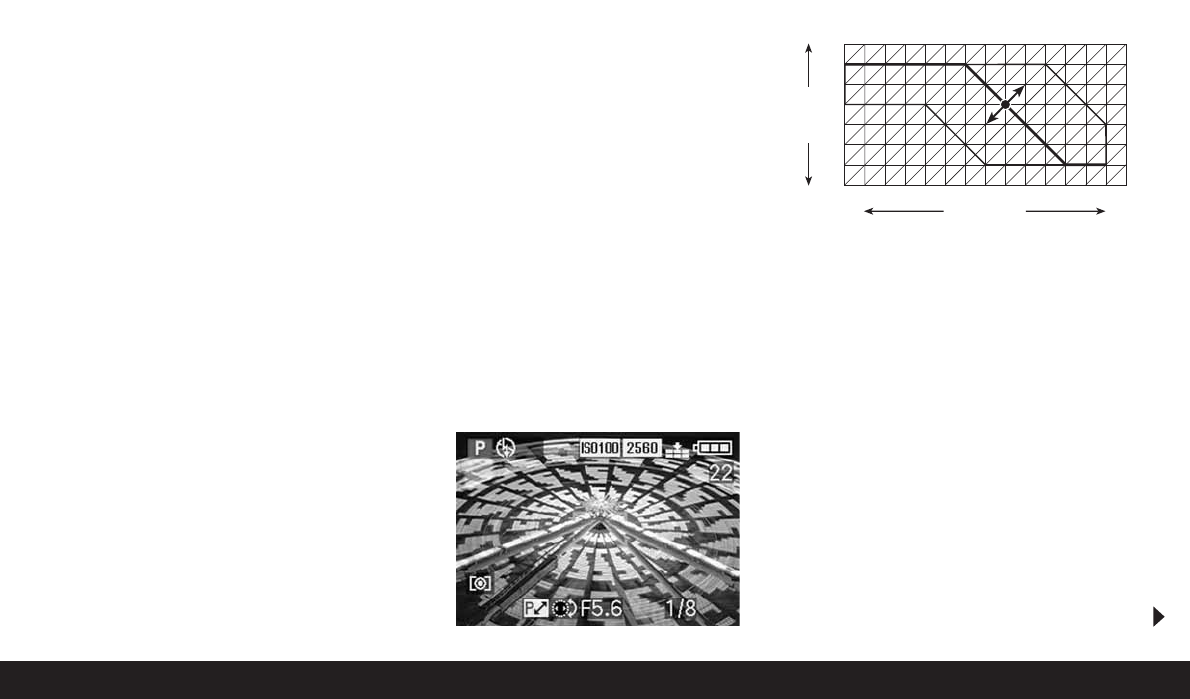
Shifting program mode
Shifting the program mode curve combines the reli-
ability and speed of fully automatic exposure control
with the possibility of being able at any time to vary
the speed/aperture combination selected by the
camera according to your ideas.
This is possible both with the direction pad (1.30) and
the central setting dial (1.29). For example, if you are
taking sports photographs and prefer to use fast
speeds and a large aperture, turn it to the left
(anticlockwise). If, on the other hand, you would
rather have a large depth of field (small aperture) and
accept the associated slower speeds that are neces-
sary, then turn it to the right (clockwise) (e.g. for land-
scape photography).
The overall exposure, i.e. the brightness of the image,
remains unchanged.
With all pairs of values set by shifting, a corre-
sponding indication
h
(2.1.22). also appears This
allows the automatic default pair of values can be
recognized at any time.
The graphic below shows the available shift ranges.
Taking photographs with speed priority mode - T
The speed priority mode automatically controls the
exposure with manual setting of the shutter speed. It
is therefore particularly well suited for taking pictures
of moving subjects, where the sharpness of the move-
ment portrayed – which is determined by the shutter
speed used – is the crucial element of composition.
By manually pre-selecting an appropriately fast
shutter speed, you can therefore prevent unwanted
blurring of the movement – you can “freeze” your
subject. Or, in reverse, you can express the dynamics
of the movement with a deliberate “wiping” effect
using a correspondingly slower shutter speed.
Shutter speeds in the range of 8s to
1
/
2000
s can be
set.
Exposure Value
15
16
17
18
19
141312111098765432
20
Shutter speed
1
Aperture
2
2.8
4
5.6
8
11
1
1
/
2
1
/
4
1
/
8
1
/
15
1
/
30
1
/
60
1
/
125
1
/
500
1
/
1000
1
/
2000
1
/
4000
2
1
/
250
137

Hulp nodig? Stel uw vraag in het forum

Spelregels

Misbruik melden

Gebruikershandleiding.com neemt misbruik van zijn services uitermate serieus. U kunt hieronder aangeven waarom deze vraag ongepast is. Wij controleren de vraag en zonodig wordt deze verwijderd.

Product:

Bijvoorbeeld antisemitische inhoud, racistische inhoud, of materiaal dat gewelddadige fysieke handelingen tot gevolg kan hebben.

Bijvoorbeeld een creditcardnummer, een persoonlijk identificatienummer, of een geheim adres. E-mailadressen en volledige namen worden niet als privégegevens beschouwd.

Spelregels forum

Om tot zinvolle vragen te komen hanteren wij de volgende spelregels:

Belangrijk! Als er een antwoord wordt gegeven op uw vraag, dan is het voor de gever van het antwoord nuttig om te weten als u er wel (of niet) mee geholpen bent! Wij vragen u dus ook te reageren op een antwoord.

Belangrijk! Antwoorden worden ook per e-mail naar abonnees gestuurd. Laat uw emailadres achter op deze site, zodat u op de hoogte blijft. U krijgt dan ook andere vragen en antwoorden te zien.

Abonneren

Abonneer u voor het ontvangen van emails voor uw Leica DIGILUX2 bij:


U ontvangt een email met instructies om u voor één of beide opties in te schrijven.


Ontvang uw handleiding per email

Vul uw emailadres in en ontvang de handleiding van Leica DIGILUX2 in de taal/talen: Duits, Engels als bijlage per email.

De handleiding is 1,7 mb groot.


U ontvangt de handleiding per email binnen enkele minuten. Als u geen email heeft ontvangen, dan heeft u waarschijnlijk een verkeerd emailadres ingevuld of is uw mailbox te vol. Daarnaast kan het zijn dat uw internetprovider een maximum heeft aan de grootte per email. Omdat hier een handleiding wordt meegestuurd, kan het voorkomen dat de email groter is dan toegestaan bij uw provider.

Stel vragen via chat aan uw handleiding

Stel uw vraag over deze PDF

loading

Andere handleiding(en) van Leica DIGILUX2

Leica DIGILUX2 Gebruiksaanwijzing - Deutsch - 96 pagina's

Leica DIGILUX2 Gebruiksaanwijzing - English - 96 pagina's

Leica DIGILUX2 Gebruiksaanwijzing - Français - 97 pagina's

Leica DIGILUX2 Gebruiksaanwijzing - Italiano - 97 pagina's

Leica DIGILUX2 Gebruiksaanwijzing - Espanõl - 96 pagina's


Uw handleiding is per email verstuurd. Controleer uw email

Als u niet binnen een kwartier uw email met handleiding ontvangen heeft, kan het zijn dat u een verkeerd emailadres heeft ingevuld of dat uw emailprovider een maximum grootte per email heeft ingesteld die kleiner is dan de grootte van de handleiding.

Er is een email naar u verstuurd om uw inschrijving definitief te maken.

Controleer uw email en volg de aanwijzingen op om uw inschrijving definitief te maken

U heeft geen emailadres opgegeven

Als u de handleiding per email wilt ontvangen, vul dan een geldig emailadres in.

Uw vraag is op deze pagina toegevoegd

Wilt u een email ontvangen bij een antwoord en/of nieuwe vragen? Vul dan hier uw emailadres in.


Info