Distribution and copying of this document, use and communication of its contents is not permitted without written authorization from Keiser Corporation. The content
of this document is furnished for informational use only, may be subject to change without notice, and should not be construed as a commitment by Keiser Corporation.
Every effort has been made to ensure that the information in this manual is accurate. Keiser Corporation is not responsible for printing or clerical errors.
OPERATION MANUAL
PERFORMANCE TRAINER
03
Congratulations on the purchase of your new Keiser Performance Trainer and welcome to the Keiser family. All the benets
of Keiser’s renowned Innity Series are incorporated into one single-column, high/low pulley system. From sports-specic
applications to rehabilitation, the Performance Trainer gives you the resistance training you want at any speed, without the
harmful shock load to the body.
For your safety, and to ensure the best experience and maximum gains, it is critical that you read and understand this manual
before you begin using the Performance Trainer. If you have any questions regarding the operation of the Performance Trainer
after reading this manual, our Keiser Customer Support team will be happy to assist by telephone at 1 559 256 8000 and
via live chat at keiser.com/support (Monday—Friday, 9 am to 5 pm Pacic Time), or by email at service@keiser.com.
Yours in Health,
Keiser Corporation
Please take a moment at this time to record the serial number
in the space provided below.
Serial No.:
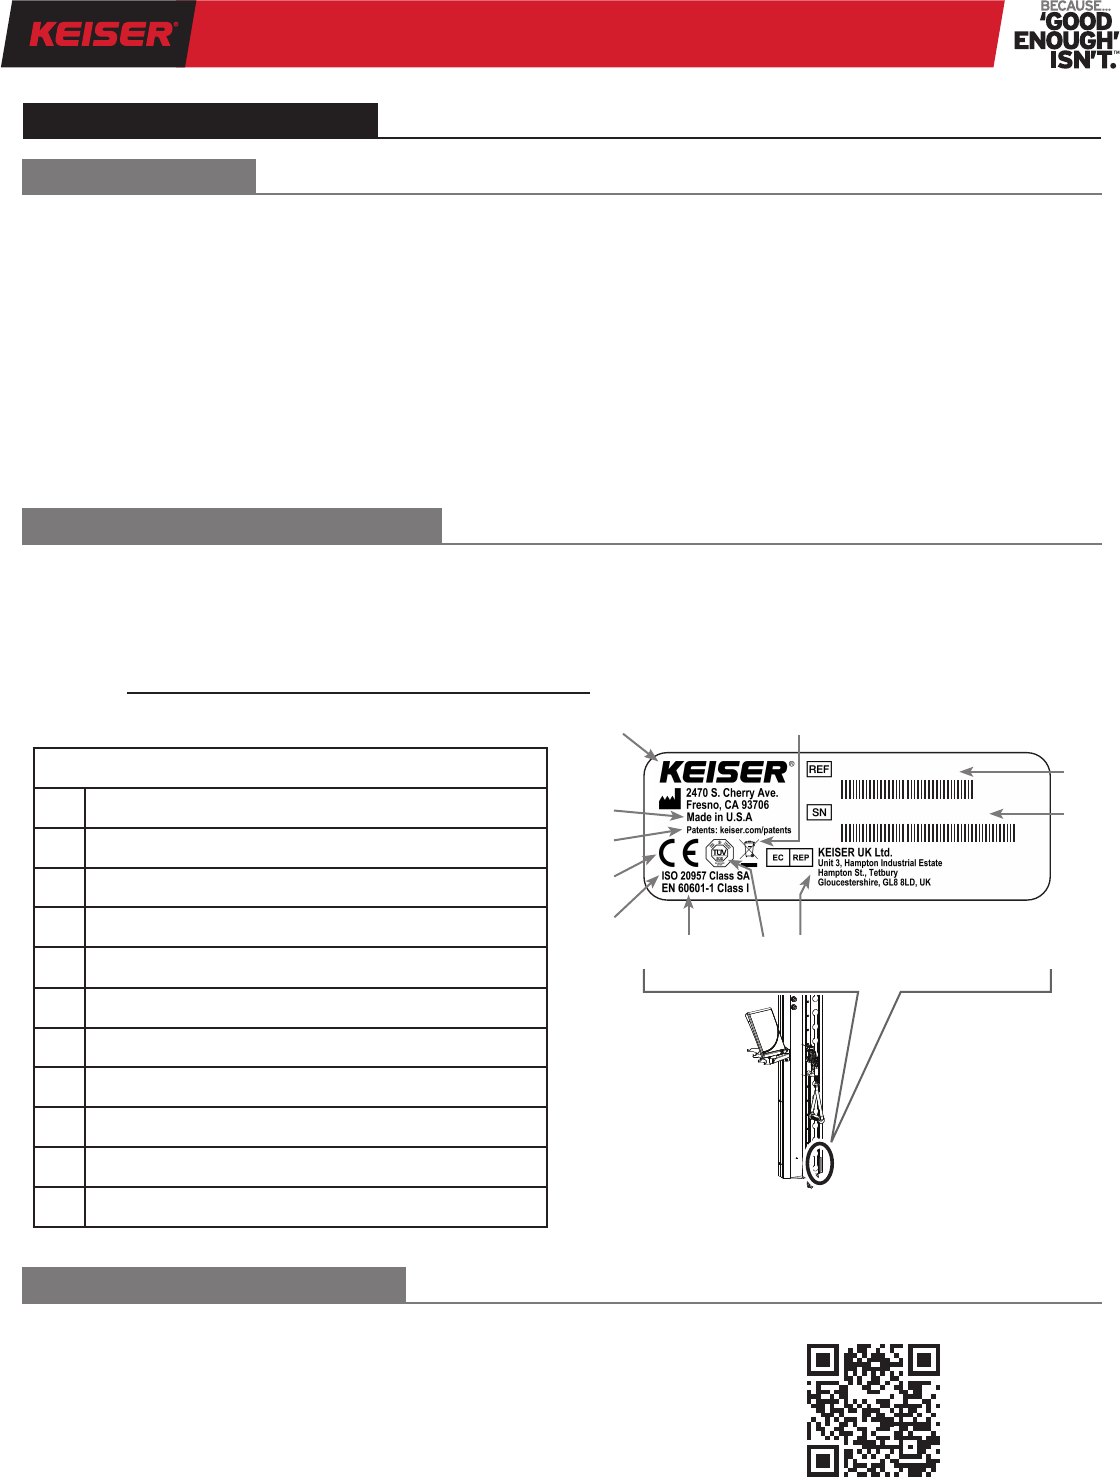
Figure 1. Serial Number Location and Information
GENERAL INFORMATION
INTRODUCTION
SERIAL NUMBER INFORMATION
Register your Performance Trainer to stay informed of safety
notications and for faster, more accurate warranty service.
Scan the QR Code to the right to access the interactive online
warranty registration form or visit:
https://www.keiser.com/forms/warrantyregistration
SCAN
REGISTER YOUR PURCHASE
Serial Number Information
AManufacturer name, logo, and address
BCountry of manufacture
CPatent information notication
DCE mark
EQuality management ISO standard
FDirective and standards compliance
GTUV SUD Mark
HEuropean Authorized Representative
ISerial number and date of manufacture
JModel number and product description
KWEEE Directive Mark
FGH
A
B
C
D
E
I
J
K
003010XP
88888-88888
OPERATION MANUAL
PERFORMANCE TRAINER
04
It is the sole responsibility of the purchaser of Keiser Corporation
equipment to instruct all individuals, whether they are the end-
user or supervising personnel, on proper usage of the equipment.
Keiser Corporation recommends that all users of its equipment
be informed of the following information before use.
1. Read these instructions.
2. Heed all warnings.
3. Follow all instructions.
4. Consult your physician before beginning any exercise program.
5. The Performance Trainer is intended for use in training areas
of organizations where access and control are specically
regulated by a person responsible for determining the
suitability of use and maintenance.
6. The use of this Performance Trainer for any purpose not
explicitly specied by the manufacturer in this manual is
prohibited.
7. Wear proper exercise clothing and shoes for exercise. Avoid
wearing loose clothing that might catch on any moving parts.
Tie long hair back.
8. The Performance Trainer is not a toy. Children should not
play with the Performance Trainer. Children under 14 years
old should not use the Performance Trainer. Keep children
and pets clear from the Performance Trainer at all times,
especially while in use. Cleaning and user maintenance should
not be performed by children.
9. Children age 14 to 17 years should not use the Performance
Trainer without constant supervision by a spotter/supervisor.
Persons with mental disabilities, reduced physical, mental,
or sensory capabilities, or lack of experience or knowledge
should not use the Performance Trainer without constant
supervision by a spotter/supervisor.
10. Proper warm-up is required to help prevent serious injury.
This Performance Trainer should only be used with proper
instructions. Always maintain good form and control during
exercise. If you feel pain or are unable to maintain good form,
stop immediately. Failure to follow these instructions could
result in serious injury.
11. Never perform Power Test without a proper warm-up. This
high resistance/high-speed test should only be performed with
proper instruction (see page 12 “Power Test” for complete
instruction). Always maintain good form and control during
the test. If you feel pain or are unable to maintain good form,
stop immediately. Failure to follow these instructions could
result in serious injury.
12. Use only Keiser accessories with your Performance Trainer
to help avoid the risk of serious injury or property damage.
13. Ensure the Cable Link is closed before the use of a Cable
Accessory.
14. The sudden release of a Cable Accessory will cause it to
snap back uncontrollably and could result in serious injury or
property damage. Maintain a rm grasp of a Cable Accessory
during exercise. Ensure hook and loop type accessories are
fastened rmly before exercise. Carefully return the Cable
Accessory to the start position before releasing.
15. Do not pull Cable beyond maximum Cable length of 93 inches
(2,362 mm). Failure to follow this direction will cause the
IMPORTANT SAFETY INFORMATION
cable to hit a hard stop and will create a sudden dynamic load
that may result in serious injury or equipment and property
damage.
16. Never make adjustments to the resistance during exercise
as this may cause muscle strain. Always return the Handle/
Cable to the start position prior to making any adjustments
to help prevent serious injury.
17. Ensure that the Adjustment Plunger is fully engaged into the
desired position hole before use. There should be no up/down
movement of the Vertical Adjustment once it is set in position.
18. The highest level of safety can only be ensured if the equipment
is regularly inspected for damage and wear. Always check
equipment is securely fastened to the Wall Mount Tubes and
wall before use (no tilt, lean, or any other movement of the
unit should be detected during use). Immediately replace
damaged, worn, or broken parts. Do not use the Performance
Trainer until all repairs have been completed and tested by
a Keiser-certied technician.
19. Use only replacement parts supplied/recommended by Keiser
Corporation. Attempting to repair or replace any damaged,
worn, or broken parts on your own is not recommended. A
Keiser-certied technician should be consulted.
20. The use of any exercise equipment, including, without
limitation, Keiser’s strength training equipment in which
resistance can be changed at any time during the repetition,
without proper instruction and supervision violates the terms
of the agreement for the purchase of such products. The
ability to add resistance any time during a repetition, including,
without limitation, the ability to do a heavy negative may be
dangerous, especially for anyone that does not recognize or
respect the potential danger.
21. Users, agents, or anyone directing the use of the Performance
Trainer shall determine the suitability of the Performance
Trainer for its intended use, and said parties are specically
put on notice that they shall assume all risk and liability in
connection herewith.
22. The Performance Trainer is intended for use in commercial
training centers. If the Performance Trainer is used in a
residential setting, special precautions should be taken.
To ensure your safety and to help prevent damage to the
Performance Trainer, read all instructions before operating.
Seek professional installation by qualied personnel as
dictated by authority having jurisdiction.
23. If you do not understand these instructions or have doubts
about the safety of the installation, assembly, or use of this
product, contact Keiser Customer Support:
1 559 256 8000
service@keiser.com
keiser.com/support
Telephone and Live Chat
Monday—Friday 9 am to 5 pm PST
OPERATION MANUAL
PERFORMANCE TRAINER
05
IMPORTANT SAFETY INFORMATION (CONTINUED)
CONVENTIONS USED CONVENTIONS USED
This Operation Manual contains the following marks:
WARNING: Indicates a hazardous situation that, if not
avoided, could result in death or serious injury.
CAUTION: Indicates a hazardous situation that, if not
avoided, could result in minor or moderate injury.
IMPORTANT: Indicates information considered critical,
but not hazard-related.
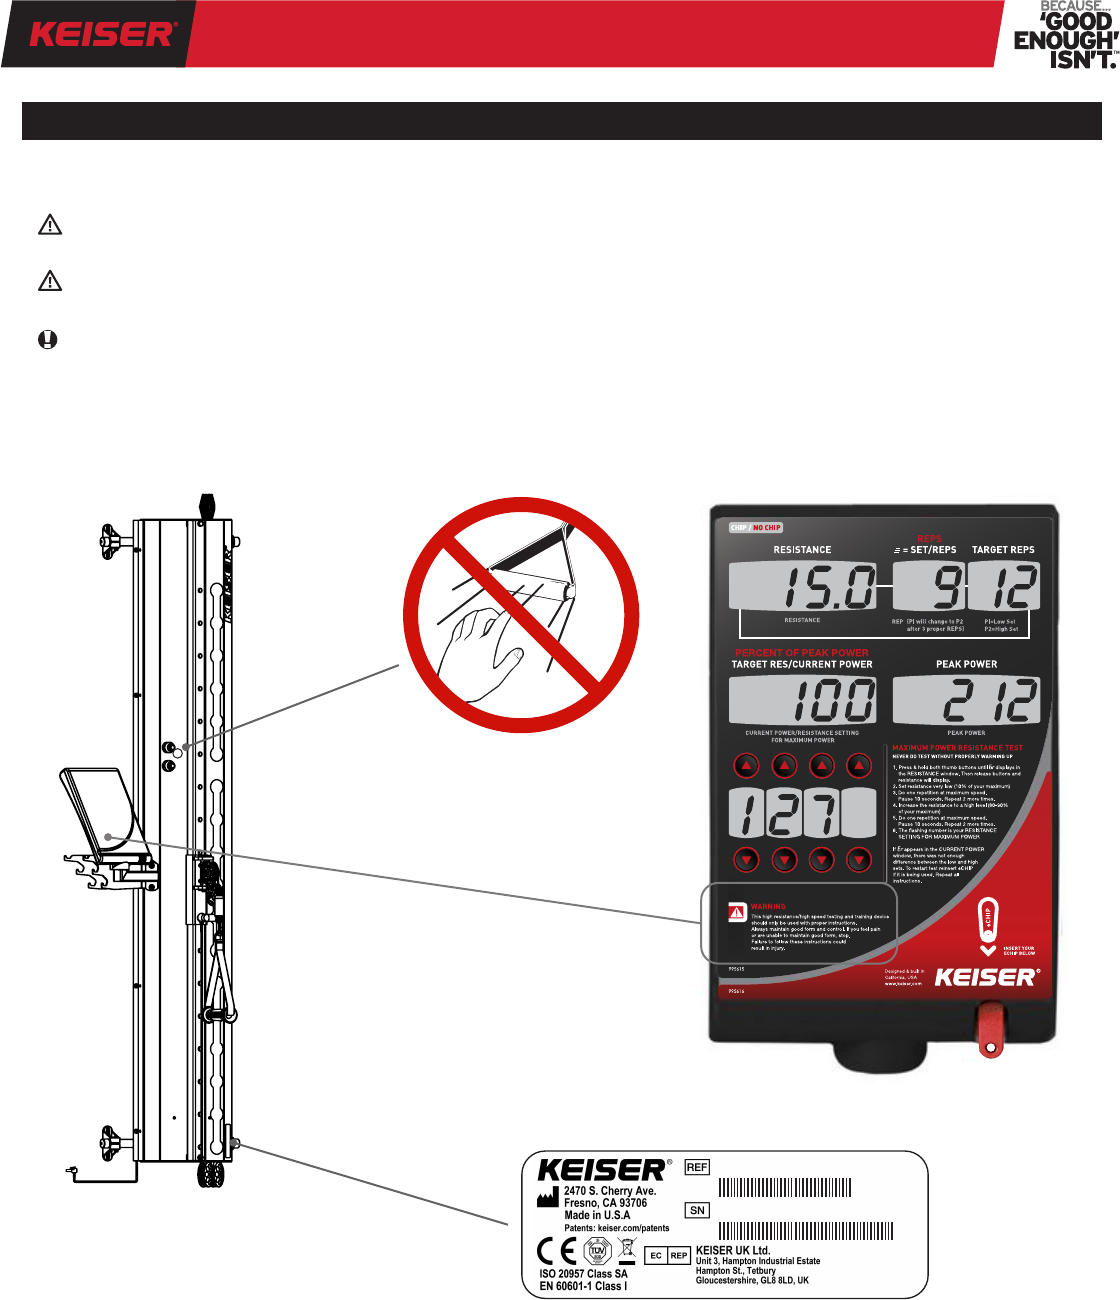
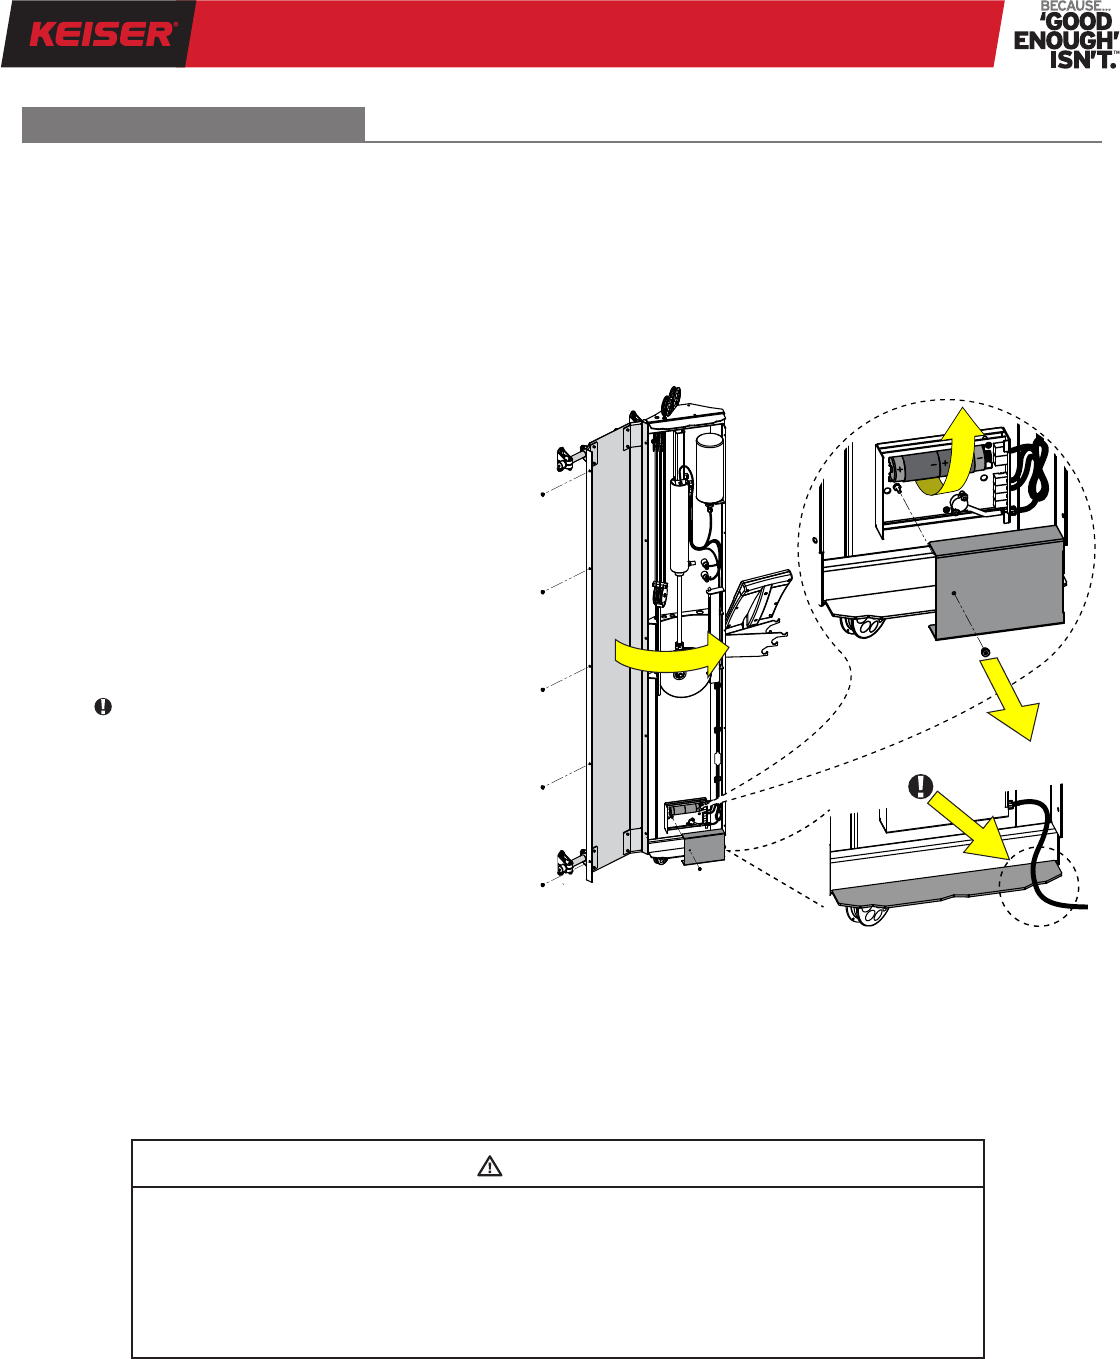
Maintain and do not remove safety or notication labels for any reason. They contain important information. If unreadable
or missing, contact Keiser Corporation (see back cover for contact information).
SAFETY AND NOTIFICATION LABELS
003010XP
88888-88888
OPERATION MANUAL
PERFORMANCE TRAINER
06
EQUIPMENT SPECIFICATIONS
TECHNICAL SPECIFICATIONS
Height: 87 inches (2,210 mm)
from oor at suggested installation height
Width: 24 inches (610 mm)
Depth: 12 inches (305 mm)
Weight: 120 lbs (54 kg)
Resistance Range: 0 to 75 lbs (0 to 34 kg)
Cable Length: 93 inches (2,362 mm)
from start to full extension, without Cable Accessory
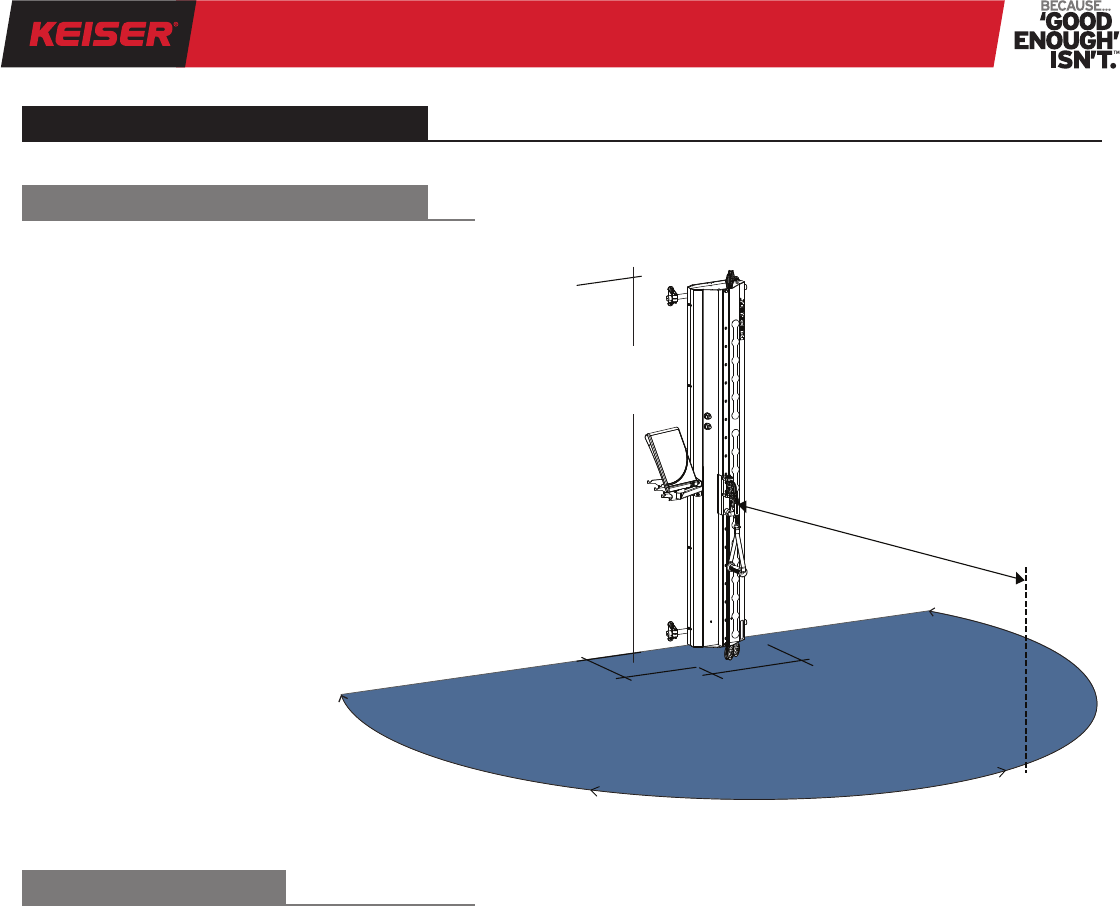
Figure 2. Performance Trainer Training Space
87 inches
(2,210 mm)
Cable Length: 93 inches
(2,362 mm)
Training Space
12 inches
(305 mm)
24 inches
(610 mm)
TECHNICAL DATA
Power:
1.5V D Alkaline Batteries
Quantity 2
Keiser PN 966500
3V CR2032 Lithium Coin Cell Battery
Quantity 1
Permanently attached, not serviceable (contact
Keiser Customer Support for service).
Keiser Chip System:
eChip insertion slot receives the Keiser
eChip (electronic memory chip) for data
transfer and storage.
OPERATION MANUAL
PERFORMANCE TRAINER
07
TRAINING SPACE
Figure 3. Cable Max Limit Illustration
Cable Max Limit
Marker
Cable
Cable Accessory
Cable Length: 93 inches (2,362 mm)
Cable Length at full extension is 93 inches (2,362 mm). Plan Training Space accordingly to allow for full-range operation.
Actual Cable Length extension may vary, based on accessory type, user height, and the position of the Vertical Adjustment.
When Performance Trainers are mounted adjacent to each other, the Training Space may be shared.
To safely and effectively use your Training Space, remember to:
1. Clear your Training Space: Ensure there is enough space for safe access and operation of the equipment.
2. Mark your Cable Max Limit: Secure your Cable Accessory to the Cable. Walk your Cable Accessory out until the stop is
reached. This is your Cable Max Limit. Place a marker on the oor (i.e. tape, keys, or a water bottle) to indicate your Cable
Max Limit (see Figure 3).
WARNING: AVOID SERIOUS INJURY OR PROPERTY DAMAGE. Do not attempt to extend the Cable beyond
the Cable Max Limit. Failure to follow this warning will cause the Cable to hit a hard stop, creating a sudden
dynamic load that may result in serious injury or equipment and property damage.
OPERATION MANUAL
PERFORMANCE TRAINER
08
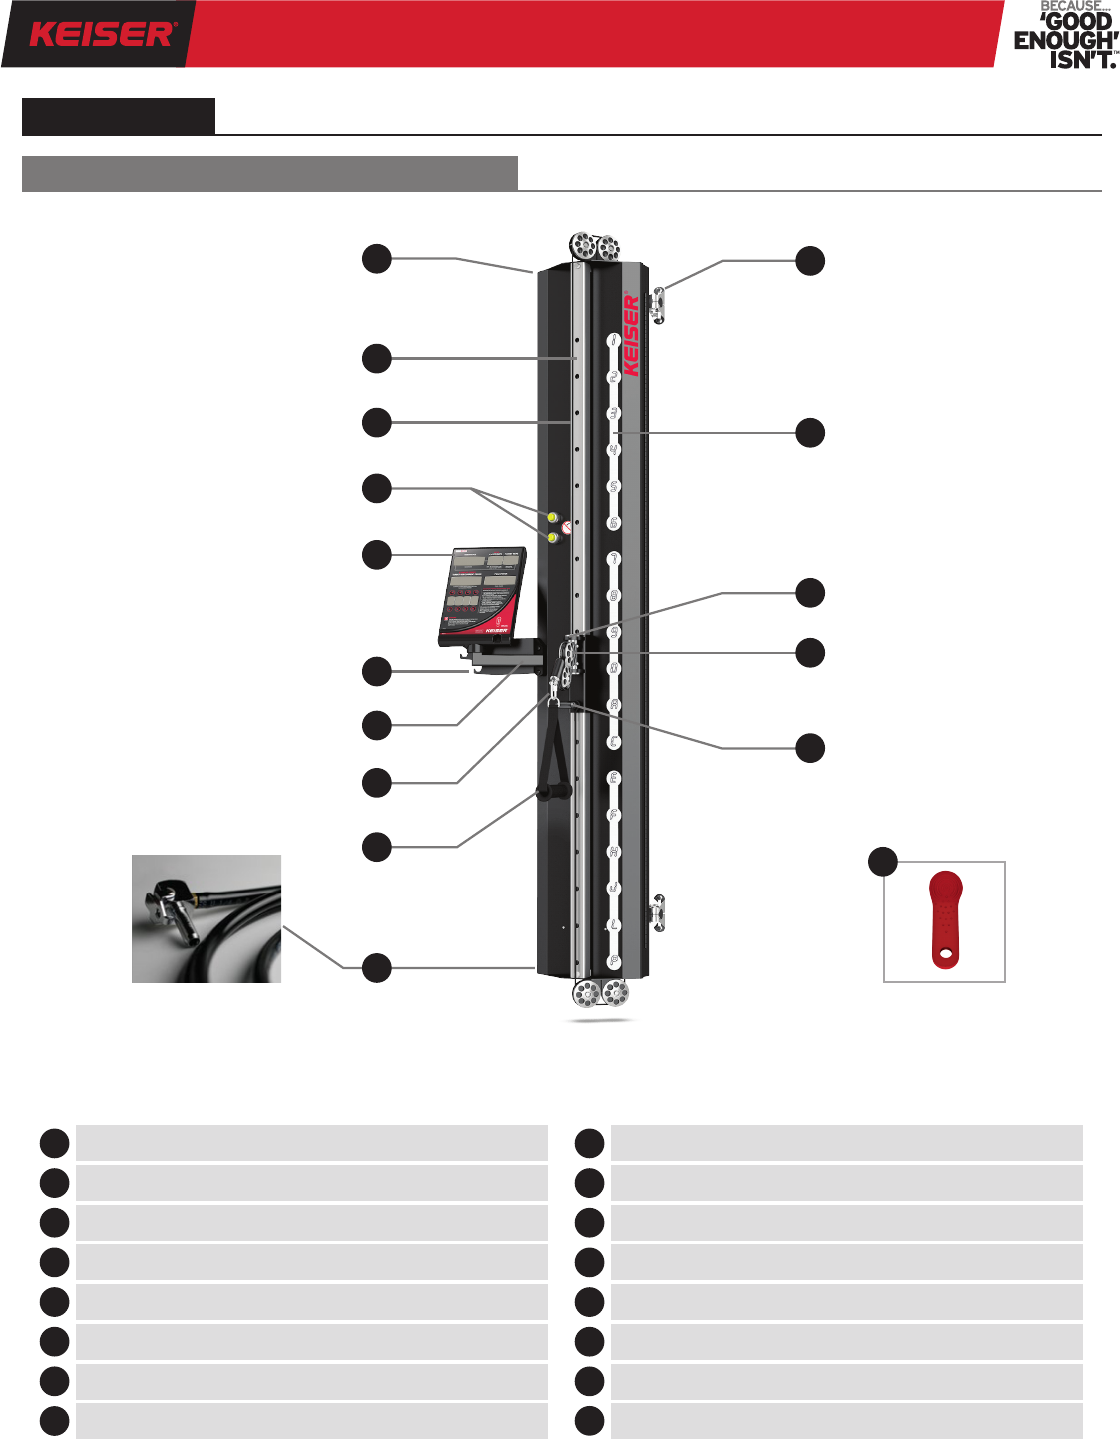
Figure 4. Performance Trainer
PERFORMANCE TRAINER OVERVIEW
Performance Trainer Body
Wall Mount System
Vertical Adjustment Settings
Accessory Hooks
Pulley Track
Vertical Adjustment
Display Mount
Quick Disconnect / Air Line
Cable
Pulley Carriage
Increase/Decrease (+/-) Thumb Buttons
Adjustment Plunger
Keiser eChip
Power Display
19
5
14
210
6
15
16
311
12
7
4
13
Handle
Cable Link
8
11
12
13
15
14
OPERATION
1
2
3
4
5
6
7
9
8
10
16
OPERATION MANUAL
PERFORMANCE TRAINER
09
CAUTION
• Rate monitoring systems may be inaccurate. Over
exercising may result in serious injury or death. If
you feel faint stop exercising immediately.
• “Current Power,” “Peak Power,” and “Percent of
Peak Power” are not suitable for use in applications
where the health and safety of the patient may be
dependent on the accuracy of those parameters.
• The use of any exercise program requires medical
consultation and compliance with exercise testing
guidelines.
POWER DISPLAY
Figure 5. Power Display Overview
When using the eChip, ensure that it is
fully inserted into the reader as shown.
5
8
7
1
3
2
6
4
EXERCISEEXERCISE
NUMBERNUMBER
VERTICALVERTICAL
ADJ.ADJ.
OPERATION MANUAL
PERFORMANCE TRAINER
10
LINE 1 - RESISTANCE
The Resistance window displays the current resistance or OFF. The current resistance may be changed by using the Thumb
Buttons located on the Performance Trainer. When the window displays OFF, the machine enters a low power consumption
sleep mode to increase battery life. Normal operation may be resumed by pressing either Thumb Button or by inserting the
eChip. If this window displays the low battery signal (“Lo-bA”), the batteries are getting weak and should be replaced soon
(two D batteries; refer to page 15 “Battery Replacement” for complete instructions).
LINE 2 - SET OR REPETITIONS
This window displays the current repetition count except immediately after an eChip is rst inserted, in which case it displays
the current set. The set count may range from 1 to 9 and is signaled by the appearance of three horizontal bars in the left
digit. The number of sets is dened as the number of sets of exercises performed in a four-hour period. Once four hours have
passed, the machine assumes that the user is returning for a new visit. The repetition count may range from 0 to 99. The
repetition count may be reset by momentarily pressing both increase and decrease (+/-)Thumb Buttons simultaneously. In
Power Test mode, the window will display the repetition count per test section (refer topage 12 “Power Test” for complete
instructions).
LINE 3- TARGET REPS
The Target Reps window displays the number of repetitions performed on the corresponding set of the previous visit, if that
set was a normal workout set and an eChip is inserted. If the corresponding set of the previous visit was a Power Test, the
display will show “Pr.” When in Power Test mode, the window will display “P1” during the low resistance test set and “P2”
during the high resistance test set (refer to page 12 “Power Test” for complete instructions).
LINE 4 - CURRENT POWER / PERCENT OF PEAK POWER
The Current Power window can display 4 different values. During an exercise set, it displays the percent of peak power
achieved for the most recent repetition. At the end of a Power Test, this window displays the resistance to use to achieve
maximum power. When an eChip is inserted and the previous corresponding set was a normal workout set, it displays the
resistance used for that set. When an eChip is inserted, and the previous corresponding set was a Power Test, it displays the
resistance to use to achieve maximum power. When the calculated resistance to achieve maximum power is being displayed,
it ashes. In summary, during an exercise set, this window displays the power for the current rep, at the end of a Power
Test it is the resistance to use for training at maximum power and when an eChip is inserted it is the resistance to set into
the window above before exercising.
LINE 5 - PEAK POWER
The Peak Power window displays the highest power that has occurred during this workout or since the data was last reset.
LINE 6 - MACHINE ADJUSTMENT
When using the eChip, the Machine Adjustments display Exercise Number and Vertical Adjustment of the Performance Trainer.
The adjustments in each of the windows may be changed by pressing the arrows located directly above/below each window.
EXERCISE NUMBER: Input your designated exercise number into the Power Display (any numbering 0 — 99) to track
exercises performed and record onto your eChip.
VERTICAL ADJUSTMENT: Input the position of the Pulley Carriage in the Vertical Position window.
NOTE: The vertical adjustments may only be changed immediately after the eChip is inserted and before the third repetition
has occurred. Once three repetitions are performed, the machine adjustments cannot be changed until the eChip has been
removed and reinserted. Machine adjustments apply to a machine and cannot be changed from set to set.
LINE 7 - eCHIP READER
The eChip Reader, located at the bottom right of the Power Display, receives and reads your eChip data.
LINE 8 - eCHIP
The eChip collects workout data and can store up to 24 separate equipment models (up to 4 equipment position settings per
model) and up to 240 separate workout sets across Keiser Air and Innity Series. Designed as an electronic replacement for
the hand-written exercise card, the eChip enables recall and set-up of the exercise equipment upon the next workout. The
Keiser eChip software allows saved eChip data to be viewed, stored, and exported (.csv le format) for analysis.
NOTE: Three user eChips (red color) come standard with your Performance Trainer. The Keiser USB Power Kit (a USB adapter
to transfer data from your eChip to your computer and Time Set eChips to set the time zone/time on your Performance
Trainer) is available. For parts order, contact Keiser Customer Support (see back cover for contact information).
Keiser eChip software system requirements, download, and user manual available at keiser.com/support (search: eChip).
DISPLAY FEATURES
OPERATION MANUAL
PERFORMANCE TRAINER
11
CONNECTING THE CABLE ACCESSORY
VERTICAL ADJUSTMENT
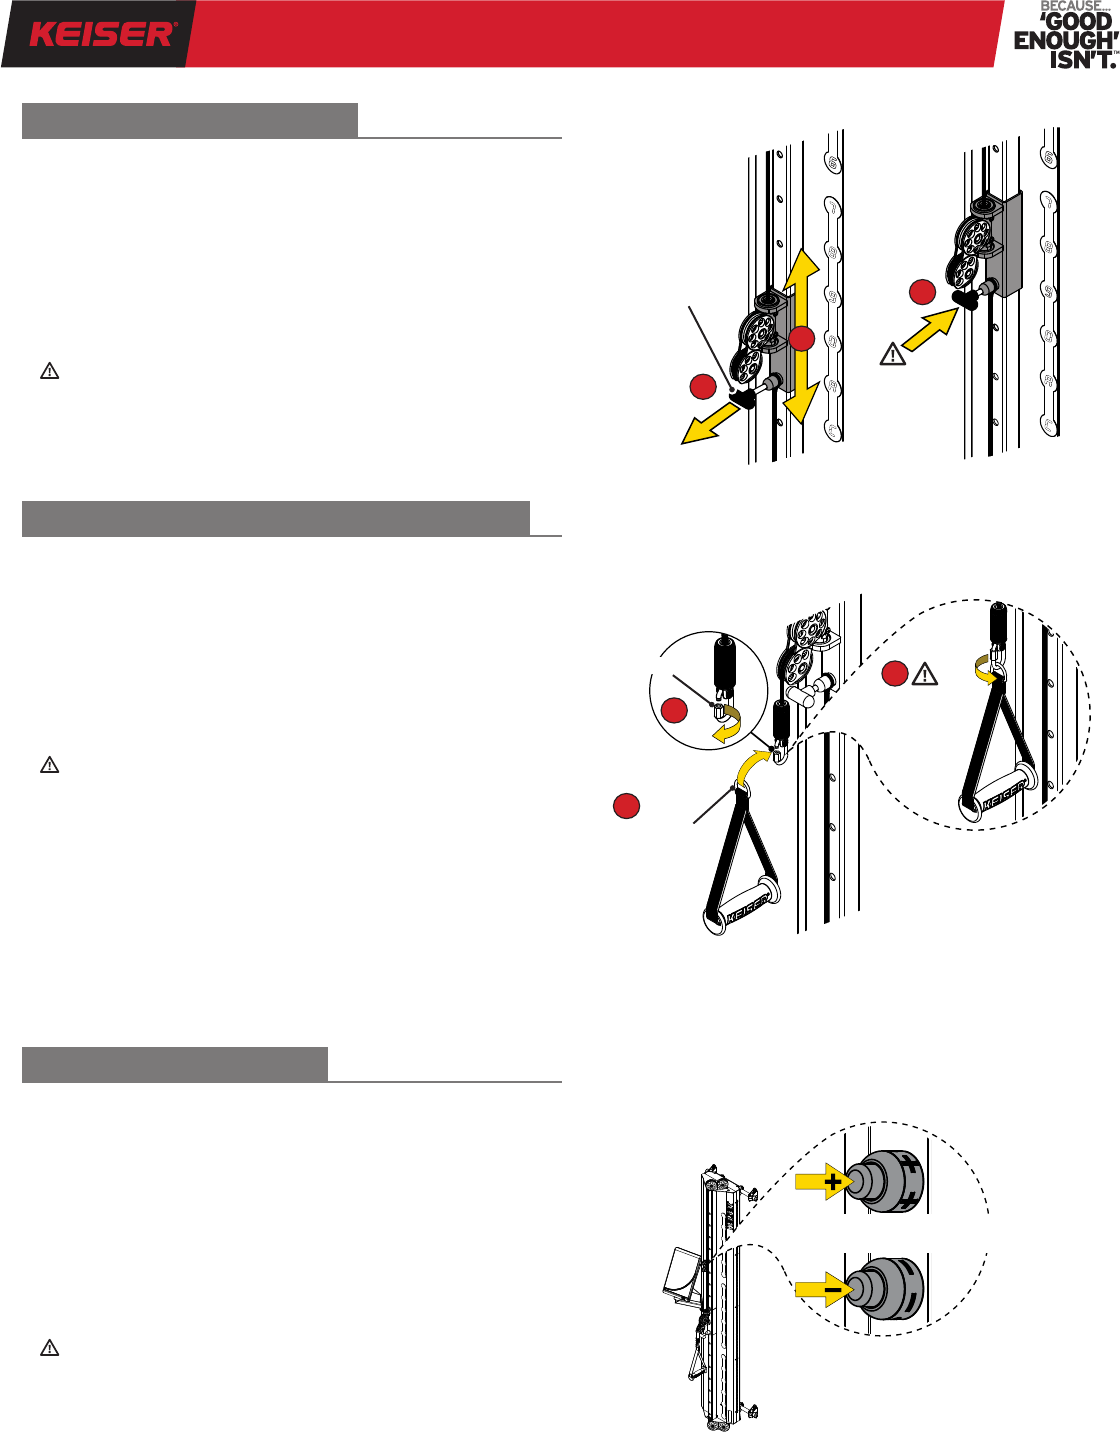
Figure 8. Set the Resistance
1
2
3
Adjustment
Plunger
SET THE RESISTANCE
Cable Link
Accessory
Ring
1
2
3
CLOSE CABLE LINK
BEFORE USE
Figure 6. Vertical Adjustment
Figure 7. Connecting the Cable Accessory
“-” = Decrease Resistance
“+” = Increase Resistance
“+” and “-” = Clear data
There are a total of 18 settings. To set the Vertical Adjustment,
refer to Figure 6 and follow the instructions below:
1. Pull out and hold the spring-loaded Adjustment Plunger.
2. Move the Vertical Adjustment to desired position setting.
3. Release the spring-loaded Adjustment Plunger at the
desired position setting.
WARNING: Ensure Adjustment Plunger is fully engaged
into the desired position hole before use. There should be
no up/down movement of the Vertical Adjustment once
it is set in position.
Keiser Performance Trainer accessories are connected to
the Cable by the Cable Link. To connect the accessory, refer
to Figure 7 and follow the instructions below:
1. Unscrew the nut on the Cable Link.
2. Hook the Accessory Ring onto the Cable Link
3. Close the Cable Link by tightening the nut.
WARNING: Avoid serious injury or property damage.
• The Handle accessory (included with your Performance
Trainer) is intended for use with the hand only. Do not
connect Keiser accessories to any other equipment.
• Use only Keiser accessories with your Performance
Trainer. Failure to do so will void your warranty and
could result in serious injury or property damage.
• Connect the Cable Link only to Keiser accessories.
• Always ensure that the Cable Link is closed before use.
Press the increase “+” Thumb Button to add resistance up
to 75 lbs (34 kg) maximum. Resistance is changed in 0.10 lb
(0.05 kg) increments. Press the decrease “-” Thumb Button
to decrease resistance (refer to Figure 8). Press “+” and “-” at
the same time to clear/reset data shown on the Power Display.
Always test the resistance before exercise by slightly pulling
on the Cable Accessory to ensure the resistance setting is
right for you. Know your limitations.
WARNING: Never make adjustments to the resistance
during exercise as this may cause muscle strain. Always
return the Handle/Cable to the start position prior to making
any adjustments to help prevent serious injury.
OPERATION MANUAL
PERFORMANCE TRAINER
12
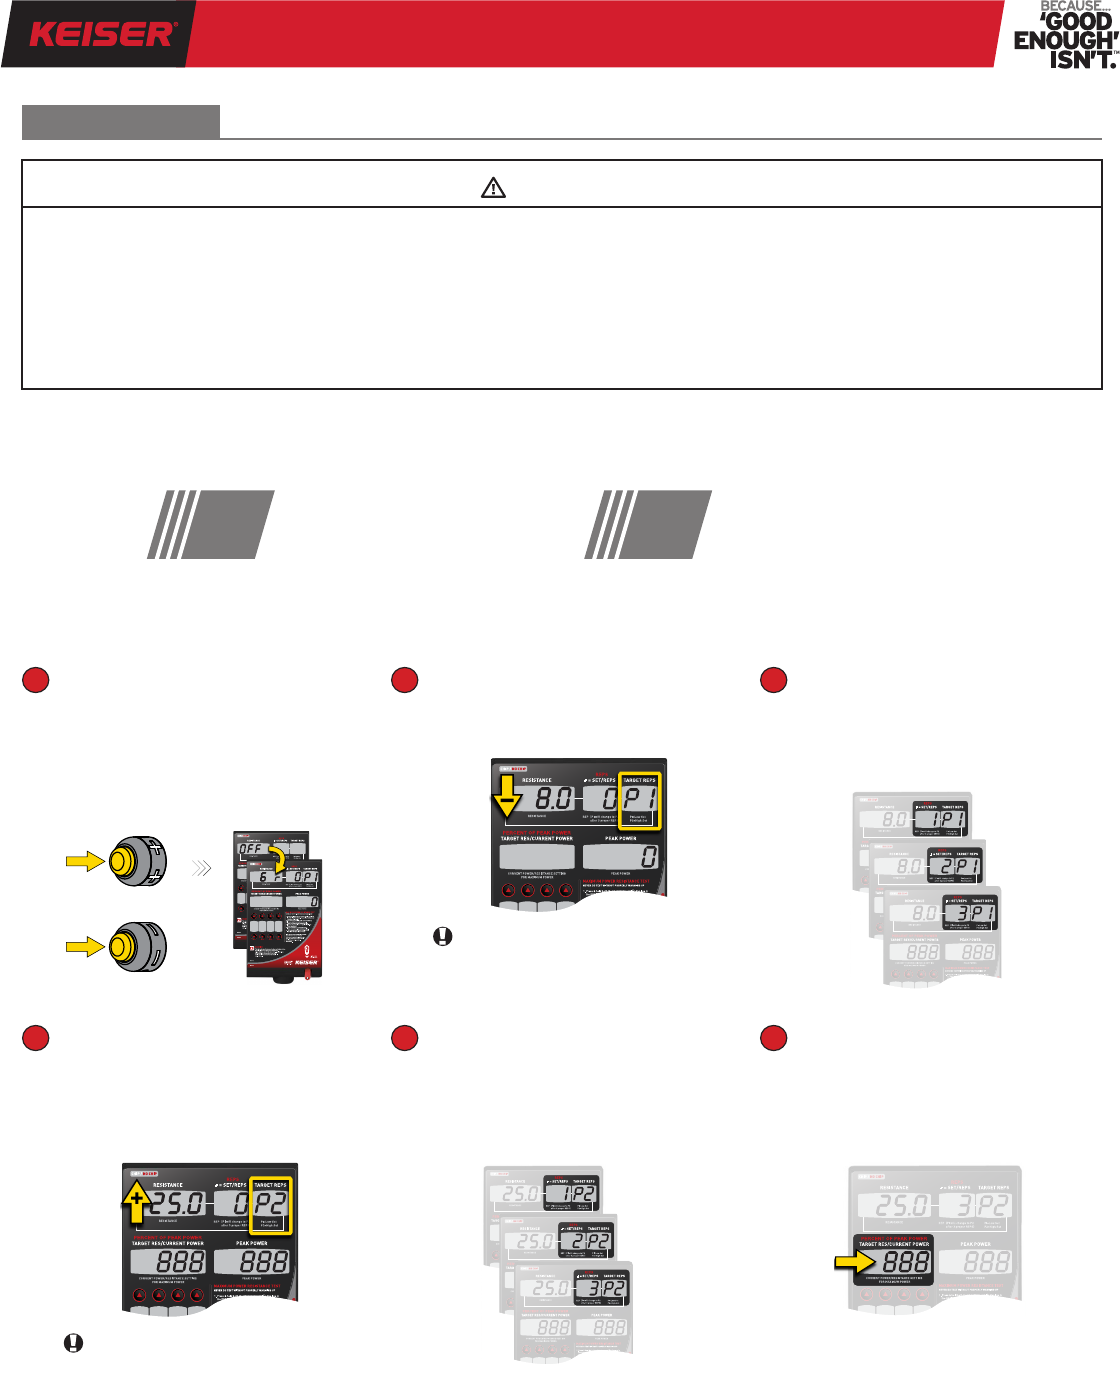
POWER TEST
START TEST: Press and hold both
Thumb Buttons until “6 r”(Test
Mode) displays in the RESISTANCE
window, then release the Thumb
Buttons. NOTE: TARGET REPS window
displays “P1”(Power Test Set 1).
SET RESISTANCE, LOW LEVEL
Set the resistance to 10% of your
maximum.
POWER TEST, SET 1 (P1)
Do one repetition at maximum
speed. Pause 10 seconds.
Repeat two more times.
1
4
2
5
3
6
SET RESISTANCE, HIGH LEVEL
Increase the resistance to a high
level (80-90% of your maximum).
NOTE: TARGET REPS window displays
“P2”(Power Test Set 2).
POWER TEST, SET 2 (P2)
Do one repetition at maximum
speed. Pause 10 seconds.
Repeat 2 more times.
TEST COMPLETE
The ashing number is your
Resistance setting for Maximum
Power.
TROUBLESHOOT:“
Er
” numbers 1 – 4 displayed in the CURRENT POWER window indicates not enough difference in resistance between
the low and high sets. Try again with greater difference in resistance between the low and high sets. To restart the Power Test, (a) reinsert
eChip, if the eChip is being used, or (b) begin at Step 1 to repeat the procedure.
To exit Power Test or resume exercise,
press both Thumb Buttons until “CLEr”
is displayed or remove eChip.
TEST PROTOCOL — The Power Test (KEISER Six-Rep Test) is used to determine the resistance at which you achieve
MAXIMUM POWER. The test consists of two sets:
Perform all repetitions at the highest possible speed at the given resistance; speed is essential in power output.
Note: The Power Test may be performed with or without an eChip. Follow the Power Test instructions below:
Three repetitions
Low resistance, high speed
10% of your maximum
Three repetitions
High resistance, high speed
80-90% of your maximum
SET
2
SET
1
CAUTION
• Test should only be performed with proper instruction.
• Never perform Power Test without proper warm-up.
• Always maintain good form and control throughout test.
• Rate monitoring systems may be inaccurate. Over exercising
may result in serious injury or death. If you feel faint stop
exercising immediately.
• “Current Power,” “Peak Power,” and “Percent of Peak
Power” are not suitable for use in applications where the
health and safety of the patient may be dependent on the
accuracy of those parameters.
• The use of any exercise program requires medical
consultation and compliance with exercise testing guidelines.
You can adjust and test your resistance
setting between the rst and second rep.
The rep count will reset to 1.
You can adjust and test your resistance
setting between the rst and second rep.
The rep count will reset to 1.
OPERATION MANUAL
PERFORMANCE TRAINER
13
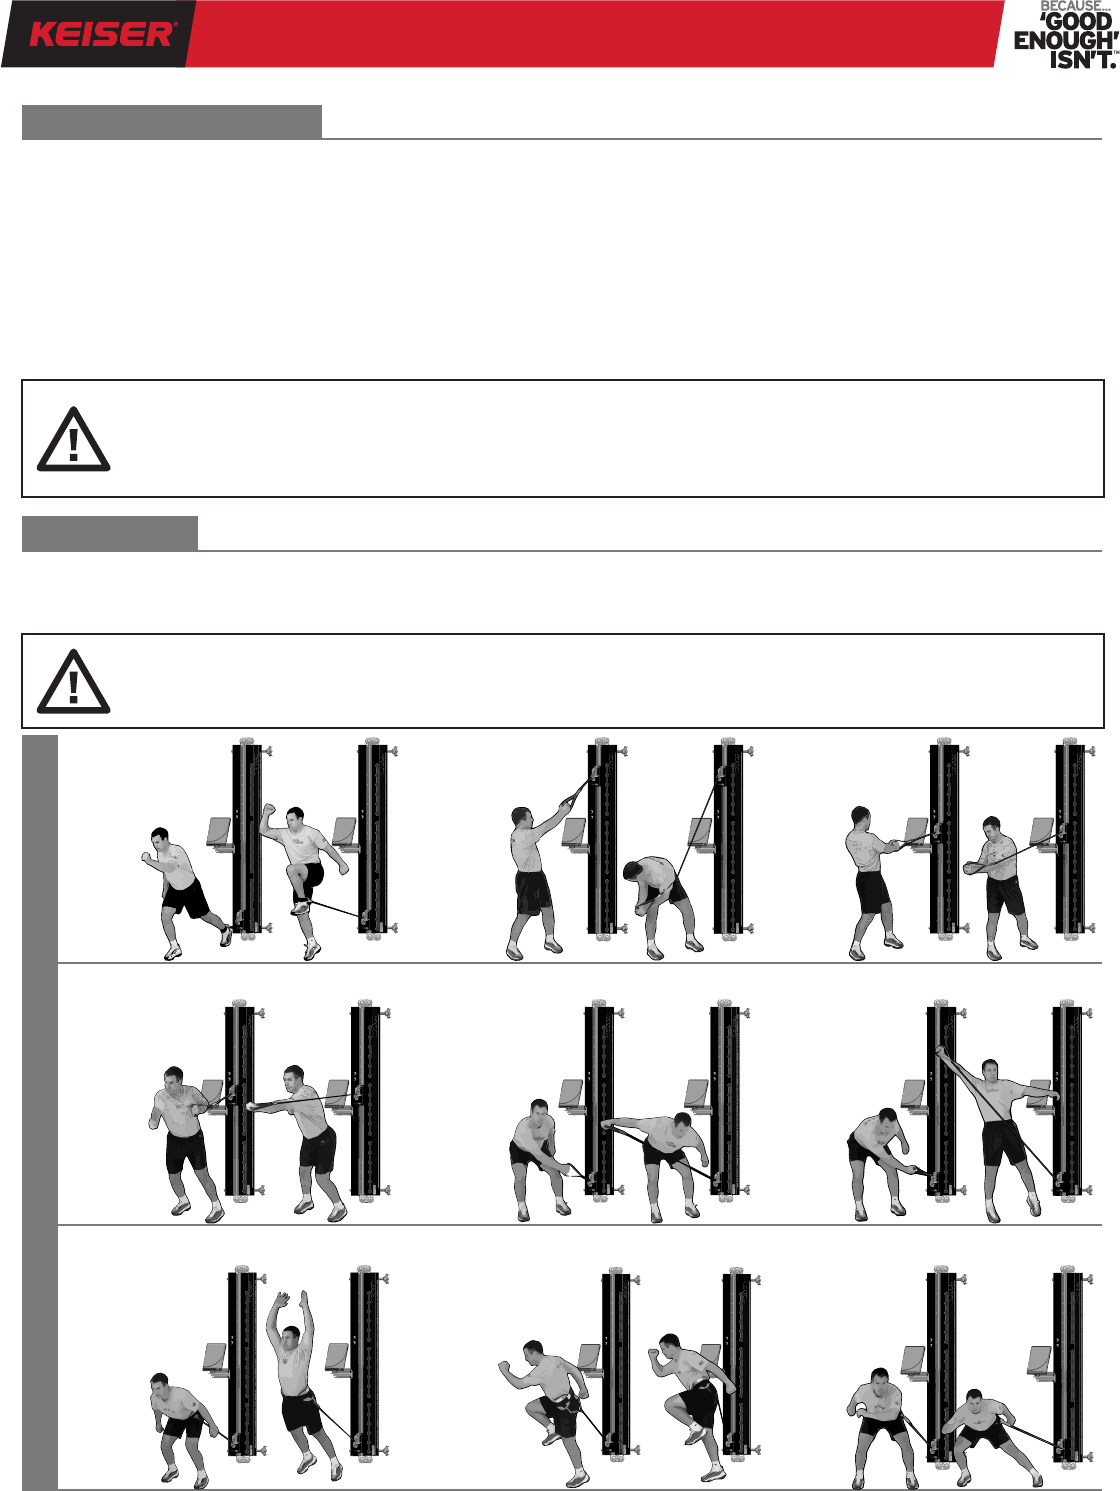
The Performance Trainer is designed for a functional training workout. The following are just samples of the basic core,
upper body, and lower body exercises (see Figure 9).
EXERCISES
LOWER BODY UPPER BODY CORE
1. Warm-up: Proper warm-up before you begin your workout helps to get your muscles ready for exercise and can help
prevent serious injury.
2. Control resistance: Always work with resistance that you can handle through a full range of motion. Know your limitations.
3. Breathe: Keep your breathing at a constant but steady pace. Avoid holding your breath as this may cause physical harm.
4. Keep your form and control: Learn and know how to perform the exercise correctly. Keep a steady/uid motion
throughout your workout. Engaging your abdominal muscles will help keep balance and protect your spine.
EXERCISE GUIDELINE
CAUTION: PROPER WARM-UP REQUIRED TO HELP PREVENT SERIOUS INJURY. This Performance Trainer
should only be used with proper instruction. Always maintain good form and control during exercise. If you feel pain
or are unable to maintain good form, stop immediately. Failure to follow these instructions could result in serious
injury. If you are unclear on proper form, consult a physical therapist or trainer.
CAUTION: NEVER MAKE ADJUSTMENTS TO THE RESISTANCE DURING EXERCISE AS THIS MAY CAUSE
MUSCLE STRAIN. Always return the Handle/Cable to the start position prior to making any adjustments to help
prevent serious injury. Refer to the “Training Space” section (page 7) for Cable length safety information.
Consult your physician before beginning any exercise program. To help ensure a safe, comfortable, and effective workout,
Gebruikershandleiding.com neemt misbruik van zijn services uitermate serieus. U kunt hieronder aangeven waarom deze vraag ongepast is. Wij controleren de vraag en zonodig wordt deze verwijderd.
Product:
Spelregels forum
Om tot zinvolle vragen te komen hanteren wij de volgende spelregels:
lees eerst de handleiding door;
controleer of uw vraag al eerder door iemand anders is gesteld;
probeer uw vraag zo duidelijk mogelijk te stellen;
heeft u een probleem en al geprobeerd om dit op te lossen, vermeld dit erbij aub;
heeft u een oplossing gekregen van een bezoeker dan horen wij dat graag in dit forum;
wilt u een reactie geven op een vraag of antwoord, gebruik dan niet dit formulier maar klik op de knop 'reageer op deze vraag';
uw vraag wordt direct op de website gezet; vermijd daarom persoonlijke gegevens in te vullen;
Belangrijk! Als er een antwoord wordt gegeven op uw vraag, dan is het voor de gever van het antwoord nuttig om te weten als u er wel (of niet) mee geholpen bent! Wij vragen u dus ook te reageren op een antwoord.
Belangrijk! Antwoorden worden ook per e-mail naar abonnees gestuurd. Laat uw emailadres achter op deze site, zodat u op de hoogte blijft. U krijgt dan ook andere vragen en antwoorden te zien.
Abonneren
Abonneer u voor het ontvangen van emails voor uw Keiser 3010XP Performance Trainer bij:
nieuwe vragen en antwoorden
nieuwe handleidingen
U ontvangt een email met instructies om u voor één of beide opties in te schrijven.
Ontvang uw handleiding per email
Vul uw emailadres in en ontvang de handleiding van Keiser 3010XP Performance Trainer in de taal/talen: Engels als bijlage per email.
De handleiding is 11,5 mb groot.
U ontvangt de handleiding per email binnen enkele minuten. Als u geen email heeft ontvangen, dan heeft u waarschijnlijk een verkeerd emailadres ingevuld of is uw mailbox te vol. Daarnaast kan het zijn dat uw internetprovider een maximum heeft aan de grootte per email. Omdat hier een handleiding wordt meegestuurd, kan het voorkomen dat de email groter is dan toegestaan bij uw provider.
Stel vragen via chat aan uw handleiding
Stel uw vraag over deze PDF
Uw handleiding is per email verstuurd. Controleer uw email
Als u niet binnen een kwartier uw email met handleiding ontvangen heeft, kan het zijn dat u een verkeerd emailadres heeft ingevuld of dat uw emailprovider een maximum grootte per email heeft ingesteld die kleiner is dan de grootte van de handleiding.
Er is een email naar u verstuurd om uw inschrijving definitief te maken.
Controleer uw email en volg de aanwijzingen op om uw inschrijving definitief te maken
U heeft geen emailadres opgegeven
Als u de handleiding per email wilt ontvangen, vul dan een geldig emailadres in.
Uw vraag is op deze pagina toegevoegd
Wilt u een email ontvangen bij een antwoord en/of nieuwe vragen? Vul dan hier uw emailadres in.