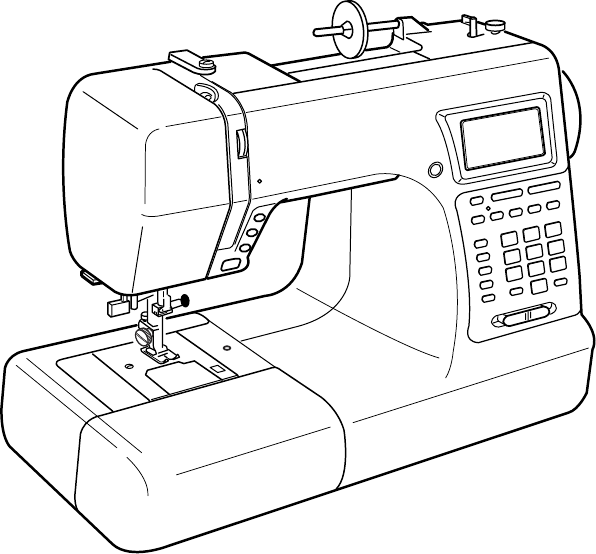
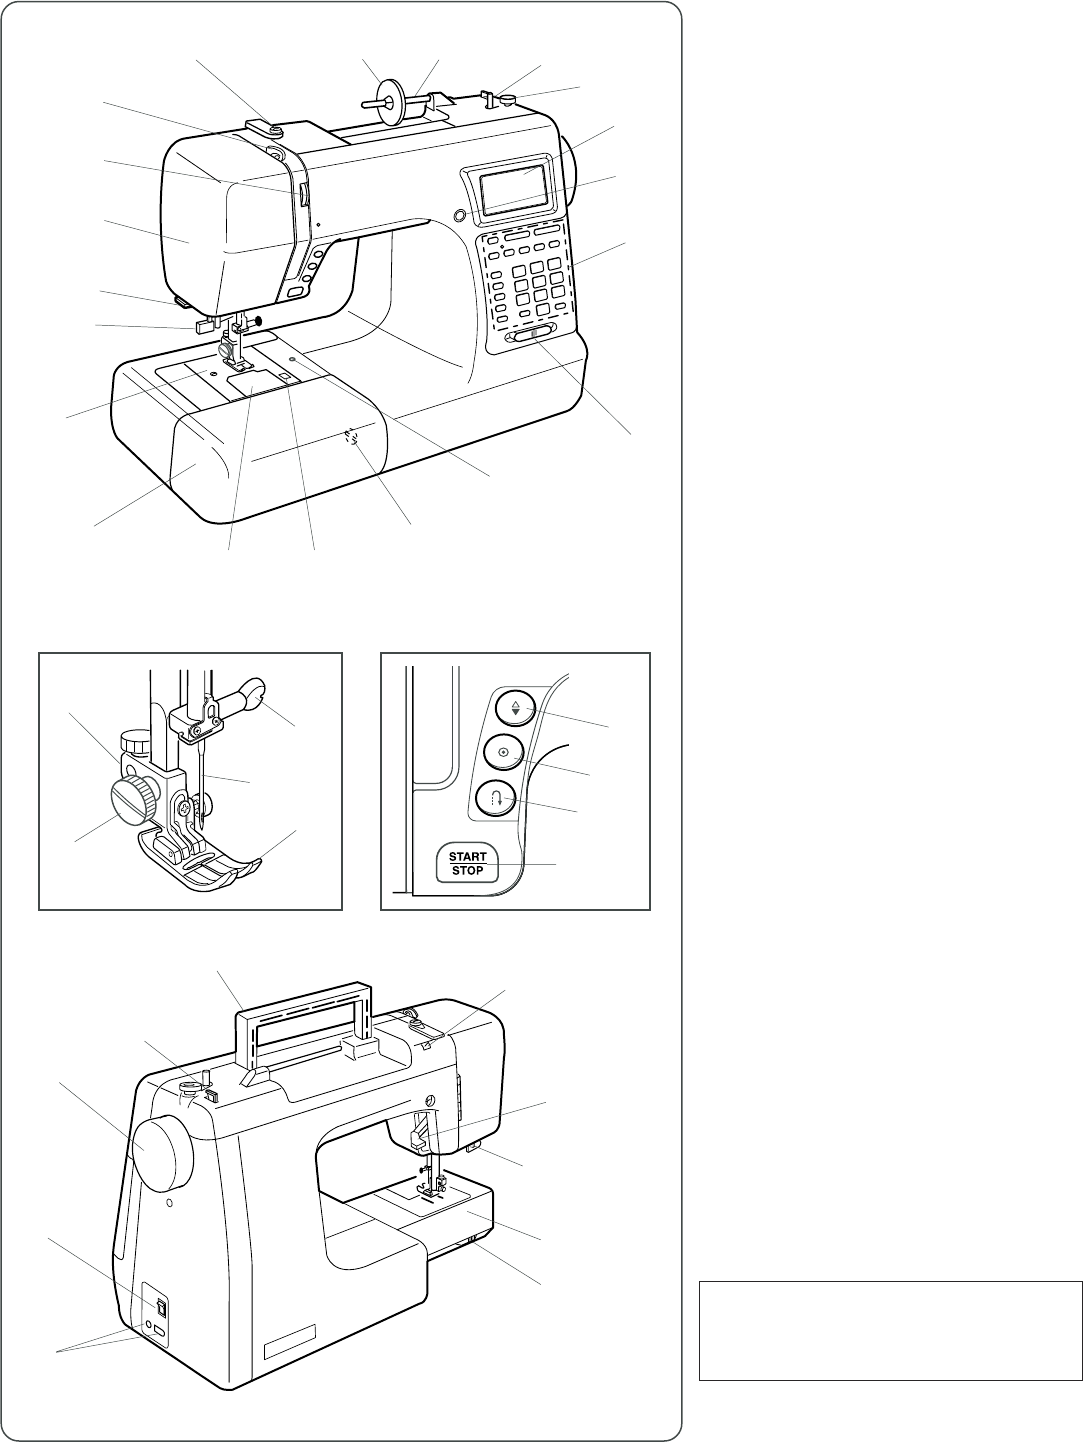
602029
76
Verklein
Vergroot
Pagina terug
1/81
Pagina verder
INSTRUCTION BOOK
IMPORTANT SAFETY INSTRUCTIONS
This sewing machine is not a toy. Do not allow children to play with this machine.
The machine is not intended for use by children or mentally infirm persons without proper supervision.
This sewing machine is designed and manufactured for household use only.
Read all instructions before using this sewing machine.
DANGERTo reduce the risk of electric shock:
1. An appliance should never be left unattended when plugged in. Always unplug this sewing machine from the
electric outlet immediately after using and before cleaning.
2. Always unplug before replacing a sewing machine bulb. Replace bulb with same type rated 12 Volts 5 Watts.
WARNING To reduce the risk of burns, fire, electric shock, or injury to persons:
1. Do not allow children to play with the machine. The machine is not intended for use by children or
infirmed persons without proper supervision.
Do not allow to be used as a toy. Close attention is necessary when this sewing machine is used by
or near children.
2. Use this appliance only for its intended use as described in this owner’s manual.
Use only attachments recommended by the manufacturer as contained in this owner’s manual.
3. Never operate this sewing machine if it has a damaged cord or plug, if it is not working properly, if it
has been dropped or damaged, or dropped into water.
Return this sewing machine to the nearest authorized dealer or service center for examination,
repair, electrical or mechanical adjustment.
4. Never operate the appliance with any air opening blocked. Keep ventilation openings of this sewing
machine and foot controller free from accumulation of lint, dust and loose cloth.
5. Never drop or insert any object into any opening.
6. Do not use outdoors.
7. Do not operate where aerosol (spray) products are being used or where oxygen is being
administered.
8. To disconnect, turn all controls to the off (“O”) position, then remove plug from outlet.
9. Do not unplug by pulling on cord. To unplug, grasp the plug, not the cord.
10. Keep fingers away from all moving parts. Special care is required around the sewing machine
needle.
11. Always use the proper needle plate. The wrong plate can cause the needle to break.
12. Do not use bent needles.
13. Do not pull or push fabric while stitching. It may deflect the needle causing it to break.
14. Switch this sewing machine off (“O”) when making any adjustment in the needle area, such as
threading the needle, changing the needle, threading the bobbin or changing the presser foot, and
the like.
15. Always unplug this sewing machine from the electrical outlet when removing covers, lubricating, or
when making any other adjustments mentioned in this owner’s manual.
SAVE THESE INSTRUCTIONS
Please note that on disposal, this product must be safely recycled in accordance with relevant National
legislation relating to electrical/electronic products. If in doubt please contact your retailer for guidance.
(European Union only)
The design and specifications are subject to change without a prior notice.
1
TABLE OF CONTENTS
NAME OF PARTS
Name of Parts .................................................................... 2
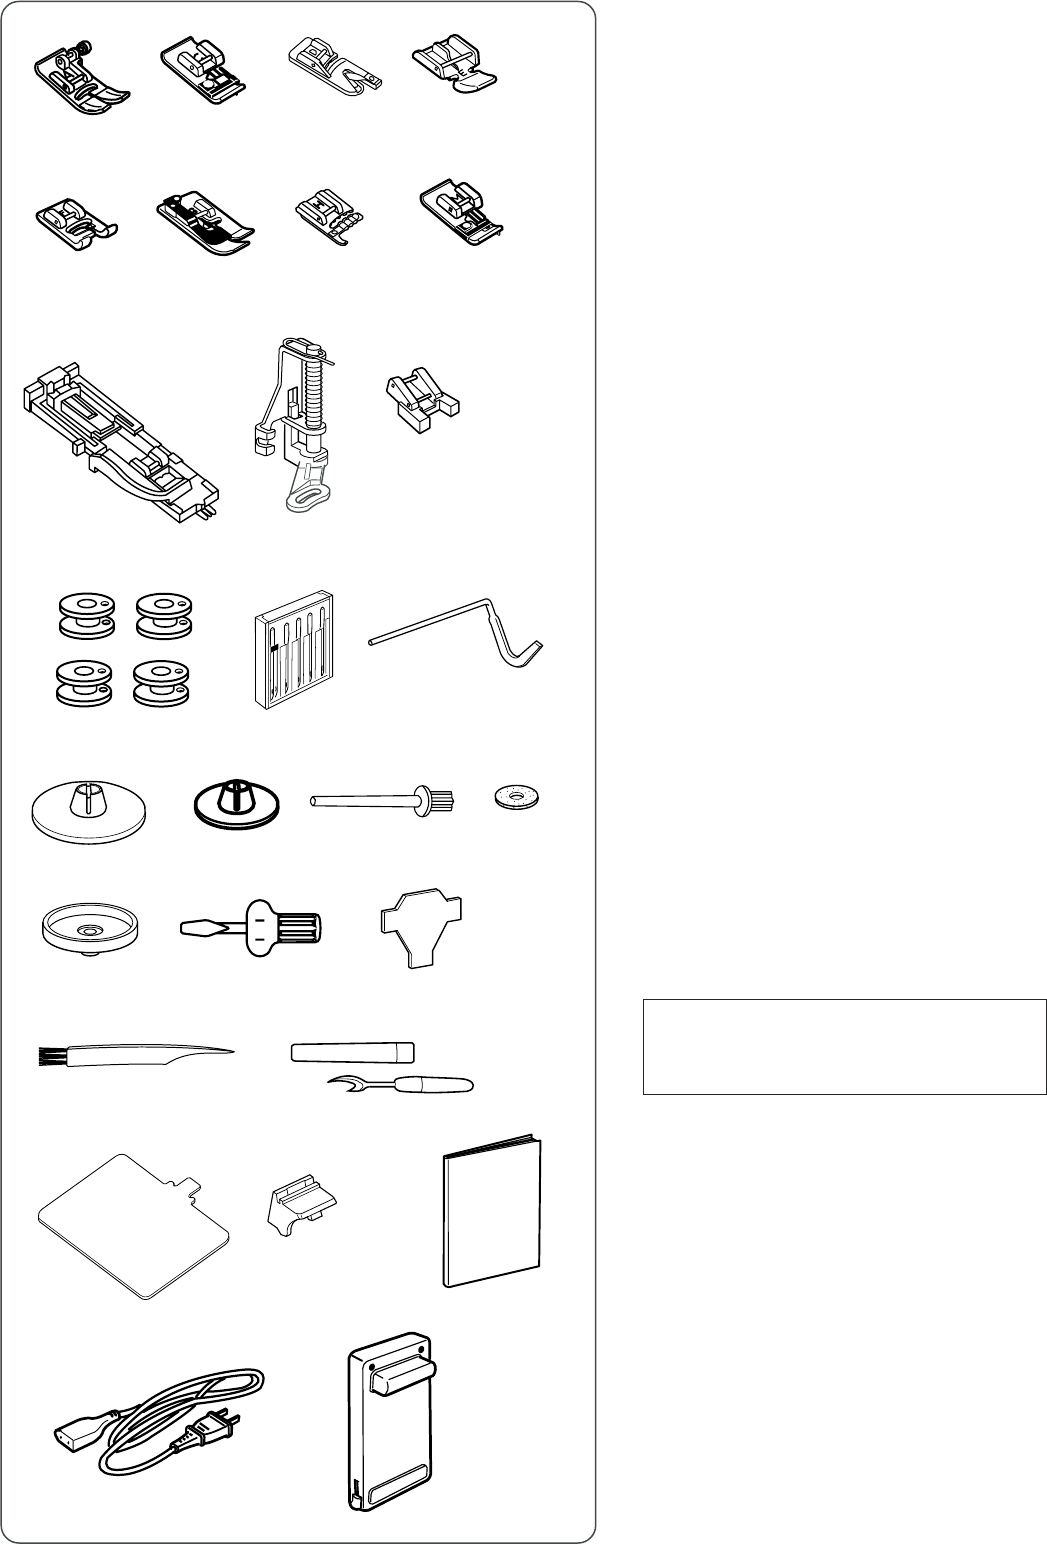
Standard Accessories ........................................................ 3
Extension Table .................................................................. 4
Stitch Chart ........................................................................ 4
GETTING READY TO SEW
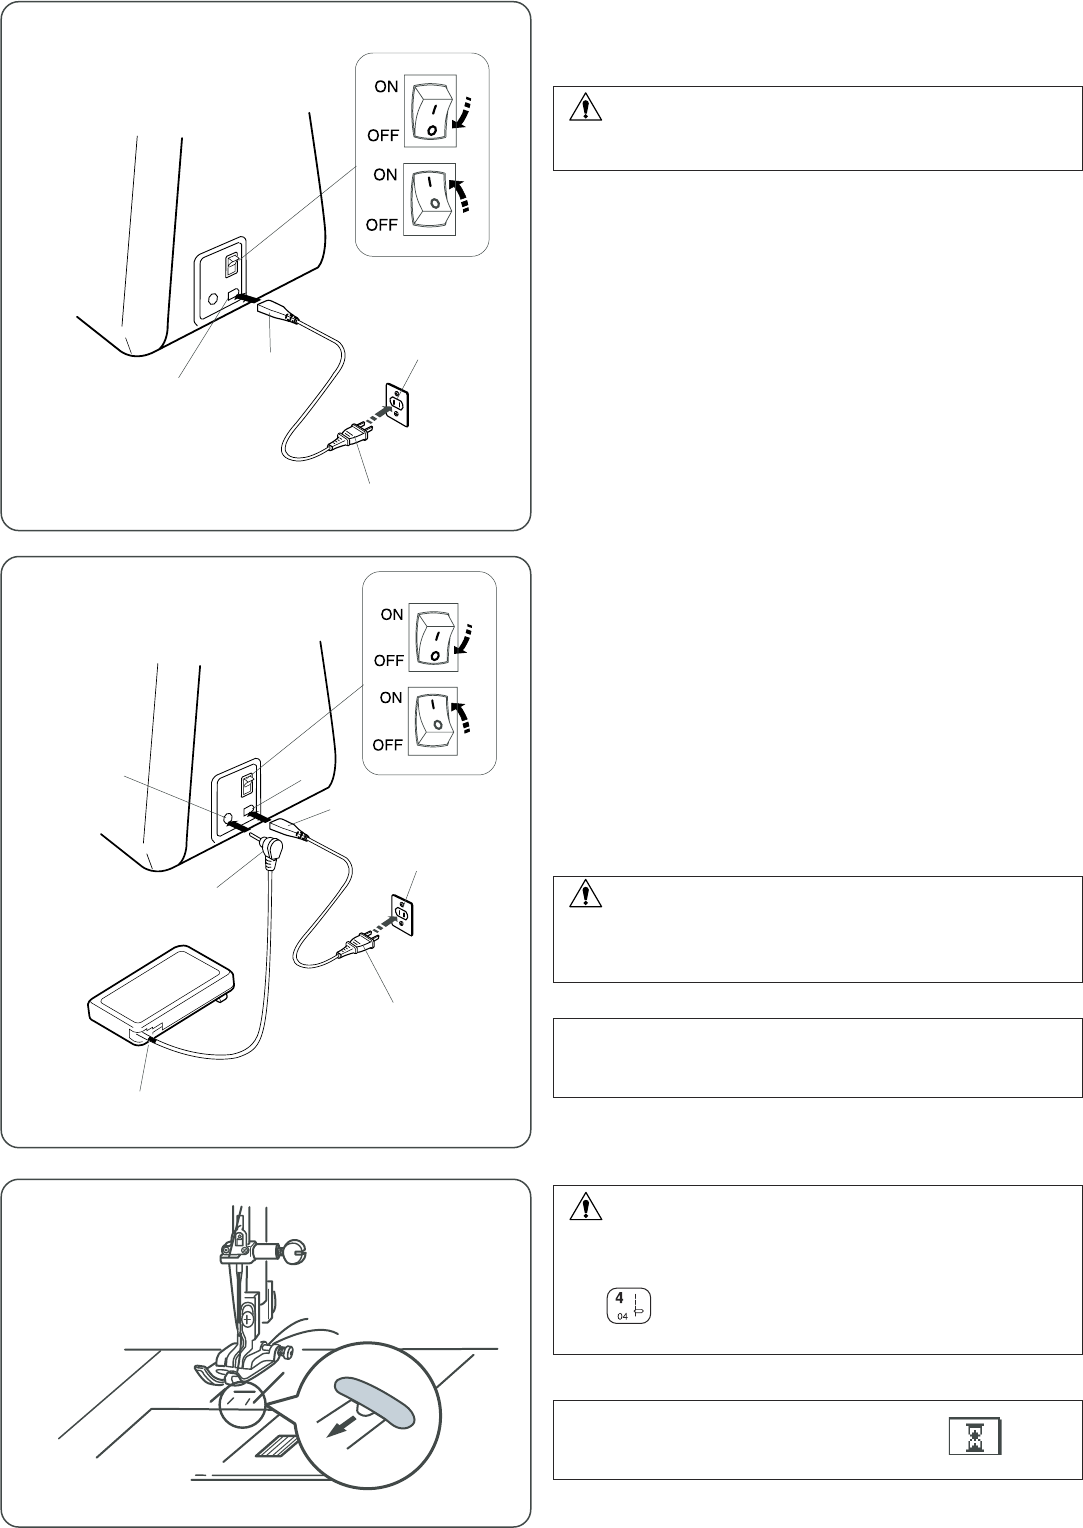
Connecting the Power Supply ............................................ 5
Controlling Sewing Speed .................................................. 6
Speed control slider ........................................................... 6
Foot control ........................................................................ 6
Function Buttons ........................................................... 7-11
Mode selection ................................................................... 9
Pattern selection .............................................................. 10
Help button ....................................................................... 11
Customizing Machine Settings .................................... 12-14
Resumption setting .......................................................... 12
Sound setting ................................................................... 12
Language setting.............................................................. 13
Pop-up window duration time setting ............................... 13
Customizing the preset value for the stitch length
and width .......................................................................... 14
Restoring the original settings .......................................... 14
Presser Foot Lifter............................................................ 15
Changing the Presser Foot .............................................. 15
Removing and Attaching the Foot Holder ........................ 15
Variety of Presser Feet and Their Uses ........................... 16
Bobbin Winding ................................................................ 17
Removing the bobbin ....................................................... 17
Setting the spool of thread ............................................... 17
Extra spool pin ................................................................. 17
Bobbin winding ................................................................. 18
Inserting the bobbin.......................................................... 19
Threading the Machine .................................................... 20
Built-in needle threader .................................................... 21
Drawing Up Bobbin Thread .............................................. 22
Changing the Needle ....................................................... 23
Balancing Thread Tension ................................................ 24
Pressure Adjusting Lever ................................................. 25
Dropping and Raising the Feed Dog ................................ 25
BASIC AND UTILITY STITCHES
Straight Stitches .......................................................... 26-30
Sewing on heavy fabric .................................................... 26
Securing a seam .............................................................. 27
Using the seam guides on the needle plate ..................... 27
Turning a square corner ................................................... 27
Using the quilting guide .................................................... 27
Straight stitch in left needle position................................. 28
Adjusting the needle drop position ................................... 28
Adjusting the stitch length ................................................ 28
Variety of Straight Stitches .......................................... 29-30
Zipper Sewing ............................................................. 31-32
Basting ............................................................................. 33
Rolled Hem ...................................................................... 34
Zigzag Stitch .................................................................... 35
Changing the stitch width ................................................. 35
Changing the stitch length................................................ 35
Overcasting ...................................................................... 36
Tricot Stitch ...................................................................... 36
Overedge Stitch ............................................................... 36
Knit Stitch ......................................................................... 37
Double Overedge Stitch ................................................... 37
Overlock Stitch ................................................................. 37
Blind Hem......................................................................... 38
Button Sewing .................................................................. 39
Buttonholes ................................................................. 40-47
Variety of buttonholes ....................................................... 40
Square buttonhole ....................................................... 41-44
Adjusting buttonhole width ............................................... 44
Adjusting stitch density..................................................... 44
Corded buttonhole............................................................ 45
Round-end buttonhole...................................................... 46
Keyhole buttonhole .......................................................... 46
Knit buttonhole ................................................................. 47
Faux chain buttonhole ...................................................... 47
Eyelet ............................................................................... 48
Darning............................................................................. 49
Tacking ............................................................................. 51
QUILTING AND DECORATIVE STITCHES
Quilting ............................................................................. 52
Free motion quilting.......................................................... 52
Patchwork ........................................................................ 52
Pintucking......................................................................... 53
Applique ........................................................................... 53
Shell Tuck......................................................................... 54
Scallop ............................................................................. 54
Smocking ......................................................................... 54
Fagoting ........................................................................... 55
Cording............................................................................. 55
Satin Stitches ................................................................... 56
Twin Needle Sewing ......................................................... 57
PROGRAMMING PATTERNS AND LETTERS
Programming the Pattern Combination ............................ 58
Programming the mirror image patterns .......................... 59
Sewing a pattern combination from the beginning ........... 61
Sewing the current pattern from the beginning ................ 61
Programming French knots .............................................. 62
Extender Stitches ............................................................. 63
Programming Letters........................................................ 65
Selecting a letter style ...................................................... 65
Programming letters ......................................................... 66
Programming letters and decorative patterns .................. 67
Viewing a long text ........................................................... 67
Editing the Programmed Patterns ............................... 68-70
Deleting a letter (pattern) ................................................. 68
Inserting a letter (pattern) ................................................. 68
Duplicating a pattern (letter) ............................................. 68
Stitch adjustment of programmed patterns ...................... 69
Unified needle drop position............................................. 70
Storing and Recalling the Pattern Combination ............... 71
Storing the pattern combinations ..................................... 71
Overwriting a stored combination..................................... 71
Recalling a stored combination ........................................ 72
Deleting a stored combination.......................................... 72
Correcting Distorted Stitch Patterns ................................. 73
CARE AND MAINTENANCE
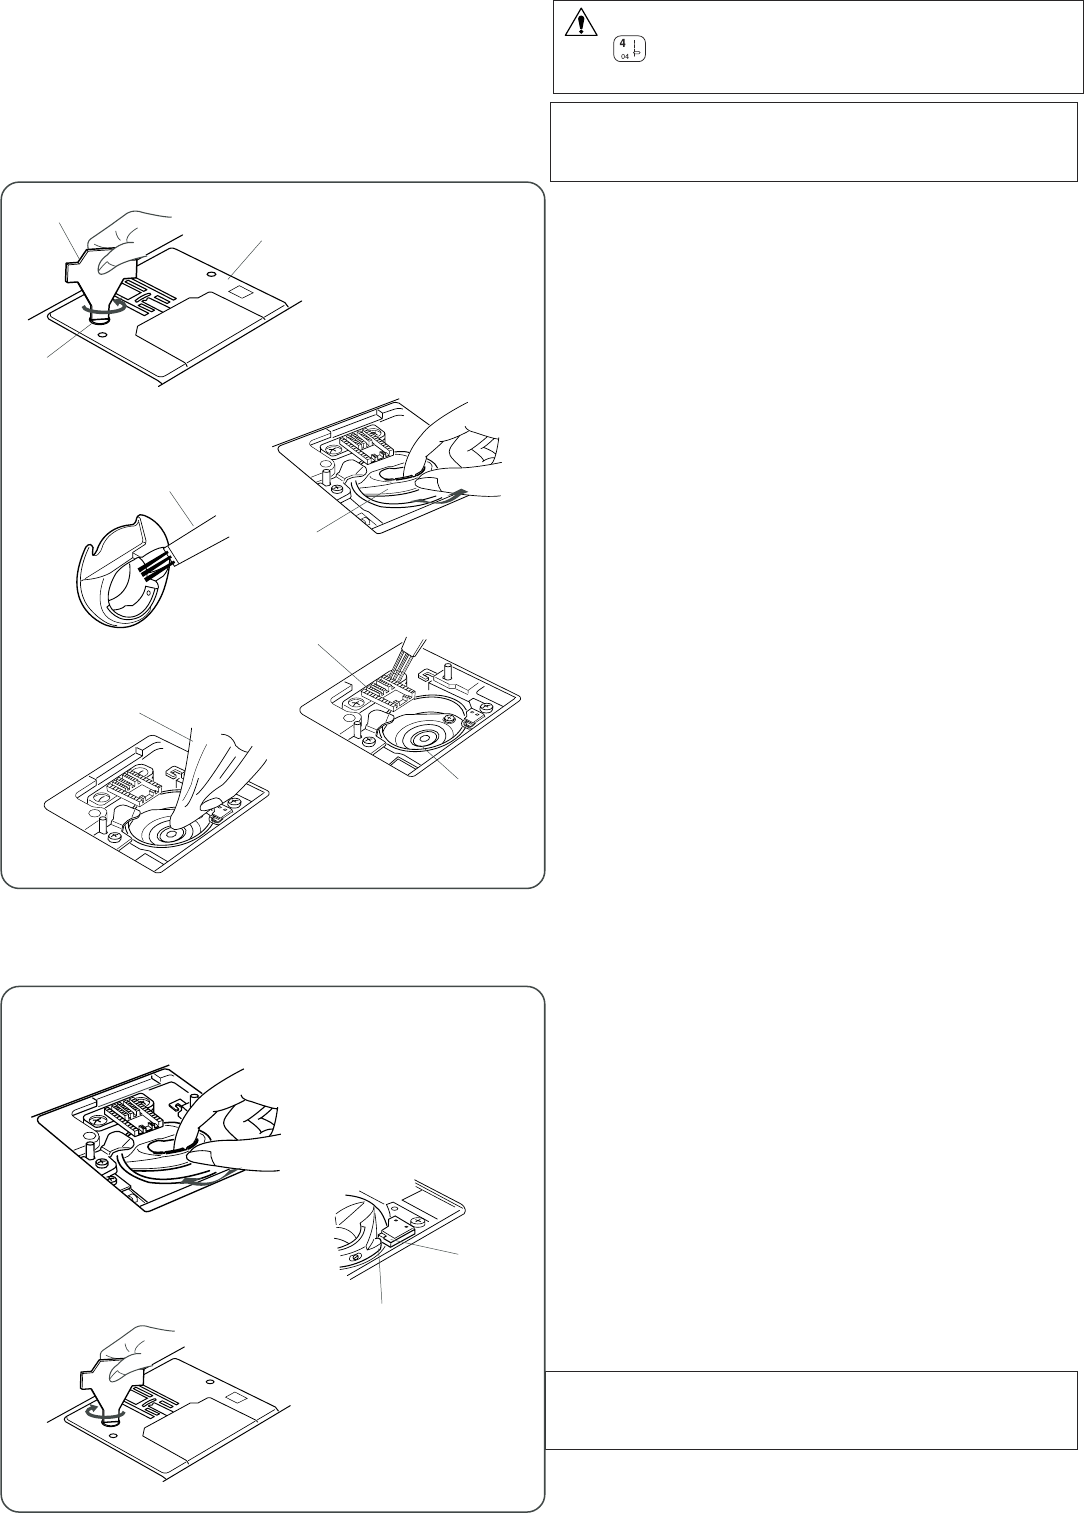
Cleaning the Hook Race and Feed Dog .......................... 74
Inserting the bobbin holder............................................... 74
Replacing the Light Bulb .................................................. 75
Warning Messages ..................................................... 76-77
Troubleshooting ............................................................... 78
2
NAME OF PARTS
Name of Parts
q Function buttons
w Liquid crystal display
e Screen sharpness adjustment dial
r Bobbin winder stopper
t Bobbin winder spindle
y Spool pin
u Large spool holder
i Thread guide
o Take-up lever
!0 Thread tension dial
!1 Face cover
!2 Thread cutter
!3 Needle threader
!4 Needle plate
!5 Extension table (Accessory box)
!6 Hook cover plate
!7 Hook cover release button
!8 Feed balancing dial
!9 Attachment hole
@0 Speed control slider
@1 Start/stop button
@2 Reverse stitch button
@3 Auto-lock button
@4 Up/down needle position button
@5 Presser foot holder
@6 Thumb screw
@7 Presser foot
@8 Needle
@9 Needle clamp screw
#0 Carrying handle
#1 Bobbin thread cutter
#2 Handwheel
#3 Power switch
#4 Machine sockets
#5 Drop feed dog lever
#6 Free-arm
#7
Buttonhole lever
#8 Presser foot lifter
#9 Hole for additional spool pin
NOTE:
The design and specifications are subject
to change without a prior notice.
q
w
e
r
t
yu
i
!2
!3
!4
!5
!6
!7
!8
!9
@5
@4
@3
@2
#0
@6
@9
@7
@8
#1
#2
#3
#4
@0
#5
#6
#7
#8
!1
!0
@1
#9
o
3
Standard Accessories
q
Zigzag foot A (set on the machine)
w Overedge foot C
e Rolled hem foot D
r Zipper foot E
t Satin stitch foot F
y Blind hem foot G
u Cording foot H
i Overcast foot M
o Automatic buttonhole foot R
!0 Darning foot P
!1 Button sewing foot T
!2 Bobbins
!3 Needle set
!4 Quilting bar
!5 Large spool holder (set on the machine)
!6 Small spool holder
!7 Extra spool pin
!8 Spool pin felt
!9 Spool stand
@0 Screwdriver
@1 Screwdriver
@2 Lint brush
@3 Seam ripper/Buttonhole opener
@4 Stitch chart
@5 Stitch chart holder
@6 Instruction book
@7 Power supply cable
@8 Foot control
NOTE:
Accessories can be stored in the extension
table (see page 4).
qw
er
t
yu
i
o
!2
!3
!4
!5
!6
!7 !8
!9
@3
@2
@0
!1
!0
@1
o
@4
@5
@6
@7
@8
4
Extension Table
The extension table provides an extra surface for sewing bulky
materials, and can be removed for free-arm sewing.
Detaching the table
Pull the table away from the machine as illustrated.
Free-arm sewing can be used for:
Stitching sleeves, waistbands, pant legs or any tubular garment
area, darning socks as well as mending knees, elbows or children’s
wear.
Attaching the table
Push the extension table until it snaps into the machine.
q Pin
w Hole
Stitch Chart
Insert the pin into the hole for additional spool pin.
Insert the stitch chart into the slot of chart holder.
q Stitch chart
w Slot
e Chart holder
r Pin
t Hole for additional spool pin
Accessory storage
Open the lid toward you.
The accessories can be conveniently stored in the foot
compartment and space under it.
q Lid
w Foot compartment
q
w
q
w
q
w
e
r
t
5
To use start/stop button
Turn off the power switch.
Insert the machine plug into the machine.
Insert the power supply plug into the wall outlet.
Turn on the power switch.
GETTING READY TO SEW
Connecting the Power Supply
To use foot control
Turn off the power switch.
Pull out the foot control cable gently.
Insert the foot control plug into the machine.
Insert the machine plug into the machine.
Insert the power supply plug into the wall outlet.
Turn on the power switch.
q Power switch
w Foot control plug cord
e Machine socket for foot control
r Machine plug
t Machine socket for power supply
y Power supply plug
u Wall outlet
CAUTION
Always turn the power switch off and unplug the sewing machine
from the electrical outlet when the machine is not in use.
NOTE:
The start/stop button cannot be used when the foot control is
connected to the machine.
q Power switch
w Machine plug
e Machine socket for power supply
r Power supply plug
t Wall outlet
CAUTION
Do not pull the foot control cable beyond the red mark to avoid
damage to the foot control.
i Red mark
CAUTION
When turning off the machine after straight stitch sewing, be sure
to open the needle plate hole to prevent the needle from hitting
the needle plate.
Press button to open the needle plate before turning the
machine off.
NOTE:
Do not turn the machine off while an hourglass is
indicated on the LCD screen.
q
w
e
r
t
y
u
t
q
w
e
r
i
6
Foot control
Controlling Sewing Speed
Speed control slider
Sewing speed can be varied according to your sewing needs with
the speed control slider.
q To increase sewing speed, slide it to the right.
w To decrease sewing speed, slide it to the left.
Sewing speed is varied by the foot control.
The harder you press down on the foot control, the faster the
machine runs.
The machine runs at the maximum speed set by the speed
control slider when the foot control is fully depressed.
Operating Instructions:
The symbol “O” on a switch indicates the "off" position of a
switch.
For appliances with a polarized plug (one blade wider than the
other): To reduce the risk of electric shock, this plug is intended
to fit in a polarized outlet only one way. If it does not fit fully in the
outlet, reverse the plug. If it still does not fit, contact a qualified
electrician to install the proper outlet. Do not modify the plug in
any way (U.S.A.and Canada only).
* Foot control model 21371 is used with this sewing machine.
qw
7
When stitches (mode 1) (mode 2)
are selected, the machine will immediately sew locking stitches
when the Auto-lock button is pressed, then automatically stop.
When sewing any other stitches, the machine will sew locking
stitches at the end of the current pattern and automatically stop.
ww
ww
w Reverse stitch button
When stitches (mode 1) (mode 2)
are selected, the machine will sew in reverse while the reverse
stitch button is pressed.
If you press the reverse stitch button when sewing any other
stitches, the machine will immediately sew locking stitches and
automatically stop.
rr
rr
r Up/down needle position button
Press this button to bring the needle up or down. The machine
will stop with the needle up or down depending on the needle
position determined by this button.
NOTE:
The needle will always stop in the up position after
sewing buttonholes, bartacks, eyelets and darning.
ee
ee
e Auto-lock button
Function Buttons
Press this button to start or stop the machine. The machine starts
running slowly for the first few stitches, it then runs at the speed
set by the speed control slider.
NOTE:
Start/stop button cannot be used when the foot control is
connected to the machine.
If you start the machine with the presser foot up, a warning
message will appear to advise you to lower the foot.
Lower the foot and rstart the machine again.
t Warning message
qq
qq
q Start/stop button
q
w
e
r
t
8
qq
qq
q Screen sharpness adjusting dial
Use this dial to adjust the brightness of the liquid crystal
display. If the screen is not clear, adjust the screen
brightness with this dial.
ww
ww
w Mode button
Press this button to change the mode.
Mode 1: Direct pattern selection
Mode 2, 3: Utility and decorative stitch pattern selection
ee
ee
e Letter style button
Press this button to select letter style for sewing letters.
rr
rr
r Stitch width adjusting button
Press “+” or “–” to change the stitch width.
tt
tt
t Stitch length adjusting button
Press “+” or “–” to change the stitch length.
yy
yy
y Edit button (see pages 12, 13, 67-69)
Press this button to enter the editing mode. In the editing
mode, this button is used to shift the cursor to the left.
uu
uu
u Help button (see pages 11-13. 67)
Press this button to view alternative applications of certain
stitches. In the editing mode, this button is used to shift the
cursor to the right.
ii
ii
i Twin needle button (see page 57)
Press this button for twin needle sewing.
oo
oo
o Memory/call button (see pages 14, 71, 72)
When you press this button after memorizing or editing
patterns, the pattern combination will be registered. You
can also recall registered patterns by pressing this button.
!0!0
!0!0
!0 Elongation button (see page 56)
Stitches #28 to #34 can be elongated up to five times of
their original size.
!1!1
!1!1
!1 Mirror image button (see pages 59, 72)
Press this button to turnover the selected pattern.
!2!2
!2!2
!2 Memory button (see pages 12-14, 58-68)
The memory button will memorize your pattern selection.
Press the memory button after you selected the stitch
pattern. (You can program up to 40 patterns.)
!3!3
!3!3
!3 Clear button (see pages 68, 72)
When this button is pressed, the pattern before or above
the cursor will be deleted.
Press and hold this button to clear the entire pattern
combination.
If this button is pressed after sewing a pattern combination,
the sequence will be deleted.
!4!4
!4!4
!4 Pattern selection buttons (see page 10)
You can select the stitch patterns directly (mode 1) or by
entering the 2-digit pattern number (mode 2).
!5!5
!5!5
!5 Buttonhole selection buttons (see page 10)
You can select buttonholes directly in any mode.
q
q
w
e
r
t
yu
i
!2
!3!1
!0
o
!4
!5
74
CARE AND MAINTENANCE
CAUTION:
Press button to open the sub needle plate and turn the
power switch off and unplug the machine before cleaning.
NOTE:
Do not dismantle the machine in any way other than what
is explained in this section.
Cleaning the Hook Race and Feed Dog
z Remove the needle and presser foot. Remove the
setscrew and remove the needle plate.
q Screwdriver
w Setscrew
e Needle plate
x Take out the bobbin. Lift up the bobbin holder and
remove it.
r Bobbin holder
c Clean the bobbin holder with a lint brush and soft dry
cloth.
t Lint brush
v Clean the feed dog and hook race with the lint brush.
y Feed dog
u Hook race
b Clean the hook race with a dry cloth. (You may also
use a vacuum cleaner.)
i Soft dry cloth
Inserting the bobbin holder
z Insert the bobbin holder.
x The knob of the bobbin holder should fit next to the
stopper on the hook race.
q Knob
w Stopper
c Reattach the needle plate and tighten the screws.
NOTE:
After cleaning the machine, attach the needle and presser
foot.
x
z
c
v
b
x
z
c
q
w
e
r
t
y
i
u
q
w
76

Hulp nodig? Stel uw vraag in het forum

Spelregels
1

Forum

Janome-Memory-Craft-5200

Misbruik melden

Gebruikershandleiding.com neemt misbruik van zijn services uitermate serieus. U kunt hieronder aangeven waarom deze vraag ongepast is. Wij controleren de vraag en zonodig wordt deze verwijderd.

Product:

Bijvoorbeeld antisemitische inhoud, racistische inhoud, of materiaal dat gewelddadige fysieke handelingen tot gevolg kan hebben.

Bijvoorbeeld een creditcardnummer, een persoonlijk identificatienummer, of een geheim adres. E-mailadressen en volledige namen worden niet als privégegevens beschouwd.

Spelregels forum

Om tot zinvolle vragen te komen hanteren wij de volgende spelregels:

Belangrijk! Als er een antwoord wordt gegeven op uw vraag, dan is het voor de gever van het antwoord nuttig om te weten als u er wel (of niet) mee geholpen bent! Wij vragen u dus ook te reageren op een antwoord.

Belangrijk! Antwoorden worden ook per e-mail naar abonnees gestuurd. Laat uw emailadres achter op deze site, zodat u op de hoogte blijft. U krijgt dan ook andere vragen en antwoorden te zien.

Abonneren

Abonneer u voor het ontvangen van emails voor uw Janome Memory Craft 5200 bij:


U ontvangt een email met instructies om u voor één of beide opties in te schrijven.


Ontvang uw handleiding per email

Vul uw emailadres in en ontvang de handleiding van Janome Memory Craft 5200 in de taal/talen: Engels als bijlage per email.

De handleiding is 2,93 mb groot.


U ontvangt de handleiding per email binnen enkele minuten. Als u geen email heeft ontvangen, dan heeft u waarschijnlijk een verkeerd emailadres ingevuld of is uw mailbox te vol. Daarnaast kan het zijn dat uw internetprovider een maximum heeft aan de grootte per email. Omdat hier een handleiding wordt meegestuurd, kan het voorkomen dat de email groter is dan toegestaan bij uw provider.

Stel vragen via chat aan uw handleiding

Stel uw vraag over deze PDF

Uw handleiding is per email verstuurd. Controleer uw email

Als u niet binnen een kwartier uw email met handleiding ontvangen heeft, kan het zijn dat u een verkeerd emailadres heeft ingevuld of dat uw emailprovider een maximum grootte per email heeft ingesteld die kleiner is dan de grootte van de handleiding.

Er is een email naar u verstuurd om uw inschrijving definitief te maken.

Controleer uw email en volg de aanwijzingen op om uw inschrijving definitief te maken

U heeft geen emailadres opgegeven

Als u de handleiding per email wilt ontvangen, vul dan een geldig emailadres in.

Uw vraag is op deze pagina toegevoegd

Wilt u een email ontvangen bij een antwoord en/of nieuwe vragen? Vul dan hier uw emailadres in.


Info