28352
7
Verklein
Vergroot
Pagina terug
1/49
Pagina verder
I
Thank you for purchasing the RADAR 1000 MK@ LCD radar. This
product will provide many years of trouble free use when operated
properly, so it is important that you read and observe the precau-
tions below.
Read this manual thoroughly to gain a good understanding of the capabili-
ties and the requirements of this equipment.
Store the manual in a safe location so, that it does not become lost or dam-
aged.
Observe standard storage and handling procedures for electronic equipment.
If, after proper installation, RADAR 1000 MK2 appears to be defective,
please contact your JRC sales or service representative for assistance.
Symbols Used In This Manual
The following symbols are used in this instruction manual and on the product
itself to ensure correct handling and proper use. Their meanings are explained
below. Please observe the advice and precautions emphasised by the symbols
as you read the manual and as you install and use the equipment.
Electric shocks
Prohibition
Prohibits
disassembly
Instruction
A safety warning to alert you of possible physical harm to
yourself, or to the equipment.
An alert to possible harm to, or failure of the equipment.
This symbol warns of the possibility of electrical and/or other related dangers.
The accompanying instructions should be meticulously followed.
This sign alerts the reader to actions which must NEVER be performed.
This sign prohibits disassembly, or otherwise tampering with the indicated com-
ponents.
This draws the reader’s attention to instructions which must be very exactly
followed.
II
Operating Precautions
To avoid electrical shock, never touch the inside of the scanner when
it is connected to an electrical supply.
Always keep the protective cover on the scanner when it is connected
to an electrical supply. High internal voltages can cause serious per-
sonal injury. The equipment should be routinely serviced, only by JRC
authorised personnel.
Avoid passing close to the scanner when the radar is in use.
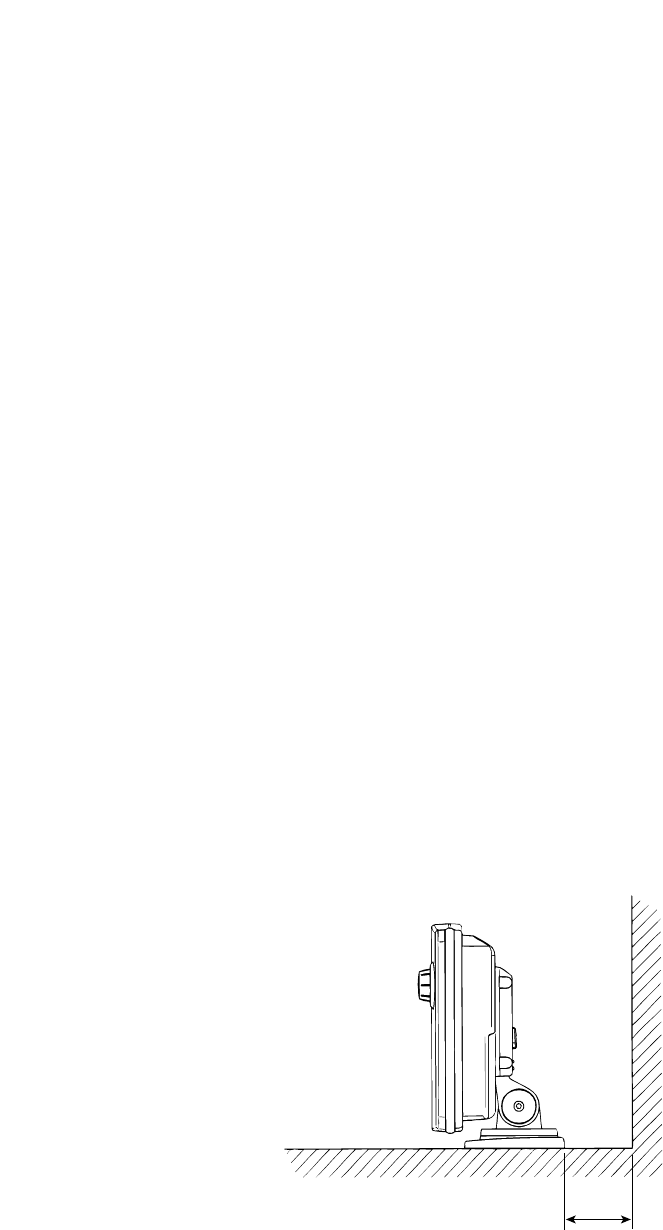
The scanner unit rotates quickly and can cause personal injury. Both
this and the enclosed radome should be installed at a high place, such
as a cabin roof, or a specially constructed arch, or radar mast. If the
radiating units cannot be installed above all possible, standing head
height, they should be guarded by a strong, protective, enclosing frame.
Prolonged, close range exposure to radar signals is not recommended.
Before approaching close to the scanner, or dismounting it, ensure
that the STBY/OFF and the X-MIT/OFF keys on the display unit have
both been turned off. The cable connector P1 at the rear of the display
unit should be disconnected before removing the scanner unit from its
installed position.
Never sit on the scanner, nor otherwise subject them to weight. They
are not intended to bear loads and ignoring this advice could cause
damage to important internal components.
You will only get optimum performance from your RADAR 1000
MK2 by carefully following this manuals instructions. Incorrect op-
eration reduces the performance level and could cause damage to the
equipment.
Remember that radar is only an aid to navigation and can be affected
by many physical, environmental and operational factors. Radar does
not diminish the users responsibility to keep a good look out at all
times and to exercise all other navigational prudence and human judge-
ment. Radar is not a substitute for human faculties.
WARNING
CAUTION
III
SCANNER UNIT NKE-1053
DISPLAY UNIT NCD-3717A
Equipment Photographs
IV
Table of Contents
Symbols Used In This Manual ------------------------------------------------ I
Operating Precautions --------------------------------------------------------- II
Equipment Photographs ------------------------------------------------------ III
Glossary of radar terms ------------------------------------------------------ IV
SECTION 1 INTRODUCTION
1.1 FUNCTION -------------------------------------------------------------- 1
1.2 FEATURES --------------------------------------------------------------- 1
1.3 COMPONENTS ---------------------------------------------------------2
1.4 DIMENSIONS -----------------------------------------------------------3
SECTION 2 OPERATING CONTROLS AND FUNCTIONS
2.1 CONTROL PANEL ----------------------------------------------------- 4
SECTION 3 INSTALLATION
3.1 UNPACKING AND INSPECTION ----------------------------------- 7
3.2 PLANNING THE INSTALLATION---------------------------------- 7
3.3 MOUNTING THE DISPLAY UNIT----------------------------------9
3.4 MOUNTING THE SCANNER UNIT ------------------------------ 12
3.5 CONNECTING THE SCANNER UNIT CABLE ---------------- 13
3.6 ELECTRICAL CONNECTION ------------------------------------- 14
3.7 INITIAL OPERATION AND SET UP ----------------------------- 17
SECTION 4 OPERATION
4.1 LAYOUT OF CONTROLS ------------------------------------------- 21
4.2 TURNING THE RADAR ON AND OFF -------------------------- 22
4.3 SELECTING A RANGE --------------------------------------------- 24
4.4 ADJUSTING RECEIVER SENSITIVITY------------------------- 24
4.5 ADJUSTING TUNING ----------------------------------------------- 24
4.6 REDUCING SEA CLUTTER --------------------------------------- 25
4.7 ADJUSTING RAIN CLUTTER ------------------------------------- 25
4.8 SETTING LCD CONTRAST ---------------------------------------- 25
4.9 SETTING DIMMER -------------------------------------------------- 25
4.10 SETTING 1/4 OFFSET ----------------------------------------------- 26
V
4.11 RANGE MEASUREMENT ------------------------------------------ 26
4.12 BEARING MEASUREMENT --------------------------------------- 27
4.13 OPERATING MENU ------------------------------------------------- 28
4.14 SETTING GUARD ---------------------------------------------------- 29
4.15 RINGS ------------------------------------------------------------------- 30
4.16 POSITION -------------------------------------------------------------- 30
4.17 WAYPOINT ------------------------------------------------------------ 30
4.18 SELECTION OF DATA FORMATS-------------------------------- 30
4.19 TRAIL ------------------------------------------------------------------- 30
4.20 TARGET EXPANSION----------------------------------------------- 31
4.21 INTERFERENCE REJECTION ------------------------------------- 31
4.22 DISPLAY MODE------------------------------------------------------ 31
4.23 PLANNED-TX MODE ----------------------------------------------- 31
4.24 SETTING AUTO/MANUAL TUNING ---------------------------- 32
4.25 IN CASE AN UNUSUAL CONDITION OCCURS
DURING OPERATION ---------------------------------------------- 32
4.26 DISPLAY OF RADAR TRANSPONDER ------------------------- 33
SECTION 5 MAINTENANCE
5.1 PREVENTIVE MAINTENANCE ---------------------------------- 34
5.2 CLEANING (MONTHLY INTERVALS) -------------------------- 35
5.3 LCD FILTER SURFACE CLEANING ----------------------------- 35
5.4 FUSE -------------------------------------------------------------------- 35
SECTION 6 AFTER-SALES SERVICE
---------------------------------------------------------------------------- 36
SECTION 7 SPECIFICATIONS
7.1 GENERAL -------------------------------------------------------------- 37
7.2 SCANNER UNIT ------------------------------------------------------ 38
7.3 DISPLAY UNIT ------------------------------------------------------- 38
APPENDIX
Fig. 1 RADAR 1000 MK2 DISPLAY UNIT (NCD-3717A) FLUSH MOUNT
TEMPLATE
Fig. 2
RADAR 1000 MK2 SCANNER UNIT (NKE-1053) RADOME TEMPLATE
VI
Glossary of radar terms
The following is a list of abbreviations and acronyms which may be used in the
text of the manual.
A/D Analog to Digital conversion
ALM Alarm In, also known as the approach alarm. Used to warn of ap-
proach to a preset zone or to a zoned target.
CPU Central Processing Unit
EBL Electronic Bearing Line
EXP Expansion
FTC
Fast Time Constant, also known as rain and snow clutter suppression
GPS Global Positioning System
IR Interference Rejection
KM Kilometer
LCD Liquid Crystal Display
LL Latitude/Longitude
MH Modulator High voltage
NM Nautical Mile
PCB Printed Circuit Board
PPI Plan Position Indicator (ships position/center screen)
PW Pulse Width
RR Range Rings (fixed)
SHM Ships Heading Marker
STBY Standby
STC
Sensitivity Time Control, also known as sea surface clutter suppression
TD Time Difference
TI Trigger
VD Video
VOM Volt-ohm Meter
VRM Variable Range Marker
WPT Waypoint
X-MIT Transmit
1
SECTION 1
1.1 FUNCTION
Congratulations on selecting the JRC RADAR 1000 MK2 LCD system to
assist with your navigation.
Whether you purchased this radar because of its compactness, power economy,
ease of installation, or long term reliability, one thing is certain, the moment
you turn on your RADAR 1000 MK2 Display you will know that you are
seeing a revolutionary new concept in radar technology. You are the proud owner
of a radar system unmatched in the marine recreational industry.
Radar signals are stored on an LCD display with excellent graphic clarity and
detail. A single glance at your Display will give you a complete and accurate
3600 radar picture of other vessels, buoys and land surrounding your vessel.
1.2 FEATURES
Easy operation using J-DIAL and JOYSTICK
High speed rotation antenna
Easy to understand, cursor-originated target information of range, bearing
and Lat/Long
Compact, lightweight scanner and display
Intermittent transmission for power saving
1/4 radius offset
6 languages (English, French, Spanish, German, Norwegian and Italian)
built-in
Automatic tuning features
Relative, Magnetic, and True bearing readout for EBL, WAYPOINT and
cursor
Dual IF bandwidth for high sensitivity
On-screen trail function to see the relative course of displayed targets
Variable on-screen data including own ships position, cursor position with
Lat/Long, ships course and range/bearing to waypoint with LL
INTRODUCTION
INTRODUCTION
2
1.3 COMPONENTS
The table below lists the components which are included with your new radar
system.
INTRODUCTION
Table 1-1 EQUIPMENT SUPPLIED
Description
Model No. or Code No.
Remarks
Radar 1000 system JMA-1011
Scanner Unit NKE-1053
Display Unit NCD-3717A
Bracket MPBX39815
Interunit Cable CFQ8768-15
8-cores composite cables (15 m)
Power Cable CFQ-8572 with Fuse (2 m)
Instruction Manual 7ZPRD0592 This Manual
Standard Spares 6ZXRD00190 5 A Fuse × 1
Sun Cover MTV303722
Scanner Mounting Hardware MPXP31088
Display Mounting Hardware MPTG30149 Screw × 4
Console Mounting Screw MPTG30380 Screw × 4
3INTRODUCTION
FIG. 1-2 SCANNER MOUNTING DIMENSIONS
FIG. 1-1 DISPLAY MOUNTING DIMENSIONS
1.4 DIMENSIONS
4
SECTION 2
OPERATING CONTROLS AND FUNCTIONS
2.1 CONTROL PANEL
DISPLAY UNIT
POWER INPUT/
NMEA/
COMPASS
CONNECTOR
INTER UNIT
CONNECTOR
LATCH
DISPLAY UNIT
VRM/EBL Key
J-Dial
Joystick with MENU/ENT
OFFSET Key
Contrast/Dimmer Key
Transmit/off Key
Stand-by/off Key
FIG. 2-1 DISPLAY UNIT
OPERATING CONTROLS AND FUNCTIONS
5
STAND-BY/OFF Key
Turns ON power to Display and Scanner and activates 90 second count-
down timer.
Press STBY/OFF key to go into Stand-by mode while in the Transmit mode.
Press STBY/OFF and X-MIT/OFF keys simultaneously to turn radar off.
TRANSMIT/OFF Key
Turns transmitter ON and activates Radome.
Press STBY/OFF and X-MIT/OFF keys simultaneously to switch off the
radar.
J-DIAL
Push repeatedly to select RANGE, SEA, RAIN, GAIN, TUNE controls.
RANGE increases or decrease the range scale in use.
SEA reduces sea clutter.
RAIN reduces rain or snow clutter.
GAIN controls strength of returned echoes.
TUNE manually fine tunes receiver by peaking tuning bar (No tuning
bar in AUTO tune).
SEA, RAIN, GAIN, TUNE, VRM, EBL, CONTRAST can be user-set for
best efficiency.
EBL/VRM Key
Activates EBL or VRM on the display. A short press will turn on/off se-
lected EBL/VRM. Press and hold, to select and control the desired EBL or
VRM by rotating the J-DIAL.
JOYSTICK
Position cursor setting.
Enables MENU for setup and selections.
OPERATING MENU
GUARD OFF ON
RINGS ON OFF
POSITION OFF L/L TD WPT
WAYPOINT OFF ON
BEARING REL MAG. TRUE
OPERATING CONTROLS AND FUNCTIONS
6 OPERATING CONTROLS AND FUNCTIONS
TRAIL OFF SHORT LONG
EXP OFF ON
IR OFF ON
DISPLAY DAY NIGHT
TX-PLAN
TX PERIOD ALL 10 20 30 SCANS
STBY PERIOD 3 5 10 15 MINS
TUNE AUTO MANUAL
INITIAL SET UP MENU
RELATIVE BEARING ALIGNMENT
DISPLAY TIMING
TUNE PRESET
STC PRESET
BUZZER VOLUME ON OR OFF
OPER. PROMPTS
LANGUAGE
OFFSET Key
To shift own ship on screen.
CONTRAST/DIMMER Key
Setts LCD contrast.
Sets back light for LCD and panel illumination.
7
SECTION 3
This section provides practical guidelines to assist in the planning and installa-
tion of the RADAR 1000 MK2.
3.1 UNPACKING AND INSPECTION
Use care when unpacking the RADAR 1000 MK2 from the shipping carton to
prevent damage to the contents. It is also good practice to save the carton and
the interior packing material until the radar has been satisfactorily installed.
The original packing material should be used in the unlikely event that it is
necessary to return the unit for service.
3.2 PLANNING THE INSTALLATION
The layout for installing the RADAR 1000 MK2 should be planned to give
the best operation and service aboard your particular vessel. In general, the
scanner unit should be mounted as high as possible above the waterline and the
display unit should be installed in a convenient viewing position near the helm.
Keep in mind the optimum viewing angle when installing the display. You may
wish to apply power before finally installing the unit so that you can determine
a satisfactory viewing angle.
A 15 meter length of interunit cable is supplied for connecting the two main
units (scanner and display). This length should be sufficient to complete the
cable run required on most small vessels. It is, however, recommended that the
maximum length of interunit cable does not exceed 20 meters.
A general system diagram for the RADAR 1000 MK2 is shown on the follow-
ing page.
INSTALLATION
INSTALLATION
8
FIG. 3-1 GENERAL SYSTEM DIAGRAM
INSTALLATION
9
3.3 MOUNTING THE DISPLAY UNIT
When planning the installation for your display unit, the following conditions
should be considered to ensure dependable and trouble-free operation.
1) The mounting location should be accessible enough to allow easy operation
of all the front panel controls.
2) There should be adequate ventilation.
3) There should be sufficient space behind the display unit to allow for cable
connections to its rear.
4) The display unit should be located near a DC power source.
5) The selected location should be far enough away from any device which
might cause interference, such as motors, generators and echo sounders.
6) Generally, the display unit should be located in a protected area, away from
prolonged direct exposure to rain and salt spray. It is good practice to pro-
tect your valuable electronic equipment as much as possible.
The display unit can be conveniently bracket-mounted on a chart table, or flush
mounted in a bulkhead or other convenient panel. Using the outline of FIG 3-1
and 3-3 as a guide, install the display unit and secure it firmly to the mounting
surface.
FIG. 3-2 TYPICAL MOUNTING METHOD
Table Top
Mounted
60 mm (Min.)
INSTALLATION
10 INSTALLATION
When the display unit is mounted overhead, remove the mounting plate, which
is secured by four screws and rotate it through 180 degrees for re-assembly on
the other side of the unit.
DISPLAY UNIT
BRACKET
LATCH
The display unit is separated from
the bracket in the shipping carton.
Install the display unit by sliding
it onto the bracket until it is fully
seated.
To remove the unit simply de-
press the latch on the rear of the
display unit and lift.
4 SCREWS BRACKET
DISPLAY UNIT
MOUNTING
PLATE
BRACKET
11
FIG. 3-4 SCANNER MOUNTING DIMENSIONS
FIG. 3-3 DISPLAY MOUNTING DIMENSIONS
INSTALLATION
12
3.4 MOUNTING THE SCANNER UNIT
Selecting an adequate location for the scanner unit requires careful consider-
ation. On many small vessels, the unit can be installed on a mast platform, on
an arch or on a bridge structure near the ships center line.
The radiator beam should not be obstructed by nearby large objects. Locate the
unit where large structures such as superstructures, searchlights, horns or masts
are not in the same horizontal plane, otherwise blind areas and false targets will
appear on the radar screen.
Using the outline drawing of FIG 3-4 or the template in the front of the manual
as a guide, install the scanner unit by securing it to a solid mounting surface.
The attachment bolts are stainless steel hexhead bolts M6, 30 mm (1.18) long.
Both flat and lock washers should be used.
Note: Do not apply excessive torque to fix the bolts. Use a 11 cm-long wrench
(Fixing torque: 87 kgf-cm).
INSTALLATION
FIG. 3-5 MOUNTING BOLTS for SCANNER UNIT
SCANNER UNIT
22 mm DEEP
FLAT WASHER
(ATTACHEMENTS)
LOCK WASHER
(ATTACHEMENTS)
STAINLESS STEEL BOLT
(ATTACHEMENT)
MOUNTING BASE
6 20 mm (0.25 0.8 inch)
The scanner unit requires a minimum mounting surface thick-
ness of 6 mm (0.25 inches). If the thickness of the mounting base
is less than this, additional flat washers are required. If the thick-
ness is more than 20 mm (0.8 inches), longer hexhead bolts are
required.
CAUTION
13
Usually, the mounting surface for the
scanner unit should be parallel with
the ships waterline. Some vessels,
however, may adopt a higher bow
angle at some cruising speeds. This
substantially alters and raises the
radars radiation plane. In this case
nearby target detection might be
poor. It may be helpful to lower the
radar beam towards the FORWARD
parallel by shimming the radar ped-
estal in order to tilt the beam angle
slightly downward with respect to
the waterline.
3.5 CONNECTING THE SCANNER UNIT CABLE
The scanner unit is supplied with an interunit cable, which includes a plug (P1)
for connection to the display unit. If your installation does not allow you to run
the cable with the plug (P1) attached, the wire cable can be disconnected and
reconnected inside the scanner unit. When reconnected, be sure to include the
cable clamp, the rubber grommet, and the clamping plate.
15
15
MAIN BEAM
WATERLINE
FORWARD
USING SHIMS TO
TOWER THE MAIN BEAM
WEDEGE or
WASHERS
IDEAL RADIATION PLANE
INTERUNIT CABLE
CABLE CLAMP
CABLE CLAMP
INTERUNIT CABLE
CLAMPING PLATE
RUBBER GROMMET
CABLE
INSTALLATION
14
3.6 ELECTRICAL CONNECTION
3.6.1 DC POWER CABLE
The RADAR 1000 MK2 will work with any electrical supply within the 10.2
to 16 V range, since it contains a power regulator circuit. Connect the power
cable to a DC source capable of supplying at least 3 A. The power cable should
normally be wired through a circuit breaker. The red lead wire of the power
cable must be connected to the positive source terminal and the black lead to
the source negative terminal. The shielded wire is be connected to Boat Main
ground. Should the power connections be inadvertently reversed, a protective
fuse will blow. In this event, check the input power leads for correct polarity
with a VOM and reconnect the leads in their correct polarity. Replace the fuse.
The fuse is located in the power cable. [NORMAL-BROW FUSE (5 A)
SHOULD BE SPECIFIED]
3.6.2 EXTERNAL SYSTEM INTERFACE
The RADAR 1000 MK2 will interface with any NAV-AID (GPS or LORAN)
and compass with the standard NMEA0182 or NMEA0183 output. The inputs
from the NAV-AID must be digital data conforming to the NMEA0183 formats
to drive various radar features such as waypoint mode. If more than one data
type is present at the radar input (for example; compass and NAV-AID) a prior-
ity system has been established in the radars software to respond to the inputs
in driving the features. The assigned priorities are set in this manner:
HEADING: 1. Compass (NMEA0183 HDG,HDM,HDT,VHW)
2. NAV-AID (NMEA0183 RMC,RMA,VTG)
POSITION: 1. NAV-AID (NMEA0l83 RMC,RMA,GLL,GTD)
SPEED: 1. NAV-AID (NMEA0183 RMC,RMA,VTG)
2. Compass (NMEA0183 VHW)
WAYPOINT: 1. NAV-AID (NMEA0183 RMB,BWC)
Using the outline of FIG 3-7 as a guide, connect the RADAR 1000 MK2 to
your NAV-AID and compass.
INSTALLATION
15
FIG. 3-6 INTERCONNECTION DIAGRAM
SHIP'S MAINTS (+)
SHIP'S MAINTS ()
NAV-AID (+)
NAV-AID ()
COMPASS (+)
COMPASS ()
E
1A
2A
+12V
TUNV
TI/GS
TIR/GSR
VD
VDR
BZ/TUNI
PW
1A
2A
PW
VD
VDR
TIR/GSR
TI/GS
BZ/TUNI
TUNV
+12V
P2
P1
P1
P2
T.RED
T.BLK
YEL
GRN
BLU
WHI
TO SHIP'S POWER
DISPLAY UNIT NCD-3717
SCANNER UNIT NKE-1053
TO NAV-AID'S
+:Data Output
:Data Ground
TO COMPASS'S
+:Data Output
:Data Ground
T.RED
T.BLU
GRN
COAX
SHLD
SHLD
WHI
YEL
T.ORN
CFQ8571-10(10m)
CFQ8768-15(15m)
CFQ8768-20(20m)
CFQ-8572
T.RED
T.BLU
T.ORN
YEL
SHLD
COAX
SHLD
WHI
GRN
INSTALLATION
16
FIG. 3-7 NAV-AID INTERCONNECTION
INSTALLATION
TO SCANNER UNIT
DISPLAY UNIT
BATTERY
FUSE
TO NAV-AID
+: NAV-AID'S Data Output
: NAV-AID'S Data Ground
YEL
(+)
(+)
()
()
GRN
BLU
WHI
RED
BLK
+
DC12V
TO COMPASS
+: COMPASS'S Data Output
: COMPASS'S Data Ground
17
3.7 INITIAL OPERATION AND SET UP
3.7.1 INSPECTION AFTER INSTALLATION
After completing the installation and prior to energizing the equipment, it is
necessary to ensure that all steps of the installation were accomplished in ac-
cordance with the instructions. Make sure that:
(1) The cables are not pinched or damaged.
(2) The allowed voltage is not exceeded and the polarity is correct.
(3) All bolts are tight.
(4) The power cable shields has been properly connected to Boat Main ground.
3.7.2 OPERATING THE INITIAL SET UP MENU
To access this menu, push in the JOYSTICK until the INITIAL SET UP menu
appears. The JOYSTICK is then used to select a particular item on the menu by
depressing it.
INSTALLATION
INSTALLATION ADJUSTMENTS
BEARING
DISPLAY TIMING
TUNE PRESET
STC PRESET
BUZZER
OPER PROMPTS
LANGUAGE
INSTLLATION ADJUSTMENTS MENU
18
3.7.3 TUNE PRESET
Perform this step after the radar has been X-MITTING for 10 minutes.
Set the range to 3 NM.
Set gain to desired level.
Turn SEA and RAIN all the way down.
Turn IR off.
In the INITIAL SET UP MENU select Tune preset.
Move the bar to using the J-DIAL to get the strongest signal back.
Note: There may be 2 positions where the targets are strong. Pick the stron-
gest of the 2.
Press the JOYSTICK to save and exit.
INSTALLATION
TUNE PRESET ADJUST MODE
ADJUST W/J-STICK ∧ ∨
PRESS J-STICK TO END
TUNE PRESET ADJUST MODE
ADJUST W/J-STICK ∧ ∨
PRESS J-STICK TO END
TUNE PRESET ADJUST MODE
ADJUST W/J-STICK ∧ ∨
PRESS J-STICK TO END
T
T
T
3.7.4 STC PRESET
Set range to 6 NM.
Set Gain to maximum.
In the INITIAL SET UP MENU select STC PRESET.
Use the J-DIAL to remove all background noise from 0 2 NM.
Press the JOYSTICK when done.
STC PRESET ADJUST MODE
ADJUST W/J-STICK ∧ ∨
PRESS J-STICK TO END
STC PRESET ADJUST MODE
ADJUST W/J-STICK ∧ ∨
PRESS J-STICK TO END
19
3.7.5 RELATIVE BEARING ALIGNMENT
This step must be performed. Failure to do so may result in incorrect bearing
readings.
Set the range to 1.5 NM.
Identify a suitable target such as a buoy and position the boat between 0.5
NM and 1 NM.
Point the bow at the target.
In the INITIAL SET UP MENU select BEARING.
Locate the target on the display.
Move the marker over the target.
Press the JOYSTICK once.
Move cursor back to the SHM (Ships Heading Marker is the solid vertical
line on the display).
Press JOYSTICK in when done.
3.7.6 DISPLAY TIMING
This step must be performed. Failure to perform this step may result in incor-
rect target distance reading.
Set the range to 0.25 NM.
Locate a pier, a jetty, a bridge (close to water line) or any other straight
object. Position the vessel so that it appears on the display. It does not
matter which way you are facing.
In the INITIAL SET UP MENU select DISPLAY TIMING.
If the bridges, pier or jetty does not appear to be in a straight line on the
display, then the DISPLAY TIMING needs to be adjusted.
Use the JOYSTICK to adjust the timing and make the object appear straight
on the display.
Press JOYSTICK when done.
INSTALLATION
PUSHING
DISPLAY TIMING EARLY
CORRECT
PULLING
DISPLAY TIMING LATE
20 INSTALLATION
3.7.7 Buzzer ON or OFF
In the INITIAL SET UP MENU select BUZZER.
Select ON or OFF.
Press JOYSTICK when done.
3.7.8 OPERATOR PROMPTS
Operation prompts can be helpful to new users operating the radar. The default
setting is ON.
In the INITIAL SET UP MENU select OPER.PROMPT.
Select ON or OFF.
Press JOYSTICK when done.
3.7.9 LANGUAGE
English is the default language. It can be changed to Spanish, French, German,
Norwegian, and Italian.
In the INITIAL SET UP MENU select LANGUAGE.
Select the desired Language.
Press JOYSTICK when done.
21
SECTION 4
In normal operation the RADAR 1000 MK2 is very easy to use and several of
its functions are totally automatic. However, the prudent navigator spends time
in good visibility to learn the layout of the controls and to become proficient in
their use, so that he/she will obtain the best performance from the equipment
when the visibility is poor, or the sea area is crowded.
This section takes you through the controls step-by-step.
4.1 LAYOUT OF CONTROLS
The layout of front panel controls is as shown in the diagram below.
FIG. 4-1 OPERATING CONTROLS
OPERATION
OPERATION
VRM/EBL Key
J-Dial
Joystick with MENU/ENT
OFFSET Key
Contrast/Dimmer Key
Transmit/off Key
Stand-by/off Key
22
4.2 TURNING THE RADAR ON AND OFF
TO TURN ON Press the STBY/OFF key.
TO TRANSMIT Press the X-MIT key.
TO STAND-BY Press the STBY/OFF key.
TO TURN OFF Press the STBY/OFF key and the X-MIT/OFF key si-
multaneously.
When you
Press the STBY/OFF key a 90 second warm-up count down timer is activated
and displayed together with the total (display unit) usage to date.
Press the X-MIT/OFF key the radar transmits, the scanner begins to rotate and
echoes will appear on the screen.
Press the STBY/OFF key the radar returns to stand-by mode to reduce battery
drain. The rotator stops.
Press the X-MIT/OFF key again, the radar reverts to full transmitting function
These sequences are also guided by on-screen prompts.
OPERATION
FIG. 4-2 TURNING THE RADAR ON/OFF
90 SEC
0000HOURS
VX.X
PUSH XMIT TO OPERATE
23
FIG. 4-3 LAYOUT OF THE SCREEN
OPERATION
TRAIL "ON"
GUARD ZONE ALARM "ON"
OWN SHIP SPEED DATA SELECTING J-DIAL
LEVEL INDICATOR
TUNE INDICATOR
OWN SHIP COURSE DATA
INTERFERENCE REJECTION "ON"
TARGET EXPANDER "ON"
RANGE RING INTERVAL (NM)
RANGE SCALE (NM)
POSITION DATA
NAVIGATION DATA
24
4.3 SELECTING A RANGE
Press the J-DIAL until RANGE is highlighted in the upper right corner of the
display. The range scale and range rings setting in use is shown in the upper left
corner. Rotate the J-DIAL clockwise to increase the range and anti-clockwise
to decrease it. The range rings are automatically set to correspond with this
selection.
4.4 ADJUSTING RECEIVER SENSITIVITY
Press the J-DIAL until GAIN appears highlighted in the upper right corner of
the display. Rotate the J-DIAL clockwise or counterclockwise, to vary the gain
and thus control the strength of echo returns on the radar screen. An on-screen
bar indicates the gain level selected. The proper setting is when the background
noise is just visible on the screen. (i.e. a light speckled effect)
4.5 ADJUSTING TUNING
Press the J-DIAL until the TUNE appears highlighted at the upper right corner
of the display. Rotate the J-DIAL clockwise or counterclockwise, to maximize
the target echo. If there is no large, identifiable target (e.g. big ship or land)
within range, select SEA CLUTTER and turn the control to maximum. Use
these echoes from wave crests to adjust the tuning bar for fullest attainable
deflection. This is best done with the range set to 3 nm or 6 nm.
When the radar has warmed up, it may be necessary to make a further fine tune
adjustment.
AUTO TUNE
The RADAR 1000 MK2 has an automatic tuning feature. In this mode, the
radar automatically tunes itself for best efficiency at all ranges (refer to 4.24)
OPERATION
25
4.6 REDUCING SEA CLUTTER
The SEA CLUTTER control is normally only used on the shorter ranges to
suppress the effect of sea clutter formed by breaking wave crests which the
radar sees as solid objects.
Press the J-DIAL until the SEA appears highlighted in the upper right corner of
the display. Rotate the J-DIAL clockwise, or counterclockwise to vary the sea
clutter control and thus control the strength of echo returns from the sea sur-
face. The on-screen bar indicates the selected level.
4.7 ADJUSTING RAIN CLUTTER
Press the J-DIAL until the RAIN appears highlighted at the upper right corner
of the display. Rotate the J-DIAL clockwise or counterclockwise, to vary the
level and thus control the strength of echoes returned from rain or snow. As you
rotate clockwise, the returned echoes will become narrower and the returns
from rain or snow will be reduced.
4.8 SETTING LCD CONTRAST
Press the CONT/DIM key, and then rotate the J-DIAL clockwise or counter-
clockwise to change the display contrast.
4.9 SETTING DIMMER
By pressing the CONT/DIM key, the back light for the LCD and the panel
illumination can be varied in intensity. This function has only the two settings
ON and OFF.
OPERATION
Increasing the SEA CLUTTER control effectively diminishes the
radar’s sensitivity. SEA CLUTTER should never be advanced to
the point where it obliterates all returns from waves, since this
setting could prevent the detection of nearby targets, especially
small wood/grp boats and yachts approaching head-on.
CAUTION
26
4.10 SETTING 1/4 OFFSET
By pressing the OFFSET key, the display is offset downwards by 1/4 radius,
expanding the display area in front of the vessel. Press the key a second time to
return the display to normal.
4.11 RANGE MEASUREMENT
(1) Count the number of range scale rings in use between the center of the
screen and the ring preceding the target. Add to this distance an estimate of
the distance between this nearest ring and the inner edge of the target.
(2) Using VRM
Press the EBL/VRM key.
If EBL is highlighted, press and hold the EBL/VRM key to change to VRM
mode and activate the split-line VRM ring.
Rotate the J-DIAL clockwise to expand the VRM ring and increase its range.
To lessen the indicated range, rotate the dial in an anti-clockwise direction. The
actual target distance, in nautical miles, from the ship appears on the center top
of the screen in.
To turn off the VRM, press the EBL/VRM key while VRM is highlighted.
OFFSET MODE OFF OFFSET MODE ON
OPERATION
27
(3) Using cursor
Press the JOYSTICK to make the cross cursor appear on the screen. The
cross mark can be moved any direction by using the JOYSTICK. The range
and bearing will be displayed at the lower right corner on the display.
4.12 BEARING MEASUREMENT
(1) Using the bearing scale
Using the bearing scale on the screen, visually estimate a line from the cen-
ter of the display (ships position) projected through the center of the target,
to reach the bearing scale around the perimeter of the display. The bearing
which you obtain is the tergets relative bearing in degrees.
(2) Using EBL
Press the EBL/VRM key.
If VRM is highlighted, press and hold the EBL/VRM key to change to EBL
mode.
Rotate the J-DIAL clockwise or counterclockwise to move the electronic bear-
ing line to cut the center of the target. The target bearing (in degrees relative to
the ship) then appears at the top center of the screen. The bearing may be dis-
played in relative R, true or magnetic M depending on the menu selection
and what other equipment is interfaced to the rader.
To turn off the EBL, press the EBL/VRM key while EBL is highlighted.
OPERATION
28
4.13 OPERATING MENU
Press the JOYSTICK to access the first menu sheet.
The JOYSTICK is then used to select a particular menu. Press again to open up
the sub menu, which will be displayed to the right side of the selected menu
with the mark. The DISPLAY can be scrolled for the second menu
sheet which is below IR selection. GUARD on the first menu sheet is below
TUNE on the second menu and so on.
Pressing the JOYSTICK again will return the display to the normal video pre-
sentation.
FIRST MENU
SECOND MENU
FIG. 4-4 FIRST/SECOND MENU SHEET
OPERATION
29
4.14 SETTING GUARD
The guard zone alarm is effective for alerting the operator to targets approach-
ing his own ship. An alarm is sounded when any (apparent) target returning an
echo above the noise threshold is detected. If sea clutter, or other incidental
echoes trip the alarm, adjust the gain control and/or the sea clutter to avoid this
false alarming.
Press the JOYSTICK to display the menu sheet.
Select GUARD-ON and press the JOYSTICK. The radar display returns to
the normal video presentation.
Corsor appears on the PPI screen and shows the distance and the azimuth of
the Maker. It displays the distance help line and the azimuth help line of the
dotted line.
Move the cursor to the desired guard
zone start point using the JOYSTICK
and then press the JOYSTICK again.
The distance help line and the azimuth
help line of the dotted line are displayed
in the fixation in the start point posi-
tion at this time.
Next, move the cursor to the desired
guard zone Width point of your Guards
zone then press the JOYSTICK con-
trol.
It displays the distance help line of the
dotted line which is new at this time.
Next, move the cursor to the desired
end point of your guard zone then press
the JOYSTICK control. A ring in the
distance range is displayed by the solid
line at this time.
To turn the GUARD function Off,
select the GUARD-OFF on the Menu
sheet.
OPERATION
THE DISTANCE
HELP LINE
CURSOR
THE AZIMUTH
HELP LINE
START POINT (cf. )
CURSOR
START
POINT
THE NEW
DISTANCE
HELP LINE
GUARD ZONE WIDTH (cf. )
END
POINT
END POINT (cf. )
START
POINT
30
4.15 RINGS
The range rings can be turned to on or off via this menu.
4.16 POSITION
Select this option to display the ships position (derived from a navaid input).
This function allows selection of ships position in latitude/longitude (LL), time
difference (TD) position, you may also display waypoint (WPT) as a LL posi-
tion in place of your own position data. This menu also removes this data from
display. To highlight the required sub-function, move the cursor to it with the
JOYSTICK, then press JOYSTICK to activate it.
4.17 WAYPOINT
If the radar is interfaced with a LORAN or GPS with the necessary data output,
a waypoint symbol can be made to appear on the radar screen by activating the
WAYPOINT function in the DISPLAY menu. Numeric data, showing the
waypoints bearing, range, and time-to-go appear at the bottom right corner on
the screen.
4.18 SELECTION OF DATA FORMATS
This function selects the units and formats for the SHM, EBL, CURSOR and
WAYPOINT data.
It can be displayed in degrees True (T) or magnetic (M) and is indicated by
these letters on screen. The Ships Head Marker is always displayed as zero
degrees.
4.19 TRAIL
This feature allows the operator to see the past history of target movement as an
after-glow, or trail behind moving targets. The glow-time of these trails
and - hence - the amount of display time which they occupy, can be set to
short or long.
OPERATION
31
4.20 TARGET EXPANSION
Target expand mode can be set to on or off. When on, this function in-
creases the size of the displayed images to make small targets appear larger and
easier to view on screen. When active,EXP is highlighted in the upper left
area of the screen.
4.21 INTERFERENCE REJECTION
OPERATION
Interference Rejection (IR) mode can be set to on or off. The IR reduces
noise on the display caused by other radars. When active, the IR is high-
lighted at the upper left of the screen. If you are navigating in a port area ser-
viced by a RACON, you should turn off the IR mode in order to see the RA-
CON signals clearly.
4.22 DISPLAY MODE
Targets can be displayed in black on a white background, or vice versa.
4.23 PLANNED-TX MODE
The PLANNED-TX mode allows the operator to program the radar automati-
cally to transmit for a pre-determined length of time, followed by a stand-by
period.
This maintains a radar watch whilst reducing the power consumption experi-
enced during full transmit operation. In PLANNED-TX mode press the STBY/
OFF key and the radar will return to its normal operating mode.
If youll watch the RADAR BEACON and the SART, set the pro-
cess as follows.
IR OFF
CAUTION
32
4.24 SETTING AUTO/MANUAL TUNING
The Radar 1000 MK2 can be tuned either automatically or manually. If
MANUAL TUNING is selected, a tuning bar indicator is displayed. AUTO
TUNE mode will automatically tune the radar for optimum reception whenever
the radar is turned on, even if ranges are changed.
4.25 In Case an Unusual Condition Occurs during Operation
If the operator encounters unusual conditions, such as:--
The screen is disturbed.
The machine accepts no key input.
While manipulating, initialize RADAR 1000 MK2 by following the steps given
below.
(a) Press the STBY/OFF and X-MIT/OFF keys simultaneously.
The RADAR 1000 MK2 is turned off.
(b) Press the EBL/VRM and STBY/OFF keys simultaneously.
All settings except the initial settings established through the INITIAL
SET UP menu are reset to their factory-set values.
OPERATION
33
SART Code
Position of SART
Other Ships
Land
Position of the
Rescue Craft
4.26 DISPLAY OF RADAR TRANSPONDER
SART (Search and Rescur Radar Transponder) is life preserving device ap-
proved by GMDSS which is used for locating survivors in the event of a disas-
ter or distress. SART operates in the 9 GHz frequency band. When it receives a
radar signal (interrogating radio wave) of 9 GHz transmitted by a rescue ship or
aircraft radar, SART transmits a series of respouse signals to the searchers to
indicate the distress position.
In order to see the SART or radar beacon mark on the radar screen.
RANGE SCALE : Select 6 or 12 nm.
SEA : Set to minimum.
TUNE : DETUNED to reduce the clutter.
IR : Set IR OFF.
OPERATION
When above settings to are made to display SART signals, objects around the own
ship will not appear on the radar screen, so perform thorough visual monitoring of the sea
area around the own ship to avoid any collision or stranding.
Further, when more than one radar systems are mounted, while using a 9 GHz band radar
for searching SART signals, be sure to use another radar as an ordinary radar to perform
monitoring of objects around the own ship to avoid any collision, check of the position of
the own ship to avoid any stranding, and so on.
Need to retune the set for normal operation on completeion.
Attention
[EXAMPLE]
34
SECTION 5
The purpose of this section is to provide instructions for the service technician.
The RADAR 1000 MK2 is designed to provide long periods of trouble free
operation. However, environmental and other factors may require this equip-
ment to be periodically serviced.
MAINTENANCE
WARNING
This radar equipment contains high voltage. Adjustments re-
quire specialized service procedures and tools only available to
qualified service technicians. The layman should never remove
the radar unit cover, nor attempt to service this equipment. When
servicing this equipment, it is important that the technician com-
plies with all safety precautions set forth in this manual.
The high voltage can cause severe personal injury.
5.1 PREVENTIVE MAINTENANCE
Continuous satisfactory operation of the radar depends on how well it is treated.
The following maintenance tips will save you time and money and will help to
avoid equipment failure.
1. Always keep the equipment as clean as possible. Remove immediately dirt,
dust, or spray from the display and from the scanner from time to time.
These units are water resistant, but not water proof. Do not immerse.
2. During routine ships maintenance, inspect the radar system for the follow-
ing points:
(1) Check all hardware for tightness.
MAINTENANCE
35
(2) Check for any evidence of corrosion in the scanner unit and display unit,
or their cables and connecotrs. Clean as required.
(3) Check that the cable connector is secure.
5.2 CLEANING (MONTHLY INTERVALS)
Wash the exterior of the scanner with fresh water, but do not immerse the unit.
A heavy deposit of dirt, or caked salt on the surface of the scanner may cause a
considerable drop in the radar performance. Clean the face of the display unit
with a clean, soft, lint-free cloth, slightly dampened with fresh water.
5.3 LCD FILTER SURFACE CLEANING
In time, the surface of the LCD FILTER (screen) may accumulate a film of
contaminants, which tend to dim the picture. A good glass cleaner and a soft
cloth or towel can be used to clean the LCD display, the keyboard and the
display cabinet.
5.4 FUSE
A fuse seldom blows without some cause. Even if a fuse is replaced and it does
not immediately blow again, it may still be necessary to make further checks on
its associated circuits. If necessary, replace the 5A fuse (Normal-brow type) in
the power cable.
MAINTENANCE
36
SECTION 6
To verify ownership and warranty registration, you should take a few minutes
to fill out your warranty registration card in the front of the manual. It is very
important that you take time to fill out this card.
The warranty registration card should be returned to the nearest JRC service
center immediately after your purchase, in order to receive full warranty ben-
efits.
Read the attached the warranty card. It contains important information on war-
ranty limitations.
AFTER-SALES SERVICE
AFTER-SALES SERVICE
37
SECTION 7
7.1 GENERAL
1. Maximum range: 16 NM
2. Minimum range: Less than 25 m on the 0.125 NM range
3. Range scales: Range Number of Range ring
(NM) Rings Interval(NM)
0.125 2 0.0625
0.25 2 0.125
0.5 2 0.25
0.75 3 0.25
1.0 4 0.25
1.5 6 0.25
3.0 6 0.5
6.0 6 1.0
12.0 6 2.0
16.0 4 4.0
4. Range discriminations: Less than 25 m
5. Range ring accuracy: Better than ± 0.9% ofmaximum range
of the scale in use, or 8 m, whichever is
the greater.
6. Bearing accuracy: ± 1 degree
7. Display device: LCD: 115 × 86.4 mm (320 × 240 dots)
8. Environmental conditions:
Scanner unit Temperature 15 to 55
Humidity Up to 95% at 35
Display unit Temperature
10℃ to 50(Except LCD)
0 to 50 (LCD)
Humidity Up to 95% at 35
SPECIFICATIONS
SPECIFICATIONS
38
Note: LCD performance will be slightly deteriorated in response
speed and brightness during extreme low temperatures.
9. Input power: 10.2 V to 16 V
10. Power consumption: Approx. 30 W
11. AVR: Floating AVR system
7.2 SCANNER UNIT
1. Dimensions: Diameter 318 mm
Height 200 mm
2. Mass: Approx. 4 kg
3. Polarization: Horizontal
4. Beam width: Horizontal 7°nominal
Vertical 30°
5. Sidelobes: Less than 20 dB
6. Rotation: Approx. 32 rpm
7. Transmitter frequency: 9445 MHz
8. Peak power output: 1.5 kW
9. Pulse length/PRF: 0.08 µs/ 2250 Hz
(0.125, 0.25, 0.5, 0.75 NM)
0.3 µs/ 1200 Hz (1, 1.5 NM)
0.8 µs/ 600 Hz (3, 6, 12, 16 NM)
10. Duplexer: T-junction with diode Limiter
11. Mixer: MIC front end
12. IF amplifier: Center frequency 60 MHz
Bandwidth 3/10 MHz
13. Noise figure: Less than 10 dB
14. Characteristic: Linear
7.3 DISPLAY UNIT
1. Dimensions: Width 187 mm
Depth 83 mm
Height 183 mm
2. Mass: Approx. 1.2 kg
SPECIFICATIONS
39
3. Mounting: Table, Overhead or Flush mount
4. Video: 4 levels quantitized
5. Tuning: Auto/ Manual
6. Bearing scale: 360˚scale graduated at intervals of 5˚
7. VRM: 3 digit readout
8. EBL: 3 digit readout
9. Alarm: Audible alarm with zone mark
10. Offset: 1/4 radius below
11. Timed TX: Rotation period 10, 20 or 30 scans
Repetition period 3, 5, 10, 15 min.
12. Language: English, French, Spanish,
Italian, Norweigian, German
13. Features: VRM, EBL, Cursor with LL,
Interference rejection, Target expansion,
Target alarm, LL or TD readout, Waypoint
with LL, Offset, Timed TX, Target trail,
Auto tune
14. External input:
NAV-AID
NMEA0183 (RMA, RMB, RMC, GLL,
GTD, VTG, BWC sentence) NMEA0182
Compass NMEA0183 (HDG, HDM, HDT or VHW
sentence)
SPECIFICATIONS
CUT OUT HATCHED AREA
4-HOLES DRILL
4.5mm ( .177" ) DIA
7.36"
187mm
6.65"
169mm
6.33"
161mm
6.49"
165mm
3.93"
100mm
7.20"
183mm
Fig.1 RADAR 1000 MK2 DISPLAY UNIT (NCD-3717A) FLUSH MOUNT TEMPLATE
FOWARD
ATF
6.3"
160mm
6.3"
160mm
4-HOLES DRILL
7.5mm ( 0.29" ) DIA
Fig.2 RADAR 1000 MK2 SCANNER UNIT (NKE-1053) RADOME TEMPLATE
7

Hulp nodig? Stel uw vraag in het forum

Spelregels
1

Forum

JRC-Radar1000_MKII

Misbruik melden

Gebruikershandleiding.com neemt misbruik van zijn services uitermate serieus. U kunt hieronder aangeven waarom deze vraag ongepast is. Wij controleren de vraag en zonodig wordt deze verwijderd.

Product:

Bijvoorbeeld antisemitische inhoud, racistische inhoud, of materiaal dat gewelddadige fysieke handelingen tot gevolg kan hebben.

Bijvoorbeeld een creditcardnummer, een persoonlijk identificatienummer, of een geheim adres. E-mailadressen en volledige namen worden niet als privégegevens beschouwd.

Spelregels forum

Om tot zinvolle vragen te komen hanteren wij de volgende spelregels:

Belangrijk! Als er een antwoord wordt gegeven op uw vraag, dan is het voor de gever van het antwoord nuttig om te weten als u er wel (of niet) mee geholpen bent! Wij vragen u dus ook te reageren op een antwoord.

Belangrijk! Antwoorden worden ook per e-mail naar abonnees gestuurd. Laat uw emailadres achter op deze site, zodat u op de hoogte blijft. U krijgt dan ook andere vragen en antwoorden te zien.

Abonneren

Abonneer u voor het ontvangen van emails voor uw JRC Radar1000_MKII bij:


U ontvangt een email met instructies om u voor één of beide opties in te schrijven.


Ontvang uw handleiding per email

Vul uw emailadres in en ontvang de handleiding van JRC Radar1000_MKII in de taal/talen: Engels als bijlage per email.

De handleiding is 1,07 mb groot.


U ontvangt de handleiding per email binnen enkele minuten. Als u geen email heeft ontvangen, dan heeft u waarschijnlijk een verkeerd emailadres ingevuld of is uw mailbox te vol. Daarnaast kan het zijn dat uw internetprovider een maximum heeft aan de grootte per email. Omdat hier een handleiding wordt meegestuurd, kan het voorkomen dat de email groter is dan toegestaan bij uw provider.

Stel vragen via chat aan uw handleiding

Stel uw vraag over deze PDF

Uw handleiding is per email verstuurd. Controleer uw email

Als u niet binnen een kwartier uw email met handleiding ontvangen heeft, kan het zijn dat u een verkeerd emailadres heeft ingevuld of dat uw emailprovider een maximum grootte per email heeft ingesteld die kleiner is dan de grootte van de handleiding.

Er is een email naar u verstuurd om uw inschrijving definitief te maken.

Controleer uw email en volg de aanwijzingen op om uw inschrijving definitief te maken

U heeft geen emailadres opgegeven

Als u de handleiding per email wilt ontvangen, vul dan een geldig emailadres in.

Uw vraag is op deze pagina toegevoegd

Wilt u een email ontvangen bij een antwoord en/of nieuwe vragen? Vul dan hier uw emailadres in.


Info