685865
27
Verklein
Vergroot
Pagina terug
1/36
Pagina verder
Residential Irrigation Controller
Owner’s Manual and Programming Instructions
Compatible with Hunter Remotes and Solar Sync
®
SEASONAL ADJUSTMENT
WATER DAYS
START TIMES
SYSTEM OFF
CURRENT TIME/DAY
RUN TIMES
ACTIVE
SENSOR BYPASS
RUN
X-CORE
SEASONAL ADJUSTMENT
WATER DAYS
START TIMES
SYSTEM OFF
CURRENT TIME/DAY
RUN TIMES
ACTIVE
SENSOR BYPASS
RUN
MANUAL SINGLE STATION
XCORE
COMPONENTS ................................................................... 2
MOUNTING THE CONTROLLER TO WALL ........................................ 6
CONNECTING VALVES AND TRANSFORMER .................................. 7
ACTIVATING THE BATTERY ............................................................. 8
REPLACING THE BATTERY .............................................................. 8
CONNECTING A MASTER VALVE ..................................................... 9
CONNECTING A PUMP START RELAY .............................................10
CONNECTING A HUNTER “CLIK” WEATHER SENSOR .....................11
Testing the Weather Sensor ..........................................................11
Manually Bypassing the Weather Sensor ......................................11
CONNECTING A HUNTER SOLAR SYNC ET SENSOR ....................... 12
Installing Solar Sync
®
Sensor ........................................................ 12
Installing the Wireless Solar Sync ................................................ 12
Solar Sync Settings ...................................................................... 12
Region
................................................................................... 13
Water Adjustment
................................................................. 14
Uninstalling a Solar Sync Sensor .................................................. 14
Calibration/Setup ........................................................................ 15
CONNECTING A HUNTER REMOTE ................................................. 16
Connecting to a Hunter Remote (not included) ........................... 16
To install the SmartPort
connector ............................................. 16
POWER FAILURES ........................................................................... 16
PROGRAMMING THE CONTROLLER .............................................. 17
Setting the Date and Time
...................................................... 17
Setting the Program Start Time(s)
......................................... 18
Eliminating a Program Start Time ................................................ 18
Setting Station Run Times ........................................................18
Setting Days To Water ............................................................ 18
Selecting Specic Days of the Week to Water .............................. 19
Selecting Odd or Even Days to Water .......................................... 19
Selecting Interval Watering
................................................... 19
Setting Event Day(s) O ............................................................. 20
Automatic Watering
............................................................... 20
System O
............................................................................ 20
Programmable Rain O .............................................................. 20
Seasonal Adjustment
............................................................. 21
Manually Run a Single Station
1
.............................................. 22
One Touch Manual Start and Advance ........................................ 22
ADVANCED FEATURES ................................................................... 23
Programmable Sensor Override ................................................. 23
Test Program of All Stations ....................................................... 23
Hunter Quick Check™ Diagnostics .............................................. 23
Easy Retrieve™ Program Memory .............................................. 24
Programmable Delay Between Stations ..................................... 24
Clearing the Controller’s Memory/Resetting the Controller ...... 24
Cycle and Soak.............................................................................25
TROUBLESHOOTING GUIDE ............................................................. 27
SPECIFICATIONS ............................................................................ 30
Operating Specications ............................................................. 30
Electrical Specications .............................................................. 30
Explanation of Symbols .............................................................. 30
CERTIFICATE OF CONFORMITY TO EUROPEAN DIRECTIVES ... .....31
TABLE OF CONTENTS
2
XCORE
COMPONENTS
Terminal
block for -E
(International
models only)
Note: Plug may
look dierent from
illustration
Indoor Model
Outdoor Model
(Internal Transformer Included)
3
XCORE
COMPONENTS
LCD Display
1
Run Times
Allows user to set each valve station run time from 1 minute to 4 hours
2
Start Times
Allows 1 to 4 start times to be set in each program
3 Station Number
Indicates currently selected station number
4 Program Designator
Identies program (A, B, or C) in use
5 Day of the Week
Identies day of the week
6 Interval Watering
Identies month when programming current date
7 Odd/Even Watering
Identies if Odd or Even watering has been selected
8 Flashing Sprinkler
Indicates that watering is taking place
9
System O
Allows user to discontinue all programs and watering. Also allows the user to set the programmable
“rain o,” which stops watering for a period from 1 to 7 days.
10
Umbrella
Indicates that the rain sensor is active
11
Seasonal Adjustment
Allows the user to make run time changes according to the seasons without reprogramming the controller.
Bars on the le allow quick visual reference to the seasonal adjustment percentage. When using Solar Sync
®
ET Sensor, will display seasonal adjust updated daily by sensor.
12
Rain Drop
Indicates watering will occur on the selected day
13
Crossed Rain Drop
Indicates the watering will NOT occur on the selected day
14
Calendar
Indicates interval watering schedule has been programmed. Icon also appears when programming the
current day
4
Wiring Compartment
15 Lithium Battery
The replaceable lithium battery (included) allows the controller to be programmed in the absence
of AC power. In addition, the battery will provide power for backup timekeeping in the event of a
power outage.
16 Internal Junction Box Junction box in outdoor models for making AC power connections
17 Terminal Strip Use to attach transformer, sensor, and valve wires from their source to the controller
18 Reset Button Use to reset the controller (located on side of controller)
19 REM Allows for connection of Hunter SmartPort
®
and Hunter Remote Controls
20 Sensor Bypass Switch
Ignores “Clik” weather sensor input when in Bypass position
Control Buttons
Button Increases the selected item ashing in the display
Button Decreases the selected item ashing in the display
Button
Returns selected ashing display to previous item
Button
Advances the selected ashing display to the next item
Button
Selects program A, B, or C for dierent watering zone requirements
XCORE
COMPONENTS
5
Dial Settings
Run Normal dial position for all controller automatic and manual operation
Current Time/Day
Allows current day and clock time to be set
Start Times
Allows 1 to 4 start times to be set in each program
Run Times
Allows user to set each valve station run time from 1 minute to 4 hours
Water Days
Allows the user to select interval days to water
Seasonal Adjustment
Allows user to make run time changes according to the seasons without reprogramming the controller.
Bars on the le allow quick visual reference to the seasonal adjustment percentage.
1
Manual-One Station
Allows user to activate a one-time watering of a single valve
System O
Allows user to discontinue all programs and watering. Also allows the user to set the programmable
“rain o,” which stops watering for a period from 1 to 7 days
Solar Sync Settings
Allows user to program settings when using Solar Sync
®
ET Sensor
External Transformer (Indoor Model Only)
A plug in transformer is provided to supply AC power to the controller
XCORE
COMPONENTS
6
Note: The indoor version of the X-Core
®
is not water-
proof or weather resistant, and must be installed indoors or
in a protected area.
1. Secure one screw into the wall. Install screw anchors if attaching
to drywall or masonry wall.
2. Slide the keyhole on top of the controller over the screw.
3. Secure the controller in place by installing screws in the holes
below the terminal strip.
Do not plug transformer into power source until
controller is mounted and all valve wiring has
been connected.
For XC - x01 - A: If the supply cord is damaged, it
must be replaced by the manufacturer or service agent,
or a similarly qualied person in order to
avoid hazard.
C
A
B
MOUNTING THE CONTROLLER TO WALL
7
Installation of the X-Core
®
should only be done by trained personnel.
1. Route valve wires between the control valve location and controller.
2. At valves, attach a common wire to either solenoid wire on all
valves. This is most commonly a white colored wire. Attach a
separate control wire to the remaining wire of each valve. All wire
connections should be done using waterproof connectors.
3. Route the valve wires through the conduit. Attach the conduit
through the bottom right side of the controller.
4. Secure the white valve common wire to the C (Common) screw on
the terminal strip. Attach each of the individual valve control wires
to the appropriate station terminals and tighten their screws.
5. Indoor Models: route the transformer cable through the hole on the
le side of the controller and connect the wires to the two screws
marked 24VAC.
Outdoor Models: transformer wires are already connected to the
AC terminals so all that is required is to connect primary power to
the junction box (see below).
NOTE: X-Core
®
outdoor models are water and
weather resistant. Connecting the outdoor X-Core
to primary AC power should only be done by a licensed
electrician following all local codes. Improper installa
-
tion could result in shock or re hazard.
BAT
High Voltage Wiring (Outdoor Model only)
1. Route AC power cable and conduit through the ½" (13 mm) conduit
opening on the le side bottom of the cabinet.
2. Connect one wire to each of the two wires inside the junction box.
The ground wire should be connected to the green wire. Wire nuts
are provided to make these connections.
Note: For –E models only: Connect the wires to the AC
terminal block inside the junction box. AC supply wires must
be 14 AWG (1.85 mm) or larger with appropriate circuit breaker for
the wire size. A switch or circuit-breaker shall be included in the
building installation (in close proximity to the controller, within
easy reach of the operator) and marked as the disconnecting de
-
vice for the equipment.
3. Replace the junction box cover.
Connect the two transformer
wires to the two AC Terminals
Valve Common Wire
Valve 4
Valve 3
Valve 2
Valve 1
Valve
Wires
CONNECTING VALVES AND TRANSFORMERS
8
Aer installing your X-Core
, make sure to remove the battery
contact insulator to allow the X-Core to keep time in the event of a
power outage.
CAUTION:
RISK OF EXPLOSION IF BATTERY IS REPLACED BY AN
INCORRECT TYPE. DISPOSE OF USED BATTERIES AC
-
CORDING TO THE INSTRUCTIONS.
A high-energy lithium battery is included with your X-Core controller.
The battery allows the user to remotely program the controller
without connecting AC power. It is also used to keep
the current time and day during power outage conditions.
To replace the battery:
1. Remove the screw from the battery holder.
2. Slide the battery holder down to access the battery.
3. Remove and replace the new battery into the battery holder
and reinstall the battery holder.
NOTE: This positive(+) side of the battery should face
the inside of the battery holder.
Battery type: CR2032 3V
SEN C P 1 2 3 4 5 6 7 8
24VA C
BAT
Battery Compartment
Lithium Battery
Battery
Holder
(--)
(+)
ACTIVATING THE BATTERY
REPLACING THE BATTERY
25
NOTE: If a Stations Runtime is less than or equal to the
Cycle time then no Cycle will be applied.
NOTE: Before 1 hour only minutes are displayed (36, for
example). At 1 hour or above, the display will change to
include the hour digit (1:13 and 4:00, for example).
ADVANCED FEATURES
Cycle and Soak
The Cycle and Soak feature is an enhancement to the existing X-Core
controller. It is designed to aord customers the ability to minimize
runo due to dierent soil and terrain characteristics.
The Cycle and Soak feature allows you to split a station’s runtime into
shorter watering periods. The shorter watering periods will help prevent
run o in situations like slopes or tight soils. It is recommended that the
Cycle time is less than the station’s watering time, and the Soak time
for the water to be absorbed. The total number of cycles is determined
by taking the total programmed station run time and dividing it by the
Cycle time.
Accessing the Cycle and Soak Menu
With the dial in the RUN position, press and holding the
button for
3 seconds; while holding the button rotate the dial to the RUNTIME
dial position, then release the button.
Setting the Cycle Time
1. Initially Station 1 will be displayed. To
access other stations, press the
or
button.
2. Once the desired station is displayed,
use the
or button to increase or
decrease the Cycle time. The user can
set the time from 1 minute to 4 hours
in 1 minute increments or to OFF if no
Cycle is desired.
Cycle Screen With Only Minutes Cycle Screen With Hours Included
Accessing the Soak Menu
Once the desired Cycle times for each station has been programed the
soak time can be accessed by pressing the
button.
The station will remain the same as was previously displayed under the
Cycle time (if station 2 is displayed in the Cycle menu then Station 2 will
be displayed upon pressing the
button, for example).
NOTE: The Soak menu cannot be accessed without a
programmed Cycle time.
27

Hulp nodig? Stel uw vraag in het forum

Spelregels
1

Forum

Hunter-X-Core
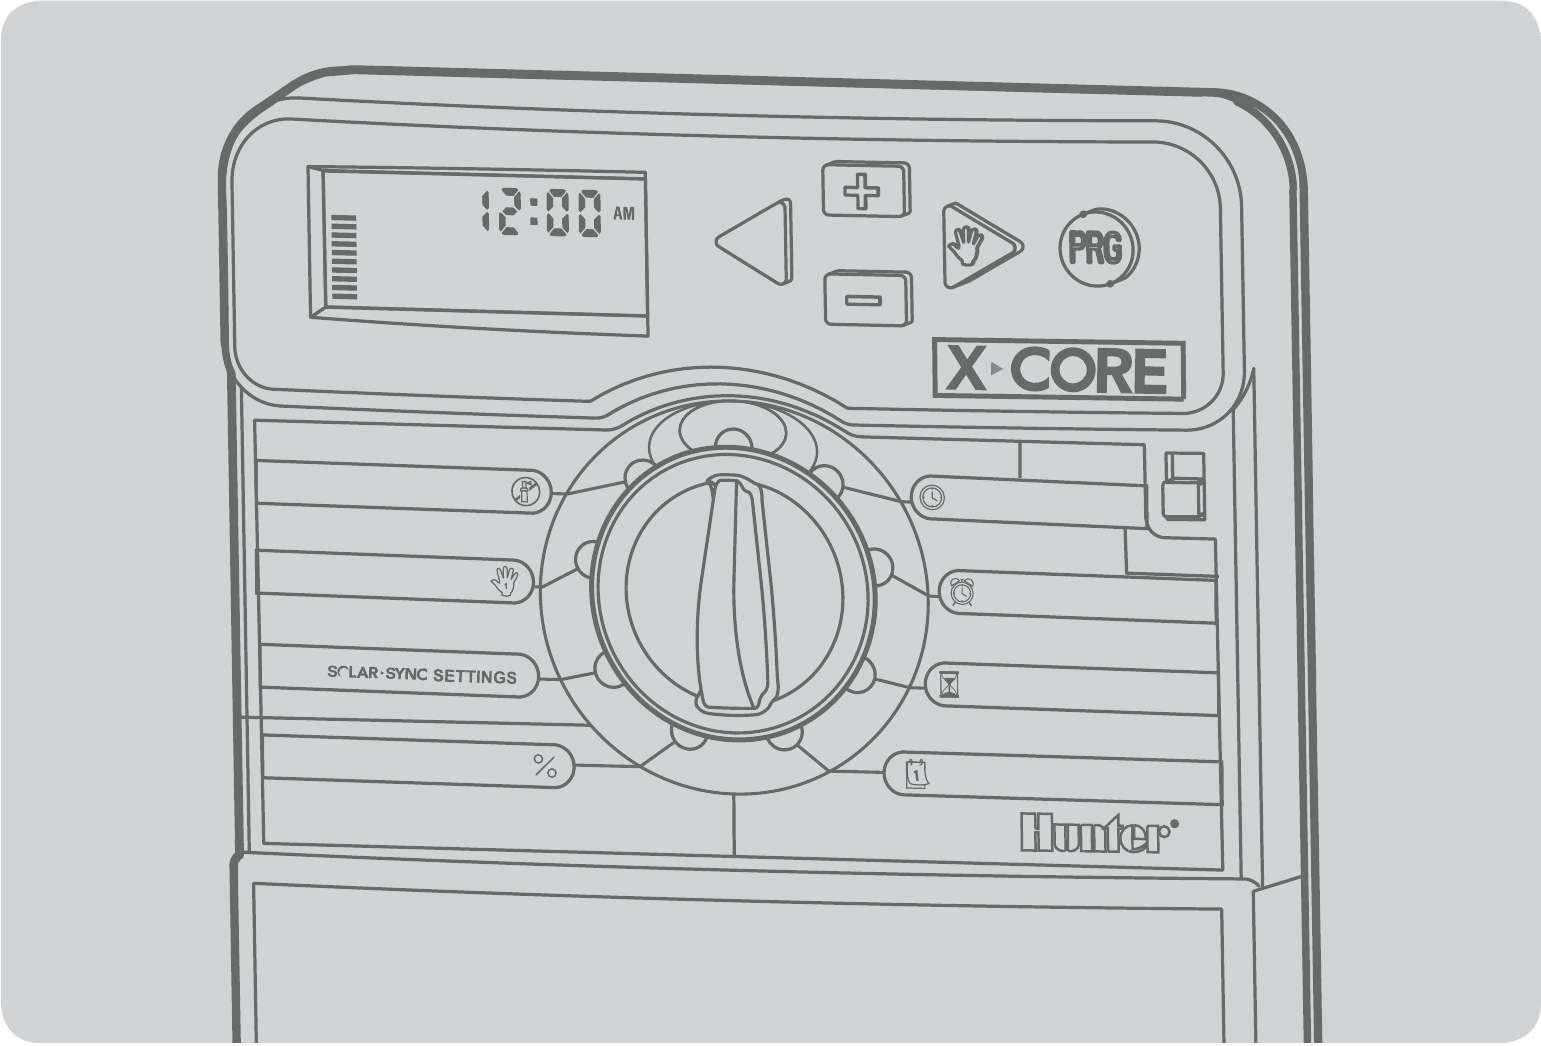
  • Beregeningsprogramma word afgewerkt maar begint dan opnieuw en moet handmatig uitgezet worden. Dit lijkt me niet de bedoeling weet iemand de oplossing hiervoor? Alvast bedankt! Gesteld op 28-7-2024 om 21:43

    Reageer op deze vraag Misbruik melden
  • De unit staat op OFF. Na instelling naar ON blijft de indicatie op OFF Gesteld op 10-5-2024 om 15:39

    Reageer op deze vraag Misbruik melden
  • Beregening computer zet de pomp aan terwijl de beregeningsautomaat op nul staat
    Hij blijft sproeien
    Hoe op te lossen Gesteld op 13-4-2024 om 15:27

    Reageer op deze vraag Misbruik melden
  • Beregeningsprogramma wordt afgewerkt, maar begint opnieuw en moet dan handmatig uitgezet worden.
    Hoe op te lossen?
    Deze vraag is door verschillende personen gesteld.
    Waar vinden wij een antwoord Gesteld op 7-9-2023 om 13:20

    Reageer op deze vraag Misbruik melden
  • Beregeningsprogramma wordt afgewerkt, maar begint opnieuw en moet dan handmatig uitgezet worden. Is niet de bedoeling. Hoe dit probleem op te lossen?
    Gesteld op 3-9-2023 om 16:44

    Reageer op deze vraag Misbruik melden
  • Hoi, Beregeningsprogramma wordt afgewerkt, maar begint opnieuw en moet dan handmatig uitgezet worden. Is niet de bedoeling. Hoe dit probleem op te lossen?
    Gr. George Gesteld op 26-7-2023 om 22:23

    Reageer op deze vraag Misbruik melden
    • Goeieavond George heeft u intussen dit probleem kunnen oplossen? Ik zit namelijk met hetzelfde :s ik hoor het graag.

      Mvg Tom Geantwoord op 28-7-2024 om 22:05

      Waardeer dit antwoord Misbruik melden
6
  • Beregeningsprogramma wordt afgewerkt, maar begint opnieuw en moet dan handmatig uitgezet worden. Is niet de bedoeling. Hoe dit probleem op te lossen? Gesteld op 22-6-2022 om 07:51

    Reageer op deze vraag Misbruik melden
    • Beregeningsprogramma wordt afgewerkt, maar begint opnieuw en moet dan handmatig uitgezet worden. Is niet de bedoeling. Hoe dit probleem op te lossen? Geantwoord op 26-7-2023 om 22:21

      Waardeer dit antwoord (7) Misbruik melden

Misbruik melden

Gebruikershandleiding.com neemt misbruik van zijn services uitermate serieus. U kunt hieronder aangeven waarom deze vraag ongepast is. Wij controleren de vraag en zonodig wordt deze verwijderd.

Product:

Bijvoorbeeld antisemitische inhoud, racistische inhoud, of materiaal dat gewelddadige fysieke handelingen tot gevolg kan hebben.

Bijvoorbeeld een creditcardnummer, een persoonlijk identificatienummer, of een geheim adres. E-mailadressen en volledige namen worden niet als privégegevens beschouwd.

Spelregels forum

Om tot zinvolle vragen te komen hanteren wij de volgende spelregels:

Belangrijk! Als er een antwoord wordt gegeven op uw vraag, dan is het voor de gever van het antwoord nuttig om te weten als u er wel (of niet) mee geholpen bent! Wij vragen u dus ook te reageren op een antwoord.

Belangrijk! Antwoorden worden ook per e-mail naar abonnees gestuurd. Laat uw emailadres achter op deze site, zodat u op de hoogte blijft. U krijgt dan ook andere vragen en antwoorden te zien.

Abonneren

Abonneer u voor het ontvangen van emails voor uw Hunter X-Core bij:


U ontvangt een email met instructies om u voor één of beide opties in te schrijven.


Ontvang uw handleiding per email

Vul uw emailadres in en ontvang de handleiding van Hunter X-Core in de taal/talen: Engels als bijlage per email.

De handleiding is 2 mb groot.


U ontvangt de handleiding per email binnen enkele minuten. Als u geen email heeft ontvangen, dan heeft u waarschijnlijk een verkeerd emailadres ingevuld of is uw mailbox te vol. Daarnaast kan het zijn dat uw internetprovider een maximum heeft aan de grootte per email. Omdat hier een handleiding wordt meegestuurd, kan het voorkomen dat de email groter is dan toegestaan bij uw provider.

Stel vragen via chat aan uw handleiding

Stel uw vraag over deze PDF

Andere handleiding(en) van Hunter X-Core

Hunter X-Core Gebruiksaanwijzing - Nederlands - 16 pagina's

Hunter X-Core Gebruiksaanwijzing - Deutsch - 36 pagina's


Uw handleiding is per email verstuurd. Controleer uw email

Als u niet binnen een kwartier uw email met handleiding ontvangen heeft, kan het zijn dat u een verkeerd emailadres heeft ingevuld of dat uw emailprovider een maximum grootte per email heeft ingesteld die kleiner is dan de grootte van de handleiding.

Er is een email naar u verstuurd om uw inschrijving definitief te maken.

Controleer uw email en volg de aanwijzingen op om uw inschrijving definitief te maken

U heeft geen emailadres opgegeven

Als u de handleiding per email wilt ontvangen, vul dan een geldig emailadres in.

Uw vraag is op deze pagina toegevoegd

Wilt u een email ontvangen bij een antwoord en/of nieuwe vragen? Vul dan hier uw emailadres in.


Info