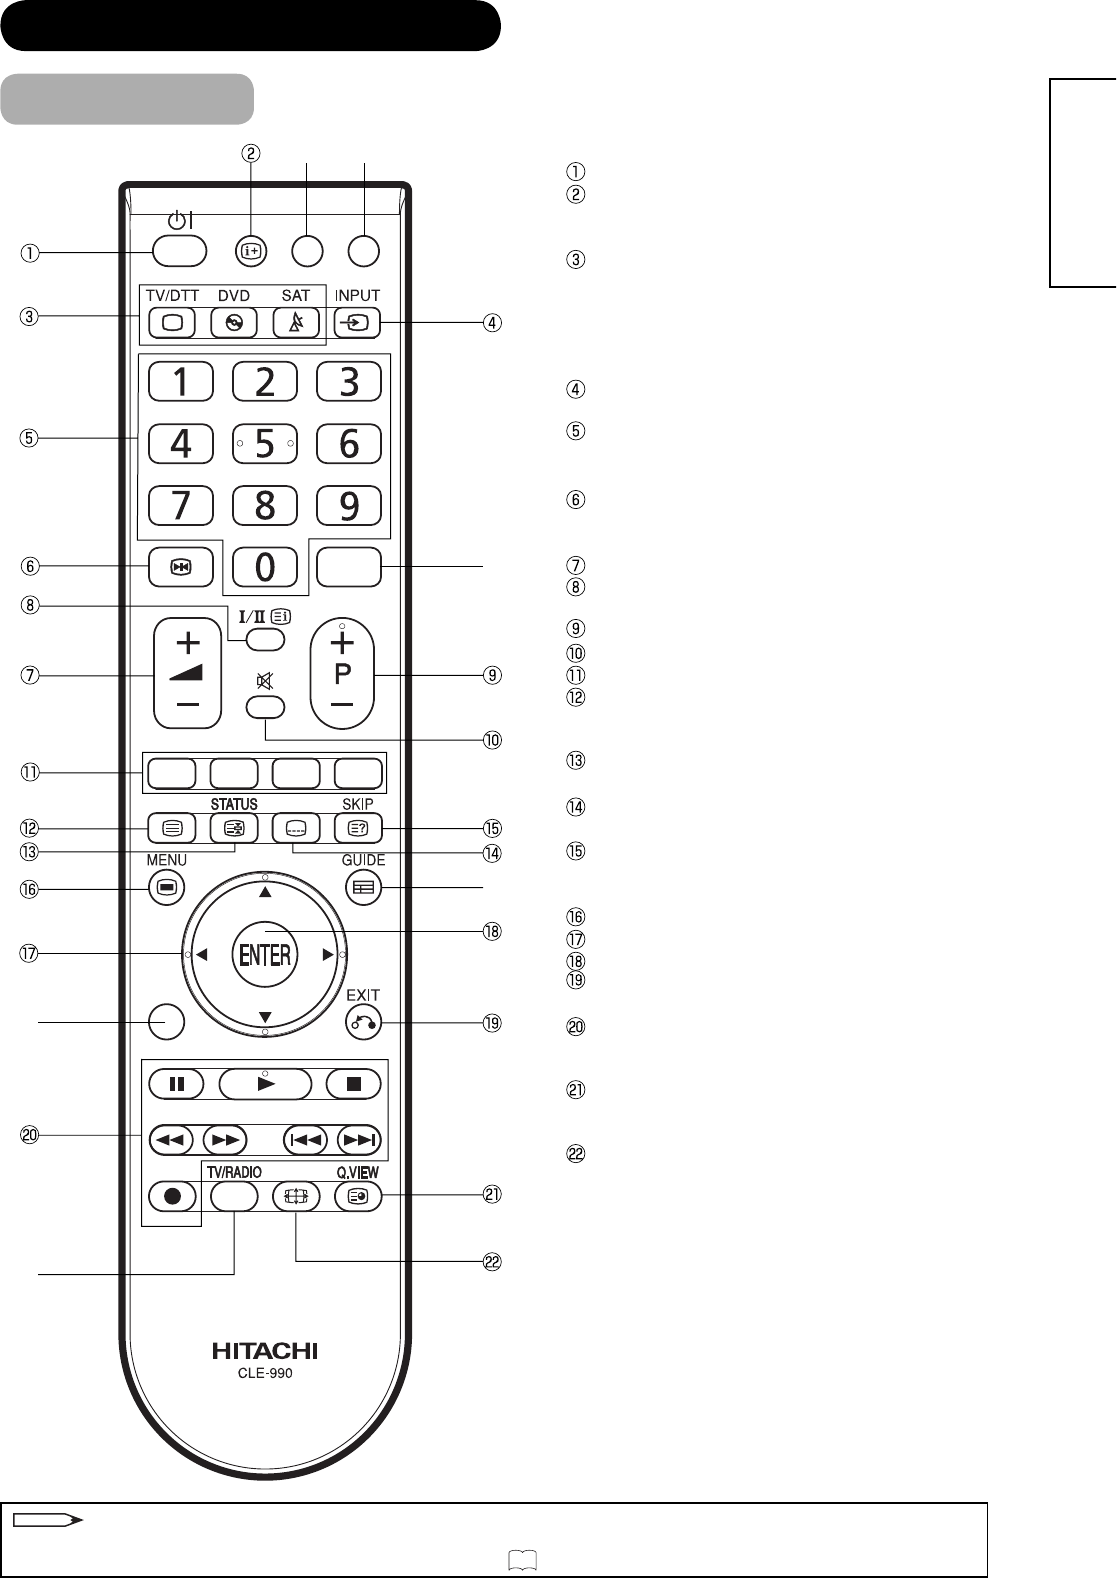
A
B
C
D
3
4
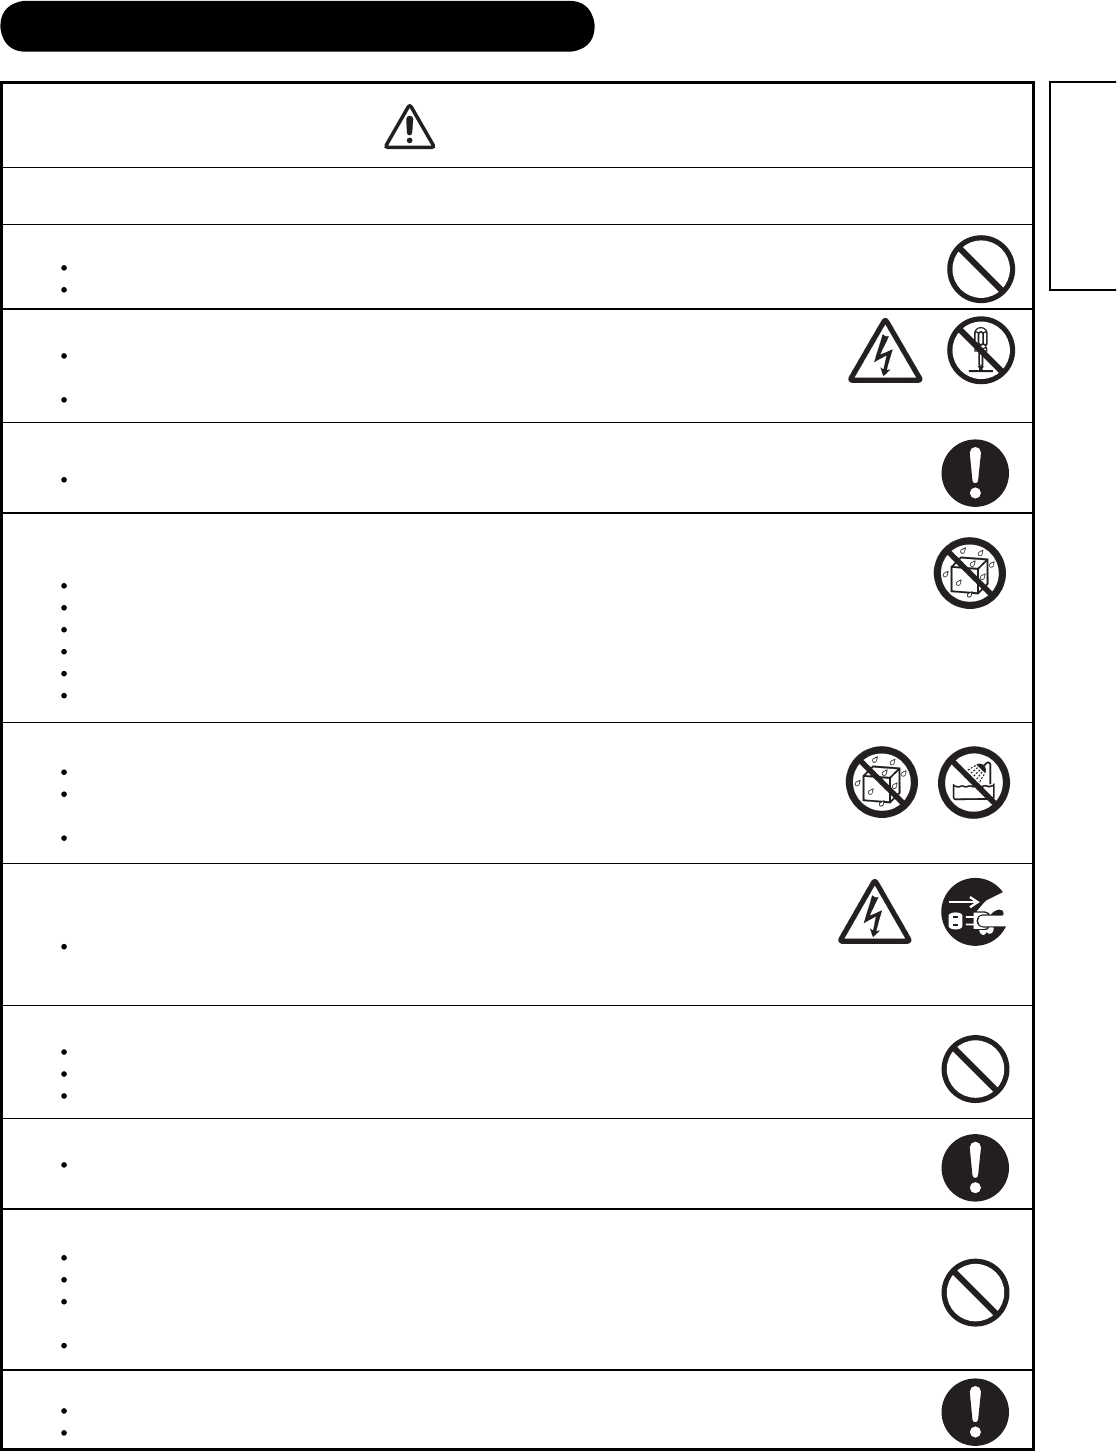
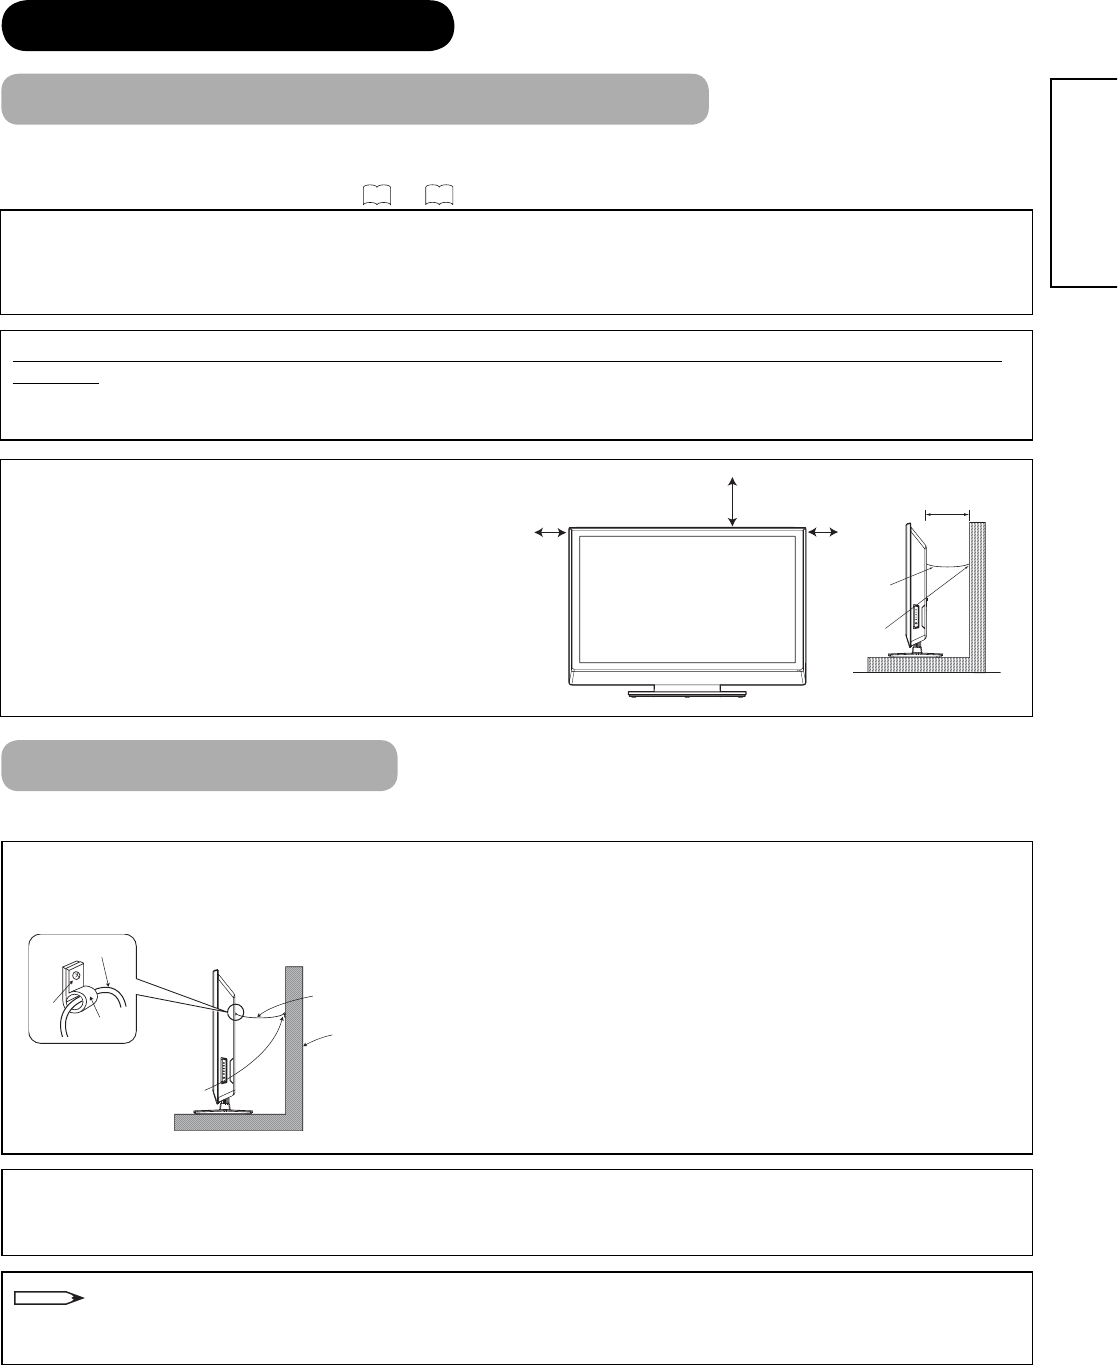
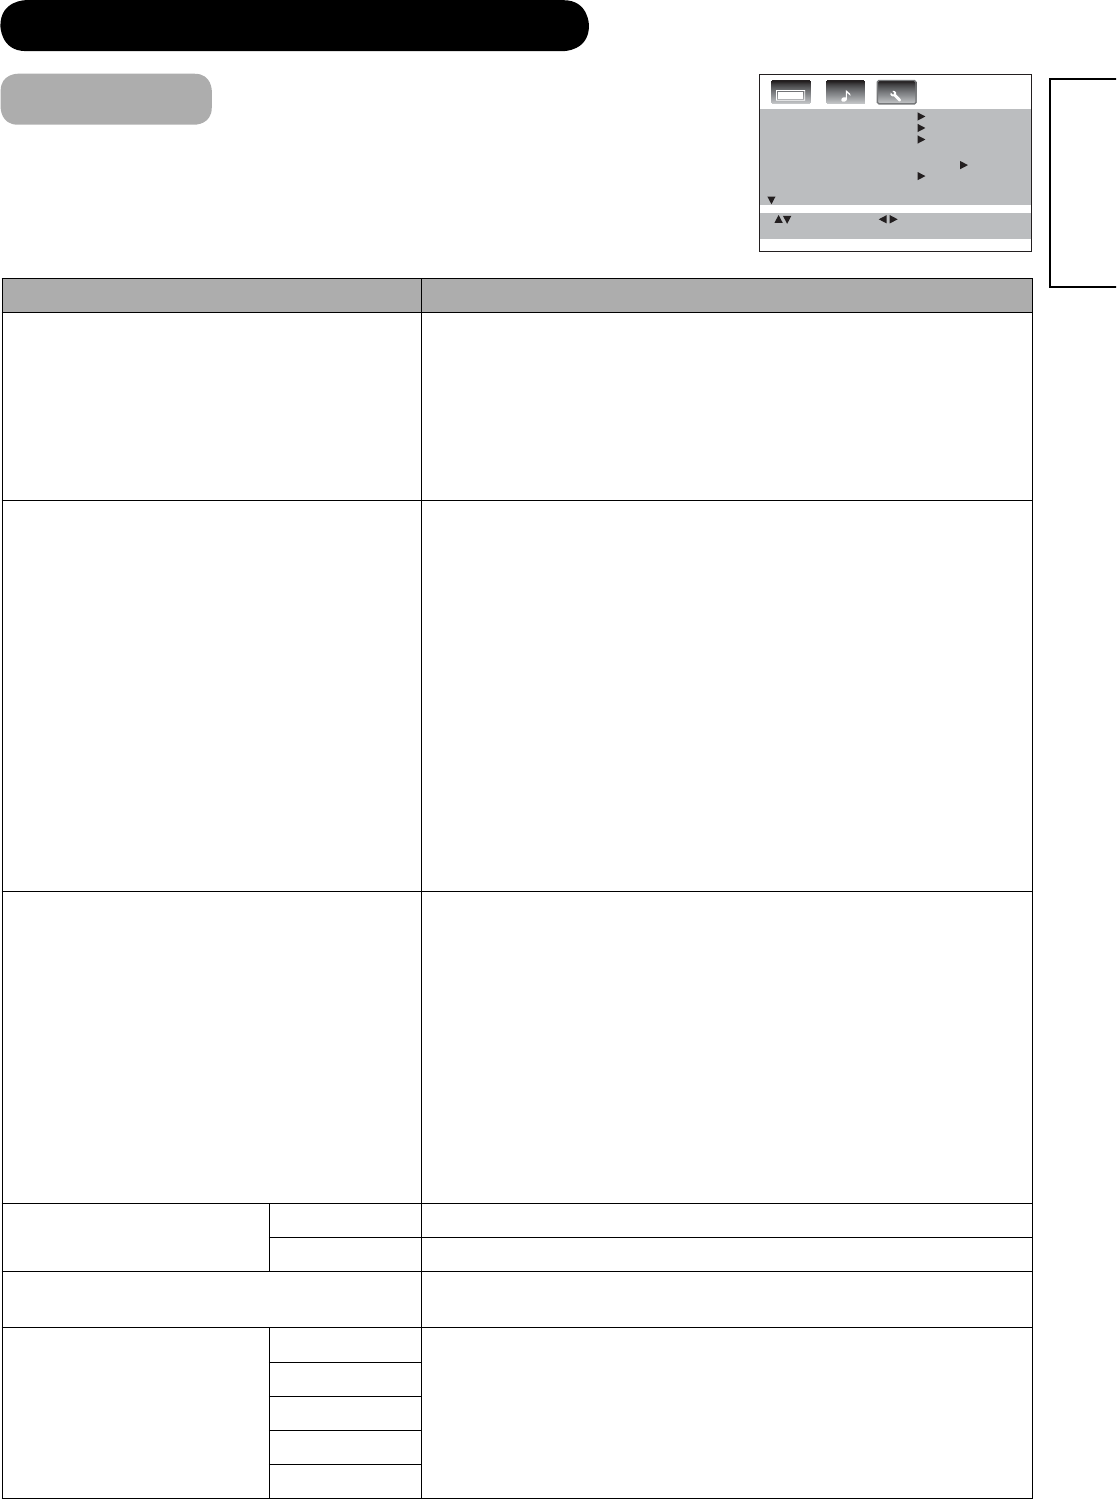
IMPORTANT
Ensure there is at least a 100mm (10cm) gap to the sides,
rear and top of the television if placing into a cabinet or
mounting in a wall. This is to allow for adequate ventilation.
Do not allow soft furnishings, such as curtains to be draped
over the TV whilst in operation.
Never place the TV onto a carpet during normal operation -
this could obstruct ventilation slots on the base of the TV.
Always place the TV on a flat surface, or if supplied, the stand
accessory.
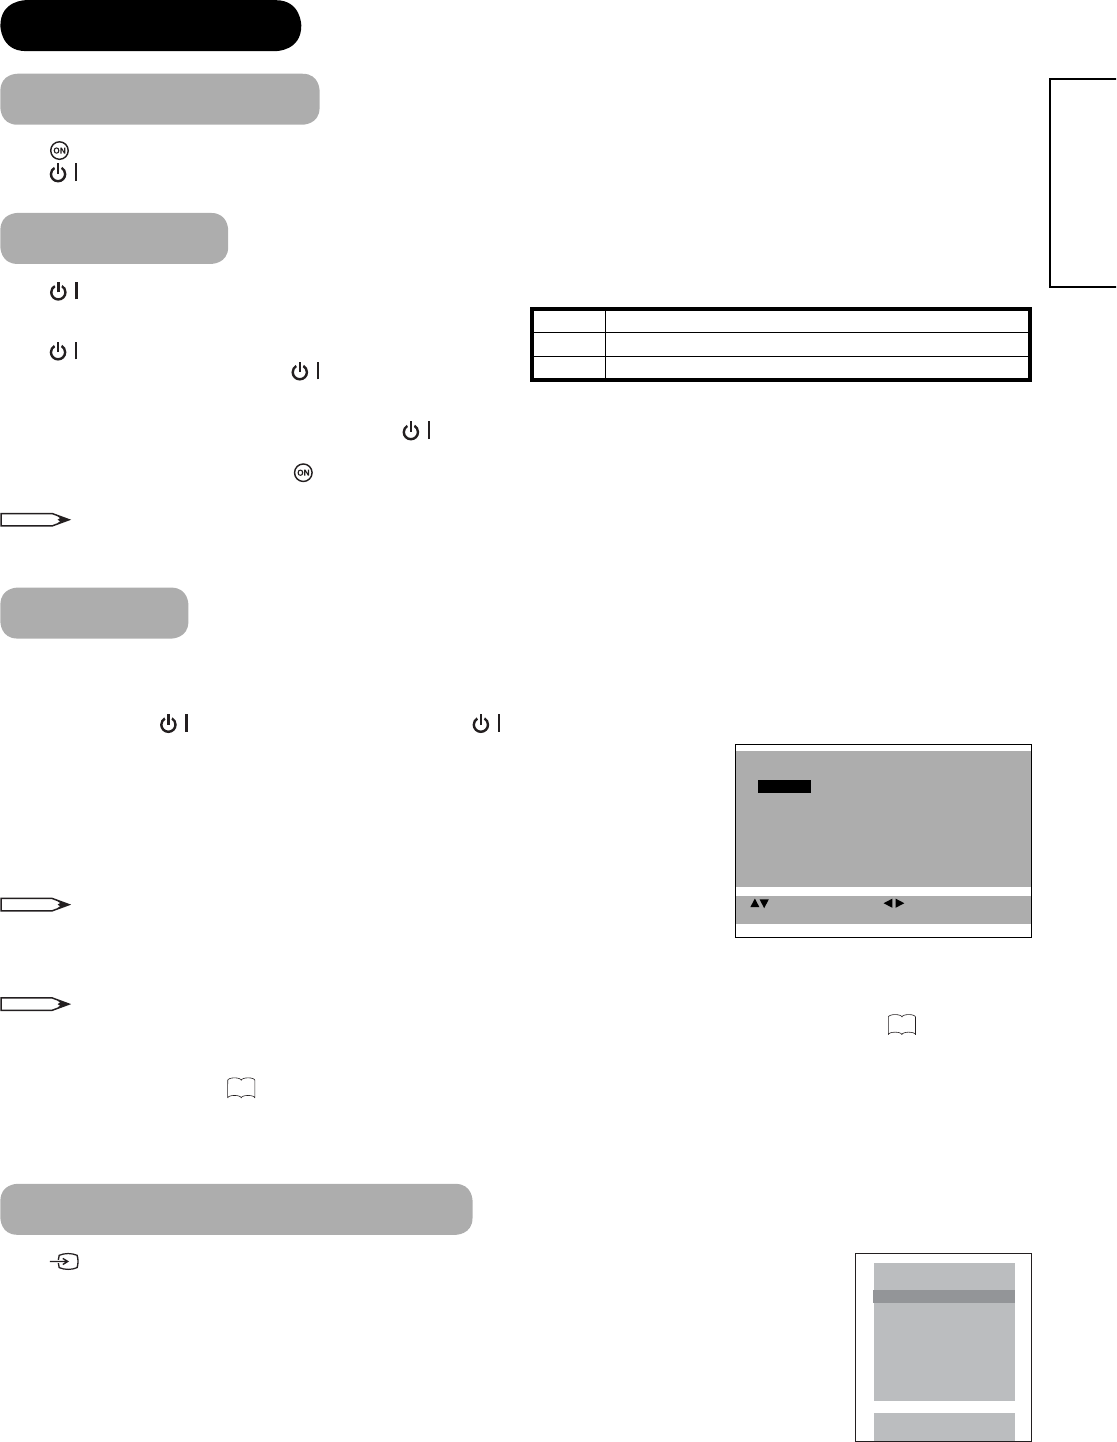
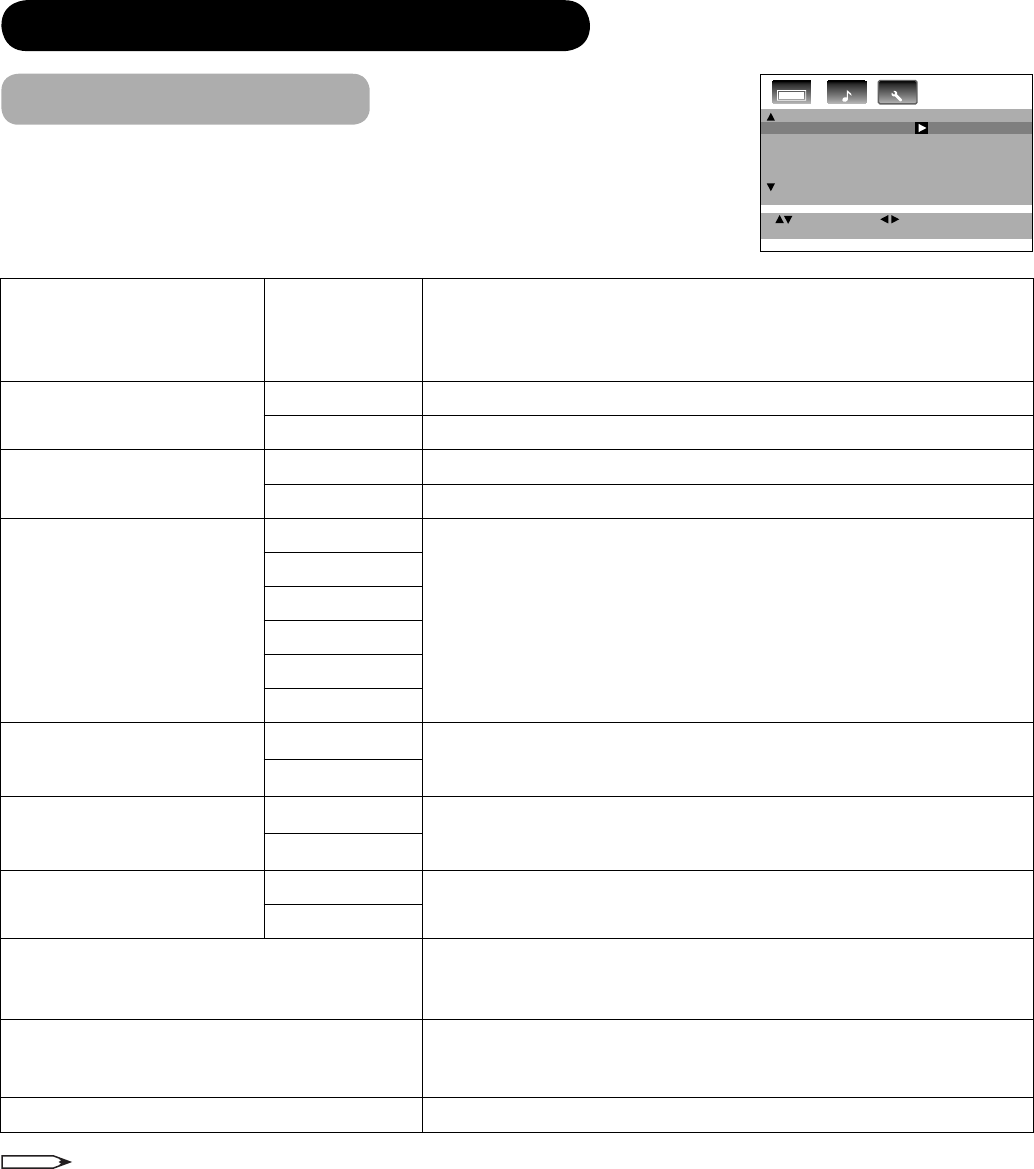
Switch your TV on, ready to start Auto setup procedure...
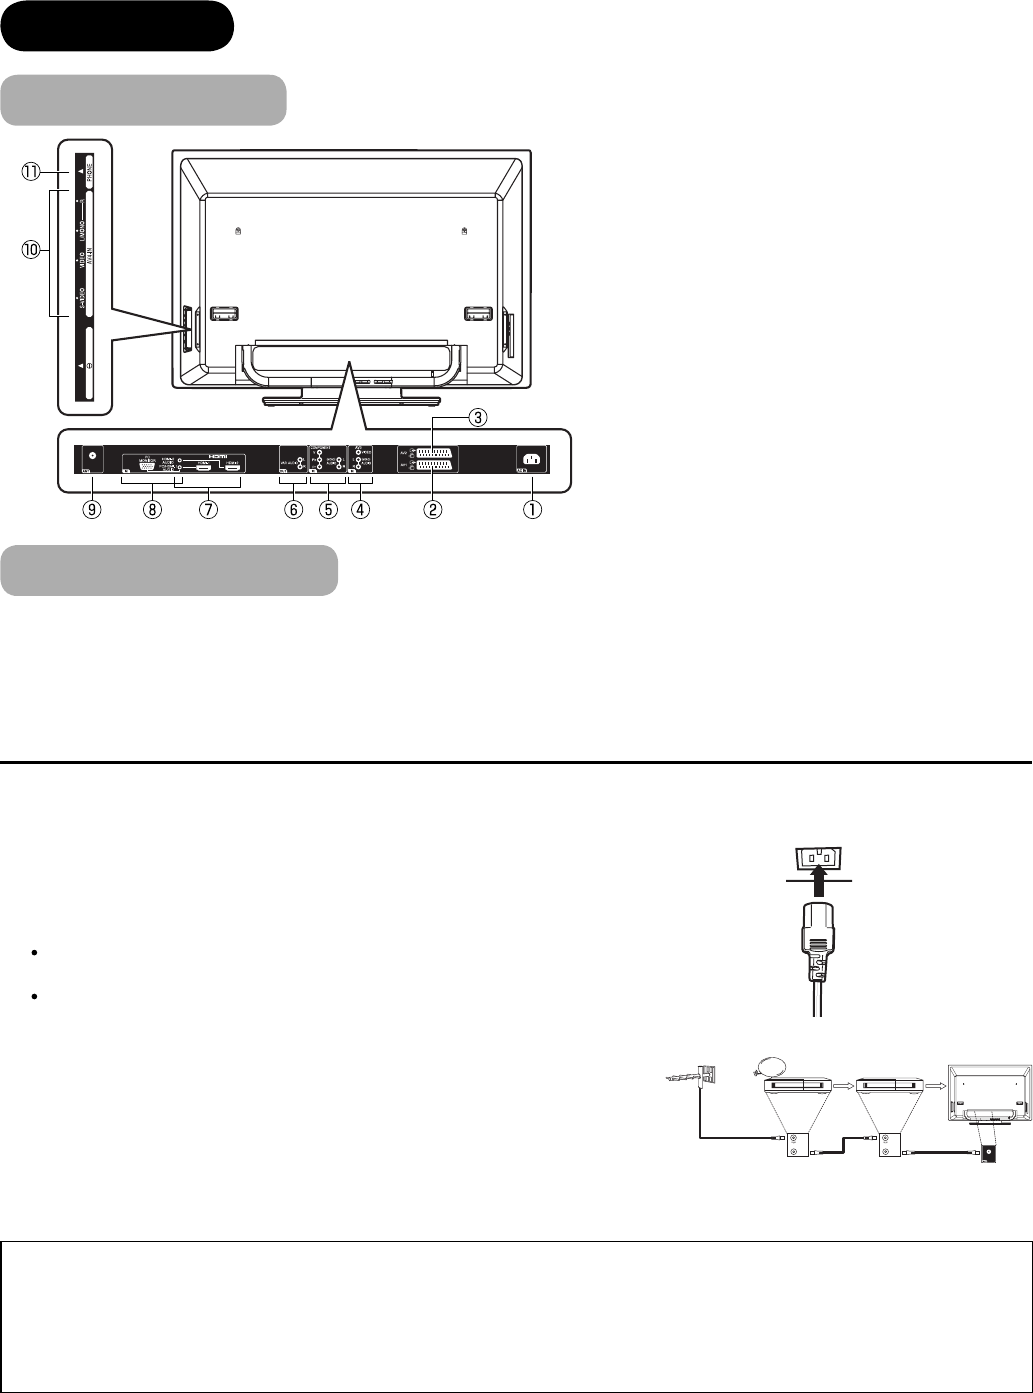
Connect the TV plug to the mains socket
Connect the main lead to the Plasma TV.
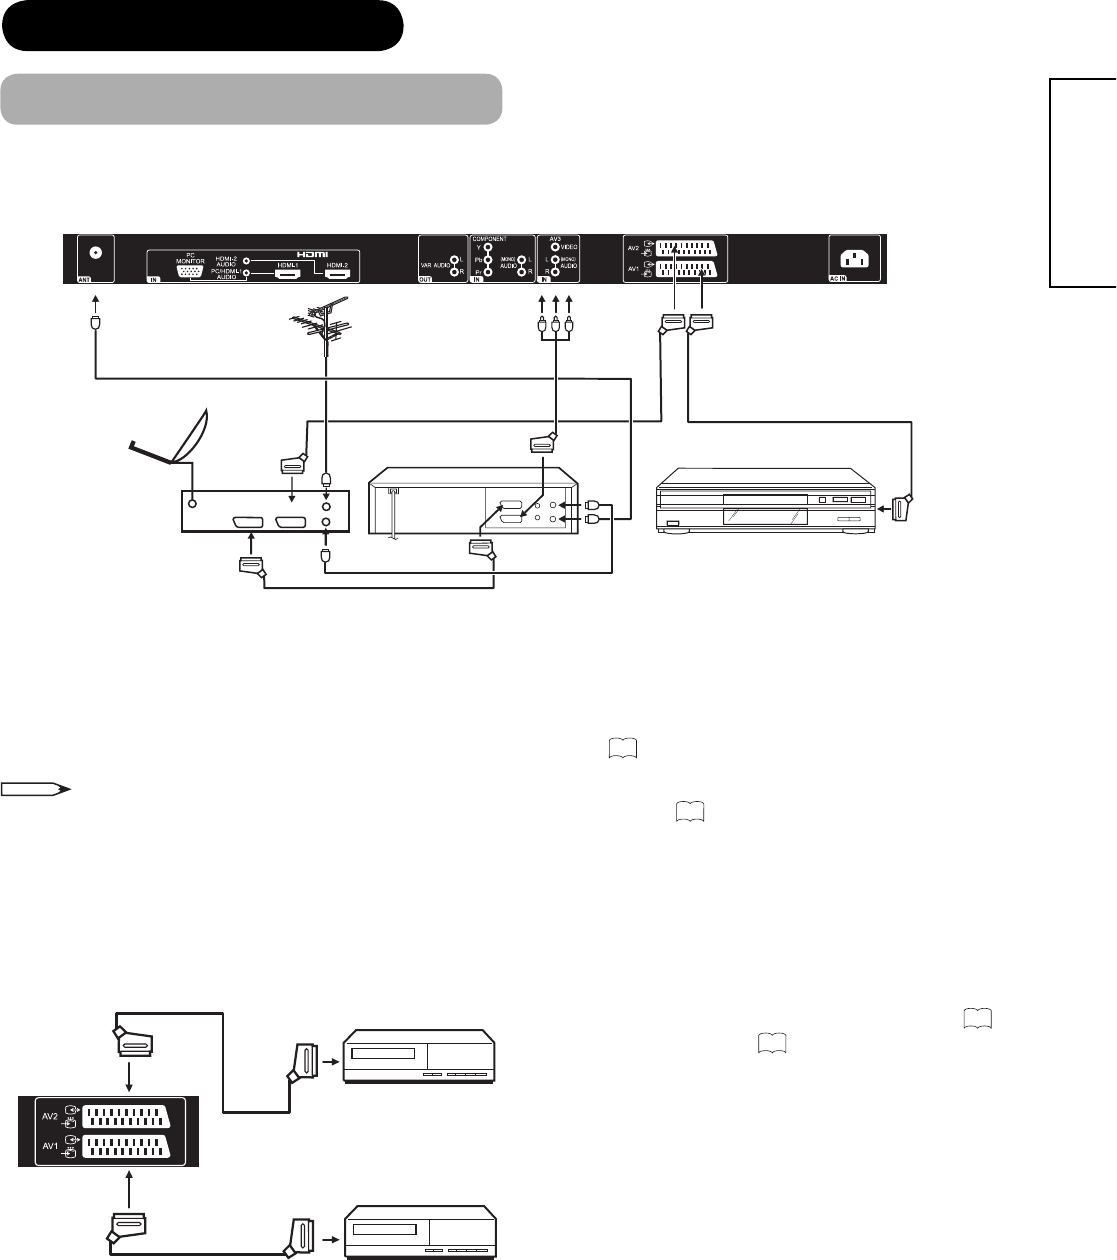
Connect aerial connection lead to the DIGIBOX(STB) ‘in’ socket marked .
Connect VCR ‘out’ to ANT on Plasma TV socket marked ‘ANT’.
Connect DIGIBOX(STB) ‘out’ to VCR ‘in’ socket marked .
: Failure to observe the following guidelines could result in
serious overheating of your TV, or even, in extreme cases, fire.
European plug
UK plug
Stecker für Europa
Stecker für Großbritannien
insert plug...
...and switch on
insert plug...
Prise européenne
Prise britannique
A
B
C
D
3
4
Schalten Sie Ihr Fernsehgerät ein, um das automatische
Setup beginnen zu können ...
A
B
C
D
3
4
Mettez votre TV sous-tension, prêt à démarrer la
procédure d’auto-installation…
QUICK GUIDE/KURZANLEITUNG/MODE D’EMPLOI ABRÉGÉ/GUIDA DI CONSULTAZIONE
Schließen Sie das Hauptstromkabel am Plasmabildschirm an.
Schließen Sie das Antennenkabel an die mit markierte DIGIBOX
(STB)-Eingangsbuchse an.
Schließen Sie die DIGIBOX (STB)-Ausgangsbuchse an die mit
markierte Eingangsbuchse des Videorekorders an.
Verbinden Sie die Videorekorder-Ausgangsbuchse ‘out
,
in die mit
markierte Antennenbuchse (ANT) am Plasmabildschirm an.
Spina europea
Spina Regno Unito
A
B
C
D
3
4
Accendete il vostro televisore, pronti ad avviare la
procedura di configurazione automatica...
QUICK GUIDE/KURZANLEITUNG/MODE D’EMPLOI ABRÉGÉ/GUIDA DI CONSULTAZIONEQUICK GUIDE/KURZANLEITUNG/MODE D’EMPLOI ABRÉGÉ/GUIDA DI CONSULTAZIONE
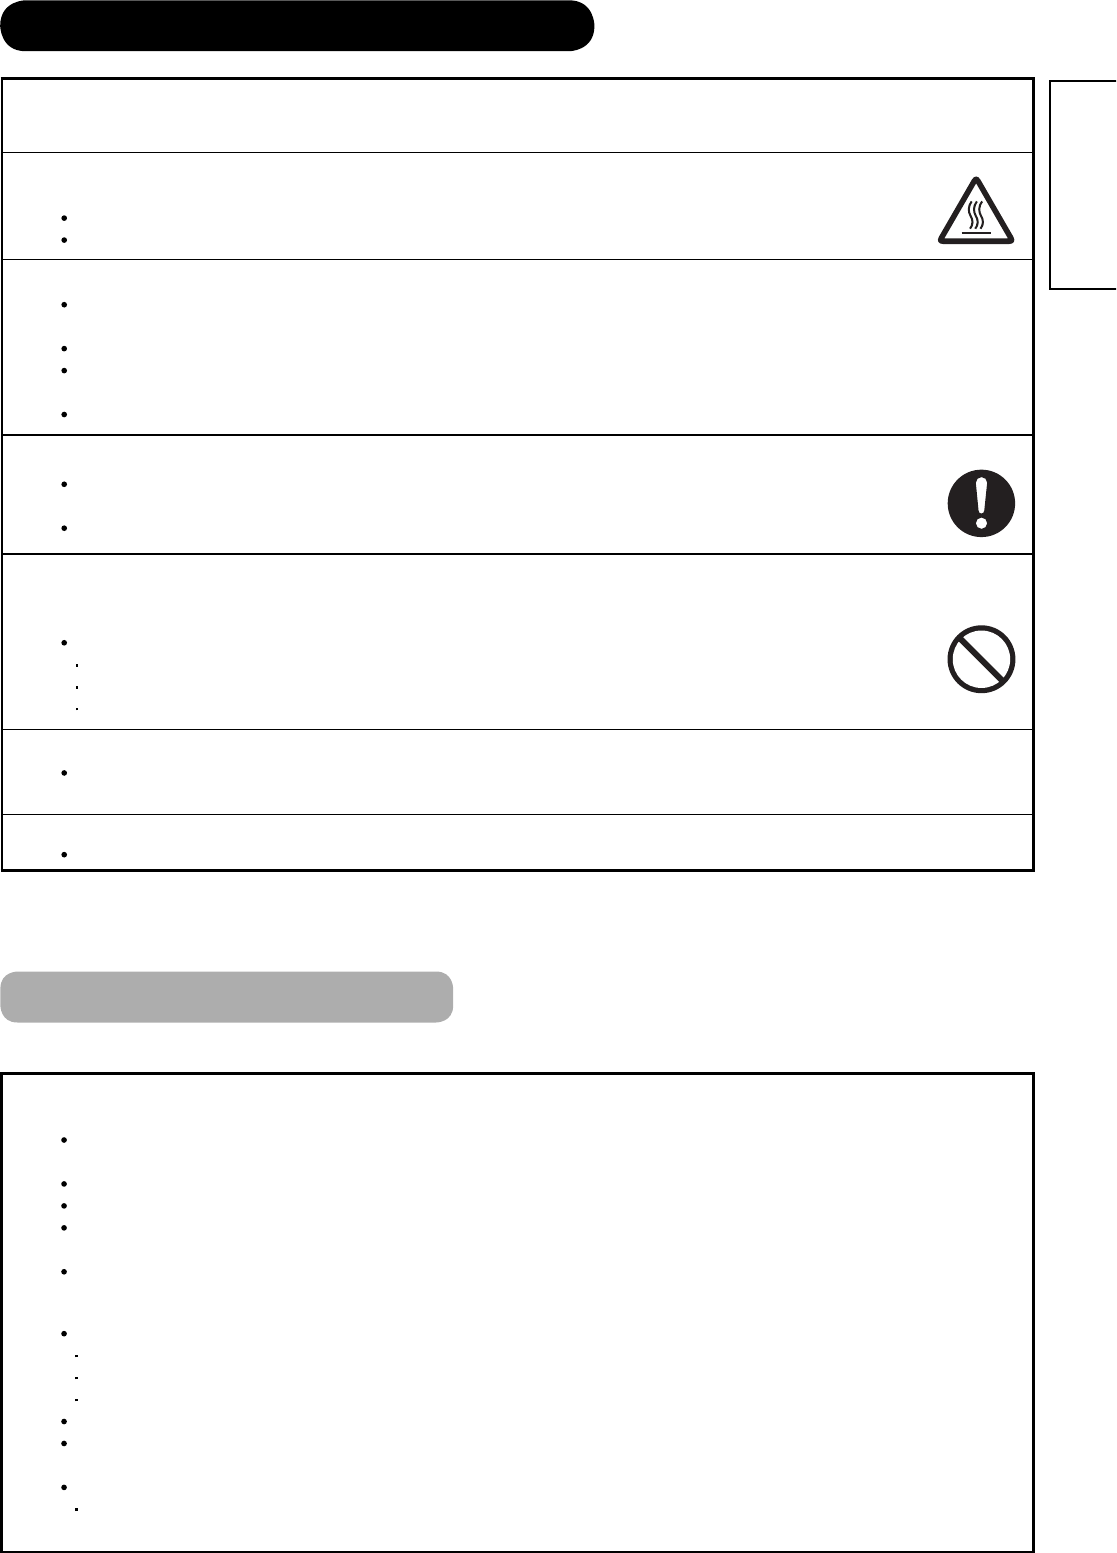
IMPORTANT NOTE : Do not switch your TV on until all external equipment
is connected. If you have a Video Cassette Recorder or a Satellite receiver
connected to this TV, please ensure that they are switched on before
automatic tuning begins. In the case of a VCR, insert a prerecorded tape and
begin playback of your equipment. With a Satellite receiver, select Sky News.
These measures ensure that all your external equipment is tuned in during
the autotune procedure.
To minimize the potential for the occurrence of image retention, reduce the
Brightness and Contrast levels as much as possible without impairing image
quality.
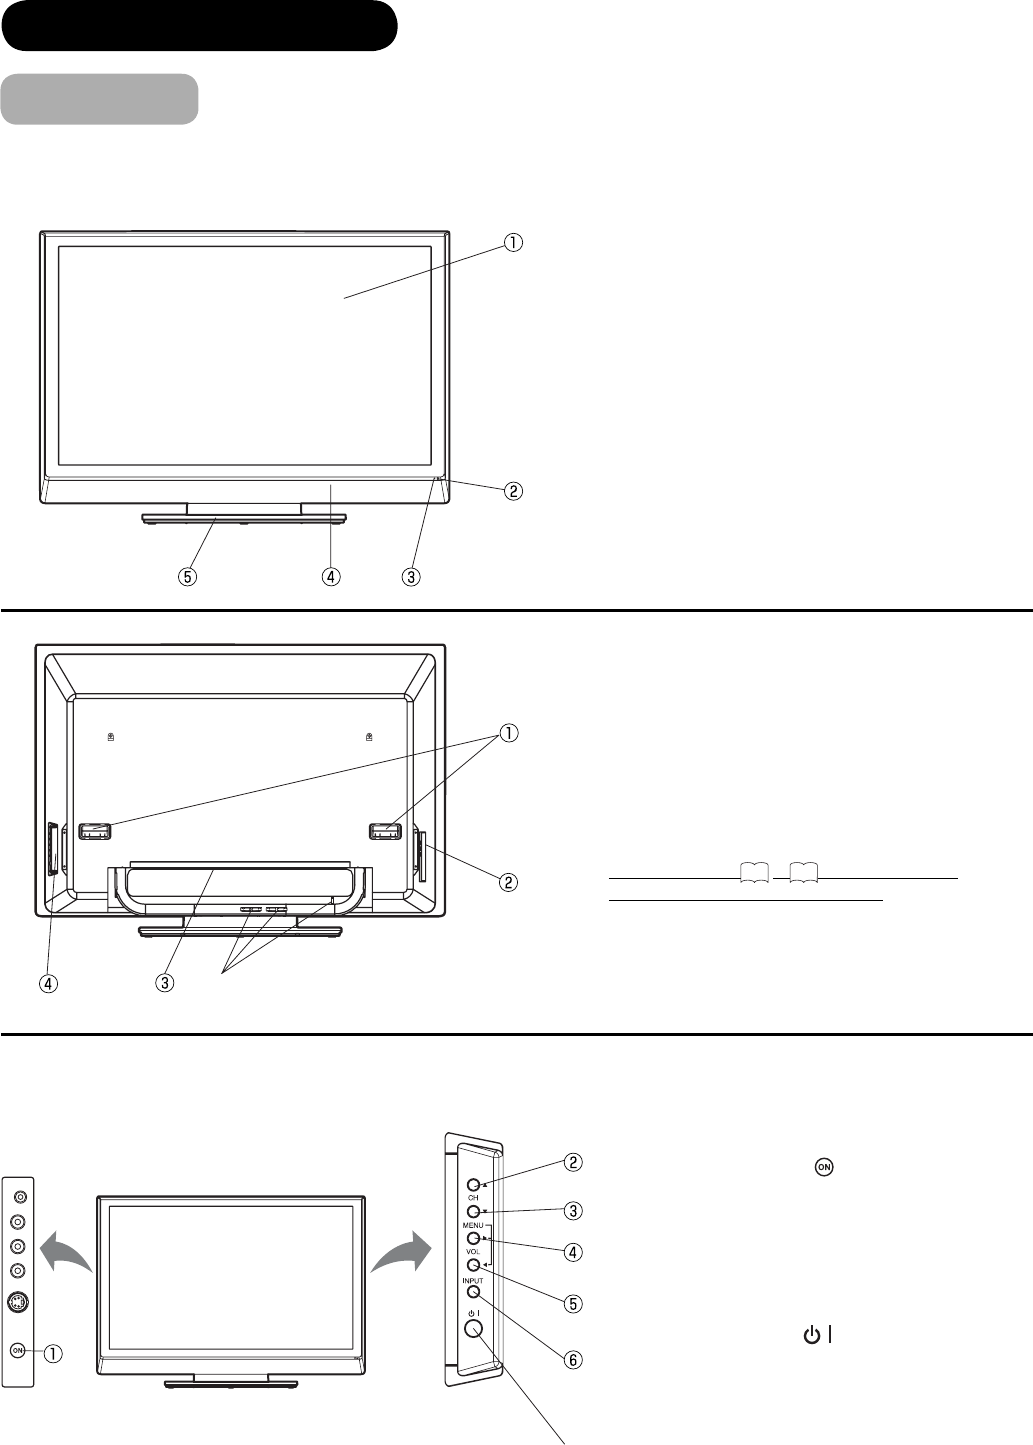
Main Power switch
(on the left of the TV)
Hauptschalter
(an der linken Seite
des Fernsehgerätes)
Bouton d’alimentation
générale (à gauche du TV)
Interruttore di
alimentazione
principale (a sinistra
del televisore)
AUX
VCR TV
IN
OUT
D
A
IN
OUT
IN
OUT
B
C
AV1/TV
AV2/
DECODER
IN
OUT
C
B
C
R
Y
COMPONENT VIDEO OUT
L
R
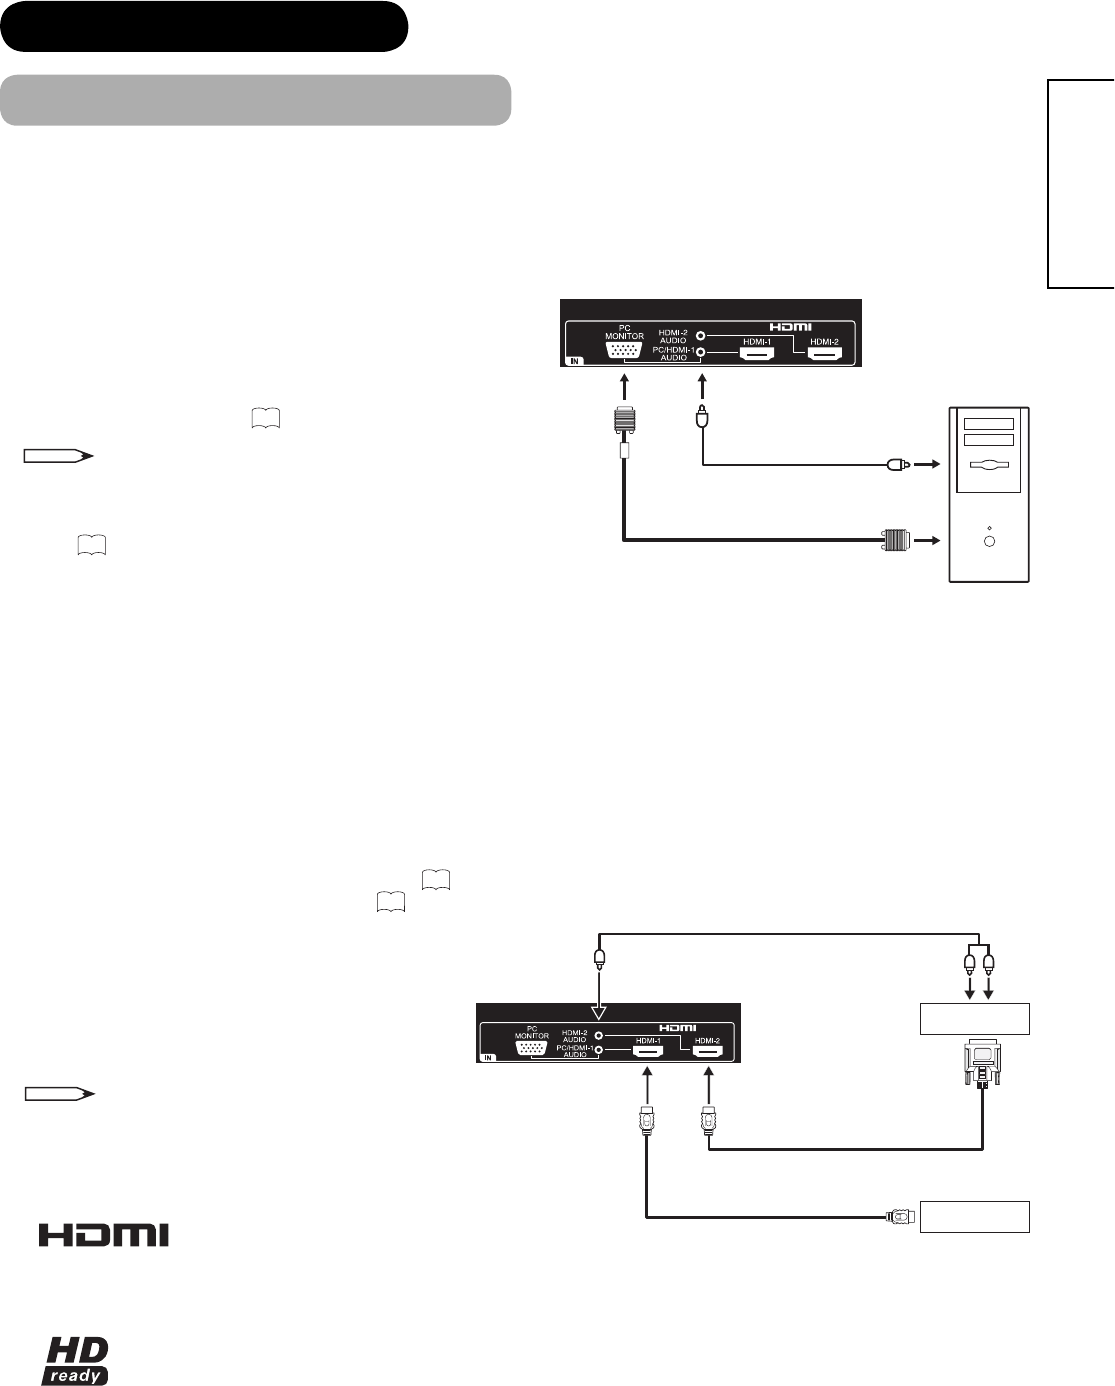
HDMI
C
B
C
R
Y
COMPONENT VIDEO OUT
LR
HDMI
C
B
C
R
Y
COMPONENT VIDEO OUT
LR
HDMI
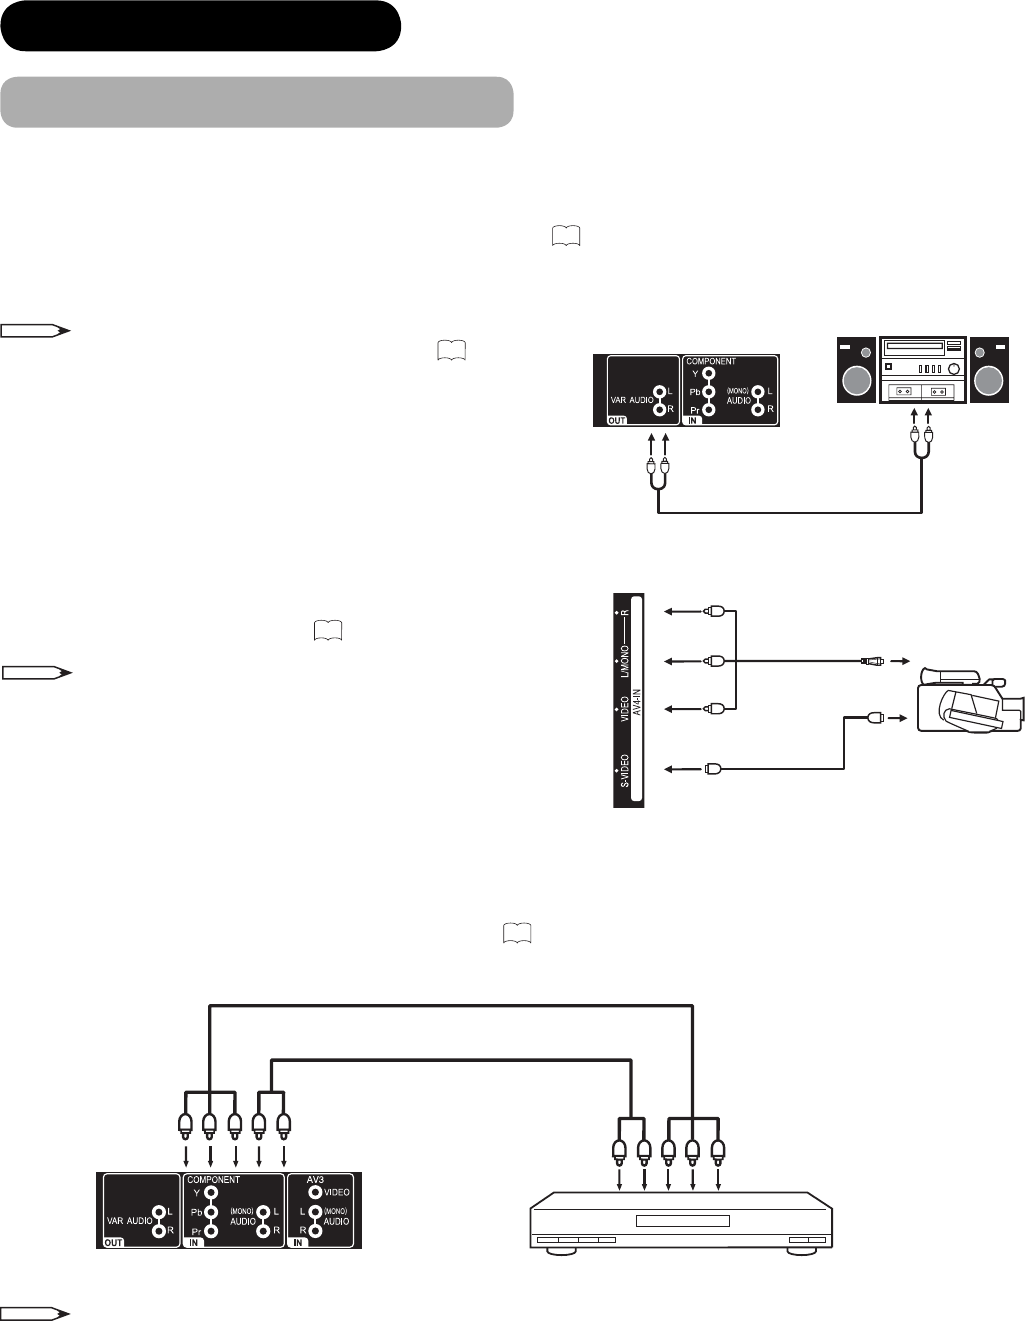
CAMCORDER
RF LEADS
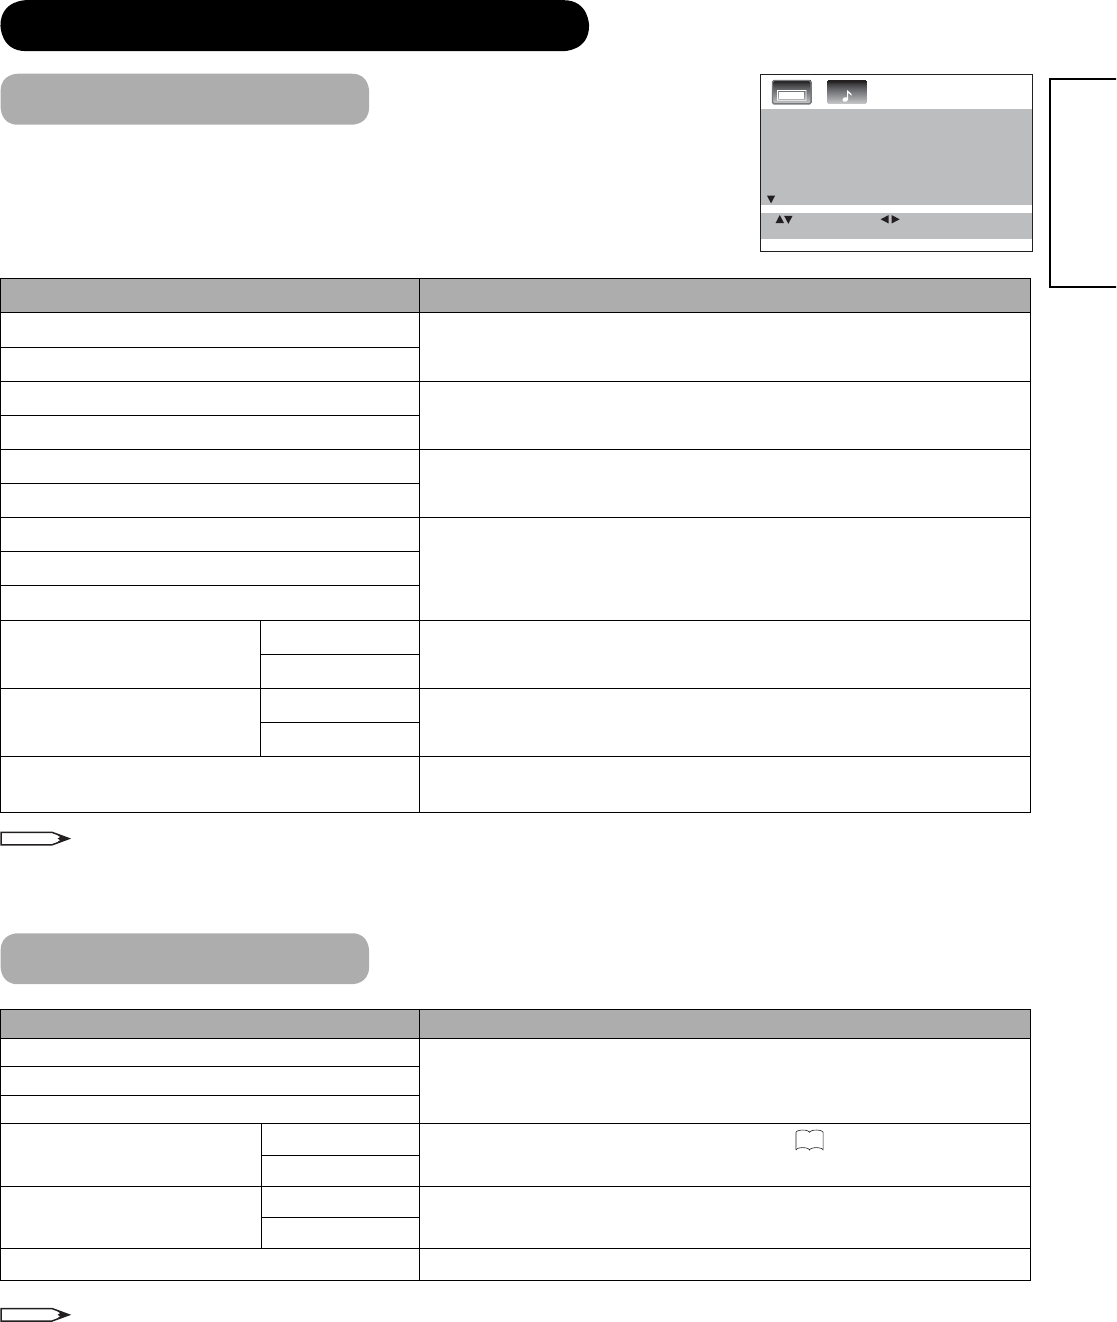
TV rear Panel
HDMI LEAD (optional)
HDMI-KABEL (optional)
CÂBLE HDMI (optionnels)
CAVO HDMI (opzionali)
SCART LEADS (optional)
SCART-KABEL (optional)
CÂBLES PÉRITEL (optionnels)
PRESE SCART (opzionali)
SCART LEADS (optional)
SCART-KABEL (optional)
CÂBLES PÉRITEL (optionnels)
PRESE SCART (opzionali)
AERIAL*
ANTENNE*
ANTENNE*
ANTENNA*
S-CABLE
S-KABLE
CÂBLE S
CAVO-S
2 PHONO LEADS
(AUDIO L, AUDIO R) (optional)
1
CAMÉSCOPE
VIDEOCAMERA
CAMCORDER
DIGIBOX (STB)
DIGIBOX (STB)
DIGIBOX (Boîtier adaptateur)
DIGIBOX (STB)
VCR
VIDEOREGISTATORE
VIDEOREKORDER
Magnétoscope
PRESE RF
RF-KABEL
CÂBLES HF
LETTORE DVD
DVD-PLAYER
DVD PLAYER
LECTEUR DE DVD
LETTORE DVD
DVD-PLAYER
DVD PLAYER
LECTEUR DE DVD
LETTORE DVD
DVD-PLAYER
DVD PLAYER
LECTEUR DE DVD
Monitorrückseite
Monitor Pannello posteriore
Panneau arrière du moniteur
Solo Regno Unito
U.K. ONLY
R.U. UNIQUEMENT
Nur Großbritannien
Except UK
Sauf R.U.
Ad eccezione del Regno Unito
Außer Großbritannien
WICHTIGER HINWEIS : Schalten Sie das Fernsehgerät erst ein, wenn alle
externen Geräte angeschlossen sind. Falls ein Videokassettenrekorder oder
Satellitenreceiver an dieses Fernsehgerät angeschlossen ist, sorgen Sie
dafür, dass diese Geräte eingeschaltet werden, bevor die automatische
Kanalsuche beginnt. Im Falle eines Videorekorders setzen Sie ein
bespieltes Band in das Gerät ein, und beginnen Sie dann mit der
Wiedergabe dieses Bandes. Bei einem Satellitenreceiver wählen Sie Sky
News. Auf diese Weise wird sichergestellt, dass alle externen Geräte bei
der automatischen Kanalsuche eingestellt werden.
Die Gefahr einer Bildretention kann reduziert werden, indem die Helligkeits-
und Kontraststufen so weit als möglich verringert werden, ohne die
Bildqualität zu beeinträchtigen.
WICHTIG
: Bei Nichtbeachtung der folgenden Anleitungen kann sich das
Fernsehgerät überhitzen und, im Extremfall, sogar einen Brand
auslösen.
Achten Sie darauf, dass ein Freiraum von mindestens 100 mm
(10 cm) an den Seiten, hinter und über dem Fernsehgerät
vorhanden ist, wenn Sie das Gerät in einem Schrank aufstellen
oder an der Wand montieren. Auf diese Weise wird für die
geeignete Belüftung gesorgt.
Hüllen Sie das Fernsehgerät während des Betriebs nicht in weiche
Einrichtungsgegenstände, wie etwa Vorhänge. Stellen Sie das
Fernsehgerät während des normalen Betriebs nie auf einen.
Teppich. Dieser könnte die auf der Unterseite des Fernsehgeräts
befindlichen Belüftungsöffnungen blockieren.
Stellen Sie das Fernsehgerät immer auf einer ebenen Fläche auf
oder, falls vorhanden, auf dem Ständer.
Stecken Sie den Netzstecker des Fernsehgeräts in eine
Wandsteckdose ein
Führen Sie den
Stecker ein …
Führen Sie den
Stecker ein …
...und schalten Sie
den Schalter ein
Connectez la fiche d’alimentation du téléviseur sur une
prise secteur murale
REMARQUE IMPORTANTE : Ne mettez pas votre téléviseur sous tension
tant que tous les appareils extérieurs ne sont pas connectés. Si un
magnétoscope ou un récepteur satellite est connecté à ce téléviseur,
assurez-vous de le mettre sous tension avant de commencer le réglage
automatique. Dans le cas d’un magnétoscope, insérez une cassette
préenregistrée et démarrez sa lecture. Dans le cas d'un récepteur satellite,
choisissez Sky News. Ces mesures permettent d’assurer que votre appareil
extérieur est accordée pendant la procédure de réglage automatique.
Pour réduire le potentiel de rétention d’image, diminuez autant que possible
les niveaux de Luminosité et de Contraste sans que cela n’affecte la qualité
de l’image.
insérez la fiche... insérez la fiche...
...et mettez sous tension
IMPORTANT
: Ne pas observer les directives suivantes peut entraîner une
surchauffe importante de votre téléviseur et même dans les
cas extrêmes, un incendie.
Assurez-vous qu’il y a un espace d’au moins 100 mm (10
cm) sur les côtés, à l’arrière et au-dessus du téléviseur,
s’il est placé dans un meuble ou monté dans un mur. Cela
permet une ventilation correcte.
Ne recouvrez pas le téléviseur d’un tissus tel qu’un rideau
pendant qu'il est en cours de fonctionnement.
Ne placez jamais le téléviseur sur un tapis pendant sont
fonctionnement normal - cela pourrait boucher les fentes
de ventilation situées dessous le téléviseur.
Placez toujours le téléviseur sur une surface plate, ou, s’il
est fourni, sur un socle.
Connectez le câble d'antenne à l’écran à plasma.
Connectez le câble de connexion d’antenne à la prise marquée ‘in’ du
DIGIBOX (boîtier adaptateur).
Connectez la prise marquée ‘out’ du DIGIBOX (boîtier adaptateur) à la
prise marquée ‘in’ du magnétoscope.
Connectez la prise marquée ‘out’ du magnétoscope à la prise marquée
ANT de l’écran à plasma.
English Deutsch Français Italiano
5 PHONO LEADS
(Y, P
B, PR, AUDIO L, AUDIO R) (optional)
5 CAVO AUDIO
(Y, P
B, PR, AUDIO S, AUDIO D) (optional)
5 PHONO-KABEL
(Y, P
B, PR, AUDIO L, AUDIO R) (optional)
5 CÂBLE PHONO
(Y, P
B, PR, AUDIO G, AUDIO D) (optionnels)
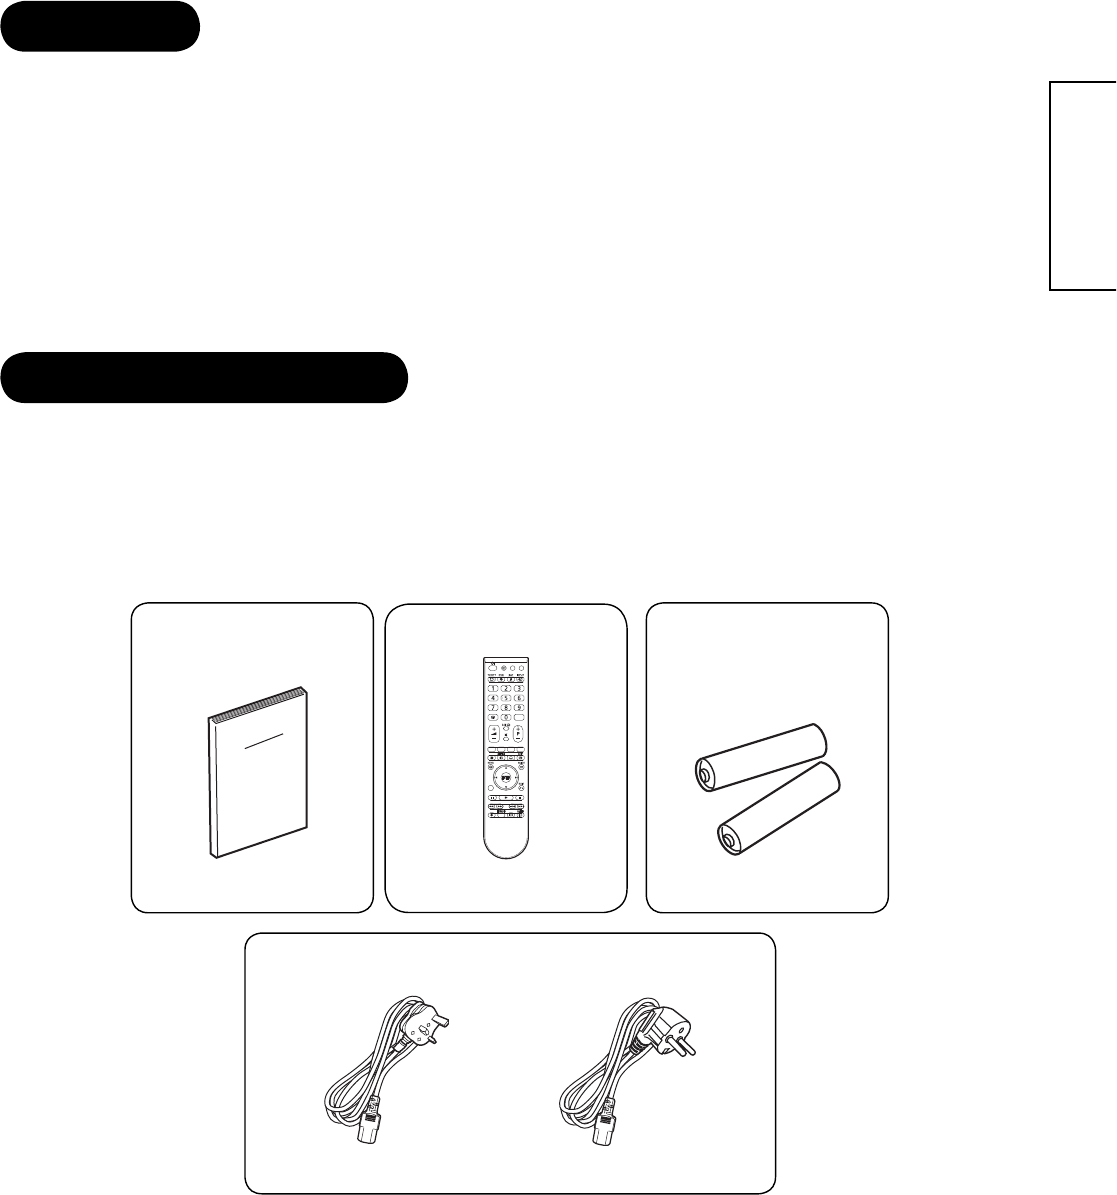
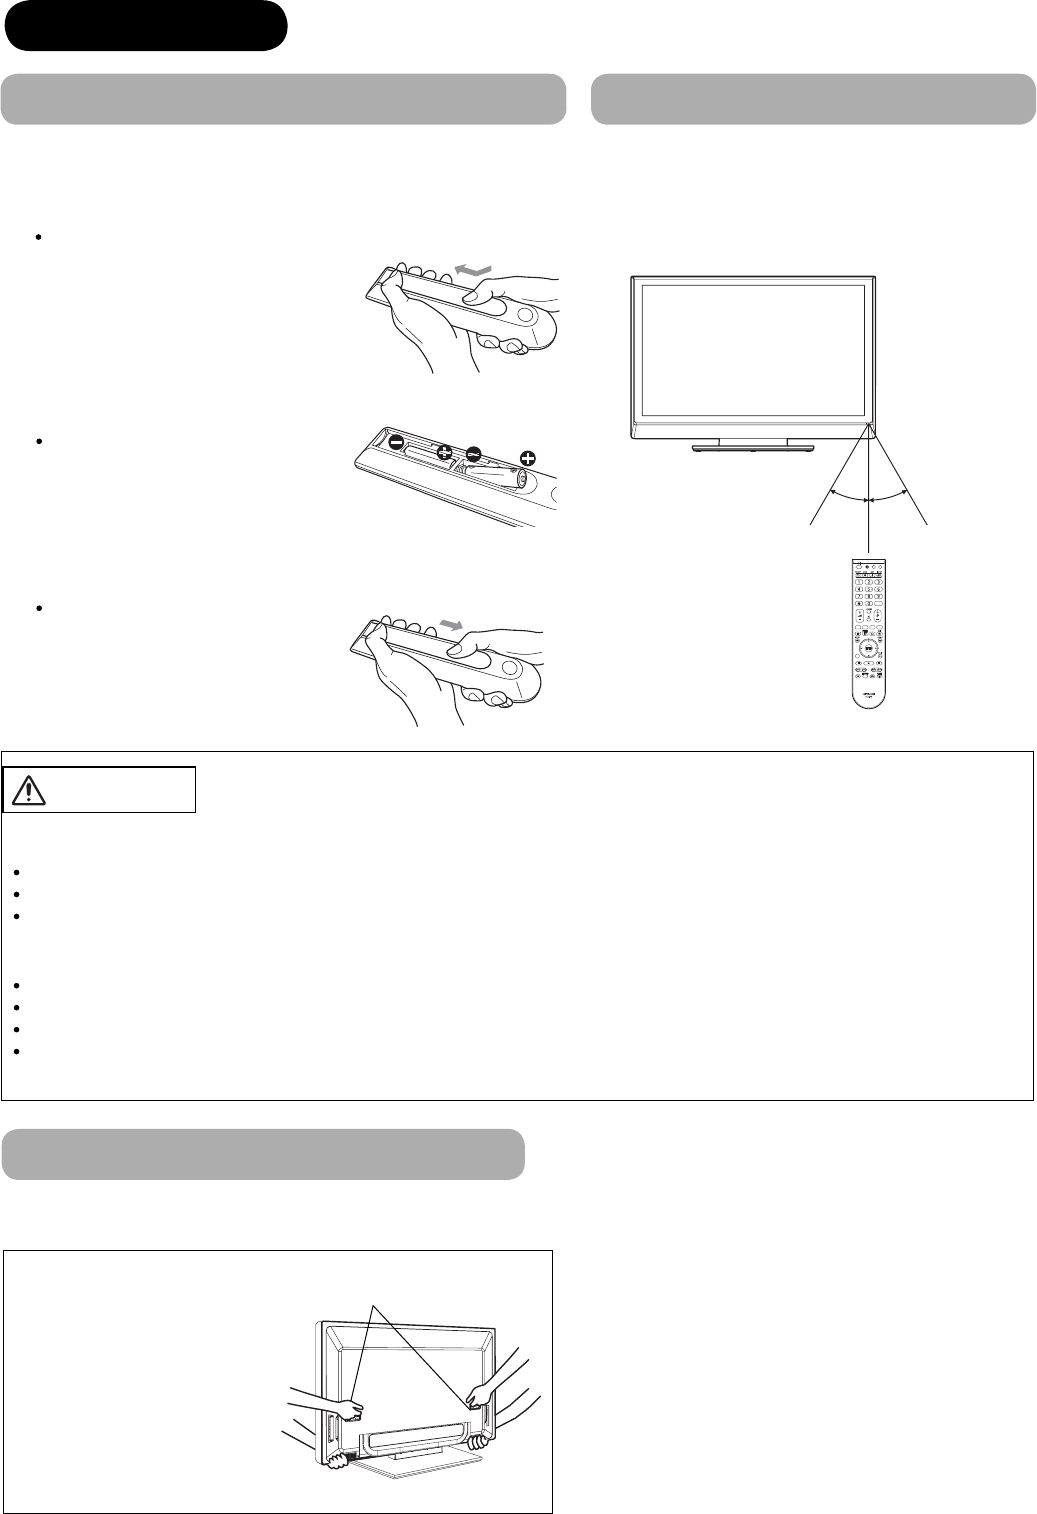
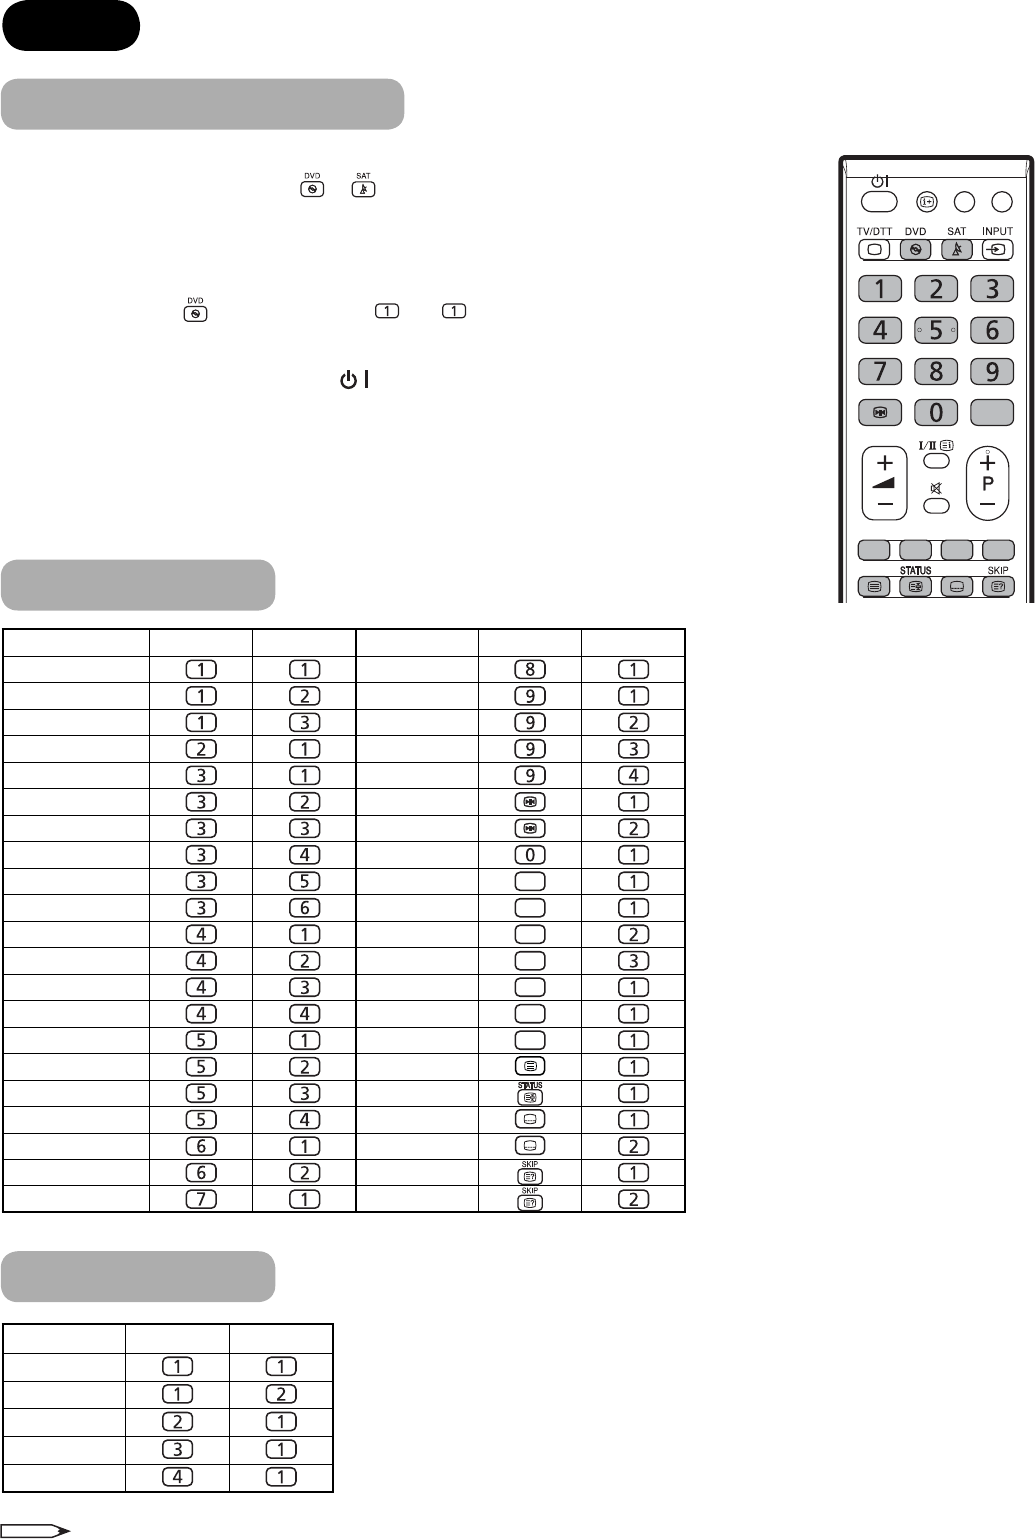
Insert the batteries into your handset
2 2 2
Setzen Sie die Batterien in die Fernbedienung ein
2
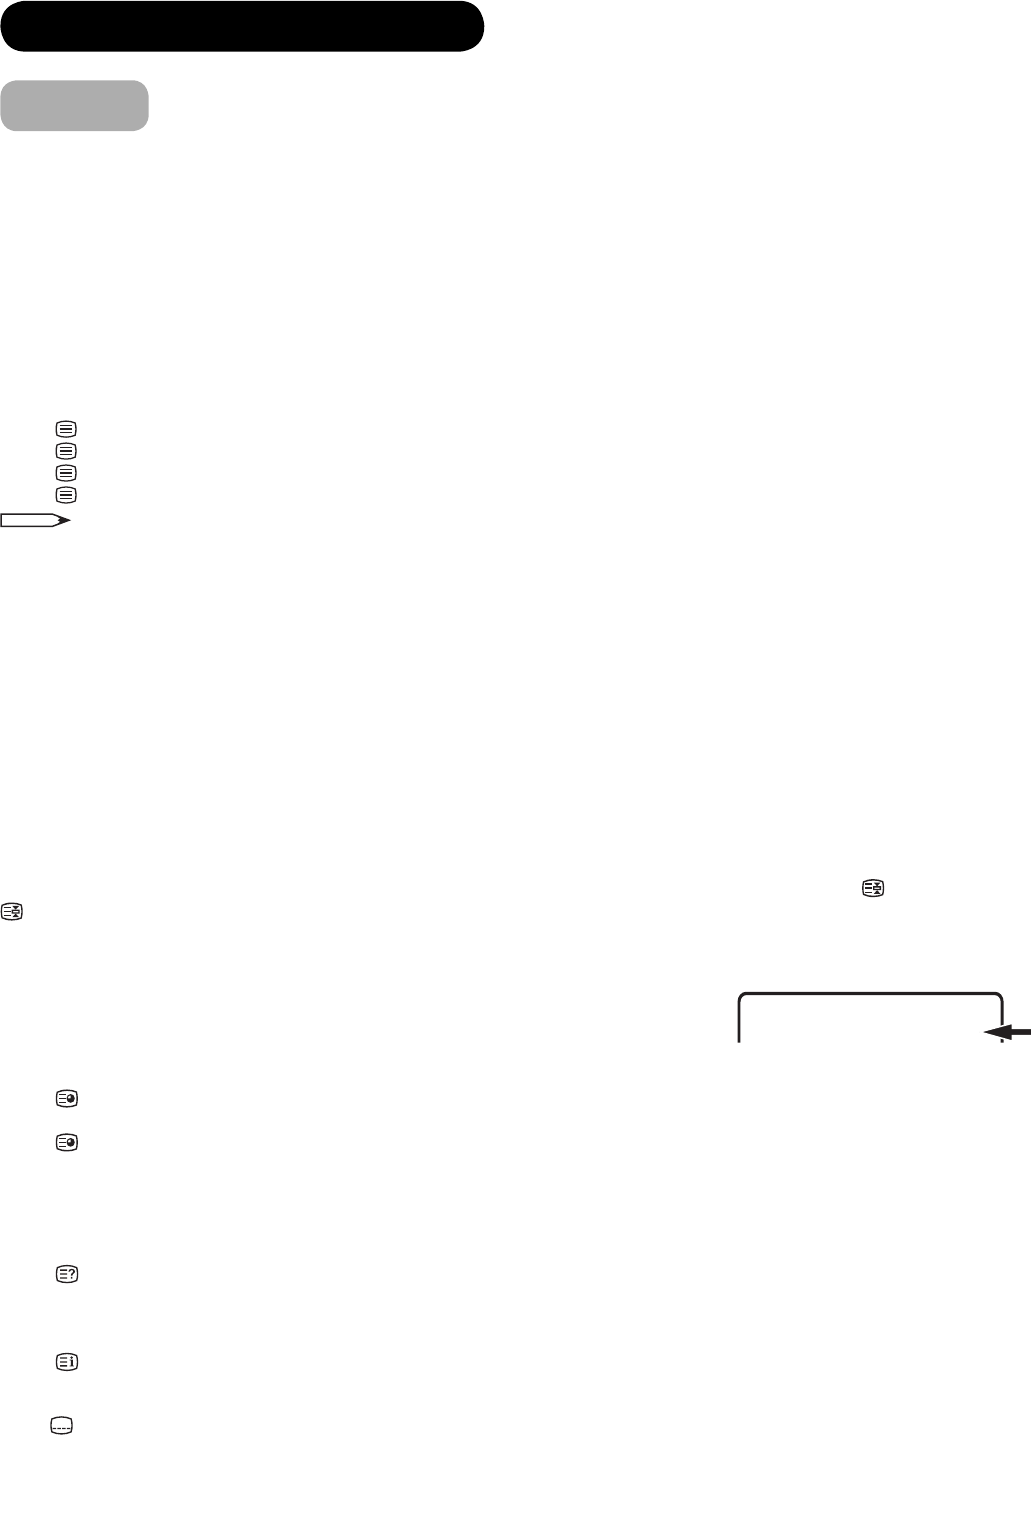
NOTE
If you are not using any of the devices shown in the diagram above, plug the
aerial directly into the TV.
REMARQUE
HINWEIS
NOTA
Insérez les piles dans votre télécommande
Inserire le batterie nel vostro telecomando
Falls Sie keines der oben dargestellten Geräte verwenden, stecken Sie die
Antenne direkt am Fernseher ein.
Si vous n’utilisez aucun des appareils indiqués sur le schéma ci-dessus,
branchez directement l’antenne sur le TV.
Se non utilizzate nessuno dei dispositivi mostrati nello schema qui sopra,
inserite il cavo dell’antenna direttamente nel televisore.
TV SETUP Installation
TV-Einstellung
Installation du téléviseur
Installazione Setup TV
2 CAVO AUDIO
(AUDIO S, AUDIO D) (optional)
2 PHONO-KABEL
(AUDIO L, AUDIO R) (optional)
2 CÂBLE PHONO
(AUDIO G, AUDIO D) (optionnels)
esterni non siano collegati. Se avete un Registratore di Cassette Video o un
che inizi la sintonizzazione automatica. Nel caso di un VCR, inserire un
nastro pre-registrato e avviare la riproduzione dell’apparecchio. Con un
ricevitore Satellitare, selezionare Sky News. Questi provvedimenti
garantiscono che tutti i vostri dispositivi esterni siano sintonizzati durante la
procedura di sintonizzazione automatica.
Per minimizzare la possibilità della ritenzione di immagini, ridurre i livelli di
dell'immagine.
inserire la spina... inserire la spina......e accendere
Collegare il cavo principale allo Schermo al Plasma.
contrassegnata con .
Collegare il DIGIBOX (STB) ‘out’ al VCR ‘in’ presa contrassegnata con .
contrassegnata con .
persino, in casi estremi, un incendio.
muro. Ciò permetterà una ventilazione adeguata.
funzione.
ventilazione sulla base della TV.
sull’accessorio di supporto, se in dotazione.