637265
44
Verklein
Vergroot
Pagina terug
1/64
Pagina verder
ScanJet Pro 2500 f1 atbed scanner
www.hp.com/support
User Guide
HP ScanJet Pro 2500 f1 flatbed scanner
User Guide
Copyright and license
© 2015 Copyright HP Development Company,
L.P.
Reproduction, adaptation or translation
without prior written permission is prohibited,
except as allowed under the copyright laws.
The information contained herein is subject to
change without notice.
The only warranties for HP products and
services are set forth in the express warranty
statements accompanying such products and
services. Nothing herein should be construed
as constituting an additional warranty. HP shall
not be liable for technical or editorial errors or
omissions contained herein.
Trademark credits
ENERGY STAR
®
and the ENERGY STAR
®
mark are
registered U.S. marks.
Microsoft®, Windows®, Windows® XP, and
Windows Vista® are U.S. registered trademarks
of Microsoft Corporation.
Apple and the Apple logo are trademarks of
Apple Computer, Inc., registered in the U.S. and
other countries. iPod is a trademark of Apple
Computer, Inc. iPod is for legal or rightholder-
authorized copying only. Don't steal music.
OS X is a trademark of Apple Inc., registered in
the U.S. and other countries.
AirPrint is a trademark of Apple Inc., registered
in the U.S. and other countries.
Edition 2, 11/2015
Table of contents
1 Product overview .......................................................................................................................................... 1
Product views ........................................................................................................................................................ 2
Front view ............................................................................................................................................ 2
Back view ............................................................................................................................................. 2
Serial and product numbers ................................................................................................................ 3
Control panel ....................................................................................................................................... 4
Product specifications ........................................................................................................................................... 6
Technical specifications ...................................................................................................................... 6
Supported operating systems ............................................................................................................ 6
Product dimensions ............................................................................................................................. 6
Power consumption, electrical specifications and acoustic emissions ............................................. 6
Operating environment range ............................................................................................................ 7
Product hardware setup and software installation .............................................................................................. 8
Hardware setup ................................................................................................................................... 8
How to get software updates ............................................................................................................. 8
Product features .................................................................................................................................................... 9
Product Features ................................................................................................................................. 9
Scanner software (Windows) .............................................................................................................................. 10
HP Scan software .............................................................................................................................. 10
HP Scanner Tools Utility .................................................................................................................... 10
HP TWAIN ........................................................................................................................................... 10
Scanner software (OS X) ...................................................................................................................................... 10
Sleep Mode and auto-off settings ....................................................................................................................... 10
2 Use the scanner ........................................................................................................................................... 11
Load originals ...................................................................................................................................................... 11
Document loading tips ...................................................................................................................... 11
Supported paper types ..................................................................................................................... 13
Load documents on the scanner glass ............................................................................................. 14
Load paper in the Automatic Document Feeder (ADF) input tray .................................................... 15
Introduction .................................................................................................................... 15
Required guidelines before loading documents ............................................................ 15
ENWW iii
Load same-sized documents ......................................................................................... 16
Start a scan from the hardware .......................................................................................................................... 18
Scan from the control panel buttons ................................................................................................ 18
Use the scanning software (Windows) ................................................................................................................ 18
Work with scan shortcuts .................................................................................................................. 18
View scan shortcuts ........................................................................................................ 19
Create scan shortcuts ..................................................................................................... 19
Modify shortcuts ............................................................................................................. 19
Scan by using the HP Scan software (Windows) ............................................................................... 19
Scan to a picture (Windows) .............................................................................................................. 19
Scan to a PDF (Windows) ................................................................................................................... 19
Scan text for editing (OCR) (Windows) .............................................................................................. 20
Scan to Email (Windows) ................................................................................................................... 20
Scan to cloud (Windows) ................................................................................................................... 20
Scan long or extra-long documents (Windows) ............................................................................... 21
Automatically detect page size (Windows) ...................................................................................... 21
Automatically detect color (Windows) ............................................................................................. 21
Scan using text-enhanced black and white mode (Windows) .......................................................... 21
Use the scanning software (OS X) ....................................................................................................................... 22
Scan documents (OS X) ..................................................................................................................... 22
Scan to email (OS X) .......................................................................................................................... 22
Scan from other applications (OS X) ................................................................................................. 22
Scanning tips ....................................................................................................................................................... 23
Optimize scanning and task speeds ................................................................................................. 23
Scanning fragile originals ................................................................................................................. 23
3 Care and maintenance .................................................................................................................................. 25
HP Scanner Tools Utility Maintenance tab (Windows) ........................................................................................ 26
HP Utility (Mac OS X) ............................................................................................................................................ 26
Clean the product ................................................................................................................................................ 27
Clean the scanner glass .................................................................................................................... 27
Introduction .................................................................................................................... 27
Required items for cleaning ........................................................................................... 27
Clean the scanner glass .................................................................................................. 27
Clean the Automatic Document Feeder scanning strips .................................................................. 28
Introduction .................................................................................................................... 28
Clean the scanning strips ................................................................................................ 28
Clean the rollers ................................................................................................................................ 29
Introduction .................................................................................................................... 29
Clean the rollers .............................................................................................................. 29
Replace parts ....................................................................................................................................................... 32
iv ENWW
Replace the roller cover .................................................................................................................... 32
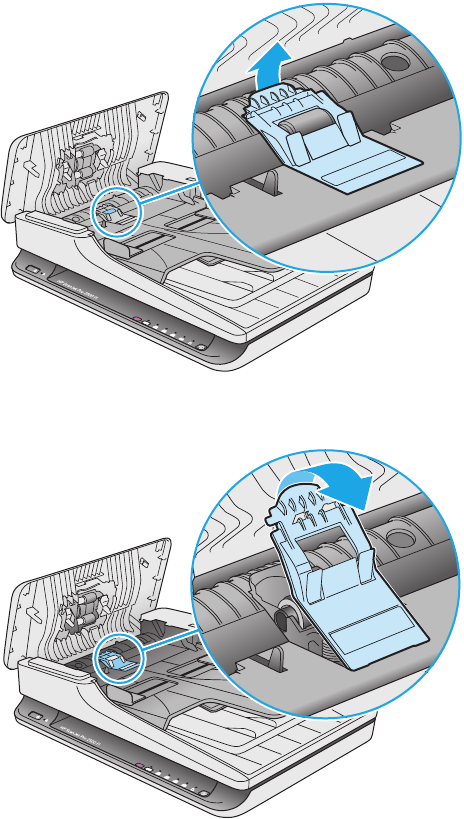
Replace the roller kit ......................................................................................................................... 34
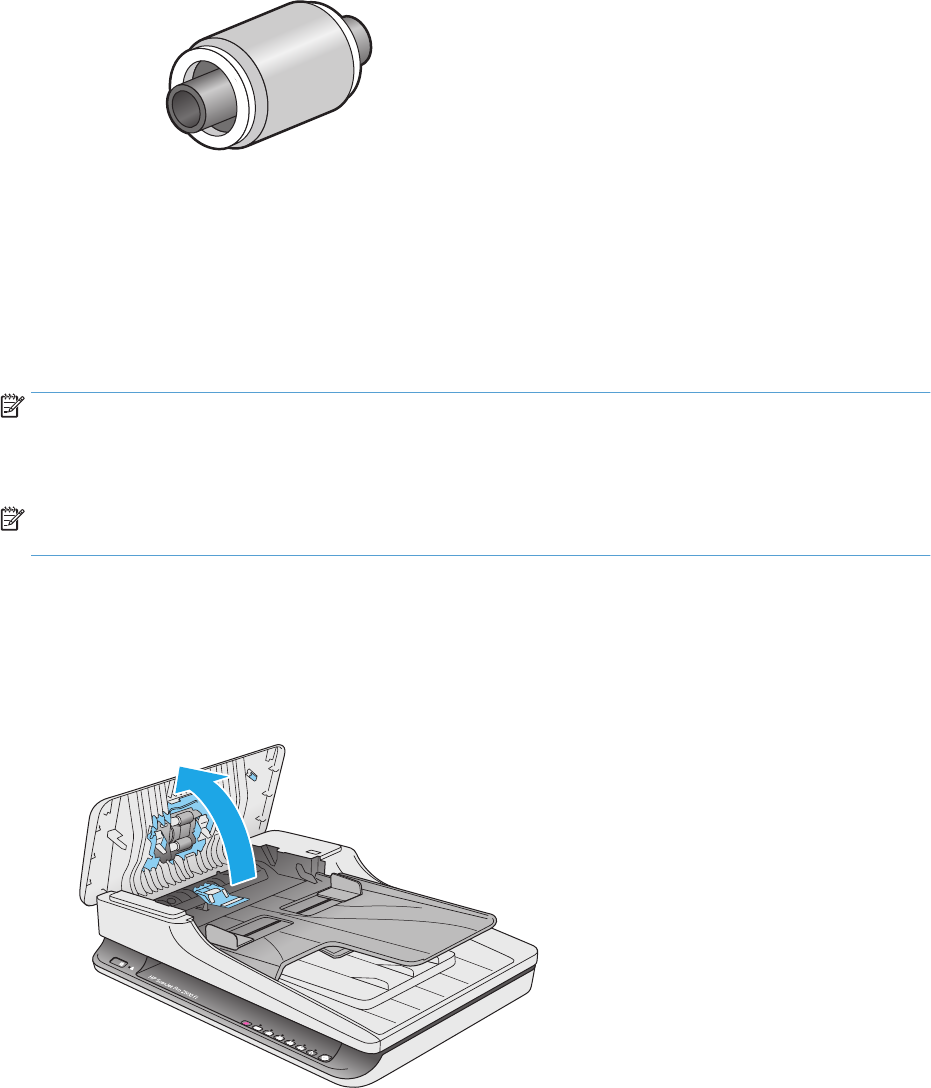
Replace the pick up roller module .................................................................................................... 36
Order parts and accessories ................................................................................................................................ 38
4 Solve problems ........................................................................................................................................... 39
Basic troubleshooting tips .................................................................................................................................. 40
Test the scanner .................................................................................................................................................. 41
Reset the scanner ................................................................................................................................................ 42
Scanner installation troubleshooting ................................................................................................................. 43
Check the cables ................................................................................................................................ 43
Uninstall and then reinstall the HP ScanJet drivers and tools (Windows) ....................................... 43
Paper jams ........................................................................................................................................................... 45
Clear jams from the scanner paper path .......................................................................................... 45
An item loaded in the scanner jams repeatedly ............................................................................... 46
Paper feed issues ................................................................................................................................................ 47
Paper jamming, skewing, misfeeds, or multiple-page feeds .......................................................... 47
Paper does not feed from the scanner ............................................................................................. 47
Originals are curling up in the scanner output tray. ......................................................................... 47
Image quality problems ...................................................................................................................................... 48
Scanned images are not straight ...................................................................................................... 48
The scanned images have streaks or scratches ............................................................................... 48
Scanned image is fuzzy ..................................................................................................................... 48
The scan is completely black or completely white ........................................................................... 48
The bottom of the scanned image is cut off ..................................................................................... 48
Scanner operation problems ............................................................................................................................... 49
Connection issues ............................................................................................................................. 50
Check the USB connection .............................................................................................. 50
Buttons are not working properly .................................................................................................... 50
Scanner buttons are not working correctly ................................................................... 50
Scanning performance issues ........................................................................................................... 51
Scanner does not scan right away .................................................................................. 51
Scanner scans only one side of a two-sided page ......................................................... 51
Scanned pages are missing at the scan destination ...................................................... 51
Scanned pages are out of order at the scan destination ............................................... 51
Scan files are too large ................................................................................................... 51
Power issues ........................................................................................................................................................ 52
Check that the scanner has power .................................................................................................... 52
Scanner will not turn on .................................................................................................................... 52
Scanner keeps turning off ................................................................................................................. 52
Additional troubleshooting ................................................................................................................................. 54
ENWW v
Index ............................................................................................................................................................. 55
vi ENWW
1 Product overview
This User Guide covers important information about the HP ScanJet Pro 2500.
Product views
Product specifications
Product hardware setup and software installation
Product features
Scanner software (Windows)
Scanner software (OS X)
Sleep Mode and auto-off settings
For more information, go to
www.hp.com/support/. Click Troubleshooting. Enter the scanner name
(HP ScanJet Pro 2500), and then click Search.
HP’s all-inclusive help for this product includes the following:
Install and configure
Learn and use
Solve problems
Download software updates
Join support forums
Find warranty and regulatory information
ENWW 1
Product views
This section describes the physical components of the HP ScanJet Pro 2500.
Front view
2
8
7
3
1
9
6
4
5
1. Paper guides
2. Document input tray
3. Document output tray
4. Scan button
5. Simplex/duplex toggle button and LED indicator
6. Scan shortcut toggle button and LED indicators
7. Cancel button
8. Error LED indicator
9. Power button
Back view
2
1
1. USB port 2. Power connector
2 Chapter 1 Product overview ENWW
Serial and product numbers
The serial and product numbers are located on the bottom of the scanner.
CN493D1050
ENWW Product views 3
Control panel
Use the buttons on the control panel to power the unit on and off, and to start or cancel a scan.
1 2
Callout Name Description
1 Power button Press the Power button to power on the scanner. Press and hold the
Power button for three seconds to power off the scanner.
2 Error LED Indicator Indicates an error with the scan.
1 2 3 4 5 6 7 8
Callout Name Description
1Cancel
Button Press the cancel button to cancel a scan.
4 Chapter 1 Product overview ENWW
Callout Name Description
2 Scan Shortcut
Toggle Button Press this button to toggle through and select a scan shortcut option:
Scan to PDF
Scan to JPEG (picture)
Scan to Email
Scan to Cloud
The selected shortcut will be indicated by the corresponding LED
indicator.
NOTE: The settings of the shortcuts can be configured in the
HP Scan software.
3
Scan to PDF
LED Indicator
Indicates that the Scan to PDF shortcut is selected.
4
Scan to JPEG
LED Indicator
Indicates that the Scan to JPEG (picture) shortcut is selected
5
Scan to Email
LED Indicator
Indicates that the Scan to Email shortcut is selected
6
Scan to Cloud
LED Indicator
Indicates that the Scan to Cloud shortcut is selected
7
Simplex/Duplex Toggle
Button and
Indicator
Press this button to toggle between simplex and duplex scanning.
When the LED indicator is on, it indicates duplex scanning function.
8
Scan
Button
Press the Scan button to initiate a scan.
ENWW Product views 5
Product specifications
Technical specifications
Automatic document feeder specifications:
Name Description
Input tray capacity 50 sheets of 75g/m2 (20 lb)
Minimum paper size 148 x 89 mm (5.8 x 3.5 in)
Maximum paper size 3100 x 216 mm (122 x 8.5 in)
Minimum paper weight 60 g/m2 (16 lb)
Maximum paper weight 105 g/m2 (28 lb)
Minimum paper guiding space 89 mm (3.5 in)
Supported operating systems
Supported operating systems Windows 7
Windows 8
Windows 8.1
Windows 10
OS X Mavericks 10.9
OS X Yosemite 10.10
Product dimensions
Table 1-1 Product dimensions
Product Height Depth Width Weight
HP ScanJet Pro 2500 f1 122 mm (4.8 in) 351 mm (13.8 in) 452 mm (17.8 in) 4.3 kg (9.5 lb)
Power consumption, electrical specifications and acoustic emissions
Power usage drops significantly while in Ready or Sleep mode, which saves natural resources and saves
money without affecting the high performance of this product.
6 Chapter 1 Product overview ENWW
Product AC power Sleep Off On/Ready (Flatbed
scanning)
On/Ready (Duplex
Automatic
Document Feeder
scanning)
HP ScanJet Pro
2500
AC110V 1.8 W 0.2 W 10.7 W at 300dpi
8.8 W at 600dpi
15.3 W at 300dpi
10.6 W at 600dpi
HP ScanJet Pro
2500
AC230V 1.69 W 0.16 W 11 W at 300dpi
9.2 W at 600dpi
15.9 W at 300dpi
10.9 W at 600dpi
Operating environment range
This product is intended to be supplied by a Listed Power Unit, marked with LPS or Limited Power Source.
The power supply is rated 100–240V~, and has a DC output of 24 Vdc, 1.5 A, 36 W.
Name Description
Temperature Operating the scanner: 10° to 35° C (50° to 95° F)
Storage: -40° to 65° C (-40° to 149° F)
Relative humidity Operating the scanner: 10% to 80% noncondensing 10° to 35° C (50° to 95° F)
Storage: up to 90% at 0° to 65° C (32° to 149° F)
ENWW Product specifications 7
Product hardware setup and software installation
Hardware setup
For basic setup instructions, see the Installation Guide that came with the scanner. For additional
instructions, go to HP support on the Web.
Go to
www.hp.com/support for HP's all-inclusive help for the scanner. Find the following support:
Install and configure
Learn and use
Solve problems
Download software updates
Join support forums
Find warranty and regulatory information
How to get software updates
For the latest software updates, see www.hp.com/support, select your location, click Drivers & Software,
and then search on your product name or number.
8 Chapter 1 Product overview ENWW
Product features
Product Features
Resolution
1200 pixels per inch (ppi) for Flatbed scanning
600 pixels per inch (ppi) for Automatic Document Feeder
scanning
Memory 64 MB
Environmental features
By default, device enters Sleep Mode after 15 minutes of
inactivity
High content of recyclable components and materials
ENERGY STAR® qualified
ENWW Product features 9
Scanner software (Windows)
The HP ScanJet Pro 2500 comes with a variety of Windows scanning software and drivers, including HP Scan,
ReadIris, CardIris, PaperPort and ArcSoft Photo Studio.
HP Scan software
Create, manage, and edit scan shortcuts by using HP Scan software.
HP Scanner Tools Utility
Use the HP Scanner Tools Utility to change the scanner's power management settings, and to find
information about scanner settings, status, and maintenance.
HP TWAIN
HP TWAIN allows scanning with TWAIN-compliant scan software from other (non-HP) vendors. Not all TWAIN-
compliant software works in the same way, so consult the software documentation for details on how to
acquire scans.
Scanner software (OS X)
The HP ScanJet Pro 2500 provides a scanner driver for Mac OS X. This allows the scanner to be used with an
ICA-compliant application, including the Image Capture and Preview applications that are already installed on
a Mac OS X.
Image Capture provides basic scanning features for scanning documents. Image Capture is available in
the Applications folder.
HP Utility allows you to configure the device and assign the scan button workflow on a Mac OS X.
HP Utility is available in the Applications/HP folder.
Sleep Mode and auto-off settings
By default, the scanner will enter Sleep Mode after 15 minutes of inactivity, and will turn off automatically
after two hours of inactivity to conserve power.
Windows: To change the default auto-off settings, complete these steps:
1. Start the HP Scanner Tools Utility by doing one of the following:
Click Start, point to Programs or All Programs, point to HP, point to ScanJet, point to 2500 f1, and
then click Scanner Tools Utility.
On the Start screen, click to HP Scanner Tools Utility tile.
2. Click the Settings tab, and then select the appropriate sleep mode and auto-off settings.
To specify the period of inactivity after which the scanner automatically turns off, select the
appropriate value (1 hour, 2 hours, 4 hours, or Never) from the Auto-Off: Turn off the scanner
after: drop down list.
Mac OS X: Use HP Utility to change the default sleep and auto-off settings.
10 Chapter 1 Product overview ENWW
2 Use the scanner
The following topics describe how to load and scan originals.
Load originals
The following topics describe how to load originals into the document feeder and on the scanner glass.
Document loading tips
The maximum capacity of the document feeder is 50 sheets of 75 g/m
2
(20 lb) paper. When using
heavier paper, the maximum capacity is decreased.
TIP: Use the lines on the input tray paper guides to help avoid exceeding the document feeder
capacity.
Be sure that the documents are within these guidelines:
Width: 89 mm to 216 mm (3.5 in to 8.5 in)
Length: 148 mm to 3100 mm (5.8 in to 122 in)
Weight:
60 g/m
2
to 105 g/m
2
(16 lb to 28 lb)
Scanning the following types of documents might result in paper jams or damage to the documents.
Wrinkled or creased documents Curled documents
Torn documents Documents with paper clips or staples
Carbon paper Coated paper
Extremely thin, translucent paper Paper with adhesive notes or flags
attached
ENWW Load originals 11
Photos Overhead transparencies
Papers that are stuck together Paper where the toner has not fully
dried, or with wet substances such as
glue or correction fluid
Smooth out any folds or curls in the documents before placing them into the feeder. If the leading edge
of a document is curled or folded, it may cause a paper jam.
To scan fragile documents (such as photos or documents on wrinkled or very lightweight paper), place
the document on the flatbed scanner glass.
Make sure that the hatch on the document feeder is securely latched.
Adjust the paper guides to the width of the documents. Make sure that the paper guides touch the
edges of the original. If there is any clearance between the paper guides and the edges of the
documents, the scanned image might be skewed.
12 Chapter 2 Use the scanner ENWW
Supported paper types
Supported paper sizes for the automatic document feeder:
Name Description
Minimum paper size 148 x 89 mm (5.8 x 3.5 in)
Maximum paper size 3100 x 216 mm (122 x 8.5 in)
Supported paper sizes for the flatbed scanner:
Name Description
Maximum paper size 297.18 x 215.9 mm (11.7 x 8.5 in)
ENWW Load originals 13
Load documents on the scanner glass
1. Open scanner lid.
2. Load the document on the scanner glass face down according to the indicators on the product.
3. Close the scanner lid. The document is now ready to scan.
14 Chapter 2 Use the scanner ENWW
Load paper in the Automatic Document Feeder (ADF) input tray
Introduction
Required guidelines before loading documents
Load same-sized documents
Introduction
This document provides instructions on how to load documents into the Automatic Document Feeder (ADF)
input tray of an HP ScanJet Flatbed Scanner.
Required guidelines before loading documents
Before loading the documents in the ADF input tray, make sure to follow these guidelines:
Use the recommended paper type and size in the ADF input tray. Refer to the Supported paper types
section for paper capacities and capabilities.
Smooth any folds or curls in the pages to avoid paper jams.
Fan through the pages to remove any staples, paper clips, or sticky notes.
Figure 2-1 Fan the pages of the document
Turn on the scanner.
Load originals 15
Slide the paper guides to fit the width of the document. If there is any gap between the paper guides
and the edges of the documents, the scanned image might be skewed.
NOTE: When loading small documents like checks, place the longest edge parallel to the paper width
guides.
Figure 2-2 Adjust paper guides
Load same-sized documents
NOTE: To scan fragile documents (such as photos or documents on wrinkled or very light paper), place the
document face down on the scanning glass.
Make sure to refer to the section Required guidelines before loading documents, and then follow the
following steps to load same-sized documents in the ADF input tray:
1. Tap the long edge of the pages on a flat surface, then rotate and tap the top edge of the document
pages to align the edges of the document pages.
16 Chapter 2 Use the scanner
2. Load the pages with the print side up and the top edge of the pages into the ADF input tray.
NOTE: Do not tap the edge of the document stack or drop the paper stack into the ADF input tray.
Figure 2-3 Load same-sized pages in the ADF input tray
3. Adjust the paper guides to the width of the document.
NOTE: Make sure not to push the paper guides so tightly as they bend the documents.
The documents are now ready to be scanned.
Load originals 17
Start a scan from the hardware
Scan from the control panel buttons
To scan from the control panel, follow these steps:
1. Load the originals in the document feeder or flatbed scanner glass.
2. Press the Toggle
button to select a scan shortcut.
3. Press the Scan
button.
To cancel a scan, press the Cancel
button.
NOTE: If there is paper loaded in one source but not the other, the scanner will only scan from that source.
For example, if there is paper loaded in the automatic document feeder but not on the scanner glass, the
scanner will scan from the automatic document feeder.
Use the scanning software (Windows)
The following topics describe how to use the scanning software.
Work with scan shortcuts
Scan shortcuts provide a fast, efficient way to select the settings for frequently performed scanning tasks.
Use HP Scan software to set up and modify shortcuts.
Use the HP Scanner Tools Utility to create shortcuts associated with TWAIN-compliant non-HP
applications
18 Chapter 2 Use the scanner ENWW
View scan shortcuts
To view existing scan shortcuts, open HP Scan. Existing scan shortcuts will display in a list to the left.
Create scan shortcuts
To create a scan shortcut, follow these steps:
1. Open the HP Scan Software.
2. Click Create new scan shortcut.
3. Enter a name for the new shortcut.
4. Choose to create the new shortcut from current settings, or a pre-existing shortcut.
5. Choose settings for the new scan shortcut. Click More for more settings.
6. Click to the save icon next to the name of the new shortcut in the shortcut list to save the shortcut, or
click the undo icon to undo modifications.
Modify shortcuts
To modify a scan shortcut, follow these steps:
1. Open the HP Scan Software.
2. Select the shortcut to be modified from the list to the left.
3. Choose settings on the right side of the screen.
4. Click the Save icon to the right of the shortcut name to save changes.
Scan by using the HP Scan software (Windows)
1. Open the HP Scan Software.
2. Select a scan shortcut, and then click Scan.
Click Cancel to stop the scan.
Scan to a picture (Windows)
1. Load the document into the document feeder or place on flatbed scanner glass.
2. Open HP Scan Software.
3. Select Save as JPEG or Email as JPEG and click Scan.
4. Or, choose any other scan shortcut and select Photo from the File Type drop down list, and click Scan.
Scan to a PDF (Windows)
1. Load the document into the document feeder or place on flatbed scanner glass.
2. Open HP Scan Software.
ENWW Use the scanning software (Windows) 19
3. Select Save as PDF or Email as PDF and click Scan.
4. Or, choose any other scan shortcut and select PDF from the File Type drop down list, and click Scan.
Scan text for editing (OCR) (Windows)
The scanner uses optical character recognition (OCR) to convert text on a page to text that can be edited on a
computer. The OCR software comes with the scanner. For information about using the OCR software, see
scan text for editing in the online Help.
Scan to Email (Windows)
NOTE: To scan to email, make sure there is an Internet connection.
1. Load the document into the document feeder or on the flatbed scanner glass according to the
indicators.
2. Open HP Scan Software.
3. Select Email as PDF or Email as JPEG and click Scan.
4. Or, choose any other scan shortcut and select Email from the Send To drop down list, and click Scan.
Scan to cloud (Windows)
NOTE: To scan to the cloud, make sure there is an Internet connection.
1. Load the document into the document feeder or place on flatbed scanner glass according to the
indicators.
2. Open HP Scan Software.
3. Select Scan to Cloud and click Scan.
20 Chapter 2 Use the scanner ENWW
Scan long or extra-long documents (Windows)
By default, the scanner will automatically detect your page size using the Auto Detect Size selection in the
page size drop-down list.
For long or extra long documents, select Long (8.5 x 34 inches) or Extra Long (8.5 x 122 inches) from the
page size drop-down list in the scan shortcut settings.
NOTE: Only one page at a time can be scanned when using a long or extra-long page setting.
If the scanner is set to scan long or extra-long pages and a page jams, the entire page could be wrinkled as a
result of the jam. Therefore, select scan profiles that specify long or extra-long pages only when scanning
pages longer than 356 mm (14 in).
Automatically detect page size (Windows)
By default, the scanner will automatically detect your page size using the Auto Detect Size option, and will
crop the scanned image to the size of the detected page and straighten any skewed content.
NOTE: Use the TWAIN user interface to set crop options when scanning from non-HP scanning software.
For information about the auto-detect page size settings, see the online help for the scanning software that
you are using.
Automatically detect color (Windows)
Use this feature to reduce the size of the scanned file by only saving pages that contain color as color scans,
and saving all other pages as black and white.
To automatically detect color in a scanned image, follow these steps:
1. Open the HP Scan Software.
2. Select a scan shortcut, and then click More.
3. Click on the Image tab and select Auto Detect Color from the Color Mode drop down box.
NOTE: For information about the automatic color detection settings, see the online help for the scanning
software that you are using.
Use the TWAIN user interface to automatically detect color when scanning from non-HP scanning software.
Scan using text-enhanced black and white mode (Windows)
You can use this feature to enhance the scanned image when scanning black and white text. To use this
feature, complete the following steps:
1. Open the HP Scan Software.
2. Select a scan shortcut.
3. Click More, and then select the Image tab.
4. Select Enhance Content, and then click OK.
ENWW Use the scanning software (Windows) 21
Use the scanning software (OS X)
The following topics describe how to scan using Mac OS X software.
Scan documents (OS X)
Use the Image Capture application to scan documents from the document feeder.
NOTE: Integrated optical character recognition (OCR) functionality is only available via the Scan button, and
the shortcut assigned to the button must specify OCR output. However, you can initiate a scan through the
optional I.R.I.S. ReadIris Pro software and then save the OCR-processed scan results to a file.
To scan from Image Capture, complete these steps:
1. Place the document in the document feeder.
2. In the Applications folder, double click the Image Capture icon.
3. In the Image Capture window, select your scanner from the Devices list.
TIP: For more Image Capture scanning options, click Show Details.
4. Select a file format and scan destination in the Scan To list, and then click Scan.
Scan to email (OS X)
The computer must be connected to the Internet to complete this task.
To scan to an email, complete these steps:
1. Place the document in the document feeder.
2. In the Applications folder, double click the Image Capture icon.
3. In the Image Capture window, select your scanner from the Devices list.
TIP: For more Image Capture scanning options, click Show Details.
4. Select Mail in the Scan To list to automatically attach the scan to an email message.
NOTE: If you use an email application other than Apple Mail, you can scan the document to a file and
manually attach it to an email, or you can add your email application to the Scan To list.
To add your email application to the list, select Other, select your email application, and then click
Choose.
5. On the resulting email message, enter the email address, subject, and any message text, and then send
the email.
Scan from other applications (OS X)
An image can be scanned directly into any ICA-compliant application. In your application, look for options to
import or acquire images from a scanner.
NOTE: The HP software does not support TWAIN scanning. If your application has import or acquire
functions but your HP scanner is not listed, the application might only be searching for scanners that support
TWAIN.
22 Chapter 2 Use the scanner ENWW
Scanning tips
Optimize scanning and task speeds
Several settings influence the total time for a scanning job. To optimize scanning performance, consider the
following information.
To optimize performance, make sure the computer meets the recommended system requirements. To
view minimum and recommended system requirements, see
www.hp.com, and then search for the
scanner model plus the word specifications.
Saving a scanned image to a searchable format (for example, searchable PDF) takes more time than
saving to an image format because the scanned image is analyzed using Optical Character Recognition
(OCR). Verify the need for a searchable output file before selecting a searchable scan format.
Scanning at a higher resolution than necessary increases scanning time and creates a larger file with no
additional benefit. If scanning at a high resolution, set the resolution to a lower level to increase
scanning speed.
Scanning fragile originals
To scan fragile documents (such as photos or documents on wrinkled or very lightweight paper), place the
document face down on the flatbed scanner glass.
ENWW Scanning tips 23
24 Chapter 2 Use the scanner ENWW
3 Care and maintenance
This section presents information about how to care for and maintain the scanner. For the latest
maintenance information, see
www.hp.com/support.
HP Scanner Tools Utility Maintenance tab (Windows)
HP Utility (Mac OS X)
Clean the product
Replace parts
Order parts and accessories
ENWW 25
HP Scanner Tools Utility Maintenance tab (Windows)
The Maintenance tab of the HP Scanner Tools Utility displays the scanner usage, maintenance history, and
settings. The HP Scanner Tools Utility provides the ability to record scanner maintenance and change the
setting for maintenance alerts.
HP Utility (Mac OS X)
Use HP Utility to manage settings for device configuration, to assign scan shortcuts to the scan shortcut
indicators on the control panel, and to modify shortcut settings.
26 Chapter 3 Care and maintenance ENWW
Clean the product
Occasional cleaning of the scanner helps ensure high-quality scans. The amount of care necessary depends
on several factors, including the amount of use and the environment. Perform routine cleaning as necessary.
Clean the scanner glass
Introduction
Required items for cleaning
Clean the scanner glass
Introduction
Clean the scanner glass periodically, including any time dust or debris is present.
Required items for cleaning
Make sure to have the following items before cleaning:
Clean, lint-free or micro-fiber cloths
Glass Cleaner or clean water
CAUTION: Do not use cleaners that contain abrasives, acetone, benzene, or carbon tetrachloride as
these chemicals can damage the scanning glass.
Avoid using isopropyl alcohol as it can leave streaks on the glass.
Clean the scanner glass
To clean the scanning glass, follow these steps:
1. Lift up the document feeder.
ENWW Clean the product 27
2. Use a clean, lint-free cloth moistened with water or spray the glass cleaner on a clean, lint-free cloth,
and then thoroughly clean the flatbed scanner glass.
CAUTION: Do not spray the glass cleaner directly on the scanner glass as this might cause permanent
damage.
3. Dry the scanner glass with a dry, soft, lint-free cloth.
NOTE: Make sure to dry the scanner glass completely.
4. Turn on the scanner.
The scanner is now ready to use.
Clean the Automatic Document Feeder scanning strips
Introduction
Clean the scanning strips
Introduction
Clean both of the scanning strips periodically, including any time a scanned image has streaks. Dust the strips
of gray, reflective material if debris is present.
Clean the scanning strips
To clean the scanning strip components, follow these steps:
1. Press the Power button to turn off the scanner, and then disconnect the USB cable and power supply
from the scanner.
2. Lift up the document feeder.
28 Chapter 3 Care and maintenance
3. Clean the scanning strips with a soft, lint-free cloth that has been sprayed with a mild glass cleaner.
CAUTION: Use only glass cleaner to clean the scanning strips. Avoid cleaners that contain abrasives,
acetone, benzene, and carbon tetrachloride, all of which can damage the scanning strips. Avoid
isopropyl alcohol because it can leave streaks on the scanning strips.
Do not spray the glass cleaner directly on the scanning strips.
4. Dry the scanning strips with a dry, soft, lint-free cloth. Wipe the strips of gray, reflective material on
each strip.
5. Close the document feeder, reconnect the USB cable and power supply to the scanner, and then press
the Power button to turn on the scanner. The scanner is now ready to use.
Clean the rollers
Introduction
Clean the rollers
Introduction
The rollers may need to be cleaned under the following conditions:
The HP Scanner Tools Utility indicates that cleaning is needed.
The scanner jams repeatedly or multiple sheets are being scanned at the same time.
If the following types of paper are frequently scanned: coated paper, chemically treated documents
such as carbonless paper, documents with a large amount of calcium carbonate, documents written on
with pencil, documents printed by Inkjet printers, or documents on which the toner has not been fused.
Clean the rollers
To clean the separation and feed rollers, follow these steps:
1. Press the Power button to turn off the scanner, and then disconnect the USB cable and power supply
from the scanner.
Clean the product 29
2. Open the document feeder hatch.
3. Using a clean, lint-free cloth moistened with distilled or clean tap water, wipe the separation roller from
right to left. Rotate the roller a full 360 degrees to ensure the entire roller surface is cleaned.
30 Chapter 3 Care and maintenance
4. Wipe the feed rollers from right to left. Rotate the rollers a full 360 degrees to ensure the entire roller
surface is cleaned.
CAUTION: Wait at least two minutes for the rollers to dry before loading documents into the
document input tray.
5. Close the document feeder hatch, and then reconnect the USB cable and power supply to the scanner.
6. Press the Power button to turn on the scanner, and then update the scanner maintenance history:
Open the HP Scanner Tools Utility.
Under Record Cleaning Rollers, click Record Cleaning to log this cleaning activity and update the
roller cleaning history.
Clean the product 31
Replace parts
Replacing parts when necessary helps ensure high-quality scans. Parts may need to be replaced when
indicated by the Scanner Tools Utility, or if the scanner is not working correctly. The HP ScanJet Pro 2500 f1
ADF Roller Replacement Kit includes the following replacement parts:
Roller cover
Separation roller
Pickup roller module
The replacement kit also includes detailed instructions for replacing each of these parts.
Replace the roller cover
To remove and replace the roller cover, follow these steps:
1. Press the Power button to turn off the scanner, and then disconnect the USB cable and power supply
from the scanner.
2. Open the document feeder hatch.
32 Chapter 3 Care and maintenance ENWW
3. Release the roller cover hook.
4. Rotate the roller cover to remove.
5. Replace the roller cover as described in the instructions that were included with the replacement kit.
6. Close the document feeder hatch. Reconnect the USB cable and power supply to the scanner.
Scanner is now ready to use.
ENWW Replace parts 33
Replace the roller kit
Replace the separation roller under the following conditions:
Windows: When the Maintenance Recommended dialog indicates they are due for maintenance.
If the scanner experiences repeated document jams.
NOTE: HP recommends replacing the pickup module and separation roller every 30,000 scans.
Windows: The HP Scanner Tools Utility can provide a reminder when service is needed, which depends on
many conditions and might be sooner than this replacement interval.
NOTE: The roller replacement kit is a consumable and is not covered under warranty or standard service
agreements.
To replace the roller and separation pad, follow these steps:
1. Press the Power button to turn off the scanner, and then disconnect the USB cable and power supply
from the scanner.
2. Open the document feeder hatch.
34 Chapter 3 Care and maintenance ENWW
3. Release the roller cover hook, and then rotate the roller cover to remove.
4. Remove and replace the roller as described in the instructions that were included with the replacement
kit.
ENWW Replace parts 35
5. Press the Power button to turn on the scanner:
6. Windows: Update the scanner maintenance history.
a. Open the HP Scanner Tools Utility.
b. Under Record Replacement, click Record & Replacement to log this replacement activity and
update the roller replacement history.
Replace the pick up roller module
To replace the pick up roller module, follow these steps:
1. Press the Power button to turn off the scanner, and then disconnect the USB cable and power supply
from the scanner.
2. Open the document feeder hatch.
36 Chapter 3 Care and maintenance ENWW
44

Hulp nodig? Stel uw vraag in het forum

Spelregels
1

Forum

HP-ScanJet-Pro-2500-f1
  • Op de gescande documenten zijn strepen (in de lengte van de pagina) zichtbaar, die op het originele document niet staan. Wordt m.i. veroorzaakt tijdens het scannen.
    Hoe kan ik dit oplossen/schoonmaken? Gesteld op 26-8-2021 om 08:35

    Reageer op deze vraag Misbruik melden

Misbruik melden

Gebruikershandleiding.com neemt misbruik van zijn services uitermate serieus. U kunt hieronder aangeven waarom deze vraag ongepast is. Wij controleren de vraag en zonodig wordt deze verwijderd.

Product:

Bijvoorbeeld antisemitische inhoud, racistische inhoud, of materiaal dat gewelddadige fysieke handelingen tot gevolg kan hebben.

Bijvoorbeeld een creditcardnummer, een persoonlijk identificatienummer, of een geheim adres. E-mailadressen en volledige namen worden niet als privégegevens beschouwd.

Spelregels forum

Om tot zinvolle vragen te komen hanteren wij de volgende spelregels:

Belangrijk! Als er een antwoord wordt gegeven op uw vraag, dan is het voor de gever van het antwoord nuttig om te weten als u er wel (of niet) mee geholpen bent! Wij vragen u dus ook te reageren op een antwoord.

Belangrijk! Antwoorden worden ook per e-mail naar abonnees gestuurd. Laat uw emailadres achter op deze site, zodat u op de hoogte blijft. U krijgt dan ook andere vragen en antwoorden te zien.

Abonneren

Abonneer u voor het ontvangen van emails voor uw HP ScanJet Pro 2500 f1 bij:


U ontvangt een email met instructies om u voor één of beide opties in te schrijven.


Ontvang uw handleiding per email

Vul uw emailadres in en ontvang de handleiding van HP ScanJet Pro 2500 f1 in de taal/talen: Engels als bijlage per email.

De handleiding is 1,19 mb groot.


U ontvangt de handleiding per email binnen enkele minuten. Als u geen email heeft ontvangen, dan heeft u waarschijnlijk een verkeerd emailadres ingevuld of is uw mailbox te vol. Daarnaast kan het zijn dat uw internetprovider een maximum heeft aan de grootte per email. Omdat hier een handleiding wordt meegestuurd, kan het voorkomen dat de email groter is dan toegestaan bij uw provider.

Stel vragen via chat aan uw handleiding

Stel uw vraag over deze PDF

Andere handleiding(en) van HP ScanJet Pro 2500 f1

HP ScanJet Pro 2500 f1 Gebruiksaanwijzing - Nederlands - 66 pagina's

HP ScanJet Pro 2500 f1 Gebruiksaanwijzing - Deutsch - 70 pagina's

HP ScanJet Pro 2500 f1 Gebruiksaanwijzing - Français - 70 pagina's


Uw handleiding is per email verstuurd. Controleer uw email

Als u niet binnen een kwartier uw email met handleiding ontvangen heeft, kan het zijn dat u een verkeerd emailadres heeft ingevuld of dat uw emailprovider een maximum grootte per email heeft ingesteld die kleiner is dan de grootte van de handleiding.

Er is een email naar u verstuurd om uw inschrijving definitief te maken.

Controleer uw email en volg de aanwijzingen op om uw inschrijving definitief te maken

U heeft geen emailadres opgegeven

Als u de handleiding per email wilt ontvangen, vul dan een geldig emailadres in.

Uw vraag is op deze pagina toegevoegd

Wilt u een email ontvangen bij een antwoord en/of nieuwe vragen? Vul dan hier uw emailadres in.


Info