695920
24
Verklein
Vergroot
Pagina terug
1/28
Pagina verder
English
Amplified cordless telephone with
answering machine
TABLE OF CONTENTS
1. IMPORTANT SAFETY INSTRUCTIONS ............................. 1
2. SET UP THE TELEPHONE .................................................. 2
2.1 Package Contents............................................................................2
2.2 Location ...........................................................................................2
2.3 Connect the Corded Base Station ....................................................3
2.4 Install and Charge the Handset Battery ............................................4
3. GET TO KNOW YOUR PHONE ........................................... 5
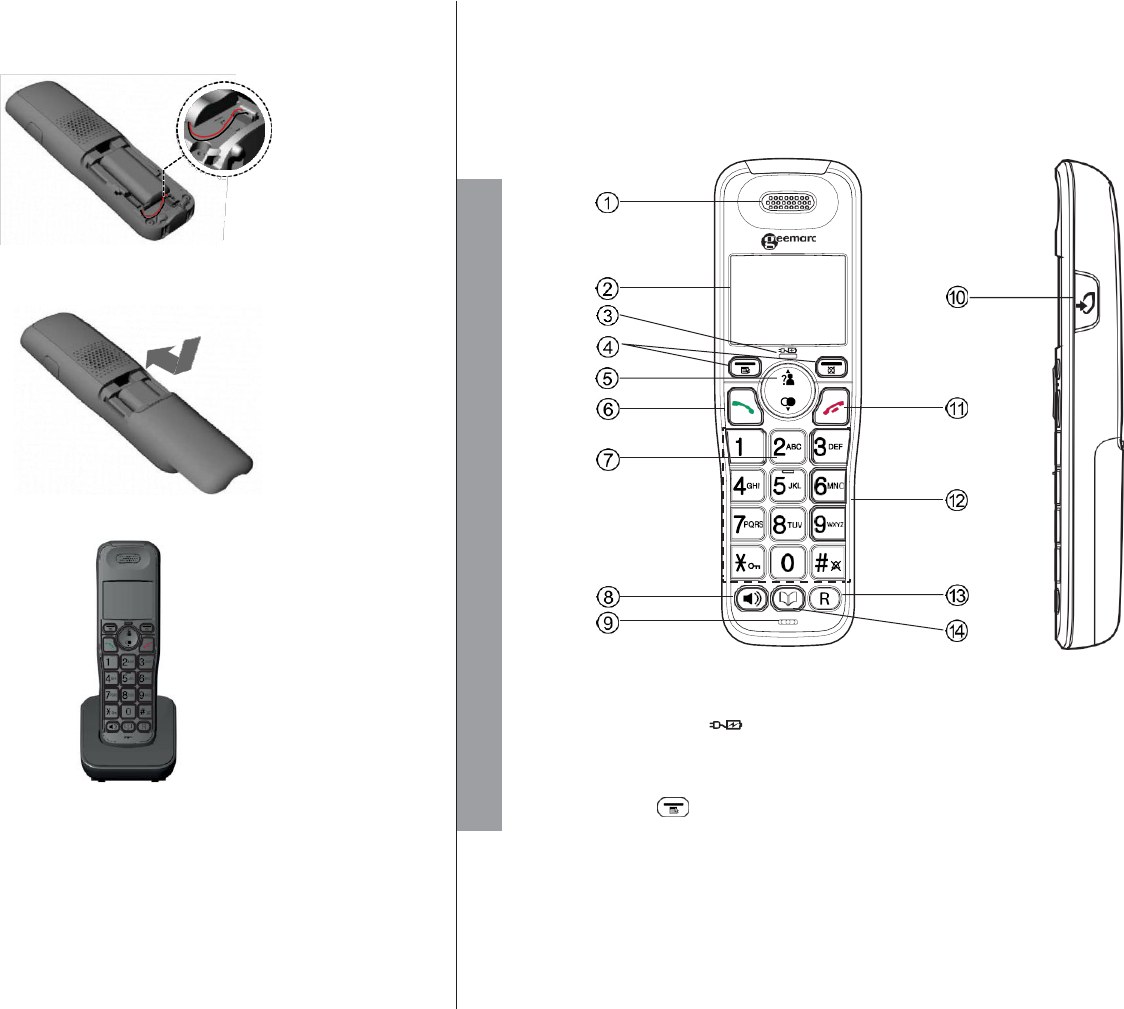
3.1 Overview of the Handset ..................................................................5
3.2 Overview of the Corded Base ..........................................................8
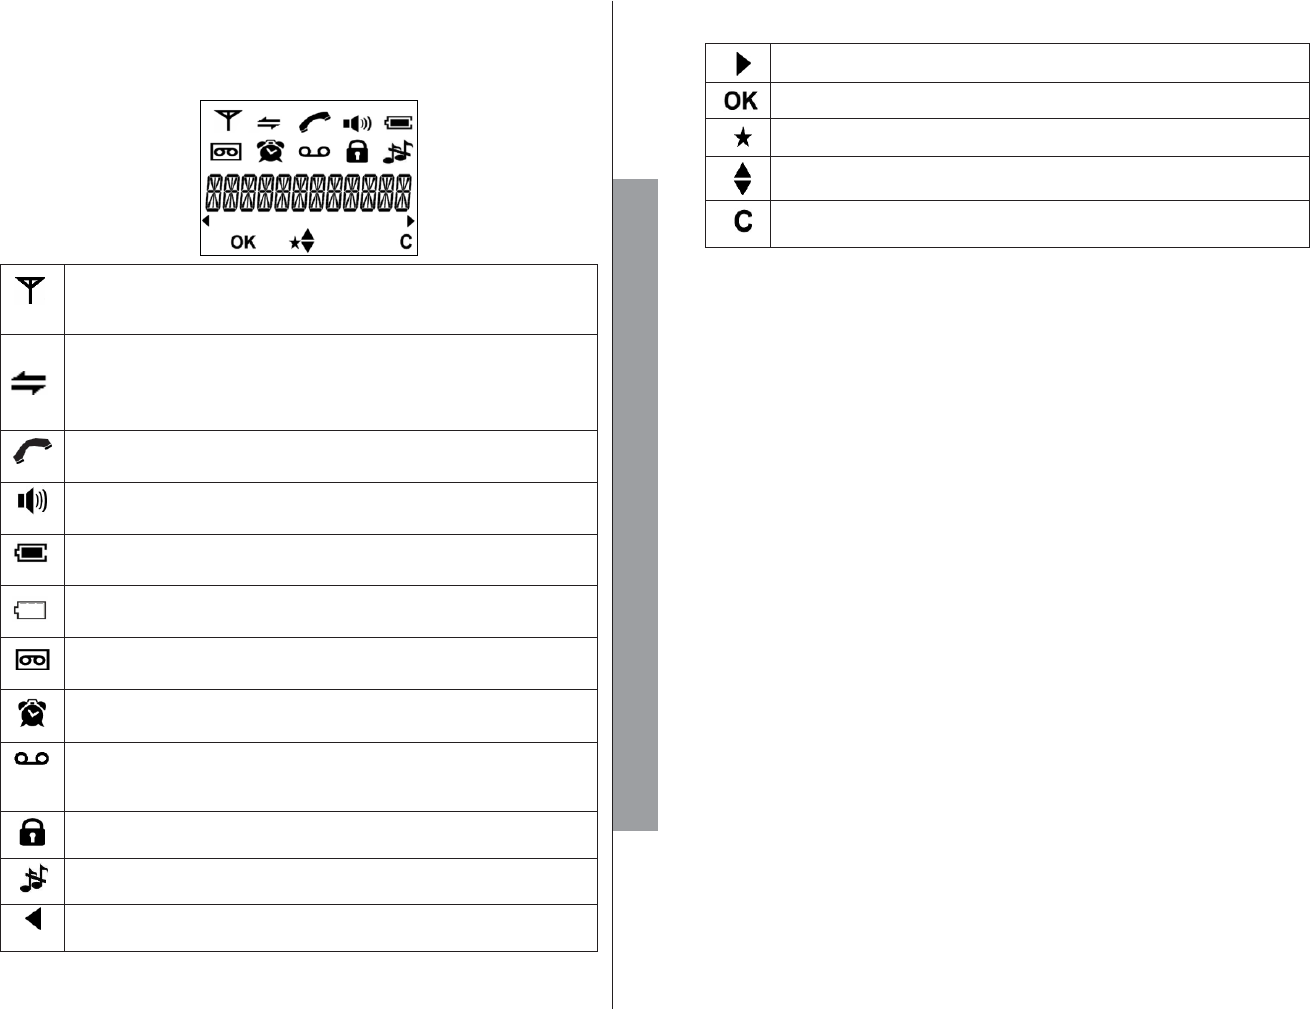
3.3 Handset LCD Display Icons and Symbols ...................................... 10
3.4 Handset Menu Structure ................................................................ 12
3.5 Text and Digit Entry Table ...................................................................... 13
3.5.1 English Character Set ..................................................... 13
4. USE YOUR PHONE ............................................................ 14
4.1 Make an External Call .................................................................... 14
4.1.1 Preparatory Dialing .......................................................... 14
4.1.2 Direct Dialing ................................................................... 14
4.1.3 Call from the Phonebook.................................................. 14
4.1.4 Call from the Call List ....................................................... 14
4.1.5 Call from the Redial List ................................................... 15
4.1.6 Call Timer ........................................................................ 15
4.2 Answer a Call ................................................................................. 15
4.3 BOOSTER Function ....................................................................... 15
4.4 End a Call ...................................................................................... 16
4.5 Adjust Earpiece and Speakerphone Volume .................................... 16
4.6 Mute a Call .................................................................................... 16
4.7 Set the Handset Silent Mode .......................................................... 16
4.8 Set the Handset Keypad Lock ........................................................ 16
4.9 Redial the Last Number ................................................................. 17
4.9.1 Redial a Number from the Redial List ............................. 17
4.9.2 Store a Redial Number into the Phonebook ................... 17
4.9.3 Delete a Redial Number ................................................. 17
4.9.4 Delete the Entire Redial List ........................................... 18
4.10 Find the Handset............................................................................ 18
4.11 Make an Internal Call ..................................................................... 18
4.11.1 Intercom ......................................................................... 18
4.11.2 Call All Handsets ............................................................ 19
4.11.3 Transfer an External Call ................................................ 19
4.11.4 Make a 3-way Conference Call ...................................... 19
5 PHONEBOOK ...................................................................... 20
5.1 Add a New Phonebook Entry ......................................................... 20
5.2 Search for a Phonebook Entry ....................................................... 20
5.3
View a Phonebook Entry ............................................................... 20
5.4 Edit a Phonebook Entry ................................................................ 21
5.5 Delete a Phonebook Entry ............................................................ 21
5.6 Delete the Entire Private Phonebook ............................................. 21
5.7 Check the Phonebook Usage ........................................................ 22
5.8 Set the Fast Dial Numbers ............................................................ 22
5.8.1 Add or Edit the Fast Dial Number .................................... 22
5.8.2 Delete the Fast Dial Number ........................................... 22
6 CALLER DISPLAY (NETWORK DEPENDENT) ................. 23
6.1 View the Call List .......................................................................... 23
6.2 Store a Call List Number into the Phonebook ................................ 23
6.3 Delete an Entry in the Call List ...................................................... 24
6.4 Delete the Entire Call List .............................................................. 24
7 DIRECT MEMORIES KEYS ................................................ 25
7.1 Set direct Memory Keys in Handset .............................................. 25
8 PHONE SETTINGS ............................................................. 26
8.1 Clock Settings ............................................................................... 26
8.2 Alarm Settings (Handset only) ....................................................... 27
8.3 Handset Settings ........................................................................... 28
8.3.1 Set the Ringer Melody for Internal Calls .......................... 28
8.3.2 Set the Ringer Melody for External Calls ......................... 28
8.3.3 Set the Ringer Volume ........................................................ 28
8.3.4 Set Alert Tones ........................................................................ 29
8.3.5 Select Base .................................................................... 29
8.3.6 Set the Handset Language ............................................. 29
8.3.7 Rename the Handset ...................................................... 29
8.3.8 Choose the Information to be Displayed in Idle ............... 30
8.3.9 Set the Auto Answer ........................................................ 30
8.4 Base Settings using the Handset .................................................. 31
8.4.1 Set the Ringer Melody ..................................................... 31
8.4.2 De-register a Handset ..................................................... 31
8.4.3 Set the Dial Mode ........................................................... 31
8.4.4 Set the Flash Time .............................................................. 32
8.4.5 Change the System PIN Code ........................................ 32
8.5 Registration................................................................................... 33
8.6 Reset Your Phone ......................................................................... 34
9 ANSWERING MACHINE .................................................... 35
9.1 Switching Answering Machine On/Off ............................................ 35
9.2 Play Messages on TAM ......................................................................... 35
9.3 Delete all Messages on TAM ................................................................ 36
9.4 Record Memos on TAM ......................................................................... 37
9.5 Answering Machine Settings (Base Only) ...................................... 37
9.5.1 Set the Answer Mode ...................................................... 37
9.5.2 Record your Outgoing Message (OGM) ........................... 38
9.5.3 Playback the Outgoing Message (OGM) .......................... 38
9.5.4 Delete a Personalized OGM (SET OGM to DEFAULT) .... 39
9.5.5 Set the Answer Delay ....................................................... 39
9.5.6 Set the Recording Time of Incoming Message ................. 39
9.5.7 Set the TAM Language .................................................... 40
9.5.8 Turn On or Off the Base Screening .................................. 40
9.5.9 Change the Compression Rate ........................................ 40
9.5.10 Activate Remote Access .................................................. 41
9.5.10.1 Change the 4-Digit Remote Access PIN ........................ 41
9.5.10.2 Activate or Deactivate the Remote access .................... 41
9.5.10.4 Remote Operations ....................................................... 42
10. TROUBLESHOOTING ....................................................... 43
11. TECHNICAL SPECIFICATIONS ........................................ 46
12. CARE AND MAINTENANCE INSTRUCTIONS ................. 47
13. GUARANTEE ..................................................................... 48
14. DECLARATIONS ............................................................... 48
1. IMPORTANT SAFETY INSTRUCTIONS
When using your telephone equipment, basic safety precautions should always be
followed to reduce the risk of fire, electric shock and injury, including the following:
1. Read and understand all the instructions.
2. Follow all warnings and instructions marked on the product.
3. Unplug this product from the wall outlet before cleaning. Do not use liquid cleaners
or aerosol cleaners. Use a damp cloth for cleaning.
4. Do not use this product near water (for example, near a bath tub, kitchen sink,
swimming pool).
5. Do not expose the telephone to direct sunlight or extreme cold environment. Do not
put the telephone close to a heating source such as radiators, cookers, etc.
6. Do not overload wall outlets and extension cords as this can result in the risk of fire
or electric shock.
7. Unplug this product from the wall outlet and refer servicing to the distributor under
the following conditions:
When the power supply cord or plug is damaged or frayed.
If the product does not operate normally by following the operating instructions.
If the product has been dropped and the cabinet has been damaged.
If the product exhibits a distinct change in performance.
8. Avoid using a telephone (other than a cordless type) during an electrical storm.
There may be a remote risk of electric shock from lightning.
9. Do not use the telephone to report a gas leak in the vicinity of the leak.
10. Use only the supplied NiMH (Nickel Metal Hydride) battery pack! The operation
periods for the handsets are only applicable with the default battery capacities
11. The use of other battery types or non-rechargeable batteries/primary cells can be
dangerous. These may cause interference and/or unit damages. The manufacturer
will not be held liable for damage arising from such non-compliance.
12. Do not use third party charging bays. The battery may be damaged.
13. Battery should not be exposed to excessive heat such as bright sunshine or fire and
immersed in water.
14. For pluggable equipment, the socket-outlet (power adaptor) shall be installed near
the equipment and shall be easily accessible.
Disposal warning
1. When this crossed-out wheeled bin symbol is attached to a product,
it means the product is covered by the European Directive 2002/96/EC.
2. All electrical and electronic products/battery should be disposed of
separately from the municipal waste stream via designated collection
facilities appointed by the government or the local authorities.
3. The correct disposal of your old appliance/battery will help
prevent potential negative consequences for the environment and
human health.
For more detailed information about disposal of your old appliance/battery, please
Contact your city office, waste disposal service or the shop where you purchased the
product.
1
2. SET UP THE TELEPHONE
2.1 Package Contents
The package contains the following items:
Base station
Cordless handset
AC power adapter
NiMH rechargeable battery pack
Telephone line cord
User’s manual
2.2 Location
For maximum coverage and reduce the interference, here are some guidelines you
should consider when you place the base unit,
- place it at a convenient, high, and central location with no obstructions between
the handset and base unit in an indoor environment.
- place it away from electronic appliances such as televisions, microwave ovens,
radios, personal computers, wireless devices or other cordless phones.
- avoid facing radio frequency transmitters, such as external antennas of mobile
phone cell stations.
- avoid plugging it into the same circuit as other major household electrical
appliances because of the potential for interference. Try moving the appliance or
the base unit to another power outlet.
2.3 Connect the Corded Base Station
Plug the large end
of the larger power
adapter into an
electrical outlet not
controlled by a wall
switch.
Route the cords
through the slots.
Plug the small end
of the larger power
adapter into the power
jack on the back of the
telephone base.
NOTE
Plug one end of the
telephone line cord
into a telephone jack
or a DSL filter.
A DSL filter (not included)
is required if you have
DSL high-speed Internet
service. The DSL filter
must be plugged into the
telephone wall jack.
Telephone line cord
Plug the other end of
the telephone line cord
into the TEL. LINE
jack on the back of the
telephone base.
If the reception for a base unit location is not satisfactory, move it to another location
for better reception.
Depending on the surrounding conditions as well as spatial and structural factors, the
range may be reduced. The range indoors is normally less than outdoors.
Use only the power adapter supplied with the base station.
2 3
SET
U
P
THE
TELEPHONE
2.4 Install and Charge the Handset Battery
3. GET TO KNOW YOUR PHONE
3.1 Overview of the Handset
1. Plug the battery connector securely into the socket inside the handset battery
compartment. Insert the supplied battery as indicated.
2. Align the cover flat against the battery compartment, and then slide it upwards
until it clicks into place.
3. Charge the handset by placing it face forward in the charger. You hear a beep
when the handset is charging in the charger.
NOTES
Use only the supplied NiMH rechargeable battery pack.
If you do not use the handset for a long time, disconnect and remove the battery
to prevent possible leakage.
1. EARPIECE
2. LCD DISPLAY
3. CHARGE LIGHT ( )
Steadily on when the handset is charging in the charger.
4. SOFT KEYS
MENU/OK )
In idle mode: Press to access the main menu.
In sub-menu mode: Press to confirm the selection.
During a call: Press to access Intercom / Phonebook / Redial list / Call list.
4 5
SET
U
P
THE
TELEPHONE
INT/MUTE/CLEAR )
In main menu mode: Press to go back to idle screen.
In sub-menu mode: Press to go back to previous menu.
In sub-menu mode: Press and hold to go back to idle screen.
In editing/pre-dial mode: Press to delete a character/digit.
In editing/pre-dial mode: Press and hold to delete all the characters/digits.
During a call: Press to mute/resume the microphone.
In idle mode: Press to intercom another handset.
5. UP/CALL LIST ( )
In idle mode: Press to access the call list.
In menu mode: Press to scroll up the menu items.
In phonebook list/redial list/call list: Press to scroll up the list.
In editing mode: Press to move the cursor one character to the left.
During a call: Press to increase the listening volume.
6. TALK ON )
In idle/pre-dial mode: Press to make a call in earpiece mode.
In phonebook/redial list/call list: Press to make a call to the selected entry in the
list in earpiece mode.
During ringing: Press to answer a call in earpiece mode.
7. DOWN/REDIAL LIST )
In idle mode: Press to access the redial list.
In menu mode: Press to scroll down the menu items.
In phonebook list/redial list/call list: Press to scroll down the list.
In editing mode: Press to move the cursor one character to the right.
During a call: Press to decrease the listening volume.
8. SPEAKERPHONE )
In idle/pre-dial mode: Press to make a call in speakerphone mode. Press again
to switch to earpiece mode.
In phonebook list/redial list/call list: Press to make a call to the selected entry in
the list in speakerphone mode. Press again to switch to earpiece mode.
During ringing: Press to answer a call in speakerphone mode. Press again to
switch to earpiece mode.
9. MICROPHONE
10. BOOSTER )
During a call: Press to activate/deactivate the BOOSTER function.
11. TALK OFF )
During a call: Press to end a call and go back to idle screen.
In menu/editing mode: Press to go back to previous menu.
In menu/editing mode: Press and hold to go back to idle screen.
In idle mode: Press and hold to power off the handset.
Press and hold to power on when it is off.
12. ALPHANUMERIC KEYPAD, STAR ), HARSH )
In predial or editing mode: Press to insert a digit / character / /
key in idle mode: Press and hold to enable or disable the keypad lock.
key in idle mode: Press and hold to turn on/off the ringer.
0 key in idle/pre-dial mode/number editing mode: Press and hold to insert a pause.
13.
In menu/editing mode: Press to insert a flash.
During a call: Press to answer a new call if you subscribed to Call Waiting service
from your service provider.
14. PHONEBOOK )
In idle mode: Press to access the phonebook.
6 7
GET
T
O
KNO
W
YOUR PHONE
3.2 Overview of the Corded Base
1. /HANDSET LOCATOR
While the phone is idle, press to page all handsets.
2. IN USE
On when handsets are in use, or when the answering system is answering an
incoming call.
On when a handset is being registered.
Flashes when there is an incoming call or when handsets are being deregistered.
Flashes when another telephone is in use on the same line.
3. Message counter
Flashes when there is a incoming call.
4. /SKIP
Press to skip a message
5.
VOL
During message playback, press to increase the listening volume.
While in idle mode, press to increase the base ringer volume.
6. /PLAY/STOP
Press to start or stop message playback.
7. /ANS ON
Press to turn the built-in answering system on or off.
8. X/DELETE
Press to delete the message currently playing.
Press twice to delete all old messages when the phone is not in use.
9.
VOL
During message playback, press to decrease the listening volume.
While in idle mode, press to decrease the base ringer volume.
10. /REPEAT
Press to repeat a message.
Press twice to play the previous message
8 9
GET
T
O
KNO
W
YOUR PHONE
3.3 Handset LCD Display Icons and Symbols
The screen display gives you information on the current status of the telephone.
Steadily on when the handset is within range of the base.
Flashes when the handset is out of range of the base or cannot
communicate with the base.
Steadily on when an intercom call is in progress.
Flashes when there is an incoming internal call or an internal call is put
on hold.
Steadily on when a call is in progress.
Flashes when there is an incoming call.
Steadily on when the speakerphone is turned on.
Steadily on when the battery is fully charged.
Animates when battery is charging.
Flashes when low battery is detected to indicate that it needs charging.
Steadily on when the telephone answering machine (TAM) is turned on.
Flashes when a new message is received in the answering machine.
Steadily on when an alarm is set.
Flashes when the alarm time set before reaches.
Steadily on when there are received new Voice Message Waiting
(VMWI) not yet read.
Disappears when all the voice messages have been read.
Steadily on when the keypad is locked.
Steadily on when the ringer is switched off.
Steadily on when more digits are existed before the text currently
displayed.
10 11
GET
T
O
KNO
W
YOUR PHONE
Steadily on when more digits are existed after the text currently displayed.
Press to confirm the current selection if applicable.
Steadily on when there is(are) new call(s) in call list.
Scroll up / down the menu items / Phonebook / Redial list / Call List.
Press to clear a character or stop the alarm if applicable, press to mute /
unmute during a call.
3.4 Handset Menu Structure
In idle mode, pressing LEFT SOFTKEY will access the menu. Refer to the following for
the menu structure.
3.5 Text and Digit Entry Table
The following tables show you where each letter and punctuation character can be
found. This will be helpful when storing a name in the phonebook or renaming
your handset.
LEFT SOFTKEY
/ / /
In editing mode, a cursor is displayed to indicate the current text entry position. It is
positioned at the right of the last character entered.
Writing Tips:
1. Once a character is selected, the cursor will move to the next position after a
short pause.
2. You can move the cursor within the text by / to amend the text entry.
3.
Press RIGHT SOFTKEY on the handset to delete the last character.
4.
Press and hold RIGHT SOFTKEY on the handset to delete the entire text
string.
3.5.1 English Character Set
/
/
/ / /
DATE & TIME
ALARM
REGISTRATION
DEFAULT
ANS. MACHINE
DATE
FORMAT
TIME
FORMAT
SET TIME
SET DATE
ON
OFF
BASE 1
BASE 2
BASE 3
BASE 4
PIN?
MSG PLAYBACK
DELETE ALL
MEMO
TAM ON/OFF
TAM SETTINGS
ANSWER MODE
OGM SETTINGS
ANSWER DELAY
RECORD TIME
COMPRESSION
BS SCREENING
REMOTE ACC.
CHANGE PIN
12 13
GET
T
O
KNO
W
YOUR PHONE
PHONEBOOK
CALL LIST
BS SETTINGS
HS SETTINGS
DIRECT MEM
Review
phonebook list
Under a
Phonebook
entry:
ADD
VIEW
EDIT
DELETE
DELETE ALL
PB STATUS
FASTDIAL
Review Call
List
Under a
selected Call
List entry:
ADD TO PB
DELETE
DELETE ALL
DETAILS
CATEGORY
BS RINGER
RING
VOLUME
DELETE HS
DIAL MODE
FLASH TIME
CHANGE PIN
RING SETUP
TONE SETUP
SELECT
BASE
LANGUAGE
RENAME HS
HS DISPLAY
AUTO
ANSWER
MAILBOX
M1
M2
M3
M4
Key
Alphanumeric Editing
(For phonebook name editing and renaming
handset)
Number Editing
(For phone
number editing,
date / time
editing)
Key
press
1st
2nd
3rd
4th
5th
6th
7th
8th
9th
10th
1
space
-
1
1
2
A
B
C
2
2
3
D
E
F
3
3
4
G
H
I
4
4
5
J
K
L
5
5
6
M
N
O
6
6
7
P
Q
R
S
7
7
8
T
U
V
8
8
9
W
X
Y
Z
9
9
0
0
0, P (Pause)
*
*
?
/
\
(
)
*
#
#
,
-
.
&
#
4. USE YOUR PHONE
4.1 Make an External Call
4.1.1 Preparatory Dialing
Using a handset:
Enter the phone number and press or to dial the number. Press
LEFT SOFTKEY to clear the entry.
4.1.2 Direct Dialing
Using a handset:
Press or to take the line, and then enter the phone number.
4.1.3 Call from the Phonebook
Using a handset:
1. Press to access the phonebook list and press to select the
desired
phonebook entry.
2. Press or to dial the selected entry. Press it again to turn on the
speakerphone.
4.1.4 Call from the Call List
Using a handset:
1. Press to access the call list.
OR
1. Press LEFT SOFTKEY to enter the main menu.
2. Press / to select the desired call list entry.
3.
Press or to dial the selected call list entry. Press it again to turn on the
speakerphone.
4.1.5 Call from the Redial List
Using a handset:
1. Press to access the redial list.
2.
Press / to select the desired redial number.
3. Press or to dial the selected redial number. Press it again to turn on the
speakerphone.
4.1.6 Call Timer
Your handset or base automatically times the duration of each call. The call timer
will display a few seconds after the call has ended. It is shown in hours, minutes and
seconds format (HH:MM:SS).
4.2 Answer a Call
Using a handset:
If the handset is not on the charging cradle or the base station:
When the phone rings, press or to answer a call. Press it again to turn on the
speakerphone.
If the handset is on the charging cradle or the base station and if AUTO ANSWER is set
to be ON: When the phone rings, pick up the handset to answer a call.
4.3 BOOSTER Function
The BOOSTER function allows you to amplify the handset earpiece volume to
compensate for the ear’s limited sensitivity.
Using a handset:
To turn on the BOOSTER function:
Press at any time during a call. “BOOST ON” displays on the handset screen.
When the BOOSTER function is activated, press to increase or decrease
the earpiece volume.
To turn off the BOOSTER function and return the earpiece volume back to normal:
Press again and the handset top indicator will turn off.
NOTE:
The audio boost feature will be turned off automatically when the call is ended.
14 15
US
E
YOU
R PHONE
9.5.10.4 Remote Operations
If you are away from your home, you can call your answering machine to switch on
or off the answering machine and listen to your messages remotely using another
tone-dialing phone.
10. TROUBLESHOOTING
If you have difficulty with your phone, please try the suggestions listed below.
1. Place a call from a tone-dialing phone.
2. When the answering machine answers the call and starts playing OGM, press .
3. Enter the 4-digit Remote Access PIN (default PIN is 0000).
4. Press the following keys to carry out your desired function.
Keys
Functions
While message is not playing
While message is playing
2
Delete the current message
playback
4
Repeat playing the current
message from the beginning.
Press twice to skip backward to the
previous message.
5
Play the message
6
Skip forward to play the next
message
7
Turn on the answering machine
8
Stop the current message playback
9
Turn off the answering machine
*
Enter the 4-digit remote access PIN
NOTE:
When your answering machine memory is full and the answer mode is in
ANS & RECORD, the answer mode will change to ANSWER ONLY automatically.
It will change to ANS & RECORD mode automatically after some messages have
been deleted.
42 43
ANSWERIN
G MACHINE
Problem
Solutions
My telephone does
not work at all.
Make sure the battery is installed and charged correctly.
For optimum daily performance, return the handset to
the telephone base after use.
Make sure the power adapter is securely plugged into an
outlet not controlled by a wall switch.
Make sure the telephone line cord is plugged firmly into
the telephone base and the telephone wall jack.
Unplug the electrical power to the telephone base. Wait
for approximately 15 seconds, then plug it back in. Allow
up to one minute for the handset and telephone base to
synchronize.
Remove and re-insert the battery. If that still does not
work, it might be necessary to purchase a new battery.
Disconnect the telephone base from the telephone
wall jack and plug in a working telephone. If the other
telephone does not work, the problem is probably in
the wiring or the telephone service. Call your telephone
service provider.
Low battery shows
on screen.
Place the handset in the telephone base for recharging.
Remove and re-install the battery and use it until
fully depleted, then recharge the handset in the
telephone base.
If the above measures do not solve the problem, replace
the battery.
The battery do
not charge in the
handset or the
handset battery do
not accept charge.
Make sure the handset is placed in the telephone
base correctly.
Remove and reinstall the battery, then charge for up to
16 hours.
Purchase a new battery.
24

Hulp nodig? Stel uw vraag in het forum

Spelregels
1

Forum

Geemarc-AMPLIDECT295
  • Ik heb een geermarc photodect 295 gekocht, maar krijg de handset met de photo's op geen enkele manier aan de gang, ik heb van alles gedaan en er ook diverse anderen naar laten kijken maar zonder succes, is er iemand die er een oplossing voor weet? Gesteld op 27-11-2023 om 15:43

    Reageer op deze vraag Misbruik melden
  • Hoe wis ik alle nummers in de telefoon en hoe spreek ik het antwoordapparaat in Gesteld op 3-7-2023 om 11:53

    Reageer op deze vraag Misbruik melden
  • ik heb telefoonnummers ingevoerd,hoe haal ik deze er weer uit Gesteld op 8-1-2022 om 14:38

    Reageer op deze vraag Misbruik melden
  • Hoe kan ik mijn tekst inspreken op het antwoordapparaat van mijn Geemarc Amlidect 295 telefoon? Gesteld op 8-8-2020 om 08:55

    Reageer op deze vraag Misbruik melden

Misbruik melden

Gebruikershandleiding.com neemt misbruik van zijn services uitermate serieus. U kunt hieronder aangeven waarom deze vraag ongepast is. Wij controleren de vraag en zonodig wordt deze verwijderd.

Product:

Bijvoorbeeld antisemitische inhoud, racistische inhoud, of materiaal dat gewelddadige fysieke handelingen tot gevolg kan hebben.

Bijvoorbeeld een creditcardnummer, een persoonlijk identificatienummer, of een geheim adres. E-mailadressen en volledige namen worden niet als privégegevens beschouwd.

Spelregels forum

Om tot zinvolle vragen te komen hanteren wij de volgende spelregels:

Belangrijk! Als er een antwoord wordt gegeven op uw vraag, dan is het voor de gever van het antwoord nuttig om te weten als u er wel (of niet) mee geholpen bent! Wij vragen u dus ook te reageren op een antwoord.

Belangrijk! Antwoorden worden ook per e-mail naar abonnees gestuurd. Laat uw emailadres achter op deze site, zodat u op de hoogte blijft. U krijgt dan ook andere vragen en antwoorden te zien.

Abonneren

Abonneer u voor het ontvangen van emails voor uw Geemarc AMPLIDECT295 bij:


U ontvangt een email met instructies om u voor één of beide opties in te schrijven.


Ontvang uw handleiding per email

Vul uw emailadres in en ontvang de handleiding van Geemarc AMPLIDECT295 in de taal/talen: Engels als bijlage per email.

De handleiding is 1,43 mb groot.


U ontvangt de handleiding per email binnen enkele minuten. Als u geen email heeft ontvangen, dan heeft u waarschijnlijk een verkeerd emailadres ingevuld of is uw mailbox te vol. Daarnaast kan het zijn dat uw internetprovider een maximum heeft aan de grootte per email. Omdat hier een handleiding wordt meegestuurd, kan het voorkomen dat de email groter is dan toegestaan bij uw provider.

Stel vragen via chat aan uw handleiding

Stel uw vraag over deze PDF

Andere handleiding(en) van Geemarc AMPLIDECT295

Geemarc AMPLIDECT295 Gebruiksaanwijzing - Nederlands - 50 pagina's

Geemarc AMPLIDECT295 Gebruiksaanwijzing - Nederlands - 2 pagina's

Geemarc AMPLIDECT295 Gebruiksaanwijzing - Deutsch - 28 pagina's

Geemarc AMPLIDECT295 Gebruiksaanwijzing - Français - 56 pagina's


Uw handleiding is per email verstuurd. Controleer uw email

Als u niet binnen een kwartier uw email met handleiding ontvangen heeft, kan het zijn dat u een verkeerd emailadres heeft ingevuld of dat uw emailprovider een maximum grootte per email heeft ingesteld die kleiner is dan de grootte van de handleiding.

Er is een email naar u verstuurd om uw inschrijving definitief te maken.

Controleer uw email en volg de aanwijzingen op om uw inschrijving definitief te maken

U heeft geen emailadres opgegeven

Als u de handleiding per email wilt ontvangen, vul dan een geldig emailadres in.

Uw vraag is op deze pagina toegevoegd

Wilt u een email ontvangen bij een antwoord en/of nieuwe vragen? Vul dan hier uw emailadres in.


Info