• Antes da montagem, ler com atenção as instruções dadas
a seguir.
• Por razões de segurança, nunca instalar a piscina numa
varanda ou num terraço.
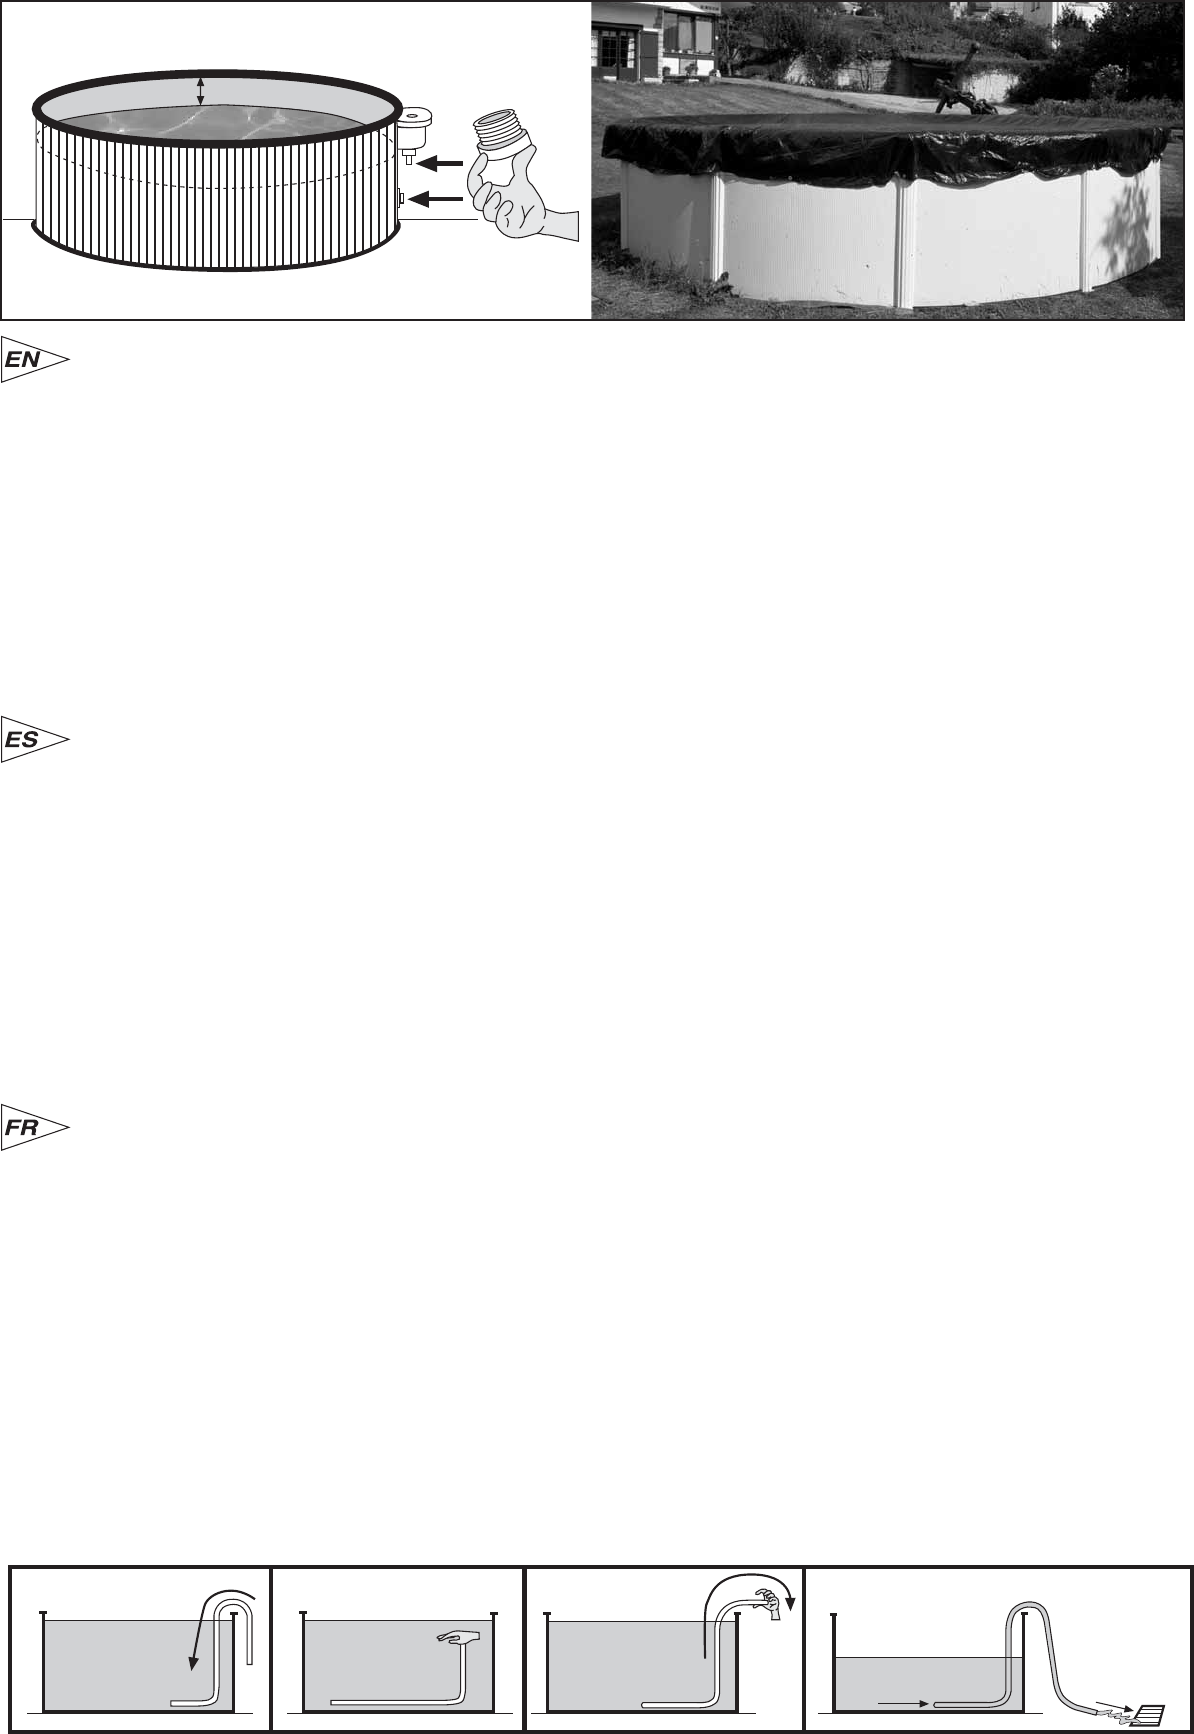
• Mantenha a piscina sempre cheia de água.
• Importante: Colocar a piscina num lugar próximo a um
desaguadoiro, para evitar inundações se a piscina se partir. A
piscina é como uma pequena barragem; se estiver desnivelada,
a pressão pode partir a parede e nesse caso toda a agua
poderia sair. Um volume de agua tão importante pode provocar
danos importantes no terreno e também às pessoas que se
encontrarem ao pé da piscina.
• Esta piscina foi concebida para as crianças.
• Nunca tirar-se de cabeça para a piscina.
• Não utilizar a piscina de noite ou quando houver pouca
visibilidade.
• Não utilizar a piscina debaixo do efeito de bebidas alcoólicas,
medicamentos ou drogas.
• Não permitir brigas ou jogos violentos na piscina.
•
Não nadar nunca entre a parede da piscina e a escada
(risco de ficar entalado).
• Não deixar nunca um animal (cão, gato, ou outro) tomar
banho na piscina.
• Nunca manipule o depurador se estiver com o corpo molhado
ou se ou chão estiver molhado (risco de electrocussão).
• Não sentar-se, não deve atirar-se nem andar na borda
superior da piscina.
NORMATIVA DE SEGURAN A
Vigiar e actuar:
- Vigie as crianças de perto e constantemente. Ponha uma
pessoa responsável da segurança e aumente a vigilância
quando há muitas pessoas na piscina.
- Ponha um equipamento de flutuação para os que não sabem
nadar.
- Ensine a nadar aos pequenos o mais cedo possível.
- Molhe a nuca, os braços e as pernas antes de entrar na
água.
- Aprenda primeiros auxílios para atender urgentemente as
crianças.
- Proíba o mergulho e os saltos em presença das crianças,
assim como correr e os jogos bruscos ao pé da piscina.
- Proíba o acesso à piscina sem colete ou braceletes às
crianças que não sabem nadar e que não estão
acompanhadas por um adulto na água.
- Não deixe brinquedos à volta nem dentro da piscina se
estiver sem vigilância.
- Mantenha permanentemente a água limpa e desinfectada.
- Guarde os produtos de tratamento da água fora do alcance
das crianças.
Prever:
- Equipamentos que possam contribuir à segurança, sem os
substituir
nunca pela vigilância de um adulto.
- Uma vala de protecção cujo acesso possa estar fechado.
- Coberta de protecção manual ou automática correctamente
colocada e fixada.
- Detector electrónico de queda na piscina (alarme).
- Telefone acessível ao pé da piscina (portátil ou fixo).
- Bóia e vara ao pé da piscina.
Em caso de acidente:
- Tirar a criança da água o mais rapidamente possível.
- Pedir imediatamente socorro e seguir os conselhos que lhe
forem comunicados.
- Tirar a roupa molhada e vestir roupa seca (cobrir o acidentado
com uma manta).
- Memorizar e afixar um cartaz ao pé da piscina com os
telefones de primeiros auxílios: Bombeiros, Cruz Vermelha,
Médico, Urgências, etc.
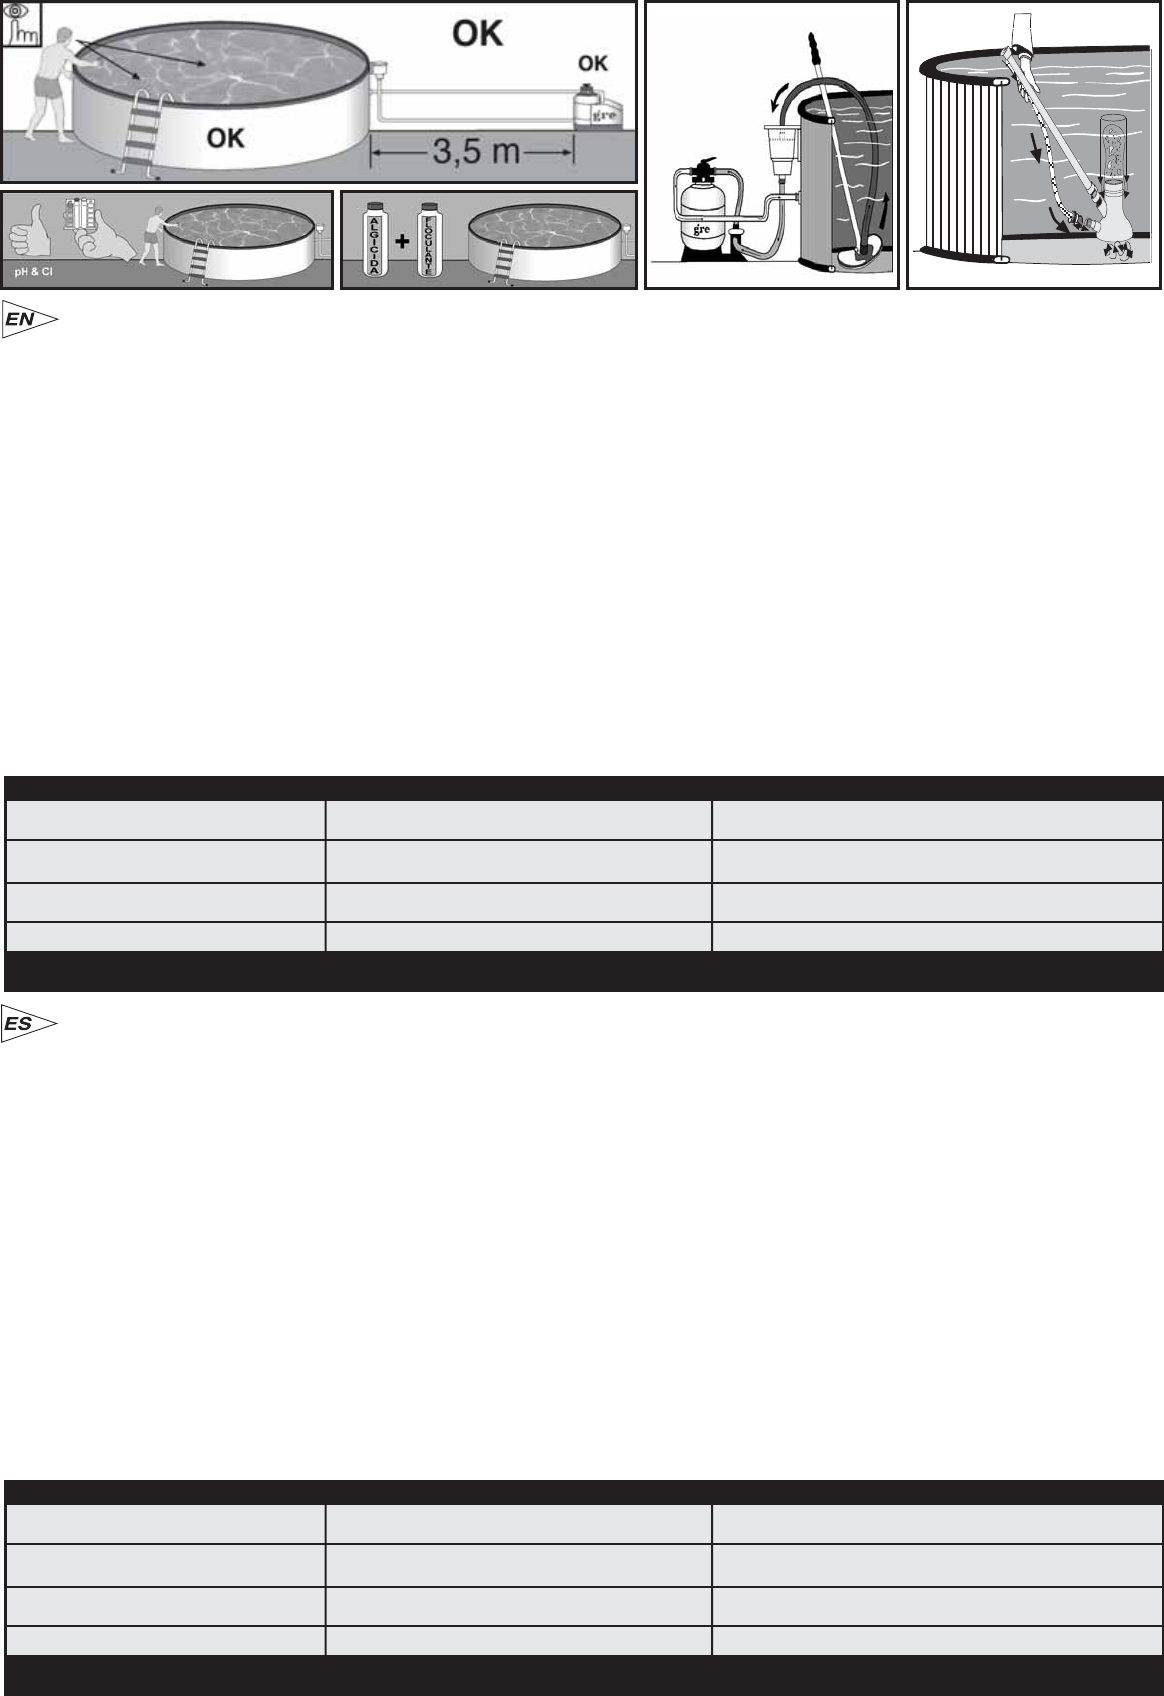
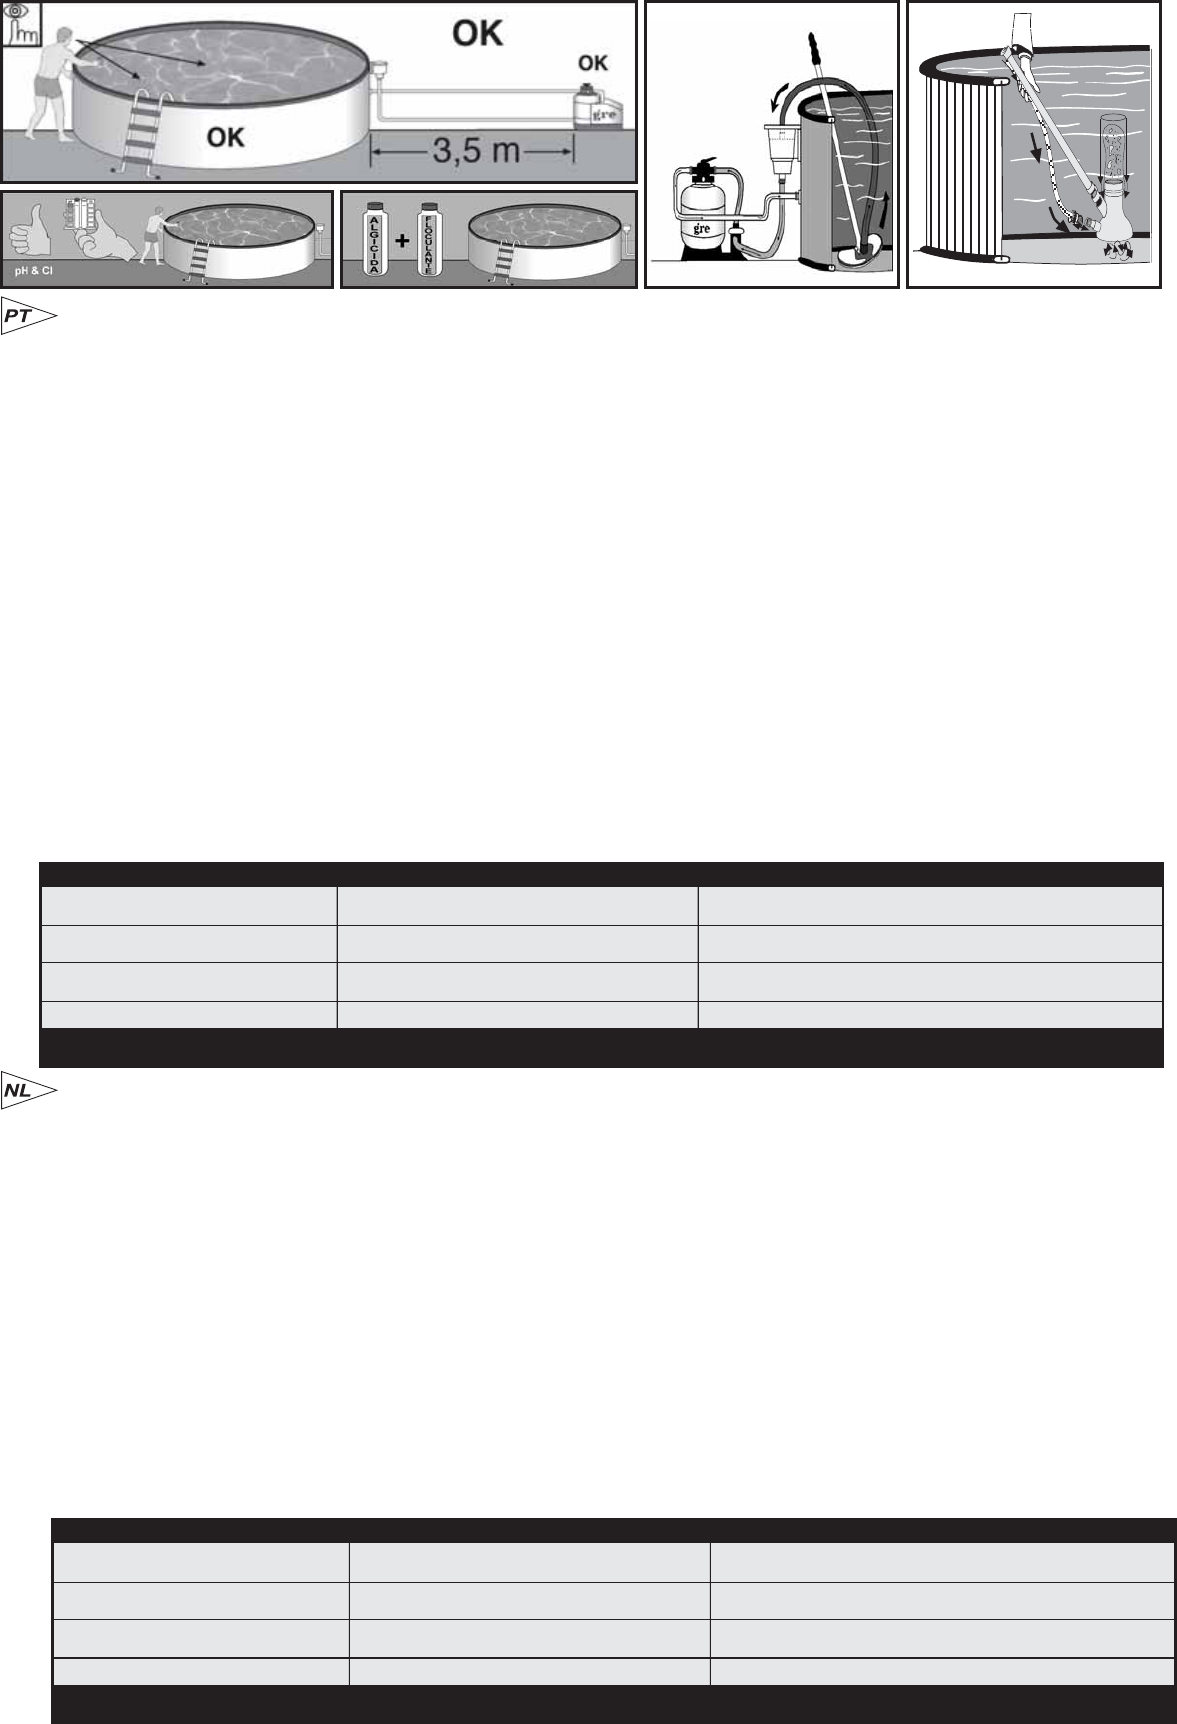
ATEN AO:Todas as filtra oes seguem a norma
de instalaao NF C15-100, que estipula que
qualquer aparelho el ctrico, situado a menos
de 3,50 m da piscina, e livremente acess vel, dever ser
alimentado a uma tens o muito baixa: 12 V.
Qualquer aparelho el ctrico alimentado com 220 V, deve
estra situado pelo menos a 3,50 m do borde da piscina.
Utilizar uma tomada equipado com um disjuntor diferencial
de 30 mA.
Guardar estas instru oes para futuras consultas
EM CASO DE PROBLEMA, ..¡CONSULTAR-NOS!
TELEFONO CONSULTA:
Tel.: (34) 946 741 844 Fax: (34) 946 741 708
e-mail: gre@gre.es - starpool@starpool.es
web: www.gre.es - www.starpool.es
¤
GB
E
F
D
I
NL
P
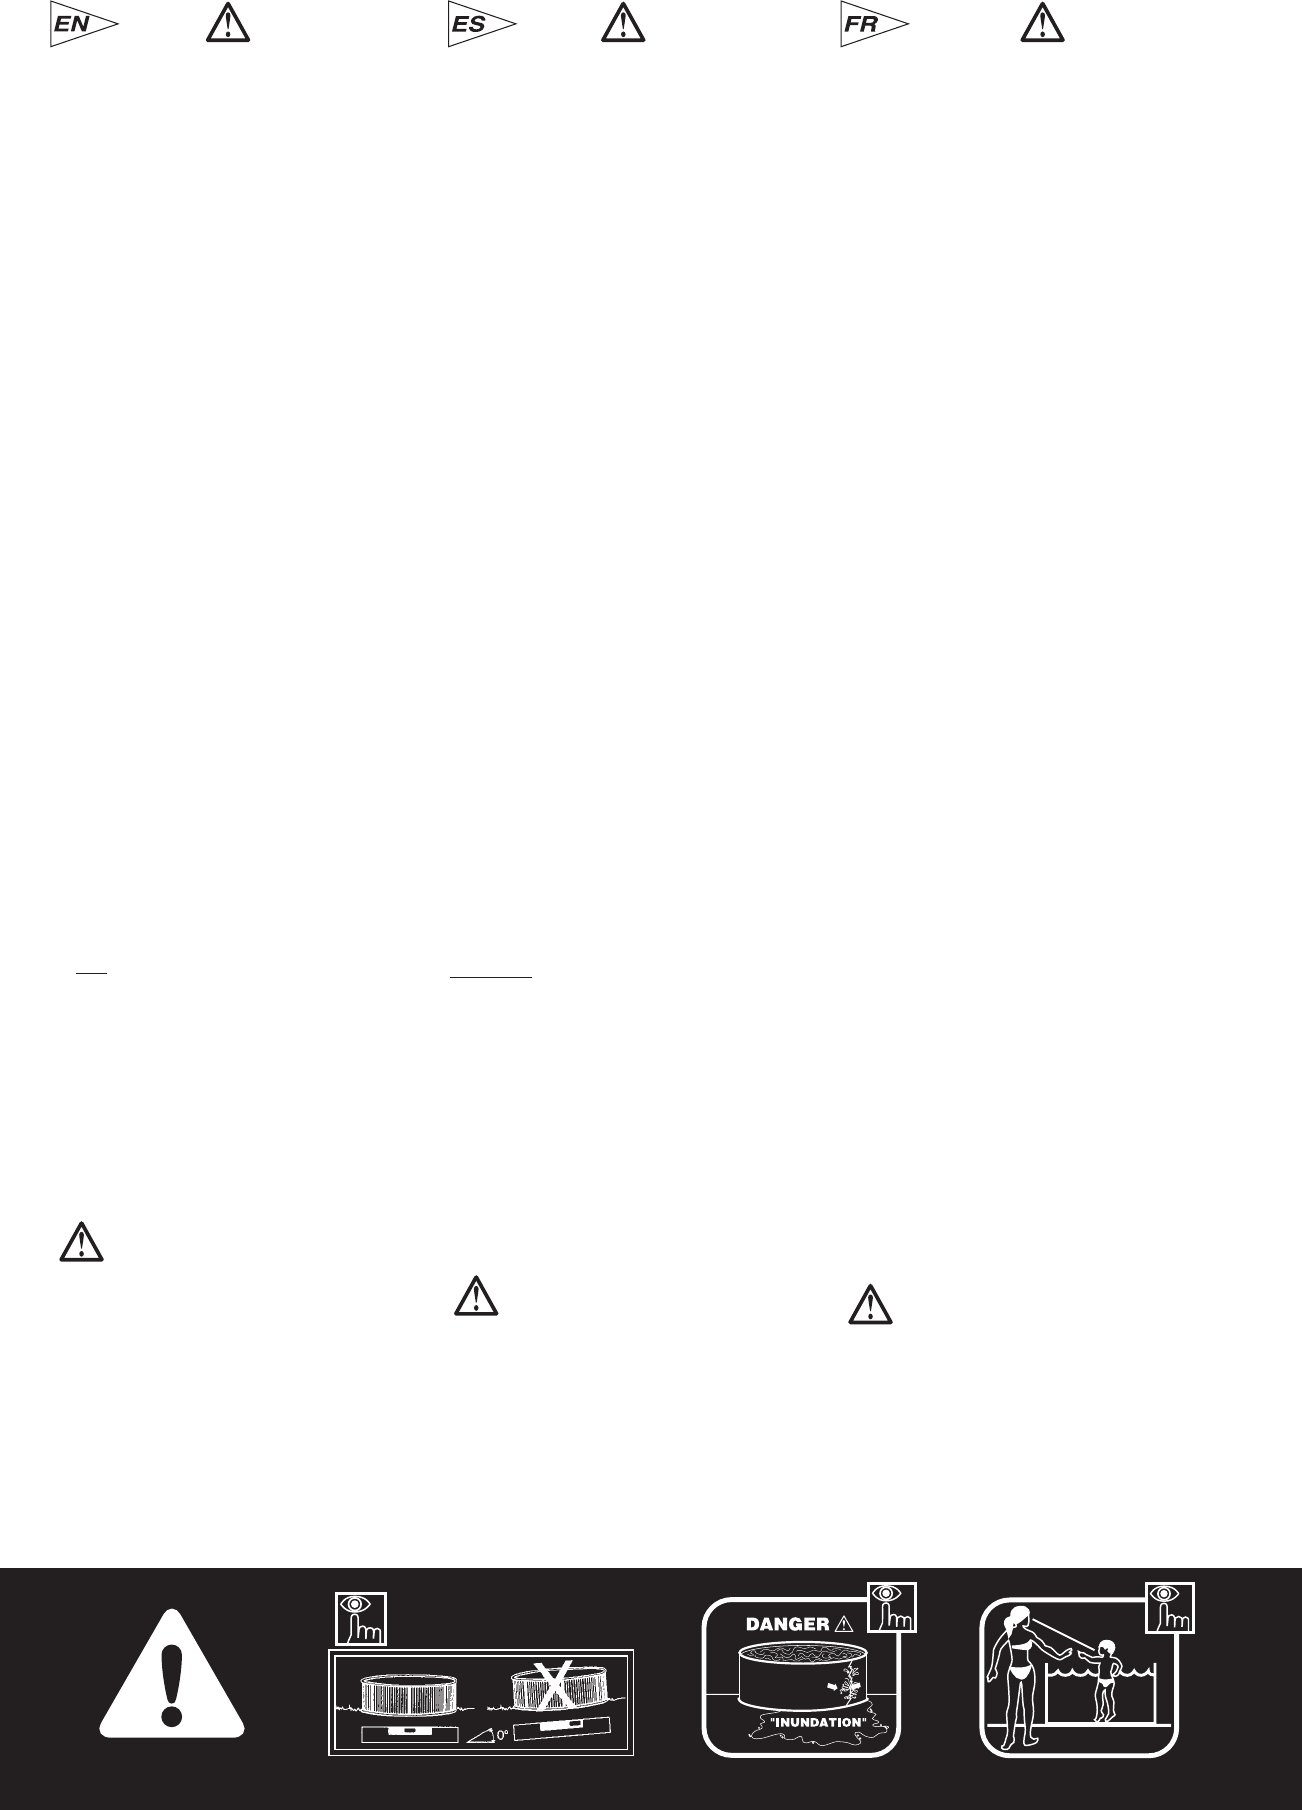
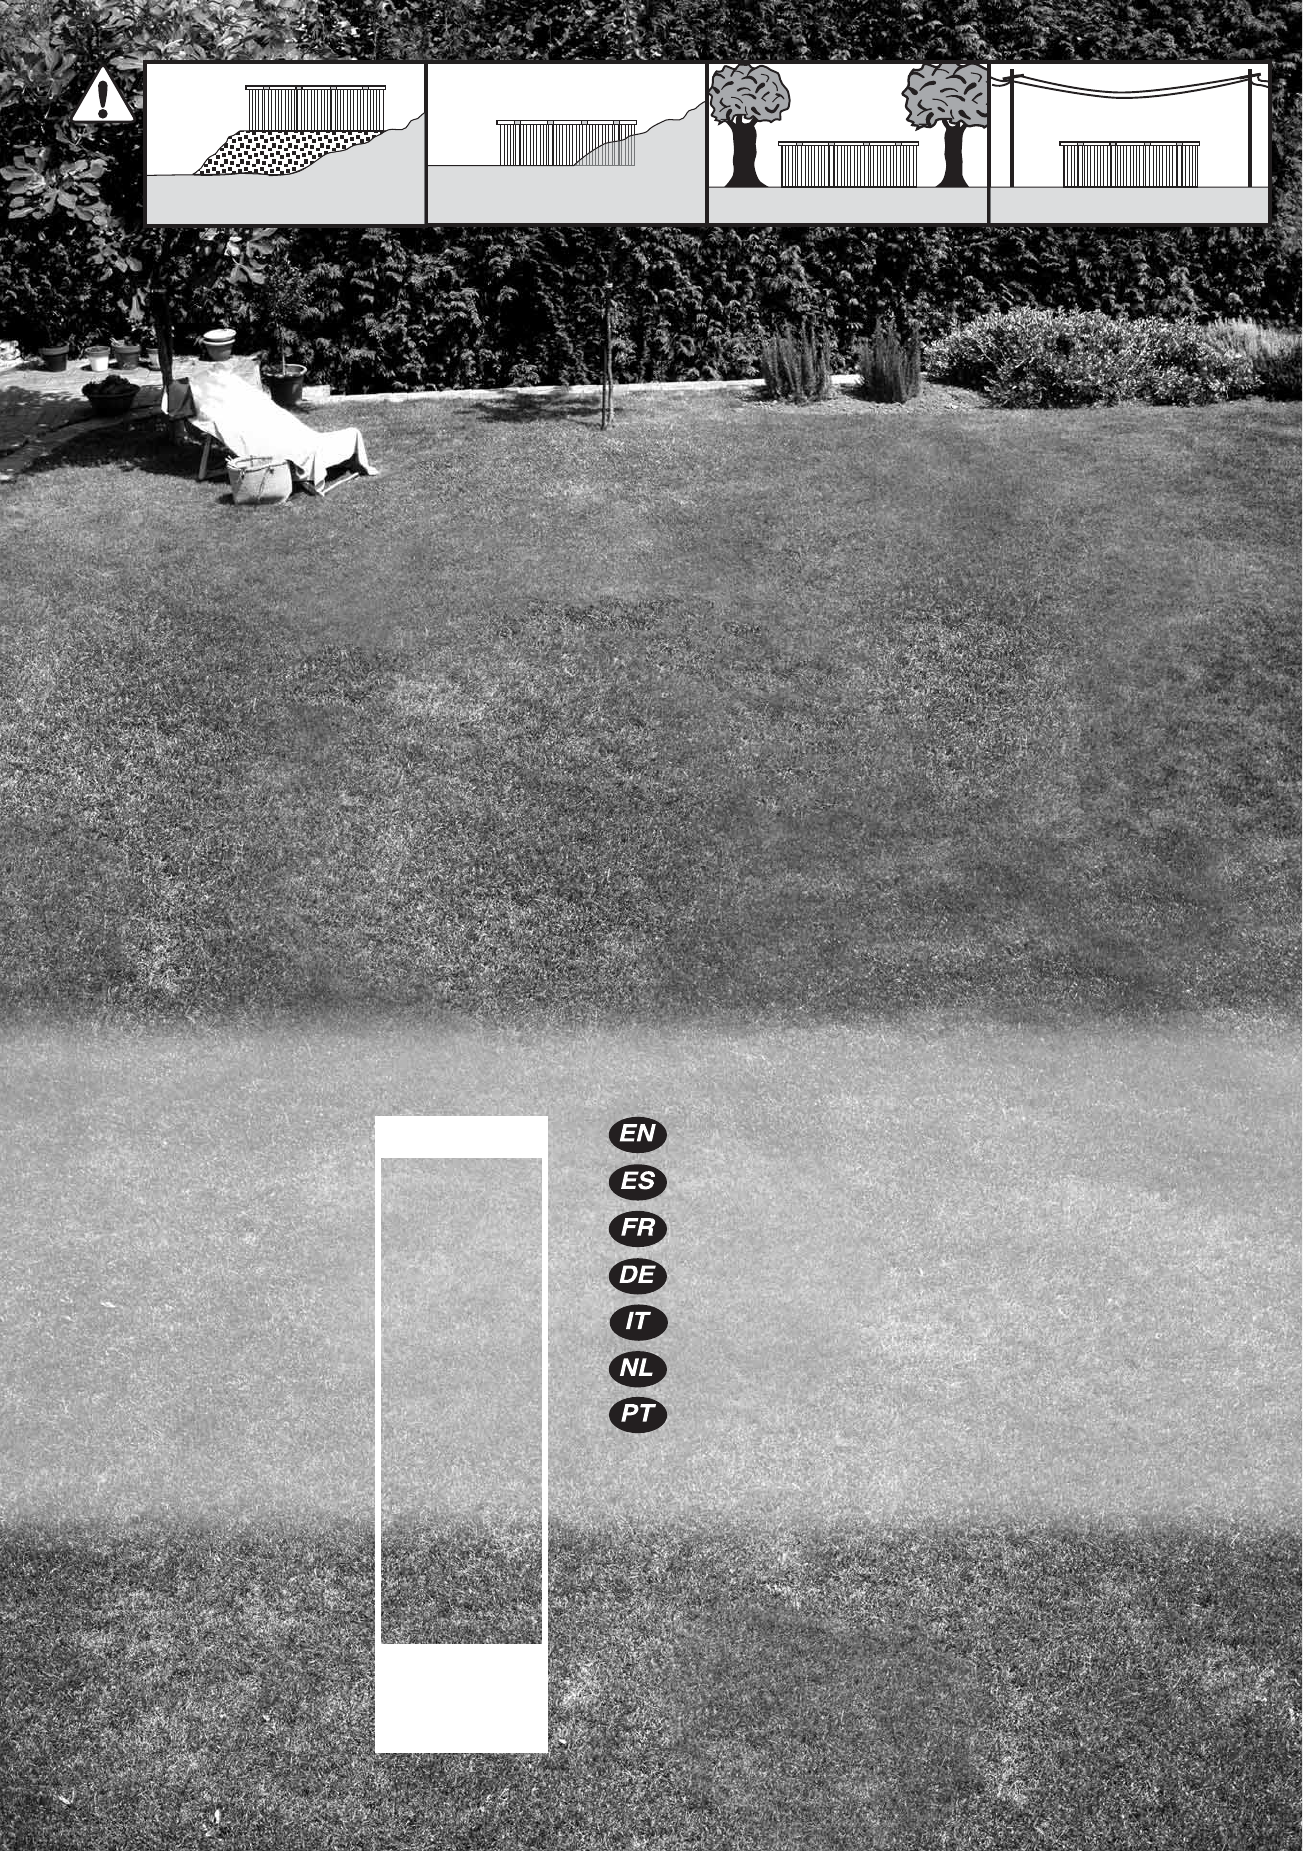
CAUTION: REMOVE LADDER FROM POOL AFTER USE.
ATENCION: QUITE LA ESCALERA DE LA PISCINA DESPUES DEL USO.
ATTENTION: RETIRER L CHELLE DE LA PISCINE APRØS UTILISATION.
ACHTUNG: ENTFERNEN SIE DIE POOLLEITER NACHDEM GEBRAUCH.
ATTENZIONE: TOGLIERE LA SCALA DELLA PISCINA DOPO L USO.
OPGELET: VERWIJDER, NA GEBRUIK, DE TRAP VAN HET ZWEMBAD.
ATENO: TIRE A ESCADA DA PISCINA DEPOIS DA UTILIZAO.
GB
E
F
D
I
NL
P
CAUTION: RISK OF FLOODING IN EVENT OF BREAKAGE.
ATENCION: RIESGO DE INUNDACION EN CASO DE ROTURA.
ATTENTION: RISQUE D INONDATION EN CAS DE CASSURE.
ACHTUNG: BEI BRUCH BESTEHT BERSCHWEMMUNGSGEFAHR.
ATTENZIONE: RISCHIO DI INONDAZIONE IN CASO DI ROTTURA.
OPGELET: IN GEVAL VAN BREUK: RISICO VOOR OVERSTROMING.
ATENO: RISCO DE INUNDAO EM CASO DE ROTURA.
GB
E
F
D
I
NL
P
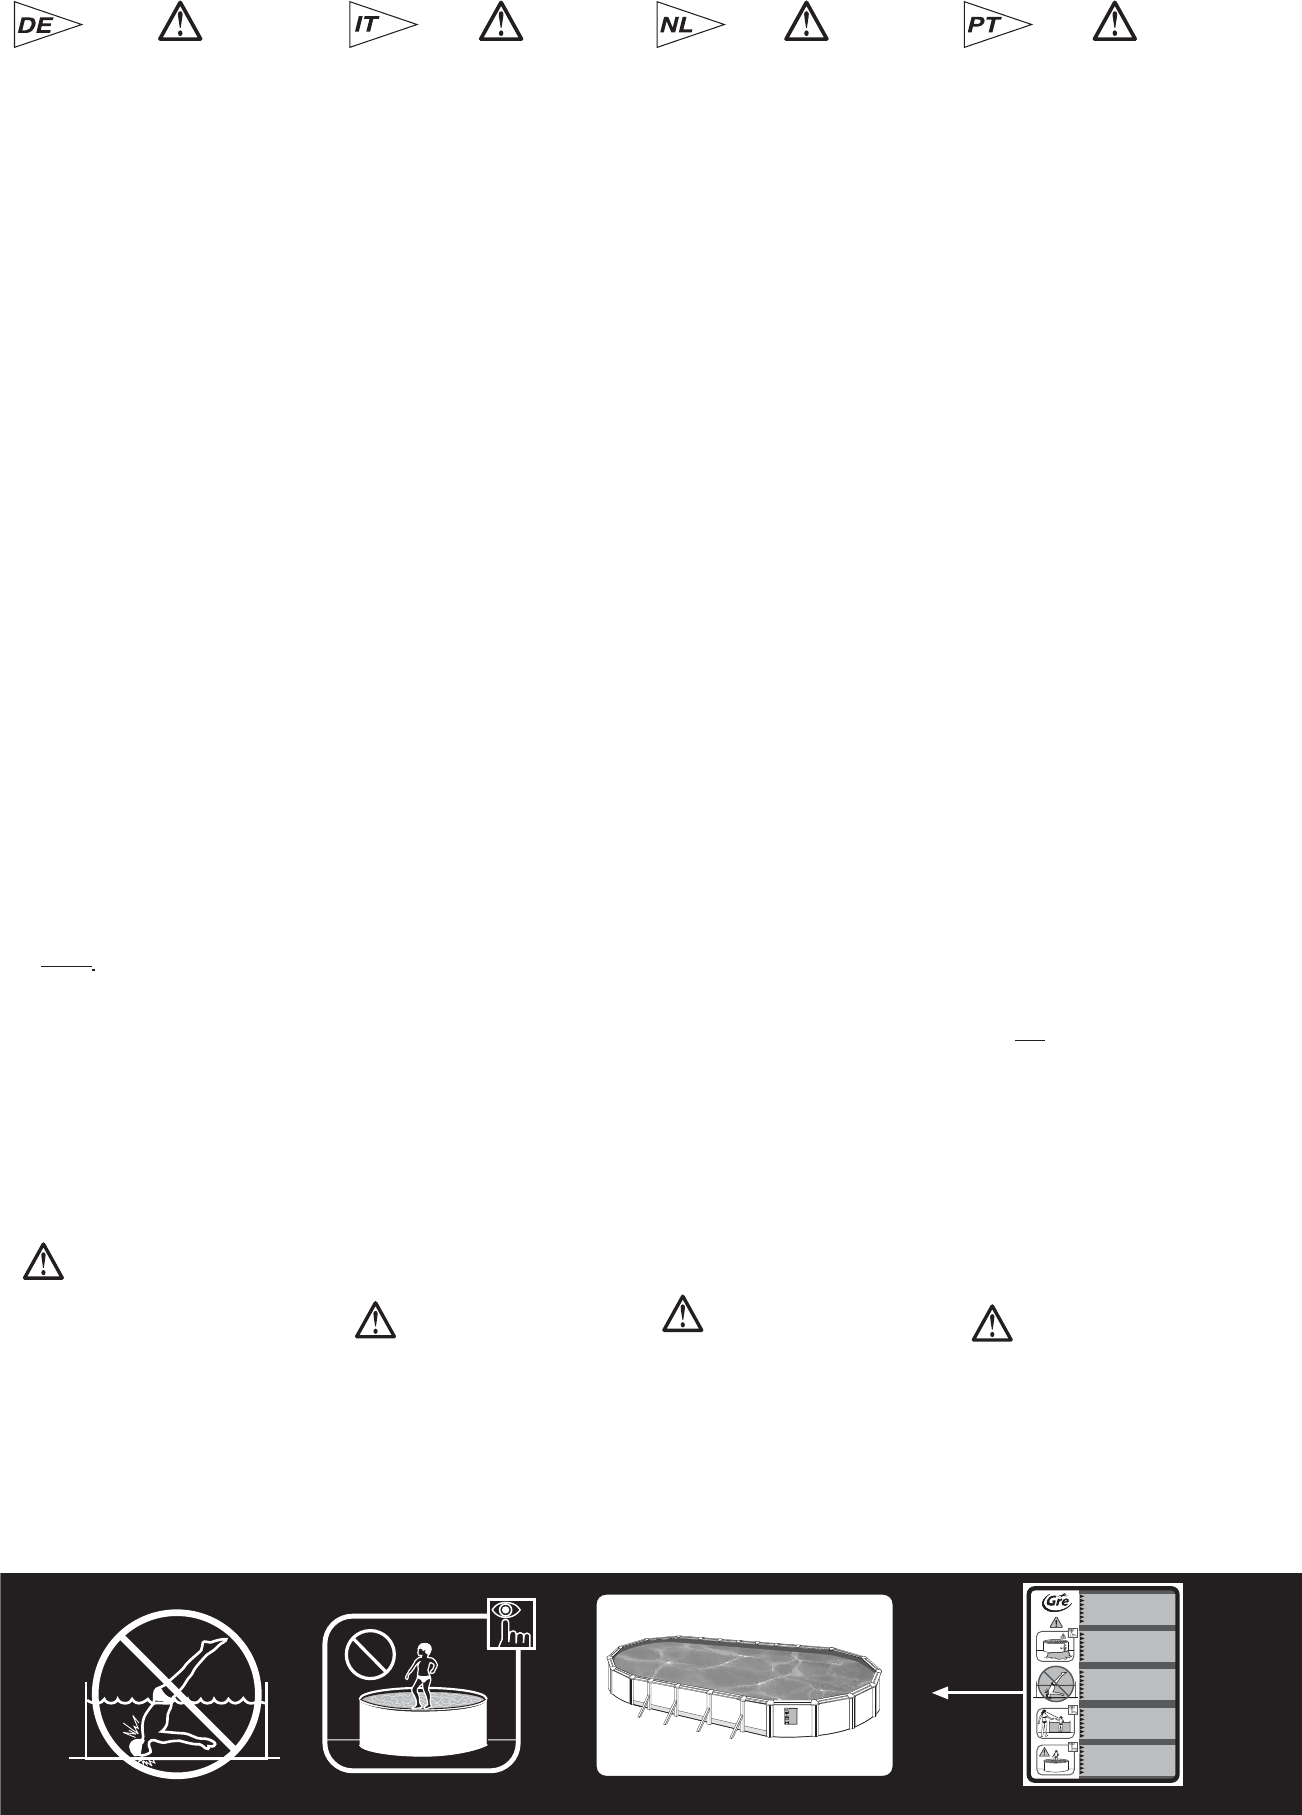
CAUTION: DO NOT DIVE IN HEAD FIRST.
ATENCION: NO SE LANCE DE CABEZA A LA PISCINA.
ACHTUNG: KEINE KOPFSPR NGE MACHEN.
ATTENZIONE: NON TUFFARSI DI TESTA.
OPGELET: NIET DUIKEN.
ATENO: N O SE TIRE DE CABE A.
ATTENTION: NE PLONGEZ PAS LA TTE LA PREMIØRE.
GB
E
F
D
I
NL
P
CAUTION: UNSUPERVISED, YOUR CHILD IS IN DANGER .
ATENCION: SIN VIGILANCIA, SU NI O EST EN PELIGRO .
ATTENTION: SANS SURVEILLANCE LES ENFANTS SONT EN DANGER.
ACHTUNG: OHNE AUFSICHT BEFINDET SICH IHR KIND IN GEFAHR .
ATTENZIONE: NON VIGILATA, PERICOLO PER I BAMBINI .
OPGELET: ZONDER TOEZICHT LOOPT UW KIND GEVAAR .
ATENO: SEM VIGIL NCIA AS CRIAN AS EST O EM PERIGO .
GB
E
F
D
I
NL
P
CAUTION: DO NOT WALK ALONG THE EDGE OF THE SWIMMING-POOL.
ATENCION: NO ANDAR SOBRE EL BORDE DE LA PISCINA.
ATTENTION: NE PAS MARCHER SUR LES BORDS DE LA PISCINE.
ACHTUNG: POOLRAND NICHT BETRETEN ODER BEGEHEN.
ATTENZIONE: NON CAMMINARE SUL BORDO DELLA PISCINA.
OPGELET: NIET OVER DE RAND VAN HET ZWEMBAD LOPEN.
ATENO: N O ANDAR NAS BORDAS DA PISCINA.
"INUNDATION"
DANGER
WARNING IMPORTANTE IMPORTANT ACHTUNG ATTENZIONE OPGELET ATEN AO
WARNING IMPORTANTE IMPORTANT ACHTUNG ATTENZIONE OPGELET ATENAO
WARNING
IMPORTANTE IMPORTANT ACHTUNG ATTENZIONE OPGELET ATEN A O
WARNING IMPORTANTE IMPORTANT ACHTUNG ATTENZIONE OPGELET ATEN A O
¤
4
NO
NO
NO
NO
PREPARATION OF THE SITE
PREPARACION DEL TERRENO
PRØPARATION DU TERRAIN
VORBEREITUNG DES BODENS
PREPARAZIONE DEL TERRENO
BEREIDING VAN HET TERREIN
PREPARAO DO TERRENO
INSTRUCTIONS
PARTE
2
2
5
Tool necessary (not included)
Herramienta necesaria (no incluida)
Outil n cessaire (non compris)
Erforderliches werkzeug (nicht eingeschlossen)
Utensile necessario (non compreso)
Benodigd gereedschap (niet inbegrepen).
Ferramenta necess ria (não éstá incluída)
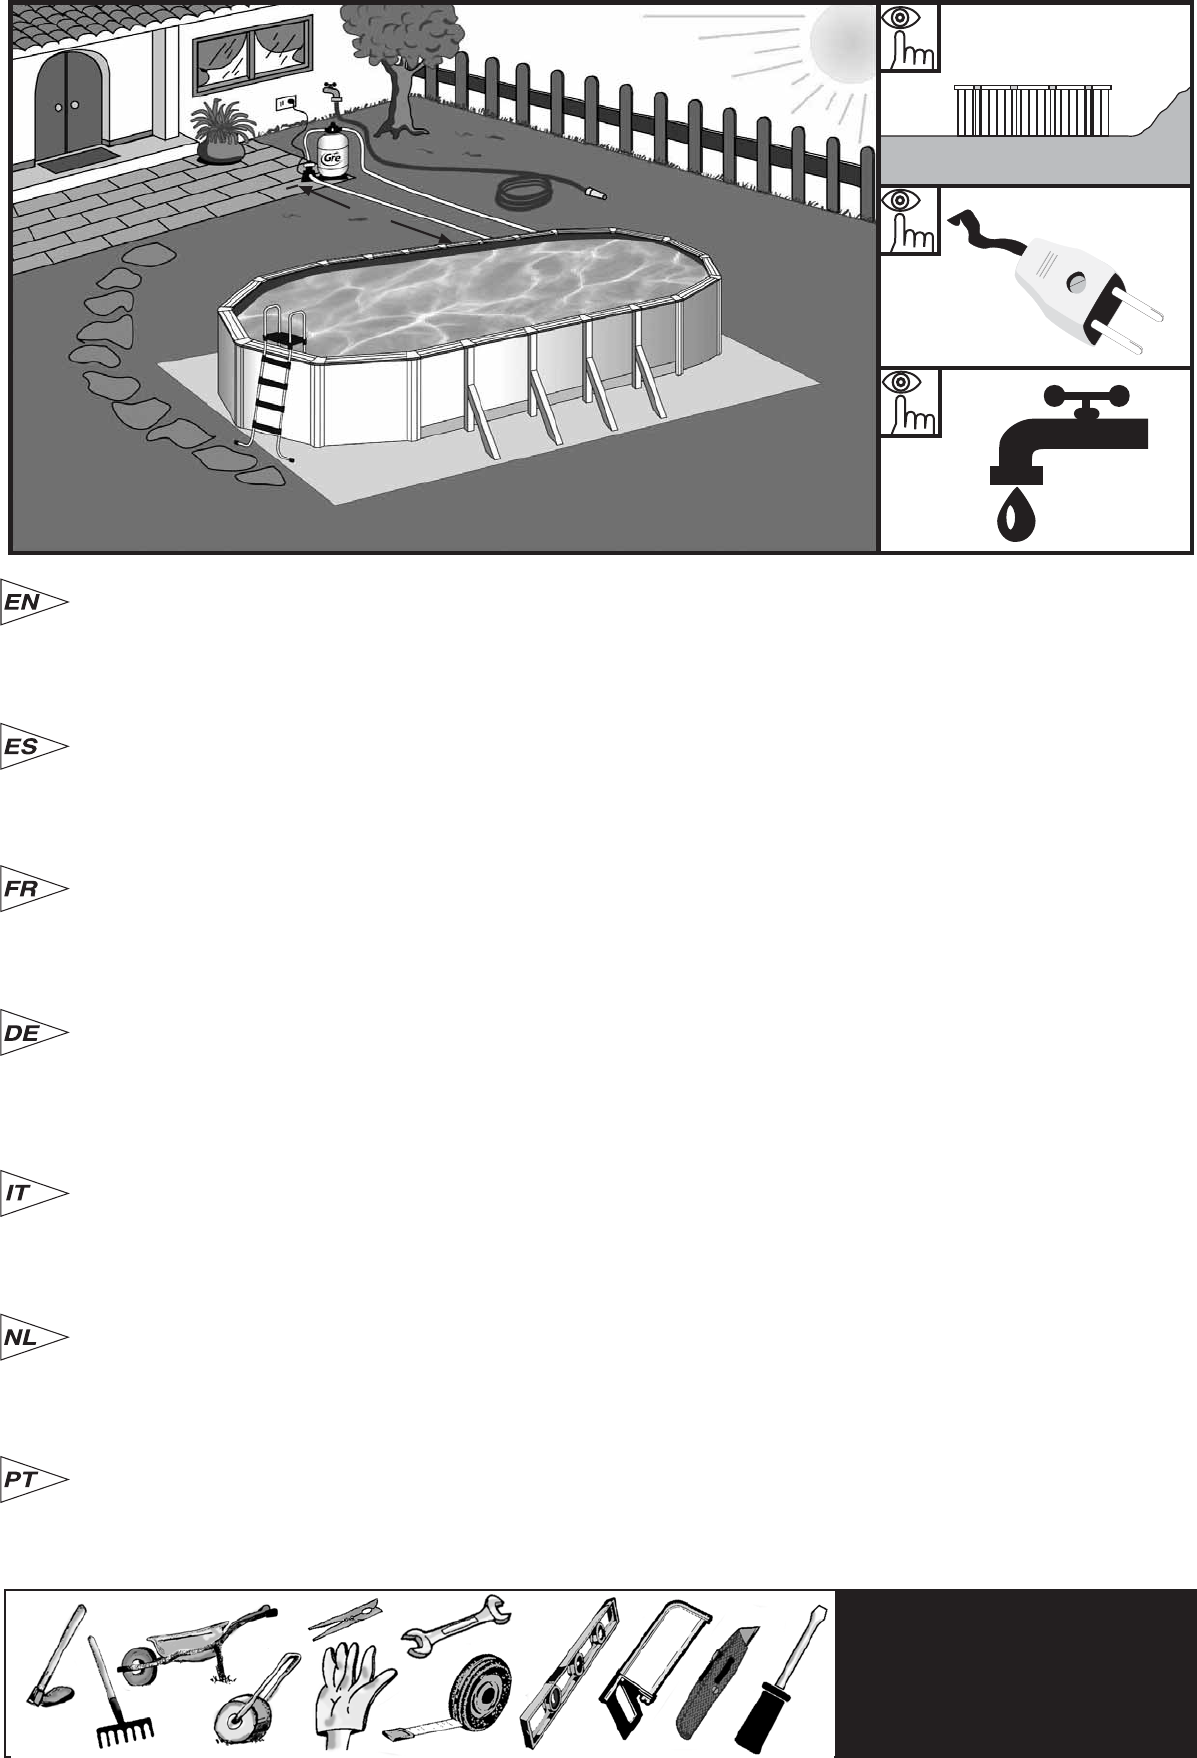
Lugar de colocaao: As nossas piscinas estão concebidas para serem instaladas na superfície do chãoe para o uso familiar ao ar livre.
O chão deve estar firme, liso e perfeitamente horizontal. Nota: 1000 l. = 1 m
3
= 1000 Kg.
Recomendaes para eleger a melhor situ ao para a sua piscina:
• Escolha um lugar onde as escavaçoes para nivelar o terreno sejam mínimas. • Uma zona que não se inunde em caso de chuva. • Onde não passem
canais nem fios subterrãneos, ( água, gás, electricidade,....). • Não instalar por baixo de linhas eléctricas. • Protegida do vento e sem árvores, já
que o pólen e as folhas sujam a piscina. • Zona com sol, onde dê mais o sol de manhã. • Perto de uma tomada elévtrica, de uma tomada de água
e de um escoamiento.
Punt voor plaatsing: Onze zwembaden zijn ontworpen voor hun installatie op de begane grond en bestemd voor familiegebruik in de open lucht.
De grond dient vast, vlak en perfect horizontaal te zijn. Onthoud: 1000 liter water = 1 m
3
= 1000 Kg.
Aanbevelingen voor het uitzoeken van de beste ligging voor uw zwembad:
• Zoek een plek uit waarop zo min mogelijk moet worden afgegraven voor de nivellering van het terrein. • Zorg voor een stuk grond, dat in geval
van regen niet onder water komt te staan. • Vermijd iedere aanwezigheid van ondergrondse aansluitingen ( water, gas, elektriciteit,....). • Niet
intallaren onder elektriciteitsdraden. • Beschermen tegen wind en bomen vermijden, aangezien de pollen en bladeren het zwembad kunnen
vervuilen. • Zoek een zonnige plek met vooral ochtendzon. • Plaatsen in de nabijheid van een elektriciteits-, water- en afvoeraansluiting.
Luogo di posa: Le nostre piscine sono progettate per essere installate sul piano del terreno e per uso familiare all'aria aperta. Il terreno deve essere
stabile, liscio e perfettamente orizzontale. Ricordare: 1000 lts. d'acqua = 1 m
3
= 1000 Kg.
Raccomandazioni per scegliere la migliore posizione per la piscina:
• Scegliere un luogo in cui si debba eseguire il minor scavo possibile per livellare il terreno. • Scegliere una zona che, in caso di pioggia, non si inondi.
• Scegliere una zona in cui non passi nessun allacciamento sotterraneo. (acqua, gas, elettricitá,....). • Non installaresotto linee eletriche. • Scegliere
una zona protetta dal vento e senza alberi, poiché il polline e le foglie sporcheranno la piscina. • Scegliere una zona soleggiata, con maggiore
esposizione ai raggi mattutini. • Scegliere una zona nelle vicinanze di una presa elettrica, presa d;acqua e uno scolo.
Austellort: Unsere Schwimmbäder sind zur Aufstellung im Freien auf dem Boden und zur Benutzung durch die Familie ausgelegt. Der Boden muss
fest und vollkommen waagerecht sein. Beachten Sie: 1000 l. wasser = 1 m
3
= 1000 Kg.
Hier einige Empfehlungen zur Wahl des optimalen Standortes Ihres Schwimmbades:
• Wählen Sie für die Aufstellung ein Gelände, wo Sie möglichst wenig Erde auszuheben brauchen, um den Boden zu planieren. • Der Bereich darf
bei Regen nicht überschwemmt werden. • Durch den Untergrund darf keine unterirdische Leitung führen ( Wasser, Gas, Strom,....). • Installieren Sie
das Pool nicht unter Stromleitungen. • Der Aufstellort solite windgeschützt sein und keinen Baumbestand aufweisen, denn Pollen und Laub verschmutzen
das Schwimmbad. • Wählen Sie einen sonnenbeschienenen Bereich, vor allerm mit Morgensonne. • Wählen Sie Ihren Standort in der Nähe eines
Strom- und Wasseranschlusses und eines Abflusses.
Lieu d’installation: Nos piscines sont conçues pour être installlés sur la surface du sol et pour un usage familial de plein air. Le sol doit être ferme,
plat et parfaitement horizontal. Pour m moire: 1000 lts. d'eau = 1 m
3
= 1000 Kgs.
Recomendations pour choisir le meilleur emplacement pour votre piscine:
• Choisissez un lieu où vous devez réaliser le moins d'excavation possible pour niveler le terrain. • Zone non inondable en cas de pluie. • Où il ne
passe aucun branchement souterrain. ( eau, gaz, électricité,....). • Ne pas installer en dessous de lignes électriques. • Protégée du vent et sans arbres
étant donné que le pollen et les feuilles salissent la piscine. • Zone ensoileillée, où il y a le plus de soleil le matin. • Près d'une prise électrique, prise
d'eau et d'un lieu d'écoulement.
Lugar de colocacin: Nuestras piscinas están diseñadas para ser instaladas sobre la superficie del suelo y para uso familiar al aire libre.
El suelo debe estar firme, liso y perfectamente horizontal. Recuerde: 1000 lts. = 1 m
3
= 1000 Kgs.
Recomendaciones para elegir la mejor ubicaci n para su piscina:
• Escoja un lugar donde deba realizar la menor excavación posible para nivelar el terreno. • Zona donde en caso de lluvias no se inunde. • Que no
pase ninguna conexión subterránea ( agua, gas, electricidad,....). • No instalar debajo de tendidos eléctricos. • Protegida del viento y sin árboles ya
que el polen y las hojas ensucian la piscina. • Zona soleada, donde de más el sol por la mañana. • Cerca de una toma eléctrica, toma de agua y
un desagüe.
Installation place: Our pols are designed to be erected above ground an for an outdoor family use. The ground has to be firm, flat and perfectly
horizontal. Remenber: 1000 lts of water = 1 m
3
= 1000 Kgs.
Advices to chose the best location for your pool:
• Select a place where you'll have to realize the least excavation to levelled the ground. • Non easily inundated area in case of rain. • Where there is
not any underground conection (water, gaz, electricity,…). • Do not install it underneath electric line. • Protected from wind and without any trees
because the pollen and the leaves make the pool dirty. • Sunny area, where the most sun is during the morning. • Close to a water and power supply
and drainage system.
OK
3,5
m
N… 8
6
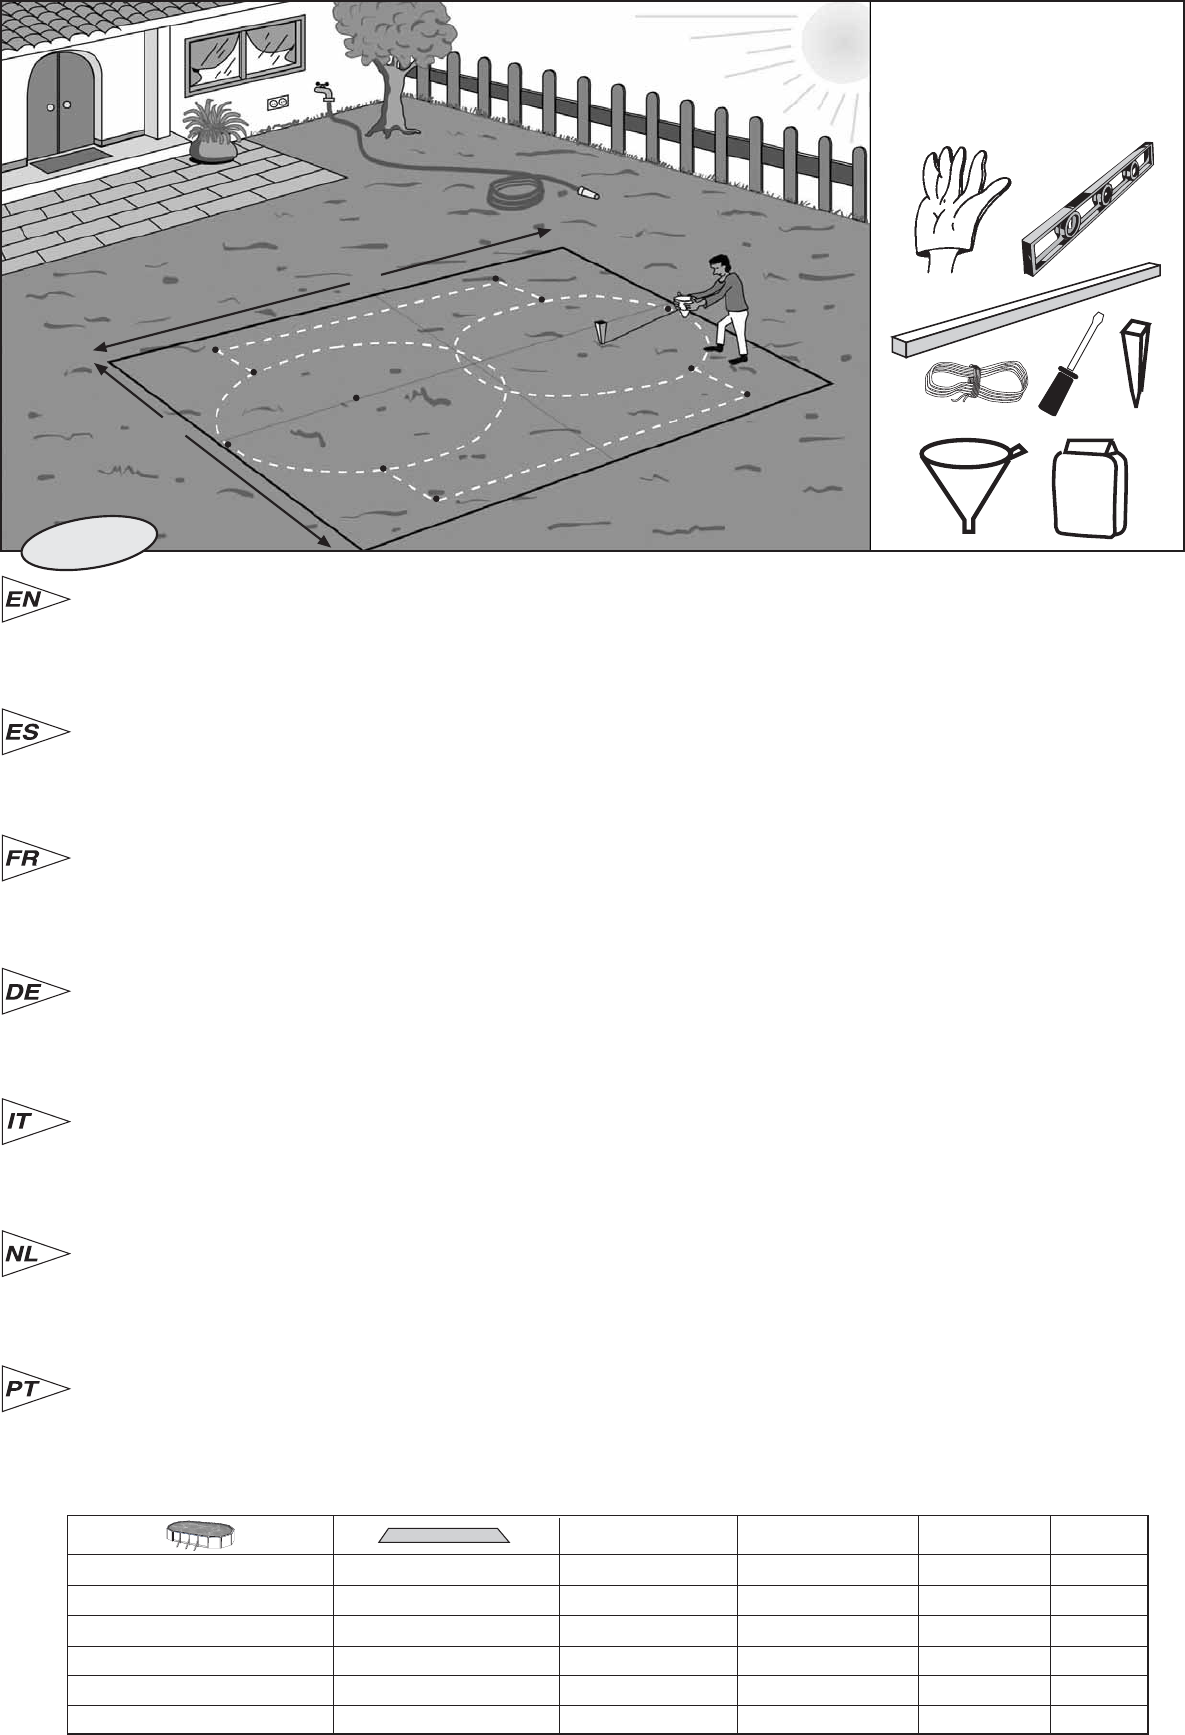
Marcar zona de instalaci n:
Una vez escogida la zona de ubicación de la piscina (que debe estar perfectamente nivelada) procederemos al marcaje.
Para ello tiene Ud. dos opciones:
- Preparar una plataforma de hormigón (cemento,etc.) de la medida necesaria según dimensiones de su piscina.
- Directamente sobre el terreno previa preparación que detallamos a continuación:
Para marcar el terreno ayúdese de estacas de madera, destornillador, embudo (ó botella de plástico), harina ó cal y una cuerda.
Se aconseja nivelar la superficie total necesaria antes del marcaje (que debe quedar centrado en el rectángulo correspondiente al modelo de la piscina) para que en el
montaje se trabaje más cómodo y con holgura.
Mark the installation area:
Once the location area is chosen (which have to be perfectly levelled), we’ll proceed at the marking.
You ‘ve got 2 options for that :
1° To prepare a concrete platform (cement,…) with the necessary measure according to your swimming-pool size.
2° Directly on the ground :
To mark the ground using wood pickets, screwdriver, funnel (or plastic bottle), flour or lime and a rope.
It is advisable to level the total surface area necessary before marking it (marking should be centered on the rectangle corresponding to the pool model) so that
assembly work is more convenient and easy.
Marquer la zone d’installation:
Une fois choisie la zone d'emplacement de la piscine (qui doit être parfaitement nivelée) nous procéderons au marquage.
Pour cela, vous avez deux options:
- Préparer une plateforme en béton (ciment,etc.) de la mesure nécessaire selon les dimensions de votre piscine.
- Directement sur le terrain:
Marquer le terrain en s'aidant de pieux en bois, tournevis, entonnoir (ou bouteille en plastique), farine ou chaux et une corde.
Il est conseillé de niveler la surface totale nécessaire avant le marquage (qui doit rester centré dans le rectangle correspondant au modèle de la piscine) pour que le
montage soit plus commode.
Standort markieren:
Der für die Aufstellung des Pools gew|ahlte (gut planierte) Ort wird anschließend markiert.
Dafür bieten sich Ihnen zwei Optionen:
- Die Vorbereitung einer Betonplatte (aus Zement usw.) in den notwendigen Abmessungen für das Schwimmbad.
- Aufstellung direkt auf dem Boden:
Boden mit Hilfe von Holzpflocks, Schraubenzieher, Trichter (oder Kunststofflasche), Mehl oder Kalk und einer Kordel abstecken.
Es empfiehlt sich, vor dem Markieren den gesamten Platzbedarf zu nivellieren (ausgerichtet mittig zum Rechteck entsprechend der Poolausführung). Dadurch werden
die Montagearbeiten erheblich erleichtert.
Tracciare zona di installazione:
Una volta scelta la zona di sistemazione della piscina (che deve essere perfettamente nivelata), si provvederà alla relativa tracciatura.
A tale scopo, si hanno due opzioni:
- Predisporre una piattaforma di calcestruzzo (cemento,ecc.) con le misure necessarie, a seconda delle dimenzioni della propia piscina.
- Direttamente sul terreno:
Tracciare il terreno servendosi di picchetti di legno, di un cacciavite, un imbuto (o una bottiglia di plastica), gesso o calce e una corda.
Si consiglia di livellare la superficie totale necessaria prima di tracciare (la tracciatura deve restare centrata sul rettangolo corrispondente al modello di piscina) in
modo che il lavoro sia più comodo.
Her markeren van de plaats voor installatie:
Wanneer we de plaats (die volkomen genivelleerd dient te zijn) voor de ligging van het zwembad eenmaal hebben uitgezocht gaan we over tot het markeren daarvan.
Dit kunt u op twe manieren doen:
- Een platform van beton bereiden (cement, enz.) met nodige afmeting, al naar gelang de grootte van uw zwembad.
- Direct op het terrein:
Het terrein markeren met behulp van houten palen, schroevedraaier, trechter (of een plastic fles), meel of kalk en een touw.
Aangeraden wordt, vóór het markeren, de gehele benodigde oppervlakte te nivelleren (die al naar gelang het model van zwembad in de rechthoek gecentreerd moet
zijn) opdat bij de montage gemakkelijker en met ruimte gewerkt kan worden.
Marcar zona de instalao:
Depois de escolher a zona de colocação da piscina (que tem de estar perfeitamente nivelada), é preciso marcar.
Para isso, existem duas opções:
- Preparar uma plataforma de formigão (cimento,etc.) com a medida necessária segundo as dimensiões da piscina.
- Directamente sobre o terreno:
Marcar o terreno com a ajuda de estacas de madeira, uma chave de parafusos, um funil (ou uma garrafa de plástico), farinha ou cal, e uma corda.
Aconselha-se nivelar a superfície total necessária antes da marcação (que deve ficar centrada no rectângulo correspondente ao modelo da piscina) para trabalhar
na montagem mais cómodo .
REQUIERED AREA - AREA NECESARIA - SURFACE NECESSAIRE - ENFORDERLICHE FL CHE - SUPERFICIE RICHIESTA - VEREISTE OPPERVLAKTE
FLOUR
HARINA
FARINE
MEHL
Tool necessary (not included)
Herramienta necesaria (no incluida)
Outil n cessaire (non compris)
Erforderliches werkzeug (nicht eingeschlossen)
Utensile necessario (non compreso)
Benodigd gereedschap (niet inbegrepen).
Ferramenta necess ria (não éstá incluída)
1
A
A
C
C
D
D
C
C
B
B
D
D
G
F
A-AA-B=B-CC-DD-D
10,00 x 5,50 m. 10,20 x 7,50 m.9,93 m.2,750 m.1 m. 4,87 m.
9,15 x 4,70 m.9,35 x 6,70 m.9,01 m.2,350 m.1 m.4,87 m.
8,10 x 4,70 m.8,30 x 6,70 m.7,88 m.2,350 m.1 m.3,75 m.
7,30 x 3,75 m.7,50 x 5,75 m.7,23 m.1,875 m.1 m.3,75 m.
6,10 x 3,75 m.6,30 x 5,75 m.6,11 m.1,875 m.1 m.2,62 m.
5,00 x 3,00 m.5,20 x 5,00 m.5,10 m.1,500 m.1 m.2,62 m.
7
Tool necessary (not included)
Herramienta necesaria (no incluida)
Outil n cessaire (non compris)
Erforderliches werkzeug (nicht eingeschlossen)
Utensile necessario (non compreso)
Benodigd gereedschap (niet inbegrepen).
Ferramenta necess ria (não éstá incluída)
Nivelar: En caso de nivelar el terreno nunca aadiremos tierra donde falta, siempre cavaremos donde sobra. De ésta forma garantizaremos la
estabilidad del terreno, su firmeza. En cualquier caso eliminaremos todas las hierbas, raíces, piedras, etc...El proceso de nivelado del terreno es
muy importante, dedíquele el tiempo y atención necesarios para que su piscina se asiente perfectamente en el terreno elegido y evitará problemas.
Como nivelar: Con reglas ó “ listones “ de madera largos, sitúelos enterrándolos en la zona elegida y limpia, formando rectángulos (ó cuadrados)
nivelados entre sí, por medio de una regla de albañil (aluminio) y un nivel.Cuando estén todos los “ listones “ a nivel y retirada la tierra donde sobre,
podrá rellenar,las peque as zonas que falten de nivelar (con tierra limpia ó arena) pero siempre compactando y nivelando a continuación. Es
importante que quede bien firme para que no se hunda el terreno cuando tenga la piscina llena de agua. Consulte con un profesional: Constructor,
jardinero, etc.
Levelling: When levelling the ground, always remove material from the top of the slope rather than filling in the bottom: this will ensure greater
ground stability and firmness. Always remove all grass, roots, stones, etc. Levelling is extremely important: devoting the necessary time and effort to
ensuring that your pool sits properly on the ground will avoid problems later.
How to level: thanks to a large mason rule (aluminium or wood) and a
level, level out the ground forming rectangles (or squares), locating this rule in the selected and cleaned area. When all the areas are on level and
when the excess of ground is removed, you may fill in the small areas which are left to level out (with clean ground or sand) but always compacting
and levelling again afterwards. It is very important the installation area is well compressed and firm in order the ground do not subside when the pool
will be full of water. Please ask a professional : builder, gardener,…
Nivellierung: Zum Planieren des Boden darf niemals Erde aufgesch ttet werden, wo diese fehlt, sodern es darf nur uberschüssige Erde ausgehoben
werden. Nur so wird die Stabilität und Festigkeit des Boden gesichert. Laub, wurzeln, Steine usw. müssen natürlich entfernt werden. Wir weisen besonders
darauf hin, dass die Bondennivellierung außerordentlich wichtig ist. Nehmen Sie sich daher Zeit und achten Sie darauf, dass das Pool einwandfrei auf
dem gewählten Boden aufliegt. Sie sparen sich dadurch Probleme. Wie wird nivelliert: Mit Linealen oder Holzleisten. Graben Sie diese im ausgewählten,
sauberen Bereich ein, indem Rechtecke (oder Quadrate) gebildet werden, die untereinander mit Hilfe eines Maurerlineals (aus Aluminium) und einer
Wasserwaage niveliert werden müssen. Wenn alle “Leisten” auf gleicher Höhe liegen und überflüssiges Erdreich entfernt ist, können die noch nicht nivellierten
kleinen Zonen aufgefüllt werden (mit sauberem Erdreich oder Kiessand). Dabei muss jedoch immer verdichtet und anschließend nivelliert werden. Achten
Sie darauf, dass der Untergrund fest ist un nicht absinkt, wenn das mit Wasser gefüllte Pool darauf steht. Wir empfehlen, einen Fachmann zu Rate zu
ziehen: Bauunternehner, Gärtner usw.
Niveler: Dans le cas de nivellement du terrain, ne jamais rajouter de terre aux endroits o il en manque, toujours creuser aux endroits où il y en a
en trop. Ainsi, nous garantirons la stabilité du terrain, sa fermeté. Dans tous les cas, éliminez toutes les herbes, racines, pierres, etc… Le procédé de
nivellement du terrain est très important, accordez lui le temps et l'attention nécessaires pour que votre piscine soit parfaitement installée sur le terrain
choisi et cela évitera des problèmes. Comment niveler: à l'aide d'une longue règle de maçon (aluminium ou bois) et d'un niveau, niveler le terrain en
formant des rectangles (ou carrés), en plaçant cette règle dans la zone choisie et propre. Lorsque toutes les zones seront de niveau et que la terre
en surplus aura été enlevée, vous pourrez remplir les petites zones qui restent à niveler (avec de la terre propre ou du sable) mais toujours en re-
compactant et re-nivelant par la suite. Il est important que la zone d'installation soit bien tassée et ferme pour que le terrain ne s'enfonce pas lorsque
la piscine sera remplie d'eau. Consultez un professionnel, jardinier, etc.
Nivelleren: In het geval van nivellering van het terrein moeten we nooit aarde bijvoegen op de plaats waar deze ontbreekt, we graven altijd uit daar
waar deze teveel aanwezig is. Op deze manier zullen we de stabiliteit van het terrein garanderen. In eider geval moeten we al het onkruid, de wortels,
stenen enz. …verwijderen. Het proces van de nivellering van het terrein is zeer belangrijk; besteed daar de nodige tijd en aandacht aan opdat uw zwembad
op de juiste manier zijn plaats vindt op het uitgekozen terrein en u zult problemen voorkomen. Wijze voor nivellering: met gebruik van latten of lange
houten tengels. Plaats deze in de grond op het uitgekozen en schone terrein, waarin met behulp van een metselaarsmeetlat (aluminium) en een waterpas
onderling genivelleerde rechthoeken (of vierkanten) worden gevormd. Wanneer alle latten zich dezelfde hoogte bevinden en de overtollige aarde is verwijderd
kunnen de kleine niet-genivelleerde plekken worden gevuld (met schone aarde of grind), warbij steeds de aarde moet worden gevuld samengedrukt om
daarna tot nivellering over te gaan. Het is belangrijk dat de met water wordt gevuld. Raadpleeg een deskundige: een aannemer, een tuinman, enz.
Livellare: Per livellare il terreno non aggiungere mai terra nel punto in cui manca, ma si scaverà sempre nel punto in cui è in eccesso.In questo modo
si garantirà la stabilità e solidità del terreno. Occorrerà comunque eliminare tutte le erbacce, le radici, le pietre, ecc. La procedura di livellamento è molto
importante, occorrerà quindi dedicargli il tempo e la cura necessari affinché la piscina si sistemi perfettamente sul terreno prescelto ed eviterà eventuali
problemi. Come livellare: Dopo aver pulito la zona prescelta, situare sottoterra delle squadre o dei “listelli” di legno lunghi, formando rettangoli (o quadrati)
livellati fra loro, per mezzo di una squadra da muratore (alluminio) e una livella. Quando tutti i “listelli” saranno a livello e dopo aver rimosso la terra eccedente,
si potrano riempire le piccole zone mancanti da livellare (con terra pulita o sabbia di fiume) ma sempre compattando e livellando di seguito. È importante
che sia ben saldo affinché non sprofondi il terreno quando la piscina sarà piena d'acqua. Consultare un professinista: construttore, giardiniere, ecc.
Nivelar: Se se nivelar o terreno nunca se dever acrescentar terra onde falta, sempre deve-se cavar onde sobra. Desta forma garante-se a estabilidade
do terreno e a sua firmeza. Em qualquer caso devem-se eliminar as ervas, raízes, pedras, etc. O processo de nivelamento do terreno é muito importante.
Deve-se dedicar a ele todo o tempo e atenção necessários para a sua piscina se assentar perfeitamente no terreno escolhido, o que evitará problemas.
Como nivelar: com regras ou “réguas de madeira compridas: coloque-as enterradas na zona escolhida e limpa, formando rectângulos (ou quadrados)
nivelados entre eles, por meio de una regra de pedreiro (alumínio) e um nível. Quando estiverem todas as “réguas” a nível e tirada a terra aí onde sobrar,
poderá encher as peque as zonas que faltam por nivelar (com terra limpa ou areia) mas sempre compactando e nivelando depois. É importante que
fique bem firme para não se arrombar o terreno quando a piscina estiver cheia de água. Consulte um profissional (um construtor ou um jardineiro, ou
qualquet outro).
2
D
D
D
D
A
B
C
C
B
C
C
NIVEL
A
8
Tool necessary (not included)
Herramienta necesaria (no incluida)
Outil n cessaire (non compris)
Erforderliches werkzeug (nicht eingeschlossen)
Utensile necessario (non compreso)
Benodigd gereedschap (niet inbegrepen).
Ferramenta necess ria (não éstá incluída)
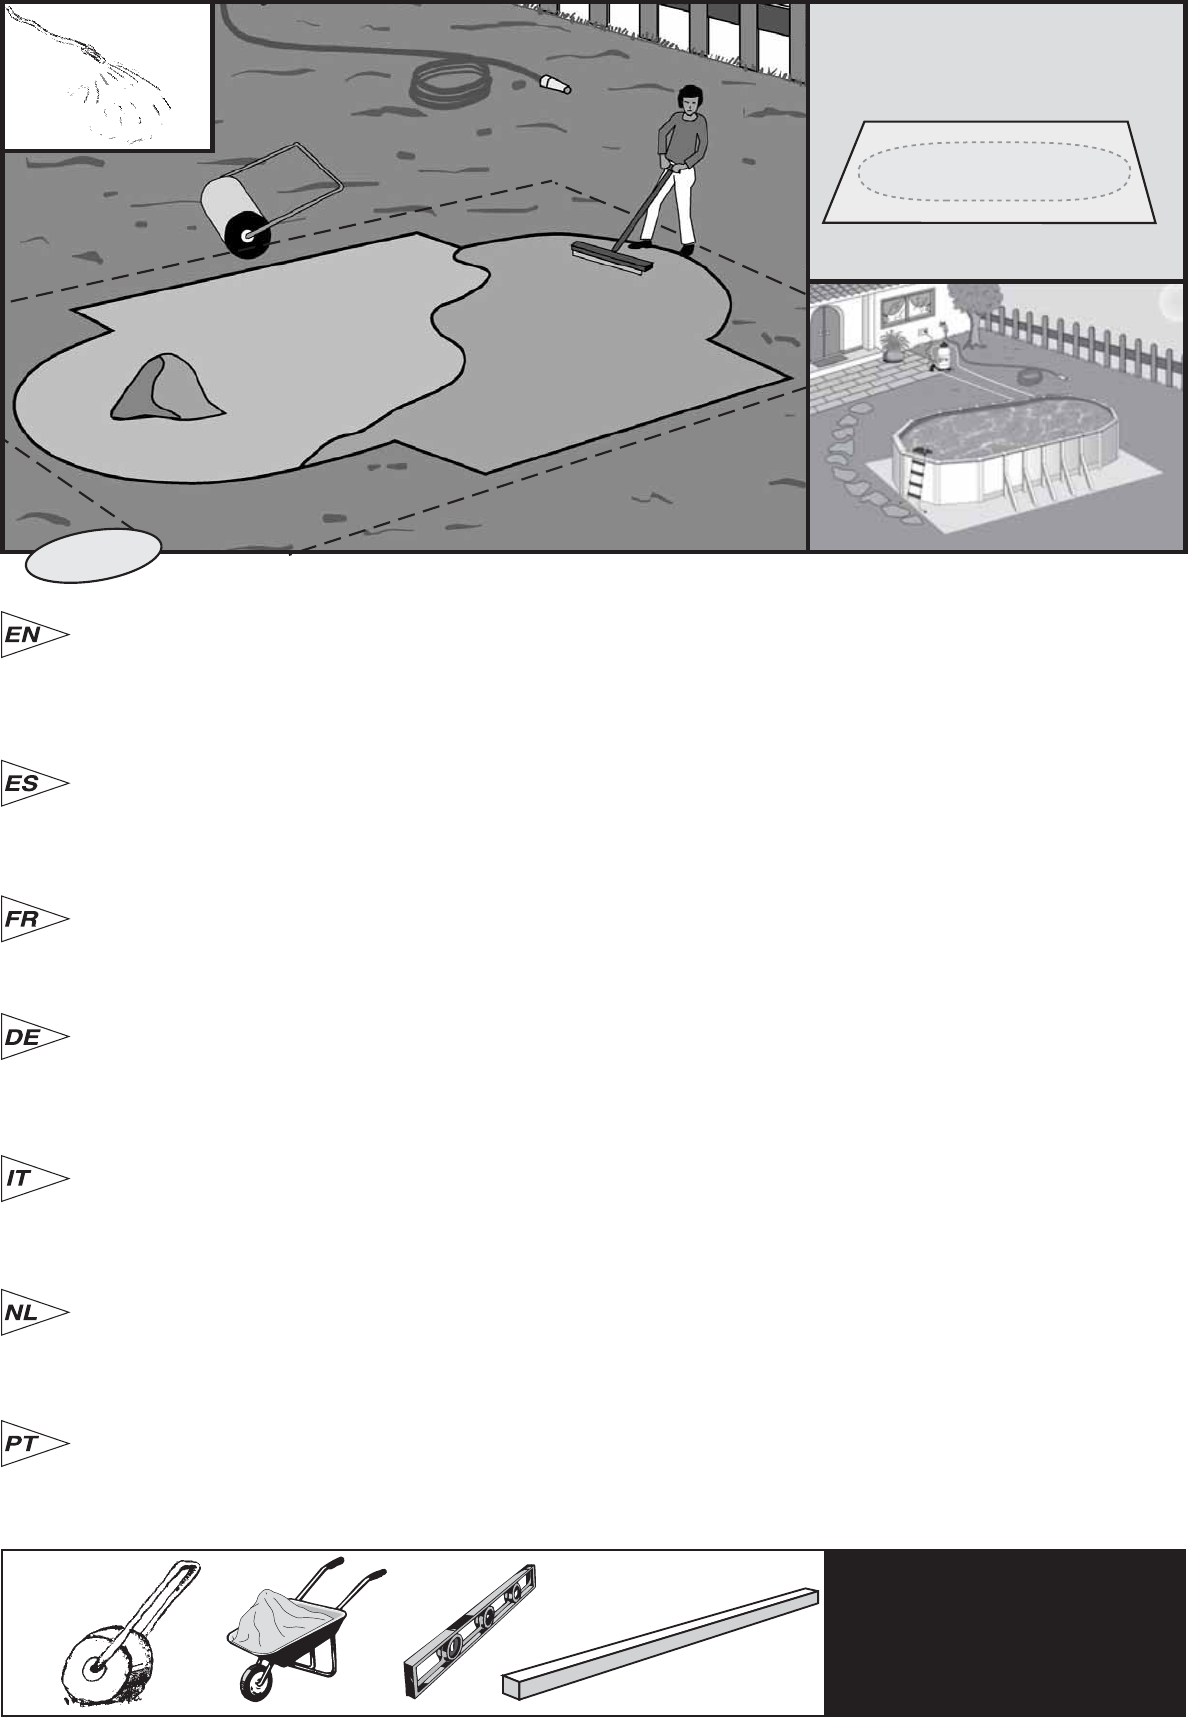
Acabado: Encima del terreno limpio y nivelado esparciremos una fina capa (max.1 cm) de arena tamizada.
Lo regaremos y compactamos ( con un rodillo de jardín ). Verificamos que esté bien nivelado.
No usar la arena para nivelar el terreno.El acabado debe ser perfecto.
Aconsejamos poner sobre el terreno compactado un tapiz de suelo (TPR) ó una manta protectora de fondos (MPR).
Si opta por este sistema se recomienda cortar todo el sobrante exterior una vez montada la piscina. Estos protectores del liner (manta o tapiz)
es más correcto colocarlos como se indica en la página 20, justo antes de la colocación del liner.
Finishing: On the cleaned and levelled ground, spread a light coat of sieved sand (max. 1cm).
Water and compact it (with a garden roller). Check that is well levelled.
Do not use the sand to level the ground. The finishing has to be perfect.
We advise to put a ground cover (TPR) or a thick one (MPR) above the compact ground.
If you choose this system, you should cut away the exterior excess once the swimming pool has been assembled. It is more correct to fit these liner
protectors (ground cover or carpet) as shown on page 20, just before installing the liner.
Finish: Auf dem sauberen und nivellierten Untergrund wird eine feine Schicht (max.1 cm) gesiebter Sand verteilt.
Diese Schicht wird befeuchtet und verdichtet (mit einer Gartenwalze). Danach noch einmal auf einwandfreie Planierung prüfen.
Der Sand darf nicht zum Nivellieren des Boden benutz werden. Das Finish muss einwandfrei sein.
Wir empfehlen, den verdichteten Boden mit einer Bodendecke (TPR) oder einen Poolbodenschutzabdeckung (MPR) zu belegen.
Wenn Sie sich für dieses Verfahren entschließen, empfehlen wir, dass Sie das überstehende Außenstück nach der Montage des Schwimmbads
schneiden. Achten Sie dabei auf korrektes Anbringen der Liner-Schutzstreifen (Decke bzw. Überzug) unmittelbar vor dem Liner-Bezug, wie auf
Seite 20 dargestellt.
Finition: Sur le terrain propre et nivelé, répartir une fine couche (max.1 cm) de sable tamisé.
L'arroser et le compacter (avec un rouleau de jardin). Vérifier qu'il soit bien nivelé.
Ne pas utiliser le sable pour niveler le terrain. La finition doit être parfaite.
Nous vous conseillons de mettre sur le terrain compacté un tapis de sol (TPR) ou une feutrine (MPR).
Si vous choisissez ce système, après avoir monté la piscine, il faudra couper ce qui dépasse de la partie extérieure. Il est plus judicieux de placer
les protecteurs du liner (couverture ou tapis) tel qu´indiqué en page 20, juste avant d´installer le liner.
Voltooiing: Over het schone en genivelleerde terrein strooien we een fijne laag (maximaal1 cm) gezeefd zand uit.
Deze begieten we en stampen we aan (met een tuinpletter). We verifiëren de juiste nivellering.
Het zand niet gebruiken voor het nivelleren van het terrein. De voltooiing dient volmaakt te zijn.
We raden aan op het aangestampte terrein een vloerbekleding (TPR) of een bodembeschermdek (MPR) aan te brengen.
Wanneer u voor dit system heeft gekozen en het zwembad eenmaal is gemonteerd, raden wij u aan alle overtolligheden aan de buitenkant af
te snijden. De juiste wijze voor het aanbrengen van de beschermers van de liner (deken of kleed), nét voordat de liner wordt geplaatst, vindt u
aangegeven op blz. 20.
Finitura: Sul terreno pulito e nivellato si spargerà un sottile strato (max.1 cm) di sabbia setacciata.
Quindi irrigare e compattare (con un rullo da giardino). Verificare che il terreno sia ben livellato.
Non utilizzare la sabbia per livellare il terreno. La finitura deve essere perfetta.
Si consiglia di riporre sotto il terreno compattato un tappeto da suolo (TPR) o una coperta di protezione fondi (MPR).
Se si sceglie da questo sistema, si consiglia di tagliare tutto l’eccesso esterno una volta montata la piscina. È più corretto situare questi protettori
del liner (coperta o tappeto) come illustrato a pagina 20, prima di montare il liner.
Acabamento: Encima do terreno limpo e nivelado, pôr uma camada fina (max.1 cm) de areia tamisada.
Depois rega-se e compacta-se (com um rodízio de jardim). Verificar se está bem nivelado.
Não utilizar a areia para nivelar o terreno. O acabamento deve ser perfeito.
Aconselhamos pôr sobre o terrenocompactado um tapete de chão (TPR) ou uma manta protectota de fundos (MPR).
Se se optar por este sistema recomenda-se cortar todo o sobrante exterior após a montagem da piscina. É mais correcto colocar estes protectores
do liner (manta ou tapete) como se indica na página 20, justo antes da colocação do liner.
TPR MPR
3
9
INSTRUCTIONS
PARTE
3
3
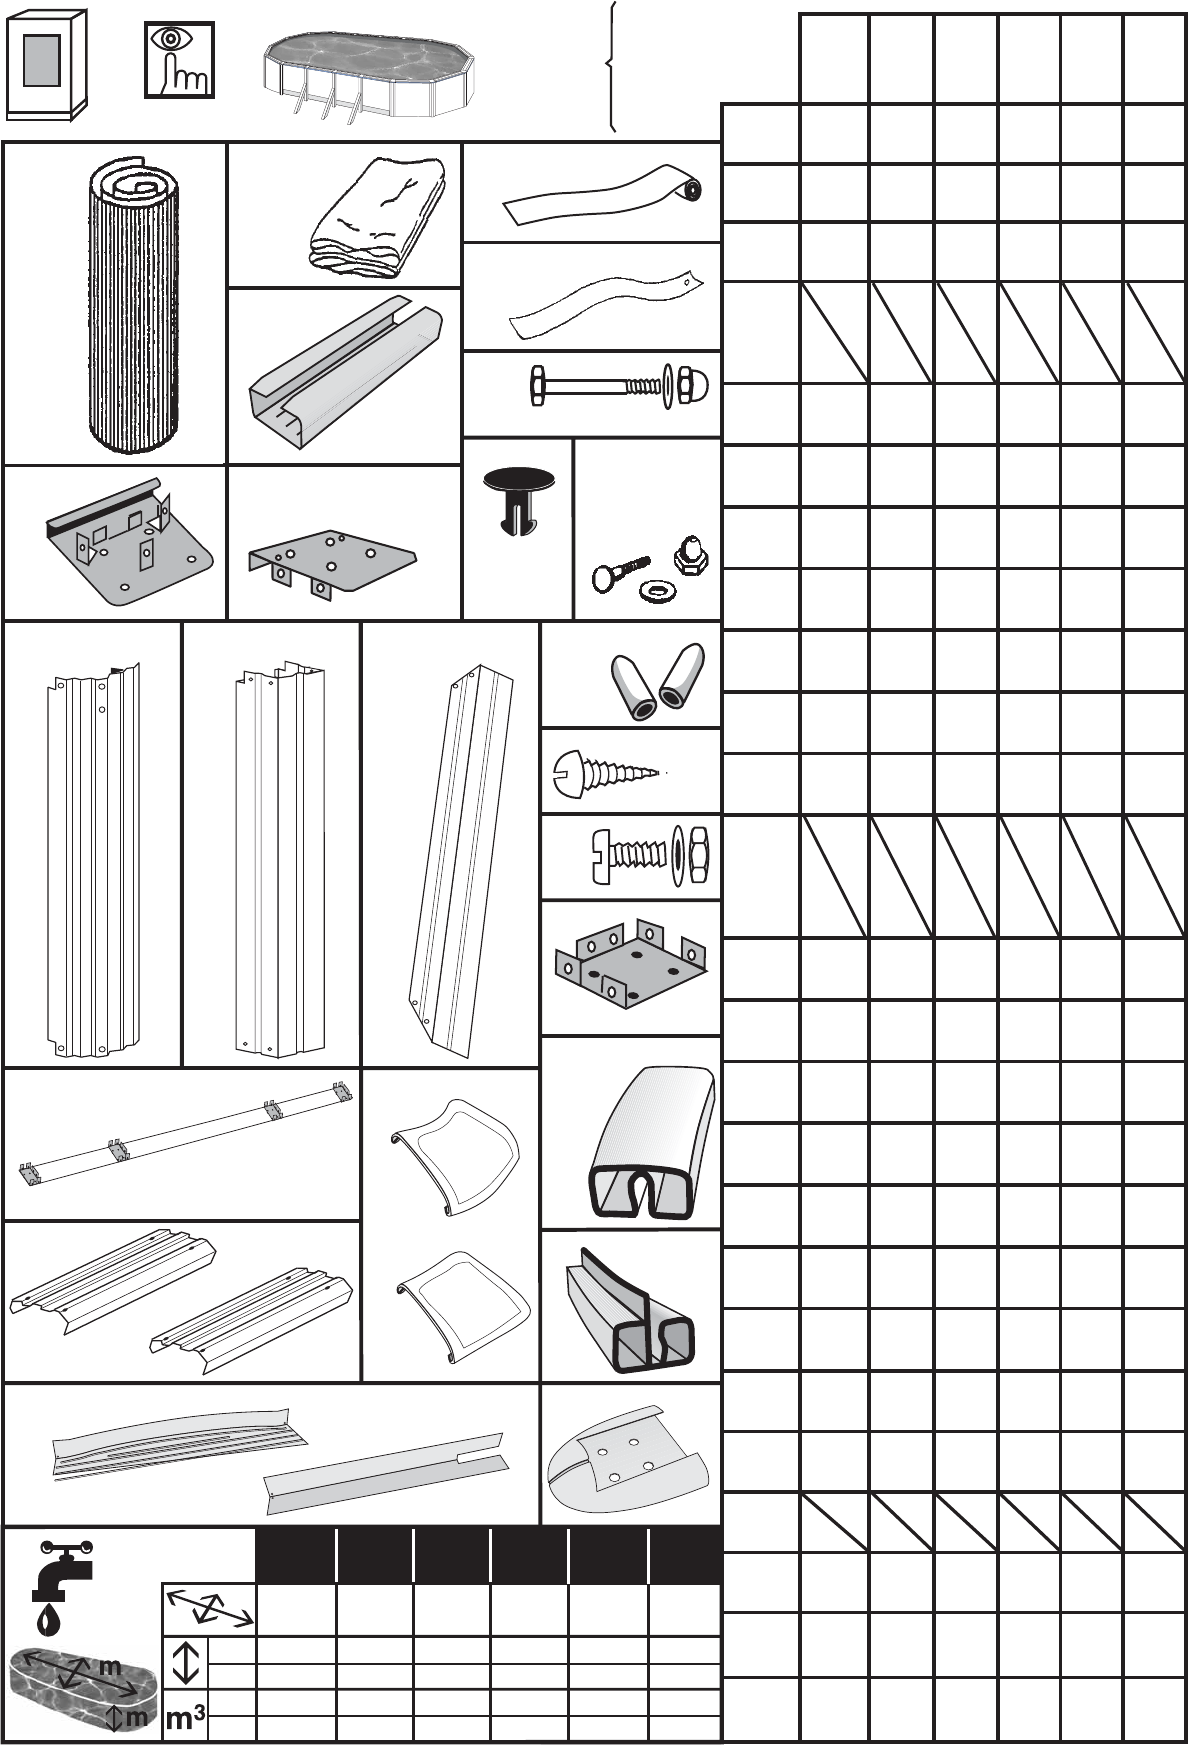
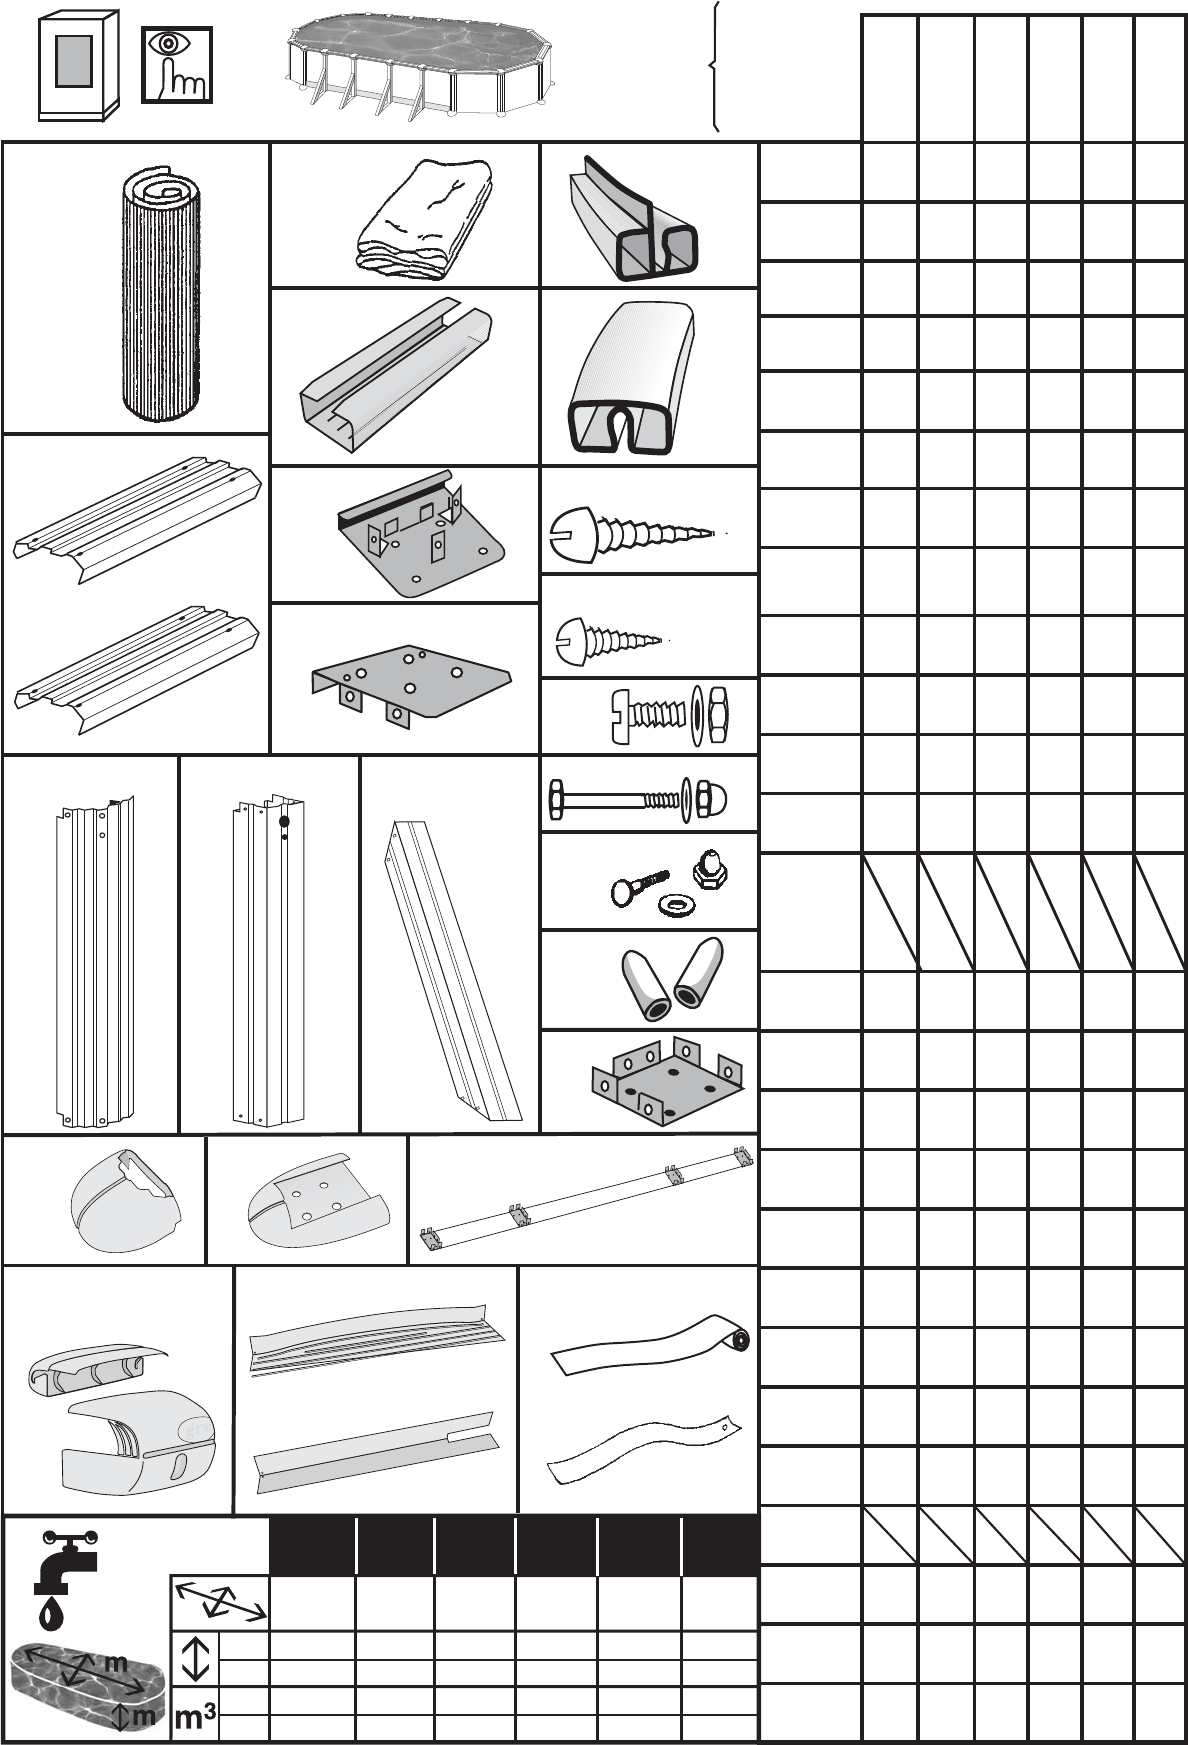
COMPONENTS
Draw and clasify all components included before assembly. It's
time to assemble the ladder and the pump, follow the respective instructions. Kits
with missing parts will be covered by the warranty only if reported to the after-sales
service within 15 days as from the date of purchase of the swimming pool.
ELEMENTS
Avant de commencer le montage prenez et séparez les differents
élements qui constituent votre piscine.De même procedez au montage de l'échelle
et de l'épurateur (suivre leurs instructions d'installation et d'utilisation).
Il faut signaler au service après-vente si le kit est incomplet (pièces manquantes),
et ce, dans un délai maximum de 15 jours à partir de la date d´achat de la piscine.
Si cette condition n´est pas respectée, la garantie ne sera pas valide.
BESTANDTEILE
Bestandteile vor dem Aufbau des Schwimmbeckens überprüfen
und einordnen.Wenn Sie einen KIT erworben haben, bauen sie jetzt die Leiter und
Filteranlage ein. (Beachten Sie die Montageanweisungen).
Spätestens 15 Tage nach dem Pool-Kaufdatum ist der Mangel an Kit-Bestandteilen
dem Kundendienst mitgeteilt zu werden. Andernfalls wird die Garantie unwirksam.
COMPONENTI
Estrarre e classificare i componenti della piscina prima di provve-
dere al montaggio della stessa.Allora è il momento di montare la scala e il depura-
tore (vedere le relative istruzioni per il montaggio).
La mancanza dei pezzi nel kit deve essere informata al servizio post-vendita entro
un massimo di 15 giorni dalla data dell’acquisto della piscina; in altro caso la garanzia
non coprirà la mancanza.
ONDERDELEN
Pak eerst de onderdelen van het zwembad uit en sorteer deze
al vorens met de montage te beginnen.Is dit het moment om de trap en de zuivering-
sinstallatie te monteren (zie de respectievelijke instructies voor de montage daarvan).Het
gebrek aan onderdelen in de kit moet maximaal binnen 15 dagen vanaf de datum
van aankoop van het zwembad worden medegedeeld aan de service na aankoop;
in het tegenovergestelde geval zal het gemis niet door de garantie worden gedekt.
COMPONENTES
Tirar os componentes da piscina e classificá-los antes de começar a
montagem.Monte durante esse tempo a escada e o equipamento de depuração (ver instruções
de montagem respectivas).
A falta de peças no kit deve ser informada ao serviço após venda num prazo máximo
de 15 dias desde a data de compra da piscina, caso contrário não estará coberto
pela garantia.
COMPONENTES
Saque y clasifique los componentes de la piscina antes de iniciar el
montaje. Además es el momento de montar la escalera y la depuradora (vea sus respectivas
instrucciones de montaje). La falta de piezas en el kit debe de ser informada al servicio
postventa en un plazo máximo de 15 días desde la fecha de compra de la piscina, en caso
contrario no estará cubierto por la garantía.
Pags.
10, 11
Pags.
12, 13
"Important: You must take into account the type of protectors that
your pool has, in order to correctly follow the assembly instructions
Importante: Debe tener en cuenta el tipo de protectores que lleva su piscina
para seguir correctamente las instrucciones
"Important : Il faut tenir compte du type de margelles avec enjoliveur
dont dispose votre piscine, afin de suivre correctement les
instructions de montage"
WICHTIGER HINWEIS: Um den Anweisungen der Montageanleitung
ordnungsgem ss zu folgen, beachten Sie bitte dabei die Ausf hrung
der Schutzteile.
"Importante: Si deve tener conto d il tipo di protettori della piscina,
per seguire correttamente le istruzioni di montaggio"
"Belangrijk: Om op de juiste wijze de montageinstructies te volgen
moet rekening worden gehouden met het type bescherming van
uw zwembad".
"Importante: necess rio ter em linha de conta o tipo de protectores
da sua piscina, para seguir correctamente as instrues de
INSTALAO DA PISCINA: ACONSELHA-SE QUE SEJA MONTADA POR DUAS PESSOAS ADULTAS OU MAIS, UM DIA SEM VENTO. PELA
SUA SEGURIDADE, UTILIZAR LUVAS PARA FAZER A MONTAGEM.
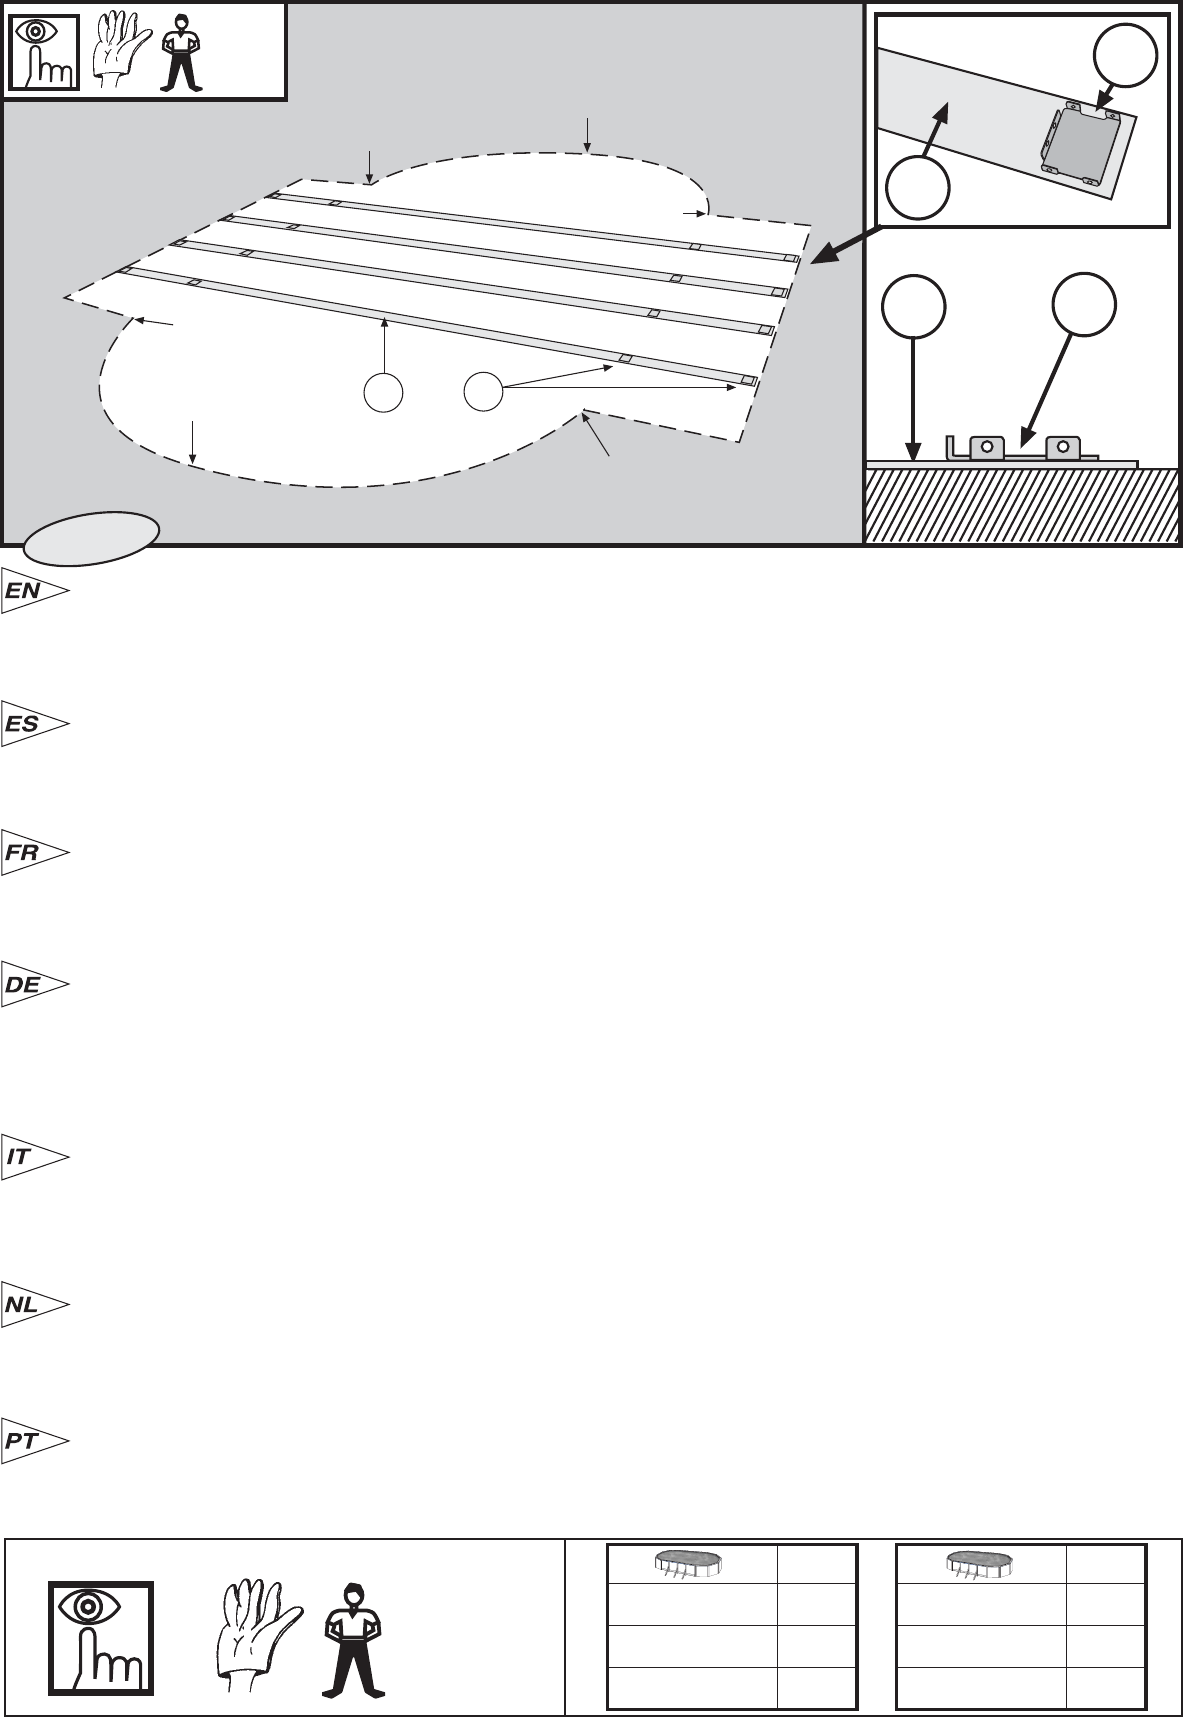
COLOCAÇÃO DOS PERFIS INFERIORES (PI): (Metade dos perfis totais)
COLOCAÇÃO DAS CILHAS/ METÁLICAS (CN):1000 x 550 cm = 4 x (CN).915 x 470 cm = 4 x (CN). 810 x 470 cm = 3 x (CN). 730 x 375 cm = 3
x (CN). 610 x 375 cm = 2 x (CN). 500 x 300 cm = 2 x (CN).
Cada cilha leva 4 peças de fixação rebitadas (PE) que se devem de colocar com os grampos para cima. Desdobrar as cilhas em todo o seu
comprimento e colocá-las transversalmente na zona recta da piscina, e paralelas entre elas.
INSTALLATIE VAN HET ZWEMBAD: Wij raden U aan dit met twee of meerdere volwassen personen te realiseren en op een dag zonder wind.
VOOR UW EIGEN VEILIGHEID IS HET GEBRUIK VAN HANDSCHOENEN TIJDENS HET MONTEREN VAN HET ZWEMBAD ZEER BELANGRIJK.
PLAATSING VAN DE METALEN BANDEN (CN):
1000 x 550 cm = 4 x (CN).915 x 470 cm = 4 x (CN). 810 x 470 cm = 3 x (CN). 730 x 375 cm =
3 x (CN). 610 x 375 cm = 2 x (CN). 500 x 300 cm = 2 x (CN)
Op elke band werden 4 bevestigingsstukken (PE) geponst. Deze moeten met hun flenzen naar boven komen te liggen. Vouw de banden open
over hun volledige lengte. De banden worden dwars en parallel aan elkaar geplaatst op de rechte zijde van het zwembad.
INSTALLAZIONE DELLA PISCINA:
PER CIÓ CHE RIGUARDA IL MONTAGGIO DELLA PISCINA, CONSIGLIAMO DO FARLO IN DUE O PIÙ
PERSONA ADULTE, IN UNA GIORNATA SENZA VENTO. PER VOSTRA SICUREZA, MOLTO IMPORTANTE E' L'USO DI GUANTI DURANTE IL
MONTAGGIO DELLA PISCINA.
SISTEMAZIONE DELLE FASCETTE METALLICHE (CN): 1000 x 550 cm = 4 x (CN).915 x 470 cm = 4 x (CN). 810 x 470 cm = 3 x (CN). 730 x 375
cm = 3 x (CN). 610 x 375 cm = 2 x (CN). 500 x 300 cm = 2 x (CN)
Ciascuna fascetta dispone di 4 pezzi stampati (PE) ribaditi che vanno sistemati avendo cura di lasciare il bordino rivolto verso l’alto. Svolgere
del tutto le fascette disponendole trasversalmente nella zona rettilinea della piscina e parallele tra di loro.
INSTALLATION DES SCHWIMMBECKENS:
DER ZUSAMMENBAU DES SCHWIMMBECKENS SOLLTE MINDESTENS VON ZWEI
ERWACHSENEN PERSONEN AUSGEFÜHRT WERDEN. FÜR DEN AUFBAU SOLLTE EINE KONSTANTE WETTERLAGE GEWÄHLT WERDEN
(OHNE WIND). VERWENDEN SIE VORSICHTSHALBER HANDSCHUHE, SIE SIND ZUM MONTIEREN DER STAHLWAND UNBEDINGT
ERFORDERLICH.
VERLEGUNG DER METALLREIFEN (CN): 1000 x 550 cm = 4 x (CN).915 x 470 cm = 4 x (CN). 810 x 470 cm = 3 x (CN). 730 x 375 cm = 3 x
(CN). 610 x 375 cm = 2 x (CN). 500 x 300 cm = 2 x (CN)
An jedem Reifen sind 4 Stanzteile (PE) angenietet, die mit dem Vorstoß nach oben gerichtet verlegt werden müssen. Die in ihrer vollen Länge
entfalteten Reifen werden quer und parallel zueinander im geradlinigen Poolbereich verlegt.
INSTALLATION DE LA PISCINE: NOUS VOUS CONSEILLONS DE LE FAIRE À 2 OU PLUSIEURS PERSONNES ET PAR UNE JOURNÉE
SANS VENT. POUR VOTRE SECURITE, IL EST TRES IMPORTANT D'UTILISER DES GANTS LORS DU MONTAGE DE LA PISCINE.
INSTALLATION DES SANGLES METALLIQUES (CN): 1000 x 550 cm = 4 x (CN).915 x 470 cm = 4 x (CN). 810 x 470 cm = 3 x (CN). 730 x 375
cm = 3 x (CN). 610 x 375 cm = 2 x (CN). 500 x 300 cm = 2 x (CN)
Chaque sangle porte 4 pièces de serrage (PE) rivetées qui doivent être placées avec les languettes vers le haut. Déplier les sangles dans toute
leur longueur, les placer transversalement sur la zone droite de la piscine et parallèles entre elles.
INSTALACION DE LA PISCINA: ACONSEJAMOS QUE SE REALICE ENTRE DOS O MAS PERSONAS ADULTAS Y EN UN DÍA SIN VIENTO.
POR SU SEGURIDAD, ES MUY IMPORTANTE LA UTILIZACION DE GUANTES DURANTE EL MONTAJE DE LA PISCINA.
COLOCACION DE LAS CINCHAS METALICAS (CN):
1000 x 550 cm = 4 x (CN).915 x 470 cm = 4 x (CN). 810 x 470 cm = 3 x (CN). 730 x 375 cm
= 3 x (CN). 610 x 375 cm = 2 x (CN). 500 x 300 cm = 2 x (CN).
Cada cincha tiene remachadas 4 piezas de estampación (PE) que deben quedar situadas con sus pestañas hacia arriba.Desplegar las cinchas en toda
su longitud. Las cinchas se colocan transversalmente en la zona recta de la piscina,paralelas entre sí.
INSTALLATION OF THE SWIMMINGPOOL: WE RECOMMEND THAT THIS IS DONE BY TWO OR MORE ADULTS AND ON A DAY WITHOUT
WIND. FOR YOUR SAFETY, IT IS VERY IMPORTANT TO WEAR GLOVES WHILE ASSEMBLING THE POOL.
FITTING THE METAL STRUTS (CN): 1000 x 550 cm = 4 x (CN).915 x 470 cm = 4 x (CN). 810 x 470 cm = 3 x (CN). 730 x 375 cm = 3 x (CN).
610 x 375 cm = 2 x (CN). 500 x 300 cm = 2 x (CN)
Each strut has 4 drop-forged parts (PE) riveted to it which must be fitted with the tabs upwards. Fully extend the struts parallel to each other across
the straight part of the pool.
2 - 3
CN
1000 x 550 cm
915 x 470 cm
810 x 470 cm
4
4
3
CN
730 x 375 cm
610 x 375 cm
500 x 300 cm
3
2
2
CN
PE
Refs:
A
A
C
C
C
C
CN
PE
2 - 3
CN
PE
1
1000 x 550 cm
915 x 470 cm
16
EM2
PU
T2
EM2
CN
EM1
A
A
C
C
C
PE
CN
EM2
EM1
EM1
EM1
EM2
PU
PU
PU
2
EM1
EM2
1000 x 550 cm
915 x 470 cm
810 x 470 cm
EM1
3 + 3
3 + 3
2 + 2
EM2
2 + 2
2 + 2
2 + 2
730 x 375 cm
610 x 375 cm
500 x 300 cm
EM1
2 + 2
1 + 1
1 + 1
EM2
2 + 2
2 + 2
2 + 2
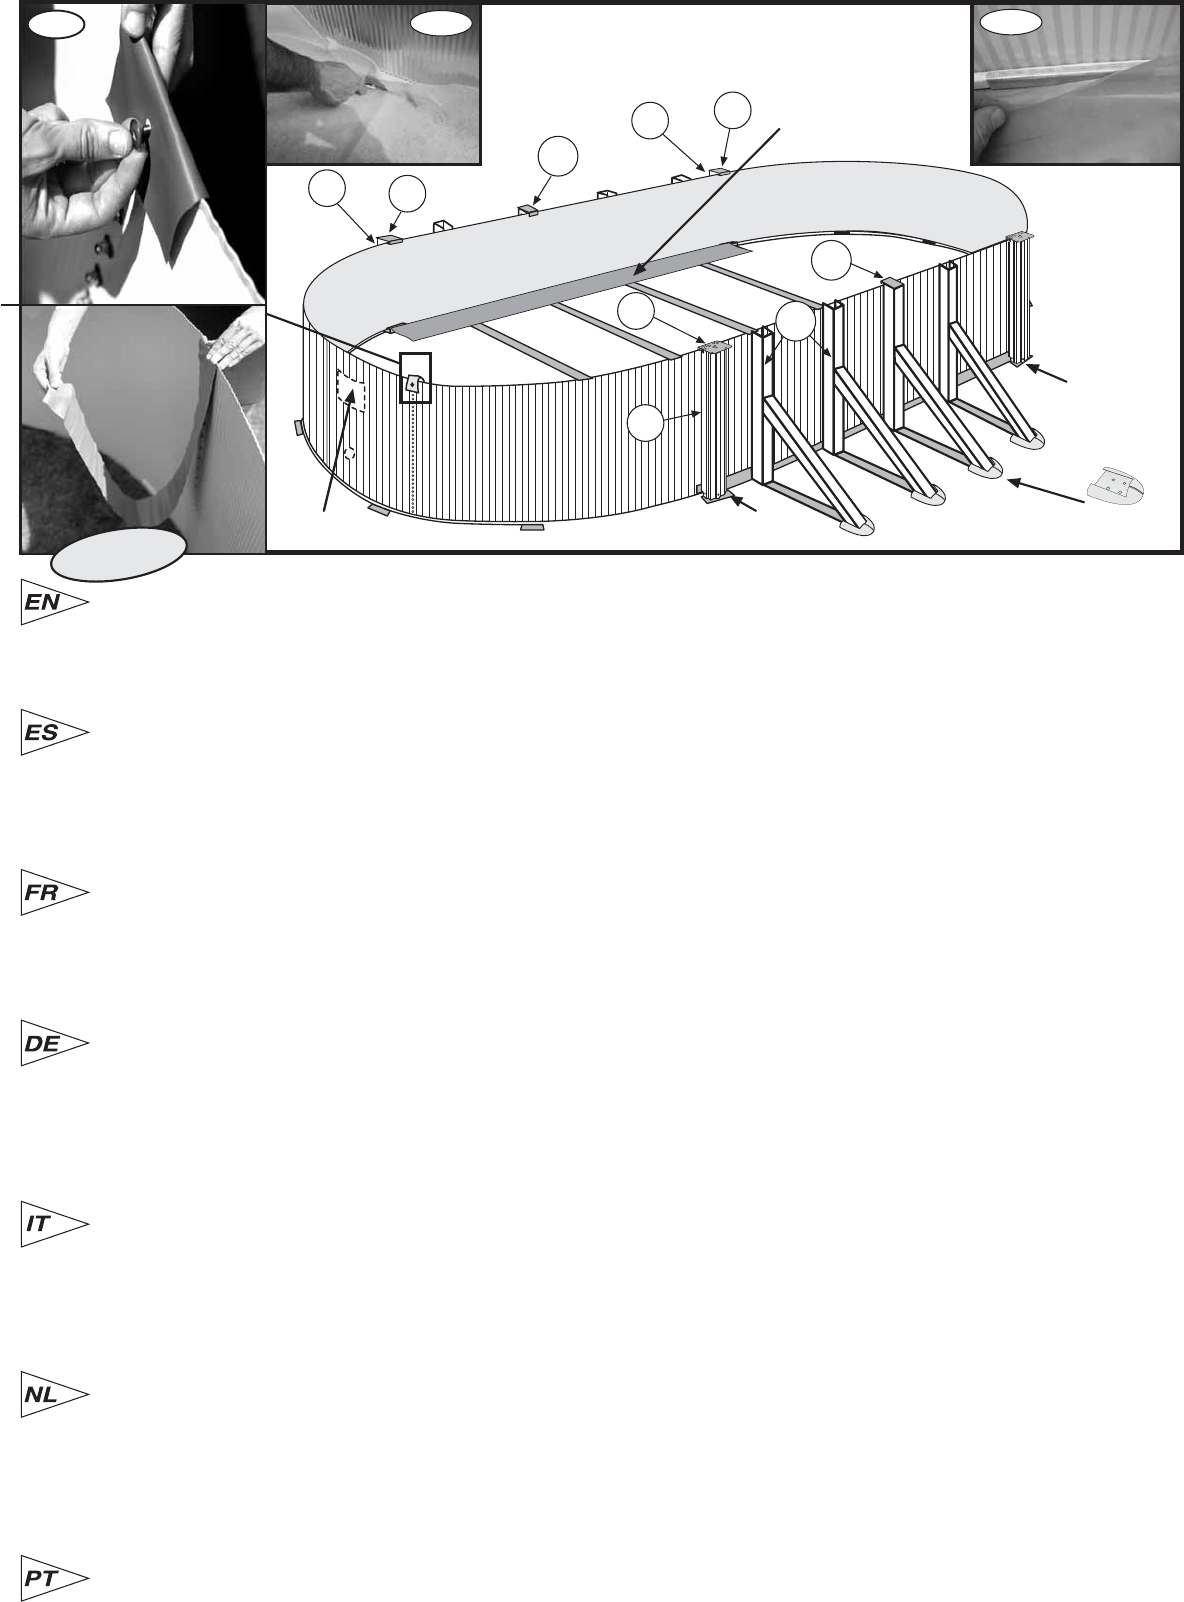
SISTEMAZIONE DELLE SQUADRE METALLICHE (EM1) - (EM2): Le squadre metalliche centrali (EM1) vengono sistemate nella zona centrale
(metà su un fianco e metà sull’altro) unendole con fascette e viti (T2) ai bordini dei pezzi stampati (PE). La parte più larga della squadra metallica
dovrà essere rivolta verso l’interno della piscina mentre quella più stretta e verticale per poterla fissare al pezzo stampato più interno della fascetta.
Ultimata la sistemazione e relativo fissaggio a vite, verranno sistemate le squadre metalliche esterne (EM2) (2 a sinistra e 2 a destra), servendosi
sempre di viti T2 alle estremità e tenendo conto dei pezzi di unione (PU) che verranno disposti nelle scanalature delle squadre (EM2) rivolte verso
l’inizio delle estremità di ciascuna semicirconferenza (nel punto C). IMPORTANTE: nell’unire le squadre metalliche tra di loro, la testa delle viti (T2)
deve essere sistemata verso l’interno della piscina mentre la rondella con il dado andrà rivolta verso l’esterno.
VERLEGUNG DER METALLWINKELST CKE (EM1) - (EM2): Die mittleren Metallwinkelstücke (EM1) werden im mittleren Bereich (die eine Hälfte
nach einer Seite, die andere nach der anderen Seite) verlegt und mit den Reifen mit Hilfe der Schrauben (T2) mit den Stanzteilen (PE) verbunden.
Der breitere Teil des Winkelstücks muß im Pool nach innen, der schmalere Teil senkrecht liegen, um die Verbindung mit demjenigen Stanzteil
herzustellen, das am Reifen am weitesten nach innen liegt. Nach Verlegung und Verschraubung der mittleren Winkelstücke werden nunmehr die
äußeren Winkelstücke (EM2) (2 links und 2 rechts), ebenfalls mit Schrauben T2, an den Enden angebracht. Dabei ist darauf zu achten, daß die
Verbindungsteile (PU) zur Einführung in die Nuten der Winkel (EM2) auf den Anfang der Enden jedes Halbkreises (am Punkt C) ausgerichtet sein
müssen. WICHTIGER HINWEIS: Wenn die Winkelstücke miteinander verbunden werden, muß der Kopf der Schrauben (T2) innen im Pool, die
Unterlegscheibe mit Mutter jedoch Außen liegen.
COLOCACION DE LAS ESCUADRAS METALICAS (EM1) Y (EM2): Las escuadras metálicas centrales (EM1) se colocan en la zona central (mitad
a un lado y mitad al otro) uniéndolas a las cinchas, por medio de tornillos (T2), a las pestañas de las piezas de estampación (PE). La parte más
ancha de la escuadra metálica debe quedar hacia el interior de la piscina y la parte más estrecha, vertical, para poderla sujetar a la pieza de
estampación más interior de la cincha. Una vez colocadas y bien atornilladas, se colocan las escuadras metálicas exteriores (EM2) (2 izquierdas
y 2 derechas), tambien con tornillos T2, en los extremos y teniendo en cuenta que deben quedar las piezas de unión (PU) que se colocarán en
las ranuras de las escuadras (EM2) orientadas hacia el comienzo de los extremos de cada media circunferencia (en el punto C). IMPORTANTE:
Al unir las escuadras metálicas entre sí, la cabeza de los tornillos (T2) deben quedar hacia el interior de la piscina y la arandela con la tuerca hacia
el exterior.
COLOCAO DOS ESQUADROS MET LICOS (EM1) - (EM2): Os esquadros metálicos centrais (EM1) colocam-se na zona central (uma metade
de cada lado) e fixam-se às cilhas com parafusos (T2), e aos grampos das peças de fixação (PE). A parte mais larga do esquadro metálico deve
ficar para o interior da piscina e a parte mais estreita, vertical, para poder sujeitá-la à peça de fixação mais interior da cilha. Depois de estarem
colocados e bem aparafusados, colocam-se os esquadros metálicos exteriores (EM2) (2 esquerdos e dois direitos), com parafusos T2 nos extremos;
tomar nota que as peças de união (PU) que se colocarão nas ranhuras dos esquadros (EM2), devem ficar orientadas para o começo dos extremos
de cada meia circunferência (no ponto C). IMPORTANTE: Quando se unirem os esquadros metálicos entre eles, a cabeça dos parafusos (T2)
devem ficar para o interior da piscina e a arandela com a porca para o exterior.
PLAATSING VAN DE METALEN HOEKSTUKKEN (EM1) - (EM2): De centrale metalen hoekstukken (EM1) worden op de centrale zijde geplaatst
(de helft aan de ene kant en de andere helft aan de andere). Zij worden hierbij aan de banden bevestigd door middel van schroeven (T2), aan de
flenzen van de bevestigingstukken (PE). Het breedste deel van het metalen hoekstuk moet aan de binnenkant van het zwembad komen te liggen
en het smalste deel verticaal, opdat het aan het meest naar binnen gelegen bevestigingsstuk van de band kan worden gehecht. Zodra zij geplaatst
en goed vastgeschroefd zijn, worden de buitenste metalen hoekstukken (EM2) aan de uiteinden geplaatst (2 linkse en 2 rechtse). Dit gebeurt
eveneens met T2 schroeven, waarbij er rekening mee dient te worden gehouden dat de aansluitstukken (PU) in de groeven van de hoekstukken
(EM2) zullen worden geplaatst naar het begin van de uiteinden van elke halve cirkel (in punt C) dienen te worden georiënteerd. BELANGRIJK:
wanneer de metalen hoekstukken met elkaar worden verbonden dient de kop van de schroeven (T2) aan de binnenkant van het zwembad komen
te liggen, en de tussenring met de moer aan de buitenkant.
FITTING THE METAL BRACKETS(EM1) - (EM2): The central metal brackets (EM1) go in the central part (half on one side and half on the other),
attached to the tabs on the drop-forged parts (PE) on the struts by the screws (T2). The widest part of the metal bracket should face the inside of
the pool and the narrow part should be upright so that it can be attached to the innermost drop-forged part on the strut. Once these brackets are
in place and firmly screwed on, fit the outer brackets (EM2) (2 left and 2 right) onto the ends, also with T2 screws, ensuring that the joining pieces
(PU) to be fitted into the bracket (EM2) slots face towards the point where the relevant half-circular pool end begins (Point C). NB: When the metal
brackets are fixed together the heads of the screws (T2) should face the inside of the pool, and the washers and nuts should face outwards.
INSTALLATION DES EQUERRES METALLIQUES (EM1 - (EM2): Les équerres métalliques centrales (EM1) se placent dans la zone centrale (une
moitié d'un côté et une moitié de l'autre) et elles se fixent sur les sangles avec des vis (T2) et aux languettes des pièces de serrage (PE). La partie
la plus large de l'équerre métallique doit être à l'intérieur de la piscine y la partie la plus étroite à la verticale, pour pouvoir la serrer sur la pièce de
fixation la plus intérieure de la sangle. Après les avoir placées et vissées, placer les équerres métalliques extérieures (EM2) (2 gauches et 2 droites),
avec des vis (T2) aux extrémités; les pièces d'union (PU) montées dans les rainures des équerres (EM2), orientées vers le début des extrémités
de chaque demi circonférence (au point C). REMARQUE IMPORTANTE: au moment de relier les équerres métalliques entre elles, la tête des vis
(T2) doivent être vers l'intérieur de la piscine et la rondelle avec l'écrou vers l'extérieur.
17
PI
PU
PI
PI
PIPC
PI
PIPC
1cm
PI
A
A
C
C
C
CN
EM2
EM2
PU
PI
PE
PIPC
(LO)
PI
PU
EM2
PIPC
3
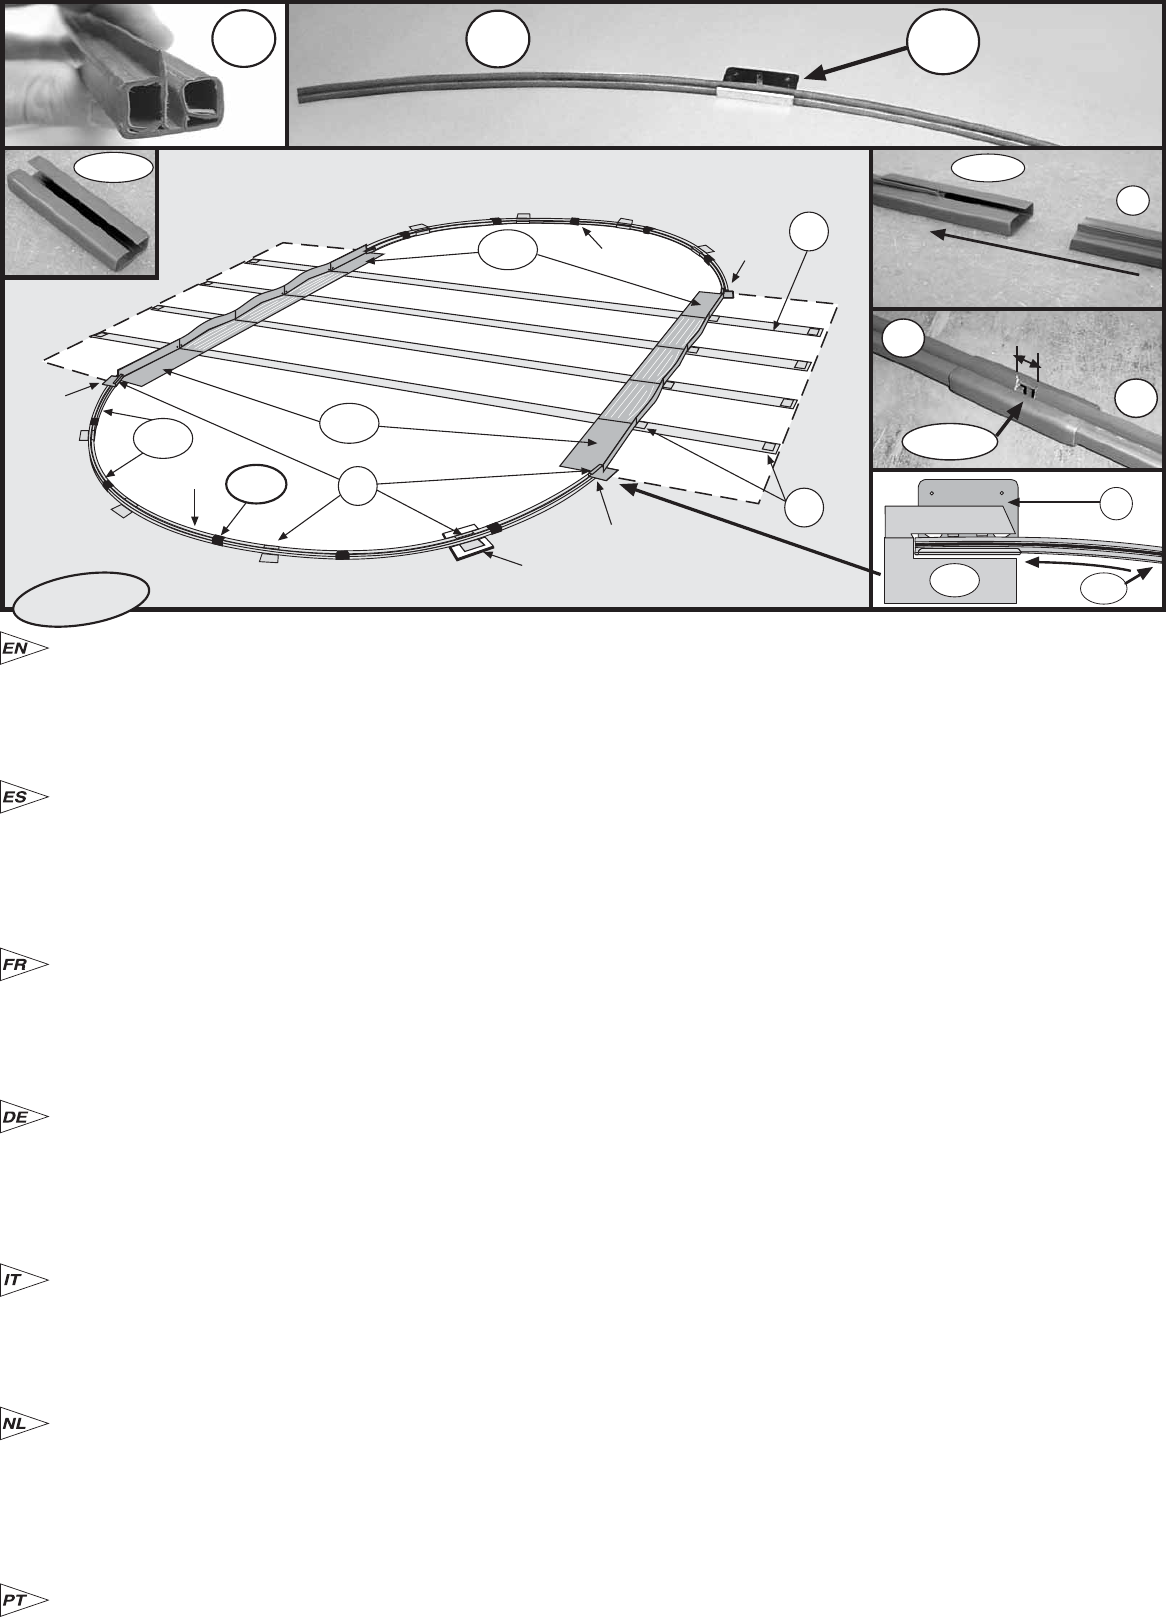
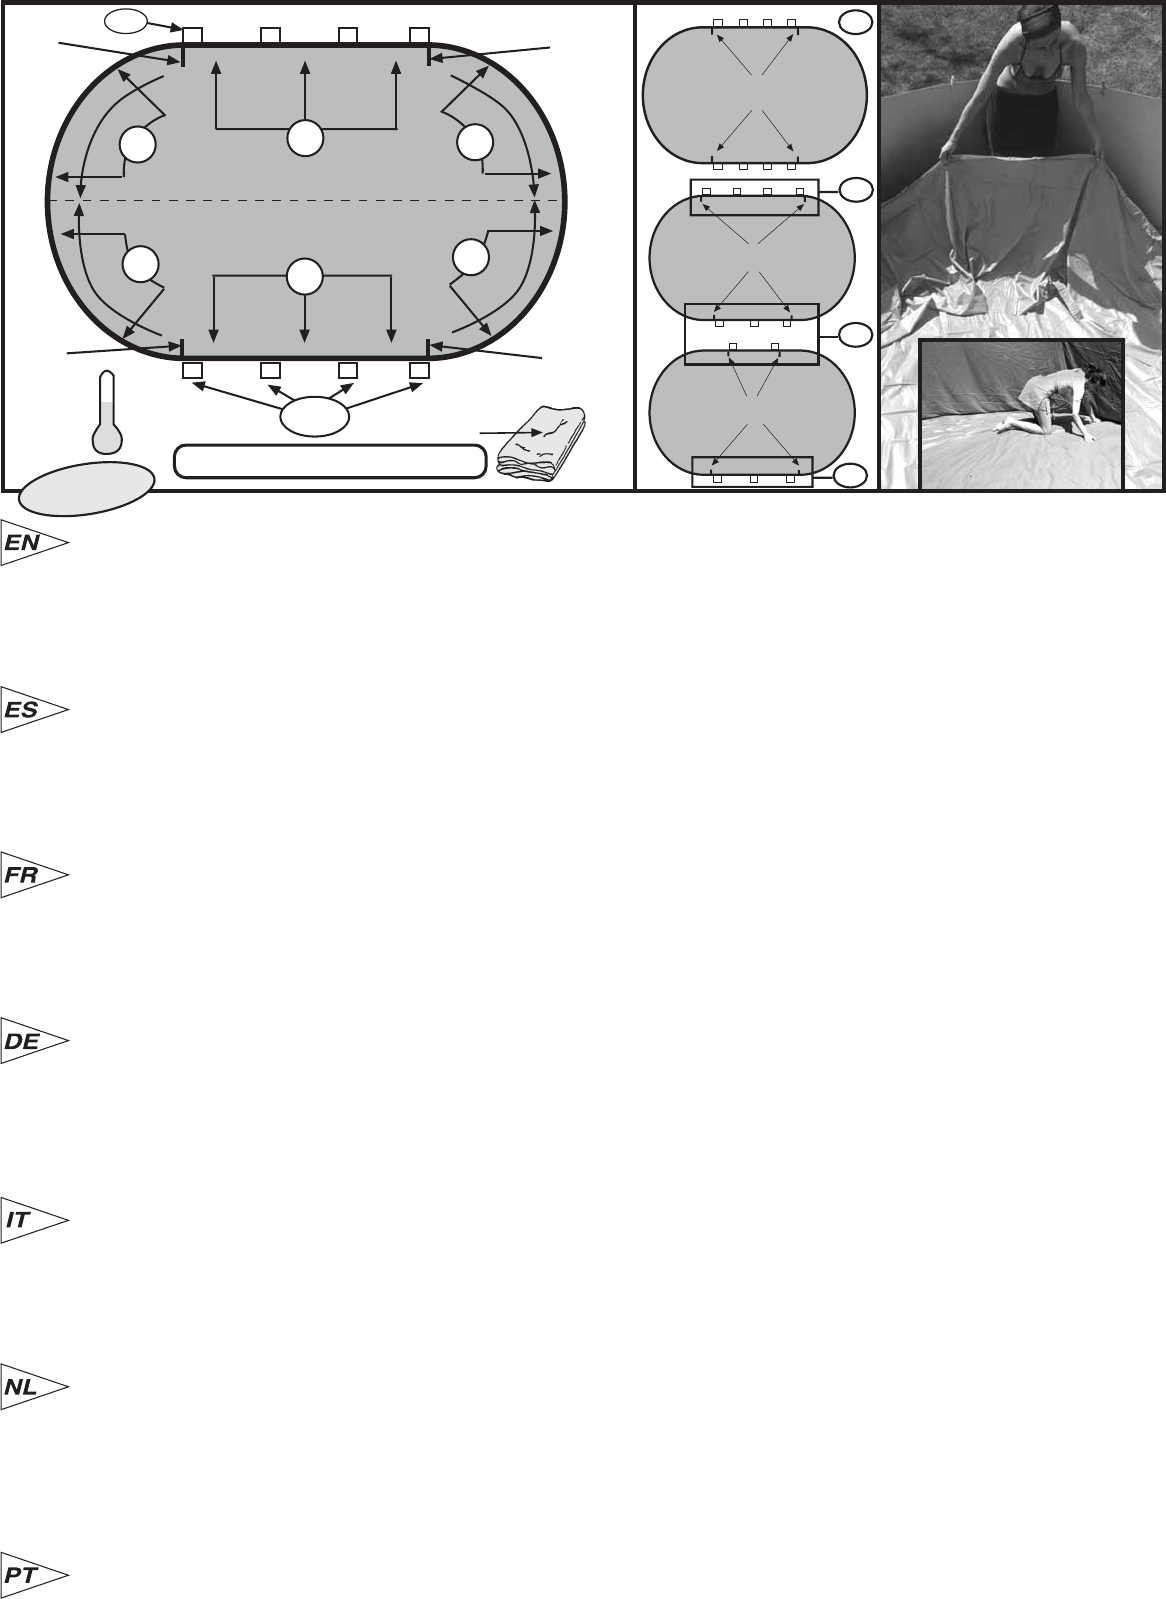
PERFIS INFERIORES (PI ) para Piscinas Ovais.
ATENÇÃO: Estes perfis curvos SÃO PARA A PARTE INFERIOR das PISCINAS OVAIS. Situar os perfis inferiores (PI) de cada meia circunferência.
Pôr em cada perfil uma peça de encaixe (PU). Nos perfis dos extremos pôr a peça de encaixe exactamente no extremo. Unir os perfis com a peça
(PIPC) deixando 1 cm de separação entre os mesmos.IMPORTANTE: As duas meias circunferências têm que ter o mesmo comprimento e
distribuição (iguais). Quando fechar a chapa, se não encaixar com exactamente no comprimento
das meias circunferências, deverá fechar ou pelo contrário abrir entre si os perfis inferiores e sempre por igual em ambas as circunferências.NOTA:
( LO ) Se o terreno não for firme (Betão, etc. ) recomenda-se pôr uma laje ou placa enterrada (ao nível do chão) debaixo de cada peça PU para
evitar o afundamento dos perfis verticais (PV) no terreno com o peso da água. ATENO: As peas de estampagem PU sob nenhuma
circunstncia devem fixar-se ao cho por nenhum meio; em caso de realizar-se, corre-se o risco de ruptura da piscina e da perda
autom tica da garantia.
BENEDENPROFIELEN (PI ) voor ovale zwembaden.
OPMERKING: Deze gebogen profielen ZIJN BESTEMD VOOR DE ONDERKANT van de OVALE ZWEMBADEN. Plaats de benedenprofielen (PI)
in iedere halve cirkelomtrek. Breng in ieder profiel een ponsdeel (PU) aan. Plaats in de uiterste profielen het ponsdeel (PU) in hetzelfde uiteinde.
De profielen verbinden met het onderdeel (PIPC) en 1 cm ruimte overlaten tussen de profielen.
BELANGRIJK: de twee halve cirkelomtrekken moeten dezelfde lengte en verdeling hebben (moeten volkomen gelijk zijn). Wanneer bij het sluiten
van de wand deze niet precies past in de lengte van de halve cirkelomtrekken moeten de benedenprofielen gesloten of in het tegenovergestelde
geval geopend worden; dit altijd op gelijke wijze in beide cirkelomtrekken.OPMERKING: (LO ) Wanneer het terrein niet vast is (beton, enz.) wordt
aangeraden onder ieder onderdeel PU platte stenen of plavuizen ingegraven in de grond aan te brengen (op gelijk niveau als dat van de grond)
om te voorkomen dat de vertikale profielen (PV) op dit terrein door het gewicht van het water niet kunnen verzakken. Opgelet: De gestampte
onderdelen PU moeten onder geen enkele omstandigheid en op geen enkele manier aan de vloer worden bevestigd. Voor het geval dit
wl gebeurt loopt men het risico van een breuk in het zwembad en het daaruit voortvloeiende verlies van de garantie.
PROFILI INFERIORI (PI ) per Piscine Ovali. ATTENZIONE: Questi profili curvi SONO PER LA PARTE INFERIORE delle PISCINE OVALI. Situare
i 6 profili inferiori (PI) di ogni semicirconferenza. Mettere su ogni profilo un pezzo stampato (PU). Sui profili delle estremità situare il pezzo stampato
sulla stessa estremità. Unire i profili al pezzo (PIPC) lasciando 1 cm di separazione fra loro.IMPORTANTE: Le due semicirconferenze devono avere
la stessa lunghezza e distribuzione (uguali). Nel chiudere la lamiera, se non combacia perfettamente con la lunghezza delle semicirconferenze, si
dovranno chiudere o aprire i profili inferiori e sempre in modo identico su entrambe le circonferenze.
NOTA: ( LO ) Se il terreno non è solido (calcestruzzo, ecc.), si consiglia di posare una mattonella o una piastrella interrata (a livello del suolo) sotto
ogni pezzo PU per evitare che i profili verticali sprofondino (PV) nel terreno con il peso dell'acqua. ATTENZIONE: I pezzi stampati PU in nessun
caso devono essere fissate al suolo per nessun mezzo; in caso di essere eseguito, pu provocare la rottura della piscina e la perdita
automatica della garanzia.
UNTERPROFILE (PI ) f r Ovalpools.
HINWEIS: DIESE GEBOGENEN PROFILE SIND FÜR DAS UNTERTEIL OVALER POOLS BESTIMMT.
Legen Sie die 6 Unterprofile (PI) auf jeden Halbkreis. Befestigen Sie nun auf jedem Profil ein Stanzteil (PU). An den Endprofilen ist das Stanzteil
direkt am Ende zu verlegen. Verbinden Sie nun die Profile mit dem Teil (PIPC) und belassen Sie 1 cm Abstand zwischen beiden.
WICHTIG: Die beiden Halbkreise müssen die gleiche Länge und die gleiche Verteilung aufweisen. Wenn das Blech beim Schließen nicht genau
mit der Länge der Halbkreise übereinstimmt, dann schließen bzw. öffnen Sie die Unterteile und zwar gleich an beiden Halbkreisen. HINWEIS: (
LO ) Wenn der Untergrund nicht fest ist (Beton usw.), wird empfohlen, eine Fliese unter jedes PU-Teil bündig in den Boden einzulassen, damit sich
die Senkrechtprofile (PV) nicht unter dem Gewicht des Wassers in den Boden eingraben. HINWEIS: Unter keinen Umstnden sind die PU-
Stanzteile in keiner Weise am Boden befestigt zu werden. Dadurch w rde die Gefahr einer Besch digung Ihres Pools und der fr hzeitigen
Aufhebung der Garantie bestehen.
PROFIL S INF RIEURS (PI ) pour Piscines Ovales.
ATTENTION : Ces profilés courbes SONT PRÉVUS POUR LA PARTIE INFÉRIEURE des PISCINES OVALES. Placez les profilés inférieurs (PI)
sur chaque arc de cercle. Posez sur chaque profilé une bride (PU). Pour les profilés situés aux extrémités, posez la bride sur l’extrémité elle-même.
Assemblez les profilés à l’aide de la pièce d’assemblage (PIPC) en laissant 1 cm d’écart entre eux.
IMPORTANT˚: Les deux arcs de cercle doivent être de la même longueur et distribution (égaux).Si en terminant l’installation de la tôle, vous voyez
qu’elle ne correspond pas exactement à la longueur des arcs de cercle, vous devrez serrer davantage ou au contraire séparer les profilés inférieurs
et toujours de la même façon sur les deux cercles.ATTENTION˚: (LO ) Si le terrain n’est pas solide (béton, etc.), il est recommandé de mettre des
carreaux ou un dallage enterré (au niveau du sol) sous chaque pièce PU pour éviter l’effondrement des profils verticaux (PV) sur le terrain avec
le poids de l’eau. ATTENTION: Les pi ces d union PU ne doivent en aucun cas tre fixs au sol par n importe quel moyen, si cela se produit,
vous prenez le risque de d chirer la piscine et de perdre automatiquement la garantie.
PERFILES INFERIORES (PI ) para piscinas ovaladas.
ATENCION: Estos perfiles curvos SON PARA LA PARTE INFERIOR de las PISCINAS OVALADAS. Situar los perfiles inferiores (PI) de cada media
circunferencia. Poner en cada perfil una pieza de estampación (PU).En los perfiles de los extremos poner la pieza de estampación en el mismo
extremo. Unir los perfiles con la pieza (PIPC) dejando 1 cm de separación entre ellos.
IMPORTANTE: Las dos medias circunferencias tienen que ser de la misma longitud y distribución (iguales). Al cerrar la chapa, si no encaja
exactamente en la longitud de las medias circunferencias deberá cerrar ó por el contrario abrir entre sí los perfiles inferiores y siempre por igual
en ambas circunferencias.NOTA:(LO) Si el terreno no es firme (Hormigón, etc.) se recomienda poner una loseta ó baldosa enterrada (a nivel del
suelo ) debajo de cada pieza de estampación PU para evitar que se hundan los perfiles verticales PV en el terreno con el peso del agua.
ATENCI N:
Las piezas de estampaci n PU " bajo ninguna circunstancia deben fijarse al suelo por ning n medio, en caso de realizarse corren riesgo
de rotura de la piscina y perdida autom tica de la garant a ".
BOTTOM SECTION PIECES (PI ) for Oval Swimming Pools.
NOTE: These curved SECTION PIECES ARE FOR THE BOTTOMS of OVAL SWIMMING POOLS. Position the bottom section pieces (PI) in each half
circumference. Fit a drop-forged part (PU) on each section piece. For the section pieces at the ends, fit the drop-forged parts right at the end of them. Join
the section pieces with a joining piece (PIPC), leaving a 1cm gap between them.
IMPORTANT: the two half circumferences must be the same length and have equal distribution. If on completing the wallplate installation it does not fit exactly
with the lengths of the half circumferences, you will have to close up the bottom section pieces (or if necessary open them up), always doing the same for
both half circumferences.NOTE: (LO ) If the ground is not firm (concrete, etc.), it is advisable to set a tile or slab into the ground under each part PU to prevent
the upright supports PV from sinking under the weight of the water.
NOTE: Drop-forged parts PU under no circumstances shall be affixed to the
ground by any means; in the event of doing so, you run the risk of swimming pool breakage and the automatic loss of the warranty.
1000 x 550 cm: 8 + 8 PU / 915 x 470 cm: 6 + 6 PU / 810 x 470 cm: 6 + 6 PU
730 x 375 cm: 6 + 6 PU / 610 x 375 cm: 6 + 6 PU / 500 x 300 cm: 6 + 6 PU
18
MONTAGE VAN DE VERTICALE PROFIELEN VAN DE RECHTE ZIJDE: 1000 x 550 cm= 8 x(PV2 & PTM).915 x 470 cm = 8 x(PV2 & PTM). 825 x 470 cm = 6 x(PV2 & PTM).
730 x 375 cm = 6 x(PV2 & PTM). 610 x 375 cm = 4 x (PV2 & PTM). 500 x 300 cm = 4 x (PV2 & PTM). Op deze zijde houdt de structuur zich staande door middel van peilers die
bestaan uit een verticaal profiel met vierkante doorsnede (PV2), dat wordt ondersteund door middel van een ander dwarsprofiel (PTM). Beiden worden aan de banden vastgehecht
door middel van bevestigingstukken (PE). Om elk van de centrale peilers te monteren gaat u als volgt te werk: 1- Bevestig met behulp van schroeven (T2) een bevestigingsstuk (PE)
langs de buitenkant van een verticaal profiel met vierkante doorsnede (PV2) met de langste flens in horizontale stand en naar boven gericht. 2- Plaats dit profiel op het bevestigingsstuk
dat zijn band aan de binnenkant heeft zitten (verbonden met het metalen hoekstuk), en breng het erin met twee wormschroeven (T3). 3- Neem een dwarsprofiel (PTM) en breng het
met twee andere wormschroeven (T3) langs zijn meest vierkante uiteinde in het bevestigingsstuk dat halverwege het eerder geplaatste verticale profiel (PV2) zit. 4- Het andere meer
rechthoekige uiteinde van het dwarsprofiel (PTM) moet (met schroeven T3) in het bevestigingsstuk worden gebracht dat op het uiteinde van de respectievelijke band zit. Wanneer de
hele peiler werd geplaatst moeten alle schroeven goed worden vastgedraaid en herhaalt u deze stappen over de volledige rechte zijde (bij alle banden). (B2) INJECTIEBASIS RECHTE
ZONE: Wanneer alle vertikale profielen van de rechte zone vaststaan kan op de basis van de PT die zich verbindt met de band CN de beschermbasis B2 worden geplaatst. OPMERKING:
(LO) Wanneer het terrein niet vast is (beton, enz.) wordt aangeraden plavuis aan te brengen aan de onderkant van de uiteinden van de band (CN) om te voorkomen dat de dwarsprofielen
(PTM) door het watergewicht van het zwembad niet zullen verzakken.
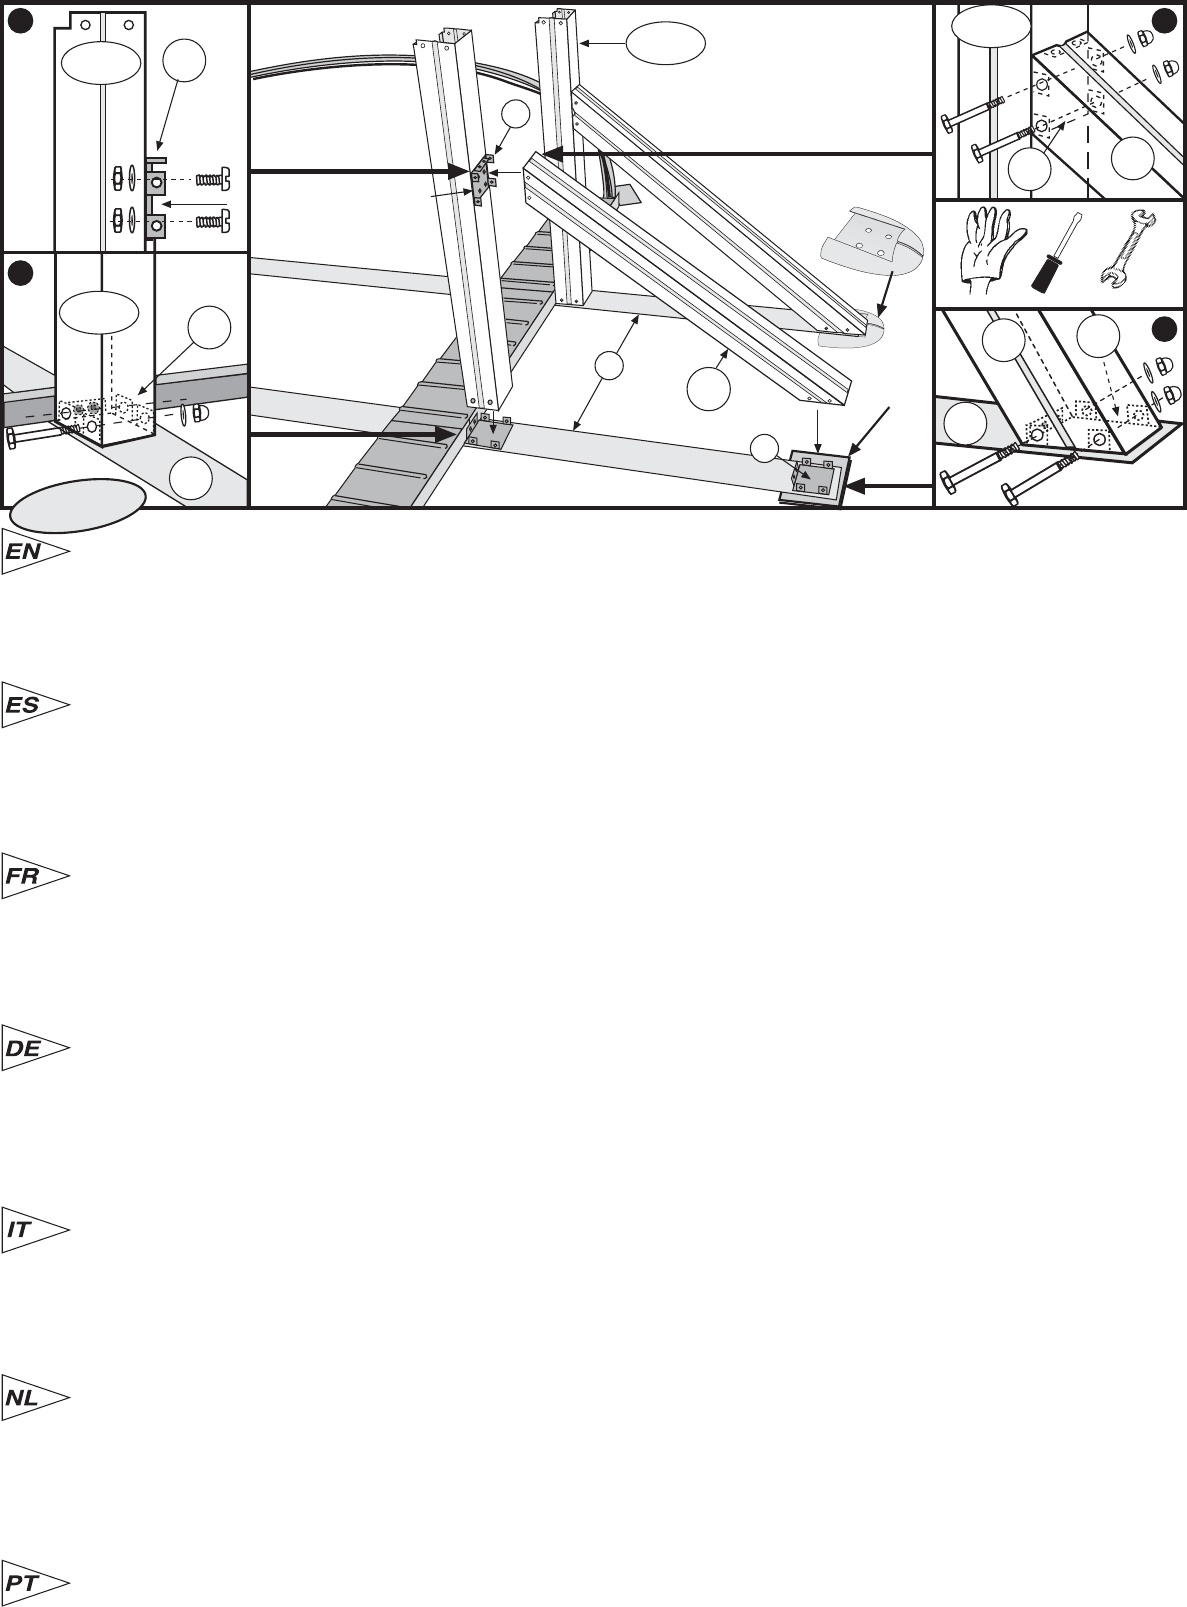
MONTAGEM DOS PERFIS VERTICAIS DA ZONA RECTA: 1000 x 550 cm= 8 x(PV2 & PTM).915 x 470 cm = 8 x(PV2 & PTM). 825 x 470 cm = 6 x(PV2 & PTM). 730 x 375 cm =
6 x(PV2 & PTM). 610 x 375 cm = 4 x (PV2 & PTM). 500 x 300 cm = 4 x (PV2 & PTM). Nesta zona a estrutura suste-se por uns pilares constituídos por um perfil vertical de secção
quadrara (PV2), sujeitado por outro perfil transversal (PTM). Ambos os dois fixam-se às cilhas com peças de fixação (PE). Para a montagem de cada pilar central, proceder da maneira
seguinte: 1- Fixar uma peça de fixação (PE) com parafusos (T2), com o grampo mais comprido em posição horizontal e para cima, a um perfil vertical de secção quadrara (PV2)
pela sua parte exterior. 2- Coloque este perfil sobre a peça de fixação que tem a cilha na parte interior (unida ao esquadro metálico) e faça-o coincidir com os parafusos passadores
(T3). 3- Tome um perfil transversal (PTM) e dois parafusos passadores (T3) e faça-o coincidir pelo seu extremo mais quadrado com a peça de fixação colocada a meia altura do
perfil vertical (PV2) colocado antes. 4- O outro extremo mais rectangular do perfil transversal (PTM) deve aproximar-se (com parafusos T3) à peça de fixação que está no extremo
da cilha respectiva. Depois de ter colocado todo o pilar, aperte bem os parafusos e repita a mesma operação para toda a zona recta (em todas as cilhas). (B2) BASE INJECO
ZONA RECTA: Quando estiverem fixos todos os perfis verticais da zona recta pode colocar a base protectora B2 na base do PT que se une à cilha CN. NOTA: (LO) Se o terreno
não for firme (betão, etc) recomenda-se colocar uma laje ou ladrilhos por baixo dos extremos da cilha (CN) para não se arrombarem os Perfis transversais (PTM) com o peso da
água da piscina.
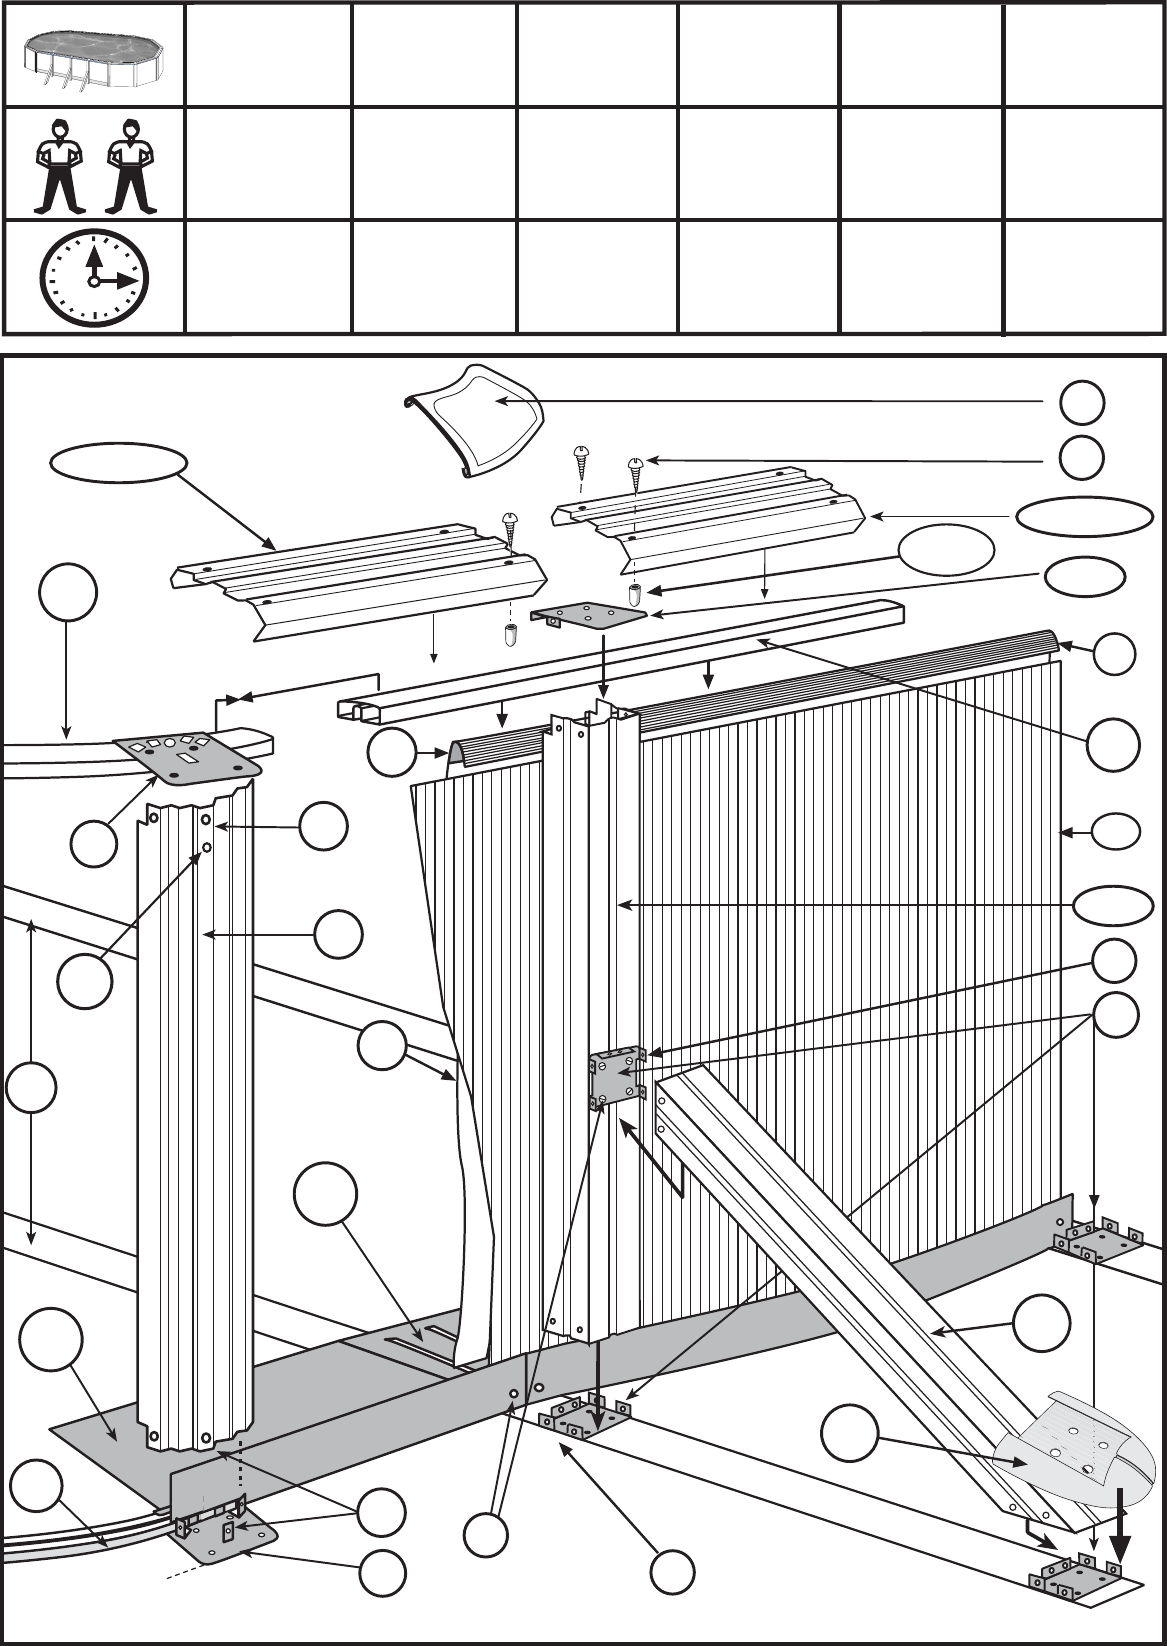
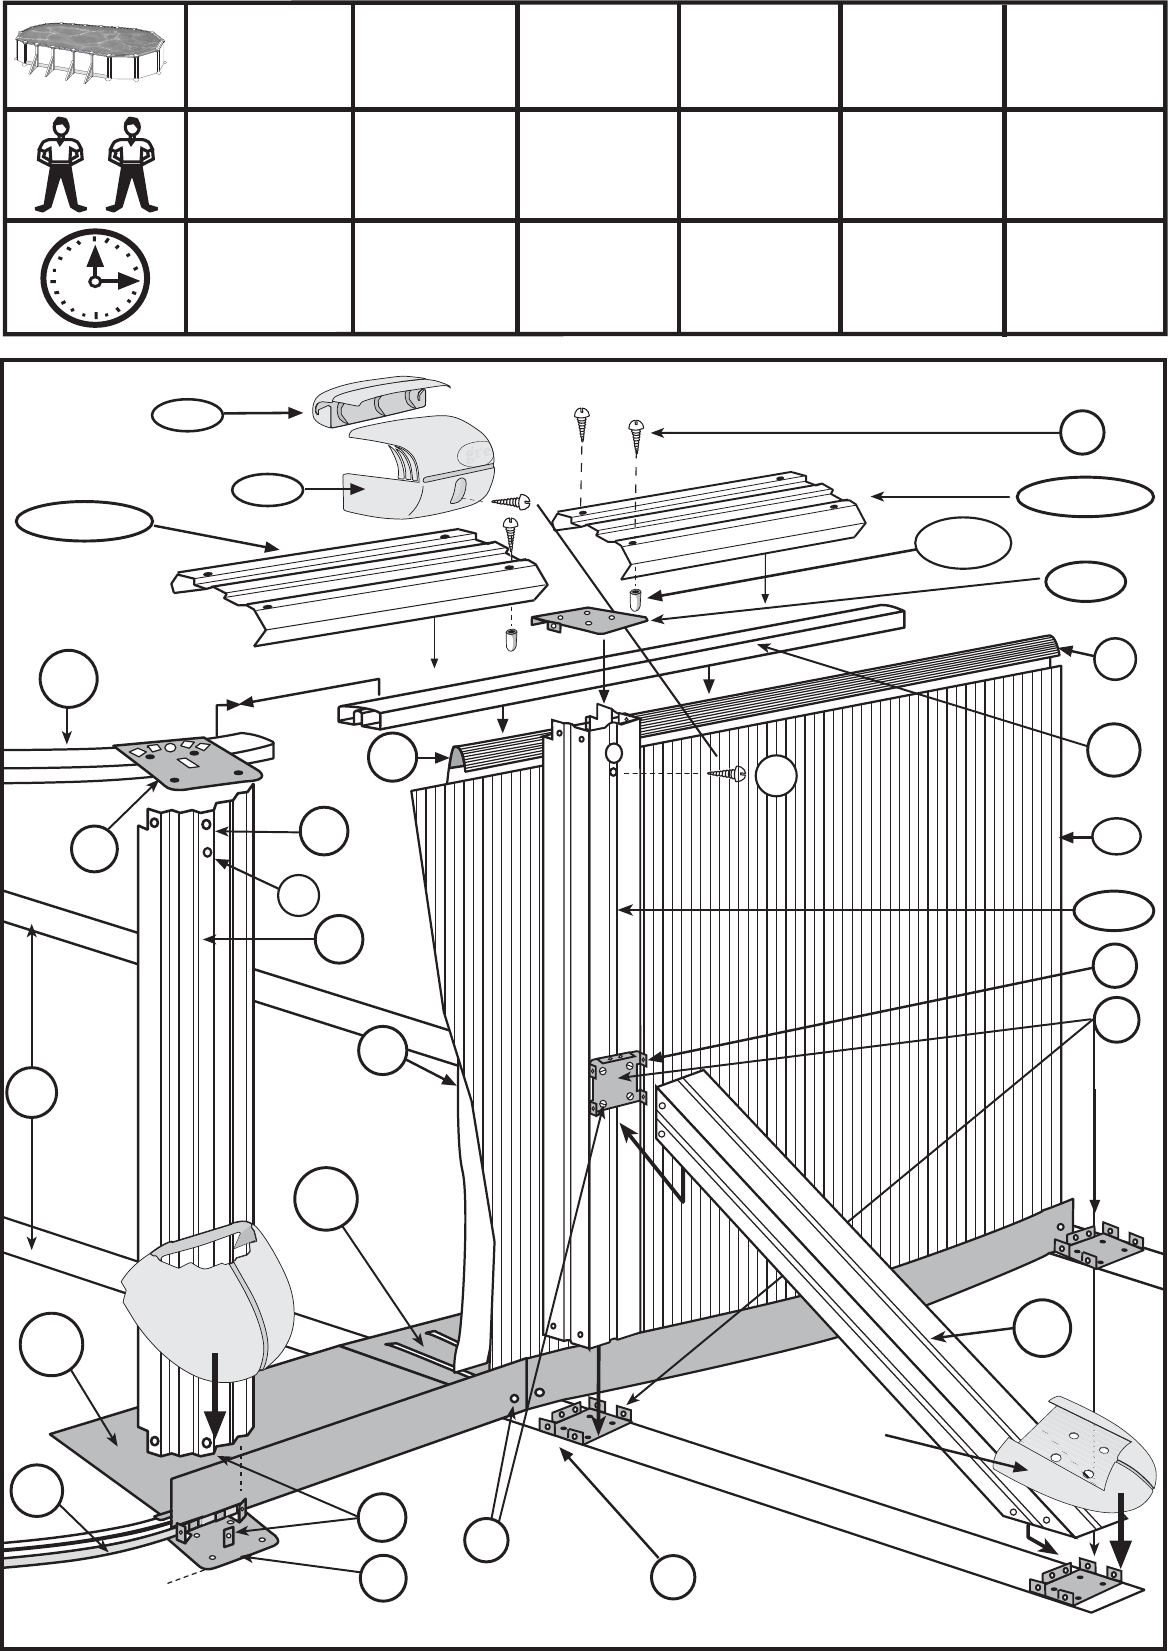
FITTING THE UPRIGHT SUPPORTS IN THE STRAIGHT PART: 1000 x 550 cm= 8 x(PV2 & PTM).915 x 470 cm = 8 x(PV2 & PTM). 825 x 470 cm = 6 x(PV2 & PTM). 730 x 375
cm = 6 x(PV2 & PTM). 610 x 375 cm = 4 x (PV2 & PTM). 500 x 300 cm = 4 x (PV2 & PTM).This part of the structure is based on square-sectioned upright supports (PV2) shored up
by a cross-support (PTM). Both are attached to the struts by drop-forged parts (PE). Each upright support should be fitted as follows: 1- Using T2 screws, attach the outer part of a
square-sectioned upright support (PV2) to one of the drop-forged parts (PE), with the longest tab horizontal and uppermost. 2- Place this upright on the drop-forged part on the inner
part of the strut (attached to the metal bracket) and hold in place with two through screws (T3). 3- Take a cross-support (PTM) and fit the squarer end to the drop-forged part half-way
up the upright support (PV2) already fitted. 4- Use T3 screws to hold the more rectangular end of the cross-support (PTM) in place on the drop-forged part at the end of the relevant
strut. Once the whole upright is in place, tighten all screws firmly. Repeat this process on all the struts until the straight part of the pool is completed. (B2) ENVELOPING JOINT
PROTECTORS STRAIGHT PART: When all the vertical perfiles of the straight part are fixed, you can install the enveloping joint protector B2 to the bottom of the PTM which combine
to the strap CN. NOTE: (LO) If the ground is not firm (concrete, etc.), we recommend placing a tile under the ends of the struts (CN) so that the cross-supports (PTM) will not sink
down under the weight of the water in the pool.
MONTAGE DES POTEAUX VERTICAUX DE LA ZONE DROITE: 1000 x 550 cm= 8 x(PV2 & PTM).915 x 470 cm = 8 x(PV2 & PTM). 825 x 470 cm = 6 x(PV2 & PTM). 730 x 375
cm = 6 x(PV2 & PTM). 610 x 375 cm = 4 x (PV2 & PTM). 500 x 300 cm = 4 x (PV2 & PTM).Dans cette zone, la structure est soutenue
par des piliers constitués par un poteau vertical
à section carrée (PV2), supporté par un autre poteau transversal (PTM). Les deux se fixent aux sangles avec des pièces de serrage (PE). Pour le montage de chaque pilier central,
procéder tel qu'indiqué ci-après: 1- attachez une pièce de fixation (PE) à l'aide de vis (T2), avec la languette la plus longue en position horizontale et vers le haut, à un poteau vertical
à section carrée (PV2), par la partie extérieure. 2- Mettez ce poteau sur la pièce de serrage avec la sangle dans la partie intérieure (unie à l'équerre métallique) et faites-le coïncider
avec les vis traversantes (T3). 3- Prenez un poteau transversal (PTM) et deux vis traversantes (T3) et faites-le coïncider à son extrémité la plus carrée avec la pièce de fixation placée
à mi-hauteur du poteau vertical (PV2) placé avant. 4- L'autre extrémité plus rectangulaire du poteau transversal (PTM) doit être rapprochée (avec des vis T3) à la pièce de fixation qui
se trouve à l'extrémité de la sangle correspondante. Après avoir monté tout le pilier, serrez bien les vis et répétez la même opération pour toute la zone droite (avec toutes les sangles).
(B2) ENJOLIVEUR ENVELOPPANT ZONE DROITE: lorsque tous les profilés verticaux de la zone droite sont fixes, vous pouvez installer l'enjoliveur enveloppant B2 à la base du
PT qui s'unie à la sangle CN. NOTA: (LO) Si le terrain n’est pas ferme (béton, etc.) il est recommandé de poser une sangle ou des carreaux sous les extrémités de l’arc (CN) pour
éviter que ne s’enfoncement les (PTM) (poteau transversal) sous le poids de l’eau de la piscine.
MONTAGE DER SENKRECHTPROFILE IM GERADEN BEREICH: 1000 x 550 cm= 8 x(PV2 & PTM).915 x 470 cm = 8 x(PV2 & PTM). 825 x 470 cm = 6 x(PV2 & PTM). 730 x
375 cm = 6 x(PV2 & PTM). 610 x 375 cm = 4 x (PV2 & PTM). 500 x 300 cm = 4 x (PV2 & PTM). In diesem Bereich wird die Struktur durch Stützen gehalten, die aus einem senkrechten
Vierkantprofil (PV2) besteht, das seinerseits von einem weiteren Querprofil (PTM) abgestützt wird. Beide Profile werden mittels Stanzteilen (PE) an den Reifen befestigt. Zur Montage
jeder dieser Mittelstützen ist wie folgt vorzugehen: 1- Mit den Schrauben T2 verschrauben Sie an einem Vierkantprofil (PV2) von Außen ein Stanzteil (PE), dessen längerer Vorstoß
waagerecht und nach oben ausgerichtet sein muß. 2- Legen Sie nun dieses Profil auf das Stanzteil, das innen am Reifen (durch Winkelstück) angebracht ist und befestigen Sie es
mit zwei Durchsteckschrauben (T3). 3- Nehmen Sie nun ein Querprofil (PTM) und befestigen Sie es mit zwei weiteren Durchsteckschrauben (T3) mit dem stärker ausgebildeten
Vierkantende am Stanzstück, das sich etwa auf halber Höhe des vorher verlegten Senkrechtprofils (PV2) befindet. 4- Das andere, stärker rechteckig ausgebildete Ende des Querprofils
(PTM) muß (mit den Schrauben T3) am Stanzteil befestigt werden, das sich am Ende des zugehörigen Reifens befindet. Sobald die gesamte Stützkonstruktion plaziert ist, sämtliche
Schrauben anziehen und die gleichen Schritte im geraden Bereich (an allen Reifen) wiederholen. (B2) SPRITZGUSSAUFLAGER IM GERADEN BEREICH: Wenn alle Querprofile
im geraden Bereich befestigt sind, kann die Schutzvorrichtung B2 an der PT-Stütze angebracht werden, die mit dem Reifen CN verbunden ist. HINWEIS: (LO) Wenn der Untergrund
nicht fest ist (betoniert usw.), empfehlen wir, jeweils eine Steinplatte oder Bodenfliese unter den Reifen (CN) zu legen, damit sich die Querprofile (PTM) durch das Gewicht des
Poolwassers nicht in den Boden bohren.
MONTAGGIO DEI PROFILATI VERTICALI DELLA ZONA RETTILINEA: 1000 x 550 cm= 8 x(PV2 & PTM).915 x 470 cm = 8 x(PV2 & PTM). 825 x 470 cm = 6 x(PV2 & PTM).
730 x 375 cm = 6 x(PV2 & PTM). 610 x 375 cm = 4 x (PV2 & PTM). 500 x 300 cm = 4 x (PV2 & PTM). In questa zona la struttura appoggia su dei pilastri costituiti da un profilato
verticale avente sezione quadrata (PV2), puntellato da un altro profilato trasversale (PTM). Entrambi verranno fissati alle fascette metalliche a mezzo pezzi stampati (PE). Ai fini del
montaggio di ciascun pilastro centrale, provvedere come segue: 1- Fissare a mezzo viti (T2) sulla parte esterna di un profilato verticale avente sezione quadrata (PV2) un pezzo
stampato (PE) con il bordino più lungo in posizione orizzontale e rivolto verso l'alto. 2- Sistemare tale profilato sul pezzo stampato presente all'interno della fascetta metallica (unita
alla squadra metallica) e fissarla con due viti passanti (T3). 3- Prendere un profilato trasversale (PTM) e mediante altre due viti (T3) fissarne l'estremità più quadrata al pezzo stampato
posto a mezza altezza del profilato verticale (PV2) collocato in precedenza. 4- L'altra estremità più rettangolare del profilato trasversale (PTM) dovrà essere fissata (a mezzo viti T3)
al pezzo stampato che si trova all'estremità della rispettiva fascetta. Ultimata la sistemazione dell'intero pilastro, serrare a fondo tutte le viti e ripetere le medesime operazioni su tutta
la zona rettilinea (su tutte le fascette). (B2) BASE INIEZIONE ZONA DRITTA: Quando tutti i profili verticali della zona dritta saranno fissati sarà possibile montare sulla base del PT
che si unisce al sottopancia CN la base di protezione B2. NOTA: (LO) Se il terreno non è solido (calcestruzzo, ecc.) si consiglia di porre una mattonella o piastrella sotto le estremità
delle piastrine (CN) affinché non sprofondino i Profili trasversali (PTM) con il peso dell'acqua della piscina.
MONTAJE DE LOS PERFILES VERTICALES DE LA ZONA RECTA: 1000 x 550 cm= 8 x(PV2 & PTM).915 x 470 cm = 8 x(PV2 & PTM). 825 x 470 cm = 6 x(PV2 & PTM). 730 x
375 cm = 6 x(PV2 & PTM). 610 x 375 cm = 4 x (PV2 & PTM). 500 x 300 cm = 4 x (PV2 & PTM). En esta zona la estructura se sustenta mediante unos pilares constituidos por un
perfil vertical de sección cuadrada (PV2), apuntalado mediante otro perfil transversal (PTM). Ambos se fijarán a las cinchas mediante piezas de estampación (PE). Para el montaje
de cada uno de los pilares centrales proceda de la siguiente manera: 1- Fije con tornillos (T2) a un perfil vertical de sección cuadrada (PV2) por su parte exterior una pieza de
estampación (PE) con su pestaña más larga en posición horizontal y hacia arriba. 2- Sitúe éste perfil sobre la pieza de estampación que tiene la cincha en su parte interna (unida a
la escuadra metálica),y abóquela con dos tornillos pasantes (T3). 3- Coja un perfil transversal (PTM) y con otros dos tornillos pasantes (T3) abóquelo por su extremo más cuadrado
a la pieza de estampación situada a media altura del perfil vertical (PV2) antes colocado. 4- El otro extremo más rectangular del perfil transversal (PTM) debe abocarse (con tornillos
T3) a la pieza de estampación que se encuentra en el extremo de la cincha respectiva. Una vez situado todo el pilar apretar todos los tornillos fijamente y repetir los pasos en toda la
zona recta (en todas las cinchas). (B2) BASE INYECCIN ZONA RECTA: Cuando estén fijos todos los perfiles verticales de la zona recta puede colocar en la base del PT que se
une a la cincha CN la base protectora B2. NOTA: (LO) Si el terreno no es firme (Hormigón,etc) se recomienda poner una loseta ó baldosa por debajo de los extremos de la cincha
(CN) para que no se hundan los (PTM) con el peso del agua de la piscina.
B2
(LO)
T3 x 2
PV2
PE
CN
PE
T2 x 4
PV2
1
2
PV2
PTM
T3 x 2
PE
PTM
T3 x 2
CN
4
3
PE
4º
PE
T2 x 4
CN
PTM
PE
PV2
4
19
Tool necessary (not included)
Herramienta necesaria (no incluida)
Outil n cessaire (non compris)
Erforderliches werkzeug (nicht eingeschlossen)
Utensile necessario (non compreso)
Benodigd gereedschap (niet inbegrepen).
Ferramenta necess ria (não éstá incluída)
PI
PTM
CH
EM1
T1 x 3
EM2
PU
PU1
PV2
CN
PU1
T1
T1
T1
C
C
C
PV2
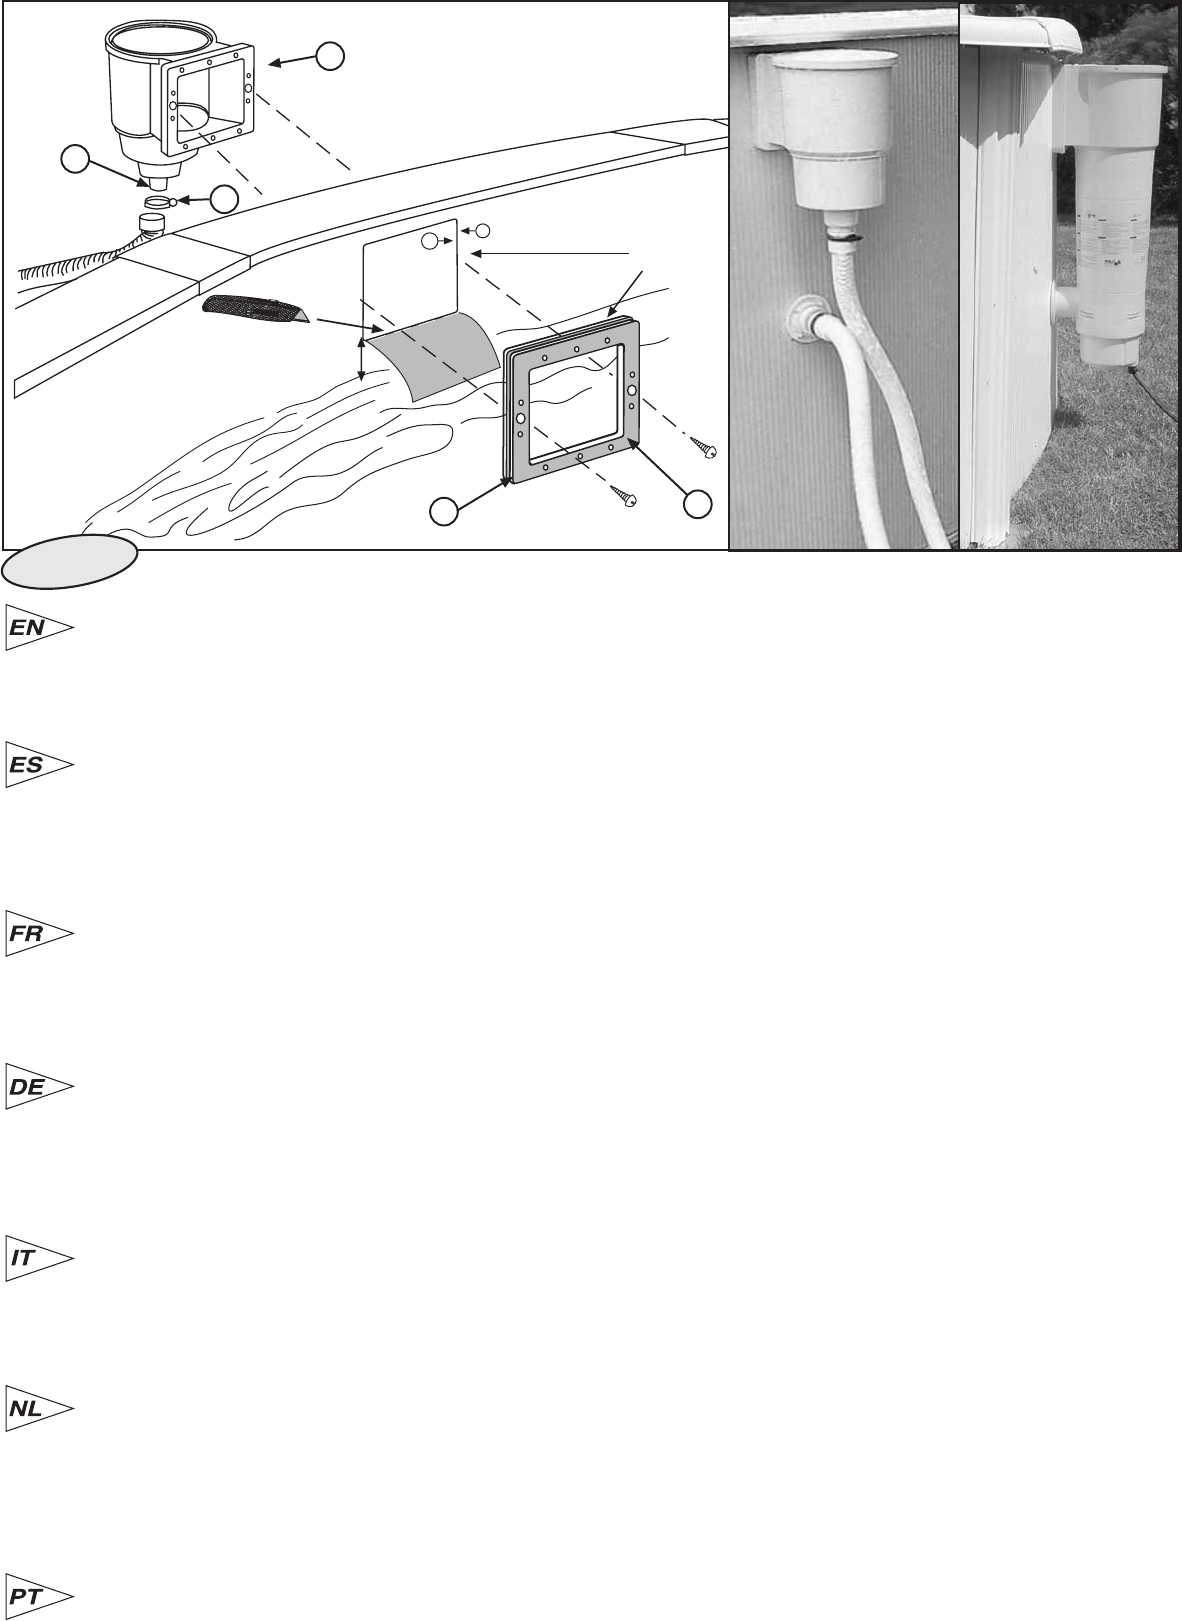
SKIMMER
PV
PU
PU
TC
B2
5
COLOCACION DE LA CHAPA: Coloque la chapa (CH) verticalmente sobre un trozo de cartón para evitar estropear la superficie preparada para la instalación (comprobando que el troquel
del skimmer quede en la parte superior de la pared). NO DESPLEGAR LA CHAPA POR COMPLETO ya que se puede complicar su montaje. Siguiendo el sentido de las agujas del reloj
encajar el comienzo de forma que el troquel del skimmer quede centrado en una zona curva (en mitad de la media circunferencia), entre 2 piezas de unión (PU)
. En las zonas rectas se
fijará temporalmente la chapa a los 4 perfiles verticales (PV) de los 4 extremos (punto C) con 4 piezas de uni n (PU), y cada uno con 3 tornillos (T1) abajo y un tornillo (T1) arriba. Para
evitar que la chapa se caiga, en la zona recta sujétela en ambos lados y por su zona central con una pieza de unión (PU1) a uno de los perfiles verticales (PV2), provisionalmente con 1
tornillo (T1). Complete todo el perímetro de la piscina con la chapa y ciérrela con los tornillos teniendo en cuenta que la cabeza de los mismos debe quedar en la parte interior de la piscina,
la arandela y la tuerca ciega en la parte exterior. (Apriete los tornillos sin deformar el material). Si llegados a éste punto se observa que el desarrollo de la chapa es demasiado largo o
corto, actue sobre los perfiles inferiores de la zona curva juntándolos a tope entre sí y contra las escuadras metálicas en la unión de la zona curva con la zona recta. ATENCION: Si hay
que acortar los perfiles inferiores, la medida exacta a cortar, deber repartirla entre las dos medias circunferencias, es decir, cortar la mitad de la medida en un perfil de la media
circunferencia derecha y la otra mitad en otro perfil de la media circunferencia izquierda.ANTES DE CORTAR COMPRUEBE ALREDEDOR DE TODA LA PISCINA QUE LA CHAPA ESTE
ENCAJADA EN LA RANURA DE TODOS LOS PERFILES DE LA ZONA CURVA Y BIEN ARRIMADA A LAS ESCUADRAS METALICAS EN LA ZONA RECTA.
IVERLEGUNG DES BLECHS: Blech (CH) senkrecht auf ein Stück Pappe stellen um die für die Installierung vorbereitete Fläche nicht zu beschädigen. (Dabei darauf achten, daß das Skimmer-
Stanzteil oben an der liegen kommt).BLECH NICHT VOLLSTÄNDIG ENTFALTEN, da dadurch die Montage komplizierter sein kann, Den Anfang im Uhrzeigersinn so einrasten, daß das
Skimmer-Stanzteil mittig in einem gebogenen Teil (auf der Hälfte des Halbkreises) zwischen 2 Verbindungsstücken (PU) liegt. In den geraden Bereichen wird das Blech provisorisch an den
4 Senkrechtprofilen (PV) der 4 Enden (Punkt C) mit Hilfe von 4 Verbindungsstcken (PU) befestigt. Dazu jeweils 3 Schrauben (T1) unten und eine Schraube (T1) oben verwenden. Um
zu vermeiden, daß das Blech im geraden Teil herabfällt, ist dieses provisorisch an beiden Seiten und in der Mitte mit einem Verbindungsstück (PU1) an einem der senkrechten Profile (PV2)
unter Verwendung einer Schraube (T1) zu heften. Vervollständigen Sie den Poolumfang mit dem Blech und verschließen Sie dieses mit den Schrauben. Achten Sie dabei darauf, daß der
Schraubenkopf innen im Pool liegen muß, die Unterlegscheibe und die Blindmutter jedoch außen.
(Ziehen Sie die Schrauben an, ohne das Material zu verformen). Sollte sich herausstellen,
daß das Blech zu lang oder kurz ist, verstellen Sie die Innenprofile im gebogenen Bereich, indem Sie diese bis zum Anschlag untereinander und gegen die Winkelstücke an der Verbindung
zwischen geradem und gebogenem Bereich verschieben. WICHTIGER HINWEIS: Sollten die Innenprofile verkürzt werden müssen, dann ist das exakte Maß, um das verkürzt werden muß,
auf die beiden Halbkreise zu verteilen. Das heißt, das halbe Maß wird an einem Profil des rechten Halbkreises, die andere H lfte an einem anderen Profil des linken Halbkreises gek rzt.
BEVOR SIE JEDOCH ABSCHNEIDEN, PRÜFEN SIE, OB DAS BLECH ÜBER DEN GESAMTEN POOLUMFANG IN ALLE PROFILE DES GEBOGENEN BEREICHES EINGERASTET
IST UND IM GERADEN BEREICH GUT AN DEN METALLWINKELSTÜCKEN ANLIEGT.
INSTALLATION DE LA TOLE: Poser la tôle (CH) verticalement sur un morceau de carton pour éviter de détériorer la surface préparée pour l’installation (s'assurer que la pièce percée du
skimmer se trouve dans la partie supérieure de la paroi). NE PAS DEPLIER COMPLETEMENT LA TOLE car cela pourrait compliquer le montage.
En suivant le sens des aiguilles d'une montre,
emboîter le debut , afin que la pièce percée du skimmer reste centrée sur une zone courbée (au milieu de la demi-circonférence), entre deux pièces d'union (PU). Dans les zones droites,
fixer temporairement la tôle aux 4
poteaux verticaux (PV) des 4 extrémités (point C) avec 4 pi ces d’union (PU), avec 3 vis chacun (T1) au-dessous et une vis (T1) au-dessus. Pour éviter
la chute de la tôle dans la zone droite, fixez-la provisoirement avec 1 vis (T1) des deux côtés par la zone centrale avec une pièce d'union (PU1) à l'un des
poteaux verticaux (PV2).Terminez
tout le périmètre de la piscine avec la tôle et fermez avec les vis (les têtes des vis doivent être dans la partie intérieure de la piscine et la rondelle et l'écrou borgne dans la partie extérieure).
(Serrez les vis en vitant de dformer le matriel). Si sur ce point l'on observait que la tôle est trop longue ou trop courte, intervenez sur les profilés de la zone courbe, en les reliant
complètement entre eux et contre les équerres métalliques dans l'union de la zone courbée avec la zone droite.ATTENTION: en cas de besoin, couper les profilés; la mesure exacte à couper
devra tre distribue entre les deux demi circonfrences, c'est à dire qu'il faudra couper la moitié de la mesure d'un profilé de la demi circonférence droite et l'autre moitié d'un autre
profilé de la demi circonférence gauche. AVANT DE COUPER, VERIFIEZ SUR TOUTE LA CIRCONFERENCE DE LA PISCINE SI LA TOLE EST EMBOITEE DANS LA RAINURE DE TOUS
LES PROFILES DE LA ZONE COURBE ET QU'ELLE EST BIEN APPUYEE AUX EQUERRES METALLIQUES DANS LA ZONE DROITE.
FITTING THE WALL PLATING: Fit the wall plating CH vertically on a piece of cardboard (to avoid damaging the area prepared for the installation (checking that the cut-out for the skimmer
is at the top of the wall).
DO NOT FULLY UNFOLD THE WALL PLATING as this may complicate assembly. Working clockwise, fit the end into place so that the skimmer cut-out is at the middle
of one of the curved parts, between 2 joining-pieces (PU).
Attach the plating provisionally to the 4 upright supports (PV) at the 4 corners (point C) of the straight part using 4 joining-pieces
(PU), each with 3 screws (T1) at the bottom and one screw (T1) at the top. Attach the plating provisionally with a T1 screw to one of the upright supports (PV2) at the middle on both sides in
the straight part using a joining-piece (PU1) to stop it from falling. Fit the wall plating all around the pool and screw the ends together, ensuring that the screw heads face inwards and the
washers and blind nuts outwards. (Tighten the screws without distorting the material). If the wall plating is too long or too short, adjust the bottom section-pieces in the curved part of
the pool to ensure that they are properly butted against each other and against the metal brackets where the curved parts meet the straight part. NB: If the bottom section-pieces need to be
cut, half the amount to be cut off must be cut from each half-circle. BEFORE CUTTING, CHECK THAT THE WALL PLATING IS SLOTTED INTO THE GROOVES IN THE SECTION-PIECES
IN THE CURVED PART ALL AROUND THE POOL AND PROPERLY FITTED AGAINST THE METAL BRACKETS IN THE STRAIGHT PART.
PLAATSEN VAN DE PLAAT:De plaat CH vertikaal plaatsen op een stuk karton om te voorkomen dat de voor de installatie gereedgemaakte oppervlakte wordt beschadigd (erop lettend dat
de matrijs van de skimmer aan de bovenkant van de wand komt te liggen). DE PLAAT NIET VOLLEDIG OPENVOUWEN. Dit zou de montage ervan kunnen benoelijken. Zet het begin vast
in wijzerzin, zodat de matrijs van de skimmer in het midden van een ronde zijde komt te liggen (in het midden van de halve cirkel), tussen 2 aansluitstukken in (PU). Op de rechte zijden zal
de plaat voorlopig aan de 4 verticale profielen (PV) van de 4 uiteinden (punt C) worden bevestigd met behulp van 4 aansluitstukken (PU), en elk met 3 schroeven (T1) onderaan en een
schroef (T1) bovenaan. Om te vermijden dat de plaat op de rechte zijde zou vallen, dient u haar voorlopig met 1 schroef (T1) aan beide kanten en in het midden met behulp van een aansluitstuk
(PU1) vast te hechten aan een van de verticale profielen (PV2). Maak de hele omtrek van het zwembad af met de plaat en sluit haar met behulp van de schroeven. Hierbij dient u er rekening
mee te houden dat de kop van de schroeven aan de binnenkant van het zwembad dient komen te liggen, en de tussenring en de dopmoer aan de buitenkant.
(Druk de schroeven stevig
aan zonder het materiaal te vervormen).
Stelt u op dit punt vast dat de plaat te lang of te kort lijkt, werk dan op de onderste profielen van de ronde zijde door ze onderling zo dicht mogelijk
tegen elkaar en tegen de metalen hoekstukken aan te brengen op de plaats waar de ronde en de rechte zijde samenkomen. OPGELET: De helft van de afstand zal dus van een profiel van
de rechter halve cirkel worden afgesneden, en de andere helft van een ander profiel van de linker halve cirkel. CONTROLEER EERST RONDOM HET HELE ZWEMBAD OF DE PLAAT
GOED IN DE GLEUF VAN ALLE PROFIELEN VAN DE RONDE ZIJDE ZIT EN OF ZIJ OP DE RECHTE ZIJDE ZO DICHT MOGELIJK TEGEN DE METALEN HOEKSTUKKEN AANLEUNT
ALVORENS TE GAAN SNIJDEN.
COLOCAO DA CHAPA: Colocar a chapa (CH) verticalmente sobre um pedaço de cartão para evitar de estragar a superfície preparada para a instalação (assegurar-se que a peça furada
do skimmer cica na parte superior da parede). NÃO DESDOBRAR COMPLETAMENTE A CHAPA já que isto poderia complicar a montagem. Seguindo o sentido das agulhas de um relógio,
encaixar o començo, de maneira que a peça furada do skimmer fique centrada numa zona curvada (no meio da meia circunferência), entre duas peças de união (PU). Nas zonas rectas
fixar temporariamente a chapa aos 4 perfis verticais (PV) dos 4 extremos (ponto C) com 4 pe as de uni o (PU), cada um com 3 parafusos (T1) debaixo e um parafuso (T1) encima. Para
evitar a chapa cair na zona recta, sujeite-a provisoriamente com 1 parafuso (T1) nos dois lados pela zona central com uma peça de união (PU1) a um dos perfis verticais (PV2). Termine
todo o perímetro da piscina com a chapa e feche com os parafusos (as cabeças dos parafusos têm de ficar na parte interior da piscina e a arandela e a porca cega na parte exterior).
(Aperte
os parafusos evitando deformar o material).
Se neste ponto se observar que a chapa é demasiado comprida ou demasiado curta, actue sobre os perfis inferiores da zona curva, juntando-
os completamente entre eles e contra os esquadros metálicos na união da zona arqueada com a zona recta. ATENO: Se for necessário cortar os perfis; a medida exacta a cortar dever
ser distribu da entre as duas meias circunfer ncias, quer dizer, que se deve cortar a metade da medida num perfil da meia circunferência direita e a outra metade noutro perfil da meia
circunferência esquerda. ANTES DE CORTAR VERIFIQUE EM TODA A CIRCUNFERÊNCIA DA PISCINA SE A CHAPA ESTÁ ENCAIXADA NA RANHURA DE TODOS OS PERFIS DA
ZONA ARQUEADA E BEM ACOSTADA AOS ESQUADROS METÁLICOS NA ZONA RECTA.
SISTEMAZIONE DELLA LAMIERA: Montare la lamiera (CH) verticalmente su un pezzo di cartone per evitare di rovinare la superficie preparata per l'installazione (verificare che la punzonatura
dello skimmer si trovi nella parte superiore della medesima). NON SPIEGARE L'INTERO ROTOLO giacché potrebbe renderne più difficile il montagio. In senso orario, inserire la parte iniziale
di modo che la punzonatura dello skimmer venga centrata in una zona curva (al centro della mezza circonferenza), tra due pezzi di unione (PU). Nelle zone rettilinee, la lamiera verrà fissata
momentaneamente ai 4 profilati verticali (PV) alle 4 estremità (punto C) con i 4 pezzi di unione (PU), ciascun avente 3 viti (T1) sotto e una vite (T1) sopra. Per evitare che la lamiera cada
nella zona rettilinea, fissarla ai due lati e al centro con un pezzo di unione (PU1) a uno dei profilati verticali (PV2) a mezzo di una vite (T1). Completare tutto il perimetro della piscina con la
lamiera e chiuderla con delle viti tenendo presente che la testa delle medesime deve rimanere nella parte interna della piscina, la rondella e il dado cieco nella parte esterna.
(Stringere le
viti senza deformare il materiale).
Se a questo punto, si rileva che la lamiera è troppo corta o lunga, agire sui profilati inferiori della zona ricurva avvicinandoli l'un l'altro e contro le squadre
metalliche nell'unione della zona curva con la zona rettilinea. ATTENZIONE: se si rendesse necessario tagliare i profilati inferiori, la misura esatta andr suddivisa tra le due mezze
circonferenze, cioè, tagliare la metà della misura in un profilato della mezza circonferenza di destra e l'altra metà su un altro profilato della mezza circonferenza di sinistra. PRIMA DI
EFFETTUARE IL TAGLIO, VERIFICARE SU TUTTO IL PERIMETRO DELLA PISCINA CHE LA LAMIERA SIA PERFETTAMENTE INSERITA NELLA SCANALATURA DI TUTTI I PROFILATI
DELLA ZONA RICURVA E CHE ADERISCA ALLE SQUADRE METALLICHE NELLA ZONA RETTILINEA.
TPR
MPR
B2
PU
SKIMMER
C
C
PV
P
V
C
(TPVCP)
PV
PU
PU1
PU
PU1
PV2
PV
TPVC
TIRAS DE PVC PROTECTORAS (RECUBRIMIENTO INTERIOR DE LA PISCINA): Entre los componentes de la piscina hay 2 tiras de PVC
anchas (TPVCP) y 1 tira de PVC más estrecha (TPVC). La tira de PVC más estrecha se coloca enganchándola a la tuerca más alta del cierre
de la chapa y se cuelga la tira hacia el interior de la piscina para que tape las cabezas de los tornillos. Las 2 tiras más anchas son para sujetarlas
cada una con cinta adhesiva para que tapen a las escuadras metálicas que quedan en el interior de la piscina en la zona recta. La función de
todas éstas tiras es la de proteger el Liner de la piscina.
La Manta o Tapiz: Advertencia: se recomienda limpiar todas las suciedades de la pared y suelo de la piscina con ayuda de una aspiradora
antes de colocar la manta o tapiz. Colocar la manta protectora o el tapiz en el interior de la piscina, eliminando todos los pliegues, ajustando y
cortando el sobrante de la superficie total. Realice el corte de forma que queden tapados los perfiles inferiores y las piezas metálicas. De esta forma
el liner quedará protegido cuando lo instale.
PVC PROTECTIVE STRIPS (INSIDE OF POOL): The pool is supplied with 2 wide PVC strips and 1 narrow one. The narrow strip must be
attached to the top nut at the join of the wall plating and hung down inside to cover the screw heads. The 2 wider strips must be taped on to
cover the metal brackets inside the straight part of the pool. All these strips are intended to protect the pool liner.
The Ground Cover or floor tapestry - Caution: Clean all dirt from the pool wall and bottom with a vacuum cleaner before placing the ground
cover or floor tapestry in position. Fit the protective ground cover or floor tapestry in the interior of the pool and smooth out all the creases,
adjusting and cutting away excess from the total surface area. Cut so that the bottom section pieces and the metal parts are covered. This way
the liner will be protected when you install it.
STRISCI DI PVC DI PROTEZIONE (RIVESTIMENTO INTERNO DELLA PISCINA):
Tra gli elementi della piscina vi sono 2 strisci di PVC larghe (TPVCP) e un'altra più stretta (TPVC). La striscia stretta di PVC viene sistemata
agganciandola al dado più alto della chiusura della lamiera e si attacca quindi all'interno della piscina affinché copra le teste delle viti
Le 2 viti più larghe vanno fissate di modo che nascondano le squadre metalliche che rimangono all'interno della piscina nella zona rettilinea.
La funzione di questi strisci è quella di proteggere il liner della piscina.
La Coperta o tappeto da suolo - Avvertenza: si consiglia di pulire ogni traccia di sporco dalla parete e dal pavimento della piscina con l’aiuto
di un aspiratore prima di sistemare la coperta o tappeto da suolo. Situare la coperta protettiva o tappeto da suolo all’interno della piscina,
eliminando tutte le pieghe, sistemando e tagliando l’eccesso della superficie totale. Fare il taglio in modo da rendere coperti i profili inferiori e i
pezzi metallici. In questo modo il liner rimanerà protetto una volta montato.
BANDES DE PROTECTION EN PVC (RECOUVREMENT INTERIEUR DE LA PISCINE): Parmi les composants de la piscine, il y a 2 bandes
de PVC larges e 1 bande plus étroite. La plus étroite s'accroche à l'écrou le plus haut de la fermeture de la tôle et se tourne vers l'intérieur de
la piscine, pour couvrir les têtes des vis. Les 2 bandes plus longues s'accrochent avec une bande adhésive pour cacher les équerres métalliques
qui sont à l'intérieur de la piscine dans la zone droite. Ces bandes de PVC servent à protéger le liner de la piscine.
La Couverture ou tapis de sol: Avertissement : bien nettoyer la paroi et le sol de la piscine avec un aspirateur, pour la débarrasser de toutes
les saletés, avant de poser la couverture ou tapis de sol. Poser la couverture ou tapis de sol protectrice à l’intérieur de la piscine ; éliminer tous
les plis, ajuster et couper ce qui dépasse de la surface totale. Couper de façon à ce que les profils inférieurs et les pièces métalliques restent
couverts. Le liner sera ainsi protégé lors de son installation.
BESCHERMSTROKEN VAN PVC (BINNENBEKLEDING VAN HET ZWEMBAD): Bij de onderdelen van het zwembad zitten 2 brede PVC-
stroken en 1 smallere PVC-strook. De smalste PVC-strook wordt geplaatst door haar vast te haken aan de bovenste moer van de plaatafsluiting.
De strook wordt langs de binnenkant van het zwembad gehangen om de schroefkoppen te bedekken. De 2 bredere stroken dienen om ze elk
met TESA vast te hechten zodat zij de metalen hoekstukken zouden bedekken die aan de binnenkant van het zwembad in de rechte zijde zitten.
Het doel van deze stroken is de Liner van het zwembad te beschermen.
De Bedekking / voerbekleding: Waarschuwing: het wordt aanbevolen al het vuil van de zwembandwand en -vloer te reinigen met behulp
van een stofzuiger voordat de bedekking / voerbekleding geplaatst wordt.
De beschermbedekking / voerbekleding aan de binnenzijde van het zwembad plaatsen, alle plooien verwijderen, afstellen en het overtollige
van het totaal oppervlak afsnijden. Verricht het afsnijden op zodanige wijze dat de binnenprofielen en de metalen onderdelen bedekt blijven.
Op deze manier zal de liner bij de installatie daarvan beschermd zijn.
TIRAS PROTECTORAS DE PVC (REVESTIMENTO INTERIOR DA PISCINA): Entre os componentes da piscina, há 2 tiras de PVC largas e
1 tira de PVC mais estreita. A mais estreita engancha-se à porca mais alta do fecho da chapa e vira-se para o interior da piscina, para tapar
as cabeças dos parafusos. As 2 tiras mais largas sujeitam-se cada uma com fita adesiva para tapar os esquadros metálicos que ficam no interior
da piscina na zona recta. Estas tiras servem para proteger o liner da piscina.
A Manta ou tapete de ch o: Advert ncia: Recomenda-se limpar todas as sujidades da parede e do chão da piscina com a ajuda de um
aspirador antes de colocar a manta ou tapete de chão. Colocar a manta de protecção ou tapete de chão no interior da piscina, eliminando todas
as dobras, ajustando e cortando o sobrante da superfície total. Faça o corte de maneira que fiquem tapados os perfis inferiores e as peças
metálicas. Deste modo, o liner ficará protegido quando instalá-lo.
6
PVC-SCHUTZSTREIFEN (POOL-INNENBELAG): Unter den Bestandteilen und Komponenten unserer Pools befinden sich 2 breite PVC-Streifen
(TPVCP) und 1 schmalerer PVC-Streifen (TPVC). Dieser schmalere PVC-Streifen wird von der höchstgelegenen Mutter am Blechverschluss
eingehängt. Dann wird der Reststreifen zum Innern des Pools hin verlegt, damit dadurch die Schraubenköpfe abgedeckt werden. Die 2 breiteren
Streifen dienen zur Abdeckung der Metallwinkel im geraden Innenbereich des Pools und werden mit Klebestreifen darauf geklebt. Alle diese
Streifen dienen zum Schutz des Pool-Liners.
Decke bzw. Bodendecke - Zu Beachtung: Es wird dringend empfohlen, Wand und Boden des Schwimmbads mit einem Staubsauger von
jeglichem Schmutz zu befreien, bevor die Decke bzw. Bodendecke verlegt wird.
Verlegen Sie die Schutzdecke bzw. Bodendecke im Poolinnern, beseitigen Sie sich bildende Falten, passen Sie sie ein und schneiden Sie
überstehende Teile der Fläche ab. Schneiden Sie das überstehende Stück so, dass die Innenprofile und die Metallteile abgedeckt bleiben. Auf
diese Weise ist der Liner während des Bezugs geschützt.
20
21
UNFOLDING THE PVC LINER: Stretch and extend the liner (L) in the shade so that it recovers its texture at least 2 hours before it is to be positioned.
Ideal temperature: in order to handle the liner more easily, ensure that it is fitted at an ambient temperature of between 25 - 30º C.
THE LINER IS OVAL IN SHAPE, TO MATCH THE SHAPE OF THE POOL WALLS, I.E. COMPRISED OF A RECTANGLE WITH A HALF MOON ON EITHER SIDE:
IT CAN THEREFORE ONLY BE FITTED IN ONE POSITION. PROPER LINER PLACEMENT IS ESSENTIAL TO PREVENT FOLDS AND WRINKLES. The PVC liner must be spread out evenly. In order to
ensure correct positioning, the pool liner has 4 marks (M) on its base which must be positioned to coincide with the outer part of the upright supports (PV2) at the ends of the straight areas as shown in the
drawing.Position the liner (L) in the middle of the pool. Unfold the liner along the main axis of the pool and extend the side towards the wall plate. The seam between the bottom and the side must be butted
against the base of the wall plating all around the pool bottom, to prevent folds. Before positioning the liner, follow the steps below for assembly:1. Start at one of the straight parts by positioning the marks on
this side so that they coincide with the upright supports at the ends. 2. Position the other half, i.e. the straight part opposite. 3. Continue from one of the ends on the straight part up to the middle of a semi-
circumference. 4. Complete the other half of this same semi-circumference. In the event that there is too much, or insufficient, material (liner), adjust by stretching or gathering respectively, all the material of
this semi-circumference (distributing it) along the perimeter of the aforementioned semi-circumference. 5 and 6. Repeat steps 3 and 4 respectively in order to complete the pool. CHECK: it is very important
that each mark coincides with the outer edge of each upright support at the ends. NOTE: if there are creases on the base of the liner this does not mean that it has to be changed for another since this does
NOT indicate a manufacturing defect. SERIAL NO.: located on the base of the liner. Take note of the serial no. in the box on the instruction sheet for any possible complaints.
POUR DEPLOYER LA HOUSSE (LINER PVC): Etirer et étendre le liner (L) à l’ombre, pendant 2 heures au moins avant la pose pour qu’il puisserécupérer sa texture.
Température idéale : Pour faciliter la manipulation du Liner, il serait préférable de le poser à une température ambiante comprise entre 25 et 30º C. LA HOUSSE ADOPTE UNE FORME OVALE IDENTIQUE
A CELLE DE LA PAROI DE LA PISCINE. ELLE EST COMPOSÉE D´UN RECTANGLE ET D´UNE DEMI-LUNE DE CHAQUE CÔTÉ, CE QUI REND LA POSITION DE SON INSTALLATION UNIQUE. AFIN
D´ÉVITER LES PLIS, IL FAUT PLACER CORRECTEMENT LA HOUSSE. La housse en PVC doit être bien tendue.Pour faciliter l´installation, les 4 marques (M) du fond du Liner de la piscine doivent être
situées de sorte à ce qu´elles coïncident avec la partie extérieure des postes verticaux (PV2) des extrémités des zones droites tel qu´indiqué sur le schéma. Placer la housse (L) au centre de la piscine.
Commencer par déployer le fond en suivant l´axe principal de la piscine et en mettant le latéral vers la tôle. La soudure qui unit le fond au latéral doit être bien plaquée à la base de la paroi de la tôle sur tout
le périmètre du fond de la piscine, (éviter les plis). Avant d´accrocher le liner, suivre les étapes de montage ci-après mentionnées: 1º Commencer par l´une des parties droites : placer les marques de ce côté
pour qu´elles coïncident avec les postes des extrémités. 2º Placer l´autre moitié ou la partie droite opposée. 3º De l´une des extrémités de la partie droite jusque la moitié d´une semi-circonférence. 4º Compléter
l´autre moitié de la même semi-circonférence. Au cas où le matériel (liner) est en trop ou au contraire en moins, ajuster avec le matériel de toute cette semicirconférence, en l´étirant ou le récupérant (bien le
répartir) sur tout le périmètre de ladite semi-circonférence. 5º et 6º Recommencer respectivement les étapes 3º et 4º pour finir la piscine. V RIFICATION : Chaque marque doit coïncider avec le bord extérieur
de chaque poste vertical des extrémités. REMARQUE : S´il y a des plis dans le fond du liner, ce n´estpas la peine de le changer puisque CE N´EST PAS un défaut de fabrication. N… DE S RIE : Repérer
dans le fond du liner le Nº de série et le noter dans l´encart du manuel d´instructions pour d´éventuelles réclamations.
ENTFALTEN DER AUSKLEIDUNG (PVC LINER): Entfalten und strecken Sie den Liner mindestens 2 Stunden vor dem Einbau an einem der Sonne abgewandten, schattigen Ort. Ideale Temperatur: Der
Liner lässt sich am besten bei einer Umgebungstemperatur von 25-30ºC manipulieren.
DIE AUSKLEIDUNG HAT EINE OVALE FORM WIE DAS POOL, d.h. SIE WIRD GEBILDET AUS EINEM RECHTECK UND EINEM HALBKREIS AN JEDER SEITE, SO DASS SIE NUR IN EINER POSITION
EINGEBAUT WERDEN KANN. DER KORREKTE EINBAU DER AUSKLEIDUNG IST WESENTLICH, DENN NUR SO LASSEN SICH FALTEN UND KNITTER VERMEIDEN.
Die PVC-Auskleidung muss einwandfrei gestreckt sein. Der Einbau wird dadurch erleichtert, dass sich am Poolboden 4 Markierungen (M) befinden, die so liegen müssen, dass sie auf die senkrechten Stützen
(PV2) an den Enden des geraden Teils treffen, wie auf den Zeichnung angegeben. Auskleidung (Liner) in die Poolmitte legen und entfalten; dabei der Poolhauptachse folgen und die Seitenteile zum Blech
hin ziehen. Die den Boden mit dem Seitenteil verbindende Schweißnaht muss über den gesamten Umfang des Poolbodens satt an der Basis der Blechwand anliegen. Falten dürfen nicht entstehen. Bevor
Sie den Liner anbringen, führen Sie folgende Montageschritte aus: 1. Mit den geraden Teilen beginnen und die Markierungen dieser Seite so plazieren, dass sie auf die Stützen an den Enden treffen. 2. Die
andere Hälfte oder den gegenüber liegenden geraden Teil plazieren. 3. Von einem der Enden des geraden Teiles aus bis zur Hälfte eines Halbkreises ziehen. 4. Ergänzen Sie dann die andere Hälfte dieses
Halbkreises. Sollte der Liner überstehen oder zu kurz sein, den gesamten Stoff des Halbkreises über seinen Umfang strecken oder straffen (verteilen). 5. und 6. Wiederholen Sie die Schritte 3 bzw. 4 für das
restliche Pool. BERPR FUNG: Es ist unbedingt darauf zu achten, dass jede Markierung auf den äußerten Rand jeder senkrechten Stütze an den Enden trifft. HINWEIS: Sollten sich am Boden des Liners
Falten gebildet haben, so braucht er durch einen anderen ersetzt zu werden, da es sich NICHT um einen Herstellungsmangel handelt. SERIEN NR. Machen Sie die Serien Nr. am Boden de Liners ausfindig
und notieren Sie diese für evtl. Reklamationen im entsprechenden Kästchen des Anweisungsblattes.
SPIEGATURA DELLA COPERTURA (LINER PVC): Tirare e stendere il liner (L) all’ombra, in modo da recuperare la sua consistenza, almeno 2 ore prima della posa. Temperatura ideale: Per maneggiare
meglio il Liner, è consigliabile posarlo a una temperatura ambiente da 25 a 30º C. LA COPERTURA È A FORMA OVALE, COME LA PARETE DELLA PISCINA, CIOÈ FORMATA DA UN RETTANGOLO E
UNA MEZZA LUNA AD OGNI LATO, PER CUI LA SUA POSIZIONE DI POSA È UNICA. È ESSENZIALE UNA CORRETTA UBICAZIONE DELLA COPERTURA, AL FINE DI EVITARE PIEGHE E GRINZE.
È molto importante che la copertura di PVC sia ben stesa.Per facilitare la corretta posa, il Liner della piscina ha sul fondo 4 segni (M) che dovranno essere situati in corrispondenza della parte esterna dei
pali verticali (PV2) delle estremità delle zone dritte, come illustra il disegno. Situare la copertura (L) al centro della piscina. Iniziare a spiegare il fondo seguendo l’asse principale della piscina ed accostando
il laterale verso la lamiera. La saldatura che unisce il fondo al laterale deve essere perfettamente accostata alla base della parete della lamiera su tutto il perimetro del fondo della piscina, evitando la formazione
di pieghe. Prima di appendere il liner, seguire i seguenti passi di montaggio:
1º Iniziare da una delle parti dritte, situando i segni di questo lato in modo che coincidano con i pali delle estremità. 2º Situare l’altra metà o parte dritta opposta.3º Da una delle estremità della parte dritta fino
alla metà di una semicirconferenza.4º Completare l’altra metà della stessa semicirconferenza. In caso di eccesso o mancanza di materiale (liner), adattare con il materiale totale di tale semicirconferenza,
tirando o raccogliendo (distribuire) lungo il perimetro di tale semicirconferenza. 5º e 6º Ripetere rispettivamente i passi 3º e 4º, per completare la piscina.
VERIFICA: È molto importante che ogni segno coincida con il bordo esterno di ogni palo verticale delle estremità. NOTA: Se restano pieghe sul fondo del liner, non è necessario cambiarlo con un altro, dato
che NON è un difetto di fabbrica. N… DI SERIE: Individuare sul fondo del liner ed appuntare il Nº di serie sul riquadro del foglio delle istruzioni per eventuali reclami.
ESTENDER A COBERTURA (LINER PVC): Estire e estenda o liner (L) na sombra para ele recuperar a sua textura, pelo menos 2 horas antes da colocação.
Temperatura ideal: para manipular o liner aconselha-se uma temperatura ambiente de 25 - 30º C. A COBERTURA É OVAL COMO A PAREDE DA PISCINA, QUER DIZER QUE ESTÁ FORMADA POR UM
RECTÂNGULO E UMA MEIA LUA DE CADA LADO, ASSIM QUE A SUA POSIÇÃO PARA A COLOCAÇÃO É ÚNICA. É ABSOLUTAMENTE NECESSÁRIO COLOCAR CORRECTAMENTE A COBERTURA,
PARA EVITAR DOBRAS E RUGAS. É muito importante que a cobertura de PVC fique bem estendida.Para facilitar a correcta colocação, o Liner da piscina leva 4 marcas (M) no fundo, que devem coincidir
com a parte exterior dos postes verticais (PV2) dos extremos das zonas rectas, como indica o desenho. Situar a cobertura (L) no centro da piscina. Começar por estender o fundo seguindo o eixo principal
da piscina e aproximando o lateral à chapa. A soldadura que une o fundo com o lateral deve ficar perfeitamente apoiada à base da parede da chapa por todo o perímetro do fundo da piscina; evitar dobras.
Antes de suspender o liner siga os passos seguintes para a montagem:1º Começar por uma das partes rectas situando as marcas desse lado para coincidirem com os postes dos extremos. 2º Situe a outra
metade ou parte recta oposta. 3º Desde um dos extremos da parte recta até à metade de uma semicircunferência.
4º Complete a outra metade dessa mesma semicircunferência.Se sobrar ou faltar material (liner), ajustar com o material do total dessa semicircunferência, estirando ou apanhando (distribuir) por todo o
perímetro dessa semicircunferência. 5º e 6º Repita os passos 3º e 4º respectivamente para completar a piscina. VERIFICAO: é muito importante que cada marca coincida com a borda exterior de cada
poste vertical dos extremos.NOTA: Se ficarem dobras no fundo do liner, não é um motivo para trocá-lo por outro já que não é um defeito de fabricação. N… SERIE: Localize no fundo do liner e aponte o Nº
de série no quadro da folha de instruções para caso de reclamação.
UITLEGGEN VAN HET DEK (LINER PVC): Vouw de liner (L) uit in de schaduw en op z´n minst 2 uur vóór de plaatsing daarvan; strek hem uit zodat deze zijn textuur kan herkrijgen. Ideale temperatuur:
Voor een betere hantering van de Liner dient u ervoor te zorgen dat deze geplaatst wordt bij een omgevingstemperatuur van tussen de 25 en 30º C.
HET DEK HEEFT EVENALS DE WAND VAN HET ZWEMBAD EEN OVALE VORM, d.w.z. HET IS GEVORMD DOOR EEN RECHTHOEK EN EEN HALVE MAAN AAN BEIDE KANTEN, ZODAT DE PLAATSING
SLECHTS OP ÉÉN ENKELE WIJZE KAN GEBEUREN. EEN JUISTE LIGGING VAN HET DEK IS VAN VITAAL BELANG VOOR HET VOORKOMEN VAN PLOOIEN EN KREUKELS.
Het is allerbelangrijkst dat het dek van PVC goed wordt uitgelegd. Voor het vergemakkelijken van de juiste plaatsing is de Liner van het zwembad aan de bodem voorzien van 4 merken (M) die overeen
moeten komen met de buitenkant van de verticale palen (PV2) aan de uiteinden van de rechte zones, zoals op de tekening wordt aangegeven. Situeer het dek (L) in het midden van het zwembad. Begin
met het uitleggen van de bodem, volg daarbij de hoofdas van het zwembad en breng de zijkant naar de plaat toe. De las die de bodem met de zijkant verbindt moet over de hele omtrek van de bodem van
het zwembad volkomen tegen de basis van de wand van de plaat aankomen, waarbij achterblijvende plooien moeten worden voorkomen. Volg, voordat de Liner wordt aangebracht, de volgende handelingen
voor de montage: 1.- Begin met één van de rechte delen en situeer de merken van deze kant zó dat zij overeenkomen met de palen aan de uiteinden. 2.- Situeer de andere helft of het tegenovergestelde
rechte deel.3.- Vervolg met één van de uiteinden van het rechte deel tot aan de helft van een halve cirkelomtrek. 4.- Voltooi de andere helft van dezelfde halve cirkelomtrek.
Voor het geval dat er materiaal (Liner) overblijft of ontbreekt dan moet u het materiaal van het geheel van deze halve cirkelomtrek aanpassen door het op te rekken of in te nemen (te verdelen) over de lengte
van de omtrek van genoemde halve cirkelomtrek. 5.- en 6.- Herhaal de handelingen van punt 3 resp. punt 4 voor de voltooiing van het zwembad. TOETSING: Het is zeer belangrijk dat ieder merk overeenkomt
met de buitenrand van iedere verticale paal aan de uiteinden. OPMERKING: Mochten er plooien achterblijven op de bodem van de Liner dan geeft dat geen reden tot inruil voor een andere daar dit GEEN
fabrieksfout inhoudt. SERIENUMMER: Zoek aan de onderkant van de Liner het serienummer en noteer het in het vakje van de gebruiksaanwijzing voor mogelijke klachten.
DESPLIEGUE DE LA FUNDA (LINER PVC): Estire y extienda el liner (L) a la sombra para que recupere su textura, al menos 2 horas antes de su colocación.
Temperatura ideal:Para manipular el Liner mejor,procure colocarlo a una temperatura ambiente de entre 25 - 30º C.
LA FUNDA ES DE FORMA OVAL IGUAL QUE LA PARED DE LA PISCINA,ES DECIR FORMADA POR UN RECTANGULO UNA MEDIA LUNA A CADA LADO, POR LO QUE SU POSICION DE COLOCACION
ES UNICA. ES FUNDAMENTAL UNA CORRECTA UBICACION DE LA FUNDA PARA EVITAR PLIEGUES Y ARRUGAS. Es muy importante que la funda de PVC quede bien extendida. Para facilitar la correcta
colocación, el Liner de la piscina tiene en su fondo 4 marcas(M) que deberán situarse coincidiendo con la parte exterior de los postes verticales (PV2) de los extremos de las zonas rectas como indica el
dibujo
.Situar la funda (L) en el centro de la piscina. Comenzar por desplegar el fondo siguiendo el eje principal de la piscina y arrimando el lateral hacia la chapa. La soldadura que une el fondo con el lateral
debe quedar perfectamente arrimada a la base de la pared de la chapa por todo el perímetro del fondo de la piscina evitando que queden pliegues.Antes de colgar el liner siga los pasos siguientes de montaje:
1º Comenzar por una de las partes rectas situando las marcas de ese lado para que coincidan con los postes de los extremos. 2º Situe la ota mitad o parte recta opuesta. 3º Desde uno de los extremos de
la parte recta hasta la mitad de una semicircunferencia. 4º Complete la otra mitad de esa misma semicircunferencia. En el caso de que sobre ó falte material (liner), ajustar con el material del total de esa
semicircunferencia, estirando ó recogiendo ( repartirlo ) a lo largo del perímetro de dicha semicircunferencia. 5ºy 6º Repita los pasos 3º y 4º respectivamente para completar la piscina. COMPROBACI N:
Muy importante que coincida cada marca con el borde exterior de cada poste vertical de los extremos.NOTA: Si quedan pliegues en el fondo del liner, no es motivo para cambiarlo por otro ya que NO es un
defecto de fabricación. N… SERIE: Localice en el fondo del liner y apunte el Nº de serie en el recuadro de la hoja de instrucciones para posibles reclamaciones.
PR
N…SERIE:
º C
25º- 30º
LINER PVC
M
M
M
M
1…
2…
3…
4…
5…
6…
PV2
PV2
M
M
M
LINER:
1000 x 550
915 x 470
cm
LINERS:
810 x 470
730 x 375
cm
LINERS:
610 x 375
500 x 300
cm
LINER
PR
NP
NP
7
22
Localizar uma das soldaduras de fecho da parede (W), porque estas marcas vão servir de guia para uma correcta colocação da bainha. Começar
por esse ponto. Pendurar o borde superior do lateral do liner por cima do borde superior da chapa, para que toda a soldadura vertical (W) fique
PERFEITAMENTE RECTA E PERPENDICULAR AO CHÃO. Suspender o contorno do coberta sobre o alto da chapa pela dobradura flexibel do
PVC (SF). À medida que se vai pendurando a bainha, sujeite-a provisoriamente com alfinetes de roupa ou com os perfis superiores (de PVC),
sem os encaixar completamente e separados 5 cm uns dos outros. Se quando acabar esta operação observar nesse ponto um excesso de parede
da funda, distribuir o que sobrar de maneira uniforme por todo o perímetro da piscina para evitar rugas. Se pelo contrario observar que o comprimento
total da parede da bainha é insuficiente, esticar uniformemente por todo o perímetro.
Localizar la soldadura de cierre de la pared (W) ya que ésta servirá de guía para una correcta colocación de la funda. Comenzando por este punto
colgar el borde superior del lateral del liner por encima del borde superior de la chapa de forma que toda la soldadura vertical (W) quede
PERFECTAMENTE RECTA Y PERPENDICULAR AL SUELO. Colgar el borde superior de la funda sobre la parte alta de la chapa por medio de
la solapa flexible de PVC (SF). A medida que se va colgando la funda sujetarla provisionalmente con pinzas para la ropa o con los mismos perfiles
superiores (de PVC) sin encajarlos del todo y separados 5 cm los unos de los otros. Si en el momento de completar esta operación se observase
en ese punto un exceso de pared de la funda, repartir este sobrante uniformemente a lo largo de todo el perímetro de la piscina para evitar arrugas.
Si por el contrario observase que la longitud total de la pared de la funda fuese insuficiente, estírela uniformemente a lo largo de todo su perímetro.
Locate one of the seams on the wall (W), which can be used as guides for proper liner placement. Starting from the seam, hang the top edge of
the liner side over the top of the wall plate so that the vertical seam (W) is PERFECTLY STRAIGHT AND PERPENDICULAR TO THE GROUND.
Hang the liner sides from the pool walls using the flexible PVC flap (SF). As you hang the liner in place, secure it provisionally with clothes-pegs
or with the top PVC section-pieces (without fitting them fully into place and with a 5 cm gap between them). If the liner wall is over large, distribute
the excess evenly all around the pool to prevent wrinkles. If it seems too small, stretch it evenly around the pool perimeter.
Repérer l'une des soudures de fermeture de la paroi (W), car ces marques vont servir comme guide pour une installation correcte du liner.
Commencer par ce point. Accrocher le bord supérieur du latéral du liner sur le bord de la tôle, pour que toute la soudure verticale (W) soit
PARFAITEMENT DROITE ET PERPENDICULAIRE AU SOL. Chercher le rail d’accroche qui se trouve sur le rebord du liner. Installer le rail d’accroche
sur le haut du périmétre de la tole, et ajuster le en bas, contre les profiles. Au fur et à mesure que l'on accroche le liner (SF), il faudra la fixer
provisoirement avec des pinces à linge ou avec des profilés supérieurs (en PVC), sans les emboîter complètement et séparés de 5 cm entre eux.
A la fin de cette opération, si l'on observe un excès de liner, distribuer cet excès uniformément sur tout le périmètre de la piscine pour éviter les
plis. Si au contraire on observe que la longueur du liner est insuffisante, étirer uniformément sur tout le périmètre.
Suchen Sie eine der Verschlußnähte der Wand (W), da diese Wegweise für die korrekte Verlegung des Überzugs sind. An diesem Punkt beginnend,
hängen Sie den oberen Rand der Seitenteile des Überzugs auf den oberen Blechrand, und zwar so, daß die gesamte senkrechte Schweißnaht
(W) EINWANDFREI GERADE UND LOTRECHT ZUM BODEN liegt. Die Folie wird über den gesamten Umfang durch die flexibel PVC-Überlappung
an die obere Kante der Wand gehängt (SF). Bei Einhängen des Überzugs heften Sie diesen im Abstand von jeweils 5 cm provisorisch mit
Wäscheklammern oder auch direkt mit Hilfe der oberen (PVC)-Profile, ohne diese jedoch einzurasten. Sollte sich nach Beendigung dieses
Arbeitsgangs ein Übermaß an Überzug herausstellen, so ist dieses gleichmäßig über den ganzen Poolumfang zu verteilen, damit sich keine Falten
bilden. Wenn jedoch die gesamte Wandlänge des Überzugs nicht ausreicht, strecken Sie den Überzug gleichmäßig über den gesamten Poolumfang.
Cercare una delle saldature di chiusura della parete (W) giacché queste fungeranno da guida ai fini di una corretta sistemazione del telone. Iniziando
da questo punto, sospendere il bordo superiore del fianco del liner al di sopra del bordo superiore della lamiera di modo che tutta la saldatura
(W) sia PERFETTAMENTE RETTILINEA E PERPENDICOLARE AL TERRENO. Appendere nonostante cio il bordo della fodera sulla parte superiore
della lamiera mediante il risvolto flessibile di PVC (SF). Durante tale operazione di sistemazione del telone, questo andrà fissato con delle mollette
da bucato o a mezzo degli stessi profilati superiori (di PVC) senza inserirli del tutto, a una distanza di 5 cm l'uno dall'altro. Se, a operazione ultimata,
in questo punto si rilevasse che il telone è troppo abbondante, la parte rimanente andrà suddivisa uniformemente lungo tutto il perimetro della
piscina per evitar così delle grinze. Se, invece, la lunghezza totale della parete del telone fosse insufficiente, la si stenda uniformemente per tutto
il perimetro.
Zoek een van de sluitnaden van de wand (W), aangezien deze als leidraad zullen dienen voor een correcte plaatsing van het zeil. Begin bij dit
punt de bovenrand van de zijkant van de liner over de bovenrand van de plaat te hangen, zodat de hele verticale lasnaad (W) PERFECT RECHT
EN LOODRECHT OP DE GROND komt te staan. De omtreck van het dek over de hoge van de plaat heen slaan door middel van het flexibele
omslang van PVC (SF). Naarmate het zeil wordt opgehangen dient u het voorlopig vast te zetten met wasspelden of met de bovenste profielen
(uit PVC) zelf, zonder ze volledig vast te drukken en op een onderlinge afstand van 5 cm. Indien u, wanneer u hiermee klaar bent, op dit punt zou
vaststellen dat er een overschot aan zeilwand bestaat, dan moet u dit overschot uniform verdelen over de hele omtrek van het zwembad om rimpels
te voorkomen. Stelt u daarentegen vast dat de totale lengte van de zeilwand onvoldoende is, trek het zeil dan op uniforme wijze strak over de hele
omtrek.
PV
PU
W
LINER
PU1
SF
SF
SF
8
PCF
PCF
L
PCF
L
CH
CH
PU
PCF
23
9
PERFILES SUPERIORES FLEXIBLES (PCF) para Piscinas Ovaladas
ATENCION: Estos perfiles FLEXIBLES SON PARA LA PARTE SUPERIOR de las PISCINAS OVALADAS.
Se colocan sobre el liner una vez colgado éste sobre la chapa de la piscina y no necesitan unirse entre sí. Se situan uno a
continuación del otro y al final del perímetro se corta el trozo que sobra de perfil.
Poner en cada perfil una pieza de estampación (PU).
FLEXIBLE TOP SECTION PIECES (PCF) for Oval Swimming Pools
NOTE: These FLEXIBLE SECTION PIECES ARE FOR THE TOPS of OVAL SWIMMING POOLS.
They are fitted on top of the liner once this has been fitted over the swimming pool sheet and they do not need to be joined
together. They are positioned one after the other, and when the perimeter is completed, the extra length is cut off.
Fit a drop-forged part (PU).
PROFIL S SUP RIEURS FLEXIBLES (PCF) pour Piscines Ovales
ATTENTION : Ces profilés FLEXIBLES SONT PRÉVUS POUR LA PARTIE SUPÉRIEURE des PISCINES OVALES.
Une fois que vous avez fixé le liner à la tôle de la piscine, posez les profilés sur le liner. Vous n’avez pas besoin d’effectuer de
soudure. Placez-les les uns derrière les autres et, une fois arrivé au dernier profilé, coupez le morceau qui dépasse.
Glisser sur chaque profilé une pièce (PU), la faire correspondre verticalement à celle du bas en la faisant coulisser.
FLEXIBLE OBERPROFILE (PCF) f r Ovalpools
HINWEIS: DIESE FLEXIBLEN PROFILE SIND FÜR DAS OBERTEIL OVALER POOLS BESTIMMT.
Sie werden einfach auf die in das Poolblech eingehängte Innenverkleidung gelegt und brauchen nicht miteinander verbunden
zu werden. Sie werden nacheinander aufgelegt und am Ende des Umfangs wird das überstehende Profilende abgeschnitten.
Befestigen sie nun auf jedem Profil ein Stanzteil (PU).
PROFILI SUPERIORI FLESSIBILI (PCF) per Piscine Ovali
ATTENZIONE: Questi profili FLESSIBILI SONO PER LA PARTE SUPERIORE delle PISCINE OVALI.
Si collocano sul liner una volta appeso sulla lamiera della piscina e non occorre unirli fra loro. Vanno situati uno dopo l’altro e
alla fine del perimetro si taglia il pezzo di profilo eccedente.
Mettere su ogni profilo un pezzo stampato (PU).
FLEXIBELE BOVENPROFIELEN (PCF) voor ovale zwembaden
OPMERKING: Deze FLEXIBELE profielen ZIJN BESTEMD VOOR DE BOVENKANT van de OVALE ZWEMBADEN.
Zij worden geplaatst over de liner heen wanneer deze reeds over de wand van het zwembad is gelegd, zonder dat het nodig
is dat zij onderling worden verbonden. De een wordt na de ander geplaatst en aan het einde van de perimeter wordt het
overgebleven stuk van het profiel afgesneden.
Breng in ieder profiel een ponsdeel (PU) aan.
PERFIS SUPERIORES FLEXŒVEIS (PCF) para Piscinas Redondas
ATENÇÃO: Estes perfis FLEXÍVEIS SÃO PARA A PARTE SUPERIOR das PISCINAS REDONDAS. Colocam-se sobre o “liner”
uma vez que este tiver sido pendurado sobre a chapa da piscina e não precisam ser unidos entre si. Situam-se um a seguir
ao outro e no fim do perímetro corta-se o excesso que sobrar do perfil.
Pôr em cada perfil uma peça de encaixe (PU).
24
T1
PCF
PU
PV
C
PU
PCF
T
B1
Screw the upright support (PV) to the appropriate bottom and top joining-pieces with 3 T1 screws each. ENVELOPING JOINT PROTECTORS
B1: Introduce the enveloping joint protector (B1) through the top part of the vertical profile (PV), screw the profile in its inferior part and lower
the enveloping joint protector until it touch the floor.
Repeat this procedure until the half-circle is completed. Join the section-pieces together
and check by looking at the ribbing on the wall-plating that the upright supports are properly vertical.
NB: Check that the 3 + 3 (top and bottom) T1 screws are all fitted on each upright support and joining-piece all around the pool.
Fill the pool to
a depth of 2 cm of water and extend the liner to eliminate all wrinkles.If the water does not lie evenly over the whole of the pool bottom, the
ground is not level enough. Remove the liner and level the ground.
Atornille el perfil vertical (PV) con 3 tornillos T1 a la pieza de unión correspondiente que está en la parte inferior y con otros 3 tornillos a la
pieza de unión superior. BASES INYECCI N B1: Introducir la base de inyección (B1) por la parte alta del perfil vertical (PV),atornillar el perfil
en su parte inferior y bajar la base hasta apoyar en el suelo. Repita estos pasos hasta completar la media circunferencia, junte bien los perfiles
entre sí y compruebe que los perfiles verticales queden perfectamente verticales, para ello ayúdese de las lineas del perfilado que tiene
la chapa.
NOTA: Compruebe haber colocado todos los tornillos (T1) ( 3+3),arriba y abajo por cada perfil vertical y sus piezas de unión, en toda la piscina.
Llenar la piscina con 2 cm. de agua. Volver a extender la funda hasta eliminar todas las arrugas. Si se observase que el agua no se reparte
uniformemente sobre toda la superficie del fondo, esto es síntoma de que el terreno no se encuentra convenientemente nivelado. Retire la
funda y proceda a nivelarlo.
Vissez le profilé vertical (PV) avec 3 vis T1 à la pièce d'union correspondante qui se trouve dans la partie inférieure, et avec 3 autres vis à la
pièce d'union supérieure.
ENJOLIVEURS ENVELOPPANTS B1: Introduire l'enjoliveur enveloppant (B1) par la partie haute du profilé vertical
(PV), visser le profilé dans sa partie inférieure et baisser l'enjoliveur enveloppant jusqu'à ce qu'il touche le sol.
Répétez ce processus jusqu'à
la fin de la demi-circonférence; assemblez bien les profilés entre eux et assurez-vous que les profil s verticaux sont parfaitement verticaux.
Pour ce faire, suivez les lignes du profilé de la tôle.
NOTE: vérifiez si vous avez bien mis toutes les vis (T1) (3+3) au-dessus et au-dessous de chaque profilé vertical ainsi que les pièces d'union
dans toute la piscine. Remplissez le bassin d’environ 2 cm. d'eau. Fermez l’arrivée d’eau. Supprimez les plis en tendant le fond du liner vers la
paroi. Verifiez que l’eau se repartisse sur le fond, de maniere egale.
Verschrauben Sie das senkrechte Profil (PV) mit 3 Schrauben T1 am entsprechenden innen liegenden Verbindungsstück mit weiteren 3 Schrauben
am oberen Verbindungsstück. KUNSTSTOFFEINSPRITZSTTZEN B1: Kunststoffeinspritzstützen B1 von oben in das Senkrechtprofil (PV)
einführen, Profil am unteren Ende anschrauben und Stütze auf dem Boden befestigen. Wiederholen Sie diese Schritte, bis der Halbkreis
vollständig zusammengesetzt ist, verbinden Sie die Profile untereinander und sellen Sie sicher, da§ die senkrechten Profile einwandfrei
lotrecht stehen. Als Wegweiser dazu dienen Ihnen die Profillinien des Blechs.
HINWEIS: Stellen Sie sicher, daß alle Schrauben (T1) (3+3) oben und unten an jedem senkrechten Profil und seinen Verbindungsstücken am
ganzen Pool eingesetzt sind.
Füllen Sie ca.2 cm. Wasser in das Becken. Strecken Sie das Liner wieder, um alle noch vorhandenen Falten zu
entfernen. Sollte das Wasser den Boden nicht gleichmäßig bedecken, so deutet dies darauf hin, daß der Untergrund nicht einwandfrei nivelliert
ist. Nehmen Sie dann das Becken-Liner wieder ab und nivellieren Sie den Untergrund.
Avvitare il profilato verticale (PV) con 3 viti T1 al relativo pezzo di unione che si trova nella parte inferiore e con altre 3 viti al pezzo di unione
superiore.
BASI INIEZIONE B1: Introdurre la base a iniezione (B1) dalla parte alta del profilo verticale (PV), avvitare il profilo sulla relativa parte
inferiore ed abbassare la base sino a poggiare sul suolo.
Ripetere questi passaggi fino a completamento di metà circonferenza, unire bene i
profili l'un l'altro e verificare la perfetta verticalit dei profilati verticali. A questo fine, usufruire delle linee di profilato della lamiera.
NOTA: verificare la collocazione di tutte le viti (T1) (3+3), sopra e sotto in ogni profilato verticale e loro pezzi di unione in tutta la piscina.
Riempire
la piscina con 2 cm d’acqua. Tendere nuovamente la guaina fino ad eliminazione completa di tutte le pieghe. Qualora si rilevasse che l’acqua
non si distribuisce uniformemente su tutta la superficie del fondo, ciò significa che il terreno non è del tutto livellato. Togliere la guaina e provvedere
al livellamento del medesimo.
Schroef het verticale profiel (PV) met 3 schroeven T1 op het overeenkomstige aansluitstuk aan de onderkant vast en met 3 andere schroeven
op het bovenste aansluitstuk.
BASES INJECTIE B1: De injectiebasis (B1) inbrengen aan de bovenkant van het vertikale profiel (PV), het profiel
aan de onderkant aanschroeven en de basis naar beneden brengen en op de grond laten rusten.
Herhaal deze stappen tot de halve cirkel werd
vervolledigd. Zet de profielen onderling goed tegen elkaar en controleer of de verticale profielen perfect verticaal komen te staan. Maak
hiervoor gebruik van de profielmarkeringen op de plaat.
OPMERKING: Controleer of u alle schroeven (T1) (3 + 3) boven- en onderaan voor elk verticaal profiel met zijn aansluitstukken overal op het
zwembad heeft geplaatst.
Vul het zwembad met water tot op een hoogte van 2 cm. Trek het zeil opnieuw strak tot alle plooien verdwenen zijn.
Stelt u vast dat het water niet gelijkmatig over het volledige bodemoppervlak wordt verdeeld, dan wil dat zeggen dat het terrein niet goed waterpas
staat. Haal het zeil weg en maak de ondergrond waterpas.
Aparafuse o perfil vertical (PV) com 3 parafusos T1 à peça de união correspondente que está na parte inferior e, com mais 3 parafusos à peça
de união superior.
BASES INYECO B1: Introduzir a base de injecção (B1) pela parte alta do perfil vertical (PV), aparafusar o perfil na parte
inferior e baixar a base até se apoiar no chão.
Repita este procedimento até acabar meia circunferência; junte bem os perfis entre eles e
assegure-se que os perfis verticais ficaram perfeitamente verticais. Para isso, siga as linhas de perfilado da chapa.
NOTA. Verifique se colocou todos os parafusos (T1) (3+3), em cima e em baixo de cada perfil vertical e as peças de união em toda a piscina.
Encher a piscina com 2 cm de água. Esticar novamente a bainha até eliminar todos os vincos. Se a água não se distribuir de modo uniforme
por toda a superfície do fundo, quer dizer que o terreno não está bem nivelado. Tirar a bainha e nivelar.
10
25
P
L
A
Y
A
PU
T1
2º
1º
2º
P
L
A
Y
A
PCF
PV
TPS
11
INSTALACION DE LAS PLAYAS SUPERIORES:
EVITAR QUE DURANTE LA COLOCACION DE LAS PLAYAS ESTAS CAIGAN EN EL INTERIOR DE LA PISCINA YA QUE PODRIAN DAÑAR LA FUNDA
. Colocar cada playa apoyada sobre dos piezas de unión consecutivas con la parte redondeada hacia afuera. Observará que cada playa cuenta con cuatro
agujeros (dos interiores y dos exteriores) para su fijación a las piezas de unión. COMENZAR FIJANDO CADA PLAYA A LAS PIEZAS DE UNION PERO
UNICAMENTE COLOCANDO (y sin apretarlos hasta el fondo para que exista juego entre ellos) LOS TORNILLOS INTERIORES DE CADA LADO (1º).
Una vez que se han colocado todas las playas, Volver a comprobar que los perfiles verticales se encuentran verticales, si no es así corregir su posición. A
continuación colocar los tornillos exteriores ( 2º ) y afianzar todos los tornillos de la estructura. Poner los tapones de pl stico (TPS ) en los tornillos (para
protecci n) por el exterior de la piscina.
ATENCION: QUEDA TERMINANTEMENTE PROHIBIDO SUBIR, ANDAR O SENTARSE SOBRE LAS PLAYAS, ASI COMO SALTAR O TIRARSE DESDE
LAS MISMAS.
INSTALLATION DES PLAGES (PLAYA):
EVITER DE FAIRE TOMBER LES PLAGES A L`INTERIEUR DE LA PISCINE SUR LE LINER CAR ELLES POURRAIENT L'ENDOMMAGER. Installer
chacune des plages (la partie arrondie vers l'extérieur), en les positionant entre 2 pièces PU à l'aide des vis (T1). Chaque plage est percée de 4 trous
permettant de l'ajuster correctement. Ne pas serrer complètement les vis dans un premier temps. Lorsque toutes les plages seront montées, vérifier l'alignement
vertical des poteaux (PV), puis finir de serrer les vis.
Mettre les bouchons de securit (TPS) sur le vis (pour protection) une fois que toutes les plages
(PLAYAS) ont t viss es.
ATTENTION: IL EST STRICTEMENT INTERDIT DE MONTER, MARCHER OU S'ASSEOIR SUR LES PLAGES DE MEME QUE DE SAUTER OU PLONGER
DES PLAGES.
ANBRINGUNG DER OBEREN RANDST CKE:
ACHTEN SIE DARAUF, DAß DIE RANDSTÜCKE BEI DER MONTAGE NICHT IN DAS BECKEN FALLEN, SIE KÖNNEN DAS BECKEN-LINER
BESCHÄDIGEN.Setzen Sie jedes der Randstücke, mit dem runden Seit nach außen, auf jede zwei Verbindungsstücke. An jedem randstücke befinden sich
vier Bohrungen (zwei Innen- und zwei Aussenbohrungen). BEFESTIGEN SIE DIE RANDSTÜCKE AN DEN VERBINDUNGSSTÜCKEN MIT ZWEI SCHRAUBEN
AN DIE INNENSCHRAUBEN (1'') (jedoch ohne sie fest anzuziehen, damit sie Spiel behalten). Nachdem alle Randstücke angebracht sind, KONTROLLIEREN
SIE NOCH EINMAL, OB ALLE SENKRECHTEN PROFILE LOTRECHT STEHEN UND KORRIGIEREN SIE BEI BEDARF. DANACH DREHEN SIE DIE
AUßENSCHRAUBEN (2'') EIN UND ZIEHEN ALLE SCHRAUBEN GLEICHZEITIG FEST. Kunststoffsicherheitsstopfen (TPS)nach dem Verschrauben
aller oberen waagerechten PLAYA-Umlaufprofile/PLAYAs (zum Schutz) auf den Schrauben anbrigen.
VORSICHT: ES IST STRENG VERBOTEN, AUF DIE PLAYA-PROFILE ZU STEIGEN ODER VON DIESEN AUS IN DEN POOL ZU SPRINGEN.
INSTALLAZIONE DEI BORDI SUPERIORI (PLAYAS):
DURANTE LA POSA IN OPERA DEI BORDI, EVITARNE LA CADUTA NELLA PISCINA GIACCHÉ POTREBBERO ROVINARNE IL TELONE. Ogni bordo è
provvisto di quattro fori (due all’interno e due all’esterno) che ne consentono il fissaggio su due giunti consecutivi con la parte arrotondata verso l’esterno.
FISSARE INIZIALMENTE OGNI BORDO AL GIUNTO PREDISPONENDO SOLTANTO LE VITI INTERNE SU CIASCUN LATO (1º) (senza stringerle fino in
fondo in modo tale che vi sia un gioco tra di esse). Ultimata la posa in opera di tutti i bordi, VERIFICARE NUOVAMENTE LA PERFETTA VERTICALITÀ DEI
PROFILATI VERTICALI. IN CASO CONTRARIO, CORREGGERNE LA POSIZIONE. SUBITO DOPO, PREDISPORRE LE VITI ESTERNE (2º) E STRINGERE
TUTTE LE VITI DELLA STRUTTURA.
Porre i tappi di plastica di sicurezza (TPS) sulle viti (per protezione) dopo aver avvitato tutte le SPIAGGE/PLAYAS.
ATTENZIONE: È ASSOLUTAMENTE VIETATO SALIRE, CAMMINARE O SEDERSI SULLE SPIAGGE, COSÌ COME SALTARE O TUFFARSI DALLE STESSE.
INSTALLATIE VAN DE RECHTHOEKIGE BOVEN-SIERRANDEN (PLAYAS):
VOORKOMEN DAT GEDURENDE DE PLAATSING VAN DE RECHTHOEKIGE SIERRANDEN DEZE BINNENIN HET ZWEMBAD VALLEN, ZODAT HET
DEK BESCHADIGD ZOU KUNNEN WORDEN. Ledere sierrand plaatsen op twee opeenvolgende verbindingsonderdelen met het ronde gedeelte naar buiten.
Men zal opmerken, dat in iedere sierrand vier gaten te zien zijn (twee aan de binnenkant en twee aan de buitenkant) voor de bevestiging aan de
verbindgsonderdelen. BEGIN MET IEDERE SIERRAND AAN DE VERBINDINGSONDERDELEN TE BEVESTIGEN, MAAR PLAATS DE SCHROEVEN
ALLEEN AAN DE BINNENKANT VAN IEDERE KANT (1º) (zonder deze volledig vast te draaien, opdat er speling onder elkaar blijft bestaan). Wanneer men
alle sierranden reeds heeft geplaatst MOET MEN WEDEROM NAKIJEN OF DE VERTIKALE PROFIELEN ZICH INDERDAAD IN VERTIKALE POSITIE
BEVINDEN. MOCHT DIT NIET HET GEVAL ZIJN DAN DE POSITIE CORRIGEN. VERVOLGENS DE SCHROEVEN AAN DE BUITENKANT (2º) PLAATSEN
EN ALLE ALLE SCHROEVEN VAN HET GERAAMTE STEVIG VASTZETTEN. Wanner alle PLAYAS/profielen eenmaal zijn aangeschroefd, de plastic
doppen voor veiligheid (TPS) in de schroeven aanbrengen (ter bescherming).
BELANGRIJK: HET IS TEN STRENNGSTE VERBODEN OM OP DE BOVENPROFIELEN TE KLIMMEN, EROVER TE LOPEN, EROP TE GAAN ZITTEN
OF DAARVAN AF TE SPRINGEN.
INSTALAO DAS COBERTAS SUPERIORES (PLAYAS):
EVITAR DE DEIXAR CAIR AS COBERTAS NA PISCINA DURANTE A INSTALAÇÃO JÁ QUE PODEM DANÁ-LA. Instalar cada coberta, apoiando-a nas
duas peças de junção consecutivas, (com a parte redonda para o exterior). Poderemos observar que cada coberta leva 4 furos (2 interiores e 2 exteriores)
para a fixação às peças de junção. COMEÇAR POR FIXAR CADA COBERTA NAS PEÇAS DE UNIÃO, PONDO SÓ OS PARAFUSOS INTERIORES DE
CADA LADO (1º) (sem apertar completamente para haver jogo entre elas). Quando todas as cobertas estiverem montadas, Verificar se os perfis verticais
estão bem verticais, senão, corrigir sua posição pôr depois os parafusos exteriores (2º) e apertar todos os parafusos da estrutura. P r as tampas de pl stico
de seguran a (TPS) nos parafusos (para protec ao) depois de ter aparafusado todos os perfis/as PLAYAS.
ATENO: ESTÁ TERMINANTEMENTE PROIBIDO SUBIR, ANDAR OU SENTAR-SE EM CIMA DOS PERFIS, SALTAR OU TIRAR-SE DAS MESMAS.
INSTALLING THE TRIM PIECES (PLAYAS):
TAKE CARE THAT THE TRIM PIECES DO NOT FALL INTO THE POOL DURING FITTING, AS THEY MAY DAMAGE THE LINER. Fit each trim piece
supported on two consecutive union pieces with the rounded part outwards. Each trim piece has four holes (two inside and two outside) for fixing to the union
pieces. START FIXING EACH TRIM PIECE TO THE UNION PIECES, BUT ONLY PLACE THE INSIDE SCREWS (1) ON EACH SIDE (and do not tighten
down, so that there is some flexibility between them). When all the trim pieces have been placed, CHECK AGAIN THAT THE VERTICAL SECTIONS ARE
PROPERLY VERTICAL. IF NOT, CORRECT THEIR POSITION. NEXT, PLACE THE OUTSIDE SCREWS (2) AND FASTEN DOWN ALL THE SCREWS IN
THE STRUCTURE. Put the flexible joint protectors of security (TPS) on the screws (for protection) once all the brinks (PLAYAS) have been screwed.
WARNING: Do not climb onto, walk or sit on, jump or dive off the PLAYA finishing pieces.
26
COLOCACION DE LOS PROTECTORES DE UNION FLEXIBLES (EM): Los protectores de unión flexibles se colocan en las
uniones de dos playas. Para ello comience fijando su parte posterior (interior de la piscina) a la playa y ayudándose de un
destornillador hacer palanca sobre sus resaltes delanteros hasta conseguir que se fijen a la playa. NOTA: Si su piscina dispone
de protectores de unión flexibles EM deberá tapar el orificio central (de la parte superior) de cada perfil vertical PV con los tapones
(PT) que se adjuntan.
PLACING THE FLEXIBLE JOINT PROTECTORS (EM): The flexible joint protectors are fitted to the joints between the trim pieces.
To fix them, start by fixing the back part (inside the pool) to the trim piece and with the aid of a screwdriver lever the front ribs over
until they fit to the trim piece. COMMENT: If your swimming pool has joint protectors EM, you may plug the central hole (of the
superior part) of each vertical strengthening PV thanks to the caps (PT) provided.
INSTALLATION DES CACHES D’ANGLES (EM): Chaque cache se positionne en 2 plages. Pour ce faire, emboîter la partie la
plus étroite coté intérieur de la piscine. Tirer ensuite les languettes de façon à les ramener sous le rebord des plages à l'opposé.
NOTE: Si votre piscine dispose de cache-d'angles EM, vous devrez boucher le trou central (de la partie supérieure) de chaque
Poteau Vertical PV avec les bouchons (PT) fournis.
ANBRINGUNG DER ELASTISCHEN VERBINDUNGSSCHUTZKAPPEN (EM): Die elastischen verbindungsschutzkappen werden
jeweils an der Verbindung zwischen zwei Randstücken angebracht. Hierzu beginnen Sie, den rückwärtigen Teil an den vorderen
Schultern zu befestigen, bis diese fest an den Randstücken sitzen. HINWEIS: Wenn Ihr Schwimmbad mit flexiblen
Verbindungsschutzvorrichtungen EM ausgestattet ist, dann muss die mittlere Bohrung (oben) jedes Senkrechtprofils PV mit Hilfe
der mitgelieferten Stopfen (PT) verschlossen werden.
POSA IN OPERA DEI COPRIGIUNTI FLESSIBILI (EM): I coprigiunti flessibili vanno posti sul punto di unione di due bordi. A questo
scopo, fissarne la parte superiore (interna della piscina) al bordo e con un cacciavite, fare leva sulle relative sporgenze poste sul
davanti affinché si vadano a fissare al bordo.
NOTA: Se la piscina dispone di Protettori ad Unione Flessibili EM si dovrà chiudere
il foro centrale (della parte superiore) di ogni Profilo Verticale PV con i tappi (PT) in dotazione.
PLAATSING VAN DE FLEXIBELE VERBINDINGSBESCHERMERS (EM): De flexibele verbindingsbeschermers worden geplaatst
in de verbindingen van twee rechthoekige sierranden. Daarvoor begint men met het vastzetten van het achterste deel (binnenkant
van het zwembad) aan de sierrand en met behulp van een schroevedraaier tilt men de uitspringende delen aan de voorkant op
totdat deze aan de sierrand vastzitten.
OPMERKING: Indien uw zwembad beschikt over flexibele verbindingsbeschermers EM
moet het centrale gat ( van het bovendeel) van ieder vertikaal profiel PV met de doppen (PT), die zijn bijgeleverd, bedekt worden.
INSTALAO DOS PROTECTORES DE UNI O FLEXŒVEIS (EM): Os protectores de união flexíveis têm que estar instalados
nas uniões entre dois cobertas. Para isso, fixar primeiro a parte traseira (interior da piscina) na coberta. Depois, com uma chave
de parafuso, fazer alavanca nos bordes dianteiros para fixá-los à coberta.sobre cada una de las piezas de unión inferiores. NOTA:
Se a sua piscina levar protectores de união flexíveis EM deverá tapar o buraco central (da parte superior ) de cada perfil vertical
PV com as tampas (PT) juntas.
2º
1º
EM
PT
PV
12
27
PROTECTORES DE INYECCION: PID + PIT Se colocan en las uniones de 2 Playas.Los protectores de inyección se componen de 2 piezas:
Protector Inyección Delantero (PID) y Protector Inyección Trasero (PIT).Primero encaje por su parte posterior la pieza PIT a las partes posteriores
de las 2 Playas. Luego por la parte frontal encaje la pieza PID y sujétela al perfil vertical con un tornillo (T) Si las Playas de su piscina son de 18
cm de ancho deberá quitar las muescas (en los laterales y en la parte inferior para la zona recta) de la pieza PID para que haga tope con el perfil
vertical y las Playas. Repita estos pasos hasta completar toda la piscina. ATENCION: Para la zona recta atornillar el protector de inyección PID al
perfil vertical PV2 por el orificio inferior, (deberá quitar la muesca del PID para que encaje en el PV2).
JOINT PROTECTORS: PID + PIT Have to be fitted to the joints between the trim pieces. The joint protectors consist of 2 pieces : Front joint protector
(PID) and back joint protector (PIT). To fix them, start by fixing the rounded back part PIT (by the interior side of the pool) on 2 trim pieces. Then,
fix the front part (PID) (by the exterior side of the pool) in the back piece (PIT) with the aid of its 2 rails, and fix it to the vertical profile using a screw
(T). If your pool trim pieces are 18 cm wide, you may remove the jagged notches of the piece PID (on the sides and bottom in the straight area)
to make a good installation with vertical profile and trim pieces. Do repeat this process for all pool trim piece junctions. ATTENTION: In the straight
area, screw the PID injection protector to the PV2 vertical section piece through the bottom hole (remove the notch in the PID so that it fits into
PV2).
ENJOLIVEUR: PID + PIT Ils se posent sur les jonctions de 2 plages. Les enjoliveur se composent de 2 pièces: enjoliveur avant (PID) et enjoliveur
arrière (PIT). En premier lieu, glisser la partié intérieure arrondie de la pièce (PIT) sur 2 plager par la côte intérieur de la piscine. Ensuite, glisser
la pièce (PID) (par la côte extérieur de la piscine) dans la pièce (PIT) à l'aide de ses 2 rails, et fixez-la au profilé vertical avec une vis (T). Si les
plages de votre piscine sont de 18 cm de large, vous devrez enlever les encoches prédécoupées de la pièce PID (sur les côtes et dans la partie
inferieure pour la zone deroite) pour une correcte installation avec le profilé vertical et les plages. Repéter ces opérations pour toutes les jonctions
de plages de la piscine. ATTENTION: Pour la zone droite, visser le enjoliveur PID au profil vertical PV2 à travers l'orifice inférieur (il faudra enlever
l'encoche du PID pour emboîter le PV2).
EINSPRITZSCH TZER:
PID + PITDiese werden in die Verbindungen der beiden Playa-Profile eingebracht. Spritzgusschützer bestehen aus zwei
Teilen:Vorderer Spritzgussschützer (PID ) und hinterer Spritzgusschützer (PIT). Zunächst muss das PIT-Teil von hinten in die hinteren Teile der 2
Playa-Profile eingepasst werden. Passen Sie dann das PID-Teil von vorn ein und befestigen Sie es mit einer Schraube (T) am senkrechten Profil.
Wenn die Playa-Profile Ihres Pools 18 cm breit sind, die seitlich liegenden Rasten (seitlich und unten für den geradlinigen Bereich) vom PID-Teil
entfernen, damit es satt am senkrechten Profil und am Playa-Profil anliegt. Wiederholen Sie diese Schritte, bis das ganze Pool komplett ist.
WICHTIGER HINWEIS: Im geraden Bereich Spritzgusschutz PID an das Senkrechtprofil PV2 von der Innenbohrung aus anschrauben (vorher zum
Eipassen in PV2 Raste vom PID nehmen).
PROTETTORI AD INIEZIONE: PID + PIT Vengono situati sulle unioni di 2 Spiagge. I protettori ad iniezione sono composti di 2 pezzi: Protettore
Iniezione Anteriore ( PID ) e Protettore Iniezioni Posteriore ( PIT ). Innanzitutto inserire dalla parte posteriore il pezzo PIT nelle parti posteriori delle
2 Spiagge. Quindi, dalla parte frontale inserire il pezzo PID e situarlo sul profilo verticale con una vite (T). Se le Spiagge della piscina sono di 18
cm. di larghezza, si dovranno rimuovere le tacche (nelle zone laterali e nella parte inferiore per la zona dritta) del pezzo PID affinché faccia da fermo
sul profilo verticale e sulle Spiagge. Ripetere questi passaggi sino a completare tutta la piscina. ATTENZIONE: Per la zona dritta, avvitare il protettore
ad iniezione PID al profilo verticale PV2 dal foro inferiore (si dovrà rimuovere la tacca del PID affinché si incastri nel PV2).
INJECTIEBESCHERMERS: PID + PIT Deze worden geplaatst in de verbindingen van 2 metalen bovenprofielen. De injectiebeschermers bestaan
uit 2 onderdelen: Voor-injectiebeschermer (PID) en achter-injectiebeschermer (PIT). Pas eerst het achterdeel van het PIT-onderdeel in aan de
achterdelen van de 2 metalen bovenprofielen. Pas daarna het voorste deel van het PID-onderdeel in het vertikale profiel en zet het vast met een
schroef (T). Wanneer de bovenprofielen van uw zwembad 18 cm. breed zijn zult u de inkepingen moeten verwijderen (aan de zijkanten en aan de
onderkant voor de rechte zone) van het PID-onderdeel, opdat het tegen het vertikale profiel en de bovenprofielen aankomt. Herhaal deze handeling
totdat het gehele zwembad voltooid is. OPMERKING: Voor de rechte zone de injectiebeschermer PID vastschroeven aan het vertikale profiel PV2
door de onderopening (de flens van de PID zal, voor de inpassing in het PV2, moeten worden verwijderd).
PROTECTORES DE INJECO: PID + PIT Colocam-se nas uniões de 2 Playas. Os protectores de injecção compõem-se de 2 peças: Protector
Injecção Dianteiro (PID) e Protector Injecção Traseiro (PIT). Primeiro encaixe pela traseira a peça PIT às partes traseiras das 2 Playas. Depois,
pela parte frontal, encaixe a peça PID e sujeite-a ao perfil vertical com um parafuso (T). Se as Playas da piscina forem de 18 cm de largo deverá
tirar as ranhuras (nos laterais e na parte inferior para a zona recta) da peça PID para que esta faça tope com o perfil vertical e as Playas. Repita
estes passos até terminar toda a piscina. ATENÇAO: Para a zona direita, aparafusar o protector de injecçao PID no perfil vertical PV2 pelo orificio
inferior (será preciso tirar o entalhe do PID para encaixar o PV2).
PIT
PID
T
13
FITTING THE SKIMMER AND RETURN VALVE
COLOCACI N DEL SKIMMER Y VALVULA RETORNO
INSTALLATION DU SKIMMER ET DE LA BUSE DE REFOULEMENT
EINBAU VON SKIMMER UND R CKLAUFVENTIL
INSTALLAZIONE DELLO SKIMMER E DELLA VALVOLA DI RITORNO
PLAATSING VAN DE SKIMMER EN VAN DE TERUGVOERKLEP
INSTALAO DO SKIMMER E DA VALVULA DE EVACUAO
28
29
COLOCACION DE LA VALVULA DE RETORNO (V): (BOQUILLA DE IMPULSION V):
Es una válvula situada en la parte inferior de la pared de la piscina, por donde retorna el agua depurada procedente de la depuradora. Comenzar
a llenar la piscina (con una manguera de jardín), hasta que llegue a 4 cm . por debajo del borde inferior de la válvula . Marcar el orificio en el liner
con un rotulador y hacer un corte en cruz en el centro con ayuda de un cúter (cuchilla), sin rebasar el agujero del troquel.Se introduce en el interior
de la piscina por el corte, con un anillo de fricción (F) y una junta (J). Cortar el trozo de liner que asomará por el exterior. Colocar la otra junta (J) y
el otro anillo de fricción (F) y apretar firmemente con la tuerca (T). Insertar la manguera de retorno (M), que va desde la toma de salida de la
depuradora, hasta la válvula de retorno (V) y sujetarla con la abrazadera (A).
FITTING THE RETURN VALVE (V): (IMPELLER NOZZLE: V)
This valve is located at the bottom of the pool wall, and water is returned to the pool through it after treatment in the treatment unit. Start pouring
water into the pool through a garden hose, and stop 4 cm. below the bottom of the valve hole. Mark the posititon of the hole on the liner with a felt
pen and make a cross-shaped cut in the centre of the mark with a stanley knife or similar. Do not cut beyond the edge of the hole. Place inside the
pool through the cut, with a seal (J) and a friction ring (F). Cut the protruding part of the liner. Fit the other seal (J) and the other friction ring (F)
and tighten firmly with the nut (T). Insert the return hose (M) which goes from the outlet of the treatment unit to the return valve (V), and secure it
with the clamp (A).
MONTAGE DE LA VALVE DE REFOULEMENT (V): (BUSE D'IMPULSION: V)
La tôle est munie de 2 perçages, afin d'y fixer le skimmer et la buse de refoulement. BUSE DE REFOULEMENT: elle est installée sur la tôle, dans
le milleu de la piscine. L'eau provenant de l'epurateur, retourne dans la piscine au travers de cette buse. Commencer le remplissage de la piscine
avec un tuyau d'arrosage. Arrêter le remplissage à 4 cm. du bord inférieur du perçage de la buse. Ne pas dépasser le niveau de perçage de la buse.
Faire une découpe de 4 cm. en forme de croix dans le liner, au centre du peçage de la buse, à l'aide d'un cutter. ATTENTION, NE PAS DEPASSER
LE TROU. Prenez la buse de refoulement (V) puis enfilez dessus tout d'abord une bague friction (F) suivie d'un joint d'etanchéité en caoutchouc
(J). Par l'intèreur de la piscine faites passer la buse à travers la découpe en forme de croix faite sur le liner et le perçage sitúe sur la tôle. Le joint
(J) doit se situer parfaitement en contact avec le liner pour assurer l'etanchéité. Couper les morceaux de liner sortant à l'extérieur (la coupe doit
être nette et ajustée). Par l'exterieur de la piscine enfiler un joint d'étanchéité (J) en le plaçant en contact avec la tôle puis une bague de friction
(F). Ajuster l'ensemble des pièces en serrant fermement avec l'ecrou (T). Ce montage doit se mener à bien avec beaucoup de soin, évitant les plis
à travers lesquels pourraient se produire des fuites d'eau. Avant de continuer le remplissage de la piscine il faudra installer le tuyau de refoulement
(M) qui va de la prise de sortie de l'epurateur à la buse de refoulement (V), en le fixant avec deux colliers (A).
EINBAU DES R CKLAUFVENTIL (V):
Es handelt sich um ein unten an der Beckenwand befindliches Ventil, durch das das geklärte Wasser aus der Filteranlage ins Becken zurückfließt.
Befüllen Sie das Becken zunächts bis ca. a cm. Wasser unter dem unteren Rand der Ventilöffnung. Markieren Sie in dem Liner einen zentrierten
kreuzförmige Schnitt, und dann mit Hilfe eines Cutters schneiden, ohne den Durchmesser der Öffnung zu überchreiben. HINWEIS: GEWINDE DES
RÜCKLAUFVENTILS MIT TEFLON BELEGEN. Durch die Öffnung vom Beckeninnern aus, das Rücklaufventil (V) mit einen Nebendichtungsring
(F) und einer Dichtung (J) einführen. Das nach außen überragende Linerstück sauber abschneiden. Außen wird dann die andere Dichtung (J) und
Nebendichtungsring (F) angebracht und mit der Mutter (T) fest angezogen. Rücklaufschlauch (M) zwischen dem Ausgang der Filternanlage und
dem Rücklaufventil (V) mit den Rohrschellen (A) anbringen.
MONTAGGIO DELLA VALVOLA DI RITORNO (V): (UGELLO DI SPINTA V):
Come si può capire dal nome si tratta di una valvola situata nella parte inferiore della parete della piscina, da dove ritorna l'acqua depurata alla
piscina proveniente dal depuratore. Inziare il riempimento della piscina con acqua (mediante un idrante da giardino).Non superare il livello della
valvola, fermare l'acqua, una volta raggiunti circa i 4 cm. dal bordo inferiore del foro. Procedete a segnare il foro sulla fodera (liner) mediante un
pennarello a fare un taglio o croce sul centro servendovi di un cutter senza oltrepassare il foro del prestampato.
Si inserisce all’interno della piscina
attraverso la fenditura, con una giunta (J) e una rondella di frizione (F). Tagliare il lembo di Liner che sporgerà all’esterno. Posizionare l’altra giunta
(JG) e l’altra rondella di frizione (F) e stringere a fondo con il dado (T). Inserire la manica di ritorno (M) che va dall’uscita del depuratore fino alla
valvola di ritegno (V) e fissarla con la ghiera (A).
MONTAGEM DA VALVULA D EVACUAO (V): (CANO DE IMPULÇÃO V):
É uma válvula instalada na parte baixa da piscina que permite à agua que vem do purificador de ser evacuada para a piscina. Començar o enchimento
da piscina (com uma mangueira). Não ultrapassar o nivel da válvula. Só encher até uma altura de 4 cm. do bordo interior do orificio. Marcar o orificio
da coberta com uma esferográgica e cortar desenhando uma cruz no centro com uma lámina, sem ultrapassar o orificio. MUITO IMPORTANTE:
COBRIR O PASSO DE ROSCA DA VÁLVULA DE EVACUAÇÃO COM TEFLON.
Introduzir no interior da piscina pelo corte, com uma junta (J) e
um anel de fricção (F). Cortar o pedaço de liner que sobressai no exterior. Colocar a outra junta (J) e o outro anel de fricção (F) e apertar firmemente
com a porca (T). Montar a mangueira de retorno (M) que vai da tomada de saída do purificador até à válvula de retorno (V) e sujeitá-la com a
braçadeira (A).
MONTAGE VAN DE TERUGVOERKLEP (V): (MOND AANDRIJVING V):
Dit is een klep, gesitueerd aan de onderkant van de wand van het zwenbad, waardoor het gezuiverde water, afkomsting van de zuiveringsinstallatie
weer terugstroomt. Begin het zwembad met water te vullen (met een tuinslang) totop een niveau van 4 cm. onder de benedenrand van de klep. Geef
de opening in het dek (de liner) aan met een vilstift en maak in het mideen een kruisvormige insnijding met behulp van een mesje, zonder de geponste
opening te overschrijden. ZEER BELANGRIJK: TEFLON (AFDICHTINGSMIDDEL) AANBRENGEN OP DE GEHELE SCHROEFDRAAD VAN DE
TERUGVOERKLEP.
Wordt via de opening in het zwembad aangebracht met een wrijvingsring (F) en een koppeling (J). Snijd het stuk Liner dat naar
buiten uitsteekt af. Breng de andere koppeling (J) en de andere wrijvingsring (F) aan en span ze stevig aan met behulp van de moer (T). Breng de
waterslangvoor het terugkerende water (M), die van de uitlaat van de zuiveringsinstallatie naar het terugslagventiel (V) loopt, in en zet haarvast met
de klemring (A).
4 cm
14
F
F
AGUA
EAU - AGUA - WATER
ANILLO
FRICCION
F
30
ATTACHING THE SKIMMER BODY (S) TO THE OUTSIDE OF THE POOL:
Fill the pool with water until the level is 4 cm from the bottom of the perforation for the skimmer. Using a Stanley knife, cut the liner (L) inside the
pool opposite the perforation. Locate the double seal (J) so that the wall plate and liner are within the groove (X) made for this purpose and fit
the two shorter screws into the larger centre holes from the inside of the pool through the double seal and the liner. Screw them into the center
holes on the skimmer (S). Cover the connecting bushing (C) and the water treatment unit inlet with Teflon. Screw the connecting bushing (C) tightly
to the skimmer, connect one end of the hose to the skimmer connecting bushing (C) using a clamp (A), and fit the other end to the treatment unit
inlet. Clamp this end also. NB.- Fit Teflon on all water hose connection threads to ensure leak-tightness.
FIJACION DEL CUERPO DEL SKIMMER (S) AL EXTERIOR DE LA PISCINA:
Seguir llenando de agua la piscina, hasta que el nivel esté a 4 cm. de la parte inferior del troquel del skimmer. Recorte con un cúter (cuchilla) el
liner (L) que se encuentra en el interior de la piscina y ocupa el recuadro del troquel. Situe la junta doble (J) de manera que en su canaladura (X)
(canaladura de la junta doble prevista para esto) quede la chapa y el liner. A continuación, colocar los dos tornillos más cortos desde la parte
interior de la piscina dentro de los 2 agujeros centrales más grandes (a través de la junta doble y del liner) y atornillar dentro de los agujeros
centrales correspondientes al cuerpo del skimmer (S). Cubrir con teflón el manguito de conexión (C) y la toma de entrada del agua de la depuradora.
Atornillar fuertemente el manguito de conexión (C) al cuerpo del skimmer y conectar un extremo de la manguera con la ayuda de una abrazadera
(A) al manguito de conexión del skimmer (C). Encajar el otro extremo de la manguera a la entrada de la toma de agua de la depuradora y apretar
con la ayuda de una abrazadera. IMPORTANTE : Poner teflón en todas las roscas de conexión de agua.
INSTALLATION DU CORPS DU SKlMMER (S) ¸ L’EXT RIEUR DE LA PlSCINE:
Continuer a remplir la piscine, jusqu'à ce que le niveau d'eau soit à 4 cm de la partie inférieure du perçage du skimmer. Avec une lame (cuter)
découper la liner (L) qui se trouve à l'intérieur de la piscine au format du perçage. Installer le double joint (J) en emboîtant la tôle et le liner dans
la rainure (X) du double joint prévu à cette effet. Ensuite, mettre les 2 plus petites vis depuis l'intérieur de la piscine dans les 2 trous centraux plus
grands (à travers le double joint et le liner) et visser aux trous centraux correspondants du corps du skimmer (S). Recouvrir le tube de connexion
(C) ainsi que la prise d'entrée d'eau de l'epurateur avec du Téflon. Visser fortement le tube de connection (C) au corps du skimmer et brancher
l'extrémité de tuyau à l'aide d'un collier (A) au tube de connexion du skimmer (C). Emboîter l'autre extrémité du tuyau a l'entrée de la prise d'eau
de l'epurateur et serrer à l'aide d'un collier.IMPORTANT: Recouvrir de Téflon tous les filetages de raccord d'eau,pour en garantir l'étanchéité.
BEFESTIGUNG DES SKIMMERGEH USES (S) AN DER BECKENWAND:
Pool weiter mit Wasser bis zu einer Höhe von ca. 4 cm. innem am gestanzten Teil des Skimmers befüllen. Schneiden sie mit einen Cutter (Messer)
den Liner (L) auf der innem im Pool den Stanzrahmen abdeckt. Plazieren Sie die doppelte Dichtung (J) so, das ihrer Nut (X) (Nut der hierfür
vorgesehenen Doppeldichtung) Blech und Liner zu liegen kommen.Drehen Sie dann die kürzeren Schrauben vom Innern des Pools aus in die
beiden größeren Mittelbohrungen (durch die doppelte Dichtung und den Liner) ein und shrauben Sie anschließend das Skimmerhäuse (S) mit Hilfe
sie in die Mittelbohrungen des Skimmergehäuse (S). Mit Teflon die Anschlussmuffe (C) und den Wasseranschluss der Waserreinigungsanlage
abdecken. Anschlussmuffe (C) fest an das Skimmergehäuse schrauben und ein Schlauchendede mit Hilfe der Rohrschelle (A) an die Anschlussmuffe
des Skimmers (S) anschließen. Das andere Schlauchende an den Wasseranschluss der Wasserreinigungsanlage anschließen und mit einer
Rohrschelle sicherrn. WICHTIG: Um für Abdichtung zu sorgen, alle Wasseranschlussgewinde mit Teflon abdecken.
FISSAGIO CORPO SKIMMER (S) ALLl’ESTERNO DELLA PISCINA:
Continuare a rimpire d'acqua la piscina, fino a un livello di 4 cm. dalla parte inferiore dello stampo dello skimmer. Tagliare con cutter (lama) il liner
(L) che si trova all'interno della piscina e che occupa il riquadro dello stampo. Situare la guarnizione doppia (J) in modo che nella sua scanalatura
(X) (scanalatura della guarnizione doppia prevista allo scopo)resti inserita la lamiera ed il liner. Collocare quindi le due viti più corte dalla parte
interna de la piscina all'interno dei 2 fori centrali più grandi (attraverso la guarnizione doppia e il liner) ed avvitare all'interno dei fori centrali
corrispondenti al corpo dello skimmer (S). Ricoprire con Teflon il raccordo di attacco (C) al corpo dello skimmer ed unire un'estremità del tubo
flesibile all'entrata della presa d'acqua della depuratrice e stringere servendosi di una fascetta. IMPORTANTE:Porre teflon in tutte la filettature
degli attachi d'acqua, allo scopo di assicurare la tenuta stagna..
HET VASTZETTEN VAN HET SKELET VAN DE SKIMMER (S) AAN DE BUITENKANT VAN HET ZWEMBAD:
U vervolgt met het vullen van het zwembad totdat het niveau top op 4 cm. beneden geponste opening van de skimmer komt te staan.
Snij met een
cutter het dek (de liner L) dat zich aan de binnenkant van het zwembad bevindt en dat het vierkant van de geonste opening bedekt, af. Situeer de
dubblele pakking (J) op de manier waarop in de gleuf (X) (de gleuf die speciaal bestemd is voor de dubbele pakking) de wand en het dek geplaatst
kunnen worden. Vervolgens dient u de twee korste schroeven vanuit de binnenkant van het zwembad in te brengen in de twee grootste centrale
gaten van het skelet van de skimmer (S). Het verbindingsslangetje (C) en de aansluiting van de watertoevoer van de zuiveringinstallatie met Teflon
bedekken.Het verbindingsslangetje (C) stevig aan het skelet van de skimmer aanschroeven en het uiteinde van de waterslang met behulp van
een klembab (A) aansluiten aan het verbindingsslangetje van de skimmer (C). Het andere uiteinde van de waterslang inpassen in de toever van
de wateraansluiting van zuiveringinstallatie en stevig vastzetten met behulp van een klemband. BELANGRIJK: Teflon aanbrengen aan schroefdraden
van de wateraansluiting teneinde lekkages te voorkomen.
SUJEIO DO CORPO DO SKIMMER (S) AO EXTERIOR DA PISCINA:
Continuar a encher a piscina até o nível estar a 4 cm da parte inferior da peça furada do skimmer. Com um cuter, corte o liner (L) do interior da
piscina que ocupa o quadro da peça furada. Coloque a junta dupla (J) de maneira que na estria (X) fique a chapa e o liner; (estria da junta dupla
prevista ao efeito). Depois, colocar os parafusos
mais pequenos desde a parte interior da piscina dentro dos 2 furos centrais (através da junta dupla e
do liner), e aparafusar nos furos centrais correspondentes ao corpo do skimmer (S).
Cobrir com teflon o tubo de ligação (C) ao corpo do skimmer e
ligar um extremo da mangueira con uma braçadeirae (A) ao tubo de ligação do skimmer (C). Encaixar o outro extremo da mangueira à entrada
da tomada de 'agua da depuradora e apertar com uma braçadeira. MUITO IMPORTANTE: Envolver com Teflón todas as roscas de conexão de
'agua para assegurar a estanqueidade.
4 cm
L
OUT
IN
+
X
C
S
A
J
CH
L
15
FITTING THE SKIMMER FRAME (M):
En sure that all holes are lined up properly (seal to wall plate perforation to
skimmer). Screw 10 remaining screws loosely through the frame to check that
the fit is correct. Then tighten the screws a little more one by one in the order
indicated. Finally, tighten them fully in the same order. FINAL DETAILS: Clip
the trim cover over the skimmer frame (Z). Put the gate (K) into the skimmer
mouth and clip it in place by pressing the two ends. Fit the basket (O) inside the
skimmer and finally fit the skimmer body cover (TS).FINISH FILLING THE
POOL TO HALF WAY UP THE SKIMMER MOUTH TO ENSURE THAT THE
WATER ENTERS THE SKIMMERS.
COLOCACION DEL MARCO DEL SKIMMER (M) :
Asegurarse de que todos los agujeros estén uno frente a otro (junta-troquel
chapa-skimmer). Insertar los 10 tornillos que quedan a través del marco sin
enroscarlos demasiado para verificar el correcto encaje. Enroscar un poco los
tornillos, uno después de otro, siguiendo el orden indicado. AL FINAL
APRETARLOS FIRMEMENTE SIGUIENDO EL MISMO ORDEN. ULTIMOS
DETALLES:Colocar a presión la tapa embellecedora del marco del skimmer
(Z). Para acabar, introducir la compuerta (K) por la apertura rectangular (presionar
con delicadeza los dos extremos y encajar los salientes). Colocar el cesto (O)
en el interior del skimmer y la tapa del cuerpo del skimmer(TS).TERMINAR DE
LLENAR LA PISCINA HASTA LA MITAD DE LA PUERTA DEL SKIMMER,
(10 - 15 cm por debajo del borde de la piscina) PARA QUE ENTRE AGUA EN
SU INTERIOR Y LLENE EL SISTEMA DE FILTRACION.
INSTALLATION DU CADRE DU SKIMMER (M):
S'assurer que tous les trous se trouvent en face les uns des autres (joint-perçage
tôle-skimmer). Mettre les10 vis restants dans le cadre sans les serrer pour
s'assurer que l'emboîtement est correct. Serrer un peu les vis, l'une apres l'autre,
suivant l'ordre indique. FINALEMENT LES VISSER FORTEMENT DANS LE
MÊME ORDRE. DERNIERS DØTAlLS: Installer, par pression, l'enjoliveur du
cadre du skimmer (Z). Pour finir, positionner la porte du skimmer (K) dans
l'ouverture rectangulaire (appuyer délicatement sur les deux extrémités et
emboîter les ergots). Installer le panier (O) à l'intérieur du skimmer ainsi que
le couvercle (TS). TERMINER LE REMPLISSAGE DE LA PISCINE; JUSQU’¸
CE QUE L’EAU ARRIVE ¸ LA MOITI DE LA BOUCHE DU SKIMMER, AFIN
QUE L'EAU ENTRE À L'INTÉRIEUR DE CE DERNIER ET REMPLISSE LE
SYSTEME DE FILTRATION.
ANBRINGEN DE MERRAHMENS (M):
Stellen Sie sischer, dass alle Bohrungen genau gegenüber liegen (Dichtung-
Stanzrahmen und Blech-Skimmer). Legen Sie die 10 verbliebenen Schrauben
durch den Rahmen ein, ohne sie jedoch zu sehr anzuziehen, um die korrekte
Justierung zu überprüfen. Schrauben nacheinander und in der angegebenen
Reihenfolge etwas eindrehen. AM SCHLUSS IN DER ANGEBENEN
REIHENFOLGE FESTZIEHEN. LETZTE EINZELHEITEN: Zierleiste des
Skimmerrahmens (Z) einrasten. Skimmerklappe (K) durch die Skimmeröffnung
einführen, dabei auf die beiden Enden drücken und einrasten lassen. Korb (O)
in den Skimmer einsetzen und schließlich das Skimmerhäuse (TS) mit dem
Deckel verschließen. BECKEN ETWA BIS ZUR HLFTE DER
SKIMMERFFNUNG BEFLLEN, DAMIT DAS WASSER AUCH IN DAS
SKIMMERINNERE GELANGEN KANN.
COLLOCAZIONE DELL«INFISSO DELLO SKIMMER (M):
Assicurarsi she tutti i fori siano uno di fronte all'altro (guarnizione-stampo lamiera-
skimmer). Inserire le 10 viti che restano attraverso l'infisso senza avvitarle troppo,
allo scopo di verificare la corretta sistemazione. Avvitare un po' le viti, una dopo
l'altra, seguendo l'ordine indicato. PER FINIRE, STRINGERLE SALDAMENTE
SEGUENDO LO STESSO ORDINE. AVVERTENZE: Inserire a pressione il
coperchio abbellitore nella cornice dello skimmer (Z). Introdulle lo sportello (K)
dalla bocca dello skimmer e fare pressione sulle 2 estremità fino ad incastrarè
stesse. Sistemare il cestello (O) all'interno dello skimmer e ad ultimo, coperchio
del corpo dello skimmer (TS). ULTIMARE IL RIEMPIMENTO DELLA PISCINA
CON ACQUA FINO AD OLTREPASSARE MET¸ DELLA BOCCA DELLO
SKIMMER, IN MODO DI FAR RIENTRARE L'ACQUA ALL'INTERNO DELLO
STESSO.
PLAATSING VAN HET RAAM VAN DE SKIMMER (M):
Verzekert u zich ervan dat alle gaten met elkaar overeenkomen (pakking-
geponste opening-skimmer). De overgebleven door de lijst inbrengen zonder
deze al te schroeven om de correcte inpassing te kunnen verifiëren. De schroeven
de één na de ander een iets aanschroeven, de aangewezen volgorde volgende.
UITEINDELIJK DE SCHROEVEN STEVIG VATSCHROEVEN VOLGENS
DEZELFDE VOLGORDE. LAATSTE BIJZONDERHEDEN: Onder druk het
sierdeksel van het raam van de skimmer (Z) plaatsen, de deur (K) door de mond
van de skimmer inbrengen, druk uitoefenende op de twee uiteinden en deze
inpassen. De mand (O) plaatsen binnenin de skimmer en daarna het deksel
van de romp van de skimmer (TS). GEBRUIK HET DEKSEL VAN DE ZUIGER
(TA) ALLEEN ALS DE BODEMREINIGER GEBRUIKT WORDT. HET VULLEN
VAN HET ZWEMBAD VOLTOOIEN TOTAAN DE HELFT VAN DE SKIMMER,
OPDAT HET WATER NAAR BINNEN KAN STROMEN.
INSTALAO DO QUADRO DO SKIMMER:
Verificar se todos os furos estão enfrente uns dos outros (junta-peça furada
chapa-skimmer). Pôr os 10 últimos parafusos no quadro sem aparafusar muito,
para verificar se estão bem encaixados. Aparafusar pouco a pouco os parafusos,
um após o outro seguindo a ordem indicada.FINALMENTE, APERTAR
FIRMEMENTE SEGUINDO A MESMA ORDEM. ULTIMOS DETALHES: Instalar
o tampão do caixilho do shimmer (T) carregando nele. Introduzlr a válvula (K)
na boca do skimmer (carregar nas duas extremidades e encaixar). Instalar o
recipiente (O) no interior do skimmer e, por fim, colocar a tampa do corpo do
skimmer (TS). TERMINAL O ENCHIMENTO DA PISCINA AT A AGUA
CHEGAR ¸ METADE DA BODA DO SKIMMER, PARA QUE A AGUA POSSA
ENTRAR NO INTERIOR DO MESMO.
4 cm
OUT
IN
J
M
S
1º
10º3º
4º
9º2º
8º
6º
5º
7º
F
F
15 cm
AGUA
Nivel WATER
EAU
31
16
MAINTENANCE AND USE
MANTENIMIENTO Y USO
ENTRETIENT ET UTILISATION
WARTUNG UND GEBRAUCH
MANUTENZIONE E USO
ONDERHOUD EN GEBRAUCH
MANUTENO E UTILIZAO
INSTRUCTIONS
32
PARTE
5
5
MAINTENANCE AND USE˚:
- Check every pool screws, the corrosion points possible and check the liner is clean before filling the pool.
- The pool water level has always to be hold in a minimum of 15 cm from the pool superior edge. Do not leave the pool without any water.
- Clean regularly the P.V.C liner and the water level mark with non-abrasive products.
Regularly clean the fold joining the bottom to the side of the liner, as it is an area where dirt
accumulates.
If you do by accident a small hole in the liner, you can repair it thanks to our rubber patches AR202 and V12.
- Do not jump or walk on the superior edge of the pool.
- You have to use the ladder exclusively to go in or to go out of the pool. (Remove it after use)
- The isothermic covers (for the summer) protect your pool from insects, dust, leaves, … and avoid to loose the water temperature. Do always set it in order the bubbles are in contact with the water.
- Chimical measures˚: Please read carefully the chemical product manufacturer instructions. WARNING: Keep chemical products in a clean, dry and out of children place.
Important˚: Every products used have to be compatible with the P.V.C liner.
- First filling˚: Analyse the water pH and chlorine (Cl) and adjust them to the optimal levels : pH : 7,2 – 7,6 ; Chlorine : 0.5 – 2 ppm.
- Chlorine treatments˚: Consist in increasing the chlorine level until approximatively 20ppm to eliminate germs and seaweeds. This process has to be done only when
the pool water comes from rivers or ponds, … or if it stayed a long time without any treatments.
- Checking : Check at least once a week the chlorine levels (Use a chlorine and pH analyser). In the same way, we advise to add an algicid to prevent seaweeds appearance.
- Warning: Never have a swim before the chlorine level stabilization. Make sure the pool water level is correct.
Do always use a floating dispenser for the chemical product (tablets) dissolution. The chemical product measuring out has to be done in accordance with˚: Your pool
water volume, the bathe frequency, the climatic conditions, the water temperature and the location. Do always move the water and wait for the chemical product dissolution
before adding another one. Wait approximatively 12 hours between any pH, chlorine or algicid adjustment using the filter system.
- Mechanical measures˚:Check the filter, the skimmer, the valves and the pipes are well connected to the pool. Switch on the filter system once a day in to insure a
complete water volume renewal and never do it when somebody is in the pool (see filter manual). Do consider high water temperature will involved more time for the
filtering. Theoretic filtering time = Water volume / Filter system discharge (generally 8h/day with water temperature of 21°C), (Ideal :2h in the morning – 4h around
midday – 2h in the afternoon). PLEASE RESPECT THE CONTINUOUS WORKING PERIOD INDICATED IN THE FILTER MANUALS
- Bottom cleaner for exhaustion (manual or automatic)˚: Only for pools with skimmer. Connect an hose extremity to the brush head and immerse it into the water
to make it fill in. Connect the other pipe extremity to the exhaustion adapter (TA) and place it above the skimmer basket. Switch on the filter in the FILTER position and
begin to clean the bottom.
Pay special attention to areas with folds where dirt accumulates.
- Bottom cleaner Ventury style˚: Connect a garden hose to the bottom cleaner join and introduce it into the pool. Open the tap until a normal pressure to make the water
flow out against the bottom of the pool, producing in that way an ascendant stream which leave the dirt into the filter (bag) which is adjust on the bottom cleaner.
MANTENIMIENTO DE LA PISCINA
- Revisar toda la tornillería de la piscina, los posibles puntos de corrosión y comprobar que el liner está limpio antes del llenado de la piscina.
- El nivel de agua de la piscina debe mantenerse siemprecomo mínimo a 15 cm del borde superior de la misma. Nunca deje la piscina sin agua.
-
Limpie regularmente el Liner P.V.C.y la línea del nivel de agua con productos no abrasivos. Limpiar periódicamente el pliegue de unión del fondo con el lateral del liner ya que es
una zona de acumulación de suciedad. Si Ud. por accidente hace un pequeño agujero en el liner, puede repararlo con nuestros parches AR202.
- No tirarse ni andar sobre el borde superior de la piscina.
-
Utilizar la escalera
exclusivamentepara entrar y/o salir de la piscina.( Retírela de la piscina despues del uso).
- Las cubiertas de verano ( isotérmicas ) protegen su piscina de insectos, polvo, hojas, etc. y evitan la pérdida de temperatura del agua. Colóquela siempre con las burbujas en contacto con el agua.
- Medios Qu micos: Lea con atención las instrucciones del fabricante del producto químico. ATENCION: Guarde los productos químicos en un lugar limpio, seco y fuera del alcance
de los niños. Importante: Todos los productos utilizados deben ser compatibles con el liner de P.V.C.
- Primer llenado: Analizar el pH y Cloro (Cl) del agua y ajustarlos a los niveles óptimos: pH: 7,2 - 7,6 ; Cloro: 0,5 - 2 ppm.
- Cloraci n de choque: Consiste en aumentar el nivel de cloro hasta 20 ppm aprox. para eliminar las bacterias y algas. Sólo la realizaremos cuando el agua de la piscina provenga de ríos,
estanques,.... o lleve mucho tiempo sin tratamiento.
- Controles: Revisar, al menos una vez a la semana, los niveles de pH y Cloro. ( Utilice un analizador de Cloro y pH ). Así mismo, deberá añadir Algicida para prevenir la formación de algas.
- Advertencias: Nunca bañarse hasta que se estabilice el nivel de cloro. Vigilar el correcto nivel de agua de la piscina.Utilizar siempre un Dosificador flotante para la disolución del producto
químico (pastillas ). La dosificación de los productos químicos se hace en función de:
El volúmen de agua de su piscina,la frecuencia del baño, las condiciones climáticas, temperatura del
agua y ubicación.Siempre remover el agua y esperar a la disolución de un producto químico antes de añadir otro.Espere más o menos 12 h. entre cada ajuste de pH, de Cloro, o deantialgas
haciendo funcionar el sistema de filtración.
- Medios Mec nicos: Comprobar que la depuradora, skimmer, válvulas y mangueras estén correctamente conectadas a la piscina. Ponga a funcionar el sistemade filtración una vez al día
para asegurar un renovamiento completo del volúmen de agua y siempre cuando no se esté utilizando la piscina para el baño. ( ver manual de la depuradora ). Tenga en cuenta que a mayor
temperatura del agua necesitará más tiempo de filtración. Tiempo filtración teórico = Volúmen de agua / Caudal del sistema de filtración ( generalmente 8 h/día con la temperatura
del agua a 21ºC ), ( Ideal: 2 h. por la mañana- 4 h. a medio dia - 2 h. por la tarde ).Respete los periodos en continuo indicados en los manuales de las depuradoras
- Limpia fondos por Aspiracin ( manual o automtico ): Slo para piscinas con skimmer.
Conectar un extremo de la manguera del limpia fondos a la barredera y sumergirlo en el
agua para que se llene la manguera. Conectar el otro extremo de la manguera a la Tapa de Aspiración (TA) y situarlo encima del cesto del skimmer. Poner en marcha la depuradora en posición
FILTER y comenzar a limpiar el fondo. Especial atención a zonas con pliegues donde se acumule la suciedad.
- Limpia fondos tipo Ventury: Acoplar una manguera de jardín al cabezal del limpia fondos e introducirlo dentro de la piscina. Abrir el grifo a una presión normal para que el agua fluya contra
el fondo de la piscina, produciendo una corriente ascendente que deposita la suciedad enel filtro que incorpora el limpia fondos.
33
WATER CONTROL IMPORTANCE˚: It’s important to do this controls to insure a water quality and the bather security, to prevent infection,
intoxication problems,… due to a bad state of water.
PROBLEMSCAUSESSOLUTIONS
Cloudy waterFilters deficiencyPH too high
Put back some clean water in the pool, add into the dispenser a
Organic residues excessflocculant in tablets. Realise a chlorine treatment
Green waterSeaweeds and mildew formationBrush carefully the bottom and the steel walls of the pool
Analyse the pH and adjust it Realise a chlorine treatment
Brown waterIron or manganese presence Analyse the pH and adjust it Realise a chlorine treatment
Add an algicid and a flocculant
Skin and eyes Irritation. Bad smellsUnbalanced pH. Organic residues excessReplace the pool water
PROBLEMASCAUSASSOLUCIONES
Agua TurbiaFalta de filtración. pH alto
Reponga con agua limpia la piscina. Añada floculante en pastillas
Exceso de residuos orgánicos.en dosificador. Realice una Cloración de choque.
Agua VerdeFormación de algas o verdín.Cepillar suavemente el fondo y las paredes de la piscina.
Analice el pH y ajústelo. Realice una Cloración de choque.
Agua MarrónPresencia de Hierro ó Manganeso. Analice el pH y ajústelo. Realice una Cloración de choque..
Añada algicida y floculante líquido.
Irritación de ojos y piel. Malos olores.pH desajustado. Exceso de residuos orgánicosSustituya el agua de la piscina.
IMPORTANCIA DE LOS CONTROLES DEL AGUA:Es importante hacer estos controles para asegurar la calidad del agua y la seguridad de los bañistas,para
prevenir problemas de infecciones, intoxicaciones, etc. producidas por un agua en mal estado.
POR ASPIRACION
TIPO VENTURY
34
IMPORTANCE DES CONTROLES DE LEAU : Il est important de faire ces contrôles pour assurer la bonne qualité de l’eau et la sécurité des baigneurs, pour prévenir les problèmes d’infections,
d’intoxications, etc. produits par une eau de mauvaise qualité.
PROBLEMESCAUSESSOLUTIONS
Eau troubleManque de filtration.PH elevé,Remettez de l’eau propre dans lapiscine, ajoutez un floculant en
surplus de résidus organiquespastilles dans un dosificateur .Réalisez une chloration de choc
Eau verteFormation d’algues ou de moisissuresBrossez soigneusement le fond et les parois de la piscine
Analysez le pH et ajustez-le. Réalisez une chloration de choc
Eau marronPrésence de fer ou de manganèse Analysez le pH et ajustez-le .Réalisez une chloration de choc
Ajoutez un algicide et un floculant Liquide
Irritation des yeux et de la peau. Mauvaises odeursPH déséquilibré. Surplus de résidus organiquesRemplacez l’eau de la piscine
WASSERKONTROLLEN SIND AUSSERORDENTLICH WICHTIG: Diese müssen regelmäßig durchgeführt werden, um die Wasserqualität und die Sicherheit der Badend en zu gewährleisten,
um Infektionen, Vergiftungen usw. infolge mangelhafter Wasserqualität vorzubeugen.
PROBLEMURSACHENL SUNGEN
Trübes WasserKeine Filterung. Hoher pH-Wert. Zu viele organischePool ablassen und mit frischem Wasser füllen. Flockungsmittel in Tablettenform
Abfälle im Wasserin einem Dosierer zugeben. Stoßchlorierung vornehmen.
Grünes WasserAlgen- oder MoosbildungBoden und Wände des Pool vorsichtig abbürstenpH-Wert prüfen
und einstellen.Stoßchlorierung vornehmen.
Braunes WasserPool enthält Eisen oder Mangan.pH-Wert prüfen und einstellen. Stoßchlorierung vornehmen.
Algenvertilgungsmittel und flüssiges flockungsmittel zugeben.
Augen- und Hautreizung.Übler Geruch.pH-Wert falsch eingestellt. Zu viele organische AbfällePool ablassen und mit frischem Wasser füllen
IMPORTANZA DEI CONTROLLI DELL’ACQUA: È importante eseguire tali controlli per assicurare la qualità dell'acqua e la sicurezza dei bagnanti, per prevenire eventuali infezioni, intossicazioni,
ecc…, prodotte da un'acqua in cattivo stato.
PROBLEMICAUSESOLUZIONI
Acqua torbidaMancanza di filtraggio. pH elevatoSostituirla con acqua pulita.Aggiungere una sostanza flocculante
Eccesso di rifiuti organiciin pastiglie a mezzo dosatore. Effettuare una clorazione shock.
Acqua verdeFormazione di alghe o verderameSpazzolare lievemente il fondo e le pareti della piscina
Analizzarne il pH e regolarlo. Effettuare una clorazione shock.
Acqua marronePresenza di ferro e manganese Analizzarne il pH e regolarlo.Effettuare una clorazione shock.
Aggiungere un alghicida e una sostanza flocculante liquida.
Irritazione agli occhi e alla pelleCattivo odorepH non regolare. Eccesso di rifiuti organici.Sostituire l’acqua della piscina.
ENTRETIEN ET UTILISATION:
- Contrôler toute la visserie de la piscine, les possibles points de corrosion et contrôler que le liner soit propre avant le remplissage de la piscine
- Le niveau d’eau de la piscine doit toujours être maintenu au minimum à 15 cm du rebord supérieur de celle-ci. Ne jamais laisser la piscine sans eau.
- Nettoyer régulièrement le liner PVC et la ligne du niveau de l’eau avec des produits non abrasifs.
Nettoyez périodiquement le pli d’union du fond au latéral du liner car c’est une zone où la saleté s’accumule.
Si vous faites par accident un petit trou dans le liner, vous pouvez le réparer avec nos rustines AR202 ou V12
- Ne pas plonger ni marcher sur le rebord supérieur de la piscine
- Utiliser exclusivementl’échelle pour entrer et/ou sortir de la piscine. (Retirez-la de la piscine après utilisation)
- Les bâches d’été (isothermes) protègent votre piscine des insectes, poussière, feuilles, etc. et évitent la perte de température de l’eau. Placez-la toujours avec les bulles en contact avec l’eau
- Traitements Chimiques : Lisez avec attention les instructions du fabricant du produit chimique. ATTENTION: Conserver les produits chimiques dans un endroit prope, sec et horsde portée des enfants.
Important˚: Tous les produits utilisés doivent être compatibles avec le liner en PVC
- Premier remplissage : Analyser le pH et le Chlore (Cl) de l’eau et les ajuster aux niveaux optimum : pH : 7,2 – 7,6 ; Chlore : 0,5 – 2 ppm
- Cloration choc˚: Cela consiste à augmenter le niveau de chlore jusqu’à 20 ppm approximativement pour éliminer les bactéries et algues. La réaliser uniquement lorsque l’eau de la piscine provient de
puits, étangs, … ou lorsqu’elle est restée longtemps sans traitement.
- Contr les˚: Contrôler, au moins une fois par semaine, les niveaux de pH et Chlore. (Utilisez un analyseur de Chlore et pH) De même, vous devrez rajouter de l’algicide pour prévenir la formation des
algues.
- Avertissements˚: Ne jamais se baigner jusqu’à ce que le niveau de chlore soit stabilisé. Surveiller le niveau correct de l’eau de la piscine
Toujoursutiliser un dosificateur flottant pour la dissolution du produit chimique (pastilles). Le dosage des produits chimiques se fait en fonction de: le volume d’eau de votre piscine, la fréquence des
baignades, les conditions climatiques, température de l’eau et emplacement. Toujours agiter l’eau et attendre la dissolution d’un produit chimique avant d’en rajouter un autre. Attendre environ 12 h. entre
chaque ajustement de pH, de Chlore, ou d’anti-algues en faisant fonctionner le système de filtration.
- Traitements M caniques˚: Vérifier que l’épurateur, skimmer, buses et tuyaux soient correctement connectés à la piscine. Mettre en fonctionnement le système de filtration une fois par jour pour assurer
un renouvellement complet du volume d’eau et toujours lorsque la piscine n’est pas utilisée pour la baignade. (voir manuel de l’épurateur). Tenez en compte que plus la température de l’eau est élevée,
plus long sera le temps de filtration.Temps de filtration théorique = volume d’eau / débit du système de filtration (généralement 8h/jour avec la température de l’eau à 21°C), (Idéal: 2h le matin – 4h à la mi
journée – 2h l’après-midi) Bien respecter les p riodes de fonctionnement en continu indiqu es sur les manuels des purateurs.
- Aspirateur de fond par Aspiration (manuel ou automatique)˚: Uniquement pour les piscines avec skimmer. Connecter une extrémité du tuyau à la tête du balai et le plonger dans l’eau pour qu’il
se remplisse. Connecter l’autre extrémité du tuyau à l’adaptateur d’aspiration (TA) et le mettre sur le panier du skimmer. Mettre en marche l’épurateur en position FILTER et commencer à nettoyer le fond.
Faire attention dans les zones à plis là où s’accumule la saleté.
- Aspirateur de fond type Ventury : Assembler un tuyau d’arrosage sur l’embout de l’aspirateur de fond et l’introduire dans la piscine. Ouvrir le robinet à une pression normale pour que l’eau coule vers
le fond de la piscine, produisant ainsi un courant ascendant qui récupère la saleté et la dépose dans le filtre installé sur l’aspirateur de fond.
WARTUNG UND BENUTZUNG:
- Sämtliche Schraubverbindungen des Pools auf evtl. Rostschäden überprüfen. Bevor Wasser eingefüllt wird, ist auch der Liner auf Sauberkeit zu überprüfen.
- Der Poolwasserstand muss immer mindestens 15 cm unter der Pooloberrand liegen. Schwimmbad niemalsohne Wasser lassen.
-
PVC-Liner und Wasserlinie immer sauber halten und dazu nicht aggressive Reinigungsmittel verwenden. Reinigen Sie regelmäßig die Falte, die den Boden mit dem Seitenteil des Liners verbindet, da
sich in diesem Bereich leicht Schmutz ansammeln kann.
Geringfügige Löcher, die im Liner entstehen könnten, lassen sich mit unseren Flicken AR202 instandsetzen.
- Nicht ins Pool springen oder den oberen Poolrand begehen.
-
Die Leiter darf nur zum Hineingehen und/oder zum Verlassen des Pools benutzt werden.(Entfernen Sie sie nach der Benutzung aus dem Pool).
- Die (isothermische) Sommerabdeckung schützt Ihr Schwimmbad vor Insekten, Staub, Laub usw. und halten die Wassertemperatur. Bringen Sie sie so an, dass die Blasen direkt auf dem Wasser liegen.
- Chemische Produkte:
Bitte lesen Sie sorgfältig die Anweisungen des Herstellers des chemischen Produktes. WICHTIGER HINWEIS: Bewahren Sie die chemischen Stoffe an einem sauberen, trockenen
und Kindern nicht zugänglichen Ort auf. Wichtiger Hinweis: Alle eingesetzten Produkte müssen mit dem PVC-Liner kompatibel sein.
- Erste Bef llung: pH-Wert und Chlorgehalt (Cl) des Wassers feststellen und auf die optimalen Werte einstellen: pH: 7,2-7,6 ;Chlor 0,5-2 ppm.
- Schock-chlorierung:Dabei wird der Chlorgehalt zur Beseitigung von Bakterien und Algen bis ca. 20 ppm eingestellt, Schockchlorierung ist jedoch nur angezeigt, wenn das Poolwasser aus Flüssen,
Teichen usw. stammt oder längere Zeit nicht behandelt wurde.
- Kontrollen: Mindestens einmal wöchentlich pH-Wert und Chlorgehalt überprüfen. (Dazu Chlor- und pH-Analysator verwenden).Außerdem ist ein Algenvertilgungsmittel beizugeben, um Algenbildung zu
unterbinden.
- Wichtige Hinweise: Das Schwimmbad darf keinesfalls benutzt werden, bevor nicht der Chlorgehalt eingestellt ist. Achten Sie auf korrekten Wasserstand des Pools.Zum Auflösen des chemischen Produktes
(Pastillen) verwenden Sie immer einen Schwimmdosierer.Die Dosierung chemischer Produkte erfolgt in Abhängigkeit : vom Wasservolumen Ihres Pools, der Badehäufigkeit, den klimatischen Bedingungen,
der Wassertemperatur und dem Standort. Nach dem Eindosieren immer rühren und abwarten, bis sich das chemische Produkt gelöst hat, bevor ein weiteres zugegeben wird. Zwischen einer Einstellung
des pH-, Chlorwertes und des Algenvertilgungsmittelwertes und der nächsten, lassen sie mehr oder weniger 12 Stunden beim gleichzeitigem Betrieb der Filteranlage verstreichen.
- Mechanische Mittel: Stellen Sie sicher, dass Reinigungsanlage, Skimmer, Ventile und Schläuche korrekt an das Pool angeschlossen sind.
Schalten Sie die Filteranlage einmal täglich ein, um sicher zu gehen, dass das gesamte Wasservolumen erneuert wird und immer dann, wenn das Pool nicht zum Baden benutzt wird. (Siehe Handbuch
der Reinigungsanlage). Bedenken Sie dabei, dass die Filtrierzeit umso länger ist, je höher die Wassertemperatur ist.Theoretische Filtrierzeit = Wasservolumen / Durchflussmenge des Filtersystems (im
Allgemeinen 8 h/Tag bei einer Wassertemperatur von 21ºC ), ( Ideal: 2 Std.. morgens - 4 Std. mittags - 2 Std. nachmittags ).
- Bodenreinigung durch Absaugung (manuell oder automatisch ): Nur f r Schwimmb der mit Skimmer. Schlauchende des Bodenreinigers an die Kehrvorrichtung anschließen und ins Wasser tauchen,
damit sich der Schlauch füllt. Das andere Schlauchende mit dem Saugdeckel (TA) verbinden und in den Skimmerkorb setzen. Reinigungsanlage in Stellung FILTER in Gang setzen und mit der Bodenreinigung
beginnen.
Auf Faltenbereiche, in denen sich Schmutz ansammelt, ist besonders zu achten.
- Venturibodenreiniger: Einen Gartenschlauch mit dem Kopf des Bodenreinigers verbinden und in das Schwimmbad einführen. Hahn mit normalem Druck öffnen, damit das Wasser gegen den Poolboden
fließt und so ein aufsteigender Strom entsteht, durch den der Schmutz in den Bodenreiniger eingebauten Filter gelangt.
USO E MANUTENZIONE:
- Controllare la viteria della piscina, i possibili punti di corrosione e verificare che il liner sia pulito prima di riempire la piscina.
- Il livello d'acqua della piscina deve sempreessere come minimo a 15 cm dal bordo superiore della stessa. Non lasciare maila piscina senz'acqua.
-
Pulire regolarmente il Liner P.V.C. e la linea del livello d'acqua con prodotti non abrasivi. Pulire periodicamente la piega d’unione del fondo con il laterale del liner, poiché è una zona di accumulo di sporco.
Se incidentalmente si fa un piccolo foro nel liner, si può riparare con le nostre toppe AR202.
- Non tuffarsi o camminare sul bordo superiore della piscina.
-
Utilizzare esclusivamentela scaletta per entrare e/o uscire dalla piscina (rimuoverla dalla piscina dopo l'uso).
- Le coperture estive (isotermiche) proteggono la piscina da insetti, polvere, foglie, ecc…, ed evitano la perdita di temperatura dell'acqua. Montarla sempre con le bolle a contatto con l'acqua
- Mezzi chimici: Leggere attentamente le istruzioni del fabbricante del prodotto chimico. ATENZIONE: Conservare i prodotti chimici in un luogo asciutto e pulito, lontano dalla portata dei bambini. Importante: Tutti i
prodotti utilizzati devono essere compatibili con il liner di P.V.C.
- Primo riempimento:Analizzare il pH e il Cloro (Cl) dell'acqua e regolarli agli indici ottimali: pH: 7,2 - 7,6 ;Cloro: 0,5 - 2 ppm.
- Clorazione d’urto:Consiste nell'aumentare l'indice di cloro sino a 20 ppm circa, allo scopo di eliminare i batteri e le alghe. Si realizzerà soloquando l'acqua della piscina proviene da fiumi, stagni,
o dopo un lungo periodo senza trattamento.
- Controlli:Controllare almeno una volta alla settimana gli indici di pH e Cloro (utilizzare un analizzatore di Cloro e pH ). Si dovrà inoltre aggiungere Alghicida per prevenire la formazione di alghe.
- Avvertenze:Non fare maiil bagno finché non si sarà stabilizzato l'indice di cloro. Tenere sotto controllo il corretto livello dell'acqua della piscina.
Utilizzare sempreun Dosatore galleggiante per la soluzione del prodotto chimico (pastiglie). La dosatura dei prodotti chimici si realizza in funzione:Del volume d'acqua della piscina, della frequenza di bagno,
delle condizioni climatiche, della temperatura dell'acqua e dell'ubicazione. Rimuovere sempre l'acqua ed attendere la soluzione di un prodotto chimico prima di aggiungerne un altro. Attendere circa 12 ore fra
una regolazione di pH, Cloro, o di antialghe, facendo funzionare il sistema di filtraggio.
- Mezzi meccanici:Verificare che il depuratore, lo skimmer, le valvole e i tubi flessibili siano correttamente collegati alla piscina. Porre in funzionamento il sistema di filtraggio una volta al giorno, per assicurare
un rinnovamento completo del volume d'acqua e semprequando non si sta utilizzando la piscina per il bagno (vedi manuale del depuratore). Tenere sempre presente che a maggior temperatura dell'acqua
sarà necessario più tempo di filtraggio. Tempo filtraggio teorico = Volume d'acqua / Portata del sistema di filtraggio (in genere, 8 h/giorno con la temperatura dell'acqua a 21ºC ), (Ideale: 2 h. al mattino - 4
h. a mezzogiorno - 2 h. la sera).
- Pulisci fondo mediante Aspirazione (manuale o automatico): Solo per piscine con skimmer. Collegare un'estremità del tubo flessibile del pulisci fondo alla spazzatrice e sommergerlo nell'acqua
fino a riempire il tubo. Collegare l'altra estremità del tubo flessibile al Coperchio di Aspirazione (TA) e situarlo sopra la cesta dello skimmer. Avviare il depuratore in posizione FILTER ed iniziare a pulire il
fondo.
Fare particolare attenzione alle zone con pieghe, in cui si accumula lo sporco.
- Pulisci fondo tipo Venturi: Collegare un tubo flessibile da giardino alla testa del pulisci fondo e sommergerlo nella piscina. Aprire il rubinetto a una pressione normale affinché l'acqua fluisca contro il
fondo della piscina, producendo una corrente ascendente che deposita lo sporco nel filtro di cui è dotato il pulisci fondo.
35
HET BELANG VAN DE WATERCONTROLES: Het is belangrijk deze controles te verrichten om verzekerd te zijn van de kwaliteit van het water en de veiligheid voor
de baders teneinde problemen van infecties, vergiftigingen, enz die door water in slechte conditie kunnen worden veroorzaakt, te voorkomen.
PROBLEMENOORZAKENOPLOSSINGEN
Troebel waterFiltratiefout: hoog pH.Het zwembadwater vernieuwen met schoon water.Zuiveringstabletten in een
Overmaat aan organisch afval.doseermaat toevoegen.Voer een schok-chloorbehandeling uit
Groen waterOntstaan van algen of groene aanslag.Voorzichtig de bodem en de wanden van het zwembad schoonvegen.
Analyseer het pH-gehalte en pas het aan . Voer een schok-chloorbehandeling uit.
Bruin waterAanwezigheid van ijzer of mangaan Analyseer het pH - gehalte en pas het aan. Voer een een schok-chloorbehandeling
uit. Algicide en zuiveringsvloeistof toevoegen.
Irritatie aan ogen en huid. Onaangename luchten.pH-gehalte niet in evenwicht. Overmaat aan organisch afval.Vervang het zwembadwater.
IMPORT NCIA DOS CONTROLOS DA GUA: É importante realizar estes controlos para assegurar a qualidade da água e a segurança das pessoas que lá tomam
banho, para evitar problemas de infecções, intoxicações, etc. produzidas por uma água em mau estado.
PROBLEMASCAUSASSOLU ˝ES
Água turvaFalta de filtração ou pH altoEncha a piscina com água limpa. Acrescente floculante em
Excesso de resíduos orgânicoscomprimidos num dosificador. Faça uma cloragem de choque.
Água verdeFormação de algas ou de verdeteEscovar suavemente o fundo e as paredes da piscina.
Analise o pH e ajuste-o. Faça uma cloragem de choque.
Água castanhaPresença de ferro ou de manganésio Analise o pH e ajuste-o. Faça uma cloragem de choque
Acrescente algicida ou floculante líquido
Irritação dos olhos e da pelepH mal ajustado. Excesso de resíduos orgânicosMude a água da piscina.
ONDERHOUD EN GEBRUIK:
- Voordat wordt begonnen met het vullen van het zwembad eerst alle schroeven van het zwembad en de mogelijke corrosiepunten nakijken en verifiëren of de Liner schoon
is.
- Het waterniveau van het zwembad moet altijd minstens tot op 15 cm vanaf de bovenrand van het zwembad worden gehandhaafd. Laat het zwembad nooit zonder water
staan.
- Reinig regelmatig de Liner P.V.C. en de streep van het waterniveau met niet- bijtende middelen.
Reinig regelmatig de verbindingsvouw van de bodem met de zijkant
van de liner daar dit een zone is waarin het vuil zich gemakkelijk opeenhoopt.
Mocht u per ongeluk een gaatje veroorzaken in de Liner dan kunt u dat repareren door
onze plakkertjes AR202 te gebruiken.
- Niet duiken vanaf en lopen over de bovenrand van het zwembad.
- De trap alleen maar gebruiken om in of uit het zwembad te gaan. ( Verwijder deze van het zwembad na gebruik).
- De zomerovertrekken (isothermische) beschermen uw zwembad tegen insecten, stof, bladeren enz. en voorkomen het verlies van de temperatuur van het water. Plaats
deze zodanig dat de belletjes altijd in contact zijn met het water.
- Chemische middelen: Lees aandachtig de instructies van de fabrikant betreffende het chemische product. BELANGRIJK: Bewaar de chemische producten op een
schone, droge plaats en altijd buiten het bereik van kinderen. Belangrijk: Alle gebruikte producten dienen compatibel te zijn met de Liner van P.V.C.
- Eerste vulling: Het pH- en Chloorgehalte (Cl) van het water analyseren en deze aanpassen aan de optimale niveaus: pH: 7,2-7,6; Chloor: 0,5 tot 2 ppm.
- Schokchloring: Deze bestaat uit het verhogen van het chloorniveau tot ongeveer 20 ppm voor het elimineren van bacteriën en algen. Alleenuit te voeren wanneer
het zwembadwater afkomstig is uit rivieren, vijvers, of wanneer het water gedurende lange tijd geen behandeling heeft ondergaan.
- Controles: Minstens één keer per week het pH- en chloorgehalte nakijken. (gebruik een analysator voor chloor en pH). Eveneens dient Algicide te worden toegvoegd
om het onstaan van algen te voorkomen.
- Waarschuwing: Nooitbaden voordat het chloorniveau in evenwicht is. Letten op het juiste waterniveau van het zwembad. Gebruik altijd een drijvende doseermaat voor
de oplossing van het chemische product (tabletten). De dosering van de chemische producten geschiedt in overeenstemming met:Het watervolume van het zwembad,de
veelvuldigheid van het baden, de weersomstandigheden, de temperatuur van het water en de ligging van het zwembad. Het water steeds in beweging houden en wachten
tot een chemisch product is opgelost alvorens een ander daaraan toe te voegen. Wacht ongeveer 12 uur tussen iedere aanpassing van pH, chloor of antialgen en laat
het filtratiesysteem werken.
- Mechanische middelen: Verifiëren of de zuiveringsinstallatie, de skimmer, de kleppen en slangen op de juiste wijze aan het zwembad zijn verbonden. Stel het
filtratiesysteem eenmaal per dag in werking om van een volledige verversing van het watervolume verzekerd te zijn en doe dit altijd wanneer het zwembad niet voor het
bad in gebruik is. (zie de handleiding van de zuiveringsinstallatie). Er moet rekening mee worden gehouden dat het water bij hogere temperatuur meer tijd voor filtratie
nodig zal hebben. Theoretische filtratietijd = Watervolume/ watermassa van het filtratiesysteem (meestal 8 uur per dag met een temperatuur van het water van 21ºC), (
- Bodemreinigers door opzuiging (hand- of automatische bediening):Alleen voor zwembaden met skimmer. Eén uiteinde van de slang van de bodemreiniger
bevestigen aan de veger en onder water dompelen zodat de slang volloopt. Het andere uiteinde van de slang verbinden aan de deksel van de zuiger (TA) en deze plaatsen
op het mandje van de skimmer. Stel de zuiveringsinstallatie in werking op stand FILTER en begin met het reinigen van de bodem.Speciale aandacht moet worden besteed
aan de zones met vouwen waarin het vuil zich kan opeenhopen.
- Bodemreiniger type Venturi: Een tuinslang aansluiten op de kop van de bodemreiniger en deze in het zwembad brengen. De kraan openen met een normale waterdruk
zodat het water tegen de zwembadbodem vloeit en een opwaartse stroom veroorzaakt die het vuil in het filter, dat deel uitmaakt van de bodemreiniger, deponeert.
MANUTENO E USO:
- Verificar todos os parafusos da piscina, os pontos eventuais de corrosão e se o liner está limpo, antes de encher da piscina.
- O nível de água da piscina deve manter-se semprecomo mínimo a 15 cm do borde superior. Não deixe nuncaa piscina sem água.
-
Limpe regularmente o Liner P.V.C. e a linha do nível de água, com produtos não abrasivos. Limpar periodicamente a dobra de união do fundo com o lateral do liner já que é uma
zona onde se acumula a sujidade.
Se acidentalmente houver um pequeno furo no liner, pode-se arranjar com os nossos remendos AR202.
- Não se deve tirar nem andar em cima do borde superior da piscina.
-
Só deve de utilizar a escada para entrar ou para sair da piscina. Tire a escada da piscina depois do uso).
- As cobertas de verão (isotérmicas) protegem a piscina dos insectos, do pó, das folhas, etc. e evitam baixar a temperatura da água. Coloque-a sempre com as bolhas em contacto com a água.
- Meios Qu micos: Leia com atenção as instruções do fabricante do produto químico. ATENÇÃO: Guarde os produtos químicos num local limpo, seco e fora do alcance
das crianças. Importante: Todos os produtos utilizados devem ser compatíveis com o liner de P.V.C.
- Primeiro enchimento: Analisar o pH e o Cloro (Cl) da água e ajustar aos níveis óptimos: pH: 7,2 - 7,6 ; Cloro: 0,5 - 2 ppm.
- Cloragem de choque: Consiste em aumentar o nível de cloro até 20 ppm aprox. para eliminar as bactérias e as algas. Sóse deve realizar se a água da piscina
vier de rios, tanques,... ou quando levar muito tempo sem tratamento.
- Controlos: Revisar pelos menos uma vez por semana os níveis de pH e de Cloro. (Utilize um analisador de Cloro e de pH ). Também deverá acrescentar algicida para evitar a formação de algas.
- Advert ncias: Nuncatome banho antes de se ter estabilizado o nível de cloro. Vigie o correcto nível de água da piscina. Utilize sempre umdosificador flutuante
para a dissolução do produto químico (comprimidos). A dosagem dos produtos químicos faz-se em funçãodo volume de água da piscina, da frequência dos banhos,
das condições climáticas, da temperatura da água e da situação. Mexer sempre a água e esperar a dissolução de um produto químico antes de pôr outro. Espere
más ou menos 12 h. entre cada ajustamento de pH, de Cloro, ou de anti algas com o sistema de filtração em funcionamento.
- Meios mec nicos: Verificar se e a junção à piscina do depurador, do skimmer, das válvulas e das mangueiras é correcta. Ponha a funcionar o sistema de filtração
uma vez por dia para assegurar um renovamento completo do volume de água, e sempreque não se estiver a utilizar a piscina para o banho. (Ver o manual do
depurador). Tenha em conta que quanto mais alta for a temperatura da água mais necessitará tempo de filtração. Tempo filtração teórico = Volume de água / caudal
do sistema de filtração (em geral 8 h/dia com uma temperatura de água de 21º C), (Ideal: 2 h pela manhã - 4 h ao meio dia - 2 h pela tarde).
- Limpa fundos por aspirao (manual ou autom tico): S para piscinas com skimmer. Ligar um extremo da mangueira do limpa fundos à varredora e submergi-
lo na água para se encher a mangueira. Ligar o outro extremo da mangueira à Tampa de Aspiração (TA) e colocá-lo em cima do cesto do skimmer. Pôr em funcionamento
o depurador na posição FILTER e começar a limpar o fundo.
Especial atenção nas zonas com dobras aonde se acumule a sujidade.
- Limpa fundos tipo Ventury: Acoplar uma mangueira de jardim à cabeça do limpa fundos e introduzi-lo na piscina. Abrir a torneira a uma pressão normal, para a
água fluir contra o fundo da piscina, produzindo uma corrente ascendente que deposita a sujidade no filtro do limpa fundos.
SCARICO PRINCIPIO VASI COMUNICANTI - HET LEGEN COMMUNICERENDE VATEN - ESVAZIAMENTO PRINCIPIO VASOS COMUNICANTES
INVIERNO
A) SI OPTAMOS POR NO DESMONTAR LA PISCINA
1º- Limpiar el fondo y las paredes del liner con un producto no abrasivo.
2º-Tratar el agua con producto químico de invernaje.
3º-Dejar la piscina llena de agua, teniendo en cuenta:
a) Para piscinas con skimmer y válvula de retorno nivel de agua, 5 cm por debajo del skimmer y cerrar la válvula de retorno con el tapón de rosca que se
adjunta con la depuradora.
b) Para piscinas con válvulas de admisión y retorno nivel de agua a 20 cm del borde superior de la piscina, cerrando las válvulas mediante el sistema de
rosca que incorporan.
4º-Desconectar las mangueras. No desmontar el skimmer ni las válvulas.
5º-Proteger la piscina con una cubierta de invierno, colocando un elemento flotante entre ésta y el agua., con el fin de protegerla contra el frío.
6º-Depuradora Desconectarla de la piscina. Limpiarla, vaciar la arena o sacar el cartucho, secarla y guardarla en un lugar cubierto y sin humedad.
7º-Accesorios Quitar todos los accesorios (escalera, alarma, foco, pértiga,...), limpiarlos con agua dulce y guardarlos.
NUEVA PUESTA EN MARCHA Quitar la cubierta de invierno, instalar la depuradora, cambiar al menos 1/3 del agua y realizar una Cloración de Choque. Poner
la depuradora en funcionamiento al menos durante 8 horas ininterrumpidamente.
B) SI OPTAMOS POR DESMONTAR LA PISCINA
1º-Vaciar la piscina. Medios Depuradora, Bomba de Achique o Principio de vasos comunicantes.
Utilizar el principio de los vasos comunicantes: Para ello
tome la manguera dela depuradora con menor diámetro. Ate un peso a uno de sus extremos y sumérjalo en la piscina . A continuación sumerja la totalidad
de la manguera hasta evacuar el aire de su interior. Con la palma de la mano tapone herméticamente bajo el agua el extremo libre de la manguera y llévelo
hasta donde desee desaguar la piscina . Retire la mano y el agua comenzará a fluir.
No utilice ésta agua para riego, ya que contendrá producto químico.
2º- Limpiar todos los componentes de la piscina con una esponja y un producto jabonoso con PH neutro. Secarlos y guardarlos en un lugar seco y limpio.
Es normal que después de varios montajes y desmontajes el liner de PVC se dilate y pierda elasticidad.
NUEVA PUESTA EN MARCHA Leer de nuevo las Instrucciones de este manual desde el principio.
WINTER-SEASON˚
A) IF YOU CHOOSE NOT TO DISMOUNT THE POOL
1°-Clean the liner bottom and sides with a non-abrasive product
2°-Treat the water with a chemical product for wintering
3°-Leave the pool full of water considering :
a) For pools with skimmer and refulling pipe, reduce the water level 5 cm underneath the skimmer and close the refulling pipe with the screw tap which is included
with the filter
b) For pools with exhaustion and refulling pipes, reduce the water level 20 cm from the superior edge of the pool and close the pipes using the screw system
incorporated
4°- Disconnect the pipes. Do not dismount the skimmer and the refulling and exhaustion pipes
5°- Protect the pool with a winter cover, and put a floating element between the cover and the water, in order to protect it from frost
6°-Filter: Disconnect it from the pool. Clean it, empty the sand or remove the cartridge, dry it and keep it in a covered and sheltered from dampness place
7°- Accessories : Remove every accessories (ladder, alarm, spotlight, pole …), rinse them with soft water and tidy them away
TO RUN THE POOL AGAIN Remove the winter cover, install the filter, change at least 1/3 of water and realize a chlorine treatment. Switch on the filter for at
least 8 hours in an uninterrupted way, respecting the continuous working period indicated in the filter manuals.
B) IF YOU CHOOSE TO DISMOUNT THE POOL
1°- Empty the pool. Measures : Filter, Automatic pump for handling clean water or communicating vessels system.
Communicating vessels system. Use the hose from
your filter with the smallest cross-section. Fix a weight to one of its end and plunge it into the swimming pool. After this, sink the whole hose, until there is no
air inside. With one hand, and under the water stop up hermeticly the end of the hose and take it to the emptying point. Remove hand, and water will start
running.
Do not use this water for watering the plants, because it contains chemical products
2°-Clean every pool constituents with a sponge and a soap product with a neutral pH. Dry them and tidy them away in a dry and clean place.
That’s normal that after having installed and dismounted the pool several times, the P.V.C liner dilate and loose its elasticity.
TO RUN THE POOL AGAIN Read another time this manual instructions from the beginning
HIVERNAGE˚
A)SI VOUS CHOISISSEZ DE NE PAS DEMONTER LA PISCINE
1° -Nettoyer le fond et les parois du liner avec un produit non abrasif
2°- Traiter l’eau avec un produit d’hivernage
3°- Laisser la piscine remplie d’eau en tenant compte que :
a) Pour les piscines avec skimmer et buse de refoulement baisser le niveau de l’eau 5 cm en dessous du skimmer et fermer la buse de refoulement avec le
bouchon à vis qui est joint à l’épurateur
b) Pour les piscines avec buses d’aspiration et de refoulement baisser le niveau de l’eau à 20 cm du rebord supérieur de la piscine, en fermant les buses
par le système de vis qui est incorporé
4°- Déconnecter les tuyaux. Ne pas démonter le skimmer ni les buses
5°- Protéger la piscine avec une bâche d’hivernage, en mettant un élément flottant entre celle-ci et l’eau, afin de la protéger du gel
6°-Epurateur: Le déconnecter de la piscine. Le nettoyer, vider le sable ou enlever la cartouche, le sécher et le conserver dans un endroit couvert et à l’abri de
l’humidité
7°- Accessoires: Enlever tous les accessoires (échelle, alarme, projecteur, perche, …), les nettoyer à l’eau douce et les ranger
REMISE EN MARCHE Enlever la bâche d’hivernage, installer l’épurateur, changer au moins 1/3 de l’eau et réaliser une cloration de choc. Mettre l’épurateur
en fonctionnement pendant au moins 8 heures en respectant les périodes de fonctionnement en continu indiquées sur les manuels des épurateurs.
B) SI VOUS CHOISISSEZ DE DEMONTER LA PISCINE
1°- Vider la piscine. Moyens: Epurateur, Pompe de vidange ou Principe des vases communicants. U
tiliser le principe de vases communicants. Pour ceci, prenez
le tuyau de l'epurateur à diamètre inférieur. Attachez un poids à l'une de ses extrémités et faites le plonger au fond de la piscine. A la suite plongez la totalité
du tuyau jusqu'à vider tout l'air qui se trouve à l'intérieur. Avec la paume de la main bouchonner hermétiquement sous l'eau l'extrémité libre du tuyau puis
menez-la jusqu'au point de vidange désiré. Retirez la main et l'eau commencera à couler. Ne pas utiliser cette eau pour l’arrosage, étant donné qu’elle contient
des produits chimiques
2°- Nettoyer tous les composants de la piscine avec une éponge et un produit savonneux avec pH neutre. Les sécher et les ranger dans un endroit sec et propre.
l est normal qu’après plusieurs montages et démontages le liner en PVC se dilate et perde de l’élasticité.
REMISE EN MARCHE Lisez de nouveau les instructions contenues dans ce manuel depuis de début
38
WATER
D
OK
BERWINTERUNG
A) WENN DAS POOL NICHT ABGEBAUT WERDEN SOLL
1-Boden und Linerflächen mit einem nicht aggressiven Reinigungsmittel reinigen.
2-Das Wasser mit einem chemischen Überwinterungsstoff behandeln.
3-Schwimmbad mit Wasser befüllen und dabei folgendes beachten:
a) Für Pools mit Skimmer und Rücklaufventil muss der Wasserstand bis ca. 5 cm unter dem Skimmer reichen; Rücklaufventil mit dem
der Reinigungsvorrichtung beigefügten Stopfen verschließen.
b) Für Pools mit Zu- und Rücklaufventilen muss der Wasserstand bis ca. 20 cm unter dem oberen Poolrand reichen. Ventile mit Hilfe
des eingebauten Gewindes schließen.
4-Schläuche abklemmen. Jedoch weder Skimmer noch Ventile ausbauen.
5-Schwimmbad mit einer Winterabdeckung bedecken und ein schwimmendes Element zwischen und Abdeckung und Wasser als
Kälteschutz plazieren.
6-Die Reinigungsanlage ist vom Pool abzuklemmen und zu reinigen. Sand oder die Filterpatrone daraus entfernen. Anlage abtrocknen
und an einem trockenen Ort unter Dach aufbewahren.
7-Zubehör: Alle Zubehörteile (Leiter, Alarmanlage, Scheinwerfer, Stange usw.) entfernen, mit Süßwasser reinigen und aufbewahren.
NEUE INBETRIEBMNAHME: Winterabdeckung entfernen, Reinigungsanlage installieren, mindestens ein Drittel des Wasservolumen
WATERMAN GMBH: Nürtiger Str. 48 D-73257 Köngen - After sales Service Tel.: 0180 333 0123 Fax: 0180 333 0200
ESPT
UK
FRBELUNLIT
CH
DEAT
DKNOSE
SI
FI
BGROELSKCZHRRSRUHU
GEEMAC 3 Carousel way - Riverside Business Park - Northampton NN39HG - Tel: 00 44 1604 40 17 19 Fax: 00 44 1604 80 86 64
EMPRESA ADHERIDA
ARBITRAJE DE CONSUMO
GUARANTEE CARD
TARJETA DE GARANTIA
CERTIFICAT DE GARANTIE
GARANTIESCHEIN
BUONO DI GARANZIA
CART O DE GARANTIA
GARANTIEBEWIJS
We reserve to change all of part of the articles or contents of this document, without prior notice.
Nos reservamos el derecho de cambiar total o parcialmente las caracter sticas de nuestros art culos o contenido de este documento sin previo aviso.
Nous nous r servons le droit de modifier totalement oru en partie les caracteristiques de nos articles ou le contenu de ce document san pr avis.
Wir behalten uns das recht vor die eigenschaften unserer produkte oder den inhalt diese prospektes teilweise oder wollstanding, ohne vorherige benachichtigung su andern.
Ci riservamo il diritto di cambiare totalemente o parzialmente le caratteristiche tecniche dei nostri prodotti ed il contenuto di questo documento senza nessum preavviso.
Wij behouden ons het recht voor geheel of gedeeltelijk de kenmerken van onze artikelen of de inhouk van deze handleiding zonder voorafgaand bericht te wijzigen.
Reservamo-nos no dereito de alterar, total ou parcialmente as caracteristicas os nossos artigos ou o conte do deste documento sem aviso pr vio.
swimming pools are guaranteed for a period of 24 months from the date of purchase against manufacturing defects or defective material.
The guarantee is for replacement or repair in the factory of the parts accepted as defective. The guarantee does not cover deterioration of the
product or accidents arising from negligence defective installation or improper usage etc. The PVC Liner is not guaranteed should the pool be
dismantled and reassembled. The rigid swimming pools should not be buried. Manufacturas
does not take responsibility of the damages
caused by an inadecuate preparation of the site. Both cases will be out of guarantee. Receipts must be presented when making any complaint.
Las piscinas
están garantizadas durante un período de 24 meses a partir de la fecha de compra, contra cualquier defecto de fabricación o
de los materiales. La garantía está sujeta al cambio o reparación en fábrica de las piezas reconocidas como defectuosas. La garantía no cubre
el deterioro del producto o los accidentes provenientes de negligencia, instalación defectuosa, mala utilización, etc. La Funda ( Liner P.V.C.) no
está garantizada en el caso de desmontaje y nuevo montaje de la piscina. Las piscinas rígidas no es aconsejable enterrarlas. Manufacturas
no se responsabiliza de los daños causados por una mala preparación del terreno. Ambos casos quedarán fuera de garantía. Para cualquier
tipo de reclamación será condición necesaria el justificante de compra.
La garantie des piscines dure 24 mois à compter de la date d'achat, et porte sur tout défaut de fabrication ou de matière première. Elle se
fait par l'échange ou par la réparation en usine des pièces reconnues défectueuses. La garantie ne couvre pas la détérioration du produit ou les
accidents dûs à la négligence, au montage imparfait ou la mauvaise utilisation, etc... Le fond (Liner PVC) n'est pas garanti suite au démontage
et remontage de la piscine. Les piscines rigides ne doivent pas être enterrées. Manufacturas
ne prend pas la responsabilité des dommages
provoqués par une mauvaise préparation du terrain. Les deux cas seront considérés hors garantie. Pour toute réclamation, la présentation du
justificatif d'achat est obligatoire.
Für
-Schwimmbecken wird eine Garantiefrist von 24 Monaten gegen Herstellungs- oder Materialschäden jeder Art gewährt. Die Gewährleistung
gilt nur für Teile, die als schadhaft anerkannt und im Werk ausgetauscht oder instandgesetzt werden. Beschädigungen des Produkts oder durch
Nachlässigkeit, unsachgemässen Einbau, unsachgemässe Benutzung usw. entstandene Schäden sind nicht durch die Garantie gedeckt. Bei
Ausbau und Wiedereinbau erlischt der Gewährleistungsanspruch für den Überzug (PVC-Liner). Die Stahlwandbecken sollten nicht begraben
werden. Manufacturas
nimmt nicht die Verantwortlichkeit für Beschädigungen, die durch eine falsche Vorbereitung des Geländes verursacht
werden. Beide Fälle sind äußer Garantie. Bei Reklamationen wird die Vorlage des Kaufbelegs zur Pflicht gemacht.
Le piscine
sono garantite per un periodo di 24 mesi dalla data d'acquisto contro ogni diffeto di fabbricazione oppure dei materiali. La garanzia
è soggetta alla sostituzione o riparazione presso fabrica delle parti riconosciute difettose. Non sono coperti dalla garanzia il deperimento del
prodotto, nè gli incidenti dovuti a noncuranza, installazione difettosa, utilizzazione inappropriata, ecc. La Fodera (Liner PVC) è fuori garanzia nel
caso di eventuale smontaggio e successivo montaggio della piscina. Le piscine rigide non e’ consigliabile essere sotterrate. Manufacturas
non è responsabile dei danni causati da preparazione inadeguata del terreno. La garanzia è inefficace in tutti e due i casi. "Per qualsiasi
eventuale reclamo, è indispensabile presentare il ticket d'acquisto".
De zwembaden
zijn gegarandeerd voor een periode van 24 maanden vanaf de datum van aankoop voor iedere fabrieksfout of voor die
van het materiaal. De garantie is onderhevig aan verandering of reparatie in de fabriek van de als zodaning erkende defecte onderdelen. De
garantie dekt geen beschadiging aan het product of ongelukken, welke werden veroorzaakt door nalatigheid, foute installatie, slechte gebruikmaking,
enz. Het overtrek (Liner P.V.C.) wordt niet gegarandeerd in het geval van demontage en het opnieuw installeren van het zwembad. De onbuigzame
zwembaden kunnen niet onder de grond worden aangebracht. Manufacturas
stelt zich niet verantwoordelijk voor de schade die wordt
veroorzaakt door een slechte bereiding van het terrein. Beide situaties vallen buiten de garantie. Voor welke reclamatie dan ook zal de aankoopnota
worden vereist.
As piscinas estão garantidas durante 24 meses a partir da data de compra, contra quaisquer defeito de fabricação ou de material. A garantia
está sujeita ao cambio ou à reparação na fábrica das peças reconhecidas como defeituosas. A garantia não cobre a deterioração do produto
nem os acidentes devidos a negligencia, má instalação, má utilização, etc. A gualdrapa (liner PVC) não está garantida em caso de se desmontar
e voltar a montar a piscina. As piscinas rígidas não é aconselhável ser enterradas. Manufacturas
não se responsabiliza dos danos causados
por uma má preparação do terreno. Ambos os casos estão fora de garantia. Para qualquer reclamação é obrigatória a apresentação do justificativo
Wat nodig om de ingeboude pomp met de cartridge filter van de Gre Bora Bora rond 350×120 10102 liter zwembad aan te sluiten (te vervangen ) met een ingaande slang en een uitgaande slang om er een zandfilterpomp en warmtepomp op aan te sluiten
Gesteld op 7-9-2020 om 10:54
Gebruikershandleiding.com neemt misbruik van zijn services uitermate serieus. U kunt hieronder aangeven waarom deze vraag ongepast is. Wij controleren de vraag en zonodig wordt deze verwijderd.
Product:
Spelregels forum
Om tot zinvolle vragen te komen hanteren wij de volgende spelregels:
lees eerst de handleiding door;
controleer of uw vraag al eerder door iemand anders is gesteld;
probeer uw vraag zo duidelijk mogelijk te stellen;
heeft u een probleem en al geprobeerd om dit op te lossen, vermeld dit erbij aub;
heeft u een oplossing gekregen van een bezoeker dan horen wij dat graag in dit forum;
wilt u een reactie geven op een vraag of antwoord, gebruik dan niet dit formulier maar klik op de knop 'reageer op deze vraag';
uw vraag wordt direct op de website gezet; vermijd daarom persoonlijke gegevens in te vullen;
Belangrijk! Als er een antwoord wordt gegeven op uw vraag, dan is het voor de gever van het antwoord nuttig om te weten als u er wel (of niet) mee geholpen bent! Wij vragen u dus ook te reageren op een antwoord.
Belangrijk! Antwoorden worden ook per e-mail naar abonnees gestuurd. Laat uw emailadres achter op deze site, zodat u op de hoogte blijft. U krijgt dan ook andere vragen en antwoorden te zien.
Abonneren
Abonneer u voor het ontvangen van emails voor uw GRE Bora Bora bij:
nieuwe vragen en antwoorden
nieuwe handleidingen
U ontvangt een email met instructies om u voor één of beide opties in te schrijven.
Ontvang uw handleiding per email
Vul uw emailadres in en ontvang de handleiding van GRE Bora Bora in de taal/talen: Nederlands, Duits, Engels, Frans, Italiaans, Portugees, Spaans als bijlage per email.
De handleiding is 5,36 mb groot.
U ontvangt de handleiding per email binnen enkele minuten. Als u geen email heeft ontvangen, dan heeft u waarschijnlijk een verkeerd emailadres ingevuld of is uw mailbox te vol. Daarnaast kan het zijn dat uw internetprovider een maximum heeft aan de grootte per email. Omdat hier een handleiding wordt meegestuurd, kan het voorkomen dat de email groter is dan toegestaan bij uw provider.
Stel vragen via chat aan uw handleiding
Stel uw vraag over deze PDF
Uw handleiding is per email verstuurd. Controleer uw email
Als u niet binnen een kwartier uw email met handleiding ontvangen heeft, kan het zijn dat u een verkeerd emailadres heeft ingevuld of dat uw emailprovider een maximum grootte per email heeft ingesteld die kleiner is dan de grootte van de handleiding.
Er is een email naar u verstuurd om uw inschrijving definitief te maken.
Controleer uw email en volg de aanwijzingen op om uw inschrijving definitief te maken
U heeft geen emailadres opgegeven
Als u de handleiding per email wilt ontvangen, vul dan een geldig emailadres in.
Uw vraag is op deze pagina toegevoegd
Wilt u een email ontvangen bij een antwoord en/of nieuwe vragen? Vul dan hier uw emailadres in.