554126
392
Verklein
Vergroot
Pagina terug
1/404
Pagina verder
DAIKIN ROOM AIR CONDITIONER
OPERATION MANUAL
MODELS
FTXG20LV1BW
FTXG25LV1BW
FTXG35LV1BW
FTXG50LV1BW
FTXG20LV1BS
FTXG25LV1BS
FTXG35LV1BS
FTXG50LV1BS
EnglishDeutschFrançaisNederlandsEspañolItalianoEλληνικάPortuguêsPyccкийТürkçe
00_CV_3P357704-1.indd 100_CV_3P357704-1.indd 1 12/19/2013 1:13:53 PM12/19/2013 1:13:53 PM
1
Feature
For your comfort and energy For your comfort and energy
savingsaving
Other functionsOther functions
COMFORT AIRFLOW OUTDOOR UNIT QUIET
The air ow direction will be in upward
while in COOL operation, in downward
while in HEAT operation. This function
will prevent cold or warm air from
directly blowing on your body.
Page 15
OUTDOOR UNIT QUIET operation
lowers the noise level of the outdoor
unit. This function is useful when you
need to consider the noise for your
neighbourhood.
Page 19
INTELLIGENT EYE
The INTELLIGENT EYE sensor detects the human movement in
a room. If no one is in the room for more than 20 minutes, the
operation automatically changes to energy saving operation.
Page 15
WEEKLY TIMER
Up to 4 timer settings can be saved for each day of the week
according to your family’s life style. The WEEKLY TIMER allows
you to set on/off time and the desired temperature.
Page 23
01_EN_3P357704-1.indd 101_EN_3P357704-1.indd 1 12/17/2013 3:21:35 PM12/17/2013 3:21:35 PM
English
2
ECONO
This function enables ef cient operation
by limiting the maximum power
consumption. It is useful when using the
air conditioner and other electrical
devices simultaneously.
Page 19
Contents
Read before Operatio
n
Safety Precautions ......................................... 3
Names of Parts ............................................... 5
Preparation before Operation ......................... 9
Operatio
n
AUTO · DRY · COOL · HEAT · FAN
Operation ........................................... 11
Adjusting the Air ow Direction
and Rate ............................................13
COMFORT AIRFLOW /
INTELLIGENT EYE Operation ...........15
POWERFUL Operation ......................18
ECONO / OUTDOOR UNIT QUIET
Operation ...........................................19
OFF TIMER Operation .......................21
ON TIMER Operation ........................22
WEEKLY TIMER Operation ...............23
Multi Connectio
n
Note for Multi System .................................. 29
Car
e
Care and Cleaning ....................................... 31
Troubleshootin
g
Troubleshooting ........................................... 35
The English text is the original instruction. Other languages are
translations of the original instructions.
01_EN_3P357704-1.indd 201_EN_3P357704-1.indd 2 12/17/2013 3:21:46 PM12/17/2013 3:21:46 PM
3
Safety Precautions
Keep this manual where the user can easily nd it.
Read the precautions in this manual carefully before operating the unit.
This appliance is intended to be used by expert or trained users in shops, in light industry and on farms, or for commercial use
by lay persons.
Sound pressure level is less than 70 dB (A).
The precautions described herein are classi ed as WARNING and CAUTION. They both contain important information
regarding safety. Be sure to observe all precautions without fail.
WARNING
CAUTION
Failure to follow these instructions properly may result in
personal injury or loss of life.
Failure to observe these instructions properly may result in
property damage or personal injury, which may be serious
depending on the circumstances.
Never attempt.
Be sure to follow the
instructions.
Be sure to establish an earth
connection.
After reading, keep this manual in a convenient place so that you can refer to it whenever necessary. If the equipment is
transferred to a new user, be sure also to hand over the manual.
WARNING
In order to avoid re, explosion or injury, do not operate the unit when harmful gases (e.g. ammable or corrosive)
are detected near the unit.
Be aware that prolonged, direct exposure to cool or warm air from the air conditioner, or to air that is too cool or too
warm can be harmful to your physical condition and health.
Do not place objects, including rods, your ngers, etc., in the air inlet or outlet. Product damage or personal injury
may result due to contact with the air conditioner’s high-speed fan blades.
Do not attempt to repair, dismantle, reinstall or modify the air conditioner yourself as this may result in water leakage,
electric shocks or re hazards.
Do not use ammable spray near the air conditioner, or otherwise re may result.
Do not use a refrigerant other than the one indicated on the outdoor unit (R410A) when installing, moving or
repairing. Using other refrigerants may cause trouble or damage to the unit, and personal injury.
To avoid electric shocks, do not operate with wet hands.
Beware of re in case of refrigerant leakage. If the air conditioner is not operating correctly, i.e. not generating cool or
warm air, refrigerant leakage could be the cause. Consult your dealer for assistance. The refrigerant within the air
conditioner is safe and normally does not leak.
However, in the event of a leakage, contact with a naked burner, heater or cooker may result in generation of noxious
gas. Do not use the air conditioner until a quali ed service person con rms that the leakage has been repaired.
Do not attempt to install or repair the air conditioner yourself. Improper workmanship may result in water leakage,
electric shocks or re hazards. Please contact your local dealer or quali ed personnel for installation and
maintenance work.
When the air conditioner is malfunctioning (giving off a burning odour, etc.) turn off power to the unit and contact your
local dealer. Continued operation under such circumstances may result in a failure, electric shocks or re hazards.
Be sure to install an earth leakage circuit breaker. Failure to install the earth leakage circuit breaker may result in
electric shocks or re.
Be sure to earth the unit. Do not earth the unit to a utility pipe, lightning conductor or telephone earth lead. Imperfect
earthing may result in electric shocks.
CAUTION
Do not use the air conditioner for purposes other than those for which it is intended. Do not use the air conditioner for
cooling precision instruments, food, plants, animals or works of art as this may adversely affect the performance,
quality and/or longevity of the object concerned.
Do not expose plants or animals directly to air ow from the unit as this may cause adverse effects.
Do not place appliances that produce naked ames in places exposed to the air ow from the unit as this may impair
combustion of the burner.
Do not block air inlets nor outlets. Impaired air ow may result in insuf cient performance or trouble.
01_EN_3P357704-1.indd 301_EN_3P357704-1.indd 3 12/17/2013 3:21:54 PM12/17/2013 3:21:54 PM
English
4
CAUTION
Do not sit on the outdoor unit, put things on the unit, or pull the unit. Doing so may cause accidents, such as falling or
toppling down, thus resulting in injury, product malfunctioning, or product damage.
Do not place objects that are susceptible to moisture directly beneath the indoor or outdoor units. Under certain
conditions, condensation on the main unit or refrigerant pipes, air lter dirt or drain blockage may cause dripping,
resulting in fouling or failure of the object concerned.
After prolonged use, check the unit stand and its mounts for damage. If they are left in a damaged condition, the unit
may fall and cause injury.
To avoid injury, do not touch the air inlet or aluminium ns of the indoor or outdoor units.
The appliance is not intended for use by unattended young children or in rm persons. Impairment of bodily functions
and harm to health may result.
Children should be supervised to ensure that they do not play with the unit or its remote controller. Accidental
operation by a child may result in impairment of bodily functions and harm health.
Avoid impacts to the indoor and outdoor units, or otherwise product damage may result.
Do not place ammable items, such as spray cans, within 1m of the air outlet.
The spray cans may explode as a result of hot air from the indoor or outdoor units.
Be careful not to let pets urinate on the air conditioner. Urination on the air conditioner may result in electric shocks or re.
Do not wash the air conditioner with water, as this may result in electric shocks or re.
Do not place water containers (vases etc.) above the unit, as this may result in electric shocks or re hazards.
To avoid oxygen depletion, ensure that the room is adequately ventilated if equipment such as a burner is used
together with the air conditioner.
Before cleaning, be sure to stop unit operation, turn off the circuit breaker or remove the power cord. Otherwise, an
electric shock and injury may result.
Only connect the air conditioner to the speci ed power supply circuit. Power supplies other than the one speci ed
may result in electric shocks, overheating and res.
Arrange the drain hose to ensure smooth drainage. Imperfect drainage may cause wetting of the building, furniture etc.
Do not place objects in direct proximity of the outdoor unit and do not let leaves and other debris accumulate around
the unit. Leaves are a hotbed for small animals which can enter the unit. Once in the unit, such animals can cause
malfunctions, smoke or re when making contact with electrical parts.
Do not place objects around the indoor unit.
Doing so may have an adverse in uence on the performance, product quality, and life of the air conditioner.
This appliance is not intended to be used by persons with reduced physical, sensory or mental capabilities, or with
lack of operation knowledge, unless they have been given supervision or instruction concerning the appliance use by
person responsible for their safety.
Keep out of children’s reach to ensure that they do not play with the appliance.
P003
Installation site.
To install the air conditioner in the following types of environments, consult the dealer.
Places with an oily environment or where steam or soot occurs.
Salty environment such as coastal areas.
Places where sul de gas occurs such as hot springs.
Places where snow may block the outdoor unit.
Be sure to follow the instructions below.
The indoor unit is at least 1m away from any television or radio set (unit may cause interference with the picture or sound).
The drain from the outdoor unit must be discharged to a place of good drainage.
Consider nuisance to your neighbours from noises.
For installation, choose a place as described below.
A place solid enough to bear the weight of the unit which does not amplify the operation noise or vibration.
A place from where the air discharged from the outdoor unit or the operation noise will not annoy your neighbours.
Electrical work.
For power supply, be sure to use a separate power circuit dedicated to the air conditioner.
System relocation.
Relocating the air conditioner requires specialized knowledge and skills. Please consult the dealer if relocation is
necessary for moving or remodeling.
01_EN_3P357704-1.indd 401_EN_3P357704-1.indd 4 12/17/2013 3:21:55 PM12/17/2013 3:21:55 PM
Display
5
Names of Parts
Indoor Unit
Appearance of the indoor unit may differ.
Air inlet
Upper front
panel
Air outlet
Louvres (vertical blades)
The louvres are inside of the air outlet.
Page 13
INTELLIGENT EYE
sensor
It detects the movements
of people and automatically
switches between normal
operation and energy
saving operation.
Page 15
Flaps
(horizontal
blades)
Page 13
INTELLIGENT EYE lamp
(green)
Page 16
Signal receiver and Indoor
unit ON/OFF switch
Signal receiver
It receives signals from the remote
controller.
When the unit receives a signal, you will
hear a beep sound.
Case Sound type
Operation start beep-beep
Setting changed beep
Operation stop long beep
Indoor unit ON/OFF switch
Press this switch once to start operation.
Press once again to stop it.
For the operation mode setting, refer to the following
table.
Mode Temperature setting Air ow rate
AUTO 25°C AUTO
This switch can be used when the remote controller is
missing.
TIMER lamp
When operation by timer has been set, the multi-monitor lamp
periodically changes to orange. After lighting orange for about
5 seconds, it returns to the colour of the operation mode.
The multi-monitor lamp will turn orange on and off in cyclic
manner while the air conditioner is not in operation.
TIMER lamp colour
TIMER lamp colour : For COOL
Orange
Blue
3 min.
5 sec. 5 sec.
2 sec.
2 sec. 2 sec.
Green OrangeDRY :
COOL :
Blue Orange
HEAT :
Red Orange
FAN :
White Orange
Stop :
Off Orange
Indoor temperature
sensor
It detects the air
temperature around the
unit.
Multi-monitor lamp and
TIMER lamp
Multi-monitor lamp
The lamp colour changes according to
the operation.
Operation Multi-monitor lamp
AUTO Red/Blue
DRY Green
COOL Blue
HEAT Red
FAN White
TIMER Orange
Lower front panel
It is located on the back of the
upper front panel during operation.
01_EN_3P357704-1.indd 501_EN_3P357704-1.indd 5 12/17/2013 3:21:55 PM12/17/2013 3:21:55 PM
English
Panel support plate
Back of the upper front panel
6
Outdoor Unit
Appearance of the outdoor unit may differ from some models.
Open the upper front panel
Air lter
Titanium apatite
photocatalytic
air-purifying lter
Refrigerant piping and
inter-unit wiring
Earth terminal
It is inside of this cover.
Drain hose
Air inlet
(back and side)
Air outlet
Outdoor temperature
sensor (back)
Model name plate
Lower front panel
01_EN_3P357704-1.indd 601_EN_3P357704-1.indd 6 12/17/2013 3:21:56 PM12/17/2013 3:21:56 PM
7
Names of Parts
Remote Controller
Signal transmitter
Receiver
50cm
or more
To use the remote controller, aim the
transmitter at the indoor unit. If there
is anything to block signals between
the unit and the remote controller,
such as a curtain, the unit will not
operate.
Do not drop the remote controller. Do
not get it wet.
The maximum distance for
communication is approx. 6m.
Make sure that there are no
obstacles within 50cm under the
signal receiver.
Such obstacles, if any, may have an
adverse in uence on the reception
performance of the receiver and the
reception distance may be
shortened.
FAN setting button
It selects the air ow rate setting.
Page 14
POWERFUL button
POWERFUL operation.
Page 18
Display (LCD)
It displays the current settings.
(In this illustration, each section is
shown with its displays on for the
purpose of explanation.)
TEMPERATURE
adjustment buttons
It changes the temperature setting.
Page 12
ON/OFF button
Press this button once to start
operation.
Press once again to stop it.
Page 11
Front cover
Open the front cover.
Page 8
Model ARC466A9
01_EN_3P357704-1.indd 701_EN_3P357704-1.indd 7 12/17/2013 3:21:57 PM12/17/2013 3:21:57 PM
English
8
Open the front cover
ECONO/QUIET button
ECONO/OUTDOOR UNIT
QUIET operation.
Page 19
SWING button
Adjusting the air ow direction
.
Page 13
: WEEKLY button
: PROGRAM button
: COPY button
: BACK button
: NEXT button
WEEKLY TIMER operation.
Page 23
ON TIMER button
Page 22
CLOCK button
Page 10
Lamp brightness
setting button
Page 9
COMFORT/SENSOR
button
COMFORT AIRFLOW and
INTELLIGENT EYE
operation.
Page 15
OFF TIMER button
(NIGHT SET mode)
Page 21
TIMER CANCEL
button
It cancels the timer setting.
Page 21,22
It cannot be used for the
WEEKLY TIMER operation.
SELECT button
It changes the ON/OFF
TIMER and WEEKLY TIMER
settings.
Page 21,22,23
MODE selector button
It selects the operation mode.
(AUTO/DRY/COOL/HEAT/
FAN)
Page 11
01_EN_3P357704-1.indd 801_EN_3P357704-1.indd 8 12/17/2013 3:21:58 PM12/17/2013 3:21:58 PM
9
Preparation before Operation
To set the batteries
Position and
correctly!
+
2
3
1
Slide the front cover to take it off.1.
Set 2 dry batteries AAA.LR03 (alkaline).2.
Set the front cover as before.3.
To x the remote controller holder on the wall
Remote
controller holder
Remote controller
Screws
Choose a place from where the signals 1.
reach the unit.
Fix the holder to a wall, a pillar, or similar
2.
location with the screws procured locally.
Place the remote controller in the remote
3.
controller holder.
The luminance of the indoor unit display can be set.
Press .
NOTE
Notes on batteries
When replacing the batteries, use batteries of the same type, and replace both old batteries together.
When the system is not used for a long time, take the batteries out.
The batteries will last for approx. 1 year. If the remote controller display begins to fade and the degradation of reception performance occurs
within a year, however, replace both batteries with new, size AAA.LR03 (alkaline).
The attached batteries are provided for the initial use of the system.
The usable period of the batteries may be short depending on the manufactured date of the air conditioner.
Notes on remote controller
Never expose the remote controller to direct sunlight.
Dust on the signal transmitter or receiver will reduce the sensitivity. Wipe off dust with soft cloth.
Signal communication may be disabled if an electronic-starter-type uorescent lamp (such as inverter-type lamps) is in the room. Consult
the shop if that is the case.
If the remote controller signals happen to operate another appliance, move that appliance to somewhere else, or consult the service shop.
To set the luminance of the display
Hi L
ow
Off
01_EN_3P357704-1.indd 901_EN_3P357704-1.indd 9 12/17/2013 3:21:59 PM12/17/2013 3:21:59 PM
English
10
NOTE
Note on setting the clock
If the indoor unit’s internal clock is not set to the correct time, the ON TIMER, OFF TIMER and WEEKLY TIMER will not operate punctually.
Turn on the circuit breaker
After the power is turned on, the aps of the indoor unit open and close once to set
the reference position.
To set the clock
Press 1. .
” is displayed on the LCD.
” and “ ” blink.
Press 2. to set the current day of the week.
Press
3. .
” blinks.
Press 4. to set the clock to the present time.
Holding down or rapidly increases or decreases the time display.
Press 5. .
Point the remote controller at the indoor unit when pressing the buttons.
” blinks.
01_EN_3P357704-1.indd 1001_EN_3P357704-1.indd 10 12/17/2013 3:21:59 PM12/17/2013 3:21:59 PM
11
AUTO · DRY · COOL · HEAT ·
FAN Operation
The air conditioner operates with the operation mode of your choice.
From the next time on, the air conditioner will operate with the same operation
mode.
To start operation
Press 1. and select an operation mode.
Each pressing of the button advances the mode setting in sequence.
AUTO DRY COOL HEAT FAN
Press 2. .
• “ ” is displayed on the LCD.
The multi-monitor lamp lights up.
The colour of the lamp varies depending on the
operation mode.
Display
To stop operation
Press again.
” disappears from the LCD.
The multi-monitor lamp goes off.
Operation
Multi-monitor lamp
AUTO Red/Blue
DRY Green
COOL Blue
HEAT Red
FAN White
NOTE
MODE Notes on each operation mode
HEAT
Since this air conditioner heats the room by taking heat from outdoor air to indoors, the heating capacity becomes smaller in
lower outdoor temperatures. If the heating effect is insuf cient, it is recommended to use another heating appliance in
combination with the air conditioner.
The heat pump system heats the room by circulating hot air around all parts of the room. After the start of HEAT operation,
it takes some time before the room gets warmer.
In HEAT operation, frost may occur on the outdoor unit and lower the heating capacity. In that case, the system switches
into defrosting operation to take away the frost.
During defrosting operation, hot air does not ow out of indoor unit.
COOL
This air conditioner cools the room by releasing the heat in the room outside.
Therefore, the cooling performance of the air conditioner may be degraded if the outdoor temperature is high
DRY
The computer chip works to rid the room of humidity while maintaining the temperature as much as possible. It automatically
controls temperature and air ow rate, so manual adjustment of these functions is unavailable.
AUTO
In AUTO operation, the system selects an appropriate operation mode (COOL or HEAT) based on the room and outside
temperatures and starts the operation.
The system automatically reselects setting at a regular interval to bring the indoor temperature to user-setting level.
FAN This mode is valid for fan only.
01_EN_3P357704-1.indd 1101_EN_3P357704-1.indd 11 12/17/2013 3:22:00 PM12/17/2013 3:22:00 PM
English
12
To change the temperature setting
Press .
The displayed items on the LCD will change whenever either one of the buttons is
pressed.
COOL operation HEAT operation AUTO operation DRY or FAN operation
18-32°C 10-30°C 18-30°C
The temperature setting is
not variable.
Press
to raise the temperature and press to lower the
temperature.
Operating conditions
Recommended temperature setting
For cooling: 26-28°C
For heating: 20-24°C
Tips for saving energy
Be careful not to cool (heat) the room too much.
Keeping the temperature setting at a moderate level helps save energy.
Cover windows with a blind or a curtain.
Blocking sunlight and air from outdoors increases the cooling (heating) effect.
Clogged air lters cause inef cient operation and waste energy. Clean them once in about every 2 weeks.
Notes on the operating conditions
The air conditioner always consumes a small amount of electricity even while it is not operating.
If you are not going to use the air conditioner for a long period, for example in spring or autumn, turn off the circuit breaker.
Use the air conditioner in the following conditions.
Operation outside the humidity or temperature range described in the table may cause a safety device to disable the system.
MODE Operating conditions If operation is continued out of this range
COOL
Outdoor temperature : <2/3/4/5MXS> –10-46°C
<RXG> –10-46°C
Indoor temperature : 18-32°C
Indoor humidity : 80% max.
A safety device may work to stop the operation.
(In multi system, it may work to stop the operation of the
outdoor unit only.)
Condensation may occur on the indoor unit and drip.
HEAT
Outdoor temperature : <2MXS> –10-24°C
<3/4/5MXS> –15-24°C
<RXG> –15-24°C
Indoor temperature : 10-30°C
A safety device may work to stop the operation.
DRY
Outdoor temperature : <2/3/4/5MXS> –10-46°C
<RXG> –10-46°C
Indoor temperature : 18-32°C
Indoor humidity : 80% max.
A safety device may work to stop the operation.
Condensation may occur on the indoor unit and drip.
01_EN_3P357704-1.indd 1201_EN_3P357704-1.indd 12 12/17/2013 3:22:02 PM12/17/2013 3:22:02 PM
13
Adjusting the Air ow Direction
and Rate
You can adjust the air ow direction to increase your comfort.
To start auto swing
Up and down air ow direction
Press .
” is displayed on the LCD.
The aps (horizontal blades) will begin to swing.
Right and left air ow direction
Press .
” is displayed on the LCD.
The louvres (vertical blades) will begin to swing.
The 3-D air ow direction
Press and .
” and “ ” are displayed on the LCD.
The aps and louvres move in turn.
To cancel 3-D air ow, press either
or again.
The aps or louvres will stop moving.
To set the aps or louvres at desired position
This function is effective while aps or louvres are in auto swing mode.
Press and when the aps or
louvres have reached the desired position.
In the 3-D air ow, the aps and louvres move in turn.
” or “ ” disappears from the LCD.
01_EN_3P357704-1.indd 1301_EN_3P357704-1.indd 13 12/17/2013 3:22:02 PM12/17/2013 3:22:02 PM
English
14
To adjust the air ow rate setting
Press .
Each pressing of advances the air ow rate setting in sequence.
Auto Indoor unit quiet Low Middle low
MiddleMiddle highHigh
When the air ow is set to “ ”, indoor unit quiet operation will start and the noise
from the unit will become quieter.
In indoor unit quiet operation, the air ow rate is set to a weak level.
If the temperature does not reach the desired point, change the air ow rate setting.
In DRY operation, the air ow rate setting is not variable.
NOTE
Note on the angles of the aps
The aps swinging range depends on the operation. (See the gure.)
HEAT operation
75°
30°
COMFORT AIRFLOW
Lower limit
Upper limit
Stop operation
70°
25°
Lower limit
Upper limit / COMFORT AIRFLOW
Stop operation
50°
COOL, DRY and
FAN operation
Note on the angles of the aps
Using 3-D air ow circulates cold air, which tends to collect at the bottom of the room, and hot air, which tends to collect near the ceiling,
throughout the room, preventing areas of cold and hot developing.
Notes on air ow rate setting
At smaller air ow rates, the cooling (heating) effect is also smaller.
If the air conditioner is operated in COOL or DRY operation with the aps kept stopped in the downward direction, the aps will automatically
start operating in approximately an hour in order to prevent dew condensation.
CAUTION
Always use a remote controller to adjust the angles of the aps and louvres.
- If you attempt to move the aps and louvres forcibly by hand when they are swinging, the mechanism may be damaged.
- Inside the air outlet, a fan is rotating at a high speed.
01_EN_3P357704-1.indd 1401_EN_3P357704-1.indd 14 12/17/2013 3:22:04 PM12/17/2013 3:22:04 PM
15
COMFORT AIRFLOW /
INTELLIGENT EYE Operation
COMFORT AIRFLOW operation
The ow of air will be in the upward direction while in COOL operation and in the downward direction while
in HEAT operation, which will provide a comfortable wind that will not come in direct contact with people.
COOL operation HEAT operation
INTELLIGENT EYE operation
“INTELLIGENT EYE” is the infrared sensor which detects the human movement.
If no one is in the room for more than 20 minutes, the operation automatically changes to energy saving
operation. The INTELLIGENT EYE sensor works differently depending on the situation.
[Example]
A person is detected in area 1.
Area 1 Area 2
A person is detected in area 2.
Area 1 Area 2
People are detected in both areas.
Area 1 Area 2
No people are detected in the areas.
Use the INTELLIGENT EYE operation in
combination with the COMFORT AIRFLOW
operation.
The air conditioner will go into energy-saving
mode after 20 minutes.
*The air ow direction may differ from the
illustrated direction depending on the actions
and movements of the people in the areas.
INTELLIGENT EYE operation is useful for energy saving
Energy saving operation
If no presence detected in the room for 20 minutes, the energy saving operation will start.
This operation changes the temperature –2°C in HEAT / +2°C in COOL / +2°C in DRY operation from set temperature.
When the room temperature exceeds 30°C, the operation changes the temperature +1°C in COOL / +1°C in DRY operation from set
temperature.
This operation decreases the air ow rate slightly in FAN operation only.
Combination of COMFORT AIRFLOW operation and INTELLIGENT EYE operation
The air conditioner can go into operation with the COMFORT AIRFLOW and INTELLIGENT EYE
operations combined.
01_EN_3P357704-1.indd 1501_EN_3P357704-1.indd 15 12/17/2013 3:22:05 PM12/17/2013 3:22:05 PM
English
24
To use WEEKLY TIMER operation
Setting mode
Make sure the day of the week and time are set. If not, set the day of the week and time.
Page 10
6:00 8:30 17:30 22:00
25°C 27°C
Program 1 Program 2 Program 3 Program 4
ON OFF ON OFF
[Monday]
Setting Displays
Day and number ON/OFF Time Temperature
Press 1. .
The day of the week and the reservation number of the current day will be displayed.
1 to 4 settings can be made per day.
Press 2. to select the desired day of the week
and reservation number.
Pressing changes the reservation number and the day of the week.
Press 3. .
The day of the week and reservation number will be set.
” and “ ” blink.
Press 4. to select the desired mode.
Pressing changes “ ” or “ ” setting in sequence.
Pressing
alternates the following items appearing on the LCD in rotational
sequence.
ON TIMER OFF TIMER blank
In case the reservation has already been set, selecting “blank” deletes the
reservation.
Go to step
9 if “blank” is selected.
To return to the day of the week and reservation number setting, press
.
Press 5. .
The ON/OFF TIMER mode will be set.
” and the time blink.
01_EN_3P357704-1.indd 2401_EN_3P357704-1.indd 24 12/17/2013 3:22:14 PM12/17/2013 3:22:14 PM
25
WEEKLY TIMER Operation
NOTE
Notes on WEEKLY TIMER operation
Do not forget to set the clock on the remote controller rst.
Page 10
The day of the week, ON/OFF TIMER mode, time and set temperature (only for ON TIMER mode) can be set with WEEKLY TIMER.
Other settings for ON TIMER are based on the settings just before the operation.
Both WEEKLY TIMER and ON/OFF TIMER operation cannot be used at the same time. The ON/OFF TIMER operation has priority if it is set
while WEEKLY TIMER is still active. The WEEKLY TIMER will go into standby state, and “
” will disappear from the LCD. When
ON/OFF TIMER is up, the WEEKLY TIMER will automatically become active.
Shutting off the circuit breaker, power failure, and other similar events will render operation of the indoor unit’s internal clock inaccurate.
Reset the clock.
Page 10
6. Press to select the desired time.
The time can be set between 0:00 and 23:50 in 10 minute intervals.
To return to the ON/OFF TIMER mode setting, press
.
Go to step
9 when setting the OFF TIMER.
Press 7. .
The time will be set.
” and the temperature blink.
Press 8. to select the desired temperature.
The temperature can be set between 10°C and 32°C.
COOL or AUTO: The unit operates at 18°C even if it is set at 10 to 17°C.
Page 12
HEAT or AUTO: The unit operates at 30°C even if it is set at 31 to 32°C.
Page 12
To return to the time setting, press .
The set temperature is only displayed when the mode setting is on.
Press 9. .
Be sure to direct the remote controller toward the indoor unit and check for a receiving
tone and ashing of the multi-monitor lamp.
The temperature and time are set while in ON TIMER operation, and the time is set
while in OFF TIMER operation.
The next reservation screen will appear.
To continue further settings, repeat the procedure from step
4.
The multi-monitor lamp blinks twice.
The TIMER lamp periodically lights orange.
Page 5
The multi-monitor lamp will not blink orange if all the reservation settings are deleted.
Display
Press
10.
to complete the setting.
” is displayed on the LCD and WEEKLY TIMER operation is activated.
A reservation made once can be easily copied and the same settings used for another
day of the week. Refer to “Copy mode”.
Page 26
01_EN_3P357704-1.indd 2501_EN_3P357704-1.indd 25 12/17/2013 3:22:16 PM12/17/2013 3:22:16 PM
English
26
Copy mode
A reservation made once can be copied to another day of the week. The whole reservation
of the selected day of the week will be copied.
6:00 8:30 17:30 22:00
25°C 27°C
6:00 8:30 17:30 22:00
25°C 27°C
COPYCOPY
Program 1 Program 2 Program 3 Program 4
ON OFF ON OFF
[Monday]
Program 1 Program 2 Program 3 Program 4
ON OFF ON OFF
[Tuesday]
to
[Friday]
Setting Displays
Con rmation Copy Paste Normal
Press 1. .
Press
2. to con rm the day of the week to be
copied.
Press
3. .
The whole reservation of the selected day of the week will be copied.
Press 4. to select the destination day of the
week.
Press 5. .
Be sure to direct the remote controller toward the indoor unit and check for a receiving
tone and ashing the multi-monitor lamp.
The reservation will be copied to the selected day of the week. The whole reservation
of the selected day of the week will be copied.
To continue copying the settings to other days of the week, repeat step
4 and step 5.
The multi-monitor lamp blinks twice. The TIMER lamp periodically lights orange.
Press 6. to complete the setting.
” is displayed on the LCD and WEEKLY TIMER operation is activated.
NOTE
Note on copy mode
The entire reservation of the source day of the week is copied in the copy mode.
In the case of making a reservation change for any day of the week individually after copying the content of weekly reservations, press
and change the settings in the steps of “Setting mode”.
Page 24
01_EN_3P357704-1.indd 2601_EN_3P357704-1.indd 26 12/17/2013 3:22:17 PM12/17/2013 3:22:17 PM
27
WEEKLY TIMER Operation
Con rming a reservation
The reservation can be con rmed.
Setting Displays
Normal Con rmation
Press 1. .
The day of the week and the reservation number of the current day will be displayed.
Press 2. to select the day of the week and the
reservation number to be con rmed.
Pressing displays the reservation details.
To change the con rmed reserved settings, select the reservation number and press
.
The mode is switched to setting mode. Go to setting mode step
2.
Page 24
Press 3. to exit con rming mode.
To deactivate WEEKLY TIMER operation
Press while “ ” is displayed on
the LCD.
The “ ” will disappear from the LCD.
The TIMER lamp goes off.
To reactivate the WEEKLY TIMER operation, press
again.
If a reservation deactivated with
is activated once again, the last reservation
mode will be used.
CAUTION
If not all the reservation settings are re ected, deactivate the WEEKLY TIMER operation once. Then press again to reactivate the
WEEKLY TIMER operation.
01_EN_3P357704-1.indd 2701_EN_3P357704-1.indd 27 12/17/2013 3:22:19 PM12/17/2013 3:22:19 PM
29
Note for Multi System
Multi system has one outdoor unit connected to multiple indoor units.
Selecting the operation mode
When the priority room setting is active
but the set unit is not operating or when
the priority room setting is inactive
When more than one indoor unit is operating, priority is given to
the rst unit that was turned on.
In this case, set the units that are turned on later to the same
operation mode as the rst unit.
Otherwise, they will enter the standby state, and the multi-monitor
lamp will ash: this does not indicate malfunction.
NOTE
Notes on operation mode for multi system
COOL, DRY and FAN operation may be used at the same time.
AUTO operation automatically selects COOL operation or HEAT operation based on the indoor temperature.
Therefore, AUTO operation is available when selecting the same operation mode as that of the room with the rst unit to be turned on.
CAUTION
Normally, the operation mode in the room where the unit is rst run is given priority, but the following situations are exceptions, so please keep
this in mind.
If the operation mode of the rst room is FAN operation, then using HEAT operation in any room after this will give priority to HEAT operation. In
this situation, the air conditioner running in FAN operation will go on standby, and the multi-monitor lamp will ash.
With the priority room setting active
Refer to “Priority room setting” on the next page.
NIGHT QUIET mode (Available only for COOL operation)
NIGHT QUIET mode requires initial programming during installation. Please consult your retailer or dealer for assistance.
NIGHT QUIET mode reduces the operation noise of the outdoor unit during the nighttime hours to prevent annoyance to
neighbours.
The NIGHT QUIET mode is activated when the temperature drops 5°C or more below the highest temperature recorded that day.
Therefore, when the temperature difference is less than 5°C, this function will not be activated.
NIGHT QUIET mode reduces slightly the cooling ef ciency of the unit.
OUTDOOR UNIT QUIET operation
Refer to “OUTDOOR UNIT QUIET operation”.
Page 19
When the priority room setting is active but the set unit is not operating or
when the priority room setting is inactive
When using the OUTDOOR UNIT QUIET operation feature with the multi system, set all indoor units to OUTDOOR UNIT
QUIET operation using their remote controllers.
When clearing OUTDOOR UNIT QUIET operation, clear one of the operating indoor units using their remote controller.
However OUTDOOR UNIT QUIET operation display remains on the remote controller for other rooms.
We recommend you release all rooms using their remote controllers.
When the priority room setting is active
Refer to “Priority room setting” on the next page.
A room B room
C room D room
Outdoor unit
01_EN_3P357704-1.indd 2901_EN_3P357704-1.indd 29 12/17/2013 3:22:21 PM12/17/2013 3:22:21 PM
English
30
COOL/HEAT mode lock
The COOL/HEAT mode lock requires initial programming during installation. Please consult your authorized dealer for
assistance. The COOL/HEAT mode lock sets the unit forcibly to either COOL or HEAT operation. This function is convenient
when you wish to set all indoor units connected to the multi system to the same operation mode.
NOTE
The COOL/HEAT mode lock cannot be activated together with the priority room setting.
Priority room setting
The priority room setting requires initial programming during installation. Please consult your authorized dealer for assistance.
The room designated as the priority room takes priority in the following situations.
Operation mode priority
As the operation mode of the priority room takes precedence, the user can select a different operation mode from other
rooms.
[Example]
Room A is the priority room in the examples.
When COOL operation is selected in room A while operating the following modes in room B, C and D :
Operation mode in room B, C and D Status of room B, C and D when the unit in room A is in COOL operation
COOL or DRY or FAN
Current operation mode maintained
HEAT
The unit enters standby mode. Operation resumes when the room A unit stops operating.
AUTO
If the unit is set to COOL operation, it continues. If the unit is set to HEAT operation, it enters
standby mode. Operation resumes when the room A unit stops operating.
Priority when POWERFUL operation is used
[Example]
Room A is the priority room in the examples.
The indoor units in rooms A, B, C and D are all operating. If the unit in room A enters POWERFUL operation, operation
capacity will be concentrated in room A. In such a case, the cooling (heating) ef ciency of the units in room B, C and D
may be slightly reduced.
Priority when OUTDOOR UNIT QUIET operation is used
[Example]
Room A is the priority room in the examples.
Just by setting the unit in room A to QUIET operation, the air conditioner starts OUTDOOR UNIT QUIET operation.
You don’t have to set all the operated indoor units to QUIET operation.
01_EN_3P357704-1.indd 3001_EN_3P357704-1.indd 30 12/17/2013 3:22:21 PM12/17/2013 3:22:21 PM
31
Care and Cleaning
Quick reference
How to open the upper front panel How to close the upper front panel
Hold the upper front panel by the sides and open it.
Fix the panel with the panel support plate.
Return the panel support plate to its previous position.
Lower the lower front panel to the original position.
Press the upper front panel at both sides.
Cleaning parts
Notes on cleaning
For cleaning, do not use the materials as follows.
Hot water above 40°C.
Benzine, gasoline, thinner, other volatile oils.
Polishing compound.
Scrubbing brushes, other hard stuff.
CAUTION
Before cleaning, be sure to stop the operation and turn off the circuit breaker.
Do not touch the aluminium ns of the indoor unit. If you touch those parts, this may cause an injury.
Air lter
Vacuum dust or wash the lter.
Once every 2 weeks
Page 32
Titanium apatite photocatalytic air-purifying lter
Vacuum dust or replace the lter.
[Cleaning] [Replacement]
Once every 6 months Once every 3 years
Page 33
Page 33
Upper and lower
front panels
With the panels closed, wipe
them with a soft damp cloth.
If bothered by dirt
Indoor unit and
remote controller
Wipe them with soft cloth.
If bothered by dirt
01_EN_3P357704-1.indd 3101_EN_3P357704-1.indd 31 12/17/2013 3:22:21 PM12/17/2013 3:22:21 PM
English
32
CAUTION
Do not touch the aluminium ns by bare hand at the time of dismounting or mounting the lter.
Pull out the air lters.1.
Open the upper front panel.
Set the panel support plate between the ribs on
the unit to x the upper front panel.
Push the lter tab at the center of each air lter a
little upwards, then pull it down.
3) Pull down
2) Push
Filter tab
1) Pull
Panel support plate
Ribs
Back of the upper
front panel
Wash the air lters with 2.
water or clean them with
vacuum cleaner.
It is recommended to clean the air lters every
2 weeks.
If the dust does not come off easily
Wash the air lters with neutral detergent thinned with
lukewarm water, then dry them up in the shade.
Be sure to remove the titanium apatite photocatalytic
air-purifying lter. Refer to “Titanium apatite
photocatalytic air-purifying lter” on the next page.
Set the lters as they were 3.
and close the upper front
panel.
Return the panel support plate to its previous
position.
Lower the lower front panel to the original
position.
Close the upper front panel slowly.
Press the upper front panel at both sides.
Air lter
01_EN_3P357704-1.indd 3201_EN_3P357704-1.indd 32 12/17/2013 3:22:22 PM12/17/2013 3:22:22 PM
33
Care and Cleaning
Take off the titanium 1.
apatite photocatalytic air-
purifying lter.
Open the upper front panel and pull out the air lters.
Hold the recessed parts of the frame and unhook
the 4 claws.
Claw
Clean or replace the titanium
2.
apatite photocatalytic air-
purifying lter.
[Maintenance]
Vacuum dusts, and soak in 2-1
lukewarm water or water for about
10 to 15 minutes if dirt is heavy.
Do not remove the lter from frame when
washing with water.
After washing, shake off remaining 2-2
water and dry in the shade.
Since the material is made out of polyester, do not
wring out the lter when removing water from it.
[Replacement]
Remove the lter from the lter
frame and attach a new one.
Do not throw away the lter frame. Reuse the
lter frame when replacing the titanium apatite
photocatalytic air-purifying lter.
When attaching the lter, check that the lter is
set in the tabs.
Tabs
Dispose of the old lter as non- ammable waste.
Set the lters as they were and
3.
close the upper front panel.
Return the panel support plate to its previous position.
Lower the lower front panel to the original position.
Close the upper front panel slowly.
Press the upper front panel at both sides.
NOTE
Operation with dirty lters:
cannot deodorise the air,
cannot clean the air,
results in poor heating or cooling,
may cause odour.
Dispose of old lters as non- ammable waste.
To order titanium apatite photocatalytic air-purifying
lter, contact the service shop where you bought the air
conditioner.
Item
Titanium apatite photocatalytic
air-purifying lter (without frame) 1 set
Part No. KAF970A46
Titanium apatite photocatalytic air-purifying lter
01_EN_3P357704-1.indd 3301_EN_3P357704-1.indd 33 12/17/2013 3:22:25 PM12/17/2013 3:22:25 PM
English
34
Check the units
Check that the base, stand and other ttings of the outdoor unit are not decayed or corroded.
Check that nothing blocks the air inlets and the outlets of the indoor unit and the outdoor unit.
Check that the drain comes smoothly out of the drain hose during COOL or DRY operation.
If no drain water is seen, water may be leaking from the indoor unit. Stop operation and consult the service shop if this is the
case.
Before a long idle period
Operate the FAN only for several hours on a ne day to dry 1.
out the inside.
Press and select “ ” operation.
Press
and start the operation.
After operation stops, turn off the circuit breaker for the room 2.
air conditioner.
Clean the air lters and set them again.3.
Take out batteries from the remote controller.4.
When a multi outdoor unit is connected, make sure the HEAT operation is not used at the other room before you use
the FAN operation.
Page 29
We recommend periodical maintenance
In certain operating conditions, the inside of the air conditioner may get foul after several seasons of use, resulting in poor
performance. It is recommended to have periodical maintenance by a specialist aside from regular cleaning by the user.
For specialist maintenance, contact the service shop where you bought the air conditioner.
The maintenance cost must be borne by the user.
Important information regarding the refrigerant used
This product contains uorinated greenhouse gases covered by the Kyoto Protocol.
Refrigerant type:R410A
GWP
(1)
value:1975
(1) GWP = global warming potential
Periodical inspections for refrigerant leaks may be required depending on European or local legislation. Please contact your
local dealer for more information.
01_EN_3P357704-1.indd 3401_EN_3P357704-1.indd 34 12/17/2013 3:22:25 PM12/17/2013 3:22:25 PM
35
Troubleshooting
These cases are not troubles.
The following cases are not air conditioner troubles but have some reasons. You may just continue using it.
Indoor unit
Outdoor unit
The HEAT operation stops suddenly
and a owing sound is heard.
The outdoor unit is taking away the frost.
The HEAT operation starts after the frost on the outdoor
unit is removed. You should wait for about 4 to 12 minutes.
Operation does not start soon.
When “ON/OFF” button was pressed soon
after operation was stopped.
When the mode was reselected.
This is to protect the air conditioner.
You should wait for about 3 minutes.
The aps do not start swinging
immediately.
The air conditioner is adjusting the position of the
aps. The aps will start moving soon.
A sound is heard.
A sound like a ow of water
This sound is generated because the refrigerant in
the air conditioner is owing.
This is a pumping sound of the water in the air
conditioner and heard when the water is pumped out
from the air conditioner in cooling or drying operation.
The refrigerant ows in the air conditioner even if the
air conditioner is not working when the indoor units
in other rooms are in operation.
Blowing sound
This sound is generated when the ow of the
refrigerant in the air conditioner is switched over.
Ticking sound
This sound is generated when the size of the air conditioner
slightly expands or shrinks as a result of temperature changes.
Whistling sound
This sound is generated when refrigerant ows
during defrosting operation.
Clicking sound during operation or idle time
This sound is generated when the refrigerant control
valves or the electrical parts operate.
Clopping sound
This sound is heard from the inside of the air conditioner
when the exhaust fan is activated while the room doors
are closed. Open the window or turn off the exhaust fan.
The outdoor unit emits water or steam.
In HEAT operation
The frost on the outdoor unit melts into water or steam when the air conditioner is
in defrost operation.
In COOL or DRY operation
Moisture in the air condenses into water on the cool surface of outdoor unit piping
and drips.
The air conditioner stops generating
air ow during operation.
Once the set temperature is reached, the air ow
rate is reduced and operation stopped in order to
avoid generating cool air ow (during heating) or in
order to keep the humidity from rising (during
cooling). Operation will resume automatically when
the indoor temperature rises or falls.
01_EN_3P357704-1.indd 3501_EN_3P357704-1.indd 35 12/17/2013 3:22:25 PM12/17/2013 3:22:25 PM
English
36
Troubleshooting measures are classi ed into the following
2 types on a remedial basis.
Take an appropriate measure according to the symptom.
Not trouble
These cases are not troubles.
Check
Please check again before calling a
repair person.
The air conditioner does not operate.
(Multi-monitor lamp is off.)
Has a circuit breaker turned off or a fuse blown?
Is it a power failure?
Are batteries set in the remote controller?
Is the timer setting correct?
Cooling (Heating) effect is poor.
Are the air lters clean?
Is there anything blocking the air inlet or the outlet of
the indoor and the outdoor units?
Is the temperature setting appropriate?
Are the windows and doors closed?
Are the air ow rate and the air ow direction set
appropriately?
Is the air conditioner in ECONO operation or
OUTDOOR UNIT QUIET operation?
An abnormal functioning happens
during operation.
The air conditioner may malfunction with lightning or
radio waves. Turn off the circuit breaker, turn it on
again and try operating the air conditioner with the
remote controller.
Operation stopped suddenly.
(Multi-monitor lamp ashes.)
Are the air lters clean?
Clean the air lters.
Is there anything blocking the air inlet or the outlet of
the indoor and the outdoor units?
Turn off the circuit breaker and take all obstacles away.
Then turn it on again and try operating the air conditioner
with the remote controller. If the lamp still ashes, call
the service shop where you bought the air conditioner.
Are operation modes all the same for indoor units
connected to outdoor units in the multi system?
If not, set all indoor units to the same operation mode
and con rm that the lamps ash.
Moreover, when the operation mode is in AUTO, set all
indoor unit operation modes to COOL or HEAT for a
moment and check again that the lamps are normal. If
the lamps stop ashing after the above steps, there is
no malfunction.
Page 29
Upper and lower front panels do not
open. (Multi-monitor lamp ashes.)
Is there something caught in the upper and lower front
panels?
Remove the object and attempt operation again using
the remote controller.
If the upper and lower front panels still do not open
and the multi-monitor lamp is still ashing,
consult the service shop where you bought
the air conditioner.
Upper front panel does not close
completely.
Are the upper front panel locks set appropriately?
Mist comes out of the indoor unit.
This happens when the air in the room is cooled into
mist by the cold air ow during COOL operation.
This is because the air in the room is cooled by the
heat exchanger and becomes mist during
defrost operation.
01_EN_3P357704-1.indd 3601_EN_3P357704-1.indd 36 12/17/2013 3:22:26 PM12/17/2013 3:22:26 PM
37
Troubleshooting
Hot air does not ow out soon after
the start of HEAT operation.
The air conditioner is warming up. You should wait for
1 to 4 minutes. (The system is designed to start
discharging air only after it has reached a certain
temperature.)
The ON/OFF TIMER does not
operate according to the settings.
Check if the ON/OFF TIMER and the WEEKLY TIMER
are set to the same time.
Change or deactivate the settings in the WEEKLY
TIMER.
Page 23
Operation stopped suddenly.
(Multi-monitor lamp is on.)
For system protection, the air conditioner may stop
operating on a sudden large voltage uctuation. It
automatically resumes operation in about 3 minutes.
Remote controller does not work
properly.
No remote controller signals are displayed.
The remote controller sensitivity is low.
The display is low in contrast or blacked out.
The display runs out of control.
The batteries are dying and the remote controller is
malfunctioning. Replace all the batteries with new, size
AAA.LR03 (alkaline). For details, refer to “To set the
batteries” of this manual.
Page 9
The outdoor fan rotates while the
air conditioner is not in operation.
After operation is stopped
The outdoor fan continues rotating for another
60 seconds for system protection.
While the air conditioner is not in operation
When the outdoor temperature is very high, the
outdoor fan starts rotating for system protection.
The indoor unit gives out odour.
This happens when smells of the room, furniture, or
cigarettes are absorbed into the unit and discharged
with the air ow.
( If this happens, we recommend you to have the
indoor unit washed by a technician. Consult the
service shop where you bought the air conditioner.)
If the upper and lower front panels
are closed while the air conditioner is
in operation, the air conditioner will
stop operating and the multi-monitor
lamp will blink.
Restart the air conditioner after stopping the operation
of the air conditioner with the remote controller.
HEAT operation cannot be selected,
even though the unit is heat pump
model.
Check that the jumper (J8) has not been cut. If it has
been cut, contact the service shop.
Jumper (J8)
01_EN_3P357704-1.indd 3701_EN_3P357704-1.indd 37 12/17/2013 3:22:27 PM12/17/2013 3:22:27 PM
English
38
Call the service shop immediately
WARNING
When an abnormality (such as a burning smell) occurs, stop operation and turn off the circuit breaker.
Continued operation in an abnormal condition may result in troubles, electric shocks or re.
Consult the service shop where you bought the air conditioner.
Do not attempt to repair or modify the air conditioner by yourself.
Incorrect work may result in electric shocks or re.
Consult the service shop where you bought the air conditioner.
If one of the following symptoms takes place, call the service shop immediately.
The power cord is abnormally hot or damaged.
An abnormal sound is heard during operation.
The circuit breaker, a fuse, or the earth leakage circuit
breaker cuts off the operation frequently.
A switch or a button often fails to work properly.
There is a burning smell.
Water leaks from the indoor unit.
Turn off the circuit breaker and call the service
shop.
After a power failure
The air conditioner automatically resumes operation in about 3 minutes. You should just wait for a while.
Lightning
If lightning may strike the neighbouring area, stop operation and turn off the circuit breaker for system protection.
Disposal requirements
Your product and the batteries supplied with the controller are marked with this symbol. This symbol means that
electrical and electronic products and batteries shall not be mixed with unsorted household waste.
For batteries, a chemical symbol can be printed beneath the symbol. This chemical symbol means that the
battery contains a heavy metal above a certain concentration. Possible chemical symbols are:
Pb: lead (>0.004%)
Do not try to dismantle the system yourself: the dismantling of the product, treatment of the refrigerant, of oil and of other parts
must be done by a quali ed installer in accordance with relevant local and national legislation.
Units and waste batteries must be treated at a specialized treatment facility for re-use, recycling and recovery.
By ensuring correct disposal, you will help to prevent potential negative consequences for the environment and human health.
Please contact the installer or local authority for more information.
01_EN_3P357704-1.indd 3801_EN_3P357704-1.indd 38 12/17/2013 3:22:27 PM12/17/2013 3:22:27 PM
39
Troubleshooting
Fault diagnosis by remote controller
The remote controller can receive from the indoor unit a corresponding error code according
to the fault.
When 1. is held down for about 5 seconds,
a “ ” indication blinks on the temperature
display section.
Press
2. repeatedly until a continuous
beep is produced.
The code indication changes as shown below, and noti es with a long beep.
NOTE
A short beep and two consecutive beeps indicate non-corresponding codes.
To cancel the code display, hold
for about 5 seconds. The code display also cancels itself if the button is not pressed for 1 minute.
CODE
MEANING
SYSTEM
00
NORMAL
U0
REFRIGERANT SHORTAGE
U2
OVER-VOLTAGE DETECTION
U4
SIGNAL TRANSMISSION ERROR (BETWEEN INDOOR AND OUTDOOR UNIT)
INDOOR
UNIT
A1
INDOOR UNIT PCB ABNORMALITY
A5
FREEZE-UP PROTECTION OR HEATING PEAK-CUT CONTROL
A6
FAN MOTOR (DC MOTOR) ABNORMALITY
C4
INDOOR HEAT EXCHANGER THERMISTOR ABNORMALITY
C7
FRONT PANEL OPEN /CLOSE FAULT
C9
ROOM TEMPERATURE THERMISTOR ABNORMALITY
OUTDOOR
UNIT
EA
FOUR WAY VALVE ABNORMALITY
E1
OUTDOOR UNIT PCB ABNORMALITY
E5
OL ACTIVATION (COMPRESSOR OVERLOAD)
E6
COMPRESSOR LOCK
E7
DC FAN LOCK
F3
DISCHARGE PIPE TEMPERATURE CONTROL
H0
COMPRESSOR SYSTEM SENSOR ABNORMALITY
H6
POSITION SENSOR ABNORMALITY
H8
DC VOLTAGE / CURRENT SENSOR ABNORMALITY
H9
OUTDOOR TEMPERATURE THERMISTOR ABNORMALITY
J3
DISCHARGE PIPE THERMISTOR ABNORMALITY
J6
OUTDOOR HEAT EXCHANGER THERMISTOR ABNORMALITY
L4
RADIATION FIN TEMPERATURE RISE
L5
OUTPUT OVERCURRENT DETECTION
P4
RADIATION FIN THERMISTOR ABNORMALITY
01_EN_3P357704-1.indd 3901_EN_3P357704-1.indd 39 12/17/2013 3:22:27 PM12/17/2013 3:22:27 PM
English
40
LED ON OUTDOOR UNIT PCB
3MXS, 4MXS, 5MXS series
GREEN RED
MICROCOMPUTER
NORMAL
MALFUNCTION
DETECTION
LED-A LED1 LED2 LED3 LED4 LED5 DIAGNOSIS
●●●●●
NORMAL CHECK INDOOR UNIT
HIGH PRESSURE PROTECTOR WORKED OR FREEZE-UP IN
OPERATING UNIT OR STAND-BY UNIT
OVERLOAD RELAY WORKED OR HIGH DISCHARGE PIPE
TEMPERATURE
FAULTY COMPRESSOR START
INPUT OVERCURRENT
●●●
THERMISTOR OR CT ABNORMALITY
HIGH TEMPERATURE SWITCHBOX
●●●
HIGH TEMPERATURE AT INVERTER CIRCUIT HEATSINK
●● ●●
OUTPUT OVERCURRENT
●●
REFRIGERANT SHORTAGE
●●
LOW VOLTAGE TO MAIN CIRCUIT OR MOMENTARY VOLTAGE
LOSS
●●●●
REVERSING SOLENOID VALVE SWITCHING FAILURE
FAN MOTOR FAULT
−−−−
[NOTE 1]
−−−−
POWER SUPPLY FAULT OR [NOTE 2]
NOTE: The LED5 is only available in the 5M series.
GREEN NORMALLY FLASHING
RED NORMALLY OFF
ON
FLASHING
OFF
IRRELEVANT
LED ON OUTDOOR UNIT PCB
2MXS series
GREEN
MICROCOMPUTER NORMAL
LED-A DIAGNOSIS
NORMAL CHECK INDOOR UNIT
[NOTE 1]
POWER SUPPLY FAULT OR [NOTE 2]
GREEN NORMALLY FLASHING
ON
FLASHING
OFF
NOTE
Turn off the power and then on again. If the LED display recurs, the outdoor unit PCB is faulty.
Diagnosis marked
Do not apply to some cases. For details, refer to the service guide.
01_EN_3P357704-1.indd 4001_EN_3P357704-1.indd 40 12/17/2013 3:22:28 PM12/17/2013 3:22:28 PM
Deutsch
22
EIN-TIMER-Betrieb
Zur Benutzung des EIN-TIMER-Betriebs
Prüfen Sie, ob die Uhr korrekt eingestellt ist.
Stellen Sie anderenfalls die Uhr auf die aktuelle Zeit ein.
Seite 10
Drücken Sie 1. .
” wird auf dem LCD angezeigt.
” blinkt.
” und der Wochentag verschwinden vom LCD.
Drücken Sie 2. , bis die Zeiteinstellung den
gewünschten Punkt erreicht.
Mit jedem Drücken der Tasten wird die Zeiteinstellung um 10 Minuten erhöht oder
erniedrigt. Durch Gedrückthalten der Tasten wird die Einstellung schnell geändert.
Drücken Sie 3. erneut.
” und die eingestellte Zeit werden auf dem LCD angezeigt.
Die Multi-Monitor-Lampe blinkt zweimal.
Die TIMER-Lampe leuchtet periodisch in Orange.
Seite 5
Anzeige
Zur Aufhebung des EIN-TIMER-Betriebs
Drücken Sie .
” und die eingestellte Zeit verschwinden vom LCD.
” und der Wochentag werden auf dem LCD angezeigt.
Zum Kombinieren von EIN-TIMER und AUS-TIMER
Ein Beispiel der Kombination der 2 Timer ist unten angegeben.
(Beispiel)
Aktuelle Zeit: 23:00 (Das Gerät ist in Betrieb)
AUS-TIMER um 0:00
EIN-TIMER um 14:00
Kombiniert
HINWEIS
Stellen Sie in den folgenden Fällen den Timer erneut ein.
Nachdem ein Leistungsschalter ausgeschaltet worden ist.
Nach einem Stromausfall.
Nach dem Auswechseln der Batterien in der Fernbedienung.
02_DE_3P357704-1.indd 2202_DE_3P357704-1.indd 22 12/17/2013 9:37:17 AM12/17/2013 9:37:17 AM
23
WOCHENTIMER-Betrieb
Bis zu 4 Timereinstellungen können für jeden Wochentag gespeichert werden. Es ist praktisch, wenn der
WOCHENTIMER auf die Lebensgewohnheiten der Familie eingestellt wird.
Einstellungsbeispiel für den WOCHENTIMER
Die gleichen Timer-Einstellungen werden für die Wochentage von Montag bis Freitag verwendet, während für das
Wochenende andere Einstellungen verwendet werden.
[Montag]
Timereinstellungen können für die Programme 1-4 vorgenommen werden.
Seite 24
6:00 8:30 17:30 22:00
25°C 27°C
EIN EIN AUSAUS
Programm 1 Programm
2
Programm
3
Programm
4
EIN AUS EIN AUS
[Dienstag]
bis
[Freitag]
Benutzen Sie den Kopiermodus, um die Einstellungen für Dienstag bis Freitag vorzunehmen, weil diese
Einstellungen mit denen für Montag identisch sind.
Seite 26
6:00 8:30 17:30 22:00
25°C 27°C
Programm
1
Programm
2
Programm
3
Programm
4
EIN AUS EIN AUS
[Samstag] Keine Timereinstellungen
[Sonntag]
Timereinstellungen können für die Programme 1-4 vorgenommen werden.
Seite 24
8:00 10:00 19:00 21:00
27°C 27°C25°C
EIN
EIN
AUS
AUS
EIN AUS AUS EIN
Programm
1
Programm
2
Programm
3
Programm
4
Bis zu 4 Reservierungen pro Tag und 28 Reservierungen pro Woche können im WOCHENTIMER festgelegt werden. Der
effektive Gebrauch des Kopiermodus gewährleistet die bequeme Durchführung von Reservierungen.
So ermöglicht beispielsweise der Gebrauch der Einstellungen EIN-EIN-EIN-EIN, den Betriebsmodus zu planen und
Temperaturänderungen festzulegen. Darüber hinaus kann durch Verwendung der Einstellungen AUS-AUS-AUS-AUS nur
die Ausschaltzeit für jeden Tag festgelegt werden. Dadurch wird die Klimaanlage automatisch ausgeschaltet, falls der
Benutzer vergisst, sie auszuschalten.
02_DE_3P357704-1.indd 2302_DE_3P357704-1.indd 23 12/17/2013 9:37:19 AM12/17/2013 9:37:19 AM
Deutsch
24
Zur Benutzung des WOCHENTIMER-Betriebs
Einstellmodus
Stellen Sie sicher, dass Wochentag und Uhrzeit eingestellt sind. Stellen Sie anderenfalls
den Wochentag und die Uhrzeit ein.
Seite 10
6:00 8:30 17:30 22:00
25°C 27°C
Programm 1 Programm 2 Programm 3 Programm 4
EIN AUS EIN AUS
[Montag]
Einstellungsanzeigen
Tag und Nummer EIN/AUS Zeit Temperatur
Drücken Sie 1. .
Der Wochentag und die Reservierungsnummer des aktuellen Tages werden angezeigt.
1 bis 4 Einstellungen können pro Tag vorgenommen werden.
Drücken Sie
2.
,
um den gewünschten Wochentag
und die Reservierungsnummer auszuwählen.
Durch Drücken von werden Reservierungsnummer und Wochentag geändert.
Drücken Sie
3. .
Der Wochentag und die Reservierungsnummer werden eingestellt.
” und “ ” blinken.
Drücken Sie
4.
, um den gewünschten Modus zu wählen.
Durch Drücken von
werden die Einstellungen von
oder
der Reihe nach geändert.
Durch Drücken von wird zwischen den folgenden Posten umgeschaltet, die in
abwechselnder Reihenfolge auf dem LCD erscheinen.
EIN-TIMER AUS-TIMER leer
Falls die Reservierung bereits eingestellt worden ist, wird sie durch die Wahl von “leer” gelöscht.
Gehen Sie zu Schritt
9 , wenn “leer” gewählt wird.
Um zur Einstellung des Wochentags und der Reservierungsnummer zurückzukehren,
drücken Sie
.
Drücken Sie 5. .
Der EIN/AUS-TIMER-Modus wird eingestellt.
” und die Zeit blinken.
02_DE_3P357704-1.indd 2402_DE_3P357704-1.indd 24 12/17/2013 9:37:20 AM12/17/2013 9:37:20 AM
25
WOCHENTIMER-Betrieb
HINWEIS
Hinweise zum WOCHENTIMER-Betrieb
Vergessen Sie nicht, zuerst die Uhr an der Fernbedienung einzustellen.
Seite 10
Wochentag, EIN/AUS-TIMER-Modus, Uhrzeit und Solltemperatur (nur für EIN-TIMER-Modus) können mit dem WOCHENTIMER eingestellt
werden. Die anderen Einstellungen für EIN-TIMER basieren auf den Einstellungen unmittelbar vor dem Betrieb.
WOCHENTIMER und EIN/AUS-TIMER können nicht gleichzeitig benutzt werden. Der EIN/AUS-TIMER-Betrieb hat Vorrang, falls er bei noch aktivem
WOCHENTIMER eingestellt wird. Der WOCHENTIMER wird in den Bereitschaftszustand versetzt, und “ ” wird vom LCD ausgeblendet.
Wenn der EIN/AUS-TIMER abgelaufen ist, wird der WOCHENTIMER automatisch aktiv.
Durch Ausschalten des Leistungsschalters, Stromausfälle und andere ähnliche Ereignisse wird der Betrieb der internen Uhr des Innengeräts
ungenau.
Seite 10
6.
Drücken Sie , um die gewünschte Zeit zu wählen.
Die Zeit kann zwischen 0:00 und 23:50 in 10-Minuten-Intervallen eingestellt werden.
Um zur Einstellung des EIN/AUS-TIMER-Modus zurückzukehren, drücken Sie
.
Gehen Sie zu Schritt
9 bei Einstellung des Ausschalttimers.
Drücken Sie 7. .
Die Zeit wird eingestellt.
” und die Temperatur blinken.
Drücken Sie
8.
, um die gewünschte Temperatur zu wählen.
Die Temperatur kann zwischen 10°C und 32°C eingestellt werden.
KÜHLEN oder AUTOMATIK: Das Gerät arbeitet bei 18°C, selbst wenn es auf 10 bis
17°C eingestellt ist.
Seite 12
HEIZEN oder AUTOMATIK: Das Gerät arbeitet bei 30°C, selbst wenn es auf 31 bis
32°C eingestellt ist.
Seite 12
Um zur Zeiteinstellung zurückzukehren, drücken Sie .
Die Solltemperatur wird nur angezeigt, wenn die Moduseinstellung aktiviert ist.
Drücken Sie 9. .
Richten Sie die Fernbedienung auf das Innengerät, und prüfen Sie, ob der
Empfangston ertönt und die Multi-Monitor-Lampe blinkt.
Die Temperatur und Zeit werden im EIN-TIMER-Betrieb eingestellt und die Zeit wird
im AUS-TIMER-Betrieb eingestellt.
Der nächste Reservierungsbildschirm erscheint.
Um weitere Einstellungen durchzuführen, wiederholen Sie den Vorgang ab Schritt
4.
Die Multi-Monitor-Lampe blinkt zweimal.
Die TIMER-Lampe leuchtet periodisch in Orange.
Seite 5
Die Multi-Monitor-Lampe blinkt nicht in Orange, wenn alle Reservierungseinstellungen gelöscht werden
.
Anzeige
Drücken Sie
10.
, um die Einstellung abzuschließen.
” wird auf dem LCD angezeigt, und der WOCHENTIMER-Betrieb wird aktiviert.
Eine vorgenommene Reservierung kann leicht kopiert werden, um dieselben Einstellungen
für einen anderen Wochentag zu benutzen. Siehe “Kopiermodus”.
Seite 26
02_DE_3P357704-1.indd 2502_DE_3P357704-1.indd 25 12/17/2013 9:37:21 AM12/17/2013 9:37:21 AM
Deutsch
26
Kopiermodus
Eine vorgenommene Reservierung kann für einen anderen Wochentag kopiert werden.
Die gesamte Reservierung des ausgewählten Wochentags wird kopiert.
6:00 8:30 17:30 22:00
25°C 27°C
6:00 8:30 17:30 22:00
25°C 27°C
KOPIERENKOPIEREN
Programm 1 Programm 2 Programm 3 Programm 4
EIN AUS EIN AUS
[Montag]
Programm 1 Programm 2 Programm 3 Programm 4
EIN AUS EIN AUS
[Dienstag]
bis
[Freitag]
Einstellungsanzeigen
Bestätigung Kopieren Einfügen Normal
Drücken Sie 1. .
Drücken Sie
2. , um den zu kopierenden
Wochentag zu bestätigen.
Drücken Sie
3. .
Die gesamte Reservierung des ausgewählten Wochentags wird kopiert.
Drücken Sie
4.
, um den Ziel-Wochentag einzustellen.
Drücken Sie 5. .
Richten Sie die Fernbedienung auf das Innengerät, und prüfen Sie, ob der
Empfangston ertönt und die Multi-Monitor-Lampe blinkt.
Die Reservierung wird zum ausgewählten Wochentag kopiert. Die gesamte
Reservierung des ausgewählten Wochentags wird kopiert.
Um das Kopieren der Einstellungen zu anderen Wochentagen fortzusetzen,
wiederholen Sie Schritt
4 und Schritt 5.
Die Multi-Monitor-Lampe blinkt zweimal. Die TIMER-Lampe leuchtet periodisch in Orange.
Drücken Sie
6.
, um die Einstellung abzuschließen.
wird auf dem LCD angezeigt, und der WOCHENTIMER-Betrieb wird aktiviert.
HINWEIS
Hinweis zum Kopiermodus
Die gesamte Reservierung des Quellen-Wochentags wird im Kopiermodus kopiert.
Falls Sie nach dem Kopieren des Inhalts wöchentlicher Reservierungen eine Reservierungsänderung für einen einzelnen Wochentag
vornehmen möchten, drücken Sie
und ändern Sie die Einstellungen in den Schritten des “Einstellmodus”.
Seite 24
02_DE_3P357704-1.indd 2602_DE_3P357704-1.indd 26 12/17/2013 9:37:22 AM12/17/2013 9:37:22 AM
27
WOCHENTIMER-Betrieb
Bestätigen einer Reservierung
Die Reservierung kann bestätigt werden.
Einstellungsanzeigen
Normal Bestätigung
Drücken Sie 1. .
Der Wochentag und die Reservierungsnummer des aktuellen Tages werden
angezeigt.
Drücken Sie
2.
, um den zu bestätigenden Wochentag
und die Reservierungsnummer auszuwählen.
Durch Drücken von werden die Reservierungsdetails angezeigt.
Um die bestätigten Reservierungseinstellungen zu ändern, wählen Sie die
Reservierungsnummer, und drücken Sie
.
Der Modus wird auf den Einstellmodus umgeschaltet. Gehen Sie zu Einstellmodus
Schritt
2.
Seite 24
Drücken Sie 3. , um den Bestätigungsmodus
zu beenden.
Zum Deaktivieren des WOCHENTIMER-Betriebs
Drücken Sie , während “ auf
dem LCD angezeigt wird.
” wird vom LCD ausgeblendet.
Die Lampe TIMER erlischt.
TUm den WOCHENTIMER-Betrieb neu zu aktivieren, drücken Sie
erneut.
Wird eine mit
deaktivierte Reservierung wieder aktiviert, wird der letzte
Reservierungsmodus verwendet.
ACHTUNG
Werden nicht alle Reservierungseinstellungen re ektiert, deaktivieren Sie den WOCHENTIMER-Betrieb einmal. Drücken Sie dann
erneut, um den WOCHENTIMER-Betrieb wieder zu aktivieren.
02_DE_3P357704-1.indd 2702_DE_3P357704-1.indd 27 12/17/2013 9:37:24 AM12/17/2013 9:37:24 AM
Deutsch
28
Zum Löschen von Reservierungen
Individuelle Reservierung
Drücken Sie 1. .
Der Wochentag und die Reservierungsnummer werden angezeigt.
Drücken Sie
2.
, um den zu löschenden Wochentag
und die Reservierungsnummer auszuwählen.
Drücken Sie 3. .
” und “ ” oder “ ” blinken.
Drücken Sie 4. , und wählen Sie “leer”.
Durch Drücken von ird der EIN/AUS-TIMER-Modus gewechselt.
Durch Drücken von wird zwischen den folgenden Posten umgeschaltet, die in
abwechselnder Reihenfolge auf dem LCD erscheinen.
Bei Wahl von “leer” werden eventuell vorgenommene Reservierungseinstellung aufgehoben.
EIN-TIMER AUS-TIMER leer
Drücken Sie 5. .
Die gewählte Reservierung wird gelöscht.
Drücken Sie 6. .
Sind noch andere Reservierungen vorhanden, wird der WOCHENTIMER-Betrieb aktiviert.
Reservierungen für jeden Wochentag
Diese Funktion kann zum Löschen der Reservierungen für jeden Wochentag verwendet werden.
Sie kann während der Bestätigung oder Einstellung von Reservierungen verwendet werden.
Drücken Sie
1.
, um den zu löschenden Wochentag auszuwählen
Halten Sie
2.
für etwa 5 Sekunden gedrückt.
Die Reservierung des ausgewählten Wochentags wird gelöscht.
Alle Reservierungen
Halten Sie während der Normalanzeige für etwa 5
Sekunden gedrückt.
Richten Sie die Fernbedienung auf das Innengerät, und prüfen Sie, ob der Empfangston ertönt.
Dieser Vorgang ist unwirksam, während der WOCHENTIMER eingestellt wird.
Alle Reservierungen werden gelöscht.
02_DE_3P357704-1.indd 2802_DE_3P357704-1.indd 28 12/17/2013 9:37:25 AM12/17/2013 9:37:25 AM
29
Hinweis für Multisystem
Das Multisystem besteht aus einem Außengerät, das mit mehreren
Innengeräten verbunden ist.
Wählen des Betriebsmodus
Wenn die Prioritätsraum-Einstellung aktiv, aber
die eingestellte Einheit nicht in Betrieb ist, oder
wenn die Prioritätsraum-Einstellung nicht aktiv ist
Wenn mehr als ein Innengerät in Betrieb ist, erhält das zuerst
eingeschaltete Gerät die Priorität.
Stellen Sie in diesem Fall die später eingeschalteten Geräte auf
den gleichen Betriebsmodus wie das erste Gerät ein.
Anderenfalls werden sie in den Bereitschaftszustand versetzt, und
die Multi-Monitor-Lampe blinkt: Dies ist kein Anzeichen für eine
Funktionsstörung.
HINWEIS
Hinweise zum Betriebsmodus für Multisystem
Die Betriebsarten KÜHLEN, ENTFEUCHTEN und GEBLÄSE können gleichzeitig benutzt werden.
Der AUTOMATIK-Betrieb wählt automatisch den KÜHLEN- oder HEIZEN-Betrieb auf der Basis der Innentemperatur.
Daher ist der AUTOMATIK-Betrieb verfügbar, wenn derselbe Betriebsmodus wie der des Raums mit dem zuerst eingeschalteten Gerät gewählt wird.
ACHTUNG
Normalerweise erhält der Betriebsmodus im Raum, in dem das Gerät zuerst eingeschaltet wurde, die Priorität. Aber beachten Sie bitte, dass die folgenden Situationen Ausnahmen sind.
Wenn der Betriebsmodus des ersten Raums GEBLÄSE-Betrieb ist, dann erhält der HEIZEN-Betrieb durch anschließende Benutzung des HEIZEN-Betriebs in einem der
Räume den Vorrang. In dieser Situation wird die im GEBLÄSE-Betrieb laufende Klimaanlage in den Bereitschaftszustand versetzt, und die Multi-Monitor-Lampe blinkt.
Wenn die Prioritätsraum-Einstellung aktiv ist
Siehe “Prioritätsraum-Einstellung” auf der nächsten Seite.
NACHTFLÜSTER-Modus (nur für KÜHLEN-Betrieb verfügbar)
Der NACHTFLÜSTER-Modus bedarf einer anfänglichen Programmierung während der Installation. Bitte wenden Sie sich an
Ihren Händler oder Vertreter um Hilfe.
Der NACHTFLÜSTER-Modus reduziert das Betriebsgeräusch des Außengeräts während der Nachtstunden, um eine Belästigung der Nachbarn zu vermeiden.
Der NACHTFLÜSTER-Modus wird aktiviert, wenn die Temperatur 5°C oder mehr unter die am betreffenden Tag aufgezeichnete
Höchsttemperatur sinkt. Daher wird diese Funktion nicht aktiviert, wenn der Temperaturunterschied weniger als 5°C beträgt.
Der NACHTFLÜSTER-Modus reduziert die Kühlef zienz des Geräts geringfügig.
AUSSENGERÄT-FLÜSTER-Betrieb
Siehe “AUSSENGERÄT-FLÜSTER-Betrieb”.
Page 19
Wenn die Prioritätsraum-Einstellung aktiv, aber die eingestellte Einheit nicht in
Betrieb ist, oder wenn die Prioritätsraum-Einstellung nicht aktiv ist
Wenn Sie die Funktion des AUSSENGERÄT-FLÜSTER-Betriebs mit dem Multisystem verwenden wollen, stellen Sie alle
Innengeräte mit ihren Fernbedienungen auf AUSSENGERÄT-FLÜSTER-Betrieb ein.
Wenn Sie den AUSSENGERÄT-FLÜSTER-Betrieb aufheben wollen, nehmen Sie die Aufhebung an einem der laufenden Innengeräte mit dessen Fernbedienung vor.
Die Anzeige des AUSSENGERÄT-FLÜSTER-Betriebs bleibt jedoch auf den Fernbedienungen für die übrigen Räume bestehen.
Wir empfehlen, die Aufhebung in allen Räumen mit deren Fernbedienungen vorzunehmen.
Wenn die Prioritätsraum-Einstellung aktiv ist
Siehe “Prioritätsraum-Einstellung” auf der nächsten Seite.
Raum A Raum B
Raum C Raum D
Außengerät
02_DE_3P357704-1.indd 2902_DE_3P357704-1.indd 29 12/17/2013 9:37:26 AM12/17/2013 9:37:26 AM
Français
18
Fonctionnement PUISSANT
Le fonctionnement PUISSANT augmente au maximum l’effet de refroidissement (chauffage),
quel que soit le mode de fonctionnement. Vous pouvez obtenir la capacité maximale.
Démarrage du fonctionnement PUISSANT
Appuyez sur pendant le fonctionnement.
Le fonctionnement PUISSANT prend n au bout de 20 minutes. Le système se remet ensuite automatiquement
à fonctionner avec les réglages précédents qui étaient utilisés avant le fonctionnement PUISSANT.
” apparaît sur l’af chage à cristaux liquides.
Annulation du fonctionnement PUISSANT
Appuyez à nouveau sur .
” disparaît de l’af chage à cristaux liquides.
[Exemple]
Fonctionnement normal
Lorsque vous voulez obtenir
rapidement l’effet de
refroidissement, enclenchez le
fonctionnement PUISSANT.
Fonctionnement
PUISSANT
Le fonctionnement
PUISSANT fonctionnera
pendant 20 minutes.
Retour au
fonctionnement normal
REMARQUE
Remarques concernant le fonctionnement PUISSANT
Certaines fonctions ne sont pas disponibles lors de l’utilisation du fonctionnement PUISSANT.
Le fonctionnement PUISSANT ne peut pas être utilisé conjointement avec le fonctionnement ÉCONO, COURANT D’AIR CONFORTABLE
ou BRUIT RÉDUIT DE L’UNITÉ EXTÉRIEURE. La fonction dont la touche est pressée en dernier est prioritaire.
Le fonctionnement PUISSANT ne peut être réglé que lorsque l’unité est en marche. Si vous appuyez sur
, les réglages sont annulés et
” disparaît de l’af chage à cristaux liquides.
Le fonctionnement PUISSANT n’augmentera pas la capacité du climatiseur si le climatiseur fonctionne déjà avec sa capacité maximum.
En fonctionnement REFROIDISSEMENT et CHAUFFAGE
Pour augmenter au maximum l’effet de refroidissement (chauffage), la capacité de l’unité extérieure doit être augmentée et le débit d’air xé au réglage maximum.
Les réglages de la température et du débit d’air ne peuvent pas être modi és.
En fonctionnement SÉCHAGE
Le réglage de la température est diminué de 2,5°C et le débit d’air est légèrement augmenté.
En fonctionnement VENTILATEUR
Le débit d’air est xé au réglage maximum.
En fonctionnement AUTO
Pour augmenter au maximum l’effet de refroidissement (chauffage), la capacité de l’unité extérieure doit être augmentée et le débit d’air xé au réglage maximum.
Lors de l’utilisation du réglage de salle prioritaire
Reportez-vous à la “Remarque concernant le système multiple”.
Page 29
03_FR_3P357704-1.indd 1803_FR_3P357704-1.indd 18 12/17/2013 3:25:00 PM12/17/2013 3:25:00 PM
19
Fonctionnement ÉCONO / BRUIT
RÉDUIT DE L’UNITÉ EXTÉRIEURE
Fonctionnement ÉCONO
Le fonctionnement ÉCONO est une fonction qui permet d’obtenir un fonctionnement ef cace en limitant la
valeur maximale de consommation de courant.
Cette fonction est utile dans les cas où il faut faire attention à ce qu’un disjoncteur ne saute pas lorsque le
produit est utilisé en même temps que d’autres appareils.
[Exemple]
Fonctionnement normal Fonctionnement ÉCONO
Si le climatiseur et d’autres appareils qui consomment
une grande quantité de courant sont utilisés
simultanément, un disjoncteur pourra sauter si le
climatiseur fonctionne à sa capacité maximum.
La consommation de courant maximum du climatiseur est
limitée en utilisant le fonctionnement ÉCONO.
Le disjoncteur ne sautera presque jamais, même si le
climatiseur et d’autres appareils sont utilisés en même
temps.
Fonctionnement BRUIT RÉDUIT DE L’UNITÉ EXTÉRIEURE
Le fonctionnement BRUIT RÉDUIT DE L’UNITÉ EXTÉRIEURE diminue le niveau sonore de l’unité
extérieure en changeant la fréquence et la vitesse du ventilateur de l’unité extérieure. Cette fonction est
fort commode pendant la nuit.
[Exemple]
Utilisation du fonctionnement BRUIT RÉDUIT DE L’UNITÉ EXTÉRIEURE pendant la nuit.
Le niveau sonore de l’unité
extérieure diminuera.
Cette function est utile
lorsque vous devez
prendre en compte les
nuisances sonores pour
votre voisinage.
03_FR_3P357704-1.indd 1903_FR_3P357704-1.indd 19 12/17/2013 3:25:01 PM12/17/2013 3:25:01 PM
Français
20
Démarrage du fonctionnement
Appuyez sur et sélectionnez le mode
désiré.
À chaque pression sur la touche , une option de réglage différente s’af che sur
l’af chage à cristaux liquides.
Annulation du fonctionnement
Appuyez sur et sélectionnez “vierge”
sur l’af chage à cristaux liquides.
REMARQUE
Remarques concernant le fonctionnement ÉCONO
Le fonctionnement ÉCONO ne peut être réglé que quand l’unité fonctionne. Si vous appuyez sur
, les réglages sont annulés et
” disparaît de l’af chage à cristaux liquides.
Le mode ÉCONO est une fonction qui permet d’obtenir un fonctionnement ef cace en limitant la consommation de courant de l’unité
extérieure (fréquence de fonctionnement).
Le fonctionnement ÉCONO est utilisable en fonctionnement AUTO, REFROIDISSEMENT, SÉCHAGE et CHAUFFAGE.
Le mode PUISSANT et le mode ÉCONO ne peuvent pas être utilisés en même temps.
La fonction dont la touche est pressée en dernier est prioritaire.
Si le niveau de consommation de courant est déjà bas, le fonctionnement ÉCONO ne diminuera pas la consommation de courant .
Remarques concernant le fonctionnement BRUIT RÉDUIT DE L’UNITÉ EXTÉRIEURE
En cas d’utilisation d’un système multiple, le mode BRUIT RÉDUIT DE L’UNITÉ EXTÉRIEURE sera activé seulement s’il est réglé sur toutes
les unités intérieures utilisées. Toutefois, si vous utilisez le réglage de salle prioritaire, reportez-vous à la “Remarque concernant le
système multiple”.
Page 29
Cette fonction est disponible en fonctionnement REFROIDISSEMENT, CHAUFFAGE et AUTO.
Elle n’est pas disponible en fonctionnement VENTILATEUR et SÉCHAGE.
Le fonctionnement PUISSANT et le fonctionnement BRUIT RÉDUIT DE L’UNITÉ EXTÉRIEURE ne peuvent pas être utilisés en même temps.
La fonction dont la touche est pressée en dernier est prioritaire.
Même si vous arrêtez le fonctionnement en utilisant la télécommande ou l’interrupteur MARCHE/ARRÊT de l’unité principale lorsque vous
utilisez le fonctionnement BRUIT RÉDUIT DE L’UNITÉ EXTÉRIEURE, “
” continuera à apparaître sur l’af chage de la télécommande.
Le fonctionnement BRUIT RÉDUIT DE L’UNITÉ EXTÉRIEURE ne fera diminuer ni la fréquence ni la vitesse du ventilateur si celles-ci ont
déjà été diminuées suf samment.
Ce fonctionnement s’effectue avec moins de courant et, par conséquent, peut ne pas fournir un effet de refroidissement (chauffage)
suf sant.
03_FR_3P357704-1.indd 2003_FR_3P357704-1.indd 20 12/17/2013 3:25:01 PM12/17/2013 3:25:01 PM
21
Fonctionnement MINUTERIE
D’ARRÊT
Les fonctions de la minuterie sont utiles pour mettre en marche ou arrêter
automatiquement le climatiseur la nuit ou le matin. Vous pouvez également
utiliser MINUTERIE D’ARRÊT et MINUTERIE DE MARCHE en combinaison.
Utilisation du fonctionnement MINUTERIE D’ARRÊT
Véri ez que l’horloge est bien réglée à l’heure juste.
Sinon, réglez l’horloge à l’heure actuelle.
Page 10
Appuyez sur 1. .
” apparaît sur l’af chage à cristaux liquides.
” clignote.
” et le jour de la semaine disparaissent de l’af chage à cristaux liquides.
Appuyez sur 2. jusqu’à ce que le réglage de
l’heure atteigne la valeur désirée.
À chaque pression sur l’une ou l’autre touche, le réglage de l’heure augmente ou
diminue par pas de 10 minutes. Si vous maintenez l’une ou l’autre touche enfoncée,
le réglage change rapidement.
Appuyez à nouveau sur 3. .
” et l’heure réglée apparaissent sur l’af chage à cristaux liquides.
Le témoin multi-contrôle clignote deux fois.
Le témoin de la MINUTERIE s’allume périodiquement en orange.
Page 5
Af chage
Annulation du fonctionnement MINUTERIE D’ARRÊT
Appuyez sur .
” et l’heure réglée disparaissent de l’af chage à cristaux liquides.
” et le jour de la semaine apparaissent sur l’af chage à cristaux liquides.
REMARQUE
Remarques concernant le fonctionnement MINUTERIE
Lorsque la MINUTERIE est réglée, l’heure actuelle ne s’af che pas.
Une fois que vous avez réglé la MINUTERIE DE MARCHE/ARRÊT, le réglage de l’heure reste mémorisé. La mémoire est annulée lorsque
vous remplacez les piles de la télécommande.
Lors de l’utilisation de l’unité via la MINUTERIE DE MARCHE/ARRÊT, le temps réel de fonctionnement pourra être différent du temps entré
par l’utilisateur. (Environ 10 minutes au maximum)
Mode RÉGLAGE NOCTURNE
Lorsque la MINUTERIE D’ARRÊT est réglée, le climatiseur ajuste automatiquement le réglage de la température (0,5°C de plus pour le
REFROIDISSEMENT, 2,0°C de moins pour le CHAUFFAGE) a n d’éviter tout refroidissement (chauffage) excessif et de vous offrir un sommeil agréable.
03_FR_3P357704-1.indd 2103_FR_3P357704-1.indd 21 12/17/2013 3:25:02 PM12/17/2013 3:25:02 PM
Français
22
Fonctionnement MINUTERIE
DE MARCHE
Utilisation du fonctionnement MINUTERIE DE MARCHE
Véri ez que l’horloge est bien réglée à l’heure juste.
Sinon, réglez l’horloge à l’heure actuelle.
Page 10
Appuyez sur 1. .
” apparaît sur l’af chage à cristaux liquides.
” clignote.
” et le jour de la semaine disparaissent de l’af chage à cristaux liquides.
Appuyez sur 2. jusqu’à ce que le réglage de
l’heure atteigne la valeur désirée.
À chaque pression sur l’une ou l’autre touche, le réglage de l’heure augmente ou
diminue par pas de 10 minutes. Si vous maintenez l’une ou l’autre touche enfoncée,
le réglage change rapidement.
Appuyez à nouveau sur 3. .
” et l’heure réglée apparaissent sur l’af chage à cristaux liquides.
Le témoin multi-contrôle clignote deux fois.
Le témoin de la MINUTERIE s’allume périodiquement en orange.
Page 5
Af chage
Annulation du fonctionnement MINUTERIE DE MARCHE
Appuyez sur .
” et l’heure réglée disparaissent de l’af chage à cristaux liquides.
” et le jour de la semaine apparaissent sur l’af chage à cristaux liquides.
Combinaison de MINUTERIE DE MARCHE et MINUTERIE D’ARRÊT
Un exemple de réglage pour combiner les 2 minuteries est indiqué sur l’illustration
ci-dessous.
(Exemple)
Heure actuelle: 23:00 (L’unité fonctionne.)
MINUTERIE D’ARRÊT à 0:00
MINUTERIE DE MARCHE à 14:00
Combiné
REMARQUE
Dans les cas suivants, réglez à nouveau la minuterie.
Après qu’un disjoncteur a été mis sur arrêt.
Après une panne de courant.
Après avoir remplacé les piles de la télécommande.
03_FR_3P357704-1.indd 2203_FR_3P357704-1.indd 22 12/17/2013 3:25:04 PM12/17/2013 3:25:04 PM
23
Fonctionnement MINUTERIE
HEBDOMADAIRE
Il est possible de sauvegarder jusqu’à 4 réglages de minuterie pour chaque jour de la semaine. Ceci est
fort commode si vous voulez régler la MINUTERIE HEBDOMADAIRE en fonction du style de vie de la
famille.
Exemple de réglage de la MINUTERIE HEBDOMADAIRE
Les mêmes réglages de minuterie sont effectués pour la semaine du lundi au vendredi, alors que des réglages de minuterie
différents sont effectués pour la n de semaine.
[Lundi]
Effectuez les réglages de minuterie des programmes 1 à 4.
Page 24
6:00 8:30 17:30 22:00
25°C 27°C
MARCHE MARCHE
ARRÊTARRÊT
Programme 1 Programme 2 Programme 3 Programme 4
MARCHE ARRÊT MARCHE ARRÊT
[Mardi]
à
[Vendredi]
Utilisez le mode copie pour effectuer les réglages du mardi au vendredi, ces réglages étant les mêmes
que ceux du lundi.
Page 26
6:00 8:30 17:30 22:00
25°C 27°C
Programme 1 Programme 2 Programme 3 Programme 4
MARCHE ARRÊT MARCHE ARRÊT
[Samedi] Pas de réglage de minuterie
[Dimanche]
Effectuez les réglages de minuterie des programmes 1 à 4.
Page 24
8:00 10:00 19:00 21:00
27°C 27°C25°C
MARCHE
MARCHE
ARRÊT
ARRÊT
MARCHE ARRÊT ARRÊT MARCHE
Programme 1 Programme 2 Programme 3 Programme 4
Il est possible de régler jusqu’à 4 réservations par jour et 28 réservations par semaine dans la MINUTERIE
HEBDOMADAIRE. L’utilisation ef cace du mode copie permet d’effectuer facilement les réservations.
L’utilisation des réglages MARCHE-MARCHE-MARCHE-MARCHE, par exemple, permet de programmer le mode de
fonctionnement et de régler les changements de température. De plus, l’utilisation des réglages ARRÊT-ARRÊT-ARRÊT-
ARRÊT permet de ne régler que l’heure d’arrêt de chaque jour. Ceci arrêtera automatiquement le climatiseur si l’utilisateur
oublie de l’arrêter.
03_FR_3P357704-1.indd 2303_FR_3P357704-1.indd 23 12/17/2013 3:25:05 PM12/17/2013 3:25:05 PM
Français
24
Utilisation du fonctionnement MINUTERIE HEBDOMADAIRE
Mode de réglage
Véri ez si le jour de la semaine et l’horaire sont bien réglés. Si ce n’est pas le cas, réglez le
jour de la semaine et l’heure.
Page 10
6:00 8:30 17:30 22:00
25°C 27°C
Programme 1 Programme 2 Programme 3 Programme 4
MARCHE ARRÊT MARCHE ARRÊT
[Lundi]
Af chages de réglage
Jours et nombres MARCHE/ARRÊT Heure Température
Appuyez sur 1. .
Le jour de la semaine et le numéro de réservation du jour actuel apparaissent.
Il est possible d’effectuer de 1 à 4 réglages par jour.
Appuyez sur
2.
pour sélectionner le jour de la
semaine et le numéro de réservation désirés.
Si vous appuyez sur , le numéro de réservation et le jour de la semaine changent.
Appuyez sur 3. .
Le jour de la semaine et le numéro de réservation sont réglés.
” et “ ” clignotent.
Appuyez sur
4.
pour sélectionner le mode désiré.
Si vous appuyez sur , le réglage “ ” ou “ ”change dans l’ordre.
Si vous appuyez sur
, les éléments suivants apparaissant sur l’af chage à cristaux
liquides s’af chent tour à tour en ordre cyclique.
MINUTERIE DE MARCHE MINUTERIE D’ARRÊT
vierge
Si la réservation a déjà été réglée, le fait de sélectionner “vierge” supprime la
réservation.
Allez à l’étape
9 si “vierge” est sélectionné.
Pour revenir au réglage du jour de la semaine et du numéro de réservation, appuyez sur
.
Appuyez sur 5. .
Le mode MINUTERIE DE MARCHE/ARRÊT est réglé.
” et l’heure clignotent.
03_FR_3P357704-1.indd 2403_FR_3P357704-1.indd 24 12/17/2013 3:25:06 PM12/17/2013 3:25:06 PM
25
Fonctionnement MINUTERIE
HEBDOMADAIRE
REMARQUE
Remarques concernant le fonctionnement MINUTERIE HEBDOMADAIRE
N’oubliez pas de régler tout d’abord l’horloge sur la télécommande.
Page 10
Le jour de la semaine, le mode MINUTERIE DE MARCHE/ARRÊT, l’heure et la température réglée (seulement pour le mode MINUTERIE
DE MARCHE) peuvent être réglés à l’aide de la MINUTERIE HEBDOMADAIRE.
Les autres réglages de MINUTERIE DE MARCHE sont basés sur les réglages qui étaient utilisés juste avant l’opération.
Il est impossible d’utiliser en même temps les fonctionnements MINUTERIE HEBDOMADAIRE et MINUTERIE DE MARCHE/ARRÊT. Le
fonctionnement MINUTERIE DE MARCHE/ARRÊT a priorité s’il est réglé pendant que la MINUTERIE HEBDOMADAIRE est encore activée.
La MINUTERIE HEBDOMADAIRE passe en mode d’attente et “
” disparaît de l’af chage à cristaux liquides. Lorsque la
MINUTERIE DE MARCHE/ARRÊT arrive à son terme, la MINUTERIE HEBDOMADAIRE est activée automatiquement.
La fermeture du disjoncteur, des pannes de courant et les autres événements similaires rendront le fonctionnement de l’horloge interne de
l’unité intérieure imprécis. Réinitialisez l’horloge.
Page 10
6.
Appuyez sur pour sélectionner l’heure désirée.
Vous pouvez régler l’heure entre 0:00 et 23:50 par intervalles de 10 minutes.
Pour revenir au réglage du mode MINUTERIE DE MARCHE/ARRÊT, appuyez sur
.
Allez à l’étape 9 si vous voulez régler la MINUTERIE D’ARRÊT.
Appuyez sur 7. .
L’heure est réglée.
” et la température clignotent.
Appuyez sur
8.
pour sélectionner la température désirée.
Vous pouvez régler la température entre 10°C et 32°C.
REFROIDISSEMENT ou AUTO: L’unité fonctionne à 18°C même si elle est réglée entre 10 et 17°C.
Page 12
CHAUFFAGE ou AUTO: L’unité fonctionne à 30°C même si elle est réglée entre 31 et 32°C.
Page 12
Pour revenir au réglage de l’heure, appuyez sur .
La température réglée ne s’af che que lorsque le réglage du mode est sur marche.
Appuyez sur 9. .
Veillez à diriger la télécommande vers l’unité intérieure, et véri ez qu’un son de réception est émis et que le témoin multi-contrôle clignote.
La température et l’heure sont réglées pendant le fonctionnement MINUTERIE DE
MARCHE, et l’heure est réglée pendant le fonctionnement MINUTERIE D’ARRÊT.
L’écran de réservation suivant apparaîtra.
Pour continuer les réglages, répétez la procédure à partir de l’étape
4.
Le témoin multi-contrôle clignote deux fois.
Le témoin de la MINUTERIE s’allume périodiquement en orange.
Page 5
Le témoin multi-contrôle ne clignotera pas en orange si tous les réglages de réservation sont supprimés.
Af chage
Appuyez sur
10.
pour terminer le réglage.
” apparaît sur l’af chage à cristaux liquides et le fonctionnement MINUTERIE HEBDOMADAIRE est activé.
Une réservation faite une fois peut être copiée facilement pour utiliser les mêmes
réglages un autre jour de la semaine. Reportez-vous à “Mode copie”.
Page 26
03_FR_3P357704-1.indd 2503_FR_3P357704-1.indd 25 12/17/2013 3:25:08 PM12/17/2013 3:25:08 PM
Français
26
Mode copie
Une réservation faite une fois peut être copiée pour un autre jour de la semaine. Toute la
réservation du jour de la semaine sélectionné est copiée.
6:00 8:30 17:30 22:00
25°C 27°C
6:00 8:30 17:30 22:00
25°C 27°C
COPIECOPIE
Programme 1 Programme 2 Programme 3 Programme 4
MARCHE ARRÊT MARCHE ARRÊT
[Lundi]
Programme 1 Programme 2 Programme 3 Programme 4
MARCHE ARRÊT MARCHE ARRÊT
[Mardi]
à
[Vendredi]
Af chages de réglage
Con rmation Copie Collage Normal
Appuyez sur 1. .
Appuyez sur
2. pour con rmer le jour de la
semaine à copier.
Appuyez sur
3. .
Toute la réservation du jour de la semaine sélectionné est copiée.
Appuyez sur 4. pour sélectionner le jour de
destination de la semaine.
Appuyez sur 5. .
Veillez à diriger la télécommande vers l’unité intérieure, et véri ez qu’un son de
réception est émis et que le témoin multi-contrôle clignote.
La réservation est copiée sur le jour de la semaine sélectionné. Toute la réservation
du jour de la semaine sélectionné est copiée.
Pour continuer à copier les réglages sur d’autres jours de la semaine, répétez l’étape
4 et l’étape 5.
Le témoin multi-contrôle clignote deux fois. Le témoin de la MINUTERIE s’allume périodiquement en orange.
Appuyez sur 6. pour terminer le réglage.
” apparaît sur l’af chage à cristaux liquides et le fonctionnement MINUTERIE HEBDOMADAIRE est activé.
REMARQUE
Remarque concernant le mode copie
Toute la réservation du jour de la semaine source est copiée en mode copie.
Dans le cas où vous effectuez des changements de réservation pour un jour de la semaine individuellement après avoir copié le contenu
des réservations hebdomadaires, appuyez sur
et changez les réglages dans les étapes de “Mode de réglage”.
Page 24
03_FR_3P357704-1.indd 2603_FR_3P357704-1.indd 26 12/17/2013 3:25:09 PM12/17/2013 3:25:09 PM
27
Fonctionnement MINUTERIE
HEBDOMADAIRE
Con rmation d’une réservation
La réservation peut être con rmée.
Af chages de réglage
Normal Con rmation
Appuyez sur 1. .
Le jour de la semaine et le numéro de réservation du jour actuel s’af chent.
Appuyez sur 2. pour sélectionner le jour de
la semaine et le numéro de réservation à
con rmer.
Si vous appuyez sur , les détails de la réservation s’af chent.
Pour changer les réglages des réservations con rmées, sélectionnez le numéro de
réservation et appuyez sur
.
Le mode passe au mode de réglage. Allez à mode de réglage étape
2.
Page 24
Appuyez sur 3. pour quitter le mode de
con rmation.
Désactivation du fonctionnement MINUTERIE HEBDOMADAIRE
Appuyez sur pendant que “
apparaît sur l’af chage à cristaux liquides.
” disparaît de l’af chage à cristaux liquides.
Le témoin de la MINUTERIE s’éteint.
Pour réactiver la MINUTERIE HEBDOMADAIRE, appuyez à nouveau sur
.
Si une réservation désactivée avec
est à nouveau activée, le mode de
réservation utilisé en dernier sera utilisé.
ATTENTION
Si les réglages de réservation n’apparaissent pas tous, désactivez une fois le fonctionnement MINUTERIE HEBDOMADAIRE. Ensuite,
appuyez à nouveau sur
pour réactiver le fonctionnement MINUTERIE HEBDOMADAIRE.
03_FR_3P357704-1.indd 2703_FR_3P357704-1.indd 27 12/17/2013 3:25:10 PM12/17/2013 3:25:10 PM
Français
28
Suppression des réservations
Réservation individuelle
Appuyez sur 1. .
Le jour de la semaine et le numéro de réservation seront af chés.
Appuyez sur
2.
pour sélectionner le jour de la
semaine et le numéro de réservation à supprimer.
Appuyez sur 3. .
” et “ ” ou “ ” clignotent.
Appuyez sur 4. et sélectionnez “vierge”.
Lorsque vous appuyez sur , le mode MINUTERIE DE MARCHE/ARRÊT change.
Si vous appuyez sur , les éléments suivants apparaissant sur l’af chage à cristaux
liquides s’af chent tour à tour en ordre cyclique.
Le fait de sélectionner “vierge” annulera toute réservation que vous avez pu faire.
MINUTERIE DE MARCHE MINUTERIE D’ARRÊT
vierge
Appuyez sur 5. .
La réservation sélectionnée sera supprimée.
Appuyez sur 6. .
S’il y a encore d’autres réservations, le fonctionnement MINUTERIE HEBDOMADAIRE sera activé.
Réservations pour chaque jour de la semaine
Cette fonction peut être utilisée pour supprimer les réservations pour chaque jour de la semaine.
Elle peut être utilisée pendant que vous con rmez ou que vous réglez des réservations.
Appuyez sur
1.
pour sélectionner le jour de la semaine à supprimer.
Maintenez
2.
enfoncée pendant environ 5 secondes.
La réservation du jour de la semaine sélectionné est supprimée.
Toutes les réservations
Maintenez enfoncée pendant environ 5 secondes
pendant l’af chage normal.
Veillez à diriger la télécommande vers l’unité intérieure et véri ez qu’un son de réception est émis.
Cette opération est sans effet pendant que la MINUTERIE HEBDOMADAIRE est réglée.
Toutes les réservations sont supprimées.
03_FR_3P357704-1.indd 2803_FR_3P357704-1.indd 28 12/17/2013 3:25:11 PM12/17/2013 3:25:11 PM
29
Remarque concernant le
système multiple
Le système multiple est composé d’une unité extérieure connectée à
plusieurs unités intérieures.
Sélection du mode de fonctionnement
Lorsque le réglage de salle prioritaire est activé
mais que l’unité ne fonctionne pas ou que le
réglage de salle prioritaire n’est pas activé
Lorsque plus d’une unité intérieure fonctionne, la première unité
qui a été mise en marche est prioritaire.
Dans ce cas, réglez les unités qui ont été mises en marche ultérieurement
sur le même mode de fonctionnement que la première unité.
Sinon, ces unités passeront à l’état d’attente et le témoin multi-
contrôle clignotera: ceci n’indique aucun dysfonctionnement.
REMARQUE
Remarques concernant le mode de fonctionnement du système multiple
Les fonctionnements REFROIDISSEMENT, SÉCHAGE et VENTILATEUR peuvent être utilisés en même temps.
Le fonctionnement AUTO sélectionne automatiquement le fonctionnement REFROIDISSEMENT ou le fonctionnement CHAUFFAGE en fonction de la température intérieure.
Par conséquent, le fonctionnement AUTO est disponible lorsque vous sélectionnez le même mode de fonctionnement que celui de la salle contenant l’unité mise en marche en premier.
ATTENTION
Normalement, le mode de fonctionnement dans la salle contenant l’unité mise en marche en premier est prioritaire, mais les situations suivantes sont des exceptions; gardez ceci présent à l’esprit.
Si le mode de fonctionnement de la première salle est le fonctionnement VENTILATEUR, le fait d’utiliser ensuite le fonctionnement
CHAUFFAGE dans une salle quelconque donnera priorité au fonctionnement CHAUFFAGE. Dans cette situation, le climatiseur fonctionnant en
fonctionnement VENTILATEUR passera en mode d’attente, et le témoin multi-contrôle clignotera.
Avec le réglage de salle prioritaire activé
Reportez-vous à “Réglage de salle prioritaire” à la page suivante.
Mode BRUIT RÉDUIT NOCTURNE (Disponible pour le fonctionnement REFROIDISSEMENT seulement)
Le mode BRUIT RÉDUIT NOCTURNE requiert une programmation initiale lors de l’installation. Veuillez demander de l’aide à
votre détaillant ou à votre revendeur.
Le mode BRUIT RÉDUIT NOCTURNE réduit le bruit de fonctionnement de l’unité extérieure durant les heures nocturnes a n de ne pas déranger le voisinage.
Le mode BRUIT RÉDUIT NOCTURNE est activé lorsque la température baisse de 5°C ou plus par rapport à la plus haute température
enregistrée ce jour-là. Par conséquent, lorsque la différence de température est inférieure à 5°C, cette fonction n’est pas activée.
Le mode BRUIT RÉDUIT NOCTURNE réduit légèrement les performances de refroidissement de l’unité.
Fonctionnement BRUIT RÉDUIT DE L’UNITÉ EXTÉRIEURE
Reportez-vous à “fonctionnement BRUIT RÉDUIT DE L’UNITÉ EXTÉRIEURE”.
Page 19
Lorsque le réglage de salle prioritaire est activé mais que l’unité ne
fonctionne pas ou que le réglage de salle prioritaire n’est pas activé
Lorsque vous utilisez le fonctionnement BRUIT RÉDUIT DE L’UNITÉ EXTÉRIEURE avec le système multiple, réglez toutes
les unités intérieures sur le fonctionnement BRUIT RÉDUIT DE L’UNITÉ EXTÉRIEURE à l’aide de leurs télécommandes.
Lorsque vous annulez le fonctionnement BRUIT RÉDUIT DE L’UNITÉ EXTÉRIEURE, annulez une des unités intérieures en fonction à l’aide de sa télécommande.
Le fonctionnement BRUIT RÉDUIT DE L’UNITÉ EXTÉRIEURE reste cependant af ché sur la télécommande pour les autres salles.
Nous vous recommandons de désactiver toutes les salles à l’aide de leur télécommande.
Lorsque le réglage de salle prioritaire est activé
Reportez-vous à “Réglage de salle prioritaire” à la page suivante.
Salle A Salle B
Salle C Salle D
Unité extérieure
03_FR_3P357704-1.indd 2903_FR_3P357704-1.indd 29 12/17/2013 3:25:12 PM12/17/2013 3:25:12 PM
Français
30
Verrouillage de mode REFROIDISSEMENT/CHAUFFAGE
Le verrouillage de mode REFROIDISSEMENT/CHAUFFAGE requiert une programmation initiale lors de l’installation. Veuillez
demandez de l’aide à votre revendeur agréé. Le verrouillage de mode REFROIDISSEMENT/CHAUFFAGE effectue le réglage
forcé de l’unité au fonctionnement REFROIDISSEMENT ou CHAUFFAGE. Cette fonction est fort commode lorsque vous
désirez régler sur le même mode de fonctionnement toutes les unités intérieures connectées au système multiple.
REMARQUE
Le verrouillage de mode REFROIDISSEMENT/CHAUFFAGE ne peut pas être activé en même temps que le réglage de salle prioritaire.
Réglage de salle prioritaire
Le réglage de salle prioritaire requiert une programmation initiale lors de l’installation. Veuillez demander de l’aide à votre
revendeur agréé.
La salle désignée comme prioritaire a priorité dans les situations suivantes.
Priorité du mode de fonctionnement
Le réglage de salle prioritaire requiert une programmation initiale lors de l’installation. Veuillez demander de l’aide à votre
détaillant ou à votre revendeur.
[Exemple]
La salle A est prioritaire dans les exemples suivants.
Lorsque le fonctionnement REFROIDISSEMENT est sélectionné dans la salle A alors que les modes suivants sont
utilisés dans les salles B, C et D:
Mode de fonctionnement dans les
salles B, C et D
État des salles B, C et D lorsque l’unité de la salle A est en fonctionnement REFROIDISSEMENT
REFROIDISSEMENT, SÉCHAGE ou
VENTILATEUR
Maintien du mode de fonctionnement actuel
CHAUFFAGE
L’unité passe en mode d’attente. Le fonctionnement reprend lorsque l’unité de la salle A cesse de
fonctionner.
AUTO
Si l’unité est réglée sur le fonctionnement REFROIDISSEMENT, elle continue dans le même état.
Si l’unité est réglée sur le fonctionnement CHAUFFAGE, elle passe en mode d’attente. Le
fonctionnement reprend lorsque l’unité de la salle A cesse de fonctionner.
Priorité lors de l’utilisation du fonctionnement PUISSANT
[Exemple]
La salle A est prioritaire dans les exemples suivants.
Les unités intérieures des salles A, B, C et D fonctionnent toutes. Si l’unité de la salle A passe en fonctionnement
PUISSANT, la capacité de fonctionnement sera concentrée dans la salle A. Dans ce cas, les performances de
refroidissement (chauffage) des unités des salles B, C et D peuvent légèrement baisser.
Priorité lorsque le fonctionnement BRUIT RÉDUIT DE L’UNITÉ EXTÉRIEURE est
utilisé
[Exemple]
La salle A est prioritaire dans les exemples suivants.
En réglant simplement l’unité de la salle A sur le fonctionnement BRUIT RÉDUIT, le climatiseur passe en fonctionnement
BRUIT RÉDUIT DE L’UNITÉ EXTÉRIEURE.
Il n’est pas nécessaire de régler toutes les unités intérieures en fonction sur le fonctionnement BRUIT RÉDUIT.
03_FR_3P357704-1.indd 3003_FR_3P357704-1.indd 30 12/17/2013 3:25:13 PM12/17/2013 3:25:13 PM
31
Entretien et nettoyage
Référence rapide
Ouverture du panneau avant supérieur Fermeture du panneau avant supérieur
Saisissez le panneau avant supérieur par les côtés, et
ouvrez-le.
Fixez le panneau à la plaque de support du panneau.
Remettez la plaque de support du panneau dans sa position précédente.
Abaissez le panneau avant inférieur à sa position d’origine.
Appuyez sur le panneau avant supérieur des deux côtés.
Nettoyage des pièces
Remarques concernant le nettoyage
Pour le nettoyage, n’utilisez pas les matériaux suivants.
Eau chaude à plus de 40°C.
Benzine, essence, diluant, autres huiles volatiles.
Cire.
Brosses à récurer, autres objets durs.
ATTENTION
Avant d’effectuer le nettoyage, veillez à arrêter le fonctionnement et à mettre le disjoncteur sur arrêt.
Ne touchez pas les parties en aluminium de l’unité intérieure. Si vous touchez ces parties, vous pourriez vous blesser.
Filtre à air
Éliminez la poussière avec un
aspirateur ou lavez le ltre.
Une fois toutes les
2 semaines
Page 32
Filtre puri cateur d’air photocatalytique à apatite de titane
Éliminez la poussière avec un aspirateur ou remplacez le ltre.
[Nettoyage] [Remplacement]
Une fois tous les 6 mois
Une fois tous les 3 ans
Page 33
Page 33
Panneaux avant
supérieur et inférieur
Avec les panneaux fermés, essuyez-
les avec un chiffon humide doux.
Si la crasse est tenace
Unité intérieure
et télécommande
Essuyez-les avec un chiffon
doux.
Si la crasse est
tenace
03_FR_3P357704-1.indd 3103_FR_3P357704-1.indd 31 12/17/2013 3:25:13 PM12/17/2013 3:25:13 PM
Français
32
ATTENTION
Ne touchez pas les ailettes en aluminium avec les mains nues lorsque vous enlevez ou montez le ltre.
Retirez les ltres à air.1.
Ouvrez le panneau avant supérieur.
Pour xer le panneau avant supérieur, installez
la plaque de support du panneau entre les
nervures de l’unité.
Poussez la languette du ltre située au centre de
chaque ltre à air légèrement vers le haut, puis
tirez-la vers le bas.
3) Abaissez
2) Poussez
Languette de filtre
1) Tirez
Plaque de support du panneau
Nervures
Arrière du panneau
avant supérieur
Lavez les ltres à air avec 2.
de l’eau ou nettoyez-les
avec un aspirateur.
Il est recommandé de nettoyer les ltres à air
toutes les 2 semaines.
S’il est dif cile d’enlever la poussière
Lavez les ltres à air avec un détergent neutre dilué
dans de l’eau tiède, puis laissez-les sécher à l’ombre.
Veillez à retirer le ltre puri cateur d’air photocatalytique à
apatite de titane.
Reportez-vous à “Filtre puri cateur
d’air photocatalytique à apatite de titane” à la page
suivante.
Remettez les ltres à leur 3.
place initiale et refermez le
panneau avant supérieur.
Remettez la plaque de support du panneau dans
sa position précédente.
Abaissez le panneau avant inférieur à sa
position d’origine.
Fermez lentement le panneau avant supérieur.
Appuyez sur le panneau avant supérieur des
deux côtés.
Filtre à air
03_FR_3P357704-1.indd 3203_FR_3P357704-1.indd 32 12/17/2013 3:25:14 PM12/17/2013 3:25:14 PM
33
Entretien et nettoyage
Retirez le ltre puri cateur d’air
1.
photocatalytique à apatite de titane.
Ouvrez le panneau avant supérieur et retirez les
ltres à air.
Tenez les parties en retrait du cadre et
décrochez les 4 griffes.
Griffe
Nettoyez ou remplacez le ltre
2.
puri cateur d’air photocatalytique
à apatite de titane.
[Entretien]
Éliminez la poussière avec un aspirateur,
2-1
puis faites tremper le ltre dans de l’eau
froide ou tiède pendant 10 à 15 minutes
environ s’il est très encrassé.
Ne retirez pas le ltre de son cadre lorsque vous
le lavez à l’eau.
Après l’avoir lavé, secouez-le pour éliminer
2-2
l’eau résiduelle et faites-le sécher à l’ombre.
Le matériau étant en polyester, ne tordez pas le
ltre pour en extraire l’eau.
[Remplacement]
Retirez le ltre du cadre de
ltre et xez-en un nouveau.
Ne jetez pas le cadre de ltre. Réutilisez le cadre
de ltre lorsque vous remplacez le ltre puri cateur
d’air photocatalytique à apatite de titane.
En xant le ltre, véri ez s’il est installé dans les
languettes.
Languettes
Jetez le ltre usagé avec les déchets incombustibles.
Remettez les ltres à leur
3.
place initiale et refermez le
panneau avant supérieur.
Remettez la plaque de support du panneau dans sa
position précédente.
Abaissez le panneau avant inférieur à sa position
d’origine.
Fermez lentement le panneau avant supérieur.
Appuyez sur le panneau avant supérieur des deux
côtés.
REMARQUE
Fonctionnement avec des ltres sales :
l’air ne peut pas être désodorisé,
l’air ne peut pas être puri é,
le chauffage ou le refroidissement sont faibles,
une odeur peut se dégager.
Jetez les ltres usagés avec les déchets
incombustibles.
Pour commander un ltre puri cateur d’air
photocatalytique à apatite de titane, adressez-vous au
magasin où vous avez acheté le climatiseur.
Élément
Filtre puri cateur d’air photocatalytique
à apatite de titane
(sans cadre) 1 jeu
N° de pièce KAF970A46
Filtre puri cateur d’air photocatalytique à apatite de titane
03_FR_3P357704-1.indd 3303_FR_3P357704-1.indd 33 12/17/2013 3:25:16 PM12/17/2013 3:25:16 PM
Français
34
Véri ez les unités
Véri ez que la base, le support et les autres accessoires de l’unité extérieure ne soient ni pourris ni corrodés.
Véri ez que rien ne bloque les entrées d’air et les sorties d’air de l’unité intérieure et de l’unité extérieure.
Véri ez que le liquide évacué sorte régulièrement du tube d’évacuation lors du fonctionnement REFROIDISSEMENT ou
SÉCHAGE.
Si vous ne voyez pas d’eau évacuée, il est possible que l’eau fuit par l’unité intérieure. Arrêtez le fonctionnement et
adressez-vous à l’atelier de service si c’est le cas.
Avant une longue période d’inactivité
Par beau temps, utilisez le fonctionnement VENTILATEUR 1.
seulement pendant plusieurs heures pour faire sécher
l’intérieur.
Appuyez sur et sélectionnez le fonctionnement “ ” .
Appuyez sur
et mettez en route le fonctionnement.
Après que le fonctionnement ait été arrêté, mettez le 2.
disjoncteur du climatiseur de la salle sur arrêt.
Nettoyez les ltres à air et remettez-les en place.3.
Retirez les piles de la télécommande.4.
Lorsqu’une unité extérieure multiple est connectée, assurez-vous que le fonctionnement CHAUFFAGE n’est pas
utilisé dans une autre salle avant d’utiliser le fonctionnement VENTILATEUR.
Page 29
Nous recommandons d’effectuer un entretien périodique
Dans certaines conditions de fonctionnement, l’intérieur du climatiseur peut être encrassé après plusieurs saisons
d’utilisation, entraînant de mauvaises performances. Nous recommandons de faire entretenir périodiquement le climatiseur
par un spécialiste en plus des nettoyages réguliers de l’utilisateur.
Pour l’entretien par un spécialiste, adressez-vous à l’atelier de service où vous avez acheté le climatiseur.
Le coût de l’entretien est à la charge de l’utilisateur.
Information importante relative au réfrigérant utilisé
Ce produit contient des gaz à effet de serre uorés encadrés par le protocole de Kyoto.
Type de réfrigérant:R410A
Valeur GWP
(1)
:1975
(1) GWP = potentiel de réchauffement global
Des inspections périodiques de fuites de réfrigérant peuvent être exigées en fonction de la législation européenne ou
locale. Veuillez contacter votre distributeur local pour plus d’informations.
03_FR_3P357704-1.indd 3403_FR_3P357704-1.indd 34 12/17/2013 3:25:16 PM12/17/2013 3:25:16 PM
35
Dépannage
Les cas suivants ne sont pas des dysfonctionnements.
Les cas suivants ne sont pas des dysfonctionnements du climatiseur, mais ont certaines causes. Vous pouvez simplement continuer à l’utiliser.
Unité intérieure
Unité extérieure
Le fonctionnement CHAUFFAGE s’arrête
brusquement et un bruit d’écoulement est émis.
L’unité extérieure est en train d’éliminer le givre.
Le système de CHAUFFAGE se met en route une
fois le givre éliminé sur l’unité extérieure. Vous
devez attendre de 4 à 12 minutes environ.
Le fonctionnement ne démarre pas immédiatement.
Lorsque vous appuyez sur la touche “ON/OFF”
juste après avoir arrêté le fonctionnement.
Lorsque le mode a été resélectionné.
Ceci a pour but de protéger le climatiseur.
Vous devez attendre environ 3 minutes.
Les clapets ne se mettent pas à
osciller immédiatement.
Le climatiseur est en train de régler la position des
clapets. Les clapets vont bientôt se mettre à osciller.
Un son est émis.
Son ressemblant à un écoulement d’eau
Ce son est produit par l’écoulement du réfrigérant
dans le climatiseur.
Ceci est un son de pompage de l’eau dans le climatiseur,
qui est émis lorsque l’eau est pompée hors du climatiseur
lors du fonctionnement refroidissement ou séchage
.
Le réfrigérant s’écoule dans le climatiseur, même si le
climatiseur ne fonctionne pas pendant que les unités
intérieures se trouvant dans d’autres salles fonctionnent.
Souf ement
Ce son est produit lorsque l’écoulement du
réfrigérant dans le climatiseur est commuté.
Tic-tac
Ce son est produit lorsque la taille du climatiseur se dilate ou
rétrécit légèrement en raison des variations de température.
Sif ement
Ce son est émis lorsque le réfrigérant s’écoule
pendant le fonctionnement dégivrage.
Cliquètement émis lors du fonctionnement
ou en période d’inactivité
Ce bruit est généré lorsque la valve de contrôle du
réfrigérant ou les éléments électriques fonctionnent.
Léger battement
Ce son est émis de l’intérieur du climatiseur lorsque
le ventilateur d’échappement est activé alors que les
portes de la pièce sont fermées. Ouvrez la fenêtre
ou éteignez le ventilateur d’échappement.
L’unité extérieure émet de l’eau ou de la vapeur.
En fonctionnement CHAUFFAGE
Le givre sur l’unité extérieure se transforme en eau ou en vapeur quand le
climatiseur est en fonctionnement dégivrage.
En fonctionnement REFROIDISSEMENT ou SÉCHAGE
L’humidité de l’air se condense en eau sur la surface froide de la tuyauterie de
l’unité extérieure et goutte.
Le climatiseur cesse de produire un
courant d’air pendant le fonctionnement.
Une fois que la température réglée est atteinte, le débit
d’air est réduit et le fonctionnement s’arrête a n
d’éviter toute production de courant d’air froid (pendant
le chauffage), ou a n d’empêcher toute élévation de
l’humidité (pendant le refroidissement).
Le fonctionnement reprendra automatiquement lorsque
la température intérieure s’élèvera ou baissera.
03_FR_3P357704-1.indd 3503_FR_3P357704-1.indd 35 12/17/2013 3:25:17 PM12/17/2013 3:25:17 PM
Français
36
Les mesures de dépannage sont classées dans les 2 types
suivants.
Prenez la mesure convenant au symptôme.
Aucun
dysfonctionnement
Les cas suivants ne sont pas des
dysfonctionnements.
Véri cation
Veuillez véri er à nouveau avant de
faire appel à un réparateur.
Le climatiseur ne fonctionne pas.
(Le témoin multi-contrôle est éteint.)
Un disjoncteur n’est-il pas sur arrêt, ou un fusible n’a-t-il pas sauté?
N’y a-t-il pas une panne de courant?
Les piles sont-elles installées dans la télécommande?
Le réglage de la minuterie est-il correct?
L’effet de refroidissement
(chauffage) est faible.
Les ltres à air sont-ils propres?
Un obstacle bloque-t-il l’entrée ou la sortie d’air des
unités intérieures et extérieures?
Le réglage de la température est-il correct?
Les fenêtres et les portes sont-elles fermées?
Le débit d’air et la direction du courant d’air sont-ils
réglés correctement?
Le climatiseur est-il en mode ÉCONO ou BRUIT
RÉDUIT DE L’UNITÉ EXTÉRIEURE?
Un fonctionnement anormal se
produit pendant le fonctionnement.
Le climatiseur peut ne pas fonctionner correctement à
cause de la foudre ou d’ondes radio. Mettez le
disjoncteur sur arrêt, rallumez-le, puis essayez de faire
fonctionner le climatiseur avec la télécommande.
Le fonctionnement s’arrête brusquement.
(Le témoin multi-contrôle clignote.)
Les ltres à air sont-ils propres?
Nettoyez les ltres à air.
Un obstacle bloque-t-il l’entrée ou la sortie d’air des
unités intérieures et extérieures?
Mettez le disjoncteur sur arrêt et enlevez tous les
obstacles.
Remettez-le ensuite sur marche et tentez de
faire fonctionner le climatiseur avec la télécommande. Si
le témoin clignote encore, appelez l’atelier de service où
vous avez acheté le climatiseur.
Les unités intérieures connectées aux unités extérieures du
système multiple sont-elles toutes réglées sur le même mode
de fonctionnement? Si elles ne le sont pas, réglez toutes les
unités intérieures sur le même mode de fonctionnement et
véri ez que les témoins clignotent.En outre, lorsque le mode
de fonctionnement est sur AUTO, réglez momentanément le
mode de fonctionnement de toutes les unités intérieures sur
REFROIDISSEMENT ou CHAUFFAGE et véri ez à nouveau
si l’état des témoins est bien normal. Si les témoins cessent
de clignoter après les étapes ci-dessus,
il n’y a aucun dysfonctionnement.
Page 29
Les panneaux avant supérieur et inférieur ne
s’ouvrent pas. (Le témoin multi-contrôle clignote.)
Un objet est-il coincé dans les panneaux avant supérieur et inférieur?
Retirez l’objet et essayez à nouveau de faire fonctionner le
climatiseur en utilisant la télécommande.
Si les panneaux avant supérieur et inférieur ne s’ouvrent toujours
pas et le témoin multi-contrôle clignote toujours, adressez-vous
au magasin où vous avez acheté le climatiseur.
Le panneau avant supérieur ne se
ferme pas complètement.
Les verrous du panneau avant supérieur
sont-ils réglés correctement?
De la brume sort de l’unité intérieure.
Ceci se produit lorsque l’air de la salle est refroidi en brume par le
courant d’air froid pendant le fonctionnement REFROIDISSEMENT.
Ceci se produit parce l’air de la salle est refroidi par l’échangeur de
chaleur et se transforme en brume pendant le
fonctionnement dégivrage.
03_FR_3P357704-1.indd 3603_FR_3P357704-1.indd 36 12/17/2013 3:25:17 PM12/17/2013 3:25:17 PM
1
Características
Para maior conforto e Para maior conforto e
poupança de energiapoupança de energia
Outras funçõesOutras funções
CAUDAL DE AR DE CONFORTO
SILENCIOSA DA UNIDADE EXTERIOR
A direcção do caudal de ar será ascendente quando da operação
REFRIGERAÇÃO, e descendente quando da operação
AQUECIMENTO. Esta função evita que o ar frio ou morno seja
soprado directamente sobre as pessoas.
Página 15
A operação SILENCIOSA DA UNIDADE EXTERIOR
diminui o nível de ruído da unidade exterior. Esta
função é útil para quando se deseja minimizar o ruído
de modo a não incomodar os vizinhos.
Página 19
OLHO INTELIGENTE
O sensor OLHO INTELIGENTE detecta o movimento humano
no recinto. Caso ninguém se mova por mais de 20 minutos, a
operação passa automaticamente ao modo de poupança de
energia.
Página 15
16
TEMPORIZADOR SEMANAL
Um máximo de 4 ajustes podem ser feitos para cada dia da
semana, conforme o estilo de vida familiar. O TEMPORIZADOR
SEMANAL permite que se ajuste o horário de ligar/desligar e a
temperatura desejada.
Página 23
08_PT_3P357704-1.indd 108_PT_3P357704-1.indd 1 12/17/2013 3:39:08 PM12/17/2013 3:39:08 PM
Português
2
ECONO
Esta função eleva a e ciência operacional
através da limitação do consumo de força
máxima. É útil ao usar o condicionador de
ar juntamente com outros dispositivos
eléctricos.
Página 19
Índice
Ler antes da operaçã
o
Precauções de segurança .............................. 3
Nome dos componentes ................................. 5
Preparação antes da operação ...................... 9
Operaçã
o
Operação em modo AUTOMÁTICO ·
SECAGEM · REFRIGERAÇÃO ·
AQUECIMENTO · VENTILADOR ...... 11
Ajuste da direcção e da razão do
caudal de ar .......................................13
Operação CAUDAL DE AR DE
CONFORTO/OLHO
INTELLIGENTE .................................15
Operação POTENTE .........................18
Operação ECONO/SILENCIOSA DA
UNIDADE EXTERIOR .......................19
Operação DESLIGAR COM
TEMPORIZADOR ..............................21
Operação LIGAR COM
TEMPORIZADOR ..............................22
Operação do TEMPORIZADOR
SEMANAL ..........................................23
Conexão múltipl
a
Nota sobre multisistema .............................. 29
Cuidado
s
Limpeza e cuidados ..................................... 31
Detecção de defeito
s
Detecção de defeitos ................................... 35
As instruções foram redigidas originalmente em inglês. As
versões noutras línguas são traduções da redacção original.
08_PT_3P357704-1.indd 208_PT_3P357704-1.indd 2 12/17/2013 3:39:19 PM12/17/2013 3:39:19 PM
3
Precauções de segurança
Guarde este manual onde o utilizador o possa encontrar facilmente.
Leia as precauções deste manual cuidadosamente antes de operar a unidade.
Este dispositivo é para utilização por pro ssionais ou utilizadores quali cados em lojas, indústria ligeira e em quintas, ou para
utilização comercial por utilizadores leigos.
O nível da pressão sonora é inferior a 70 dB (A).
As precauções aqui descritas são classi cadas como ADVERTÊNCIA e PRECAUÇÃO. Ambas contêm informações
importantes relacionadas à segurança. Assegurar-se de observar todas as precauções sem falta.
ADVERTÊNCIA
PRECAUÇÃO
A não observação destas instruções pode resultar em
ferimentos pessoais ou até a morte.
A não observação destas instruções pode resultar em danos
materiais ou ferimentos pessoais, que podem ser graves
dependendo das circunstâncias.
Nunca tentar.
Cumpra as seguintes
instruções.
Assegurar-se de fazer uma
conexão à terra.
Depois de lê-lo, guarde este manual em um lugar conveniente onde possa servir como referência a qualquer momento. Caso
o equipamento seja transferido a um novo usuário, assegure-se de entregar o manual também.
ADVERTÊNCIA
Para evitar incêndios, explosões ou ferimentos, não utilize a unidade se forem detetados gases perniciosos (por
exemplo, in amáveis ou corrosivos) perto da unidade.
Observe que a exposição directa e prolongada a ar condicionado quente ou frio, ou que ar quente demais ou frio
demais pode ser prejudicial às condições físicas e à saúde.
Não coloque objectos tais como varetas, os dedos, etc. na entrada ou saída de ar.
Danos ou ferimentos podem resultar
do contacto com as lâminas do ventilador do ar condicionado a girar a alta velocidade.
Não tente reparar, desmontar, reinstalar nem modi car o ar condicionado por si, visto que isto pode resultar em
fugas de água, choques eléctricos ou perigo de incêndio.
Não use atomizadores in amáveis perto do condicionador de ar. Caso contrário, isto pode resultar em incêndio.
Não utilize um refrigerante que não o indicado na unidade exterior (R410A) para a instalação, quando o mudar de lugar ou em
trabalhos de reparação. A utilização de outros refrigerantes pode provocar problemas ou danos à unidade e/ou ferimentos pessoais.
Para evitar choques elétricos, não opere com as mãos molhadas.
Tome cuidado com o fogo no caso de vazamento de refrigerante. Caso o ar condicionado não esteja operando
correctamente, ou seja, não gere ar quente ou frio, a causa disto pode ser vazamento de refrigerante. Consulte o
representante para assistência. Dentro do ar condicionado o refrigerante está seguro e normalmente não vaza.
Contudo, no caso de vazamento, o contacto com chama aberta, aquecedor ou fogão pode resultar na geração de gás
nocivo.
Não use o ar condicionado até que um técnico quali cado con rme que o vazamento está reparado.
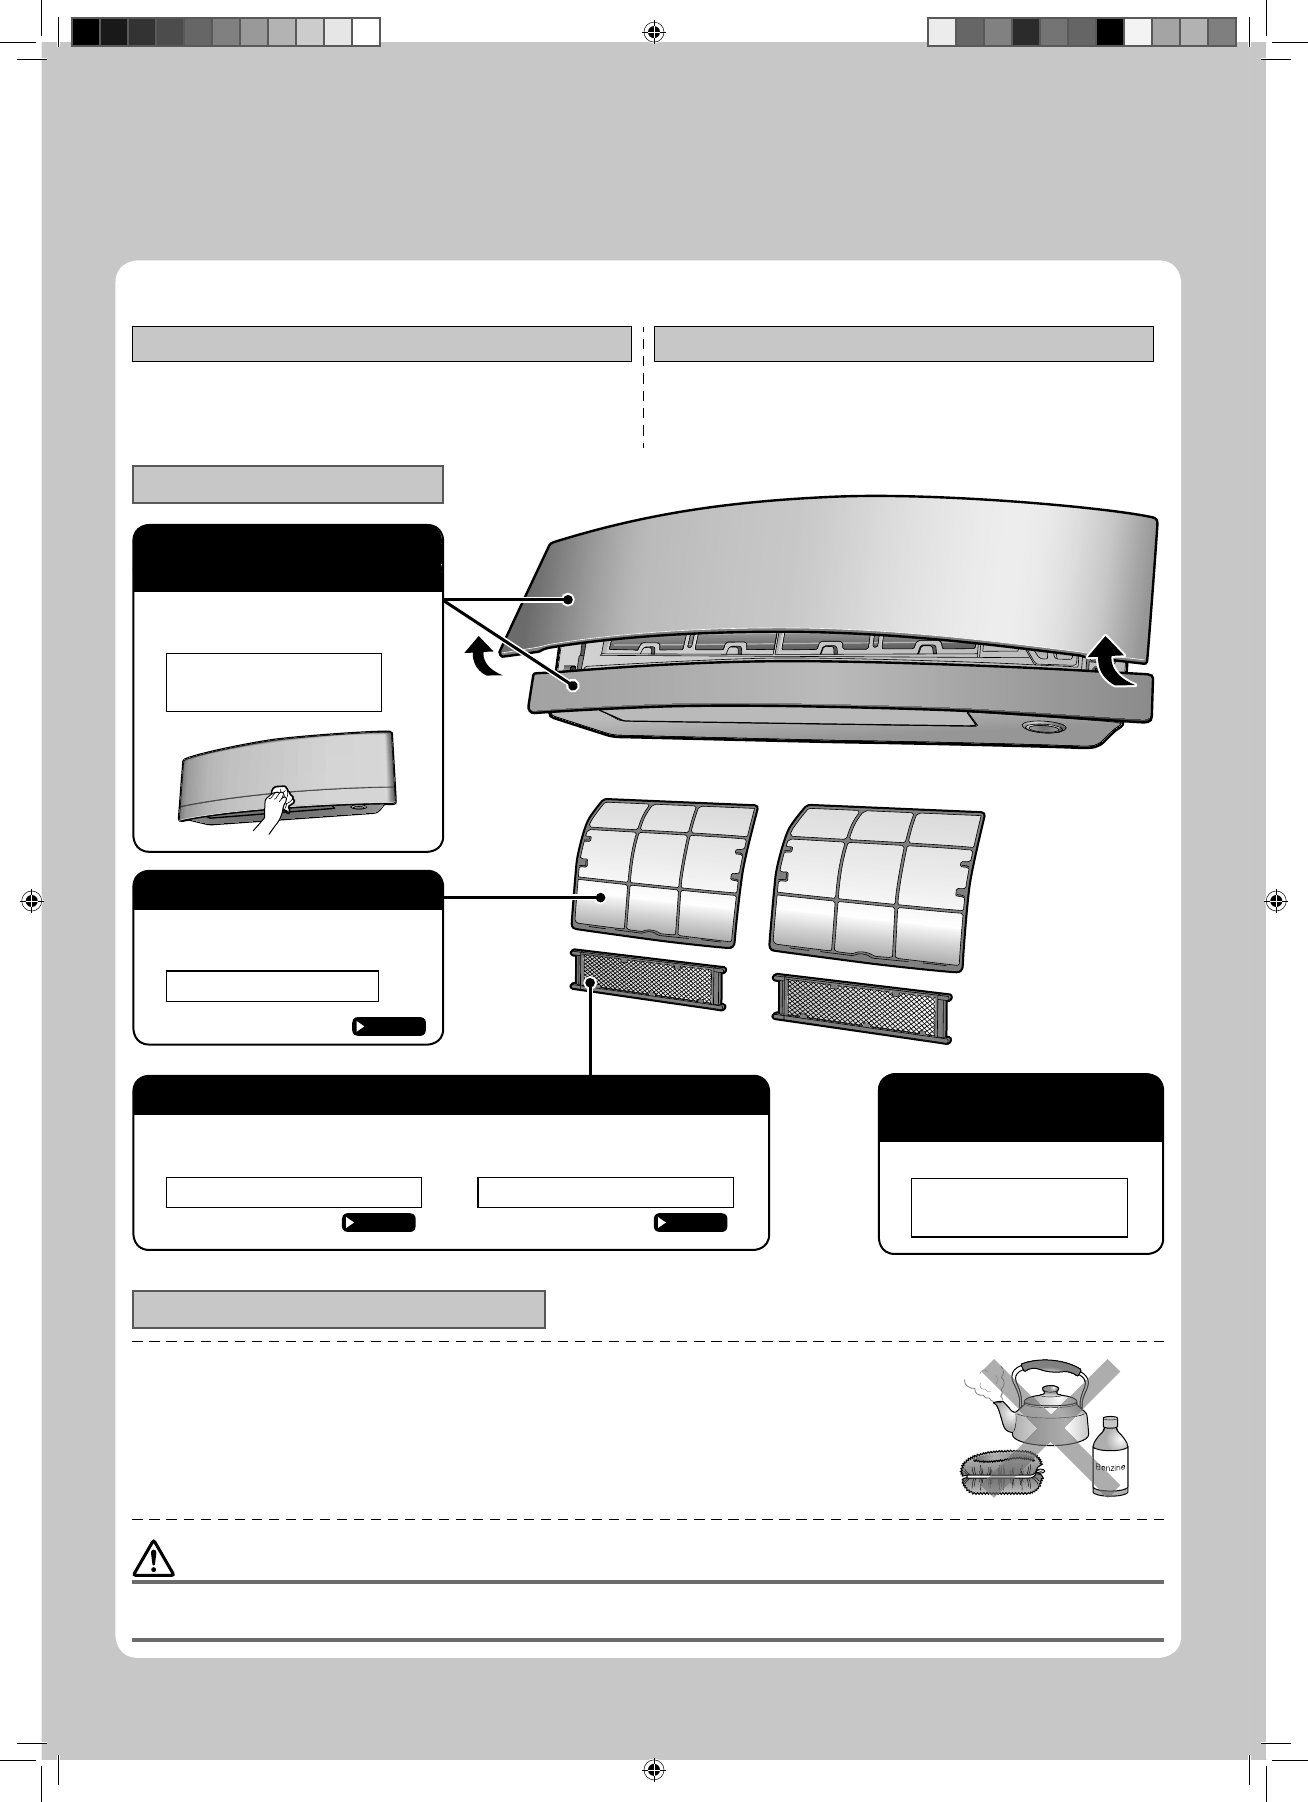
Nunca tentar instalar nem consertar o condicionador de ar por si. Um serviço inadequado pode resultar em
vazamento de água, choque eléctrico ou perigo de incêndio. Chame o distribuidor local ou um técnico quali cado
para fazer o trabalho de instalação e manutenção.
Caso o ar condicionado esteja funcionando mal (emanando um odor de queimado, etc.), desligue a alimentação à unidade e chame
o distribuidor local. A operação contínua sob tais circunstâncias pode resultar em falha, choque eléctrico ou perigo de incêndio.
Assegure-se de que instala um disjuntor de fuga à terra. Ao não instalar um disjuntor de fuga à terra pode resultar
em choques elétricos ou incêndio.
Assegure-se de ligar a unidade à terra. Não ligar à terra através de um cano, condutor eléctrico ou o terra de
telefone. Uma má ligação à terra pode resultar em choque eléctrico.
PRECAUÇÃO
Não utilize o ar condicionado para propósitos outros que não os especi cados. Não use o ar condicionado para
esfriar instrumentos de precisão, comida, plantas, animais ou peças de arte, visto que isto pode afectar
adversamente o rendimento, a qualidade e/ou a vida útil do objecto em questão.
Não exponha plantas nem animais directamente ao uxo de ar da unidade, visto que isto pode causar efeitos adversos.
Não deixe aparelhos que produzem chamas abertas em lugares expostos ao uxo de ar da unidade, visto que isto
pode prejudicar a combustão do queimador.
Não tape entradas nem saídas. O caudal de ar obstruído poderá originar um funcionamento insu ciente ou problemas.
08_PT_3P357704-1.indd 308_PT_3P357704-1.indd 3 12/17/2013 3:39:26 PM12/17/2013 3:39:26 PM
31
Bakım ve Temizlik
Hızlı referans
Üst ön panelin açılması Üst ön panelin kapatılması
Üst ön paneli her iki tarafından tutun ve açın.
Paneli panel destek levhası ile sabitleyin.
Panel destek levhasını yeniden eski konumuna getirin.
Alt ön paneli ilk konumuna getirin.
Üst ön panele her iki taraftan da basın.
Parçaların temizlenmesi
Temizleme hakkında açıklamalar
Temizleme için, aşağıda belirtilen malzemeleri kullanmayın.
40°C’nin üstünde sıcak su.
Benzin, mazot, tiner, diğer uçucu yağlar.
Cila karışımı.
Tel fırçalar, diğer sert cisimler.
İKAZ
Temizlemeden önce, işletime son verdiğinizden ve devre kesiciyi kapattığınızdan emin olun.
İç üniteninmekan iç ünite alüminyum kanatçıklarına dokunmayın. Bu parçalara dokunursanız, yaralanmaya sebep olabilir.
Hava ltresi
Elektrikli süpürge ile tozu alın
veya ltreyi yıkayın.
Her iki haftada bir
Sayfa 32
Titanyum apatit fotokatalitik hava temizleyici ltre
Elektrikli süpürge ile tozu alın veya ltreyi değiştirin.
[Temizleme] [Değiştirme]
Her 6 ayda bir Her 3 yılda bir
Sayfa 33
Sayfa 33
Üst ve alt
ön panelleri
Panelleri kapattığınızda onları
yumuşak nemli bir bezle silin.
Eğer kirlenme söz
konusu ise
İç ünite ve uzaktan
kumanda
Bunları yumuşak bir bezle silin.
Eğer kirlenme söz
konusu ise
10_TR_3P357704-1.indd 3110_TR_3P357704-1.indd 31 12/17/2013 3:59:24 PM12/17/2013 3:59:24 PM
392

Hulp nodig? Stel uw vraag in het forum

Spelregels
1

Forum

Daikin-FTXG25LV1BS
  • Als mijn Emura unit al een tijdje (na verwarmen) uit is ligt af en toe het lampje een paar seconden oranje op.
    Geen idee wat dit betekend…
    Wie weet dit? Gesteld op 5-4-2023 om 17:57

    Reageer op deze vraag Misbruik melden

Misbruik melden

Gebruikershandleiding.com neemt misbruik van zijn services uitermate serieus. U kunt hieronder aangeven waarom deze vraag ongepast is. Wij controleren de vraag en zonodig wordt deze verwijderd.

Product:

Bijvoorbeeld antisemitische inhoud, racistische inhoud, of materiaal dat gewelddadige fysieke handelingen tot gevolg kan hebben.

Bijvoorbeeld een creditcardnummer, een persoonlijk identificatienummer, of een geheim adres. E-mailadressen en volledige namen worden niet als privégegevens beschouwd.

Spelregels forum

Om tot zinvolle vragen te komen hanteren wij de volgende spelregels:

Belangrijk! Als er een antwoord wordt gegeven op uw vraag, dan is het voor de gever van het antwoord nuttig om te weten als u er wel (of niet) mee geholpen bent! Wij vragen u dus ook te reageren op een antwoord.

Belangrijk! Antwoorden worden ook per e-mail naar abonnees gestuurd. Laat uw emailadres achter op deze site, zodat u op de hoogte blijft. U krijgt dan ook andere vragen en antwoorden te zien.

Abonneren

Abonneer u voor het ontvangen van emails voor uw Daikin FTXG25LV1BS bij:


U ontvangt een email met instructies om u voor één of beide opties in te schrijven.


Ontvang uw handleiding per email

Vul uw emailadres in en ontvang de handleiding van Daikin FTXG25LV1BS in de taal/talen: Engels als bijlage per email.

De handleiding is 32,82 mb groot.


U ontvangt de handleiding per email binnen enkele minuten. Als u geen email heeft ontvangen, dan heeft u waarschijnlijk een verkeerd emailadres ingevuld of is uw mailbox te vol. Daarnaast kan het zijn dat uw internetprovider een maximum heeft aan de grootte per email. Omdat hier een handleiding wordt meegestuurd, kan het voorkomen dat de email groter is dan toegestaan bij uw provider.

Stel vragen via chat aan uw handleiding

Stel uw vraag over deze PDF

Andere handleiding(en) van Daikin FTXG25LV1BS

Daikin FTXG25LV1BS Gebruiksaanwijzing - Nederlands - 42 pagina's

Daikin FTXG25LV1BS Gebruiksaanwijzing - Deutsch - 42 pagina's


Uw handleiding is per email verstuurd. Controleer uw email

Als u niet binnen een kwartier uw email met handleiding ontvangen heeft, kan het zijn dat u een verkeerd emailadres heeft ingevuld of dat uw emailprovider een maximum grootte per email heeft ingesteld die kleiner is dan de grootte van de handleiding.

Er is een email naar u verstuurd om uw inschrijving definitief te maken.

Controleer uw email en volg de aanwijzingen op om uw inschrijving definitief te maken

U heeft geen emailadres opgegeven

Als u de handleiding per email wilt ontvangen, vul dan een geldig emailadres in.

Uw vraag is op deze pagina toegevoegd

Wilt u een email ontvangen bij een antwoord en/of nieuwe vragen? Vul dan hier uw emailadres in.


Info