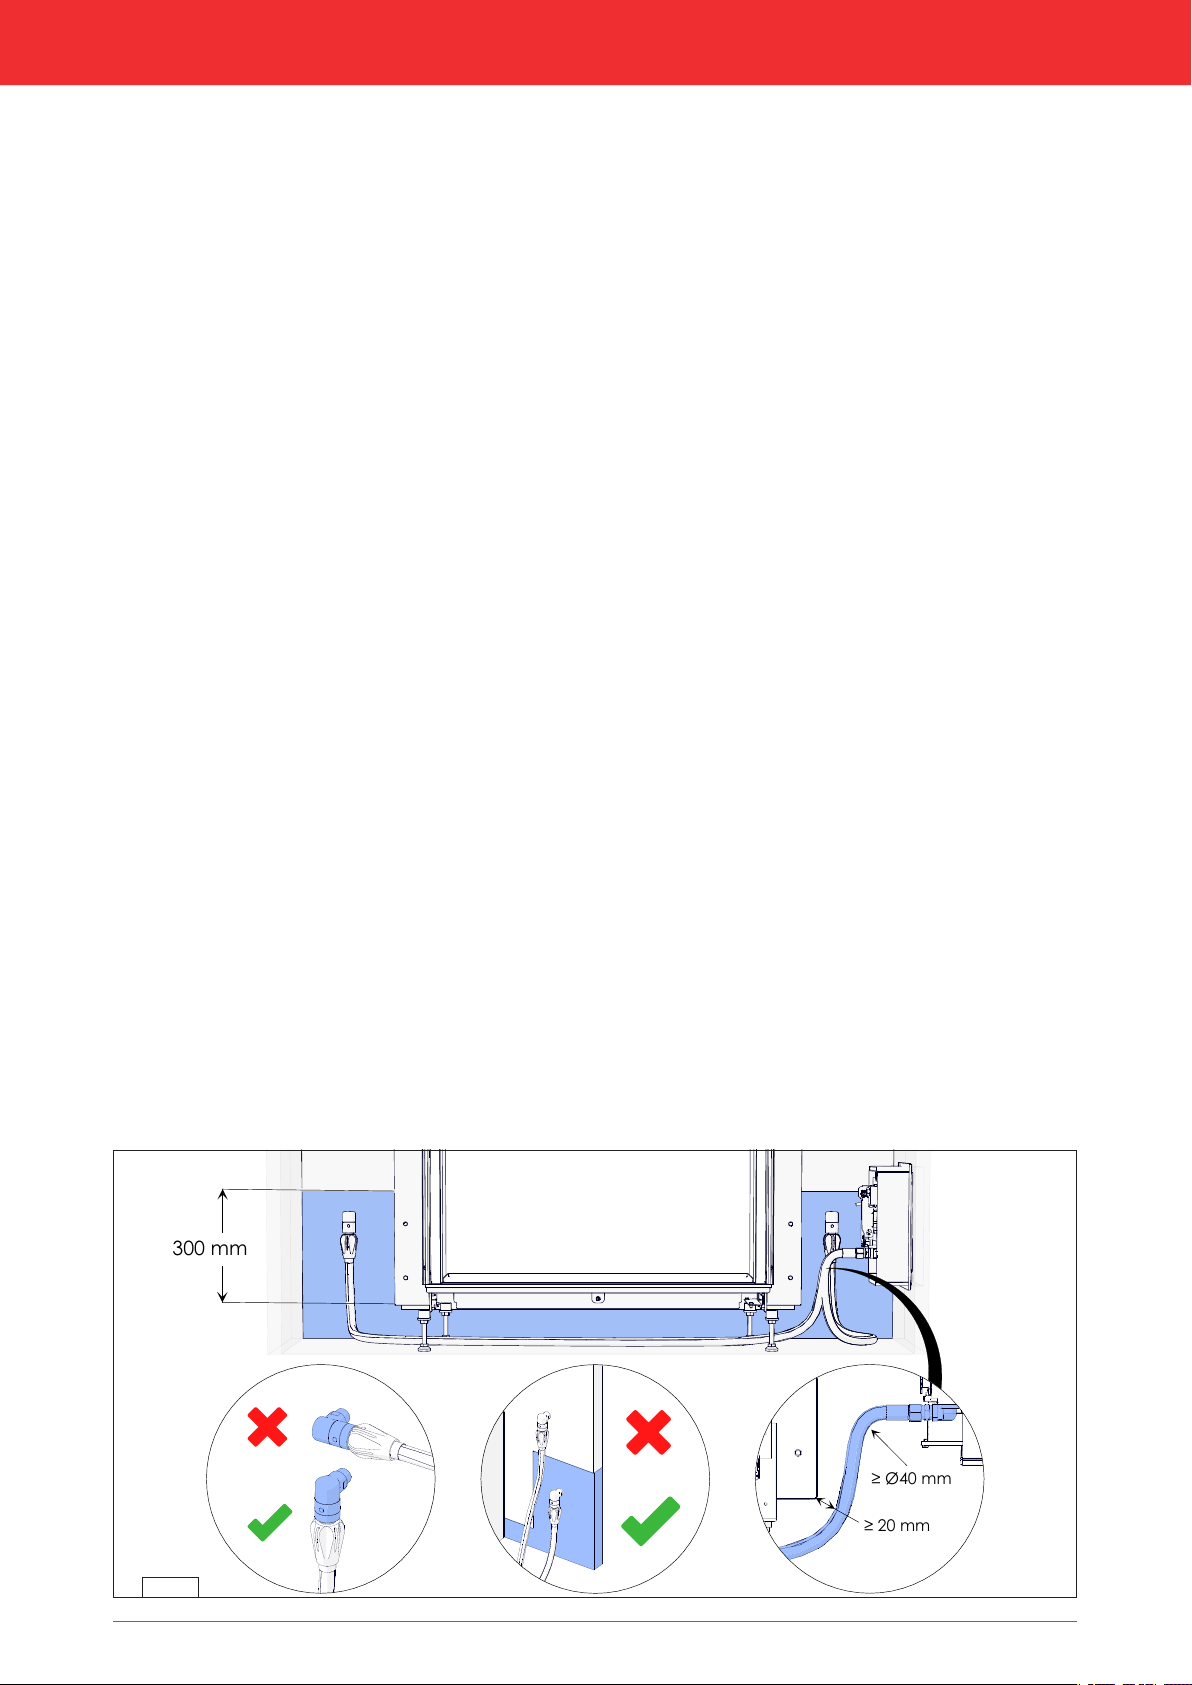
Installation manual96.3.1 Gas hose for gas connectionIf legally permitted, a gas hose for a gas socket (in accordance with EN14800) can be ordered for the appliance. (Please consult DRU service.). The gas hose is mounted to the appliance and has been checked for leak-tightness. This gas hose is available in different lengths.3Take the following into account when installing the gas connection and the appliance (see fig. 6-1):-The gas connection must always be accessible to be able to shut off the gas supply.-The gas connection may only be mounted vertically, so that the gas hose can be connected vertically at the bottom.-The gas connection is permitted in a zone (blue hatched area in fig. 6-1). To the left and right of the appliance to a height of 30 cm above the bottom side of the appliance (the bottom side is the end of the adjustable feet holder, without the feet). Under the appliance in the area between the legs.-The gas connection and gas hose should not be placed behind the appliance.-The gas hose may not get above the bottom side of the appliance (the bottom side is the end of the foot without the adjustable feet)-The minimum bend radius of the hose is 40 mm.-The hose should be placed as low as possible, must have a minimum distance from the appliance of 20 mm and, if possible, should not be placed under the burner.-The entrance of the gas control in which the hose is mounted faces the appliance. Due to the bend radius, the chimney breast width becomes larger on the side of the control hatch. The minimal depth of the control hatch is 270 mm.6.4 Electric connectionIn case of an electrical connection of 230 Volts, always provide sufficient earthing. Place this electrical connection away from the appliance, as low as possible in the chimney breast. Make sure the electrical connection is within reach. This has to do with the temperature development in the chimney breast.3Make sure that it is easy to disconnect the appliance from the power supply after installation: By disconnecting the plug or by means of a 2-core switch installed by a recognised installer in accordance with current regulations.3-Protect the gas control and electric components, hereafter referred to as the gas control, against building dust and moisture!-In the case of appliances made with the CM system®, observe the instructions in the supplied manual for connecting the receiver and control panel.
Gebruikershandleiding.com neemt misbruik van zijn services uitermate serieus. U kunt hieronder aangeven waarom deze vraag ongepast is. Wij controleren de vraag en zonodig wordt deze verwijderd.
Product:
Spelregels forum
Om tot zinvolle vragen te komen hanteren wij de volgende spelregels:
lees eerst de handleiding door;
controleer of uw vraag al eerder door iemand anders is gesteld;
probeer uw vraag zo duidelijk mogelijk te stellen;
heeft u een probleem en al geprobeerd om dit op te lossen, vermeld dit erbij aub;
heeft u een oplossing gekregen van een bezoeker dan horen wij dat graag in dit forum;
wilt u een reactie geven op een vraag of antwoord, gebruik dan niet dit formulier maar klik op de knop 'reageer op deze vraag';
uw vraag wordt direct op de website gezet; vermijd daarom persoonlijke gegevens in te vullen;
Belangrijk! Als er een antwoord wordt gegeven op uw vraag, dan is het voor de gever van het antwoord nuttig om te weten als u er wel (of niet) mee geholpen bent! Wij vragen u dus ook te reageren op een antwoord.
Belangrijk! Antwoorden worden ook per e-mail naar abonnees gestuurd. Laat uw emailadres achter op deze site, zodat u op de hoogte blijft. U krijgt dan ook andere vragen en antwoorden te zien.
Abonneren
Abonneer u voor het ontvangen van emails voor uw DRU Maestro 60 RCH bij:
nieuwe vragen en antwoorden
nieuwe handleidingen
U ontvangt een email met instructies om u voor één of beide opties in te schrijven.
Ontvang uw handleiding per email
Vul uw emailadres in en ontvang de handleiding van DRU Maestro 60 RCH in de taal/talen: Engels als bijlage per email.
De handleiding is 4.91 mb groot.
U ontvangt de handleiding per email binnen enkele minuten. Als u geen email heeft ontvangen, dan heeft u waarschijnlijk een verkeerd emailadres ingevuld of is uw mailbox te vol. Daarnaast kan het zijn dat uw internetprovider een maximum heeft aan de grootte per email. Omdat hier een handleiding wordt meegestuurd, kan het voorkomen dat de email groter is dan toegestaan bij uw provider.
Uw handleiding is per email verstuurd. Controleer uw email
Als u niet binnen een kwartier uw email met handleiding ontvangen heeft, kan het zijn dat u een verkeerd emailadres heeft ingevuld of dat uw emailprovider een maximum grootte per email heeft ingesteld die kleiner is dan de grootte van de handleiding.
Er is een email naar u verstuurd om uw inschrijving definitief te maken.
Controleer uw email en volg de aanwijzingen op om uw inschrijving definitief te maken
U heeft geen emailadres opgegeven
Als u de handleiding per email wilt ontvangen, vul dan een geldig emailadres in.
Uw vraag is op deze pagina toegevoegd
Wilt u een email ontvangen bij een antwoord en/of nieuwe vragen? Vul dan hier uw emailadres in.