100848
31
Verklein
Vergroot
Pagina terug
1/54
Pagina verder
Downloaded from www.Manualslib.com manuals search engine
1
CONGRATULATIONS
Congratulations on the purchase of your new
camera. Your camera has been carefully engineered
and manufactured to give you dependable
operation. Read this manual before operating the
camera to become more familiar with it.
This manual has been written and formatted with
depth and detail so that you can easily follow the
instructions to maximize the features of your
camera.
ENGLISH
Duo Manual (510939-02) 8/7/02 12:43 pm Page 1
Downloaded from www.Manualslib.com manuals search engine
Table of Contents
Important Information......................................................................................4
Camera Features ..............................................................................................6
System Requirements ......................................................................................6
1. The Camera
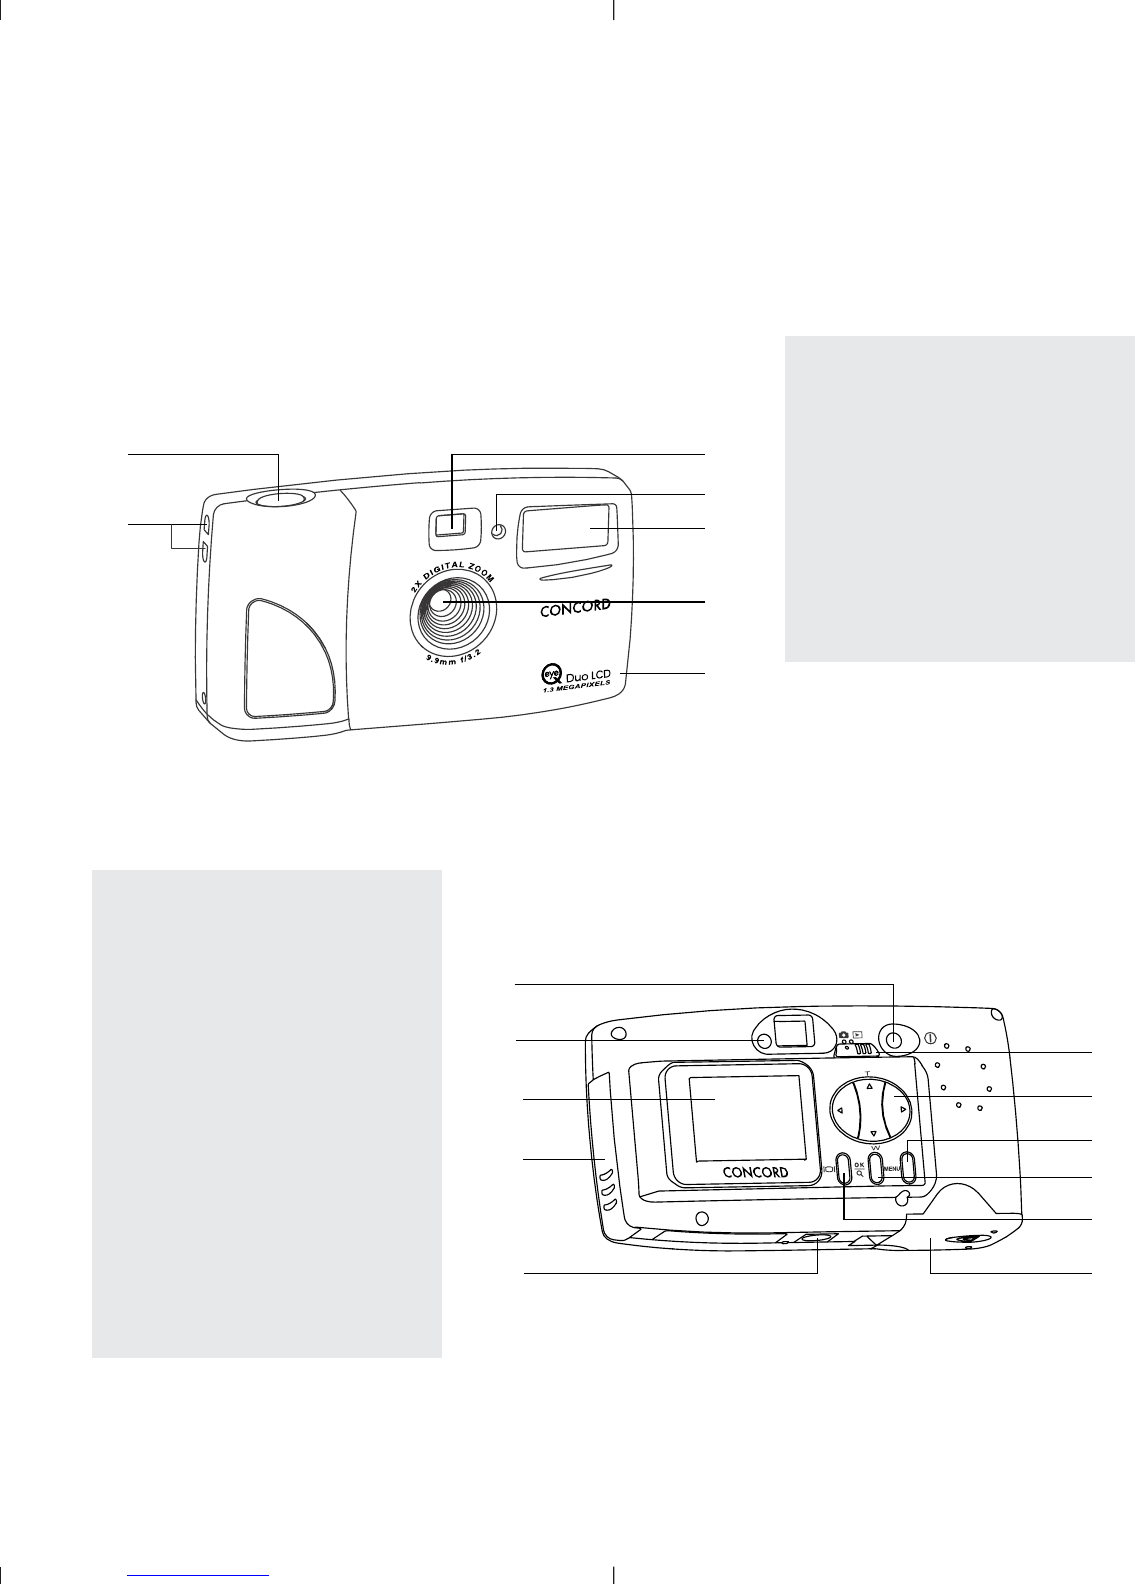
Overview of your Concord Eye-Q Duo LCD Camera ........................................7
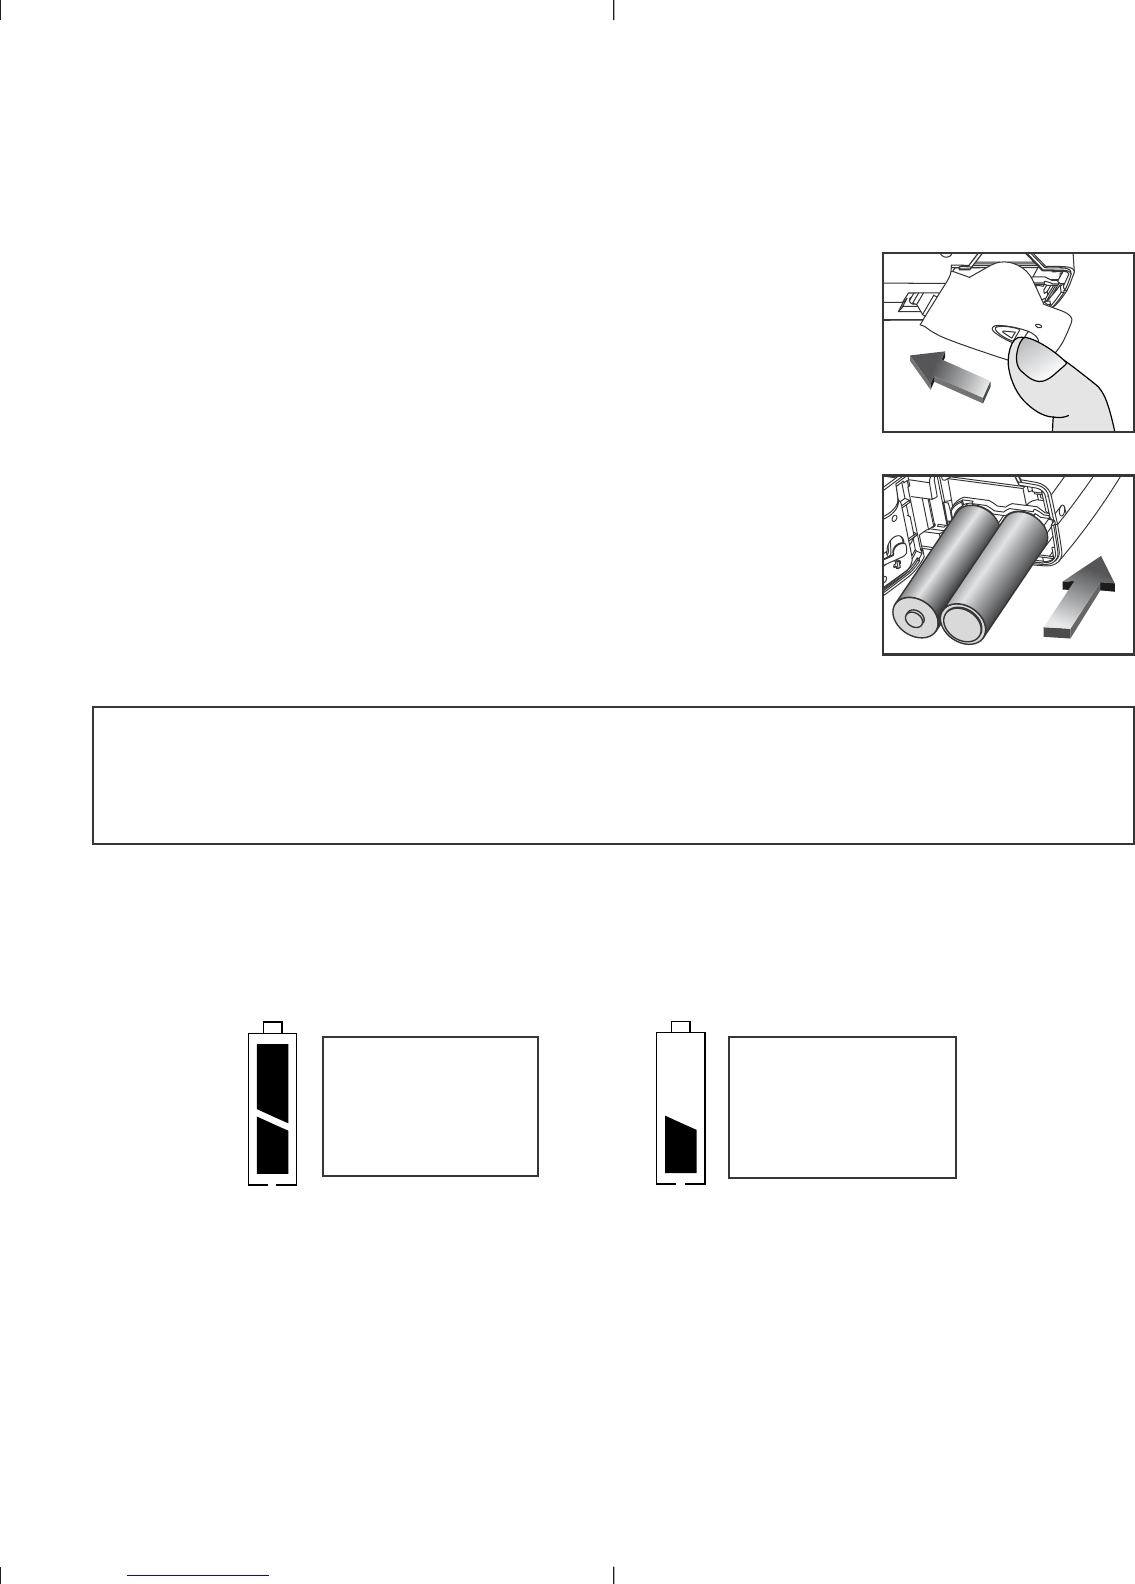
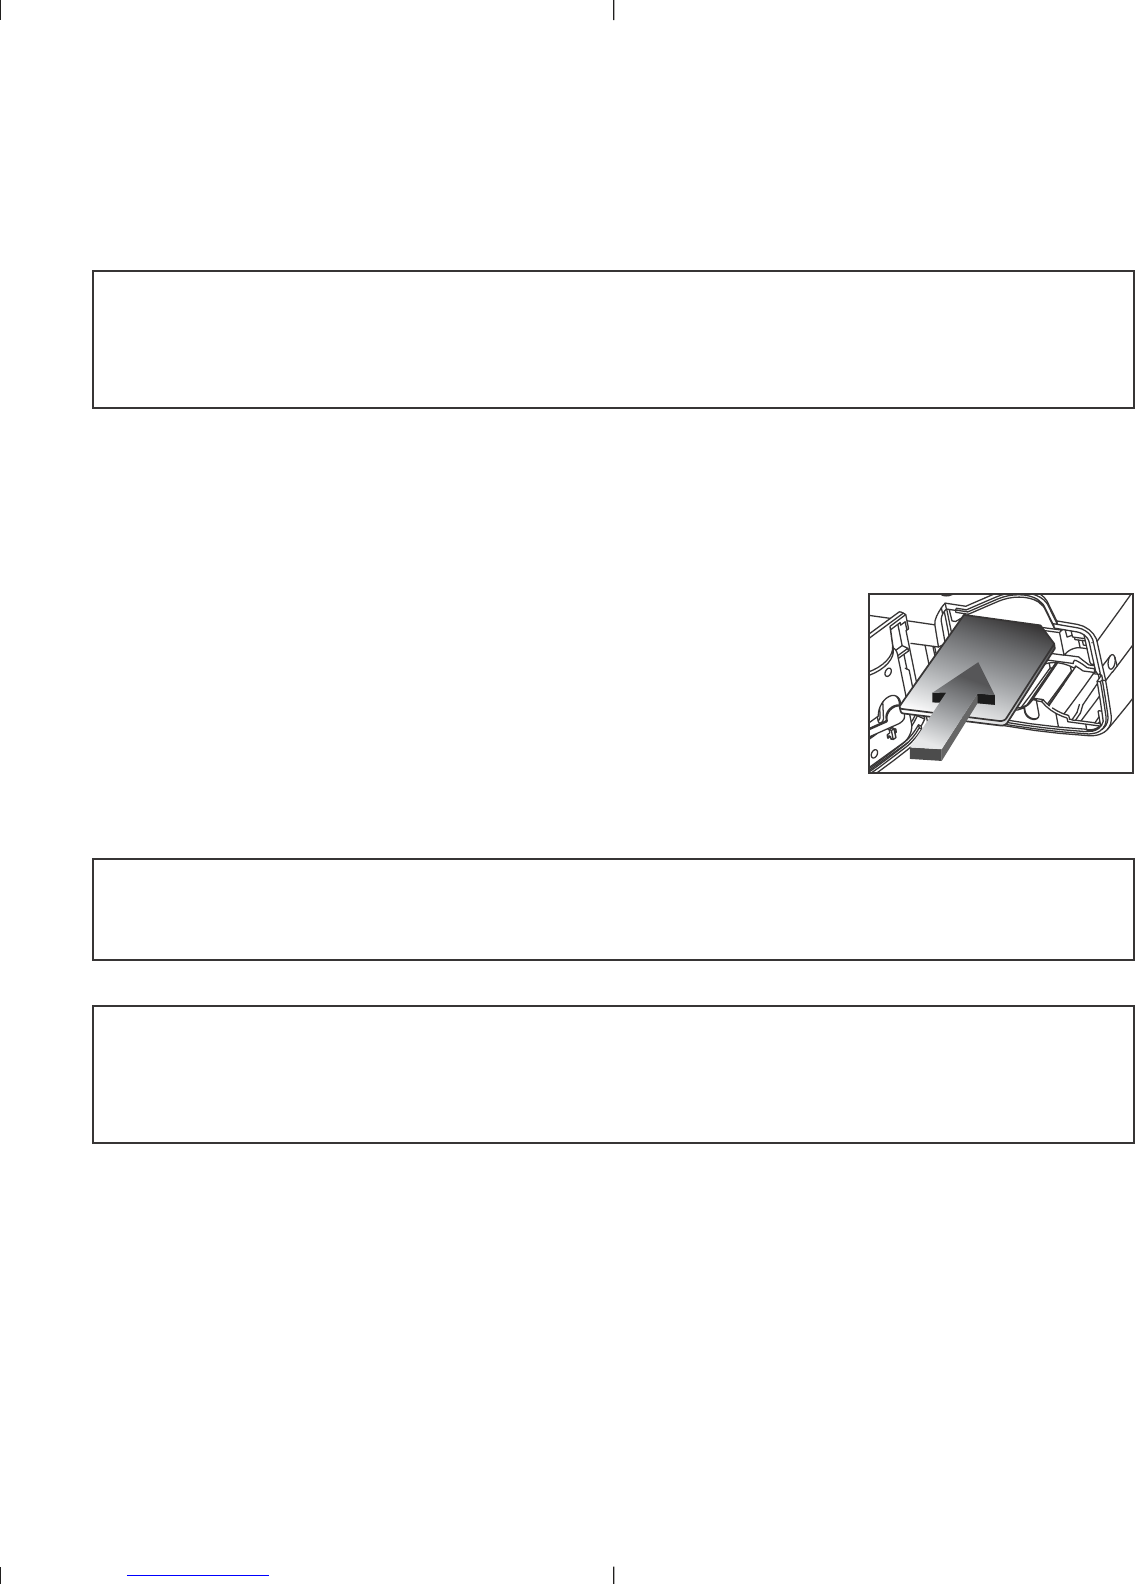
Loading the Batteries ......................................................................................8
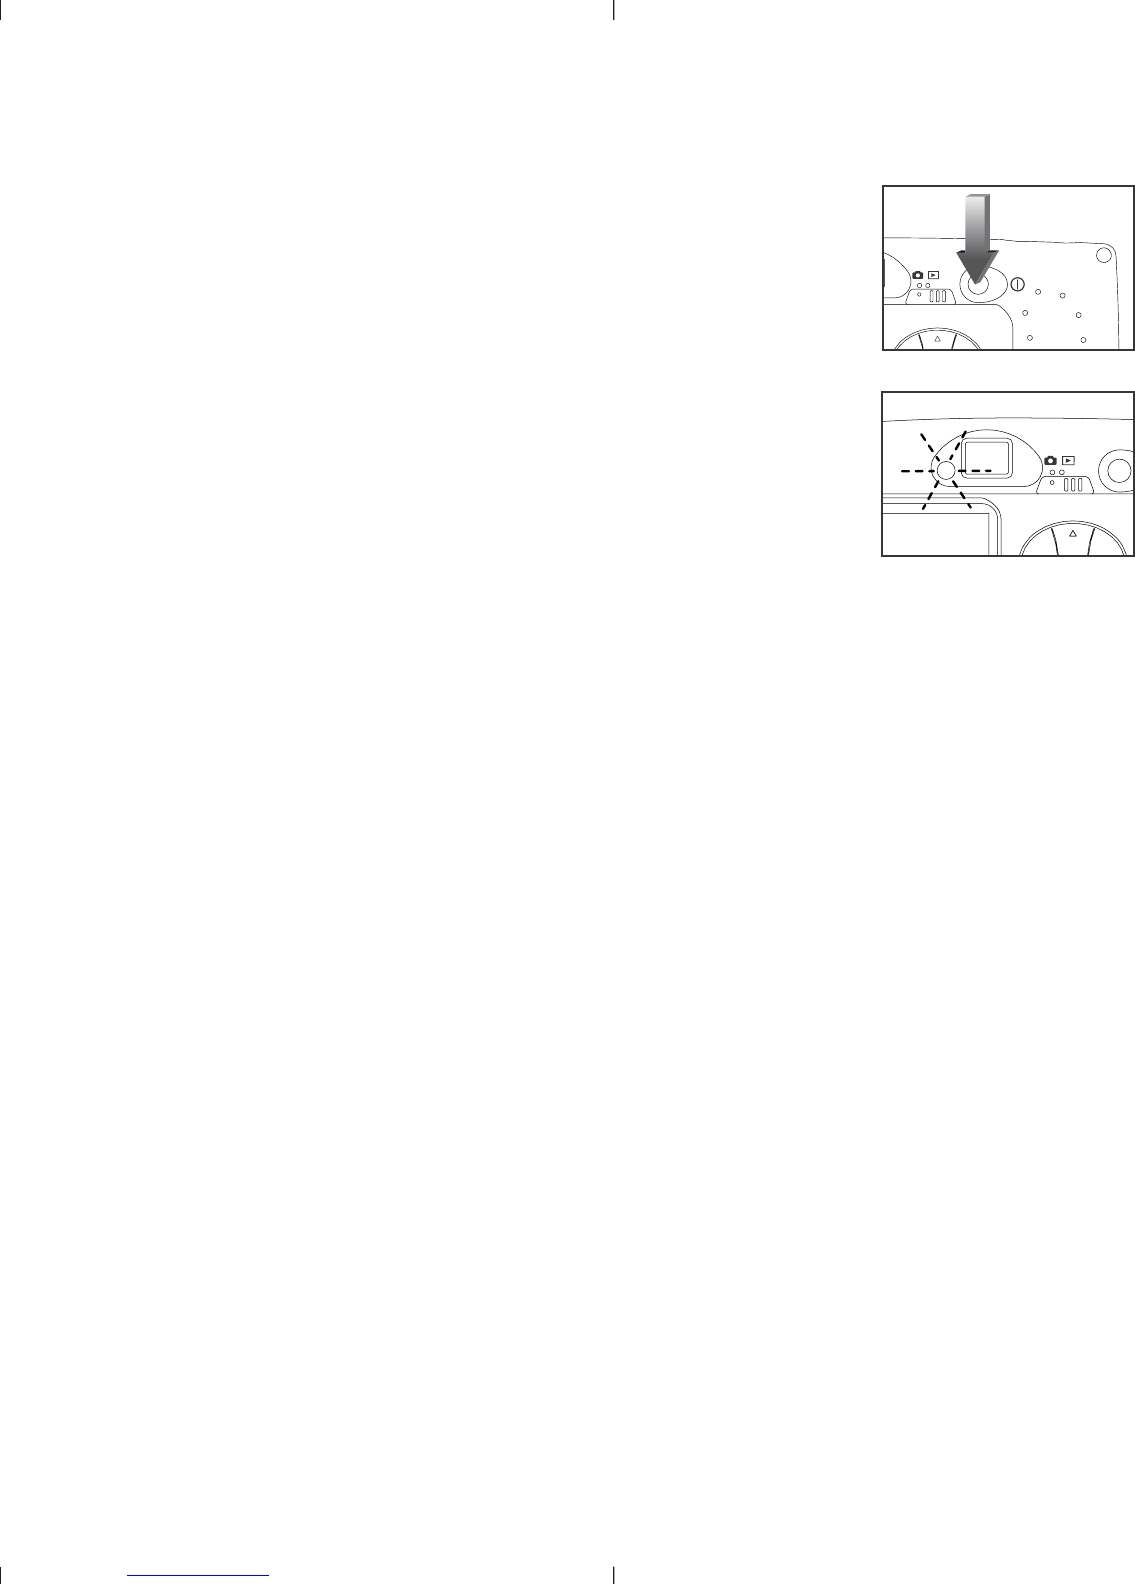
Turning the Camera On and Off ......................................................................9
LCD Menu Screens ........................................................................................10
LCD Status Messsages....................................................................................12
Turning the LCD On and Off ..........................................................................13
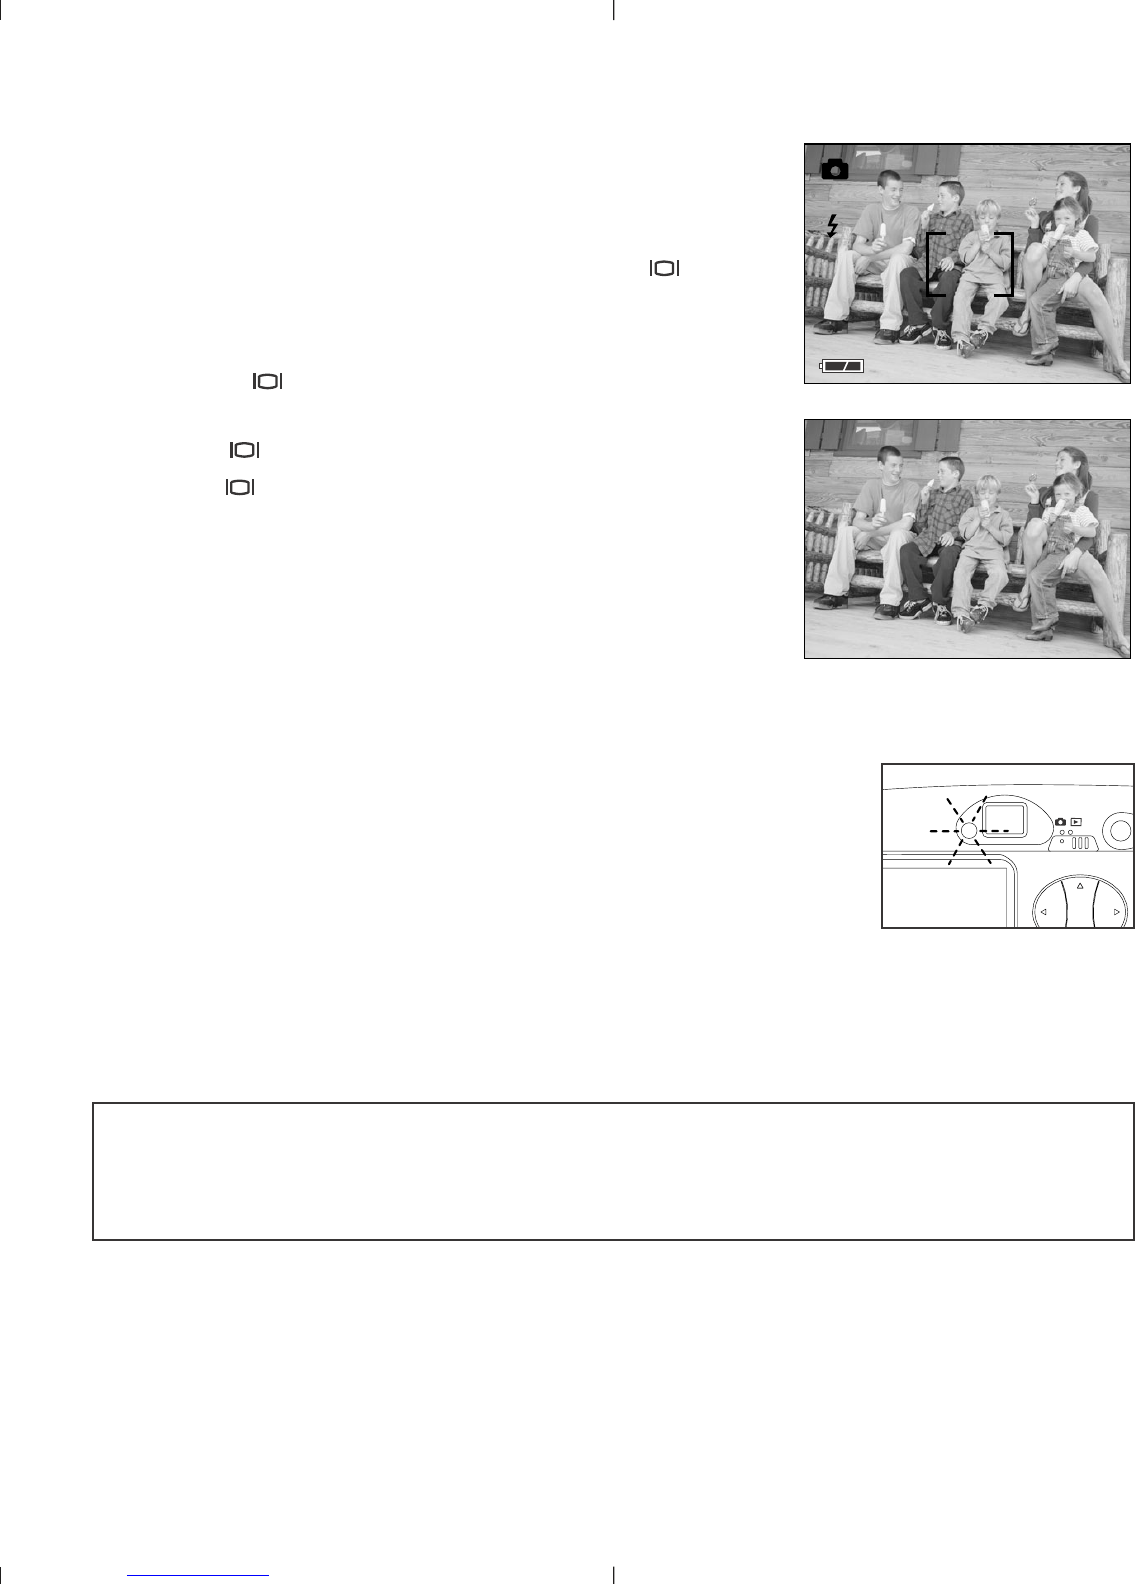
Camera Ready LED Status ..............................................................................13
Camera Memory..............................................................................................14
2. Camera Mode
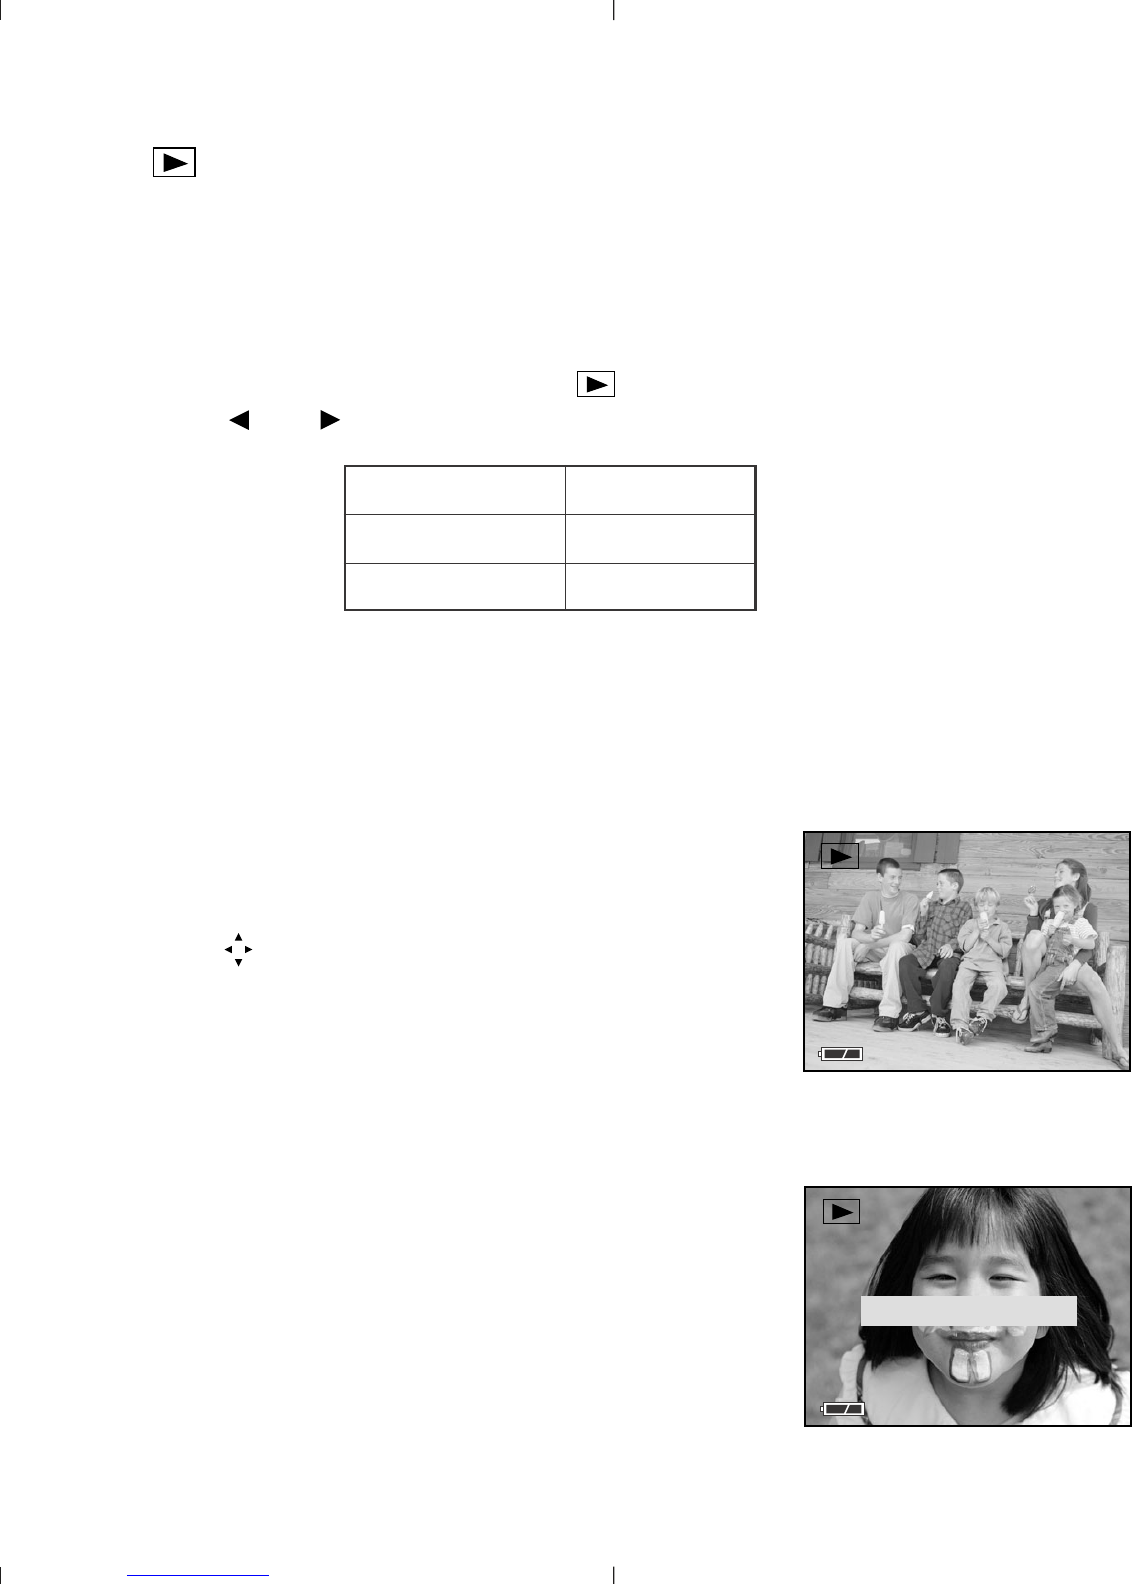
Taking Images ................................................................................................16
Main Menu......................................................................................................16
Mode Select ..............................................................................................17
Video Clips ............................................................................................17
Self-timer ................................................................................................18
Quality........................................................................................................19
Flash ..........................................................................................................20
WB (White Balance) ..................................................................................21
Brightness ................................................................................................22
Setup ........................................................................................................23
2X Digital Zoom ............................................................................................26
3. Review Mode
2X Enlargement ..............................................................................................27
Viewing Video Clips ......................................................................................27
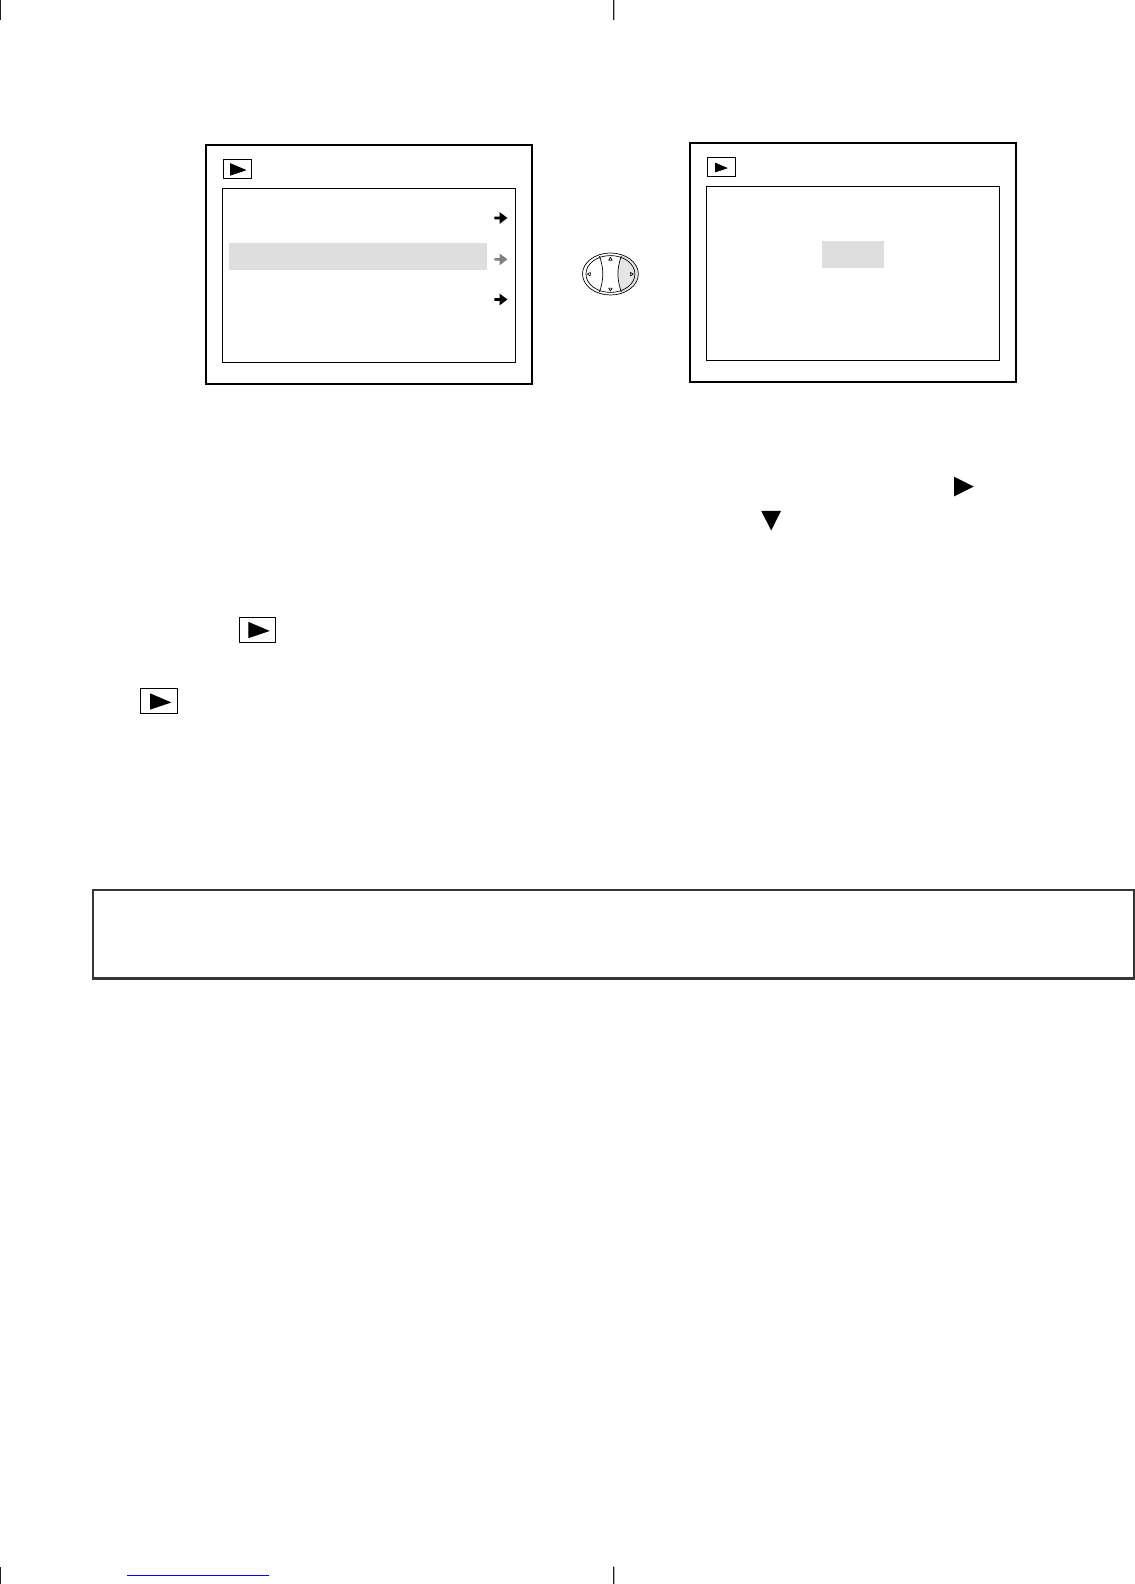
Main Menu ....................................................................................................28
Delete ........................................................................................................28
Thumbnail..................................................................................................30
Brightness ................................................................................................30
4. Software Installation
Installing the Camera Drivers and ArcSoft Applications ................................31
2
Duo Manual (510939-02) 8/7/02 12:43 pm Page 2
Downloaded from www.Manualslib.com manuals search engine
3
5. Transferring Photos to the Computer
Connecting the Camera to the Computer......................................................32
WDM/TWAIN Drivers (PC) ..........................................................................33
Mass Storage Mode (HDD) ......................................................................34
ArcSoft PhotoImpression ........................................................................36
6. Special Features
PC Video Clips................................................................................................37
Web Camera ..................................................................................................38
TV Mode ........................................................................................................39
Interchangeable Face Plates ..........................................................................42
7. Camera Maintenance
Cleaning the Eye-Q Duo LCD..........................................................................43
8. Tips and Troubleshooting ..............................................................................44
9. Getting Help ..................................................................................................48
10. Camera Specifications ....................................................................................49
11. Warranty Information ....................................................................................52
Duo Manual (510939-02) 8/7/02 12:43 pm Page 3
Downloaded from www.Manualslib.com manuals search engine
4
IMPORTANT INFORMATION
FCC INFORMATION
FCC WARNING: This equipment meets the limits for a Class B digital device,
pursuant to Part 15 of FCC rules. Only the cable supplied with the camera
should be used. Operation with other cables is likely to result in interference to
radio and TV reception and could void the user’s authorization to operate this
equipment. This device complies with Part 15 of the FCC Rules. Operation is
subject to the following two conditions:
This device may not cause harmful interference.
This device must accept any interference received, including interference
that may cause undesired operation.
Tested To Comply
With FCC Standards
for HOME OR OFFICE USE
Changes or modifications not expressly approved by the manufacturer may void
the user’s authority to operate this equipment.
USER INFORMATION
NOTE: This equipment has been tested and found to comply with the limits for
a class B digital device, pursuant to Part 15 of the FCC Rules. These limits are
designed to provide reasonable protection against harmful interference in a
residential installation. This equipment generates, uses and can radiate radio
frequency energy and, if not installed and used in accordance with the
instructions, may cause harmful interference to radio communications. However,
there is no guarantee that interference will not occur in a particular installation.
If this equipment does cause harmful interference to radio or television
reception, which can be determined by turning the equipment on and off, the
user is encouraged to try to correct the interference by one or more of the
following measures:
•Reorient or relocate the receiving antenna.
•Increase the separation between the equipment and receiver.
Connect the equipment into an outlet on a circuit different from that to
which the receiver is connected.
Consult the dealer or an experienced radio/TV technician for help.
Duo Manual (510939-02) 8/7/02 12:43 pm Page 4
Downloaded from www.Manualslib.com manuals search engine
5
VCCI INFORMATION
This is a Class B product, to be used in a domestic environment, based on the
Technical Requirement of the Voluntary Control Council for Interference (VCCI)
from Information Technology Equipment. If this is used near a radio or
television receiver in a domestic environment, it may cause radio interference.
Please install and use the equipment according to the instruction manual.
PRECAUTIONS
Be sure to observe the following precautions when using the camera:
•Do not open the case of the camera or attempt your own repairs. Always
leave this service to authorized repair facilities.
•Keep the camera away from water and other liquids, and never let it get
wet. Never use outdoors when it is raining or snowing.
•Should foreign matter or water get into the unit, immediately turn the
power off and contact your local authorized service center.
•Physical damage and malfunction of this unit can cause the image data
stored in its memory to be deleted. Be sure to always keep backup copies
of data by transferring them to a personal computer.
•Under the environment with electrostatic discharge, the camera may
malfunction and require the user to reset the camera.
•Do not leave the camera in places subject to extremely high temperatures,
such as in a closed vehicle or in direct sunlight.
•Remove the battery when camera is not used for long periods of time.
•Use LR6 AA batteries only.
•Dispose of the batteries in a manner that complies with applicable laws.
•Do not place the camera in unstable locations where the camera may fall
and be damaged.
•Do not press on the LCD or lens.
•Do not unplug the camera from the TV or computer while the camera is in
operation; otherwise, the memory may be corrupted.
•Do not turn the power off or open the battery compartment when the LED
is blinking or lit up; otherwise, the image may not get stored.
Duo Manual (510939-02) 8/7/02 12:43 pm Page 5
Downloaded from www.Manualslib.com manuals search engine
Camera Features
•Stores up to 14 Fine, 33 Normal or 54 Economy mode photos with
7MB internal memory
•Virtually unlimited storage using the removable MultiMediaCard (MMC).
MMC memory cards sold separately at electronic or computer retailers.
1.6" Color LCD
USB connection and cable
TV connection (NTSC and PAL) and cable
•Built-in automatic flash
•Focus free from 4 feet (1.2 meter) to infinity
1280 x 960 pixel resolution (1.3 Mega Pixel)
TV On Screen Display (OSD) menu
2X Digital Zoom
•Video Clip Mode
•Web Camera
•Mass Storage
•Self-timer
•Interchangeable face plates
•Tripod socket
•Multi-language support
System Requirements
PC:
•Microsoft Windows 98SE/ME/2000 and XP
IBM PC/AT or compatible, 200 Mhz or higher
•Minimum 32MB RAM (64MB recommended)
USB Port
640 x 480 monitor, minimum 16 bit color (1024 x 768 24 bit color
recommended)
175MB free hard disk space
56K or faster modem, ISDN, or LAN connection (for the Web Camera
feature only)
CD-ROM drive
Macintosh:
•Mac OS 9 or higher
•Macintosh Power PC or higher, Minimum 64MB of RAM
USB Port
100MB of available Hard Disk Space
6
Duo Manual (510939-02) 8/7/02 12:43 pm Page 6
Downloaded from www.Manualslib.com manuals search engine
1. The Camera
Overview of Your Concord Eye-Q Duo LCD Camera
7
FRONT/TOP
1. Shutter Button
2. Lug for Neck / Wrist Strap
3. Viewfinder
4. Self-timer LED
5. Flash
6. Ir Filter and Lens
7. Interchangeable Face Plate
8. Power Button
9. Camera Ready LED
10. LCD
11. Cable Connection Panel
12. Tripod Socket
13. Mode Switch
14. Navigation Button
15. Menu Button
16. OK Button
17. LCD On/Off Button
18. Battery Door
BACK/BOTTOM
1
2
3
5
4
6
7
8
9
10
11
12
13
14
15
16
17
18
Duo Manual (510939-02) 8/7/02 12:43 pm Page 7
Downloaded from www.Manualslib.com manuals search engine
8
Loading the Batteries
The Concord Eye-Q Duo LCD uses 2 LR6 AA batteries.
Loading the Batteries:
1. Locate the battery door on the bottom of the
camera.
2. Slide the button on the battery door towards the
center of the camera. (fig.1.1)
3. Lift the battery door to open.
4. Insert the batteries with the positive terminal
toward the + sign, and the negative terminal
toward the – sign. (fig.1.2)
5. Close the battery door.
Note: Remove the batteries from the Concord Eye-Q Duo LCD if the
camera will not be used for an extended period of time to prevent
corrosion or battery leaks.
Checking the Batteries
The camera has a battery indicator that shows the current battery level.
FULL
Batteries are full
and ready to use.
LOW
Batteries are low
and need to be
replaced soon.
fig.1.1
fig.1.2
Duo Manual (510939-02) 8/7/02 12:43 pm Page 8
Downloaded from www.Manualslib.com manuals search engine
9
Turning the Camera on and off
When the camera is turned on, the camera ready LED
on the back of the camera blinks and the LCD
displays the default settings.
Turning the Camera on and off:
1. Press the Power button to turn the camera on.
(fig.1.3)
2. The camera is ready for picture taking when the
camera ready LED stops blinking. (fig.1.4)
3. To turn the camera off, press the Power button for
a few seconds.
T
fig.1.3
fig.1.4
T
Duo Manual (510939-02) 8/7/02 12:43 pm Page 9
Downloaded from www.Manualslib.com manuals search engine
10
LCD Menu Screens
Brightness
BRIGHTNESS
AWB
Sunny
Fluoresent
Tungsten
WB
Auto
Flash
Flash Off
Main Menu
FLASH
Fine
Normal
Economy
Main Menu
QUALITY
Video Clip
Self-timer Off
Main Menu
MODE
Time-out 15S
Driver PC
TV NTSC
Language
SETUP
Default
Format
Main Menu
SETUP
Mode
Quality
Flash
WB
MAIN MENU
Brightness
Setup
Exit
MAIN MENU
PC
HDD
NTSC
PAL
15S
30S
60S
90S
Non
English
Français
Español
Deutsch
Italiano
Duo Manual (510939-02) 8/7/02 12:43 pm Page 10
Downloaded from www.Manualslib.com manuals search engine
11
Delete One
Delete All
Main Menu
DELETE
Brightness
BRIGHTNESS
Delete
Thumbnail
Brightness
Exit
MAIN MENU
THIS FILE
No
Yes
DELETE ONE
No
Yes
DELETE ALL
Duo Manual (510939-02) 8/7/02 12:43 pm Page 11
Downloaded from www.Manualslib.com manuals search engine
12
LCD Status Messages
Messages on the LCD indicate if the memory is full or if there is a
problem with the memory.
1. MMC MEMORY IS INSUFFICIENT:
If the file in the internal memory is larger
than the available memory space in the
MMC, the file will not be transferred and this
message will appear. Please insert a MMC
with sufficient memory or delete files.
2. MMC IS FULL:
The MMC is full
3. INTERNAL MEMORY IS FULL:
The internal memory is full
4. ERROR:
The cameras internal memory or the MMC’s
memory may be corrupted. Please format the
memory. (P.25)
MMC MEMORY IS
INSUFFICIENT
MMC FULL!
INTERNAL MEMORY
FULL
ERROR!
Duo Manual (510939-02) 8/7/02 12:43 pm Page 12
Downloaded from www.Manualslib.com manuals search engine
13
Turning the LCD On and Off
By default, the LCD automatically turns on
when the camera is powered on. Press to
turn the LCD on or off.
Using the Display ON/OFF Button:
1. Press once to turn the LCD icons off.
2. Press again to turn the LCD monitor off.
3. Press to turn the LCD on.
Camera Ready LED Status
When the Camera Ready LED is:
1. Steady
The camera is in capture mode. Please hold the
camera steady during this time; otherwise, the image
may come out blurry. (fig.1.5)
2. Blinking
The flash is recharging or the camera is in background storage mode.
You may move the camera in this mode. (fig.1.5)
Note: Do not open the battery door or turn the power off while the
Camera Ready LED is steady or blinking; otherwise, the images or
video clips in the camera may be damaged.
A
005/080
FINE
T
fig.1.5
Duo Manual (510939-02) 8/7/02 12:43 pm Page 13
Downloaded from www.Manualslib.com manuals search engine
Camera Memory
The Concord Eye-Q Duo LCD can store files in one of two ways using either
the cameras 7MB internal memory or the removable MultiMediaCard (MMC).
MMC memory cards are sold separately and can be purchased from major
electronic or computer retailers.
When the MMC memory card is inserted, the images and video clips
stored in the internal memory will be transferred automatically onto
the memory card.
LCDDefault Memory
MMC
No Internal Memory (7MB)
Note: If a MMC with insufficient memory is inserted, there will only be
a partial transfer and the memory card will be filled. Please insert a
memory card with sufficient memory, or delete images. Please refer to
the Deleting Files section for instruction. (P. 28) The files that were not
transferred will remain in the internal memory.
14
Duo Manual (510939-02) 8/7/02 12:43 pm Page 14
Downloaded from www.Manualslib.com manuals search engine
15
When the cameras internal memory or the MMC is full, you will need to
delete images to continue to take pictures, or insert a new MMC memory
card. Please refer to the Deleting Photos section for instructions.
Note: there may be available storage space by using a lower photo
quality setting. Refer to the QUALITY section to select a lower quality
setting on P. 19.
Using the MultiMediaCard
Inserting the memory card:
1. Locate the battery door on the bottom of the
camera.
2. Slide the button on the battery door towards the
center of the camera and lift the door.
3. Insert the MMC as indicated by the arrow. (fig.1.6)
4. Close the battery door.
Note: For better performance, please use MMC memory cards with 16
MB of storage or higher.
Note: If the internal memory or the MMC is corrupted, the LCD will
read ERROR! The memory needs to be formatted. Please format all
files to continue. (P.25)
fig.1.6
Duo Manual (510939-02) 8/7/02 12:43 pm Page 15
Downloaded from www.Manualslib.com manuals search engine
16
2. Camera Mode
Taking Images:
1. Set the camera to Camera Mode by moving the
Mode Switch to .
2. Position the subject in the viewfinder OR the LCD.
(fig.2.1)
3. Gently press the Shutter button (fig.2.2) and keep
the camera still until the camera ready LED next to
the viewfinder flashes. (fig.2.3)
4. When the image has been captured, the camera
ready LED next to the viewfinder begins to blink.
This indicates that the image is being processed.
5. A preview of the image will be displayed on the
LCD for 2 seconds and the file counter number
displayed in the LCD will be updated.
MAIN MENU
1. In Camera Mode, press MENU.
2. Press or to toggle between the
options.
3. Press to view the sub-menu of the
selected option.
4. If you would like to exit any menu, press
until Main Menu is highlighted and press
OK to return to the Main Menu.
OR
5. Press MENU return to still image taking mode.
fig.2.2
fig.2.3
fig.2.1
Mode
Quality
Flash
WB
MAIN MENU
Duo Manual (510939-02) 8/7/02 12:43 pm Page 16
Downloaded from www.Manualslib.com manuals search engine
MODE
Taking Video Clips
1. When Video Clip is highlighted in the MODE
menu, press .
2. Press the Shutter button to begin recording
a continuous video clip. (fig.2.4)
3. Press the Shutter button again to stop
recording. (fig.2.5)
OR
4. The camera will continue recording until the
memory is almost full.
5. When the recording is completed, the
camera will return to still image taking
mode.
Note: The camera ready LED will blink rapidly when the camera is
storing the video clip. Do not open the battery door or turn the
camera off while the LED is blinking, otherwise the video clip may not
be stored.
Note: To exit video clip mode before recording, press MENU to return
to still image taking mode.
17
Mode
Quality
Flash
WB
MAIN MENU
Video Clip
Self-timer Off
Main Menu
MODE
PRESS SHUTTER TO STOP
fig.2.4
fig.2.5
Duo Manual (510939-02) 8/7/02 12:43 pm Page 17
Downloaded from www.Manualslib.com manuals search engine
18
Self-timer:
1. Highlight Self-timer in the MODE menu,
press to switch to On. (fig.2.6)
2. Press MENU to return to Camera Mode.
3. Position the subject in the camera
4. Press the Shutter button.
5. The camera ready LED and the self-timer LED
will blink for 10 seconds and then the image
will be captured.
Note: The self-timer is automatically deactivated once the image is
taken.
To cancel Self-timer:
1. Highlight Self-timer in the MODE menu,
press to switch to Off. (fig.2.7)
2. Press MENU to return to Camera Mode.
Video Clip
Self-timer On
Main Menu
MODE
A
005/080
FINE
Mode
Quality
Flash
WB
MAIN MENU
Video Clip
Self-timer Off
Main Menu
MODE
fig.2.6
fig.2.7
+
Duo Manual (510939-02) 8/7/02 12:43 pm Page 18
Downloaded from www.Manualslib.com manuals search engine
19
QUALITY
1. In the QUALITY menu, press or to toggle between Fine, Normal
and Economy.
2. Press OK to select the quality mode and press MENU to return to
Camera Mode.
Fine Normal Economy
JPEG ratio 5.5:1 12:1 24:1
Images taken with
7MB of Memory (approx.)
Note: The selected option will be marked by (
).
14 33 54
Mode
Quality
Flash
WB
MAIN MENU
Fine
Normal
Economy
Main Menu
QUALITY
Duo Manual (510939-02) 8/7/02 12:43 pm Page 19
Downloaded from www.Manualslib.com manuals search engine
20
FLASH
1. In the FLASH menu, press or to choose between Auto ( A ),
Flash ( ), and Flash Off ( ).
2. Press OK to select the flash mode and press MENU to exit.
Flash Status Distance from subject
Auto ( A ) 8.5ft (2.5m)and 3.9ft (1.2m).
Flash ( ) 8.5ft (2.5m)and 3.9ft (1.2m).
Flash OFF ( ) 3.9ft (1.2m) to infinity
Note: The selected option will be marked by (
).
Note: The flash may need time to recharge between images. While it is
charging the camera ready LED blinks. When it stops blinking you are
ready to take another picture. If the batteries are low, the flash will
not work. Please insert fresh batteries.
Mode
Quality
Flash
WB
MAIN MENU
Auto
Flash
Flash Off
Main Menu
FLASH
Duo Manual (510939-02) 8/7/02 12:43 pm Page 20
Downloaded from www.Manualslib.com manuals search engine
WB (WHITE BALANCE)
1. In the WB (WHITE BALANCE) menu, press or to choose between
AWB, Sunny, Fluorescent or Tungsten.
2. Press OK to select the white balance mode and press MENU to exit.
White Balance Option Explanation
Auto White Balance (AWB) The camera will automatically
choose the white balance setting.
Sunny ( ) To be used outdoors with sufficient
sunlight.
Fluorescent ( ) To be used indoors with fluorescent
light conditions.
Tungsten ( ) To be used indoors with tungsten
light conditions.
21
Mode
Quality
Flash
WB
MAIN MENU
AWB
Sunny
Fluoresent
Tungsten
WB
Duo Manual (510939-02) 8/7/02 12:43 pm Page 21
Downloaded from www.Manualslib.com manuals search engine
22
BRIGHTNESS
Use this option to change the LCD brightness.
1. In the BRIGHTNESS menu, press or to toggle between both
options.
2. Press MENU to exit.
Brightness
Setup
MAIN MENU
Brightness
Main Menu
BRIGHTNESS
Duo Manual (510939-02) 8/7/02 12:43 pm Page 22
Downloaded from www.Manualslib.com manuals search engine
23
SETUP
Using the SETUP menu:
1. Use or to toggle between the options.
2. When the option is highlighted, use to change the setting.
3. Press to select and scroll to the next option or press MENU to exit.
Setup Option Selection Options Explanation
Timeout 15, 30, 60, 90 Sets the automatic power off option.
None Deactivates the automatic power off option.
Driver PC WDM/TWAIN Driver. Use this mode when
using ArcSoft or video conferencing software.
HDD Mass Storage mode. Use this mode to view
your images and video clips using the Mass
Storage driver.
TV NTSC Sets the mode the camera needs to adapt to
your TV (in North America).
PALSets the mode camera needs to adapt with
your TV (in Europe).
Language English, Sets the language in your camera.
Francais,
Espanol,
Deutch,
Italiano
Format Formats the internal memory or the MMC
memory card by deleting all files.
Default Sets all camera settings to the
factory default.
Brightness
Setup
Exit
MAIN MENU
Time-out 30S
Driver PC
TV NTSC
Language
SETUP
Duo Manual (510939-02) 8/7/02 12:43 pm Page 23
Downloaded from www.Manualslib.com manuals search engine
24
TIME-OUT
To extend battery life, the camera will
automatically power off after 30 seconds of
inactivity. Use this option to change the
default setting.
DRIVER
Please refer to the Transferring Files to the Computer section on P.32 for
further information.
TV
Please refer to the TV Mode section on P.39 for further information.
LANGUAGE
Use this option to change the language setting in your camera. All menus
and messages will be displayed in the selected language.
Time-out 30S
Driver PC
TV NTSC
Language
SETUP
Duo Manual (510939-02) 8/7/02 12:43 pm Page 24
Downloaded from www.Manualslib.com manuals search engine
25
DEFAULT
To set your camera to its default settings:
1. When the Default option is highlighted, press OK.
2. The camera will reset to the factory defaults.
3. Press MENU to exit.
Mode Default Setting
Flash Auto ( A )
White Balance AWB
Quality Fine
Time-out 30
Driver PC
TV NTSC
Language English
Note: The default version for TV mode will vary depending on the
country where the camera was purchased.
FORMAT
Formatting deletes all files. Use this option to format the internal
memory or the MMC/SD memory card.
To format the:
•Internal memory – The MMC/SD card must not be in the camera.
MMC/SD card – Insert the memory card into the camera.
Note: If ERROR! is displayed on the LCD screen, this means that the
internal memory or the memory in the MMC/SD is corrupted. Please
format the memory to continue.
Duo Manual (510939-02) 8/7/02 12:43 pm Page 25
Downloaded from www.Manualslib.com manuals search engine
26
2X Digital Zoom
The Concord Eye-Q Duo LCD can use 2X Digital Zoom to take pictures.
Setting the 2X Digital Zoom Mode:
1. In Camera and/or Video Clip mode, press (T) to zoom into the subject.
2. Press (W) to zoom out and to return to normal mode.
Duo Manual (510939-02) 8/7/02 12:43 pm Page 26
Downloaded from www.Manualslib.com manuals search engine
27
3. REVIEW MODE
In review mode, you can review your captured images and video clips
through the LCD.
Using REVIEW mode:
1. Slide the Mode Switch towards .
2. Press or to scroll through each file.
File Type Format
Image JPG
Video Clip AVI
2X Enlargement (JPEG)
When viewing images, you may use 2X enlargement to zoom into the
stored image.
To use 2X Enlargement:
1. While viewing a JPG file, press OK to enter
2X Enlargement Mode.
2. Press to navigate in the image.
3. Press OK to exit 2X Enlargement mode and
to return to the original image.
Viewing Video Clips (AVI)
To view video clips:
1. Press OK to play the video clip.
005/080
FINE
JPEG
008/080
AVI
Press OK to Play AVI
Duo Manual (510939-02) 8/7/02 12:43 pm Page 27
Downloaded from www.Manualslib.com manuals search engine
28
MAIN MENU
To use the MAIN MENU in Review Mode:
1. Press MENU to enter the MAIN MENU.
2. Use or to toggle between the options.
3. When the option is highlighted press to
enter its submenu.
4. If you would like to exit any menu, press
until Exit is highlighted to return to the
previous menu.
OR
5. Press MENU to exit.
DELETE
To delete one file from the internal memory:
1. When Delete One is highlighted in the DELETE menu, press .
2. The next screen will read " This File?" Press to highlight No or Yes.
Press OK to select.
3. If Yes is selected, the file will be deleted and the camera will return to
the Main Menu.
4. If No is selected, no change will be made, and you will return to the
Main Menu.
Delete
Thumbnail
Brightness
Exit
MAIN MENU
Delete One
Delete All
Main Menu
DELETE
THIS FILE?
No
Yes
DELETE ONE
Duo Manual (510939-02) 8/7/02 12:43 pm Page 28
Downloaded from www.Manualslib.com manuals search engine
29
To delete ALL files from the internal memory:
1. When Delete All is highlighted in the DELETE menu, press .
2. The next screen will read "All Files?" Press to highlight No or Yes.
Press OK to select.
3. If Yes is selected, ALL FILES will be deleted and the camera will return
to the Main Menu.
4. If No is selected, no change will be made, and you will return to the
Main Menu.
To Delete Files from the MMC:
1. Insert the MMC into the camera.
2. Follow the steps above.
Note: Once images have been deleted, you will not be able to recover
them.
Delete One
Delete All
Main Menu
DELETE
No
Yes
DELETE ALL
Duo Manual (510939-02) 8/7/02 12:43 pm Page 29
Downloaded from www.Manualslib.com manuals search engine
30
THUMBNAIL
1. When Thumbnail is highlighted in the Main Menu, press OK to
enter the Thumbnail mode.
2. Use to navigate between all of the stored files.
3. Press OK to view the selected file.
BRIGHTNESS
Please refer to the Brightness section on P. 22.
Delete
Thumbnail
Brightness
Exit
MAIN MENU
OK
Duo Manual (510939-02) 8/7/02 12:43 pm Page 30
Downloaded from www.Manualslib.com manuals search engine
31

Hulp nodig? Stel uw vraag in het forum

Spelregels

Misbruik melden

Gebruikershandleiding.com neemt misbruik van zijn services uitermate serieus. U kunt hieronder aangeven waarom deze vraag ongepast is. Wij controleren de vraag en zonodig wordt deze verwijderd.

Product:

Bijvoorbeeld antisemitische inhoud, racistische inhoud, of materiaal dat gewelddadige fysieke handelingen tot gevolg kan hebben.

Bijvoorbeeld een creditcardnummer, een persoonlijk identificatienummer, of een geheim adres. E-mailadressen en volledige namen worden niet als privégegevens beschouwd.

Spelregels forum

Om tot zinvolle vragen te komen hanteren wij de volgende spelregels:

Belangrijk! Als er een antwoord wordt gegeven op uw vraag, dan is het voor de gever van het antwoord nuttig om te weten als u er wel (of niet) mee geholpen bent! Wij vragen u dus ook te reageren op een antwoord.

Belangrijk! Antwoorden worden ook per e-mail naar abonnees gestuurd. Laat uw emailadres achter op deze site, zodat u op de hoogte blijft. U krijgt dan ook andere vragen en antwoorden te zien.

Abonneren

Abonneer u voor het ontvangen van emails voor uw Concord EYE Q DUO LCD bij:


U ontvangt een email met instructies om u voor één of beide opties in te schrijven.


Ontvang uw handleiding per email

Vul uw emailadres in en ontvang de handleiding van Concord EYE Q DUO LCD in de taal/talen: Engels als bijlage per email.

De handleiding is 1,27 mb groot.


U ontvangt de handleiding per email binnen enkele minuten. Als u geen email heeft ontvangen, dan heeft u waarschijnlijk een verkeerd emailadres ingevuld of is uw mailbox te vol. Daarnaast kan het zijn dat uw internetprovider een maximum heeft aan de grootte per email. Omdat hier een handleiding wordt meegestuurd, kan het voorkomen dat de email groter is dan toegestaan bij uw provider.

Stel vragen via chat aan uw handleiding

Stel uw vraag over deze PDF

Uw handleiding is per email verstuurd. Controleer uw email

Als u niet binnen een kwartier uw email met handleiding ontvangen heeft, kan het zijn dat u een verkeerd emailadres heeft ingevuld of dat uw emailprovider een maximum grootte per email heeft ingesteld die kleiner is dan de grootte van de handleiding.

Er is een email naar u verstuurd om uw inschrijving definitief te maken.

Controleer uw email en volg de aanwijzingen op om uw inschrijving definitief te maken

U heeft geen emailadres opgegeven

Als u de handleiding per email wilt ontvangen, vul dan een geldig emailadres in.

Uw vraag is op deze pagina toegevoegd

Wilt u een email ontvangen bij een antwoord en/of nieuwe vragen? Vul dan hier uw emailadres in.


Info