Our products are all TÜV-GS tested and therefore represent the highest
current safety standards. However, this fact does not make it unnecessary
to observe the following principles strictly.
1. Assembly the machine exactly as described in the installation instructions
and use only the enclosed, specific parts of the machine. Before assembling,
verify the completeness of the delivery against the delivery notice and the
completeness of the carton against the assembly steps in the installation
and operating instructions.
2. Before the first use and at regular intervals (approximately every 50 Operat-
ing hours) check the tightness of all screws, nuts and other connections and
the access shafts and joints with some lubricant so that the safe operating
condition of the equipment is ensured. In particular, the adjustment of saddle
and handlebar need smooth function and good condition.
3. Set up the machine in a dry, level place and protect it from moisture and
water. Uneven parts of the floor must be compensated by suitable measures
and by the provided adjustable parts of the machine if such are installed.
Ensure that no contact occurs with moisture or water.
4. Place a suitable base (e.g. rubber mat, wooden board etc.) beneath the
machine if the area of the machine must be specially protected against
indentations, dirt etc.
5. Before beginning training, remove all objects within a radius of 2 metres
from the machine.
6. Do not use aggressive cleaning agents to clean the machine and employ
only the supplied tools or suitable tools of your own to assemble the machine
and for any necessary repairs. Remove drops of sweat from the machine
immediately after finishing training.
7.WARNING! Your health can be impaired by incorrect or excessive train-
ing. Consult a doctor before beginning a planned training programme. He
can define the maximum exertion (pulse, Watts, duration of training etc.)
to which you may expose yourself and can give you precise information
on the correct posture during training, the targets of your training and your
diet. Never train after eating large meals.
8. Only train on the machine when it is in correct working order. Use original
spare parts only for any necessary repairs. WARNING: Replace the worm
parts immediately and keep this equipment out of use until repaired.
9. When setting the adjustable parts, observe the correct position and the
marked, maximum setting positions and ensure that the newly adjusted
position is correctly secured.
10. Unless otherwise described in the instructions, the machine must only
be used for training by one person at a time. The exercise time should not
overtake 90 min./daily.
11. Wear training clothes and shoes which are suitable for fitness training
with the machine. Your clothes must be such that they cannot catch dur-
ing training due to their shape (e.g. length). Your training shoes should be
appropriate for the trainer, must support your feet firmly and must have
non-slip soles.
12.WARNING! If you notice a feeling of dizziness, sickness, chest pain or
other abnormal symptoms, stop training and consult a doctor.
13. Never forget that sports machines are not toys. They must therefore
only be used according to their purpose and by suitably informed and
instructed persons.
14.People such as children, invalids and handicapped persons should
only use the machine in the presence of another person who can give aid
and advice. Take suitable measures to ensure that children never use the
machine without supervision.
15. Ensure that the person conducting training and other people never move
or hold any parts of their body into the vicinity of moving parts.
16. At the end of its life span this product is not allowed to dispose over
the normal household waste, but it must be given to an assembly point for
the recycling of electric and electronic components. You may find the symbol
on the product, on the instructions or on the packing.
The materials are reusable in accordance with their marking. With the re-use,
the material utilization or the protection of our environment. Please ask the
local administration for the responsible disposal place.
17. To protect the environment, do not dispose of the packaging materials,
used batteries or parts of the machine as household waste. Put these in
the appropriate collection bins or bring them to a suitable collection point.
18. For speed dependent operation mode, the braking resistance level can
be adjustable manually and the variations of power will depend on the ped-
aling speed. For speed independent operation mode, the user can set the
wanted power consumption level in Watt, constant power level will be kept
by various braking resistance levels, that will be determined automatically
by system. That is independent on the pedaling speed.
19. The unit has a resistance device with 32 levels. This makes it possible
to increase or reduce the braking resistance and thus the amount of effort
required in the training. Pressing the button with „-“ reduces the braking
resistance and thus the amount of effort required in the training. Pressing
the button „+“ increases the braking resistance and thus the amount of
effort required in the training.
20. This machine has been tested and certified in compliance with wird
EN ISO 20957-1:2013 and EN ISO 20957-5:2016 „H/A“. The maximum
permissible load (=body weight) is specified as 150 kg. The classification of
HA means this exercise bike is designed foe home use only and with good
accuracy class, the variations of power consuming are within ±5W up to
50W and ±10% over 50W. This item’s computer corresponds to the basic
demands of the EMV Directive of 2014/30/EU.
21. The assembly and operating instructions is part of the product. If selling
or passing to another person the documentation must be provided with
the product.
Dear customer,
We congratulate you on your purchase of this home training sports unit and
hope that we will have a great deal of pleasure with it. Please take heed
of the enclosed notes and instructions and follow them closely concerning
assembly and use.
Please do not hesitate to contact us at any time if you should have any
questions.
Top-Sports Gilles GmbH
Friedrichstr. 55
42551 Velbert
English
16
Please contact us if any components are defective or missing, or if
you need any spare parts or replacements in future:
Adresse:Top-Sports Gilles GmbH
Friedrichstr. 55
42551 Velbert
Telefon: +49 (0) 2051 - 6 06 70
Telefax: +49 (0) 2051 - 6 06 74 4
e-mail: info@christopeit-sport.com
www.christopeit-sport.com
Parts list – List of spare parts
ET6 Order No. 2003
Technical data: Issue: 03.01.2022
Ergometer with high accuracy of class H/A
• Electric induction braking
• 32 stepped resistance control
• Approx. 12 kg flywheel mass
• 12 stored training programs
• 3 heart rate programs
• 1 individual programs
• 1 manual program
• 1 speed independent program (10-300 Watt,
resistance adjustable in 5 Watt steps)
• 1 body fat program
• Hand pulse measurement and receiver for chest belt
• Horizontally and vertically adjustable comfort saddle
• Saddle and handlebar inclination adjustable
• Floor level compensation
• Transport rollers
• Back Light LCD Display shows simultaneously: Time, Speed, Distance,
approx. calorie consumption, RPM, Watt, pulse frequency and ODO.
• Inputs of limits: Time, Distance, approx. Calories, Pulse frequency and Watt
• Announcement of limits
• Fitness-Test (Recovery Function)
• Integrated holder for smartphones and tablets
• USB port for charging during exercising
• Bluetooth-Connection for KINOMAP (APP for IOS and Android)
• Electrical data: 220-240V/50-60Hz~/60Watt
• Load max. 150 kg (Body weight)
Items weight: 40kg
Space requirement approx.: L 96 x W 52 x H 140 cm
0 5 10 15 20 25 30 35 40 50 60 70 80 90 100 mm
This product is created only for private Home sports activity
and not allowed to us in a commercial or professional area.
Home Sport use class H/A
Illustration
No.
DesignationDimension
mm
QuantityAttached to
Stück
ET-Number
1Main frame1 33-2003-01-SW
2Front bottom tube1 133-2003-02-SW
3Rear bottom tube 1 133-2003-03-SW
4Handlebar post1 133-2003-04-SW
5Handlebar1 433-2003-05-SW
6Saddle Post1 1+3833-2003-06-SW
7Saddle bracket13836-9814-12-BT
7aSaddle1 3836-9107-06-BT
8Computer1 436-2003-03-BT
9LPedal left9/16“L1 10R36-9109-84-BT
9RPedal right9/16“R110L36-9109-85-BT
10LCrank left9/16“L 1 6433-9109-82-SW
10RCrank right9/16“R16433-9109-83-SW
11LFront end cap left1 236-9108-54-BT
11RFront end cap right1236-9108-55-BT
12End cap with height adjustment2 336-9108-56-BT
13Carriage boltM10x572 1+239-10026
14Washer 10//203 1339-10206-CR
15Spring washer for M102 1339-9995-CR
16Cap nut M102 1339-10021
17Bolt M8x1610 1,3+439-9888-CR
18Spring washer for M810 1739-9864-VC
19Washer 8//1613 7,17+2539-10018-CR
20Adjustable foot2 336-9805-24-BT
21Controller cable1 22+7136-2003-05-BT
22Connection cable1 8+2136-2003-06-BT
23 aComputer cover a14+23b36-9108-57-BT
23 bComputer cover b14+23a36-9108-58-BT
24Screw M5x122 2339-9988
25L-shaped knob1 4+536-9107-29-BT
26Screw 4.2x1813 10,23,71+7736-9111-38-BT
17
English
Illustration
No.
DesignationDimension
mm
QuantityAttached to
Stück
ET-Number
27Screw4 839-9903-SW
28Pulse cable1 5+3036-9107-07-BT
29 aHandlebar grip 2 536-9109-59-BT
29 bHandlebar grip2536-9805-15-BT
30Pulse unit2 5+2836-9107-08-BT
31Round plug2 536-9211-21-BT
32Quick release1 1+636-9211-18-BT
33Saddle bushing1 136-9109-60-BT
34Saddle support wrapping1 636-9805-11-BT
35Knob1 3636-9211-19-BT
36Fixed bracket1 3833-9211-08-SI
37Square plug2 3836-9211-23-BT
38Saddle slide1 6+733-9211-07-SI
39Round plug1 3836-9109-61-BT
40Power cord1 7536-9836113-BT
41Curved washer8//1921739-9966-CR
42Spring1 436-9109-62-BT
43Plug1 4536-2003-07-BT
44Axle nut M10x1.252 6439-9820-SI
45Turn plate2 1036-2003-04-BT
46LChain cover left11+46R36-2003-01-BT
46RChain cover right11+46L36-2003-02-BT
47Screw14 10+4536-9836-22-BT
48C-clip C172 6439-9805-32-BT
49Bearing 6203Z4 1+5236-9805-31-BT
50Square plug1 136-9109-64-BT
51Spring1 5236-9109-65-BT
52Idle wheel bracket1 5633-9109-18-SI
53Sensor1 1+7136-9109-66-BT
54Bolt8 5639-9911
55Washer 6//168 5439-10013-VC
56EMS Flywheel1 133-9109-19-SI
57Nylon bushing1 5236-9109-67-BT
58Nylon washer1 5236-9814-20-BT
59Rubber ring 11 136-9109-68-BT
60Rubber ring 21 136-9109-69-BT
61Screw M6x154 63+6439-10120-SW
62Spring washer for M612 54+6139-9865-SW
63Belt wheel1 6436-9109-70-BT
64Axle1 6333-9109-20-SI
65Nylon nut M64 439-9861-VZ
66Power supply holder1 4636-2003-08-BT
67Nylon nut M81 5639-9918-CR
68Belt1 56+6336-9109-72-BT
69Screw 4.2x256 4639-9909-SW
70Wave washer1 6436-9918-22-BT
71Controller board1 7736-2003-09-BT
72EMS connector wire1 56+7136-9109-74-BT
73Magnet16336-1122-23-BT
74Small round cover2 4536-2003-10-BT
75Power outlet1 6636-2003-11-BT
76Switch1 6636-2003-12-BT
77Fixed frame1 133-2003-07-SW
78Screw4x152 7539-10188
79Power wire1 75+7636-2003-13-BT
18
Illustration
No.
DesignationDimension
mm
QuantityAttached to
Stück
ET-Number
80AC wire blue1 71+7636-2003-14-BT
81AC wire brown1 71+7636-2003-15-BT
82Ground wire1 1+7136-2003-16-BT
83Tool Set136-9109-75-BT
84Assembly and exercise instruction136-2003-17-BT
19
English
Assembly Instructions
Before beginning assembly, be sure to observe our recommendations
and safety instruction. Remove all the part of your cycle from the carton
and place them on the floor carefully. Some parts are pre-assembled.
Assembly time: 30 - 40 min.
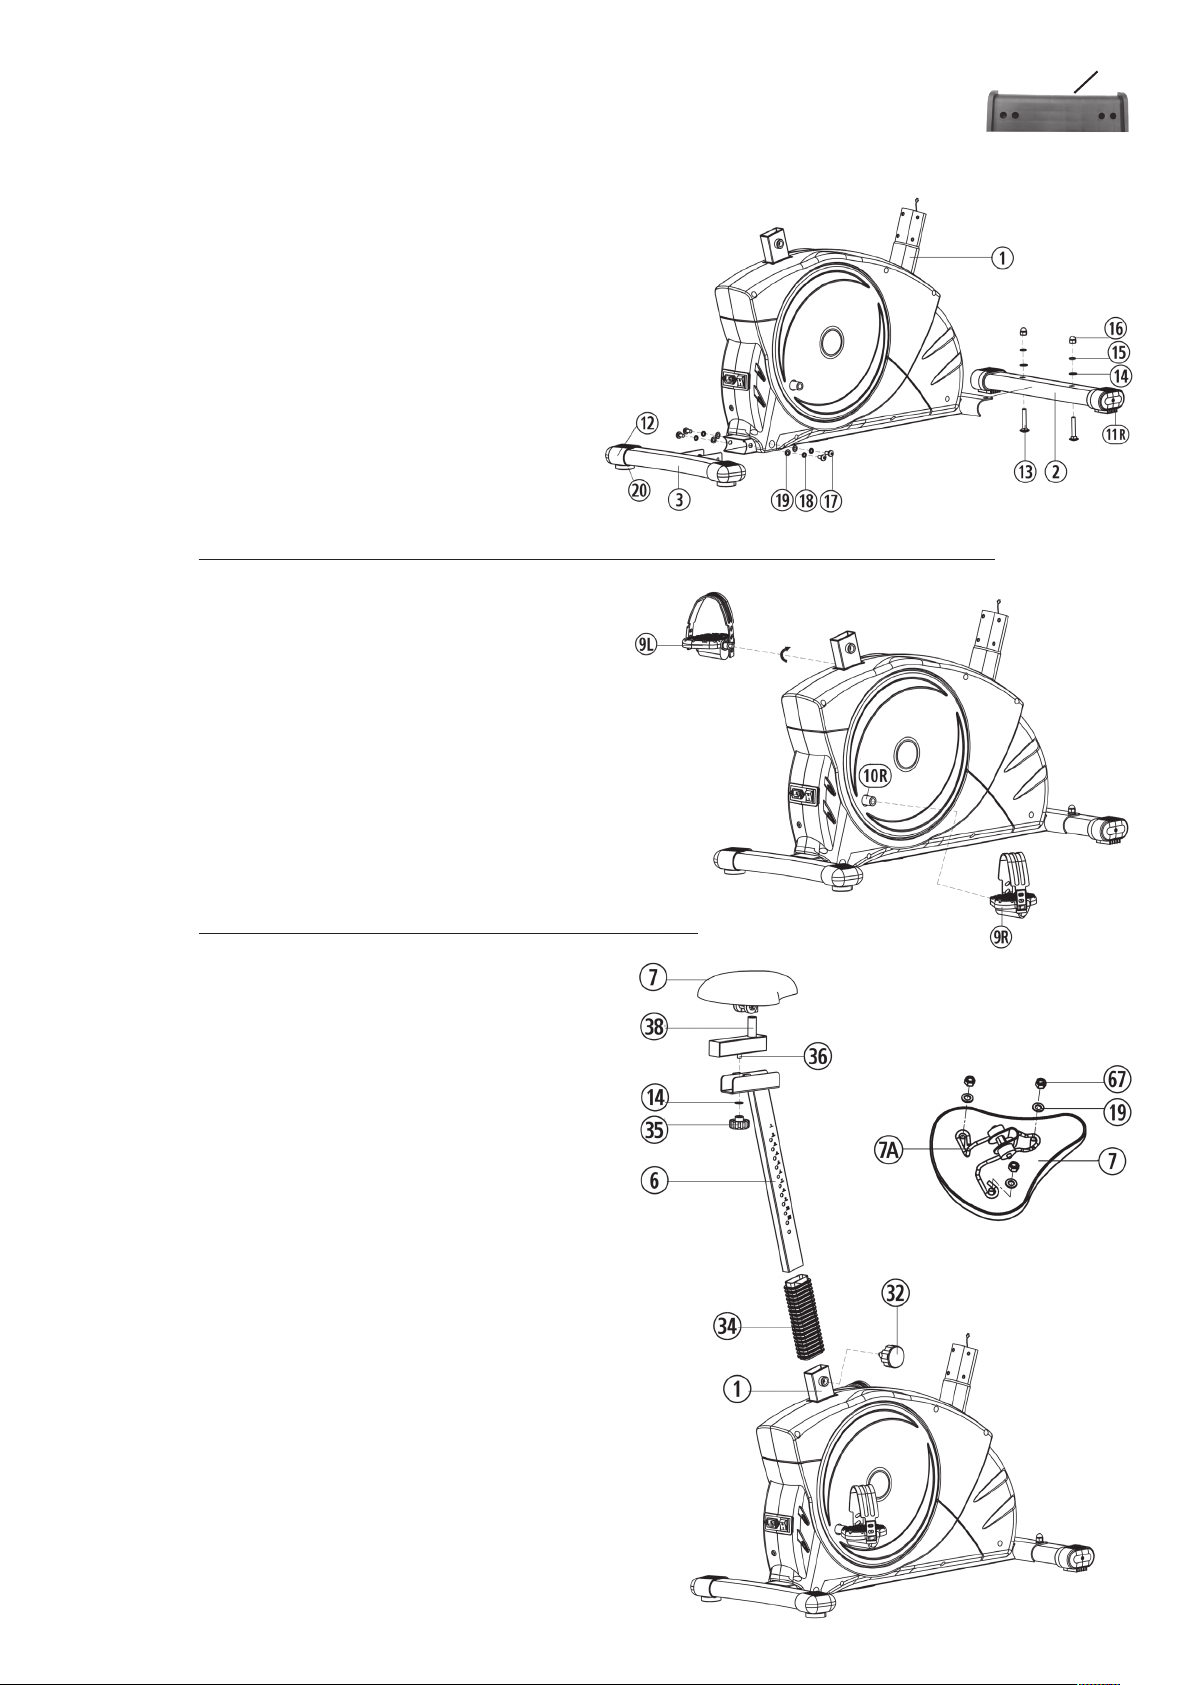
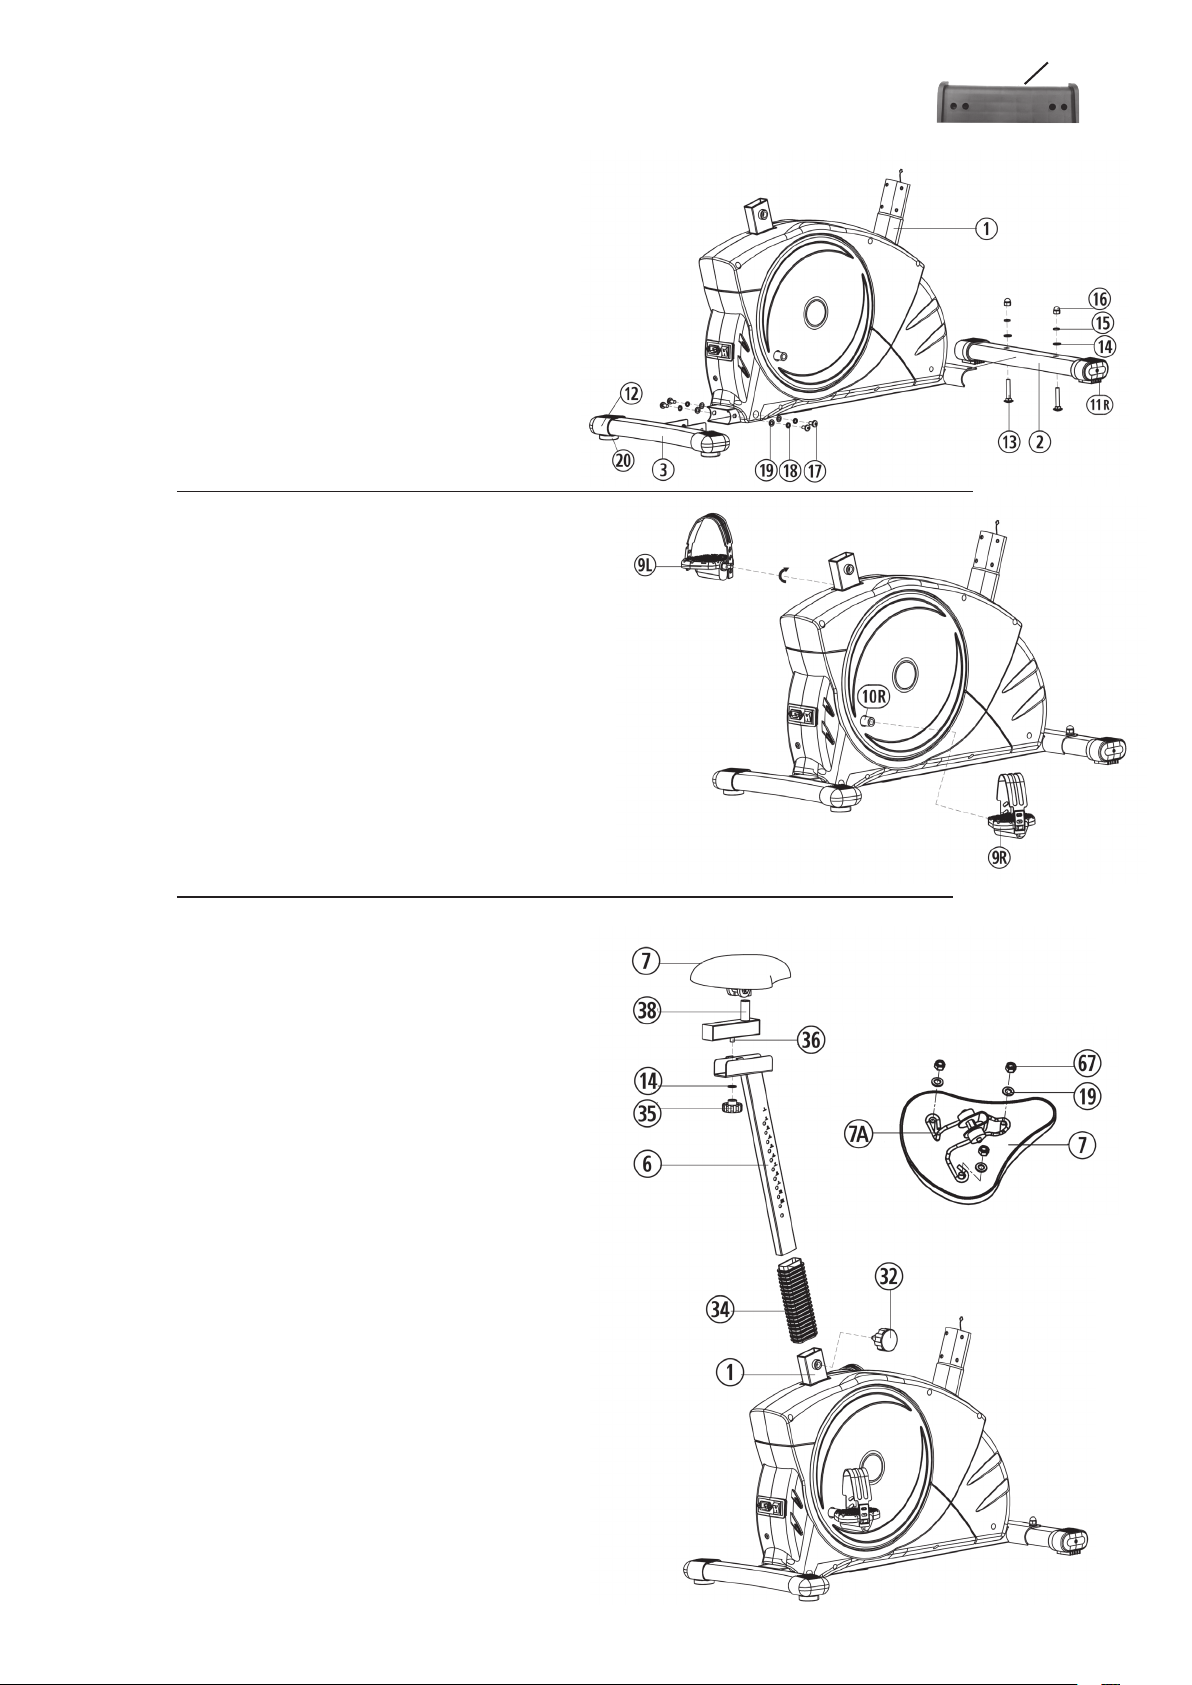
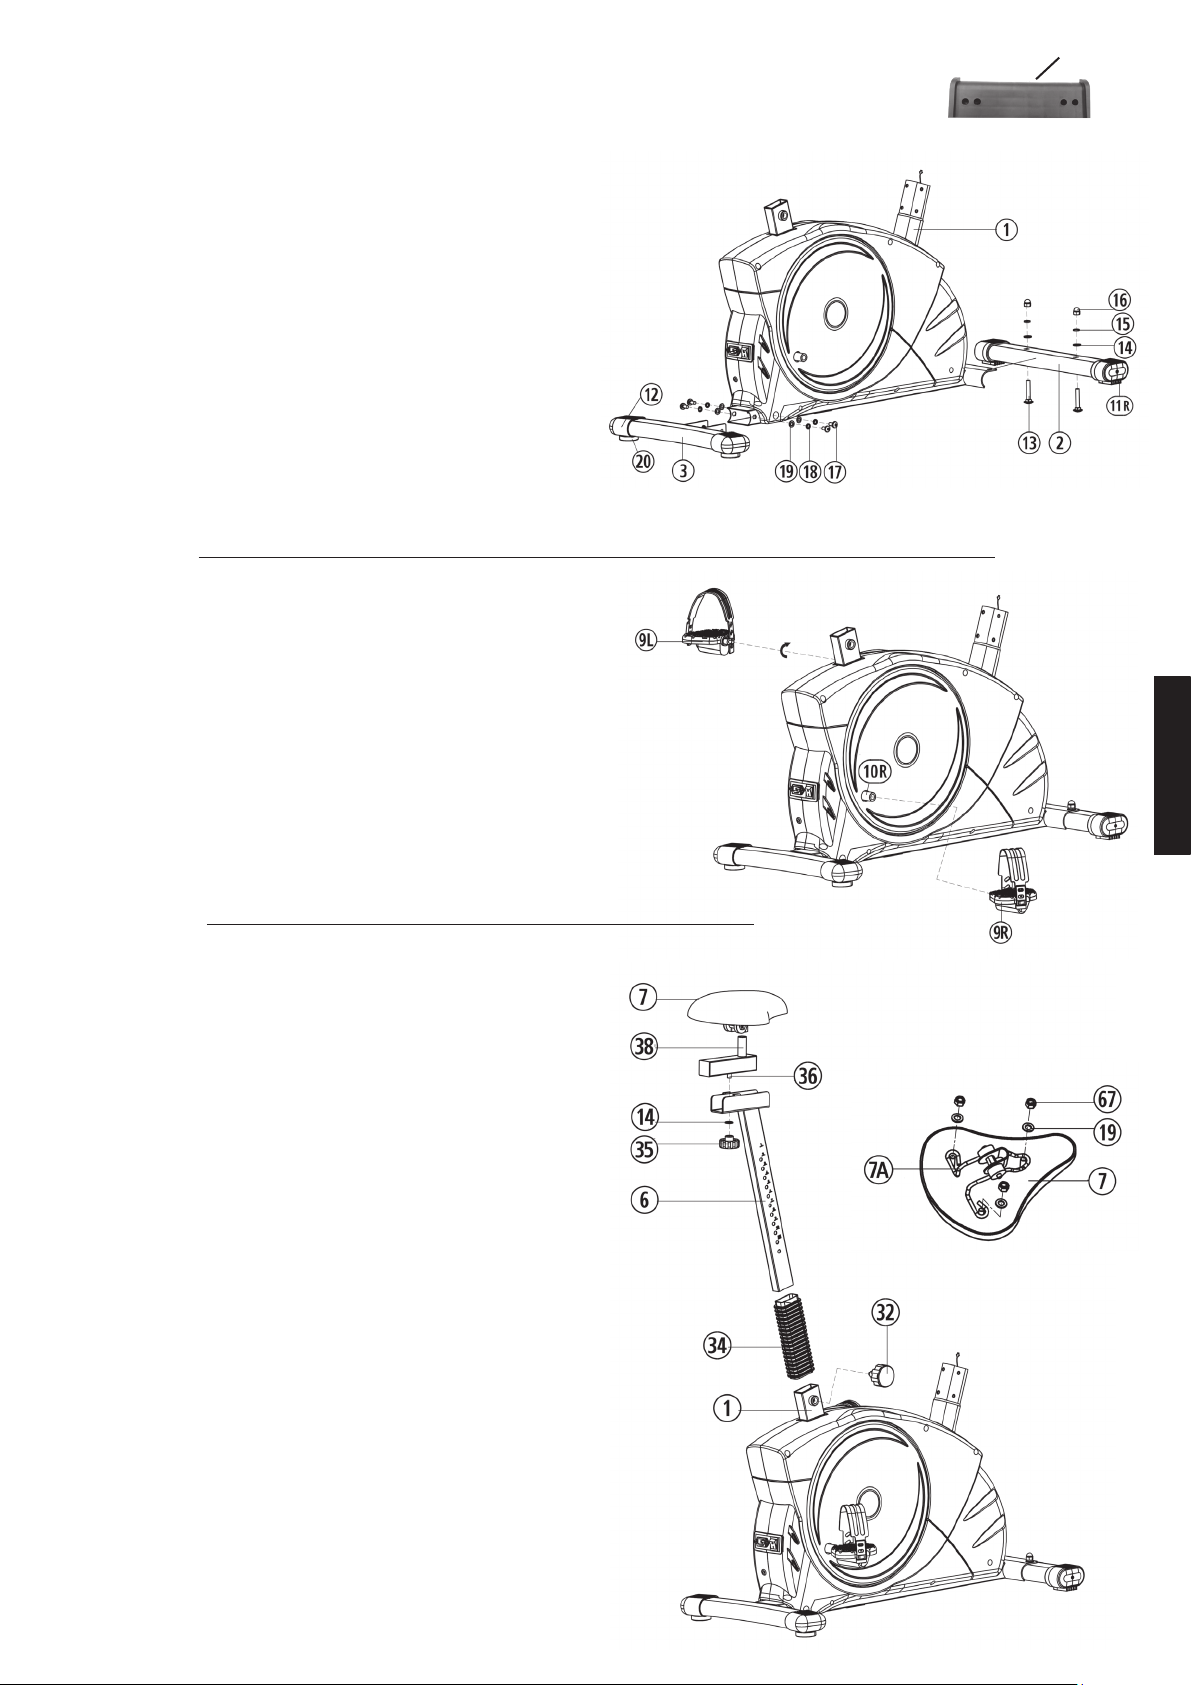
Step 1:
Attach the front and rear stabilizer (2+3) at mainframe (1).
1. Attach the rear stabilizer (3) assembled with 2 rear caps (12) and
adjustable feet (20) to main frame (1), using 2 Allen head bolts (17), 2
washers (19) and 2 spring washers (18). You can use adjustable feet
(20) to level the bike at uneven floor.
2. Please dismount the plastic protection from front side of main frame
and use the screw materiel for assembly the front foot. Attach the front
stabilizer (2) assembled with 2 front caps with transportation roller (11)
to main frame (1), using 2 carriages bolts (13), 2 washers (14), 2 spring
washers (15) and two cap nuts (16).
Step 2:
Attach the pedals (9R+9L) at pedal crank (10).
1. Attach the pedal straps to the appropriate pedals (9R+9L).
NOTE: The end with many adjustable holes must be set outwards.
2. The pedals (9R+9L) are marked with „R“ & „L“
NOTE: Right and Left is specified as viewed seated on the machine
during training.
Connect each pedal (9R+9L) to the matching pedal crank (10R+10L)
(NOTE: The right pedal „R“ should be threaded on clockwise. The left
pedal „L“ should be threaded on counter-clockwise.)
Step 3:
Attach the seat (7) and seat post (6).
1. Slide the plastic collar (34) to cover the seat post (6). Insert the seat
post (6) to seat post mounting tube of mainframe (1) and secure in
position with the seat post quick release (32).
2. Place the saddle (7) with the seat surface downwards. Place the saddle
bracket (7a) on the upwards pointing bottom of the saddle (7). The
threaded pieces on the bottom of the saddle must project through the
corresponding holes in the saddle bracket (7a). Place washers (19) on
the threaded pieces, screw on nuts (67) and tighten firmly.
3. Put the clamp of seat (7) to the seat slide (38) and tighten the seat firmly
into your desired position.
4. After place the seat slide (38) with seat (7) onto the seat post (6) fix
it with washer (14) star grip nut (35), you can move the seat slide to
adjust your desired position.
Part „A“ serves as a transport safety
device and it is no need after build up.
A
20
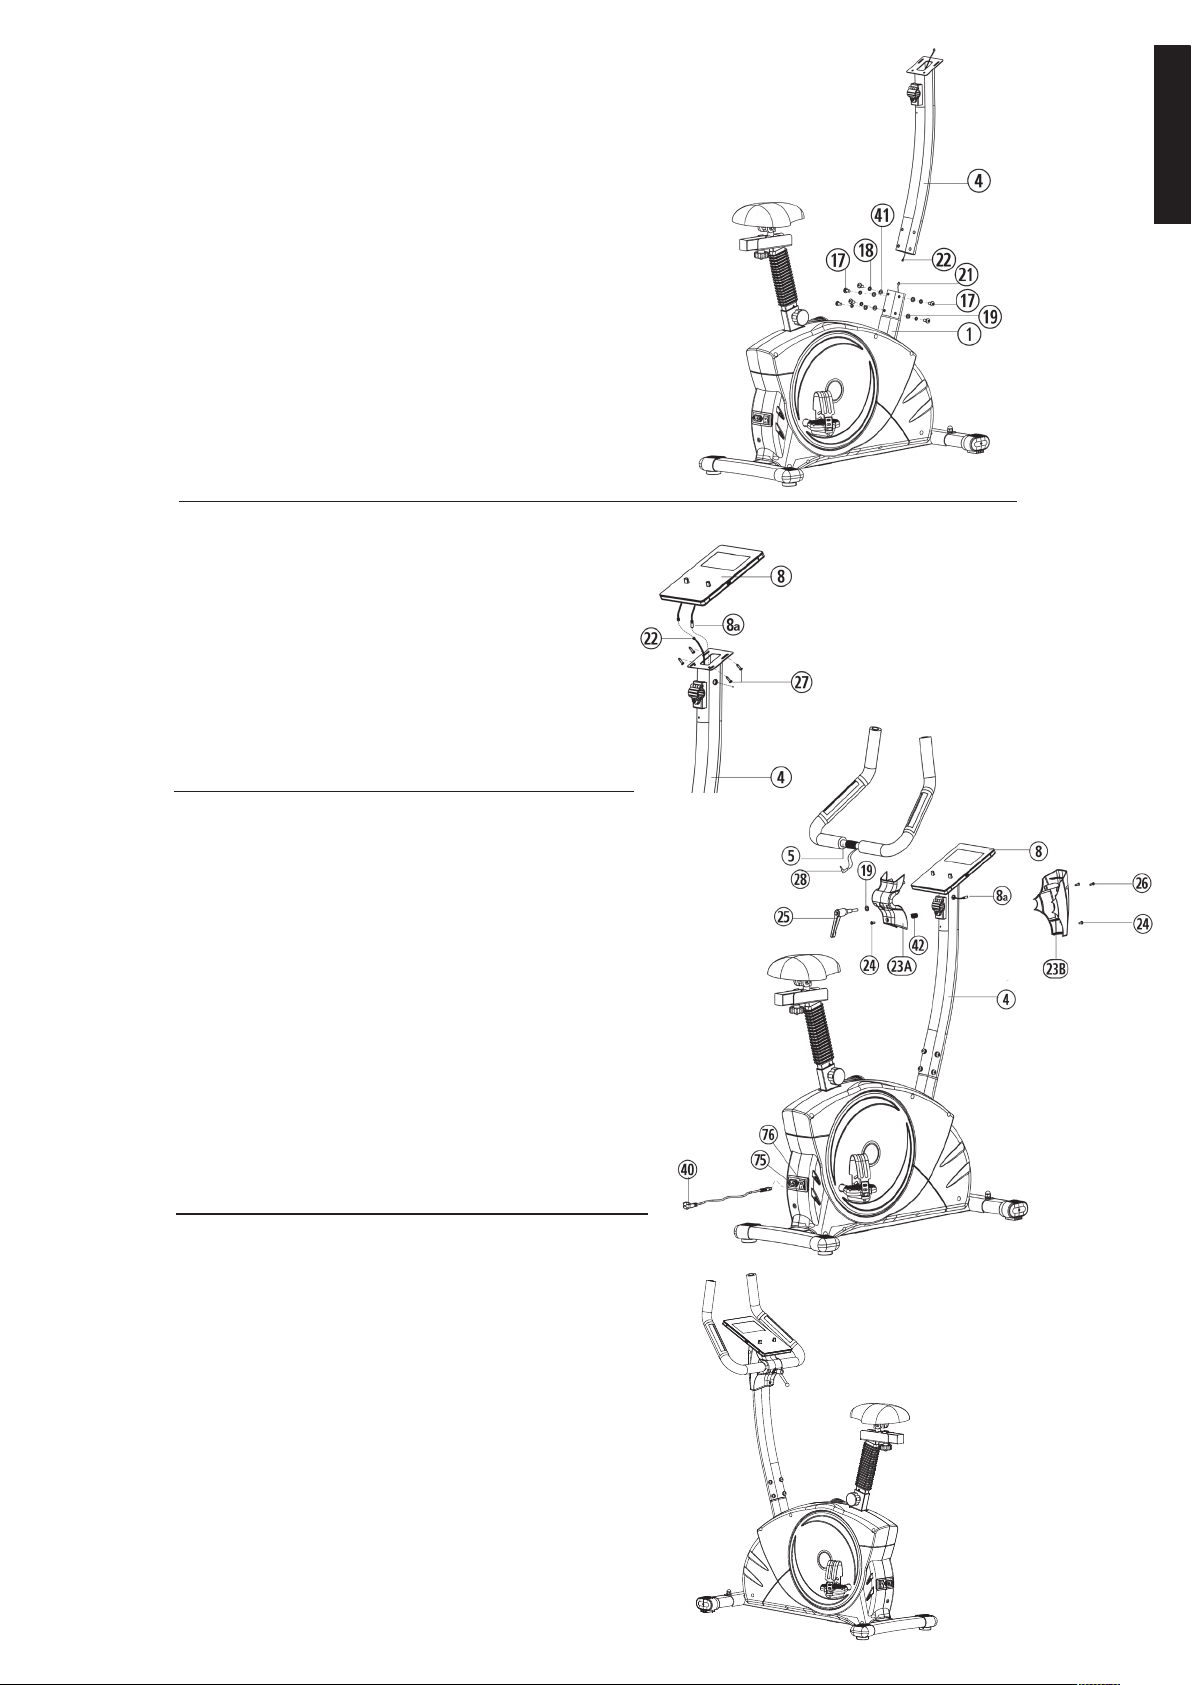
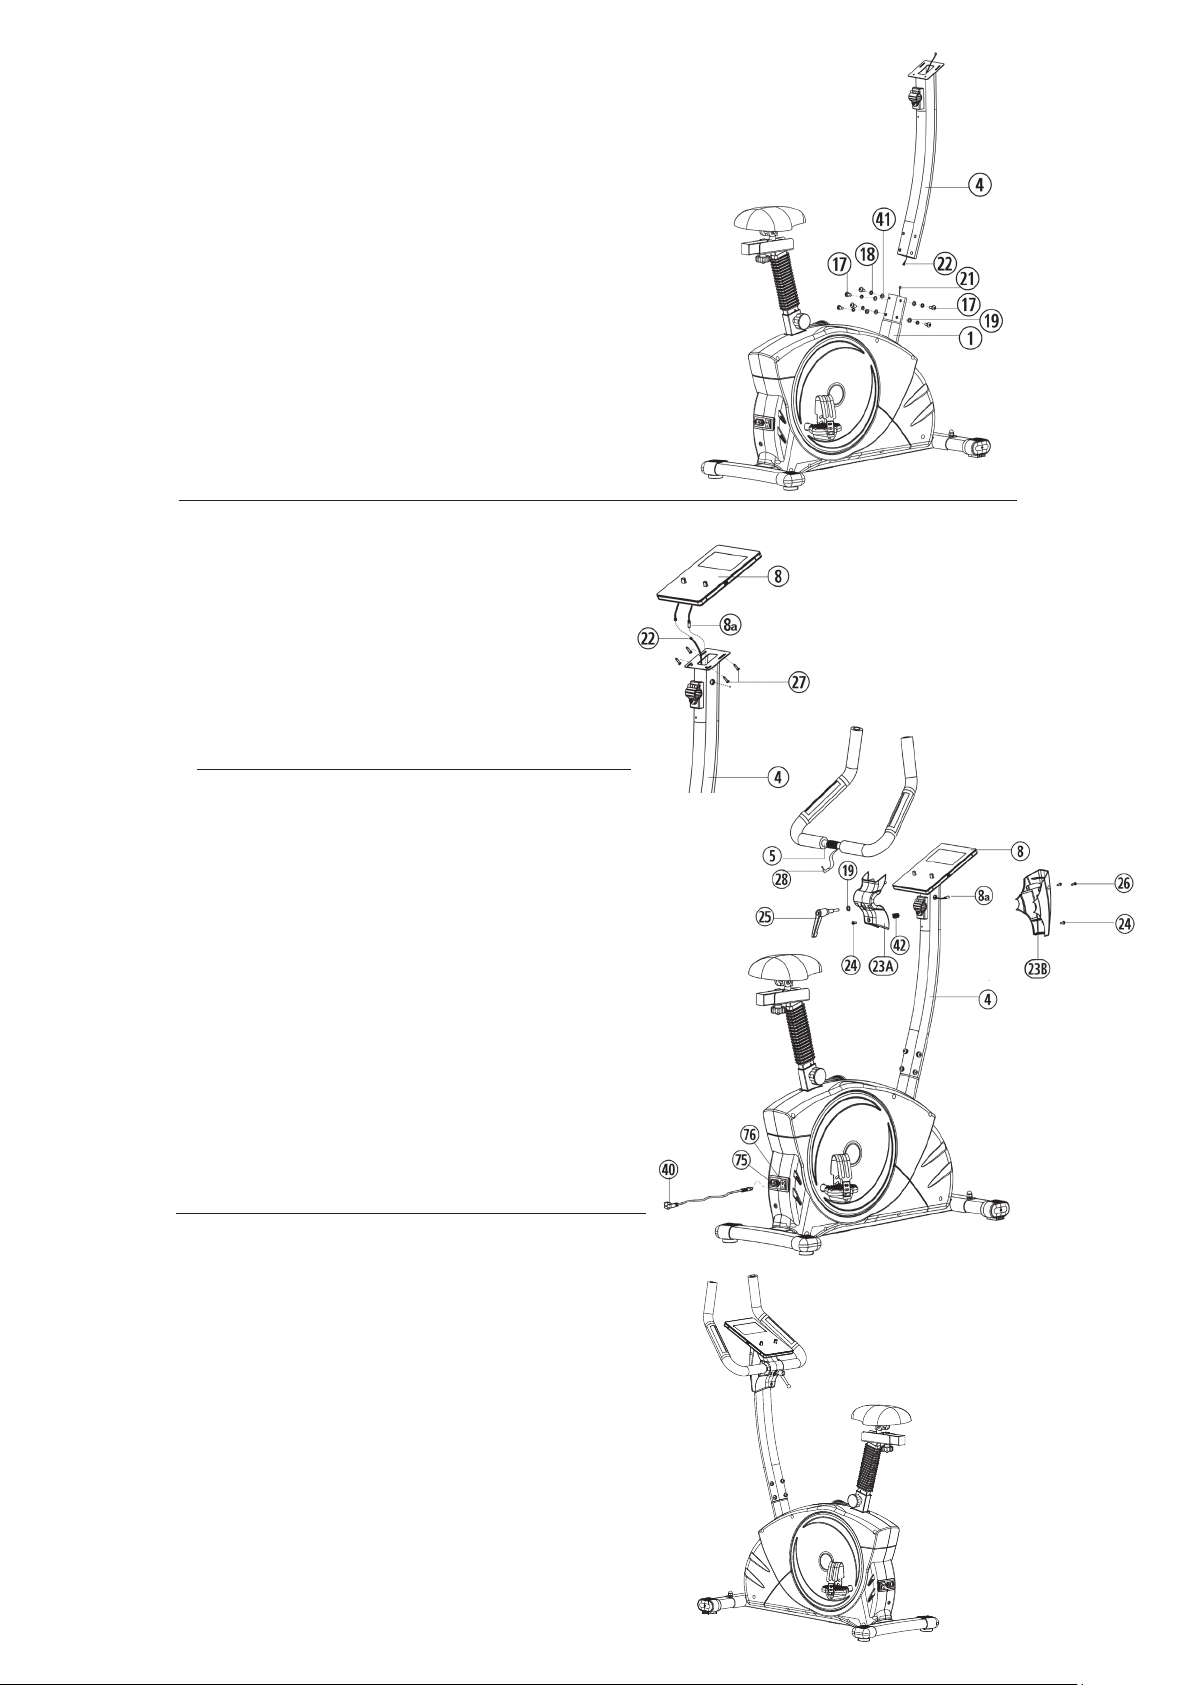
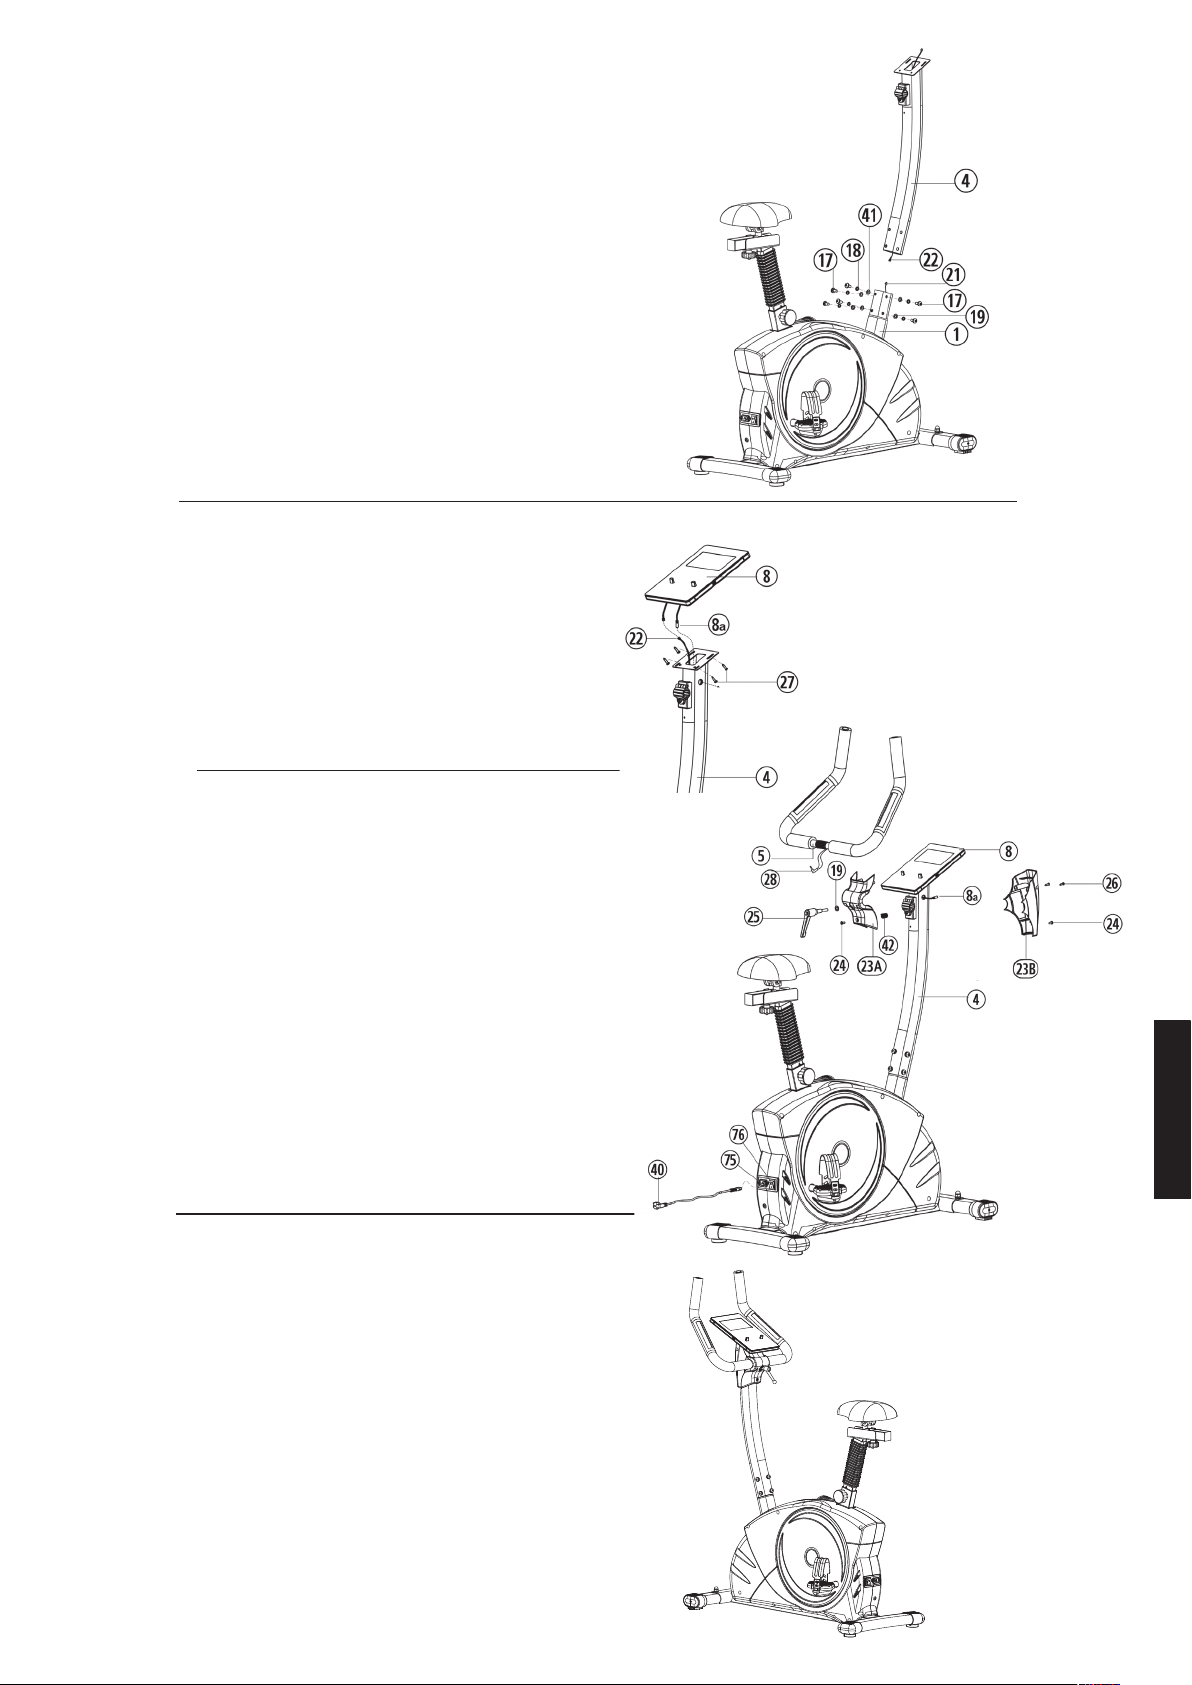
Step 5:
Attach the computer (8) at handlebar post (4).
1. Remove the screws (27) to fix the computer from backside of com-
puter (8). Put in the plug of connection cable (22) into the socket from
computers (8) backside.
2. Guide the pulse cable (8a) from the computer (8) through the side
opening on the support tube (4). Attach the computer (8) on top of
handlebar post (4) with and tighten with screws (27). (Attention: Ensure
that the cable loom are not crunched or pinched during installation.
Step 6:
Attach the handlebar (5).
1. Remove the screws (26) from the handlebar cover (23A + 23B). Attach
the handlebar (5) to the welded clamp of front post (4) and secure with
clamp first. Then put on the decoration cover (23a) and a washer and
the handlebar grip screw (25) to tighten the handlebar (5) firmly.
Fix the decoration cap (23a) with screw (24).
2. Insert the plug of hand pulse wire (28) to the jack (8a). Attach the
handlebar cover (23b) with screws (24+26).
3. Plug the mains cable (40) into the mains connection socket (75) and
into a properly connected socket (230V ~ 50Hz). Then switch on the
main switch (76).
Step 7:
Checks
1.Check the correct installation and function of all screwed and plug
connections.
Installation is thereby complete.
2.When everything is in order, familiarize yourself with the machine at a
low resistance
Setting and make your individual adjustments.
Note:
Please keep the tool set and the instructions in a safe place as these
may be required for repairs or spare parts orders becoming necessary
later.
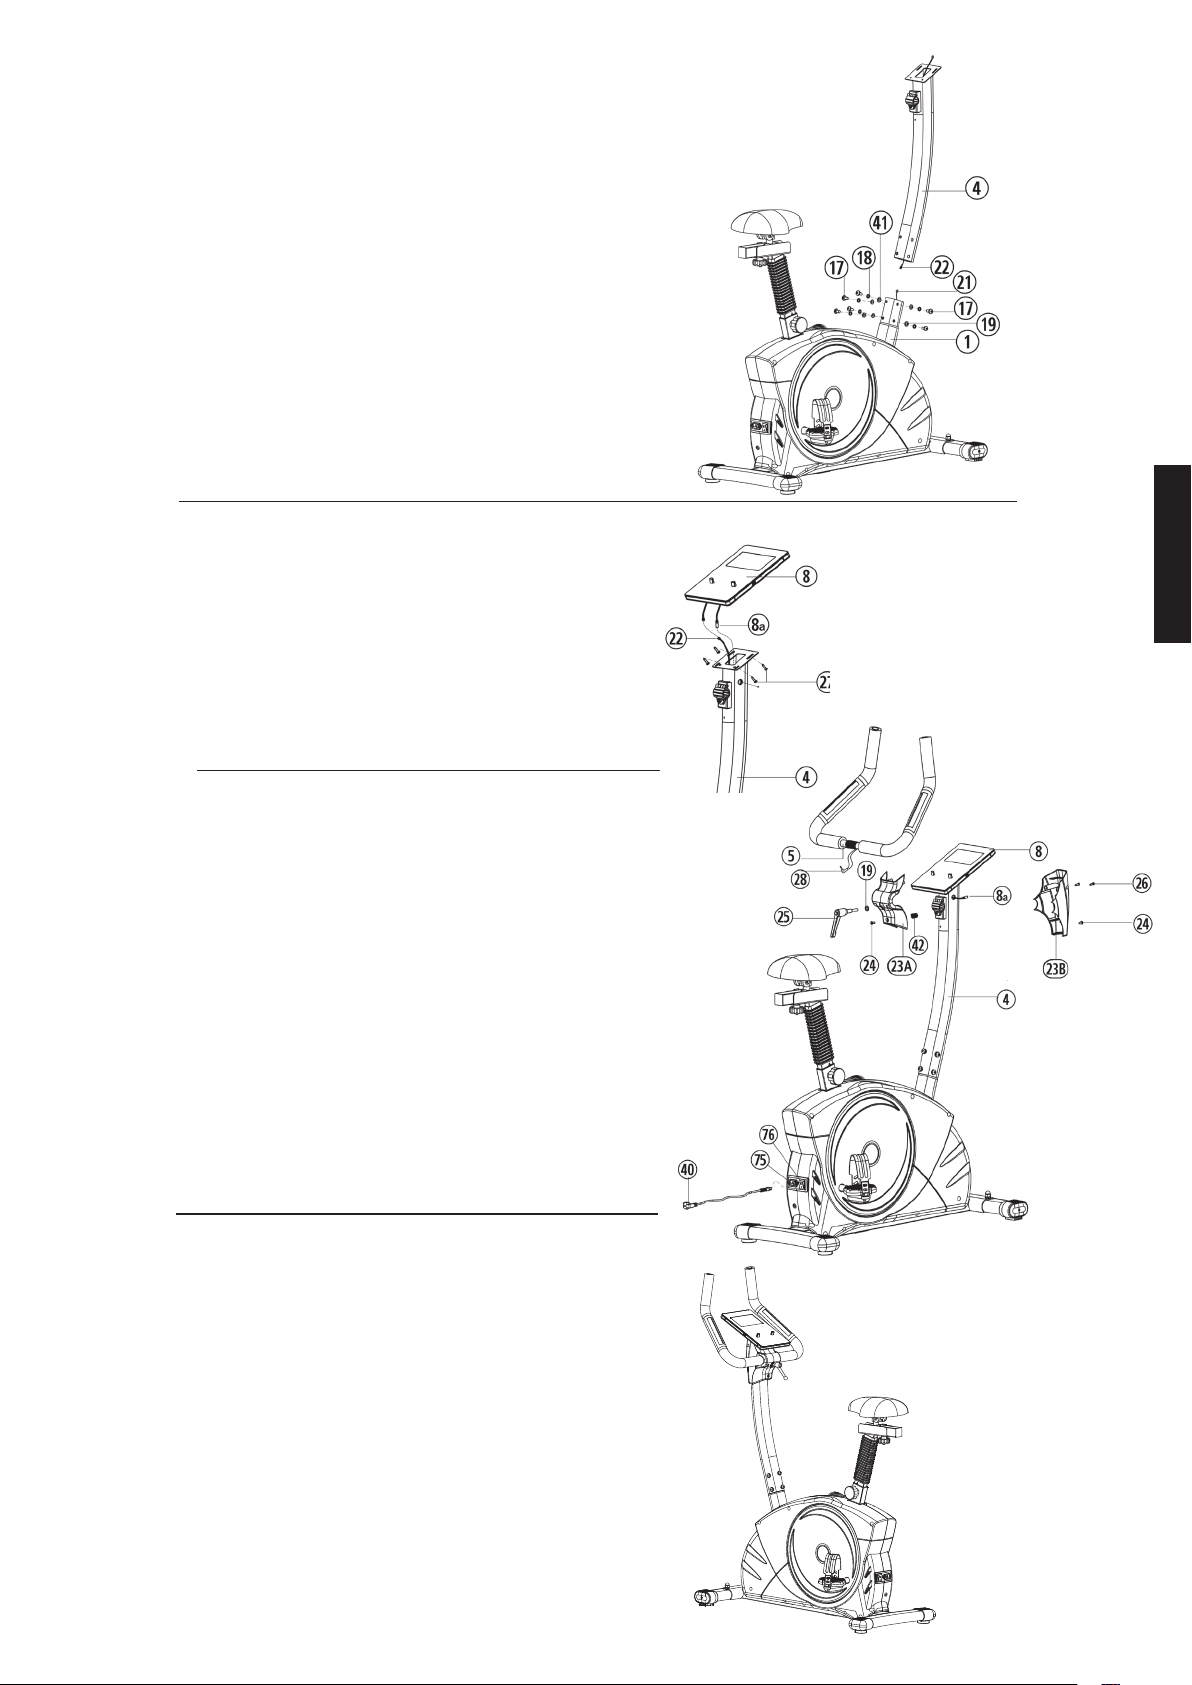
Step 4:
Attach the handlebar post (4) at mainframe (1).
1. Remove the pre-assembled 6 Allen head bolt (17), 4 washers (19), 2
washers (41) and 6 spring washers (18) from main frame (1).
2. Attach the front post (4) to the front post mounting tube of main frame
(1) and connect the plug of control cable (21) to the socket of the con-
nection cable (22).
3. Insert the front post (4) to mainframe (1) and secure, using 6 Allen head
bolts (17), 6 spring washers (18), 2 washers (41) and 4 washers (19).
21
English
Transportation of Equipment:
There are two rollers equipped on the front foot. For moving, you can lift
up the rear foot and drive it to where you would like to locate or store it.
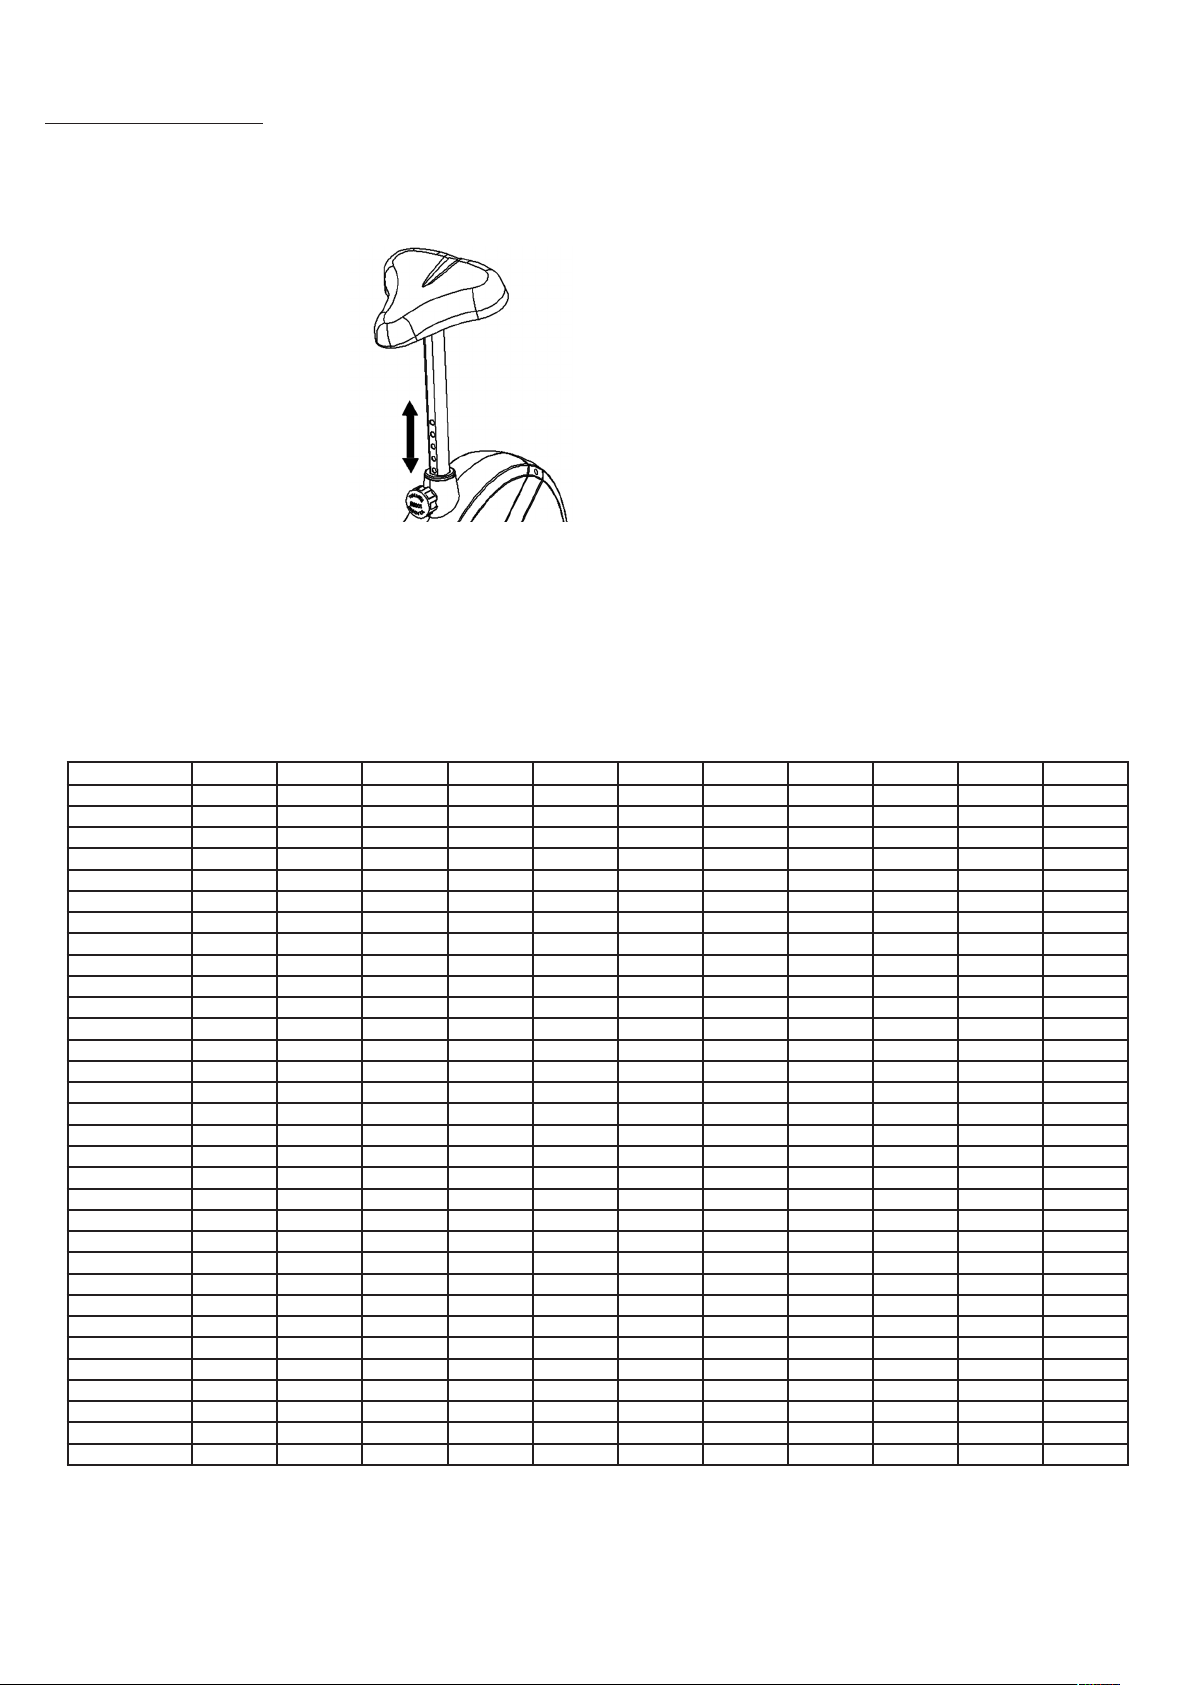
Adjustment – Seat Position
For an effective workout, the seat must be
adjusted properly. While your are pedaling,
your Knees should be slightly bent when the
pedals are in the farthest position. In order to
adjust the seat, unscrew the knob few turns
and draw it out slightly. Adjust the seat to the
right height, then release the knob and tighten
it all the way.
Important:
Make sure to put the knob back into place in the seat post and tighten it
completely. Never exceed the maximum height of the seat. Always get off
the bicycle before making any adjustment.
Remarks:
1. The power consumptions (Watt) are calibrated by measuring the driving
speed (min-1) of axle and the braking torque (Nm).
2. Your equipment was calibrated to fulfill the requirements of its accuracy
classification before shipment, If you have doubts about the accuracy, ple-
ase contact with your local retailer or send it to accredited test laboratory
to ensure or calibrate it.
Mount, Use & Dismount
Mount, Use & Dismount
Mount:
a. After the seat is adjusted to properly position, insert your foot into
retaining strap of pedal step on the pedal and hold the handlebar
tightly.
b. Try to put whole body weight on your foot and simultaneously cross
over the trainer and land your another foot on the other side.
c. Now you are in the position to start your training.
Use:
a. Keep you hands on the handlebar, and both feet are insert into
retaining straps of both pedal properly.
b. Pedal your exercise bike by your both feet alternately.
c. Then you can increase the pedaling speed gradually and adjust
braking resistance levels to increase the exercise intension.
Dismount:
a. Slow down the pedaling speed until it comes to rest.
b. Keep the left hand grabbing the left handlebar tightly, put your
feet cross over the equipment and land on the floor, then land the
other one.
This training equipment is a stationary exercise machine used to simulate
without causing excessive pressure to the joints, hence decreasing the risk
of impact injuries.
Exercise bike offer a non-impact cardiovascular workout that can vary from
light to high intensity based on the resistance preference set by the user.
It will strengthen your muscles of legs and increase cardio capacity and
maintain fitness of your body also.
Levelâ/ RPMà2030405060708090100110120
1814192632394550596469
21017253240495764748188
312203038485969778998107
41424354556698090104115126
516284051647991104119132145
6183145577289103118134149164
7203450638098115131148166183
82137556988107126144163182201
92340597696117137158178198218
1025436383104126148171193214236
1127466890112136160184208231254
1229497397120146171198223248273
13305278103128156182211238265292
14315582109136166193224252282311
15335886115144176204237266297328
16356190121152185215250281313346
17376495128160194226263296328363
183868100134168204238276310344381
194071104140176213250289324360398
204274108146184222262302338376416
214377113152192232274315353392434
224580117159200241285328368408452
234783122165208250297341382424470
244886126171216260309354396440488
254989131177224270320367410456506
265192136183232279331380425473524
275395141189240288342393440489543
285498145195248297353406455506562
2955101150201256307365420471523581
3056104154207264317377433486540600
3157107159213272327389446501557619
3259110164220280337401459516574638
RPM and Power Level Stufe 1 - Level 32 for ET 6 PRO Art.-No. 2003.
22
Computer instruction for ET 6 Pro
DISPLAY:
RPM : 0~15~999
(Alternates with SPEED every 6 seconds.)
SPEED : 0.0~99.9 km/h
(Alternates with RPM every 6 seconds.)
TIME : 00:00~99:59.
DISTANCE : 0.00~99.99 km
CALORIES : 0~999kcal
WATT : 0~999
(Alternates with LEVEL every 6 seconds.)
PULSE : P~40~240, max value is available.
(Heart symbol flashes on/off if pulse data transmit.)
LEVEL : 1~32 level
(Alternates with WATT every 6 seconds.)
PROGRAM : MANUAL; PROGRAM (P1~P12);
WATT; USER; H.R.C.; FAT
KM Total (ODO):
The distance in km of all training units is displayed. It is not possible to
specify. The ODO display can be reset to zero at any time. To do this,
press the +-key and the --key at once for 2 seconds.
KEY FUNCTIONS
1. START/STOP key: Starts or stops/interrupts program
2. F -key: Function select and confirmation key.
3. + key: Increases value or select option.
4. – key: Decreases value or select option.
(Only flashing values are adjustable.)
5. L –key: Press to return to select program.Reset the computer by 3 sek.
press.
6. TEST key: Fitness test by measuring your recovery rate. (F1-6)
OPERATION
Use
1) Connect the power cord with the ET 6 PRO and one correctly connected
socket and turn on the main switch. The display in the computer lights up
accompanied by a signal tone and briefly shows internal data for speed
programming, bluetooth interface and ODO. Then MANUAL appears in the
display and you are in the manual program.
2) Use the +/- keys to select a program category: MANUAL, PROGRAM,
WATT, USER, H.R.C., FAT and confirm by pressing the F -key. The default
values such as time, distance, calories and pulse in the selected program
can be called up with the F –key and changed by using the +/- keys.
3) When the program and the default values are set, press the START/
STOP-key to start training.
4) Pressing the START/STOP -key again ends or interrupts the program.
All values reached up to that point are save until the device switched off
and you can continue training based on these values or you can set all
functions to zero using the „L“ key.
5) The computer switches off automatically approx. 4 minutes after the end
of the training. We recommend to turn off the main switch after each trai-
ning.
ConditionScoreHeart Rate
ExcellentF1Über 50
GoodF240 ~ 49
AverageF330 ~ 39
FairF420 ~ 29
PoorF510 ~ 19
Very PoorF6Unter 10
1. MANUAL: manually program:
When selecting the program, select the MANUAL category using the +/-
keys and confirm with the F -key. Call up the setting options LEVEL / TIME
/ DISTANCE / CALORIES / PULSE by pressing the F -key and setting the
values using the +/- keys. Use the START/STOP button to start the manual
program and adjust the resistance during training using the +/- keys.
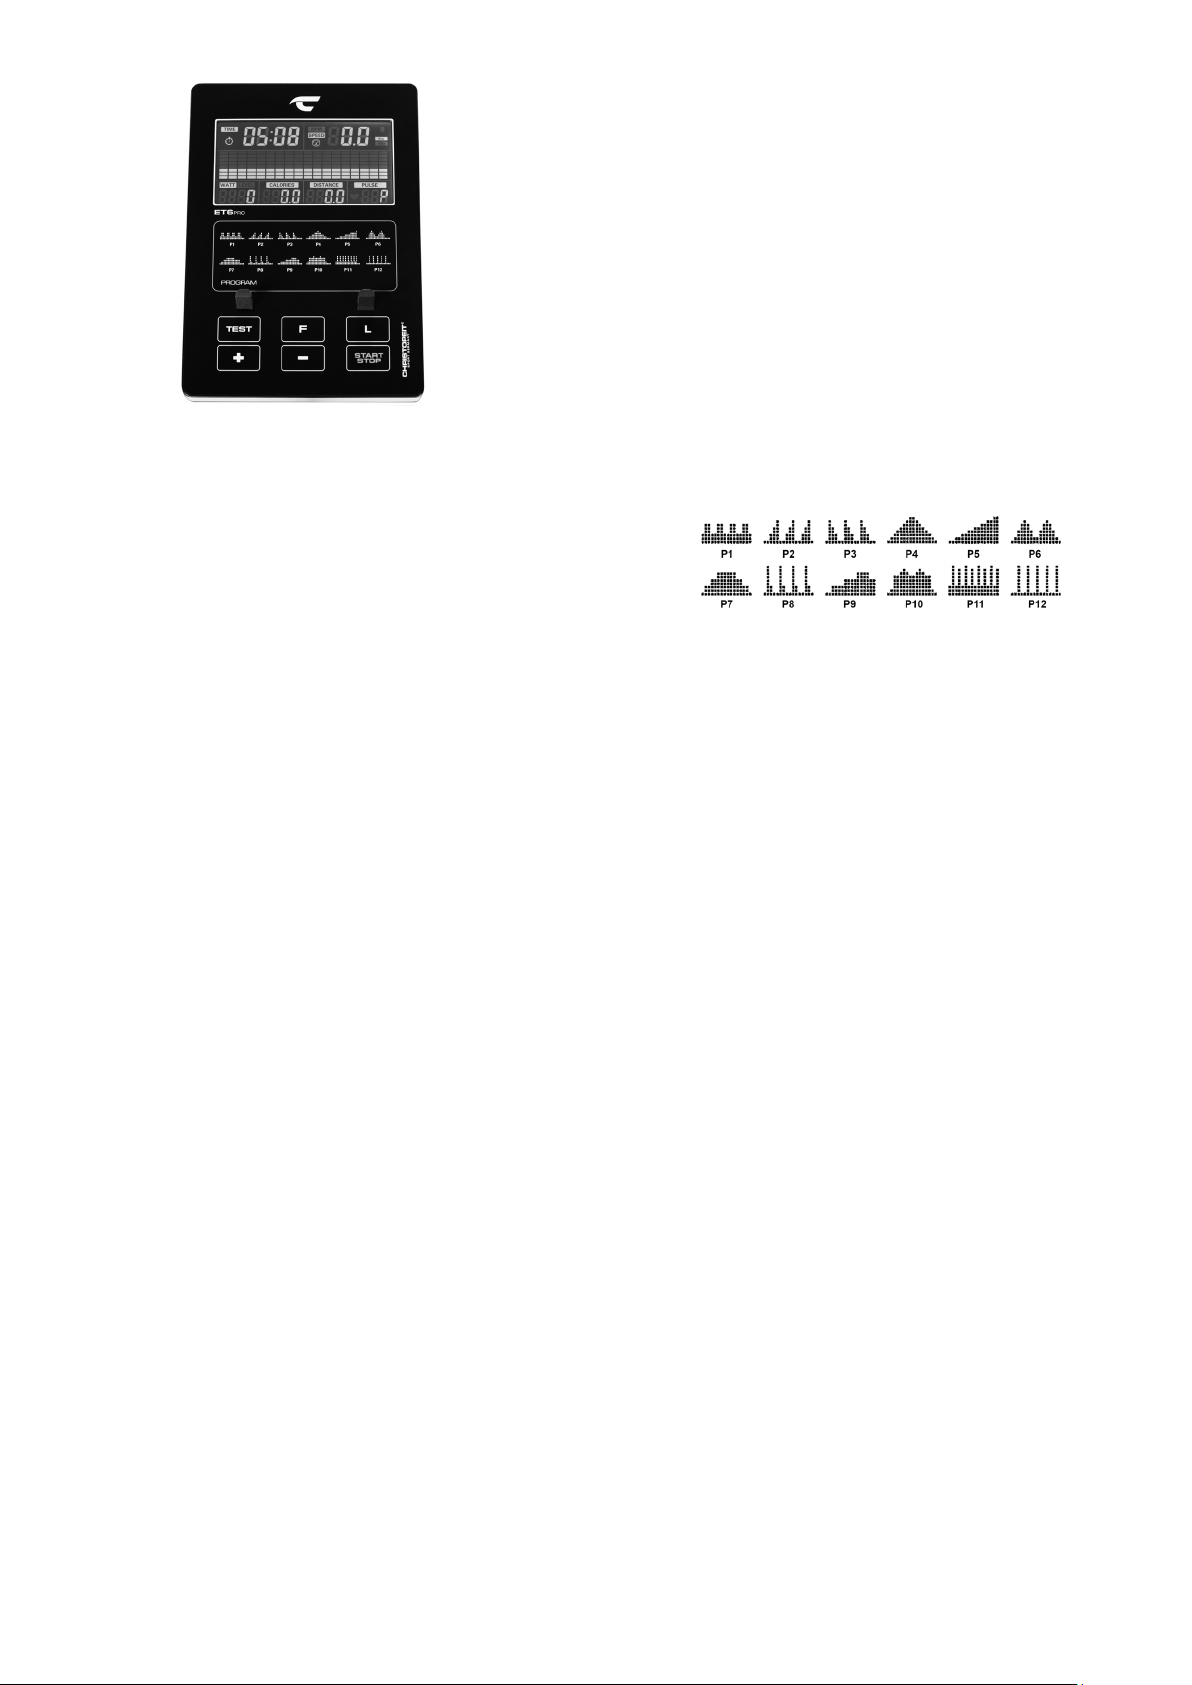
2. PROGRAM: exercise programs:
When selecting the program, select the PROGRAM category using the
+/- keys and confirm with the F -key. Then call up one of the 12 different
training programs using the +/- keys and confirm with the F –key. Call
up the default options LEVEL / TIME / DISTANCE / CALORIES / PULSE
by pressing the F -key and setting the values using the +/- keys. Use the
START/STOP -keys to start the selected program.
3. WATT: independent watt program:
When selecting the program, select the WATT category using the +/- keys
and confirm with the F -key. Calling up the default options WATT / TIME
/ DISTANCE / CALORIES / PULSE by pressing the F -key and setting the
values using the +/- keys. The default setting for the WATT value is 100, the
value can be changed from 10 to 300 watts in 5 watt steps. The WATT va-
lue is set with the +/- keys. The entered WATT value remains independent
of the pedal speed constant through automatic adjustment of resistance.
Use the START/STOP -key to start the watt program.
4. USER: individual programs:
When selecting the program, select the USER category using the +/- keys
and confirm with the F -key. Create your own program profile. With this
program you can determine the resistance of each section (18 bars) by
yourself. Set the desired resistance for the first bar using the +/- keys and
confirm the entry using the F -key. Proceed in the same way for all 18 bars.
Then press the L key to set TIME / DISTANCE / CALORIES / PULSE. You
can use the +/- keys to change the value and confirm with the F key. Start
the program by pressing the START / STOP button. The set program pro-
file is saved automatically and can be overwritten if necessary. Once you
have set the USER program, you only need to open it and you can set the
TIME / DISTANCE / CALORIES / PULSE directly by pressing the L key.
5. H.R.C .: pulse programs:
When selecting the program, select the H.R.C. category using the +/- keys
and confirm with the F -key. Call up the preset options GENDER / AGE /
PULSE PROGRAM / TIME / DISTANCE / CALORIES by pressing the F key
and setting the values using the +/- keys. The pulse programs 55%, 75%
and 90% are based on the age input and use this to calculate the upper
pulse limit 55%, 75% or 90% of the maximum heart rate value. With the
pulse program ♥ you can set the upper pulse limit yourself. The PULSE
display flashes as soon as the upper pulse limit is reached during training.
55% -- DIET PROGRAM
75% -- HEALTH PROGRAM
90% -- SPORTS PROGRAM
♥ - TARGET HEARTRATE
TEST (RECOVERY):
When you have finished your workout, press Test-key. For RECOVERY to
function correctly, it needs your Heart Rate input. TIME will count down
from 1 minute and then your fitness level from F1 to F6 will be displayed.
(See table under Fitness Test Program)
NOTE: During RECOVERY, no other displays will operate.
23
English
PULSE RATE
1. Hand pulse measurement:
On the left and right handlebar grip part two metal contact plates are insert
as pulse sensors. Please take care that both hands at the same time in nor-
mal force on the sensors. During the heartbeat measurement a heart sym-
bol flashes next to the pulse display. (The hand pulse measurement serves
only for orientation, as it is caused by movement, friction, sweat etc. it can
come to deviations from the actual pulse. A few people may cause mal-
functions of hand pulse measurement. Should you have trouble with the
hand pulse measurement, we recommend the use of a cardio chest belt.)
„WARNING“ Heart rate monitor systems may be inaccurate. Excessive
exercising can lead to serious damage or maybe to death. If dizziness or
weakness is felt, stop exercising immediately.
2. Cardio - Pulse Measurement:
On the market, cardio pulse measurements are available, which consist
of a transmitter chest belt and a watch receiver or only chest belt. The
computer of your Ergometer has build in receiver (without sender) and with
using a suitable chest belt for cardio pulse measurement the computer can
show the pulse data. This works with all un-coded chest belts with trans-
mission frequency is between 5.0 - 5.5 kHz. The range of the transmitters
depends on the model approx.. 1m.
ATTENTION: If both pulse measuring methods are used simultaneously
Hand pulse measurement takes precedence.
The product can be used with the Kinomap app. This enables en-
tertaining and interactive training with Android or IOS devices and
saving training data.
Sport, coaching, gaming and eSport are the keywords of the Ki-
nomap app. This contains many kilometers of real film material to
exercise inside as if you were outside; Tracking routes and analysis
of your performance; Coaching content; Multiplayer mode; new
posts daily; Official indoor races and more ... The APP thus con-
tains approx. 100,000 videos recorded by athletes and 200,000 km
of accumulated tracks for cycling, running or rowing for currently
approx. 270,000 members from all over the world.
Download the app and connect
Scan the adjacent QR code with your smartphone / tablet or use
the search function at the Playstore (Android) or APP Store (IOS) to
download the Kinomap APP. Register and follow the instructions
in the APP.
Activate Bluetooth on the smartphone or tablet and select the device
manager via the menu in the APP and then select the „Exercise bike“
category. Then select your type designation via the manufacturer
logo „Christopeit Sport“ in order to connect the sports equipment.
Depending on the sports equipment, different functions are recorded
by the APP via Bluetooth or data is exchanged.
Attention: The Kinomap APP offers a free trial version for 14 days.
After that, fees will apply which are listed on the Kinomap homepage.
Further information can be found at: https://www.kinomap.com/en/
INDOOR TRAININGS APP
IOS AND ANDROID APP
6.FAT: body fat program
Here you can analyse a BMI and get an individual training proposal. Use
the F key to select the personal values: gender = male / female, age = 10-
99 years, height = 120-200cm, weight = 20-150kg and enter your data by
using the +/- buttons. Then grab the hand pulse sensors to measure your
body fat. After approx. 10 seconds the result is displayed: BMI value and
the resulting body fat type (1-4). A training program is suggested after the
BMI and body fat type are displayed twice. To start the training program,
press the Start / Stop button.
ATTENTION: If the computer displays an error message „Err1“, there is
a signal interference with the pulsesensor. In this case, run the body fat
program again and grab the pulse sensors again so that the pulse sensors
are covered with your hand as much as possible.
BODY MASS INDEX - Table
Bodyfat-TypeUnderweightNormal-
weight
Slightly
Overweight
Overweight
Gender Type 1Type 2Type 3Type 4
man< 10%10%~19,9%20%~24,9%≥ 25%
woman< 20%20%~29,9%30%~34,9%≥ 35%
˿
˿
24
Cleaning, Checks and Storage of the Ergometer
bike:
1. Cleaning
Use only a less wet cloth for cleaning. Caution: Never use benzene,
thinner or other aggressive cleaning agents for surface cleaning as
this damage caused.
The device is only for private home use and for use suitable indoors.
Keep the unit clean and moisture from the device.
2. Storage
Plug out the power supply unit while intending the unit for more than
4 weeks not to use. Push the saddle slide toward the handlebar and
the seat support tube as deeply as possible into the frame. Choose
a dry storage in-house and put some spray oil to the pedal bearings
left and right, to the thread of the handlebar bolt, and on the thread
of the quick release for saddle support.
Cover the bike to protect it from being discolor by any sunlight and
dirty through dust.
3. Checks
We recommend every 50 hours to review the screw connections for
tightness, which were prepared in the assembly. Every 100 operating
hours, you should put some spray oil at the pedal bearings left and
right, to the thread of the handlebar bolt and to the thread of quick
release for saddle support.
Troubleshooting
If you cannot solve the problem with the following information,
please contact the authorized service center.
ProblemPossible CauseSolution
Computer has
no value at Dis-
play if you press
any key.
No power cord
is well plugged
or wall power is
without power.
Check that the power cord is
properly plugged in, possibly
with another electric device
check if the wall power is fine.
Computer is
not counting
data and do not
switch on after
start cycling.
Sensor impulse
missing base on
not well plugged
connection
Check the plug connections at
computer and inside of handle-
bar support.
Computer is
not counting
data and do not
switch on after
start cycling.
Sensor impulse
missing base on
not correct posi-
tion of sensor.
Take off the cover and check
the distance between magnet
and Sensor. The magnet at
turning belt wheel should have
only less than < 5mm distance
against the sensor position.
No pulse valuePulse cable is
not plugged in.
Check the separately pulse
cable is well connected with
computer.
No pulse valuePulse sensors
not well connec-
ted
Screw out the screw for pulse
measurement and check if
plugs are well connected and no
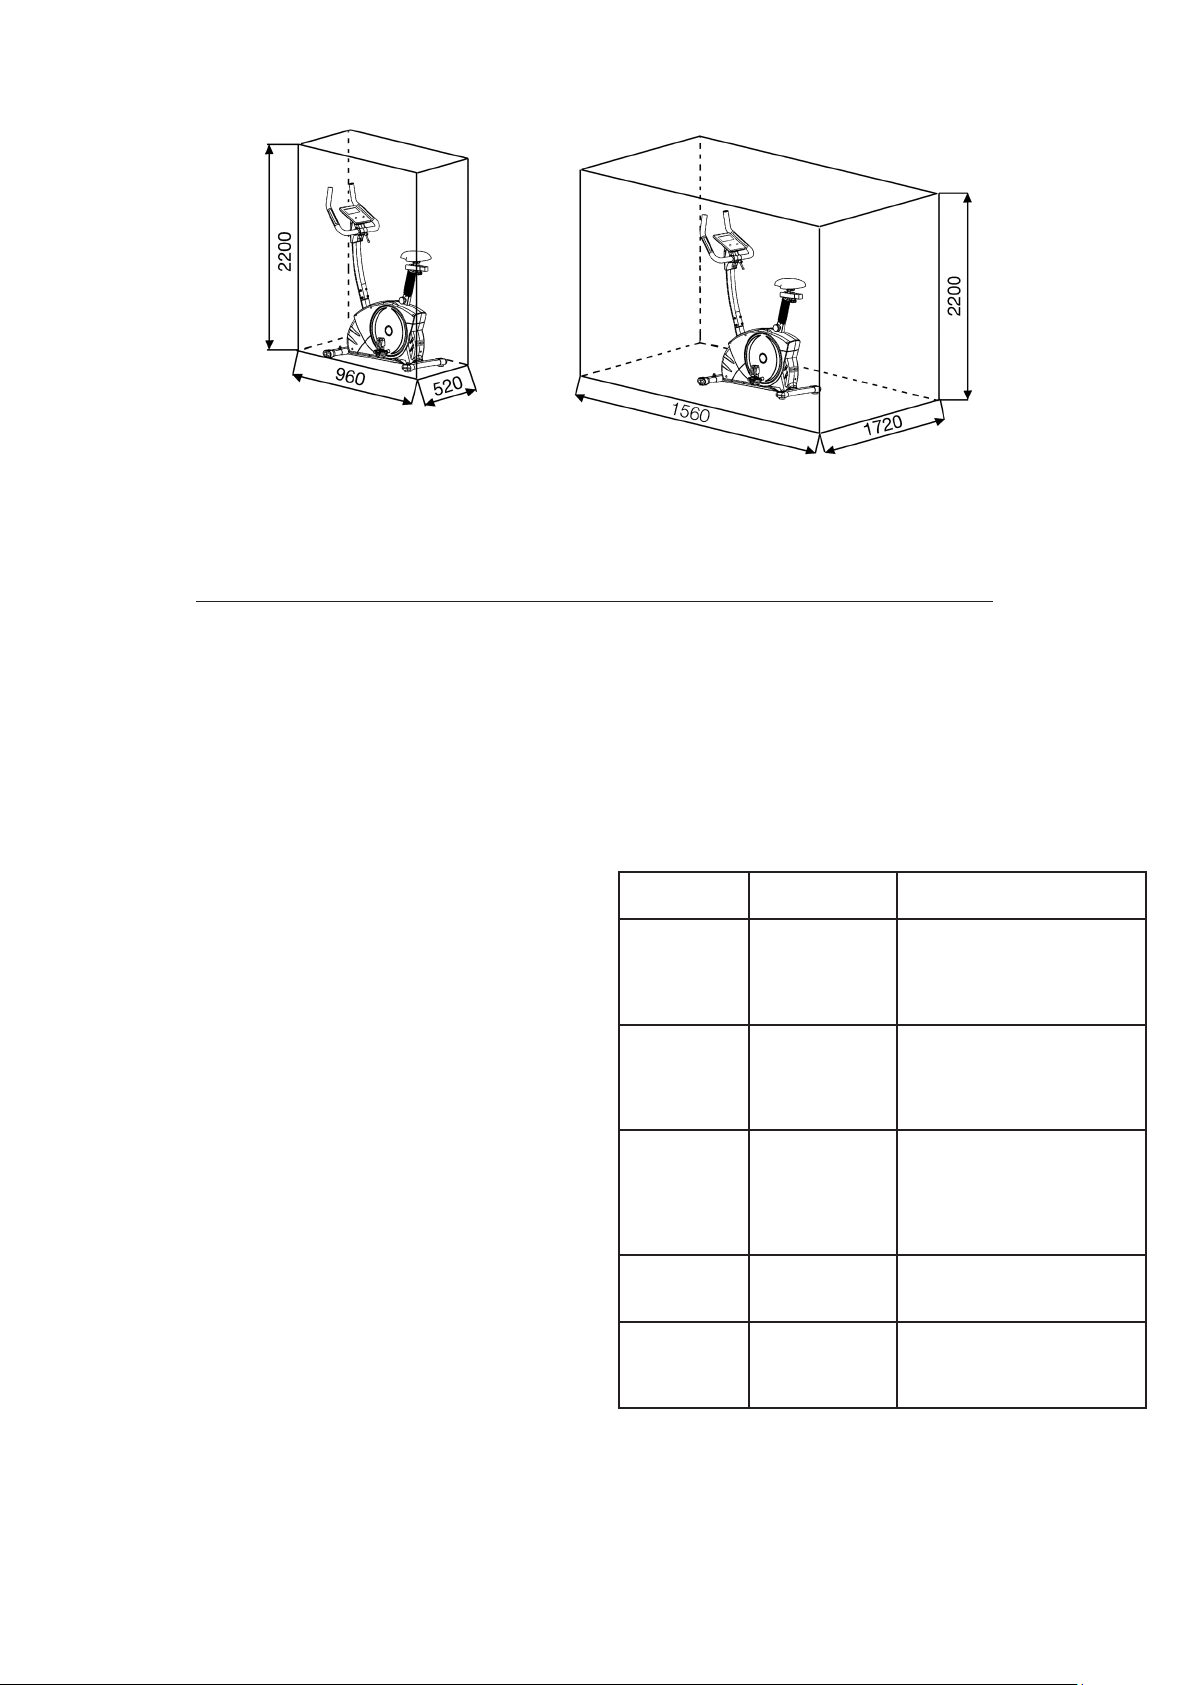
damage at pulse cable.
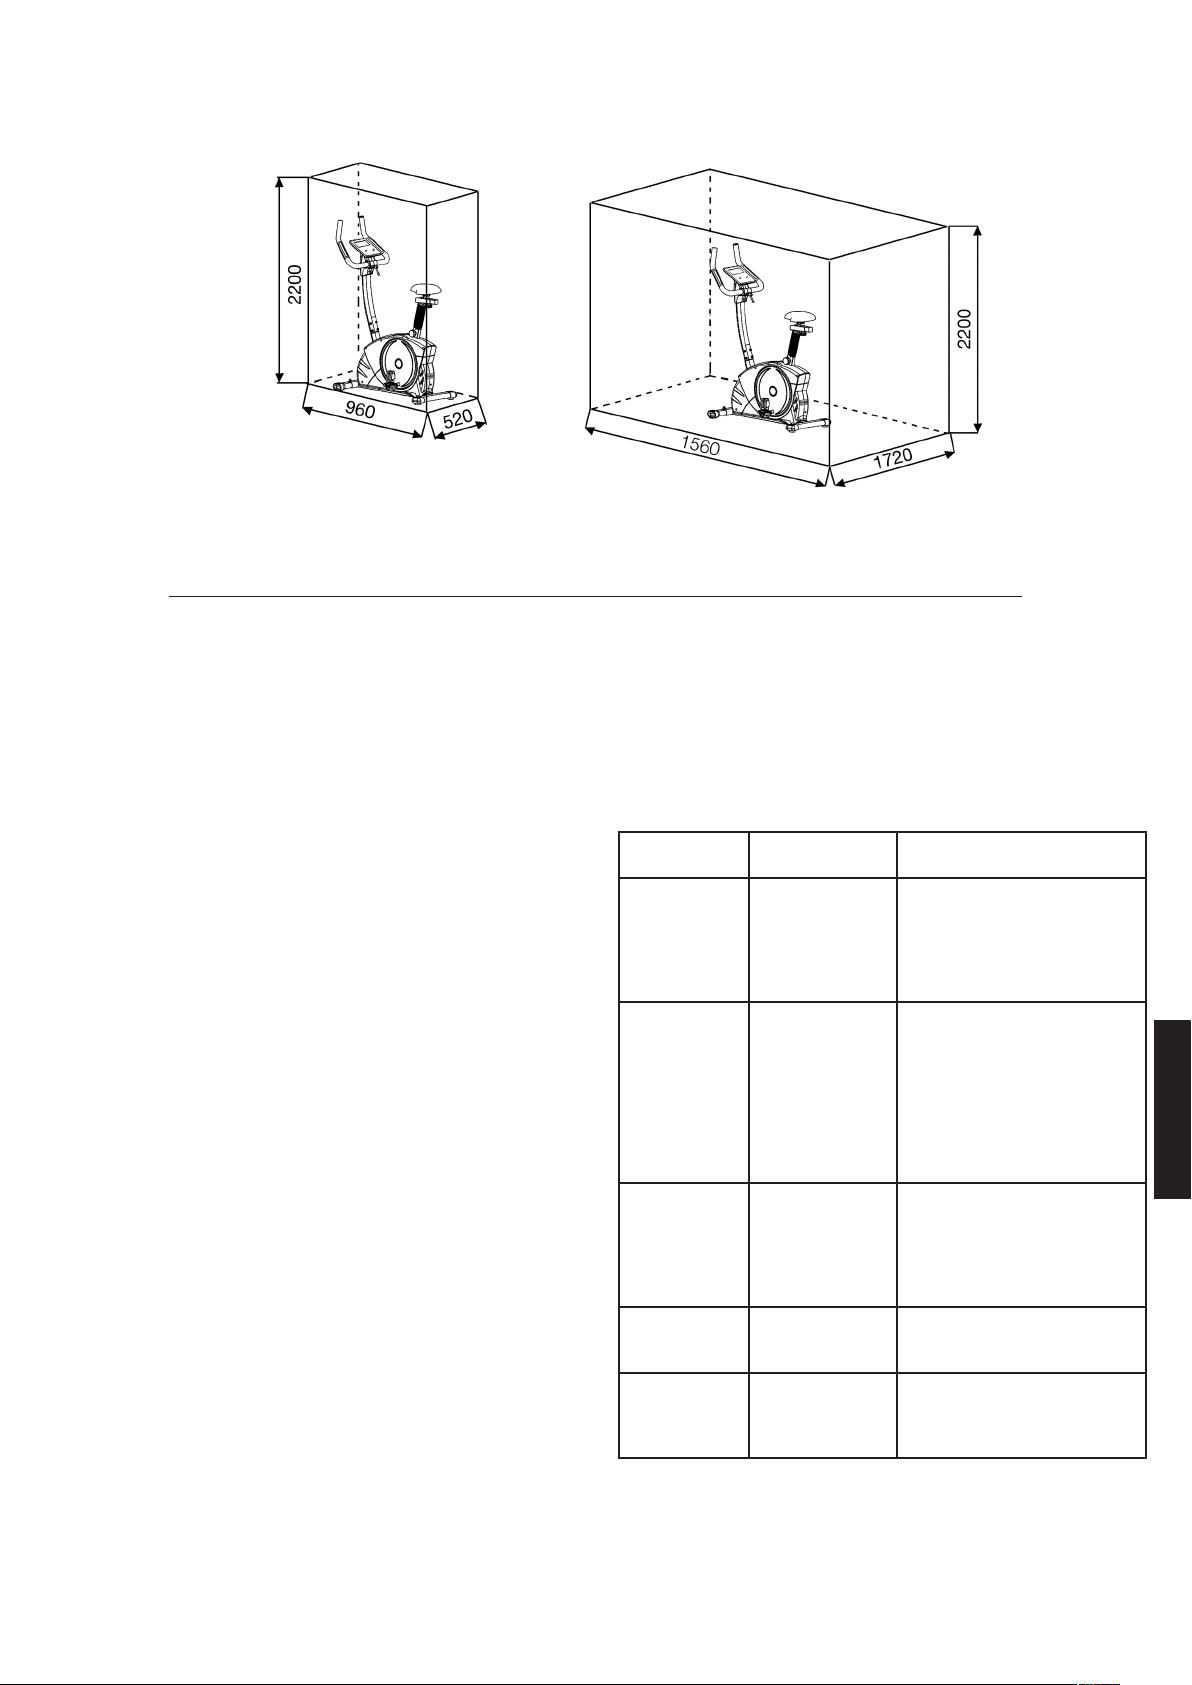
Training area in mm
(for home trainer and user)
Free area in mm
(Training area and security area
(rotating 60cm))
25
English
Training instructions
You must consider the following factors in determining the amount of training
effort required in order to attain tangible physical and health benefits:
1. Intensity:
The level of physical exertion in training must exceed the level of normal
exertion without reaching the point of breathlessness and / or exhaustion.
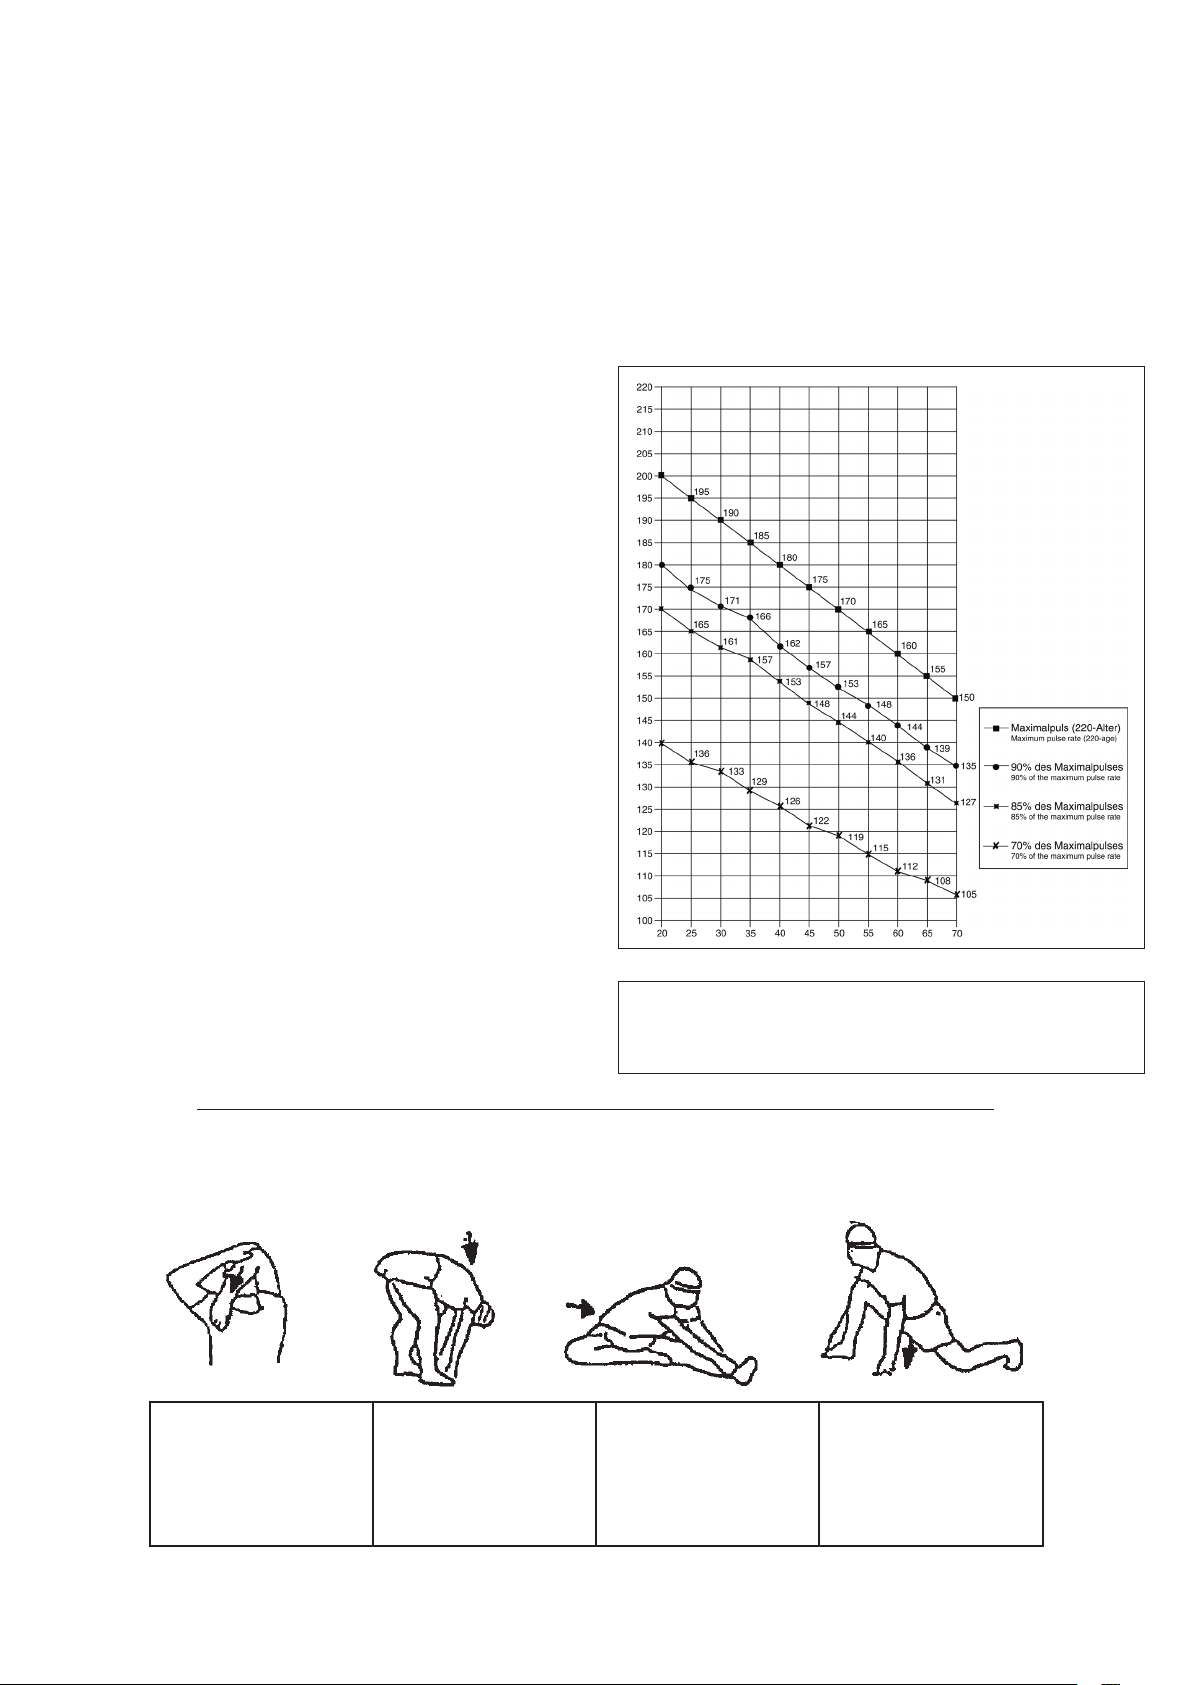
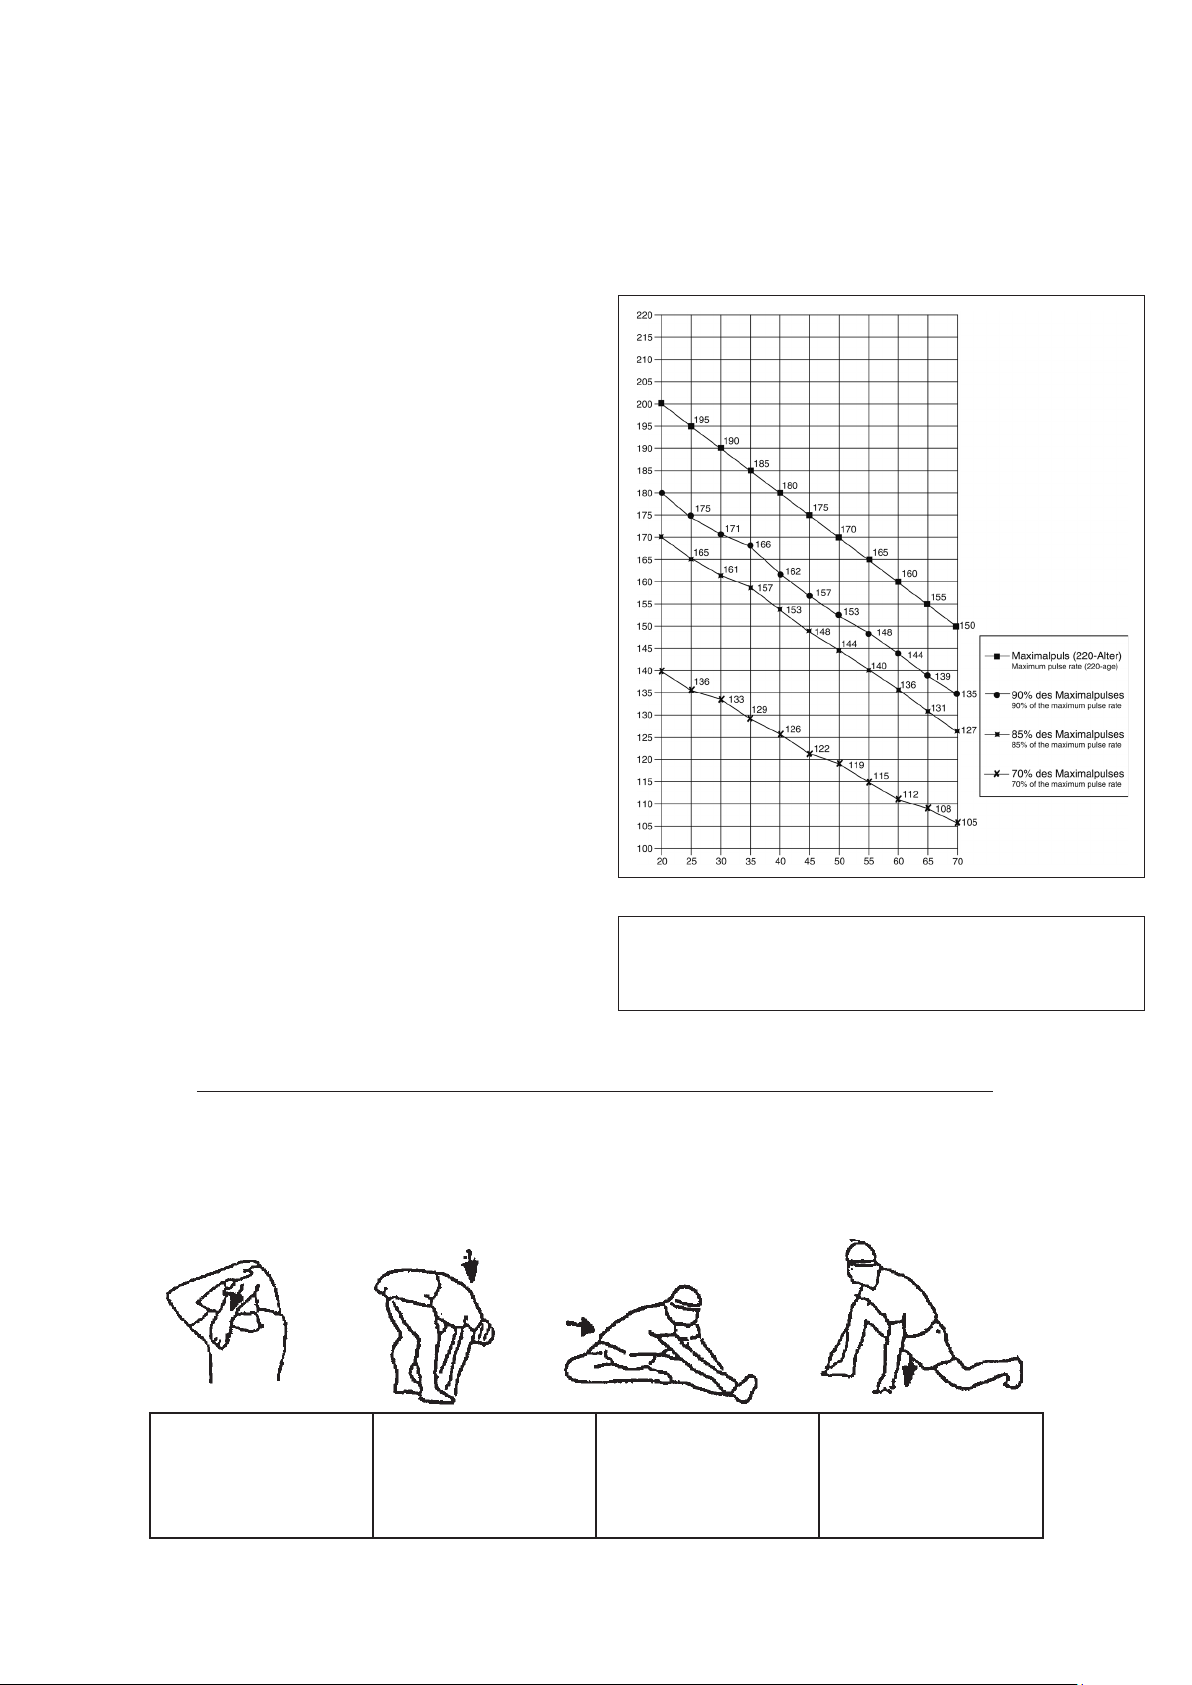
A suitable guideline for effective training can be taken from the pulse rate.
During training this should rise to the region of between 70% to 85% of
the maximum pulse rate (see the table and formular for determination and
calculation of this).
During the first weeks, the pulse rate should remain at the lower end of this
region, at around 70% of the maximum pulse rate. In the course of the follo-
wing weeks and months, the pulse rate should be slowly raised to the upper
limit of 85% of the maximum pulse rate. The better the physical condition
of the person doing the exercise, the more the level of training should be
encreased to remain in the region of between 70% to 85% of the maximum
pulse rate. This should be done by lengthening the time for the training and
/ or encreasing the level of difficulty.
If the pulse rate is not shown on the computer display or if for safety reasons
you wish to check your pulse rate, which could have been displayed wrongly
due to error in use, etc., you can do the following:
a. Pulse rate measurement in the conventional way (feeling the pulse at the
wrist, for example, and counting the number of beats in one minute).
b. Pulse rate measurement with a suitable specialised device (available from
dealers specialising in health-related equipment).
2.Frequency
Most experts recommend a combination of health-conscious nutrition, which
must be determined on the basis of your training goal, and physical training
three times a week. A normal adult must train twice a week to maintain his
current level of condition. At least three training sessions a week are required
to improve one’s condition and reduce one’s weight. Of course the ideal
frequency of training is five sessions a week.
3. Planning the training
Each training session should consist of three phases: the warm-up phase,
the training phase, and the cool-down phase. The body temperature and
oxygen intake should be raised slowly in the warm-up phase. This can be
done with gymnastic exercises lasting five to ten minutes.
Then the actual training (training phase) should begin. The training exertion
should be relatively low for the first few minutes and then raised over a period
of 15 to 30 minutes such that the pulse rate reaches the region of between
70% to 85% of the maximum pulse rate.
In order to support the circulation after the training phase and to prevent
aching or strained muscles later, it is necessary to follow the training phase
with a cool-down phase. This should be consist of stretching exercises and
/ or light gymnastic exercises for a period of five to ten minutes.
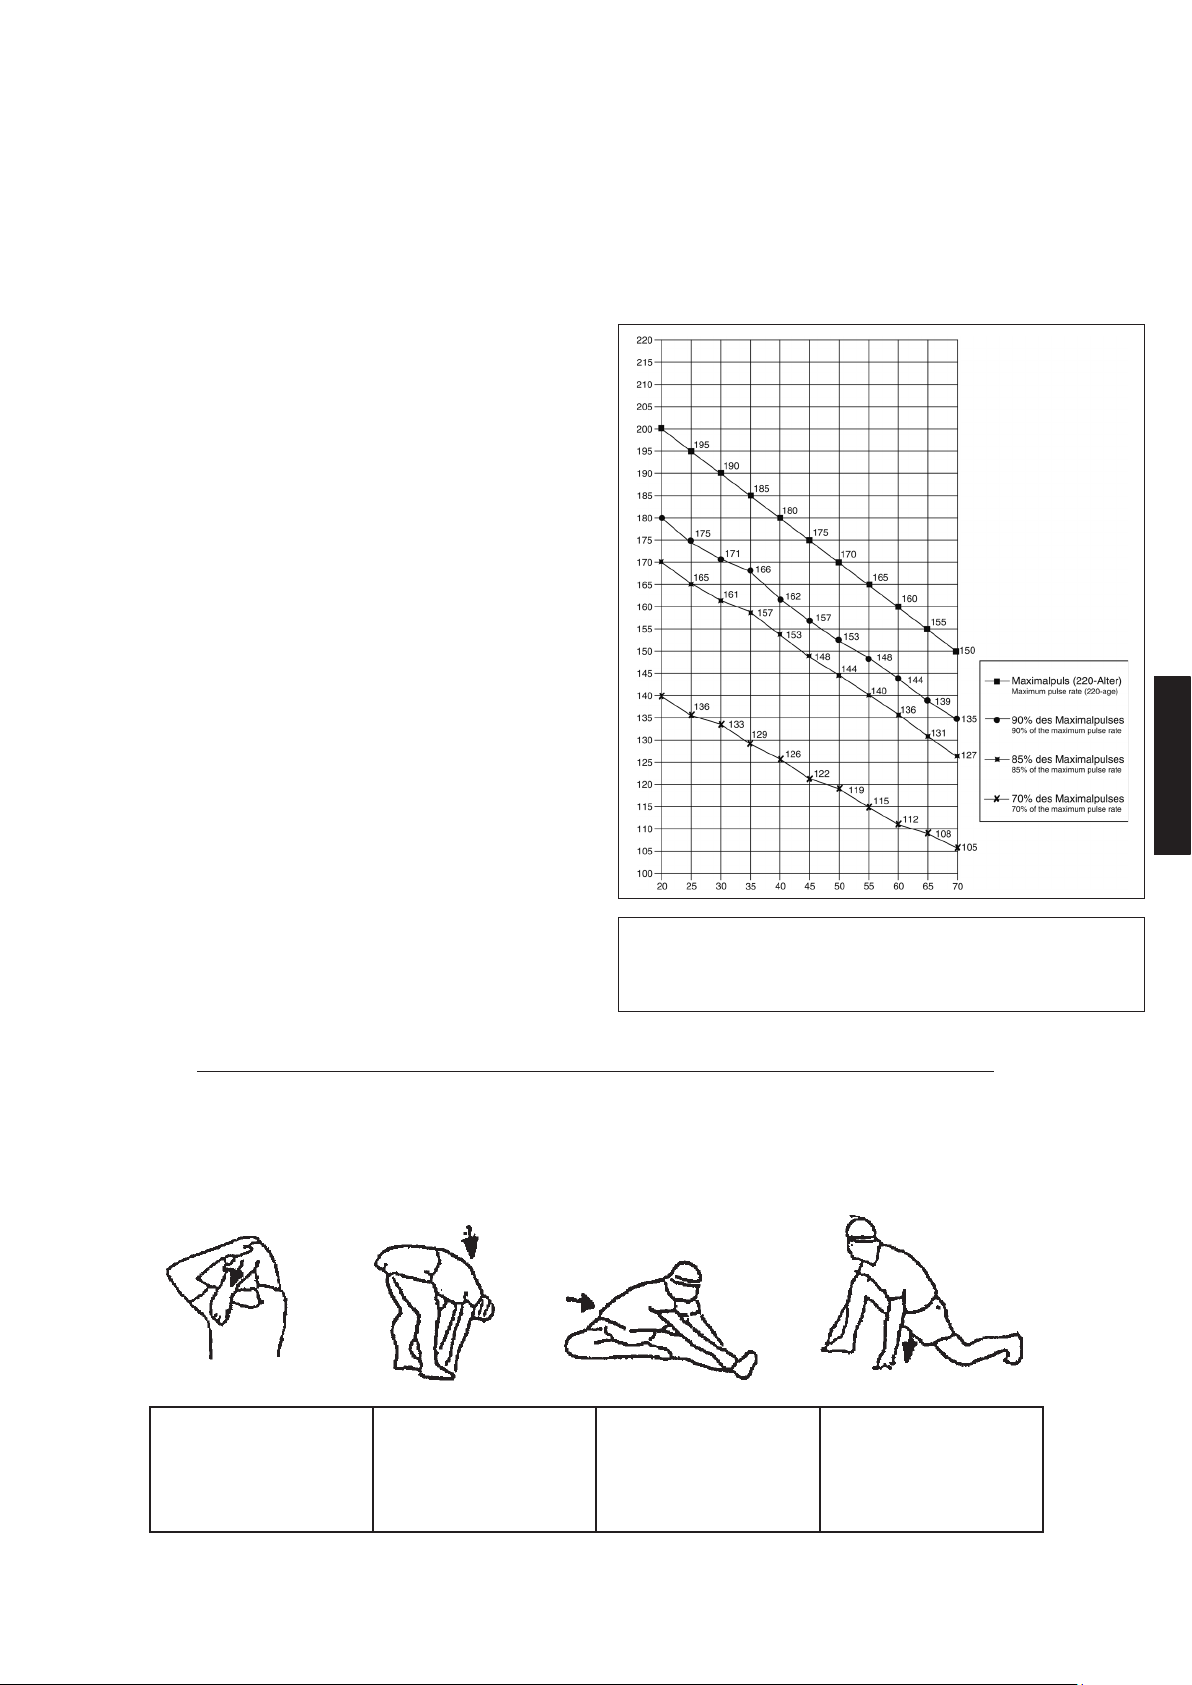
Calculation formula: Maximum pulse rate = 220 - age
(220 minus your age)
90% of the maximum pulse rate = (220 - age) x 0.9
85% of the maximum pulse rate = (220 - age) x 0.85
70% of the maximum pulse rate = (220 - age) x 0.7
Warm up exercises (Warm Up)
Start your warm up by walking on the spot for at least 3 minutes and then perform the following gymnastic exercises to the body for the training phase to
prepare accordingly. The exercises do not overdo it and only as far run until a slight drag felt. This position will hold a while.
Reach with your left hand
behind your head to the right
shoulder and pull with the
right hand slightly to the left
elbow. After 20sec. switch
arm.
Bend forward as far forward
as possible and let your
legs almost stretched. Show
it with your fingers in the
direction of toe. 2 x 20sec.
Sit down with one leg
stretched out on the floor
and bend forward and try
to reach the foot with your
hands. 2 x 20sec.
Kneel in a wide lunge for-
ward and support yourself
with your hands on the
floor. Press the pelvis down.
Change after 20 sec leg.
After the warm-up exercises by some arms and legs shake loose.
Don’t finish the exercise phase abruptly, but will cycle leisurely something without resistance from to return to the normal pulse-zone. (Cool down) We re-
commend the warm-up exercises at the end of the training be conducted and to end your workout with shaking of the extremities.
You find further information on the subject warm-up exercises, stretch exer-
cises or general gymnastics exercises in our download area under www.
christopeit-sport.com
4. Motivation
The key to a successful program is regular training. You should set a fixed
time and place for each day of training and prepare yourself mentally for the
training. Only train when you are in the mood for it and always have your goal
in view. With continuous training you will be able to see how you are progres-
sing day by day and are approaching your personal training goal bit by bit.
26
Recommandations importantes et
consignes de sécurité
Nos produits sont systématiquement soumis au contrôle et sont ainsi
conformes aux normes de sécurité actuelles les plus élevées. Cependant,
cela ne dégage pas de l’obligation de suivre strictement les indications
suivantes.
1. Monter l’appareil en suivant exactement les instructions de montage et
n’utiliser que les pièces spécifiques à l’appareil et ci-jointes pour le mon-
tage de l’appareil. Avant le montage en lui-même, contrôler l’intégralité
de la livraison à l’aide du bon de livraison et l’intégralité des emballages
en carton à l’aide de la instructions de montage dans les instructions de
montage et d’utilisation.
2. Avant la première utilisation et à intervalles réguliers (environ tous les
50 les heures d‘ouverture), le serrage de toutes les vis, écrous et autres
vérifiez les connexions et les puits d‘accès et les joints avec une certaine
traiter lubrifiant afin que le bon état de fonctionnement de l‘équipement est
assurée. Vérifiez en particulier la selle et réglage de guidon pour l‘étanchéité.
3. Mettre en place l’appareil à un endroit sec et plan, et le protéger contre
l’humidité. Les inégalités du sol doivent être compensées par des mesures
appropriées et par les pièces réglables de l’appareil, prévues à cet effet, si
présentes. Il faut exclure tout contact avec l’humidité et l’eau.
4. Dans la mesure où le lieu de montage doit être protégé contre des points
de pression, des saletés ou autres, prévoir un support antidérapant (p. ex.
tapis en caoutchouc, plaque en bois etc.) sous l’appareil.
5. Avant de commencer l’entraînement, enlever tous les objets dans un
rayon de 2 mètres autour de l’appareil.
6. Pour nettoyer l’appareil, ne pas utiliser de détergents agressifs, et pour le
montage ainsi que d’éventuelles réparations, n’utiliser que les outils fournis
ou des outils appropriés. Les traces de sueur sur l’appareil doivent être
enlevées tout de suite après l’entraînement.
7.RESPECT! Des systèmes de la fréquence de coeur peuvent être in-
exacts. Le fait de s‘entraîner excessif sait dommage de santé sérieux ou
mènent vers la mort
Un entraînement inadapté ou excessif peut entraîner des risques pour la
santé. C’est pourquoi, avant de commencer un entraînement précis, il faut
consulter un médecin. Ce dernier peut définir les sollicitations maximales
(pouls, watts, durée d’entraînement etc.) auxquelles on peut se soumettre,
et donner des renseignements exacts sur les conditions de l’entraînement,
les objectifs et l’alimentation. Il ne faut pas s’entraîner après un repas lourd.
8. Ne s’entraîner avec l’appareil que lorsque celui-ci est en parfait état de
fonctionnement. Pour les réparations éventuelles, n’utiliser que des pièces
de rechange originales. RESPECT! Si des parties sont excessivement
chaudes à l‘utilisation de l‘appareil ils remplacent immédiatement celui-ci
et sûr cet équipement de l‘utilisation jusqu‘à réparé.
9. Pour le réglage des pièces, faire attention à régler la bonne position ou
la position de réglage maximale marquée, et à bloquer correctement la
nouvelle position réglée.
10. Si rien d’autre n’est indiqué dans le mode d’emploi, l’appareil ne doit être
utilisé que par une personne pour l’entraînement. Le temps d‘entraînement
ne devait pas dépasser au total 90 Min./ chaque jour.
11. Il faut porter des vêtements et des chaussures adaptés à un entraînement
fitness avec l’appareil. Les vêtements doivent être conçus de manière à ce
que de par leur forme (p. ex. longueur), ils ne puissent pas rester accrocher
pendant l’entraînement. Les chaussures d’entraînement doivent être choisies
en fonction de l’appareil, doivent systématiquement bien tenir le pied et
posséder une semelle antidérapante.
12.RESPECT! Si des sensations de vertige, des nausées, des douleurs
dans la poitrine ou d’autres symptômes anormaux se font sentir, arrêter
l’entraînement et consulter un médecin adapté.
13. Il faut savoir que les appareils de sport ne sont pas des jouets. C’est pour-
quoi, ils ne doivent être utilisés que de manière conforme à l’emploi prévu
et uniquement par des personnes informées et initiées en conséquence.
14. Les personnes, telles que les enfants, les invalides ou les handicapés,
ne doivent utiliser l’appareil qu’en présence d’une autre personne qui peut
fournir son aide ou donner des instructions. Il faut exclure l’utilisation de
l’appareil par des enfants sans surveillance, par des mesures appropriées.
15. Il faut faire attention à ce que la personne qui s’entraîne, ainsi que
d’autres personnes, ne se trouvent jamais dans la zone des pièces encore
en mouvement.
16. Ce produit ne peut pas être enlevé les déchets à la fin de sa durée
de vie sur les déchets budgétaires normaux, main doit être livre à un point
collectif pour le recyclage des appareils électriques et électroniques. Le
symbole sur le produit du mode d’emploi ou de l’emballage fait rem arguer
sur cela.
Les matières sont réutilisables conformément à leur marquage. Avec le
réemploi, la valorisation matérielle ou d’autres formes de valorisation vous
apportez des appareils de contralto, une contribution importante à la pro-
tection a notre environnement. Veuillez demander lors de l’administration
communale le poste d’enlèvement des déchets constant.
17. Les matériaux d’emballage, les piles vides et les pièces de l’appareil
doivent être évacués en respectant l’environnement, pas avec les ordures
ménagères, mais dans les containers de collecte prévus à cet effet, ou remis
aux services de collecte adaptés.
18. Dans les modes d’opération qui dépendent de la vitesse, la résistance
peut être réglée manuellement et les variations de puissance dépendent de
la vitesse. Dans les modes d’opération indépendant de la vitesse, l’utilisateur
peut régler la consommation de puissance en Watt désirée. La machine
maintiendra automatiquement le même niveau de puissance, modifiant si
nécessaire le niveau de résistance. Ce réglage ne dépend pas de la vitesse.
19. L’appareil est équipé d’un réglage de résistance à 32 niveaux. Cela
permet de réduire ou d’augmenter la résistance de freinage et ainsi le niveau
d’entraînement. En tournant le bouton de réglage de la résistance vers niveau
1, cela entraîne une diminution de la résistance de freinage et ainsi du niveau
d’entraînement. En tournant le bouton de réglage de la résistance vers le
niveau 16, cela entraîne une augmentation de la résistance de freinage et
ainsi du niveau d’entraînement.
20. Cet appareil a été contrôlé et certifié suivant les normes wird EN ISO
20957-1:2013 et EN ISO 20957-5:2016 „H/A“. La charge (=poids) maxi-
male admise a été fixée à 150 kg. La classification HA implique que ce vélo
d’exercice a été conçu uniquement pour l’usage domestique. Cette clas-
sification garantit que l’anomalie dans la consommation énergétique d’un
appareil jusqu’à 50W ne dépasse pas ±5W et celle d’un appareil supérieur
à 50 W ne dépasse pas ±10%. Cet ordinateur d‘appareils correspond aux
demandes fondamentales d‘elle EMV Directive en 2014/30/EU.
21. Les instructions de montage et d‘utilisation doivent être considérées
comme faisant partie du produit. Cette documentation doit être fournie lors
TANCE / CALORIES en appuyant sur la touche F et en réglant les valeurs à
l‘aide des touches +/-. Les programmes de pouls 55%, 75% et 90% sont
basés sur l‘entrée d‘âge et l‘utilisent pour calculer la limite supérieure du
pouls 55%, 75% ou 90% de la valeur maximale de la fréquence cardiaque.
Avec le programme de pouls ♥, vous pouvez régler vous-même la limite
supérieure du pouls. L‘affichage PULSE clignote dès que la limite supéri-
eure du pouls est atteinte pendant l‘entraînement.
55% -- DIET PROGRAM – programme de régime
75% -- HEALTH PROGRAM – programme de santé
90% -- SPORTS PROGRAM – programme de sport
♥ - FRÉQUENCE CARDIAQUE CIBLE
34
RYTHME CARDIAQUE :
1. Les poignées droite et gauche comportent chacune un capteur (pièces
de contact métalliques.) Attention, veillez à ce que la paume de vos mains
repose simultanément sur les capteurs, avec une pression normale. Dès
que les pulsations sont enregistrées, un coeur apparaît en surbrillance à
côté de l’affichage des pulsations. La mesure des pulsations à la poignée
n’a qu’une valeur indicative. En effet, tout mouvement, frottement, la tran-
spiration etc. peuvent entraîner des variations par rapport aux pulsations
réelles. Chez certaines personnes, la mesure des pulsations peut être er-
ronée. En cas de problèmes avec la mesure des pulsations aux mains,
nous vous recommandons d’utiliser une sangle de poitrine cardiologique.
ATTENTION: Les systèmes de surveillance du rythme cardiaque peuvent
être inexacts. Un exercice excessif peut causer de graves dommages ou
la mort. À l‘adresse suivante : Étourdissement / faiblesse Arrêtez immédi-
atement l‘entraînement.
2. Mesure des pulsations cardiologiques Dans le commerce, on trouv les
appareils de mesure cardiologique, qui consiste en une sangle de poitrine
pourvue d’un émetteur et d’une montre récepteur. L’ordinateur de vot-
re ERGOMETRE est équipé d’un récepteur (sans émetteur) prévu pour
les appareils de mesures des pulsations cardiaques disponibles. Si vous
vous procurez un appareil de ce genre, vous pourrez voir sur le tableau
d’affichage de l’ordinateur les pulsations émises par votre émetteur (sang-
le de poitrine). Il peut fonctionner avec toutes les sangles de poitrine non
codées, et dont la fréquence est entre 5,0 et 5,5 KHz. La portée des émet-
teurs est, selon le modèle, de 1 à 2 m.
ATTENTION: Si vous utilisez simultanément les deux systèmes de mesure
des pulsations c’est la mesure faite aux poignées qui a la priorité.
Le produit peut être utilisé avec l’application Kinomap. Cela permet
une formation divertissante et interactive avec des appareils Android
ou IOS et la sauvegarde des données d‘entraînement.
port, coaching, gaming et eSport sont les maîtres mots de
l‘application Kinomap. Cela contient de nombreux kilomètres de
matériel filmique réel s‘entraîner à l‘intérieur comme si vous étiez
à l‘extérieur; Suivi des itinéraires et analyse de vos performances;
Contenu de coaching; Mode multijoueur; nouveaux messages quo-
tidiens; Courses officielles en salle et plus encore ... L‘APP contient
ainsi environ 100 000 vidéos enregistrées par des athlètes et 200
000 km de pistes cumulées pour le cyclisme, la course à pied ou
l‘aviron pour environ 270 000 membres du monde entier.
Téléchargez l’APP et connectez-vous
Scannez le code QR adjacent avec votre smartphone / tablette ou
utilisez la fonction de recherche sur le Playstore (Android) ou l‘APP
Store (IOS) pour télécharger l‘application Kinomap. Inscrivez-vous
et suivez les instructions de l‘APP.
Activez Bluetooth sur le smartphone ou la tablette et sélectionnez
le gestionnaire d‘appareils via le menu de l‘APP puis sélectionnez
la catégorie «Vélo d‘appartement». Sélectionnez ensuite votre dé-
signation de type via le logo du fabricant „Christopeit Sport“ afin
de connecter l‘équipement sportif. Selon l‘équipement sportif,
différentes fonctions sont enregistrées par l‘APP via Bluetooth ou
des données sont échangées.
APP DE FORMATION INTÉRIEURE
IOS ET ANDROID APP
ConditionNiveauBattement du coeur
ExcellentF1Über 50
BienF240 ~ 49
MoyenF330 ~ 39
AssezF420 ~ 29
FaibleF510 ~ 19
Très faibleF6Moins que 10
BOUTON DE TEST DE FITNESS:
Après un entraînement avec affichage de la fréquence cardiaque dans
n‘importe quel programme, vous pouvez appuyer sur le bouton TEST et
démarrer un test de condition physique. Pour que le programme foncti-
onne correctement, placez les deux mains sur les capteurs cardiaques
pendant 60 secondes. Une fois les 60 secondes écoulées, une note de
forme physique de F1 à F6 s‘affiche. (Voir le tableau sous-programme de
test de condition physique)
ATTENTION: Aucun autre écran ne fonctionne pendant le test de fitness.
6.FAT: programme de graisse corporelle
Ici, vous pouvez analyser un BMI et obtenir une proposition de formation
individuelle. Utilisez la touche F pour sélectionner les valeurs personnelles:
sexe = homme / femme, âge = 10-99 ans, hauteur = 120-200cm, poids
= 20-150kg l‘une après l‘autre et saisissez vos données en utilisant les
boutons +/-. Ensuite, prenez les capteurs de pouls manuels pour mesurer
votre graisse corporelle. Après env. 10 secondes, le résultat est affiché: la
valeur de BMI et le type de graisse corporelle résultant (1-4). Un programme
d‘entraînement est suggéré une fois que BMI et le type de graisse corpo-
relle sont affichés deux fois. Pour démarrer le programme d‘entraînement,
appuyez sur le bouton Start / Stop.
ATTENTION: Si l‘ordinateur affiche un message d‘erreur «Err1», il y a une
interférence de signal avec le capteur d‘impulsions. Dans ce cas, exécutez
à nouveau le programme de graisse corporelle et saisissez à nouveau les
capteurs de pouls afin que les capteurs de pouls soient couverts de votre
main autant que possible.
BMI - Table:
Attention: L‘application Kinomap propose une version d‘essai gra-
tuite pendant 14 jours. Après cela, des frais s‘appliqueront et seront
répertoriés sur la page d‘accueil de Kinomap. De plus amples infor-
mations peuvent être trouvées sur: https://www.kinomap.com/en/
Type de graisse
corp. .
Insuffisance
pondérale
Poids
normal
Légèrement
en surpoids
Surpoids
SexeType 1Type 2Type 3Type 4
mâle< 10%10%~19,9%20%~24,9%≥ 25%
femme< 20%20%~29,9%30%~34,9%≥ 35%
˿
˿
35
Centre d‘entraînement en mm
(Pour appareil et l‘utilisateur)
Surface libre en mm
(Zone de la formation et de la zone
de sécurité (60cm rotation))
Nettoyage, Entretien et stockage de ergomètre:
1. nettoyage
Utilisez uniquement un chiffon humide pour le nettoyage.
Attention: Ne jamais utiliser de benzène, de diluant ou autre agents
de nettoyage agressifs pour le nettoyage de surface comme ce les
dommages causés.
L‘appareil est uniquement pour un usage domestique privé et pour
un usage intérieur approprié. Gardez l‘appareil propre et l‘humidité
de l’appareil.
2. stockage
Branchez le bloc d‘alimentation tout en entendant l‘unité pour de
4 semaines de ne pas utiliser. Faire glisser le coulisseau de l‘étrier
vers le guidon et la Tube de selle aussi profondément que possible
dans le cadre. Choisissez un stockage à sec dans la maison et
mettre un peu d‘huile de pulvérisation pour les roulements de la
pédale gauche et à droite, au fil du boulon de serrage du guidon,
et sur les filets de la libération rapide. Couvrir le dispositif pour le
protéger d‘être décolorés par la lumière du soleil et de la poussière.
3. Entretien
Nous recommandons toutes les 50 heures pour examiner les conne-
xions à vis pour l‘étanchéité, qui ont été préparés dans l‘ensemble.
Toutes les 100 heures de fonctionnement, vous devriez au peu
d‘huile de pulvérisation les roulements de la pédale gauche et à
droite, au fil de la vis de fixation du guidon, et sur les filets de la
libération rapide.
Corrections:
Si vous ne pouvez pas résoudre en utilisant les informations
énumérées à l‘dysfonctionnement, s‘il vous plaît contactez votre
revendeur ou fabricant.
ProblèmeCausePossible Solution
L‘ordinateur ne
s‘allume pas en
appuyant sur un
bouton.
Aucun Cordon
d‘ alimentation
est insérée ou la
prise n‘est pas.
Vérifiez que Cordon d‘ alimenta-
tion est correctement branché,
éventuellement avec un autre
consommateur si la prise de
courant pour.
L‘ordinateur ne
compte pas et
ne s‘allume pas
par le début
de la formation
d‘un.
Manquant impul-
sion du capteur
en raison de
mauvais connec-
teur ou dissous.
Vérifiez le connecteur sur
l‘ordinateur et le connecteur
dans le tube de support pour un
bon ajustement.
L‘ordinateur ne
compte pas et
ne s‘allume pas
par le début
de la formation
d‘un.
Manquant
impulsion du
capteur en raison
de la position
incorrecte du
capteur.
Dévissez le couvercle et vérifier
la distance entre le capteur et
l‘aimant. Un aimant dans la ma-
nivelle est en regard du capteur,
et doit avoir une distance de
moins de <5mm.
Pas de lecture
du pouls
Prise d‘impulsion
n‘est pas bran-
ché.
Branchez le connecteur du
câble d‘impulsion séparée dans
le connecteur approprié sur
l‘ordinateur.
Pas de lecture
du pouls
Capteur de pouls
n‘est pas con-
necté correcte-
ment.
Visser les capteurs cardiaques
tactiles et vérifier l‘., Les connec-
teurs sont correctement et que le
câble d‘éventuels dommages.
Français
36
Formules de calcul: Pouls maximum = 220 - âge
90% du pouls maximum = (220 - âge) x 0,9
85% du pouls maximum = (220 - âge) x 0,85
70% du pouls maximum = (220 - âge) x 0,7
Recommandations pour l’entraînement
Les facteurs ci-après doivent être pris en compte pour la détermination de
l’entraînement indispensable afin d’améliorer concrètement son physique
et sa santé:
1. Intensité:
L’entraînement n’aura d’effets positifs que si les efforts déployés dépassent
ceux de la vie quotidienne, mais sans être hors d’haleine et/ou se sentir épui-
sé. Le pouls peut constituer un repère valable pour un entraînement efficace.
Au cours de celui-ci le pouls devrait se situer entre 70 % et 85% du pouls
maximum (le déterminer et le calculer au moyen du tableau et de la formule).
Pendant les premières semaines, le pouls devrait tourner autour de 70%
du maximum. Pendant les semaines et les mois suivants, le pouls devrait
augmenter lentement pour atteindre la limite supérieure, c.-à-d. 85% du
pouls maximum. Plus la condition physique de la personne qui s’entraîne
est bonne, plus il faut accroître l’entraînement pour rester entre 70 et 85%
du pouls maximum. On y arrive en allongeant la durée de l’entraînement et/
ou en renforçant la difficulté de celui-ci.
Si la fréquence cardiaque n’est pas affichée sur le visuel de l’ordinateur ou
si, pour des raisons de sécurité, vous souhaitez la contrôler, car elle aurait
pu être incorrectement indiquée suite à des erreurs d’utilisation, etc., vous
pouvez alors procéder comme suit:
a. Mesure de contrôle du pouls de manière classique (c.-à-d. en posant le
pouce sur la veine du poignet et en comptant les battements en une minute).
b Mesure de contrôle du pouls au moyen d’un dispositif approprié (vendu
dans un magasin spécialisé).
2. Fréquence
La majorité des experts recommandent de combiner une alimentation
comme pour la santé, qui sera choisie en fonction de l’objectif recherché par
l’entraînement, et les exercices physiques trois ou quatre fois par semaine.
Un adulte normal doit s’entraîner deux fois par semaine pour conserver
la forme actuelle. Mais au moins trois fois par semaine pour améliorer et
modifier son poids. Cinq fois par semaine étant idéal.
3. Programmation de l’entraînement
Chaque séance d’entraînement devrait comprendre trois phases:
«phase d’échauffement», «phase d’entraînement» et «phase de ralentis-
sement». La température du corps et l’absorption d’oxygène doivent aug-
menter lentement durant la phase «d’échauffement». Ce qui est possible
en effectuant de la gymnastique pendant cinq à dix minutes.
L’entraînement proprement dit («phase d’entraînement») devant commen-
cer ensuite. Choisir une faible résistance pendant quelques minutes puis
accroître entre 15 et 30 minutes de sorte que le pouls se situe entre 70%
et 85% de son maximum.
Afin de faciliter la circulation après la «phase d’entraînement» et d’éviter
des courbatures ou des muscles noués, la «phase d’entraînement» doit
être suivie d’une «phase de ralentissement». Celle-ci devrait englober des
exercices d’élongation et/ou de la gymnastique sans forcer, et ce entre
cinq et dix minutes.
Vous trouvez les autres informations au sujet exercices pour réchauffer,
Exercices d‘échauffement (Warm Up)
Commencez votre échauffement en marchant sur place pendant au moins 3 minutes puis effectuer les exercices de gymnastique suivantes à l‘organisme
pour la phase de formation pour se préparer en conséquence. Les exercices ne faites pas trop et que dans la mesure fonctionnent jusqu‘à une légère rési-
stance sentir. Cette position va tenir quelque chose.
Atteindre avec votre main
gauche derrière votre tête
vers l‘épaule droite et tirez
avec la main droite légère-
ment au coude gauche.
Après 20sec. Mettez bras
Penchez-vous aussi loin
que possible et laissez vos
jambes presque tendue.
Montrez-le avec vos doigts
dans la direction de l‘orteil. 2
x 20sec.
Asseyez-vous avec une jam-
be allongée sur le sol et se
pencher en avant et essayer
d‘atteindre le pied avec vos
mains. 2 x 20sec.
Agenouillez-vous dans une
grande fente avant et vous
soutenir avec vos mains sur
le sol. Appuyez sur le bassin
vers le bas. Changer après
20 jambe sec.
Après les exercices d‘échauffement par des bras et des jambes tremblent lâche.
Écouter après la phase de formation n‘est pas brusquement, mais le cycle de volonté quelque chose tranquillement sans résistance de la part de revenir à
l‘impulsion de la zone normale. (Refroidir) Nous recommandons les exercices d‘échauffement à la fin de la formation se déroule et à la fin de votre séance
d‘entraînement avec le tremblement des extrémités.
aux exercices de distension ou les exercices de gymnastique généraux
dans notre domaine de téléchargement sous le www.christopeit-sport.com
4. Motivation
Un entraînement régulier est la clef de la réussite de votre programme.
Vous devriez prévoir votre entraînement à heure fixe chaque jour et vous y
préparer mentalement. Il est primordial d’être de bonne humeur au moment
de l’entraînement et de ne pas perdre l’objectif visé. Jour après jour, en
vous entraînant continuellement, vous verrez les progrès accomplis et votre
objectif se rapprocher progressivement.
37
Belangrijke aanbevelingen
en veiligheidsinstructies
Onze producten werden in principe door de (Technische Keuringsdienst)
gecontroleerd en voldoen bijgevolg aan de actuele, hoogste veiligheidsnorm.
Dit feit impliceert echter niet dat de hierna volgende beginselen niet strikt
in acht genomen moeten worden.
1. Het toestel nauwkeurig in overeenstemming met de montage-instructies
opbouwen en uitsluitend de voor de opbouw van het toestel bijgevoegde,
specifiek voor het toestel bestemde onderdelen gebruiken. Vóór de eigenlijke
opbouw de volledigheid van de levering aan de hand van de leveringsnota en
de volledigheid van de kartonnen verpakking aan de hand van de montage
staps van de montage-instructies en van de gebruiksaanwijzing controleren.
2.Voor het eerste gebruik en met regelmatige tussenpozen (ongeveer
iedere 50 Bedrijfsuren) de dichtheid van alle schroeven, moeren en andere
controleer de aansluitingen en de toegang assen en verbindingen met een
aantal behandel smeermiddel zodat het veilig is voor gebruik van de ap-
paratuur wordt gewaarborgd. Bekijk vooral het zadel en het stuur correctie
voor stevig positie.
3. Het toestel op een droge, effen plaats installeren en het toestel tegen
vochtigheid en vocht beschermen. Oneffenheden van de vloer dienen door
gepaste maatregelen op de vloer en, voor zover beschikbaar bij dit toestel,
door daarvoor bestemde, regelbare onderdelen van het toestel geneutra-
liseerd te worden. Het contact met vochtigheid en vocht dient uitgesloten
te worden.
4.Voor zover de opstellingsplaats in het bijzonder tegen drukplaatsen,
verontreiniging en dergelijke beschermd moet worden, een geschikt, slipvrij
support (bijvoorbeeld rubberen mat, houten plaat of dergelijke) onder het
toestel leggen.
5. Vóór het begin van de training alle voorwerpen binnen een omtrek van 2
meter rond het toestel verwijderen.
6. Voor de reiniging van het toestel geen agressieve reinigingsmiddelen
gebruiken. Voor de opbouw en voor eventuele herstellingen uitsluitend het
respectievelijk bijgeleverde of geschikte, eigen gereedschap gebruiken.
Residu door het lassen aan het toestel dient onmiddellijk verwijderd te
worden zodra de training beëindigd werd.
7.Waarschuwing! Systemen van hart koers kan zijn onnauwkeurig. Buiten-
sporige kunnen opleiden tot een ernstige aandoeningen of door overlijden
In geval van een ondeskundige en bovenmatige training zijn nadelige ge-
volgen voor de gezondheid mogelijk. Vóór het begin van een doelgerichte
training dient daarom een geschikte geneesheer te worden geraadpleegd.
Deze geneesheer kan bepalen, aan welke maximale belasting (impulsie,
watt, duur van de training enz.) men zich mag blootstellen, en kan nauw-
keurige inlichtingen met betrekking tot een correcte lichaamshouding bij de
training, de doelstellingen van de training en de voeding geven. Er mag niet
na uitgebreide maaltijden getraind worden.
8. Met het toestel slechts trainen wanneer het foutloos functioneert. Voor
eventuele herstellingen uitsluitend van originele reserveonderdelen gebruik
maken. Waarschuwing! Delen moeten worden warm voor het gebruik van
de beveiligingsinrichting overdreven vervanging van dit meteen en u zult
krijgen. De beveiligingsinrichting tegen het gebruik, zolang het nog niet in
cabine is vastgesteld.
9. Bij de instelling van verstelbare onderdelen op respectievelijk de correcte
positie of de gemarkeerde, maximale instelpositie alsook op een reglementair
voorgeschreven positie letten.
10. Voor zover in de gebruiksaanwijzing niet anders beschreven, mag het
toestel met het oog op de training uitsluitend door één persoon gebruikt
worden. De totale uitoefening tijd mag niet hoger dan 90 min. /dagelijks.
11. Er moeten trainingskledij en schoenen gedragen worden, die voor een
fitnesstraining met het toestel geschikt zijn. De kleding moet zodanig zijn,
dat deze omwille van de vorm (bijvoorbeeld lengte) ervan tijdens de training
niet kan blijven hangen. De trainingschoenen moeten in overeenstemming
met het trainingstoestel gekozen worden, uw voeten in principe een vaste
passing geven en een slipvrije zool hebben.
12. Waarschuwing! Wanneer duizeligheid, misselijkheid, borstpijn en an-
dere abnormale symptomen ondervonden worden, de training vroegtijdig
beëindigen en u tot een geschikte geneesheer wenden.
13. Over het algemeen geldt dat sporttoestellen geen speelgoed zijn.
Ze mogen daarom uitsluitend in overeenstemming met de bepalingen
en door op gepaste wijze geïnformeerde en geïnstrueerde personen
gebruikt worden.
14. Personen zoals kinderen, mindervaliden en gehandicapten mogen
het toestel uitsluitend gebruiken in bijzijn van een tweede persoon, die
hulp kan verlenen en instructies kan geven. Het gebruik van het
toestel door kinderen zonder toezicht dient door gepaste maatregelen te
worden uitgesloten.
15. Er dient op gelet te worden dat de trainer en andere personen zich nooit
met één of ander lichaamsdeel binnen het bereik van nog in beweging zijnde
onderdelen begeven of bevinden.
16. Dit produkt kan aan het einde van de levensduur niet via het gewone
huisafval worden afgevoerd, maar dient naar een verzamelpunt voor recycling
electrische apparaten gebracht te worden.Het symbool op het produkt, de
gebruiksaanwijzing, of de verpakking wijst u daarop.
De grondstoffen zijn volgens hun kenmerken verwerkbaar. Met de verwerking,
van deze oude apparaten, doet u een bijdrage aan de bescherming van ons
milieu Vraagt u bij de gemeente naar de desbetreffende verwerkingsplaats.
17. De verpakkingsmaterialen, lege batterijen en onderdelen van het toestel
omwille van het milieu niet samen met het huishoudelijk afval evacueren,
maar in daarvoor bestemde opslagtanks werpen of op geschikte inzamel-
punten afgeven.
18. Voor de snelheidsafhankelijke modus kan het weerstandsniveau hand-
matig worden ingesteld en de wisselingen in energie zijn afhankelijk van
de trapsnelheid. Voor snelheids-onafhankelijke modus, kan de gebruiker
de gewenste.
Energieconsumptie in Watt selecteren, dan zal een constant energie-
niveau worden aangehouden met verschilllende weerstandsniveau´s, die
automatisch door het systeem worden bepaald. Dit is onafhankelijk van
de trapsnelheid.
19. Het toestel is met een 32-trappige weerstandsinstelling uitgerust. Deze
maakt respectievelijk een verlaging en een verhoging van de remweerstand
en daardoor van de trainingsbelasting mogelijk. Darbij leidt het draaien van
de instelknop van de weerstandsinstelling in de richting van niveau 1 tot
een verlaging van de remweerstand en daardoor van de trainingsbelasting.
Het draaien van de instelknop van de weerstandsinstelling in de richting
van niveau 16 leidt tot een verhoging van de remweerstand en daardoor
van de trainingsbelasting.
20.Dit toestel werd conform de wird EN ISO 20957-1:2013 en EN ISO
20957-5:2016 „H/A“ gekeurd en gecertificeerd. De toegelaten maximale
belasting (= lichaamsgewicht) werd op 150 kg bepaald. De classificatie HA
betekent dat deze fiets exclusief voor thuisgebruik is ontworpen en met
een goede accuratiekwalificatie, de afwijking in energieconsumptie onder
de 50W ligt binnen ±5W en bedraagt boven de 50W maximaal ±10%. De
computer is gekeurd en gecertificeerd en in overeenstemming is met het
EG-richtlijn 2014/30/EU.
21. De montage- en bedieningsinstructies worden als onderdeel van het
product beschouwd. Deze documentatie moet worden met gegeven bij het
verkopen of doorgeven van het product.
NLInhoudsopgave
1. Overzicht van de losse delen pagina 3 - 4
2. Belangrijke aanbevelingen en veiligheidsinstructies pagina 37
3. Stuklijst-reserveonderdelenlijst, pagina 37 - 40
Technische specificatie
4. Montagehandleiding met explosietekeningen pagina 41 - 43
Opstappen, Gebruiken en Afstappen
5. Watt tafel pagina 43
6. Handleiding bij de computer-fixes pagina 44 - 46
Reiniging, onderhoud en opslag
7. Trainingshandleiding-warming-up oefeningen pagina 47
Geachte klant
Wij willen u van harte gelukwensen met de aanschaf van uw hometrainer en
hopen dat u hier veel plezier aan zult beleven. Neem a.u.b. de instructies
en aanwijzingen uit deze montage- en bedieningshandleiding in acht en
volg deze op.
Bij eventuele vragen kunt u natuurlijk altijd contact met ons opnemen.
Met vriendelijke groeten, Top-Sports Gilles GmbH
Friedrichstr. 55
42551 Velbert
Nederlands
38
Wanneer een bepaald onderdeel niet in orde is of ontbreekt, of
wanneer u in de toekomst een reserveronderdeel nodig heeft, kunt
u zich wenden tot:
Adresse:Top-Sports Gilles GmbH
Friedrichstr. 55, 42551 Velbert
Telefon: +49 (0) 2051 - 6 06 70
Telefax: +49 (0) 2051 - 6 06 74 4
e-mail: info@christopeit-sport.com
www.christopeit-sport.com
Stuklijst - reserveonderdelenlijst
ET 6 PRO Art.-Nr. 2003
Technische specificatie: Stand: 03.01.2022
Ergometer met hoge weergavenauwkeurigheid volgens klasse H/A
• Inductie remsysteem
• ca. 12 kg vliegwielmassa
• Computer gestuurde weerstandsregeling met 32 weerstandfases
• 12 voorgeprogrammeerde weerstandsprogramma’s
• 3 hartslag programma’s (polsgestuurd)
• 1 individuele instelbare trainingsprogramma’s
• 1 manueel programma
• 1 omwentelings onafhankelijk programma (instelbaarheid watt prestatie van
10 tot 300 watt in 5 stappen)
• 1 Lichaamsvetprogramma
• Handpolsslag meting en Ontvanger voor draadloze hartslagband
• USB-aansluiting (bijvoorbeeld voor het opladen van de smartphones
terwijl het uitoefenen)
• Horizontaal en vertikaal verstelbare zadelpositie (snelsluiting)
• Zadel universeel verwisslbaar
• Zadel en stuur zijn helling verstelbaar
• Stelvoeten om waterpas te zetten en transportrollen
• Bedieningsvriendelijke Blue-Back-Light computer met gelijktijdige
aanduiding van; tijd, snelheid, afstand, ca. calorieverbruik,
pedaalomwentelingen, Wattage en polsslagfrequentie en ODO.
• Plank voor smartphone of tablet aan op uw computer
• Fitness-Test aanduiding
• Invoer van persoonlijke grenswaarden zoals tijd, afstand,
ca. calorieverbruik, polsslag en watt mogelijk
• Bluetooth-verbinding voor Kinomap (APP voor iOS und Android)
• Elektrische Data: 220-240V/50-60Hz~/60W
• Belastbaar met een lichaamsgewicht tot ca. 150 kg
Gewicht van het product: 40kg
Afmeting: L 96 x B 52 x H 140cm
Afbeeldings-
nr.
BeschrijvingAfmetingen
mm
Aantal
Stuks
Gemonteerd aan
afbeeldingsnr.
ET-nummer
1Basisframe1 33-2003-01-SW
2Voorste voetbuis1 133-2003-02-SW
3Achterste voetbuis1 133-2003-03-SW
4Steunpijp1 133-2003-04-SW
5Stuur1 433-2003-05-SW
6Steunbuis voor zadel1 1+3833-2003-06-SW
7Zadelopname13836-9814-12-BT
7aZadel 1 3836-9107-06-BT
8Computer1 436-2003-03-BT
9LPedaal Links9/16“L1 10R36-9109-84-BT
9RPedaal Rechts9/16“R110L36-9109-85-BT
10LPedaalopname links9/16“L1 6433-9109-82-SW
10RPedaalopname rechts9/16“R16433-9109-83-SW
11LVoet kappen met transportrolleneenheid links1 236-9108-54-BT
11RVoet kappen met transportrolleneenheid rechts1236-9108-55-BT
12Voet kappen2 336-9108-56-BT
13SlotschroefM10x572 1+239-10026
14Onderlegplatje10//203 1339-10206-CR
15Veerringvoor M102 1339-9995-CR
16Dop moerM102 1339-10021
17Rondkopschroef met binnenzeskantM8x1610 1,3+439-9888-CR
18Veerringvoor M810 1739-9864-VC
19Onderlegplatje8//1613 7,17+2539-10018-CR
20Schroef voor hoogtecompensatie2 336-9805-24-BT
21Stuurkabel1 22+7136-2003-05-BT
22Verbindingskabel1 8+2136-2003-06-BT
23 aStuurafdekking a14+23b36-9108-57-BT
23 bStuurafdekking b14+23a36-9108-58-BT
24SchroefM5x122 2339-9988
25L-greep schroef1 4+536-9107-29-BT
26Schroef4.2x1813 10,23,71+7736-9111-38-BT
0 5 10 15 20 25 30 35 40 50 60 70 80 90 100 mm
Deze produkt alleen bedoeld voor persoonlijke home-fitness-ruimte
en niet geschikt voor industrieel of commercieel gebruik. Home
fitness gebruik klasse H / A
39
Nederlands
Afbeeldings-
nr.
BeschrijvingAfmetingen
mm
Aantal
Stuks
Gemonteerd aan
afbeeldingsnr.
ET-nummer
27Schroef4 839-9903-SW
28Polskabel1 5+3036-9107-07-BT
29 aStuurovertrek a2 536-9109-59-BT
29 bStuurovertrek b2536-9805-15-BT
30Handpulseenheid2 5+2836-9107-08-BT
31Ronde dop2 536-9211-21-BT
32Snelslot1 1+636-9211-18-BT
33Kunstofglijder1 136-9109-60-BT
34Zadelsteunbuis afdekking1 636-9805-11-BT
35Stergreepmoer1 3636-9211-19-BT
36Klemstuk1 3833-9211-08-SI
37Vierkante dop2 3836-9211-23-BT
38Zadelglijder1 6+733-9211-07-SI
39Ronde dop1 3836-9109-61-BT
40Stroomdraad1 7536-9836113-BT
41Onderlegplatje gebogen8//1921739-9966-CR
42Veer1 436-9109-62-BT
43Ronde dop1 4536-2003-07-BT
44AsmoerM10x1.252 6439-9820-SI
45Ronde afdekking2 1036-2003-04-BT
46LLinkse bekleding11+46R36-2003-01-BT
46RRechtse bekleding11+46L36-2003-02-BT
47Schroef14 10+4536-9836-22-BT
48VazetringC172 6439-9805-32-BT
49Kogellager6203Z4 1+5236-9805-31-BT
50Vierkante dop1 136-9109-64-BT
51Spanveer1 5236-9109-65-BT
52Spanbeugel1 5633-9109-18-SI
53Sensor1 1+7136-9109-66-BT
54Schroef8 5639-9911
55Onderlegplatje6//168 5439-10013-VC
56Vliegwiel1 133-9109-19-SI
57Kunstofstuck1 5236-9109-67-BT
58Kunststof sluitring1 5236-9814-20-BT
59Rubberenring 11 136-9109-68-BT
60Rubberenring 21 136-9109-69-BT
61SchroefM6x154 63+6439-10120-SW
62Veerringvoor M612 54+6139-9865-SW
63Pedalkrukwiel1 6436-9109-70-BT
64Pedalkrukas1 6333-9109-20-SI
65Zelfborgende moerM64 439-9861-VZ
66Bevestigingsconstructie1 4636-2003-08-BT
67Zelfborgende moerM81 5639-9918-CR
68Flakke riem1 56+6336-9109-72-BT
69Schroef4.2x256 4639-9909-SW
70Gegolfte onderlegplaatje1 6436-9918-22-BT
71Besturingskaart1 7736-2003-09-BT
72EMS Verbinding1 56+7136-9109-74-BT
73Magneet16336-1122-23-BT
74Rubberen stop2 4536-2003-10-BT
75Netaansluiting1 6636-2003-11-BT
76Hoofdschakelaar1 6636-2003-12-BT
77Houder 1 133-2003-07-SW
78Schroef4x152 7539-10188
79Spanningsaansluiting1 75+7636-2003-13-BT
40
Afbeeldings-
nr.
BeschrijvingAfmetingen
mm
Aantal
Stuks
Gemonteerd aan
afbeeldingsnr.
ET-nummer
80Aansluitkabel blauw1 71+7636-2003-14-BT
81Aansluitkabel bruin1 71+7636-2003-15-BT
82Aansluitkabel gn/gb1 1+7136-2003-16-BT
83Werktuigset136-9109-75-BT
84Montage- en bedieningshandleiding136-2003-17-BT
41
Nederlands
Montagehandleiding
Vooraleer met de montage te beginnen, absoluut onze aanbevelingen
en veiligheidsaanwijzingen in acht nemen. De details vindt u op het
karton. Controleer of de zending volledig is met behulp van de stuklijst.
Sommige delen zijn al voorgemonteerd. Montage tijd: 30 - 40 min.
Stap 1:
Montage van de voorste en de achterste voet (2+3) aan het basisfra-
me(1).
1. Breng de achterste voet (3) gemonteerd met voetafdekkingen (12) en
hoogtecompensatieschroeven (20) op het frame (1), en schroef hem vast
door middel van binnenzeskantschroeven (17), onderlegplaatjes (19)
en veerringen (18). De hoogtecompensatieschroeven (20) zijn voorzien
om het toestel in geval van oneffenheden te stabiliseren.
2. Demonteer de plastic bescherming van het frame van de voorkant en
gebruik het schroefmateriaal om de voorste voetbuis te bevestigen.
Breng de voorste voet (2), gemonteerd met voetafdekkingen (11) op het
frame (1) en schroef hem vast door middel van de de afsluitschroeven
(13), onderlegplaatjes (14), veerringen (15) en dopmoeren (16).
Stap 3:
Montage van de steunbuis voor het zadel (6) en de zadel (7).
1. Schuif de afdekking (34) op het zadel steunbuis (6) en in de dienove-
reenkomstige opname op het frame (1) en zet deze in de gewenste
positie vast met behulp van de snelsluiting (32).
(De snelsluiting (32) moet losgemaakt worden door deze een beetje
te draaien, en daarna kan getrokken worden om de hoogtevastzetting
vrij te geven en de hoogte van het zadel te verstellen. Na de gewenste
instelling de snelsluiting (32) opnieuw vastdraaien en vastzetten).
2. Het zadel (7) met het zitvlak naar onderen neerleggen. De zadelopna-
me (7a) op de bovenliggende achterzijde van het zadel (7) leggen. De
schroefdraadgaten op de achterzijde van het zadel moeten door de
betreffende gaten in de zadelopname (7a) steken. Op de schroefdraad-
stukken de onderlegplaatjes (19) steken en de moeren (67) aanbrengen
en vast aantrekken.
3. Steek het zadel (7) op de zadelglijder (38) en schroef hem in de gewenste
schuine positie op de houder van het zadel vast.
4. Schroef uw zadelglijder (38) in de gewenste positie in en zet het opname
van de zadel steunbuis (6) vast door middel van de stergreepmoer (35)
en onderlegplatje (14).
Stap 2:
Montage van de pedalen (9L+9R) aan de krukarmen (10).
1. Monteer de pedaalvastzetbanden op de desbetreffende pedalen
(9R+9L). (Opgepast: Het uiteinde met de gaten voor de grootteinstelling
moet naar buiten wijzen.)
2. Monteer de pedalen (9R+9L) op de krukarmen (10R+10L). De pedalen
zijn gemarkeerd met „R“ voor rechts en „L“ voor links.
(opgepast: links en rechts zijn te zien vanuit de richting wanneer men op
het toestel zit en traint. Het rechter pedaal (9R) moet in de richting van
de wijzers van de klok, en het linker pedaal (9L) in tegenovergestelde
richting van de wijzers van de klok ingedraaid worden.)
De component „A“ dient als trans-
portbeveiliging, en niet meer nodig
na de bouw.
A
42
Stap 4:
Montage van de steunbuis (4) aan het basisframe (1).
1. Verwijder de schroeven (17), onderlegplaatjes (19+41) en veerringen
(18) uit de opname van de steunbuis van het stuur op het frame (1).
2. Breng de steunbuis van het stuur (4) op het frame, en verbind de con-
trolkabel (21) met de verbindingskabel (22).
3. Schuif de steunbuis van het stuur (4) in de desbetreffende opname op
het frame (1) zonder de kabels te klemmen en bevestig deze door middel
van de schroeven (17), de onderlegplaatjes (19+41) en de veerringen
(18).
Stap 6:
Montage van den Stuur (5).
1. Verwijder de schroeven (26) van de stuurafdekking (23A + 23B). Voert
u het stuur (5) door de geopende stuurophanging op het frame (4) en
sluit u deze over het stuur (5). Steekt u de stuurbekleding (23a) over de
stuurophanging en schroeft u het stuur (5) op het steunbuis (4) middels
de L-vormige stuur schroef (25) en onderlegplaatje (19) vast. Tevens
zekert u dan de stuurbekleding (23a) middels de schroef (24).
2. Steek vervolgens de pulskabel (28) in de pulsstekker (8a). Schroeft u de
achterste stuurbekleding (23b) middels de schroeven (24+26) eveneens
vast.
3. Netkabel (40) in de netaansluitbus (75) en in een volgens de voorschrif-
ten aangesloten stopcontact (230V ~ 50Hz) steken. Schakel vervolgens
de hoofdschakelaar (76) in.
Stap 5:
Montage van de computer (8) aan de steunbuis (4).
1. Neemt u de computer (8) en steekt u de verbindingskabel (22) in de
achterkant van de computer (8).
2. Leid de pulskabel (8a) van de computer (8) door de zijopening op de
steunbuis (4).
3. U schroeft de computer (8) op de computerhouder aan het steunbuis
(4) middels de schroeven (27) vast, zonder de kabel daarbij de bescha-
digen.
Stap 7:
Controle:
1. Alle schroef- en stekkerverbindingen op een correcte montage en juiste
werking controleren. Daarmee is de montage beëindigd.
2. Wanneer alles in orde is, met lichte weerstandsinstellingen vertrouwd
raken met het apparaat en de individuele instellingen vastzetten.
Opmerking:
De gereedschapsset en de gebruiksaanwijzing a.u.b. zorgvuldig be-
waren, omdat u ze wellicht later voor een reparatie of het bestellen van
reserveonderdelen nodig heeft.
43
Nederlands
Transport van Apparaat:
Aan de voorzijde bevinden zich twee rollers. Om het apparaat te verplaatsen
kunt u de achterzijde van het apparaat optillen en sturen naar waar u wilt
om het te plaatsen of te stallen.
Aanpassen – Hoogte zadel
Voor een effectieve workout, dient het zadel op
de juiste hoogte te zijn afgesteld. Tijdens het
trappen, dienen
Uw knieën licht gebogen te zijn wanneer de pe-
dalen in de verste positie staan. Om de hoogte
Van het zadel aan te passen, draait u de knop los
en trekt deze voorzichtig uit.
Zet het zadel op de juiste hoogte, laat de knop
los en draai deze goed vast.
Belangrijk:
Verzeker u ervan dat u de knop goed terug in de stang plaatst, en volledig
is vastdraait. Stel het zadel nooit boven de maximale hoogte af. Voor nooit
aanpassingen uit wanneer u op het zadel zit.
Levelâ/ RPMà2030405060708090100110120
1814192632394550596469
21017253240495764748188
312203038485969778998107
41424354556698090104115126
516284051647991104119132145
6183145577289103118134149164
7203450638098115131148166183
82137556988107126144163182201
92340597696117137158178198218
1025436383104126148171193214236
1127466890112136160184208231254
1229497397120146171198223248273
13305278103128156182211238265292
14315582109136166193224252282311
15335886115144176204237266297328
16356190121152185215250281313346
17376495128160194226263296328363
183868100134168204238276310344381
194071104140176213250289324360398
204274108146184222262302338376416
214377113152192232274315353392434
224580117159200241285328368408452
234783122165208250297341382424470
244886126171216260309354396440488
254989131177224270320367410456506
265192136183232279331380425473524
275395141189240288342393440489543
285498145195248297353406455506562
2955101150201256307365420471523581
3056104154207264317377433486540600
3157107159213272327389446501557619
3259110164220280337401459516574638
RPM en wattage van niveau 1 tot niveau 32 voor ET 6 PRO art.nr. 2003.
Opmerkingen:
1. De energieconsumptie (Watt) wordt gemeten door de trapsnelheid te
meten (min-1) van de as en de torsie (Nm).
2. Het apparaat is vóór verscheping geijkt om te voldoen aan vereisten van de
accuratieclassificatie, Mocht u twijfels hebben over de accuratie, neem dan
aub contact op met uw leverancier of stuur het apparaat naar een bevoegd
laboratorium om te laten testen, og opnieuw te laten ijken.
Opstappen, Gebruiken & Afstappen
De Opstappen, Gebruiken en Afstappen
Opstappen:
a. Nadat u de zitting op de juiste hoogte hebt afgesteld, plaatst u uw
voet op de voetsteun, onder het riempje en houdt het handvat
stevig vast.
b. Probeer uw gewicht nu op deze voet te brengen en tegelijkertijd uw
andere been over het apparaat te zwaaien en aan de
andere kant uw voet ook op het pedaal te plaatsen.
c. U bevindt zich nu in de juiste houding om de training te beginnen.
Gebruik:
a. Houdt met beide handen het handvat vast en houdt beide voeten op
de pedalen, en onder de riempjes van beide pedalen.
b. Fiets op het apparaat door de pedalen afwisselend met uw voeten
te bewegen.
c. U kunt de snelheid waarmee u fietst en/of de weerstand verhogen
om de intensiteit van de workout te verhogen.
Afstappen:
a. Verminder de trapsnelheid tot het apperaat tot stilstand komt.
b. Houdt met uw linkerhand het handvat stevig vast, terwijl u uw
voet over het apparaat zwaait en op de grond plaatst. Hierna
kunt u met uw andere voet afstappen.
Dit trainingsapparaat is een stationair apparaat en simuliert fietsen, zonder
hierbij de gewrichten te overbelasten, waardoor het risico op blessures
lager is.
Oefeningen op dit apparaat bieden de mogelijkheid van een vloeiende, non-
impact workout die afhankelijk van de ingestelde weerstand lichter of zwaar-
der kan zijn. U zult de spieren van zowel uw boven- als uw onderlichaam
versterken en het uithoudingsvermogen en algehele conditie verbeteren.
44
Computerhandleiding ET 6 Pro
SCHERM:
Omwentelingen per minuut (RPM): 15 ~ 999
(Het display verandert elke 6 seconden met km/h)
Snelheid (SPEED): 0,0 ~ 99,9 km / u
(Het display verandert elke 6 seconden met RPM)
Tijd (TIME): 00: 00 ~ 99: 59.
KM / Afstand (DISTANCE): 0,00 ~ 99,99 km
Calorieën (CALORIES): 0 ~ 999kcal
Watt: 0 ~ 999
(Het display verandert elke 6 seconden met Level)
Pulsweergave (PULSE): P ~ 40 ~ 240 max. mogelijke waarde
Hartsymbool knippert wanneer pulsgegevens worden ontvangen
Weerstandsprofiel: 1 ~ 32 niveau
(Het display verandert elke 6 seconden met Watt)
Programmacategorieën: HANDMATIG; PROGRAMMA (P1-P12);
WATT; USER; H.R.C.; FAT
BELANGRIJKSTE FUNCTIES:
1. START/STOP-knop: Start, onderbreekt of stopt het trainingsprogramma.
2. F-toets: Bevestigt een programmaselectie, roept invoerfuncties op en
bevestigt deze.
3. + knop: Verhoogt een standaardwaarde of gaat naar de volgende functie
in de selectie.
4. - knop: Verlaagt een vooraf ingestelde waarde of roept de vorige functie
in een selectie op.
(Alleen knipperende informatie kan worden gewijzigd/bevestigd.)
5. L-toets: terug naar programmaselectie. Reset de computer door 3 sec.
op te drukken.
6. TEST-knop: Fitness-test met toekenning van cijfers (F1-F6).
KM Totaal (ODO)
De afstand in km van alle trainingseenheden wordt weergegeven. Het
is niet mogelijk om de waarden op te geven. Het ODO-display kan op
elk moment op nul worden gereset. Druk hiervoor de +-toets en de
--toets gelijktijdig 2 seconden in.
FUNCTIONELE BESCHRIJVING
Installatie
1) ) Verbind het netsnoer met de ET 6 PRO en één correct aangesloten
stopcontact en zet de hoofdschakelaar aan. Het display in de computer
licht op, vergezeld van een signaaltoon en toont kort interne gegevens
voor de snelheidsprogrammering, de Bluetooth-interface en ODO. Ver-
volgens verschijnt MANUAL op het display en bent u in het handmatige
programma.
2) Vervolgens knippert de programmakeuze. Gebruik de +/- toetsen om
een programmacategorie te selecteren: MANUAL, PROGRAM, WATT,
USER, H.R.C., FAT en bevestig door op de F-toets te drukken. De stan-
daardwaarden zoals tijd, afstand, calorieën en hartslag in het geselecteer-
de programma kunnen worden opgeroepen met de F-toets en gewijzigd
met de +/- -toetsen.
3) Als het programma en de standaardwaarden zijn ingesteld, Druk op de
START/STOP-knop om de training te starten.
INDOOR TRAININGEN APP
4) Door nogmaals op de START / STOP-knop te drukken, wordt het pro-
gramma beëindigd of onderbroken. Alle tot dan bereikte waarden worden
gedurende 4 minuten opgeslagen en u kunt op basis van deze waarden
verder trainen.
5) De computer wordt ca. 4 minuten na afloop van de training automatisch
uitgeschakeld in de standby-modus. We raden aan om na elke trainings-
sessie de hoofdschakelaar uit te zetten.
1. MANUEEL: handmatig programma
Selecteer bij het selecteren van het programma de rubriek MANUAL met
de +/- toetsen en bevestig met de F-toets. Roep de instelopties LEVEL /
TIJD / DISTANCE / CALORIES / PULSE op door op de F-toets te drukken
en de waarden in te stellen met de +/- -toetsen. Gebruik de START/STOP-
knop om het handmatige programma te starten en pas de weerstand tij-
dens de training aan met de +/- knoppen.
2. PROGRAMMA: trainingsprogramma‘s
Selecteer bij het selecteren van het programma de PROGRAM-rubriek met
de +/- toetsen en bevestig met de F-toets. Roep vervolgens één van de
12 verschillende trainingsprogramma‘s op met de +/- knoppen en beves-
tig met de F-knop. Roep de standaard opties LEVEL / TIJD / AFSTAND /
CALORIEËN / PULS op door op de F-toets te drukken en de waarden in te
stellen met de +/- toetsen. Gebruik de START/STOP-knop om het geselec-
teerde programma te starten.
3. WATT: onafhankelijk wattprogramma:
Selecteer bij het selecteren van het programma de WATT-categorie met de
+/- toetsen en bevestig met de F-toets. Oproepen van de standaardopties
WATT / TIME / DISTANCE / CALORIES / PULSE door op de F-toets te
drukken en de waarden in te stellen met de +/- toetsen. De standaardin-
stelling voor de WATT-waarde is 100, de waarde kan worden gewijzigd van
10 tot 300 watt in stappen van 5 watt. De WATT-waarde wordt ingesteld
met de +/- knoppen. De ingevoerde WATT-waarde blijft constant ongeacht
de trapsnelheid door de weerstand automatisch aan te passen. Gebruik de
START/STOP-knop om het wattprogramma te starten.
4. USER: individuele programma‘s:
Selecteer bij het selecteren van het programma de categorie USER met de
+/- toetsen en bevestig met de F-toets. Maak uw eigen programmaprofiel.
Met dit programma kun je de weerstand van elke sectie (18 maten) zelf
bepalen. Stel met de +/- toetsen de gewenste weerstand voor de eerste
maat in en bevestig de invoer met de F-toets. Ga op dezelfde manier te
werk voor alle 18 maten. Druk vervolgens op de L-toets om TIME / DIS-
TANCE / CALORIES / PULSE in te stellen. U kunt de +/- toetsen gebruiken
om de waarde te veranderen en bevestigen met de F toets. Start het pro-
gramma door op de START / STOP-knop te drukken. Het ingestelde pro-
grammaprofiel wordt automatisch opgeslagen en kan indien nodig worden
overschreven. Nadat u het GEBRUIKER-programma heeft ingesteld, hoeft
u het alleen maar op te roepen en kunt u de standaardinstellingen TIME /
DISTANCE / CALORIES / PULSE rechtstreeks instellen door op de L-toets
te drukken.
5. H.R.C.: Pulsprogramma‘s
Selecteer bij het selecteren van het programma de H.R.C. categorie met
de +/- toetsen en bevestig met de F -toets. Roep de vooraf ingestelde op-
ties GENDER / AGE / PULSE PROGRAM / TIME / DISTANCE / CALORIES
op door op de F-toets te drukken en de waarden in te stellen met de +/-
-toetsen. De polsslagprogramma‘s 55%, 75% en 90% zijn gebaseerd op
de leeftijdsinvoer en gebruiken deze om de bovengrens van de polsslag
55%, 75% of 90% van de maximale hartslagwaarde te berekenen. Met het
pulsprogramma ♥ kun je zelf de bovengrens instellen. Het PULSE-display
knippert zo
55% -- DIET PROGRAM - dieetprogramma
75% -- HEALTH PROGRAM- gezondheidsprogramma
90% -- SPORTS PROGRAM - sportprogramma
♥ -- DOEL HARTSLAG
FITNESS TEST KNOP:
Na een training met hartslagweergave in elk programma, kunt u op de
TEST-toets drukken en een fitnesstest starten. Om het programma goed te
laten werken, plaatst u beide handen gedurende 60 seconden op de hand-
polssensoren. Nadat de 60 seconden zijn verstreken, wordt een fitness-
cijfer van F1 tot F6 weergegeven. (Zie tabel onder Fitness Test Program)
LET OP: Geen enkel ander beeldscherm werkt tijdens de conditietest
45
Nederlands
HARTSLAG
1. Handpulsmeting:
In het linkse en rechtse stuurgedeelte is telkens een metalen contactplaat,
de voelers, voorzien. Gelieve erop te letten dat steeds beide handpalmen
gelijktijdig met normale kracht op de voelers liggen. Zodra er een polsslag
volgt, knippert er een hart naast het polsslagdisplay. (De handpulsmeting
dient slechts ter oriëntatie omdat het door beweging, wrijving, zweet etc.
tot afwijkingen van de effectieve polsslag kan komen. Bij een klein aan-
tal personen kan het tot foutieve functies van de handpulsmeting komen.
Indien u moeilijkheden met de handpulsmeting ondervindt, raden wij het
gebruik van een externe cardioborstgordel aan.
OPGELET: Hartslagmonitoringsystemen kunnen onnauwkeurig zijn. Over-
matige lichaamsbeweging kan ernstige schade of de dood tot gevolg heb-
ben. Op Duizeligheid / zwakte Stop de training onmiddellijk.
2. Cardiopolsslagmeting:
In de handel zijn zogeheten cardiopolsslagmeters verkrijgbaar, die uit een
zenderborstgordel en een armbandhorloge-ontvanger bestaan. De com-
puter van uw ERGOMETER is met een ontvangtoestel (zonder zender) voor
bestaande cardiopolsslagmeetinstrumenten uitgerust. Indien u in het bezit
van een dergelijk toestel bent, kunnen de door uw zendtoestel (borstgor-
del) uitgestraalde impulsen op het computerdisplay afgelezen worden. Dit
functioneert met al de niet-gecodeerde borstgordels, waarvan de zend-
frequentie tussen 5,0 en 5,5 KHz ligt. De reikwijdte van de zendtoestellen
bedraagt al naargelang het model 1 tot 2 m.
OPGELET:Indien beide polsslagmeetmethoden tegelijkertijd gebruikt
worden heeft de handpulsmeting voorrang.
Het product kan worden gebruikt met de Kinomap-app. Dit maakt
vermakelijke en interactieve training met Android- of IOS-pparaten
mogelijk en het opslaan van trainingsgegevens.
Sport, coaching, gaming en eSport zijn de sleutelwoorden van de
Kinomap-app. Hierin zitten vele kilometers echt filmmateriaal binnen
te oefenen alsof je buiten bent; Traceren van routes en analyse van
uw prestaties; Coaching inhoud; Multiplayer-modus; nieuwe berich-
ten dagelijks; Officiële indoorwedstrijden en meer ... De APP bevat
dus ongeveer 100.000 video‘s die zijn opgenomen door atleten en
200.000 km verzamelde tracks voor fietsen, hardlopen of roeien
voor momenteel ongeveer 270.000 leden van over de hele wereld.
Download de APP en maak verbinding
Scan de naastliggende QR-code met je smartphone / tablet of
gebruik de zoekfunctie in de Playstore (Android) of APP Store
(IOS) om de Kinomap APP te downloaden. Registreer en volg de
instructies in de APP.
Activeer Bluetooth op de smartphone of tablet en selecteer de ap-
paraatbeheerder via het menu in de APP en selecteer vervolgens
de categorie „Sport fiets“. Selecteer vervolgens uw type-aanduiding
via het fabriekslogo „Christopeit Sport“ om de sportuitrusting aan te
sluiten. Afhankelijk van de sportuitrusting worden door de APP via
Bluetooth verschillende functies opgenomen of worden gegevens
uitgewisseld.
Let op: De Kinomap APPbiedt een gratis proefversie van 14
dagen. Daarna zijn er kosten van toepassing die worden vermeld
op de Kinomap homepage. Zie voor meer informatie: https://www.
kinomap.com/en/
INDOOR TRAININGEN APP
IOS EN ANDROID APP
6.FAT: lichaamsvetprogramma
Hier kunt u een BMI analyseren en een individueel trainingsvoorstel krijgen.
Gebruik de F-toets om de persoonlijke waarden te selecteren: geslacht =
man / vrouw, leeftijd = 10-99 jaar, lengte = 120-200 cm, gewicht = 20-150
kg achter elkaar en voer je gegevens in met de +/- knoppen. Pak vervolgens
de handpolssensoren vast om uw lichaamsvet te meten. Na ongeveer. 10
seconden wordt het resultaat weergegeven: BMI-waarde en het resulterende
type lichaamsvet (1-4). Een trainingsprogramma wordt voorgesteld nadat
de BMI en het lichaamsvet-type tweemaal zijn weergegeven. Druk op de
Start / Stop-knop om het trainingsprogramma te starten.
LET OP: Als de computer een foutmelding „Err1“ weergeeft, is er een sign-
aalstoring met de pulssensor. Voer in dit geval het lichaamsvetprogramma
opnieuw uit en pak de polssensoren weer vast, zodat de polssensoren
zoveel mogelijk met uw hand bedekt zijn.
BMI-tafel
StaatScoreHartslag
UitstekendF1Über 50
Mooi zoF240 ~ 49
GemiddeldeF330 ~ 39
EerlijkF420 ~ 29
SlechtF510 ~ 19
Zeer slechtF6Unter 10
Lichaamsvet
Type .
Onder
gewicht
Normaal
gewicht
Lets
overgewicht
Over
gewicht
GeslachtType 1Type 2Type 3 Type 4
Mens< 10%10%~19,9%20%~24,9%≥ 25%
Vrouw< 20%20%~29,9%30%~34,9%≥ 35%
˿
˿
46
Oefenterrein in mm
(Voor de apparaat-en
gebruikers)
Oefenterrein in mm
(Voor de apparaat-en
gebruikers)
Reiniging, onderhoud en opslag van de Ergometer:
1. Reiniging
Gebruik alleen een vochtige doek voor het reinigen.
Let op:Gebruik nooit benzeen, thinner of andere agressieve
reinigingsmiddelen voor oppervlaktereiniging als deze Schade
veroorzaakt .
Het apparaat is alleen voor prive gebruik en voor gebruik geschikte
binnenshuis. Houd het apparaat schoon en vocht uit het apparaat.
2. Opslag
Steek de stroom adapter uit met de intentie het apparaat voor dan
4 weken te gebruiken. Schuif de zadel glijder naar het stuur en de
zadelbuis zo diep mogelijk in het frame. Kies een droge opslag in het
huis en doe er wat nevel olie aan het pedaal lagers links en rechts,
om de schroefdraad van het stuur klem bout, en op de schroefdraad
van de zadel sluitschroef. Bedek de apparaat om het te beschermen
tegen verkleuring door een zon en stof.
3. Onderhoud
Wij adviseren om de 50 bedriljfsuren aan de schroefverbindingen op
dichtheid beoordelen, die werden bereid in het samenstel. Elke 100
bedrijfsuren, moet je op een gegeven oliespray het pedaal lagers
links en rechts, om de draad van het stuur bevestigingsbout, en op
de schroefdraad van de zadel sluitschroef.
Fixes:
Als u niet kunt oplossen met behulp van de genoemde storing
informatie, kunt u contact opnemen met uw dealer of Fabrikant.
ProbleemMogelijke oor-
zaak
Oplossing
De computer
wordt niet inge-
schakeld door
het indrukken
van een knop.
Geen Netsnoer
is geplaatst of
de socket is niet
leven.
Controleer of de Netsnoer cor-
rect is aangesloten, eventueel
met een andere consument als
het stopcontact stroom levert.
De computer
telt niet en
gaat niet aan
de start van de
opleiding een.
Ontbrekende
sensor impuls als
gevolg van onjui-
ste of opgelost
connector.
Controleer de stekker van de
computer en de stekker in de
ondersteunende buis voor een
goede pasvorm.
De computer
telt niet en
gaat niet aan
de start van de
opleiding een.
Ontbrekende sen-
sor puls door een
onjuiste positie
van de sensor.
Schroef het deksel en controleer
de afstand van de sensor tot de
magneet. Een magneet in de
Tretkurbelscheibe tegenover de
sensor en moet een afstand van
minder dan <5 mm.
Geen hartsla-
gindicatie
Pols stekker niet
in het steekcon-
tact.
Steek de connector van de
afzonderlijke puls kabel in de jui-
ste aansluiting op de computer.
Geen hartsla-
gindicatie
Pols-sensor is niet
goed aangesloten
Schroef de handsensoren en
controleer het., Zijn de connec-
tors goed zitten en de kabel
voor de mogelijke schade.
47
Nederlands
Trainingshandleiding
De onderstaande factoren moeten in acht worden genomen bij het bepalen
van de benodigde training voor het bereiken van een merkbare verbetering
van uw figuur en gezondheid:
1. Intensiteit:
De mate van lichamelijke belasting bij de training moet de normale belasting
overschrijden, zonder dat u daarbij buiten adem en/of uitgeput raakt. De
hartslag kan een geschikte richtwaarde voor een effectieve training zijn.
Tijdens de training moet deze tussen de 70% en 85% van de maximale
hartslag liggen (zie de tabel en formule om deze te bepalen en te berekenen).
Tijdens de eerste weken moet de hartslag tijdens de training in het laagste
deel hiervan, rond 70% van de maximale hartslag liggen. In de loop van
de daaropvolgende weken en maanden zou de hartslag langzaam tot de
bovengrens van 85% van de maximale hartslag moeten stijgen. Hoe beter
de conditie van degene die traint is, des te meer moet het trainingsniveau
stijgen om tussen de 70% tot 85% van de maximale hartslag te komen. Dit
kan worden bereikt door langer te trainen en/of door de moeilijkheidsgraad
te verhogen.
Wanneer de hartslag niet op het display wordt weergegeven of wanneer u
voor de zekerheid uw hartslag wilt controleren, omdat deze door eventuele
gebruiksfouten enz. onjuist weergegeven kan zijn, kunt u het volgende doen:
De hartslag op de gebruikelijke wijze meten (bijv. de pols voelen en het
aantal slagen per minuut tellen).
De hartslag met een geschikt en geijkt meetapparaat meten (verkrijgbaar
bij gezondheidsinstellingen)
2. Frequentie:
De meeste experts adviseren een gezondheidsbewust dieet, dat op uw
trainingsdoel moet worden afgestemd en drie tot vijf maal per week een
lichamelijke training. Een normale volwassene moet tweemaal per week
trainen om zijn huidige conditie te behouden. Om zijn conditie te verbeteren
en zijn lichaamsgewicht te veranderen moet hij minimaal driemaal per week
trainen. Natuurlijk is de ideale trainingsfrequentie vijf maal per week.
3. Planning van de training
Iedere trainingssessie moet uit drie fasen bestaan: een “warming-up”,
een “trainingsfase” en een “cooling down”. In de “warming-up” moet de
lichaamstemperatuur en de zuurstoftoevoer langzaam toenemen. Dit kan
worden bereikt door vijf tot tien minuten lang gymnastiekoefeningen te doen.
Daarna moet de eigenlijke training (“trainingsfase”) beginnen. De
trainingsbelasting moet de eerste minuten laag zijn en dan gedurende een
periode van 15 tot 30 minuten zo toenemen, dat de hartslag zich tussen de
70% en 85% van de maximale hartslag bevindt.
Om de bloedsomloop na de “trainingsfase” te ondersteunen en om
spierpijn of verrekte spieren te voorkomen, moet de trainingsfase door
een “cooling down” worden gevolgd. Hierbij moeten vijf tot tien minuten
lang stretchoefeningen en/of lichte gymnastiekoefeningen worden gedaan.
Voor meer informatie over uitoefening van warme up, oefening te rekken
of algemene gymnastische oefenen in onze downloadarea onder www.
90% van de maximale hartslag = (220 - leeftijd) x 0,9
85% van de maximale hartslag = (220 - leeftijd) x 0,85
70% van de maximale hartslag = (220 - leeftijd) x 0,7
Warming-up oefeningen (Warm Up)
Begin uw warming-up door te lopen op de plek voor minimaal 3 minuten en voer de volgende gymnastische oefeningen om het lichaam voor de opleidingsfase
dienovereenkomstig te bereiden. De oefeningen overdrijf het niet en alleen zo ver draaien tot een lichte weerstand gevoeld. Deze positie zal iets vast te houden.
Bereik met je linkerhand
achter je hoofd naar rechts
en trek met de rechterhand
iets naar links elleboog. Na
20sec. Switch arm
Buig naar voren zo ver
mogelijk naar voren en laat
je benen bijna gestrekt.
Toon het met je vingers in
de richting van de teen. 2 x
20sec.
Ga zitten met een been ge-
strekt op de grond en buig
naar voren en proberen om
de voet te bereiken met je
handen. 2 x 20sec
Knielen in een breed lunge
naar voren en ondersteunen
jezelf met je handen op de
grond. Druk op de bekken
naar beneden. Veranderen
na 20 sec been.
Na de warming-up oefeningen door sommige armen en benen los te schudden.
Luister na de training fase is niet abrupt, maar wil cyclus ontspannen iets zonder verzet van om terug te keren naar de normale hartslag-zone. (Afkoelen)
Wij raden de warm-up oefeningen op het einde van de training worden uitgevoerd en om uw workout te beëindigen met het schudden van de ledematen.
4. Motivatie
De sleutel tot een succesvol programma is een regelmatige training. U kunt
het beste een vaste tijd en plaats per trainingsdag vaststellen en u ook
geestelijk op de training voorbereiden. Train alleen met een goed humeur
en houd uw doel voor ogen. Met een continue training zult u zien dat u per
dag vooruitgang boekt, dat u zich verder ontwikkelt en dat u uw persoonlijke
trainingsdoel beetje bij beetje nadert.
48
Важные рекомендации и указания
по безопасности
Наши изделия принципиально подвергаются испытаниям со стороны
и тем самым отвечают актуальному, самому высокому стандарту
безопасности. Однако этот факт не освобождает от обязанности строго
соблюдать приведенные ниже принципиальные указания.
1.Монтировать тренажер в точном соответствии с монтажной
инструкцией и использовать только те относящиеся к тренажеру
детали, которые приложены для монтажа тренажера и указаны в
спецификации. Перед проведением монтажа проверить комплектность
поставки на основании накладной и комплектность
содержимого картонной коробки-упаковки на основании спецификации,
приведенной в руководстве по монтажу и эксплуатации.
2. Перед первым использованием и через регулярные промежутки
времени (примерно через каждые 50 Часы работы) герметичность
всех винтов, гаек и других проверьте соединения и валы доступа и
суставы с некоторыми лечить смазку так, что безопасная состояние
оборудования обеспечивается.
Особенно проверить седло и регулировку руля на герметичность.
3. Разместить тренажер в сухом, ровном месте и предохранить его от
влаги и сырости. Скомпенсировать неровности пола за счет
соответствующих мер, осуществляемых на полу, и предусмотренных
для этого, юстируемых деталей тренажера, если они есть на данном
тренажере. Исключить контакт с влагой и сыростью.
4. Если следует защитить место размещения тренажера в особенности
от продавливания, загрязнений и тому подобного, подложить под
тренажер подходящую, нескользящую прокладку (например, резиновый
коврик, деревянную плиту или т. п.).
5. Перед тренировкой удалить все предметы в радиусе 2 метров вокруг
тренажера.
6. Для очистки тренажера нельзя пользоваться агрессивными
очистными средствами, а для монтажа и возможного ремонта
использовать только поставленный вместе с ним или подходящий
собственный инструмент.
Удалить с тренажера следы пота сразу же после окончания тренировки.
7.ВНИМАНИЕ:Системы сердечной частоты контроль могут быть
неточны. Повышенная тренировка может к серьезному гигиеническому
повреждению или ведут к смерти. Неквалифицированная и чрезмерная
тренировка может причинить
вред здоровью. Поэтому перед тем, как приступать к целенаправленной
тренировке, проконсультироваться с соответствующим врачом. Он
может определить, каким максимальным нагрузкам (пульс, ватт,
продолжительность тренировки и т. д.) разрешается подвергаться,
и дать точную информацию о правильном положении тела во
время тренировки, о целях тренировки и о питании. Запрещается
тренироваться после обильной еды.
8. Тренироваться на тренажере только тогда, когда он работает
безупречно. Для возможного ремонта использовать только оригинальные
запасные части. ВНИМАНИЕ: Если части при использовании устройства
становятся чрезмерно горячи они заменяют ее были срочны и они еще
не гарантируют устройство против использования до тех пор пока это
в состоянии были помещены.
9. Настраивая регулируемые детали, следить за правильным
положением или, соотв., учитывать помеченную максимальную позицию
настройки и обеспечивать надлежащую фиксацию заново настроенного
положения.
10. Если в руководстве не указано иного то тренажером может
пользоваться только один человек. Время тренировки не должно было
превосходить в целом 90 Min./ежедневно.
11.Необходимо носить тренировочную одежду и обувь, которые
подходят для оздоровительной тренировки на тренажере. Одежда
должна такой, чтобы по своей форме (например, длине) она не могла
зацепиться во время тренировки. Следует подбирать тренировочную
обувь, которая подходит к тренажеру, обеспечивает устойчивость для
ног и имеет нескользящую подошву.
12. ВНИМАНИЕ: Если возникнут головокружение, тошнота, боли в груди
и другие аномальные симптомы, прервать тренировку и обратиться к
соответствующему врачу.
13. Следует принципиально учесть, что спортивные снаряды - не
игрушки.
Поэтому их разрешается использовать только в соответствии с
назначением и лицами, которые располагают соответствующей
информацией и которые прошли соответствующий инструктаж.
14. Таким лицам как дети, инвалиды и люди с увечьями следует
пользоваться тренажером только в присутствии еще одного человека,
который может оказать помощь и дать руководящие указания.
Исключить возможность использования тренажера детьми без надзора,
приняв соответствующие меры.
15. Следить за тем, чтобы тренирующиеся и другие лица никогда не
попадали какими-либо частями своего тела в зону еще движущихся
деталей или чтобы они не находились там.
16. В конце срока службы этот продукт не должен быть утилизирован
в домашние отходы, а должен быть отдан на сборный пункт утилизации
использованных электрических и электронных приборов. На это
указывает символ на продукте, на инструкции по эксплуатации или
на упаковке.
Все материалы могут быть снова использованы согласно маркировке.
При повторном использовании, вторичной переработке или других
формах вторичного использования старых приборов Вы вносите свой
вклад в защиту окружающей среды.
Пожалуйста, узнайте в коммунальном управлении адрес близлежащего
сборного пункта утилизации.
17. Учитывая требования экологии, не удалять упаковочный материал,
израсходованные батарейки и детали тренажера вместе с бытовыми
отходами, а класть их в предусмотренные для этого контейнеры-
сборники или сдавать их в соответствующие пункты сбора утильсырья.
18. Для зависимой от скорости тренировки тормозное сопротивление
можно установить вручную и достигнутая мощность будет зависеть от
шаговой скорости педалей. Для независимой от скорости тренировки
пользователь может сам задать на компьютере желаемый показатель
в ваттах и проводить независимую от скорости тренировку при
равной мощности. Тормозная система автоматически устанавливает
сопротивление к шаговому передвижению, чтобы достигнуть заданный
Gebruikershandleiding.com neemt misbruik van zijn services uitermate serieus. U kunt hieronder aangeven waarom deze vraag ongepast is. Wij controleren de vraag en zonodig wordt deze verwijderd.
Product:
Spelregels forum
Om tot zinvolle vragen te komen hanteren wij de volgende spelregels:
lees eerst de handleiding door;
controleer of uw vraag al eerder door iemand anders is gesteld;
probeer uw vraag zo duidelijk mogelijk te stellen;
heeft u een probleem en al geprobeerd om dit op te lossen, vermeld dit erbij aub;
heeft u een oplossing gekregen van een bezoeker dan horen wij dat graag in dit forum;
wilt u een reactie geven op een vraag of antwoord, gebruik dan niet dit formulier maar klik op de knop 'reageer op deze vraag';
uw vraag wordt direct op de website gezet; vermijd daarom persoonlijke gegevens in te vullen;
Belangrijk! Als er een antwoord wordt gegeven op uw vraag, dan is het voor de gever van het antwoord nuttig om te weten als u er wel (of niet) mee geholpen bent! Wij vragen u dus ook te reageren op een antwoord.
Belangrijk! Antwoorden worden ook per e-mail naar abonnees gestuurd. Laat uw emailadres achter op deze site, zodat u op de hoogte blijft. U krijgt dan ook andere vragen en antwoorden te zien.
Abonneren
Abonneer u voor het ontvangen van emails voor uw Christopeit ET6 PRO bij:
nieuwe vragen en antwoorden
nieuwe handleidingen
U ontvangt een email met instructies om u voor één of beide opties in te schrijven.
Ontvang uw handleiding per email
Vul uw emailadres in en ontvang de handleiding van Christopeit ET6 PRO in de taal/talen: Nederlands, Duits, Engels, Frans als bijlage per email.
De handleiding is 6.84 mb groot.
U ontvangt de handleiding per email binnen enkele minuten. Als u geen email heeft ontvangen, dan heeft u waarschijnlijk een verkeerd emailadres ingevuld of is uw mailbox te vol. Daarnaast kan het zijn dat uw internetprovider een maximum heeft aan de grootte per email. Omdat hier een handleiding wordt meegestuurd, kan het voorkomen dat de email groter is dan toegestaan bij uw provider.
Stel vragen via chat aan uw handleiding
Stel uw vraag over deze PDF
Uw handleiding is per email verstuurd. Controleer uw email
Als u niet binnen een kwartier uw email met handleiding ontvangen heeft, kan het zijn dat u een verkeerd emailadres heeft ingevuld of dat uw emailprovider een maximum grootte per email heeft ingesteld die kleiner is dan de grootte van de handleiding.
Er is een email naar u verstuurd om uw inschrijving definitief te maken.
Controleer uw email en volg de aanwijzingen op om uw inschrijving definitief te maken
U heeft geen emailadres opgegeven
Als u de handleiding per email wilt ontvangen, vul dan een geldig emailadres in.
Uw vraag is op deze pagina toegevoegd
Wilt u een email ontvangen bij een antwoord en/of nieuwe vragen? Vul dan hier uw emailadres in.