631760
20
Verklein
Vergroot
Pagina terug
1/23
Pagina verder
Operating manual
Order no.: 20210011 / 20210017
20210012 / 20210018
CityCom
®
Communication systems
1. SAFETY INSTRUCTIONS .............................................................................................................3
2. CONNECTIONS ................................................................................................................................. 4
3. OPERATION ....................................................................................................................................5
3.1. LOCAL CONTROL ............................................................................................................................ 5
3.2. FUNCTIONS OF THE REMOTE CONTROL ........................................................................................ 5
3.3. PROGRAMME...................................................................................................................................6
3.3.1 PROGRAMME SELECTION WITH THE NUMERICAL BUTTONS [0...9], [] , [] AND LIST ........6
3.3.2 LAST PROGRAMME WITH THE [E] BUTTON................................................................................. 6
3.3.3 ZAPPER-FUNCTION WITH THE [OK] AND [] [] [] [] BUTTONS .....................................6
3.3.4 PROGRAMME MANAGEMENT WITH 10 FAVOURITE LISTS..........................................................6
3.4. TV / RADIO SWITCH-OVER ......................................................................................................... 7
3.5. VOLUME ADJUSTMENT ...................................................................................................................7
3.6. LANGUAGE SELECTION .................................................................................................................. 7
3.7. TIMER ..............................................................................................................................................8
3.8. EPG – PROGRAMME INFORMATION (BASIS NAVIGATOR) .......................................................... 9
4. MENU STRUCTURE..................................................................................................................... 10
4.1. PROGRAMMES............................................................................................................................... 10
4.1.1 FAVOURITE LIST............................................................................................................................10
4.1.2 CHANGING NAMES OF THE FAVOURITE LISTS...........................................................................11
4.1.3 PROGRAMME POOL..................................................................................................................... 12
4.1.4 PARENTAL LOCK.........................................................................................................................13
4.2. SEARCH .........................................................................................................................................14
4.2.1. SATELLITE SEARCH ...................................................................................................................14
4.2.2. TRANSPONDER SEARCH.............................................................................................................14
4.2.3. MANUAL ENTRY (FOR EXPERTS) ................................................................................................ 14
4.3. SATELLITE..................................................................................................................................... 15
4.4. INSTALLATION ..............................................................................................................................15
4.4.1. TIME OFFSET.............................................................................................................................. 15
4.4.2. MENU LANGUAGE ......................................................................................................................16
4.4.3. SIGNAL PATHS ............................................................................................................................ 16
4.4.4. LNB SETTINGS ........................................................................................................................... 17
4.4.5. DISEQC (DIGITAL SATELLITE EQUIPMENT CONTROL)............................................................. 17
4.4.6. DOWNLOAD-OVER-AIR (SOFTWARE UPDATE VIA SATELLITE) ...............................................18
4.5. CA (CONDITIONAL ACCESS) = ENCRYPTED PROGRAMMES (CCR 512)................................... 18
4.5. CA (CONDITIONAL ACCESS) = ENCRYPTED PROGRAMMES (CCR 512)................................... 19
4.5.1 GENERAL INFORMATION............................................................................................................ 19
4.5.2 RECEIVING ENCRYPTED PROGRAMMES .................................................................................... 19
5. GLOSSARY.....................................................................................................................................20
6. TECHNICAL DATA .........................................................................................................................21
- 2 -
1. Safety instructions
The following section contains important information regarding operation, place of
installation and connection of the receiver.
Read these instructions carefully before putting the unit into operation.
Extended absence / thunderstorms
Always switch the unit off via its mains switch on the right side of the front panel during periods of
extended absence or at the onset of thunderstorms or withdraw the mains plug from the outlet. This also
applies to any other equipment that is connected to the receiver.
However, take into account any possible timer programming and switch the unit on again in good time
prior to the recording time.
Mains cable
Make certain that the mains cable (power supply cable) is undamaged. Never put the unit into
operation, if the mains cable is damaged.
Cleaning
Withdraw the mains plug before cleaning the unit. Use a dry cloth for cleaning. Clean the surface only
and nothing else.
On no account open the housing. There is a risk of electric shock if components within the unit are
touched.
Children-at-play
Pay attention that children do not insert objects into the ventilation slots. There is a risk of mortal danger
due to electric shock.
Repairs
If your receiver needs repairing or settings need to be changed, have qualified specialists carry this out.
Unauthorised opening and attempts at repairs entail loss of guarantee.
The unit’s electrical safety can be affected by improper tampering with it.
The manufacturer’s liability excludes accidents occurring to the user when the unit is opened.
Connections
The unit may be rendered inoperative or not work properly if the connections are not wired up properly.
- 3 -
Important notes for siting and installation
Place of installation
Every electronic device generates heat. The rise in temperature, however, lies within a safe range.
Slight colour changes may occur to sensitive furniture surfaces and veneers over the course of time due
to the constant effect of heat. In conjunction with treated furniture surfaces, the unit’s rubber feet can
likewise give rise to changes in colour. Where necessary, place the unit on a suitable pad.
Ventilation
The heat which is generated in this unit is dissipated quite adequately. Never install the receiver in a
cabinet, shelf or rack with inadequate ventilation. Never close off the cooling slots on the unit.
Do not place objects on top of the unit. Maintain a clearance of at least 10 cm above the unit, so that the
heat generated within the unit is conducted away without obstruction.
Humidity, exposure to sunlight, heat
Protect the unit against humidity, drips and splashing.
Do not place the unit close to radiators nor expose it to direct sunlight.
Mains voltage
Operate the receiver only from a 230V / 50 Hz mains voltage.
The unit must not be connected to the mains and switched on until after the connections have been set
up for the antenna and TV set.
Grounding
The parabolic antenna is to be grounded in accordance with regulations. The relevant local and/or
German VDE regulations are to be observed.
Remote control
Place the supplied batteries into the remote control. Ensure correct polarity of the batteries according to
the + and – markings inside the battery compartment!
2. Connections
The following connections are located on the rear panel of the unit:
230V / 50 Hz Connect the mains cable with the mains socket.
AUDIO TV L a. R Audio output, left and right channel for connection to a stereo system.
TV Connect the TV socket to your television set with the Scart cable, which is
included in the scope of delivery.
VCR VCR Scart socket for connection of a video recorder.
SAT IF INPUT Sat IF signal input and output for LNB supply and control signals –
Connect the cable from your satellite system to this socket.
SAT IF OUTPUT IF signal output (Loop-through e.g. to an analogue receiver).
DATA INTERFACE RS 232 interface for serial data transmission for servicing.
0-modem cable (Pin 2 and 3 crossed, Pin 1, 4, 6-9 are not used).
Receiver: PC:
Pin 2 = RXD Pin 2 = RXD
Pin 3 = TXD Pin 3 = TXD
Pin 5 = GND Pin 5 = GND
- 4 -
3. Operation
3.1. Local control
Open (and close) the flap on the front panel of the unit by pressing the dotted area (left).
The local control consists of the buttons [STANDBY], [] and [] for switching the programmes
(up/down), as well as [ - ] and [
+ ] for adjusting the volume.
VOLUME CHANNEL
STANDBY - +
R TV
To switch between radio and TV, quickly press the button [STANDBY] and within one second the [ - ]
button for radio or the [
+ ] button for TV operation.
For a second, the LED display shows the switch-over operation Radio / TV.
[ r t ]
The unit has an On/Off switch with mains separation.
The display of the programme number appears on a 4-digit, green, 7-segment display!
Display of TV programmes
P 9 9 9
Display of radio programmes
r 2 5
Display t = TV mode ( + programme number of the satellite receiver )
t 1 2 3
Note: The unit has been switched to TV operation with the TV button. The picture on the
television set comes from the TV set; e.g. with an additional cable connection.
P 2.3.4.
The points are displayed, when the unit is muted.
V c r
Display ‚Vcr‘:
The video/audio signal from the video recorder is automatically switched to the
television set during play – also in standby.
Display ‚Vcr-‘ : Switching in standby.
V c r -
The unit is in standby and can be switched on by pressing the [STANDBY] button.
-
3.2. Functions of the remote control
The unit is switched on in standby by pressing the red button or with the numerical buttons [ 0 ]
... [ 9 ] .
A description of the remote control functions is integrated in the unit’s software. In order to call up the
function description, simply press the [RC] on the remote control and then the button, whose function is
to be described -The respective text is displayed.
Exit the help menu by pressing the [RC] button again.
The [] [] and [] [] buttons, which are arranged around the OK button, possess the volume
function - / + (Vol -/+) and the programme function - / + (Ch -/+) during normal operation.
- 5 -
3.3. Programme
3.3.1 Programme selection with the numerical buttons [0...9], [] , [] and list
Setting a programme is carried out by direct entry of the programme number with the numerical buttons
(0 is also a programme number).
Switch to the next / previous programme with the [] / [] buttons.
After pressing the [OK] button two times, a list is displayed which is arranged according to programme
numbers. The desired programme can be called up using the [] / [] and [] / [] buttons and set
by pressing the [OK] button. Exit the list by pressing the [OK] button once more or by pressing the [E]
button.
3.3.2 Last programme with the [E] button
Press the [E] button to switch between the last two set programmes.
3.3.3 Zapper-function with the [OK] and [] [] [] [] buttons
If the current „desired“ programme is interrupted by advertisements, many users „zap“ to a „substitute“
programme or even to a second or a third. It easily happens, that the user does not return to the
originally watched programme.
The „zapper-function“ marks three „substitute programmes,“ which were ‚zapped to‘ after the „desired“
programme. Only programmes, which are watched for at least 5 seconds, are saved.
The 4 programmes, which were last saved, can be directly called up by pressing the [OK] button and
afterwards one of the [] [] [] [] buttons.
3.3.4 Programme management with 10 favourite lists
The digital television technology provides watchers with a variety of programmes. Depending on the
number of received satellites, up to 1,000 TV and up to 1,000 radio programmes are available.
In order to manage such an enormous array of programmes, – who can remember hundreds of
programmes along with their assigned programme number? – ten definable favourite lists are available
for the user, which allow clear management and sorting of the programmes.
A favourite list is a list, in which any of the selected programmes from a programme pool can be
categorised.
The list names are predefined at the factory comparable to the following example. The name of the
favourite list can be individually changed. In each favourite list, the programme numbers P000....P999
are available.
Favourite list : Name Sorted programmes (example)
--------------------------------------- ---------------------------------------------------------------------------------
Example: F0: ALL (e.g. all programmes from the programme pool)
F1: NEWS (e.g. PHOENIX, n-TV, N-24, Bloomberg........)
F2: SPORT (e.g. DSF, EuroSport, Motors-TV, .................)
F3: MUSIC (e.g. MTV, VIVA, VIVA zwei, Video Italia, Hit-Channel.....)
F4: TRAVEL (e.g. Canal Canarias, Travel-Channel, .......)
F5: SHOPPING (e.g. Home Shopping, QVC, Wishline, ONYX, ................)
F6: CHILDREN (e.g. KIKA + other programmes for children...........................)
F7: DIVERSE (e.g. – all programmes, which are not yet categorised)
F8: ABC (e.g....)
F9: XYZ (e.g....)
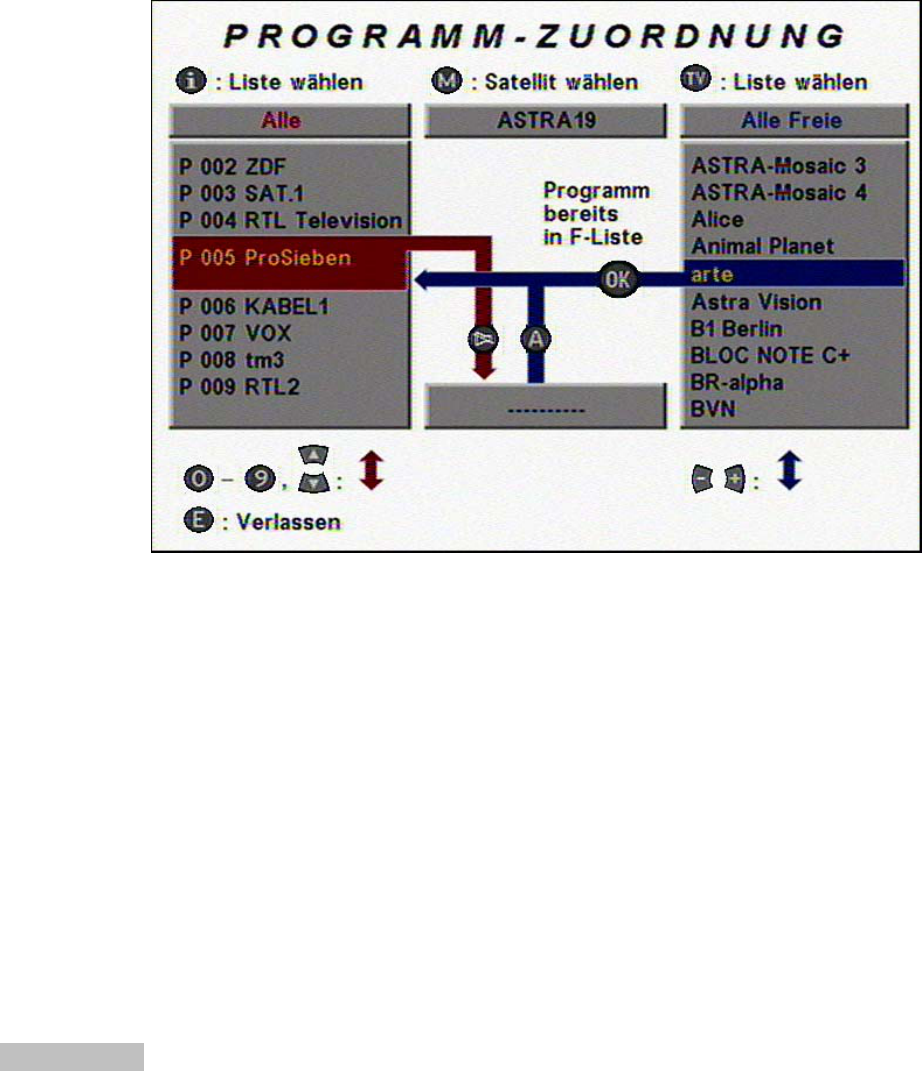
The desired programmes can be taken from the programme pool, which contains all the programmes in
alphabetical order, and can be copied into one of the 10 favourite lists.
- 6 -
All programmes from the programme pool are also saved in the favourite list 0 = „ALL“ upon delivery.
The favourite list F0 = ALL contains all the programmes known thus far for satellite receivers.
Some of the programmes from the satellites Astra 19 and Eutelsat Hotbird are additionally contained in
different favourite lists.
The selection of the desired favourite list is carried out by pressing the [F] button and one of the
assigned numerical buttons [0] .....[9].
Note: After selecting a programme, the following display appears:
Current favourite list
Current time
| Fav 0 | P 001 | Das Erste | 20:10 | F | F = free / $ = encrypted
| 20:00-20:15 Tagesschau | Current programme
| 20:15-21:45 Tatort | Following programme
3.4. TV / Radio – switch-over
The switch-over to radio or TV is carried out by pressing the [R] or [TV] button. Both buttons influence
the so-called switching voltage of the TV Scart socket. If you also receive programmes via antenna or
cable on your television set, you can switch between the programmes received by your television set
and those received by your satellite receiver by pressing the [TV] button, provided that the switching
voltage from your television set is recognised and processed.
Note: All the programme functions (last programme, zapper-function, favourite lists,
programme lists and programme pool etc.) used for TV can also be separately
used for 1,000 radio programmes.
3.5. Volume adjustment
a) The volume of the receiver can be adjusted in 20 steps using the [] or [] button.
The current volume status is displayed in the programme display.
L 2 0
b) [ W ] Sound on/off – switch (mute) - on „sound off,“ a respective OSD symbol is displayed for
ca. 2 seconds! The function „sound-off“ is removed by pressing the volume button [] or [].
3.6. Language selection
After pressing the [A] button, a menu window appears for language selection. The number of available
languages depends on the programme. Press the [] or [] to select the language.
When exiting the menu by pressing the [E] button, the originally set language remains active.
When exiting the menu by pressing the [OK] button, then the newly selected language is saved.
Note: Please note that many programmes only offer one language. However, there are
radio stations, which offer up to 20 or more „sub-„ programmes. These
programmes can be selected in the radio mode with the [A] button.
- 7 -
3.7. Timer
The „timer programming“ menu is called up by pressing the [¹] button. Up to 8 timer events can be
alternatively entered with TV or radio programmes.
Note: Keep in mind, that the video recorder must also be set to the same recording time.
Note: Please make sure, that no remote control commands are made during the recording
time, otherwise unwanted OSD displays will also be recorded. The volume is set to the
maximum level during a recording.
Once a command is recognised from the remote control, „r E c“ is displayed on the
programme display on the unit as a reminder that a recording is in progress!
r E c
E n d
The timer recording can only be stopped in advance by pressing the [
¹] button. After
cancelling the recording, „End“ is displayed. The unit now operates as normal.
If the timer recording is started in standby, the unit switches back to standby after a
recording has ended.
[1...8] Select the next open entry field with the numerical buttons [1]..[8] or with [] or [].
[][] Select the entry field for {Date} {Start} {Stop} and {Programme} one after another
(the entry field is indicated in white).
[OK] Activate the entry in the selected field by pressing the [OK] button
(the entry field is indicated in black).
Enter in the respective event either directly with the numerical buttons [0]...[9] or by switching
step-by-step with the [] [] buttons.
[OK] End the entry with [OK] and select the next entry field.
[ E ] After entering the {Date} {Start} {Stop} and {Programme}, you can exit the timer menu by
pressing [E] and quit, or enter in another event.
The data for the timer programming - as long as it is transmitted- can also be directly transferred
to the timer by pressing the [
¹] button in the menu ‚EPG-...programme overview.‘
Deleting a timer programming:
[1...8] Select the timer line, which is to be deleted, using the numerical buttons [1]..[8] or with [] or
[],
[OK] and delete the programme data by pressing the OK button.
Note: If you have accidentally deleted a line and would like to restore the original information,
exit the timer menu by pressing the [E] button twice.
Note: Time and date are taken from the DVB data transmitted by the
broadcaster. Please correct the „Offset time“ in the ‚Installation‘ menu for
summer and winter time.
For UTC summer time = {+2 h}
For UTC winter time = {+1 h}
Please take note, that a few „exotic“ programmes do not transmit the correct
time.
Control the date and time in the ‚Timer programming‘ menu, when you carry out a
programming.
- 8 -
3.8. EPG – Programme information (Basis navigator)
In the EPG (Electronic Programme Guide), information about the current and following programmes is
displayed.
The magnitude of this programme-accompanying information is determined by the respective
programme provider and varies from programme to programme. Many programmes are transmitted
without usable supplementary information (SI data).
It is the same for the programme overview. Some programme providers do not transmit data, others
transmit a programme overview, each with supplementary information covering several days.
The EPG-programme information is called up and exited by pressing the [ i ] button.
a) Current and following programme
[ i ] Shows title, start and end of the current programme,
and other information about the programme depending on the programme provider!
[ i ] Shows title, start and end of the next programme,
and other information about the programme depending on the programme provider!
[ i ] Exits the programme information display.
[ E ] Immediately exits the programme display.
b) Further programme overview and supplementary information
[ i ] Activates basis navigator, Displays info about the current programme.
[OK] Calls up the programme overview!
You receive a programme list for the current day or the next several days depending on the
programme provider.
With the [] [] or [] [] buttons you can switch to the desired programme line-by-line or
page-by-page.
[OK] When you have called up the desired programme, you can then call up more detailed
information by pressing the [OK] button. If supplementary information is not available, a
corresponding message will be displayed.
If the text of the supplementary information exceeds the page, you can scroll up and down line-
by-line using the [] [] buttons.
Exit the display of the supplementary information by pressing the [OK] or [ E ] button – You
return to the programme overview.
c) Timer programming
The data from the programme overview can be transferred to the recording-timer by pressing a
button. If a programme overview is available, then select the desired programme, and directly
copy the data into the recording-timer by pressing the [
¹] button.
- 9 -
4. Menu structure
4.1. Programmes
4.1.1 Favourite list
Access the main menu by pressing [M], and then press the [OK] button twice.
Sorting, exchanging, copying and deleting programmes – all in one menu!
[ i ] Selects one of the favourite lists 0...9.
[M] Selects the satellite (e.g. Astra, Eutelsat or other).
[TV] Selects the programme source (e.g. NEW or ALL programmes).
[] []
Selects the targeted position in the favourite list (point of blue arrow).
[] [] Selects the programme from the source-programme list (right window).
The programmes are categorised in alphabetical order.
[
W ] Takes the current programme from the favourite list and places it in the centre
field (withdraw).
[ A ] Copies the programme from the centre field into the favourite list (= add).
[OK] Transfers the programme selected in the source-programme list to the favourite
list (left window) (= copy).
Exchanging:Move the desired programme to the red bar with [] [] or by entering the
programme number.
Place it in the centre field using the [
W ] button.
Select the desired programme number with the [] [] buttons or [0...9].
Add the programme by pressing the [ A ] button– finished!
- 10 -
5. Glossary
Band Frequency band of a satellite.
Low-band and high-band
CA (Conditional Access) stands for encrypted programmes.
CVBS Composite Video Burst Sync :
Video-Standard for TV or VCR units
DiSEqC Digital Satellite Equipment Control
DVB Digital Video Broadcast
EPG Electronic Programme Guide
Favourite list List of selected programmes from the programme pool.
Free Freely received (unencrypted) programmes.
GHz Abbreviation for gigahertz (Giga =billion)
LNB Low Noise Block Converter – Electrical unit on the parabolic antenna for reception of satellite
signals.
LO Local Oscillator – is a part of the LNB –Conversion of the satellite signal into a frequency range
receivable by the receiver.
MHz Abbreviation for megahertz (Mega = Million)
MPEG Moving Picture Expert Group
Standardising committee for coding and compressing pictures.
OSD On Screen Display – display of information on the screen.
PID Packet Identification for video, audio and teletext etc.
PCR Programme Clock Reference
Pool Programme pool –collection of receivable TV and radio programmes.
RGB Video standard (Division into 3 individual signals for red, green and blue).
SVHS Super Video Home System – Video recorder standard (S-Video).
Symbol rate means the data amount, which is transmitted per second.
(in MS/s Megasymbols/Second or kS/s Kilosymbols/Second)
Transponder A digital transponder can simultaneously transmit several TV and radio programmes on
one transmitting frequency.
VCR Video cassette recorder.
YC (Y= brightness, C= colour signal) Video signal standard for SVHS recorder.
‚Zap‘ Frequently switching the programme with the remote control.
- 20 -
20

Hulp nodig? Stel uw vraag in het forum

Spelregels

Misbruik melden

Gebruikershandleiding.com neemt misbruik van zijn services uitermate serieus. U kunt hieronder aangeven waarom deze vraag ongepast is. Wij controleren de vraag en zonodig wordt deze verwijderd.

Product:

Bijvoorbeeld antisemitische inhoud, racistische inhoud, of materiaal dat gewelddadige fysieke handelingen tot gevolg kan hebben.

Bijvoorbeeld een creditcardnummer, een persoonlijk identificatienummer, of een geheim adres. E-mailadressen en volledige namen worden niet als privégegevens beschouwd.

Spelregels forum

Om tot zinvolle vragen te komen hanteren wij de volgende spelregels:

Belangrijk! Als er een antwoord wordt gegeven op uw vraag, dan is het voor de gever van het antwoord nuttig om te weten als u er wel (of niet) mee geholpen bent! Wij vragen u dus ook te reageren op een antwoord.

Belangrijk! Antwoorden worden ook per e-mail naar abonnees gestuurd. Laat uw emailadres achter op deze site, zodat u op de hoogte blijft. U krijgt dan ook andere vragen en antwoorden te zien.

Abonneren

Abonneer u voor het ontvangen van emails voor uw CITYCOM CCR 512 bij:


U ontvangt een email met instructies om u voor één of beide opties in te schrijven.


Ontvang uw handleiding per email

Vul uw emailadres in en ontvang de handleiding van CITYCOM CCR 512 in de taal/talen: Engels als bijlage per email.

De handleiding is 0,86 mb groot.


U ontvangt de handleiding per email binnen enkele minuten. Als u geen email heeft ontvangen, dan heeft u waarschijnlijk een verkeerd emailadres ingevuld of is uw mailbox te vol. Daarnaast kan het zijn dat uw internetprovider een maximum heeft aan de grootte per email. Omdat hier een handleiding wordt meegestuurd, kan het voorkomen dat de email groter is dan toegestaan bij uw provider.

Stel vragen via chat aan uw handleiding

Stel uw vraag over deze PDF

Andere handleiding(en) van CITYCOM CCR 512

CITYCOM CCR 512 Gebruiksaanwijzing - Deutsch - 23 pagina's


Uw handleiding is per email verstuurd. Controleer uw email

Als u niet binnen een kwartier uw email met handleiding ontvangen heeft, kan het zijn dat u een verkeerd emailadres heeft ingevuld of dat uw emailprovider een maximum grootte per email heeft ingesteld die kleiner is dan de grootte van de handleiding.

Er is een email naar u verstuurd om uw inschrijving definitief te maken.

Controleer uw email en volg de aanwijzingen op om uw inschrijving definitief te maken

U heeft geen emailadres opgegeven

Als u de handleiding per email wilt ontvangen, vul dan een geldig emailadres in.

Uw vraag is op deze pagina toegevoegd

Wilt u een email ontvangen bij een antwoord en/of nieuwe vragen? Vul dan hier uw emailadres in.


Info