451224
12
Verklein
Vergroot
Pagina terug
1/30
Pagina verder
1
Start Here
MFC-5890CN
Quick Setup Guide
UK/IRE/GEN/SAF Version 0
Before you can use the machine, read this Quick Setup Guide for the correct setup and installation.
1
Unpack the machine and check the components
WARNING
Plastic bags are used in the packaging of your machine. To avoid danger of suffocation, please keep
these bags away from babies and children.
a Remove the protective tape and film covering the scanner glass.
b Make sure you have all components.
WARNING
Warnings tell you what to do to prevent possible personal injury.
Important
DO NOT connect the USB cable yet (if you are using a USB
cable).
Ink Cartridges
[x4]
Black (LC1100HY-BK)
Yellow (LC1100HY-Y)
Cyan (LC1100HY-C)
Magenta (LC1100HY-M)
Quick Setup Guide
User’s Guide CD-ROM Power Cord Telephone Line Cord
One Touch Labels
Note
The components included in the box may differ depending on your country.
Save all packing materials and the box in case for any reason you must ship your machine.
You need to purchase the correct interface cable for the interface you want to use (for USB or network
connection).
USB cable
Please make sure you use a USB 2.0 cable (Type A/B) that is no more than 2 metres long.
Network cable
Use a straight-through Category5 (or greater) twisted-pair cable for 10BASE-T or 100BASE-TX Fast Ethernet Network.
2
2
Load plain A4 paper
a Pull the paper tray a completely out of the
machine.
b Open the paper tray cover a.
c With both hands, gently press and slide the
paper side guides a and then the paper length
guide b to fit the paper size.
Make sure that the triangular marks c on the
paper side guides a and paper length guide b
line up with the mark for the paper size you are
using.
d Fan the stack of paper well to avoid paper jams
and misfeeds.
e Gently put the paper into the paper tray print
side down and top edge first. Check that the
paper is flat in the tray.
f Gently adjust the paper side guides to the
paper with both hands. Make sure that the
paper side guides touch the edges of the
paper.
g Close the paper tray cover. Check that the
paper is flat in the tray and below the maximum
paper mark a.
h Slowly push the paper tray completely into the
machine.
1
1
3
2
1
3
Important
Do not push the paper in too far.
1
3
i While holding the paper tray in place, pull out
the paper support a until it clicks, and then
unfold the paper support flap b.
1
2
4
3
Connect the power cord
and telephone line
a Connect the power cord.
WARNING
The machine must be fitted with an earthed
plug.
b Connect the telephone line cord. Connect one
end of the telephone line cord to the socket on
the machine marked LINE and the other end to
a telephone wall socket.
WARNING
Since the machine is grounded through the
power outlet, you can protect yourself from
potentially hazardous electrical conditions on
the telephone network by keeping the power
cord connected to your machine when you
connect it to a telephone line. Similarly, you
can protect yourself when you want to move
your machine by disconnecting the telephone
line first and then the power cord.
Important
DO NOT connect the USB cable yet (if you are
using a USB cable).
Important
The telephone line cord MUST be connected
to the socket on the machine marked LINE.
Note
If you are sharing one telephone line with an
external telephone, connect it as shown below.
1 Extension telephone
2 External telephone
Note
If you are sharing one telephone line with an
external telephone answering machine, connect it
as shown below.
Set the receive mode to External TAD if
you have an external answering machine.
See Choose a Receive Mode on page 7.
For additional details, see Connecting an
external TAD (telephone answering device)
in Chapter 7 of the User’s Guide.
11
22
5
4
Install the ink cartridges
WARNING
If ink gets in your eyes, wash them out with
water at once, and if irritation occurs consult a
doctor.
a Make sure that the power is turned on.
The LCD shows:
b Open the ink cartridge cover a.
c Remove the green protective part a.
d Unpack the ink cartridge.
e Turn the green knob on the protective yellow
cap clockwise until it clicks to release the
vacuum seal, then remove the cap a.
f Take care to match the colour of the lever a
with the cartridge colour b, as shown in the
diagram below.
g Install each ink cartridge in the direction of the
arrow on the label.
Note
Do not throw away the green protective part. You
will need it if you transport the machine.
No Cartridge
Black
Install Ink
1
1
1
1
1
2
6
h
Gently push the ink cartridge until it clicks. After
all the ink cartridges are installed close the ink
cartridge cover.
5
Check the print quality
a When the preparation process has finished, the
LCD shows this message
.
Press Colour Start.
b Check the quality of the four colour blocks a
on the sheet. (black/yellow/cyan/magenta)
c If all lines are clear and visible, press 1 (Yes)
on the dial pad to finish the quality check.
If you can see missing short lines, press 2 (No)
on the dial pad and go to d.
d The LCD asks you if the print quality is OK for
black and colour. Press 1 (Yes) or 2 (No) on
the dial pad.
After pressing 1 (Yes) or 2 (No) for both black
and colour, the LCD shows:
e Press 1 (Yes), the machine will then start
cleaning the colours.
f After cleaning is finished, press Colour Start.
The machine starts printing the Print Quality
Check Sheet again. Go back to b.
Note
The machine will prepare the ink tube system for
printing. This process will take approximately four
minutes. Do not turn off the machine.
Set Paper and Press
Start
1
1
<Black> <Colour>
OK OK
<Black> <Colour>
Poor Poor
Black OK?
Yes Press
Press
No
Start Cleaning?
Yes Press
Press
No
7
6
Choose a Receive Mode
There are four possible receive modes: Fax Only,
Fax/Tel, Manual and External TAD.
a Press Menu.
b Press a or b to choose Initial Setup.
Press OK.
c Press a or b to choose Receive Mode.
d Press d or c to choose the receive mode.
Press OK.
e Press Stop/Exit.
7
Set the LCD contrast
(If needed)
If you are having difficulty reading the LCD, try
changing the contrast setting.
a Press Menu.
b Press a or b to choose General Setup.
Press OK.
c Press a or b to choose LCD Settings.
Press OK.
d Press a or b to choose LCD Contrast.
e Press d or c to choose Light, Med or Dark.
Press OK.
f Press Stop/Exit.
8
Set the date and time
The machine displays the date and time, and if you
set up the station ID, it will add it to each fax you send.
a Press Menu.
b Press a or b to choose Initial Setup.
Press OK.
c Press a or b to choose Date&Time.
Press OK.
d Enter the last two digits of the year on the dial
pad, and then press OK.
(e.g. Enter 0 8 for 2008.)
e Repeat for Month and Day, and Hours and
Minutes in 24-hour format.
f Press Stop/Exit.
For details, see Using receive modes in
Chapter 6 of the User's Guide.
Do you want to use the telephone features of your
machine (if available) or an external telephone or
external telephone answering device connected on the
same line as the machine?
Your machine
automatically answers
every call as a fax.
Your machine controls
the line and
automatically answers
every call. If the call is
not a fax, the telephone
will ring for you to pick
up the call.
Your external telephone
answering device (TAD)
automatically answers
every call. Voice
messages are stored
on the external TAD.
Fax messages are
printed.
You control the
telephone line and must
answer every call
yourself.
Do you want the machine to
answer fax and telephone calls
automatically?
Manual
Fax Only
Fax/Tel
External TAD
No
Yes
Yes
No
No
Yes
Are you using the voice message
function of an external telephone
answering device?
Note
You can also adjust the angle of the display by
lifting it.
Date&Time
Year:20
08
MENU Input & Press OK
8
9
Enter personal
information (station ID)
You should store your name and fax number to be
printed on all fax pages that you send.
a Press Menu.
b Press a or b to choose Initial Setup.
Press OK.
c Press a or b to choose Station ID.
Press OK.
d Enter your fax number (up to 20 digits) on the
dial pad, and then press OK. To enter a “+” for
international codes, press l. For example, to
enter the UK dialling code “+44
”, press l, 4, 4
and then the rest of your number.
e Enter your name (up to 20 characters) using
the dial pad, and then press OK.
f Press Stop/Exit.
10
Set tone or pulse dialling
mode
Your machine comes set for Tone dialling service. If
you have Pulse dialling service (rotary), you need to
change the dialling mode.
a Press Menu.
b Press a or b to choose Initial Setup.
Press OK.
c Press a or b to choose Tone/Pulse.
d Press d or c to choose Pulse (or Tone).
Press OK.
e Press Stop/Exit.
11
Set the telephone line
type
If you are connecting the machine to a line that
features PBX or ISDN to send and receive faxes, it is
necessary to change the telephone line type
accordingly by completing the following steps.
a Press Menu.
b Press a or b to choose Initial Setup.
Press OK.
c Press a or b to choose Phone Line Set.
d Press d or c to choose Normal, PBX or ISDN.
Press OK.
e Press Stop/Exit.
PBX and TRANSFER
The machine is initially set to Normal, which lets the
machine connect to a standard PSTN (Public
Switched Telephone Network) line. However, many
offices use a central telephone system or Private
Branch Exchange (PBX). Your machine can be
connected to most types of PBX. The machine’s
recall feature supports timed break recall only (TBR).
TBR will work with most PBX systems allowing you to
gain access to an outside line, or transfer calls to
another extension. The feature works when the Tel/R
key is pressed.
Note
See the following chart for entering your name.
If you need to enter a character that is on the
same key as the last character, press c to
move the cursor to the right.
If you entered a letter incorrectly and want to
change it, press d or c to move the cursor to the
incorrect character, press Clear/Back.
Press
key
One
time
Two
times
Three
times
Four
times
2 ABC2
3 DEF3
4 GH I 4
5 JKL5
6 MNO6
7 PQRS
8 TUV8
9 WX Y Z
Note
If you make a mistake and want to start again,
press Stop/Exit and go back to a.
For details, see Entering Text in Appendix C
of the User's Guide.
9
Windows
®
Macintosh
®
Windows
®
Macintosh
®
USB Wired Network
12
Choose your connection type
For USB interface cable
Windows
®
, go to page 10
Macintosh
®
, go to page 14
For Wired Network
Windows
®
, go to page 17
Macintosh
®
, go to page 22
10
Windows
®
USB
For USB Interface Users
(For Windows
®
2000 Professional/XP/XP Professional x64 Edition/
Windows Vista
®
)
13
Before you install
a Make sure that your computer is ON and you
are logged on with Administrator rights.
b Disconnect the machine from the power socket
and from your computer, if you already
connected an interface cable.
14
Install MFL-Pro Suite
a Put the supplied CD-ROM into your CD-ROM
drive. If the model name screen appears,
choose your machine. If the language screen
appears, choose your language.
b The CD-ROM main menu will appear. Click
Initial Installation.
c Click Install MFL-Pro Suite.
Important
DO NOT connect the USB cable yet.
If there are any programs running, close
them.
Make sure there are no memory cards or a
USB Flash memory drive inserted.
The screens may differ depending on the
operating system.
The supplied CD-ROM includes ScanSoft™
PaperPort™ 11SE. This software supports
Windows
®
2000 (SP4 or greater), XP (SP2 or
greater), XP Professional x64 Edition and
Windows Vista
®
. Update to the latest
Windows
®
Service Pack before installing
MFL-Pro Suite.
Note
If the Brother screen does not appear
automatically, go to My Computer (Computer),
double-click the CD-ROM icon, and then
double-click start.exe.
11
Windows
®
USB
Windows
®
Macintosh
®
USB
d When the ScanSoft PaperPort 11SE
License Agreement window appears, click
Yes if you agree to the Software License
Agreement.
e The installation of ScanSoft PaperPort
11SE will automatically start and is followed by
the installation of MFL-Pro Suite.
f When the Brother MFL-Pro Suite Software
License Agreement window appears, click
Yes if you agree to the Software License
Agreement.
g Choose Local Connection, and then click
Next. The installation continues.
h When this screen appears, go to the next step.
Note
If this screen appears, click OK and restart
your computer.
If the installation does not continue
automatically, open the main menu again by
ejecting and then reinserting the CD-ROM or
double-click the start.exe program from the
root folder, and continue from b to install MFL-
Pro Suite.
For Windows Vista
®
, when the User Account
Control screen appears, click Allow.
12
Windows
®
USB
15
Connect the USB cable
a Lift the scanner cover until it locks securely into
the open position.
b Connect the USB cable to the USB socket
marked with a symbol. You will find the
USB socket inside the machine on the right as
shown below.
c Carefully guide the USB cable through the
trench as shown below, following the trench
around and toward the back of the machine.
Then connect the cable to your computer.
d Lift the scanner cover to release the lock a.
Gently push the scanner cover support
down b and close the scanner cover c using
both hands.
Important
DO NOT connect the machine to a USB port
on a keyboard or a non-powered USB hub.
Connect the machine directly to your
computer.
LAN USB
Important
Make sure that the cable does not restrict the
cover from closing, or an error may occur.
1
3
2
13
Windows
®
USB
Windows
®
Macintosh
®
USB
16
Connect the power cord
a Connect the power cord.
The installation will continue automatically.
The installation screens appear one after
another.
b When the On-Line Registration screen is
displayed, make your selection and follow the
on-screen instructions.
17
Finish and restart
a Click Finish to restart your computer.
After restarting the computer, you must be
logged on with Administrator rights.
Now go to
Proceed to Install Optional Applications on
page 26.
Important
DO NOT cancel any of the screens during the
installation. It may take a few seconds for all
screens to appear.
Note
For Windows Vista
®
, when this screen appears,
click the check box and click Install to complete
the installation correctly.
Note
If an error message appears during the software
installation, run the Installation Diagnostics
located in Start/All Programs/Brother/
MFC-XXXX (where MFC-XXXX is your model
name).
Finish
The installation is now
complete.
14
Macintosh
®
USB
For USB Interface Users (For Mac OS
®
X 10.2.4 or greater)
13
Before you install
a Make sure your machine is connected to the
power and your Macintosh
®
is ON. You must
be logged on with Administrator rights.
14
Connect the USB cable
a Lift the scanner cover until it locks securely into
the open position.
b Connect the USB cable to the USB socket
marked with a symbol. You will find the
USB socket inside the machine on the right as
shown below.
c Carefully guide the USB cable through the
trench as shown below, following the trench
around and toward the back of the machine.
Then connect the cable to your Macintosh
®
.
Important
For Mac OS
®
X 10.2.0 to 10.2.3 users,
upgrade to Mac OS
®
X 10.2.4 or greater. (For
the latest information for Mac OS
®
X, visit
http://solutions.brother.com/
)
Make sure there are no memory cards or a
USB Flash memory drive inserted.
Important
DO NOT connect the machine to a USB port
on a keyboard or a non-powered USB hub.
Connect the machine directly to your
Macintosh
®
.
Important
Make sure that the cable does not restrict the
cover from closing, or an error may occur.
LAN USB
15
Macintosh
®
USB
Windows
®
Macintosh
®
USB
d Lift the scanner cover to release the lock a.
Gently push the scanner cover support
down b and close the scanner cover c using
both hands.
15
Install MFL-Pro Suite
a Put the supplied CD-ROM into your CD-ROM
drive.
b Double-click the Start Here OSX icon to install.
c The Brother software will search for the Brother
device. During this time the following screen
will appear.
d When this screen appears, click OK.
For Mac OS
®
X 10.3.x or greater, the
installation of MFL-Pro Suite is now
complete.
Go to step 16 on page 16.
e For Mac OS
®
X 10.2.4 to 10.2.8 users,
click Add.
f Choose USB.
g Choose XXX-XXXX (where XXX-XXXX is your
model name), and then click Add.
Note
Please wait, it will take a few seconds for the
software to install. After the installation, click
Restart to finish installing the software.
1
3
2
16
Macintosh
®
USB
h Click Print Center, then Quit Print Center.
The installation of MFL-Pro Suite is now
complete.
Go to step 16 on page 16.
16
Install
Presto!
®
PageManager
®
When Presto!
®
PageManager
®
is installed OCR
capability is added to Brother ControlCenter2. You
can easily scan, share and organize photos and
documents using Presto!
®
PageManager
®
.
a Double-click the Presto! PageManager icon
and follow the on-screen instructions.
For Mac OS
®
X 10.2.4 to 10.3.8 users,
when this screen appears, click Go to
download the software from the Brother
Solutions Center website.
Finish
The installation is now
complete.
17
Windows
®
Wired Network
Windows
®
Macintosh
®
Wired Network
For Wired Network Interface Users
(For Windows
®
2000 Professional/XP/XP Professional x64 Edition/
Windows Vista
®
)
13
Before you install
a Make sure that your computer is ON and you
are logged on with Administrator rights.
b Disconnect the machine from the power
socket.
14
Connect the network
cable
a Lift the scanner cover until it locks securely into
the open position.
b Connect the network cable to the LAN socket
marked with a symbol. You will find the
LAN socket inside the machine on the left as
shown below.
Important
If there are any programs running, close
them.
Make sure there are no memory cards or a
USB Flash memory drive inserted.
The screens may differ depending on the
operating system.
The supplied CD-ROM includes ScanSoft™
PaperPort™ 11SE. This software supports
Windows
®
2000 (SP4 or greater), XP (SP2 or
greater), XP Professional x64 Edition and
Windows Vista
®
. Update to the latest
Windows
®
Service Pack before installing
MFL-Pro Suite.
Important
Before installation, if you are
using personal firewall
software (other than Windows
®
Firewall), anti-spyware or
antivirus applications,
temporarily disable them.
LAN USB
18
Windows
®
Wired Network
c Carefully guide the network cable to the trench
as shown below, following the trench around
and toward the back of the machine. Then,
connect the cable to your network.
d Lift the scanner cover to release the lock a.
Gently push the scanner cover support
down b and close the scanner cover c using
both hands.
15
Connect the power cord
a Connect the power cord.
16
Install MFL-Pro Suite
a Put the supplied CD-ROM into your CD-ROM
drive. If the model name screen appears,
choose your machine. If the language screen
appears, choose your language.
Note
If both USB and LAN cables are being used,
guide both cables through the trench with one on
top of the other.
Important
Make sure that the cable does not restrict the
cover from closing, or an error may occur.
1
3
2
Note
If the Brother screen does not appear
automatically, go to My Computer (Computer),
double-click the CD-ROM icon, and then
double-click start.exe.
19
Windows
®
Wired Network
Windows
®
Macintosh
®
Wired Network
b The CD-ROM main menu will appear. Click
Initial Installation.
c Click Install MFL-Pro Suite.
d When the ScanSoft PaperPort 11SE
License Agreement window appears, click
Yes if you agree to the Software License
Agreement.
e The installation of ScanSoft PaperPort
11SE will automatically start and is followed by
the installation of MFL-Pro Suite.
f When the Brother MFL-Pro Suite Software
License Agreement window appears, click
Yes if you agree to the Software License
Agreement.
g Choose Wired Network Connection, and
then click Next.
Note
If this screen appears, click OK and restart
your computer.
If the installation does not continue
automatically, open the main menu again by
ejecting and then reinserting the CD-ROM or
double-click the start.exe program from the
root folder, and continue from b to install MFL-
Pro Suite.
For Windows Vista
®
, when the User Account
Control screen appears, click Allow.
20
Windows
®
Wired Network
h For Windows
®
XP SP2/Windows Vista
®
users,
when this screen appears, choose Change the
Firewall port settings to enable network
connection and continue with the
installation. (Recommended) and click Next.
If you are using a firewall other than Windows
®
Firewall or Windows
®
Firewall is off, this screen
may appear.
See the instructions provided with your firewall
software for information on how to add the
following network ports.
For network scanning, add UDP port 54925.
For network PC-Fax receiving, add UDP port
54926.
If you still have trouble with your network
connection, add UDP port 137.
i The installation of the Brother drivers will
automatically start. The installation screens
appear one after another.
Note
If the machine is configured for your network,
choose the machine from the list, and then click
Next.
This window will not appear if there is only one
machine connected on the network, it will be
chosen automatically.
If your machine shows APIPA in the IP
Address field, click Configure IP Address
and enter an IP address for your machine that
is suitable for your network.
If the machine is not yet configured for use on
your network, the following screen appears.
Click OK.
The Configure IP Address window will
appear. Enter an IP address for your machine
that is suitable for your network by following the
on-screen instructions.
Important
DO NOT cancel any of the screens during the
installation. It may take a few seconds for all
screens to appear.
21
Windows
®
Wired Network
Windows
®
Macintosh
®
Wired Network
j When the On-Line Registration screen is
displayed, make your selection and follow the
on-screen instructions.
17
Finish and restart
a Click Finish to restart your computer. After
restarting the computer, you must be logged on
with Administrator rights.
18
Install MFL-Pro Suite on
additional computers
(If needed)
If you want to use your machine with multiple
computers on the network, install MFL-Pro Suite on
each computer. Go to step 16 on page 18. Also see
step 13-a on page 17 before you install.
Now go to
Proceed to Install Optional Applications on
page 26.
Note
For Windows Vista
®
, when this screen appears,
click the check box and click Install to complete
the installation correctly.
Note
If an error message appears during the software
installation, run the Installation Diagnostics
located in Start/All Programs/Brother/
MFC-XXXX (where MFC-XXXX is your model
name).
Note
This product includes a PC license for up to 2
Users.
This license supports the installation of the
MFL-Pro Suite including ScanSoft™ PaperPort™
11SE on up to 2 PCs on the network.
If you want to use more than 2 PCs with
ScanSoft™ PaperPort™ 11SE installed, please
buy the Brother NL-5 pack which is a multiple PC
license agreement pack for up to 5 additional
users. To buy the NL-5 pack, contact your Brother
dealer.
Finish
The installation is now
complete.
22
Macintosh
®
Wired Network
For Wired Network Interface Users (For Mac OS
®
X 10.2.4 or greater)
13
Before you install
a Make sure your machine is connected to the
power and your Macintosh
®
is ON. You must
be logged on with Administrator rights.
14
Connect the network
cable
a Lift the scanner cover until it locks securely into
the open position.
b Connect the network cable to the LAN socket
marked with a symbol. You will find the
LAN socket inside the machine on the left as
shown below.
c Carefully guide the network cable to the trench
as shown below, following the trench around
and toward the back of the machine. Then,
connect the cable to your network.
d Lift the scanner cover to release the lock a.
Gently push the scanner cover support
down b and close the scanner cover c using
both hands.
Important
For Mac OS
®
X 10.2.0 to 10.2.3 users,
upgrade to Mac OS
®
X 10.2.4 or greater. (For
the latest information for Mac OS
®
X, visit
http://solutions.brother.com/
)
Make sure there are no memory cards or a
USB Flash memory drive inserted.
LAN USB
Important
Make sure that the cable does not restrict the
cover from closing, or an error may occur.
Note
If both USB and LAN cables are being used,
guide both cables through the trench with one on
top of the other.
1
3
2
23
Macintosh
®
Wired Network
Windows
®
Macintosh
®
Wired Network
15
Install MFL-Pro Suite
a Put the supplied CD-ROM into your CD-ROM
drive.
b Double-click the Start Here OSX icon to install.
c The Brother software will search for the Brother
device. During this time the following screen
will appear.
d When this screen appears, click OK.
For Mac OS
®
X 10.3.x or greater, the
installation of MFL-Pro Suite is now
complete.
Go to step 16 on page 25.
Note
Please wait, it will take a few seconds for the
software to install. After the installation, click
Restart to finish installing the software.
Note
If the machine is configured for your network,
choose the machine from the list, and then click
OK. This window will not appear if there is only
one machine connected on the network, it will
be chosen automatically. Go to d.
If this screen appears click OK.
Enter a name for your Macintosh
®
in Display
Name up to 15 characters long and click OK.
Go to d.
If you want to use the machine’s Scan key to
scan over the network you must check the
Register your computer with the “Scan To”
function on the machine box.
The name you enter will appear on the
machine’s LCD when you press the Scan key
and choose a scan option. (For more
information, see Network Scanning in the
Software User’s Guide on the CD-ROM.)
24
Macintosh
®
Wired Network
e For Mac OS
®
X 10.2.4 to 10.2.8 users,
click Add.
f Make the selection shown below.
g Choose XXX-XXXX (where XXX-XXXX is your
model name), and then click Add.
h Click Print Center, then Quit Print Center.
The installation of MFL-Pro Suite is now
complete.
Go to step 16 on page 25.
25
Macintosh
®
Wired Network
Windows
®
Macintosh
®
Wired Network
16
Install
Presto!
®
PageManager
®
When Presto!
®
PageManager
®
is installed OCR
capability is added to Brother ControlCenter2. You
can easily scan, share and organize photos and
documents using Presto!
®
PageManager
®
.
a Double-click the Presto! PageManager icon
and follow the on-screen instructions.
For Mac OS
®
X 10.2.4 to 10.3.8 users,
when this screen appears, click Go to
download the software from the Brother
Solutions Center website.
17
Install MFL-Pro Suite on
additional computers
(If needed)
If you want to use your machine with multiple
computers on the network, install MFL-Pro Suite on
each computer. Go to step 15 on page 23. Also see
step 13-a on page 22 before you install.
Finish
The installation is now
complete.
26
Windows
®
Install Optional Applications
1
Install FaceFilter Studio
supported by
Reallusion, Inc
FaceFilter Studio is an easy-to-use borderless photo
printing application. FaceFilter Studio also lets you
edit your photo data and add photo effects such as
red eye reduction or skin tone enhancement.
a Open the main menu again by ejecting and
then reinserting the CD-ROM or by double-
clicking the start.exe program from the root
folder.
b The CD-ROM main menu will appear. Choose
your language and then click Additional
Applications.
c Click the FaceFilter Studio button to install.
2
Install FaceFilter Studio
Help
To get instructions on how to use FaceFilter Studio,
download and install FaceFilter Studio Help.
a To run FaceFilter Studio, go to
Start/All Programs/Reallusion/
FaceFilter Studio on your computer.
b Click the button on the upper right corner
of the screen.
c Click Check for updates to go to the
Reallusion update web page.
d Click the Download button and choose a folder
to save the file in.
e Close FaceFilter Studio before you start the
installer for FaceFilter Studio Help.
Double-click the downloaded file from the
folder you specified and follow the on-screen
instructions for installation.
Important
The machine must be ON and connected to
the computer.
The computer must be connected to the
Internet.
Note
To view the complete FaceFilter Studio Help,
choose Start/All Programs/Reallusion/
FaceFilter Studio/FaceFilter Studio Help on
your computer.
27
Windows
®
Install Optional Applications
3
Install
BookScan&Whiteboard
Suite supported by
Reallusion, Inc
You can install BookScan&Whiteboard Suite.
The BookScan Enhancer software can correct your
scanned book images automatically. The
Whiteboard Enhancer software cleans up and
enhances text and images from photos taken of your
whiteboard. (Internet access required.)
a Open the main menu again by ejecting and
then reinserting the CD-ROM or by double-
clicking the start.exe program from the root
folder.
b The CD-ROM main menu will appear. Choose
your language and then click Additional
Applications.
c Click the BookScan&Whiteboard Suite
button to install.
Important
The machine must be ON and connected to
the computer.
The computer must be connected to the
Internet.
28
For Network Users
BRAdmin Light utility (For Windows
®
users)
BRAdmin Light is a utility for initial setup of Brother network connected devices. It also can search for Brother
products on your network, view the status and configure basic network settings, such as IP address.
For more information on BRAdmin Light, visit us at http://solutions.brother.com/
.
Install the BRAdmin Light
configuration utility
a Click Network Utilities on the menu screen.
b Click BRAdmin Light and follow the on-screen
instructions.
Set your IP address, Subnet Mask
and Gateway using BRAdmin Light
a Start BRAdmin Light. It will search for new
devices automatically.
b Double-click the unconfigured device.
c Choose STATIC for the Boot Method. Enter
the IP Address, Subnet Mask and Gateway,
and then click OK.
d The address information will be saved to the
machine.
Note
If you require more advanced printer management, use the latest Brother BRAdmin Professional utility version
that is available as a download from http://solutions.brother.com/
.
Note
If you have a DHCP/BOOTP/RARP server in your
network, you don’t have to do the following
operation. The machine will automatically obtain
its own IP address.
Note
The default password for the machine is ‘access’.
You can use BRAdmin Light to change this
password.
29
For Network Users
BRAdmin Light utility (For Mac OS
®
X users)
BRAdmin Light is a utility for initial setup of Brother network connected devices. It also can search for Brother
products on your network, view the status and configure basic network settings, such as IP address from a
computer running Mac OS
®
X 10.2.4 or greater.
The BRAdmin Light software will be installed automatically when you install the printer driver. If you have already
installed the printer driver, you don’t have to install BRAdmin Light again. For more information on BRAdmin Light,
visit us at http://solutions.brother.com/
.
Set your IP address, Subnet Mask
and Gateway using BRAdmin Light
a Double-click the Macintosh HD icon on your
desktop.
b Choose Library, Printers, Brother and then
Utilities.
c Double-click the file BRAdmin Light.jar and
run the software. BRAdmin Light will then
search for new devices automatically.
d Double-click the unconfigured device.
e Choose STATIC for the Boot Method. Enter
the IP Address, Subnet Mask and Gateway,
and then click OK.
f The address information will be saved to the
machine.
Note
If you have a DHCP/BOOTP/RARP server in
your network, you don’t have to do the
following operation. The machine will
automatically obtain its own IP address.
Make sure that version 1.4.1_07 or later of
Java™ client software is installed on your
computer.
The default password for the machine is
access. You can use BRAdmin Light to
change this password.
Consumables
Replacement consumables
When the time comes to replace ink cartridges, an error message will be indicated on the LCD. For more
information about the ink cartridges for your machine, visit http://www.brother.com/original/
or contact your local
Brother re-seller.
Ink cartridge
Trademarks
The Brother logo is a registered trademark of Brother Industries, Ltd.
Brother is a registered trademark of Brother Industries, Ltd.
Multi-Function Link is a registered trademark of Brother International Corporation.
Windows Vista is either a registered trademark or a trademark of Microsoft Corporation in the United States and other countries.
Microsoft, Windows and Windows Server are registered trademarks of Microsoft Corporation in the United States and/or other countries.
Macintosh and TrueType are registered trademarks of Apple Inc.
Nuance, the Nuance logo, PaperPort and ScanSoft are trademarks or registered trademarks of Nuance Communications, Inc. or its affiliates
in the United States and/or other countries.
Presto! PageManager is a registered trademark of NewSoft Technology Corporation.
PictBridge is a trademark.
FaceFilter Studio is a trademark of Reallusion, Inc.
Each company whose software title is mentioned in this manual has a Software License Agreement specific to its proprietary programs.
All other brand and product names mentioned in this manual are trademarks or registered trademarks of their
respective companies.
Compilation and Publication
Under the supervision of Brother Industries, Ltd., this manual has been compiled and published, covering the latest product descriptions and
specifications.
The contents of this manual and the specifications of this product are subject to change without notice.
Brother reserves the right to make changes without notice in the specifications and materials contained herein and shall not be responsible for
any damages (including consequential) caused by reliance on the materials presented, including but not limited to typographical and other
errors relating to the publication.
Copyright and License
©2008 Brother Industries, Ltd.
This product includes software developed by the following vendors:
©1983-1998 PACIFIC SOFTWORKS, INC.
Black Yellow Cyan Magenta
LC1100BK (Standard)
LC1100HY-BK (High Yield)
LC1100Y (Standard)
LC1100HY-Y (High Yield)
LC1100C (Standard)
LC1100HY-C (High Yield)
LC1100M (Standard)
LC1100HY-M (High Yield)
What is Innobella™?
Innobella™ is a range of genuine consumables offered by Brother.
The name "Innobella™" derives from the words "Innovation" and "Bella"
(meaning "Beautiful" in Italian) and is a representation of the "innovative"
technology providing you with beautiful and long lasting print results.
12

Hulp nodig? Stel uw vraag in het forum

Spelregels
1

Forum

Brother-MFC-5890CN
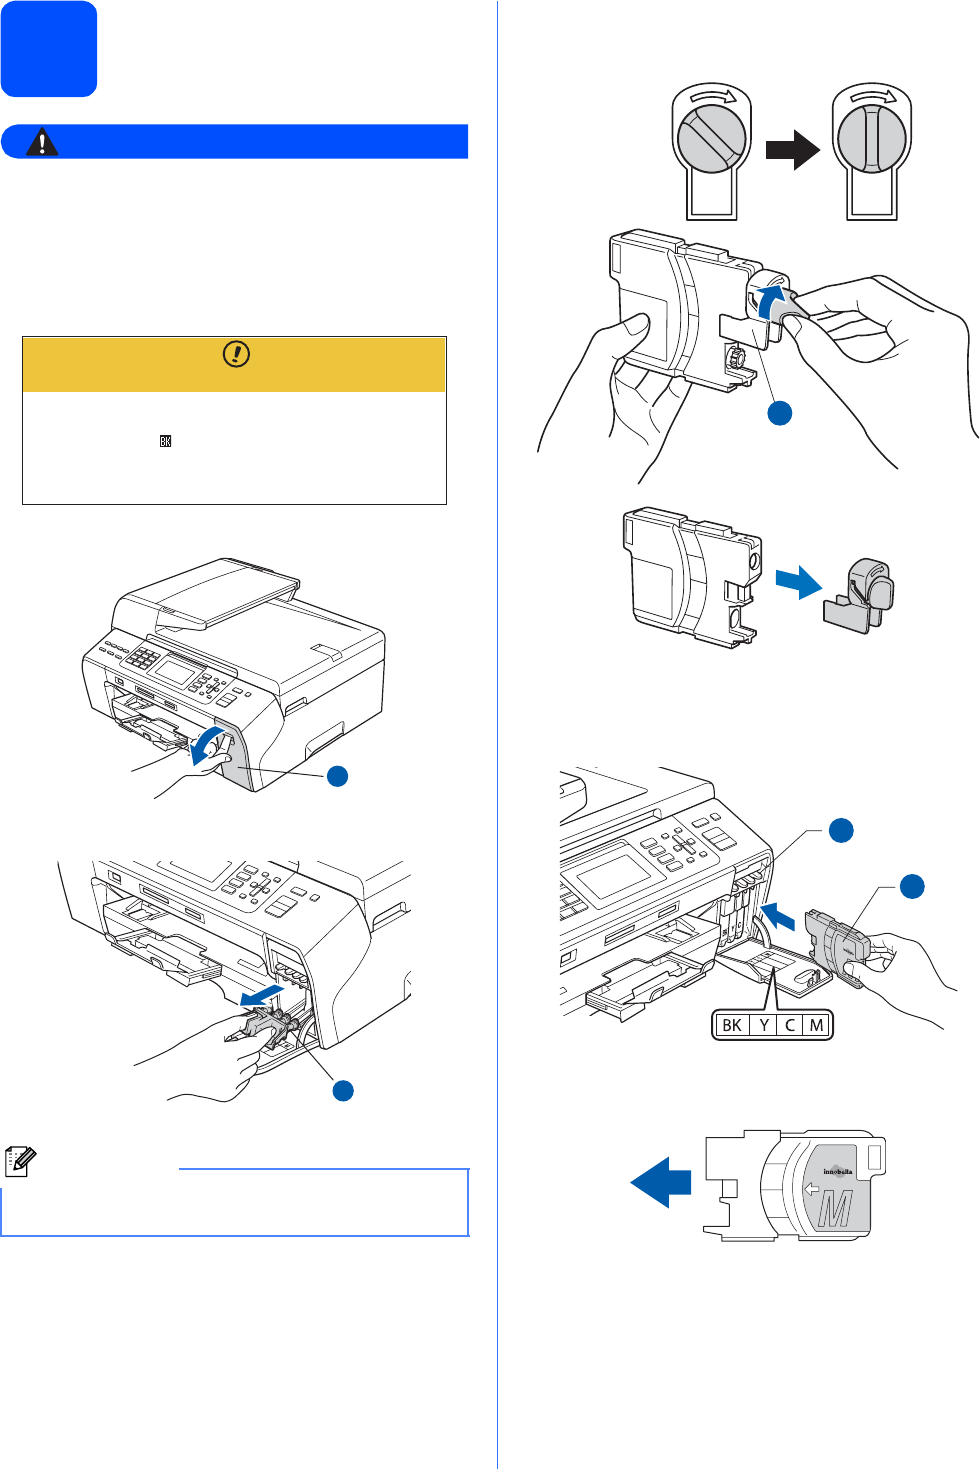
  • wat ik ook doe mijn papier blijft wit. Plotseling komt er geen inkt meer; geen zwart en geen kleur en o ja de inkt is niet op. Gesteld op 10-12-2020 om 14:27

    Reageer op deze vraag Misbruik melden
  • telkens geeft de print papier bij vullen.Maar dat is gebeurd, ook geen papier rest in de machine Gesteld op 4-6-2020 om 11:52

    Reageer op deze vraag Misbruik melden
  • geef telkens aan papier bijladen. Alles is schoon en papier zit in lade Gesteld op 4-6-2020 om 11:30

    Reageer op deze vraag Misbruik melden
  • Op mijn Brother printer MFC5890CN krijg ik een melding van "reinigen onmogelijk 50" Wat is er aan de hand en hoe krijg ik deze melding weg. Gesteld op 2-1-2016 om 11:25

    Reageer op deze vraag Misbruik melden
  • Ik krijg telkens opstartprobleem 70 als ik iets wil printen. De printer drukt niet af...
    Ik heb al geprobeerd met eens alle printjobs te wissen alsook de printer volledig af te zetten en alles weer her op te starten, maar ik blijf die foutmelding krijgen? Iemand die mij kan helpen? Gesteld op 27-6-2015 om 21:31

    Reageer op deze vraag Misbruik melden
  • ik heb hetzelfde probleem, weten jullie antwoord op opstartprobleem 70?
    Benjamin Geantwoord op 30-5-2017 om 14:25

    Waardeer dit antwoord (4) Misbruik melden
  • Beste mevrouw, meneer, ik heb een Brother MFC 5890CN printer en wil graag weten hoe ik de settings kan instellen om alleen zwart te printen. Mijn zwarte cartridge is nog niet leeg maar krijg een foutmelding om dat de gele kleuren cartridge leeg is. Graag jullie hulp om dit op te lossen. Gesteld op 7-6-2015 om 11:26

    Reageer op deze vraag Misbruik melden
6
  • Hallo, ik heb een MFC5890cn met de formaat nazien papier bijvullen, maar er zit papier in en heb er verder niets aan verandert. Wat kan ik hieraan doen?

    Gesteld op 8-4-2015 om 12:26

    Reageer op deze vraag Misbruik melden
  • Ik had hetzelfde probleem met A3 papier, heb het opgelost! volg de stappen op pagina 2: Klik op deze LINK Geantwoord op 10-3-2016 om 11:14

    Waardeer dit antwoord Misbruik melden
  • Ik heb voor het eerst in 4 jaar tijd problemen met het printen van zwart. Kleuren print hij prima alleen zwart niet meer. Reinigen in het apparaat zelf werkt niet en ook een speciale zwarte reinigingstape kan het euvel niet verhelpen. Wat nu, wie weet raad? Alvast bedankt! Gesteld op 26-1-2015 om 11:17

    Reageer op deze vraag Misbruik melden
    • in het geheugen zal staan dat de spons van zwart verzadigd is, met reinigen verhelp je dit euvel niet.
      Je kunt een nieuwe spons bestellen, maar je kan ook de printer voor de gek houden, en het mooiste is dat het gewoon werkt.
      Het gaat als volgt:
      stekker uit de printer,
      knop menu indrukken en vasthouden en intussen de stekker weer in het stopcontact doen,
      er kan een melding maintance komen of error 46,
      dat is goed, dit betekent dat het absorptiekussen voo zit.
      Nu gaat het erom om de teller weer op nul te zetten en dat doe je als volgt:
      als het goed is knipperen de 4 knoppen ( fax, scan, etc )
      toets in 8 en dan 0
      ca. 25 x op de zwarte startknop drukken, totdat in het display "purge counter "verschijnt,
      deze teller zet je als volgt op nul:
      toets 2 7 8 3
      de teller staat nu op 000000
      druk op stop/exit
      dan 2 keer op 9
      nu moet de printer het weer doen,
      voor de zekerheid kun je de zwarte cartridge even weer door de printer zelf laten reinigen..


      succes,

      Ria. Geantwoord op 20-5-2015 om 15:31

      Waardeer dit antwoord (1) Misbruik melden
  • Tip die door Ria is gegeven werkt super, dank je Ria.

    Mvg,
    Gerard Geantwoord op 29-6-2016 om 19:12

    Waardeer dit antwoord (1) Misbruik melden
  • Geachte heren, dames

    Mijn Brother geeft aan dat ik papier bij moet vullen terwijl de papier lade is voorzien van
    papier.

    Tevens geeft hij aan dat het papier formaat na gezien moet worden.
    Als ik menu drukt doet hij niets doet hij niets en kan ik ook niets controleren
    Wat kan er niet goed zijn? Hij heeft tot nu (17-6-'14) toe goed gewerkt.
    Graag uw antwoord om hem weer te laten functioneren.
    Kan in de gebruikershandleiding hier over niets vinden. Gesteld op 18-6-2014 om 00:26

    Reageer op deze vraag Misbruik melden
  • de gele inktpatroon wordt wel herkend door mijn printer maar hij print niet ( de andere kleuren wel) waar kan dit aan liggen Gesteld op 20-2-2013 om 21:05

    Reageer op deze vraag Misbruik melden
    • Ik heb precies hetzelfde probleem. Mogelijk inkt probleem. Niet de orginele maar van inkt123. Bij de test geen kleurenblok geel. Cartridge vervangen. Maakt niet uit. Wat nu te doen ????

      Frans Geantwoord op 13-3-2013 om 12:08

      Waardeer dit antwoord (5) Misbruik melden
  • heb hetzelvde probleem zelf met originele inkt Geantwoord op 16-3-2013 om 18:41

    Waardeer dit antwoord (1) Misbruik melden
  • volgens de helpdesk printkop laten vervangen nogal duur Geantwoord op 16-3-2013 om 18:43

    Waardeer dit antwoord Misbruik melden

Misbruik melden

Gebruikershandleiding.com neemt misbruik van zijn services uitermate serieus. U kunt hieronder aangeven waarom deze vraag ongepast is. Wij controleren de vraag en zonodig wordt deze verwijderd.

Product:

Bijvoorbeeld antisemitische inhoud, racistische inhoud, of materiaal dat gewelddadige fysieke handelingen tot gevolg kan hebben.

Bijvoorbeeld een creditcardnummer, een persoonlijk identificatienummer, of een geheim adres. E-mailadressen en volledige namen worden niet als privégegevens beschouwd.

Spelregels forum

Om tot zinvolle vragen te komen hanteren wij de volgende spelregels:

Belangrijk! Als er een antwoord wordt gegeven op uw vraag, dan is het voor de gever van het antwoord nuttig om te weten als u er wel (of niet) mee geholpen bent! Wij vragen u dus ook te reageren op een antwoord.

Belangrijk! Antwoorden worden ook per e-mail naar abonnees gestuurd. Laat uw emailadres achter op deze site, zodat u op de hoogte blijft. U krijgt dan ook andere vragen en antwoorden te zien.

Abonneren

Abonneer u voor het ontvangen van emails voor uw Brother MFC-5890CN bij:


U ontvangt een email met instructies om u voor één of beide opties in te schrijven.


Ontvang uw handleiding per email

Vul uw emailadres in en ontvang de handleiding van Brother MFC-5890CN in de taal/talen: Engels als bijlage per email.

De handleiding is 2,89 mb groot.


U ontvangt de handleiding per email binnen enkele minuten. Als u geen email heeft ontvangen, dan heeft u waarschijnlijk een verkeerd emailadres ingevuld of is uw mailbox te vol. Daarnaast kan het zijn dat uw internetprovider een maximum heeft aan de grootte per email. Omdat hier een handleiding wordt meegestuurd, kan het voorkomen dat de email groter is dan toegestaan bij uw provider.

Stel vragen via chat aan uw handleiding

Stel uw vraag over deze PDF

Andere handleiding(en) van Brother MFC-5890CN

Brother MFC-5890CN Installatiehandleiding - Nederlands - 30 pagina's

Brother MFC-5890CN Gebruiksaanwijzing - Nederlands - 240 pagina's

Brother MFC-5890CN Installatiehandleiding - Deutsch - 30 pagina's

Brother MFC-5890CN Gebruiksaanwijzing - Deutsch - 234 pagina's

Brother MFC-5890CN Gebruiksaanwijzing - English - 231 pagina's

Brother MFC-5890CN Installatiehandleiding - Français - 30 pagina's

Brother MFC-5890CN Gebruiksaanwijzing - Français - 241 pagina's


Uw handleiding is per email verstuurd. Controleer uw email

Als u niet binnen een kwartier uw email met handleiding ontvangen heeft, kan het zijn dat u een verkeerd emailadres heeft ingevuld of dat uw emailprovider een maximum grootte per email heeft ingesteld die kleiner is dan de grootte van de handleiding.

Er is een email naar u verstuurd om uw inschrijving definitief te maken.

Controleer uw email en volg de aanwijzingen op om uw inschrijving definitief te maken

U heeft geen emailadres opgegeven

Als u de handleiding per email wilt ontvangen, vul dan een geldig emailadres in.

Uw vraag is op deze pagina toegevoegd

Wilt u een email ontvangen bij een antwoord en/of nieuwe vragen? Vul dan hier uw emailadres in.


Info