643025
10
Verklein
Vergroot
Pagina terug
1/10
Pagina verder
EN
Folding Transport Chair
VA172/BLUE/RED/PINK/HAM
(Aluminium/Steel Range - SGLY00300119)
VA171/BLUE/RED/PINK/HAM
(Steel Range - SGLY00400119)
Assembly and Operating Instructions
Assembly and Operating Instructions Ver. 3 01/2014 (2284)
2
This file is available to view and download as a PDF at
www.aidapt.co.uk. Sight impaired customers can use a
free PDF Reader (such as adobe.com/reader) to zoom
in and increase the text size for improved readability.
READ BEFORE USE
Before using your new transit chair, you and each person that may assist you
in its use should take time to read this manual and follow all instructions.
PLEASE NOTE:
Your transit chair has a unique identification serial number. This is located on
the main cross brace below the seat canvass and should be used in all
correspondence.
Write your serial number here for future reference:
…………………………………
This model is intended for assistance pushing use only and not for wheeling
by the person sitting in the chair.
The maximum user weight is 115 kg; under no circumstances should
this be exceeded
When folding the chair for transportation in a car the leg rests can be detached
and the backrest can be folded.
Before each use please take the time to check your chair for any loose parts.
Any modification to this product without the express permission from Aidapt
will invalidate your guarantee.
Assembly and Operating Instructions Ver. 3 01/2014 (2284)
3
SAFETY SUMMARY
The following recommendations are made for the safe use of the chair.
NOTE: Do not assemble or use this equipment without first reading and
understanding this instruction manual.
If you cannot understand the instructions, please contact Aidapt, a Healthcare
Professional or a Dealer before installing this equipment.
Before using this product, care must be taken to ensure that fitments
are secure, the castors/wheels are in good working order, the chair is
properly balanced and all wheels must be in contact with the floor at
all times during use.
For safe operation, the following points must be remembered:
i. Always observe the limits regarding reaching objects, leaning
back, tilting and use of manual brakes, tyres and weights limits.
These are dealt with under the section headed Assembly and
Use.
ii. The footplates are designed only to support the feet while in the
seated position. DO NOT STAND ON THE FOOT PLATES.
iii. DO NOT USE YOUR TRANSIT CHAIR AS A TRANSPORT
SEAT IN A VEHICLE.
iv. Care should be exercised near open flames or burning cigarettes.
v. WARNING: Surface areas of your chair can get hot when the
chair is exposed to external sources of heat (e.g. sunlight).
Please now refer to the section on Assembly and use.
Assembly and Operating Instructions Ver. 3 01/2014 (2284)
4
ASSEMBLY
1. First remove all contents from the box.
2. To open the chair, push seat rails and press downwards until the chair
is fully opened taking care to keep fingers clear of moving parts
(Fig.1).
3. To close the chair, take the centre of the seat fabric at the front and
back edges and lift (Fig.2).
Fig. 1 Fig. 2
NB: When opening and closing your chair please keep fingers well away
from any possible entrapment areas.
The only part of the chair that can be adjusted are the leg rests. Ideally your
knees should be at 90 degrees with the seat. If you are not sure please
contact a healthcare professional or your local chair dealer for advice.
BRAKE OPERATION
Parking Brakes (Occupant)
See Fig. 3 which shows the chair with the parking brake not applied. To apply
the parking brake push the handle forward as in Fig. 4 until it ‘clicks’ and this
will apply the brake.
Fig. 3 Fig. 4
Assembly and Operating Instructions Ver. 3 01/2014 (2284)
5
BRAKE ADJUSTMENT
The brakes may need to be adjusted periodically. We would advise that this is
done by competent person.
For normal adjustment see Fig. 5, ‘Nut A’ needs to be unscrewed and the
sleeve moved either upwards or downwards as required to adjust the brakes.
Fig. 5
CORRECT USAGE
WARNING: The centre of balance is affected by a change in posture
body position or weight distribution.
Many activities require the chair owner to reach, bend and transfer into and
out of the chair. These movements will cause a change to normal balance,
centre of gravity and weight distribution of the chair.
The design of your chair enables it to remain stable for normal everyday
usage if used correctly in accordance with the recommendations in this
manual.
1. Reaching/bending forward
Move the chair as close as possible to the object you wish to reach.
Position the front castors so that they are extended as far forward as
possible. Fully engage the wheel locks on the rear wheels. Only reach
out to take what is within arm’s length in normal sitting position. Only
the arms should extend beyond the seat of the chair. Do not attempt
Assembly and Operating Instructions Ver. 3 01/2014 (2284)
6
to reach objects if you have to pick them up from the floor by reaching
down between your knees.
2. Reaching/bending backwards
Move the chair as close as possible to the object you wish to reach.
Reach back only as far as your arm will extend without changing your
seating position. Do not lean over the top of the back upholstery as
this could change your centre of gravity and may cause you to tip
over.
3. Reaching/leaning sideways
Move the chair as close as possible to the object you wish to reach.
Rotate the front castors to a line in the direction you will be reaching.
Fully engage the wheel locks on the rear wheels. Do not shift your
weight or sitting position towards the object you are reaching as it may
cause the chair to tip over.
4. Transferring
Before attempting to transfer in and out of the chair, every precaution
should be taken to ensure the gap between the two seats is as small
as possible. The chair should be on a smooth, stable and level area.
Be sure to fully engage the wheel brakes when transferring in and out
of the chair or when in an elevator or chair lift. Turn both castors in the
direction of the seat to which you wish to move. Lift up the footplates
and fold back the supports to the side. Do not stand on the footplates.
It is imperative that the actual transfer procedure be supervised by a
certified health care professional until the chair owner is familiar with
the procedure.
Negotiating Obstacles
5.1 Forwards
The chair should be tilted by the helper until the front castors have
passed over the kerbs. Move the chair forward until the rear wheels
touch the kerb and gently lower the front castors over the pavement.
Push the lift until the rear wheels have mounted the kerb. The chair
should not be lifted by the handles alone. Do not attempt to ride over
kerbs or obstacles. Doing so may cause your chair to tip over and
cause bodily harm or damage to the chair.
5.2 Backwards
The chair should be positioned so that the rear wheels are against the
kerb. The helper should then tilt the chair backwards and then pull the
chair until the rear wheels mount the kerb. The front castors should
Assembly and Operating Instructions Ver. 3 01/2014 (2284)
7
only be lowered to the ground when the chair has been pulled
sufficiently away from the kerb.
Warnings
1. Do not sit or transfer into the chair unless it is fully open.
2. Do not use on an escalator.
3. Do not attempt to stop a moving chair using the parking
brakes.
4. Always wear the seatbelt when using the chair.
5. Do not attempt to lift the chair by any removable (detachable)
parts. Lifting by means of any removable (detachable) parts of a
chair may result in injury to the user or cause damage to the
chair.
GENERAL DESCRIPTION
The following diagram shows details of the chair terminology used in
this manual.
GENERAL DESCRIPTION ctd.
1. Backrest
The adjustable backrest can be folded down by means of a locking
mechanism fitted to both sides of the lower part of the backrest pillars.
Assembly and Operating Instructions Ver. 3 01/2014 (2284)
8
To fold the backrest down, push on both of the black plastic levers,
then pull back and down on the top part of the backrest. To return to
the original, reverse the procedure, making sure the mechanisms are
locked securely.
2. Handles
The handles are designed for the helper to propel the chair. They
must not be used solely for lifting the chair over obstructions or kerbs
(see negotiating obstacles)
3. Armrest
PVC pads are fixed onto the armrest for comfort and can be replaced
as spare parts.
4. Seat Upholstery
Periodically check the upholstery for signs of tears or sagging.
Replace immediately if the seat is damaged. Remember: the seat
upholstery is the primary weight supporting material.
5. Footplates
The footplates are intended as a foot support only when you are sitting
in the chair. On no account should you stand on the footplates. The
heel loops or calf straps (if fitted) can be used to secure the position of
the feet. The footplate assemblies can be adjusted in height by
loosening the nut of the base of the adjustment tube, positioning the
plate at the required height and tightening the nut to secure the
assembly. The footplate supports can be swung away to the outside of
the chair. To carry out this procedure, pull the release lever towards
the front and swing the support to the outside of the chair. If the
support is to be removed, lift it upwards. To re-fit and return to the
original position, reverse the above procedure.
6. Castor and bearing
The front and rear wheels are solid puncture proof tyres. These should
be checked at regular intervals to monitor any wear. Chairs become
difficult to steer and propel when surfaces have worn flat. It is
recommended that both front tyres are replaced at the same time to
avoid one side of the chair from being higher than the other.
The wheel is secured to the castor fork by an axle bolt and axle nut.
Periodically, this bolt and nut should be checked and tightened if
necessary to allow a snug but free spinning fit. The castor fork swivel
on the front wheels allow the chair to be steered in either left or right
direction. An adjustment locknut is located under the castor cap. If the
locknut is too tight, the chair will be difficult to steer.
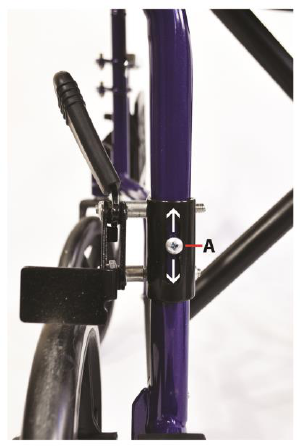
7. Wheel lock assembly
Assembly and Operating Instructions Ver. 3 01/2014 (2284)
9
These are used to hold the chair in a stationary position, and are fitted
on either side of the chair on the back wheels. They should not be
used when the chair is moving or to slow it down. They should always
be applied together.
To operate, pull the brake lever back towards the back of the chair.
This will immobilize the chair. To release the brake, move the lever
forwards the front of the chair.
8. Cross Bar
Operation of the cross brace permits the chair to be opened and
closed easily. It should be inspected at regular intervals for signs of
wear and bending.
ROUTINE CHECKS AND MAINTENANCE
1. Upholstery
Upholstery should be routinely cleaned with a mild soap and water
solution. Never use paint remover or thinners on upholstery.
2. Metal Parts
Clean all metal parts with a wax compound such as car wash to
maintain finish. Do not use any obtrusive cleanser that will scratch the
finish on the chair.
3. Cross Brace
Periodically lubricate the centre bolt on the cross brace with light
machine oil.
4. Tyres and Wheels
Examine tyres regularly for wear and replace as necessary. Solid
tyres should be replaced when they become loose on the rim or
cracks appear which expose the mounting wire groove. Check that the
wheels run freely.
5. Castors
Check periodically that the bolt and nut securing the wheel to the
castor fork is tight and allows a snug but free spinning fit. If wheels are
loose or wobble then consult service personnel.
6. Brakes
Regularly check for effective operation and there is no wear or signs
of play.
7. General
Always check before use that the chair folds and unfolds correctly and
that movement both backwards and forwards is in a straight line.
8. Servicing
Assembly and Operating Instructions Ver. 3 01/2014 (2284)
10
We recommend your chair is fully serviced every twelve months. For
parts information please contact Aidapt Bathrooms Limited (details on
the back page).
9. Recycling of your Chair
Once the chair has reached its expected service life you can contact
Aidapt for disposal.
SPECIFICATIONS
ITEM DETAILS
Width (folded) mm 245
Width (unfolded) mm 590
Net weight Kg
(Including Footrests)Aluminium Type 10.3
Net Weight Kg
(Including Footrests) Steel Type 12
Maximum User Weight Kg 115
Seat Size WxD mm 480x406
Wheel Size mm 203
Additional information Folding backrest
Distributed by Aidapt Bathrooms Ltd, Lancots Lane, Sutton Oak,
St Helens, WA9 3EX
Telephone: +44 (0) 1744 745 020 Fax: +44 (0) 1744 745 001 Web:
www.aidapt.com
Email: sales@aidapt.co.uk
Manufacturers Agent Kingsmead Service Ltd, 64 Totteridge Common,
London, NW1 0ND
10

Hulp nodig? Stel uw vraag in het forum

Spelregels

Misbruik melden

Gebruikershandleiding.com neemt misbruik van zijn services uitermate serieus. U kunt hieronder aangeven waarom deze vraag ongepast is. Wij controleren de vraag en zonodig wordt deze verwijderd.

Product:

Bijvoorbeeld antisemitische inhoud, racistische inhoud, of materiaal dat gewelddadige fysieke handelingen tot gevolg kan hebben.

Bijvoorbeeld een creditcardnummer, een persoonlijk identificatienummer, of een geheim adres. E-mailadressen en volledige namen worden niet als privégegevens beschouwd.

Spelregels forum

Om tot zinvolle vragen te komen hanteren wij de volgende spelregels:

Belangrijk! Als er een antwoord wordt gegeven op uw vraag, dan is het voor de gever van het antwoord nuttig om te weten als u er wel (of niet) mee geholpen bent! Wij vragen u dus ook te reageren op een antwoord.

Belangrijk! Antwoorden worden ook per e-mail naar abonnees gestuurd. Laat uw emailadres achter op deze site, zodat u op de hoogte blijft. U krijgt dan ook andere vragen en antwoorden te zien.

Abonneren

Abonneer u voor het ontvangen van emails voor uw Aidapt VA172 bij:


U ontvangt een email met instructies om u voor één of beide opties in te schrijven.


Ontvang uw handleiding per email

Vul uw emailadres in en ontvang de handleiding van Aidapt VA172 in de taal/talen: Engels als bijlage per email.

De handleiding is 0,54 mb groot.


U ontvangt de handleiding per email binnen enkele minuten. Als u geen email heeft ontvangen, dan heeft u waarschijnlijk een verkeerd emailadres ingevuld of is uw mailbox te vol. Daarnaast kan het zijn dat uw internetprovider een maximum heeft aan de grootte per email. Omdat hier een handleiding wordt meegestuurd, kan het voorkomen dat de email groter is dan toegestaan bij uw provider.

Stel vragen via chat aan uw handleiding

Stel uw vraag over deze PDF

Andere handleiding(en) van Aidapt VA172

Aidapt VA172 Gebruiksaanwijzing - Deutsch - 14 pagina's

Aidapt VA172 Gebruiksaanwijzing - Français - 12 pagina's


Uw handleiding is per email verstuurd. Controleer uw email

Als u niet binnen een kwartier uw email met handleiding ontvangen heeft, kan het zijn dat u een verkeerd emailadres heeft ingevuld of dat uw emailprovider een maximum grootte per email heeft ingesteld die kleiner is dan de grootte van de handleiding.

Er is een email naar u verstuurd om uw inschrijving definitief te maken.

Controleer uw email en volg de aanwijzingen op om uw inschrijving definitief te maken

U heeft geen emailadres opgegeven

Als u de handleiding per email wilt ontvangen, vul dan een geldig emailadres in.

Uw vraag is op deze pagina toegevoegd

Wilt u een email ontvangen bij een antwoord en/of nieuwe vragen? Vul dan hier uw emailadres in.


Info