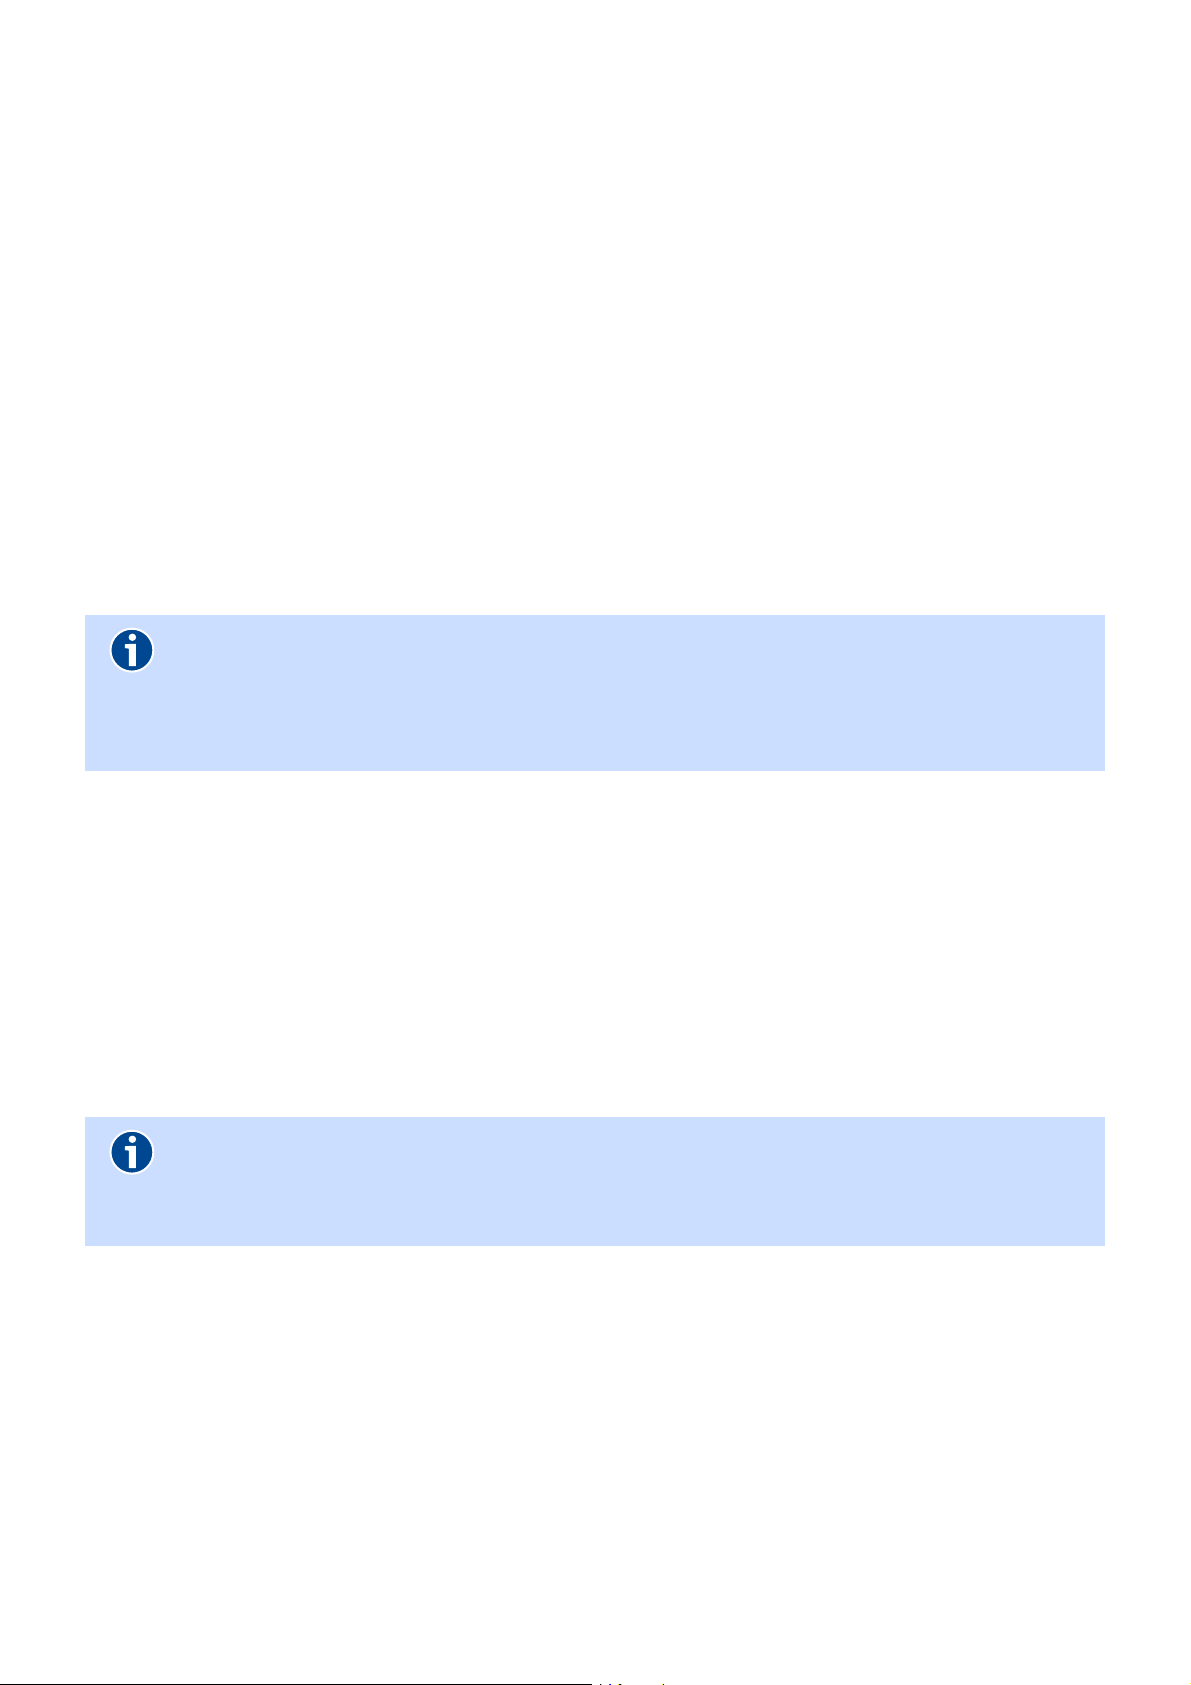
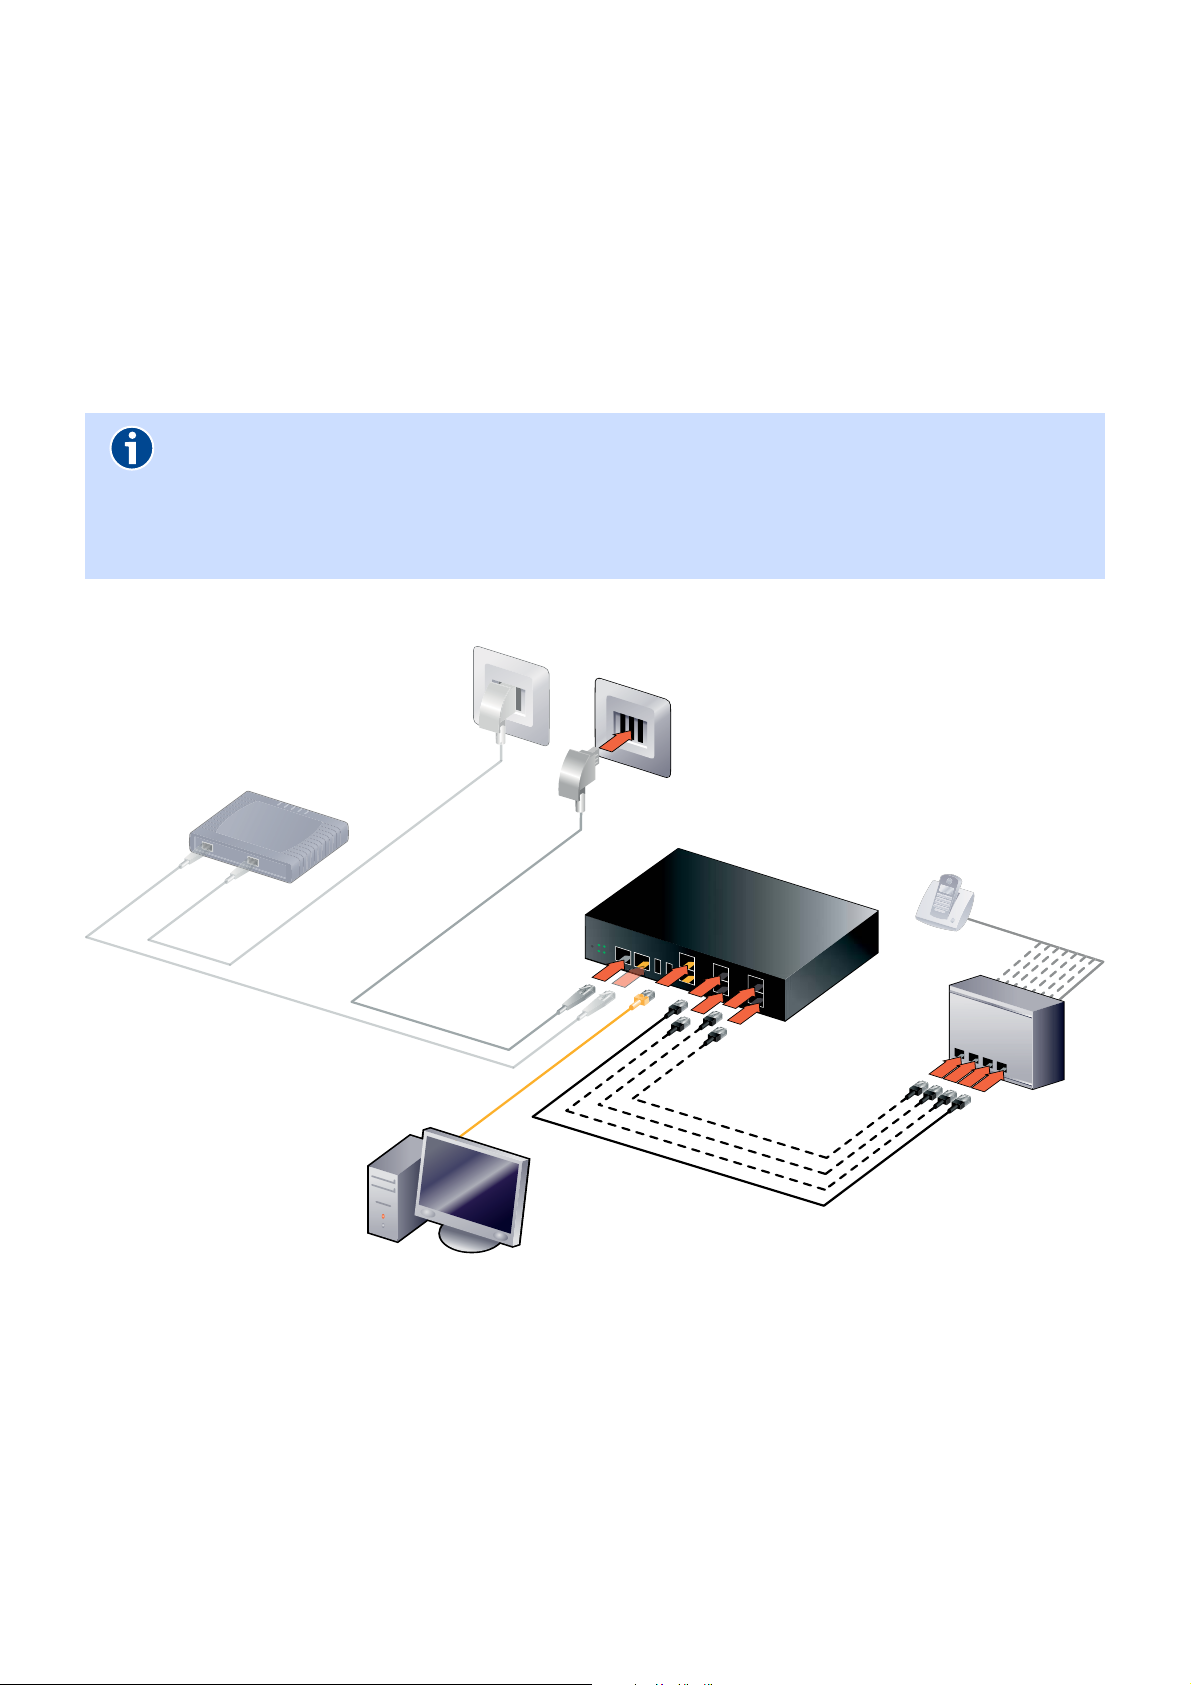
796886
9
Verklein
Vergroot
Pagina terug
1/68
Pagina verder
User Guide
Gateway 400
3
Welcome
Dear customer,
On the following pages we would like to familiarize you with the features of your new Gateway 400.
Please make sure that you definitely read the included Important Notes Quick Start Guide in any
case.
Functionality of your New Gateway 400
The Gateway 400 offers the following features:
ISDN SIP gateway for 4 ISDN Basic Rate Interfaces (8 simultaneous calls)
ISDN BRI point-to-multipoint and point-to-point connections
ADSL2+ Annex A and B/J
VDSL2 30a profile support
Vectoring support to increase the bandwidth of VDSL
GigabitETH-WANoE interface
Integrated router/NAT (double play)
IPv6 support
Audio coding (G.711, G.726, G.729, T.38 fax support)
Internal long-term, stable and highly accurate 5ppm clock
Advanced QoS guarantees double-play service quality
Remote provisioning and management through TR-069
Integrated power supply; prepared for 19 rack mounting (optional rack mounting kit available)
Supports SIP 2.0, PPPoE, DHCP, SIPconnect 1.1 interoperability
Brief Description
Voice over IP is increasingly replacing analog and ISDN-based transmission technology. This creates
the need to integrate existing ISDN private branch exchanges (PBX) in the new IP environment and
to also provide the ISDN service in an all-IP network.
The ISDN-SIP Gateway 400 provides 4 S0 interfaces on the subscriber side in its basic configuration.
This allows up to 8 simultaneous calls over the IP network. The connection can be made via both a
VDSL2/ADSL2 link and also with an upstream modem/router (e.g., SHDSL) via the WANoE interface.
The provision of a number of supplementary services such as CLIP, CLIR, COLP, COLR, and CFx enable
the professional conversion of voice services on a single IP network.
Due to the integrated router functionality (double play with QoS), the Gateway 400 can also be used
as a router for data services over the same DSL line.
For professional installation in a 19 rack, the device can be mounted with appropriate brackets; all
connecting elements and indicators are arranged on the front side, and the power cord is located on
the rear panel
4
Symbols and Notational Conventions
The following symbols and notational conventions are used to highlight specific information in this
manual:
Warnings and Notes
Symbols and Notational Conventions
Attention
Indicates important information and warnings that should always be observed in order
to avoid malfunctions and risks.
Note
Identifies useful hints and tips.
Notational Conventions Example
Bold font is used denote fields and titles of screen dialogs, connec-
tions at the Gateway 400 as well as LEDs and buttons
Save
Cancel
Setup Assistant
LAN3
WPS
Paths, folder names and file names C:/Program Files
Downloads
config.bin
Blue font is used to indicate addresses to be entered in the browser
as well as links and references within this manual
http://sphairon.box
http://192.168.100.1
see Symbols and Nota-
tional Conventions on page
4
Inputs for operating procedures on the phone are represented with
keyboard symbols


5
Table of Contents
1 Before You Start. . . . . . . . . . . . . . . . . . . . . . . . . . . . . . . . . . . . . . 9
1.1 Prerequisites. . . . . . . . . . . . . . . . . . . . . . . . . . . . . . . . . . . . . . . . . . . . . . . . . . . . . . . . . . . . . . . . . . . . .9
1.2 Package Contents . . . . . . . . . . . . . . . . . . . . . . . . . . . . . . . . . . . . . . . . . . . . . . . . . . . . . . . . . . . . . . . .9
1.2.1 Optional Accessories . . . . . . . . . . . . . . . . . . . . . . . . . . . . . . . . . . . . . . . . . . . . . . . . . . . . . . . . . . . . . .9
1.3 Safety Information . . . . . . . . . . . . . . . . . . . . . . . . . . . . . . . . . . . . . . . . . . . . . . . . . . . . . . . . . . . . . 10
1.4 Computer Settings . . . . . . . . . . . . . . . . . . . . . . . . . . . . . . . . . . . . . . . . . . . . . . . . . . . . . . . . . . . . . 10
1.4.1 Network Settings. . . . . . . . . . . . . . . . . . . . . . . . . . . . . . . . . . . . . . . . . . . . . . . . . . . . . . . . . . . . . . . 11
1.4.2 Fixed IP Address . . . . . . . . . . . . . . . . . . . . . . . . . . . . . . . . . . . . . . . . . . . . . . . . . . . . . . . . . . . . . . . . 11
2 Your Gateway 400. . . . . . . . . . . . . . . . . . . . . . . . . . . . . . . . . . . 12
2.1 Indicators and Ports on the Front Panel . . . . . . . . . . . . . . . . . . . . . . . . . . . . . . . . . . . . . . . . . . . 12
2.2 Indicators and Connectors on the Rear Panel . . . . . . . . . . . . . . . . . . . . . . . . . . . . . . . . . . . . . . 14
2.3 Reset Switch . . . . . . . . . . . . . . . . . . . . . . . . . . . . . . . . . . . . . . . . . . . . . . . . . . . . . . . . . . . . . . . . . . . 14
2.3.1 Restarting the Gateway 400 . . . . . . . . . . . . . . . . . . . . . . . . . . . . . . . . . . . . . . . . . . . . . . . . . . . . . 15
2.3.2 Resetting the Gateway 400 to the Factory Default Settings . . . . . . . . . . . . . . . . . . . . . . . . . 15
3 Installation . . . . . . . . . . . . . . . . . . . . . . . . . . . . . . . . . . . . . . . . . 16
3.1 Installation diagram for S0 bus. . . . . . . . . . . . . . . . . . . . . . . . . . . . . . . . . . . . . . . . . . . . . . . . . . . 18
4 Setup . . . . . . . . . . . . . . . . . . . . . . . . . . . . . . . . . . . . . . . . . . . . . . 20
4.1 Computer Settings . . . . . . . . . . . . . . . . . . . . . . . . . . . . . . . . . . . . . . . . . . . . . . . . . . . . . . . . . . . . . 20
4.2 Carrier Detection . . . . . . . . . . . . . . . . . . . . . . . . . . . . . . . . . . . . . . . . . . . . . . . . . . . . . . . . . . . . . . . 20
5 Configuration . . . . . . . . . . . . . . . . . . . . . . . . . . . . . . . . . . . . . . . 21
5.1 Screen Dialog Layout. . . . . . . . . . . . . . . . . . . . . . . . . . . . . . . . . . . . . . . . . . . . . . . . . . . . . . . . . . . . 21
5.2 Overview . . . . . . . . . . . . . . . . . . . . . . . . . . . . . . . . . . . . . . . . . . . . . . . . . . . . . . . . . . . . . . . . . . . . . . 22
5.3 DSL . . . . . . . . . . . . . . . . . . . . . . . . . . . . . . . . . . . . . . . . . . . . . . . . . . . . . . . . . . . . . . . . . . . . . . . . . . . 23
5.3.1 Monitoring Index. . . . . . . . . . . . . . . . . . . . . . . . . . . . . . . . . . . . . . . . . . . . . . . . . . . . . . . . . . . . . . . 23
5.3.2 Spectrum . . . . . . . . . . . . . . . . . . . . . . . . . . . . . . . . . . . . . . . . . . . . . . . . . . . . . . . . . . . . . . . . . . . . . . 23
5.4 Internet . . . . . . . . . . . . . . . . . . . . . . . . . . . . . . . . . . . . . . . . . . . . . . . . . . . . . . . . . . . . . . . . . . . . . . . 23
5.4.1 Access Setup . . . . . . . . . . . . . . . . . . . . . . . . . . . . . . . . . . . . . . . . . . . . . . . . . . . . . . . . . . . . . . . . . . . 23
5.4.1.1 Internet Access. . . . . . . . . . . . . . . . . . . . . . . . . . . . . . . . . . . . . . . . . . . . . . . . . . . . . . . . . . . . . . . . . 23
5.4.2 Dynamic DNS . . . . . . . . . . . . . . . . . . . . . . . . . . . . . . . . . . . . . . . . . . . . . . . . . . . . . . . . . . . . . . . . . . 24
5.4.3 DNS Relay . . . . . . . . . . . . . . . . . . . . . . . . . . . . . . . . . . . . . . . . . . . . . . . . . . . . . . . . . . . . . . . . . . . . . 25
5.4.4 Static Routing. . . . . . . . . . . . . . . . . . . . . . . . . . . . . . . . . . . . . . . . . . . . . . . . . . . . . . . . . . . . . . . . . . 25
5.5 Telephony . . . . . . . . . . . . . . . . . . . . . . . . . . . . . . . . . . . . . . . . . . . . . . . . . . . . . . . . . . . . . . . . . . . . . 26
5.5.1 General . . . . . . . . . . . . . . . . . . . . . . . . . . . . . . . . . . . . . . . . . . . . . . . . . . . . . . . . . . . . . . . . . . . . . . . 26
5.5.2 VoIP Provider . . . . . . . . . . . . . . . . . . . . . . . . . . . . . . . . . . . . . . . . . . . . . . . . . . . . . . . . . . . . . . . . . . 27
5.5.3 VoIP Accounts. . . . . . . . . . . . . . . . . . . . . . . . . . . . . . . . . . . . . . . . . . . . . . . . . . . . . . . . . . . . . . . . . . 27
5.5.4 VoIP Services. . . . . . . . . . . . . . . . . . . . . . . . . . . . . . . . . . . . . . . . . . . . . . . . . . . . . . . . . . . . . . . . . . . 28
5.5.5 ISDN . . . . . . . . . . . . . . . . . . . . . . . . . . . . . . . . . . . . . . . . . . . . . . . . . . . . . . . . . . . . . . . . . . . . . . . . . . 29
5.5.5.1 Interface Mapping. . . . . . . . . . . . . . . . . . . . . . . . . . . . . . . . . . . . . . . . . . . . . . . . . . . . . . . . . . . . . . 29
5.6 Network. . . . . . . . . . . . . . . . . . . . . . . . . . . . . . . . . . . . . . . . . . . . . . . . . . . . . . . . . . . . . . . . . . . . . . . 30
5.6.1 LAN . . . . . . . . . . . . . . . . . . . . . . . . . . . . . . . . . . . . . . . . . . . . . . . . . . . . . . . . . . . . . . . . . . . . . . . . . . . 30
5.6.1.1 Static Routing. . . . . . . . . . . . . . . . . . . . . . . . . . . . . . . . . . . . . . . . . . . . . . . . . . . . . . . . . . . . . . . . . . 32
6
5.6.2 USB . . . . . . . . . . . . . . . . . . . . . . . . . . . . . . . . . . . . . . . . . . . . . . . . . . . . . . . . . . . . . . . . . . . . . . . . . . . 33
5.6.2.1 Devices. . . . . . . . . . . . . . . . . . . . . . . . . . . . . . . . . . . . . . . . . . . . . . . . . . . . . . . . . . . . . . . . . . . . . . . . 33
5.6.2.2 FTP Server . . . . . . . . . . . . . . . . . . . . . . . . . . . . . . . . . . . . . . . . . . . . . . . . . . . . . . . . . . . . . . . . . . . . . 33
5.6.3 Additional Features. . . . . . . . . . . . . . . . . . . . . . . . . . . . . . . . . . . . . . . . . . . . . . . . . . . . . . . . . . . . . 34
5.6.3.1 Additional Features. . . . . . . . . . . . . . . . . . . . . . . . . . . . . . . . . . . . . . . . . . . . . . . . . . . . . . . . . . . . . 34
5.7 Security . . . . . . . . . . . . . . . . . . . . . . . . . . . . . . . . . . . . . . . . . . . . . . . . . . . . . . . . . . . . . . . . . . . . . . . 34
5.7.1 Firewall . . . . . . . . . . . . . . . . . . . . . . . . . . . . . . . . . . . . . . . . . . . . . . . . . . . . . . . . . . . . . . . . . . . . . . . 34
5.7.1.1 Settings . . . . . . . . . . . . . . . . . . . . . . . . . . . . . . . . . . . . . . . . . . . . . . . . . . . . . . . . . . . . . . . . . . . . . . . 34
5.7.1.2 Schedule Rule . . . . . . . . . . . . . . . . . . . . . . . . . . . . . . . . . . . . . . . . . . . . . . . . . . . . . . . . . . . . . . . . . . 35
5.7.1.3 Firewall Rules . . . . . . . . . . . . . . . . . . . . . . . . . . . . . . . . . . . . . . . . . . . . . . . . . . . . . . . . . . . . . . . . . . 35
5.7.1.4 IP Stack Settings. . . . . . . . . . . . . . . . . . . . . . . . . . . . . . . . . . . . . . . . . . . . . . . . . . . . . . . . . . . . . . . . 35
5.7.1.5 Zone Configuration . . . . . . . . . . . . . . . . . . . . . . . . . . . . . . . . . . . . . . . . . . . . . . . . . . . . . . . . . . . . . 36
5.7.2 Port Forwarding . . . . . . . . . . . . . . . . . . . . . . . . . . . . . . . . . . . . . . . . . . . . . . . . . . . . . . . . . . . . . . . . 36
5.7.2.1 Trigger Ports . . . . . . . . . . . . . . . . . . . . . . . . . . . . . . . . . . . . . . . . . . . . . . . . . . . . . . . . . . . . . . . . . . . 38
5.7.3 IPSec . . . . . . . . . . . . . . . . . . . . . . . . . . . . . . . . . . . . . . . . . . . . . . . . . . . . . . . . . . . . . . . . . . . . . . . . . . 38
5.8 System . . . . . . . . . . . . . . . . . . . . . . . . . . . . . . . . . . . . . . . . . . . . . . . . . . . . . . . . . . . . . . . . . . . . . . . . 39
5.8.1 Protocol Stack. . . . . . . . . . . . . . . . . . . . . . . . . . . . . . . . . . . . . . . . . . . . . . . . . . . . . . . . . . . . . . . . . . 39
5.8.2 Access Protection. . . . . . . . . . . . . . . . . . . . . . . . . . . . . . . . . . . . . . . . . . . . . . . . . . . . . . . . . . . . . . . 42
5.8.3 System Time . . . . . . . . . . . . . . . . . . . . . . . . . . . . . . . . . . . . . . . . . . . . . . . . . . . . . . . . . . . . . . . . . . . 42
5.8.4 Languages . . . . . . . . . . . . . . . . . . . . . . . . . . . . . . . . . . . . . . . . . . . . . . . . . . . . . . . . . . . . . . . . . . . . . 42
5.8.5 Save Configuration . . . . . . . . . . . . . . . . . . . . . . . . . . . . . . . . . . . . . . . . . . . . . . . . . . . . . . . . . . . . . 42
5.8.6 Reset Device . . . . . . . . . . . . . . . . . . . . . . . . . . . . . . . . . . . . . . . . . . . . . . . . . . . . . . . . . . . . . . . . . . . 43
5.8.7 Firmware Update. . . . . . . . . . . . . . . . . . . . . . . . . . . . . . . . . . . . . . . . . . . . . . . . . . . . . . . . . . . . . . . 44
5.8.8 Remote Management. . . . . . . . . . . . . . . . . . . . . . . . . . . . . . . . . . . . . . . . . . . . . . . . . . . . . . . . . . . 44
5.8.9 SSH . . . . . . . . . . . . . . . . . . . . . . . . . . . . . . . . . . . . . . . . . . . . . . . . . . . . . . . . . . . . . . . . . . . . . . . . . . . 44
5.8.10 CWMP . . . . . . . . . . . . . . . . . . . . . . . . . . . . . . . . . . . . . . . . . . . . . . . . . . . . . . . . . . . . . . . . . . . . . . . . 45
5.8.10.1ACS Configuration . . . . . . . . . . . . . . . . . . . . . . . . . . . . . . . . . . . . . . . . . . . . . . . . . . . . . . . . . . . . . . 45
5.8.10.2Client Configuration . . . . . . . . . . . . . . . . . . . . . . . . . . . . . . . . . . . . . . . . . . . . . . . . . . . . . . . . . . . . 45
5.8.11 SNMP . . . . . . . . . . . . . . . . . . . . . . . . . . . . . . . . . . . . . . . . . . . . . . . . . . . . . . . . . . . . . . . . . . . . . . . . . 45
5.8.12 Diagnostics . . . . . . . . . . . . . . . . . . . . . . . . . . . . . . . . . . . . . . . . . . . . . . . . . . . . . . . . . . . . . . . . . . . . 46
5.8.12.1System Messages. . . . . . . . . . . . . . . . . . . . . . . . . . . . . . . . . . . . . . . . . . . . . . . . . . . . . . . . . . . . . . . 46
5.8.12.2Packet Tracer . . . . . . . . . . . . . . . . . . . . . . . . . . . . . . . . . . . . . . . . . . . . . . . . . . . . . . . . . . . . . . . . . . 46
5.8.12.3LED Test . . . . . . . . . . . . . . . . . . . . . . . . . . . . . . . . . . . . . . . . . . . . . . . . . . . . . . . . . . . . . . . . . . . . . . . 46
5.8.13 QoS . . . . . . . . . . . . . . . . . . . . . . . . . . . . . . . . . . . . . . . . . . . . . . . . . . . . . . . . . . . . . . . . . . . . . . . . . . . 46
5.8.13.1Settings . . . . . . . . . . . . . . . . . . . . . . . . . . . . . . . . . . . . . . . . . . . . . . . . . . . . . . . . . . . . . . . . . . . . . . . 46
5.8.13.2Class Creation. . . . . . . . . . . . . . . . . . . . . . . . . . . . . . . . . . . . . . . . . . . . . . . . . . . . . . . . . . . . . . . . . . 47
5.8.13.3Rule Creation . . . . . . . . . . . . . . . . . . . . . . . . . . . . . . . . . . . . . . . . . . . . . . . . . . . . . . . . . . . . . . . . . . 47
5.8.13.4Statistics . . . . . . . . . . . . . . . . . . . . . . . . . . . . . . . . . . . . . . . . . . . . . . . . . . . . . . . . . . . . . . . . . . . . . . 47
6 Frequently Asked Questions . . . . . . . . . . . . . . . . . . . . . . . . . . 48
7 Legal Notices . . . . . . . . . . . . . . . . . . . . . . . . . . . . . . . . . . . . . . . 50
7.1 Disposal . . . . . . . . . . . . . . . . . . . . . . . . . . . . . . . . . . . . . . . . . . . . . . . . . . . . . . . . . . . . . . . . . . . . . . . 53
7.2 CE Declaration of Conformity . . . . . . . . . . . . . . . . . . . . . . . . . . . . . . . . . . . . . . . . . . . . . . . . . . . . 53
8 Technical Data . . . . . . . . . . . . . . . . . . . . . . . . . . . . . . . . . . . . . . 55
9 Passwords . . . . . . . . . . . . . . . . . . . . . . . . . . . . . . . . . . . . . . . . . . 57
10 Glossary . . . . . . . . . . . . . . . . . . . . . . . . . . . . . . . . . . . . . . . . . . . . 59
7
11 Index . . . . . . . . . . . . . . . . . . . . . . . . . . . . . . . . . . . . . . . . . . . . . . 65
8
Before You Start | Gateway 400 User Guide
9
1 Before You Start
This chapter covers the prerequisites for operating the Gateway 400, the package contents, and
safety information. Please read this chapter carefully.
For security reasons, you must define user names and unique passwords during the setup and con-
figuration. In Chapter 9, Passwords, on page 57, you can record all user names and passwords in a
single location for easy access. Simply print this chapter.
1.1 Prerequisites
Please note that the activities described in this manual require specialized skills and should usually
be performed only by trained administrators. Other requirements:
For surfing and making phone calls, you need an ADSL/VDSL2 connection (unlocked by your ISP).
To connect the Gateway 400 to the network device (e.g., switch, computer, NAS, server), the net-
work device must be equipped with an Ethernet port (no less than 10/100 Mbps, 1 Gbps for op-
timum speed).
For the configuration, you need a computer with a current web browser.
1.2 Package Contents
1 Gateway 400
1 power cord
1 DSL cable, RJ45-TAE (gray)
1 Ethernet cable, RJ45-RJ45 (yellow)
1 Quick Start Guide
1.2.1 Optional Accessories
You can order the following accessories in addition to the package contents supplied with the Gate-
way 400:
Order No. 954498 - Rack mounting kit (19 rack shelf or metric ETSI rack)
Order No. 954499 - Wall mount kit
Network termination (NTBA) for ISDN bus power in normal mode
Attention
Ensure that the listed passwords are kept in a safe place to prevent unauthorized access!
Gateway 400 User Guide | Before You Start
10
1.3 Safety Information
Do not open the housing.
Never install the device or insert or disconnect a cable connection during a thunderstorm.
The device is only intended for applications within a building.
The power outlet must be near the equipment and easily accessible.
Lay the cables so that no one can step on or trip over them.
Use a dry cloth to clean the housing.
Avoid direct contact with water. Never immerse the device in water.
Avoid direct sunlight.
Make sure that only terminals that provide TNV-1 voltage or are intended for operation with
TNV-1 circuits are connected to the ISDN interfaces.
RJ45 jacks are used for a number of different interfaces. There is therefore a risk of confusion.
The Gateway 400 features TNV interfaces (Telecommunications Network Voltage) for ISDN con-
nections and SELV interfaces (Safety Extra Low Voltage) for network connections. Make sure
that no TNV and SELV interfaces are connected with one another. SELV devices are not protected
against voltage spikes, which can lead to technical defects or hazards for users. In the event of
a mixup, the devices will not operate as intended.
The device is designed for use as a desktop unit.
However, it can also be mounted in a rack. Please refer to the installation instructions.
USB devices must only be connected with cables of no more than 3 meters (approx. 9 feet).
Cables to SELV interfaces must not exit the building.
Clock lines should only be connected at the remote end as described in the supplied documen-
tation.
The device is designed for use in office and residential areas.
1.4 Computer Settings
In order to enable your computer to automatically connect to the Gateway 400, please check your
LAN settings. The LAN connection on your computer must be set to Obtain an IP address au-
tomatically (DHCP).
Assigning an IP address ensures that network devices on the Internet or on a home network (local
IP network) can be properly addressed. This requires each IP address to be only assigned once. This
automatic assignment of IP addresses can be handled by the Gateway 400 with its built-in DHCP
server (recommended, default setting).
Attention
This is a Class A device. This device can cause radio interference in residential areas. In
such cases, the operator may be required to take appropriate counteractive measures.
Note
In a network, only one device can perform the service of a DHCP server.
Before You Start | Gateway 400 User Guide
11
If the DHCP server is disabled, you will need to assign a fixed IP address to connect your computer
to the gateway. This IP address depends on which LAN port of the Gateway 400 is used. Change the
LAN settings on your computer as follows:
If necessary, also refer to Chapter 6, Frequently Asked Questions, on page 48.
1.4.1 Network Settings
The DHCP server of the Gateway 400 is enabled by default and automatically assigns IP addresses
to the network devices in the network. The following parameters must be set in the network set-
tings of your computer (in Windows, under Properties of the LAN connection):
Obtain an IP address automatically must be enabled.
Obtain DNS server address automatically must be enabled.
The precise designation of the settings may differ, depending on the operating system used. Please
refer to the online help of your operating system (e.g., by pressing the Windows key and the F1
function key ). A screen dialog appears. Enter TCP/IP settings in the Search field.
1.4.2 Fixed IP Address
If you want to assign static IP addresses even though the DHCP server is enabled, you should use IP
addresses from the following ranges:
For network devices connected to the LAN 1 socket:
192.168.100.2 through 192.168.100.49
192.168.100.81 through 192.168.100.254
For network devices connected to the LAN 2 socket:
192.168.200.2 through 192.168.200.49
192.168.200.81 through 192.168.200.254
Socket Fixed IP address Subnet mask
LAN 1 192.168.100.100 255.255.255.0
LAN 2 192.168.200.100 255.255.255.0
Note
These are the default IP address ranges. The range of fixed IP addresses available de-
pends on the IP address range that is not managed by the DHCP server (see DHCP Server
LAN on page 32).
The IP address ranges 192.168.100.50 to 192.168.100.80 and 192.168.200.50 to
192.168.200.80 are managed by the DHCP server. If these ranges are changed, the range
of assignable fixed IP addresses will automatically change as well.
Gateway 400 User Guide | Your Gateway 400
12
2 Your Gateway 400
2.1 Indicators and Ports on the Front Panel
Meaning of the LEDs :
Name Color Status Meaning
PWR green on/off Power is present/absent.
flashing Automatic detection of WAN interface.
red on Power-up procedure; the Gateway 400 is starting
up. The Gateway 400 will be operational after
approx. 1 minute.
flashing Software is being updated.
SIP green on/off SIP account is successfully registered/not
registered.
flashing slowly SIP account is being registered.
flashing
quickly (4 Hz)
Active ongoing call.
red flashing At least one SIP account registration has failed.
BCK Currently without function.
RJ45 sockets or clamps for connect-
ing a telephone system or ISDN
telephones
RJ45 sockets for network devices
(e.g., computers)
USB host for USB devices
RJ45 socket for WANoE connection
or third network device.
RJ45 socket for DSL connection
LED indicators
Reset switch
Your Gateway 400 | Gateway 400 User Guide
13
MGM green on/off Internet connection established.
/No Internet connection established.
flashing Internet data traffic.
red flashing An error occurred.
VDSL/ADSL
WAN1
green on ADSL connection is active.
flashing Training on xDSL connection.
green and
yellow
on VDSL connection is active.
off xDSL connection is not active.
ETH
WAN2/LAN3
green on/off 100 MB network connection is active.
/No network device connected.
flashing Data traffic via the WAN/LAN interface.
yellow on/off 1 GB network connection is active.
/No network device connected.
LAN 1-2 green on/off 100 MB network connection is active.
/No network device connected.
flashing Data traffic on the LAN interface.
yellow on/off 1 GB network connection is active.
/No network device connected.
S0 1-4 left green on/off Bearer channel B1 is occupied/not occupied.
right green on/off Bearer channel B2 is occupied/not occupied.
Meaning of the LEDs (Contd.):
Name Color Status Meaning
Gateway 400 User Guide | Your Gateway 400
14
2.2 Indicators and Connectors on the Rear Panel
2.3 Reset Switch
The reset switch is located to the left of the LED indicators (and labeled RES). Use a ballpoint pen or
something similar to press the reset switch.
Be aware that pressing the reset button for different amounts of time initiates different reset ac-
tions as described below:
0.5 s - 5 s Restart with existing configuration
see Restarting the Gateway 400 on page 15
5 s - 15 s Restore factory defaults
see Resetting the Gateway 400 to the Factory Default Settings on page 15
> 15 s Additional reset actions (only if requested by customer support)
Meaning of the LEDs :
Name Color Status Meaning
Master green on Gateway 400 is in the master mode.
Slave yellow on Gateway 400 is in the slave mode.
Note
To avoid damaging the device, press the reset switch lightly, i.e., without applying any
force.
Note
Restarting and Resetting the device will cause all ongoing telephone and Internet con-
nections to be interrupted.
Internal frame clock
LED indicator for operating mode when
cascading
Internal data clock
Connector for power cable
Power switch
Your Gateway 400 | Gateway 400 User Guide
15
2.3.1 Restarting the Gateway 400
Restarting the Gateway 400 will not affect the existing settings and configurations.
Press the reset switch (RES) for a short time (approx. 2 seconds). After about 10 seconds, the Power
LED lights up red for about 30 seconds. It then turns green again. After about 2 minutes, the Gate-
way 400 will be operational again.
2.3.2 Resetting the Gateway 400 to the Factory Default Settings
If you want to completely reconfigure the Gateway 400, or if the owner of the Gateway 400 chang-
es, you can delete all the settings made by restoring the factory default settings.
Proceed as follows to reset the Gateway 400 to the factory default settings:
1. Press the reset button for about 10 seconds until the Power LED turns red and flashes.
2. Then release the reset switch.
The Power LED lights up red for about 30 seconds. It then turns green again.
After about 2 minutes, the Gateway 400 will be operational again.
3. As described in Chapter 4, Setup, on page 20, you must now set up and reconfigure the Gate-
way 400 or load the previously saved configuration (Chapter 5.8.5, Save Configuration, on page
42) or configure Internet access using the automatic Carrier Detection (Chapter 4.2, Carrier
Detection, on page 20).
Attention
If you press the reset switch for too long, other reset actions will be initiated, which
could also result in the permanent deletion of important data. See "Reset Switch" on
page 14.
Attention
Resetting the device to the factory default settings will cause all custom settings to be
lost. You should therefore save your configuration (as described in Chapter 5.8.5, Save
Configuration, on page 42) before resetting the device.
Gateway 400 User Guide | Installation
16
3 Installation
Step 1 Connect the Gateway 400 to the mains.
Plug the supplied power cable into the connector on the rear panel of the Gateway 400 and insert
the plug into a 230V outlet. Turn on the gateway by pressing the rocker switch next to the power
cable connector.
The PWR LED starts flashing, first in red and then in green. The Gateway 400 will be operational after
approx. 2 minutes.
Step 2 Network access.
Option 1: DSL connection.
Take the gray DSL connection cable (TAE on RJ45) and plug the RJ45 connector into the VDSL/
ADSL socket of the Gateway 400. Plug the TAE connector into the TAE socket.
Option 2: WANoE connection.
Connect the modem according to the manufacturer’s instructions. Take a network cable (mo-
dem accessory) and plug the RJ45 connector into the LAN socket on the modem and the other
RJ45 connector into the ETH socket on the Gateway 400.
Step 3 Network device connection.
Take the yellow cable (network cable) and plug the RJ45 connector of the yellow cable into the LAN
1 or LAN 2 socket on the Gateway 400. Plug the other RJ45 connector into the corresponding socket
on the network device to be connected. Wait until the LAN LED begins to light up in green.
Note
The synchronization process between the Gateway 400 and the DSL network may take
several minutes to complete. After successful synchronization, the appropriate VDSL or
ADSL LED will light up. If the synchronization process fails to complete after about 10
minutes, contact the customer service of your Internet service provider (ISP).
Note
The individual LAN sockets use the following network addresses:
192.168.100.2 to 192.168.100.254 for network devices connected to the LAN 1 socket.
192.168.200.2 to 192.168.200.254 for network devices connected to the LAN 2 socket.
Installation | Gateway 400 User Guide
17
Step 4 Connection of telephone system or telephones.
The following figures illustrate the various configuration scenarios for the S0 ports on the Gateway
400 depending on the telephony hardware used:
Only point-to-point connection
Only point-to-multipoint connection
Mixed operation of point-to-point and point-to-multipoint connections
Connect your telephone system or telephones to the sockets S01 to S04 or the clamps 1 to 4 (a1b
a2b). See "Installation diagram for S0 bus" on page 18.
Figure 1 Installation diagram for a point-to-point connection
Note
The ISDN interfaces of the Gateway 400 support the Restricted Power Mode.
This may reduce the functionality of ISDN telephones (e.g., no permanent display) or
cause some telephones to not behave as expected (e.g., signaling of all incoming calls,
regardless of the configured MSN). If necessary, connect an ISDN bus power supply.
PABX
GATEWAY 400
Option 1
Option 2
Gateway 400 User Guide | Installation
18
Figure 2 Installation diagram for mixed operation of point-to-point and point-to-multipoint connections
3.1 Installation diagram for S0 bus
Figure 3 Installation diagram for S0 bus
Note
In the Gateway 400, the terminating resistors are already integrated.
PABX
GATEWAY 400
Option 1
Option 2
ISDN Phones
1 2 3 4 5 6 7 8
RJ45 connector
cable side
Pin 3 RX+ 2a
Pin 4 TX+ 1a
Pin 5 TX- 1b
Pin 6 RX- 2b
1a 1b 2a 2b
IAE socket
1a 1b 2a 2b
IAE socket
a1b a2b resistors
100Ω100Ω
Gateway 400
S
0
bus
Terminating
1a 1b 2a 2b
IAE socket
Installation | Gateway 400 User Guide
19
Use the Telephony | ISDN menu item (Page 29) to set the Bus mode according to the following crite-
ria:
Bus mode
Short passive bus Distance between terminal devices and Gateway 400: max. 200 meters.
Max. 12 sockets and 8 terminal devices. Used only in point-to-multipoint
mode.
Extended passive bus Distance between terminal device and Gateway 400: max. 1000 meters.
Only one terminal device can be connected (point-to-point connection).
Used in point-to-point or point-to-multipoint mode; in special cases, with
only one terminal (default).
This setting is also used for the “extended passive bus”. The extended pas-
sive bus is at least 100 meters and no more than 500 meters long. The ter-
minal devices may only be connected to the final 50 meters of the bus.
Max. 12 sockets and 4 terminal devices. Used in point-to-multipoint mode.
Gateway 400 User Guide | Setup
20
4Setup
4.1 Computer Settings
Check the LAN settings of your computer to automatically connect your computer to the Gateway
400 via the network connection using DHCP. Please refer to Chapter 1.4, page 10.
4.2 Carrier Detection
You can use the Automatic area configuration for the initial startup of the Gateway 400; it is initi-
ated automatically immediately after switching on the Gateway 400. The message “The carrier de-
tection is in process“ will appear in the Overview screen dialog of the Gateway 400. This indicates
that your Internet connection is being configured automatically and should be available after a
maximum of 5 minutes. Alternatively, the Gateway 400 can also be preconfigured individually by
the ISP (depending on the procurement source).
Carrier detection can also be started manually. In this case, you can use any computer with a current
web browser:
1. Connect the computer to the LAN 1 socket on the Gateway 400.
2. Start your web browser and enter http://sphairon.box in the address line.
You can also enter
http://192.168.100.1 for a network connection via the LAN 1 socket, or http://192.168.200.1
for a network connection via the LAN 2 socket.
3. You are now prompted to enter the access credentials. The factory defaults are as follows:
Access name: admin
Password: admin
4. The start screen dialog of the Gateway 400 user interface is displayed.
Click on the System | Protocol Stack menu item
5. In the Protocol Stack screen dialog, click the Carrier Detection button.
Note
You can cancel the Automatic carrier detection via the Overview menu item.
Note
It is recommended to first configure the network settings (Chapter 5.8.1, Protocol Stack,
on page 39) and then the device services to avoid duplicating the configuration effort.
Configuration | Gateway 400 User Guide
21
5 Configuration
You an use any computer with a current web browser (such as Mozilla Firefox, Microsoft Internet
Explorer, Google Chrome) to configure the Gateway 400.
Start your web browser and enter http://sphairon.box in the address line.
For network connections via
the LAN 1 socket, you can also use the address http://192.168.100.1 , or
for connections via the LAN 2 socket, you can use the address http://192.168.200.1.
You are now prompted to specify your access credentials. The access credentials for the default ad-
ministrator are as follows:
Access name: admin
Password: admin
5.1 Screen Dialog Layout
Menu
The individual menu items open screen dialogs, which allow you to change
the Gateway 400 settings. The menu items are grouped by function and
may be subdivided into submenus. Chapter 5, Configuration, on page 21 de-
scribes each menu item of the Gateway 400 in detail.
Screen Dialog with Settings
Clicking on a menu item opens the corresponding screen dialog. Each screen offers various dia-
log boxes with settings for configuring the Gateway 400.
Clicking on the button saves the settings on the Gateway 400 and causes the
changes to take effect.
Clicking on the button opens the previous screen dialog without saving the
changes.
Buttons
Orange buttons ( ) are used to control an open
screen dialog.
Blue buttons open a new screen dialog.
Status Line
The status line displays the following elements:
Date and time
Note
We recommend that you change these credentials after the initial startup.
Please refer to Chapter 5.8.2, Access Protection, on page 42.
Gateway 400 User Guide | Configuration
22
Status of the DSL connection
Status of the ETH connection (only if a WANoE connection is used)
Status of the Internet connection
Status of Voice-over-IP (VoIP) connection(s) to the telephony provider
Status of USB connection(s) (USB devices connected to the USB ports)
Status of LAN connection(s) (network connections) over Ethernet
Language setting - Switch between ENglisch or DEutsch (German)
Access protection status - Logout to exit the configuration dialog.
5.2 Overview
This section gives you an overview of the most important settings for the Gateway 400.
CONNECTION
Status of the DSL or WANoE line.
INTERNET
Status of the Internet connection.
NETWORK
Status of the LAN connections.
USB
Connected USB network devices.
SECURITY
Enabled security settings.
TELEPHONY
Configured telephony settings.
SYSTEM
Hardware and firmware version numbers.
Security Log
Logging of logins, configuration changes, etc.
The icon
indicates that a specific setting has not been configured or is disabled.
indicates that a specific setting has been configured or is enabled.
Click on the corresponding overview item to view additional detailed information.
Click on the “+” symbol to view detailed information on individual overview items or click on the
“-” symbol to hide the details already displayed. Use the arrows next to each overview item to
update the information displayed.
Configuration | Gateway 400 User Guide
23
5.3 DSL
5.3.1 Monitoring Index
This screen provides status information about the Monitoring Index of your DSL connection.
5.3.2 Spectrum
This screen shows graphic representations of the signal-to-noise ratio, the bit allocation and the at-
tenuation of the DSL line signal.
5.4 Internet
A VDSL2 connection allows data transfer rates of up to 100 Mbps in both directions (downstream
and upstream).
Users benefit from the high download transfer rate, which enables them to use numerous multime-
dia services such as high-speed Internet applications, high-quality video streams and voice services.
This screen dialog provides an overview of the status of your Internet connection. It also allows you
to manually disconnect from the Internet and reconnect.
5.4.1 Access Setup
The Access Setup menu item allows you to change your current Internet configuration.
5.4.1.1 Internet Access
The actual layout of this menu depends on which connection type (“DSL Provider”, “Operation be-
hind a router ...” or “Operation behind a modem ...”) you selected under Carrier Detection. The con-
nection type is selected automatically during the initial configuration; it can also be adapted
manually at any time (see Protocol Stack on page 39).
Access data
For the Access data overview item, you will need to specify the access ID provided by your ISP.
Under Provider, you can choose between several pre-configured Internet providers. If your own pro-
vider is not listed, select Other provider.
Specify your access data (Access name and Password) for the Internet. Re-enter the password in the
Confirm password field. For security reasons, the password is not shown as plain text. Note that the
password is case-sensitive and make sure that you spell it correctly.
If you do not know the required access data or if the specified access data is not accepted, please
contact your ISP’s customer service.
WANoE Configuration (only for WANoE connections)
WANoE (Wide Area Network over Ethernet) refers to the use of a separate modem (e.g., a cable mo-
dem) to establish a connection to the Internet or the operation behind a router. Under WANoE Con-
figuration, you can specify the data transfer rate values for your Internet connection. The required
values are indicated in your ISP contract.
Note
First, set up your Internet connection using the Setup Assistant (Chapter 4.2, Carrier De-
tection, on page 20) or the protocol stack (Chapter 5.8.1, Protocol Stack, on page 39).
Once you have configured your access data there, you can make changes here.
Gateway 400 User Guide | Configuration
24
Under Profile Selection, you can select commonly used upstream and downstream profiles. User-
defined allows you to manually specify the transfer rate at which data is downloaded from the In-
ternet (Downstream) and at which rate data is uploaded to the Internet (Upstream).
VLAN ID (only for VLAN connections)
In a virtual LAN (VLAN), the physical network (DSL) is divided into multiple logical networks. These
networks are on a single line, but they are logically separated and addressed via their VLAN IDs. This
is where you enter the VLAN ID provided by your ISP.
Type of Internet connection
Specify whether and when an existing Internet connection should be disconnected. The option I use
a flat rate or traffic amount based tariff is intended for users with an Internet flat rate. When this
option is selected, the Gateway 400 is permanently connected to the Internet.
If you have a time-based tariff, select the option I use a time based tariff to avoid incurring high con-
nection costs. Select the option Disconnect connection automatically after [max. 10 minutes] idle
time to allow the Gateway 400 to automatically disconnect you from the Internet when no data is
being transmitted.
PPPoE Pass Through
PPPoE Pass Through allows the router to be operated in transparent mode; it also allows for an ad-
ditional Internet connection to be set up from the home network. You can also connect to the Inter-
net via any computer or router connected to the Gateway 400 even if that computer or router is
configured to use another ISP for Internet access.
Daily Auto-Disconnect
Daily Auto-Disconnect disconnects the Gateway 400 from the Internet daily at a specified time. This
setting preempts the forced disconnect initiated by the ISP after 24-hour Internet connections and
thus prevents unnecessary interruptions of ongoing calls. Forced disconnects are technically re-
quired in order to release IP addresses.
Click Save for the changes to take effect.
5.4.2 Dynamic DNS
This screen dialog lists the configured Dynamic DNS accounts. Dynamic DNS is an Internet service
which allows you to set up a fixed name as a pseudonym for a dynamically assigned IP address, as
is typically the case for Internet addresses. Using Dynamic DNS and so-called port forwardings
(Chapter 5.7.2, page 36), you can make servers in your local network statically visible on the Inter-
net, or access the contents of USB mass storage devices from the Internet under a fixed name.
To use Dynamic DNS, you first need to set up an account with a Dynamic DNS provider (such as
dyndns.org). You can then use this account to set up a new Dynamic DNS account on the Gateway
400. To do this, click New. Select the desired provider from the Provider drop-down menu. Enter the
data supplied by your provider in the following fields and click Save.
Attention
Please note that any server in your home network that is statically visible on the Internet
through Dynamic DNS is a potential target for malicious attacks by unauthorized third
parties!
Make sure you secure your Dynamic DNS account with a strong password. Always keep
your security software up to date, and investigate unusual events immediately. Stay in-
formed about the latest security issues.
Configuration | Gateway 400 User Guide
25
5.4.3 DNS Relay
A DNS (Domain Name Server) is required to resolve IP addresses. For example, the DNS server would
resolve google.com into 173.194.70.101 for IPv4 and into 2a00:1450:4005:800::1013 for IPv6. This
screen dialog allows you to set up your preferred DNS servers and configure how DNS requests are
handled.
DNS Relay: default setting: enabled. The Gateway 400 acts as a DNS relay.
If this option is disabled, the DNS relay is inactive. In this case, a DNS server must be
entered manually at each terminal device.
DNS Cache: Can only be enabled if DNS Relay has also been enabled. In this case, the Gateway
400 caches the DNS responses and uses them to respond to further requests by the
same (or any other) network device without querying the DNS again.
Activate User-Defined DNS Server: This setting is only required if you do not want to use the default
settings of your Internet service provider. If required, enter the IP address of the
DNS server. The DNS Server 1 and DNS Server 2 replace the Primary DNS and the
Secondary DNS from the Internet settings, respectively.
5.4.4 Static Routing
Here you can enter static routes for networks, which can be accessed via the WAN interface. Con-
nections to the LAN interfaces are configured under Network | LAN | Static Routing (“Static Routing
on page 32).
Click New to open a screen dialog with the following settings:
Name: Any name for the route.
Address Type: IPv4 or IPv6, depending on the address range of the external network.
Destination Network: Address range of the network devices to be reached.
Gateway: Address of the router to the destination network.
Interface: Selection depends on the configured DSL or WAN interface.
Click Save to save the data of the route.
Gateway 400 User Guide | Configuration
26
5.5 Telephony
This screen dialog shows an overview of statuses of the telephony connections. The term VoIP
(Voice over Internet Protocol) always refers to Internet telephony.
Under Telephony, the status is shown as “Available” or “Not available”.
Under Internet Telephony, you can view further details for each connection. “VoIP Accounts” on
page 27 describes how to configure and edit the Provider, Call number, Name and Status.
The status should be displayed here as a green check mark , followed by information about the
time of activation.
If a red cross appears instead, first check whether the VoIP account was disabled as described in
the section “VoIP Accounts” on page 27. If all VoIP accounts are affected, check the DSL connection.
If the error occurs for individual VoIP accounts, ask your VoIP provider (Internet telephony provider)
to check the configuration of the “VoIP Accounts” on page 27 or the status of the VoIP account.
5.5.1 General
This screen dialog allows you to make various settings for the telephony mode.
Overlap Dialing
By default, SIP uses en-bloc dialing. This dialing method first collects all the digits of the number to
be dialed and then transmits the entire number en bloc. Alternatively, the Gateway 400 provides
the option of Overlap Dialing according to RFC 3578, which tries to accelerate connection setup by
attempting to dial partially entered, incomplete numbers while digits are being entered.
If the option Overlap Dialing is enabled, the additional option Enable fallback to normal dialing will
be available. This option can be used to temporarily enable en-bloc dialing if the connection setup
fails using overlap dialing.
Configuration of incoming VoIP calls
For incoming calls, some VoIP providers (Internet telephony providers) transmit the destination call
number in the “To-Header” line of the SIP protocol instead of the “Request-Line”.
With this option, you can ensure that the destination call number is analyzed correctly and forward-
ed in the Gateway 400 exactly as specified in the transmitted data.
International Call Prefix
If the VoIP account (see VoIP Accounts on page 27) was configured with the country code, the call
numbers will also be transmitted with the country code. Here you can select the Call Prefix to be
used for outgoing call numbers. Similarly, the string selected here is also expected as a prefix for in-
coming calls.
Number format of incoming calls
Under Number Format, you can select the format in which the call number is transmitted for incom-
ing SIP-to-ISDN connections:
Unknown The call number is transmitted 1:1 from SIP to ISDN
Subscriber Only the call number (without the area code) is transmitted
National Both the area code and the call number are transmitted
International The country code, the area code and the call number are transmitted
Configuration | Gateway 400 User Guide
27
Speed Dialing
On entering the phone number of a subscriber, the actual call will be initiated about 4 seconds after
the last digit has been entered. If Speed Dialing is activated, and the call number is entered more
than once, the call will be initiated immediately after the last digit has been entered. Alternatively,
you can press the pound key () on your phone after entering the last digit.
If Speed Dialing is activated, the phone numbers are stored in a cache (buffer memory). New phone
numbers are only stored in the cache for successful voice connections; the number is not stored in
the cache if the phone rings, but the call is not accepted.
Click Delete to clear the phone number cache.
5.5.2 VoIP Provider
This screen dialog allows you to configure the VoIP provider(s) (Internet telephony provider(s)). You
can either Edit or Delete them .
Click New to create a new VoIP provider. The subsequent screen dialog allows you to configure a
new VoIP provider.
Provider name: Enter a user-defined name.
Account domain: Enter the data provided by your VoIP provider (e.g., “sipgate.de”, port: “5060”).
SIP proxy: Enter the data provided by your VoIP provider (e.g., “sipgate.de”, port: “5060”).
SIP registrar: Enter the data provided by your VoIP provider (e.g., “sipgate.de”, port: “5060”).
Outbound proxy: Enter the data provided by your VoIP provider (e.g., “sipgate.de”, port: “5060”).
RTP port range: Enter the data provided by your VoIP provider (e.g., “10000” - “19000”).
T.38 Support: Only required for fax. If the VoIP provider supports T.38 for transmission of fax data,
you can select this option.
DTMF Mode: Select one of the following options from the drop-down list:
Inband - DTMF dial tones are audibly transmitted together with voice.
Outband - DTMF dial tones are inaudibly transmitted as data.
SIP INFO - DTMF dial tones are inaudibly transmitted as data.
VoIP Interface: This setting is only relevant if there are at least two WAN interfaces which have not
been pre-configured automatically by the VoIP provider. Select the type of interface
from the drop-down list:
Internet - The connection to the VoIP provider is established via the Internet inter-
face.
VoIP - The connection to the VoIP provider is established via the VoIP interface.
Click Save to store the data in the list of configured Internet telephony providers.
5.5.3 VoIP Accounts
Here you can set up a VoIP account for the configured VoIP provider. Here, the already configured
VoIP accounts of the VoIP providers can also be edited or deleted .
New accounts can be created by clicking the New button:
Note
The icon in the Enabled column simply indicates that the account is being used with
the configured data. The overview in the menu “Telephony” on page 26 shows whether
the VoIP account has actually been used to establish a successful connection to a VoIP
provider.
Gateway 400 User Guide | Configuration
28
Select provider: Select the desired VoIP provider (Internet telephony provider) from one of the pre-
configured VoIP providers listed here. New providers can be set up under VoIP Pro-
vider. See "VoIP Provider" on page 27.
Choose Account Type: Select the type of account provided by your VoIP provider.
Display name: Enter a user-defined name.
Access name: Enter the data provided by your VoIP provider.
Authentication name: Enter the data provided by your VoIP provider.
Password: Enter the data provided by your VoIP provider.
Registration time: The default Registration time of “900” seconds can remain unchanged.
Area Code (optional): Enter the country code (“49” for Germany) in the first field and the area code
in the second field. If the country code is used, the area code must be entered with-
out a leading “0”; if the country code is not used, the area code must be entered
with a leading “0”.
Call number: Fixed network number without area code, as provided by your VoIP provider.
Not all VoIP providers use this setting. If no connection can be initialized with the
specified data, you may have to enter the fixed network number with the area code
(area code with a leading “0”) here. In this case, the fields under Area Code would
remain empty.
PABX extension: Only relevant for the account type SIP Trunk. Here you enter the call number range
for the (PABX) extensions, e.g., “11-99”
Default extension: Only relevant for the account type SIP Trunk. Here you enter the DID number for
the intercept position (central attendant), e.g., “0”.
Activate: Select this check box if you want to use this call number.
Use Registrar: Select this check box if you want to use the registrar server of the VoIP provider.
Some VoIP providers do not require a registrar; in such cases, this function must be
disabled.
Enter the required VoIP account data and click Save. Registering the account may take some time to
complete. Please wait until the previous screen dialog Internet telephony accounts is displayed
again.
5.5.4 VoIP Services
The Session Initiation Protocol (SIP) is a network protocol for setting up, controlling and clearing
down a communication session between two or more subscribers. From the drop-down list Service
Implementation, select the mapping that corresponds to the format used by your VoIP provider.
Description of the header fields:
INVITE: INVITE is used for making connection requests to the server; it includes the SIP ad-
dress of the recipient
From: SIP address of the sender
To: SIP address of the recipient
P-Preferred-Identity: The “Identity Header” is used to define which Public User Identity (call num-
ber) is used for the connection setup.
P-Asserted-Identity: The usage of P-Asserted-Identity and P-Preferred-Identity depends on the VoIP
provider; the value itself can be set via the mapping. For SIP trunks, the call number
can be “call number + default extension” orcall number + DID number”.
Privacy: Setting for caller ID display at the remote end:
“None”: caller ID restriction disabled, i.e., CLIP (Calling Line Identification Presenta-
tion)
“ID”: caller ID restriction enabled, i.e., CLIR (Calling Line Identification Restriction)
Configuration | Gateway 400 User Guide
29
5.5.5 ISDN
This screen dialog allows you to define the connection type of the individual ISDN S0 interfaces. Click
on the pencil icon to edit the settings.
VoIP Account: Optionally, the ISDN interface may also be assigned a VoIP account. See "VoIP
Accounts" on page 27.
If a VoIP account is assigned, only this account is used for the ISDN interface.
If no VoIP account is assigned, the ISDN interface is not used, since no routing is
possible. Alternatively, the VoIP account can be assigned to the ISDN interface as
described in “Interface Mapping” on page 29.
Connection type: Here you can select the connection type to be used for the ISDN interface. This set-
ting depends on which connection types are supported by the ISDN hardware.
For a point-to-point connection, you can directly dial the extension (DID or DDI) by
adding the extension number to the main call number.
For a point-to-multipoint connection, a terminal device is assigned one or several
call numbers (Multiple Subscriber Number, MSN), typically up to the maximum
number of 10 per ISDN connection.
Bus Mode: point-to-point connections always require an extended passive bus.
Point-to-multipoint connections typically use a short passive bus. An extended pas-
sive bus is used if the point-to-multipoint connection covers a distance of more
than 200 meters. At distances of more than 500 meters, no more than one terminal
device may be connected. See "Installation diagram for S0 bus" on page 18.
Interface: In this drop-down list, you can select the ISDN interface of the Gateway 400.
Group membership: The group membership enables multiple ISDN lines to be combined into a
group.
Echo Canceller: VoIP transmissions can be subject to unwanted echo and feedback. In such cases,
echo cancellation may solve the problem.
Activate: Select the check box to enable this configuration.
Layer 2 permanently active: For ISDN connections, layer 2 is required for connection control. Switch-
ing the layer to “permanently active” prevents it from entering into power saving
mode. This adjustment may be necessary if you encounter problems with outgoing
calls (no ringback tone for outside line seizure).
Click Save to store the settings in the Gateway 400.
5.5.5.1 Interface Mapping
The left column contains the configured VoIP accounts. The individual rows represent the VoIP ac-
counts, and the columns represent the four available ISDN interfaces. The check boxes in this matrix
can be used for mapping VoIP accounts to ISDN interfaces.
If multiple VoIP accounts are to be mapped or assigned to one ISDN interface, the check box Allow
more than one VoIP account for each ISDN interface must be selected.
Gateway 400 User Guide | Configuration
30
5.6 Network
The Gateway 400 features two Gigabit Ethernet LAN ports, operated in dual mode, which enables
you to set up your own broadband home network. You can, for instance, manage two separate net-
works connected to a single router.
This screen dialog gives you an overview of the current network settings and network devices con-
nected.
5.6.1 LAN
The Gateway 400 allows you to use network addresses in one of two possible formats: the proven
32-bit legacy format Internet Protocol Version 4 (IPv4) or the new 128-bit format Internet Protocol
Version 6 (IPv6). It is up to you to decide which protocol you want to use, depending on the individ-
ual circumstances.
IPv4
IPv4 addresses are typically written in four blocks of decimal numbers: for example,
192.168.100.1. Each block uses 8 bits, thus representing a range of values from 0 to 255.
IP addresses are divided into two parts: a network part and a host part. Computers can only
communicate directly with each other if the network part of their IP address is the same. In the
same network, no host address may be assigned twice. The division into network part and ad-
dress part is determined by the subnet mask (e.g., 255.255.255.0). In CIDR notation, this is
written as 192.168.100.22/24, where /24 means that the first 24 bits (starting from the left)
of the subnet mask are equal to 1.
Example:
IPv6
The new IPv6 addresses are written in eight 16-bit hexadecimal blocks, delimited by a colon.
Leading zeros can be omitted from the address in the same way as before. Furthermore, blocks
whose value is 0 (or 0000) can be omitted.
Example of equivalent notations:
2001:0db8:1a2b:0815:0000:0000:1a2f:0011
2001:db8:1a2b:815:0:0:1a2f:11
2001:db8:1a2b:815::1a2f:11
Network part Host Network part Host part
IP Address 192.168.100. 22 > 11000000.10101000.01100100. 00010110
Subnet mask 255.255.255. 0 > 11111111.11111111.11111111. 00000000
Configuration | Gateway 400 User Guide
31
5.6.1.1 Settings
The tables below show the preset default network settings:
Default network settings for the LAN 1 socket
Factory settings
Use DHCP Server active
IP Address 192.168.100.1
Subnet Mask 255.255.255.0
Host Name sphairon.box
DHCP Server activated
DHCP Gateway 192.168.100.1
IP Start Address 192.168.100.50
IP End Address 192.168.100.80
Allocation period 2 weeks
Domain Name localdomain
Default network settings for the LAN 2 socket
Factory settings
Use DHCP Server active
IP Address 192.168.200.1
Subnet Mask 255.255.255.0
Host Name sphairon.box
DHCP Server activated
DHCP Gateway 192.168.200.1
IP Start Address 192.168.200.50
IP End Address 192.168.200.80
Allocation period 2 weeks
Domain Name localdomain
Note
With these factory network settings, all computers connected to the Gateway 400 are
part of the same subnet only if they are connected via the LAN 1 or LAN 2 socket. The
built-in DHCP server automatically assigns network addresses. Only one DHCP server
must be active in your network (in this case, Gateway 400). Please ensure that no more
than one DHCP server is enabled and that all other devices are set to obtain their IP ad-
dress automatically.
Gateway 400 User Guide | Configuration
32
IP Address/Subnet Mask LAN
Two network devices can only communicate with each other if they have a unique name (address).
In IP networks, an IP address is used for this purpose. It ensures that the individual IP packets reach
their proper destination.
The IP Address and the Subnet Mask specified here are used to address the Gateway 400 in the net-
work.
DHCP Server LAN
A DHCP server enables a computer to be fully integrated in an existing network automatically with-
out any further configuration. The computer must only be set to automatically obtain an IP address
(see Chapter 1.4, page 10). The automatic assignment of IP addresses can be restricted to a specific
range of IP addresses (Start IP Address to End IP Address). You can also specify how long the assigned
IP addresses will remain valid. After this time, each computer will be assigned a new IP address. The
assignment of IP addresses is carried out for network devices that are connected via the LAN.
Distribute LAN IPv6 addresses (Router Advertisements activated)
Here you can configure the IPv6 prefix(es) for your home network. The current IPv6 prefix provided
by your ISP is shown under Provider prefix.
If Activate Router Advertisements is enabled but no IPv6 prefix, LAN has been configured, the Pro-
vider prefix supplied by your ISP will be automatically distributed in your network.
If you do not want the Provider prefix to be distributed in the local network, you must ensure that
the option Router Advertisements is disabled.
5.6.1.2 Static Routing
Here you can enter static routes for networks, which can be accessed via the LAN interfaces. Con-
nections to the WAN interface are configured under Internet | Additional Features | Static Routing
(“Static Routing” on page 25).
Click New to open a screen dialog with the following settings:
Name: Any name for the route.
Address Type: IPv4 or IPv6 depending on the address range of the external network.
Destination Network: Address range of the network devices to be reached.
Gateway: Address of the router to the destination network.
Interface: Selection depends on the configured DSL or WAN interface.
Click Save to save the data of the route.
Attention
If you do not have a basic knowledge of network settings, please do not change the de-
fault settings. Any changes to the settings in this screen dialog may cause the Gateway
400 to become inaccessible. If this should happen for some reason, reset the Gateway
400 to its factory settings. Please refer to Chapter 2.3.2, page 15.
Note
Default setting: Start IP Address 192.168.100.50, End IP Address 192.168.100.80. If the
IP address range for the DHCP server is changed, the range of assignable fixed IP ad-
dresses will automatically change as well.
Configuration | Gateway 400 User Guide
33
5.6.2 USB
The Gateway 400 provides a USB host controller with two USB 2.0 interfaces for connecting and
sharing USB devices in a network. The network devices can be attached to the connected printer(s)
or storage device(s) via the built-in file, FTP, media or printer server.
This menu item gives you an overview of the attached USB devices; it also indicates which steps are
necessary to share data content or enable the services of the respective USB device.
Supported standards: USB 1.1 and USB 2.0.
Supported file systems: FAT12, FAT16, FAT32 and NTFS.
5.6.2.1 Devices
Here you can see the status of each attached USB device (USB stick, USB hard drive, USB printer, USB
modem, etc.). You can connect up to 16 USB devices via an additional USB hub (with its own power
supply).
After connecting the USB device to the USB port of your Gateway 400 and clicking Refresh, the USB
device will appear in the table Current USB Device Status.
Select the Enable USB Host Controller check box to make the attached USB devices available in your
network.
5.6.2.2 FTP Server
Here you can share your USB device on the network via an FTP server. In this way, the files that are
located on the attached USB mass storage device will be accessible on your local network or the In-
ternet. First, set up individual user profiles and select the directories and folders whose contents you
want to share. For each user profile, you can set different passwords and directories/folders. Once
you have set up the profiles and enabled the FTP server, you can access the directories/folders by
entering the following URL in your web browser or Windows Explorer: ftp://192.168.100.1
TCP Port: Port used for FTP connections. Default = 21
Maximum number of connections: Number of connections that can access the FTP server concur-
rently.
Idle Timeout: Timeout for automatic logout from idle FTP connections.
Remote Access: (De)activate connections to the FTP server from the Internet.
Zone: Select from which zone the FTP server can be accessed remotely. This selection is
only available if Remote Access has been enabled.
Attention
To prevent data loss on a USB mass storage device or even a failure of your USB device,
always click on “Remove” before disconnecting the USB mass storage device from your
device!
Gateway 400 User Guide | Configuration
34
5.6.3 Additional Features
5.6.3.1 Additional Features
Quagga
Quagga is an open source service that offers management of dynamic routing protocols such as
OSPF or BGP. It consists of a core component named Zebra, which applies routing information to
your system.
In addition, there are two further components (OSPF, BGP), which receive routing information from
the network and pass it on to Zebra. The use of the components named above is optional, but if you
want to use dynamic routing protocols, you will need to enable at least the zebra service and one
routing protocol service. You can enable/disable the services on this page.
To configure the services themselves you need to login via the command line interface (CLI), which
is listening on the configured ports. The default user credentials to log in are the User Name “ad-
min” and the Password “admin”. For security reasons, please change these credentials after en-
abling the appropriate services. For more information about configuring Quagga via the CLI, please
refer to the community documentation.
Zebra
Zebra is a core component, which applies routing information to your system. OSPF (Open Shortest
Path First) or BGP (Border Gateway Protocol) are used for sending and receiving the routing infor-
mation over the network. These two protocols must be activated separately before they can be
used.
5.7 Security
This screen dialog shows status information for the current security settings. The security settings
can be edited via the following menu items.
5.7.1 Firewall
5.7.1.1 Settings
Firewall
The Gateway 400 features a built-in Firewall to protect your home network and your Internet access
against unauthorized use. This firewall offers a comprehensive set of security settings to restrict In-
ternet access from the outside; it reduces the risk of hacker attacks and protects your network
against many common vulnerabilities and exposures.
The firewall of the Gateway 400 performs stateful packet inspection (SPI). Stateful inspection, also
referred to as Dynamic Packet Filtering, is a security feature which ensures that each data packet is
assigned to a specific active session. The data packets are analyzed in relation to their connection
state and stored in so-called dynamic state tables. The actual state of the data connection deter-
mines whether a data packet is forwarded or not. All data packets which do not match the defined
criteria, or which are likely to be part of a DoS attack, are discarded. With its SPI technology, the fire-
wall of the Gateway 400 is superior to conventional packet filter firewalls and therefore better suit-
ed for mission critical applications.
“Port Forwarding” on page 36 describes how to define exceptions for individual applications and
how to release the data traffic for these applications.
Enable IPv4 SPI: This option cannot be disabled.
Configuration | Gateway 400 User Guide
35
Enable IPv6 SPI: Use this option to enable the stateful packet inspection (SPI) firewall for IPv6 con-
nections.
Enable Firewall Logging: Use this option for logging firewall attacks. Go to System | Diagnostics |
System Messages to open the firewall log (Chapter 5.8.12.1, System Messages, on
page 46).
5.7.1.2 Schedule Rule
Click New to create a new schedule. If required, you can also create multiple schedules. Any existing
schedules are displayed in an overview. To edit a schedule, click on the pencil icon at the end of the
overview. .
Name: Here you can enter a name for your schedule.
Activate Time Period: Here you can specify the desired time period. For each day of the week, you
can specify the Start Time (hh:mm) and the End Time (hh:mm). For contiguous pe-
riods extending over several days, each intervening day must be specified as a full
day with the Start Time 00:00 and the End Time 23:59.
5.7.1.3 Firewall Rules
Click New to create a new firewall rule. The existing firewall rules are displayed in an overview. To
edit a firewall rule,
click on the pencil icon at the end of the overview. .
You can define IP-based client rules and assign pre-defined services to them or create your own cri-
teria. The following fields are available for this:
Automatically refresh provider prefix: (only valid for IPv6) If the computers on your local network
have IPv6 addresses, these consist of a local part and a provider prefix. This prefix is
assigned to you and can be updated automatically by the Gateway 400.
Client PC Description: Enter a name for the rule.
Address Type: Select the format of the IP address to create either an IPv4 or IPv6 address.
Client PC Address: Enter the IP address of the network device to which the rule should be applied.
Use the format of the previously selected Address Type. For IPv4, the rule can be ap-
plied to all devices in the home network with the address 192.168.100.0.
Scheduling Rule (Ref. Schedule Rule Page): If you created a schedule under “Schedule Rule” on
page 35, you can select it here.
Status: Here you can select whether the rule is enabled or disabled.
Client PC Service
Select the respective service name option (WWW, Sending email, SMTP, News Forums, Receiving
email, SecureHTTP, File Transfer, Telnet Service, NetMeeting, DNS, SNMP, VPN PPTP, VPN L2TP, TCP,
UDP) to specify which services are to be blocked.
If you block User-defined Services, the following section is enabled, in which you can individually
configure the TCP or UDP protocol and the Port Range.
5.7.1.4 IP Stack Settings
The device can detect and block conventional hacker attacks (such as IP Spoofing, Land Attack, Ping
of Death, IP with zero length, Smurf Attack, UDP port loopback, Snork Attack, TCP null scan and TCP
SYN flooding).
Attention
If you select Enable IPv6 SPI, all devices in your local network are directly accessible from
the Internet. Use this option only if you are familiar with the possible consequences!
Gateway 400 User Guide | Configuration
36
5.7.1.5 Zone Configuration
Here you will find an overview of pre-configured zones. A zone can never contain more than one in-
terface. The “policy” of each zone describes how to handle data packets for which no additional
rules exist. NAT (Network Address Translation) allows you replace the IP address of your PC with the
IP address of the Gateway 400.
ICMPv6 Filter
Here you can configure the ICMPv6 Filter settings that allow or deny incoming or outgoing ICMPv6
packets. The following filters can be selected:
destination-unreachable, packet-too-big, parameter-problem, time-exceeded, echo-request and
echo-reply
Edit entry
To edit a zone, click on the pencil icon at the end of the overview. This will open the Edit entry
screen dialog.
The Policy of each zone describes how to handle data packets for which no additional rules exist.
Allowed: This policy allows all packets which are not explicitly denied.
Denied: The policy allows only packets that are explicitly allowed (e.g., by opening specific
ports).
NAT: Network Address Translation replaces the local IP address of the network device
with the public IP address of the Gateway 400. This is required, for example, if the
network device has a private IP and you want to communicate with servers on the
Internet. This feature is only available for IPv4 connections!
ICMPv4
Enable ICMPv4 Filter: ICMP is used to exchange error and information messages. Since this feature
can also be used for malicious attacks in the network, you are given the option to
activate a filter.
ICMPv6
You can allow or deny incoming and outgoing ICMPv6 packets globally. If you want to allow only
specific packets, set the transmit direction to Filtered. You can then configure the ICMPv6 filter un-
der Zone Configuration to determine which packets are allowed.
5.7.2 Port Forwarding
Port forwarding allows computers within a local network to also be reached from the Internet. This
is important, for example, if you need to exchange data over the Internet or make a web server ac-
cessible from the Internet. Computer games may require configuring port forwarding to communi-
cate with other computers.
Note
Computers that are accessible via port forwarding from the Internet are also vulnerable
to attacks from the Internet. Make sure that your computer is adequately protected
against Internet attacks by installing appropriate security software and using secure
passwords. Change your passwords at regular intervals.
Configuration | Gateway 400 User Guide
37
5.7.2.1 Settings
To set up port forwarding for a computer in your home network, click New. Any existing port for-
wardings will be displayed in an overview. To edit a port forwarding, click on the pencil icon at the
end of the overview. .
Address Type: Select the format of the IP address to create either an IPv4 or IPv6 address.
Applications: If you select the option VPN, Audio/Video, Application or Server, the services of-
fered in the drop-down list under Applications will be adjusted accordingly. Select
the desired service from the drop-down list and click Copy. This will enter the de-
fault settings for the Protocol and the port range under LAN Port and Public Port. If
the specified port range differs from the required port range, you can change it.
This rule applies to all computers in the local network: (only valid for IPv6) You can assign a port for-
warding rule to a specific computer or all computers in your local network.
Enable port forwarding on all ports: (only valid for IPv6) This option allows you to enable port for-
warding on all ports.
Automatically refresh provider prefix: (only valid for IPv6) If the computers on your local network
have IPv6 addresses, these consist of a local part and a provider prefix. This prefix is
assigned to you and can be updated automatically by the Gateway 400.
Computer: Enter the IP address of the network device in your home network (LAN). Use the for-
mat of the previously selected Address Type. If the address 0.0.0.0 (IPv4) or ::0 (IPv6)
is used, the rule applies to all connected network devices.
Verify that the IP address entered here is specified as a static IP address at the ap-
propriate computer.
Protocol: Select the transmission protocol from the Protocol drop-down menu. With the TCP
protocol, requests are constantly sent during data transmission to ensure that the
transmitted data information has been received successfully. Information that is
lost is resent.
With the UDP protocol, the data information is sent continuously. No check is per-
formed to verify that the received data information is either complete or error-free.
LAN Port: Port number(s) or port range to/from the LAN. Possible values:
Port Range: e.g., 100-150
Multiple Ports: e.g., 25,110,80
Combination: e.g., 25-100,80
Public Port: Port number(s) or port range to/from the Internet or the WAN. Possible values:
Port Range: e.g., 100-150
Multiple Ports: e.g. 25,110,80
Combination: e.g., 25-100,80
External Computer: Enter the IP address of the network device in the external network (Internet/
WAN). Use the format of the previously selected Address Type. If the address 0.0.0.0
(IPv4) or ::0 (IPv6) is used, the rule applies to all external network addresses.
Source Zone: Select the source of the packets (e.g., Internet or provider network).
Status: Select this check box to enable the rule.
Click Save to confirm your settings and return to the Port Forwarding (Port Mapping) screen dialog.
The port mapping list contains all configured port forwardings. All rules for which the Status option
is set are marked with in the Status column; rules that are not enabled yet are marked with .
To apply the enabled rules you, set the option Activate port forwarding for the following services.
On clicking Save, all rules with the Status are enabled.
Gateway 400 User Guide | Configuration
38
5.7.2.2 Trigger Ports
Some applications such as Internet gaming, video conferencing, etc., require multiple connections.
These applications do not work when network address translation (NAT) is enabled. If you need to
run applications that require multiple connections, specify the port normally associated with an ap-
plication in the Trigger Port field and select the protocol type TCP or UDP. Then enter the public ports
associated with the Trigger Port. This opens them for inbound traffic.
To create a new trigger port, click on New. All trigger ports that have already been set up are dis-
played in the overview. To edit a previously configured trigger port, click on the respective pencil
icon at the end of the overview. .
You can preselect factory-configured services with the Trigger Ports option. Select the appropriate
service in the drop-down menu. The port range is entered automatically on clicking the Copy button.
If the specified port range differs from the required port range, you can change it.
For information on the TCP and UDP transmission protocols, refer to the previous chapter.
5.7.3 IPSec
IPsec (Internet Protocol Security) enables secure communication over potentially insecure IP net-
works such as the Internet, for example. Data packets that are forwarded from one computer to an-
other on the Internet can be read and modified by any computer involved. IPsec extends the Internet
Protocol with encryption and authentication options. This makes it possible to transport crypto-
graphically secured data packets over insecure public networks.
Enable IPSec connection: Setting the check mark causes the rule to be applied.
Remote site: Name of the network device with which data is to be exchanged.
Outbound interface: Interface to the Internet or WAN.
All other options must match the settings in the responder (server).
Click Save to store the settings in the Gateway 400.
Note
The Gateway 400 is intended to be used for the initiator mode (as a VPN client). All set-
tings in this screen dialog must match the settings in the responder (server).
Configuration | Gateway 400 User Guide
39
5.8 System
This screen displays a summary of the system settings and version information of the Gateway 400.
5.8.1 Protocol Stack
The Protocol Stack Editor enables you to easily edit the current network setup. Even the IP address
of the Gateway 400 is defined here.
In the protocol stack editor, the following elements are provided for the configuration:
In order to ensure that the configuration is successful, the following information should be taken
into account:
At least one Default Gateway must be specified.
In addition, a Backup Gateway to be used when the Default Gateway is not available can be op-
tionally set.
If IPv6 is to be used, this must be configured in the properties of the PPPoE connection.
More than one Layer 2 can be used on a physical interface (for example, VLAN stacking or a VLAN
in a bridge). To do this, click the “+” symbol in the Layer 2 column to create multiple L2 interfac-
es.
Behind every IP termination, an Alias must be set. Only then can the interface be used by the ser-
vices of the device and a firewall configuration also be created.
If changes are made to the protocol stack editor, then any previously made settings at the fire-
wall will be disabled. In addition, it should be checked whether any configured services of the
device are affected by the changes.
Physical: In this column, you specify the physical interface. Select DSL, WANoE, UMTS or LAN
from the drop-down menu. More information can be found under Physical Set-
tings, page 40.
Attention
Do not delete the IP address of the Gateway 400 in the LAN configuration! The Gateway
400 would then no longer be accessible via the user interface.
You can restore access by resetting the device to the factory state; however, all configu-
rations will be lost in the process (see also Reset Device, page 43).
Drop-down lists allow you to add new interfaces
Removes the respective element
Adjust the parameters
Element unconfigured (red)
Element is not modified (yellow)
Element configured correctly (green)
To configure Q-in-Q (double tagged VLAN) or bridges, please increase the Layer 2 stack
level with the “+” symbol.
Note
It is recommended to first configure the network configuration and then configure the
services of the device in order to avoid duplicating the configuration effort.
Gateway 400 User Guide | Configuration
40
Layer 2: Select Layer 2 in this column for the physical interface specified under Physical. You
can then specify the details for this by using the Pencil icon . The “+” symbol
can be used to expand the Layer 2 stack level. For more information, see Physical
Settings, page 40.
IP: In this column, you can define PPPoE, DHCP or StaticIP as the termination (destina-
tion) of the network configuration. For more information, see Physical Settings,
page 40.
Alias: In this column, you can select one or more aliases for the connection.
Default Gateway: The Default Gateway specifies the default gateway connection. Select the Default
Gateway from the drop-down menu.
Backup gateway: Under Backup Gateway, enter the backup connection to be used in cases when the
default gateway fails. Select the Backup Gateway from the drop-down menu.
Physical Settings
Define the data transmission method under Transport Layer Encoding.
To do this, select the physical interface DSL, WANoE, UMTS or LAN from the drop-down menu. To edit
the settings, click on the pencil icon . No configuration under Physical is required for UMTS and
WANoE.
Under DSL, specify whether ADSL or VDSL is involved. In addition, you will need to specify which an-
nex is to be used.
Click Save.
Layer 2 Settings
Configure Layer 2, depending on the data transmission method selected under Physical. Layer 2 is
the second layer (data link layer) of the OSI layer model. There is where the physical addressing with
error control, error correction and data flow control occurs.
Select the required Layer 2 from the drop-down menu.
Layer 2 configuration for the Physical setting DSL
For the physical interface DSL, you can select between the options ATM (ADSL), VLAN (VDSL) and
Bridge. To edit the settings, click on the pencil icon .
ATM Configuration
Select the option ATM for the physical interface ADSL. To edit the settings, click on the pencil
icon . The configuration parameters are explained below.
The parameters for VPI (Virtual Path Identifier) and VCI (Virtual Channel Identifier) can usually
be applied by default. Please check with your provider if any deviations are required.
Encapsulation specifies how data packets are encapsulated when packed for transport over
ATM. The appropriate settings are specified by the DSL provider.
Select the quality of service characteristic from the QoS class drop-down menu:
Note
The main parameters are explained under the following Settings. For more information,
please also refer to the relevant technical literature.
Configuration | Gateway 400 User Guide
41
With UBR (Unspecified Bit Rate), the bandwidth not used by other QoS features is used for
transmission. There are no specific requirements. Consequently, no bandwidth is reserved
with UBR.
With CBR (Constant Bit Rate), a fixed bandwidth is used for transmission.
With VBR-nrt and VBR-rt, a changing bandwidth within configured parameters is used.
Depending on which quality of service characteristic is selected in the QoS Class drop-down
menu, parameters can be specified in the four fields Min PCR (Peak Cell Rate), Max PCR, SCR
(Sustainable Cell Rate) and MBS (Maximum Burst Rate). The unit of these fields is specified in
cells. To change the parameters, you must convert the available bandwidth into cells. A cell con-
tains 424 bits.
Min PCR (Peak Cell Rate) and Max PCR define the minimum and maximum cell rates.
SCR (Sustainable Cell Rate) sets the average cell rate.
MBS (Maximum Burst Rate) determines for how many cells the maximum cell rate is to be
maintained.
VLAN Configuration
Details on the configuration of the VLAN interface can be obtained from Internet service pro-
vider.
Bridge Configuration
No configuration is required here.
Layer 2 configuration for the Physical setting WANoE
For the physical interface WANoE, you can define whether the specified port is to be used as a VLAN
or a bridge. To edit the settings, click on the pencil icon .
IP Settings
Set the parameters for PPPoE and StaticIP.
PPPoE
This sets up a point-to-point connection.
Specify the Status. Set the check mark if the data is valid. Without a check mark, the data is in-
valid. With the Idle Time (in seconds), you can specify the period of inactivity after which an ac-
tive Internet connection is to be cleared.
DHCP
IP addresses are obtained dynamically from network of the Internet service provider. No config-
uration is required for this.
StaticIP
The IP address for Internet access is static, i.e., assigned manually. To do this, enter the IP address
the network device and the IP address of the Default Gateway as well as at least one DNS Server.
Click Save.
Note
Note that specifying higher parameter values in the Min PCR, Max PCR, SCR and MBS
fields than those prescribed does not achieve a higher bandwidth! It could even result
in the parameters not being accepted and thus prevent the connection from being es-
tablished.
Gateway 400 User Guide | Configuration
42
5.8.2 Access Protection
Change login data for “admin
The device is supplied with one factory set administrator account.
The default access credentials for the administrator are as follows:
Access name: admin
Password: admin
To change this, enter the new login data and click Save.
Login Parameters
The Idle Timeout is factory set at 10 minutes. In other words, the session is automatically logged out
after 10 minutes of inactivity.
Setting the idle timeout to 1 or more minutes causes an automatic logout to occur if no activity
is detected in the user interface during this time period. After the timeout, the access data is re-
quested again.
If you set the idle timeout to 0 minutes, no automatic logout occurs.
Click Save.
5.8.3 System Time
The date and time of the Gateway 400 can be automatically synchronized with a time server or en-
tered manually. The device is factory set for automatic synchronization, which also takes automatic
changes for daylight saving time taken into account.
Activate automatic time synchronization: If you want to set the Date and Time manually, clear the
check mark. You can then edit the values in the other fields.
Update interval: Select the desired value from the drop-down list.
NTP interface: Select the interface over which the connection to the time server can be made from
the drop-down list.
Time Server ConfigurationDefault: de.pool.ntp.org. You can enter two time servers in the list. You
can add an additional time server to the list with New. Existing entries can be edit-
ed with the Pencil icon .
User-defined Time Settings: If the check box Activate automatic time synchronization is disabled,
you can enter the date and time manually.
Set Time Zone: The factory setting for the time zone is GMT+1:00. This corresponds to the value for
Germany.
Click Save.
5.8.4 Languages
The available languages are German and English.
5.8.5 Save Configuration
Here you have the option to save the currently made settings, for example, on the connected PC.
You can also load previously saved configurations again into the Gateway 400 and thus overwrite
any incorrect settings that may have been made with a functioning version.
Note
In order to Save and Load the configuration file, a Password must be specified.
Configuration | Gateway 400 User Guide
43
Under Save Configuration, you must first enter a Password. Then click Save. In the Download File
screen dialog, you will then need to click Save again. Now select the storage location. This depends
on the operating system and browser. Enter a file name, e.g., config.bin. Click Save.
To Load the saved configuration, click next to the Configuration file field on Browse. Select the file
in the new dialog box and enter the password. Then click Load.
The Gateway 400 is subsequently restarted, and after the configuration has completed successfully,
the Overview screen dialog is displayed.
5.8.6 Reset Device
With this screen dialog you can restart the Gateway 400 or reset it to the factory state.
Reboot Device
Restarting the Gateway 400 will not affect the existing settings and configurations.
To do this, click the Restart button. The message “Restarting your device” appears while your device
is being restarted. After the restart has completed, the Login is displayed. Please enter your access
data.
Reset Device
In the case of an invalid configuration, the Gateway 400 can be reset to the factory default state.
To reset the factory settings, click the Reset button. The message Resetting your device to the facto-
ry default state appears while the device is being reset. After the reset has completed, the Login
screen dialog is displayed. Enter the factory set login credentials: Access name “admin” and Pass-
word “admin”.
You will now need to set up the Chapter 4, Setup, on page 20Chapter 5, Configuration, on page 21
again as described in Gateway 400 or load a working backup configuration (as described in Chapter
5.8.5, Save Configuration, on page 42).
If you cannot access the user interface of the Gateway 400 or if you have forgotten your password,
you can also restart or reset the device by pressing the Reset button on the Gateway 400. Please re-
fer to Chapter 2.3, page 14.
Note
Loading a new configuration causes all ongoing telephone calls and Internet connec-
tions to be interrupted. Please keep this in mind before pressing the Load button.
Note
Restarting and Resetting the device will cause all ongoing telephone and Internet con-
nections to be interrupted.
Attention
All previously made settings will be lost in the process. You should therefore always save
working configurations as described in Chapter 5.8.5, Save Configuration, on page 42.
Note
To protect personal data, the Gateway 400 should be reset to the default factory state
when the owner of the device changes.
Gateway 400 User Guide | Configuration
44
5.8.7 Firmware Update
If your network provider of the Gateway 400 has sent you a new file for a manual firmware update
or if you have downloaded a new version from the Internet, you can import this via the user inter-
face. To do this, click the Browse button and select the appropriate file (*.bin) in the new screen dia-
log. Confirm the loading of the new firmware by using the Update button. The firmware update will
take about 3 minutes.
5.8.8 Remote Management
In this screen dialog, you can activate the remote management of Gateway 400. If you have set the
option Allow remote management for the following IPv4 address and/or Allow remote
management for the following IPv6 address, you can start the configuration of the Gateway 400 via
the Internet. With Host Address (IP address), Port Number and Zone, you can restrict the access op-
tions for the remote computers accessing the device.
If the Gateway 400 is configured as a
bridge, you must enable the WAN side ac-
cess for remote management. This re-
quires the protocol stack to be configured.
To do this, navigate to this screen dialog
via the menu item InternetAccess
SetupProtocol Stack.
bClick on the pencil icon for Bridge X..
cIn the new screen dialog, click on the
pencil icon for ATM X/YZ..
dIn the new screen dialog, select the
Allow Local Access check box. Click
Save.
5.8.9 SSH
This screen dialog is intended only for technical support personnel. It can be used to define the prop-
erties of the command line interface (CLI) for the remote management of Gateway 400. For this,
Enable SSH must be selected and at least one SSH client user must be defined (recommended). SSH
Client IP Addresses is used to restrict remote access to specific IP addresses.
Note
The firmware update interrupts all ongoing telephone calls and Internet connections.
Attention
If you enter the IP address 0.0.0.0 (IPv4) or ::0 (IPv6), you can access the Gateway 400
from any IP address on the Internet.
Attention
If 0.0.0.0 is entered as the IP address, any IP address can access the Gateway 400 from
the Internet.
d
c
b
Configuration | Gateway 400 User Guide
45
5.8.10 CWMP
5.8.10.1 ACS Configuration
CWMP (CPE WAN management protocol) is a transport protocol. It is used to transfer configuration
data from an Auto Configuration Server (ACS) to customer premises equipment (CPE) via a broad-
band connection.
The internet address (URL) of the ACS, as well as the associated user name and the password, must
be entered for this purpose. Click Save.
5.8.10.2 Client Configuration
Enter the Common Network Settings and the CNR Settings for your CNR (Connection Request) port.
Under Dynamic CNR Port, specify the whitelisted and blacklisted CNR ports.
5.8.11 SNMP
The SNMP Network Management Protocol allows you to monitor and control the individual net-
work components from a central management station. The network components are referred to as
the Agents, and the management station is referred to as the Manager. To communicate with each
other, the Agents and the Manager must be located in the same Community. The SNMP protocol al-
lows you to remotely configure network components, send error messages to the management sta-
tion, etc.
SNMP is disabled by default. To activate it, you must enable the option Enable SNMP Agent. Under
Community, specify the community in which your Agent and its associated Manager are located.
Click Save.
Gateway 400 User Guide | Configuration
46
5.8.12 Diagnostics
This screen is used for service purposes.
5.8.12.1 System Messages
This screen shows the system messages of the Gateway 400. This information is used for detecting
and diagnosing irregularities in the behavior of the Gateway 400.
5.8.12.2 Packet Tracer
Here you can activate packet tracing for all device interfaces and save the trace information to a file.
Select the appropriate interface from the Target Interface drop-down menu and click Start. Click
Save data to download the file to your computer and analyze it locally.
5.8.12.3 LED Test
This screen allows you to can simulate the various signaling statuses of the indicators and thus
helps you to familiarize yourself with the various LED states described in Chapter 2.1, page 12.
To create a clearly defined starting point, the LEDs should be turned off first. Select the Turn all LEDs
off check box and click Execute.
The LED test allows you to simulate different LED modes using various options.
The On/Off mode with the options Off and On.
The Flash mode with the options 2 Hz (flashing slowly) and 4 Hz (flashing fast).
The Timer mode is currently not supported.
After selecting the desired options from the drop-down menus, click Execute.
5.8.13 QoS
The Quality of Service (QoS) indicates the quality of a communication service. Here you can activate
the QoS settings for your device. QoS must be enabled for configured classes and rules to take effect
in the system. Please refer to “Class Creation” on page 47 and “Rule Creation” on page 47 for further
information and advanced settings.
5.8.13.1 Settings
WAN offers a lower bandwidth than LAN, thus clearly reducing the transmission quality of applica-
tions such as voice, games or VPN in the network. QoS can be used to classify the data traffic of these
applications (by type of traffic) and to reserve certain transfer speeds for them (Diffserv = differen-
tiated services).
To use QoS, select the Enable QoS Settings option.
Note
The LAN LED lights up for the Turn all LEDs off checkbox.
Note
To return to the current LED states, clear the Turn all LEDs off check box and then click
Execute.
Note
QoS classes will only take effect if appropriate QoS rules are created first.
Configuration | Gateway 400 User Guide
47
5.8.13.2 Class Creation
If you want to set up QoS for your local network, click New. The overview shows previously config-
ured QoS settings. To edit a QoS setting, click on the respective pencil icon at the end of the over-
view. .
The new screen dialog Edit Classes for Data Traffic allows you to create or edit QoS classes. To do this,
select the DSCP class from one of the following four main categories:
BE
Best Effort Forwarding.
AFxy
Assured Forwarding enables the transmission of four independent classes. Within a class, IP
packets can be assigned one of three different, assured priority levels.
CSx
The “Class selector (CS)” settings are used for IP priorities (IP Precedence) of the older Type of
Service (ToS) QoS to ensure backward compatibility.
EF
Expedited Forwarding is intended to provide low delay, low jitter and low loss in the delivery of
packets.
Once you have selected the desired DSCP class, you can pre-assign a certain percentage of the total
available bandwidth to it. Select the option Allow More to allow this value to be exceeded if needed.
Click Activate to enable the selected DSCP class. Click Save to save your settings and return to the
QoS Overview.
For the configured DSCP classes to take effect, select the option Enable QoS and click Save.
5.8.13.3 Rule Creation
In this screen, you can define classification rules to group outbound data packets into DSCP classes.
Click New to create a new rule. The existing rules are displayed in an overview. To edit a rule, click
on the respective pencil icon at the end of the overview. .
Enter a Rule Name. From the Traffic Type drop-down menu, select the appropriate application.
If the rule is to apply to one or more network devices, click Advanced. In the two new drop-down
menus Local IP Address and Remote Address, specify whether the rule is to apply to one or more net-
work devices. Enter the appropriate details in the input fields that appear (MAC address of the net-
work device, IP address range, IP subnet).
Select the Diffserv forwarding group int he Map to Forwarding Group drop-down list and click Save.
5.8.13.4 Statistics
This screen displays statistics about the traffic of Diffserv forwarding groups in the past 12 hours.
The display is automatically refreshed every 5 minutes.
Gateway 400 User Guide | Frequently Asked Questions
48
6 Frequently Asked Questions
Questions
You can read the frequently asked questions about the Gateway 400 here. The answers are provided
after each set of questions.
Question 1 I have been using a different modem in the past. Can I use the LAN cable to connect the
Gateway 400?(Answer on page 48)
Question 2 Can I connect multiple computers to the Gateway 400?(Answer on page 48)
Question 3 I cannot access the user interface of the Gateway 400.(Answer on page 48)
Question 4 How can I assign a static IP address for my computer?(Answer on page 48)
Answers
Question 1 I have been using a different modem in the past. Can I use the LAN cable to connect the
Gateway 400?
We recommend that you always use the supplied cable. You can, of course, also use your own net-
work cable to connect your computer.
Question 2 Can I connect multiple computers to the Gateway 400?
The Gateway 400 has two network ports that are labeled LAN1 and LAN2.
You can use these ports to connect additional computers or other network devices (such as network
printers, etc.). The network activity of the connected devices is indicated via the LAN1 and LAN2 LED
displays on the Gateway 400 . Please note that separate networks are involved.
Question 3 I cannot access the user interface of the Gateway 400.
Please check if the connection between your computer and the Gateway 400 is OK. One of the LAN
LEDs (LAN1 or LAN2) or the WLAN LED should be lit or blinking rapidly.
Please verify the network settings of your computer. Refer to Chapter 1.4, Computer Settings, on
page 10 for details.
Question 4 How can I assign a static IP address for my computer?
The automatic integration of your computer at the Gateway 400 only occurs if the DHCP server is
enabled. If the DHCP server is disabled, you will need to assign a static IP address to your computer.
To do this, change the he LAN settings of your computer as described below.
Under Windows 2000
Click on Start -> Settings -> Control Panel -> Network and Dial-up Connections.
Double-click on the icon LAN Connection and then click on the Properties button. This opens the
Local Area Connection Properties screen dialog.
Select Internet Protocol (TCP/IP).
Click on the Properties button. This opens the Properties of Internet Protocol (TCP/IPv4) screen
dialog.
Frequently Asked Questions | Gateway 400 User Guide
49
Select the option Use the following IP address. Then enter the following:
IP address 192.168.100.100 (if the Gateway 400 has the address 192.168.100.x)
Subnet mask 255.255.255.0
Click OK.
Under Windows XP
Click on Start -> Control Panel (switch to classic view if required) -> Networking Connections.
Double-click on the icon LAN Connection and then click on the Properties button. This opens the
Local Area Connection Properties screen dialog.
Select Internet Protocol (TCP/IP).
Click on the Properties button. This opens the Properties of Internet Protocol (TCP/IPv4) screen
dialog.
Select the option Use the following IP address. Then enter the following:
IP address 192.168.100.100 (if the Gateway 400 has the address 192.168.100.x)
Subnet mask 255.255.255.0
Click OK.
Under Windows Vista
Click on Start -> Control Panel (switch to classic view if required) -> Network and Sharing Center.
In the screen dialog on the left, under Tasks, select the Manage network connections option. In
the new screen dialog, double-click the icon LAN Connection and then click on the Properties
button. This opens the Local Area Connection Properties screen dialog.
Select Internet Protocol Version 4 (TCP/IPv4.
Click on the Properties button. This opens the screen dialog Properties of Internet Protocol Ver-
sion 4 (TCP/IPv4).
Select the option Use the following IP address. Then enter the following:
IP address 192.168.100.100 (if the Gateway 400 has the address 192.168.100.x)
Subnet mask 255.255.255.0
Click OK.
Under Windows 7
Click on Start -> Control Panel (switch to the Large Icons (top right) if required) -> Network and
Sharing Center.
In the screen dialog, select the option Change adapter settings shown on the left. In the new
screen dialog, double-click the icon LAN Connection and then click on the Properties button. This
opens the Local Area Connection Properties screen dialog.
Select Internet Protocol Version 4 (TCP/IPv4.
Click on the Properties button. This opens the screen dialog Properties of Internet Protocol Ver-
sion 4 (TCP/IPv4).
Select the option Use the following IP address. Then enter the following:
IP address 192.168.100.100 (if the Gateway 400 has the address 192.168.100.x)
Subnet mask 255.255.255.0
Click OK.
Gateway 400 User Guide | Legal Notices
50
7 Legal Notices
GNU General Public License
Some of the software used in ZyXEL products is subject to the so-called “GNU General Public License.” In accordance with the provi-
sions of this license, you can continue to use the software that we publish. Please note, however, that we do not assume any liability
or provide any warranty for the software released by us under the “GNU General Public License” according to the license terms.
You may copy and distribute verbatim copies of the Program’s source code as you receive it, in any medium, provided that you con-
spicuously and appropriately publish on each copy an appropriate copyright notice and disclaimer of warranty; keep intact all the no-
tices that refer to this License and to the absence of any warranty; and give any other recipients of the Program a copy of this License
along with the Program.
The GNU General Public License is available in a legally binding form in English on the Internet at
http://www.gnu.org/licenses/gpl.html . The German translation can be viewed at http://www.gnu.de/gpl-ger.html.
If you want to receive the corresponding open source code covered by these licenses, please contact the Technical Support of ZyXEL
at support@zyxel.de .
The original text of the GNU General Public License is reproduced below.
GNU GENERAL PUBLIC LICENSE
Version 3, 29 June 2007
Copyright © 2007 Free Software Foundation, Inc. <http://fsf.org/ >
Everyone is permitted to copy and distribute verbatim copies of this license docu-
ment, but changing it is not allowed.
Preamble
The GNU General Public License is a free, copyleft license for software and other
kinds of works.
The licenses for most software and other practical works are designed to take
away your freedom to share and change the works. By contrast, the GNU General
Public License is intended to guarantee your freedom to share and change all ver-
sions of a program--to make sure it remains free software for all its users. We, the
Free Software Foundation, use the GNU General Public License for most of our
software; it applies also to any other work released this way by its authors. You
can apply it to your programs, too.
When we speak of free software, we are referring to freedom, not price. Our Gen-
eral Public Licenses are designed to make sure that you have the freedom to dis-
tribute copies of free software (and charge for them if you wish), that you receive
source code or can get it if you want it, that you can change the software or use
pieces of it in new free programs, and that you know you can do these things.
To protect your rights, we need to prevent others from denying you these rights or
asking you to surrender the rights. Therefore, you have certain responsibilities if
you distribute copies of the software, or if you modify it: responsibilities to respect
the freedom of others.
For example, if you distribute copies of such a program, whether gratis or for a fee,
you must pass on to the recipients the same freedoms that you received. You
must make sure that they, too, receive or can get the source code. And you must
show them these terms so they know their rights.
Developers that use the GNU GPL protect your rights with two steps: (1) assert
copyright on the software, and (2) offer you this License giving you legal permis-
sion to copy, distribute and/or modify it.
For the developers’ and authors’ protection, the GPL clearly explains that there is
no warranty for this free software. For both users’ and authors’ sake, the GPL re-
quires that modified versions be marked as changed, so that their problems will
not be attributed erroneously to authors of previous versions.
Some devices are designed to deny users access to install or run modified ver-
sions of the software inside them, although the manufacturer can do so. This is
fundamentally incompatible with the aim of protecting users’ freedom to change
the software. The systematic pattern of such abuse occurs in the area of products
for individuals to use, which is precisely where it is most unacceptable. Therefore,
we have designed this version of the GPL to prohibit the practice for those prod-
ucts. If such problems arise substantially in other domains, we stand ready to ex-
tend this provision to those domains in future versions of the GPL, as needed to
protect the freedom of users.
Finally, every program is threatened constantly by software patents. States should
not allow patents to restrict development and use of software on general-purpose
computers, but in those that do, we wish to avoid the special danger that patents
applied to a free program could make it effectively proprietary. To prevent this, the
GPL assures that patents cannot be used to render the program non-free.
The precise terms and conditions for copying, distribution and modification follow.
TERMS AND CONDITIONS
0. Definitions.
“This License” refers to version 3 of the GNU General Public License.
“Copyright” also means copyright-like laws that apply to other kinds of works, such
as semiconductor masks.
“The Program” refers to any copyrightable work licensed under this License. Each
licensee is addressed as “you”. “Licensees” and “recipients” may be individuals or
organizations.
To “modify” a work means to copy from or adapt all or part of the work in a fashion
requiring copyright permission, other than the making of an exact copy. The result-
ing work is called a “modified version” of the earlier work or a work “based on” the
earlier work.
A “covered work” means either the unmodified Program or a work based on the
Program.
To “propagate” a work means to do anything with it that, without permission, would
make you directly or secondarily liable for infringement under applicable copyright
law, except executing it on a computer or modifying a private copy. Propagation
includes copying, distribution (with or without modification), making available to
the public, and in some countries other activities as well.
To “convey” a work means any kind of propagation that enables other parties to
make or receive copies. Mere interaction with a user through a computer network,
with no transfer of a copy, is not conveying.
An interactive user interface displays “Appropriate Legal Notices” to the extent
that it includes a convenient and prominently visible feature that (1) displays an
appropriate copyright notice, and (2) tells the user that there is no warranty for the
work (except to the extent that warranties are provided), that licensees may con-
vey the work under this License, and how to view a copy of this License. If the in-
terface presents a list of user commands or options, such as a menu, a prominent
item in the list meets this criterion.
1. Source Code.
The “source code” for a work means the preferred form of the work for making
modifications to it. “Object code” means any non-source form of a work.
A “Standard Interface” means an interface that either is an official standard de-
fined by a recognized standards body, or, in the case of interfaces specified for a
particular programming language, one that is widely used among developers
working in that language.
The “System Libraries” of an executable work include anything, other than the
work as a whole, that (a) is included in the normal form of packaging a Major Com-
ponent, but which is not part of that Major Component, and (b) serves only to en-
able use of the work with that Major Component, or to implement a Standard
Interface for which an implementation is available to the public in source code
form. A “Major Component”, in this context, means a major essential component
(kernel, window system, and so on) of the specific operating system (if any) on
which the executable work runs, or a compiler used to produce the work, or an ob-
ject code interpreter used to run it.
The “Corresponding Source” for a work in object code form means all the source
code needed to generate, install, and (for an executable work) run the object code
and to modify the work, including scripts to control those activities. However, it
does not include the work’s System Libraries, or general-purpose tools or gener-
ally available free programs which are used unmodified in performing those activ-
ities but which are not part of the work. For example, Corresponding Source
includes interface definition files associated with source files for the work, and the
source code for shared libraries and dynamically linked subprograms that the
work is specifically designed to require, such as by intimate data communication
or control flow between those subprograms and other parts of the work.
The Corresponding Source need not include anything that users can regenerate
automatically from other parts of the Corresponding Source.
The Corresponding Source for a work in source code form is that same work.
Legal Notices | Gateway 400 User Guide
51
2. Basic Permissions.
All rights granted under this License are granted for the term of copyright on the
Program, and are irrevocable provided the stated conditions are met. This License
explicitly affirms your unlimited permission to run the unmodified Program. The
output from running a covered work is covered by this License only if the output,
given its content, constitutes a covered work. This License acknowledges your
rights of fair use or other equivalent, as provided by copyright law.
You may make, run and propagate covered works that you do not convey, without
conditions so long as your license otherwise remains in force. You may convey
covered works to others for the sole purpose of having them make modifications
exclusively for you, or provide you with facilities for running those works, provided
that you comply with the terms of this License in conveying all material for which
you do not control copyright. Those thus making or running the covered works for
you must do so exclusively on your behalf, under your direction and control, on
terms that prohibit them from making any copies of your copyrighted material out-
side their relationship with you.
Conveying under any other circumstances is permitted solely under the conditions
stated below. Sublicensing is not allowed; section 10 makes it unnecessary.
3. Protecting Users’ Legal Rights From Anti-Circumvention Law.
No covered work shall be deemed part of an effective technological measure un-
der any applicable law fulfilling obligations under article 11 of the WIPO copyright
treaty adopted on 20 December 1996, or similar laws prohibiting or restricting cir-
cumvention of such measures.
When you convey a covered work, you waive any legal power to forbid circumven-
tion of technological measures to the extent such circumvention is effected by ex-
ercising rights under this License with respect to the covered work, and you
disclaim any intention to limit operation or modification of the work as a means of
enforcing, against the work’s users, your or third parties’ legal rights to forbid cir-
cumvention of technological measures.
4. Conveying Verbatim Copies.
You may convey verbatim copies of the Program’s source code as you receive it,
in any medium, provided that you conspicuously and appropriately publish on
each copy an appropriate copyright notice; keep intact all notices stating that this
License and any non-permissive terms added in accord with section 7 apply to the
code; keep intact all notices of the absence of any warranty; and give all recipients
a copy of this License along with the Program.
You may charge any price or no price for each copy that you convey, and you may
offer support or warranty protection for a fee.
5. Conveying Modified Source Versions.
You may convey a work based on the Program, or the modifications to produce it
from the Program, in the form of source code under the terms of section 4, provid-
ed that you also meet all of these conditions:
a) The work must carry prominent notices stating that you modified it, and giving
a relevant date.
b) The work must carry prominent notices stating that it is released under this Li-
cense and any conditions added under section 7. This requirement modifies the
requirement in section 4 to “keep intact all notices”.
c) You must license the entire work, as a whole, under this License to anyone who
comes into possession of a copy. This License will therefore apply, along with any
applicable section 7 additional terms, to the whole of the work, and all its parts,
regardless of how they are packaged. This License gives no permission to license
the work in any other way, but it does not invalidate such permission if you have
separately received it.
d) If the work has interactive user interfaces, each must display Appropriate Legal
Notices; however, if the Program has interactive interfaces that do not display Ap-
propriate Legal Notices, your work need not make them do so.
A compilation of a covered work with other separate and independent works,
which are not by their nature extensions of the covered work, and which are not
combined with it such as to form a larger program, in or on a volume of a storage
or distribution medium, is called an “aggregate” if the compilation and its resulting
copyright are not used to limit the access or legal rights of the compilation’s users
beyond what the individual works permit. Inclusion of a covered work in an aggre-
gate does not cause this License to apply to the other parts of the aggregate.
6. Conveying Non-Source Forms.
You may convey a covered work in object code form under the terms of sections
4 and 5, provided that you also convey the machine-readable Corresponding
Source under the terms of this License, in one of these ways:
a) Convey the object code in, or embodied in, a physical product (including a phys-
ical distribution medium), accompanied by the Corresponding Source fixed on a
durable physical medium customarily used for software interchange.
b) Convey the object code in, or embodied in, a physical product (including a phys-
ical distribution medium), accompanied by a written offer, valid for at least three
years and valid for as long as you offer spare parts or customer support for that
product model, to give anyone who possesses the object code either (1) a copy of
the Corresponding Source for all the software in the product that is covered by this
License, on a durable physical medium customarily used for software interchange,
for a price no more than your reasonable cost of physically performing this con-
veying of source, or (2) access to copy the Corresponding Source from a network
server at no charge.
c) Convey individual copies of the object code with a copy of the written offer to
provide the Corresponding Source. This alternative is allowed only occasionally
and noncommercially, and only if you received the object code with such an offer,
in accord with subsection 6b.
d) Convey the object code by offering access from a designated place (gratis or
for a charge), and offer equivalent access to the Corresponding Source in the
same way through the same place at no further charge. You need not require re-
cipients to copy the Corresponding Source along with the object code. If the place
to copy the object code is a network server, the Corresponding Source may be on
a different server (operated by you or a third party) that supports equivalent copy-
ing facilities, provided you maintain clear directions next to the object code saying
where to find the Corresponding Source. Regardless of what server hosts the Cor-
responding Source, you remain obligated to ensure that it is available for as long
as needed to satisfy these requirements.
e) Convey the object code using peer-to-peer transmission, provided you inform
other peers where the object code and Corresponding Source of the work are be-
ing offered to the general public at no charge under subsection 6d.
A separable portion of the object code, whose source code is excluded from the
Corresponding Source as a System Library, need not be included in conveying the
object code work.
A “User Product” is either (1) a “consumer product”, which means any tangible
personal property which is normally used for personal, family, or household pur-
poses, or (2) anything designed or sold for incorporation into a dwelling. In deter-
mining whether a product is a consumer product, doubtful cases shall be resolved
in favor of coverage. For a particular product received by a particular user, “nor-
mally used” refers to a typical or common use of that class of product, regardless
of the status of the particular user or of the way in which the particular user actually
uses, or expects or is expected to use, the product. A product is a consumer prod-
uct regardless of whether the product has substantial commercial, industrial or
non-consumer uses, unless such uses represent the only significant mode of use
of the product.
“Installation Information” for a User Product means any methods, procedures, au-
thorization keys, or other information required to install and execute modified ver-
sions of a covered work in that User Product from a modified version of its
Corresponding Source. The information must suffice to ensure that the continued
functioning of the modified object code is in no case prevented or interfered with
solely because modification has been made.
If you convey an object code work under this section in, or with, or specifically for
use in, a User Product, and the conveying occurs as part of a transaction in which
the right of possession and use of the User Product is transferred to the recipient
in perpetuity or for a fixed term (regardless of how the transaction is character-
ized), the Corresponding Source conveyed under this section must be accompa-
nied by the Installation Information. But this requirement does not apply if neither
you nor any third party retains the ability to install modified object code on the User
Product (for example, the work has been installed in ROM).
The requirement to provide Installation Information does not include a requirement
to continue to provide support service, warranty, or updates for a work that has
been modified or installed by the recipient, or for the User Product in which it has
been modified or installed. Access to a network may be denied when the modifi-
cation itself materially and adversely affects the operation of the network or vio-
lates the rules and protocols for communication across the network.
Corresponding Source conveyed, and Installation Information provided, in accord
with this section must be in a format that is publicly documented (and with an im-
plementation available to the public in source code form), and must require no
special password or key for unpacking, reading or copying.
7. Additional Terms.
“Additional permissions” are terms that supplement the terms of this License by
making exceptions from one or more of its conditions. Additional permissions that
are applicable to the entire Program shall be treated as though they were included
in this License, to the extent that they are valid under applicable law. If additional
permissions apply only to part of the Program, that part may be used separately
under those permissions, but the entire Program remains governed by this Li-
cense without regard to the additional permissions.
When you convey a copy of a covered work, you may at your option remove any
additional permissions from that copy, or from any part of it. (Additional permis-
sions may be written to require their own removal in certain cases when you mod-
ify the work.) You may place additional permissions on material, added by you to
a covered work, for which you have or can give appropriate copyright permission.
Notwithstanding any other provision of this License, for material you add to a cov-
ered work, you may (if authorized by the copyright holders of that material) sup-
plement the terms of this License with terms:
a) Disclaiming warranty or limiting liability differently from the terms of sections 15
and 16 of this License; or
b) Requiring preservation of specified reasonable legal notices or author attribu-
tions in that material or in the Appropriate Legal Notices displayed by works con-
taining it; or
c) Prohibiting misrepresentation of the origin of that material, or requiring that
modified versions of such material be marked in reasonable ways as different from
the original version; or
d) Limiting the use for publicity purposes of names of licensors or authors of the
material; or
Gateway 400 User Guide | Legal Notices
52
e) Declining to grant rights under trademark law for use of some trade names,
trademarks, or service marks; or
f) Requiring indemnification of licensors and authors of that material by anyone
who conveys the material (or modified versions of it) with contractual assumptions
of liability to the recipient, for any liability that these contractual assumptions di-
rectly impose on those licensors and authors.
All other non-permissive additional terms are considered “further restrictions” with-
in the meaning of section 10. If the Program as you received it, or any part of it,
contains a notice stating that it is governed by this License along with a term that
is a further restriction, you may remove that term. If a license document contains
a further restriction but permits relicensing or conveying under this License, you
may add to a covered work material governed by the terms of that license docu-
ment, provided that the further restriction does not survive such relicensing or con-
veying.
If you add terms to a covered work in accord with this section, you must place, in
the relevant source files, a statement of the additional terms that apply to those
files, or a notice indicating where to find the applicable terms.
Additional terms, permissive or non-permissive, may be stated in the form of a
separately written license, or stated as exceptions; the above requirements apply
either way.
8. Termination.
You may not propagate or modify a covered work except as expressly provided
under this License. Any attempt otherwise to propagate or modify it is void, and
will automatically terminate your rights under this License (including any patent li-
censes granted under the third paragraph of section 11).
However, if you cease all violation of this License, then your license from a partic-
ular copyright holder is reinstated (a) provisionally, unless and until the copyright
holder explicitly and finally terminates your license, and (b) permanently, if the
copyright holder fails to notify you of the violation by some reasonable means prior
to 60 days after the cessation.
Moreover, your license from a particular copyright holder is reinstated permanent-
ly if the copyright holder notifies you of the violation by some reasonable means,
this is the first time you have received notice of violation of this License (for any
work) from that copyright holder, and you cure the violation prior to 30 days after
your receipt of the notice.
Termination of your rights under this section does not terminate the licenses of
parties who have received copies or rights from you under this License. If your
rights have been terminated and not permanently reinstated, you do not qualify to
receive new licenses for the same material under section 10.
9. Acceptance Not Required for Having Copies.
You are not required to accept this License in order to receive or run a copy of the
Program. Ancillary propagation of a covered work occurring solely as a conse-
quence of using peer-to-peer transmission to receive a copy likewise does not re-
quire acceptance. However, nothing other than this License grants you permission
to propagate or modify any covered work. These actions infringe copyright if you
do not accept this License. Therefore, by modifying or propagating a covered
work, you indicate your acceptance of this License to do so.
10. Automatic Licensing of Downstream Recipients.
Each time you convey a covered work, the recipient automatically receives a li-
cense from the original licensors, to run, modify and propagate that work, subject
to this License. You are not responsible for enforcing compliance by third parties
with this License.
An “entity transaction” is a transaction transferring control of an organization, or
substantially all assets of one, or subdividing an organization, or merging organi-
zations. If propagation of a covered work results from an entity transaction, each
party to that transaction who receives a copy of the work also receives whatever
licenses to the work the party’s predecessor in interest had or could give under the
previous paragraph, plus a right to possession of the Corresponding Source of the
work from the predecessor in interest, if the predecessor has it or can get it with
reasonable efforts.
You may not impose any further restrictions on the exercise of the rights granted
or affirmed under this License. For example, you may not impose a license fee,
royalty, or other charge for exercise of rights granted under this License, and you
may not initiate litigation (including a cross-claim or counterclaim in a lawsuit) al-
leging that any patent claim is infringed by making, using, selling, offering for sale,
or importing the Program or any portion of it.
11. Patents.
A “contributor” is a copyright holder who authorizes use under this License of the
Program or a work on which the Program is based. The work thus licensed is
called the contributor’s “contributor version”.
A contributor’s “essential patent claims” are all patent claims owned or controlled
by the contributor, whether already acquired or hereafter acquired, that would be
infringed by some manner, permitted by this License, of making, using, or selling
its contributor version, but do not include claims that would be infringed only as a
consequence of further modification of the contributor version. For purposes of
this definition, “control” includes the right to grant patent sublicenses in a manner
consistent with the requirements of this License.
Each contributor grants you a non-exclusive, worldwide, royalty-free patent li-
cense under the contributor’s essential patent claims, to make, use, sell, offer for
sale, import and otherwise run, modify and propagate the contents of its contribu-
tor version.
In the following three paragraphs, a “patent license” is any express agreement or
commitment, however denominated, not to enforce a patent (such as an express
permission to practice a patent or covenant not to sue for patent infringement). To
“grant” such a patent license to a party means to make such an agreement or com-
mitment not to enforce a patent against the party.
If you convey a covered work, knowingly relying on a patent license, and the Cor-
responding Source of the work is not available for anyone to copy, free of charge
and under the terms of this License, through a publicly available network server or
other readily accessible means, then you must either (1) cause the Corresponding
Source to be so available, or (2) arrange to deprive yourself of the benefit of the
patent license for this particular work, or (3) arrange, in a manner consistent with
the requirements of this License, to extend the patent license to downstream re-
cipients. “Knowingly relying” means you have actual knowledge that, but for the
patent license, your conveying the covered work in a country, or your recipient’s
use of the covered work in a country, would infringe one or more identifiable pat-
ents in that country that you have reason to believe are valid.
If, pursuant to or in connection with a single transaction or arrangement, you con-
vey, or propagate by procuring conveyance of, a covered work, and grant a patent
license to some of the parties receiving the covered work authorizing them to use,
propagate, modify or convey a specific copy of the covered work, then the patent
license you grant is automatically extended to all recipients of the covered work
and works based on it.
A patent license is “discriminatory” if it does not include within the scope of its cov-
erage, prohibits the exercise of, or is conditioned on the non-exercise of one or
more of the rights that are specifically granted under this License. You may not
convey a covered work if you are a party to an arrangement with a third party that
is in the business of distributing software, under which you make payment to the
third party based on the extent of your activity of conveying the work, and under
which the third party grants, to any of the parties who would receive the covered
work from you, a discriminatory patent license (a) in connection with copies of the
covered work conveyed by you (or copies made from those copies), or (b) primar-
ily for and in connection with specific products or compilations that contain the cov-
ered work, unless you entered into that arrangement, or that patent license was
granted, prior to 28 March 2007.
Nothing in this License shall be construed as excluding or limiting any implied li-
cense or other defenses to infringement that may otherwise be available to you
under applicable patent law.
12. No Surrender of Others’ Freedom.
If conditions are imposed on you (whether by court order, agreement or otherwise)
that contradict the conditions of this License, they do not excuse you from the con-
ditions of this License. If you cannot convey a covered work so as to satisfy simul-
taneously your obligations under this License and any other pertinent obligations,
then as a consequence you may not convey it at all. For example, if you agree to
terms that obligate you to collect a royalty for further conveying from those to
whom you convey the Program, the only way you could satisfy both those terms
and this License would be to refrain entirely from conveying the Program.
13. Use with the GNU Affero General Public License.
Notwithstanding any other provision of this License, you have permission to link
or combine any covered work with a work licensed under version 3 of the GNU
Affero General Public License into a single combined work, and to convey the re-
sulting work. The terms of this License will continue to apply to the part which is
the covered work, but the special requirements of the GNU Affero General Public
License, section 13, concerning interaction through a network will apply to the
combination as such.
14. Revised Versions of this License.
The Free Software Foundation may publish revised and/or new versions of the
GNU General Public License from time to time. Such new versions will be similar
in spirit to the present version, but may differ in detail to address new problems or
concerns.
Each version is given a distinguishing version number. If the Program specifies
that a certain numbered version of the GNU General Public License “or any later
version” applies to it, you have the option of following the terms and conditions ei-
ther of that numbered version or of any later version published by the Free Soft-
ware Foundation. If the Program does not specify a version number of the GNU
General Public License, you may choose any version ever published by the Free
Software Foundation.
If the Program specifies that a proxy can decide which future versions of the GNU
General Public License can be used, that proxy’s public statement of acceptance
of a version permanently authorizes you to choose that version for the Program.
Later license versions may give you additional or different permissions. However,
no additional obligations are imposed on any author or copyright holder as a result
of your choosing to follow a later version.
15. Disclaimer of Warranty.
THERE IS NO WARRANTY FOR THE PROGRAM, TO THE EXTENT PERMIT-
TED BY APPLICABLE LAW. EXCEPT WHEN OTHERWISE STATED IN WRIT-
ING THE COPYRIGHT HOLDERS AND/OR OTHER PARTIES PROVIDE THE
PROGRAM “AS IS” WITHOUT WARRANTY OF ANY KIND, EITHER EX-
PRESSED OR IMPLIED, INCLUDING, BUT NOT LIMITED TO, THE IMPLIED
WARRANTIES OF MERCHANTABILITY AND FITNESS FOR A PARTICULAR
PURPOSE. THE ENTIRE RISK AS TO THE QUALITY AND PERFORMANCE OF
THE PROGRAM IS WITH YOU. SHOULD THE PROGRAM PROVE DEFEC-
TIVE, YOU ASSUME THE COST OF ALL NECESSARY SERVICING, REPAIR
OR CORRECTION.
Legal Notices | Gateway 400 User Guide
53
7.1 Disposal
According to the Electrical and Electronic Equipment Act, owners of old devices are
obliged to dispose of old electrical and electronic equipment in a separate waste con-
tainer. Please help with and contribute to environmental protection by not disposing
the old device and accessories in the regular household waste. Take the old device and
accessories to a collection point provided by your local public waste authorities (e.g., a
recycling center).
7.2 CE Declaration of Conformity
This product complies with the R&TTE Directive 1999/5/EC.
The conformity of the product with the applicable standards and norms is confirmed by
the CE mark.
The EC declaration of conformity can viewed on the Internet at www.zyxel.de on the appropriate
product page.
16. Limitation of Liability.
IN NO EVENT UNLESS REQUIRED BY APPLICABLE LAW OR AGREED TO IN
WRITING WILL ANY COPYRIGHT HOLDER, OR ANY OTHER PARTY WHO
MODIFIES AND/OR CONVEYS THE PROGRAM AS PERMITTED ABOVE, BE
LIABLE TO YOU FOR DAMAGES, INCLUDING ANY GENERAL, SPECIAL, IN-
CIDENTAL OR CONSEQUENTIAL DAMAGES ARISING OUT OF THE USE OR
INABILITY TO USE THE PROGRAM (INCLUDING BUT NOT LIMITED TO LOSS
OF DATA OR DATA BEING RENDERED INACCURATE OR LOSSES SUS-
TAINED BY YOU OR THIRD PARTIES OR A FAILURE OF THE PROGRAM TO
OPERATE WITH ANY OTHER PROGRAMS), EVEN IF SUCH HOLDER OR
OTHER PARTY HAS BEEN ADVISED OF THE POSSIBILITY OF SUCH DAM-
AGES.
17. Interpretation of Sections 15 and 16.
If the disclaimer of warranty and limitation of liability provided above cannot be giv-
en local legal effect according to their terms, reviewing courts shall apply local law
that most closely approximates an absolute waiver of all civil liability in connection
with the Program, unless a warranty or assumption of liability accompanies a copy
of the Program in return for a fee.
END OF TERMS AND CONDITIONS
How to Apply These Terms to Your New Programs
If you develop a new program, and you want it to be of the greatest possible use
to the public, the best way to achieve this is to make it free software which every-
one can redistribute and change under these terms.
To do so, attach the following notices to the program. It is safest to attach them to
the start of each source file to most effectively state the exclusion of warranty; and
each file should have at least the “copyright” line and a pointer to where the full
notice is found.
<one line to give the program’s name and a brief idea of what it does.>
Copyright (C) <year> <name of author>
This program is free software: you can redistribute it and/or modify it under the
terms of the GNU General Public License as published by the Free Software
Foundation, either version 3 of the License, or (at your option) any later version.
This program is distributed in the hope that it will be useful, but WITHOUT ANY
WARRANTY; without even the implied warranty of MERCHANTABILITY or FIT-
NESS FOR A PARTICULAR PURPOSE. See the GNU General Public License
for more details. You should have received a copy of the GNU General Public Li-
cense along with this program. If not, see <http://www.gnu.org/licenses/>.
Also add information on how to contact you by electronic and paper mail.
If the program does terminal interaction, make it output a short notice like this
when it starts in an interactive mode:
<program> Copyright (C) <year> <name of author>
This program comes with ABSOLUTELY NO WARRANTY; for details type
`show w’.
This is free software, and you are welcome to redistribute it under certain con-
ditions; type `show c’ for details.
The hypothetical commands `show w’ and `show c’ should show the appropriate
parts of the General Public License. Of course, your program’s commands might
be different; for a GUI interface, you would use an “about box”.
You should also get your employer (if you work as a programmer) or school, if any,
to sign a “copyright disclaimer” for the program, if necessary. For more information
on this, and how to apply and follow the GNU GPL, see
http://www.gnu.org/licenses/
The GNU General Public License does not permit incorporating your program into
proprietary programs. If your program is a subroutine library, you may consider it
more useful to permit linking proprietary applications with the library. If this is what
you want to do, use the GNU Lesser General Public License instead of this Li-
cense. But first, please read
http://www.gnu.org/philosophy/why-not-lgpl.html.
Gateway 400 User Guide | Legal Notices
54
Technical Data | Gateway 400 User Guide
55
8 Technical Data
Interfaces
WAN port
VDSL2/ADSL2 - interface
VDSL2 ITU-T G.993.2
Frequency plan: 998 (997),
Profiles 8 MHz ... 30 MHz
ADSL, ADSL2 and ADSL2+
Annex B and J, U-R2, T-Com 1TR112,
Annex A
Connectors: RJ45 according to DIN EN
60603-7
WAN over Ethernet (WANoE)
LAN interfaces
1000 Base-T, according to IEEEE 802.3
Autonegotiation
MDI/MDIX
S0 interfaces
Up to 4 BRI ports
According to ITU-T I.430
Power feedable;
Power output: max. 420 mW
Supply voltage: 34-42 V DC
in reverse polarity
DSS-1 protocol
Telephony
SIP conformant according to RFC 3261 V2.0
Manage up to 10 Internet (SIP) accounts
Up to 8 simultaneous connections (provider-
dependent)
Support for service features:
CLIP
CLIR
CFx
CW
CH
3PTY
64k (Clear Channel)
Voice Activity Detection,
Comfort Noise Generation
Echo compensation: G.168-compatible
DTMF:
In-band
Out-band
SIP Info
Codec and voice compression
G.711 a-law/μ-law
G.726
G.729
T.38 Support
Adaptive/fixed jitter buffer - max 180 ms
RTP/SRTP Protocol Support
(RFC3550, RFC3711)
Silence Compression
Comfort Noise Generation
Additional Features
Internal clock generation - 5ppm
Synchronization via GPS, SyncE, ACR,
IEEE 1588 as an option
Management
Web server with HTTP version 1.0 and 1.1
Web-based device management
TR-069/TR-104 Remote Management
Telnet/TFTP Server
TR-069 and web-based firmware upgrade
Gateway 400 User Guide | Technical Data
56
Networking
2/3 Gigabit Ethernet Ports (LAN)
DHCP Client/Server
PPPoE Client (Multi-Session)
VLAN, secondary IP
NAT
DNS
Integrated SPI Firewall
PAP/CHAP Authentication
SSH / SSL client for management support
QoS
Voice priority
IEEE 802.1p, IEEE 802.1Q
4096 VLANs (tag insertion/deletion)
General Data
Dimensions (H x W x D): 45 x 245 x 165 mm
Integrated power supply
Nominal voltage: 230 V AC
Power consumption: 200 mA (maximum)
Nominal frequency: 50 Hz
Passwords | Gateway 400 User Guide
57
9 Passwords
You can record the user names, passwords, etc., which were assigned for your Gateway 400 here for
later reference at a glance.
Note! My Gateway 400 user name and password for access protection.
Factory default credentials: Access name: admin / Password: admin
Page 20 and Page 42, Access Protection
Access Name:
Password:
Note!
Note! My Internet access credentials. Page 23, Internet Access
User name
Password
Note! My password(s) for USB devices Read-only. Page 33, FTP Server
Note! My password(s) for USB devices Full Access. Page 33, FTP Server
Attention
Please protect this information carefully against unauthorized access!
Gateway 400 User Guide | Passwords
58
Note! More Notes:
Glossary | Gateway 400 User Guide
59
10 Glossary
A
Access data To connect to the Internet, you will need the access data that you received
with your order confirmation. To do this, you will need to enter your user
name and password. Note that the entries are case-sensitive and should be
spelled correctly.
Access protection Access protection prevents unauthorized access to the configuration inter-
face of the Gateway 400 through the use of a user name and password. You
should change the default password as soon as possible after receiving the
Gateway 400. The password must consist of at least 5 alphanumeric charac-
ters (a-z, 1-9).
B
Browser Due to the success of the Internet, the term browser has became synony-
mous with any program with which web pages are represented. These pages
can be stored on a local storage medium or anywhere on the Internet. Web
browsers typically support not only the display of HTML pages, but also other
services on the Internet such as file transfers using FTP, chat, e-mail or news-
groups.
C
Connected
USB mass storage
To make a mass storage device connected to the USB port available on your
computer, set up a network drive in Windows Explorer under Tools. Enter the
IP address of the Gateway 400 followed by an \ftp (e.g., \192.168.100.1\ftp) as
a folder. Alternatively, data can be transferred using an FTP program. Enter ei-
ther Read access or Write access as the name in your FTP program and the
password that was set up for this.
Connected
USB printer
To use a printer connected to the USB port on your computer, it must be con-
figured as a network printer. To do this, configure a local printer with a TCP/
IP printer port. This port must be configured as follows:
Protocol: LPR
Queue name: lp
LPR Byte Count: on
The IP address to be entered is the address of the Gateway 400.
Current system run-
time
The current system runtime shows the time since the last restart of the Gate-
way 400.
Gateway 400 User Guide | Glossary
60
D
DHCP Server The Dynamic Host Configuration Protocol (DHCP) is used automatically as-
sign an unused IP address from an address range to a computer or device on
the network. Other information such as the name of the domain and the
gateway can also be passed to the client. A DHCP server enables a new com-
puter to be fully integrated in an existing network automatically without any
further configuration. The computer must only be set to automatically obtain
an IP address. The assignment of IP addresses is carried out for all network de-
vices that are connected via the LAN or WLAN.
DLNA Digital Living Network Alliance - is a collaborative trade organization includ-
ing, among others, the manufacturers of computers and consumer electron-
ics. Its goal is to ensure interoperability between devices from different
manufacturers.
DNS DNS stands for Domain Name Server. A DN server contains a database of
mappings of IP addresses and domain names. Every computer and every web-
site on the Internet has a unique IP address consisting of a pattern of four dot-
separated numbers in the following format: 212.227.181.140. The IP address
of a site is usually assigned a name (the so-called domain) so that you don’t
have to remember the numerical code. For example, when you enter the do-
main name www.zyxel.com with the http protocol and the Internet service,
an IP address is actually accessed via the DNS.
DSL Digital Subscriber Line. In 1998, the German Telekom introduced new access
technology in telephone networks under the term T-DSL. The so-called xDSL
techniques use conventional copper lines as a broadband medium.
DSL modem A device with which a computer can dial into the Internet using DSL (e.g., the
Sphairon Modem Turbolink AR860). The Gateway 400, by contrast, also offers
telephony functions in addition to the simple option of dialing into the Inter-
net.
DynDNS DynDNS (Dynamic Domain Name Server) is an Internet service that allows the
Gateway 400 to be always accessed from the Internet under a fixed name
even though the assigned public IP address of the Gateway 400 may be
changed by the provider on dialing up to the Internet.
E
Encryption Coding of data (conversion to an unreadable (encrypted) string) for protection
against unauthorized access.
F
Firewall A firewall is a security feature to protect a computer or network. The firewall
monitors the data traffic between the computer/network and the Internet
and thus protects them against unauthorized access.
Firmware The term firmware refers to the underlying operating software of a hardware
component. By upgrading the firmware, the device can be equipped with new
functions without changing the hardware.
Glossary | Gateway 400 User Guide
61
G
Gateway A gateway designates and serves as the transition between two networks. A
gateway computer is a special computer that is connected to both networks.
This may require the implementation and use of different protocols. For ex-
ample, two LANs are connected by a gateway. All data from one network to
the other must pass through the gateway.
H
Home Network Home networks are local networks which enable computers and their periph-
erals to be interconnected and possibly shared. In addition, consumer elec-
tronics devices such as TVs, set-top boxes, etc., can be controlled via home
networks. A home network may be configured as a wired and/or wireless net-
work, where a wide range of different technologies such as Wi-Fi, USB or
wired Ethernet work together.
I
IAD IAD (integrated access device) refers to an xDSL modem with additional func-
tionality such as telephony.
IP address In a network that uses the TCP/IP protocol, each computer is identified by a
unique numeric address. Each IP address can occur once (i..e, must be unique)
within a network.
The Gateway 400 allows you to use network addresses in one of two possible
formats: the proven 32-bit legacy format Internet Protocol Version 4 (IPv4) or
the new 128-bit format Internet Protocol Version 6 (IPv6). Further details can
be found in the section “LAN” on page 30.
L
LAN LAN stands for Local Area Network (>= 10 Mbit/s). These networks are usually
limited to a small footprint (a building or even a floor). A LAN may often in-
clude a wide range very different computer systems.
LAN ports In the Network menu, you will see a list of all the network devices connected
via the LAN of the Gateway 400 with their respective names, if transmitted,
the assigned IP address and the MAC address of the device.
LED display LEDs (Light Emitting Diodes) serve as signal lamps that provide information
on the status of a device.
M
MAC Address The MAC (Media Access Control) address is the physical address of a network
component. The MAC address is unique world-wide and permanently as-
signed to the network component.
Gateway 400 User Guide | Glossary
62
N
NAT (Network Address Translation) NAT is a procedure used in the in Gateway 400
to connect the local network to the Internet. Only one public IP address is usu-
ally available for the Internet, whereas on the local network, by contrast, each
station has its own private IP address. These private addresses have no valid-
ity in public networks. In order to provide all the computers with private IP ad-
dresses access to the Internet, the Gateway 400 replaces the IP addresses of
the connected computers in all outgoing data packets with its own public IP
address. To enable the incoming data packets to be assigned to the correct
destination, the Gateway 400 the stored the current connections in a table.
Network The term network refers to a group multiple computers and other peripheral
devices connected together to share information. The interconnected com-
puters usually have shared access to the individual hardware components
(such as mass storage devices) on the network.In addition, consumer elec-
tronics devices such as TVs, set-top boxes, etc., can be controlled via networks.
A home network may be configured as a wired and/or wireless network,
where a wide range of different technologies such as Wi-Fi, USB or wired
Ethernet work together.
O
Offline Offline identifies an inactive connection.
Online Online identifies an active connection.
P
Password protection,
configuration
You can change the password for the user interface of the Gateway 400 in the
System/Password menu. Make sure that you always do this after you first
connect the Gateway 400 in order to prevent unauthorized access to the
Gateway 400. If you have forgotten your password, you can revert to the fac-
tory default settings of the user interface only by resetting the Gateway 400.
All custom settings will be lost in the process. To reset the Gateway 400, press
the Reset button for about 10 seconds (until the Power LED lights up in red
for the second time).
Phone switch Switching device for connecting multiple devices (such as telephones, fax
equipment, answering machines, etc.).
Port The term port designates a connection or an interface. A distinction is made
between a physical port (e.g., a USB port for a mass storage device) and a log-
ical port (such as port 80 for the Internet connection).
Port Forwarding Port forwarding enables computers within a local network to also operate
outside that network and thus be accessible to other external computers as
well. This is important, for example, to exchange data over the Internet or to
communicate with other computers while playing games over the network.
PPPoE Pass Through PPPoE (Point-to-Point-Protocol over Ethernet) Pass Through enables the rout-
er to be operated in transparent mode and an additional Internet connection
to be set up from the local network.
Glossary | Gateway 400 User Guide
63
R
Reset Reset is a process to restore an electronic device to a predefined state.
Reset Device You can reset the Gateway 400 to the factory default state via the System |
Reset Device menu. All settings are lost, and all ongoing calls and Internet
connections are interrupted.
Restart The Gateway 400 can be restarted via the System | Reset Device menu. All
settings are retained, and all ongoing calls and Internet connections are inter-
rupted.
Router Routers are devices that support different network technologies and connect
different networks. A router splits a network into segments with the aim of
reducing the amount of data to be transmitted. At the same time, it also pro-
vides security functions between the different transfer locations. Routers
work with defined protocols such as TCP/IP and make decisions to optimize
the data transfer and choose the appropriate route.
S
SELV SELV interfaces (Safety Extra Low Voltage) care used in the Gateway 400 for
network connections via RJ45 sockets. RJ45 jacks are also used with TNV in-
terfaces. There is therefore a risk of confusion. Make sure that no TNV and
SELV interfaces are connected with one another. SELV devices are not protect-
ed against voltage spikes, which can lead to technical defects or hazards for
users. In the event of a mixup, the devices will not operate as intended. Cables
to SELV interfaces must not exit the building.
SIP The Session Initiation Protocol (SIP) is a network protocol for setting up, con-
trolling and terminating a VoIP connection. The protocol is described in RFC
3261 and specifies the flow of Internet telephony.
Subnet mask A subnet mask determines to which subnet an IP address belongs. An IP ad-
dress has two components: the network address and the computer address.
With the subnet mask, the computer can internally divide the IP address into
network number and computer number.
T
TCP/IP (Transmission Control Protocol / Internet Protocol) This protocol is used for
data transmission in local networks and over the Internet.
TNV TNV = Telecommunications Network Voltage. The ISDN ports of the Gateway
400 are designed as TNV-1 circuits and can be connected via RJ45 jacks.
RJ45 jacks are also used with SELV interfaces. There is therefore a risk of con-
fusion. Make sure that no TNV and SELV interfaces are connected with one
another. Make sure that only terminals that provide TNV-1 voltage or are in-
tended for operation with TNV-1 circuits are connected to the ISDN ports.
Gateway 400 User Guide | Glossary
64
Type of Internet
connection
A flat rate or a time-based tariff rate can be used for the Internet connection.
When using a time-based tariff, the connection should be manually or auto-
matically disconnected after a specified time of inactivity to avoid unneces-
sary connection charges.
U
UDP With the UDP protocol, the data information is sent continuously. No check is
performed to verify that the received data information is either complete or
error-free. This procedure ensures fast data transfer, but can also result in
malformed data packets. This setting is recommended for real-time applica-
tions, such as online games.
USB The Universal Serial Bus (USB) is a serial bus system for connecting your Gate-
way 400 with external devices. USB storage devices and printers can be con-
nected to running systems (hot plugging), and their properties can be
detected automatically.
User Guide This User Guide provides you with detailed information. The latest edition of
this User Guide can be found on the Internet at www.zyxel.com in the Service
Area.
V
VoIP Voice over Internet Protocol. With Internet telephony (VoIP), the information
required for telephony (i.e., to control the connection setup) and voice can be
transmitted over a network that is also used for data transmissions (e.g., In-
ternet). The equipment used for this purpose may include computers, special
IP telephony devices and classical phones connected via adapters.
VoIP Provider Voice-over-IP provider, also referred to as Internet telephony provider or SIP
provider.
W
WANoE WANoE (Wide Area Network over Ethernet) refers to the use of a separate mo-
dem (e.g., a cable modem) to establish a connection to the Internet.
WPA WPA (Wi-Fi Protected Access) is an encryption method for a wireless network
(WLAN). Ever since WEP has proved to be unsafe, WPA has been established
as the new standard. The successor is WPA2, which implements the basic fea-
tures of the new IEEE 802.11i security standard.
Index | Gateway 400 User Guide
65
Index
A
access data
Internet 23
access protection 42
ACS configuration 45
auto-disconnect 24
C
carrier detection 20
computer settings
under Windows 2000 48
under Windows 7 49
under Windows Vista 49
under Windows XP 49
connectors
on rear panel 14
CWMP 45
ACS configuration 45
client configuration 45
D
DHCP server 10, 32
disposal 53
DNS relay 25
DynDNS 24
F
factory default settings
network settings 31
with user interface 43
factory settings 15
firewall 34
firewall rules 35
firmware update 44
fixed IP address 11, 32
G
Glossary 59
GNU 50
I
indicators 12
installation 16
Internet access
setup 23
IP (Protocol Stack) 41
IP address 31
L
LAN settings 30
network settings 11
language 42
layer 2 (protocol stack) 40
Legal Notices 50
License Terms and Conditions 50
login data
Gateway 400 42
M
monitoring index 23
N
network settings 31
P
package contents 9
password
set, modify, delete 42
Physical (Protocol Stack) 40
ping test 46
port forwarding 36
protocol stack 39
Q
QoS 46
R
Remote Management 44
reset switch 14
reset to factory default
with reset switch 15
restart
via user interface 43
with reset switch 15
S
safety information 10
save configuration 42
screen dialog layout 21
secure
configuration 42
security
of device through access protection 42
Setup Assistant 20
source code 50
Gateway 400 User Guide | Index
66
system messages 46
system time 42
T
technical data 55
telephony
set up 26
trigger ports 38
U
USB 33
User Administration 42
V
VoIP accounts 27
VoIP provider 27
Z
zone configuration 36
© ZyXEL Communications Corp..
www.zyxel.com
Subject to errors and technical alterations.
Gateway 400, Edition 1.2 07/14
9

Hulp nodig? Stel uw vraag in het forum

Spelregels

Misbruik melden

Gebruikershandleiding.com neemt misbruik van zijn services uitermate serieus. U kunt hieronder aangeven waarom deze vraag ongepast is. Wij controleren de vraag en zonodig wordt deze verwijderd.

Product:

Bijvoorbeeld antisemitische inhoud, racistische inhoud, of materiaal dat gewelddadige fysieke handelingen tot gevolg kan hebben.

Bijvoorbeeld een creditcardnummer, een persoonlijk identificatienummer, of een geheim adres. E-mailadressen en volledige namen worden niet als privégegevens beschouwd.

Spelregels forum

Om tot zinvolle vragen te komen hanteren wij de volgende spelregels:

Belangrijk! Als er een antwoord wordt gegeven op uw vraag, dan is het voor de gever van het antwoord nuttig om te weten als u er wel (of niet) mee geholpen bent! Wij vragen u dus ook te reageren op een antwoord.

Belangrijk! Antwoorden worden ook per e-mail naar abonnees gestuurd. Laat uw emailadres achter op deze site, zodat u op de hoogte blijft. U krijgt dan ook andere vragen en antwoorden te zien.

Abonneren

Abonneer u voor het ontvangen van emails voor uw ZyXEL Gateway 400 bij:


U ontvangt een email met instructies om u voor één of beide opties in te schrijven.


Ontvang uw handleiding per email

Vul uw emailadres in en ontvang de handleiding van ZyXEL Gateway 400 in de taal/talen: Engels als bijlage per email.

De handleiding is 1.91 mb groot.


U ontvangt de handleiding per email binnen enkele minuten. Als u geen email heeft ontvangen, dan heeft u waarschijnlijk een verkeerd emailadres ingevuld of is uw mailbox te vol. Daarnaast kan het zijn dat uw internetprovider een maximum heeft aan de grootte per email. Omdat hier een handleiding wordt meegestuurd, kan het voorkomen dat de email groter is dan toegestaan bij uw provider.

Stel vragen via chat aan uw handleiding

Stel uw vraag over deze PDF

Andere handleiding(en) van ZyXEL Gateway 400

ZyXEL Gateway 400 Snelstart handleiding - Deutsch - 16 pagina's

ZyXEL Gateway 400 Gebruiksaanwijzing - Deutsch - 95 pagina's


Uw handleiding is per email verstuurd. Controleer uw email

Als u niet binnen een kwartier uw email met handleiding ontvangen heeft, kan het zijn dat u een verkeerd emailadres heeft ingevuld of dat uw emailprovider een maximum grootte per email heeft ingesteld die kleiner is dan de grootte van de handleiding.

Er is een email naar u verstuurd om uw inschrijving definitief te maken.

Controleer uw email en volg de aanwijzingen op om uw inschrijving definitief te maken

U heeft geen emailadres opgegeven

Als u de handleiding per email wilt ontvangen, vul dan een geldig emailadres in.

Uw vraag is op deze pagina toegevoegd

Wilt u een email ontvangen bij een antwoord en/of nieuwe vragen? Vul dan hier uw emailadres in.


Info