729841
16
Verklein
Vergroot
Pagina terug
1/41
Pagina verder
Z-N328
INFOTAINER
USER MANUAL
EN
2 Rev.A 3 Rev.A
CONTENTS
Device user manual for ZENEC media system
We are delighted that you have chosen a product from ZENEC.
Please read this operating manual before you start your new ZENEC system. In this device user
manual you will find important instructions and information for the safe operation of the ZENEC
system, and to help you make the most of its technical advantages.
All the information in this manual corresponds to the state at the time of going to press, and applies
only to ZENEC systems in original condition. On account of possible updates to device software, the
illustrations and features shown in this operating manual may be different from your ZENEC system.
Differences in the information, illustrations or features cannot form a basis for any claims.
If you sell your vehicle with the ZENEC system still fitted, please ensure that this operating manual
stays with the vehicle, and that any personal data like a phonebook stored in the device is deleted.
SAFETY INSTRUCTIONS ..................................................................................................................04
TURN DEVICE ON AND OFF ............................................................................................................ 05
ANTI-THEFT PROTECTION ............................................................................................................... 05
MULTIFUNCTION STEERING WHEEL CONTROLS ........................................................................06
Z-N328 (FRONT PANEL) .................................................................................................................... 07
MAIN MENU ICONS..................................................................................................................... ........... 08
MEDIA AUDIO SOURCES ................................................................................................................. 09
INPUT SOURCES ................................................................................................................................10
STATUS BAR....................................................................................................................................... 11
SEARCH AND INPUT FUNCTION ..................................................................................................... 12
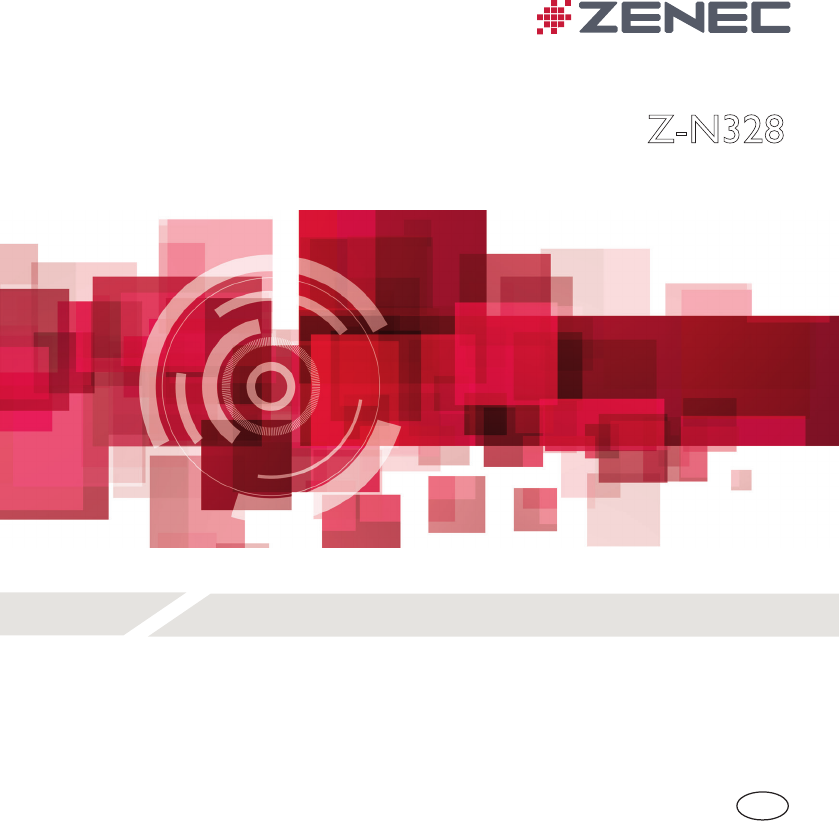
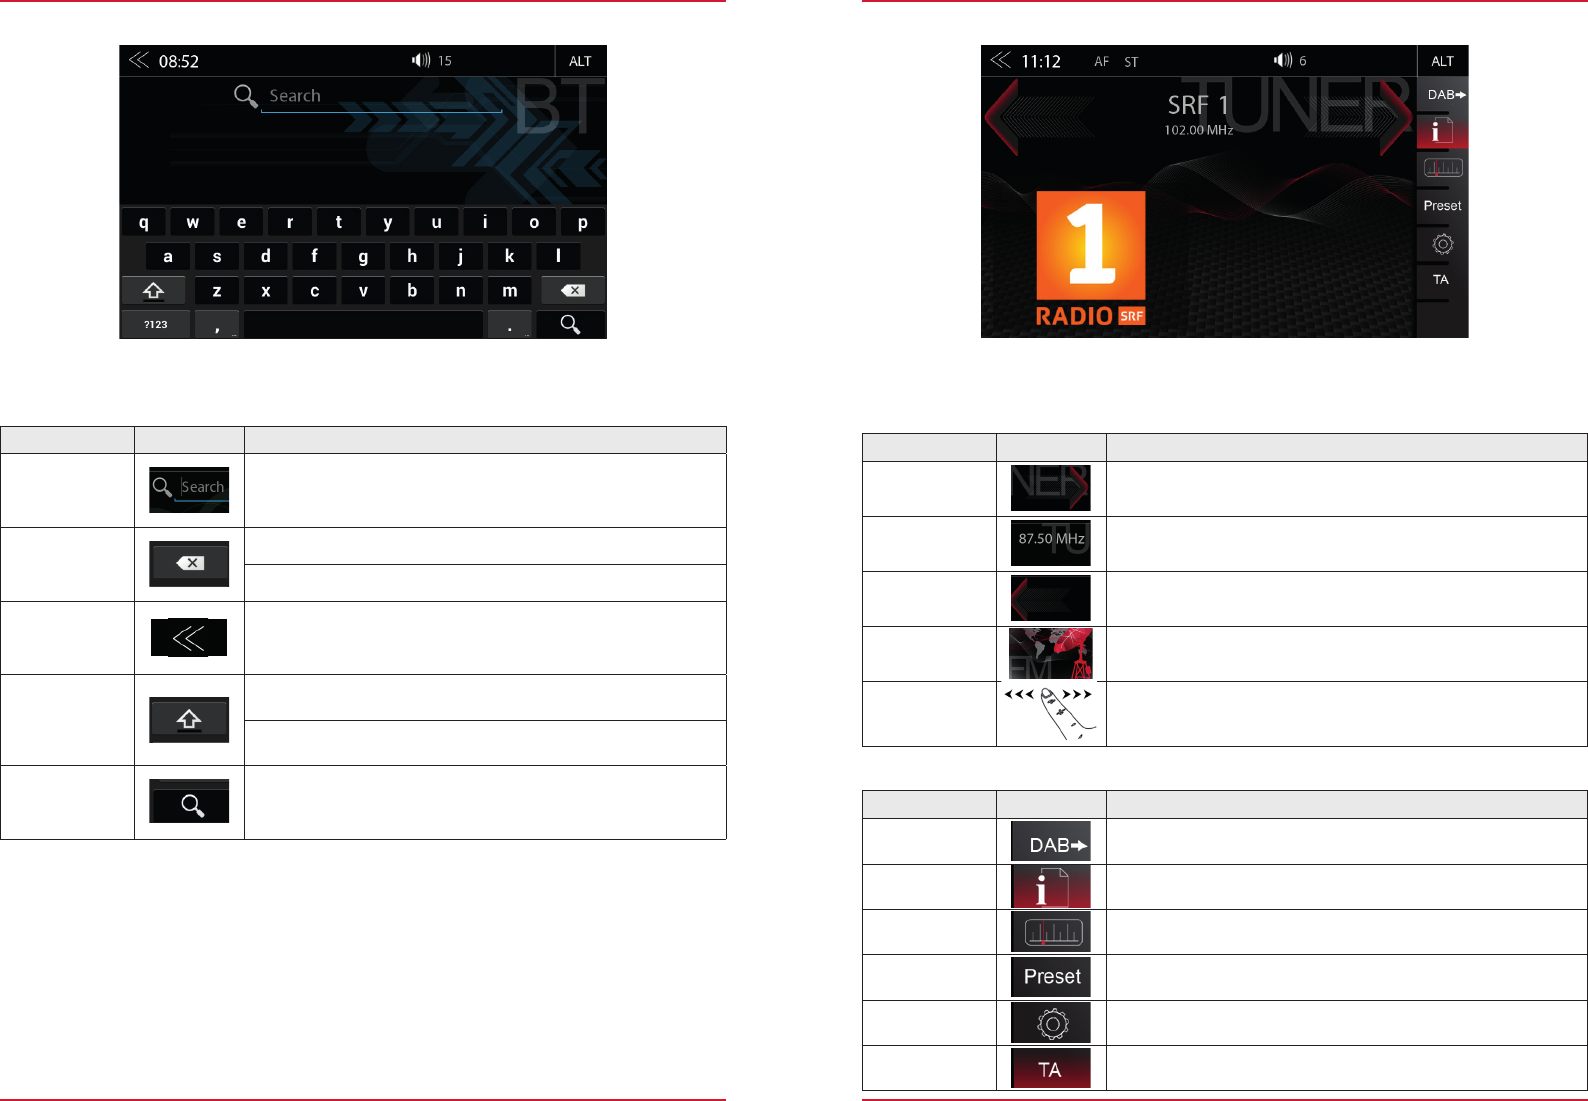
UKW (FM) RADIO ............................................................................................................................... 13
FM BAR GRAPH MODE ..................................................................................................................... 14
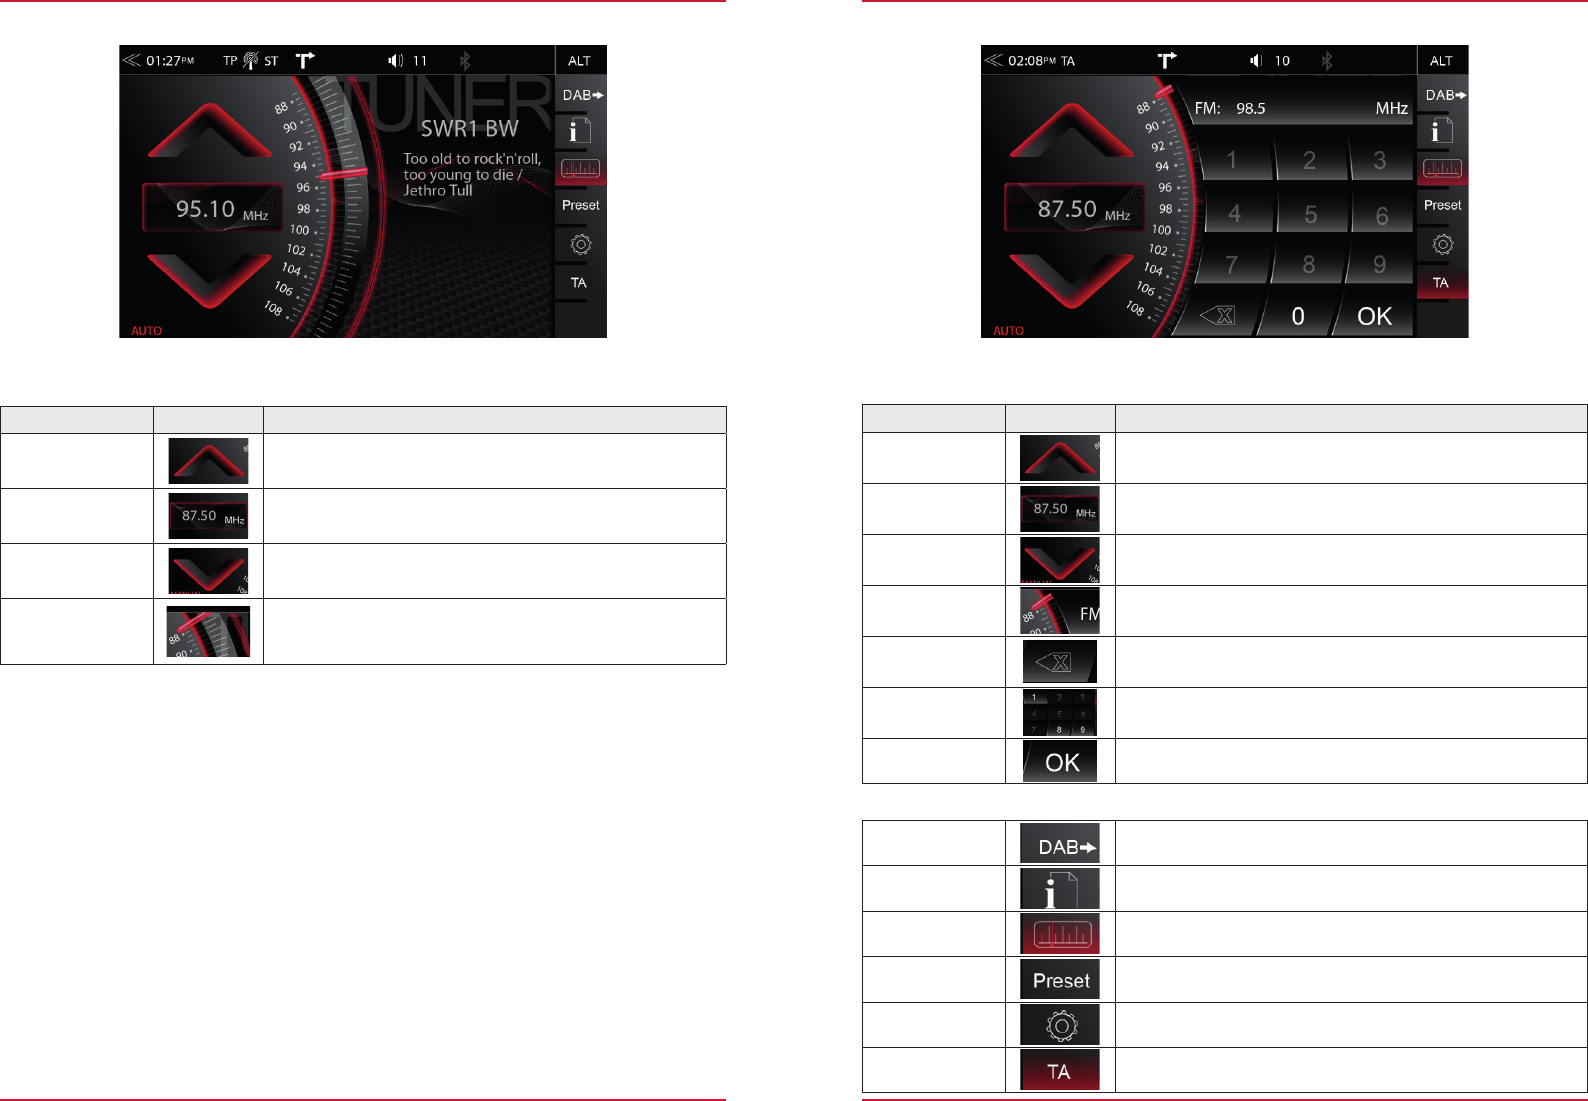
MANUAL FM STATION SEARCH ...................................................................................................... 15
UKW SETUP (FM) ............................................................................................................................... 16
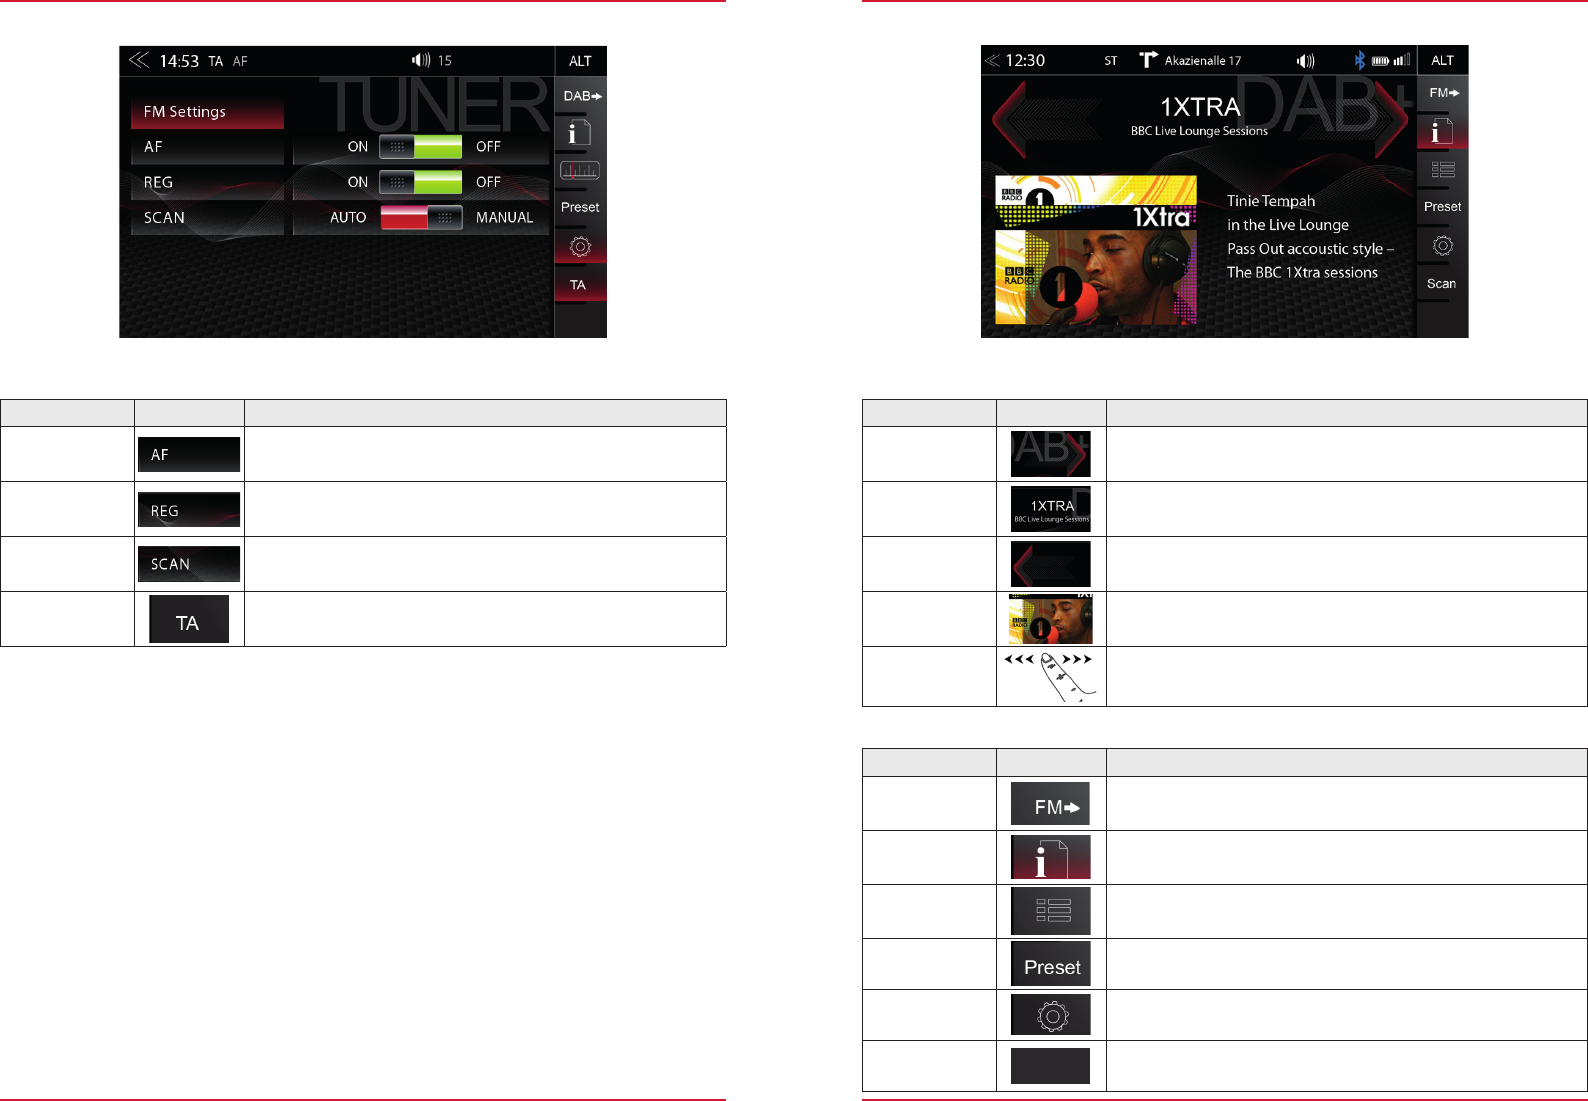
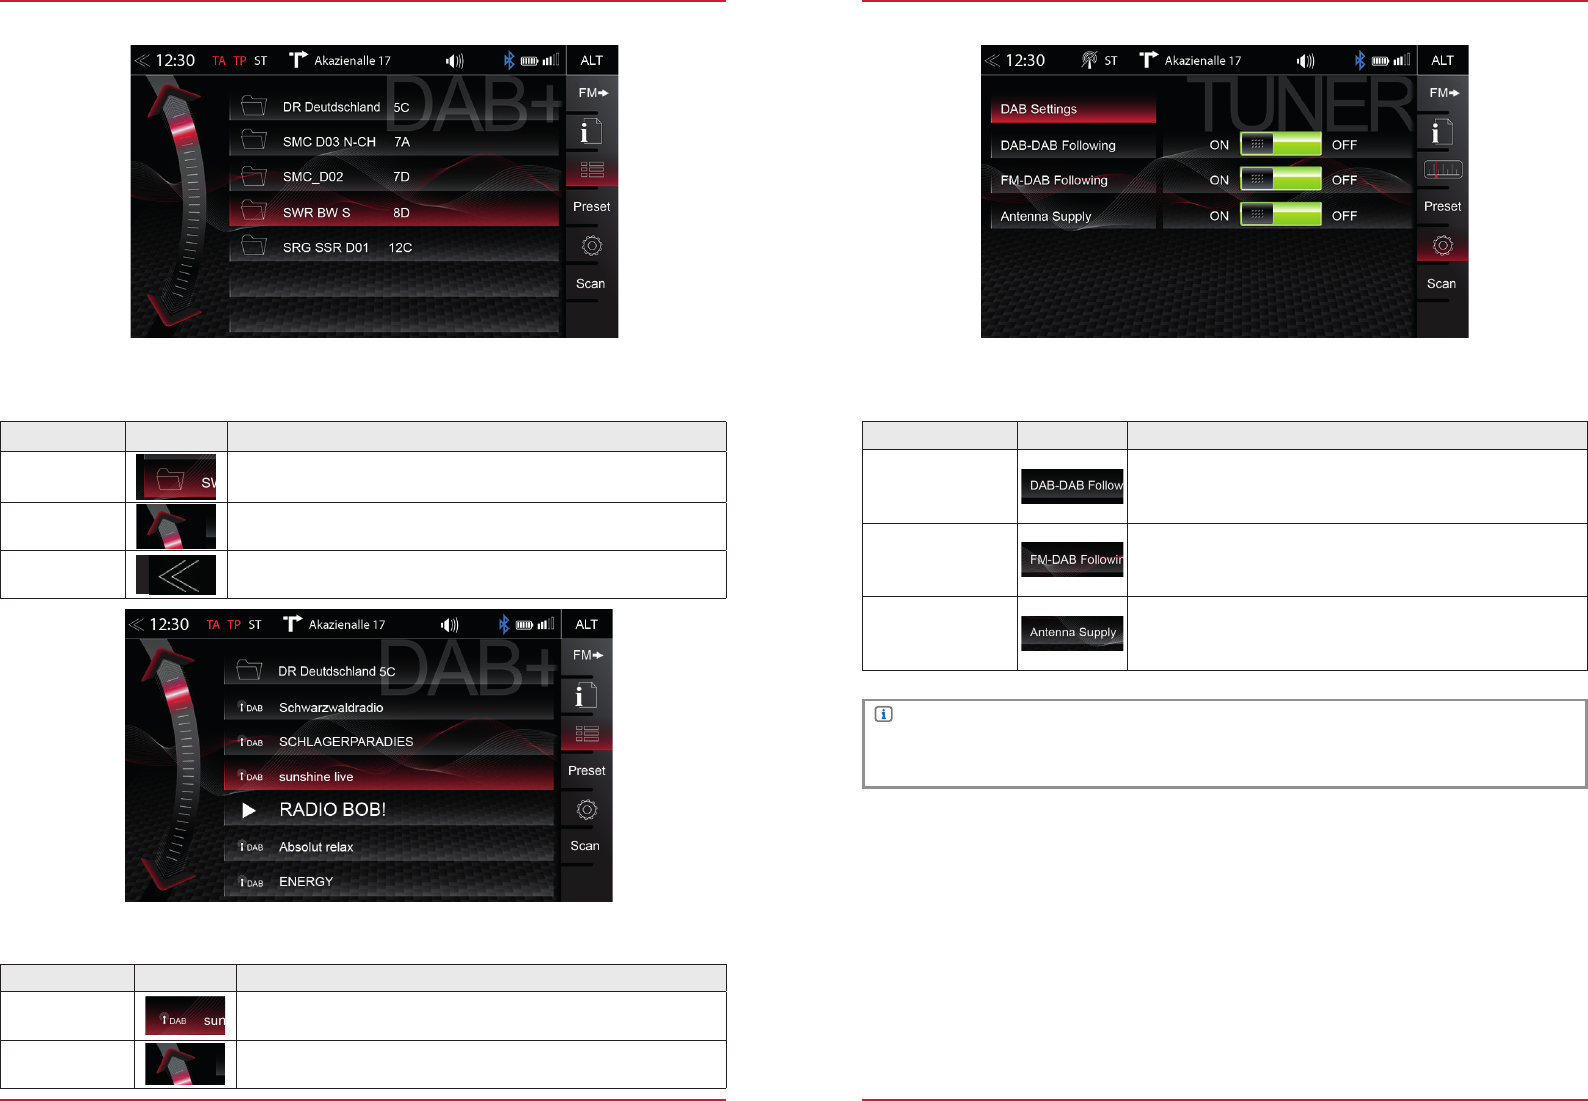
DAB+ RADIO SETUP ...................................................................................................................... ...17
DAB+ ENSEMBLE AND STATION LIST ........................................................................................... 18
DAB+ SETUP ...................................................................................................................................... 19
DAB+ STATIONS-PRESETS .............................................................................................................. 20
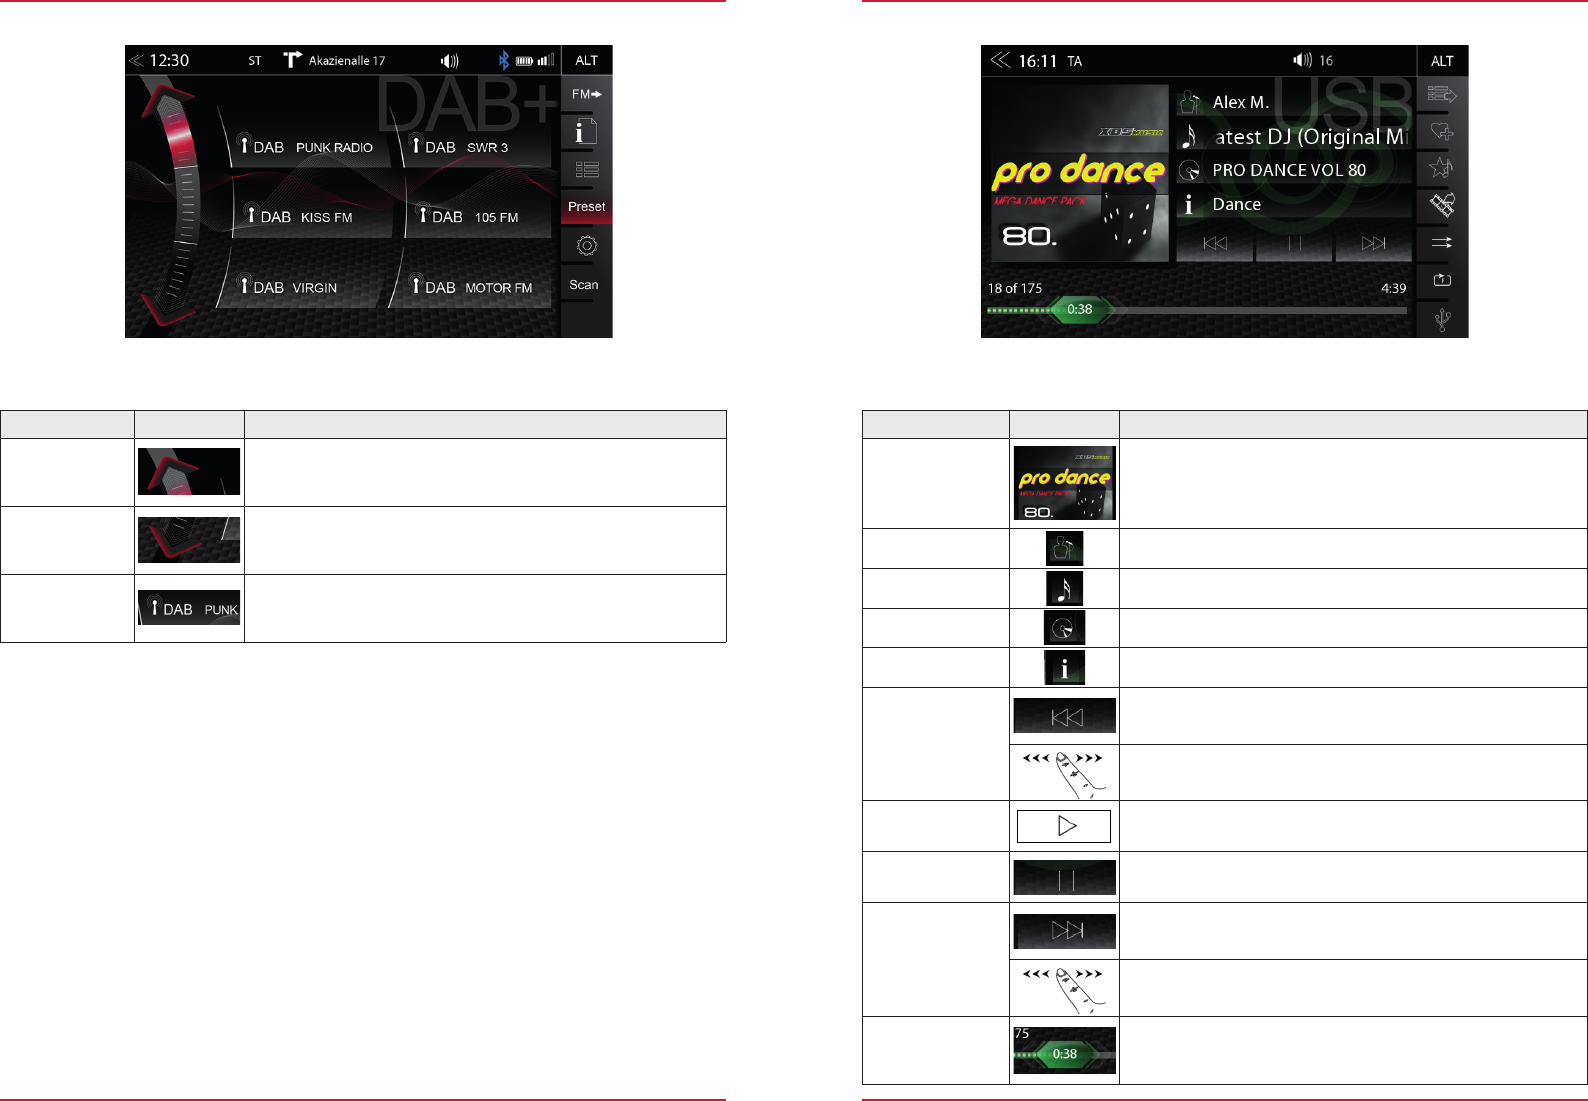
USB / BT A2DP / IPOD (AUDIO) MEDIA ........................................................................................... 21
USB / BT A2DP / IPOD (AUDIO) MEDIA CONTROL AND OPERATION BAR ...............................22
BT-MUSIC (A2DP) .............................................................................................................................23
iPOD (AUDIO) ..................................................................................................................................... 24
PLAYLIST (AUDIO) ............................................................................................................................ 25
SMART PLAYLIST (AUDIO) ............................................................................................................... 26
FAV PLAYLIST (AUDIO) ..................................................................................................................... 27
VIDEO MEDIA: HARDDISK ...............................................................................................................28
PLAYLIST (VIDEO) .............................................................................................................................29
HDMI ....................................................................................................................................................30
CAMERA ............................................................................................................................................. 31
SMARTLINK DIRECT .........................................................................................................................32
SMARTLINK DIRECT CONTROL INTERFACE ................................................................................33
SMARTLINK DIRECT CONTROL BAR ICONS .................................................................................34
SMARTPHONE APP LINKING ........................................................................................................... 35
SPOTIFY .............................................................................................................................................. 36
REALDASH ......................................................................................................................................... 37
BLUETOOTH (HANDS-FREE SYSTEM) ...........................................................................................38
CONTROL AND OPERATION BAR (RIGHT) ....................................................................................39
DEVICE MANAGER ............................................................................................................................40
PAIRING .............................................................................................................................................. 41
BLUETOOTH SETUP ..........................................................................................................................42
BLUETOOTH STATUS BAR ............................................................................................................... 42
ACCEPTING/ENDING INCOMING CALLS (VIA DEVICE) ...............................................................43
OUTGOING CALL VIA NUMERIC PAD .............................................................................................43
OUTGOING CALL VIA PHONEBOOK ............................................................................................... 43
BLUETOOTH MENU ...........................................................................................................................44
PHONEBOOK......................................................................................................................................45
CALL LISTS ........................................................................................................................................46
FAVORITES ......................................................................................................................................... 47
NAVIGATION. ...................................................................................................................................... 48
NAVIGATION UPDATE .......................................................................................................................48
MAPS (EXAMPLES) ...........................................................................................................................49
NAVIGATION START UP INSTRUCTIONS ................................................................................. 50-51
SETUP OPERATIONS ........................................................................................................................52
DISPLAY ICON (BRIGHTNESS) ........................................................................................................53
SETUP OF SOURCES ........................................................................................................................54
BT / NETWORK SETUP .....................................................................................................................55
MISC SETUP .......................................................................................................................................56
AUDIO SETUP .....................................................................................................................................57
VOLUME SETUP .................................................................................................................................58
QUICK AUDIO SETUP (BAL/FAD_SUBWOOFER_LOUDNESS_BASS BOOST) ......................... 59
AUDIO SETUP: EXPERT MODE ........................................................................................................60
AUDIO VOLUME – BASE LEVEL SETUP ......................................................................................... 61
BALANCE / FADER ............................................................................................................................62
EQUALIZER ........................................................................................................................................63
X-OVER SETUP ..................................................................................................................................64
SUBWOOFER SETUP ........................................................................................................................65
NAVI-MIXER SETUP ..........................................................................................................................66
TFT DISPLAY CONFIGURATIONS ....................................................................................................67
CAR (VEHICLE) SETUP ..................................................................................................................... 68
INPUT SETUP .....................................................................................................................................69
SYSTEM SETUP .................................................................................................................................70
SOFTWARE VERSION ...................................................................................................................... 71
CLOCK TIME ....................................................................................................................................... 72
PASSWORD ........................................................................................................................................73
INSTALLATION NOTES ..................................................................................................................... 74
REMOVAL WORK AND PREPARATION .......................................................................................... 74
OVERVIEW ACCESSORIES ..............................................................................................................75
COMMISSIONING ................................................................................................................................75
CONNECTION DIAGRAM Z-N328 ................................................................................................76-77
ABBREVIATIONS ...............................................................................................................................78
STATUTORY RIGHTS AND WARRANTY .........................................................................................79
4 Rev.A 5 Rev.A
TURN ON / OFF
Manual On / Off Z-N328
Press the ZENEC button (fig. S/7
), to turn the ZENEC system on, press and hold the
ZENEC button to switch off the device.
NOTE
Use of the multifunction steering wheel and other vehicle functions will require a vehicle-specific
CAN/Stalk interface. Further information may be obtained from an authorized ZENEC dealer.
The ZENEC system is equipped with an anti-theft protection function. If this is active, on restarting
the ZENEC system after interruption of the power supply you will be asked to enter your password.
To change the password:
Device User Manual → Setup → Device Setup → Password
Z-E3726 5
GERÄTEBEDIENUNG Z-E3726
GRUNDSÄTZLICHE BEDIENUNG
EIN-/AUSSCHALTEN
Manuelle Ein-/Ausschaltung
Drehregler links gedrückt halten, bis sich das ZENEC-System ein- oder ausschaltet
(Abb. S/01 )
Automatische Ein-/Ausschaltung
Fahrzeuge mit CAN-Bus Anbindung: Bei Einschalten der Zündung wird das ZENEC-System
aktiviert. Der Bootvorgang kann max. 1,5 Minuten in Anspruch nehmen. Dies kann zur Folge
haben, dass das System nur mit Verzögerung einsatzbereit ist. Das Ausschalten des ZENEC-
Systems wird durch das Ausschalten der Zündung oder Abziehen des Zündschlüssels aktiviert.
HINWEIS
Für eine Nutzung des Multifunktionslenkrads sowie weiterer Fahrzeugfunktionen wird ein
fahrzeugspezifisches CAN/Stalk Interface benötigt. Weitere Informationen erhalten Sie bei einem
autorisierten ZENEC-Fachhändler.
DIEBSTAHLSICHERUNG
Das ZENEC-System ist mit einer Diebstahlschutzfunktion ausgestattet. Ist diese aktiv, werden Sie nach
Trennung der Stromversorgung bei erneutem Einschalten des ZENEC-Systems aufgefordert, das von
Ihnen hinterlegte Password einzugeben.
Um das Passwort zu ändern:
Bedienungsanleitung
Einstellungen
Geräte Konfiguration
Help
Passwort
HINWEIS
Bewahren Sie das
Passwort sorgfältig auf.
Bei einem Verlust des
Passworts muss das
ZENEC-System ausgebaut
und zur Freischaltung des
Diebstahlschutzes an den
ZENEC-Service
eingesendet werden.
Dieser Dienst ist
kostenpflichtig!
ANTI-THEFT PROTECTION
NOTE
Keep your password safe. If the password is
lost the ZENEC system must be uninstalled,
and sent back in to ZENEC Service to
unblock the anti-theft protection. This service
is not free!
PANTONE 8420 C
PANTONE 186 C
Automatic On / Off
Vehicles without CAN bus:
The device automatically switches on/off by ignition signal.
Vehicles with CAN bus interface:
Switching on the ignition will activate the ZENEC system. The boot process can take up to 1.5
minutes. This may result in some delay until the system is ready. The ZENEC system is shut down by
switching off the ignition, or removing the ignition key.
SAFETY INSTRUCTIONS
CAUTION
If the driver of the vehicle is distracted, this may lead to an accident or injury. Operating the
ZENEC system can distract attention from the general traffic situation! Equally, connecting,
changing or inserting data media can distract the driver from the general traffic situation.
CAUTION
Always choose loudspeaker settings such that acoustic signals coming from outside can always
be heard in the vehicle (e.g. signal horns or sirens).
CAUTION
Incorrect installation or commissioning of the ZENEC system may cause damage to the ZENEC
system or to the vehicle electronics. Only let qualified specialists authorized by ZENEC install the
device.
CAUTION
This ZENEC system is intended solely for operation at an on-board voltage of 12 V DC. Operating
the ZENEC system at any other voltage can cause damage to the ZENEC system or to the vehicle
electrical system.
CAUTION
Taking apart or modifying the ZENEC system can result in damage to the device or the vehicle.
Opening the device or modification by a person not authorized by ZENEC will render warranty
claims null and void.
In the event of a malfunction or defect please contact an authorized ZENEC dealer. Unauthorized
repairs will render warranty claims null and void.
CAUTION
Route recommendations and displayed traffic signs on the ZENEC system may differ from the
real situation. Traffic signs and traffic regulations have precedence over route recommendations
and indications of the ZENEC systems.
Speed data displayed in the navigation system corresponds to the permitted speed limit. Please
adjust your speed and driving behavior to the prevailing visibility, weather, road, and traffic
conditions.
CAUTION
The connection and charging leads of external mobile devices can get in the way of the driver.
Please run these so that the driver's freedom of movement is not hindered.
See detailed information at page 73
6 Rev.A 7 Rev.A
Z-N328 (FRONT PANEL)
Item Icon Function
1
PANTONE 8420 C
PANTONE 186 C
Tap to select preferred content or execute a function
Inside navigation source: Long press open Quick-Media-Control-Bar
Press and hold to jump to audio settings
2
Tap to jump one level up or back
3
Tap to jump back to main menu or to previous source
Press and hold to turn device ON or OFF
4
PANTONE 8420 C
PANTONE 186 C
Tap, or press and hold to increase playback volume
5
PANTONE 8420 C
PANTONE 186 C
Tap, or press and hold to decrease playback volume
6
Hole in the glass panel for the reset pin
7
PANTONE 8420 C
PANTONE 186 C
Slot for the microSD with GPS navigation software
MULTIFUNCTION STEERING WHEEL
Item Function
Reduce volume
Increase volume
Mute
Change playback source
Radio source Press to choose the previous radio station
Media source
Press to choose the previous next track/title
Press and hold to fast rewind.
Radio source Press to choose the next radio station
Media source
Press to choose the next track/title
Press and hold to fast forward
Accept/end call
SRC
NOTE
These functions can only be used when a multifunction steering wheel is present in the vehicle,
and the ZENEC system is connected via a car specific CAN/Stalk interface.
PANTONE 8420 C
PANTONE 186 C
Z-N328
Device Front Panel Control Options
8 Rev.A 9 Rev.A
MEDIA AUDIO SOURCES
Function Icon Operation
USB
Tap to enter USB source
iPod
Tap to open audio playback source (Apple)
BT-Music
Tap to open BT-Music source
Smartlink
Tap to open Smartlink App
Tuner FM
Tap to open FM radio source
DAB+
Tap to open DAB+ radio source
HDMI
Tap to open HDMI source
You can access / enter connected internal or external sources by tapping on the main icon according
to the following list.
Function Icon Operation
Navi
Tap to open navigation App
Bluetooth
Tap to open the Bluetooth suite
Tuner
Tap to open FM radio source
USB
Tap to enter USB source
iPod
Tap to open audio playback source (Apple)
BT-Music
Tap to open BT-Music source
DAB+
Tap to open DAB+ radio source
MAIN MENU ICONS
You can navigate through main menu pages by swiping or tapping on the orange page markers in
the bottom area of each page.
10 Rev.A 11 Rev.A
INPUT SOURCES
Function Icon Operation
HDMI
Tap to open HDMI source
Camera
Tap to enter camera source
Smartlink
Tap to open Smartlink App
AV/IN
Tap to open AV/IN source
Input Sources
NOTE
Icons in the main menu remain greyed out for sources not connected to device.
To select and open external sources like HDMI, Camera, AV/IN or Smartlink, they need to be paired
or physically connected to the device.
Function Icon Operation
Back
Tap to jump one level up or back
Clock Time
Display of time (no interaction possible)
Traffic
Announcement
Traffic announcement (if function is set to active)
Volume
Shows the current playback volume
ALT
Tap to select / start a previously assigned function
Settings → Misc → ALT Softkey button
Screenshot fehlt
STATUS BAR (”INFO BAR”)
The „info bar in the upper hand screen area shows TA, volume and time but also contains two
important controls for device operation: BACK (left side) and ALT (right side).
12 Rev.A 13 Rev.A
SEARCH AND INPUT FUNCTION
The keyboard for search and input is based on the Android OS system layout. The system language
selection will automatically assign QUERTY or QWERTZ layout.
Function Icon Operation
Search
Tap to show or hide the actual input & search results
Delete
Tap to delete a number, letter or sign
Press and hold to delete the full string
Back
Tap to end the search or the input
Large / Small
Tap to select small / capital letters for entries
Tap twice to write all letters or numbers in capital style
List view
Tap to show all search results/- full list
UKW (FM) RADIO
The FM RDS source menu offers a control-/operating section on the right hand side, for fast and
convenient adjustments during the FM radio playback.
Function Icon Operation
Station forward
Tap to start the auto FM station search, running up in the
frequency band
Station
Station Name / Station Frequency
Station back
Tap to start auto FM station search, running down in the
frequency band
Cover
Shows radio station graphics or cover picture of artist
Info display
area
Finger swiping left and right to access stored FM stations
previous / next
Function Icon Operation
FM / DAB
Switch
Tap to switch to DAB
Info
Tap to show station information
Frequency
Scale
Tap to open FM station frequency bar
Preset
Tap to show the stored FM station list
Tuner Setup
Tuner settings
TA
Tap to activate or de-activate the auto switching of RDS traffic
announcements
Control- and Operating Section
Center Section of Display
14 Rev.A 15 Rev.A
FM BAR GRAPH MODE
The FM setup mode (press gear icon) allows to assign two different operation modes to both station
frequency arrows: manual steps in 100kHz, or auto scan (stopping at next station). See page 18.
Function Icon Operation
Station Frequency
UP
Tap to start manual 100kHz jump, or FM station auto search
up
Station
Frequency
Tap to open the direct frequency input mode keyboard
Station Frequency
DOWN
Tap to start manual 100kHz jump, or FM station auto search
down
Bar Graph Scale
Press and hold to slide the frequency pointer of the bar graph
into any position. Tap to set a desired frequency value on the
scale
MANUAL FM STATION SEARCH
Function Icon Operation
Station
Frequency UP
Tap to auto seek / manual seek up, depending on setting
Station
Frequency
Tap to open and close direct station frequency input via keypad
Station Frequency
DOWN
Tap to auto seek / manual seek down, depending on setting
Scale
Radio frequency scale display
Delete
Tap to delete a number
Press and hold to delete the full text string
Keypad
Direct frequency input option
OK
Touch to confirm frequency
FM / DAB
Switch
Tap to switch to DAB
Information
Tap to show station information
Frequency
Scale
Tap to open FM station frequency bar
Preset
Tap to show the stored FM station list
Tuner Setup
Tap to change settings for Tuner FM
TA
Tap to activate or de-activate the auto switching of RDS traffic
announcements
Control- and Operating Section
When you tap to the frequency display area, the numeric input keyboard opens for a direct station
frequency input.
16 Rev.A 17 Rev.A
UKW SETUP (FM)
Function Icon Operation
AF
Alternative Frequency ON / OFF
REG
Setting to keep AF in the regional (local) station tuning mode.
SCAN
Setting to choose the automatic or manual station frequency
search.
TA
Tap to activate or de-activate the auto switching of RDS traffic
announcements
Here you can set important FM RDS based settings such are AF and REG.
DAB+ RADIO SETUP
Function Icon Operation
UKW / DAB+
Switch
Tap to switch between FM / DAB +
Info
Tap to show station information - main display
List
Tap to open the station list (showing all currently receivable
radio stations in the environment)
Preset
Tap to show the stored DAB station list
Setup
Tap to change settings for DAB+ functions
Scan Scan
Tap to start full station search.
Press and hold to delete the station list and start station search
Function Icon Operation
Station up
Tap to jump to next station
Press and hold to jump to next Ensemble
Station
Station Name / Ensemble info
Station down
Tap to jump to previous station
Press and hold to jump to previous Ensemble
Slideshow
Radio station artwork / artist display (MOT Slideshow”)
Info Display
Area
Finger swiping left and right to switch between Preset stations
The DAB+ source menu offers a control- + operating section on the right side of the display, allowing
for simple and convenient direct adjustments in the playback menu.
Control- and Operating Section
18 Rev.A 19 Rev.A
DAB+ ENSEMBLE AND STATION LIST DAB+ SETUP
A tap on each Ensemble opens the related DAB+ station list of the respective Ensemble. The station
list content follows exactly the original Ensemble display format and list sequence.
Function Icon Operation
Radio station
selection
Tap to select one particular radio station out of the list
List scrolling
Press and hold to move the slider of the station list up and down
Function Icon Operation
DAB-DAB
Following
Tap to turn DAB-DAB station following ON or OFF
FM-DAB
Following
Tap to turn FM-DAB station following ON or OFF
DAB
antenna socket
phantom power
Tap to turn the 12V phantom power supply of the DAB
antenna socket on the device backside ON or OFF
The setup page for the DAB+ tuner allows to define important functions such as DAB<>DAB and
FM<>DAB station following. Or to activate the phantom power supply voltage of the DAB antenna
socket.
Once the first DAB+ band scan has completed, device will show all DAB+ Ensembles and radio
stations of sufficient signal strength. The ensemble list and content can be updated via using the scan
button.
Function Icon Operation
Ensemble list
selection
Tap to open an Ensemble, showing the assigned DAB+ radio
station list
List scrolling
Press and hold to move the slider of the Ensemble list up and
down
Back
Tap to jump one level back or up
NOTE
The FM-DAB Following function works with a static function algorithm. This may or may not
deliver good switching results, depending on the broadcast region.
20 Rev.A 21 Rev.A
DAB+ STATIONS-PRESETS
Select a previously stored DAB+ radio station by tapping on the station preset button.
Function Icon Operation
Previous
page
Tap to switch to previous preset page
Next
page
Tap to switch to next preset page
Stores
Tap to select a stored DAB+ station. Press and hold the station
to save the actual radio station on any of the station preset
buttons
USB / BT A2DP / iPOD (AUDIO) MEDIA
Function Icon Operation
Album, Art /
Cover
If a cover is stored on the music media, it can be displayed.
This function is not supported for BT Audio playback.
Interpret
Information about the artist
Track
Information about the track
Album
Information about the album
Genre
Information about the genre or any other special infos
Back
Tap to skip to the previous track
Press and hold to start fast reverse
Swipe to the left to skip forwards to the next track
Play
Tap to play a track
Pause
Tap to pause at a track
Forward
Tap to skip to the next track
Press and hold to start fast forward
Swipe to the right to skip back to the previous track
Playback Time
Line
Tap or slide to skip within a track
Various types of information shown in the source menu of the audio playback by (USB, BT A2DP,
iPOD, etc.).
22 Rev.A 23 Rev.A
Function Icon Operation
Playlist
Tap to display the folder and list
This function is not supported for BT Audio playback.
Smart Playlist
Tap to add a track to own playlist
This function is not supported for BT Audio and iPod
Favorites
Tap to add a track to FAV playlist
This function is not supported for BT Audio and iPod
Video <-> Audio
Source
Tap to switch between audio or video playback. This function is
not supported for BT Audio and iPod
Shuffle
Tap to turn on the random play feature within the folder that is
playing
Repeat
Tap to automatically repeat a track or a complete music
collection
Source
Touch to jump to next available source
(Available sources USB, iPod and BT-Music)
The control and operation bar on the right side of the audio playback media menu continues to play
lists, favorites, and external USB memory.
USB / BT A2DP / iPOD (AUDIO) MEDIA CONTROL AND OPERATION BAR
BT MUSIC (A2DP)
NOTE
The listed functions depend on the paired mobile phone, installed software versions and the
degree of compatibility.
The A2DP RVC interface offers Play, Pause and Skip control of previously paired smartphones in
audio playback mode. The iD3-Tag meta data display is possible only when tag data is contained in
the streamed music track.
24 Rev.A 25 Rev.A
iPOD (AUDIO)
The order of the Artist display of is given by the sorting sequence on the mobile Apple device and
can not be changed or adapted in any way.
Function Icon Operation
Folder
(uppermost)
Tap to go to the next higher level
Folder
Touch to go to the highest folder level
Hold to go to the hard disk overview (root)
Song
Listing by song
Interpret
Listing by artist
Album
Listing by album
Smart Playlist
Tap to access the Smart Playlist (Shows created Playlists)
FAV List
Tap to access the FAV playlist
Search
Tap to open search keypad
Scroll
Scroll in the list:
Touch and hold to move the slider up or down
Tap and hold your finger on the list to move the list up or down
There are different playlists. We generally differentiate between the standard and special playlists
(Smart Playlist and Favorites Playlist).
PLAYLIST (AUDIO)
26 Rev.A 27 Rev.A
SMART PLAYLIST (AUDIO)
This function allows you to manage the playlists which created by the Smart Playlist function. The
playlists can be renamed.
Function Icon Operation
Playlist name
field
Tap to go to the next higher level
Playlist
editing mode
Tap to edit a playlist (editing mode)
Tap to delete a playlist
Tap to rename a playlist
Tap to cancel playlist edit mode
Song
editing mode
Tap to edit a song within a playlist (editing mode)
Tap to delete a playlist song
Tap to move a playlist song
(Add a song to another playlist)
Tap to cancel edit mode
Scroll
Scroll in the list:
Touch and hold to move the slider up or down
Tap and hold your finger on the list to move the list up or down.
FAV PLAYLIST (AUDIO)
This playlist feature allows you to add a song easily and quickly to a fixed favorite playlist.
Function Icon Operation
Playlist name
field
No function, text field only.
Note: The name of the FAV playlist can not be changed.
Delete
Tap to delete a FAV playlist song
Scroll
Scroll in the list:
Touch and hold to move the slider up or down
Tap and hold your finger on the list to move the list up or down.
28 Rev.A 29 Rev.A
For video playback via USB, parking cable must be connected during the device installation. Without
this connection, the screen remains black.
VIDEO MEDIA: HARDDISK
Function Icon Operation
Jump inside
Title
Tap to skip directly to the desired position
Slide to reach the desired position
Video<->Audio
Source
Tap to switch between audio or video playback. This function is
not supported for BT Audio and iPod
Back
Tap to skip back to the previous section
Play
Tap to play a film
Pause
Tap to pause a film
Forward
Tap to skip forward to the next section
Playlist
Tap to display the folder and list
This function is not supported for BT Audio
Shuffle
Tap to turn on the random play feature within the folder that is
playing
Repeat
Tap to automatically repeat a film or complete video collection
PLAYLIST (VIDEO)
Function Icon Operation
Folder
Touch to go to the highest folder level
Hold to go to the hard disk overview (root)
Back
Tap to skip back to the previous section
Play / Pause
Tap to play a film or a video
Tap to pause a film or a video
Forward
Tap to skip forward to the next section
Shuffle
Tap to turn on the random play feature within the folder that is
playing
Repeat
Tap to automatically repeat a film or complete video collection
Video <-> Audio
Source
Tap to switch between audio or video playback. This function is
not supported for BT Audio and iPod
Scroll
Scroll in the list:
Touch and hold to move the slider up or down
Tap and hold your finger on the list to move the list up or down
CAUTION
Playing video files while driving is not permitted by the law. For this reason the screen will
switched off when the vehicle moves, with the playback of sound only.
Playlist (Video) displays the video files on the USB data carrier with their file name. In this list sliding
up or down is easily possible.
30 Rev.A 31 Rev.A
HDMI
Function Icon Operation
HDMI
Tap to open HDMI source mode
Tap to the HDMI icon starts the A / V source, if a compatible HDMI source connected, for example a
videogame, smartphone, tablet, notebook.
Tapping the camera icon starts the manual camera mode, if a CVBS capable camera is connected
to the camera input of the unit.
Function Icon Operation
Camera
switching
Tap to switch between the front and rear camera
Camera
Tap to open camera source
CAMERA
16

Hulp nodig? Stel uw vraag in het forum

Spelregels

Misbruik melden

Gebruikershandleiding.com neemt misbruik van zijn services uitermate serieus. U kunt hieronder aangeven waarom deze vraag ongepast is. Wij controleren de vraag en zonodig wordt deze verwijderd.

Product:

Bijvoorbeeld antisemitische inhoud, racistische inhoud, of materiaal dat gewelddadige fysieke handelingen tot gevolg kan hebben.

Bijvoorbeeld een creditcardnummer, een persoonlijk identificatienummer, of een geheim adres. E-mailadressen en volledige namen worden niet als privégegevens beschouwd.

Spelregels forum

Om tot zinvolle vragen te komen hanteren wij de volgende spelregels:

Belangrijk! Als er een antwoord wordt gegeven op uw vraag, dan is het voor de gever van het antwoord nuttig om te weten als u er wel (of niet) mee geholpen bent! Wij vragen u dus ook te reageren op een antwoord.

Belangrijk! Antwoorden worden ook per e-mail naar abonnees gestuurd. Laat uw emailadres achter op deze site, zodat u op de hoogte blijft. U krijgt dan ook andere vragen en antwoorden te zien.

Abonneren

Abonneer u voor het ontvangen van emails voor uw Zenec Z-N328 bij:


U ontvangt een email met instructies om u voor één of beide opties in te schrijven.


Ontvang uw handleiding per email

Vul uw emailadres in en ontvang de handleiding van Zenec Z-N328 in de taal/talen: Engels als bijlage per email.

De handleiding is 13,2 mb groot.


U ontvangt de handleiding per email binnen enkele minuten. Als u geen email heeft ontvangen, dan heeft u waarschijnlijk een verkeerd emailadres ingevuld of is uw mailbox te vol. Daarnaast kan het zijn dat uw internetprovider een maximum heeft aan de grootte per email. Omdat hier een handleiding wordt meegestuurd, kan het voorkomen dat de email groter is dan toegestaan bij uw provider.

Stel vragen via chat aan uw handleiding

Stel uw vraag over deze PDF

Andere handleiding(en) van Zenec Z-N328

Zenec Z-N328 Gebruiksaanwijzing - Nederlands - 41 pagina's

Zenec Z-N328 Gebruiksaanwijzing - Deutsch - 41 pagina's


Uw handleiding is per email verstuurd. Controleer uw email

Als u niet binnen een kwartier uw email met handleiding ontvangen heeft, kan het zijn dat u een verkeerd emailadres heeft ingevuld of dat uw emailprovider een maximum grootte per email heeft ingesteld die kleiner is dan de grootte van de handleiding.

Er is een email naar u verstuurd om uw inschrijving definitief te maken.

Controleer uw email en volg de aanwijzingen op om uw inschrijving definitief te maken

U heeft geen emailadres opgegeven

Als u de handleiding per email wilt ontvangen, vul dan een geldig emailadres in.

Uw vraag is op deze pagina toegevoegd

Wilt u een email ontvangen bij een antwoord en/of nieuwe vragen? Vul dan hier uw emailadres in.


Info