360475
47
Verklein
Vergroot
Pagina terug
1/52
Pagina verder
47
If the ambient temperature goes beyond the upper data
this means longer operating time of the compressor,
breakdown in the automatic defrosting increasing
temperature in the cooling compartment or increasing
energy consumption.
When placing the appliance ensure that it stands level.
This can be achieved by two adjustable feet (1) at the
bottom in front. 1-1 piece of distance washer (2) are
accessories of the adjustable feet. If levelling the
appliance requires, these washers can be removed.
Do not stand the appliance on a sunny place or close to
a radiator or cooker.
If it is unavoidable because of furnishing and the
appliance has to be stood near a cooker take these
minimum distances into consideration:
In case of gas or electric cooker 3 cm must be left,
when it is less put a 0,5-1 cm non-flam insulation
between the two appliances.
In case of oil or coal-fired stove the distance must be
30 cms since they give off more heat.
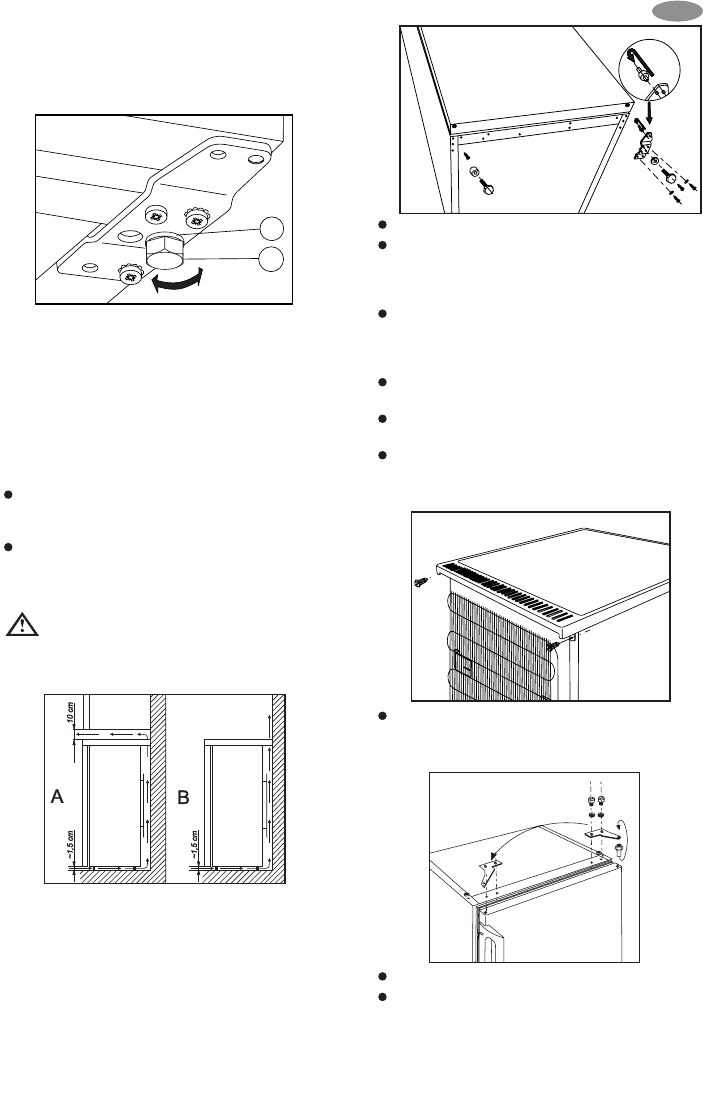
The refrigerator is designed to operate when it is totally
pushed to the wall.
When placing the refrigerator keep minimal
distances recommended in figure.
A : placing it under a wall-cupboard
B : placing it freely
Change of door opening direction
Should the setting-up place or handling demand it, door-
opening direction can be refitted from right-handed to
left-handed.
Following operations are to be done on the basis of
figures and explanations:
Pull out the plug from the mains socket.
Tilt back the appliance carefully being careful so that
the compressor can not touch the floor. It is
recommended to ask another person for help, who
can keep the appliance at this position safely.
Unscrew the adjustable feet situated on both sides (2
pieces), in addition the screws fixing the lower door
holders (3 pieces) respectively the screw on the
other side.
Put over the pin in the lower door holding plate in the
direction of the arrow.
Fix the plate on the other side leaving the position of
the door unchanged.
Then screw in the one screw in the place set free on
the other side as well as the adjustable feet (2
pieces) and set up the box.
For refitting the upper door holder take out the
screws (2 pieces) fixing the plastic top on the back of
the box.
Push back the top and lift it from the fixing elements.
Unscrew the screws fixing the upper door holder (2
pieces).
GB
2
1
47

Hulp nodig? Stel uw vraag in het forum

Spelregels

Misbruik melden

Gebruikershandleiding.com neemt misbruik van zijn services uitermate serieus. U kunt hieronder aangeven waarom deze vraag ongepast is. Wij controleren de vraag en zonodig wordt deze verwijderd.

Product:

Bijvoorbeeld antisemitische inhoud, racistische inhoud, of materiaal dat gewelddadige fysieke handelingen tot gevolg kan hebben.

Bijvoorbeeld een creditcardnummer, een persoonlijk identificatienummer, of een geheim adres. E-mailadressen en volledige namen worden niet als privégegevens beschouwd.

Spelregels forum

Om tot zinvolle vragen te komen hanteren wij de volgende spelregels:

Belangrijk! Als er een antwoord wordt gegeven op uw vraag, dan is het voor de gever van het antwoord nuttig om te weten als u er wel (of niet) mee geholpen bent! Wij vragen u dus ook te reageren op een antwoord.

Belangrijk! Antwoorden worden ook per e-mail naar abonnees gestuurd. Laat uw emailadres achter op deze site, zodat u op de hoogte blijft. U krijgt dan ook andere vragen en antwoorden te zien.

Abonneren

Abonneer u voor het ontvangen van emails voor uw Zanussi zrt 15 jb bij:


U ontvangt een email met instructies om u voor één of beide opties in te schrijven.


Ontvang uw handleiding per email

Vul uw emailadres in en ontvang de handleiding van Zanussi zrt 15 jb in de taal/talen: Nederlands, Duits, Engels, Frans als bijlage per email.

De handleiding is 1,02 mb groot.


U ontvangt de handleiding per email binnen enkele minuten. Als u geen email heeft ontvangen, dan heeft u waarschijnlijk een verkeerd emailadres ingevuld of is uw mailbox te vol. Daarnaast kan het zijn dat uw internetprovider een maximum heeft aan de grootte per email. Omdat hier een handleiding wordt meegestuurd, kan het voorkomen dat de email groter is dan toegestaan bij uw provider.

Uw handleiding is per email verstuurd. Controleer uw email

Als u niet binnen een kwartier uw email met handleiding ontvangen heeft, kan het zijn dat u een verkeerd emailadres heeft ingevuld of dat uw emailprovider een maximum grootte per email heeft ingesteld die kleiner is dan de grootte van de handleiding.

Er is een email naar u verstuurd om uw inschrijving definitief te maken.

Controleer uw email en volg de aanwijzingen op om uw inschrijving definitief te maken

U heeft geen emailadres opgegeven

Als u de handleiding per email wilt ontvangen, vul dan een geldig emailadres in.

Uw vraag is op deze pagina toegevoegd

Wilt u een email ontvangen bij een antwoord en/of nieuwe vragen? Vul dan hier uw emailadres in.


Info