540488
34
Verklein
Vergroot
Pagina terug
1/84
Pagina verder
User’s
Manual
Yoko ga
wa
Electric Corporation
Model UYF200, UYFA21
Ultrasonic Vortex
Flowmeters
(Style Code:S2)
IM 1F5B2-01E
IM 1F5B2-01E
4th Edition
i
IM 1F5B2-01E
Contents
1. INTRODUCTION ................................................................................................... 1-1
2. HANDLING PRECAUTIONS............................................................................... 2-1
2.1 Cross-check of the Model Code and Specifications ...................................... 2-1
2.2 Precautions Regarding Transportation............................................................ 2-1
2.3 Precautions Regarding Storage Location........................................................ 2-2
2.4 Precautions Regarding Installation Location .................................................. 2-2
2.5 Precautions Regarding Pipelines..................................................................... 2-3
2.6 Precautions Regarding Use of Transceivers ................................................... 2-4
2.7 Precautions Regarding Insulation Resistance and Withstanding
Voltage Tests................................................................................................... 2-4
2.8 Notes on JIS Flameproof Flowmeters ............................................................ 2-5
2.9 Installation Precautions for CENELEC (KEMA) Intrinsic Safty .................. 2-5
2.10 Installation Precautions for CENELEC (KEMA) Explosionproof ................ 2-6
3. COMPONENTS OF ULTRA YEWFLO ............................................................. 3-1
4. MOUNTING ............................................................................................................ 4-1
4.1 Piping Precautions........................................................................................... 4-1
4.2 Mounting ULTRA YEWFLO ......................................................................... 4-7
4.2.1 Mounting a Wafer Type of ULTRA YEWFLO.................................. 4-7
4.2.2 Installing a Flange Type of ULTRA YEWFLO ............................... 4-10
4.3 Mounting remote type converter................................................................... 4-12
4.4 Repositioning the Indicator/Totalizer Component ....................................... 4-12
4.5 Swiveling the Indicator/Totalizer Component.............................................. 4-13
4.6 Insulating the Piping ..................................................................................... 4-14
5. WIRING ................................................................................................................... 5-1
5.1 Selecting the Cable ......................................................................................... 5-1
5.2 Connecting Field Mounting Indicator (applies to analog output only) ......... 5-2
5.3 Wiring.............................................................................................................. 5-3
5.4 Grounding........................................................................................................ 5-5
5.5 Signal cable end finish procedure................................................................... 5-6
5.6 Power Supply Voltage and Load Resistance.................................................. 5-7
5.7 Pulse output ..................................................................................................... 5-8
5.8 Simultaneous Analog-Pulse Output ................................................................ 5-9
6. PREPARING FOR OPERATION ........................................................................ 6-1
6.1 Checking the Flowrate Range......................................................................... 6-1
6.2 Pressure Loss and Cavitation .......................................................................... 6-3
6.3 Zero Adjustment.............................................................................................. 6-3
6.4 Resetting totalized value ................................................................................. 6-3
6.5 Action Against Power Failure......................................................................... 6-4
6.6 Precautions During Startup ............................................................................. 6-4
4th Edition: Mar. 2004 (YG)
All Rights Reserved, Copyright © 1997, Yokogawa Electric Corporation
ii
IM 1F5B2-01E
7. WORKING WITH THE BT200 BRAIN TERMINAL ...................................... 7-1
7.1 Connection of a BT200 Terminal and Notes on Use ..................................... 7-1
7.1.1 Connection of a BT200 Terminal ........................................................ 7-1
7.1.2 Notes on Use ........................................................................................ 7-2
7.2 Working with the BT200 ................................................................................ 7-3
7.2.1 Layout of Keys..................................................................................... 7-3
7.2.2 Functionality of Operating Keys ......................................................... 7-4
7.3 Configuring Parameters with the BT200 ........................................................ 7-5
7.3.1 Screens for Parameter Setup ................................................................ 7-5
7.3.2 Configuring Parameters ....................................................................... 7-6
7.4 Parameter Summary ........................................................................................ 7-7
7.5 Self-checking ................................................................................................. 7-10
7.5.1 Checking for Failures......................................................................... 7-10
7.5.2 Information on Failures and Corrective Measures ............................ 7-11
8. MAINTENANCE .................................................................................................... 8-1
8.1 Equipment Needed for Maintenance .............................................................. 8-2
8.2 Adjustment ...................................................................................................... 8-3
8.2.1 Zero Adjustment .................................................................................. 8-3
8.2.2 Span Adjustment .................................................................................. 8-3
8.2.3 Trigger Level Adjustment (TLA) (Parameter H10) ............................ 8-4
8.2.4 Loop Tests (Parameters F10 and F20) ................................................ 8-4
8.3 Disassembly and Reassembly ......................................................................... 8-5
8.3.1 Removing the Indicator/Totalizer Component .................................... 8-5
8.3.2 Removing the Amplifier Unit .............................................................. 8-6
8.3.3 Replacing the Sensor Assembly .......................................................... 8-7
8.4 Troubleshooting............................................................................................. 8-10
8.4.1 Basic Troubleshooting Flow .............................................................. 8-10
8.4.2 Specific Troubleshooting Flows ........................................................ 8-11
8.4.3 Instructions on Use of Check Terminals of Amplifier Unit ............. 8-15
9. STANDARD SPECIFICATIONS.......................................................................... 9-1
9.1 STANDARD SPECIFICATION .................................................................... 9-1
9.2 Model and Suffix Codes ................................................................................. 9-4
9.3 Option Specifications ...................................................................................... 9-6
9.4 EXTERNAL DIMENSIONS .......................................................................... 9-7
INSTALLATION AND OPERATING PRECAUTIONS FOR JIS FLAMEPROOF
EQUIPMENT......................................................................................................... EX-B01E
Customer Maintenance Parts List ....................................................... CMPL 1F5B2-01E
Customer Maintenance Parts List ....................................................... CMPL 1F5B2-03E
Customer Maintenance Parts List ....................................................... CMPL 1F5B2-04E
1-1
IM 1F5B2-01E
1. INTRODUCTION
1. INTRODUCTION
The UYF200 series of ultrasonic vortex flowmeters, one in the family of YEWFLO
flowmeters, has been fine-tuned to your order specifications prior to shipment. Before
use, read this manual thoroughly and familiarize yourself fully with the features,
operations and handling of ULTRA YEWFLO to have the instrument deliver its full
capabilities and to ensure its efficient and correct use.
Notices Regarding This Manual
•This manual should be passed on to the end user.
The contents of this manual are subject to change without prior notice.
All rights reserved. No part of this document may be reproduced or transmitted in
any form or by any means without the written permission of Yokogawa Electric
Corporation (hereinafter simply referred to as Yokogawa).
This manual does not warrant the marketability of this instrument nor does it warrant
that the instrument will suit a particular purpose of the user.
Every effort has been made to ensure accuracy in the contents of this manual.
However, should any questions arise or errors come to your attention, please contact
your nearest Yokogawa sales office that appears on the back of this manual or the
sales representative from which you purchased the product.
•This manual is not intended for models with custom specifications.
Revisions may not always be made in this manual in conjunction with changes in
specifications, constructions and/or components if such changes are not deemed to
interfere with the instrument’s functionality or performance.
Notices Regarding Safety and Modification
For the protection and safety of personnel, the instrument and the system comprising
the instrument, be sure to follow the instructions on safety described in this manual
when handling the product. If you handle the instrument in a manner contrary to
these instructions, Yokogawa does not guarantee safety.
As for explosion-proof model, if you yourself repair or modify the instrument and
then fail to return it to its original form, the explosion-protected construction of the
instrument will be impaired, creating a hazardous condition. Be sure to consult
Yokogawa for repairs and modifications.
The following safety symbols and cautionary notes are used on the product and in this
manual:
1-2
IM 1F5B2-01E
WARNING
This symbol is used to indicate that a hazardous condition will result which, if not
avoided, may lead to loss of life or serious injury. This manual describes how the
operator should exercise care to avoid such a risk.
CAUTION
This symbol is used to indicate that a hazardous condition will result which, if not
avoided, may lead to minor injury or material damage. This manual describes how the
operator should exercise care to avoid a risk of bodily injury or damage to the instru-
ment.
IMPORTANT
This symbol is used to call your attention to a condition that must be observed in order
to avoid the risk of damage to the instrument or system problems.
NOTE
This symbol is used to call your attention to information that should be referred to in
order to know the operations and functions of the instrument.
For Safe Use of ULTRA YEWFLO
WARNING
If the process fluid is harmful to personnel, handle ULTRA YEWFLO carefully even
after it has been removed from the process line for maintenance or other purposes.
Exercise extreme care to prevent the fluid from coming into contact with human flesh
and to avoid inhaling any residual gas.
CAUTION
When carrying ULTRA YEWFLO around, exercise extreme care to avoid dropping it
accidentally and causing bodily injury.
CAUTION
The /JF1 option code indicates that the model in question is an officially certified
explosion-protected instrument. Stringent regulations, therefore, apply with regard to
the construction, installation location, external wiring, maintenance and repair of
ULTRA YEWFLO. Care must be taken since using ULTRA YEWFLO in disregard
of these regulations may create a hazardous condition. ALWAYS before handling
ULTRA YEWFLO, be sure to read “Installation and Operating Precautions for
Flameproof Explosion-Protected Instruments” at the end of this manual.
1-3
IM 1F5B2-01E
1. INTRODUCTION
Warranty
The warranty of this instrument shall cover the period noted on the quotation pre-
sented to the Purchaser at the time of purchase. The Seller shall repair the instrument
at free of charge when the failure occurred during the warranty period.
All inquiries on instrument failure should be directed to the Seller’s sales representa-
tive from whom you purchased the instrument or your nearest sales office of the
Seller.
Should the instrument fail, contact the Seller specifying the model and instrument
number of the product in question. Be specific in describing details on the failure and
the process in which the failure occurred. It will be helpful if schematic diagrams
and/or records of data are attached to the failed instrument.
Whether or not the failed instrument should be repaired free of charge shall be left
solely to the discretion of the Seller as a result of an inspection by the Seller.
The Purchaser shall not be entitled to receive repair services from the Seller free
of charge, even during the warranty period, if the malfunction or damage is due
to:
improper and/or inadequate maintenance of the instrument in question by the Pur-
chaser.
handling, use or storage of the instrument in question beyond the design and/or
specifications requirements.
•use of the instrument in question in a location not conforming to the conditions
specified in the Seller's General Specification or Instruction Manual.
•retrofitting and/or repair by a party other than the Seller or a party to whom the Seller
has entrusted repair services.
improper relocation of the instrument in question after delivery.
reason of force measure such as fires, earthquakes, storms/floods, thunder/lightning,
or other reasons not attributable to the instrument in question.
2-1
IM 1F5B2-01E
2. HANDLING PRECAUTIONS
All of the instruments in the UYF200 series of ultrasonic vortex flowmeters are thor-
oughly tested at the factory before shipment.
After you have received the ordered ULTRA YEWFLO flowmeter, visually check it
to ensure that the flowmeter is free from damage.
This chapter contains cautionary notes that must be observed when handling ULTRA
YEWFLO. Carefully read this chapter first.
For topics other than those found in this chapter, refer to the relevant heading of a
chapter, section or subsection.
If any questions arise, contact the vendor from whom you purchased ULTRA
YEWFLO or your nearest office of the Yokogawa service network.
2.1 Cross-check of the Model Code and Specifications
The model code and specifications are indicated on the data plate attached to the case of
ULTRA YEWFLO. Cross-check this information with that in the table in Section 9.2,
“Model and Suffix Codes,” to ensure that ULTRA YEWFLO is as specified in the order
instructions.
Figure 2.1 Example of Data Plate
2.2 Precautions Regarding Transportation
To protect against accidental damage to ULTRA YEWFLO while transporting it to a
new location, pack it in the original packing as when shipped from the Yokogawa
factory.
2-2
IM 1F5B2-01E
2.3 Precautions Regarding Storage Location
Deterioration in insulation or corrosion can occur for unexpected reasons if ULTRA
YEWFLO is left uninstalled for a prolonged period after delivery. If ULTRA YEWFLO
is likely to be stored over a prolonged period, observe the following precautions.
Choose a storage location that satisfies the following requirements:
Not exposed to rain or splashwater.
Less susceptible to mechanical vibration or shock.
•Kept within the temperature and humidity ranges shown in the following table,
preferably at normal temperature and humidity (approximately 25˚C and 65%).
erutarepmeT04- ° 58+ot °C
ytidimuH)gnisnednoc-non(%001ot5
2.4 Precautions Regarding Installation Location
ULTRA YEWFLO is designed to operate even under harsh environmental conditions,
virtually placing no limits to your choice of installation location. When determining the
location, however, consider the following for easy routine inspection and operation and
for use in a stable condition with high accuracy over a prolonged period.
Ambient Temperature
Whenever possible, avoid mounting ULTRA YEWFLO in a location with a great
temperature gradient and/or temperature variation. If ULTRA YEWFLO is likely to be
exposed to heat radiating from the plant, insulate ULTRA YEWFLO or mount it where
there is adequate ventilation.
Atmospheric Conditions
Whenever possible, avoid mounting ULTRA YEWFLO in a corrosive atmosphere. If
ULTRA YEWFLO needs to be used in such an area, insure that ULTRA YEWFLO is
installed where there is adequate ventilation. Care must also be taken to prevent
rainwater from getting inside and/or remaining inside the cable conduit.
Mechanical Shock or Vibration
ULTRA YEWFLO is designed to withstand mechanical shock or vibration. Whenever
possible, however, mount ULTRA YEWFLO in a location that is less susceptible to
such shock or vibration. If ULTRA YEWFLO needs to be mounted on a pipeline where
relatively strong mechanical vibration is present, equip the line with a pipe support (see
Figure 2.4).
Requirements for Piping and Process Fluid
Restrictions apply to the piping and process fluid. Before mounting ULTRA YEWFLO,
be sure to read Section 4.1, “Piping Precautions.”
Installation of Explosion-protected Instruments
ULTRA YEWFLO can be mounted and used in a hazardous area, as specified in the
flameproof certification mentioned in this manual. Important cautionary notes are found
in “Installation and Operating Precautions for Flameproof Explosion-Protected Instru-
ments” at the end of this manual. Be sure to read the notes when mounting ULTRA
YEWFLO.
2-3
IM 1F5B2-01E
2. HANDLING PRECAUTIONS
Pipe support
ULTRA YEWFLO
Pipeline
Figure 2.4 Example of Pipe Support
Other Considerations
Choose a location where there is sufficient clearance around ULTRA YEWFLO to
allow such work as routine inspections.
Choose a location that ensures easy wiring and piping.
It will be to your advantage if you equip the installation location with lighting for
night-time maintenance and inspections, power outlets for measuring instruments and
wired phone jacks for contact with the supervisory control room.
2.5 Precautions Regarding Pipelines
When turning on a process fluid through a pipeline, observe the following instructions to
use ULTRA YEWFLO to the intended degree of safety.
Make sure the bolts that fasten ULTRA YEWFLO and the pipeline together are
securely tightened.
Make sure no fluid is leaking from the pipeline.
Do not apply a pressure exceeding the specified limit.
ULTRA YEWFLO is under constant pressure while a process fluid is flowing. Do
NOT loosen the bolts that fasten the flanges. If you loosen the bolts, there is a risk of
the process fluid gushing out of the pipeline.
If the process fluid is toxic or otherwise harmful to personnel, exercise extreme care
to prevent the fluid from coming into contact with the eyes or skin and to avoid
inhaling any released gas.
WARNING
2-4
IM 1F5B2-01E
2.6 Precautions Regarding Use of Transceivers
IMPORTANT
ULTRA YEWFLO is designed with full consideration of and measures against
interference from high-frequency noise. It is likely, however, that ULTRA YEWFLO
is affected by such noise if you use a transceiver near the instrument or the cable
wired to it. When using a transceiver, assess its influence on the loop where ULTRA
YEWFLO is connected by first locating it a few meters away from the ULTRA
YEWFLO’s converter component and then bringing it gradually closer in. Use the
transceiver at distances that do not cause a problem.
2.7 Precautions Regarding Insulation Resistance and
Withstanding Voltage Tests
Insulation resistance and withstanding voltage tests can deteriorate insulation and
degrade safety even if the testing voltages are at levels that may not cause the
insulation to break down. Keep the application of these tests to a minimum.
During insulation resistance testing, do not apply voltages exceeding 500 V DC.
During withstanding voltage testing, do not apply voltages exceeding 500 V AC.
Follow the procedures summarized below to run these tests. During testing, leave the
cable of the transmission line disconnected.
Insulation Resistance Test Procedure
<1> Wire a cross-over cable from the SUPPLY "+" terminal through the PULSE "+"
to "-" terminals.
<2> Connect an insulation resistance meter (with the power switched off) between
the cross-over cable and the grounding terminal. Use the cross-over cable as the
positive-polarity test point and the grounding terminal as the negative-polarity
test point.
<3> Turn on the insulation resistance meter and measure the insulation resistance.
<4> After the completion of testing, remove the insulation resistance meter, connect a
100-k resistor across the cross-over cable and the grounding terminal, and
allow at least one second for the accumulated electricity to discharge. (Do not
touch the terminals during discharge.)
Withstanding Voltage Test Procedure
<1> Wire a cross-over cable from the SUPPLY "+" terminal through the PULSE "+"
to "-" terminals.
<2> Connect a withstanding voltage tester between the cross-over cable and the
grounding terminal. Connect the ground-side terminal to the grounding terminal.
<3> Gradually raise the testing voltage from 0 V to the specified level.
<4> Keep the voltage at the specified level for one minute.
<5> After the completion of testing, gradually lower the testing voltage to prevent a
power surge.
2-5
IM 1F5B2-01E
2. HANDLING PRECAUTIONS
2.8 Notes on JIS Flameproof Flowmeters
CAUTION
Models of ULTRA YEWFLO with the optional JIS flameproof feature are designed to
operate even in a hazardous atmosphere (Class 1 or Class 2 Area) that may produce the
explosive gas or gases indicated in the Users’ Guidelines for Explosion-Protected,
Factory-Use Electrical Equipment (Protection against Explosive Gas Atmospheres—
1994).
Adequate precautions must be taken to ensure safety when mounting, wiring and piping
equipment of flameproof construction. For safety reasons, regulations are imposed on
the maintenance and repair of such equipment. Before doing any such work, ALWAYS
be sure to read “Installation and Operating Precautions for Flameproof Explosion-
Protected Instruments” at the end of this manual.
2.9 Installation Precautions for CENELEC (KEMA)
Intrinsic Safety
• Electrical Data
In type of explosion protection intrinsic safety EEx ia IIC only for connection to a
certified intrinsically safe circuit with following maximum values:
Umax = 30V
Imax = 165mA
Pmax = 0.9W
Effective internal capacitance Ci = 6nF
Effective internal inductance Li = 730µH
• Installation
All wiring shall comply with local installation requirements. (Refer to the installation
diagram)
Installation Diagram
* Integral Type
Hazardous Location Non Hazardous Location
Flowmeter
(UYF200-A)
+
SUPPLY
PULSE
+
+
Safety
Barrier 1
* Note 1
+
Safety
Barrier 2
* Note 1
2-6
IM 1F5B2-01E
* Remote Type
Hazardous Location Non Hazardous Location
Flowmeter
Converter
(UYFA21)
UYF021
Signal Cable
Flowmeter
Detector
(UYF200-N)
+
SUPPLY
PULSE
+
A
B
C
A
B
C
+
Safety
Barrier 1
* Note 1
+
Safety
Barrier 2
* Note 1
Note 1: In any safety barrier used output current must be limited by a resistor ‘R’ such that Io=Uo/R
Note 2: The instrument modification or parts replacement by other than authorized representative of
Yokogawa Electric Corporation is prohibited and will void KEMA Intrinsically safe Certification.
2.10 Installation Precautions for CENELEC (KEMA)
Explosionproof
Suitable heat-resisting cables (heat-resisting over 90˚C) shall be used for the ULTRA
YEWFLO Model UYF200 Serise Ultrasonic Voltex Flowmeter when the ambient
temperature exceeds +70˚C and/or the process temperature exceeds 135˚C.
The cable entry devices shall be certified in type of protection flameproof enclosure “d”
and suitable for the conditions of use and correctly installed.
3-1
IM 1F5B2-01E
3. COMPONENTS OF ULTRA YEWFLO
The integral type of ultrasonic vortex flowmeter (wafer, flange type)
Figure 3.1 Components of ULTRA YEWFLO
Converter case
Converter covers
Bracket
Sensor assembly
Sensor-mounting plate
Bodies
Wafer type
Flange type
The remote type of ultrasonic vortex flowmeter (Converter, Detector)
Converter case
Terminal box cover
Bracket
Sensor assembly
Terminal box
Bodies
Sensor-mounting plate
Converter covers
4-1
IM 1F5B2-01E
4. MOUNTING
4. MOUNTING
Before mounting ULTRA YEWFLO, see Section 2.4, “Precautions Regarding Installa-
tion Location.” For the environmental conditions of the installation location, see Section
9.1, “Standard Specifications.”
4.1 Piping Precautions
IMPORTANT
Be sure to observe the precautions in this section. Failure to observe these precau-
tions will result in an adverse effect to your flowrate measurement.
IMPORTANT
Avoid mounting ULTRA YEWFLO on a pipeline where:
the process fluid is mixed with bubbles of gas.
the process fluid is mixed with an excessive amount of slurry or foreign matter that
has accumulated on the inner walls.
•a highly pulsating flow or pressure is present.
Valve Mounting and Straight Lengths of a Pipeline
Valve position and straight pipe length:
Install the valve on the downstream side of the flowmeter. The upstream straight pipe
length dependent on the element located on the upstream such as reducer/expander,
bent and etc., refer to description as below. Keep 5D or more for downstream straight
pipe length.
YEWFLO
5D or more
Flow
Valve
Refer to each
element below for
straight pipe run.
In case the valve has to be installed on the upstream of the flowmeter, ensure the
upstream straight pipe length to be 20D or more (for /HAC version is 30D), and the
downstream straight pipe length be 5D or more.
Flow
YEWFLO
Valve
5D or more
20D or more
(/HAC version 30D)
Figure 4.1-1 Valve Mounting and Straight Lengths of Pipe
4-2
IM 1F5B2-01E
Connection of Reducing and Expanding Pipes and Their Straight Lengths
Reducer or expander pipe:
Ensure the upstream straight pipe length be 5D or more (for /HAC version is 10D),
and the downstream straight pipe length to be 5D or more for per reducer pipe.
Ensure the upstream straight pipe length be 10D or more (for /HAC version is 20D),
and the downstream straight pipe length be 5D or more for per expander pipe.
Flow
YEWFLO
5D or more
Reducer
5D or more
(/HAC version 10D)
Flow
YEWFLO
5D or more
Expander
10D or more
(/HAC version 20D)
Figure 4.1-2 Connection of Reducing and Expanding Pipes and Their Straight
Lengths
Bent pipe and straight pipe length:
Ensure the upstream straight pipe length to be 10D or more, and the downstream straight
pipe length be 5D or more for per bent pipe.
Flow
10D × N or more 5D or more
YEWFLO
Figure 4.1-3 Connection of Bent Pipe and Straight Lengths of Pipe
In case of pulsating pressure existing:
•When pulsating pressure caused by a pump exist, install the valve on the upstream of
the flowmeter.
Installation Example
P
Pump
Valve
Figure 4.1-4a Piping Where Pulsating Pressure Caused by a Pump
4-3
IM 1F5B2-01E
4. MOUNTING
When pulsating pressure caused by a T-type piping exist, install the valve on the
upstream of the flowmeter.
Example: As shown in the figure below, when the valve V1 is turned off, the fluid
flow through B, as to meter A the flow is zero. But due to the pulsating
pressure is detected, the meterís zero point become fluctuating. To avoid
this, change the valve V1 location to V1’.
A
V1V1'
Valve (Off)
Flow
B
Relocating
Figure 4.1-4b Piping where Paulsating Pressure Caused by a T-type Piping
Piping That Prevents Cavitation from Occurring
IMPORTANT
Avoid mounting ULTRA YEWFLO with its downstream side open to the atmosphere.
Otherwise, there will be an increased risk of cavitation.
The case of downstream open to the air:
If downstream open to the air, the cavitation possibly occurs. Avoid this kind use.
If such piping cannot avoid, up and down the downstream pipe as shown the figure
below, or, install a valve on the downstream side.
Installation Example
P
Pump
Tank
Tank
Figure 4.1-5 Piping when downstream open to the air
Joint Pipes
For joint pipes, use pipes with an inner diameter greater than that of ULTRA YEWFLO
(use pipes with a schedule number no larger than 80 for joint pipes with a nominal inner
diameter ranging from 25 mm to 100 mm).
IMPORTANT
Exercise care to prevent the gaskets inserted between ULTRA YEWFLO and the joint
pipes from protruding into the flow path.
4-4
IM 1F5B2-01E
Waterproof Construction
CAUTION
The waterproof construction of ULTRA YEWFLO is designed to comply with the JIS
C0920 standard for water-tight equipment (compatible with IEC IP67 or NEMA4X)
which does not allow it to be immersed in water during use.
Mounting Position
ULTRA YEWFLO can be mounted vertically, horizontally or in any other position. For
a vertical pipe, mount ULTRA YEWFLO so that the process fluid is flowing upward,
always keeping ULTRA YEWFLO filled with the fluid.
IMPORTANT
•Mount ULTRA YEWFLO in such a manner that the pipe is constantly filled with the
running process fluid (see Figure 4.1-8).
Flushing of the Pipeline (Cleaning)
If scale or sludge (fur and/or dirt) is likely to be present inside the piping after the
installation of a new line or the repair of an existing line, flush the line before operation.
Figure 4.1-6 Flushing of Pipeline
Piping That Prevents Bubbles of Gas from Becoming Trapped
IMPORTANT
Avoid the application where the gas bubbles may be contained in the fluid to be
metered
When the flow contains bubbles, it is difficult to carry out metering. Therefore, avoid
such application. For example: when disburden fluid from tank car, it is possible to
produce the bubbles by the phenomenon occurred when the liquid level decreases.
4-5
IM 1F5B2-01E
4. MOUNTING
IMPORTANT
Starting the flow of any gas-liquid two-phase fluid in the pipeline will impede your
measurement. Care must be taken to avoid flowing any fluid containing gas bubbles.
Gas bubbles can occur, however, for a number of reasons. Pipe ULTRA YEWFLO
so that no such bubbles remain inside ULTRA YEWFLO.
During such times as the startup of plant operation, a process fluid may take the form
of a gas-liquid two-phase stream temporarily at the start of flow. Note that, in that
case, the indicator may overshoot or fail to give readings.
Figure 4.1-7 Example of Piping That Prevents Bubbles of Gas from Becoming
Trapped
Piping That Keeps ULTRA YEWFLO Filled with Process Fluid
IMPORTANT
If not filled with the process fluid, ULTRA YEWFLO will fail to operate properly
because it faces the difficulty of transmitting and receiving ultrasonic signals. Ob-
serve the following precaution when piping ULTRA YEWFLO.
Allow the process fluid to flow upward through the pipeline. This strategy keeps
ULTRA YEWFLO constantly filled with fluid. Should it be unavoidable for the fluid to
flow downward, raise the downstream side of the pipeline to the height shown in Figure
4.1-8. This strategy will also ensure that ULTRA YEWFLO is always filled with
process fluid.
4-6
IM 1F5B2-01E
Figure 4.1-8 Example of Piping That Keeps ULTRA YEWFLO Filled with
Process Fluid
4-7
IM 1F5B2-01E
4. MOUNTING
4.2 Mounting ULTRA YEWFLO
When mounting ULTRA YEWFLO, position it in such a manner that the direction in
which the process fluid is flowing matches the direction of flow indicated on ULTRA
YEWFLO’s body. For information on how to rotate the indicator/totalizer component,
see Section 4.3.
4.2.1 Mounting a Wafer Type of ULTRA YEWFLO
•When mounting a wafer type of ULTRA YEWFLO in a pipeline, make sure that
ULTRA YEWFLO is lined up with the pipeline along its central axis.
Stud bolts and nuts (material: SUS304) for mounting are supplied with ULTRA
YEWFLO upon request (specify suffix code “/BLT” for this optional feature).
If you are planning to procure stud bolts by yourself, refer to Table 4.2 that summa-
rizes their required outer diameters as classified by the standards for flanges.
It is always the user’s responsibility to procure gaskets for flowmeter mounting (see
Figure 4.2-1). (In order to prevent gaskets from protruding into the flow path, use
gaskets with pre-cut bolt holes whenever possible.)
Table 4.2 Mounting Studs for ULTRA YEWFLO’s Wafer Type
lanimoN
retemaiD
fosgnitaR
segnalF
tloBdutS
retemaiDretuO
)mm(
)mm(htgneL
mm52
).ni1(
K02,K01SIJ
051ISNA
003ISNA
61
7.21
9.51
061
551
061
mm04
).ni2/11(
K02,K01SIJ
051ISNA
003ISNA
61
7.21
1.91
061
551
071
mm05
).ni2(
K02,K01SIJ
051ISNA
003ISNA
61
9.51
9.51
002
002
002
mm08
).ni3(
K01SIJ
K02SIJ
051ISNA
003ISNA
61
02
9.51
1.91
022
042
042
042
mm001
).ni4(
K01SIJ
K02SIJ
051ISNA
003ISNA
61
02
9.51
1.91
022
042
042
042
stlobdutsehtfoshtgneletamixorppaehtera'htgneL'rednusrebmunehT
ehtybdeificepssaawagokoYybdeilppus TLB .edocxiffus
riehtecnisnekatebtsumerac,flesruoyybstlobdutsgnirucorpnehW
steksagdnastunehtfossenkcihtehtnognidnepedseiravhtgnelderiuqer
.desu
4-8
IM 1F5B2-01E
Figure 4.2-1 Gasket with Pre-cut Bolt Holes (for Four-hole Flanges)
Flange of joint pipe
Joint pipe
Figure 4.2-2 Installation of Gaskets
IMPORTANT
Use gaskets whose inner diameter is greater than those of ULTRA YEWFLO and the
joint pipe. Exercise extreme care to prevent the gaskets from protruding into the flow
path.
The procedure for mounting a wafer type of ULTRA YEWFLO is the same no matter which type of
flange you use.
Horizontal Mounting
<1> Thread two collars each through each of the lower two bolts as shown in fig 4.2-
3.
<2> Evenly fasten the nuts and bolts, tightening both edges of ULTRA YEWFLO’s
brim onto each pair of collars.
<3> Make sure the process fluid is not leaking.
4-9
IM 1F5B2-01E
4. MOUNTING
Direction of flow
Nut
Collar
Gasket
Flange
Stud bolt
Figure 4.2-3 Horizontal Mounting
Vertical Mounting
<1> Thread one collars each through each of the lower two bolts as shown in fig 4.2-
4.
<2> Make sure, at that point, that both edges of ULTRA YEWFLO’s brim are in
proper contact with each pair of collars.
<3> Evenly fasten the bolts and nuts, tightening the edges onto the collars.
<4> Make sure the process fluid is not leaking.
Direction of flow
Figure 4.2-4 Vertical Mounting
4-10
IM 1F5B2-01E
IMPORTANT
In vertical mounting, ALWAYS make sure ULTRA YEWFLO is mounted with the
wiring port facing downward, as shown in Figure 4.2-3, to prevent against the ingress
of rainwater, etc.
4.2.2 Installing a Flange Type of ULTRA YEWFLO
Using stud bolts, nuts and gaskets, install ULTRA YEWFLO as shown in Figures 4.2-
5 and 4.2-6.
It is always the user’s responsibility to procure gaskets for flowmeter mounting (see
Figure 4.2-1). (In order to prevent gaskets from protruding into the flow path, use
gaskets with pre-cut bolt holes whenever possible.)
IMPORTANT
Use gaskets whose inner diameter is greater than those of ULTRA YEWFLO and the
joint pipe. Exercise extreme care to prevent the gaskets from protruding into the flow
path.
Direction
of flow
Nut
Bolt
Gasket
Figure 4.2-5 Horizontal Mounting
IMPORTANT
In vertical mounting, ALWAYS make sure ULTRA YEWFLO is mounted with the
wiring port facing downward, as shown in Figure 4.2-3, to prevent against the ingress
of rainwater, etc.
4-11
IM 1F5B2-01E
4. MOUNTING
Figure 4.2-6 Vertical Mounting
Parts that the user should procure when installing ULTRA YEWFLO (either a wafer or
flange type):
Nuts and bolts Gasket with pre-cut bolt holes
4-12
IM 1F5B2-01E
4.3 Mounting remote type converter
For the remote type, using UYF021 signal cable to connect the converter and remote
type flowmeter.
The maximum signal cable length is 65ft (20m).
The converter is mounted on a 2-inch (60.5mm outer dia.) stanchion or horizontal pipe.
Figure 4.3 Mounting remote type converter
4.4 Repositioning the Indicator/Totalizer Component
The indicator/totalizer component of ULTRA YEWFLO can be turned 90˚ either
clockwise or counterclockwise. For example, you can install ULTRA YEWFLO on a
vertical pipe, as shown in Figure 4.3, by removing the component and then reposition-
ing the joint pin (see Subsection 8.3.1).
Position at shipment
Position for vertical mounting
Figure 4.4 Repositioning of the Indicator/Totalizer Component
U-Bolt
(Only when specifying
it is attached)
Horizontal pipe mounting
2-inch ( 60.5mmouter dia.) pipe
Stanchion (vertical pipe)mounting
Mounting bracket
(Only when specifying
it is attached)
Nut
(Only when
specifying it is
attached)
IMPORTANT
4-13
IM 1F5B2-01E
4. MOUNTING
4.5 Swiveling the Indicator/Totalizer Component
The indicator/totalizer component can be swiveled around the neck in increments of 90°.
To change the orientation of the component, follow the procedure described below.
See Note.
See step 1.
See step 2.
Figure 4.5 Swiveling the Indicator/Totalizer
Component
(1)Loosen the setscrew at the neck of the
converter case for just one turn.
(2)Remove the four screws that join the
case and bracket and, preventing the
case from lifting off the bracket, swivel
the indicator/totalizer component so it
faces the desired direction.
(3)Reverse the operation noted in step 2
above to replace the component.
Note: To swivel the component 180°, remove
the two screws that join the body and
bracket. This strategy makes your work
easier.
CAUTION
When swiveling the indicator/totalizer component or, in other words, the
converter case, exercise care to avoid damaging the leadwires by pulling
up on them.
Do not swivel the converter case more than 180° in either direction.
4-14
IM 1F5B2-01E
4.6 Insulating the Piping
When insulating the piping, exercise care to avoid covering the bracket with the
insulation to prevent heat from getting into the converter.
IMPORTANT
Do not cover the bracket.
Figure 4.6 Insulating the Piping
5-1
IM 1F5B2-01E
5. WIRING
5. WIRING
IMPORTANT
When wiring ULTRA YEWFLO, avoid locating it near such sources of noise as
transformers, motors or electromotive power supplies with large current capacities.
Remove the terminal cover and dust-prevention plug on the wiring port before wiring
ULTRA YEWFLO.
ALWAYS waterproof all threaded parts. (A silicon-resin, non-hardening sealing
material is recommended for the waterproof treatment.)
To protect against noise, do not allow the signal cable and electromotive cables to
run through the same duct.
Explosion-proof models of ULTRA YEWFLO must be wired in compliance with
applicable regulations to ensure explosion-proof performance.
Refer to “Installation and Operating Precautions for Flameproof Instruments” at the
end of this manual to wire ULTRA YEWFLO correctly.
5.1 Selecting the Cable
Observe the following precautions when choosing cables for use with the transmission
loop line.
Use a twisted cable equal to or better than 600V grade polyvinyl chloride insulated
wiring (JIS C3307).
When wiring ULTRA YEWFLO in an area susceptible to noise, use a shielded cable.
If ULTRA YEWFLO will be used in a simultaneous analog-pulse output mode,
separately shielded two-wire cables may become necessary. (See Section 5.5 for
more information.)
When wiring ULTRA YEWFLO in an area where the ambient temperature is
comparatively high or low, use a cable suited for the place of use.
When using ULTRA YEWFLO in an area where a harmful gas, liquid, oil and/or
solvent is present, use a cable resistant to these substances.
Crimp-on terminals (for 4-mm screws) with insulated sleeves are recommended as
the cable-end configuration.
CAUTION
For the remote type, using UYF021 signal cable to connect the converter and remote
type flowmeter.
5-2
IM 1F5B2-01E
5.2 Connecting Field Mounting Indicator (applies to ana-
log output only)
When using such field mounting indicator, wire them as shown in Figure 5.2.
Yokogawa Electric’s Model 4915 (standard) or 4914 (flameproof) field mounting
indicator is recommended for this use.
Figure 5.2-1 Connection of Field Mounting Indicator
Power
supply
Power
supply
Connection
box
ULTRA YEWFLO
Power supply terminal
Model 4915 or 4914
+
-
+
PULSESUPPLY
• Integral type
Power
supply
Power
supply
Vortex flowmeter
Converter
: Connecting 2
+
-
+
PULSE
SUPPLY
Connection
box
Connection
box
C
B
A
+
Terminal
-
Terminal
Electrode
Electrode
: Connecting 1
: Connecting 2
Figure 5.2-2 Connection of Field Mounting Indicator
• Remote type
5-3
IM 1F5B2-01E
5. WIRING
5.3 Wiring
CAUTION
For JIS Flameproof type:
Stringent restrictions apply to the wiring materials and methods of flameproof
instruments, including their peripheral devices. Before doing any wiring, ALWAYS
be sure to read “Installation and Operating Precautions for Flameproof Explosion-
Protected Instruments” at the end of this manual.
•Do not open the cover for two minutes after turn-off the power supply.
In case of the metal conduit wiring, the temperature limit for insulated wire must be
over 75˚C.
Follow the procedure below to wire ULTRA YEWFLO.
For reasons of waterproofing or protection of cables against damage, the use of cable
conduits and ducts is recommended for wiring. (See Figure 5.3-1.)
To open the cover of a flameproof model of ULTRA YEWFLO, turn the lock screw
clockwise. When you have closed the cover after wiring, ALWAYS turn the lock
screw counterclockwise so the cover is securely fastened.
•Use Yokogawa Electric’s flameproof packings adaptor or conduits for external wiring
of a flameproof model of ULTRA YEWFLO.
Connection box
Thick-wall steel conduit
Tee
Drainage fitting
Flexible
conduit
Figure 5.3-1 Example of Wiring Using Conduits (Standard Model of ULTRA
YEWFLO)
5-4
IM 1F5B2-01E
Follow the procedure below to attach a flameproof packing adapter (optional) (see Figure 5.3-2).
<1> Turn the lock screw clockwise to remove the cover on the terminal box.
<2> Measure the outer diameters of the cable being used, in two different directions, to
an accuracy of 0.1 mm.
<3> Determine the average of the outer diameters in two directions. Choose the
packing whose inner diameter is closest to the average from the three supplied
packings (see Table 5.3).
<4> Screw the adapter’s main assembly into the wiring port of ULTRA YEWFLO and
fasten the assembly with the locknut. (Be sure to insert the O-ring.)
<5> Insert the pressure nut, union coupling, plate packing, washer, rubber packing and
washer, in this order, into the cable. Connect each wire of the cable to their
respective terminals through the main assembly of the flameproof packing adapter.
<6> Fasten the pressure nut to fix the adapter. For a proper tightening torque, apply
another two or two-and-a-half turns to the pressure nut at a point where the rubber
packing begins to compress.
<7> Fasten the stop screw on the pressure nut.
<8> Reinstall the cover on the terminal box. Turn the lock screw counterclockwise to
fasten the cover.
Lock screw
Cable
Hexagon-socket
stop screw
Pressure
nut
Plate
packing
Washers
Union coupling
Rubber packing
Locknut
O-ring
Figure 5.3-2 Attachment of Flameproof Packing Adapter
Integral type
Remote type
detector
Remote type
detector
5-5
IM 1F5B2-01E
5. WIRING
IMPORTANT
ALWAYS waterproof all threaded parts. (A silicon-resin, non-hardening sealing
material is recommended for the waterproof treatment.)
Table 5.3 Types of Packings and Applicable Outer Diameters of Cables
edoCxiffuS
daerhTforetemaiD
troPgniriWno
elbacilppAforetemaiDretuO
)mm(elbaC
noitacifitnedI
gnikraM
rebmuNtraP
5GP2/1G
9ot5.8
01ot1.9
11ot1.01
9 φ
01 φ
11 φ
DA1069G
5.4 Grounding
For an analog output application, connect a grounding wire from ULTRA YEWFLO
to the ground.
For a pulse output application, connect a grounding wire from ULTRA YEWFLO to
the ground. Also ground the shielded cable that connects ULTRA YEWFLO to the
pulse receiver.
Use the Class 3 Grounding method (grounding resistance of no greater than 100 ).
Use a 600V grade polyvinyl chloride insulated wiring for grounding.
5-6
IM 1F5B2-01E
5.5 Signal cable end finish procedure
For finishing signal cable end, following the procedure as below:
IMPORT ANT
The length of signal cable must be less than 20m.
(1) Remove the outer jacket, outer shield and inner
jacket as shown in the figure below.
10
65
Inner shield
Outer jacket
Inner
jacket
Outer shield
45
35
25
White
Red
55
(A)
(G)
(B)
(C)
Blue tubing
Black tubing
(A)
(G)
(B)
(C)
Heat shrinkable tubing
A
Tip
Label
7
Heat shrinkable tubing
Unit : mm
(2) Remove inner shield, intertwine two drain
wires, and cut each tip.
(3) Remove the wire insulation and twist each wire
as shown below.
(4) Insert insulation tubing over B and G until it
stops inside the shield. Cut the tubing off
leaving only 0.2 inch (5mm) of the inner shield
exposed. Remove 0.2 inch of insulation from
the tips of the two wires.
(5) Insert the heat shrinkable tubing as shown
below.
(6) As shown in the figure below, install the tip on
each wire and label of the sign which corre-
sponds to the each line.
(7) Heat all of shrinkable tube with a heat blower
or heat gun, and then shrink them.
5-7
IM 1F5B2-01E
5. WIRING
5.6 Power Supply Voltage and Load Resistance
Analog Output
ULTRA YEWFLO uses two-wire transmission and, therefore, the cable is used both
as the power supply line and as a signal line. A DC power supply is needed for the
transmission loop line. (The distributors listed in Table 5.6 are available from
Yokogawa Electric. Contact the manufacturer as necessary.)
The maximum communicable distance over a transmission cable is 2 km when a
CEV cable is used.
Communication via the amplifier board is always possible irrespective of the wiring
conditions.
Table 5.6 Distributors
ledoM
foepyT
noitalusnI
otylppuSrewoP
rotubirtsiD
forebmuNelbatcennoC
s'OLFWEYARTLU
foecnatsiseRmumixaM
eriWgnitcudnoC
011-TBDS
012-TBDS
041-SBDS
detalusni-pooL
detalusni-O/I
detalusni-pooL
derewop-CD/CA
derewop-CD/CA
derewop-CD/CA
1
1
4
053
053
053
When configuring a loop, make sure the load resistances of both instruments, such as
a distributor, and conducting wires, which are to be installed in the loop, fall within
the shaded area of Figure 5.6-1.
The load resistance should preferably be connected to the negative-polarity terminal
of the power supply if no distributors are used. Figure 5.6-2 shows an example of
connection between ULTRA YEWFLO and a distributor.
R=
E–10.5
0.0236
250
600
10.5 16.4 24.7
30 42
Power Supply Voltage E (V)
Communicable
range
Load resistance R ()
Note: In the case of CENELEC intrinsic safety, the power supply voltage shold be under 30 VDC.
Figure 5.6-1 Relationship Between Power Supply Voltage and Load Resistance
(Analog Output)
5-8
IM 1F5B2-01E
SDBT or
SDBS distributor
1- to 5V DC
input
To recorder or
indicating meter
To power
supply
ULTRA YEWFLO
Power supply terminal
+
-
+
PULSESUPPLY
Figure 5.6-2 Wiring of ULTRA YEWFLO (Analog Output)
5.7 Pulse Output
ULTRA YEWFLO provides a pulse output through transistor contacts using three-
wire transmission. The contacts are rated at a maximum of 30 V DC and 120 mA
DC.
The low level is 0-2 V.
The range of the pull-up resistance is as noted below.
The pulse output is connected to such devices as an electronic counter. See Figure
5.6-3.
No communication is possible over a transmission line.
Communication via the amplifier board is always possible irrespective of the wiring
conditions.
ULTRA YEWFLO
Power supply terminal
Electronic
counter
R (1 k Typ)
Three-wire shielded cable
(resistance of conducting wire: 50 maximum)
+
-
+
PULSESUPPLY
Figure 5.6-3 Wiring of ULTRA YEWFLO (Pulse Output)
Range of Pull-up Resistance
The range of the pull-up resistance for pulse output is restricted for reasons of the
rated current and output frequency, as shown below:
E (V)
ՅՅR (k)
120
0.1
C (µF) × f (kHz)
where
E=pull up supply voltage
C=cable capacitance
f=frequency of pulse output
5-9
IM 1F5B2-01E
5. WIRING
IMPORTANT
Pull-up Resistance is necessary for pulse output. ( When resistance is low, amplifier will
be wrong.)
Pull-up Resistance is basically 1k, 1W. Depend on the cable length and pulse output
frequency, transmission may be disrupted. Determine the resistance value by equation
(1), and electric power of resistance by equation (2).
Take care of hot resistance.
5-8 Simultaneous Analog-Pulse Output
When using ULTRA YEWFLO in the simultaneous analog-pulse output mode, the
communicable distance of the transmission line is restricted depending on the wiring
method. Figure 5.6-4 illustrates three examples of flowmeter installation for this
output mode.
Communication via the amplifier board is always possible irrespective of the wiring
conditions.
R(k) =
0.1
(1)
C(µF) X f (kHz)
(*1)
Over 200 is necessary for R.
C : Capacitance of the cable f : Pulse output frequency
In case of (*1)CEV cable (2SQ),
0.1µF/km
P (W) =
R
E
R
2
(2)
E: Power supply voltage
P : Electricity of resistance
R
CAUTION
5-10
IM 1F5B2-01E
First of Three Examples – Communication is possible (up to a distance of 2 km when a CEV cable is used).
+
+
Shielded cable
Distributor
250
R
Electronic counter
E (10.5-30 V DC)*1
Counting input
Common
24V DC
*1: This su
pp
l
y
volta
g
e re
q
uires a
p
ower source with a maximum out
p
ut current of no less than E/R.
SUPPLY
PULSE
Second of Three Examples – Communication is possible (up to a distance of 200 m when the pull-up
resistance is 1 k).
+
+
Shielded cable
250
R
Electronic counter
E (16.4-30 V DC)*2
Counting input
Common
Recorder or other
instrument
*2: This supply voltage requires a power source with a maximum output current of no less than E/R + 25 mA.
The inductance of the
p
ower out
p
ut should less than 1/1000 of Pull-u
p
resistance
(
R
)
.
SUPPLY
PULSE
Third of Three Examples – No communication is possible (except when there is no process fluid flowing).
+
250
R
Electronic counter
E (16.4-30 V DC)*2
Counting input
Common
Recorder or other
instrument
*2: This supply voltage requires a power source with a maximum output current of no less than E/R + 25 mA.
+
SUPPLY
PULSE
Figure 5.6-4 Wiring of ULTRA YEWFLO (Simultaneous Analog-Pulse Output)
IMPORTANT
For the shielded cables in the first and second examples of flowmeter installation, use
two-wire separately shielded cables.
6-1
IM 1F5B2-01E
6. PREPARING FOR OPERATION
6.1 Checking the Flowrate Range
If your ULTRA YEWFLO is new, it is already calibrated to the specified range for
the flow rate.
When changing the range, determine the required range for the flow rate using the
following procedure.
Table 6.1 Measuring Ranges
Measurable Range of Flow Velocity (range including flow velocities with non-
guaranteed accuracy)
yticoleVwolFmuminiMyticoleVwolFmumixaM
ARTLU,s/m3.0(s/m2.0,regralsirevehcihW
ehtro)mm51siretemaidlanimons'OLFWEY
000,5rebmunsdlonyeRybnevigyticolevwolf
s/m6
Range of Flow Velocity with Guaranteed Accuracy (range for accuracy within
±1.0%)
yticoleVwolFmuminiMyticoleVwolFmumixaM
ehtfi,s/m3.0(s/m2.0,regralsirevehcihW
,51siretemaidlanimons'OLFWEYARTLU
sdlonyeRybnevigyticolevwolfehtro)mm52
000,02rebmun
s/m6
Range of Flow Velocity with Guaranteed Accuracy (range for accuracy within
±0.5%)–applies only to models with suffix code /HAC, but except for size 25mm,
150mm and 200mm.
yticoleVwolFmuminiMyticoleVwolFmumixaM
yticolevwolfehtros/m2.0,regralsirevehcihW
sadetaluclacrebmunsdlonyeRehtybnevig
retemaidlanimon
×
000,1
wolfehtros/m6,rellamssirevehcihW
rebmunsdlonyeRehtybnevigyticolev
sadetaluclac retemaidlanimon
×
000,4
nahtiwylpmoc1.6elbaTninwohssegnarehtnidedulcnitonseiticolevwolF:ETON
fognitarycarucca ± .%0.1
Equation for determining the Reynolds number:
Re=
354 × 10
3
× Qf
ν × D
Equation for determining the kinematic viscosity:
ν=
µ
ρ f
× 10
3
6-2
IM 1F5B2-01E
Equation for determining the volumetric flowrate (Qf) of ULTRA YEWFLO under operating conditions:
Qf=
υ × D
2
354
where
Re = Reynolds number (dimensionless)
Qf = volumetric flow rate under operating conditions (m
3
/h)
D = inner diameter of ULTRA YEWFLO (mm)
ν = kinematic viscosity under operating conditions (cSt)
ρf = density under operating conditions (kg/m
3
)
µ = viscosity under operating conditions (cP)
υ = flow velocity (m/s)
If the obtained flow velocity falls within any of the ranges shown in Table 6.1, you
can measure the flowrate properly.
Using the graph in Figure 6.1, you can determine flow velocities for cases where the
Reynolds number is 5,000. Multiplying the given value by 4 gives you the flow
velocity for a Reynolds number of 20,000.
lanimoN
retemaiD
)mm(retemaiDrennI
1 mm51 5 8.21
mm524.32
mm046.63
mm055.74
mm080.17
mm0018.39
mm0518.831
mm0026.581
Kinematic Viscosity ν (cSt)
5
3
2
1
0.5
0.3
0.2
12351020 30 50 100 200 300
0.5
6
ν
D
v = 5 ×
D:YEWFLO inner diameter (mm)
25 mm
40
mm
50 mm
80 mm
100 mm
200 mm
150 mm
Minimum Flow Velocity v (ms)
15 mm
Figure 6.1 Relationship Between Minimum Flow Velocity and Kinematic
Viscosity (curves for a Reynolds number of 5,000)
6-3
IM 1F5B2-01E
6. PREPARING FOR OPERATION
6.2 Pressure Loss and Cavitation
When changing the range, ALWAYS make sure the line’s back pressure level will not
lead to adverse effects due to pressure loss or cause cavitation.
Pressure Loss
The pressure loss is calculated by
P=108 × 10
-5
× ρf • υ
2
........................ (1)
or
P=135 × ρf •
Qf
2
D
4
..................................... (2)
where
P = pressure loss (kPa)
Qf = volumetric flow rate under operating conditions (m
3
/h)
D = inner diameter of ULTRA YEWFLO (mm)
υ = flow velocity (m/s)
ρf = density under operating conditions (kg/m
3
)
Cavitation (Minimum Back Pressure of the Line)
IMPORTANT
Cavitation may occur in fluid measurements if the line pressure is too low and the flow
velocity is too high, resulting in failure to measure the correct flow rate. Before
measurement, ALWAYS make sure the line’s back pressure level will not cause
cavitation.
No cavitation occurs if the minimum back pressure of the line at the maximum flowrate
is sufficiently low compared with the actual line pressure.
The minimum line pressure is calculated by
P=3.8 × ∆P + 1.3 × Po ......................... (3)
where
P = line pressure at a point two to seven times the nominal
diameter downstream from the ULTRA YEWFLO (kPa
abs)
P = pressure loss (kPa)
Po = liquid’s saturation vapor pressure under operating
conditions (kPa abs)
6.3 Zero Adjustment
No zero adjustment is necessary since the zero point does not shift.
6.4 Resetting totalized Value
•On the Brain Terminal (BT200), choose EXECUTE from the menu in parameter E10
(TOTAL RESET).
•Or, press the RESET switch located on the indicator/totalizer component.
6-4
IM 1F5B2-01E
6.5 Action Against Power Failure
In the case of a power failure, the totalized data value is protected by the EEPROM.
ULTRA YEWFLO cannot operate during a power failure, however, resulting in an
interruption in totalization. It resumes totalization upon recovery from the power
failure (restarts totalization, beginning with the value given immediately before the
power failure) and automatically restores normal operation.
•No backup batteries are necessary for the EEPROM.
6.6 Precautions During Startup
Because of effects due to external noise, ULTRA YEWFLO may not indicate 0%
when the flowrate is zero, giving an output greater than 0%. If this occurs, first make
sure ULTRA YEWFLO is filled with the process fluid. Then, make a TLA adjust-
ment according to the instructions in Subsection 8.2.3.
If the pipeline is empty during startup, ULTRA YEWFLO may continue to give a 0%
output or remain unstable until it fills with the process fluid.
IMPORTANT
•Whenever possible, pipe ULTRA YEWFLO while exercising care to prevent bubbles
of gas from mixing with the process fluid. (See Section 4.1, “Piping Precautions.”)
7-1
IM 1F5B2-01E
7. WORKING WITH THE BT200 BRAIN TERMINAL
7. WORKING WITH THE BT200 BRAIN
TERMINAL
ULTRA YEWFLO is equipped with a communication function called “BRAIN.”
ULTRA YEWFLO thus communicates with a BT200 BRAIN Terminal, enabling you to
change the range or set the tag number from a remote location. This chapter explains
how to set or change parameters using a BT200 terminal. For more information on a
BT200 terminal, see the BT200 BRAIN Terminal instruction manual (IM 1C0A11-01E).
7.1 Connection of a BT200 Terminal and Notes on Use
7.1.1 Connection of a BT200 Terminal
A BT200 terminal can be linked with ULTRA YEWFLO through the transmission
line in different ways. Connect the terminal to the connecting hooks in a terminal
box or to the relay terminals on the transmission line, using BT200 communication
cable with IC clip, as shown in Figure 7.1-1.
You can also communicate with ULTRA YEWFLO via the amplifier board. To do
this, connect the BT200 terminal across the HHT and COM terminals.
ULTRA YEWFLO
(converter section)
Relay
terminals
Instrument room
Terminal board
Distributor
(power supply)
Figure 7.1-1 Connection of BT200
7-2
IM 1F5B2-01E
7.1.2 Notes on Use
CAUTION
Connect the terminal to the connecting hooks in a terminal box or to the relay terminals
on the transmission line, using BT200 communication cable with IC lip, as shown in
Figure 7.1-1.
All your settings of parameters will be canceled if you turn ULTRA YEWFLO off
less than 30 seconds after the parameter setup. Keep ULTRA YEWFLO turned on
for at least 30 seconds after setting up parameters.
NOTE
<1> With Auto Power-off, the BT200 automatically turns off if it senses no access to
the keys for more than five minutes. This feature does not work, however, if the
parameters described in item 2 below are on the display.
<2> Parameters “A10: FLOW RATE (%),” “A20: FLOW RATE” and “A30: TOTAL,”
when on display, are updated with new data every five seconds.
<3> Use the UPLOAD or DOWNLOAD command when copying the parameters of
one ULTRA YEWFLO to another. Parameters that can be copied are all the items
in the B and C menus shown later in Section 7.4. (Except for B10: TAG NO and
B26: K-FACTOR)
7-3
IM 1F5B2-01E
7. WORKING WITH THE BT200 BRAIN TERMINAL
7.2 Working with the BT200
7.2.1 Layout of Keys
Figure 7.2-1 shows the layout of keys on the BT200.
21-line LCD display with 8
characters on each line
Cursor keys
• Select a menu item or parameter.
• Move the cursor.
• Browse pages.
POWER-ON/OFF key
Function keys
• Show commands at
the bottom of the display.
• Execute instructions as
dictated by the on-screen commands.
ENTER key
• Enters the selected menu.
• Sets data in the instrument to communicate with.
• Executes the functions of the BT200.
Alphanumeric keys
• Type in numerals.
• Type in letters in combination with the SHIFT key.
SHIFT key
Figure 7.2-1 Layout of Keys on the BT200
Screen titles
Message data items (a maximum of
six items is shown at one time)
Commands assigned to function keys
Parameters (a maximum of
three parameters is shown at
one time)
Parameter Screen BATTERY
A: DISPLAY
B: SET 1
C: SET 2
D: ADJUST
E: CONTROL
F: TEST
Menu Screen
Message
Parameter Screen
Parameter
A10 : FLOW RATE (%)
100.0%
A20 : FLOW RATE
10 m
3
/h
A30 : TOTAL
100 m
3
HOME
SET
ADJ ESC
PARM
HOME
SET
ADJ
7-4
IM 1F5B2-01E
B01 : TAG NO.
REIDAI
REIDAI
Alphanumeric Keys Used to Type in Data
Numeric key
In this mode, the F2 key
works as a key for shifting
between upper- and
lower-case letters.
Shift key for letters in the
upper-left corners of the keys
Press either of these keys each time you want to type
in a letter.
Function Keys and Shifting Between Upper- and Lower-case Letters
Shift key for letters in the upper-
right corners of the keys
Function keys
Each press of the F2 key toggles
between upper- and lower-case
letters.
Each function key is paired with
the command immediately
above the key.
Arrow Keys and ENTER Key
Power-on and -off
Used to select and enter a
data item.
ON/OFF
ENTER
Parameter
AB
7
CD
8
GH
4
IJ
5
MN
1
OP
2
ST
0
UV
EF
9
KL
6
QR
3
WX
SHIFT
YZ
SPACE
SHIFT
CAPS
ESC
CLRCODE
F1
F3
F4
F2
Up
Left
Down
Right
7.2.2 Functionality of Operating Keys
The following figures explain the functionality of the operating keys on the BT200.
7-5
IM 1F5B2-01E
7. WORKING WITH THE BT200 BRAIN TERMINAL
7.3 Configuring Parameters with the BT200
7.3.1 Screens for Parameter Setup
Refer to Section 7.4, “Parameter Summary,” to choose the parameter you want to
access. On the Menu screen, choose from the menu items to have access from one
parameter to another.
A: DISPLAY
B: SET 1
C: SET 2
D: ADJUST
E: CONTROL
F: TEST
- - WELCOME - -
BRAIN TERMINAL
ID : BT200
UTEL
FEED
Parameters
01 : MODEL
ULTRA YF
02 : TAG NO.
ABCDE
03 : SELF CHECK
GOOD
Parameters
A10 : FLOW RATE (%)
50.0%
A20 : FLOW RATE
10 m
3
/h
A30 : TOTAL
100 m
3
Startup screen
Utilities
1. ID
2.
3.
4.
5.
ESC
The following operations are
available on the Utilities
screen:
1. Setting of ID for the BT200
2. Setting of security code
3. Selection between
messages
4. Adjustment of the contrast of
LCD display
5. Adjustment of printing
density (BT200-P00 only)
F1
ENTER
OK
ADJ
ESC
Menus
ENTER
HOME
ENTER
DIAG
ESC
DATA
PRNT
1. Menu
2. Upload
3. Download
4. List
ADJ
SET
Commands
HOME
F4
For details on how to upload,
download and print parameters
(BT200-P00 only), see the
BT200 Brain Terminal
instruction manual.
ON/OFF
check connection
push ENTER key
Default Data screen
Menu screen
Parameter screen
7-6
IM 1F5B2-01E
7.3.2 Configuring Parameters
The following is a typical example of the procedure for configuring a parameter. Use
this example as a reference when configuring other parameters.
Example: Setting a Tag Number (Parameter B10)
In this example, you type the tag number as FIC-01.
B10 : TAG NO.
ABCDE
FIC - 01
A: DISPLAY
B: SET 1
C: SET 2
D: ADJUST
E: CONTROL
F: TEST
- - WELCOME - -
BRAIN TERMINAL
ID : BT200
UTEL
FEED
ON/OFF
Parameters
01 : MODEL
ULTRA YF
02 : TAG NO.
ABCDE
03 : SELF CHECK
GOOD
ENTER
OK
ADJ
ESC
Menus
ENTER
HOME
Continued at the top on
the right
Continued from the bottom on
the left
Parameters
B10 : TAG NO.
ABCDE
B20 : SIZE
25mm
B21 : PRESS RATING
L PRESS
ENTER
caps
ESC
Parameter
ENTER
ENTER
A: DISPLAY
B: SET 1
C: SET 2
D: ADJUST
E: CONTROL
F: TEST
ADJ
ESC
Menus
HOME
DIAG
ESC
DATA
PRNT
CLR
CODE
B10 : TAG NO.
ABCDE
FIC - 01
POFF
ESC
Parameter
print off
F2 : printer on
NO
B10 : TAG NO.
FIC-01
OK
Setting
NO
FEED
ENTER
Use the ⁄ key to move
the cursor to the parameter
B10: TAG NO.
Type in the desired tag
number, i.e., FIC-01.
Pressing the ENTER key once
makes the cursor begin
blinking.
Pressing the ENTER key twice
stops the cursor from blinking.
Press the key if this tag
number is acceptable.
F4
check connection
push ENTER key
Startup screen
Default Data screen
Menu screen
Menu screen
Parameter View screen
Setup screen
Setup screen
Setup screen
FEED
7-7
IM 1F5B2-01E
7. WORKING WITH THE BT200 BRAIN TERMINAL
7.4 Parameter Summary
This section summarizes parameters. Configure or change any of these parameters as
necessary. After configuration, always be sure to press the DIAG key to ensure that the
resulting self-test parameter x60: SELF CHECK reads GOOD.
.oNretemaraPnoitpircseDdaeRetirWegnaRataDtinUtluafeD
AYALPSIDmetIdeweiV
01A)%(ETARWOLF)%(etarwolfsuoenatnatsnIseYoN0.011ot0.0%-
02AETARWOLFnietarwolfsuoenatnatsnI
tinugnireenigne
seYoN53556ot024B-
03ALATOTeulaVdezilatoTseYoN999999ot004B-
06AKCEHCFLESegassemtset-fleSseYoNRORREroDOOG
noitacidni
-
B1TES1retemaraPputeS
01B.ONGATrebmungaTseYseYsretcarahcciremunahpla61knalb
02BEZISretemaidlanimonfoeciohCseYseYro051,001,08,05,04,52
mm002
eulavdeificepS
12BGNITARSSERPgnitarerusserPseYseYerusserpwoLerusserpwoL
52BTINUTCAF-KrotcafKroftinufoeciohC
)MK(
seYseYl/pl/p
62BROTCAF-KC˚51ta)MK(rotcafKseYseY00023ot10000.052BetairporppA
eulav
03BTINUPMETroftinufoeciohC
erutarepmet
seYseYCgedCged
13BfPMETerutarepmetralugeRseYseY002ot04-03BeulavdeificepS
23BTINUYTISNEDytisnedroftinufoeciohCseYseYm/gk
3
m/gk
3
33BfYTISNEDytisnedralugeRseYseY00023ot10000.023BeulavdeificepS
04BTINUWOLFetarwolfroftinufoeciohCseYseYm
3
)1etoN(EPSronot,gk,l,tinudeificepS
14BTINUEMITroftinuemitfoeciohC
etarwolf
seYseYd/dnah/,m/,s/tinudeificepS
24BNAPSWOLF)elacs-lluf(mumixaM
etarwolf
seYseY00023ot10000.014B+04BeulavdeificepS
05BGNIPMADemitgnipmadfoeciohCseYseYces46ro23,61,8,4,2,1,0ces4
06BKCEHCFLESegassemtset-fleSseYoNRORREroDOOG
noitacidni
-
Note1: To use the unit other than those contained in parameters, select [SPE], and set parameter [C30], [C31] and [C32].
CAUTION
All of your parameter settings will be canceled if you turn ULTRA YEWFLO off less
than 30 seconds after the parameter setup. Keep ULTRA YEWFLO turned on at least
30 seconds after setting up the parameters.
7-8
IM 1F5B2-01E
.oNretemaraPnoitpircseDdaeRetirWegaRataDtinUtluafeD
C2TES2retemaraPputeS
01CEDOMLATOTedomnoitazilatotfoeciohCseYseYdelacsnurodelacS%delacS
11CETARLATOTnoitazilatotfoetaRseYseY)2etoN(00023ot10000.004B/p1
02CEDOMESLUPtuptuoeslupfoeciohC
edom
seYseYdelacsnurodelacSdelacS
12CETARESLUPtuptuoeslupfoetaRseYseY00023ot10000.004B/p1
03CTINULAICEPStinulaicepSseYseYsretcarahcciremunahpla8
)3etoN(
04B/p.EPS
13CTINUESABotnoisrevnocroftinucisaB
tinulaiceps
seYseYm
3
notrogk,l,04B/pm
3
23CAFVNOCTINUnoisrevnocroftneiciffeoC
tinulaicepsot
seYseY00023ot10000.013C/S1
06CKCEHCFLESegassemtset-fleSseYoNRORREroDOOG
noitacidni
-
DTSUJDAretemaraPevitcerroC
01DAm4MIRTAm-4rofgninut-eniF
tuptuo
seYseY01ot1-%0.0
11DAm02MIRTAm-02rofgninut-eniF
tuptuo
seYseY01ot01-%0.0
02DTSUJDARESUresunirotcafnoitcerroC
noitacilppa
seYseY00023ot10000.01
06DKCEHCFLESegassemtset-fleSseYoNRORREroDOOG
noitacidni
-
ELORTNOCretemaraPlortnoC
01ETESERLATOTeulavdezilatotfognitteseRseYseYetucexeottonroetucexEetucexeottoN
02ETCELESPSIDnosmetiatadmorfeciohC
yalpsid
seYseY)%(etar,latot,etar,)%(etaR
etarrolatot&etar,latot&
etar&)%(
)%(etaR
06EKCEHCFLESegassemtset-fleSseYoNRORREroDOOG
noitacidni
-
FTSETretemaraPtseT
01FEDOM%TEStnerrucfotuptuOseYseY011ot0%0.0
02FEDOMFTEStuptuoesluPseYseY0006ot0zH0.0
06FKCEHCFLESegassemtset-fleSseYoNRORREroDOOG
noitacidni
-
.1nahtrehtoeulavatesuoyfieulavdezilatotehtroftinuynawohstonseodyalpsidehT:2etoN
.deyalpsiderasretcarahcxistsrifehtylnO:3etoN
Setting the totalization rate (applies only to models with an indicator/totalizer component)
The totalization rate is a parameter that sets the kg per rate of the totalizer value for a case where the
value is shown on the indicator. The flowrate set in parameter B40 applies as the totalizer value.
Example: Setting to totalize as 100 counting per 1kg.
<1> Make sure in parameter B40, ‘kg’ is selected as the unit of flowrate.
<2> Make sure in parameter C10, ‘SCALED’ is selected.
<3> In this parameter C11, set the rate at 100.
C11
Setting the pulse output rate
The pulse output rate is a parameter that sets the liter per rate for a case where the pulse output is fed to
a counter or other device. The flowrate set in parameter B40 applies as the pulse output.
Example: Setting to output as 1000 pulse 1 liter.
<1> Make sure in parameter B40, ‘l’ is selected as the unit of flowrate.
<2> Make sure in parameter C20, ‘SCALED’ is selected.
<3> In this parameter C21, set the rate at 1000.
C21
7-9
IM 1F5B2-01E
7. WORKING WITH THE BT200 BRAIN TERMINAL
Setting a special unit
A special unit of flowrate which is not found in the choices in parameter B40 can be set and used with
these parameters.
Example: Setting the special unit ‘Sm
3
/h’
<1> In parameter C30, type Sm
3
/h.
<2> In parameter C31, set the basic unit (m
3
in this case).
<3> In parameter C32, specify the coefficient of conversion from the basic unit (for example,
×0.95).
C30, C31, C32
.oNretemaraPnoitpircseDdaeRetirWegnaRataDtinUtluafeD
GATADKCEHCretemaraPatad-kcehC
01GYCNEUQERFycneuqerfxetroVseYoN- zH-
11GFNAPSycneuqerfelacs-lluFseYoN- zH-
02GYTICOLEVyticolevwolFseYoN- s/m-
12GVNAPSyticolevwolfelacs-lluFseYoN- s/m-
03GDEEPSDNUOSdnuosfodeepSseYoN- s/m-
06GKCEHCFLESegassemtset-fleSseYoN
RORREroDOOG
noitacidni
-
HECNANETNIAMretemaraPecnanetniaM
01HALTtnemtsujdAleveLreggirTseYseY2ot1-%0
02HETARWOLF.C.Lerutaefetarwolf-wol-ffo-tuCseYseY00023otX24B)5etoN(
).4etoNeeS:X(
03HLES.J.NnoitcnufnoitanimileesioNseYseYevitcatonroevitcAevitcatoN
13HFNOITALUDOMrotcafnoitaludoMseYoN- -
23HFM.C.L
rofrotcafnoitaludoM
erutaefetarwolf-wol-ffo-tuc
seYseY1ot02.0
04H2RRERLCraelcrorregnittesnapSseYseYevitcatonroevitcAevitcatoN
54HDROCERRORREsrorrefoyrotsiHseYseY
RORREroDOOG
noitacidni
-
05HNOISIVER
forebmunnoisiveR
margorp
seYoN- -
06HKCEHCFLESegassemtset-fleSseYoN
RORREroDOOG
noitacidni
-
MOMEMretemaraPmudnaromeM
01M1OMEM1omeMseYseYsretcarahcciremunahpla61knalB
02M2OMEM2omeMseYseYsretcarahcciremunahpla61knalB
03M3OMEM3omeMseYseYsretcarahcciremunahpla61knalB
06MKCEHCFLESegassemtset-fleSseYoN
RORREroDOOG
noitacidni
-
.s/m1.0foyticolevatatahtottnelaviuqeetarwolfehT:4etoN
.s/m2.0foyticolevatatahtottnelaviuqeetarwolfehT:5etoN
7-10
IM 1F5B2-01E
7.5 Self-checking
7.5.1 Checking for Failures
(1) Checking for Failures Using the BT200
Verify that:
• BT200 is connected correctly;
• BT200 is operating correctly; and
• Parameters are configured correctly;
while referring to the following examples of failures.
Connect the BT200 to
ULTRA YEWFLO and
press the key.
After the screen on the left
appears, press the
key.
ENTER
Example 1: Failure in Connection
FEED
Check cable connection.
Press the ENTER key.
BRAIN terminal
ID :
UTEL
ON/OFF
Communication failure.
Since communication is
not possible if the BT200 is
improperly connected to
ULTRA YEWFLO, the
message on the left
appears. Recheck the
connection. After
rechecking, press the
key (ESC).
F4
Example 2: Failure in Configuration of Parameters
OK
The Default Data screen
shows the current results
of a self-check on ULTRA
YEWFLO.
Pressing the key
(DIAG) on the Parameters
screen enters the self-
check screen “x60: SELF
CHECK.”
ESC
F2
Parameters
01 : MODEL
ULTRA YF
02 : TAG NO.
FIC–01
03 : SELF CHECK
ERROR
DIAG
DATA
PRNT
Parameters
B10 : TAG NO.
FIC–01
B20 : SIZE
25mm
B21 : PRESS RATING
L PRESS
ESC
FEED
PRNT
Self-check
B60 : SELF CHECK
ERROR
< ERROR >
< SPAN SET ERROR >
The Self-check screen
shows an error message if
there is an error.
ESC
(2) Checking for Failures Using the Indicator/Totalizer Component
NOTE
If any failure is found as a result of self-checking, the display of the indicator/totalizer
component shows an error number. If there is more than one failure, the display
changes from one error number to another at two-second intervals. For details on the
meanings of error numbers, see Table 7.5.1.
Figure 7.5-1 Checking for Failures Using the Indicator/Totalizer Component
7-11
IM 1F5B2-01E
7. WORKING WITH THE BT200 BRAIN TERMINAL
7.5.2 Information on Failures and Corrective Measures
Table 7.5.1 summarizes the alarm messages, along with information on the failures
and corrective measures.
Table 7.5.1 Alarm Messages
nognidaeR
-toT/rotacidnI
rezila
tnenopmoC
002TBnognidaeReruliaFfoesuaC
nopUtuptuOforoivaheB
eruliaF
noitcAevitcerroC
enoNDOOG
-RORRE
10-rrETUPTUOREVO
dedeecxesahlangistuptuoehT
mumixamdenifedehtfo%011
.etarwolf)elacs-lluf(
atadlehsituptuos'tnerrucehT
eslupehtelihw,eulav%011
.yllamronsevahebtuptuo
dnaegnaretarwolfehtkcehC
ehtfognittesehtegnahc
.etarwolf)elacs-lluf(mumixam
20-rrERORRETESNAPS
-lluf(mumixamdenifedehT
dedeecxesahetarwolf)elacs
arofetairporppaeulaveht
.s/m6foyticolevwolf
dnatuptuos'tnerrucehthtoB
evaheboteunitnoctuptuoeslup
.yllamron
dnaegnaretarwolfehtkcehC
ehtfognittesehtegnahc
.etarwolf)elacs-lluf(mumixam
40-rrEREVOTUOESLUP
eht,%001nehwro,lautcA
6dedeecxesahtuptuoeslup
.zHk
sevahebtuptuos'tnerrucehT
tuptuoeslupehtelihw,yllamron
.zHk6eulavatadlehsi
eslupehtfoetarehtegnahC
.tuptuo
50-rrERORREMORPEE.deliafsahMORPEEehT
atadlehsituptuos'tnerrucehT
eslupehtelihw,eulav%011
.delbasidsemocebtuptuo
ecivress'awagokoYtlusnoC
.lennosrep
01-rrERORRELANGIS
ehtroytpmesienilepipehT
.deliafsahylbmessarosnes
atadlehsituptuos'tnerrucehT
tuptuoeslupehtelihw,eulav%0
.delbasidsemoceb
fI.diulfhtiwenilepipehtlliF
tlusnoc,stsisrepmralaeht
.lennosrepecivress'awagokoY
11-rrE
LANGIS
ETAUTCULF
selbbubsagforebmunegralA
nidiulfehthtiwnideximsi
.enilepipeht
emitgnipmadehtfognittesehT
hguoht,selpurdauqyllacitamotua
setautculftuptuos'tnerruceht
.%001dna%0neewteb
gniximmorfsagfoselbbubpotS
.diulfehthtiwni
-TLUAFUPC.etatsdeppotsasiUPCehT
,%011revosituptuotnerrucehT
.ylralugerrituptuoeslupeht
ecivress'awagokoYtlusnoC
.lannosrep
8-1
IM 1F5B2-01E
8. MAINTENANCE
8. MAINTENANCE
This chapter explains the adjustment procedure needed for maintenance and the proce-
dures used to disassemble and reassemble ULTRA YEWFLO for parts replacement.
When doing maintenance on ULTRA YEWFLO, thoroughly read the instructions and
cautionary notes hereinafter given in order to handle the flowmeter correctly.
WARNING
If the process fluid is harmful to personnel, handle ULTRA YEWFLO carefully even
after it has been removed from the process line for maintenance or other purposes.
Exercise extreme care to prevent the fluid from coming into contact with human flesh
and to avoid inhaling any residual gas.
IMPORTANT
Precautions in Handling the Amplifier Assembly
Some of the parts used in the amplifier assembly may functionally succumb to
electrostatic discharge. Therefore when handling the assembly, use a protective
device such as an antistatic grounding strap. Exercise extreme care to avoid directly
touching any of the electronic parts and circuits in the assembly. Also, keep the
removed amplifier assembly in an antistatic bag.
8-2
IM 1F5B2-01E
8.1 Equipment Needed for Maintenance
Table 8.1 summarizes the pieces of equipment needed to maintain ULTRA YEWFLO.
Use maintenance-purpose equipment whose functionality has been adequately main-
tained and controlled.
Table 8.1 Equipment Needed for Maintenance
tnempiuqEledoMdednemmocer-awagokoYskrameR
ylppusrewoProtubirtsidSBDSroTBDS
slangisAm02-4rof
CDV42:egatlovtuptuO( ± )%01
ecnatsiserdaoL052(ecnatsiserdradnats2972 Ω± )%500.0
slangisAm02-4rof
nacecnatsiserdaolsti,desusirotubirtsidehtfI
.ecnatsisersihtsaevres
retemtloV:ycarucca(retemitlumlatigidA6052 ± )%50.0slangisAm02-4rof
epocsollicsO0451LDro0031LD,0021LD
Figure 8.1-1 Wiring of Equipment for Maintenance
CAUTION
•When using any test-purpose measuring instruments, do not ground them.
All of your parameter settings will be canceled if you turn ULTRA YEWFLO off less
than 30 seconds after the parameter setup. Keep ULTRA YEWFLO turned on at least
30 seconds after setting up the parameters.
8-3
IM 1F5B2-01E
8. MAINTENANCE
8.2 Adjustment
This section explains the procedure used to adjust the ULTRA YEWFLO converter to
change the range or for other purposes. Adjust the converter in a maintenance room
complete with the equipment necessary for adjustment.
8.2.1 Zero Adjustment
No zero adjustment is necessary since the zero point does not shift.
IMPORTANT
Because of the effect of electrical noise, ULTRA YEWFLO may provide an output
even when the flowrate is zero. In that case, properly eliminate the source of the
noise.
8.2.2 Span Adjustment
•Before span adjustment, check whether the range of the flowrate is adjustable or not
by following the instructions in Section 6.1, “Checking the Flowrate Range.” Spans
are automatically determined and set when you configure required parameters with a
BT200 BRAIN Terminal. Therefore, in normal applications, you need not confirm
the spans once they are set up. If you are verifying the analog output, follow the
procedure on the Verification Procedure.
Verification Procedure
<1> Wire the necessary pieces of equipment as shown in Figure 8.1-1. Allow at least
three minutes for the equipment to warm up.
<2> Configure the necessary parameters.
<3> Set span frequency with parameter F20: SET F MODE. (See the equation noted
below.)
<4> If the load resistance is 250 , the digital multimeter should read 5 V. Make sure
the multimeter indicates the value calculated from R × 20 (mA) when a resistor of
a known value (R ) is used.
<5> Next, set parameter F20 at a frequency equal to 50% of the full-scale frequency.
Make sure the analog output is within the specified limits of accuracy.
<6> Finally, set parameter F20 at 0 to make sure the analog output is still within the
specified limits of accuracy.
Equation for Determining the Span Frequency
f = KM • [1 - 5.25 × 10
-5
× (t - 15)] • Qf
where
f = span frequency (Hz)
Qf = maximum (span) flowrate (l/s)
KM = K-factor (p/l) (indicated on the data plate)
t = temperature of the fluid under operating conditions (°C)
Simply configure the necessary parameters. The built-in microprocessor automati-
cally calculates the frequency at the maximum flowrate (span frequency). The span
frequency is indicated under parameter G11: SPAN F.
8-4
IM 1F5B2-01E
8.2.3 Trigger Level Adjustment (TLA) (Parameter H10)
TLA helps suppress the effects of external noise.
Parameter H10 (TLA) is adjusted to 0 as the default when ULTRA YEWFLO is
shipped from the factory.
ULTRA YEWFLO in principle is hardly affected by mechanical vibration. Make a
trigger level adjustment, however, if external noise is an issue or if ULTRA
YEWFLO gives a reading larger than the true value while the flowrate is zero.
Setting parameter H10 at a larger value (for example, a value from 0 to 2) heightens
the trigger level. This strategy will help reduce the effect of noise.
IMPORTANT
•Care must be taken when making a trigger level adjustment. If you set the parameter
for TLA at a value larger than necessary, the measurable lower limit of the flow
velocity rises to an unacceptable level, possibly impeding your measurement.
Before TLA Before TLA
High trigger level
Low trigger level
Waveform observed
across TP2 and COM
Waveform observed
across P and COM
Waveform observed across
TP2 and COM
Waveform observed across
P and COM
After TLA
High trigger level
Low trigger level
Waveform observed
across TP2 and COM
Waveform observed
across P and COM
Waveform observed
across TP2 and COM
Waveform observed
across P and COM
After TLA
Figure 8.2-3 Trigger Level Adjustment (at Lower Flowrates)
8.2.4 Loop Tests (Parameters F10 and F20)
You can have ULTRA YEWFLO provide either a 4-20 mA DC output of 0.0% to
110.0% (parameter F10: SET % MODE) or a pulse output of 0 to 6,000 Hz (param-
eter F20: SET F MODE) for your loop tests.
8-5
IM 1F5B2-01E
8. MAINTENANCE
8.3 Disassembly and Reassembly
When disassembling or reassembling ULTRA YEWFLO for a part replacement or
maintenance, ALWAYS turn off both the flowmeter and flow of the process fluid. Use
the appropriate tools for the disassembly/reassembly of ULTRA YEWFLO.
CAUTION
The maintenance work described hereinafter can be done at the location where
ULTRA YEWFLO is installed if it is a standard model. If your ULTRA YEWFLO is
an explosion-protected model, however, it is an established rule that you relocate it to
a non-hazardous area, do the maintenance work, and then reassemble it in its original
form. See “Installation and Operating Precautions for Flameproof Explosion-Pro-
tected Instruments” at the end of this manual for more information.
No user modification is permitted on flameproof models of ULTRA YEWFLO. You
therefore are not allowed to add any additional indicator/totalizer component to those
models of ULTRA YEWFLO nor can you use ULTRA YEWFLO with the compo-
nent removed. If such modification is unavoidably necessary, consult Yokogawa
Electric Corporation.
When disassembling a flameproof model of ULTRA YEWFLO, first turn the lock
screw clockwise with a special tool (Allen wrench) to unlock the cover, and then
remove the cover. After having replaced the cover, ALWAYS turn the lock screw
counterclockwise to lock the cover.
8.3.1 Removing the Indicator/Totalizer Component
When removing the indicator/totalizer component to change the way it is viewed,
follow the procedure described below.
<1> Turn off ULTRA YEWFLO.
<2> Remove the cover on the converter.
<3> Using a flat-blade screwdriver, remove the two setscrews from the indicator/
totalizer component.
<4> Take the component out by hand.
<5> When reassembling the component into the converter after the component is
repositioned, follow these steps in their reverse order, while aligning the
component’s screw holes with the bolts in the converter and then fastening the two
set screws.
8-6
IM 1F5B2-01E
Figure 8.3-1 Removing the Indicator/Totalizer Component
8.3.2 Removing the Amplifier Unit
When removing the amplifier unit, follow the procedure described below.
<1> Turn off ULTRA YEWFLO.
<2> Remove the cover on the converter.
<3> If your ULTRA YEWFLO is a model with a built-in indicator/totalizer component,
remove the component according to the procedure in Subsection 8.3.1.
<4> Using a 5.5-mm hex size nut driver, remove the two bolts that clamp the amplifier
unit, while loosening the bolts alternately. Take the unit out keeping it level.
Figure 8.3-2 Removing the Amplifier Unit
CAUTION
•Do not twist the amplifier unit when removing it. Otherwise, the pins of the connec-
tor may be bent.
Exercise care to avoid applying excess force to the amplifier unit.
Indicator/Totalizer <4>
Mounting screw <3>
Converter cover <2>
Mounting screw <4>
8-7
IM 1F5B2-01E
8. MAINTENANCE
8.3.3 Replacing the Sensor Assembly
(1) Removing the Sensor Assembly
NOTE
Sensor assemblies can be replaced only if your ULTRA YEWFLO is a flange model.
When removing the sensor assembly to replace it, follow the procedure described
below.
<1> Remove the amplifier unit according to the procedure in Subsection 8.3.2. (Refer
to Subsection 8.3.1 to remove an amplifier unit of ULTRA YEWFLO that has an
indicator/totalizer component.)
<2> Unplug the terminal pin at the tip of the sensor assembly from the terminal board.
<3> Loosen the clamp screw at the neck of the case.
<4> Remove the screws on the bracket that couples the sensor assembly with the body.
Remove the bracket together with the converter case.
<5> Remove the bracket that couples the case with the body.
<6> Remove the four screws on the plate that mounts the sensor assembly on the body.
<7> Remove the sensor assembly from the body, while exercising care to avoid forcibly
bending the assembly.
Bracket <5>
Bracket <4>
<6>Plate
Sensor assembly <7>
Terminal pin <2>
Figure 8.3-3 Removing the Sensor Assembly
8-8
IM 1F5B2-01E
Accessories for Sensor Replacement (provided separately)
Sensor
assembly
Allen wrench Silicon compound O-ring
(2) Mounting a Sensor Assembly
When mounting a new sensor assembly for replacement, follow the procedure described
below.
<1> Make sure the stainless-steel tubing of the new sensor assembly fits properly into
the grooves on the body. (The tubing is preformed when shipped. If it does not fit
properly, however, reshape it so it fits into the grooves perfectly.)
<2> Using an organic solvent, clean the bottom surfaces of the sensor holders and the
surfaces of the body where the sensor holders are being mounted.
<3> Engage the metal ring with each sensor holder from the bottom surface of the
holder. Fit the O-ring coated with a uniform film of grease into the groove on one
side of the holder. At this point, exercise care to prevent the bottom surface of the
holder from getting grease on it.
CAUTION
Exercise care to prevent the surfaces where the emitter/detector of the sensor assem-
bly are mounted from becoming damaged or contaminated with dust.
<4> Loosen the two setscrews on the plate beforehand with the supplied tool.
<5> Coat the middle of the emitter/detector’s bottom surface with an adequate amount
of silicon compound.
<6> Place the emitter/detector in the approximate middle of the sensor-mounting
surface on the body.
<7> Engage the projection of the plate with the hole (concave spot) on the back of the
sensor holder to position the plate in place.
<8> Fasten the plate with the four screws.
<9> After having fastened the plate, fasten the two setscrews to pressurize the metal
ring so the O-ring comes into tight contact with the body.
<10>For reassembly of parts other than the sensor assembly, follow these steps in the
reverse order of disassembly.
8-9
IM 1F5B2-01E
8. MAINTENANCE
Coat here with silicon
compound
(on both sides)
Sensor holder
Stainless-steel
tubing
Plate
Setscrews
Figure 8.3-4 Mounting the Sensor Assembly
8-10
IM 1F5B2-01E
8.4 Troubleshooting
ULTRA YEWFLO, among other instruments, is less likely to malfunction if handled
and used correctly. Problems may arise, however, if any failure exists in its phases of
application such as mounting or piping. If ULTRA YEWFLO fails to operate normally,
take corrective measures while referring to the troubleshooting flows hereinafter de-
scribed. Some causes of failure may be too complex to localize by using only those
troubleshooting flows. If any given failure seems to be too difficult to cope with,
consult Yokogawa’s service personnel.
8.4.1 Basic Troubleshooting Flow
Output is indicated
but no fluid is flowing.
The reading
fluctuates.
No output is indicated
but the fluid is flowing.
The flowrate reading
is inconsistent.
The flowrate reading
fluctuates.
Go to page 8-9. Go to page 8-10. Go to page 8-11.Go to page 8-8
START
NO
YES
8-11
IM 1F5B2-01E
8. MAINTENANCE
8.4.2 Specific Troubleshooting Flows
Output is indicated but no fluid is flowing.
START
Is ULTRA YEWFLO
properly grounded?
P: Is no pulse present?
TP2: The signal
resonates to 50/60
Hz.
Check the fluid in the
pipeline.
Raise the trigger level.
Fill the pipeline.
Empty the pipeline.
There is a failure in the
emptiness-sensing
system.
Contact Yokogawa’s
service personnel.
Output is indicated.
YES
NO
NO
NO
The output circuit of the
converter is faulty. Replace
the converter.
Full
Empty
Ground ULTRA
YEWFLO.
YES
YES
Output is indicated.
8-12
IM 1F5B2-01E
No output is indicated but the fluid is flowing.
START
Contact Yokogawa’s
service personnel.
Is the signal current
present?
P: Are pulses present?
TP2: Is the signal
waveform normal?
YES
0mA
NO
NO
Change the
polarities.
Are the current’s
polarities correct?
Are there any
disconnected
terminals?
Is there a
broken cable?
NO
Replace the
amplifier unit.
Replace the
sensor
assembly.
Replace the
amplifier.
Replace the
cable.
Fasten the
terminal.
4mA
There is no output.
There is no output.
There is no output.
There is no output.
YES
YES
YES
NO
NO
YES
Lower the trigger
level.
8-13
IM 1F5B2-01E
8. MAINTENANCE
The flowrate reading is inconsistent.
Recheck the
setting of the
parameter.
START
Is the flowrate range
consistent with that on the
data plate?
Are the parameters
configured correctly?
The reading is
inconsistent.
YES
NO
NO
The output circuit of the
converter is faulty.
Replace the converter.
YES
YES
NO
NO
NO
Change the
flowrate range.
Configure the
parameters
correctly.
Is the receiving
resistance correct?
Change the
receiving
resistance.
Is the output consistent with
the reading of the indicator/
totalizer component or
BT200?
Is the output’s flowrate
reading consistent with the
value calculated from the
frequency at terminal P?
Check the piping conditions:
• Straight lengths of pipeline (page 4-1)
• Protrusion of gaskets (page 4-4)
• Loose piping connections
• Deposits inside piping
Contact Yokogawa’s
service personnel.
YES
NO
Are the load resistance
and supply voltage within
the tolerance limits?
Adjust to within
the tolerance
limits.
YES
YES
8-14
IM 1F5B2-01E
The flowrate reading fluctuates.
START
Contact Yokogawa’s
service personnel.
Is the flowrate
reading close to its
lower limit?
Is the output signal
at terminal P stable?
TP2: Is the voltage low?
YES
NO
Replace the
batteries.
Does the supply voltage
signal contain ripples?
Are the terminals and cables
properly connected?
NO
Replace the
amplifier unit.
Replace the
sensor
assembly.
Remedy the
improper
connection.
YES
YES
NO
Lower the
trigger level.
YES
NO
The fluctuation may be due
to the cut-off-low-flowrate
feature. Turn up the flow of
fluid.
NO
(Very high)
YES
Around 450 mVp-p
Check the piping conditions:
• Straight lengths of pipeline (page 4-1)
• Bubbles of gas (page 4-3)
• Protrusion of gaskets (page 4-4)
• Loose piping connections
The reading
fluctuates.
The output circuit
of the amplifier
assembly is faulty.
The reading
fluctuates.
The reading
fluctuates.
The reading fluctuates.
8-15
IM 1F5B2-01E
8. MAINTENANCE
8.4.3 Instructions on Use of Check Terminals of Amplifier Unit
Test all the check items hereinafter discussed in this subsection at the test points
between terminals P and COM and between terminals TP2 and COM.
CAUTION
Do not ground any test-purpose measuring instruments.
COM terminal
P termina
TP2 terminal
HHT terminal
Figure 8.4-1 Check Terminals of Amplifier Unit
(1) TP2 Terminal
Used for trigger level adjustment. See Subsection 8.2.3.
Using an oscilloscope, observe the voltage waveform appearing across terminals TP2
and COM. Make sure the ultrasonic emitter/detector of the sensor assembly and
related circuits are operating normally.
a.A waveform with the vortex frequency shown in Figure 8.4-2 should be observed at
this test point. The waveform should be neither at the power supply frequency nor
at a frequency at which the pipeline vibrates.
b.If piping conditions are inferior, the waveform should look like the one in Figure
8.4-3.
Figure 8.4-2 Normal Waveform at Terminal TP2
8-16
IM 1F5B2-01E
Figure 8.4-3 Waveform of Disturbed Flow at Terminal TP2
(2) P terminal
Used for trigger level adjustment. See Subsection 8.2.3.
9-1
IM 1F5B2-01E
9. STANDARD SPECIFICATIONS
9.1 STANDARD SPECIFICATION
Fluid to be Measured:Liquid
Measuring condition: Sound speed 500 to 2000 m/s
Be sure there are no bubbles in the flow.
Avoid severe sticky and slurry fluid meterings.
Do not use this meter where pulsating flow/pulsating pressure
exist.
Measurable Flow Rates: Refer to item 6.1.
Accuracy: ± 1.0% of reading
± 0.5% of reading is also available as an option.
(refer to item 6.1)
Note: The above shows the accuracy of pulse output. For analog
output, add up ± 0.1% of full scale to the above values.
Repeatability: ± 0.2% of reading
Process Temperature Range: –40 to 200 °C (–40 to 150 °C for 15A)
Process Pressure Limit: Up to flange rating.
Ambient Temperature Range:
–40 to 85 °C (general type)
–30 to 80 °C (with Indicator/Totalizer)
–40 to 75 °C (CENELEC Explosion proof type)
–20 to 60 °C (CENELEC Intrinsic safety type)
–20 to 60 °C (JIS Flameproof type)
(Model UYF200 is affected by fluid temperature. See Figure 9.1-2)
Ambient Humidity Range:5 to 100% Relative Humidity (at 40 °C)
(non-condensing)
Power Supply Voltage:10.5 to 42 V DC
(Refer to Figure 9.1-1 Relationship Between Power Supply
Voltage and Load Resistance)
Output signal:Analog, Pulse
Both Analog and Pulse output can be obtained simultaneously.
In this case refer to the item 5.5.
Analog: 4 to 20 mA DC, 2-wire system.
Pulse: transistor contact (open drain), 3-wire system.
Contact rating: 30 V DC, 120 mA DC
Low level: 0 to 2 V DC.
Pulse frequency: Max. 6 kHz
Duty cycles: Approx. 50% (1:2 to 2:1)
Dumping time constant: 0 to 64 Sec (can be set in 8 steps)
Delay time: 0.5 Sec
Analog output circuit time constant: 0.3 Sec
9-2
IM 1F5B2-01E
Mounting: Model UYF200; flange mounting or wafer mounting by flange
adjacent to the pipeline.
Model UYFA21; 2 inch pipe or wall mounting.
Refer to item Remarks on Installation for details.
Material: Model UYF200; body and shedder bar: SCS 14A casting
stainless steel (equivalent to CF8M, SUS316)
Sensor; SUS316 stainless steel
Bracket; SCS13 casting stainless steel
Model UYF200, UYFA21;
Converter case; Aluminum alloy
Coating Color: Converter case, cover, Terminal box, cover; Deep sea moss
green (Polyurethane anticorrosion coating)
Enclosure Classification: Designed to meet JIS C0920 watertight (equivalent to IEC
IP67, NEMA4X)
Electrical Classification: Approved by JIS Flameproof, certified for Ex d IIC T6
Electrical Connection: JIS G1/2 Female, ANSI 1/2 Female, DIN Pg13.5 Female,
M20mm Female.
Signal Cable: Model UYF021, used for remote detector and converter.
Max. length: 20m.
Outer Sheath Material: Heat resistance vinyl.
Durable Temperature; 100°C
Weight: Refer to the external dimension item 9.4.
Calibration: This flowmeter is factory-calibrated using a water flow.
Communication signal: BRAIN communication signal
(superimposed on a 4 to 20 mA DC signal)
Communication-line Condition:
Load resistance; 250 to 600 W (includes cable resistance)
Region within communication: 2 km (when CEV cables are used)
Load capacitance: 0.22 µ F Max.
Load inductance: 3.3 mH Max.
Refer to Figure 9.1-1.
Communication cables must be laid at least 15 cm away from power lines. Do not lay
the cables parallel to power lines. Instruments connected for receiving resistance: Input
impedance 10 k or greater (at 2.4 kHz)
Indicator/Totalizer: Six-digit LCD display. Totalizer value is protected by an
EEPROM at the time of a power failure.
The totalized flow as well as instantaneous flow rate in engineer-
ing unit or percent (%) of span can be displayed.
Alternative display is also possible.
In mounting direction, the right and left 90° is rotatable.
Approved by CENELEC Explosion-proof
KEMA No.: Ex-97. D. 2342
EEx d IIc T6...T3
9-3
IM 1F5B2-01E
9. STANDARD SPECIFICATIONS
Approved by CENELEC Intrinsic Safety
KEMA No.: Ex-97. D. 4156
EEx ia IIc T3, T4
Maximum voltage Vmax=30V DC
Maximum current Imax=165mA
Maximum power IP max=0.9W
Internal capacitance Cint=6nF
Internal inductance Lint=730µH
R =
E–10.5
0.0236
250
600
10.5 16.4 24.7 42
Power Supply Voltage E (V)
Load Resistance R ()
30
Communication
applicable range
Note: In the case of CENELEC intrinsic safety, the power supply voltage shold be under 30 VDC.
Figure 9.1-1 Relationship Between Power Supply Voltage and Load Resistance
Fluid Temperature (°C)
-40 60 80
200
85
60
40
-20
-30
-40
65
JIS Flameproof
model
With Indicator/Totalizer
model
General-purpose
model
60
80
85
-15
-20
Ambient Temperature (°C)
Figure 9.1-2 Operating Temperature Limit (for model UYF200)
Table 9.2-1 Paint Color and Codes
Codes
P1
Munsell Renotation Code
N1.5
Color
Black
P2 7.5BG4/1.5 Jade green
P7 Metallic silver
9-4
IM 1F5B2-01E
Table 9.2-2 Pressure Test Value
Pressure
2.1 MPa (21 kgf/cm
2
)
5.0 MPa (51 kgf/cm
2
)
2.9 MPa (29 kgf/cm
2
)
Flange Rating
JIS 10K
JIS 20K
ANSI Class 150
7.5 MPa (76 kgf/cm
2
)ANSI Class 300
9.2 Model and Suffix Codes
Model and Suffix Codes (Style Code: S2)
UYF200 Ultrasonic Vortex Flowmeter (Integral type, Remote type detector)
Model
UYF201J
UYF202J
UYF204J
UYF205J
UYF208J
UYF210J
UYF215J
UYF220J
.....................
.....................
.....................
.....................
.....................
.....................
.....................
.....................
15 mm (1/2inch)
25 mm (1 inch)
40 mm (1-1/2 inch)
50 mm (2 inch)
80 mm (3 inch)
100 mm (4 inch)
150 mm (6 inch)
200 mm (8 inch)
Converter –A
................
–N
................
Integral Type
Remote Type
Output Signal D
...............
N
...............
4 to 20 mA DC, Pulse,BRAIN
communication
Remote Type
Body Material –S
...........
Casting stainless steel (SCS 14A)
Process
Connection
(Note 1)
J1
........
J2
........
A1
.......
A2
.......
K1
.......
K2
.......
B1
........
B2
........
H1
........
H2
........
JIS10K Flange
JIS20K Flange
ANSI Class 150 Flange
ANSI Class 300 Flange
JIS10K Wafer
JIS20K Wafer
ANSI Class 150 Wafer
ANSI Class 300 Wafer
JPI Class 150 Wafer
JPI Class 300 Wafer
Electrical
Connection
0
........
2
........
3
........
4
........
JIS G1/2 Female
ANSI 1/2 NPT Female
DIN Pg 13.5 Female
ISO M20X1.5 Female
Indicator/
Totalizer (Note 2)
–D
...
–N
...
With Indicator/Totalizer
None
Options /
Refer to table Option Specifications
Suffix Code
Description
Electrical
Classification
/JF1
/FF1
/FS1
/KF1
/KS1
/CS1
JIS Explosionproof
FM Explosionproof
FM Intrinsic Safety
CENELEC Explosionproof
CENELEC Intrinsic Safety
CSA Intrinsic Safety
Table 9.2-3 Flowmeter Selection Guide
200
(8)
NO
YES
150
(6)
NO
YES
100
(4)
YES
YES
80
(3)
YES
YES
50
(2)
YES
YES
40
(1-1/2)
YES
YES
25
(1)
YES
YES
Process
Connection
Wafer
Type
Flange
Type
Body
Material
Casting
Stainless
Steel
Nominal Size mm (inch)
9-5
IM 1F5B2-01E
9. STANDARD SPECIFICATIONS
UYFA21 Ultrasonic Vortex Flowmeter Converter (Remote type)
Model
UYFA21J
.....................
Ultrasonic Vortex Flow Converter
Output Signal –D
.............
4 to 20 mA DC, Pulse,BRAIN
communication
Electrical
Connection
0
............
2
............
3
............
4
............
JIS G1/2 Female
ANSI 1/2 NPT Female
DIN Pg 13.5 Female
M20 mm Female
Indicator/
Totalizer
–D
......
–N
......
With Indicator/Totalizer
None
Mounting Bracket
A
.......
B
.......
N
.......
SECC For 2 inch Pipe Mounting
SUS304 For 2 inch Pipe Mounting
None
Options /
Refer to table Option Specifications
Suffix Code
Description
/JF1
/FF1
/FS1
/FU1
/KF1
/KS1
/CS1
Electrical
Classification
JIS Flame proof
FM Explosion proof
FM Intrinsically safe
Combined "FF1"and "FS1"
CENELEC (KEMA) Flame proof
CENELEC (KEMA) Intrinsically safe
CSA Intrinsically safe
UYF021 Signal Cable
Model
UYF021J
.....................
Ultrasonic Vortex Flow Converter
Cable End –0
..............
–1
..............
Without End finish (Note 3)
With End finish
Cable Length –05
.........
–10
.........
–15
.........
–20
.........
■■
......
5 m
10 m
15 m
20 m
■■
m (Note 4)
Options /C
(Note 5)
Cable end finish part
Suffix Code Description
Note 1: Refer to table 9.2-3.
Note 2: Indicator/Totalizer is not available for remote type detector.
Note 3: One set of end finish part is attached.
Note 4: Fill in two digit figure per 5 m unit.
The cable can be cut at required length within 20 m at customer side. In this case, select Cable End
Code [-0].
Note :5 An entered digit figure shows required set quantity.
9-6
IM 1F5B2-01E
9.3 Option Specifications
Option Specifications (for model UYF200, UYFA21)
Item
Specifications
Code
Electrical Classification
JIS Flameproof Ex d IIC T6 Certified by TIIS (Note 2).
JF1
JIS Flameproof Packing Adapter
Electrical connection should be : G1/2 female thread.
Applicable Cable φ8.5 to φ11.
PG5
Stainless Steel Bolt & Nut Assembly
Used when a wafer type is installed for a process.
Material SUS304.
BLT
Stainless Steel Tag Plate SUS304 tag plate hung on converter case. SCT
Paint Color Change Only for converter covers. Refer to Table 9.2.1. See Table 9.2.1
Material Certificate
Reproduced material certificate for body from material
manufacture.
M01
Static Pressure and Leakage Test
Certificate
Refer to Table 3 for Pressure test value.
Test time 10 minutes.
T01
Degrease Treatment (Note 5) The body is cleaned by trichloroethylene. K1
Epoxy Coating Epoxy coating for meter case and cover. X1
Converter Installing Direction
180° Change
Converter installing direction
180° change inversely when shipped.
CRC
Accuracy ± 0.5% Type
In the case of JIS Flame proof (/JF1), specify JIS G1/2 female for electrical connection and also specify in the option code with Flameproof
packing adapter (PG5) for the cable wire construction.
TIIS is the abbreviation of Technology Institution of Industrial Safety
The JIS G1/2 female is not applicable for electrical connection.
• In case of specifying JIS Flameproof Explosion proof type, JIS G1/2 female is applied for wiring connection.
• Specify in the option code with Flame proof packing ground (/PG5) for the cable wire construction.
In case of specifying FM explosion proof type, ANSI 1/2 NPT female is applied for wiring connection.
In case of specifying CENELEC explosion proof type, ANSI 1/2 NPT female, DIN Pg 13.5female or ISO M20ϫ1.5 female is applied for
wiring connection.
In case of specifying CSA explosion proof type, ANSI 1/2 NPT female is applied for wiring connection.
There is a case that a little calibration water should stay in the meter tube. So this is not degrease treatment in strict sense.
When this option is chosen, the output is set at low level (3.6 mA) when burn-out. Otherwise is set at over high level (21.6 mA) at shipping.
Model UYF202J (25 mm), UYF215J (150mm), UYF220J (200mm) is not applicable.
Note 1:
Note 2:
Note 3:
Note 4:
Note 5:
Note 6:
Note 7:
Note 8:
Note 9:
Note 10:
For accuracy guaranteed range refer item “Sizing”. HAC
Applicable Model
UYF200 wafer type
All Models
All Models
UYF200J
UYF200J
UYF200J
All Models
Lightning Protector
There is an arrester is inside converter for power supply line.
Max. power supply voltage: 30 VDC
A
UYF200J-A
UYFA21J
Down-Scale burnout in case of CPU failure
(Note 6)
Set output under 3.6 mA (low) when burn-out occurred. C1
UYF200J-A
UYFA21J
UYF200J
UYF200J (Note 7)
KF1
KS1
CENELEC Explosion Proof Type
CENELEC Intrinsic Safety type
All Models (Note 1)
All Models (Note 6)
All Models ( Note 3,6)
All Models
FM Flameproof Explosion proof type
FM Intrinsic Safety type
CSA Intrinsic Safety type
All Models (Note 5)
All Models (Note 5)
All Models (Note 7)
FF1
FS1
CS1
9-7
IM 1F5B2-01E
9. STANDARD SPECIFICATIONS
9.4 EXTERNAL DIMENSIONS
Model UYF200 (Integral type, Remote type detector)
Wafer type
Terminal Cover
60 60
15
B
φ
C
φ
78
41
21
Flow
φ
D
Electrical
Connection
Clamp
For JIS
Flameproof
A
Note: Indicator/Totalizer can be mounted horizontally or vertically
Nominal
Size
Mass (kg)A
B
C
50 mm
80 mm
75
100
210
224
47.5
71.0
96
126
3.5
5.0
100 mm 120 237 93.8 152 7.1
Note: For flowmeter with Indicator/Totalizer, add 0.1 kg.
φ
φ
Indicator
Indicator/Totalizer
25 mm
40 mm
70
70
202
204
D
23.4
36.6
51
73
2.2
2.6
9-8
IM 1F5B2-01E
Integral type
Flange type
Note: Indicator/Totalizer can be mounted horizontally or vertically
Nominal
Size
AB C
25 mm
40 mm
150
150
202
204
23.4
130
Nominal
Size
10K
ANSI FlangeJIS Flange
20K class 150 class 300
25 mm
40 mm
4.8
6.1
5.1
6.5
4.2
5.9
5.3
8.2
Note: For flowmeter with Indicator/Totalizer, add 0.1 kg.
φ
Mass (kg)
Terminal Cover
60 60
15
B
φ
C
φ
78
Electrical
Connection
41
Clamp
For JIS
Flemeproof
Flow
A
Indicator
21
Indicator/Totalizer
50 mm
80 mm
100 mm
7.3
11.0
16.0
8.0
13.0
19.0
8.4
14.0
20.0
9.5
17.0
28.0
50 mm
80 mm
100 mm
170
200
220
210
224
237
47.5
71.0
93.8
15 mm
202 12.8
36.6
15 mm 4.8 5.1 4.2 5.3
9-9
IM 1F5B2-01E
9. STANDARD SPECIFICATIONS
60
Terminal Cover
Electrical Connection
Indicator/Totalizer
Clamp
For JIS Flameproof
Flow
Unit: mm
60
41
21
A
B
15
φ78
φC
φC
Note: Indicator/Totalizer can be mounted horizontally or vertically
Nominal
Size
AB
Nominal
Size
10K
ANSI FlangeJIS Flange
20K class 150 class 300
Note: For flowmeter with Indicator/Totalizer, add 0.1 kg.
Mass (kg)
150mm
200mm
270
310
257
282
138.8
185.6
150mm
200mm
27.0
37.0
34.0
48.0
29.0
46.0
45.0
70.0
Model UYFA21
LOCK
LOCK
70
47.5
87.5
137
137.5 48
282466
183
230
55
4-
φ78
2B pipe60.5 )
Indicator/Totalizer
Terminal Cover
Electrical Connection (both side)
Clamp
For JIS
Flameproof
Mass :2.3 kg
Note :For flowmeter with Indicator/Totalizer, add 0.1 kg.
70
φ10
9-10
IM 1F5B2-01E
Model UYF021
(G)
(C)
(B)
(A)
(G)
(C)
(B)
(A)
11
computer treated
computer not treated
UYF 021
UYF 021
specified
length (L)
IMPORTANT
(A),(B),(C) connect their each terminal. (G) connect ground terminal.
9-11
IM 1F5B2-01E
9. STANDARD SPECIFICATIONS
Terminal Configuration and Terminal Wiring
+
+
SUPPLY
PULSE
Power and 4 to 20 mA DC
output
Pulse output
Ground terminal
Terminal WiringTerminal configuration
SUPPLY
+
PULSE
+
• Remote Type (Detector Part)
A
C
B
Common terminal
Terminal to remote converter
Terminal WiringTerminal configuration
CB
A
* Use UYF021 Signal Cable
Ground terminal
• Remote Type (Converter Part)
LOCK
LOCK
A
B
C
PULSE
+
SUPPLY
+
-
Terminal WiringTerminal configuration
A
C
B
Common terminal
Terminal to remote detector
* Use UYF021 Signal Cable
+
+
SUPPLY
PULSE
Power and 4 to 20 mA DC
output
Pulse output
Ground terminal
IMPORTANT
If the connection is wrong, ULTRA YEWFLO will fail to operate properly.
EX-B01E 1
IM 1F5B2-01E
INSTALLATION AND OPERATING PRECAUTIONS FOR JIS FLAMEPROOF EQUIPMENT
INSTALLATION AND OPERATING PRECAUTIONS
FOR JIS FLAMEPROOF EQUIPMENT
Apparatus Certified Under Technical Criteria (IEC-compatible Standards)
1. General
The following describes precautions on electrical apparatus of flameproof construction
(hereinafter referred to as flameproof apparatus) in explosion-protected apparatus.
Following the Labour Safety and Health Laws of Japan, flameproof apparatus is sub-
jected to type tests to meet either the technical criteria for explosionproof electrical
machinery and equipment (standards notification no. 556 from the Japanese Ministry of
Labour) (hereinafter referred to as technical criteria), in conformity with the IEC
Standards, or the “Recommended Practice for Explosion-Protected Electrical Installa-
tions in General Industries,” published in 1979. These certified apparatus can be used in
hazardous locations where explosive or inflammable gases or vapours may be present.
Certified apparatus includes a certification label and an equipment nameplate with the
specifications necessary for explosion requirements as well as precautions on explosion
protection. Please confirm these precautionary items and use them to meet specification
requirements.
For electrical wiring and maintenance servicing, please refer to “Internal Wiring Rules”
in the Electrical Installation Technical Standards as well as “USER’S GUIDELINES for
Electrical Installations for Explosive Gas Atmospheres in General Industry,” published
in 1994.”
To meet flameproof requirements, equipment that can be termed “flameproof” must:
(1) Be certified by a Japanese public authority in accordance with the Labour Safety and
Health Laws of Japan and have a certification label in an appropriate location on its
case, and
(2) Be used in compliance with the specifications marked on its certification label,
equipment nameplate and precautionary information furnished.
2. Electrical Apparatus of Flameproof Type of Explosion-Protected Construction
Electrical apparatus which is of flameproof construction is subjected to a type test and
certified by the Japanese Ministry of Labour aiming at preventing explosion caused by
electrical apparatus in a factory or any location where inflammable gases or vapours
may be present. The flameproof construction is of completely enclosed type and its
enclosure shall endure explosive pressures in cases where explosive gases or vapours
entering the enclosure cause explosion. In addition, the enclosure construction shall be
such that flame caused by explosion does not ignite gases or vapours outside the
enclosure.
3. Terminology
(1) Enclosure
An outer shell of an electrical apparatus, which encloses live parts and thus is needed
to configure explosion-protected construction.
EX-B01E 2
IM 1F5B2-01E
(2) Shroud
A component part which is so designed that the fastening of joint surfaces cannot be
loosened unless a special tool is used.
(3) Enclosure internal volume
This is indicated by:— the total internal volume of the flameproof enclosure minus
the volume of the internal components essential to equipment functions.
(4) Path length of joint surface
On a joint surface, the length of the shortest path through which flame flows from
the inside to outside of the flameproof enclosure. This definition cannot be applied to
threaded joints.
(5) Gaps between joint surfaces
The physical distance between two mating surfaces, or differences in diameters if the
mating surfaces are cylindrical.
Note: The permissible sizes of gaps between joint surfaces, the path length of a joint
surface and the number of joint threads are determined by such factors as the
enclosure’s internal volume, joint and mating surface construction, and the
explosion classification of the specified gases and vapours.
4. Installation of Flameproof Apparatus
(1) Installation Area
Flameproof apparatus may be installed, in accordance with applicable gases, in a
hazardous area in Zone 1 or 2, where the specified gases are present. Those appara-
tus shall not be installed in a hazardous area in Zone 0.
Note:Hazardous areas are classified in zones based upon the frequency of the appear-
ance and the duration of an explosive gas atmosphere as follows:
Zone 0: An area in which an explosive gas atmosphere is present continuously or is
present for long periods.
Zone 1: An area in which an explosive gas atmosphere is likely to occur in normal
operation.
Zone 2: An area in which an explosive gas atmosphere is not likely to occur in normal
operation and if it does occur it will exist for a short period only.
(2) Environmental Conditions
The standard environmental condition for the installation of flameproof apparatus is
limited to an ambient temperature range from -20 to +40C (for products certified
under Technical Criteria). However, some field-mounted instruments may be
certified at an ambient temperature up to +60C as indicated on the instrument
nameplates. If the flameproof apparatus are exposed to direct sunshine or radiant heat
from plant facilities, appropriate thermal protection measures shall be taken.
5. External Wiring for Flameproof Apparatus
Flameproof apparatus require cable wiring or flameproof metal conduits for their
electrical connections. For cable wiring, cable glands (cable entry devices for flameproof
type) to wiring connections shall be attached. For metal conduits, attach sealing fittings
as close to wiring connections as possible and completely seal the apparatus. All non-
live metal parts such as the enclosure shall be securely grounded. For details, see the
“USER’S GUIDELINES for Electrical Installations for Explosive Gas Atmospheres in
General Industry,” published in 1994.
EX-B01E 3
IM 1F5B2-01E
INSTALLATION AND OPERATING PRECAUTIONS FOR JIS FLAMEPROOF EQUIPMENT
(1) Cable Wiring
* For cable wiring, cable glands (cable entry devices for flameproof type) specified or
supplied with the apparatus shall be directly attached to the wiring connections to
complete sealing of the apparatus.
* Screws that connect cable glands to the apparatus are those for G- or PF-type parallel
pipe threads (JIS C 0202) with no sealing property. To protect the apparatus from
corrosive gases or moisture, apply nonhardening sealant such as liquid gaskets to
those threads for waterproofing.
* Specific cables (conforming to JIS C 3401) shall be used as recommended by the
“USER’S GUIDELINES for Electrical Installations for Explosive Gas Atmospheres in
General Industry,” published in 1994.
* If necessary, appropriate protective pipes (conduit or flexible pipes), ducts or trays
shall be used for preventing the cable run (outside the cable glands) from damage.
* To prevent explosive atmosphere from being propagated from Zone 1 or 2 hazardous
location to any different location or non-hazardous location through the protective
pipe or duct, apply sealing of the protective pipes in the vicinity of individual bound-
aries, or fill the ducts with sand appropriately.
* When branch connections of cables, or cable connections with insulated cables inside
the conduit pipes are made, a flameproof or increased-safety connection box shall be
used. In this case, flameproof or increased-safety cable glands meeting the type of
connection box must be used for cable connections to the box.
(2) Flameproof Metal Conduit Wiring
* For the flameproof metal conduit wiring, 600-V PVC insulated wires (JIS C 3307) or
insulated wires shall be used as recommended by the USER’S GUIDELINES for
Electrical Installations for Explosive Gas Atmospheres in General Industry, published
in 1994.
* For conduit pipes, heavy-gauge steel conduits conforming to JIS C 8305 Standard
shall be used.
* Flameproof sealing fittings shall be used in the vicinity of the wiring connections, and
those fittings shall be filled with sealing compounds to complete sealing of the
apparatus. In addition, to prevent explosive gases, moisture, or flame caused by
explosion from being propagated through the conduit, always provide sealing fittings
to complete sealing of the conduit in the following locations:
(a) In the boundaries between the hazardous and non-hazardous locations.
(b) In the boundaries where there is a different classification of hazardous location.
* For the connections of the apparatus with a conduit pipe or its associated accessories,
G- or PF-type parallel pipe threads (JIS C 0202) shall be used to provide a minimum
of five- thread engagement to complete tightness. In addition, since these parallel
threads do not have sealing property, nonhardening sealant such as liquid gaskets shall
thus be applied to those threads for ensuring waterproofness.
* If metal conduits need flexibility, use flameproof flexible fittings.
EX-B01E 4
IM 1F5B2-01E
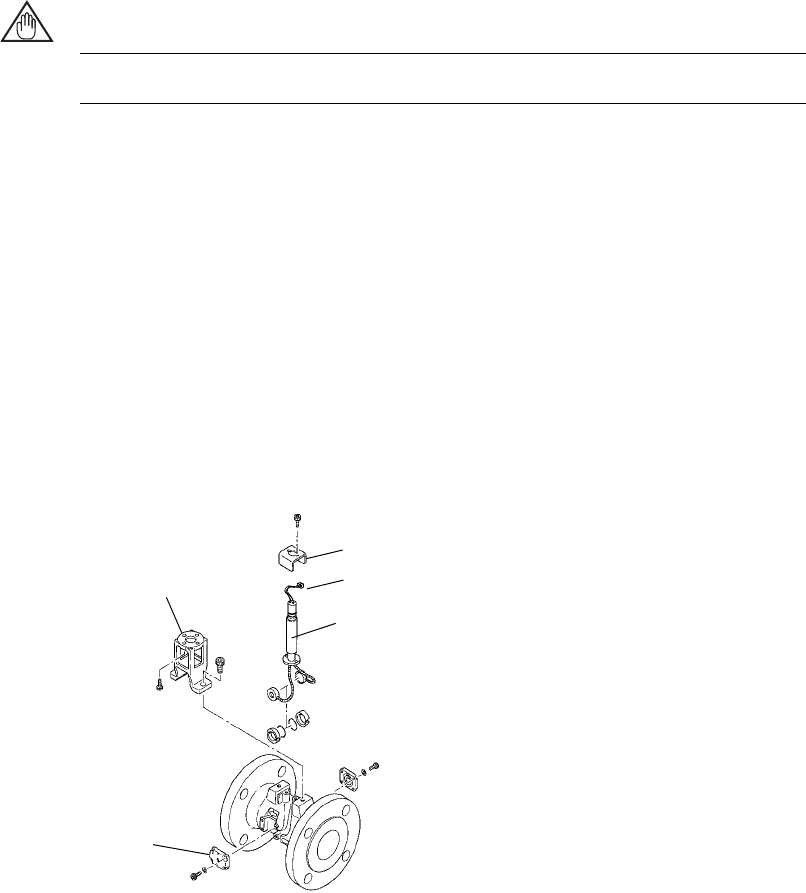
6. Maintenance of Flameproof Apparatus
To maintain the flameproof apparatus, do the following. (For details, see Chapter 10
“MAINTENANCE OF EXPLOSION-PROTECTED ELECTRICAL INSTALLATION”
in the USER’S GUIDELINES for Electrical Installations for Explosive Gas Atmospheres
in General Industry.)
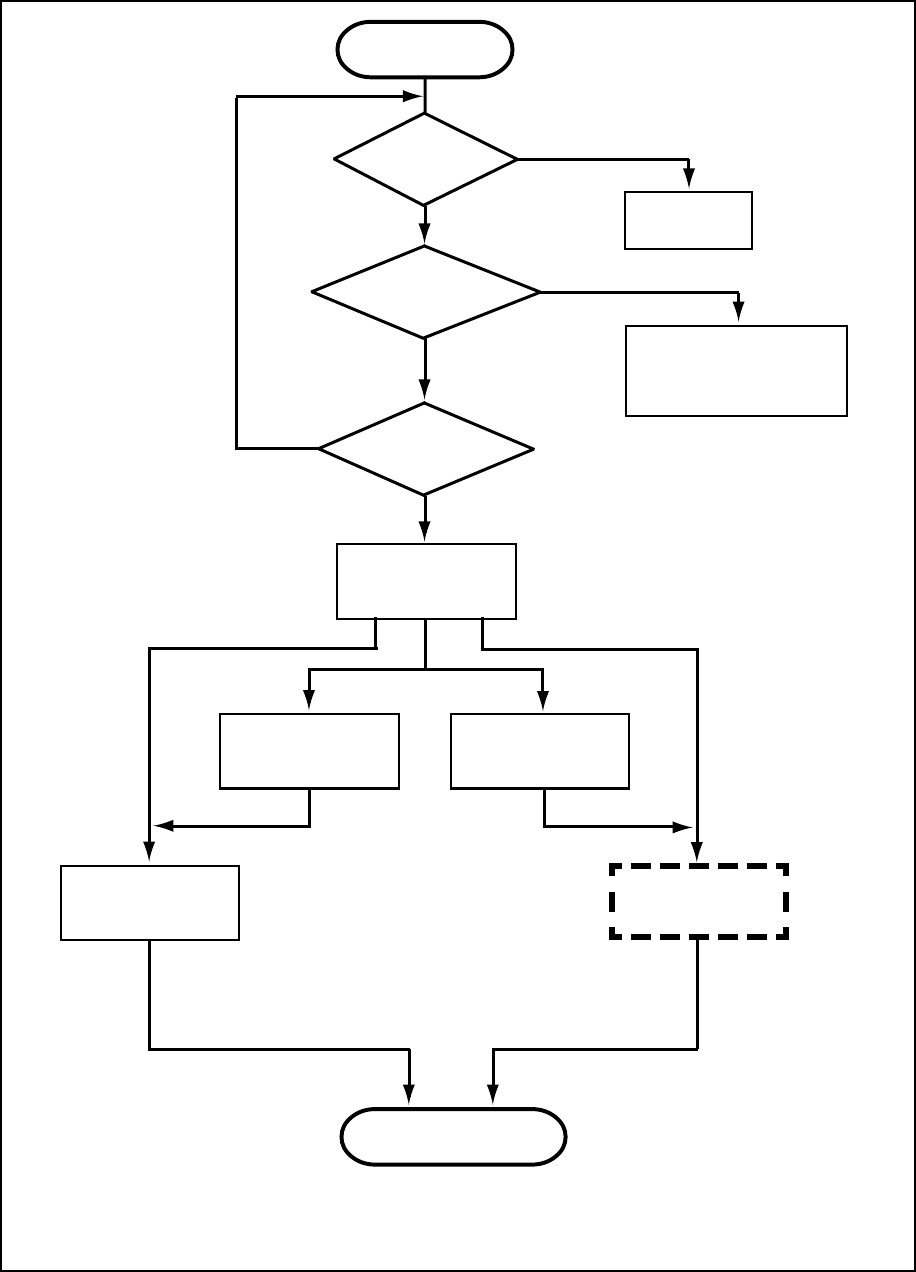
(1) Maintenance servicing with the power on.
Flameproof apparatus shall not be maintenance-serviced with its power turned on.
However, in cases where maintenance servicing is to be conducted with the power
turned on, with the equipment cover removed, always use a gas detector to check
that there is no explosive gas in that location. If it cannot be checked whether an
explosive gas is present or not, maintenance servicing shall be limited to the follow-
ing two items:
(a) Visual inspection
Visually inspect the flameproof apparatus, metal conduits, and cables for damage or
corrosion, and other mechanical and structural defects.
(b) Zero and span adjustments
These adjustments should be made only to the extent that they can be conducted
from the outside without opening the equipment cover. In doing this, great care must
be taken not to cause mechanical sparks with tools.
(2) Repair
If the flameproof apparatus requires repair, turn off the power and transport it to a
safety (non-hazardous) location. Observe the following points before attempting to
repair the apparatus.
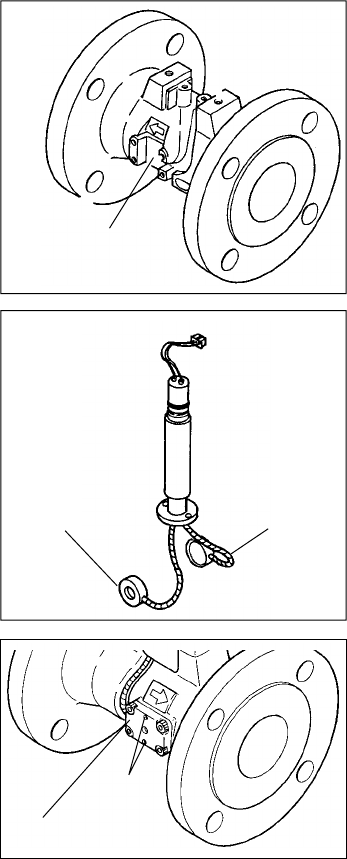
(a) Make only such electrical and mechanical repairs as will restore the apparatus to its
original condition. For the flameproof apparatus, the gaps and path lengths of joints
and mating surfaces, and mechanical strength of enclosures are critical factors in
explosion protection. Exercise great care not to damage the joints or shock the
enclosure.
(b) If any damage occurs in threads, joints or mating surfaces, inspection windows,
connections between the transmitter and terminal box, shrouds or clamps, or external
wiring connections which are essential in flameproofness, contact Yokogawa Electric
Corporation.
CAUTION: Do not attempt to re-process threaded connections or refinish joints or
mating surfaces.
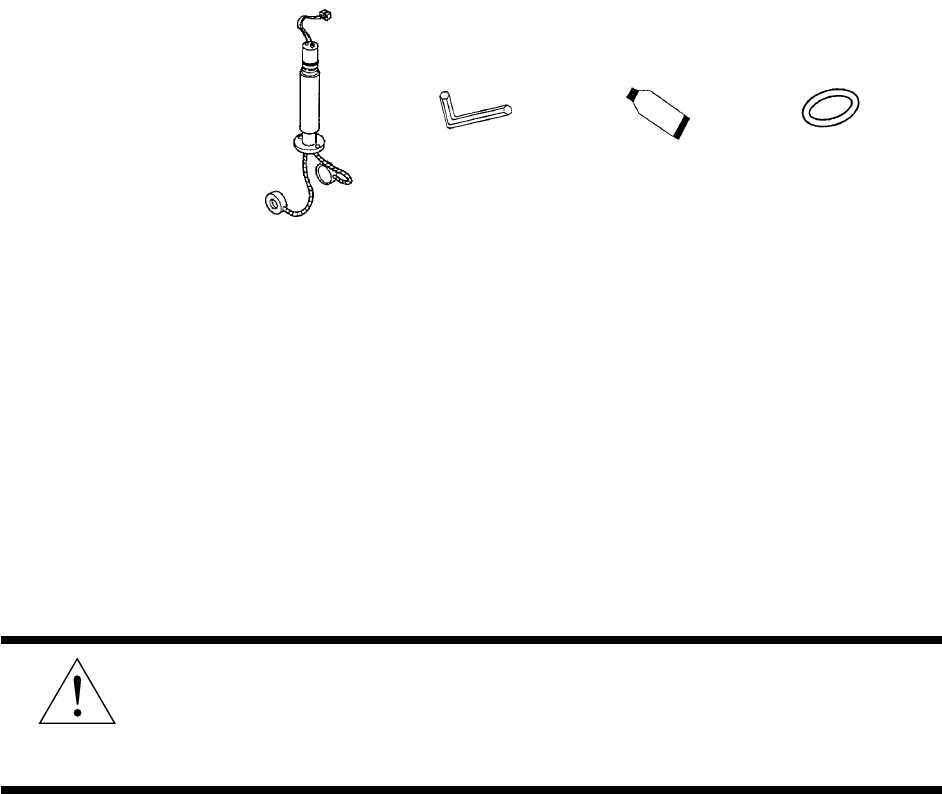
(c) Unless otherwise specified, the electrical circuitry and internal mechanisms may be
repaired by component replacement, as this will not directly affect the requirements
for flameproof apparatus (however, bear in mind that the apparatus must always be
restored to its original condition). If you attempt to repair the flameproof apparatus,
company-specified components shall be used.
(d) Before starting to service the apparatus, be sure to check all parts necessary for
retaining the requirements for flameproof apparatus. For this, check that all screws,
bolts, nuts, and threaded connections have properly been tightened.
(3) Prohibition of specification changes and modifications
Do not attempt to change specifications or make modifications involving addition of
or changes in external wiring connections.
EX-B01E 5
IM 1F5B2-01E
INSTALLATION AND OPERATING PRECAUTIONS FOR JIS FLAMEPROOF EQUIPMENT
7. Selection of Cable Entry Devices for Flameproof Type
IMPORTANT
The cable glands (cable entry devices for flameproof type) conforming to IEC Standards
are certified in combination with the flameproof apparatus. So, Yokogawa-specified
cable entry devices for flameproof type shall be used to meet this demand.
References:
(1) Type Certificate Guide for Explosion-Protected Construction Electrical Machinery
and Equipment (relating to Technical Standards Conforming to International Stan-
dards), issued by the Technical Institution of Industrial Safety, Japan
(2) USER’S GUIDELINES for Electrical Installations for Explosive Gas Atmospheres in
General Industry (1994), issued by the Japanese Ministry of Labour, the Research
Institute of Industrial Safety
34

Hulp nodig? Stel uw vraag in het forum

Spelregels

Misbruik melden

Gebruikershandleiding.com neemt misbruik van zijn services uitermate serieus. U kunt hieronder aangeven waarom deze vraag ongepast is. Wij controleren de vraag en zonodig wordt deze verwijderd.

Product:

Bijvoorbeeld antisemitische inhoud, racistische inhoud, of materiaal dat gewelddadige fysieke handelingen tot gevolg kan hebben.

Bijvoorbeeld een creditcardnummer, een persoonlijk identificatienummer, of een geheim adres. E-mailadressen en volledige namen worden niet als privégegevens beschouwd.

Spelregels forum

Om tot zinvolle vragen te komen hanteren wij de volgende spelregels:

Belangrijk! Als er een antwoord wordt gegeven op uw vraag, dan is het voor de gever van het antwoord nuttig om te weten als u er wel (of niet) mee geholpen bent! Wij vragen u dus ook te reageren op een antwoord.

Belangrijk! Antwoorden worden ook per e-mail naar abonnees gestuurd. Laat uw emailadres achter op deze site, zodat u op de hoogte blijft. U krijgt dan ook andere vragen en antwoorden te zien.

Abonneren

Abonneer u voor het ontvangen van emails voor uw Yokogawa UYFA21 Ultrasonic Vortex Flowmeter bij:


U ontvangt een email met instructies om u voor één of beide opties in te schrijven.


Ontvang uw handleiding per email

Vul uw emailadres in en ontvang de handleiding van Yokogawa UYFA21 Ultrasonic Vortex Flowmeter in de taal/talen: Engels als bijlage per email.

De handleiding is 0,93 mb groot.


U ontvangt de handleiding per email binnen enkele minuten. Als u geen email heeft ontvangen, dan heeft u waarschijnlijk een verkeerd emailadres ingevuld of is uw mailbox te vol. Daarnaast kan het zijn dat uw internetprovider een maximum heeft aan de grootte per email. Omdat hier een handleiding wordt meegestuurd, kan het voorkomen dat de email groter is dan toegestaan bij uw provider.

Stel vragen via chat aan uw handleiding

Stel uw vraag over deze PDF

Uw handleiding is per email verstuurd. Controleer uw email

Als u niet binnen een kwartier uw email met handleiding ontvangen heeft, kan het zijn dat u een verkeerd emailadres heeft ingevuld of dat uw emailprovider een maximum grootte per email heeft ingesteld die kleiner is dan de grootte van de handleiding.

Er is een email naar u verstuurd om uw inschrijving definitief te maken.

Controleer uw email en volg de aanwijzingen op om uw inschrijving definitief te maken

U heeft geen emailadres opgegeven

Als u de handleiding per email wilt ontvangen, vul dan een geldig emailadres in.

Uw vraag is op deze pagina toegevoegd

Wilt u een email ontvangen bij een antwoord en/of nieuwe vragen? Vul dan hier uw emailadres in.


Info