the need for satellite loudspeakers and cabling normally
associated with conventional surround sound systems.
This unit also employs the beam modes that let you enjoy
the surround sound (5 Beam, Stereo plus 3 Beam, 3 Beam,
and My Surround), 2-channel and 5-channel stereo
playback, and My Beam.
My Surround
In addition to the above mentioned beam modes, this unit
is equipped with My Surround beam mode that allows you
to enjoy surround system even in a small listening area.
My Surround is a function integrated and optimized with
DiMAGIC’s Euphony technology and Yamaha’s Beam
reproduction system.
My Beam
This unit employs My Beam that ensures a clear sound in
a noisy environment. You can adjust the beam angle
manually or automatically using the supplied remote
control to the maximum of 45°, rightward and leftward.
Cinema DSP
This unit employs the Cinema DSP technology developed
by Yamaha Electronics Corp. that lets you experience
movies at home with all the original dramatic sound
impact.
HDMI™ (High-Definition Multimedia Interface)
◆HDMI interface for standard, enhanced, or high-definition
video (including 1080p video signal transmission) as well as
multi-channel digital audio based on HDCP
◆Simple and easy connections with HDMI supported external
components
◆Functional link with an HDMI control-compatible TV
Versatile Remote Control
The supplied remote control comes with preset remote
control codes used to control the DVD player, VCR, cable
TV tuner, and digital satellite tuner connected to this unit.
In addition, the remote control is equipped with the macro
capability that enables a series of operations with the press
of a single button.
AUTO SETUP (IntelliBeam)
This unit employs the automatic sound beam and acoustic
optimization technology with the aid of the supplied
IntelliBeam microphone. You can avoid troublesome
listening-based speaker setup and achieve highly accurate
sound beam adjustments that best match your listening
environment.
Compatibility with the Newest Technologies
This unit employs decoders compatible with Dolby
Digital, DTS, Dolby Pro Logic, Dolby Pro Logic II, DTS
Neo:6, Music Enhancer, and Neural Surround.
◆Dolby Digital
This is the standard audio signal format used on various
digital media such as DVD, Blu-ray, and HD DVD. This
surround technology delivers high-quality digital audio for up
to 5.1 discrete channels to produce a directional and more
realistic effect.
◆DTS
This is the standard audio signal format used on various
digital media such as DVD, Blu-ray, and HD DVD. This
surround technology delivers high-quality digital audio for up
to 5.1 discrete channels to produce a directional and more
realistic effect.
◆Dolby Pro Logic
This sophisticated, matrix decoding technology up-converts
any 2-channel source audio to a 5.1-channel full bandwidth
playback, resulting in a surround sound experience.
◆Dolby Pro Logic II
This is a redesigned version of Dolby Pro Logic that employs
2 stereo surround channels, a subwoofer, and a greatly
enhanced steering logic. This improved technology provides
an exceptionally stable sound field that simulates 5.1 to a
much greater degree than the original Dolby Pro Logic.
◆DTS Neo:6
This technology decodes the conventional 2-channel sources
for 6-channel playback, enabling playback with the full-range
channels with higher separation. Music mode and Cinema
mode are available to play back music and movie sources
respectively.
◆Music Enhancer to restore the original depth and width of
compression artifacts such as the MP3 format.
◆Neural Surround decoder (U.S.A and Canada models only)
Sophisticated FM tuner
◆40-station random and direct preset tuning
◆Automatic preset tuning
◆Radio Data System capability (Europe model only)
XM™ Satellite Radio
(U.S.A. and Canada models only)
◆XM Satellite Radio tuning capability (using the XM Mini-
Tuner Dock, and Antenna sold separately by XM Satellite
Radio)
◆Neural Surround decoder to play back the XM HD content of
XM Satellite Radio broadcasts in multi-channels, resulting in
a full surround sound experience
◆XM Satellite Radio information displaying capability
iPod™ Controlling Capability
(U.S.A., Canada, and Australia models only)
◆DOCK terminal to connect a Yamaha iPod universal dock
(such as the YDS-10, sold separately), which supports iPod
(Click and Wheel), iPod nano, and iPod mini
◆Playback information displaying capability
◆Battery charging capability
Features
Features
4 En
The “” logo and “IntelliBeam” are trademarks of
YAMAHA Corporation.
The “” logo and “Cinema DSP” are registered
trademarks of YAMAHA Corporation.
Manufactured under license from Dolby Laboratories.
“Dolby”, “Pro Logic”, and the double-D symbol are trademarks
of Dolby Laboratories.
“DTS” and “Neo:6” are registered trademarks of DTS, Inc.
“HDMI”, the “HDMI” logo and “High-Definition Multimedia
Interface” are trademarks or registered trademarks of HDMI
Licensing LLC.
Manufactured under license from 1 Ltd. Worldwide patents
applied for.
The “” logo and “Digital Sound Projector
™
” are trademarks
of 1 Ltd.
TruBass, SRS and the “” symbol are registered trademarks
of SRS Labs, Inc. TruBass technology is incorporated under
license from SRS Labs, Inc.
™
is a trademark of DiMAGIC Co., Ltd.
Using this manual
5 En
INTRODUCTION
English
•This manual describes how to connect and operate this unit. For details regarding the operation of external components, refer to the
supplied owner’s manual for each component.
•Operations in this manual use keys on the supplied remote control of this unit unless otherwise specified.
•y indicates a tip for your operation.
•This manual is printed prior to production. Designs and specifications are subject to change in part as a result of improvements, etc. In
case of differences between the manual and the product, the product has priority.
1Install this unit in your listening room.
See “Installation” on page 16.
2Connect this unit to your TV and other external components.
See “Connections” on page 19.
3Prepare the remote control and turn on the power of this unit.
See “Getting started” on page 30.
4Run AUTO SETUP.
See “AUTO SETUP (IntelliBeam)” on page 35.
5Play back a source.
See “Playback” on page 45.
6Change the beam modes and/or CINEMA DSP settings.
See “Enjoying surround sound” on page 54.
7Run MANUAL SETUP to fine-tune settings and/or set remote control codes.
See “MANUAL SETUP” on page 72 and “Remote control features” on page 96.
Using this manual
Notes
If you want to make additional settings
and adjustments
Supplied accessories
6 En
Check that you have received all of the following parts.
Supplied accessories
Connecting external components such as a TV or DVD player to this unit.
Connect your TV or DVD player to this unit using appropriate cables as shown below. After all connections are complete, plug the power supply cable into the AC
wall outlet. For further information on connecting other components, see pages 19 to 29 in the Owner’s Manual.
YSP-3000
QUICK REFERENCE GUIDE
C2007All rights reserved.
Printed in Malaysia
WK75520 [En]
1
2
AUDIO INPUT
OUT
AUX 1
TV/STB
TV/STB
SUBWOOFER
AUX 1
DVD
AUX 2
VIDEO
DIGITAL INPUT
COAXIAL
COAXIAL
AUDIO OUTPUT
L
R
VIDEO
INPUT
ANALOG AUDIO
OUTPUT
OPTICAL
AUDIO OUTPUT
DVD player
TV
Decide where to install this unit.
Install this unit where there are no objects such as furniture obstructing the path of sound beams. Otherwise, the desired
surround sound effects may not be achieved. You may install this unit in parallel with the wall or in the corner.
YSP-3000
Connecting external components to this unit
Installing this unit
This quick reference guide explains steps to connect a TV and a DVD player to this unit and achieve the
surround sound effects in a quick, easy manner. For detailed operation, refer to the Owner’s Manual.
Install this unit using a rack, etc.
Depending on your installation environment, connections with external components (see “2 Connecting external components to this unit”) can be done before
installing this unit. We recommend that you temporarily place and arrange all components in order to decide which procedure must come first. In case you
install this unit on top of a rack, etc., use the supplied fasteners to prevent an accidental fall of this unit.
For further information on installation, see page 16 in the Owner’s Manual.
Install this unit in the exact center of the wall when it is
measured from the left and right corners.
Install this unit in the corner at a 40˚ to 50˚ angle from the
adjacent walls.
40˚ to 50˚
An object, such as furnitureAn object, such as furniture
To the AC wall
outlet
132
Pull out the cap
before connecting
the optical cable,
and then check the
direction to insert the
cable.
Do not plug the power
supply cable into an AC
wall outlet until all
connections are complete.
1
2
Items used for connections and operations
in this guide
s
Audio pin cable (x1)
s
OSD* video pin cable (x1)
s
Optical cable (x1)
s
Digital audio pin cable (x1)
s
IntelliBeam microphone (x1)
s
Cardboard microphone stand (x1)
s
Demonstration DVD (x1)
*OSD: On-Screen Display
Connection
example 1
1. Pull out the cap
2. Check the direction
If you have connected external components,
follow the steps on the backside to start the
AUTO SETUP procedure.
Continued
on the back
Front left channel
Center channel
Front right channel
Surround left channel
Surround right channel
Front left channel
Center channel
Front right channel
Surround left channel
Surround right channel
This connection example shows a way to connect external components such as a TV or DVD player to
this unit by using the supplied cable. You can enjoy the multi-channel audio from the DVD player and the
analog/digital audio from the TV. Use the video pin cable supplied with your DVD player to make a video
connection between your DVD player and TV.
1
2
VIDEO
INPUT
HDMI
INPUT
HDMI
OUTPUT
HDMI
OUT
IN
DVD
AUX 1
AUDIO INPUT
OUT
AUX 1
TV/STB
TV/STB
SUBWOOFER
AUX 1
DVD
AUX 2
VIDEO
DIGITAL INPUT
COAXIAL
1
To the AC wall
outlet
Connect cables in the following order.
3
Install this unit in the
rack.
1
Place this unit in front of
the rack.
This connection example shows a way to make the most of the capability of this unit. You can
enjoy DVD audio and video with higher quality via the HDMI cable. In case your TV does not have
a built-in digital satellite tuner, cable TV tuner, or digital airwave tuner, connect a digital satellite
tuner, cable TV tuner, or digital airwave tuner via the HDMI cable. For details, see “Connections
using HDMI cables” on page 21 in the Owner’s manual.
Connection
example 2
DVD player
TV
YSP-3000
Do not plug the power
supply cable into an AC
wall outlet until all
connections are complete.
If you have connected external components,
follow the steps on the backside to start the
AUTO SETUP procedure.
Continued
on the back
SuppliedSold separately
Connect cables in the following order.
1 OSD video pin cable
(Displaysthe YSP-3000 menu screen on the TV)
2 HDMI cable
(Displaysthe DVD digital video on the TV)
3 HDMI cable
(InputsDVD digital audio/video signals to this unit)
2
(Sold separately)
3
(Sold separately)
2
Place this unit upside
down and connect this unit to
your TV and DVD player.
y Hint
•To enjoy better surround effects, place this unit on the upper shelf to keep it away from the floor.
•You can also use the optional metal wall bracket (sold separately) to mount this unit on the wall. For details, refer to the instructions
supplied with the metal wall bracket.
Note
Be careful not to leave scratches on this unit or the rack.
Video connection
Supplied
1Audio pin cable
(OutputsTV analog audio sounds from this unit)
2 OSD video pin cable
(Displaysthe YSP-3000 menu screen on the TV)
3 Optical cable
(Outputs
TV digital audio sounds from this unit)
4 Digital audio pin cable
(OutputsDVD digital audio sounds from this unit)
*
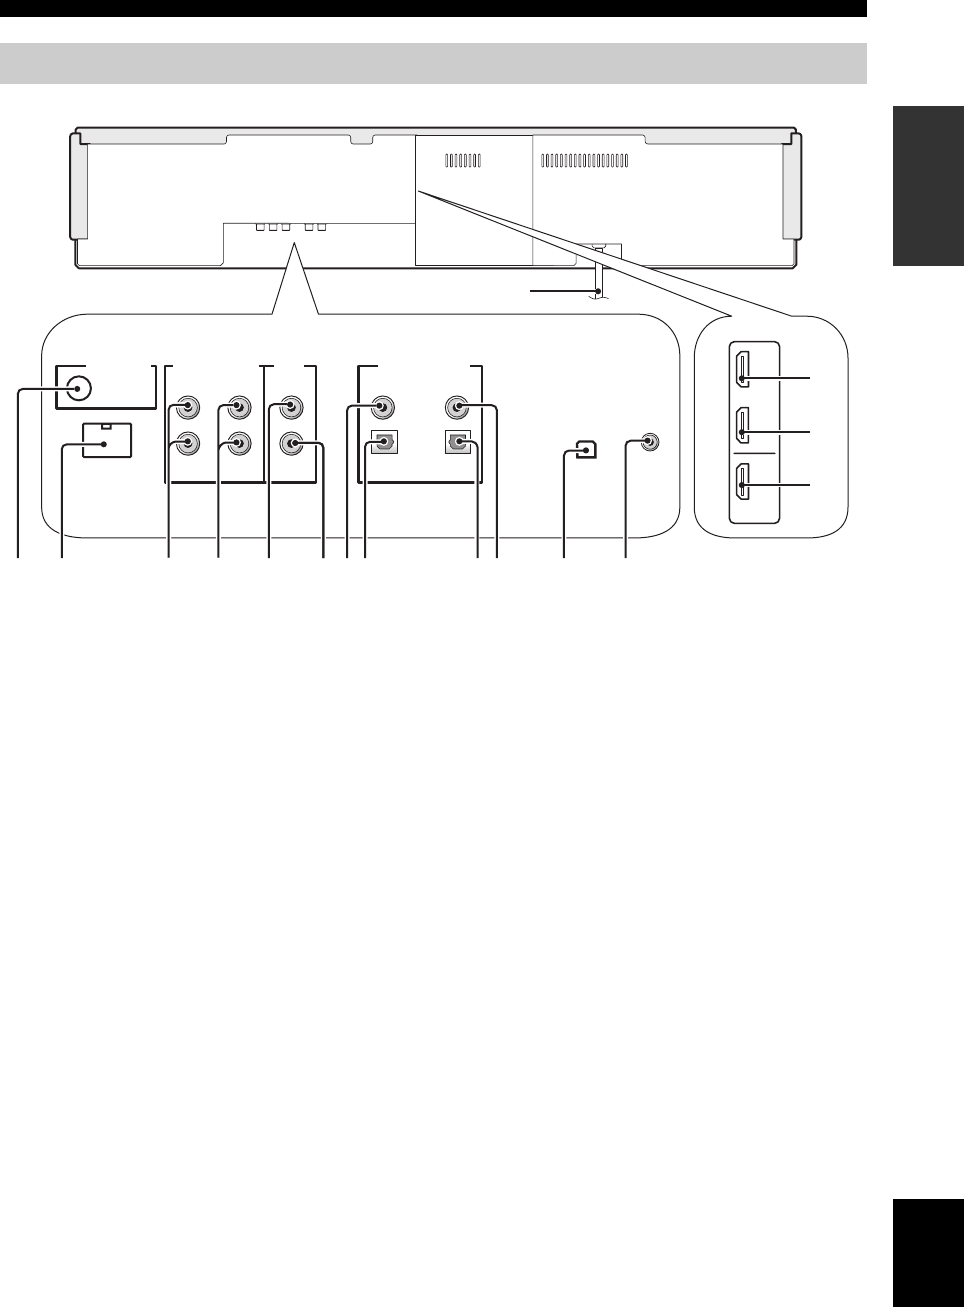
The rear panel illustration shows jacks and their names to help you find them easily. They
are not exactly the same as the ones on the actual rear panel of this unit.
4
4
Installation is completed.
The following is an example of installing this unit in a rack. To prevent this unit or the floor from being scratched, we recommend putting a piece of
cloth on the floor in step 2.
y Hint
Check whether the digital audio output of your TV and DVD
player is turned on.
y Hint
•If you connect this unit to an HDMI control-compatible TV
(except some models) via HDMI, you can use the remote
control supplied with your TV to turn on or off the power,
select the audio output component, and adjust the volume
level of this unit.
•Check whether the digital audio output of your TV and DVD
player is turned on.
*
The rear panel illustration shows jacks and their names to help youfind them easily. They
are not exactly the same as the ones on the actual rear panel of this unit.
Digital satellite tuner/Cable TV tuner/
Digital airwave tuner
Audio connection
Audio connection
HDMI connection
Subwoofer
Subwoofer
Optical cable
STEREOMY SUR.
MY BEAM
PRESET/TUNE
MEMORYSEARCH
SLEEP
INPUTMODE
ENHANCER MENU
RETURNDISPLAY
TV VOL
VOLUME
MUTE
CH LEVELTEST
TV INPUTTV MUTE
ENTER
SUR. DECODE
OFF
CODE SET
SPORTS
5BEAMST+3BEAM3BEAM
MUSICMOVIE
VOL MODE
AUTO
SETUP
CATFM/XM
MACRO
TV
INPUT1
YSP
TV/AV
CH
ENTRY
CAT/
A-E
4
6
321
AUX1AUX2
STB
TV
DVD
AUX3
TV
POWERPOWERSTANDBY/ON
DOCK
+10
0
78
9
5
AV
Remote control (×1)
Batteries (×2)
(AA, R6, UM-3)
OSD* video pin cable (×1)
IntelliBeam microphone
(×1)
Fasteners (×4)
Audio pin cable (×1)
Digital audio pin cable (×1)
Optical cable (×1)
Cable clamp (×1)
Cardboard microphone
stand (×1)
(Orange)
(White/Red)
(Yellow)
Indoor FM antenna (×1)
(U.S.A. and Canada models)
Demonstration DVD
(×1)
YSP-3000
Digital Sound Projector
TM
Reference Guide for iPod/XM Radio
This is the Reference Guide for Yamaha YSP-3000 Digital Sound Projector. This guide explains the connections and
operations of iPod and XM Satellite Radio (U.S.A. and Canada models only). Operations in this guide use keys on the
supplied remote control unless otherwise specified. For general information including the controls and functions of this
unit, refer to the owner’s manual.
y
The illustrations used in this Reference Guide are for U.S.A. and Canada models only.
“iPod” is a trademark of Apple Inc., registered in the U.S. and other countries.
The XM name and related logos are registered trademarks of XM Satellite Radio Inc.
Neural Surround
™
name and related logos are trademarks owned by Neural Audio Corporation.
Using iPod™........................................................................................................................................ 2
01EN_YSP-3000_UA-RG.book Page 12 Friday, March 7, 2008 11:38 AM
Black process 45.0° 240.0 LPI
Connecting external components such as a TV or DVD player to this unit.
Connect your TV or DVD player to this unit using appropriate cables as shown below. After all connections are complete, plug the power supply cable into the AC
wall outlet. For further information on connecting other components, see pages 19 to 29 in the Owner’s Manual.
YSP-3000
QUICK REFERENCE GUIDE
C2007 All rights reserved.
Printed in Malaysia WK75520 [En]
1
2
AUDIO INPUT
OUT
AUX 1
TV/STB
TV/STB
SUBWOOFER
AUX 1
DVD
AUX 2
VIDEO
DIGITAL INPUT
COAXIAL
COAXIAL
AUDIO OUTPUT
L
R
VIDEO
INPUT
ANALOG AUDIO
OUTPUT
OPTICAL
AUDIO OUTPUT
DVD player
TV
Decide where to install this unit.
Install this unit where there are no objects such as furniture obstructing the path of sound beams. Otherwise, the desired
surround sound effects may not be achieved. You may install this unit in parallel with the wall or in the corner.
YSP-3000
Connecting external components to this unit
Installing this unit
This quick reference guide explains steps to connect a TV and a DVD player to this unit and achieve the
surround sound effects in a quick, easy manner. For detailed operation, refer to the Owner’s Manual.
Install this unit using a rack, etc.
Depending on your installation environment, connections with external components (see “2 Connecting external components to this unit”) can be done before
installing this unit. We recommend that you temporarily place and arrange all components in order to decide which procedure must come first. In case you
install this unit on top of a rack, etc., use the supplied fasteners to prevent an accidental fall of this unit.
For further information on installation, see page 16 in the Owner’s Manual.
Install this unit in the exact center of the wall when it is
measured from the left and right corners.
Install this unit in the corner at a 40˚ to 50˚ angle from the
adjacent walls.
40˚ to 50˚
An object, such as furnitureAn object, such as furniture
To the AC wall
outlet
132
Pull out the cap
before connecting
the optical cable,
and then check the
direction to insert the
cable.
Do not plug the power
supply cable into an AC
wall outlet until all
connections are complete.
1
2
Items used for connections and operations
in this guide
s
Audio pin cable (x1)
s
OSD* video pin cable (x1)
s
Optical cable (x1)
s
Digital audio pin cable (x1)
s
IntelliBeam microphone (x1)
s
Cardboard microphone stand (x1)
s
Demonstration DVD (x1)
*OSD: On-Screen Display
Connection
example 1
1. Pull out the cap
2. Check the direction
If you have connected external components,
follow the steps on the backside to start the
AUTO SETUP procedure.
Continued
on the back
Front left channel
Center channel
Front right channel
Surround left channel
Surround right channel
Front left channel
Center channel
Front right channel
Surround left channel
Surround right channel
This connection example shows a way to connect external components such as a TV or DVD player to
this unit by using the supplied cable. You can enjoy the multi-channel audio from the DVD player and the
analog/digital audio from the TV. Use the video pin cable supplied with your DVD player to make a video
connection between your DVD player and TV.
1
2
VIDEO
INPUT
HDMI
INPUT
HDMI
OUTPUT
HDMI
OUT
IN
DVD
AUX 1
AUDIO INPUT
OUT
AUX 1
TV/STB
TV/STB
SUBWOOFER
AUX 1
DVD
AUX 2
VIDEO
DIGITAL INPUT
COAXIAL
1
To the AC wall
outlet
Connect cables in the following order.
3Install this unit in the
rack.
1Place this unit in front of
the rack.
This connection example shows a way to make the most of the capability of this unit. You can
enjoy DVD audio and video with higher quality via the HDMI cable. In case your TV does not have
a built-in digital satellite tuner, cable TV tuner, or digital airwave tuner, connect a digital satellite
tuner, cable TV tuner, or digital airwave tuner via the HDMI cable. For details, see “Connections
using HDMI cables” on page 21 in the Owner’s manual.
Connection
example 2
DVD player
TV
YSP-3000
Do not plug the power
supply cable into an AC
wall outlet until all
connections are complete.
If you have connected external components,
follow the steps on the backside to start the
AUTO SETUP procedure.
Continued
on the back
SuppliedSold separately
Connect cables in the following order.
1 OSD video pin cable
(Displays the YSP-3000 menu screen on the TV)
2 HDMI cable
(Displays the DVD digital video on the TV)
3 HDMI cable
(Inputs DVD digital audio/video signals to this unit)
2(Sold separately)3(Sold separately)
2Place this unit upside
down and connect this unit
to your TV and DVD player.
y Hint
•To enjoy better surround effects, place this unit on the upper shelf to keep it away from the floor.
•You can also use the optional metal wall bracket (sold separately) to mount this unit on the wall. For details, refer to the instructions
supplied with the metal wall bracket.
Note
Be careful not to leave scratches on this unit or the rack.
Video connection
Supplied
1Audio pin cable
(Outputs TV analog audio sounds from this unit)
2 OSD video pin cable
(Displays the YSP-3000 menu screen on the TV)
3 Optical cable
(Outputs TV digital audio sounds from this unit)
4 Digital audio pin cable
(Outputs DVD digital audio sounds from this unit)
* The rear panel illustration shows jacks and their names to help you find them easily.
They are not exactly the same as the ones on the actual rear panel of this unit.
4
4Installation is completed.
The following is an example of installing this unit in a rack. To prevent this unit or the floor from being scratched, we recommend putting a piece of
cloth on the floor in step 2.
* The rear panel illustration shows jacks and their names to help youfind them easily.
They are not exactly the same as the ones on the actual rear panel of this unit.
Digital satellite tuner/Cable TV tuner/
Digital airwave tuner
Audio connection
Audio connection
HDMI connection
Subwoofer
Subwoofer
Optical cable
Note
Check whether the digital audio output of your TV and DVD
player is turned on.
y Hint
If you connect this unit to an HDMI control-compatible TV
(except some models) via HDMI, you can use the remote
control supplied with your TV to turn on or off the power,
select the audio output component, and adjust the volume
level of this unit.
Note
Check whether the digital audio output of your TV and DVD
player is turned on.
0726_YSP-3000_En_guide.p657/26/07, 4:06 PM1
Press ENTER to start the AUTO
SETUP procedure, and then
leave the room within 10 seconds.
The following screen appears on the TV. Leave the room
within 10 seconds before the AUTO SETUP procedure
starts.
The setup screen automatically changes during the AUTO
SETUP procedure.
When the AUTO SETUP procedure is completed, the
following screen appears on the TV.
If “ENVIRONMENT CHECK (FAILED) is displayed, see page
40 in the Owner’s Manual and then run the procedure again.
y Hint
• The result may differ depending on the environment.
• If any error occurs, the corresponding error message appears
on the screen. In this case, see “Error messages for AUTO
SETUP” on page 41 in the Owner’s Manual and then follow
the instructions. To start the AUTO SETUP procedure once
again, press RETURN.
Press ENTER.
The following screen appears on the TV for 2 seconds and
then the menu screen disappears from the TV.
Disconnect the IntelliBeam
microphone.
The AUTO SETUP has completed. Keep the IntelliBeam
microphone in a safe place.
The settings are automatically saved in the system memory.
Enjoy TV or DVD digital audio in surround sound.
For instructions on how to operate or set your TV or DVD player, refer to the owner’s manual supplied with each component.
Enjoying surround sound
Carry out the AUTO SETUP to adjust the settings that best match your
listening environment
The IntelliBeam technology allows you to achieve sound adjustments that best match your listening environment. It is normal for loud test tones to be output
during the AUTO SETUP procedure. Make sure that there are no children around in the listening room while the AUTO SETUP procedure is in progress.
Press STANDBY/ON on the
remote control.
The power of this unit turns on.
Before operations, insert batteries into the remote control
(see page 30 in the Owner’s Manual).
If necessary, adjust the volume level of this unit.
If you have connected the subwoofer, set the volume and
crossover/high cut frequency. Refer to the hint on page
36 in the Owner’s Manual.
Check the digital signal being output at this unit.
The input channel indicators (see page 8 in the Owner’s Manual) are lit in the front panel display, and they switch
according to the channel composition of the corresponding input source. If the sound is output from your TV
speakers, mute the volume on your TV. For details about digital audio input signals, see page 46 in the Owner’s
Manual.
Press VOLUME +/
-
on the remote control to adjust the volume
level of this unit.
Press one of the beam mode buttons on the remote control
to select the desired beam mode.
Select one of the six beam modes that best matches the current input source of this unit.
For further information on the beam modes, see page 54 in the Owner’s Manual.
To fine-tune the listening environment parameters manually or make advanced settings for speaker positions,
sound beams, etc., see “MANUAL SETUP” on page 72 in the Owner’s Manual.
AUTOSETUPSTART
Willbeginin20sec
Pleaseleavetheroom
**--------
[RETURN]:Cancel
10
Enjoying TV in surround sound
3
SHOWRESULT
MEASUREMENTCOMPLETE
BEAMMODE:5BEAM
SUBWOOFER:NOTAPPLICABLE
[ENTER]:Saveset-up
[RETURN]:Donotsaveset-up
AUTOSETUPCOMPLETE
PleaseremovetheMICfrom
theYSPandthelistening
position.
TV/AV
YSP
ENTER
ENTRY
A-E
ENHANCER
DISPLAYRETURN
MENU
TV/AV
YSP
ENTER
ENTRY
A-E
ENHANCER
DISPLAYRETURN
MENU
Select the TV channel using the
remote control supplied with
your TV.
Set the operation mode selector
to YSP.
This unit switches to the YSP operation mode.
Press TV on the remote control
of this unit.
This unit switches to the TV playback mode.
More than 1.8 m (6.0 ft)
Within 1 m
(3.3 ft)
IntelliBeam
microphone
Cardboard
microphone
stand
Listening
position
Place the IntelliBeam microphone on
the extended center line of this unit
and 1.8 m (6.0 ft) or more away from
it. Also, make sure place the
IntelliBeam microphone within 1 m
(3.3 ft) upper or lower from the center
height of this unit.
IntelliBeam
microphone
Center line
Carry out the AUTO SETUP (IntelliBeam)
INTELLIBEAM MIC
1234
Set the IntelliBeam microphone at your normal listening position.
Use the supplied cardboard microphone stand or a tripod to place the IntelliBeam microphone at the same height as your ears would
be when you are seated.
IntelliBeam microphone (supplied)
Connect the supplied IntelliBeam microphone to the INTELLIBEAM MIC
jack on the front panel.
You may want to use the supplied cardboard microphone stand for the AUTO SETUP. Assemble the stand and place the IntelliBeam
microphone on top of it as shown below.
3
MUTETV INPUTTV MUTE
VOLUMECHTV VOL
Enjoying DVDs in surround sound
Select the DVD video input on
your TV.
Set the operation mode selector
to YSP.
This unit switches to the YSP operation mode.
1) Press DVD on the remote
control of this unit.
This unit switches to the DVD playback mode.
2)
Play back the supplied demonstration
DVD on the DVD player.
Set the operation mode selector
to YSP.
This unit switches to the YSP operation mode.
Press and hold AUTO SETUP for
more than 2 seconds.
The menu screen appears on the TV.
If the menu screen does not appear, check the OSD video
pin cable (see the connection example on the front page).
Check the following points.
About the IntelliBeam microphone
• Is the microphone placed on an imaginary center line drawn
from this unit?
• Is the microphone placed within 1 m (3.3 ft) upper or lower
from the center height of this unit?
• Is the microphone placed more than 1.8 m (6.0 ft) from the
front of this unit?
About the room environment
• Is your listening room kept as quiet as possible?
Prepare to leave the room.
The best setting may not be done if you are in the room.
Prepare to leave the room in 10 seconds after pressing
ENTER in step 10.
y Hint
• When leaving the room, bring this guide with you.
• Wait outside the room during the AUTO SETUP procedure.
• The AUTO SETUP procedure takes about 3 minutes.
• To cancel the AUTO SETUP procedure after it is started,
press RETURN.
Turn on the power of your TV.
Select the appropriate video
input on your TV.
“YSP-3000” appears on your TV. If the OSD video pin cable
is connected to the video input 1 on the TV as shown in the
connection example, switch the video input to “1”.
Gebruikershandleiding.com neemt misbruik van zijn services uitermate serieus. U kunt hieronder aangeven waarom deze vraag ongepast is. Wij controleren de vraag en zonodig wordt deze verwijderd.
Product:
Spelregels forum
Om tot zinvolle vragen te komen hanteren wij de volgende spelregels:
lees eerst de handleiding door;
controleer of uw vraag al eerder door iemand anders is gesteld;
probeer uw vraag zo duidelijk mogelijk te stellen;
heeft u een probleem en al geprobeerd om dit op te lossen, vermeld dit erbij aub;
heeft u een oplossing gekregen van een bezoeker dan horen wij dat graag in dit forum;
wilt u een reactie geven op een vraag of antwoord, gebruik dan niet dit formulier maar klik op de knop 'reageer op deze vraag';
uw vraag wordt direct op de website gezet; vermijd daarom persoonlijke gegevens in te vullen;
Belangrijk! Als er een antwoord wordt gegeven op uw vraag, dan is het voor de gever van het antwoord nuttig om te weten als u er wel (of niet) mee geholpen bent! Wij vragen u dus ook te reageren op een antwoord.
Belangrijk! Antwoorden worden ook per e-mail naar abonnees gestuurd. Laat uw emailadres achter op deze site, zodat u op de hoogte blijft. U krijgt dan ook andere vragen en antwoorden te zien.
Abonneren
Abonneer u voor het ontvangen van emails voor uw Yamaha YSP-3000 bij:
nieuwe vragen en antwoorden
nieuwe handleidingen
U ontvangt een email met instructies om u voor één of beide opties in te schrijven.
Ontvang uw handleiding per email
Vul uw emailadres in en ontvang de handleiding van Yamaha YSP-3000 in de taal/talen: Engels als bijlage per email.
De handleiding is 12,25 mb groot.
U ontvangt de handleiding per email binnen enkele minuten. Als u geen email heeft ontvangen, dan heeft u waarschijnlijk een verkeerd emailadres ingevuld of is uw mailbox te vol. Daarnaast kan het zijn dat uw internetprovider een maximum heeft aan de grootte per email. Omdat hier een handleiding wordt meegestuurd, kan het voorkomen dat de email groter is dan toegestaan bij uw provider.
Uw handleiding is per email verstuurd. Controleer uw email
Als u niet binnen een kwartier uw email met handleiding ontvangen heeft, kan het zijn dat u een verkeerd emailadres heeft ingevuld of dat uw emailprovider een maximum grootte per email heeft ingesteld die kleiner is dan de grootte van de handleiding.
Er is een email naar u verstuurd om uw inschrijving definitief te maken.
Controleer uw email en volg de aanwijzingen op om uw inschrijving definitief te maken
U heeft geen emailadres opgegeven
Als u de handleiding per email wilt ontvangen, vul dan een geldig emailadres in.
Uw vraag is op deze pagina toegevoegd
Wilt u een email ontvangen bij een antwoord en/of nieuwe vragen? Vul dan hier uw emailadres in.