This product utilizes batteries or an external power supply (adapter). DO
NOT connect this product to any power supply or adapter other than one
described in the manual, on the name plate, or specifically recom-
mended by Yamaha.
WARNING: Do not place this product in a position where anyone
could walk on, trip over, or roll anything over power or connecting cords
of any kind. The use of an extension cord is not recommended! If you
must use an extension cord, the minimum wire size for a 25’ cord (or
less) is 18 AWG. NOTE: The smaller the AWG number, the larger the
current handling capacity. For longer extension cords, consult a local
electrician.
This product should be used only with the components supplied or; a
cart, rack, or stand that is recommended by Yamaha. If a cart, etc., is
used, please observe all safety markings and instructions that accom-
pany the accessory product.
SPECIFICATIONS SUBJECT TO CHANGE:
The information contained in this manual is believed to be correct at the
time of printing. However, Yamaha reserves the right to change or mod-
ify any of the specifications without notice or obligation to update existing
units.
This product, either alone or in combination with an amplifier and head-
phones or speaker/s, may be capable of producing sound levels that
could cause permanent hearing loss. DO NOT operate for long periods
of time at a high volume level or at a level that is uncomfortable. If you
experience any hearing loss or ringing in the ears, you should consult an
audiologist.
IMPORTANT: The louder the sound, the shorter the time period before
damage occurs.
Some Yamaha products may have benches and / or accessory mounting
fixtures that are either supplied with the product or as optional accesso-
ries. Some of these items are designed to be dealer assembled or
installed. Please make sure that benches are stable and any optional fix-
tures (where applicable) are well secured BEFORE using.
Benches supplied by Yamaha are designed for seating only. No other
uses are recommended.
NOTICE:
Service charges incurred due to a lack of knowledge relating to how a
function or effect works (when the unit is operating as designed) are not
covered by the manufacturer’s warranty, and are therefore the owners
responsibility. Please study this manual carefully and consult your dealer
before requesting service.
ENVIRONMENTAL ISSUES:
Yamaha strives to produce products that are both user safe and environ-
mentally friendly. We sincerely believe that our products and the produc-
tion methods used to produce them, meet these goals. In keeping with
both the letter and the spirit of the law, we want you to be aware of the
following:
Battery Notice:
This product MAY contain a small non-rechargeable battery which (if
applicable) is soldered in place. The average life span of this type of bat-
tery is approximately five years. When replacement becomes necessary,
contact a qualified service representative to perform the replacement.
This product may also use “household” type batteries. Some of these
may be rechargeable. Make sure that the battery being charged is a
rechargeable type and that the charger is intended for the battery being
charged.
When installing batteries, never mix old batteries with new ones, and
never mix different types of batteries. Batteries MUST be installed cor-
rectly. Mismatches or incorrect installation may result in overheating and
battery case rupture.
Warning:
Do not attempt to disassemble, or incinerate any battery. Keep all batter-
ies away from children. Dispose of used batteries promptly and as regu-
lated by the laws in your area. Note: Check with any retailer of
household type batteries in your area for battery disposal information.
Disposal Notice:
Should this product become damaged beyond repair, or for some reason
its useful life is considered to be at an end, please observe all local,
state, and federal regulations that relate to the disposal of products that
contain lead, batteries, plastics, etc. If your dealer is unable to assist
you, please contact Yamaha directly.
NAME PLATE LOCATION:
The name plate is located on the bottom of the product. The model num-
ber, serial number, power requirements, etc., are located on this plate.
You should record the model number, serial number, and the date of pur-
chase in the spaces provided below and retain this manual as a perma-
nent record of your purchase.
Model
Serial No.
Purchase Date
PLEASE KEEP THIS MANUAL
92-BP (bottom)
This product contains a high intensity lamp that contains
a small amount of mercury. Disposal of this material may
be regulated due to environmental considerations.
For disposal information in the United States, refer to the
Electronic Industries Alliance web site:
www.eiae.org
(mercury)*This applies only to products distributed by
YAMAHA CORPORATION OF AMERICA.
MOXF6/MOXF8 Owner’s Manual
3
1. IMPORTANT NOTICE: DO NOT MODIFY THIS UNIT!
This product, when installed as indicated in the instructions con-
tained in this manual, meets FCC requirements. Modifications not
expressly approved by Yamaha may void your authority, granted by
the FCC, to use the product.
2. IMPORTANT: When connecting this product to accessories and/
or another product use only high quality shielded cables. Cable/s
supplied with this product MUST be used. Follow all installation
instructions. Failure to follow instructions could void your FCC
authorization to use this product in the USA.
3. NOTE: This product has been tested and found to comply with the
requirements listed in FCC Regulations, Part 15 for Class “B” digital
devices. Compliance with these requirements provides a reason-
able level of assurance that your use of this product in a residential
environment will not result in harmful interference with other elec-
tronic devices. This equipment generates/uses radio frequencies
and, if not installed and used according to the instructions found in
the users manual, may cause interference harmful to the operation
of other electronic devices. Compliance with FCC regulations does
* This applies only to products distributed by YAMAHA CORPORATION OF AMERICA.(class B)
not guarantee that interference will not occur in all installations. If
this product is found to be the source of interference, which can be
determined by turning the unit “OFF” and “ON”, please try to elimi-
nate the problem by using one of the following measures:
Relocate either this product or the device that is being affected by
the interference.
Utilize power outlets that are on different branch (circuit breaker or
fuse) circuits or install AC line filter/s.
In the case of radio or TV interference, relocate/reorient the
antenna. If the antenna lead-in is 300 ohm ribbon lead, change the
lead-in to co-axial type cable.
If these corrective measures do not produce satisfactory results,
please contact the local retailer authorized to distribute this type of
product. If you can not locate the appropriate retailer, please con-
tact Yamaha Corporation of America, Electronic Service Division,
6600 Orangethorpe Ave, Buena Park, CA90620
The above statements apply ONLY to those products distributed by
Yamaha Corporation of America or its subsidiaries.
FCC INFORMATION (U.S.A.)
(weee_eu_en_01)
Information for Users on Collection and Disposal of Old Equipment
This symbol on the products, packaging, and/or accompanying documents means that used electrical and electronic products
should not be mixed with general household waste.
For proper treatment, recovery and recycling of old products, please take them to applicable collection points, in accordance with
your national legislation and the Directives 2002/96/EC.
By disposing of these products correctly, you will help to save valuable resources and prevent any potential negative effects on
human health and the environment which could otherwise arise from inappropriate waste handling.
For more information about collection and recycling of old products, please contact your local municipality, your waste disposal
service or the point of sale where you purchased the items.
[For business users in the European Union]
If you wish to discard electrical and electronic equipment, please contact your dealer or supplier for further information.
[Information on Disposal in other Countries outside the European Union]
This symbol is only valid in the European Union. If you wish to discard these items, please contact your local authorities or dealer
and ask for the correct method of disposal.
(standby)
*This applies only to products distributed by
YAMAHA CORPORATION OF AMERICA.
COMPLIANCE INFORMATION STATEMENT
(DECLARATION OF CONFORMITY PROCEDURE)
Responsible Party :Yamaha Corporation of America
Address :6600 Orangethorpe Ave., Buena Park, Calif.
90620
Telephone :714-522-9011
Type of Equipment :MUSIC PRODUCTION SYNTHESIZER
Model Name :MOXF6, MOXF8
This device complies with Part 15 of the FCC Rules.
Operation is subject to the following two conditions:
1)this device may not cause harmful interference, and
2)this device must accept any interference received including
interference that may cause undesired operation.
See user manual instructions if interference to radio reception is
suspected.
(FCC DoC)
The model number, serial number, power requirements, etc., may be
found on or near the name plate, which is at the bottom of the unit.
You should note this serial number in the space provided below and
retain this manual as a permanent record of your purchase to aid
identification in the event of theft.
Model No.
Serial No.
(bottom_en_01)
OBSERVERA!
Apparaten kopplas inte ur växelströmskällan (nätet) så länge som
den ar ansluten till vägguttaget, även om själva apparaten har
stängts av.
ADVARSEL: Netspændingen til dette apparat er IKKE afbrudt,
sålænge netledningen sidder i en stikkontakt, som er tændt — også
selvom der er slukket på apparatets afbryder.
VAROITUS: Laitteen toisiopiiriin kytketty käyttökytkin ei irroita koko
laitetta verkosta.
4
MOXF6/MOXF8 Owner’s Manual
PRECAUTIONS
PLEASE READ CAREFULLY BEFORE PROCEEDING
Please keep this manual in a safe and handy place for future reference.
WARNING
Always follow the basic precautions listed below to avoid the possibility of serious injury or even death from electrical
shock, short-circuiting, damages, fire or other hazards. These precautions include, but are not limited to, the following:
• Do not place the power cord near heat sources such as heaters or
radiators. Also, do not excessively bend or otherwise damage the
cord, or place heavy objects on it.
• Only use the voltage specified as correct for the instrument. The
required voltage is printed on the name plate of the instrument.
• Use the specified adaptor (page 73) only. Using the wrong adaptor
can result in damage to the instrument or overheating.
• Check the electric plug periodically and remove any dirt or dust
which may have accumulated on it.
•This instrument contains no user-serviceable parts. Do not open the
instrument or attempt to disassemble or modify the internal
components in any way. If it should appear to be malfunctioning,
discontinue use immediately and have it inspected by qualified
Yamaha service personnel.
•Do not expose the instrument to rain, use it near water or in damp or
wet conditions, place on it any containers (such as vases, bottles or
glasses) containing liquids which might spill into any openings. If
any liquid such as water seeps into the instrument, turn off the
power immediately and unplug the power cord from the AC outlet.
Then have the instrument inspected by qualified Yamaha service
personnel.
• Never insert or remove an electric plug with wet hands.
•Do not put burning items, such as candles, on the unit. A burning
item may fall over and cause a fire.
•When one of the following problems occur, immediately turn off the
power switch and disconnect the electric plug from the outlet. (If you
are using batteries, remove all batteries from the instrument.) Then
have the device inspected by Yamaha service personnel.
- The power cord or plug becomes frayed or damaged.
- It emits unusual smells or smoke.
- Some object has been dropped into the instrument.
- There is a sudden loss of sound during use of the instrument.
Power supply/AC power adaptor
Do not open
Water warning
Fire warning
If you notice any abnormality
CAUTION
Always follow the basic precautions listed below to avoid the possibility of physical injury to you or others, or damage
to the instrument or other property. These precautions include, but are not limited to, the following:
•Do not connect the instrument to an electrical outlet using a
multiple-connector. Doing so can result in lower sound quality, or
possibly cause overheating in the outlet.
• When removing the electric plug from the instrument or an outlet,
always hold the plug itself and not the cord. Pulling by the cord can
damage it.
• Remove the electric plug from the outlet when the instrument is not
to be used for extended periods of time, or during electrical storms.
• Do not place the instrument in an unstable position where it might
accidentally fall over.
•B
efore moving the instrument, remove all connected cables, to prevent
damage to the cables or injury to anyone who might trip over them.
• When setting up the product, make sure that the AC outlet you are
using is easily accessible. If some trouble or malfunction occurs,
immediately turn off the power switch and disconnect the plug from
the outlet. Even when the power switch is turned off, electricity is
still flowing to the product at the minimum level. When you are not
using the product for a long time, make sure to unplug the power
cord from the wall AC outlet.
• Before connecting the instrument to other electronic components,
turn off the power for all components. Before turning the power on
or off for all components, set all volume levels to minimum.
• Be sure to set the volumes of all components at their minimum
levels and gradually raise the volume controls while playing the
instrument to set the desired listening level.
Power supply/AC power adaptor
Location
Connections
DMI-5 1/2
MOXF6/MOXF8 Owner’s Manual
5
• Never insert or drop paper, metallic, or other objects into the gaps
on the panel or keyboard. This could cause physical injury to you or
others, damage to the instrument or other property, or operational
failure.
• Do not rest your weight on, or place heavy objects on the
instrument, and do not use excessive force on the buttons, switches
or connectors.
•Do not use the instrument/device or headphones for a long period of
time at a high or uncomfortable volume level, since this can cause
permanent hearing loss. If you experience any hearing loss or
ringing in the ears, consult a physician.
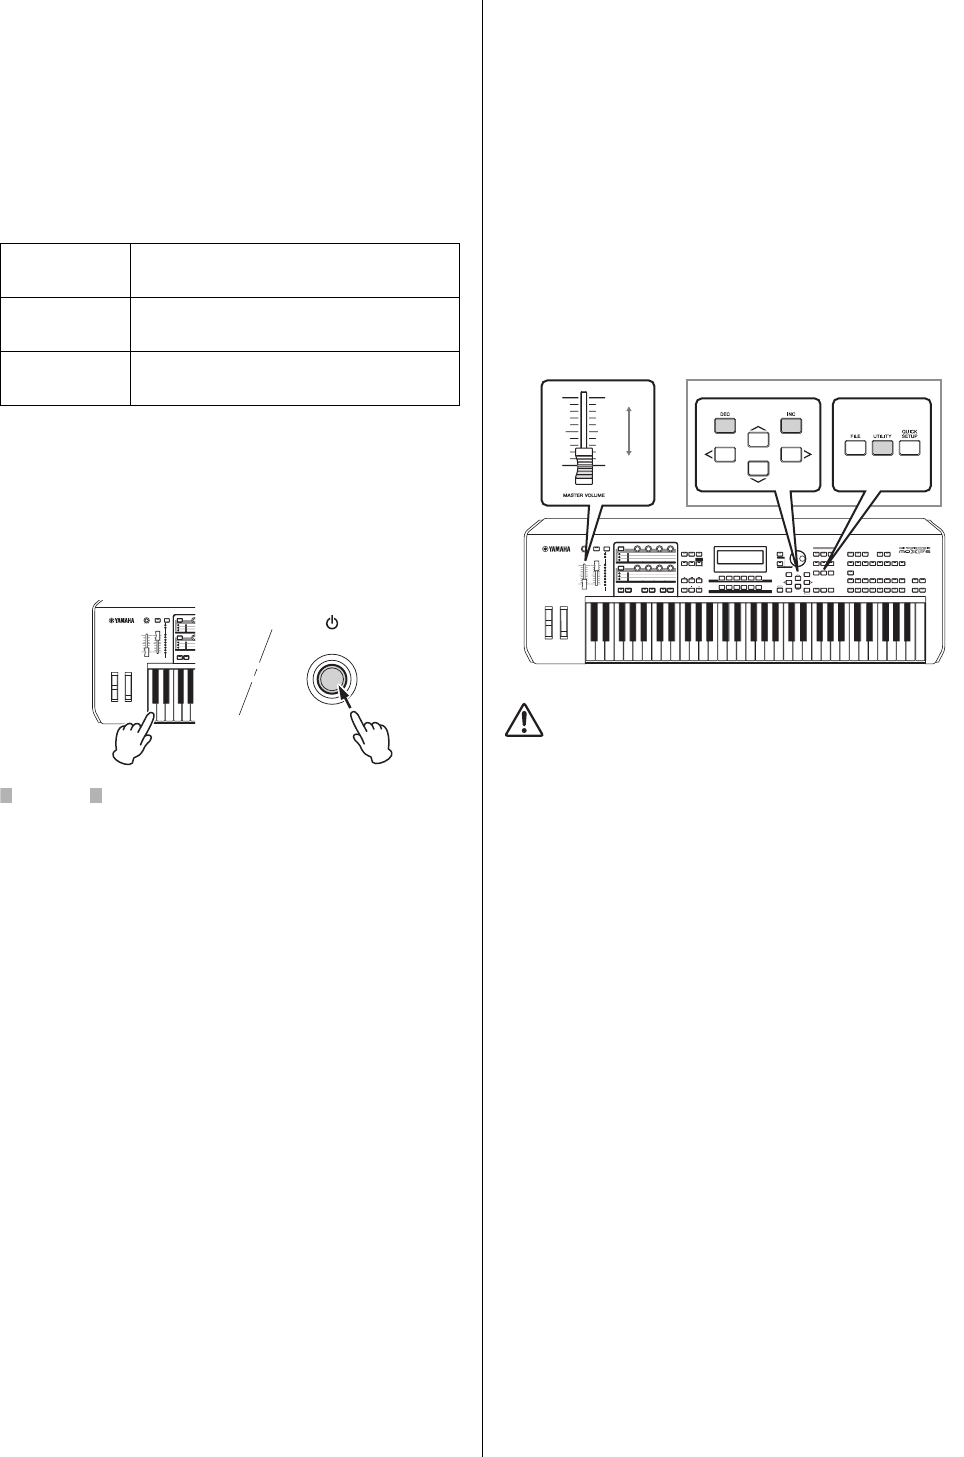
Always turn the power off when the instrument is not in use.
Even when the [] (Standby/On) switch is in standby status (display
is off), electricity is still flowing to the instrument at the minimum
level.
When you are not using the instrument for a long time, make sure you
unplug the power cord from the wall AC outlet.
Make sure to discard used batteries according to local regulations.
NOTICE
T
o avoid the possibility of malfunction/ damage to the product, damage to data, or damage to other property, follow the notices
below.
Handling and Maintenance
•Do not use the instrument in the vicinity of a TV, radio, stereo equipment, mobile phone, or other electric devices. Otherwise, the instrument, TV, or
radio may generate noise.
•Do not expose the instrument to excessive dust or vibrations, or extreme cold or heat (such as in direct sunlight, near a heater, or in a car during the
day) to prevent the possibility of panel disfiguration, damage to the internal components or unstable operation.
•Do not place vinyl, plastic or rubber objects on the instrument, since this might discolor the panel or keyboard.
•When cleaning the instrument, use a soft, dry cloth. Do not use paint thinners, solvents, cleaning fluids, or chemical-impregnated wiping cloths.
Saving data
•The data in the instrument’s Edit Buffer (memory location for edited data) will be lost when it is turned off. Save your important data to the user
memory, a USB flash memory device or external device such as a computer. Keep in mind that saved data may be lost due to malfunction or
incorrect operation.
•To protect against data loss due to media damage, we recommend that you save your important data onto two USB flash memory devices/external
media.
Information
About copyrights
•Copying of the commercially available musical data including but not limited to MIDI data and/or audio data is strictly prohibited except for your
personal use.
•This product incorporates and bundles computer programs and contents in which Yamaha owns copyrights or with respect to which it has license
to use others’ copyrights. Such copyrighted materials include, without limitation, all computer software, style files, MIDI files, WAVE data, musical
scores and sound recordings. Any unauthorized use of such programs and contents outside of personal use is not permitted under relevant laws.
Any violation of copyright has legal consequences. DON’T MAKE, DISTRIBUTE OR USE ILLEGAL COPIES.
About functions/data bundled with the instrument
•This device is capable of using various types/formats of music data by optimizing them to the proper format music data for use with the device in
advance. As a result, this device may not play them back precisely as their producers or composers originally intended.
About this manual
•The illustrations and LCD screens as shown in this manual are for instructional purposes only, and may appear somewhat different from those on
your instrument.
•Windows is a registered trademark of Microsoft
®
Corporation in the United States and other countries.
•Apple, Mac and Macintosh are trademarks of Apple Inc., registered in the U.S. and other countries.
•The company names and product names in this manual are the trademarks or registered trademarks of their respective companies.
Handling caution
Yamaha cannot be held responsible for damage caused by
improper use or modifications to the instrument, or data that is
lost or destroyed.
About the latest Firmware Version
Yamaha may from time to time update firmware of the product and the other associated software without notice for improvement. We
recommend that you check our web site for the latest releases and upgrade your firmware of the MOXF6/MOXF8 or the associated
software.
http://download.yamaha.com/
Note that the explanations in this Owner’s Manual apply to the version of firmware when this Owner’s Manual was produced. For details
about additional functions included in later releases, refer to the above website.
DMI-5 2/2
6
MOXF6/MOXF8 Owner’s Manual
A message from the MOXF6/MOXF8
Development Team
Thank you for purchasing the Yamaha MOXF6/MOXF8 Music Production Synthesizer.
We, as the development team, have designed this instrument
so that players of every genre and level can easily enjoy truly high-quality sounds and
advanced functions in creating and performing music.
SOUND
Extraordinarily high-quality sound for a variety of applications
The MOXF6/MOXF8 draws on the high-quality sound of the famed MOTIF XF, used extensively by artists worldwide,
and is equipped with a wide range of dynamic sounds for use in virtually any music application.
F
urthermore, in one of the most important advantages of the MOXF, an optional Flash Memory Expansion Board can be installed.
This feature was included in response to many and repeated requests from power users. Now, Sample (audio) data remains on
the board, even when the power is turned off—allowing you to instantly use Waveforms containing Samples when
you turn the power back on, without the need to load them from an external USB storage device.
FUNCTIONS
Instant, smooth translation from inspiration to final music composition
The MOXF6/MOXF8 features a powerful Performance Creator function which lets you combine your favorite Voice with
other Voices and drum parts, and perform with full rhythmic and chordal backing. You can also record your performances
as a Song or Pattern, simply by pressing the [REC] button from Performance mode—and then, after recording,
automatically move to the Song/Pattern mode for further editing, refining and completing the Song or Pattern.
This workflow is exceptionally smooth and transparent, and lets you create music quickly and easily as the inspiration hits.
Seamless music production with Cubase
The MOXF6/MOXF8 were developed giving maximum consideration to integration with the Cubase series DAW software made by
Steinberg. We’ve enhanced and strengthened the remote control function in connection with Cubase,
letting you easily and conveniently control optional parameters on Cubase with the AI KNOB,
or by using control templates compatible with various VST instruments to easily control multiple parameters and
complex operations on software synthesizers directly from your hardware synthesizer keyboard.
DESIGN
Stylish design and professional look
We also designed the stylish exterior to reflect the professional-level sounds and sophisticated features of the MOXF6/MOXF8,
making it an instrument you’ll love to play, and one you’ll feel proud in showing off onstage.
Moreover, its value as a live performance instrument is made even greater by its portability.
We also took particular care in designing the size and external appearance to make it easy to use,
even when combined in a computer music system.
MOXF6/MOXF8 Owner’s Manual
7
Accessories
•AC adaptor*
•USB cable
•Owner’s Manual (this book)
•Online Manual CD-ROM x 1 (Reference Manual, Synthesizer Parameter Manual, and Data List)
•CUBASE AI DOWNLOAD INFORMATION
* May not be included in your area. Please check with your Yamaha dealer.
Using the MOXF6/MOXF8 Manuals
Your MOXF6/MOXF8 synthesizer comes with four different reference guides—the Owner’s Manual (this book), the Reference
Manual, the Synthesizer Parameter Manual, and the Data List. While the Owner’s Manual is packaged together with the
synthesizer as a hardcopy booklet, this Reference Manual, Synthesizer Parameter Manual, and the Data List are provided as
PDF documents on the bundled CD-ROM.
•Owner’s Manual (this book)
Describes how to set up your MOXF6/MOXF8 and how to perform basic operations.
•Reference Manual (this PDF document)
Describes the internal design of your MOXF6/MOXF8 and the various parameters that can be adjusted and set. It also
describes how to use the instrument in specific applications and provides the following reference materials.
•Category lists for the Voices and Performances
•Setting examples of the Controller Destination
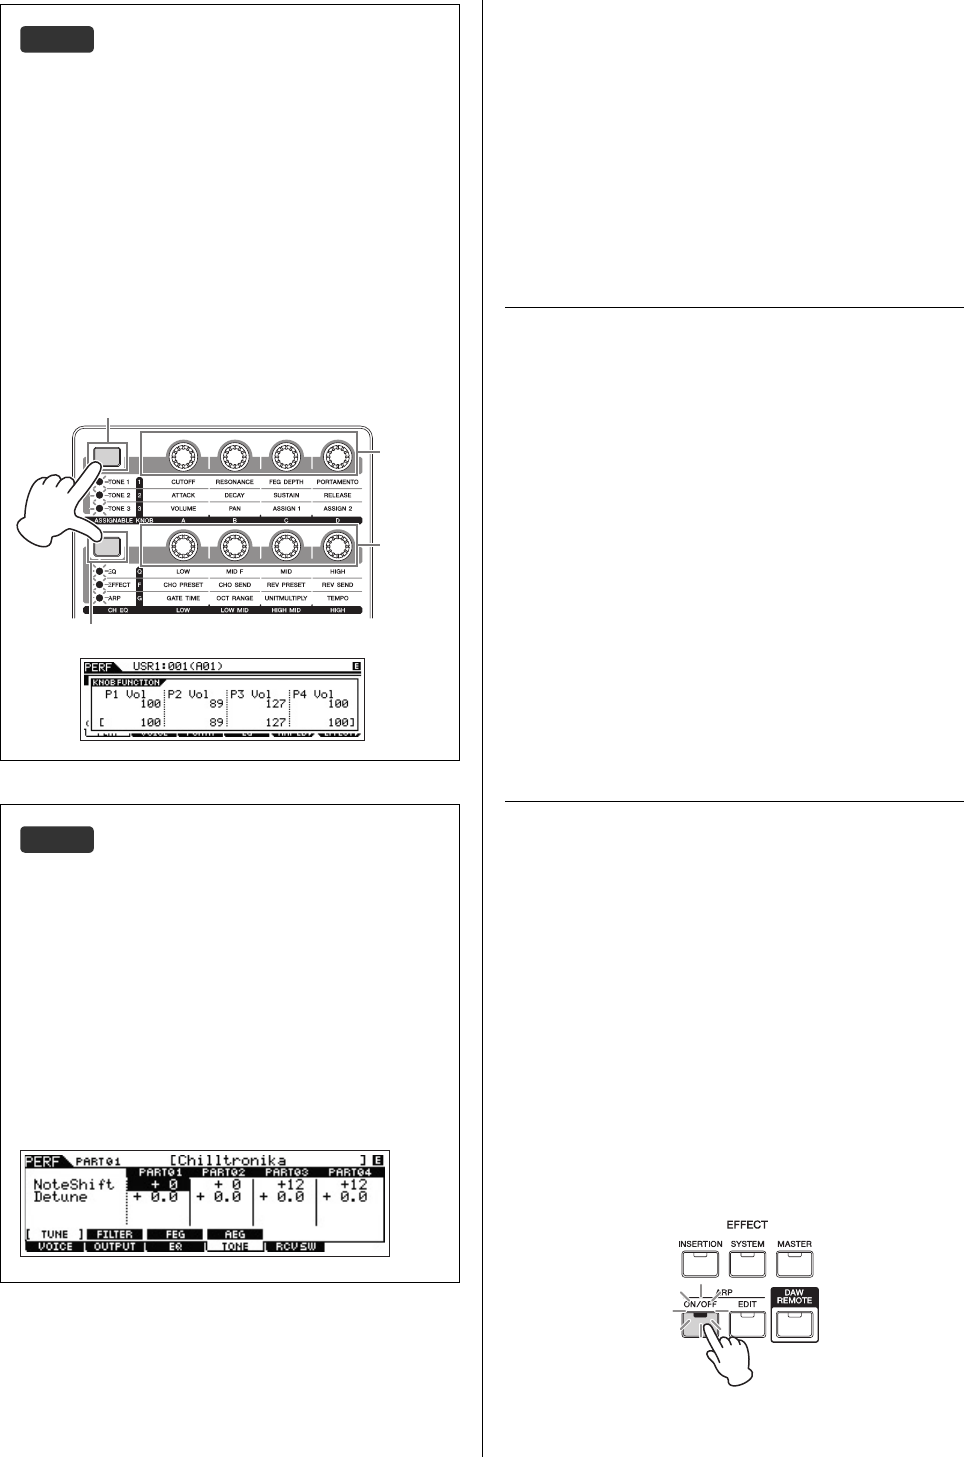
•Functions of Knobs 1 – 8 in Voice mode and Mixing mode
•Song playback types
•Song Track Loop—setting example
•Punch In/Out recording in Song mode
•Pattern playback types
•Pattern Loop recording
•Creating an Arpeggio
•Storing the Mixing settings as a Mixing Template
•Remote control assignments
•File/Folder selection in File mode
•Playing back SMF (Standard MIDI file) data from USB flash memory device
•Formatting a USB flash memory device
•Synthesizer Parameter Manual (PDF document)
This general, cross-product document explains the Voice parameters, effect types, effect parameters, and MIDI
messages that are used for all synthesizers incorporating the Yamaha AWM2 tone generators. Read the Owner’s
Manual and Reference Manual first and then use this parameter manual if necessary to learn more about parameters
and terms that relate to Yamaha synthesizers in general.
•Data List (PDF document)
Provides lists such as the Voice List, Waveform List, Performance List, Effect Type List, Arpeggio Type List, as well as
reference materials such as the MIDI Implementation Chart and Remote Control Function List.
How to use the PDF manuals
The Reference Manual, the Synthesizer Parameter Manual, and the Data List are provided as data documents in PDF format. These
PDF files can be viewed and read on a computer. When using Adobe
®
Reader
®
to view a PDF file, you can search for specific
words, print a specific page or link to open a desired section in the manual. The term search and link functions are especially
convenient methods of navigating through a PDF file, and we recommend that you use them. The latest version of Adobe Reader
can be downloaded from the following URL.
http://www.adobe.com/products/reader
8
MOXF6/MOXF8 Owner’s Manual
MOXF6/MOXF8 Main Features
MOTIF XF Sound Engine feature
The wide range of dynamic and authentic MOTIF XF waveforms (such as the realistic sounds of acoustic piano,
electric piano, synthesizer, strings, wind instruments, drums) are all included in this instrument. The sophisticated XA
(Expanded Articulation) function has also been included, providing greater performance flexibility and acoustic
realism. It allows you to more effectively recreate realistic sound and natural performance techniques—such as
legato and trills—and provides other unique modes for random and alternate sound changes as you play. Moreover,
the instrument features new Arpeggio types for Drum Voices, as well as the existing MOTIF XF Arpeggio types, plus
an extensive effect system—including VCM (Virtual Circuitry Modeling) Effects, Master Effect, and Master EQ. In a
wide variety of ways, the MOXF6/MOXF8 truly enhances your music performance and creation.
Easy-to-use user interface
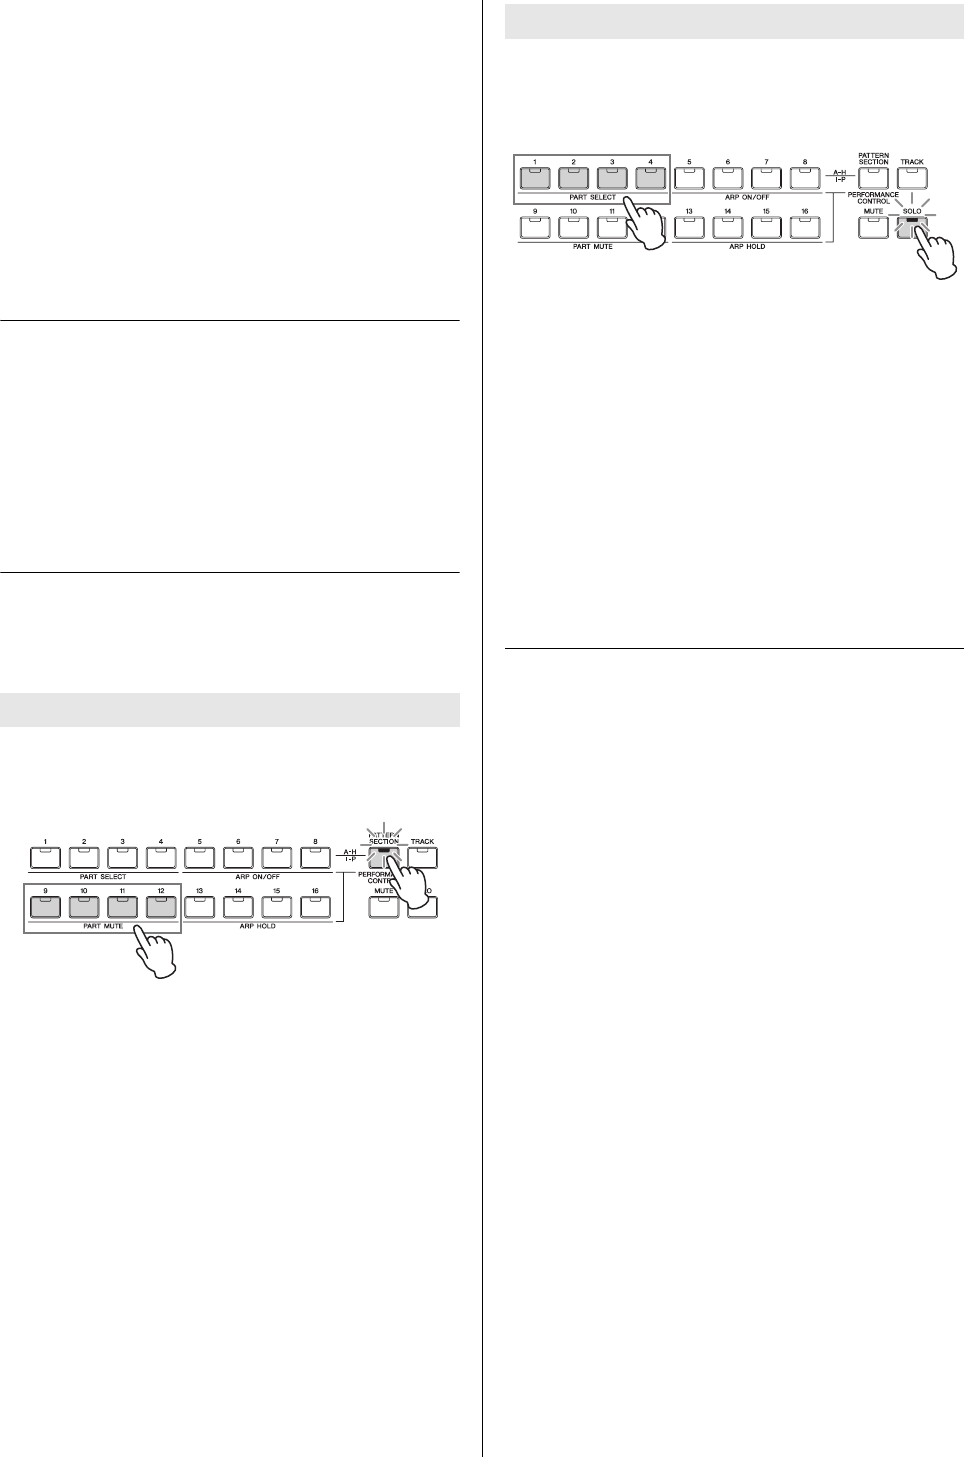
You can select a desired Voice or Performance directly by using the sixteen number buttons. You can also call up
desired Voices or Performances according to the instrument type by using the Category Search function. This
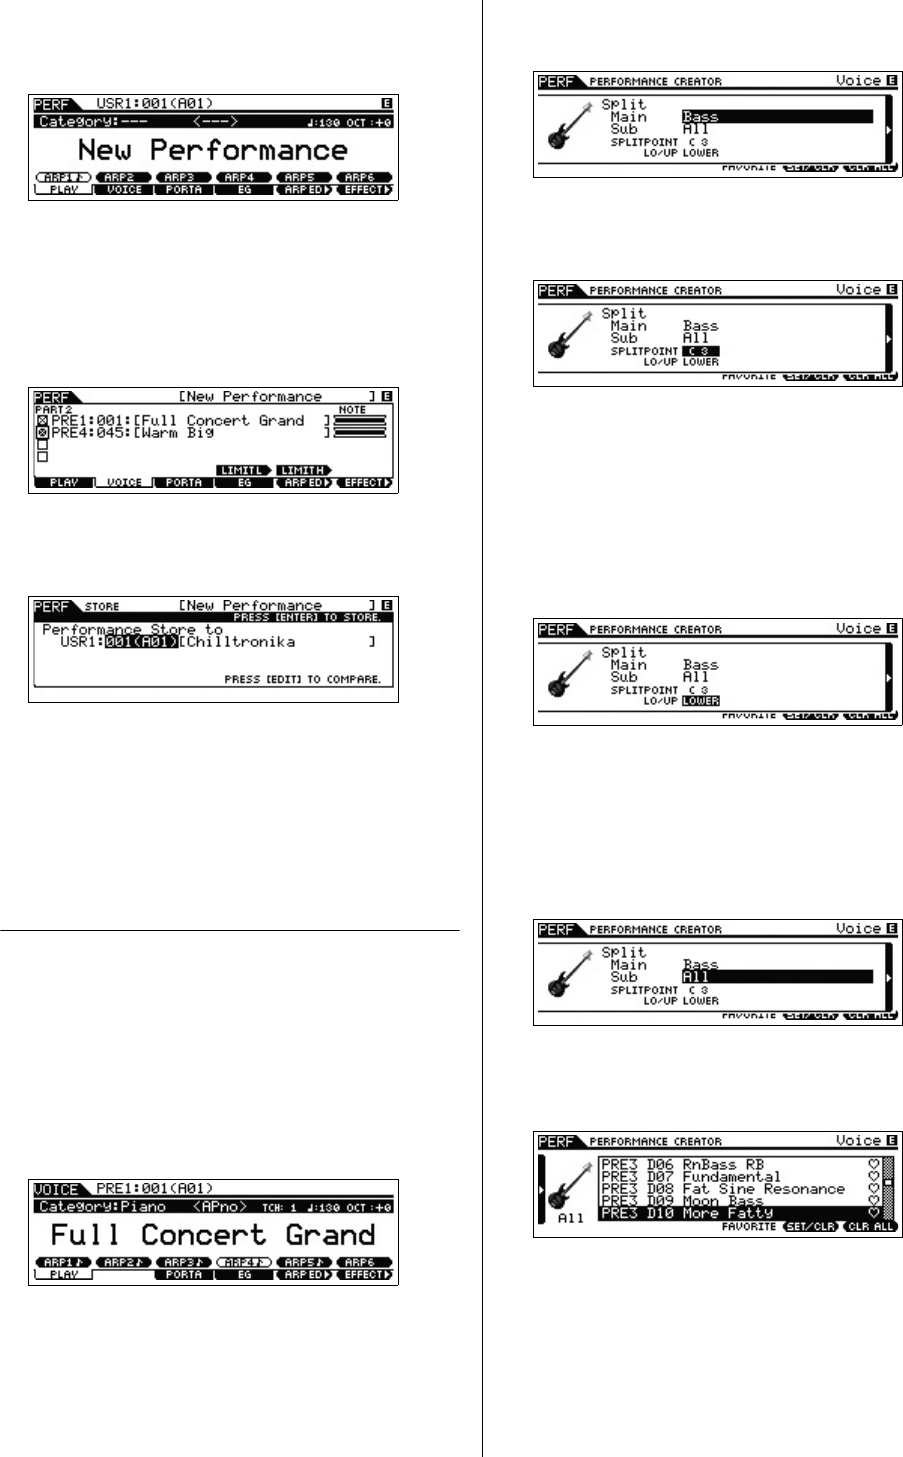
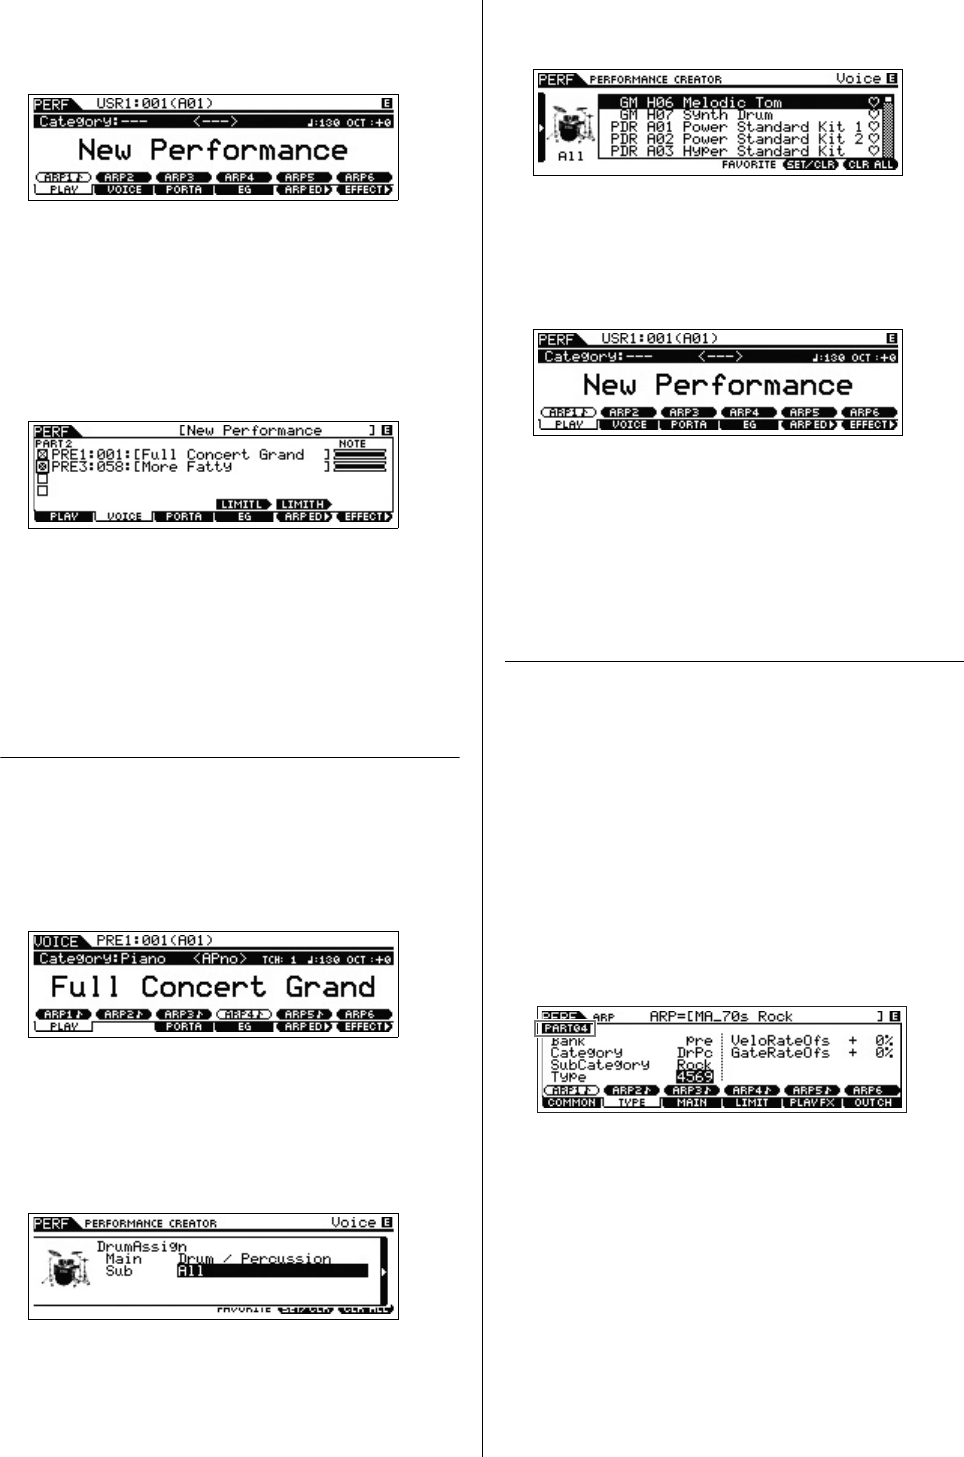
instrument also provides a powerful, easy-to-use Performance Creator function, which lets you quickly and smoothly
create fully realized music, whenever the inspiration strikes you. Use it to easily create new Performances by using
favorite Voices you’ve found in the Voice mode.
Comprehensive sequencer for creating Songs and Patterns
This instrument features a built-in sequencer which enables you to produce high-quality music, without the need of a
computer or any other devices. The sequencer features both Realtime recording, which records your performance
data as you play it, and Step recording, which is suitable for recording precise, mechanical phrases or other difficult-
to-execute passages. Moreover, you can record the Performance as a Song/Pattern simply by pressing the [REC]
button, and easily edit and refine your song to completion.
Optional Flash Memory Expansion Module
The MOXF provides the option of installing a Flash Memory Expansion Module (FL512M/FL1024M), allowing you to
internally store Waveforms that include your sampled audio sounds, and keep those Waveforms intact, even when
turning off the power.
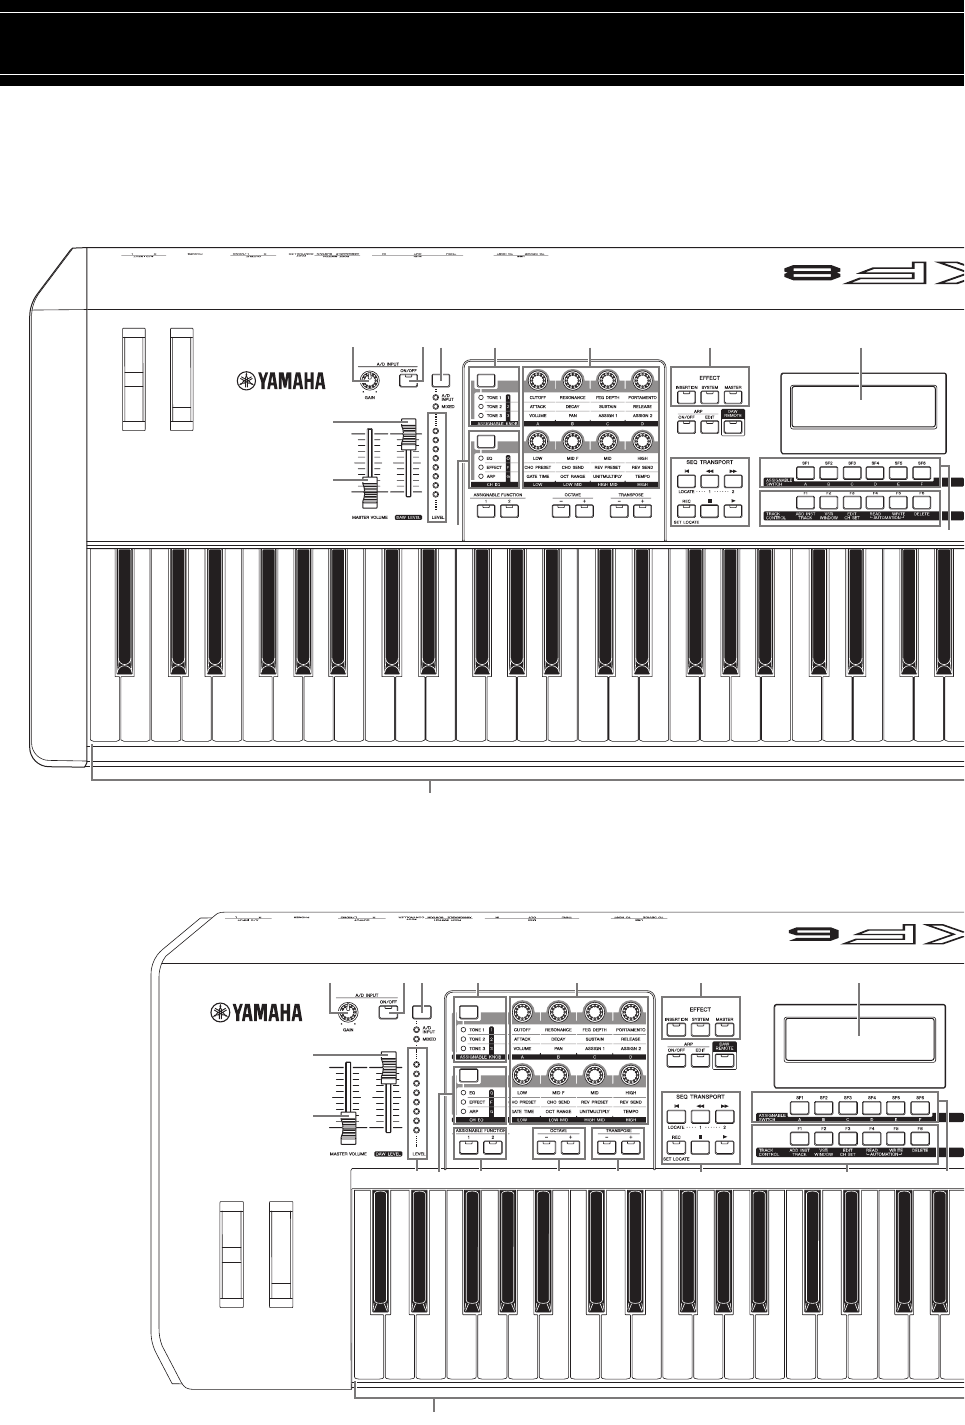
Responsive, expressive keyboard
The MOXF8 features an 88-key GHS keyboard. This feature provides authentic, realistic keyboard response—much
like the playing feel of an acoustic piano—with the lower keys being heavy in touch, the higher keys light, and all the
natural gradations in between. The MOXF6 features a newly developed, 61-key, semi-weighted keyboard. The
keyboard has been designed and adjusted so that you easily and expressively play the rich variety of sounds of the
instrument.
Master Keyboard function
This convenient function lets you use this instrument as a master keyboard controller (with independent Zones), and
for easily reconfiguring the instrument between Voice/Performance play and Song/Pattern play in live applications.
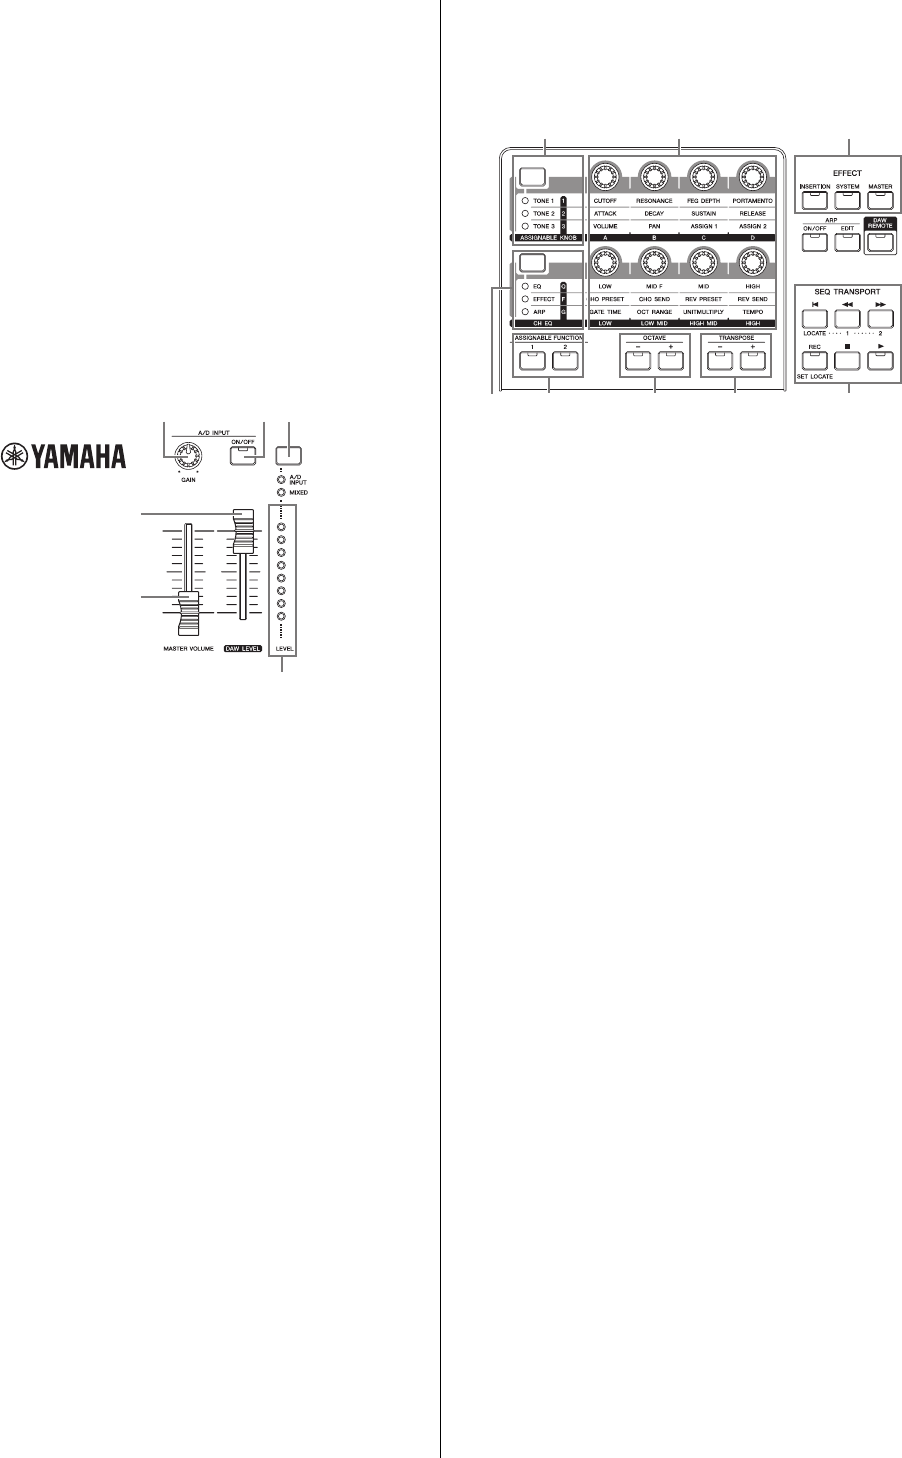
Stereo A/D INPUT [L]/[R] jacks
You can also connect various devices, such as microphone, guitar, or audio equipment, to the Input jacks of the
instrument, and have that audio input signal sound as a separate A/D input Part in the Voice/Performance/Song/
Pattern mode. Various parameters such as volume, pan, and effect can be set for this Part, and the sound is output
together with all the other Parts, letting you play and output the sound MOXF6/MOXF8 together with the external
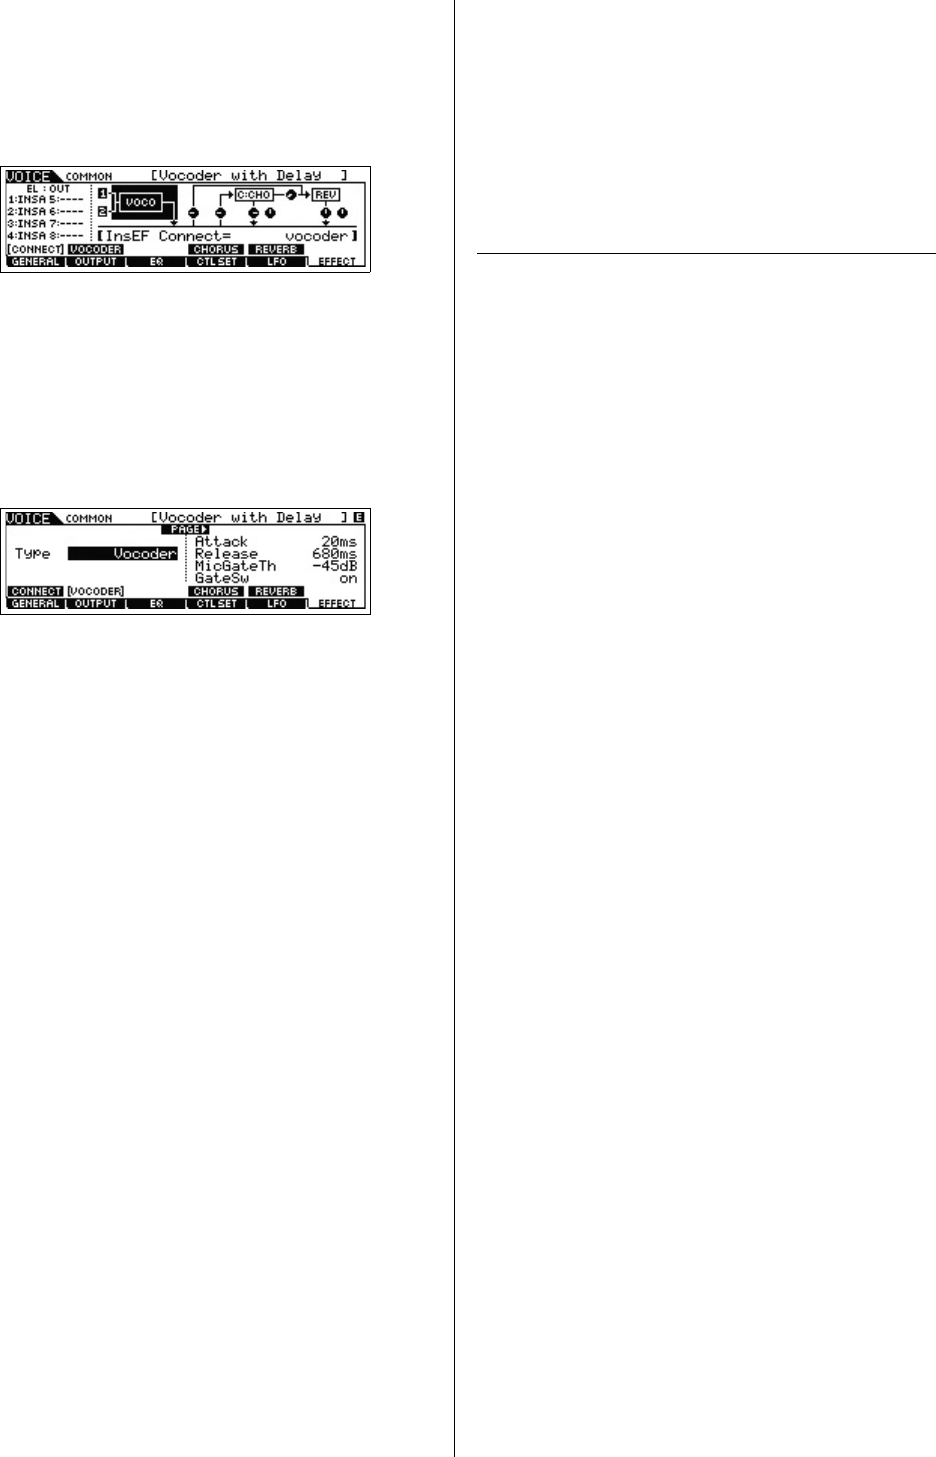
sound. Also, you can create a vocoder sound by using the input signal from these jacks and the internal effect.
USB Audio/MIDI interface
The USB terminal of the instrument serves as both a MIDI and audio interface—letting you record digitally the
instrument sound and the audio signal from the A/D INPUT [L]/[R] jacks to DAW software on a computer. You can also
output both the instrument sound and the DAW software input signal from the MOXF6/MOXF8.
Integration with Cubase
The MOXF is specially designed to work seamlessly with Cubase, Steinberg’s full-featured DAW software — giving
you a comprehensive, all-in-one music production system, in which hardware and software are fully integrated.
MOXF6/MOXF8 Owner’s Manual
9
A message from the MOXF6/MOXF8 Development Team...6
If necessary, change this parameter to the same number as
the MIDI Receive Channel of the external MIDI instrument. In
the Voice play or Performance play, pressing the [TRACK]
button (so that the lamp lights) can also change the MIDI
Transmit Channel of the MOXF6/MOXF8. When you wish to
sound
only the external tone generator, set the [Master Volume]
control
to “0” or set Local Control to “off” with the following
operation: [UTILITY] [F6] MIDI [SF2] SWITCH
“LocalCtrl” = “off.” For information on how to set the MIDI
Receive Channel of the external MIDI instrument, refer to the
owner’s manual of the external MIDI instrument.
When playing back a Song/Pattern or playing the keyboard
in the Song mode or Pattern mode:
Check the MIDI transmit channel for each Track with the
following operation: [SONG]/[PATTERN]
[F3] TRACK
[SF1]
CHANNEL “OUT CH.” If necessary, change this parameter
to the same number as the MIDI Receive Channel of the external
MIDI instrument. Alternately, you can set the output destination
(Internal or external MIDI tone generator) for each Track from
the following display: [SONG]/[PATTERN] [F3] TRACK
[SF2] OUT SW. In this case, you’ll need to set the external MIDI
tone generator to multi-timbral operation and set the MIDI
Receive Channel for each part. For details, see the owner’s
manual of the external MIDI tone generator. Alternately, you can
have your keyboard performance split and assigned to
different MIDI channels by using the Zone settings in the Master
mode (page 57).
MOXF6/MOXF8 Owner’s Manual
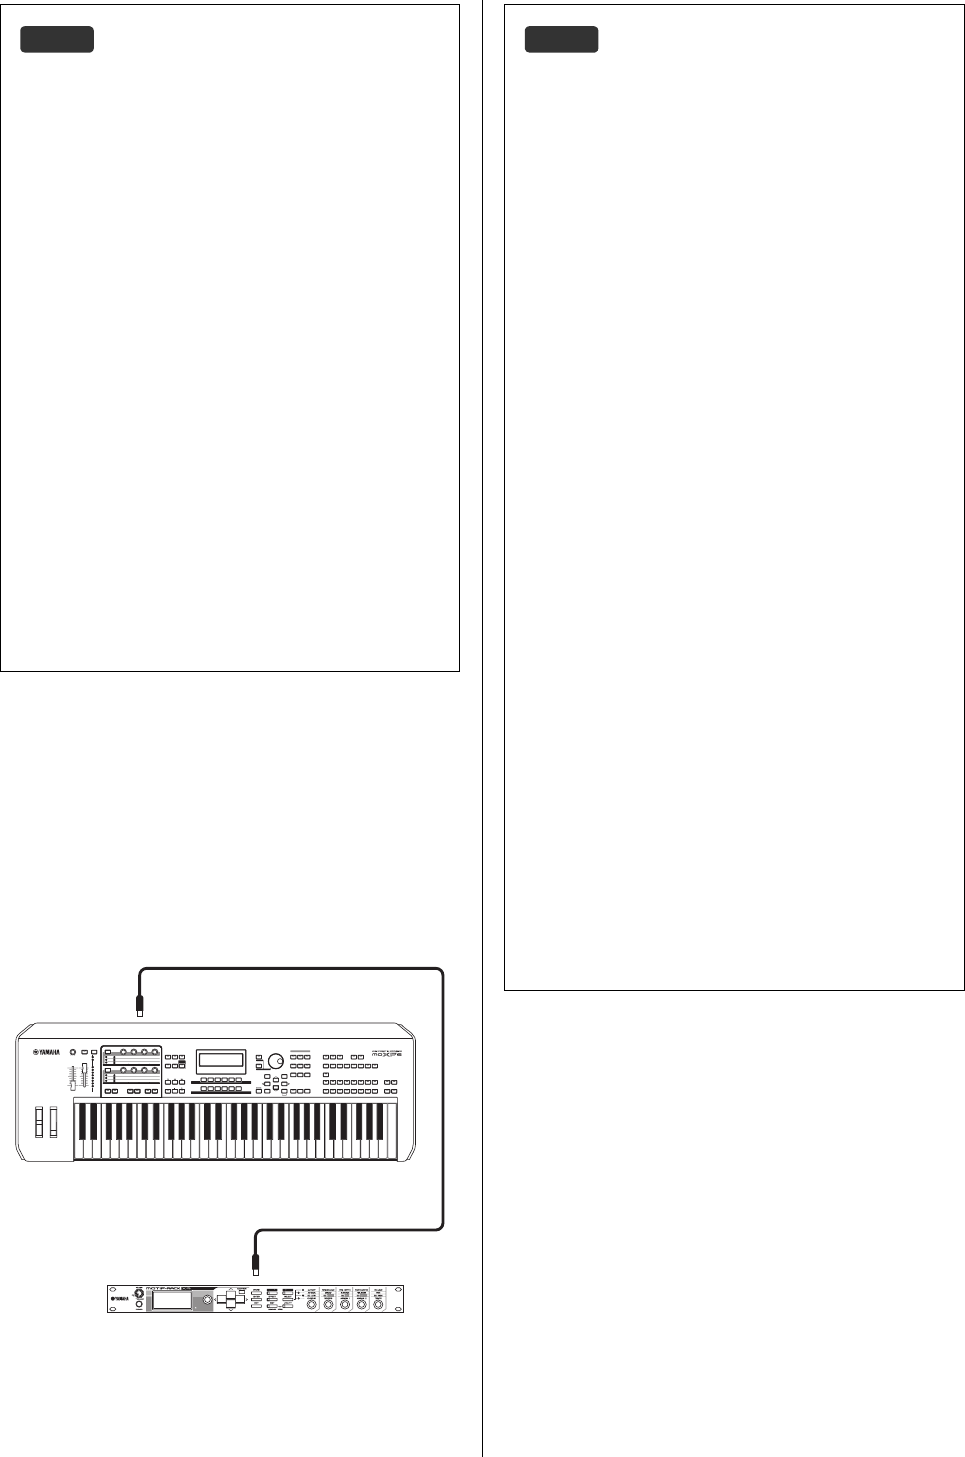
Quick Guide
53
Using a Connected
Computer
By connecting the MOXF6/MOXF8 to your computer via
USB, you can use DAW software on the computer to create
your own original songs.
NOTEThe acronym DAW (digital audio workstation) refers to music
software for recording, editing and mixing audio and MIDI data.
The main DAW applications are Cubase, Logic Pro, SONAR and
Digital Performer. Though all of these can be effectively used
with the MOXF6/MOXF8, we recommend using Cubase when
creating songs together with the instrument.
By connecting this instrument to a computer, you can take
advantage of the following functions and applications.
•External tone generator for DAW software and MIDI
keyboard
•Remote Controller of the DAW software
•Editing parameters from the computer (MOXF6/MOXF8
Editor)
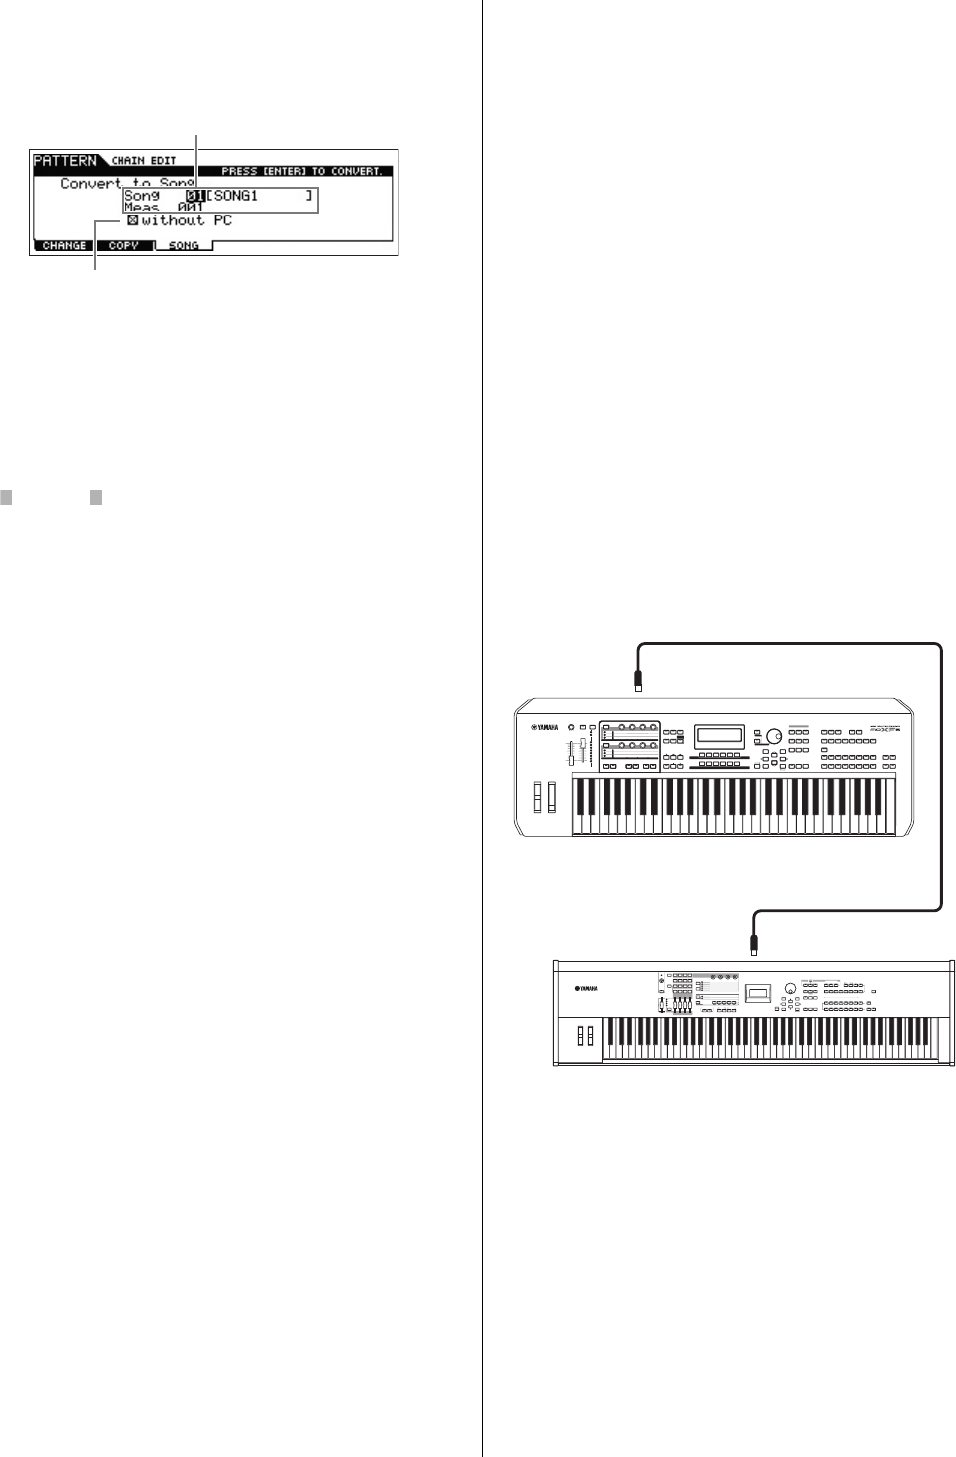
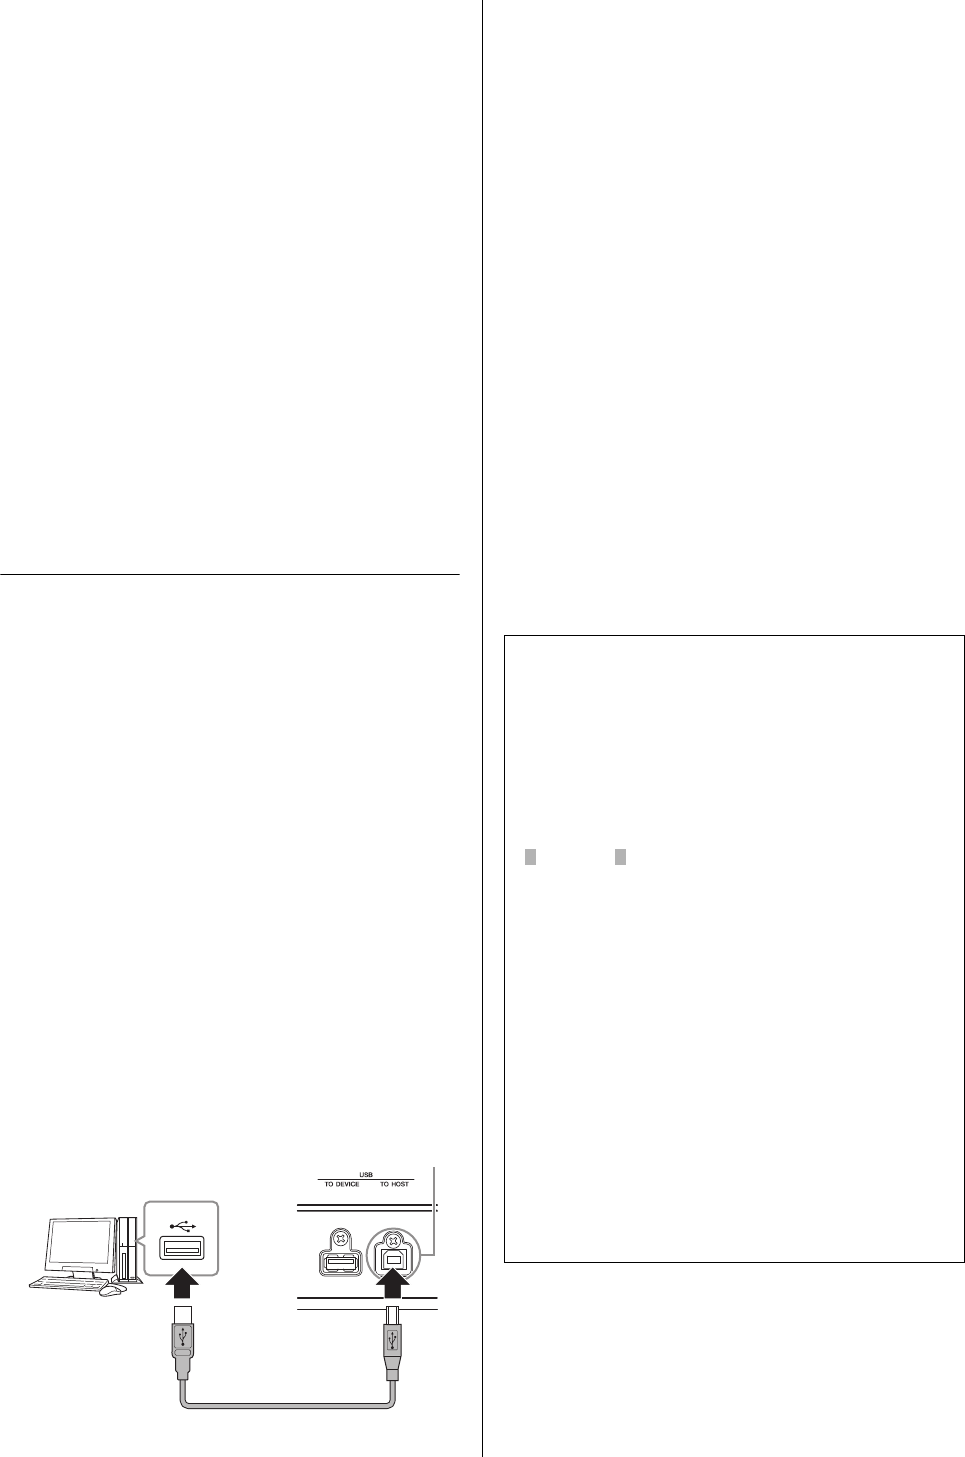
Connecting to a computer
A USB cable and the Yamaha Steinberg USB Driver are
necessary to connect the MOXF6/MOXF8 to the computer.
Follow the instructions below. Note that both audio data and
MIDI data can be transmitted through a USB cable.
1Download the latest Yamaha Steinberg USB Driver
from our website.
After clicking the Download button, extract the compressed
file.
http://download.yamaha.com/
NOTE
Information on system requirements is also available at the
above web site.
NOTEThe Yamaha Steinberg USB Driver may be revised and
updated without prior notice. Make sure to check and
download the latest version from the above site.
2Install the Yamaha Steinberg USB Driver to the
computer.
For instructions on installing, refer to the online Installation
Guide included in the downloaded file package. When
connecting this instrument to a computer, connect the USB
cable to the USB TO HOST of this instrument and the USB
terminal of the computer as shown below.
3Make sure that the USB [TO HOST] terminal of this
instrument is enabled.
Press the [UTILITY] button to call up the Utility mode, then
press the [F6] MIDI button followed by the [SF4] OTHER
button to call up the OTHER display. Set the “MIDI IN/OUT”
parameter to “USB.”
4Set the input and output settings for audio data
and MIDI data as desired to suit your personal
preferences.
These settings can be set in the [F5] USB I/O display and
[F6] MIDI display of the Utility mode. Setting the parameters
related to the Audio data and MIDI data by using the Quick
Setup lets you instantly reconfigure the MOXF6/MOXF8 for
different computer/sequencer related applications by calling
up specially programmed presets. In this case, press the
[QUICK SETUP] button and then set the “SETUP.” After
making the settings, press the [ENTER] button to apply them
to the MOXF6/MOXF8.
NOTE
For details on the parameters set by the Quick Setup
function, see the “Reference Manual” PDF document.
5Press the [STORE] button to store the settings to
internal memory.
USB terminal
USB [TO HOST] terminal
Rear panel
USB cable
Precautions when using the USB [TO HOST]
terminal
When connecting the computer to the USB [TO HOST] terminal,
make sure to observe the following points. Failing to do so risks
freezing the computer and corrupting or losing the data. If the
computer or the instrument freezes, restart the application
software or the computer OS, or turn the power to the instrument
off then on again.
NOTICE
•Use an AB type USB cable. USB 3.0 cables cannot be used.
•Before connecting the computer to the USB [TO HOST]
terminal, exit from any power-saving mode of the computer
(such as suspend, sleep, standby).
•Before turning on the power to the instrument, connect the
computer to the USB [TO HOST] terminal.
•Execute the following before turning the power to the
instrument on/off or plugging/unplugging the USB cable to/
from the USB [TO HOST] terminal.
•Quit any open application software on the computer.
•Make sure that data is not being transmitted from the
instrument. (Data is transmitted only by playing notes on
the keyboard or playing back a song.)
•While the computer is connected to the instrument, you
should wait for six seconds or more between these
operations: (1) when turning the power of the instrument off
then on again, or (2) when alternately connecting/
disconnecting the USB cable.
MOXF6/MOXF8 Owner’s Manual
Quick Guide
54
Creating a Song with a computer
By using the MOXF6/MOXF8 with the DAW software on the
computer connected to the MOXF6/MOXF8, you can take
advantage of the following functions and applications.
•MIDI recording and Audio recording of the MOXF6/MOXF8
performance to the DAW software on the computer.
•Playing back a song of the DAW software by using the
MOXF6/MOXF8 tone generator
This section contains an overview on how to use DAW software
on the computer with the MOXF6/MOXF8 after connecting.
Setting up the MOXF6/MOXF8
1If Quick Setup 1 is set to the default settings,
simultaneously hold the [QUICK SETUP] button
and press the Group [A] button.
This should be selected when recording your keyboard
performance to the DAW software on the computer. If Quick
Setup 1 is not set to the default settings, set as follows.
Audio settings
Use this setting when recording the signals from the tone
generator and the A/D INPUT [L]/[R] jacks separately to
DAW software, and playing the signals from the OUTPUT [L/
MONO]/[R] jacks directly.
MIDI settings
Use this setting when recording this instrument’s performance
(not including Arpeggio data) to the DAW software.
NOTE
For more details regarding these parameters, see the
“Reference Manual” PDF document.
2
Press the [STORE] button to store the settings to
internal memory.
3Press the desired mode button for playing, and
then select the desired program for recording.
MIDI channels and MIDI ports
MIDI data is assigned to one of sixteen channels, and this
synthesizer is capable of simultaneously playing sixteen
separate Parts, via the sixteen MIDI channels. However, the
sixteen-channel limit can be overcome by using separate MIDI
“ports,” each supporting sixteen channels. While a single MIDI
cable is equipped to handle data over up to sixteen channels
simultaneously, a USB connection is capable of handling far
more—thanks to the use of MIDI ports. Each MIDI port can
handle sixteen channels, and the USB connection allows up to
eight ports, letting you use up to 128 channels (8 ports x 16
channels) on your computer. When connecting this instrument
to a computer using a USB cable, the MIDI ports are defined
as follows:
Port 1
The tone generator block in this instrument can recognize and
use only this port. When playing the MOXF6/MOXF8 as a tone
generator from the external MIDI instrument or computer, you
should set the MIDI Port to 1 on the connected MIDI device or
computer.
Port 2
This port is used to control the DAW software on the computer
from the MOXF6/MOXF8 by using the Remote Control feature.
Port 3
This port is used as the MIDI Thru Port. The MIDI data received
over Port 3 via the USB [TO HOST] terminal will be re-transmitted
to an external MIDI device via the MIDI [OUT] terminal. The
MIDI data received over Port 3 via the MIDI [IN] terminal will be
re-transmitted to an external device (computer, etc.) via the USB
[TO HOST] terminal.
Port 4
This port is used only for data communication of the MOXF6/
MOXF8 Editor. No other software or device can use this port.
Port 5
This port is used only for data communication of the MOXF6/
MOXF8 Remote Editor.
No other software or device can use this port. When using a
USB connection, make sure to match the MIDI transmit port
and the MIDI receive port as well as the MIDI transmit channel
and the MIDI receive channel. Make sure to set the MIDI port
of the external device connected to this instrument according
to the above information.
Audio channels
The audio signals of the MOXF6/MOXF8 can be output to the
USB [TO HOST] terminal and the OUTPUT [L/MONO]/[R]
jacks. When connecting to a computer, use the USB [TO
HOST] terminal. In this case, up to four audio channels (USB 1
– USB 4) are available. The output-to-channel assignments are
made in the [F5] USB I/O display of the Utility mode.
The audio signals of the MOXF6/MOXF8 can be input from the
USB [TO HOST] terminal and the A/D INPUT [L]/[R] jacks. Up
to two channels of audio can be input to the USB [TO HOST]
terminal. Set the output level by using the [DAW LEVEL] slider
on the MOXF6/MOXF8. The signals are output to the OUTPUT
[L/MONO]/[R] jack. Also, up to two audio channels can be
input
to the A/D INPUT [L]/[R] jacks. The signal is sent to the A/D
input
part of the MOXF6/MOXF8. For more details, see the
“Reference Manual” PDF document.
Recording your performance on the
MOXF6/MOXF8 to computer
ModeDirect Monitor SW
A/D In & PartPart
2StereoReconon
Local Controloff
MIDI Syncauto
Clock Outoff
ARPOUTSwall off
KBDTxCh1
TrIntSwall on
TrExtSwall on
MOXF6/MOXF8 Owner’s Manual
Quick Guide
55
4In the Performance/Song/Pattern mode, set the
output channel of the Audio signal for each part.
When the output setting for the audio signal (“Mode”
parameter) is set to “2StereoRec” in Step 1, you can change
the audio output channel for each part. In the Performance
mode, this parameter can be set in the [F4] USB I/O display
of Common Edit. In the Song/Pattern mode, this parameter
can be set in the [F4] USB I/O display of Mixing Common
Edit.
NOTE
In the Voice mode, the audio output channel is fixed to USB
3/4.
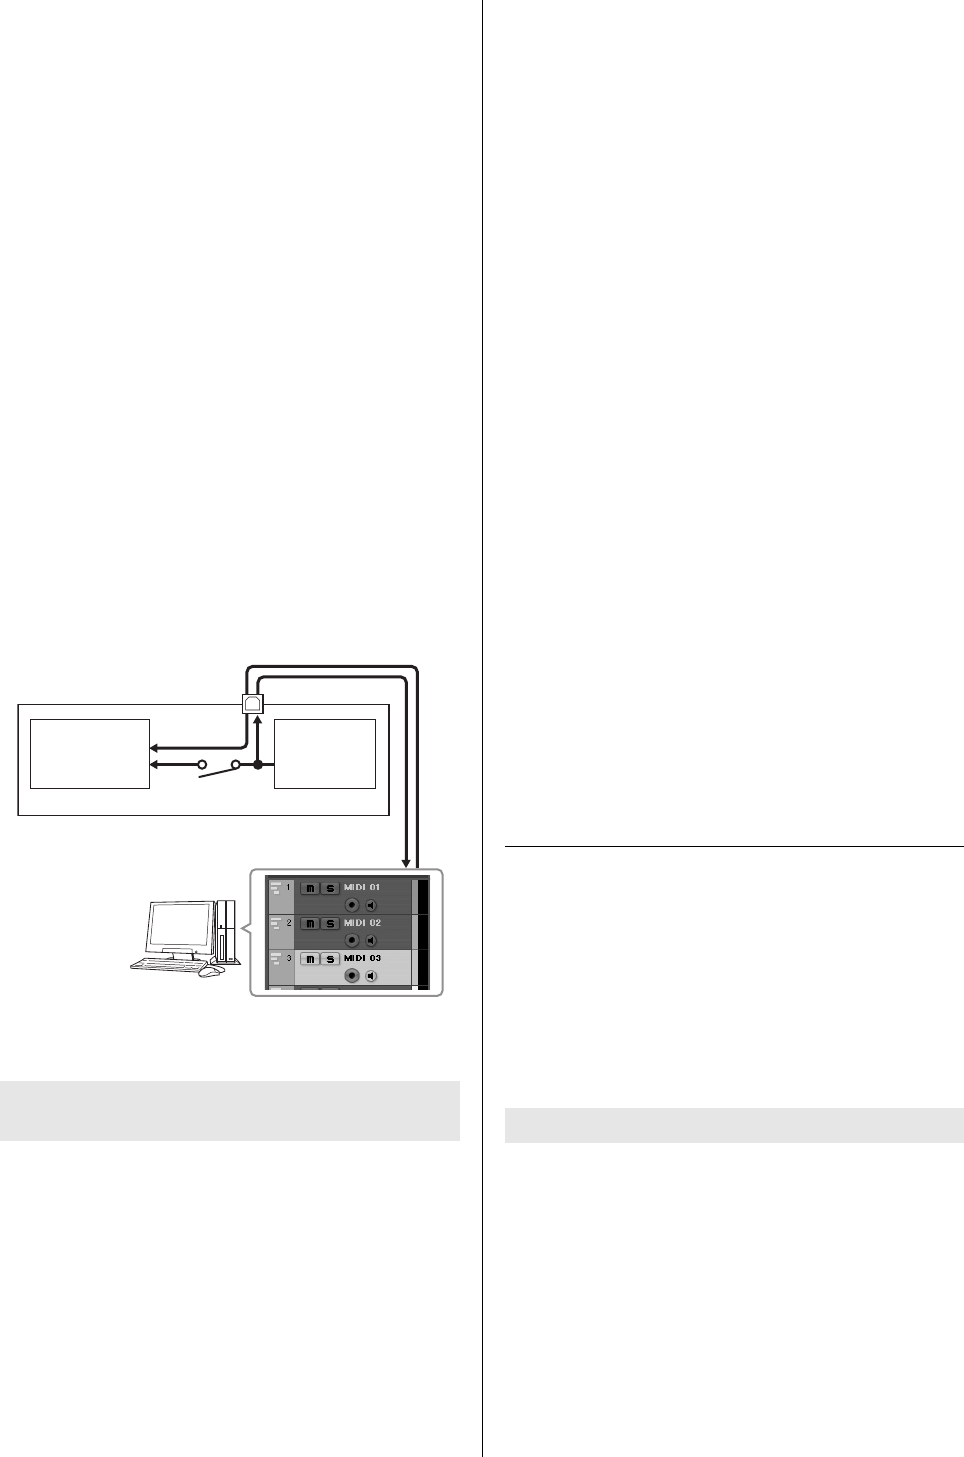
Setting up the DAW software on the computer
1Set MIDI Thru to “on” on the DAW software.
By setting MIDI Thru to “on,” the MIDI data generated by
playing the keyboard and transmitted to the computer will be
returned back to the MOXF6/MOXF8. As shown in the
example below, the MIDI data transmitted from the MOXF6/
MOXF8 then recorded to the computer via MIDI channel 1
will be returned
back from the computer to the
MOXF6/
MOXF8
via MIDI channel
3 according to the setting of the
recording Track. As a result, the tone generator of the
MOXF6/MOXF8 will sound the MIDI data generated by
playing the keyboard as MIDI data from channel 3.
The instructions below show how to use this instrument as a
MIDI tone generator. In this case, actual MIDI sequence data
is transmitted from DAW software on the computer, allowing
you to avoid using software synths and save processing
power on your computer.
Setting up the MOXF6/MOXF8
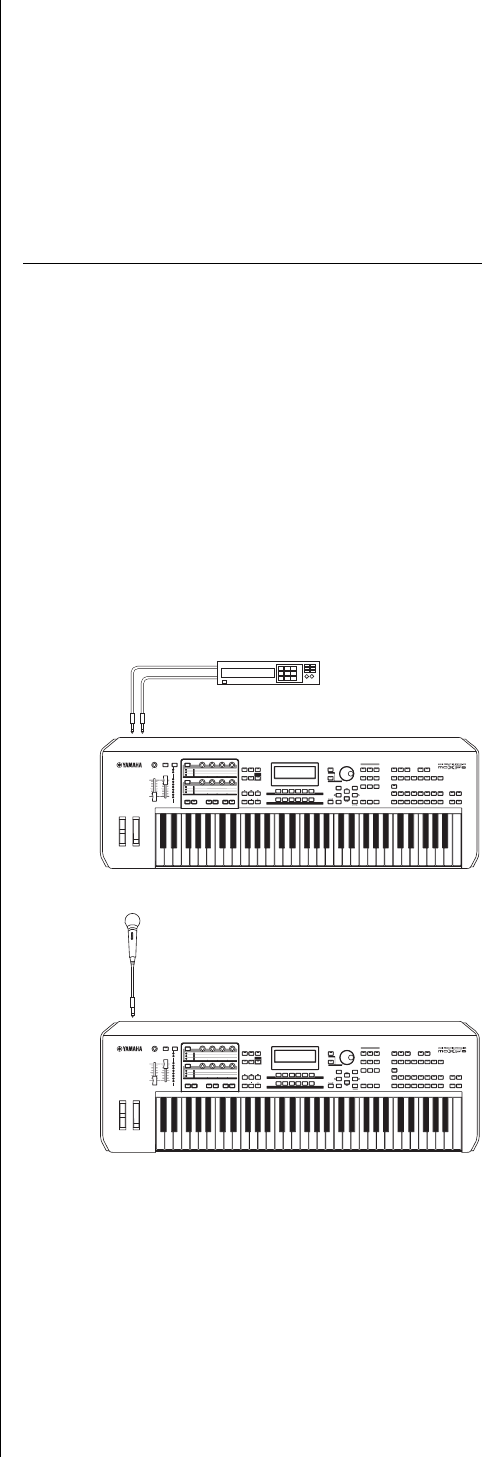
1Press the [SONG] or [PATTERN] button to enter the
Song mode or Pattern mode.
2Select the Song or Pattern to be edited.
3Press the [MIXING] button to call up the Mixing
display.
4Set up the Mixing for parts 1 – 16 as necessary.
From the Mixing display, you can select Voices and set
various parameters such as pan, volume, balance between
the Chorus/Reverb and dry sound, Insertion effect on/off and
Arpeggio on/off.
Setting up the DAW software on the computer
1Set the MIDI output port of the Tracks for playing
the MOXF6/MOXF8 to Port 1 of the “MOXF6/
MOXF8”
2Enter the MIDI data to each Track of the DAW
software on the computer.
The tone generator settings of the part corresponding to the
MIDI Track will be set in the Mixing mode on the MOXF6/
MOXF8.
NOTE
When using Cubase as the DAW, you can create an original
Mixing setup of the MOXF6/MOXF8 from the MOXF6/MOXF8
Editor on your computer. The created Mixing setup can be
saved as a Cubase Project file for future recall.
Remote-controlling the software
from the MOXF6/MOXF8 (Remote
mode)
The MOXF6/MOXF8 features a highly convenient Remote
mode which lets you control the DAW software and software
synthesizer on your computer via the panel operations of the
MOXF6/MOXF8. For example, you can start/stop playback of
the DAW software on the computer by using the Function
buttons and control the song position on the DAW software
by using the [DATA] dial, [INC] and [DEC] buttons instead of
using the mouse or computer keyboard.
Up to 50 Control Templates of VST Instruments can be stored
to internal memory of this instrument. With these, you can use
the MOXF6/MOXF8 to control various software synthesizers.
Use the MOXF6/MOXF8 Remote Editor for editing the Control
Template.
NOTETo use the MOXF6/MOXF8 Remote Editor, you need to install the
MOXF6/MOXF8 Remote Tools. The MOXF6/MOXF8 Remote Tools
consists of two components: MOXF6/MOXF8 Remote Editor and
MOXF6/MOXF8 Extension, which enables you to use the MOXF6/
MOXF8 along with Cubase series.
Song playback from a computer using the
MOXF6/MOXF8 as a tone generator
USB TO HOST terminal
Tone generator
block
(recognizing MIDI
Channel 3 data)
Keyboard
(output via
MIDI
Channel 1)
Local Control = off
MOXF6/MOXF8
OUT
CH3
IN
CH1
Computer
(Cubase, etc.)
MIDI Thru = on
Remote-controlling the software synthesizer
MOXF6/MOXF8 Owner’s Manual
Quick Guide
56
The DAW applications Cubase, Logic Pro, SONAR and Digital
Performer can be controlled via the Remote Control mode of
the MOXF6/MOXF8.
Before you can use the Remote Control function, you’ll need
to follow the setup instructions below.
NOTEBefore making the setup of DAW Remote, make sure to properly
install the Yamaha Steinberg USB Driver and the MOXF6/MOXF8
Remote Tools.
Setting up the MOXF6/MOXF8
1Connect this instrument to the computer via a USB
cable (page 53).
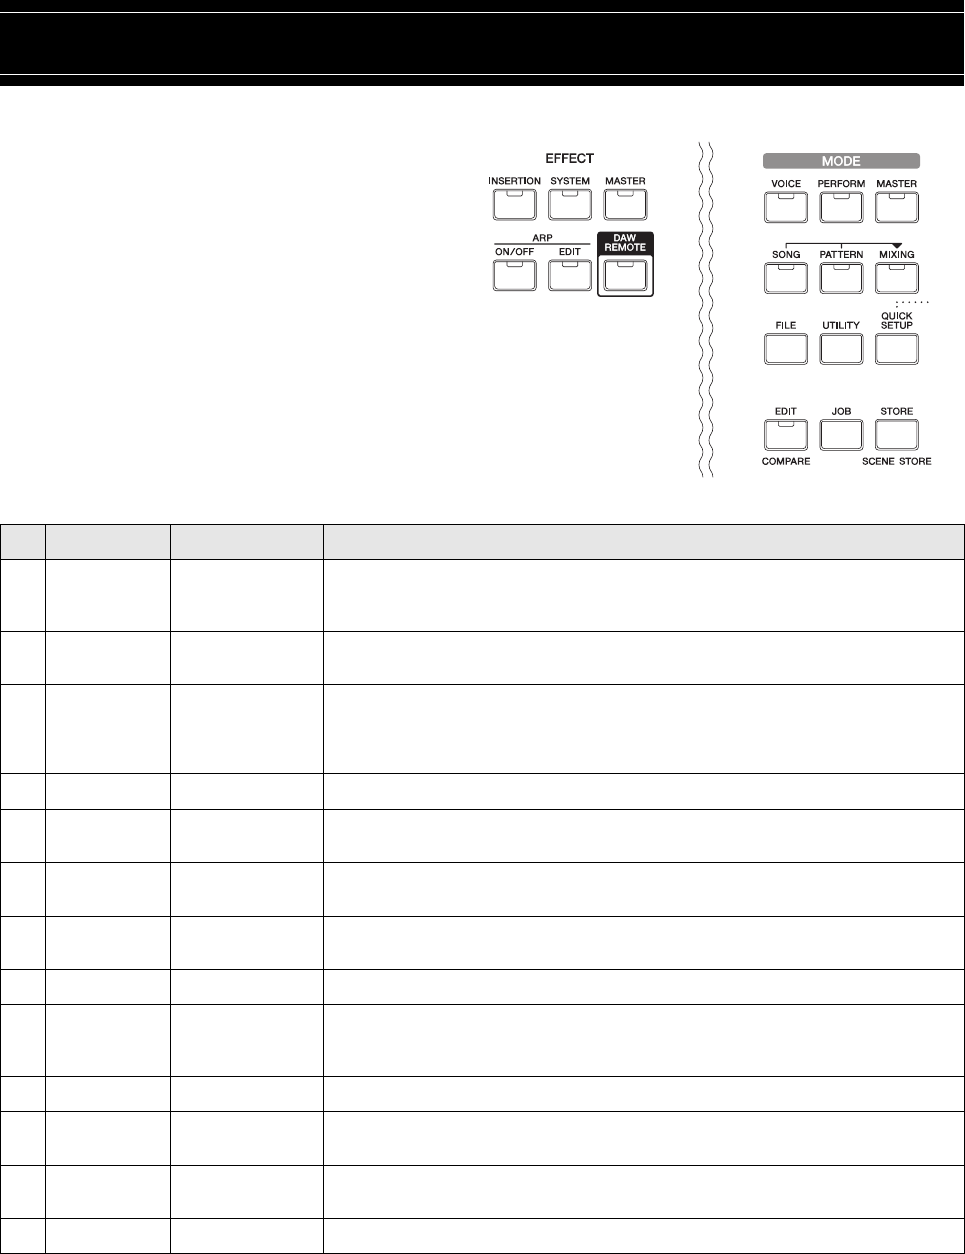
2Press the [DAW REMOTE] button to enter the
Remote mode.
3Press the [UTILITY] button to call up the REMOTE
display of the Utility mode. Then set the “DAW
Select” to the desired DAW software.
4Press the [STORE] button to store the settings to
internal memory.
5Start the DAW software on the connected
computer.
Setting up the DAW software on the computer
This section explains how to set up after starting each
application.
NOTEWhen the cable between the MOXF6/MOXF8 and the Windows
computer is disconnected or the MOXF6/MOXF8 is turned off
accidentally, the DAW will not recognize the MOXF6/MOXF8
again even if you connect the cable again or turn the MOXF6/
MOXF8 on. If this occurs, exit the DAW software, then restart it
after setting up the MOXF6/MOXF8 and making sure the
connection is secure.
JCubase
The settings will be completed by installing MOXF6/MOXF8
Remote Tools.
JSONAR
1Pull down the [Options] menu and select [MIDI Devices]
to call up the “MIDI Devices” window.
2Add “Yamaha MOXF6/MOXF8-2” to the Input Device,
then add “Yamaha MOXF6/MOXF8-2” to the Output
Device.
3Pull down the [Options] menu and select [Control
Surfaces] to call up the Control Surface window.
4Click the [+] button, select “Mackie Control,” then set the
Input Port to “Yamaha
MOXF6/MOXF8
-2” and set the
Output
Port to “Yamaha MOXF6/MOXF8-2.”
JDigital Performer
1In the Audio/MIDI setup of a Mac computer, connect Port
2 of the interface of the MOXF6/MOXF8 to Port 2 of the
tone generator. When there is only one Port for the tone
generator, add the new Port, then connect it to the
interface.
2
Pull down the [Setup] menu and select [ControlSurface
Setup]
to call up the Control Surface window.
3Click the [+] button.
4Select “Mackie Control” in the Driver section.
5In the box for setting “Unit” and “MIDI,” select “Mackie
Control” in the “Unit” section and select “MOXF6/MOXF8
New Port 2” in the “MIDI” section.
JLogic Pro
1Select the [Preference] menu [Control Surfaces]
[Settings] to call up the Settings window.
2Select the [New] menu [Install].
3Select “Mackie Control” in the model list, then add it as a
control surface.
MOXF6/MOXF8 Remote Tools can be downloaded from the
following Yamaha web site. For details on operating the
MOXF6/MOXF8 Remote Editor, see the PDF manual supplied
with the MOXF6/MOXF8 Remote Editor.
http://download.yamaha.com/
Remote-controlling the DAW software
For the most recent information on DAW software that can be
controlled from the MOXF6/MOXF8, see the following URL:
http://www.yamahasynth.com/
MOXF6/MOXF8 Owner’s Manual
Quick Guide
57
4Set the MIDI Output Port to “Yamaha MOXF6/MOXF8
Port2.”
5Set the MIDI Input Port to “Yamaha MOXF6/MOXF8
Port2.”
NOTEMackie Control is the trademark of Mackie Designs, Inc.
Using the MOXF6/MOXF8 Editor
The MOXF6/MOXF8 Editor lets you edit Voice and Mixing
setups from your computer, giving you even greater editing
convenience. Furthermore, the data edited on the MOXF6/
MOXF8 is always synchronized with the data on the
computer (MOXF6/MOXF8 Editor) and vice versa. This
provides a smooth, seamless interface, making it exceptionally
easy to create and edit data.
Using the MOXF6/MOXF8 Editor
Using the MOXF6/MOXF8 Editor VST in Cubase
The MOXF6/MOXF8 Editor VST works as a VST3 plug-in
software in Cubase. In this case, you can launch the MOXF6/
MOXF8 Editor via the same operations as that of any other
VST Instrument.
Using the MOXF6/MOXF8 Editor separately
The MOXF6/MOXF8 Editor can also be used as a stand-
alone application.
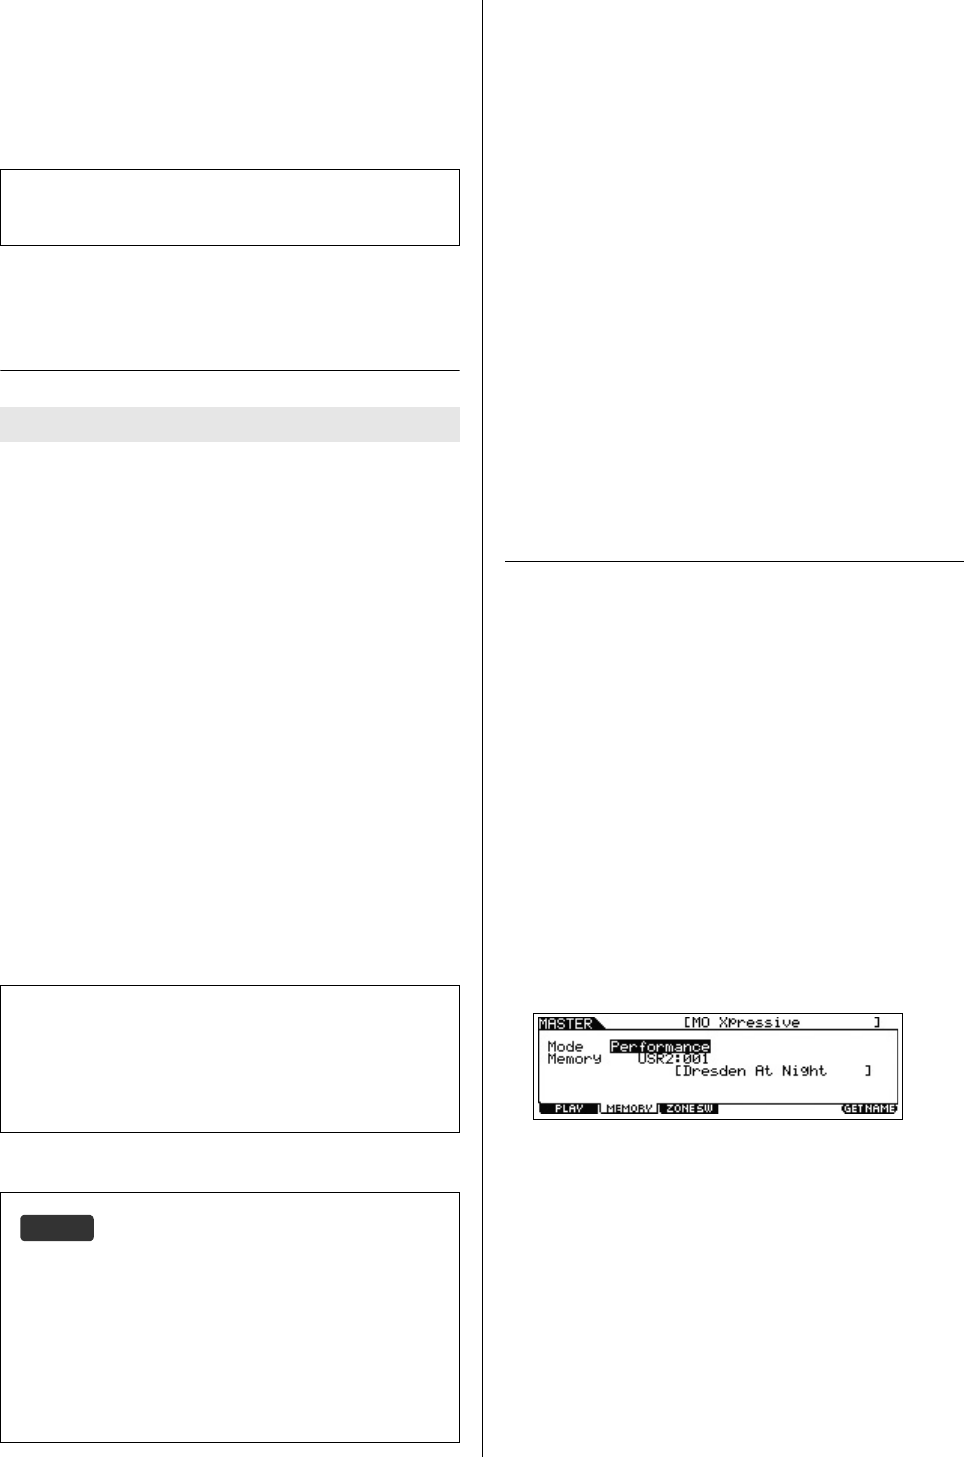
Using as a Master Keyboard
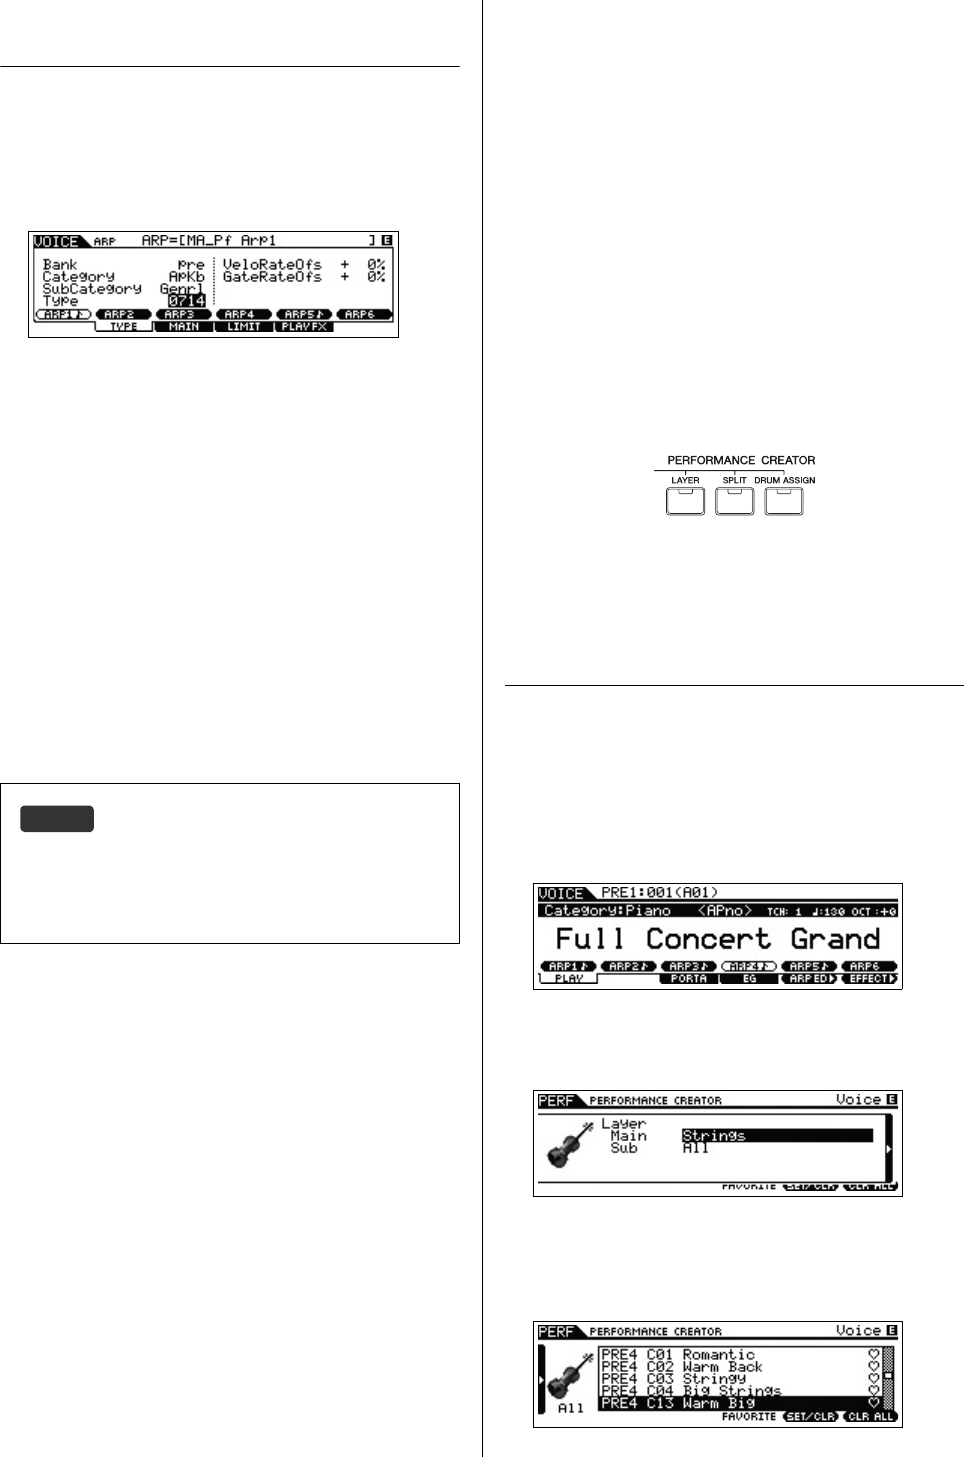
The Master mode lets you:
ICreate and store up to 128 programs, each containing a
Voice, a Performance, a Song, or a Pattern, and each of
which can be instantly called up for use.
IAssign up to four separate Zones in each Master program
for use as a master keyboard.
You can use the Master mode to memorize the settings you
use most often including the information on which mode is
used, and call up these settings instantly anytime you need
them with a single button press. Furthermore, you can
memorize the settings for controlling an external MIDI device
by the Master, allowing you to change and control the
connected external MIDI tone generator in sequence while
performing live.
Registering the Edited Voice/
Performance/Song/Pattern
The Master mode is ideal for live performance situations
since it lets you instantly switch among needed Voices,
Songs, Patterns and Performances without having to change
modes. One convenient way of using the Master mode is to
save your needed programs (Voices, Performances, etc.) to
Masters in number order, according to the songs you intend
to perform. Follow the instructions below to store programs.
1Press the [MASTER] button to enter the Master
mode.
2Select a Master to be edited.
The Master Play display appears.
3Press the [F2] MEMORY button.
The MEMORY display appears.
4At the “Mode” parameter and “Memory”
parameter, select the desired mode and program.
5Press the [STORE] button to store the set the
Master program in the store display.
For details about the button operations and functions, see the
“Reference Manual” PDF document.
About the MOXF6/MOXF8 Editor
The MOXF6/MOXF8 Editor can be downloaded from the
following URL:
http://download.yamaha.com/
For instructions on using the MOXF6/MOXF8 Editor, refer to the
respective PDF manuals included with the software.
HINT
Integration between MOXF6/MOXF8 and Cubase
When producing music by using the MOXF6/MOXF8 together
with Cubase, the MOXF6/MOXF8 Extension contained in the
MOXF6/MOXF8 Remote Tools provides useful and convenient
functions. For example, the necessary settings for connection
will be made automatically. For more details, including the
latest information, see the following URL.
http://www.yamahasynth.com/
MOXF6/MOXF8 Owner’s Manual
Quick Guide
58
Making settings for use as a master
keyboard
It is a good idea to memorize master keyboard functions to
the Master when using external multiple MIDI tone generators.
Simply by selecting a different Master, you can change the
programs in your connected external MIDI tone generators.
Here's how to do it:
1Press the [MASTER] button to enter the Master
mode.
2Select a Master to be edited.
3Press the [F3] ZONE SW button.
The ZONE SW display appears.
4Set “ZoneSwitch” to “on.”
NOTEWhen the “ZoneKnob” is set to “on,” the Zone Edit settings
are assigned to Knobs 1 – 8. If you want to assign the
settings in the memorized mode to Knobs 1 – 8 yourself, set
“ZoneKnob” to “off.“
5Press the [EDIT] button, and then press the
Number [1] button.
This calls up the Master Edit displays for Zone 1.
6Set the parameters for Zone 1 in the [F1] – [F5]
displays.
7Use the Number [2] – [4] buttons to set the
parameters for other Zones as well as Zone 1.
8After setting all the desired parameters, press the
[STORE] button to store your settings as a Master
program.
After completing these settings, assign a name to the Master
in the [F1] Name display of the Master Common Edit. After
naming, press the [STORE] button to store the Master.
For more information on the parameters which are edited in
the Master mode, see the “Reference Manual” PDF document.
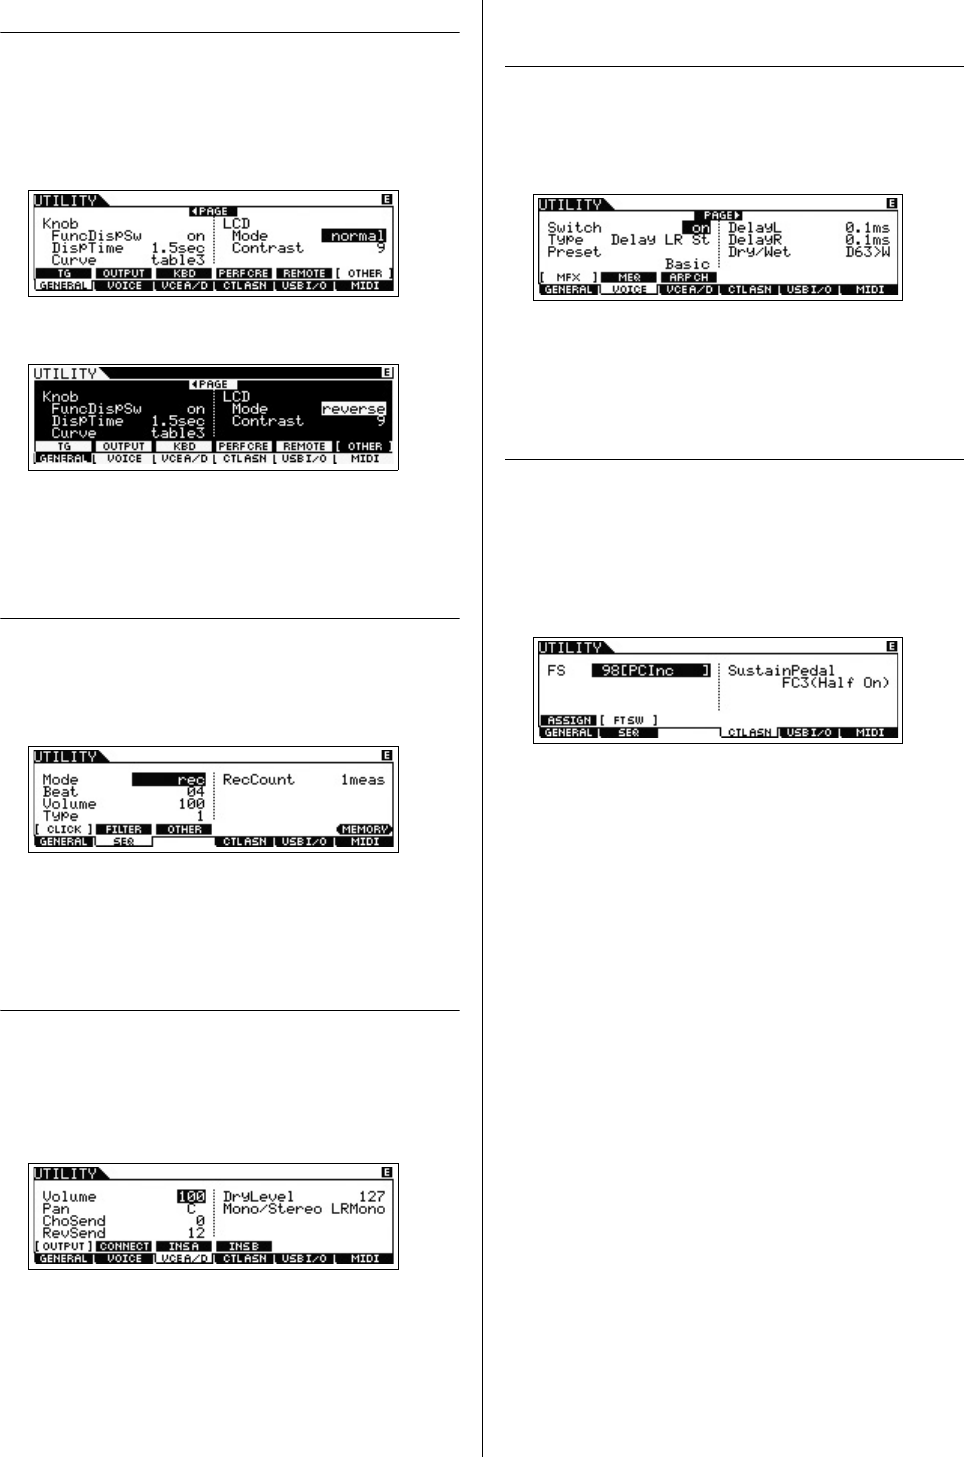
Making Global System
Settings (Utility Mode)
In the Utility mode, you can set parameters that apply to the
entire system of this instrument. To enter the Utility mode,
press the [UTILITY] button. Pressing the [EXIT] button returns
to the original display.
This section describes some useful functions in the Utility
mode.
Setting the default mode when
turning the power on
[F1] GENERAL [SF6] OTHER Cursor [>] button
“PowerOnMode”
Determines which mode is automatically called up when
turning the power on.
When this is set to “STORE+ENTER,” the display in which
you specify the mode (Voice/Performance/Master/Song/
Pattern) and the Program number will automatically be
called up when the power is turned on.
To specify a display, call it up normally, then press the
[STORE] button and the [ENTER] button simultaneously.
MOXF6/MOXF8 Owner’s Manual
Quick Guide
59
Reversing the LCD status
[F1] GENERAL [SF6] OTHER Cursor [<] button
“LCD Mode”
This parameter determines the LCD status.
You can use the Master mode to memorize the settings you
use most often.
Click (metronome) settings
[F2] SEQ [SF1] CLICK
Determines the tempo, volume and output destination of the
click (metronome).
Effect settings applied to the signal
input from the A/D INPUT jack
[F3] VCE A/D
Determines the settings for the effects applied to the
incoming audio signal from the A/D INPUT [L]/[R] jacks in
the Voice mode.
Master Effect/Master EQ settings
in the Voice mode
[F2] VOICE [SF1] MFX, [SF2] MEQ
Determines how much of the Effect and EQ processing is
applied to the master output.
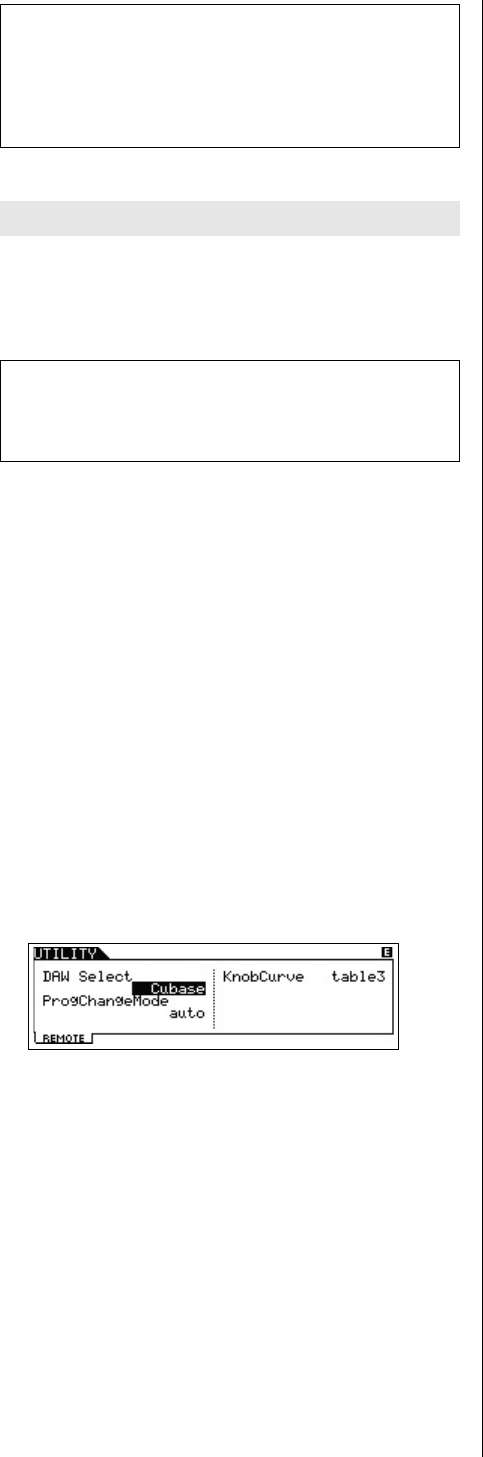
Transmitting Control Change
messages using the Foot Switch
[F4] CTL ASN [SF2] FT SW
You can transmit Control Change messages using the Foot
Switch connected to the [ASSIGNABLE] jack. For example,
when you set the value to 98 [PC Inc], the Program Change
number increases by 1 whenever the Foot Switch is pressed.
When “normal” is selected:
When “reverse” is selected:
MOXF6/MOXF8 Owner’s Manual
Quick Guide
60
Saving/Loading Data (File
Mode)
The File mode provides tools for transferring data (such as
Voice, Performance, Song, and Pattern) between the
MOXF6/MOXF8 and external USB flash memory device
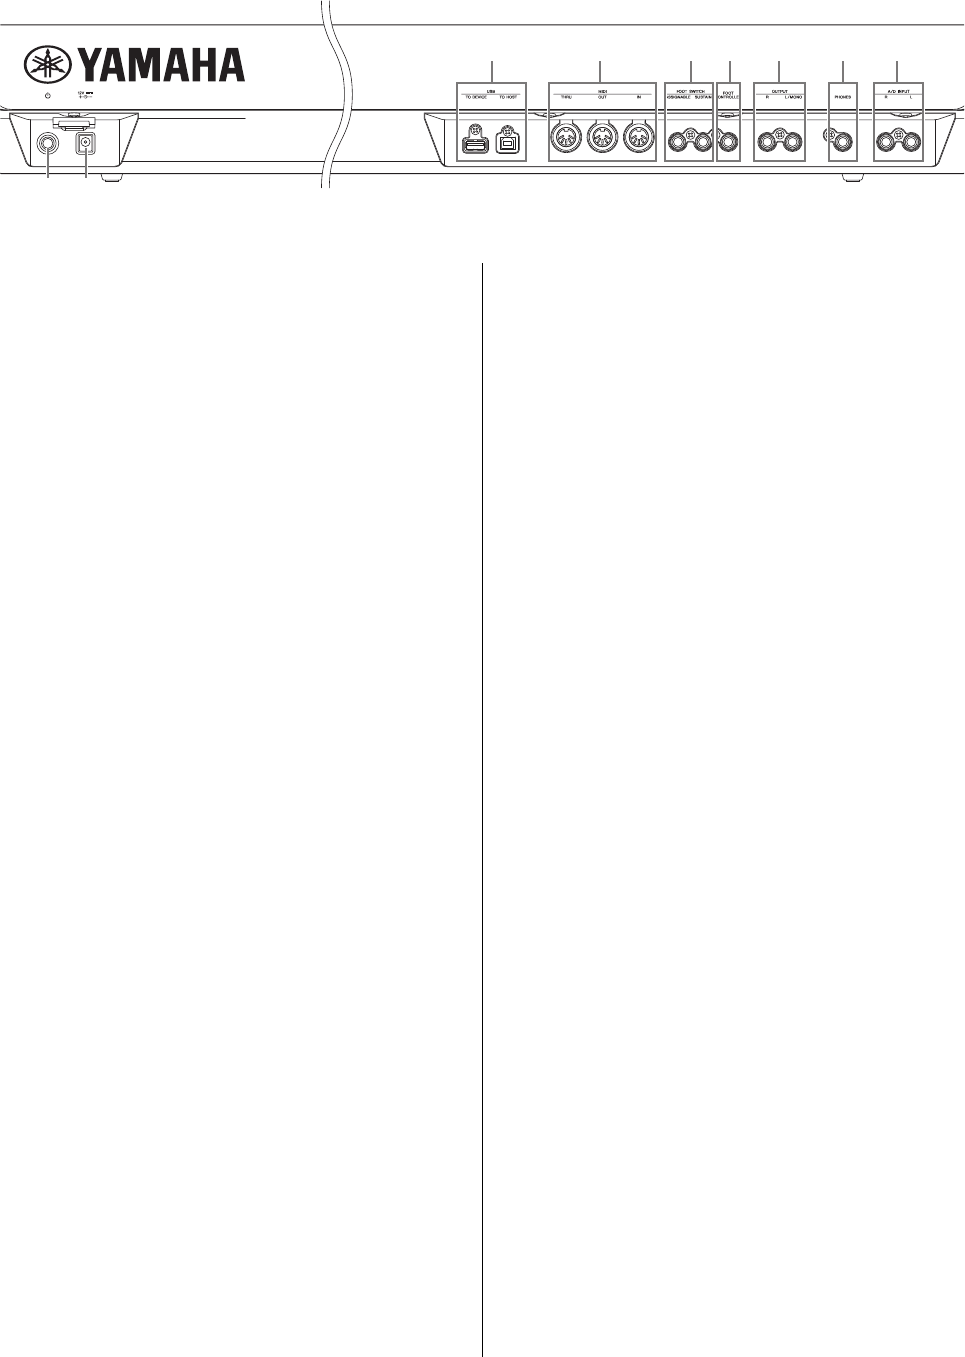
connected to the USB [TO DEVICE] terminal. To enter the
File mode, press the [FILE] button.
This section explains how to save/load all the data on the
user memory of this instrument as an “All” file.
Saving the settings to a USB flash
memory device
1Connect a USB flash memory device to the USB
[TO DEVICE] terminal of this instrument.
2Press the [FILE] button, and then press the [F2]
SAVE button.
The SAVE display appears in the File mode.
3Set “TYPE” to “All,” and then select the desired
directory of the device. After that, press the
[ENTER] button.
If storing the root directory, keep the directory set to “root”
without pressing the [ENTER] button. If you want to make a
new directory, press the [SF3] NEW button.
4Use the Cursor [<]/[v] buttons to move the cursor
to the file name field, assign a name to the file, and
then press the [ENTER] button.
Move to the desired location in the file name field by using
the Cursor [<]/[>] buttons, and then select the desired
characters by using the [DATA] dial or the [INC]/[DEC]
button to enter the selected character. By pressing the [SF6]
button, you can assign the name in the Character List
display. By pressing the [SF2] SET NAME button, the file/
directory name which selected in the file/directory selection
box is copied to the file name field.
5
Press the [SF1] EXEC button to save the file.
Loading the settings from a USB
flash memory device
1Connect a USB flash memory device to the USB
[TO DEVICE] terminal of this instrument.
2Press the [FILE] button, and then press the [F3]
LOAD button.
The LOAD display appears in the File mode.
3Set “TYPE” to “All,” and then select the file
(extension: .X6A) of the memory.
Select the directory which has desired file in the file/directory
selection box, and then press the [ENTER] button. After that,
select the desired file.
Set the desired file
type for saving
The current determined directory
as the save destination of the USB
flash memory device
File/Directory Selection box
Select the desired directory of the USB
flash memory device, and then press
the [ENTER] button.
File name field
MOXF6/MOXF8 Owner’s Manual
Quick Guide
61
4
Press the [SF1] EXEC button to load the file.
NOTICE
The Load operation overwrites any data previously existing in the
specified destination internal memory. Important data should always
be saved to a USB flash memory device connected to the USB [TO
DEVICE] terminal.
Precautions when using the USB
[TO DEVICE] terminal
This instrument features a built-in USB [TO DEVICE]
terminal. When connecting a USB device to the terminal, be
sure to handle the USB device with care. Follow the
important precautions below.
NOTEFor more information about the handling of USB devices, refer to
the owner’s manual of the USB device.
JCompatible USB devices
Only USB memory devices of the flash-memory variety can
be used with the MOXF6/MOXF8. Furthermore, the
instrument does not necessarily support all commercially
available USB flash memory devices, nor can Yamaha
guarantee operation such USB devices that you purchase.
Before purchasing a USB flash memory device for use with
this instrument, please visit the following web page:
http://download.yamaha.com/
JConnecting a USB flash memory device
When connecting a USB flash memory device to the USB
[TO DEVICE] terminal, make sure that the connector on the
memory is appropriate and that it is connected in the proper
direction.
NOTEThough the instrument supports the USB 1.1 standard, you can
connect and use a USB 2.0 storage device with the instrument.
However, note that the transfer speed is that of USB 1.1.
JFormatting a USB flash memory device
When a USB flash memory device is connected, a message
may appear prompting you to format the memory. If so,
execute the Format operation (see the “Reference Manual”
PDF document).
NOTICE
The format operation overwrites any previously existing data. Make
sure that the device you are formatting does not contain important
data.
JTo protect your data (write-protect)
To prevent important data from being inadvertently erased,
apply the write-protect provided on the USB flash memory
device. If you are saving data to the device, make sure to
disable write-protect.
JConnecting/removing the USB flash memory device
Before removing the memory from the instrument, make sure
that the instrument is not accessing data (such as in the
Save, Copy and Delete operations).
NOTICE
Avoid frequently turning the power on/off to the USB flash memory
device, or connecting/disconnecting the memory too often. Doing so
may result in the operation of the instrument “freezing” or hanging
up. While the instrument is accessing data (such as during Save,
Copy, Delete, Load and Format operations) or is mounting the USB
flash memory device (shortly after the connection), do NOT unplug
the USB connector, do NOT remove the device from the instrument,
and do NOT turn the power off to either the instrument or the USB
flash memory device. Doing so may corrupt the data on either or
both.
62
MOXF6/MOXF8 Owner’s Manual
Shift Function List
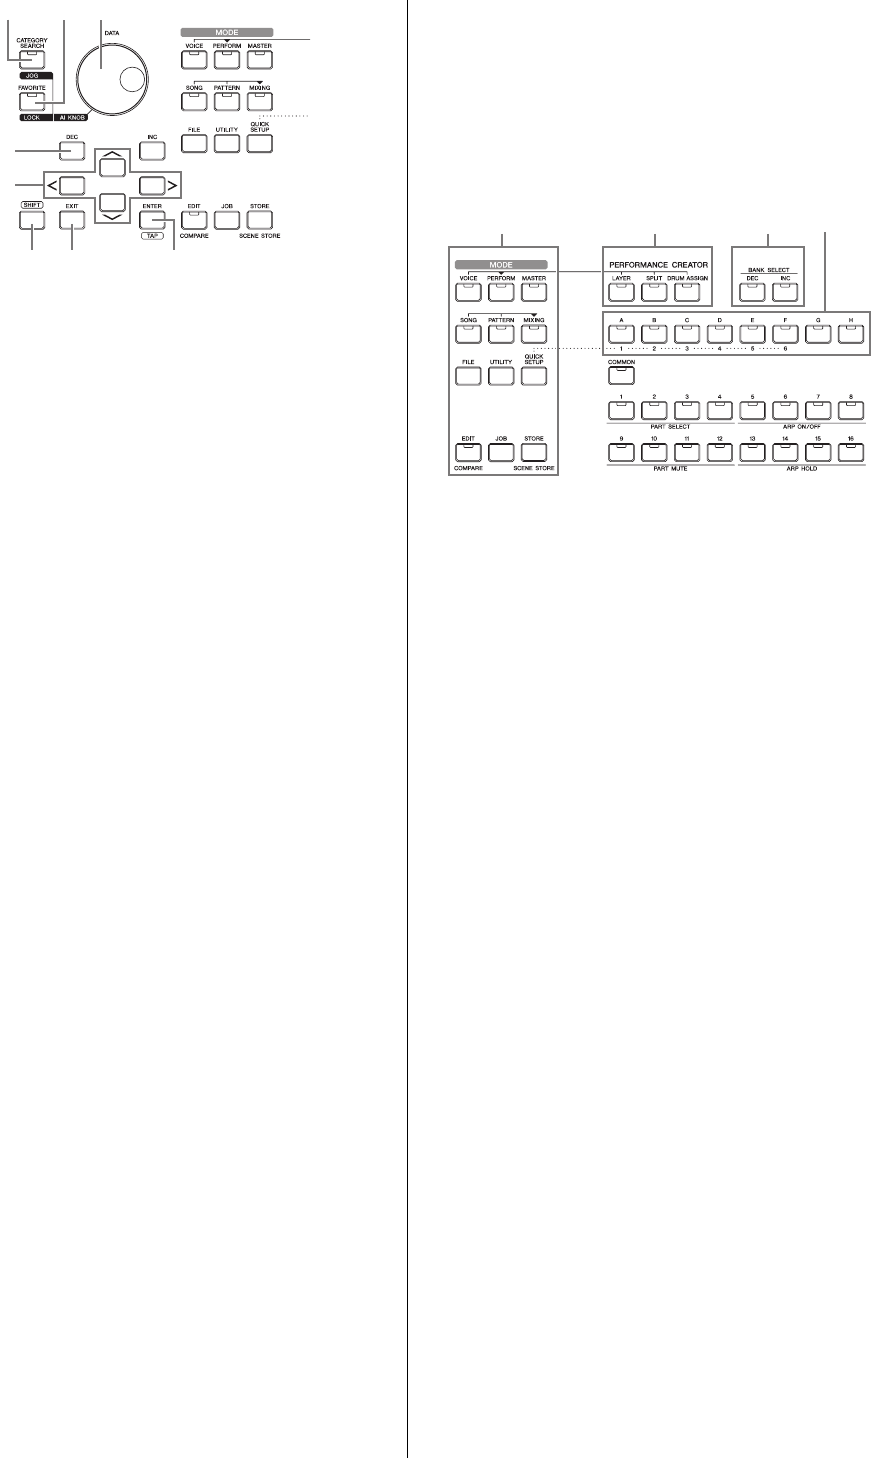
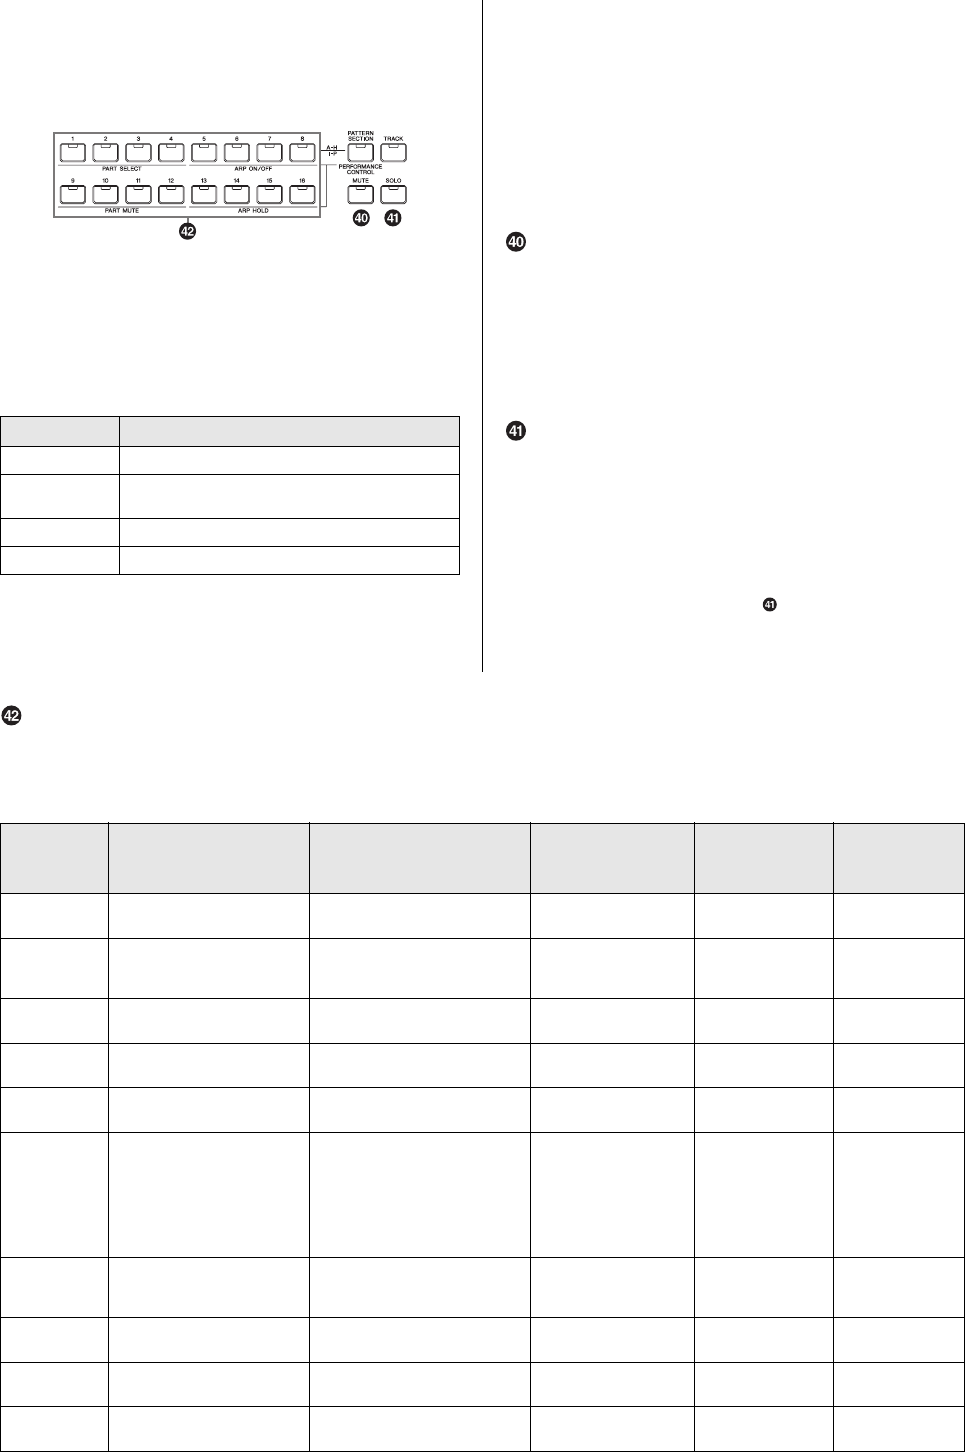
Some of the important functions and operations on the instrument can be executed with convenient panel control shortcuts.
Simply hold down the [SHIFT] button and press the indicated button (as described below).
Appendix
ModeOperationFunction
All modes[SHIFT] + [INC]/[DEC]Increases/decreases the value by 10. (Program number in the Play mode; parameter
value in the Edit mode)
All modes[SHIFT] + [DATA] dialIncreases/decreases the value by 10. (Same as [SHIFT] + [INC]/[DEC])
Voice Play[SHIFT] + BANK SELECT [DEC]/[INC]Changes the Voice Bank in the order listed below.
PRE1 USR1 PDR UDR GM GMDR
All modes other than
the File mode
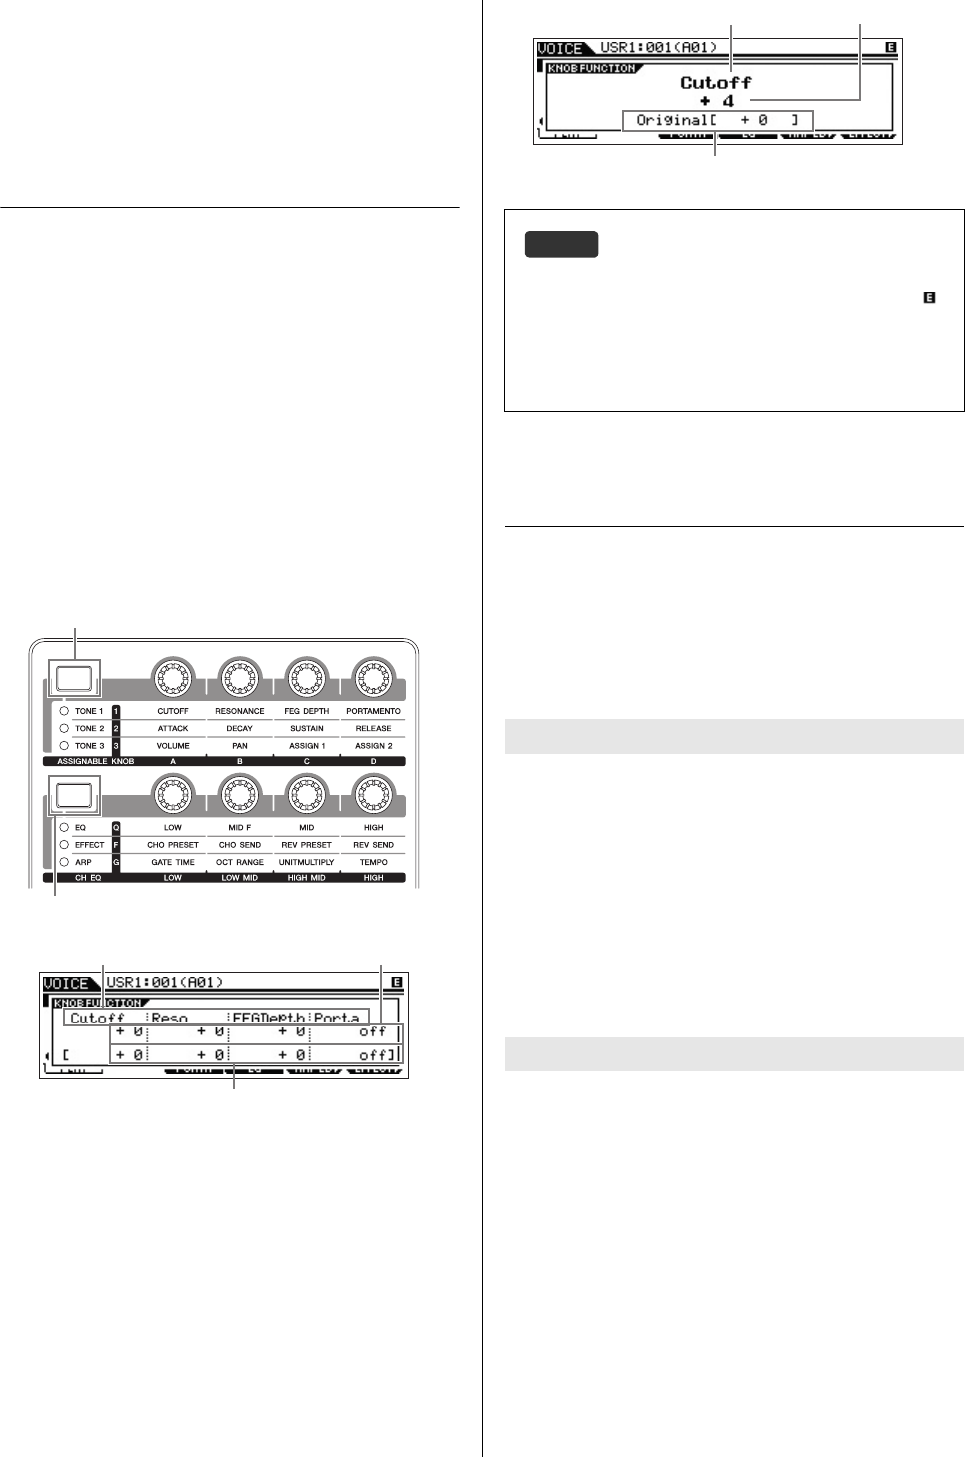
[SHIFT] + Knob 1 – 8 Increases/decreases the value by 10.
All modes other than
the File mode
[SHIFT] + Knob Function 1 buttonSets the Knob Function to TONE 1.
All modes other than
the File mode
[SHIFT] + Knob Function 2 button Sets the Knob Function to EQ.
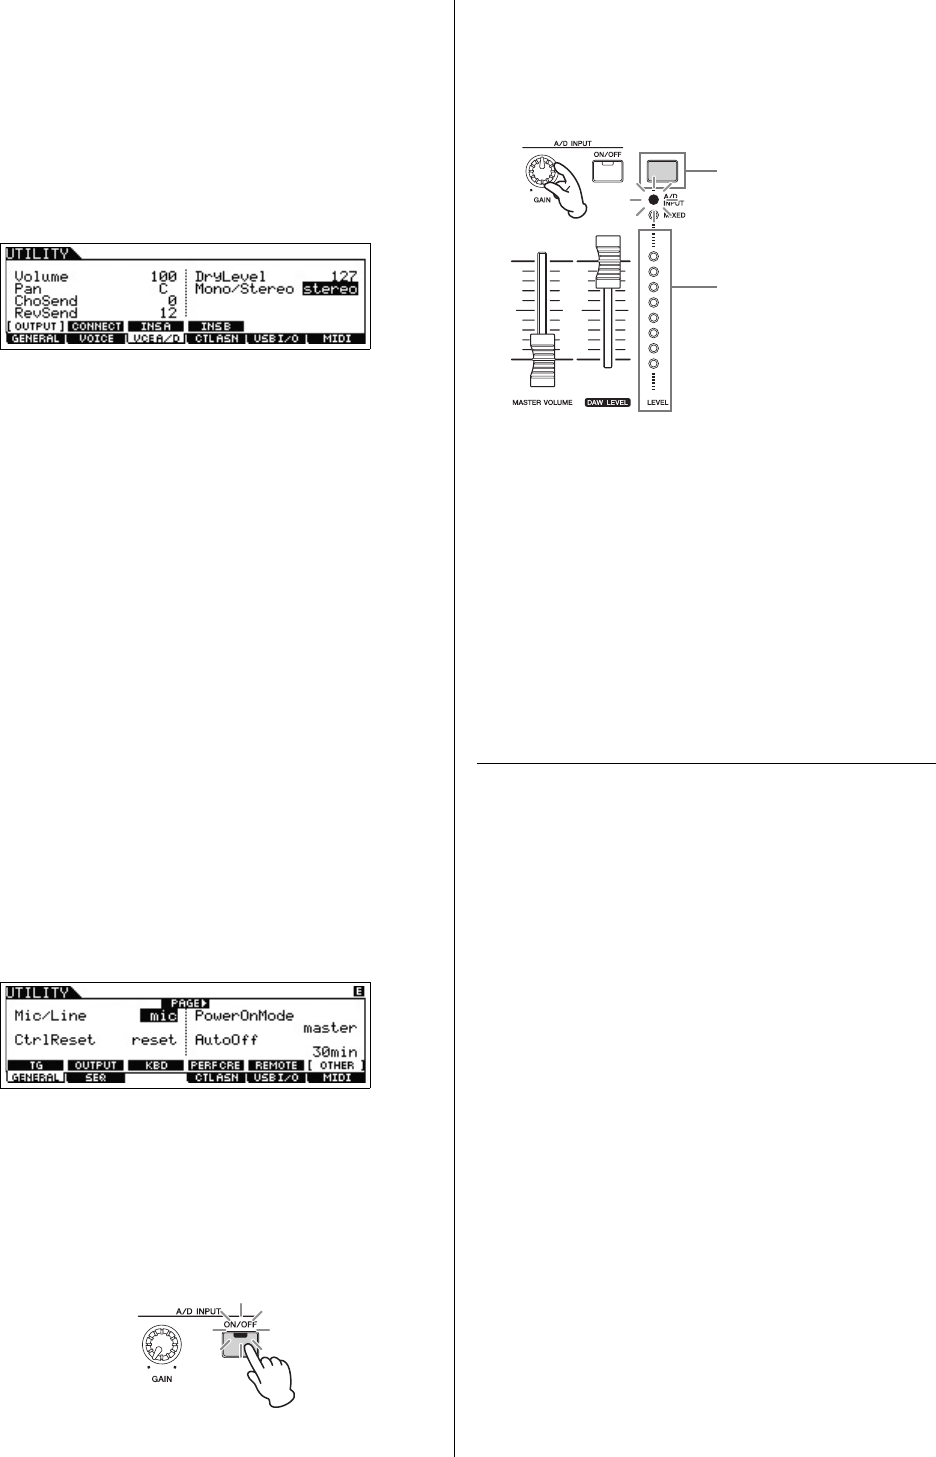
All modes[SHIFT] + [Level] Meter buttonSets the [LEVEL] meter to the A/D INPUT level.
Voice/Performance/
Song Mixing/Pattern
Mixing/Master mode
[SHIFT] + the current mode buttonExecutes the BULK Job of the current mode.
Voice Play/
Performance Play/
Category Search
display
[SHIFT] + [FAVORITE]Turns on/off the Favorite indicator of
the current Voice or Performance.
Voice/Performance/
Song/Pattern mode
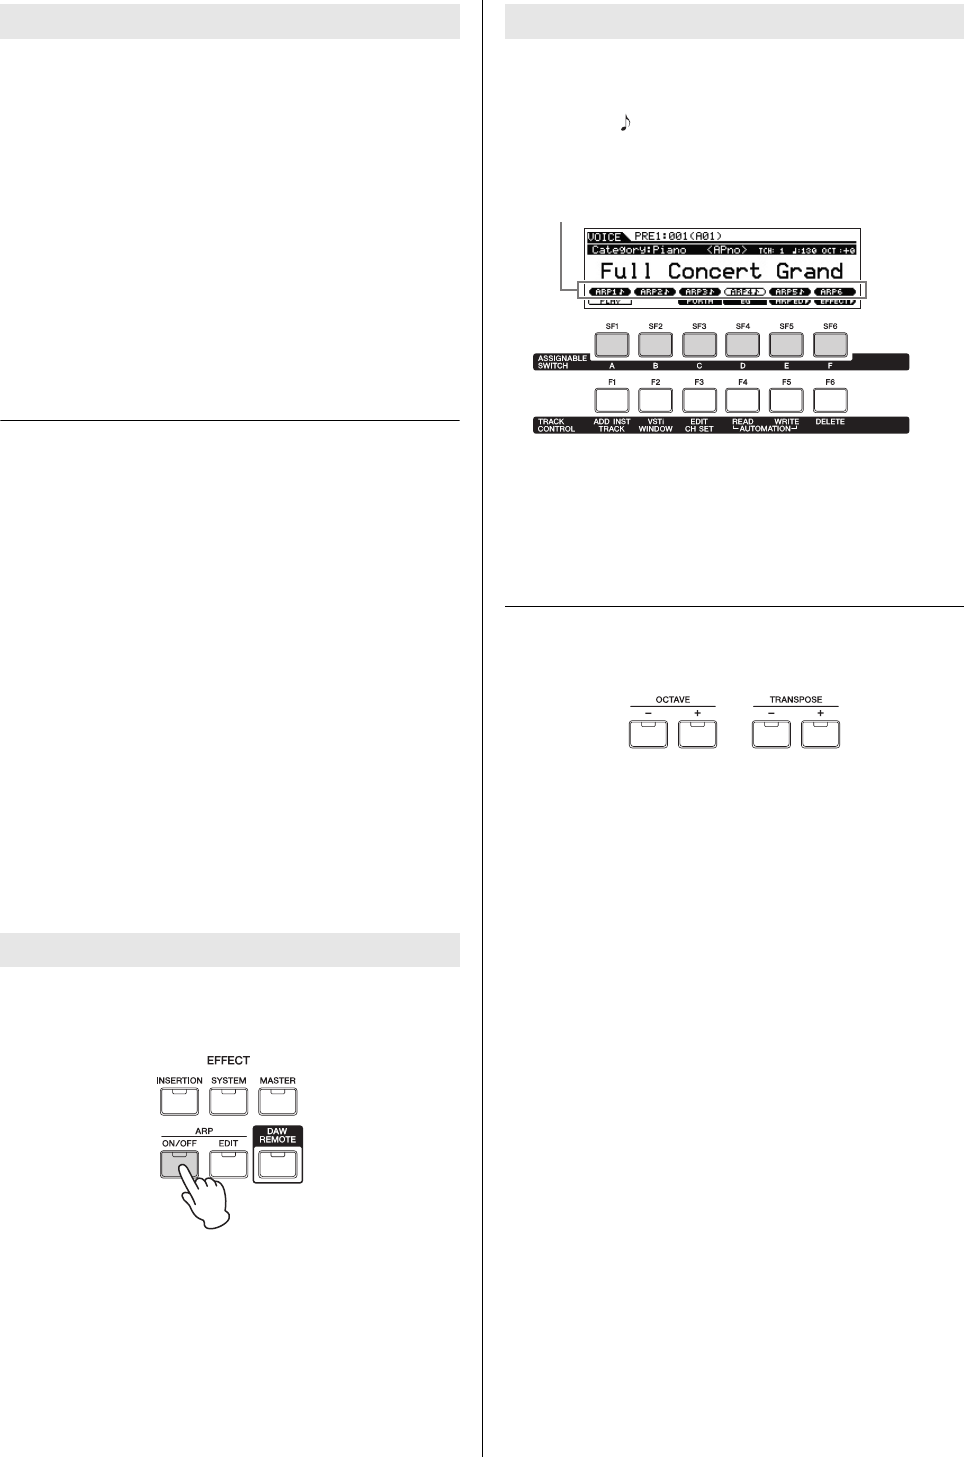
[SHIFT] + ARP [ON/OFF]• In the Voice mode, this operation will call up the [F3] MAIN display of Arpeggio Edit.
• In the Performance/Song/Pattern mode, this operation will call up the [F1] COMMON
display of Arpeggio Edit.
Voice/Performance/
Song/Pattern mode
[SHIFT] + A/D INPUT [ON/OFF]• In the Voice mode, this operation will call up the [F3] VCE A/D – [SF1] OUTPUT display
of the Utility mode.
• In the Performance mode, this operation will call up the [F5] A/D IN – [SF1] OUTPUT
display of Common Edit.
• In the Song/Pattern mode, this operation will call up the [F5] A/D IN – [SF1] OUTPUT
display of Mixing Common Edit.
Voice/Performance/
Song/Pattern mode
[SHIFT] + EFFECT [INSERTION]Calls up the [F6] EFFECT – [SF1] CONNECT display of Common Edit.
Voice/Performance/
Song/Pattern mode
[SHIFT] + EFFECT [SYSTEM]Calls up the [F6] EFFECT – [SF1] CONNECT display of Common Edit.
Voice/Performance/
Song/Pattern mode
[SHIFT] + EFFECT [MASTER]•In the Voice mode, this operation will call up the [F2] VOICE – [SF1] MFX display of the
Utility mode.
• In the Performance mode, this operation will call up the [F2] OUT MFX – [SF2] MFX
display of Common Edit.
• In the Song/Pattern mode, this operation will call up the [F2] MFX display of Mixing
Common Edit.
Voice/Performance/
Song/Pattern mode
[SHIFT] +
ASSIGNABLE FUNCTION [1]/[2]
• In the Voice mode, this operation will call up the [F1] GENERAL – [SF4] OTHER display
of Common Edit.
• In the Performance mode, this operation will call up the [F1] GENERAL – [SF5] OTHER
display of Common Edit.
• In the Song/Pattern mode, this operation will call up the [F1] GENERAL display of
Mixing Common Edit.
Voice/Performance/
Song/Pattern mode
[SHIFT] + OCTAVE [-]/[+]Calls up the [F1] GENERAL – [SF3] KBD display of the Utility mode.
Voice/Performance/
Song/Pattern mode
[SHIFT] + TRANSPOSE [-]/[+]Calls up the [F1] GENERAL – [SF3] KBD display of the Utility mode.
Favorite indicator
MOXF6/MOXF8 Owner’s Manual
Appendix
63
Display Messages
LCD indicationDescription
All remote templates stored.Appears when you store the Control Template in the Remote mode.
Are you sure?Confirms whether you want to execute a specified operation or not.
Arpeggio memory full.The internal memory for Arpeggio data is full.
Arpeggio type copied.The Arpeggio Types are copied to the [SF1] – [SF6] buttons.
Bad USB device.The USB flash memory device connected to this instrument is unusable. Format the USB flash memory device and try
again.
Bulk protected.Bulk data cannot be received because of the setting in the Utility mode.
Can't undo. OK?When certain Song/Pattern Jobs are executed, internal memory becomes too full for use of the Undo operation.
Completed.The specified load, save, format, or other Job has been completed.
Device number is off.Bulk data cannot be transmitted/received since the device number is off.
Device number mismatch.Bulk data cannot be transmitted/received since the device numbers don’t match.
Edited data will be
discarded.
Prompts you to confirm whether or not to erase the edited data.
Edits will be stored by
loading.
Confirms whether or not you want to continue the Load operation. If you select yes, the current edits will be stored.
Edits will be stored by
saving.
Confirms whether or not you want to continue the Save operation. If you select yes, the current edits will be stored.
Empty Favorite!
[SHIFT]+[FAVORITE] to add.
Appears when you press the [FAVORITE] button with no program registered to the Favorite Category.
Executing…A format operation or Job is being executed. Please wait.
File already exists.A file having the same name as the one you are about to save already exists.
File not found.The file of the specified type cannot be found.
Folder is too deep.Directories below this level cannot be accessed.
Illegal file name.The specified file name is invalid. Try entering a different name.
Illegal file.The file specified for loading is unusable by this instrument or cannot be loaded in the current mode.
Illegal input.An invalid input or value has been specified. Check the input method or value.
Illegal measure.An invalid measure number has been specified in the Song/Pattern mode. Select the measure again.
Illegal phrase number.An invalid phrase number has been specified in the Pattern mode. Select the phrase again.
Illegal Track number.An invalid Track number has been specified in the Song/Pattern mode. Select the Track again.
Incompatible USB deviceA USB device which cannot be used with this instrument has been connected to the USB [TO DEVICE] terminal.
MIDI buffer full.Failed to process the MIDI data because too much data was received at one time.
MIDI checksum error.An error occurred when receiving bulk data.
MIDI data error.An error occurred when receiving MIDI data.
Mixing Voice full.The Mixing Voice cannot be stored because the number of Voices already stored has exceeded the maximum capacity.
New Flash Memory Module.
Please load waveform data.
This message appears when the Flash Memory Expansion Module (FL512M/FL1024M) which was installed in a different
MOXF has been installed to the current MOXF. If this message appears, you should save the Waveform data (including the
parameter settings) of the previous MOXF to a USB storage device, connect the USB storage device to the current MOXF,
then load the Waveform data. This occurs because the Sample without the parameter settings cannot produce the proper
sound.
No data.When a Song/Pattern Job is executed, the selected Track or range contains no data. Select an appropriate Track or range.
In addition, this message appears when a Job related to a Mixing Voice cannot be executed because the specified Mixing
Voice is not available.
No F7 (End of Exc.)Exclusive data has been entered or changed without the necessary “End of Exclusive” byte (F7). Make sure the F7
message is included.
No Flash Memory Module
installed or module is
unformatted.
This message appears when no Flash Memory Expansion Module is installed or the unformatted Module has been
installed.
No response from USB
device
There is no response from the USB device connected to the USB [TO DEVICE] terminal.
No sample data.This message appears when you try loading Waveform data with the “with sample” checkmark removed, even when the
corresponding Sample is not available on the Flash Memory Expansion Module.
Not empty folderYou have attempted to delete a folder that contains data.
Not empty waveform.You have attempted to load Waveform data to a Waveform that already contains data.
64
MOXF6/MOXF8 Owner’s Manual
Appendix
Now Installing data to Flash
Memory Module
The Sample data is being copied to the Flash Memory Expansion Module.
Now loading...Indicates that a file is being loaded.
Now saving...Indicates that a file is being saved.
Now working...Canceling the Load/Save operation, after the [EXIT] button has been pressed.
Overwrite?A save operation will overwrite data on the USB flash memory device, and this message confirms whether it is OK to
continue or not.
Part ** is used for Drum
Assign.
This message appears when the Part switches of all Parts are set to on, and the Drum Assign function uses Part ** for the
Drum Part in Performance mode. The ** mark indicates the Part number.
Part ** is used for Layer.This message appears when the Part switches of all Parts are set to on, and the Layer function uses Part ** for the Layer
Part in the Performance mode. The ** mark indicates the Part number.
Part ** is used for Split.This message appears when the Part switches of all Parts are set to on, and the Split function uses Part ** for the Split Part
in the Performance mode. The ** mark indicates the Part number.
Phrase limit exceeded.The maximum number of Phrases (256) has been exceeded when recording, executing a Pattern Job, or editing.
Please keep power on.The data is being written to Flash ROM. Never attempt to turn off the power while data is being written to Flash ROM.
Turning the power off while this message is shown results in loss of all user data and may cause the system to freeze (due
to corruption of data in the Flash ROM). This may also result in this instrument being unable to properly start up the next
time the power is turned on.
Please reboot.Please restart this instrument.
Please stop sequencer. The operation you have attempted to execute cannot be done during Song/Pattern playback.
Power on mode stored.The settings in the Power On mode (pressing the [STORE] and [ENTER] buttons simultaneously) have been stored.
Quick Setup ** applied.Quick Setup ** has just been applied to this instrument. The ** mark indicates the Quick Setup number.
Read only file.You have attempted to delete, rename, or overwrite a read-only file.
Receiving MIDI bulkThis instrument is receiving MIDI bulk data.
Sample is too long.The Sample size is too large and the load operation cannot be executed.
Sample full.The maximum overall number of Samples has been exceeded.
Sample memory full.The Sample memory is full and further Jobs or load operations cannot be executed.
Scene & Arpeggio type
stored
The Song Scene and current Arpeggio type have been stored to one of the [SF1] – [SF6] buttons.
Sequence memory full.The internal memory for Sequence data is full, preventing any further operation (such as recording, editing, Job execution,
MIDI reception/transmission, or loading from the external storage device). Try again after erasing unwanted Song, Pattern,
or User Phrase data.
Too many fixed notesWhen converting the Song or Pattern data to the Arpeggio data, the amount of different notes in the data to be converted
has exceeded sixteen.
Transmitting MIDI bulkThis instrument is transmitting MIDI bulk data.
Unrecognized Flash
Memory Module. Please
format that.
An unformatted Flash Memory Expansion Module has been recognized. Execute the Format operation.
USB connection terminated.A break in the connection with the USB flash memory device has occurred because of an abnormal electric current.
Disconnect the device from the USB [TO DEVICE] terminal, then press the [ENTER] button.
USB device connectingCurrently recognizing the USB flash memory device connected to the USB [TO DEVICE] terminal.
USB device full.The USB flash memory device is full and no more data can be saved. Use a new USB flash memory device, or make
space by erasing unwanted data from the USB flash memory device.
USB device not ready.A USB flash memory device is not properly inserted in or connected to the USB [TO DEVICE] terminal.
USB device read/write error.An error occurred while reading or writing to/from a USB flash memory device.
USB device write protected.The USB flash memory device is write protected, or you have attempted to write to read-only media.
Utility storedThe settings in the Utility mode have been stored.
Waveform full.The maximum overall number of Waveforms has been exceeded.
Waveform is protected.You have attempted to load protected Waveform data.
LCD indicationDescription
MOXF6/MOXF8 Owner’s Manual
Appendix
65
Troubleshooting
No sound? Wrong sound? When a problem like this occurs, please check the following points before assuming that the product
is faulty. Many problems can be solved by executing the Factory Set operation (page 20), after backing up your data to an USB
flash memory device (page 60). If the problem persists, consult your Yamaha dealer.
No Sound.
Is this instrument properly connected to related external equipment (e.g., amplifier, speaker, headphone) via audio cables?
Since this instrument has no built-in speakers, you will need an external audio system or a set of stereo headphones to properly
monitor it (page 17).
Is the power of this synthesizer and any external equipment connected to it turned on?
Have you made all the appropriate level settings—including the Master Volume on this instrument and the volume settings on any
connected external equipment?
If the Foot Controller is connected to the [FOOT CONTROLLER] jack, operate the Foot Controller and check the sound volume.
Check the Local Control parameter in the Utility mode.
When this instrument is used by itself and this parameter is set to off, no sound is produced even if you play the keyboard.
Check the Direct Monitor Switch parameter in the Utility mode.
When this instrument is used by itself and this parameter is set to off, no sound is produced even if you play the keyboard.
When the Performance/Song/Pattern produces no sound, is the “ArpPlyOnly” parameter of each Part turned on?
When this parameter is turned on, the corresponding Part produces sound only via Arpeggio playback.
Are the MIDI volume or MIDI expression settings too low when using the external controller?
Are the effect and filter settings appropriate?
If you are using the filter, try changing the cutoff frequency. Some cutoff settings may filter out all of the sound.
Is “Vocoder” selected as the Insertion Effect Type of the Voice?
If so, set the parameters related to the AD Part and A/D INPUT connector to the appropriate values then play the keyboard while
speaking into the connected microphone. Check whether or not the A/D INPUT [GAIN] Knob on the rear panel is set to the minimum
position.
Are the volume or expression settings too low?
Are the parameter settings such as Element Switch, Part Switch, Note Limit and Velocity Limit appropriate?
The total memory capacity determines the number of Songs/Patterns (phrases) that can be recorded. For example, if the memory
contains Songs/Patterns (phrases) that use up a large amount of memory, the memory may become full even though the available
Pattern or Song numbers are not all used.
Cannot enter the Pattern Job mode/Pattern Mixing mode even when pressing the [JOB] button in the
Pattern mode.
Check whether the instrument is in the Pattern Chain mode or not.
If so, exit from the Pattern Chain mode, then press the [JOB] button or [MIXING] button.
The drum sound is wrong or unexpected when changing the transpose value in the Song/Pattern Play
mode.
This is normal. Changing the transpose setting while playing a Drum Voice will produce different sounds for the same keys played.
Data communication between the computer and this instrument does not work properly.
Check whether the Port settings on the computer are appropriate or not.
Check whether or not the MIDI IN/OUT parameter is set to the appropriate value.
This problem may be solved by reducing the computer load. To do this, set the USB Audio Output Channel to “2ch” in the following
display. If the setting is changed in the display, press the [ENTER] button and then restart the instrument.
The sound is not produced properly even when playing back the Song data on the computer or the MIDI
instrument connected to this instrument.
Make sure to set this instrument to the Song mode or Pattern mode.
The Voice mode or Performance mode may not produce the proper sound even when playing back Song data on the MIDI
instrument or the computer connected to this instrument.
MIDI bulk data transmission/reception does not work properly.
Is the Receive Bulk parameter set to on?
When receiving MIDI bulk data transmitted via the Bulk Dump function and recorded to the external MIDI device, you need to set the
MIDI Device Number to the same value as when transmitting.
When transmission does not work properly, is the device number of the MIDI instrument connected to this instrument set to match the
Device Number Parameter in the Utility mode?
Cannot save data to the external USB flash memory device
Is the USB flash memory device being used write protected? (Write-protect should be set to off for saving data.)
Is the USB flash memory device being used properly formatted?
Cannot enter the Edit mode
Is Category Search turned on?
Turn off Category Search then press the [EDIT] button.
[UTILITY] [F6] MIDI [SF4] OTHER “MIDI IN/OUT”
[UTILITY] [F5] USB I/O [SF1] OUT CH
[UTILITY] [F6] MIDI [SF2] SWITCH “RcvBulk”
[UTILITY] [F5] MIDI [SF1] CH “DeviceNo”
[UTILITY] [F5] MIDI [SF1] CH “DeviceNo”
[FILE] [F1] CONFIG [SF2] FORMAT
MOXF6/MOXF8 Owner’s Manual
Appendix
70
Installing Optional
Hardware
Available devices
The following optional devices can be installed to the MOXF.
Installation locations
Installation Precautions
Before installing the optional hardware, make sure you have
a Phillips screwdriver and ample space to work.
WARNING
•Before beginning installation, switch off the power to the
instrument and connected peripherals, and unplug them from the
power outlet. Installation or removal of any devices should be
started ONLY after the instrument (and any optional hardware)
returns to normal room temperature. Then remove all cables
connecting the instrument to other devices. (Leaving the power
cord connected while working can result in electric shock. Leaving
other cables connected can interfere with work.)
•Be careful not to drop any screws inside the instrument during
installation. (This can be prevented by keeping the optional units
and cover away from the instrument while attaching). If this does
happen, be sure to remove the screw(s) from inside the unit before
turning the power on. Loose screws inside the instrument can
cause improper operation or serious damage. If you are unable to
retrieve a dropped screw, consult your Yamaha dealer for advice.
•Install the optional units carefully as described in the procedure
below. Improper installation can cause shorts which may result in
irreparable damage and pose a fire hazard.
•Do not disassemble, modify, or apply excessive force to board
areas and connectors on optional units. Bending or tampering with
boards and connectors may lead to electric shock, fire, or
equipment failures.
CAUTION
•It is recommended that you wear gloves to protect your hands from
metallic projections on optional units and other components.
Touching leads or connectors with bare hands may cause finger
cuts, and may also result in poor electrical contact or electrostatic
damage.
•Be careful of static electricity. Static electricity discharge can
damage the IC chips. Before you handle the optional units, to
reduce the possibility of static electricity, touch unpainted metal
parts or a ground wire on a device that is grounded.
•Handle the optical units with care. Dropping or subjecting them to
any kind of shock may cause damage or result in a malfunction.
•Do not touch the exposed metal parts in the circuit board. Touching
these parts may result in a faulty contact.
•Be careful not to misplace any of the screws.
•Do not use any screws other than what are installed on the
instrument. Use of incorrect screws can cause damage.
FL512M/FL1024M
(Flash memory expansion module)
Bottom cover for the FL512M/FL1024M
Bottom cover for the FL512M/FL1024M
MOXF6
MOXF8
MOXF6/MOXF8 Owner’s Manual
Appendix
71
Installing Optional Hardware
FL512M/FL1024M
Configuration
There are two types of the Flash Memory Expansion Module:
FL512M
Features a memory size of 512 MB.
FL1024M
Features a memory size of 1024 MB.
Installation Procedure
1Turn the power of the MOXF off, and disconnect
the AC power cord. Also, make sure to disconnect
the MOXF from any connected external devices.
2Turn the MOXF upside down so that the keyboard
faces down and you have direct access to the
underside of the instrument.
To protect the Knobs, Wheels and Sliders from damage,
place the keyboard so the four corners are supported by
something that provides sufficient support like magazines or
cushions. Place supports at all four corners, taking care not
to touch the Knobs, Wheels and Sliders.
CAUTION
•Since the instrument—particularly the MOXF8—is very heavy, this
procedure should not be done alone, but by two or three people.
3Remove the cover from the bottom.
With the rear panel of the MOXF facing you, remove the
screws from the cover by using the Phillips screwdriver. After
removing the screws, slide the cover away to remove it.
Important
Keep the removed screws in a safe place. They will be used when re-
attaching the cover to the instrument after installation.
4Attach the FL1024M or FL512M to the slot.
As shown below.
Attach the module to the slot via the following steps.
4-1Insert the Module vertically in the slot and align the
screws (on the Module) to the female screws
respectively.
Rear side
View of the keyboard from the bottom
Place supports at all four corners, taking care
not to touch the Knobs, Wheels and Sliders.
Rear side
Bottom
Location for
FL512M/
FL1024M
Slot
Female
screws
Slot
Female screws
Rear side
FL512M/
FL1024M
MOXF6/MOXF8 Owner’s Manual
Appendix
72
4-2Press the top of the connector as shown, then push the
connector firmly into the slot.
4-3Tighten each screw of the Memory Module to each
female screw of the MOXF with your hand as shown
below.
5Re-install the cover you removed in step 3, in
reverse order.
6Check that the installed Module or Modules are
functioning properly.
6-1Turn the MOXF right side up again so that the keyboard
faces up then turn the power on. While launching, you
will see a message indicating that the Flash Memory
Module cannot be recognized.
6-2Press the [FILE] button to enter the File mode then
press the [F6] FLASH button.
6-3Press the [SF1] Format button.
6-4Press the [ENTER] button to execute the Format
operation.
6-5Check whether the Total size shown on the display is
correct or not.
Removing the Module
1Loosen both the screws.
NOTICE
•If you cannot loosen the screw with your hand, use a Phillips
screwdriver. In this case, be careful NOT to scratch the circuit
board of the FL512M/FL1024M and MOXF.
•Since the screws can be removed from the module, be careful NOT
to drop them inside the instrument when loosening them.
2Pull out the FL512M/FL1024M vertically.
3Attach the cover to the bottom panel.
Position the cover on the bottom panel aligning the screws
with the screw holes, then tighten the screws with a Phillips
screwdriver to fix the cover.
Press this section
lightly but firmly
Serial No. seal
Rear side
Bottom
MOXF6/MOXF8 Owner’s Manual
Appendix
73
Specifications
Specifications and descriptions in this owner’s manual are for information purposes only. Yamaha Corp. reserves the right to change or modify products or
specifications at any time without prior notice. Since specifications, equipment or options may not be the same in every locale, please check with your
Gebruikershandleiding.com neemt misbruik van zijn services uitermate serieus. U kunt hieronder aangeven waarom deze vraag ongepast is. Wij controleren de vraag en zonodig wordt deze verwijderd.
Product:
Spelregels forum
Om tot zinvolle vragen te komen hanteren wij de volgende spelregels:
lees eerst de handleiding door;
controleer of uw vraag al eerder door iemand anders is gesteld;
probeer uw vraag zo duidelijk mogelijk te stellen;
heeft u een probleem en al geprobeerd om dit op te lossen, vermeld dit erbij aub;
heeft u een oplossing gekregen van een bezoeker dan horen wij dat graag in dit forum;
wilt u een reactie geven op een vraag of antwoord, gebruik dan niet dit formulier maar klik op de knop 'reageer op deze vraag';
uw vraag wordt direct op de website gezet; vermijd daarom persoonlijke gegevens in te vullen;
Belangrijk! Als er een antwoord wordt gegeven op uw vraag, dan is het voor de gever van het antwoord nuttig om te weten als u er wel (of niet) mee geholpen bent! Wij vragen u dus ook te reageren op een antwoord.
Belangrijk! Antwoorden worden ook per e-mail naar abonnees gestuurd. Laat uw emailadres achter op deze site, zodat u op de hoogte blijft. U krijgt dan ook andere vragen en antwoorden te zien.
Abonneren
Abonneer u voor het ontvangen van emails voor uw Yamaha MOXF6 bij:
nieuwe vragen en antwoorden
nieuwe handleidingen
U ontvangt een email met instructies om u voor één of beide opties in te schrijven.
Ontvang uw handleiding per email
Vul uw emailadres in en ontvang de handleiding van Yamaha MOXF6 in de taal/talen: Engels als bijlage per email.
De handleiding is 12,2 mb groot.
U ontvangt de handleiding per email binnen enkele minuten. Als u geen email heeft ontvangen, dan heeft u waarschijnlijk een verkeerd emailadres ingevuld of is uw mailbox te vol. Daarnaast kan het zijn dat uw internetprovider een maximum heeft aan de grootte per email. Omdat hier een handleiding wordt meegestuurd, kan het voorkomen dat de email groter is dan toegestaan bij uw provider.
Uw handleiding is per email verstuurd. Controleer uw email
Als u niet binnen een kwartier uw email met handleiding ontvangen heeft, kan het zijn dat u een verkeerd emailadres heeft ingevuld of dat uw emailprovider een maximum grootte per email heeft ingesteld die kleiner is dan de grootte van de handleiding.
Er is een email naar u verstuurd om uw inschrijving definitief te maken.
Controleer uw email en volg de aanwijzingen op om uw inschrijving definitief te maken
U heeft geen emailadres opgegeven
Als u de handleiding per email wilt ontvangen, vul dan een geldig emailadres in.
Uw vraag is op deze pagina toegevoegd
Wilt u een email ontvangen bij een antwoord en/of nieuwe vragen? Vul dan hier uw emailadres in.