For information about the MIDI settings of the MOTIF XF, MOTIF XS, S90 XS/S70 XS, MOXF6/MOXF8, and MOX6/MOX8 refer to the respective manuals.
What is Performance Editor Essential?
This application lets you edit the VOICE/ARP/EFFECT/MEQ parameters in the Performance mode of the MOTIF XF, MOTIF XS, S90 XS/S70 XS, MOXF6/MOXF8, MOX6/MOX8
from your iPad. Select a Performance on the instrument, edit the parameters of the selected Performance on the iPad, then store the edited parameters on the instrument.
The instructions in this manual use the MOTIF XF as an example.
Depending on your particular musical instrument, there may not be equivalent displays or buttons.
Utility window
For setting the
parameters common
to all the displays.
VOICE display
For assigning the Voices to the
respective Performance Parts.
XY CONTROL display
Lets you control the specified parameter
change and MIDI Control Change messages
simultaneously by dragging in the XY Pad area.
EFFECT display
Chorus display
Reverb display
Master Effect display
ARP displayMIXING window
MEQ display
By using a Yamaha i-MX1 or i-UX1, connect the
instrument to an iPad.
The MOTIF XF can be connected via wireless Network
MIDI. For details about wireless MIDI connectivity, refer
to the “New Functions in MOTIF XF Version 1.20” Manual.
NOTE
• Before editing, enter the Performance mode.
• After editing, store the edited Performance.
• You can connect i-MX1/i-UX1 to devices featuring
the Lightning connector via Apple Lightning to 30-pin
Adapter.
Performance Editor Essential Owner’s Manual 2
Title bar and Utility window
This window lets you set the parameters common to all the displays.
Each lamp flashes according to the MIDI in/out
messages.
Tapping this opens or closes the Utility window.
Set this to the same number as that of the instrument.
Selects the connected instrument.
Tapping this calls up the Owner’s Manual.
Tapping here initializes all the settings.
Determines the connection method between the iPad
and MIDI instrument.
cable: Should be selected when connected via the
i-MX1 or i-UX1.
wireless: Should be selected when connected via
wireless Network MIDI.
NOTE
When set to “wireless,” make the Wi-Fi setup in Settings > Wi-Fi in
your iPad.
Determines the knob behavior.
rotary: Dragging around the knob will rotate it in the
same direction.
linear: Dragging vertically upward from the knob
rotates the knob clockwise, and dragging downward
rotates counter-clockwise.
Title bar
Sets the MIDI Transmit Channel.
Selects the MIDI port of the instrument in case of
wireless connection.
Assigns the MIDI Control Change numbers to each
controller.
Utility window
*What is a Template?
Each of the Templates includes the settings of all the
displays, meaning that you can call up all the Effect
settings just by selecting the desired Template. Each
of the Templates can be renamed, called up and
initialized.
When set to on, tapping [RECEIVE] calls up a
confirmation message.
Determines the Fader behavior.
jump: The Fader jumps to any tapped location in
the Fader area.
catch: The Fader will be “caught” as you drag on it.
When set to on, selecting a Template* transmits the
corresponding settings via MIDI.
Performance Editor Essential Owner’s Manual 3
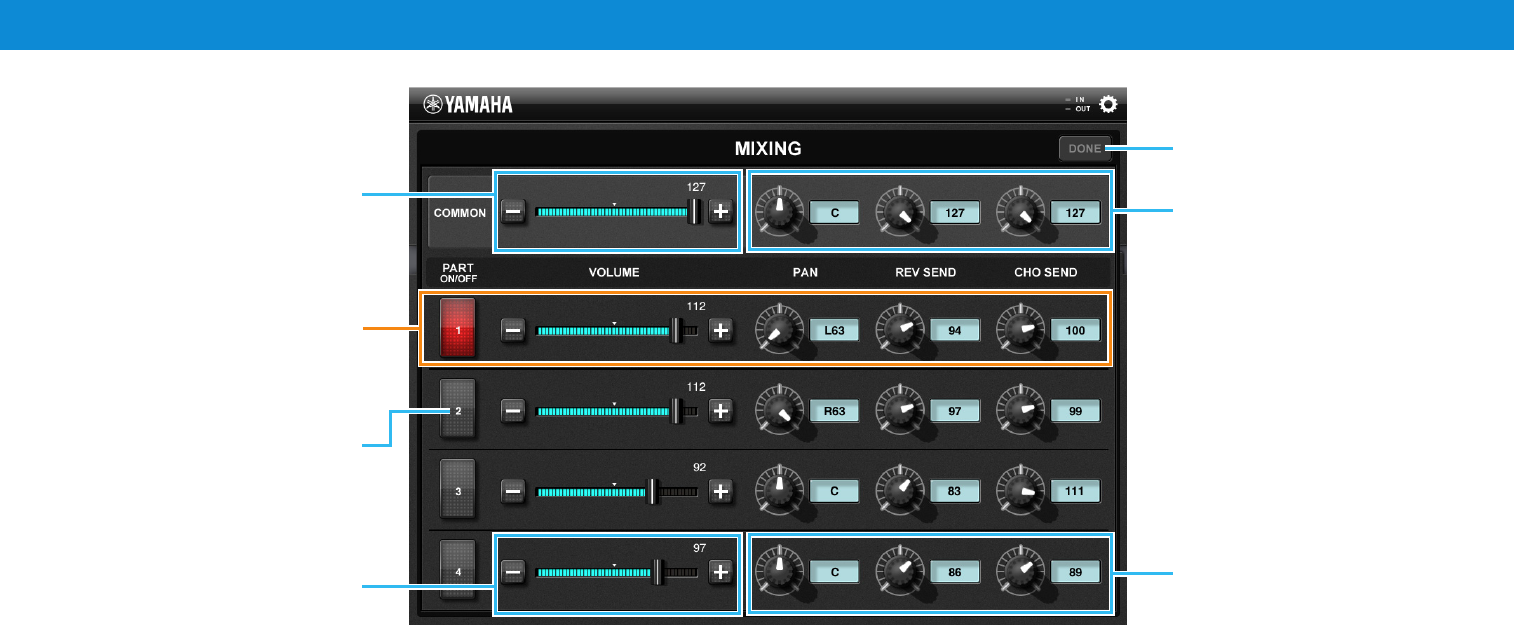
MIXING window
Adjust the COMMON VOLUME by
operating the slider. Tapping [-]/[+]
changes the value in single steps.
Tapping this closes the MIXING
window.
Allows you to edit the Part 1 parameters.
Likewise, the parameters for the Parts 2
– 4 can be edited in the corresponding
area.
Adjust the COMMON PAN/
COMMON REV SEND/COMMON
CHO SEND by operating the knob,
or by tapping the value to call up the
slider for adjusting the parameters.
Adjust the PART PAN/PART
REV SEND/PART CHO SEND by
operating the knob, or by tapping
the value to call up the slider for
adjusting the parameters.
Adjust the PART VOLUME by operating
the slider. Tapping [-]/[+] changes the
value in single steps.
Turns the Part Switch on/off. Red
indicates “ON” while gray indicates
“OFF.” The number corresponds to the
Part Number.
Performance Editor Essential Owner’s Manual 4
VOICE display
Tapping [RECEIVE] starts reception of
the settings from the instrument.
NOTE
The Voice name on the iPad may be different from
that of the instrument during Arpeggio playback
with “Voice with ARP”= ON and “Change Timing”=
ON. To remedy this situation, tap [RECEIVE].
Tapping [TRANSMIT] starts transmission
of the current settings to the instrument.
NOTE
When the Voice with ARP function is set to on,
tapping [TRANSMIT] will change the current Voice
to the one assigned to the new Arpeggio type.
Changes the Arpeggio type of the
current Part. This is equivalent to the
[SF1] – [SF5] buttons.
Lets you edit the Part 1 parameters.
Likewise, the parameters for the Parts
2 – 4 can be edited in the corresponding
area.
Template Name
Selecting a Template calls up all the settings
of all the displays. To change the Template,
tap [+] /[-], or tap the Template Name to call
up the Template list, then tap the desired
Template.
Indicates the Arpeggio tempo. To change
the tempo, tap the Tempo value to call up
the slider then operate the slider, or tap
[TAP] three times at the desired tempo.
Turns the Part Switch on/off. The red
color indicates “on” while the gray color
indicates “OFF.” The number on the
button refers to the Part Number.
Determines the Voice Bank. Tapping
[+] /[-] changes the Voice Bank. Tapping
the Bank Name between [+] and [-] calls
up the Voice List.
Determines the Voice Number.
Tapping [+]/[-] changes the Voice
number. Tapping the Voice name
between [+] and [-] calls up the Voice
List.
Indicates the Part Voice Name.
Tapping here calls up the Voice List.
Tapping here calls up the MIXING
window.
Determines the Note Limit Low and
Note Limit High. Tapping [-]/[+]
changes the value in single steps.
Tapping the Note name between [-]
and [+] calls up the slider which lets
you set the Limit value.
Shows the note range specified
via the Note Limit Low and High
parameters.
Tapping here alternately calls up
the XY CONTROL display, VOICE
display, ARP display, EFFECT
display and MEQ display.
Performance Editor Essential Owner’s Manual 5
Voice List
This list is called up by tapping the Voice Bank, Voice number or Voice name for each Part. As shown below, the Voice List features two indication types: Bank order and
Category order. Note that User Voices are not shown in the Voice List by Category.
Voice List with the Bank orderVoice List with the Voice Category order
BANK and CATEGORY tabs
Selects the indication type of the Voice List
from two types: Bank order or Category
order. When a User Voice is selected, the
CATEGORY tab is not available.
Tapping [DONE] will actually assign the
selected Voice to the current Part, then
close the List. Tapping [CANCEL] will abort
selection then close the List.
Tap the desired Bank to call up the
corresponding Voice List, then tap the desired
Voice name. The Voice List can be scrolled.
Tap the desired Main Category and Sub Category
to call up the corresponding Voice List, then tap the
desired Voice name. The Voice List can be scrolled.
Dragging upward or
downward will scroll
through the Voices.
Performance Editor Essential Owner’s Manual 6
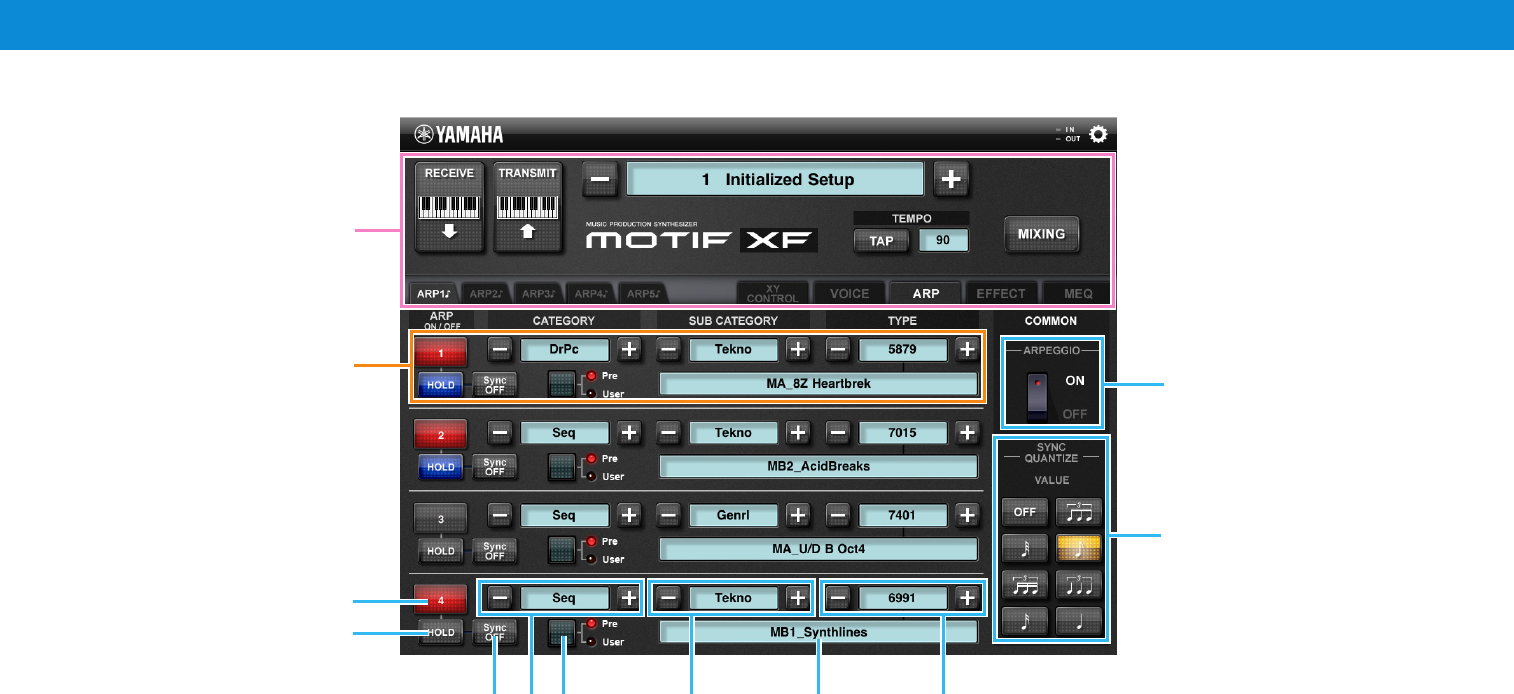
ARP display
1
2
3
4
5
6
78
1Turns on/off ARP Part Switch. The red color indicates the on status while the
gray color indicates the off status.
2Turns on/off ARP Hold. The blue color indicates the on status while the gray
color indicates the off status.
3Sets ARP Hold to Sync Off. The blue color indicates the Sync Off status while
the gray color indicates a different status.
4Tapping the [-]/[+] changes the Arpeggio Type to the first one of the new Main
Category. Tapping the indication between [-] and [+] calls up the Arpeggio
Type List.
5Selects the Arpeggio Type Bank form “Pre” or “User.” The selected Bank lamp
lights.
6Tapping the [-]/[+] changes the Arpeggio Type to the first one of the new Sub
Category. Tapping the indication between [-] and [+] calls up the Arpeggio
Type List.
7Indicates the Arpeggio Type Name. Tapping here calls up the Arpeggio Type
List.
8Tapping the [-]/[+] changes the Arpeggio Type. Tapping the indication
between [-] and [+] calls up the Arpeggio Type List.
Same as in the VOICE display
Lets you edit the Part 1 parameters.
Likewise, the parameters for the
Parts 2 – 4 can be edited in the
corresponding area.
Turns on/off ARP Common Switch.
Selects ARP Sync Quantize Value.
Performance Editor Essential Owner’s Manual 7
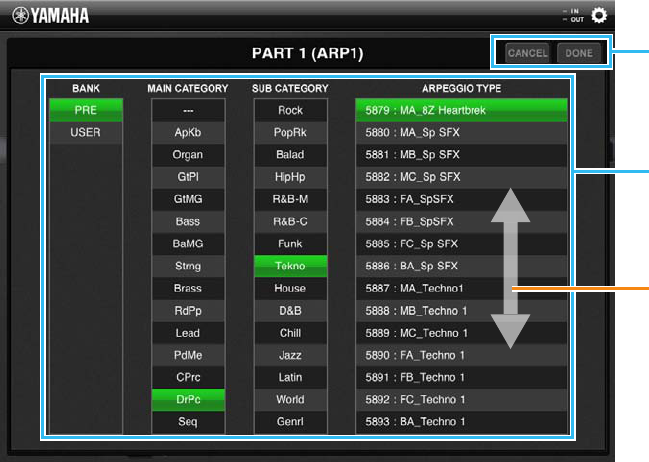
Arpeggio Type List
Tapping [DONE] actually assigns the selected Arpeggio
Type to the current Part, then closes the List. Tapping
[CANCEL] will abort selection then close the List.
Tap the desired Bank, Main Category and Sub Category,
then tap the desired Arpeggio Type.
Dragging upward or downward scrolls through the
Arpeggio Types.
Performance Editor Essential Owner’s Manual 8
EFFECT display
Same as in the VOICE display
Lets you set the Insertion Switch to
on or off for each Part.
Tapping here calls up
the CHORUS display.
Tapping here calls up
the REVERB display.
Tapping here calls up the
MASTER EFFECT display.
To adjust each value, drag around
the knob or tap the value to call
up the slider then operate the
slider.
Sets the Master Effect ON/OFF.
Performance Editor Essential Owner’s Manual 9
Reverb/Chorus/Master Effect display
From these displays, you can make the Effect settings for the Performance currently selected on the instrument. This section covers the operations on these displays having
the same design.
Tapping here returns the screen to the EFFECT display.
Effect List
To select an Effect Type:
Tap [+]/[-] in this area. Or tap the indicators in this area to call up the Effect
list, tap the desired Category, tap the desired Type, then tap the desired
Preset setting. After selecting, tap [Done] to close the Effect list.
To edit the Effect parameter:
Drag the slider of the desired parameter, or tap [+]/[-].
Dragging upward or downward will scroll through the parameters.
Performance Editor Essential Owner’s Manual 10
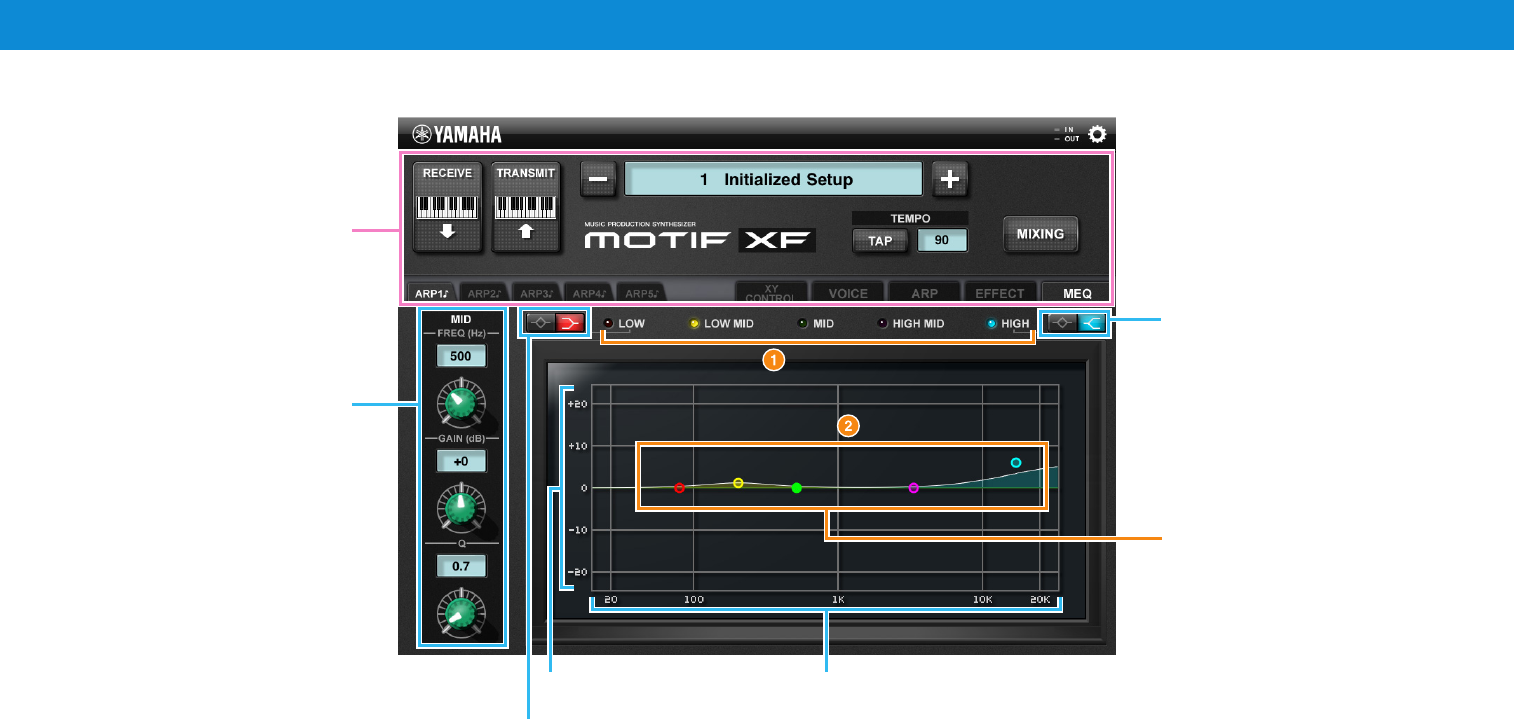
MEQ display
Same as in the VOICE display
To adjust the EQ parameters for each
Band, tap the desired band at 1 or
2 to correspondingly change the
Knob color, then operate the Knob, or
tap the value to call up the slider for
adjusting.
Select the shape of the HIGH band
from Shelving (left side) and Peaking
(right side).
To edit the EQ setting, drag the dot
with the color corresponding to that
of the desired band (LOW, LOW MID,
MID, HIGH MID or HIGH).
Select the shape of the LOW band from
Shelving (left side) and Peaking (right side).
GainFrequency
Performance Editor Essential Owner’s Manual 11
XY CONTROL display
The Pad area on this display lets you simultaneously control the five parameters specified for CONTROL 1 – 5. This means that you can freely change the sound in real time
during keyboard performance by controlling the Pad area.
Same as in the VOICE display
Sets how the Control Parameter Value is
determined.
X: The horizontal value of the ball position
will be transmitted as the parameter value.
Y: The vertical value of the ball position will
be transmitted as the parameter value.
Sets the Control Parameter.
Tap [+]/[-], or tap the Parameter name
between [-] and [+] to call up the list,
then tap the desired parameter.
Pad
Resets the ball position
to the center of the Pad.
Ball
Indicates the current
position of your control.
Sets the sensitivity of the ball in
the Pad area.
Move the slider rightward to raise
the sensitivity.
Dragging upward or
downward will scroll
through the parameters.
Parameter List
Performance Editor Essential Owner’s Manual 12
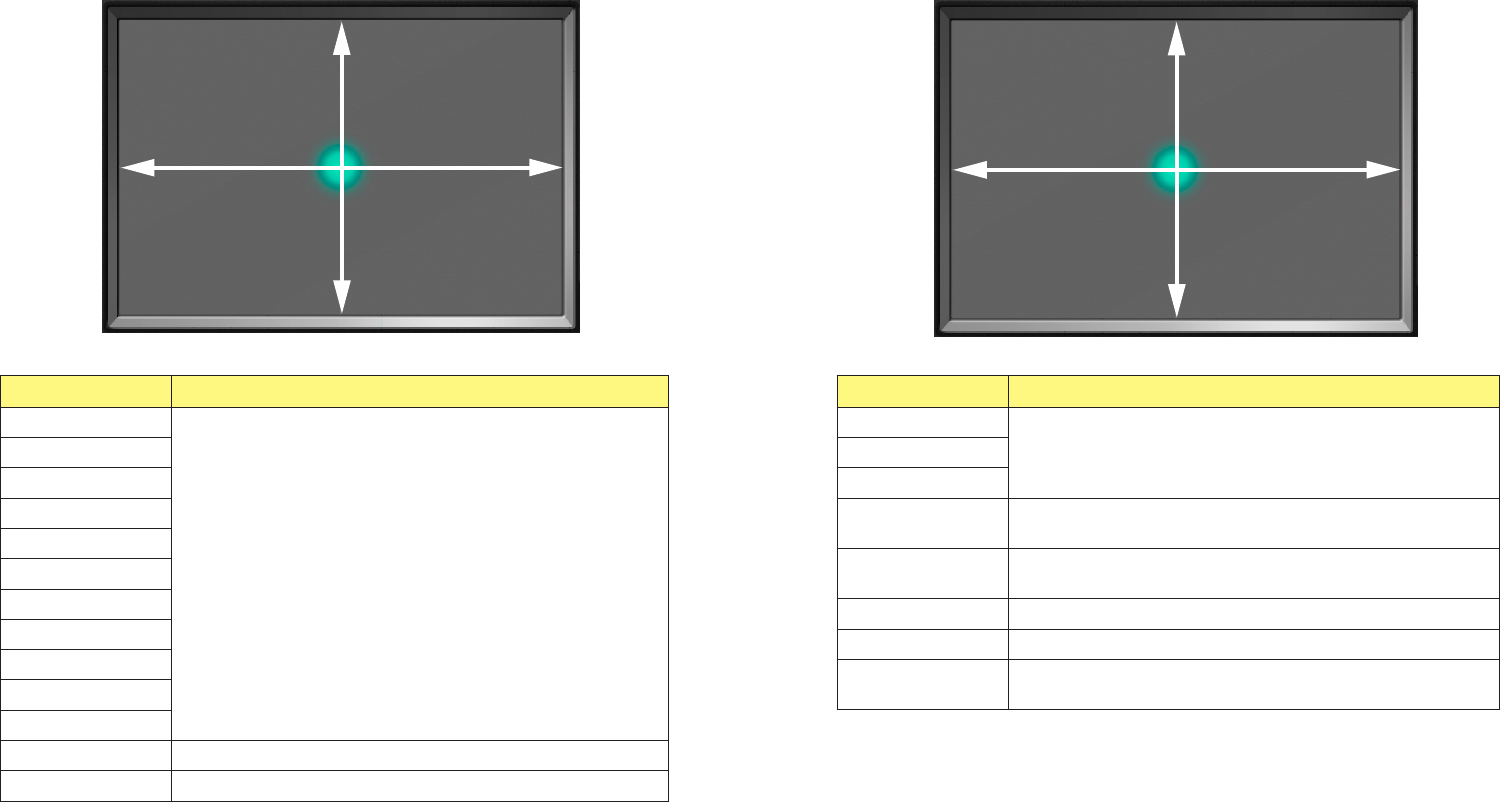
Ball position and Parameter value
Moving the ball transmits the values of the parameters specified for CONTROL 1 – 5 from your iPad to the instrument. As shown below, two different value ranges are
Gebruikershandleiding.com neemt misbruik van zijn services uitermate serieus. U kunt hieronder aangeven waarom deze vraag ongepast is. Wij controleren de vraag en zonodig wordt deze verwijderd.
Product:
Spelregels forum
Om tot zinvolle vragen te komen hanteren wij de volgende spelregels:
lees eerst de handleiding door;
controleer of uw vraag al eerder door iemand anders is gesteld;
probeer uw vraag zo duidelijk mogelijk te stellen;
heeft u een probleem en al geprobeerd om dit op te lossen, vermeld dit erbij aub;
heeft u een oplossing gekregen van een bezoeker dan horen wij dat graag in dit forum;
wilt u een reactie geven op een vraag of antwoord, gebruik dan niet dit formulier maar klik op de knop 'reageer op deze vraag';
uw vraag wordt direct op de website gezet; vermijd daarom persoonlijke gegevens in te vullen;
Belangrijk! Als er een antwoord wordt gegeven op uw vraag, dan is het voor de gever van het antwoord nuttig om te weten als u er wel (of niet) mee geholpen bent! Wij vragen u dus ook te reageren op een antwoord.
Belangrijk! Antwoorden worden ook per e-mail naar abonnees gestuurd. Laat uw emailadres achter op deze site, zodat u op de hoogte blijft. U krijgt dan ook andere vragen en antwoorden te zien.
Abonneren
Abonneer u voor het ontvangen van emails voor uw Yamaha MOX8 bij:
nieuwe vragen en antwoorden
nieuwe handleidingen
U ontvangt een email met instructies om u voor één of beide opties in te schrijven.
Ontvang uw handleiding per email
Vul uw emailadres in en ontvang de handleiding van Yamaha MOX8 in de taal/talen: Engels als bijlage per email.
De handleiding is 5,53 mb groot.
U ontvangt de handleiding per email binnen enkele minuten. Als u geen email heeft ontvangen, dan heeft u waarschijnlijk een verkeerd emailadres ingevuld of is uw mailbox te vol. Daarnaast kan het zijn dat uw internetprovider een maximum heeft aan de grootte per email. Omdat hier een handleiding wordt meegestuurd, kan het voorkomen dat de email groter is dan toegestaan bij uw provider.
Uw handleiding is per email verstuurd. Controleer uw email
Als u niet binnen een kwartier uw email met handleiding ontvangen heeft, kan het zijn dat u een verkeerd emailadres heeft ingevuld of dat uw emailprovider een maximum grootte per email heeft ingesteld die kleiner is dan de grootte van de handleiding.
Er is een email naar u verstuurd om uw inschrijving definitief te maken.
Controleer uw email en volg de aanwijzingen op om uw inschrijving definitief te maken
U heeft geen emailadres opgegeven
Als u de handleiding per email wilt ontvangen, vul dan een geldig emailadres in.
Uw vraag is op deze pagina toegevoegd
Wilt u een email ontvangen bij een antwoord en/of nieuwe vragen? Vul dan hier uw emailadres in.