Sampling the sound of an audio device to create a Drum Voice
In the previous section on
page 94, you learned how to record a Sample using a microphone. Here, you’ll learn how to record
Samples from an audio device, such as a CD player or MD player, and use the Samples to create a Drum Voice.
In order to use the Sampling function, DIMM modules must be installed to the instrument. For details on installing DIMMs, see page 289.
Depending on the size of the audio (sample) data obtained via the Sampling function, you may not be able to save all of the desired data to a SmartMedia
card (maximum capacity: 128MB). For this reason, we recommend using a large-capacity USB storage device for your Sampling data.
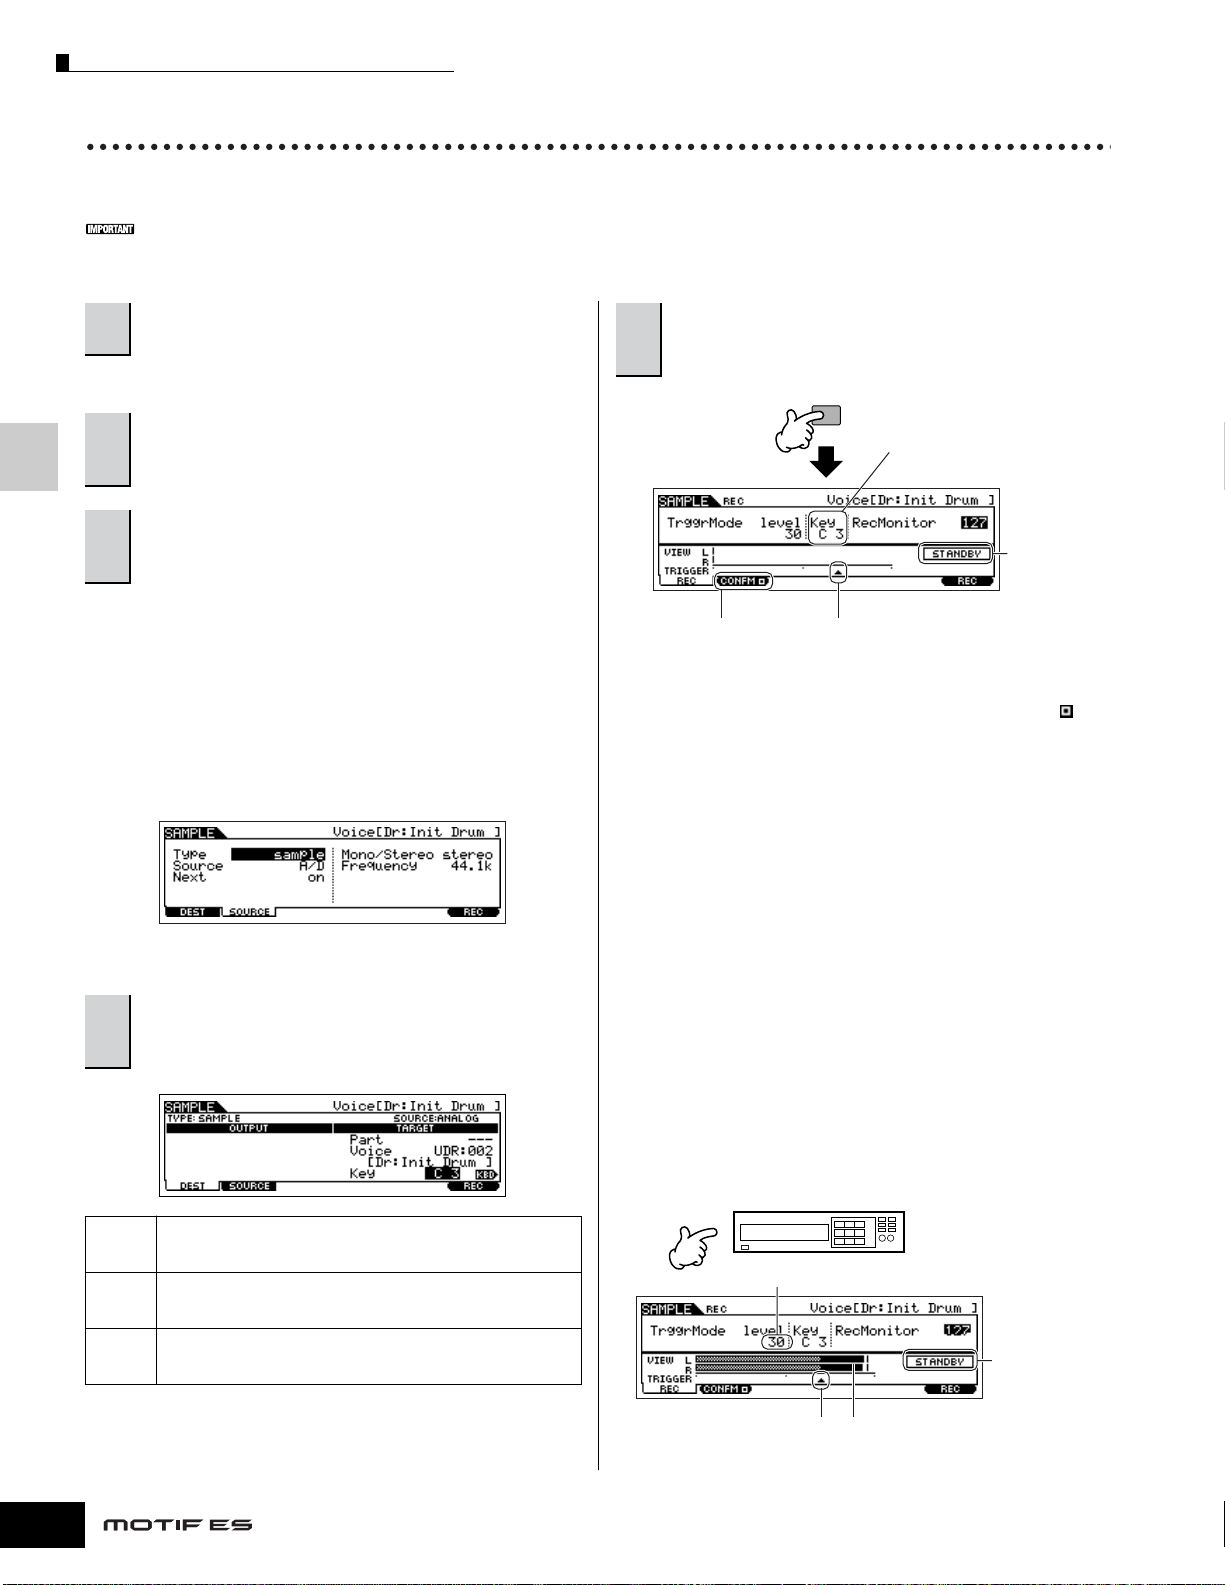
Follow steps #1 - 8 on page 73.
Type: sample
Source:A/D
Next:on
Mono/Stereo:stereo
Frequency:44.1k
When creating a Drum Voice consisting of many separate
Samples, you’ll want to quickly be able to record a Sample,
assign it to a key, then move on to the next one. To do this
smoothly and easily, set the Next parameter to “on.”
For details about each parameter, see page 251.
nIf the Voice parameter above is set to “off,” you won’t be able to play
the sampled sound as a Voice after completing this operation.
However, you can call up the sampled sound by selecting a
Waveform. For details on how to select a Waveform, see page 174.
●Setting the Confirm function
When the [F2] CONFM (Confirm function) is turned on ( is
indicated), you can easily listen back to your just-recorded
sample and conveniently re-record it if you’re not satisfied
with the results. Here, set the [F2] CONFM button on.
●Setting the Trigger mode
The Trigger mode lets you determine how the Sampling
actually starts. For example, you can start the Sampling
simply by pressing the button or when the Song/Pattern
playback reaches a specified point. Here, set the TrggrMode
(Trigger mode) to “level” which lets you start sampling as
soon as the input signal from the audio device exceeds the
specified Trigger Level.
●Setting the Trigger Level
When the Trigger mode is set to “level,” you’ll also need to set
the Trigger Level. This determines when sampling actually
starts, depending on the level of the input signal of the audio
device. As the sound plays, notice the movement of the level
meter (bar), and when the bar crosses the Trigger Level arrow.
If necessary, select the Trigger Level value and use the data
dial to change it, moving the arrow as low or as high as needed.
1Connect an audio device (CD player, etc.) to the
instrument.
2Press the [INTEGRATED SAMPLING] button in
the Voice mode or Performance mode to enter
the Sampling mode.
3Press the [F2] SOURCE button to call up the
display for setting the Sampling Source, then set
the parameters as shown below.
4Press the [F1] DEST button to call up the display
for setting the Sampling Destination, then set the
parameters as described below.
PartThis is available when entering the Sampling mode from the
Performance mode. This parameter determines the Performance
Part to which the Voice (below) created by sampling is assigned.
Voice
Set the Bank to “UDR” (User Drum Voice Bank), then select a User
Drum Voice Number. After the Sampling is completed, you can
hear the created Voice by selecting the Voice number set here.
KeyHere, set this parameter to “C3.” After the Sampling is
completed, you can hear the sampled sound by pressing the
Gebruikershandleiding.com neemt misbruik van zijn services uitermate serieus. U kunt hieronder aangeven waarom deze vraag ongepast is. Wij controleren de vraag en zonodig wordt deze verwijderd.
Product:
Spelregels forum
Om tot zinvolle vragen te komen hanteren wij de volgende spelregels:
lees eerst de handleiding door;
controleer of uw vraag al eerder door iemand anders is gesteld;
probeer uw vraag zo duidelijk mogelijk te stellen;
heeft u een probleem en al geprobeerd om dit op te lossen, vermeld dit erbij aub;
heeft u een oplossing gekregen van een bezoeker dan horen wij dat graag in dit forum;
wilt u een reactie geven op een vraag of antwoord, gebruik dan niet dit formulier maar klik op de knop 'reageer op deze vraag';
uw vraag wordt direct op de website gezet; vermijd daarom persoonlijke gegevens in te vullen;
Belangrijk! Als er een antwoord wordt gegeven op uw vraag, dan is het voor de gever van het antwoord nuttig om te weten als u er wel (of niet) mee geholpen bent! Wij vragen u dus ook te reageren op een antwoord.
Belangrijk! Antwoorden worden ook per e-mail naar abonnees gestuurd. Laat uw emailadres achter op deze site, zodat u op de hoogte blijft. U krijgt dan ook andere vragen en antwoorden te zien.
Abonneren
Abonneer u voor het ontvangen van emails voor uw Yamaha MOTIF ES7 bij:
nieuwe vragen en antwoorden
nieuwe handleidingen
U ontvangt een email met instructies om u voor één of beide opties in te schrijven.
Ontvang uw handleiding per email
Vul uw emailadres in en ontvang de handleiding van Yamaha MOTIF ES7 in de taal/talen: Engels als bijlage per email.
De handleiding is 8,4 mb groot.
U ontvangt de handleiding per email binnen enkele minuten. Als u geen email heeft ontvangen, dan heeft u waarschijnlijk een verkeerd emailadres ingevuld of is uw mailbox te vol. Daarnaast kan het zijn dat uw internetprovider een maximum heeft aan de grootte per email. Omdat hier een handleiding wordt meegestuurd, kan het voorkomen dat de email groter is dan toegestaan bij uw provider.
Uw handleiding is per email verstuurd. Controleer uw email
Als u niet binnen een kwartier uw email met handleiding ontvangen heeft, kan het zijn dat u een verkeerd emailadres heeft ingevuld of dat uw emailprovider een maximum grootte per email heeft ingesteld die kleiner is dan de grootte van de handleiding.
Er is een email naar u verstuurd om uw inschrijving definitief te maken.
Controleer uw email en volg de aanwijzingen op om uw inschrijving definitief te maken
U heeft geen emailadres opgegeven
Als u de handleiding per email wilt ontvangen, vul dan een geldig emailadres in.
Uw vraag is op deze pagina toegevoegd
Wilt u een email ontvangen bij een antwoord en/of nieuwe vragen? Vul dan hier uw emailadres in.