00_HTR-4067_5067_om_En.book Page 3 Monday, November 18, 2013 12:50 AM
AccessoriesEn4
Accessories
Check that the following accessories are supplied with the product.
Remote controlBatteries (AAA, R03, UM-4) (x2)
AM antennaFM antenna
*One of the above is supplied depending on the region of
purchase.
YPAO microphoneWireless antenna
(HTR-5067/TSR-5770 only)
CD-ROM (Owner’s Manual)
Easy Setup Guide
Safety Brochure
Insert the batteries the right
way round.
Operating range of the remote control
•Point the remote control at the remote control sensor on the unit and remain within the operating range
shown below.
•The illustrations of the main unit used in this manual are of the HTR-5067/TSR-5770 (U.S.A. model),
unless otherwise specified.
•Some features are not available in certain regions.
•Due to product improvements, specifications and appearance are subject to change without notice.
•This manual explains operations using the supplied remote control.
•This manual describes all the “iPod” and “iPhone” as the “iPod”. “iPod” refers to both “iPod” and
“iPhone” unless otherwise specified.
• indicates precautions for use of the unit and its feature limitations.
• indicates supplementary explanations for better use.
30°30°
Within 6 m (20 ft)
00_HTR-4067_5067_om_En.book Page 4 Monday, November 18, 2013 12:50 AM
FEATURES➤What you can do with the unitEn5
FEATURES
What you can do with the unit
AV receiver (the unit)
Speakers
BD/DVD player
HDMI Control
Audio/Video
TV remote control
Audio
HDMI Control
Audio
Audio/Video
TV
Sequential operation of a TV,
AV receiver, and BD/DVD
player (HDMI Control)
.p.111
Change the input source
and favorite settings with
one touch (SCENE)
.p.43
**
* HTR-5067/TSR-5770 only
Wide variety of supported content
• iPod/iPhone
.p.53
•USB
.p.57
• Media server (PC/NAS)
.p.60
• Internet radio
.p.64
•AirPlay
.p.67
iPod/iPhone
USB device
Audio
Network contents
Supports 2- to 5.1-channel (to 7.1-channel*)
speaker system. Allows you to enjoy your favorite
acoustic spaces in various styles.
• Automatically optimizing the speaker
settings to suit your room (YPAO)
.p.38
• Reproducing stereo or multichannel
sounds with the sound fields like
actual movie theaters and concert
halls (CINEMA DSP)
.p.45
• Enjoying compressed music with
enhanced sound (Compressed Music
Enhancer)
.p.48
• Playing back music in multiple rooms
(Zone B)*
.p.69
3D and 4K Ultra HD signals supported
Wireless connection to a
network*
.p.25
* HTR-5067/TSR-5770 only
00_HTR-4067_5067_om_En.book Page 5 Monday, November 18, 2013 12:50 AM
FEATURES➤What you can do with the unitEn6
Full of useful functions!
❑Connecting various devices (p.21)
A number of HDMI jacks and various input/output jacks
on the unit allow you to connect video devices (such as
BD/DVD players), audio devices (such as CD players),
game consoles, portable audio player, and other
devices.
❑Playing back TV audio in surround sound
with a single HDMI cable connection
(Audio Return Channel: ARC) (p.19)
When using an ARC -compatible TV, you only need one
HDMI cable to enable video output to the TV, audio input
from the TV, and the transmission of HDMI Control signals.
❑Easy operation and wireless music
playback from iPhone or Android™ device
By using the application for smartphone/tablet “AV
CONTROLLER”, you can control the unit from an
iPhone, iPad, iPod touch or Android devices. Visit our
website for details.
❑Creating 3-dimensional sound fields (p.45)
The Virtual Presence Speaker (VPS) function allows you
to create a 3-dimensional sound field in your own room
(CINEMA DSP 3D).
❑Surround playback with 5 speakers placed
in front (p.46)
You can enjoy the surround sound even when the
surround speakers are placed in front.
❑Enjoying pure high fidelity sound (p.48)
When the direct playback mode is enabled, the unit
plays back the selected source with the least circuitry,
which lets you to enjoy Hi-Fi sound quality.
❑Low power consumption
The ECO mode (power saving function) reduces the
unit’s power consumption and helps to create an
eco-friendly home theater system (p.88).
BD/DVD
player
Game
console
Portable
audio
player
TV
Set-top box
HDMI Control
TV audio
Video from
external device
Useful tips
The combination of video/audio input jacks does not
match an external device...
Use “Audio In” in the “Option” menu to change the
combination of video/audio input jacks so that it matches
the output jack(s) of your external device (p.22).
Video and audio are not synchronized...
Use “Lipsync” in the “Setup” menu to adjust the delay
between video and audio output (p.86).
I want to hear audio from the TV speakers...
Use “Audio Output” in the “Setup” menu to select the
output destination of signals input into the unit (p.83).
Your TV speakers may be selected as an output
destination.
I want to change the on-screen menu language...
Use “Language” in the “Setup” menu to select a
language from English, Japanese, French, German,
Spanish, Russian, Italian and Chinese (p.27).
I want to update the firmware...
Use “Network Update” (p.97) in the “Setup” menu or
“UPDATE” (p.96) in the “ADVANCED SETUP” menu to
update the unit’s firmware.
Many other settings are available that let you to
customize the unit. For details, see the following pages.
•SCENE settings (p.43)
•Sound/video settings and signal information for each
source (p.72)
•Various function settings (p.77)
•System settings (p.94)
00_HTR-4067_5067_om_En.book Page 6 Monday, November 18, 2013 12:50 AM
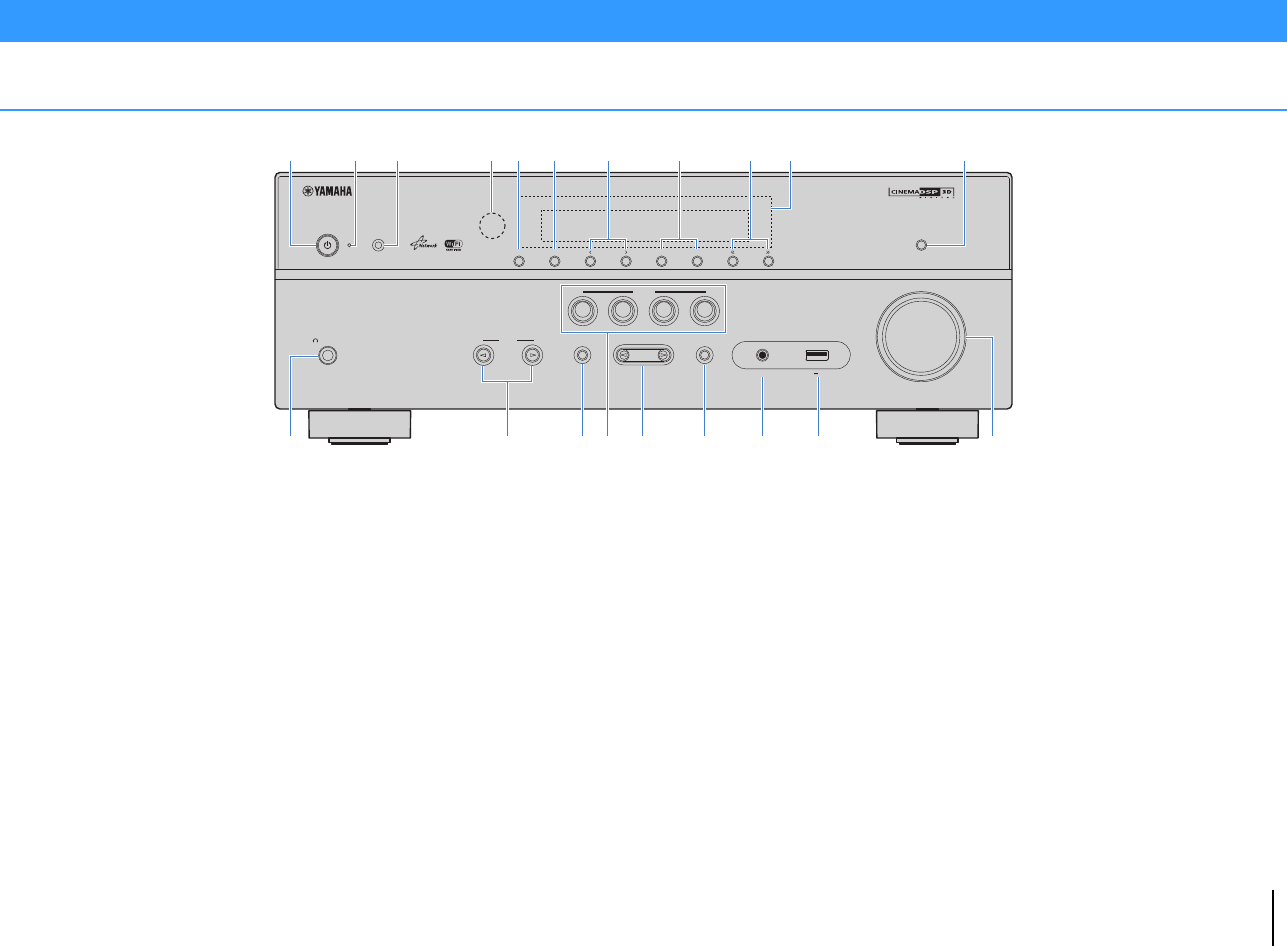
FEATURES➤Part names and functionsEn7
Front panel
1z (power) key
Turns on/off (standby) the unit.
2Standby indicator
Lights up when the unit is in standby mode under any of the
following conditions.
•HDMI Control is enabled (p.83)
•Standby Through is enabled (p.83)
•Network Standby is enabled (p.92)
•An iPod is being charged (p.53)
3YPAO MIC jack
For connecting the supplied YPAO microphone (p.38).
4Remote control sensor
Receives remote control signals (p.4).
5INFO (WPS) key
Selects the information displayed on the front display (p.71).
(HTR-5067/TSR-5770 only)
Enters the wireless LAN connection setup (WPS button
configuration) by holding down for 3 seconds (p.30).
6MEMORY key
Registers FM/AM radio stations as preset stations (p.50).
7PRESET keys
Select a preset FM/AM radio station (p.51).
8FM and AM keys
Switch between FM and AM (p.49).
9TUNING keys
Select the radio frequency (p.49).
0Front display
Displays information (p.8).
ADIRECT key
Enables/disables the direct playback mode (p.48).
BPHONES jack
For connecting headphones.
CINPUT keys
Select an input source.
DTONE CONTROL key
Adjusts the high-frequency range and low-frequency range
of output sounds (p.73).
ESCENE keys
Select the registered input source and sound program with
one touch. Also, turns on the unit when it is in standby mode
(p.43).
FPROGRAM keys
Select a sound program or a surround decoder (p.44).
GSTRAIGHT key
Enables/disables the straight decode mode (p.47).
HAUX jack
For connecting devices, such as portable audio players
(p.24).
IUSB jack
For connecting a USB storage device (p.57) or an iPod
(p.53).
JVOLUME knob
Adjusts the volume.
Part names and functions
INFO (WPS)
MEMORY
PRESET
FMAM
TUNING
CONTROL
TV
BD
DVD
NET
RADIO
INPUT
SCENE
YPAO MIC
PHONES
SILENT
CINEMA
STRAIGHT
DIRECT
AUDIO
VOLUME
AUX
TONE
PROGRAM
5V1A
4:A23561789
B
JDFG
IHCE
00_HTR-4067_5067_om_En.book Page 7 Monday, November 18, 2013 12:50 AM
FEATURES➤Part names and functionsEn8
Front display (indicators)
1HDMI
Lights up when HDMI signals are being input or output.
OUT
Lights up when HDMI signals are being output.
2ENHANCER
Lights up when Compressed Music Enhancer (p.48) is
working.
3CINEMA DSP
Lights up when CINEMA DSP (p.45) or CINEMA DSP 3D
(p.45) is working.
4STEREO
Lights up when the unit is receiving a stereo FM radio signal.
TUNED
Lights up when the unit is receiving an FM/AM radio station
signal.
5SLEEP
Lights up when the sleep timer is on.
6MUTE
Blinks when audio is muted.
7Volume indicator
Indicates the current volume.
8ECO
Lights up when the eco mode (p.88) is enabled.
9Cursor indicators
Indicate the remote control cursor keys currently operational.
0Information display
Displays the current status (such as input name and sound
mode name). You can switch the information by pressing
INFO (p.71).
ASignal strength indicator
(HTR-5067/TSR-5770 only)
Indicates the strength of the wireless signal (p.28).
BZONE indicators (HTR-5067/TSR-5770 only)
Indicate the zone to which the sound is output (p.70).
CSpeaker indicators
Indicate speaker terminals from which signals are output.
AFront speaker (L)
SFront speaker (R)
DCenter speaker
FSurround speaker (L)
GSurround speaker (R)
HSurround back speaker (L)*
JSurround back speaker (R)*
KSurround back speaker*
LSubwoofer
* HTR-5067/TSR-5770 only
DADAPTIVE DRC
Lights up when Adaptive DRC (p.73) is working.
12
PARTY
VIRTUAL
23
CHARGE
VOL.
MUTE
ENHANCER
STEREO
TUNED
SLEEP
OUT
ECO
ADAPTIVE DRC
ZONE
A
ZONE
B
SP IMP.••8 MIN
2365417
9908CDB
A
00_HTR-4067_5067_om_En.book Page 8 Monday, November 18, 2013 12:50 AM
FEATURES➤Part names and functionsEn9
Rear panel
1ANTENNA jacks
For connecting to FM and AM antennas (p.24).
2HDMI OUT jack
For connecting to an HDMI-compatible TV and outputting
video/audio signals (p.19). When using ARC, TV audio signal
can also be input through the HDMI OUT jack.
3HDMI 1–6 jacks
For connecting to HDMI-compatible playback devices and
inputting video/audio signals (p.21).
4NETWORK jack
For a wired connection to a network (p.25).
5WIRELESS jack (HTR-5067/TSR-5770 only)
For connecting to the supplied wireless antenna (p.28).
6Power cable
For connecting to an AC wall outlet (p.26).
7AV 1–6 jacks
For connecting to video/audio playback devices and
inputting video/audio signals (p.21).
8AV OUT jacks
For outputting video/audio to a recording device (such as a
VCR) (p.26).
9MONITOR OUT jacks
COMPONENT VIDEO jacks:
For connecting to a TV that supports component video and
outputting video signals (p.21).
VIDEO jack:
For connecting to a TV that supports composite video and
outputting video signals (p.21).
0SUBWOOFER PRE OUT 1–2 jacks
(HTR-5067/TSR-5770)
SUBWOOFER PRE OUT jack (HTR-4067)
For connecting to a subwoofer (with built-in amplifier) (p.16).
•(HTR-5067/TSR-5770 only)
You can connect 2 subwoofers (with built-in amplifier) to the
unit.
ADC OUT jack
For supplying power to a Yamaha AV accessory. For details
on connections, refer to the instruction manual of the AV
accessory.
BSPEAKERS terminals
For connecting to speakers (p.16).
•The SURROUND BACK/BI AMP/ZONE B jacks are available on
HTR-5067/TSR-5770 only.
CVOLTAGE SELECTOR
(General model only)
Selects the switch position according to your local voltage
(p.26).
FRONTCENTERSURROUND
SINGLE
SURROUND BACK/BI AMP
/ZONE B
AV 1
AV 2
AV 3
AV 5
AV 6
OPTICALCOAXIALCOAXIAL
(
TV
)
COMPONENT
VIDEO
COMPONENT
VIDEO
P
B
Y
VIDEO
AV
MONITOR OUT
OUT
AV 4
P
R
P
B
Y
P
R
NETWORK
FM
ANTENNA
AM
SPEAKERS
HDMI 1
(
BD/DVD
)
HDMI 2
HDMI 3
HDMI 4
HDMI
OUT
ARC
(
RADIO
)
SUBWOOFER
PRE OUT
2
1
HDMI 5
DC OUT
5V0.5A
HDMI 6
(
NET
)
WIRELESS
0AB8
21
3654
7
C
9
* The area around the video/audio output jacks is
marked in white on the actual product to prevent
improper connections.
(HTR-5067/TSR-5770 U.S.A. model)
00_HTR-4067_5067_om_En.book Page 9 Monday, November 18, 2013 12:50 AM
FEATURES➤Part names and functionsEn10
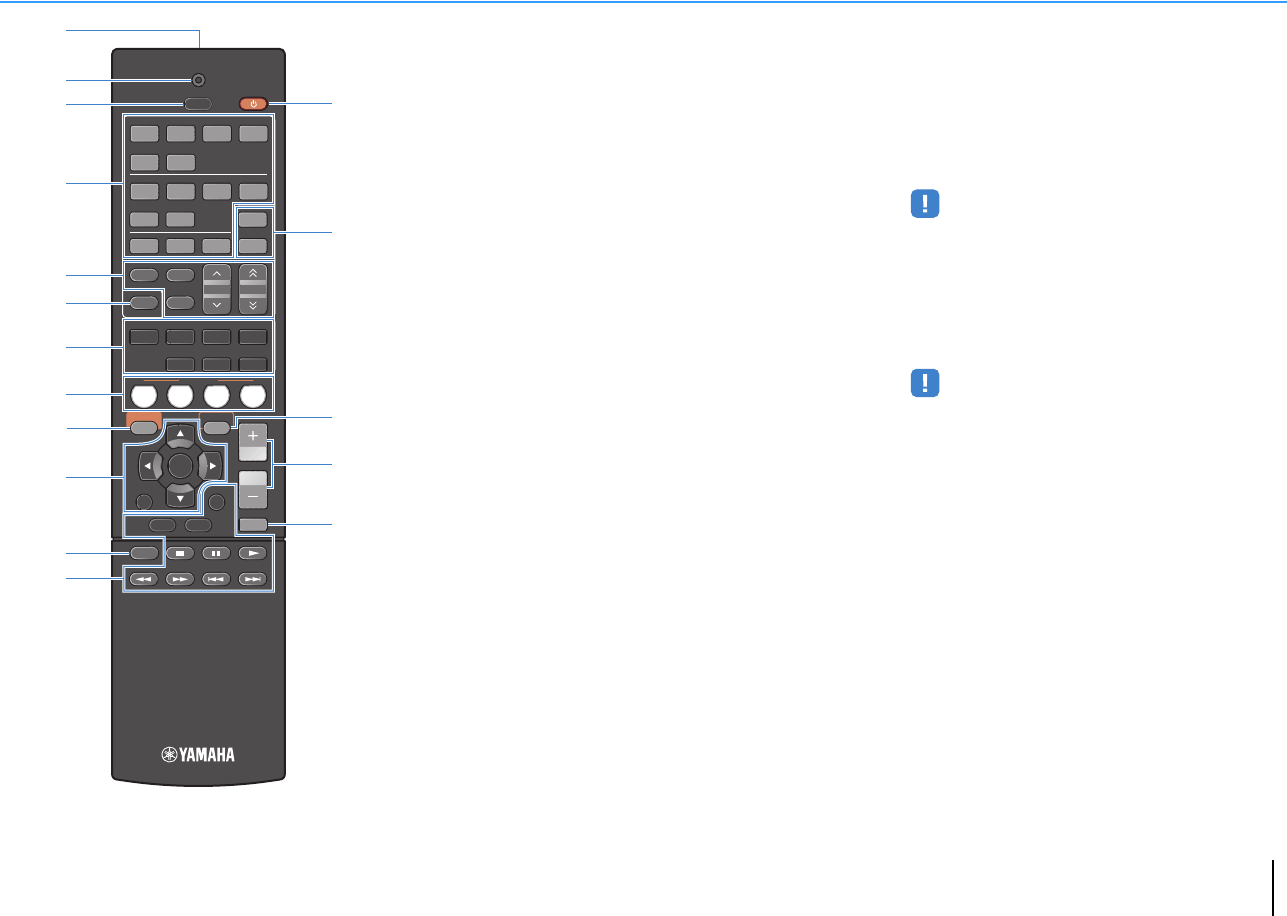
Remote control
1Remote control signal transmitter
Transmits infrared signals.
2TRANSMIT indicator
Lights up when remote control signals are transmitted.
3SLEEP key
Switches the unit to standby mode automatically after a
specified period of time has elapsed (sleep timer). Press
repeatedly to set the time (120 min, 90 min, 60 min, 30 min,
off).
4Input selection keys
Select an input source for playback.
HDMI 1–6HDMI 1–6 jacks
AV 1–6AV 1–6 jacks
AUXAUX jack (on the front panel)
USBUSB jack (on the front panel)
NETNetwork sources (press repeatedly to select a
desired network source)
5Radio keys
Operate the FM/AM radio (p.49).
FMSwitches to FM radio.
AMSwitches to AM radio.
MEMORYRegisters FM/AM radio stations as presets.
PRESETSelect a preset station.
TUNINGSelect the radio frequency.
6INFO key
Selects the information displayed on the front display (p.71).
7Sound mode keys
Select a sound mode (p.44).
8SCENE keys
Select the registered input source and sound program with
one touch. Also, turns on the unit when it is in standby mode
(p.43).
9SETUP key
Displays the setup menu (p.76).
0Menu operation keys
Cursor keysSelect a menu or a parameter.
ENTERConfirms a selected item.
RETURNReturns to the previous screen.
AMODE key
Switches between “Stereo” and “Mono” for FM radio
reception (p.49).
Switches the iPod operation modes (p.55).
BExternal device operation keys
Control playback of the iPod (p.53), USB storage device
(p.57) or PCs/NAS (p.60).
Also control playback or operate menus of the playback
devices connected to the unit with an HDMI cable.
•The playback devices must support HDMI Control. However,
Yamaha does not assure the operation of all HDMI
Control-compatible devices.
CRECEIVER z key
Turns on/off (standby) the unit.
DZONE keys
Enable/disable the audio output to Zone A or Zone B (p.70).
•ZONE keys function on HTR-5067/TSR-5770 only.
EOPTION key
Displays the option menu (p.72).
FVOLUME keys
Adjust the volume.
GMUTE key
Mutes the audio output.
1234
56
FM
INFO
MEMORY
AM
PRESET
TUNING
SCENE
RETURN
TOP
MENU
POP-UP
MENU
VOLUME
BD
DVD
TV
NET
RADIO
MUTE
DISPLAY
ENTER
TRANSMIT
RECEIVER
HDMI
AV
SLEEP
AUXUSB
56
NET
ZONE B
ZONE A
MOVIEMUSIC
SUR. DECODESTRAIGHT
ENHANCER
BASSDIRECT
MODE
SETUP
OPTION
2341
C
D
E
F
G
1
4
2
3
5
6
8
7
9
:
B
A
00_HTR-4067_5067_om_En.book Page 10 Monday, November 18, 2013 12:50 AM
PREPARATIONS➤General setup procedureEn11
PREPARATIONS
This completes all the preparations. Enjoy playing movies, music, radio and other content with the unit!
General setup procedure
1Placing speakers (p.12)
Select the speaker layout for the number of speakers that you are using and place them in your room.
2Connecting speakers (p.16)
Connect the speakers to the unit.
3Connecting a TV (p.19)
Connect a TV to the unit.
4Connecting playback devices (p.21)
Connect video devices (such as BD/DVD players) and audio devices (such as CD players) to the unit.
5Connecting the FM/AM antennas (p.24)
Connect the supplied FM/AM antennas to the unit.
6
Connecting to a network (wired LAN
connection) (p.25)
Connect the unit to a network with a commercially-available network cable.
7Connecting recording devices (p.26)
Connect recording devices to the unit.
8Connecting the power cable (p.26)
After all the connections are complete, plug in the power cable.
9
Selecting an on-screen menu language
(p.27)
Select the desired on-screen menu language.
10
Connecting to a network wirelessly
(HTR-5067/TSR-5770 only) (p.28)
Connect the unit to a network wirelessly.
11
Optimizing the speaker settings
automatically (YPAO) (p.38)
Optimize the speaker settings, such as volume balance and acoustic parameters, to suit your room
(YPAO).
00_HTR-4067_5067_om_En.book Page 11 Monday, November 18, 2013 12:50 AM
PREPARATIONS➤Placing speakersEn12
Select the speaker layout for the number of speakers that you are using and place the speakers and subwoofer in your room. This section describes the representative speaker layout
examples.
*1HTR-5067/TSR-5770 only
*2Place the surround speakers in front and set "Virtual CINEMA FRONT" (p.81) in the "Setup" menu to "On".
•HTR-5067/TSR-5770 supports 2- to 7.1-channel system, and HTR-4067 supports 2- to 5.1-channel speaker system.
•(HTR-5067/TSR-5770 only)
You can connect two subwoofers (with built-in amplifier) to the unit. Two subwoofers connected to the unit output the same sounds.
1Placing speakers
Caution
•(U.S.A. and Canada models only)
Under its default settings, the unit is configured for 8-ohm speakers. When connecting 6-ohm speakers, set the unit’s speaker impedance to “6 Ω MIN”. For details, see “Setting the speaker impedance” (p.15).
•(Except for U.S.A. and Canada models)
Use speakers with an impedance of at least 6 Ω.
Speaker typeAbbr.Function
Speaker system (the number of channels)
7.1*
1
6.1*
1
5.1
5.1
(Virtual
CINEMA
FRONT)
4.13.12.1
Front (L)1
Produce front left/right channel sounds (stereo sounds).
●●●●●●●
Front (R)2●●●●●●●
Center 3Produces center channel sounds (such as movie dialogue and vocals).●●●●●
Surround (L)4
Produce surround left/right channel sounds.
●●●
●*
2
●
Surround (R)5●●●
●*
2
●
Surround back (L)*
1
6
Produce surround back left/right channel sounds.
●
Surround back (R)*
1
7●
Surround back*
1
8Produces sounds mixed from surround back left/right channel sounds.●
Subwoofer9
Produces LFE (low-frequency effect) channel sounds and reinforces the bass parts of other channels.
This channel is counted as “0.1”.
●●●●●●●
1234567891011
00_HTR-4067_5067_om_En.book Page 12 Monday, November 18, 2013 12:50 AM
PREPARATIONS➤Placing speakersEn13
7.1-channel system (HTR-5067/TSR-5770 only)
6.1-channel system (HTR-5067/TSR-5770 only)
5.1-channel system
5.1-channel system (Virtual CINEMA FRONT)
•To utilize this configuration, set "Virtual CINEMA FRONT" (p.78) in the "Setup" menu to "On".
•You can enjoy surround sound even without the center speaker (front 4.1-channel system).
45
1
2
399
67
30 cm (1 ft) or
more
10° to 30°10° to 30°
45
1
2
39
8
10° to 30°10° to 30°
45
12
39
10° to 30°10° to 30°
12
39
45
1234567891011
00_HTR-4067_5067_om_En.book Page 13 Monday, November 18, 2013 12:50 AM
PREPARATIONS➤Placing speakersEn14
4.1-channel system
3.1-channel system
2.1-channel system
45
12
9
10° to 30°10° to 30°
12
39
12
9
1234567891011
00_HTR-4067_5067_om_En.book Page 14 Monday, November 18, 2013 12:50 AM
PREPARATIONS➤Placing speakersEn15
■Setting the speaker impedance
(U.S.A. and Canada models only)
Under its default settings, the unit is configured for 8-ohm speakers. When connecting
6-ohm speakers, set the speaker impedance to “6 Ω MIN”.
1
Before connecting speakers, connect the power cable to an AC wall
outlet.
2
While holding down STRAIGHT on the front panel, press z (power).
3
Check that “SP IMP.” is displayed on the front display.
4
Press STRAIGHT to select “6 Ω MIN”.
5
Press z (power) to set the unit to standby mode and remove the
power cable from the AC wall outlet.
You are now ready to connect the speakers.
z (power)
STRAIGHT
12
PARTY
VIRTUAL
VOL.
MUTE
ENHANCER
STEREO
TUNED
SLEEP
OUT
ECO
CHARGE
ADAPTIVE DRC
ZONE
2A
ZONE
3B
SP IMP.••8¬MIN
1234567891011
00_HTR-4067_5067_om_En.book Page 15 Monday, November 18, 2013 12:50 AM
PREPARATIONS➤Connecting speakersEn16
Connect the speakers placed in your room to the unit.
The following diagrams provide connections for 5.1-
and 7.1-channel systems as examples. For other
systems, connect speakers while referring to the
connection diagram for the 5.1-channel system.
Cables required for connection
(commercially available)
Speaker cables (x the number of speakers)
Audio pin cable (x1: for connecting a subwoofer)
5.1-channel system7.1-channel system
(HTR-5067/TSR-5770 only)
2Connecting speakers
Caution
•Remove the unit’s power cable from an AC wall outlet and turn
off the subwoofer before connecting the speakers.
•Ensure that the core wires of the speaker cable do not touch
one another or come into contact with the unit’s metal parts.
Doing so may damage the unit or the speakers. If the speaker
cables short circuit, “Check SP Wires” will appear on the front
display when the unit is turned on.
–
+
–
+
FRONTCENTERSURROUND
SINGLE
SURROUND BACK/BI AMP
/ZONE B
OR OUT
P
B
Y
SPEAKERS
SUBWOOFER
PRE OUT
2
1
DC OUT
5V0.5A
12
3
45
9
The unit (rear)
•(HTR-5067/TSR-5770 only)
You can connect 2 subwoofers (with built-in amplifier) to the unit.
The 2 subwoofers output the same sound.
FRONTCENTERSURROUND
SINGLE
SURROUND BACK/BI AMP
/ZONE B
OR OUT
P
B
Y
SPEAKERS
SUBWOOFER
PRE OUT
2
1
DC OUT
5V0.5A
1
67
2
3
45
9
9
The unit (rear)
•When using only one surround back speaker, connect it to the
SINGLE jack (L side).
1234567891011
00_HTR-4067_5067_om_En.book Page 16 Monday, November 18, 2013 12:50 AM
PREPARATIONS➤Connecting speakersEn17
■Connecting speaker cables
Speaker cables have two wires. One is for connecting
the negative (-) terminal of the unit and the speaker, and
the other is for the positive (+) terminal. If the wires are
colored to prevent confusion, connect the black wire to
the negative and the other wire to the positive terminal.
aRemove approximately 10 mm (3/8”) of insulation from
the ends of the speaker cable and twist the bare wires of
the cable firmly together.
bLoosen the speaker terminal.
cInsert the bare wires of the cable into the gap on the side
(upper right or bottom left) of the terminal.
dTighten the terminal.
Using a banana plug
(U.S.A., Canada, China, Australia and General models only)
aTighten the speaker terminal.
bInsert a banana plug into the end of the terminal.
■Connecting the subwoofer
(with built-in amplifier)
Use an audio pin cable to connect the subwoofer.
Connecting front speakers that
support bi-amp connections
(HTR-5067/TSR-5770 only)
When using front speakers that support bi-amp
connections, connect them to the FRONT jacks and
SURROUND BACK/BI-AMP/ZONE B jacks.
To enable the bi-amp function, set “Power Amp Assign”
(p.79) in the “Setup” menu to “BI-AMP” after connecting
the power cable to an AC wall outlet.
•Surround back speakers or Zone B speakers cannot be used during
bi-amp connections.
•The FRONT jacks and SURROUND BACK/BI-AMP/ZONE B jacks
output the same signals.
Connecting Zone B speakers
(HTR-5067/TSR-5770 only)
The Zone A/B function allows you to playback an input
source in the room where the unit is installed (Zone A)
and in another room (Zone B). To connect the Zone B
speakers, see “Playing back music in multiple rooms
(HTR-5067/TSR-5770 only)” (p.69).
•Surround back speakers or bi-amplified front speakers cannot be
used while the Zone B function is enabled.
FRONT
aa
b
d
c
+ (red)
- (black)
FRONT
a
b
Banana plug
AV
OUT
2
1
Audio pin cable
12
3
45
9
FRONTCENTERSURROUND
SINGLE
SURROUND BACK/BI AMP
/ZONE B
SPEAKERS
The unit (rear)
Caution
•Before making bi-amp connections, remove any brackets or
cables that connect a woofer with a tweeter. Refer to the
instruction manual of the speakers for details. If you are not
making bi-amp connections, make sure that the brackets or
cables are connected before connecting the speaker cables.
1234567891011
00_HTR-4067_5067_om_En.book Page 17 Monday, November 18, 2013 12:50 AM
PREPARATIONS➤Input/output jacks and cablesEn18
■Video/audio jacks
❑HDMI jacks
Transmit digital video and digital sound through a single
jack. Use an HDMI cable.
•Use a 19-pin HDMI cable with the HDMI logo. We recommend using
a cable less than 5.0 m (16.4 ft) long to prevent signal quality
degradation.
•The unit’s HDMI jacks support the HDMI Control, Audio Return
Channel (ARC), and 3D and 4K Ultra HD video transmission
(through output) features.
•Use high speed HDMI cables to enjoy 3D or 4K Ultra HD videos.
■Video jacks
❑COMPONENT VIDEO jacks
Transmit video signals separated into three
components: luminance (Y), chrominance blue (P
B),
and chrominance red (P
R). Use a component video
cable with three plugs.
❑VIDEO jacks
Transmit analog video signals. Use a video pin cable.
■Audio jacks
❑OPTICAL jacks
Transmit digital audio signals. Use a digital optical
cable. Remove the tip protector (if available) before
using the cable.
❑COAXIAL jacks
Transmit digital audio signals. Use a digital coaxial
cable.
❑AUDIO jacks
(Stereo L/R jacks)
Transmit analog stereo audio signals. Use a stereo pin
cable (RCA cable).
(Stereo mini jack)
Transmits analog stereo audio signals. Use a stereo
mini-plug cable.
Input/output jacks and cables
HDMI cable
Component video cable
Video pin cable
OPTICAL
Digital optical cable
Digital coaxial cable
Stereo pin cable
Stereo mini-plug cable
00_HTR-4067_5067_om_En.book Page 18 Monday, November 18, 2013 12:50 AM
PREPARATIONS➤Connecting a TVEn19
Connect a TV to the unit so that video input to the unit can be output to the TV. You can
also enjoy playback of TV audio on the unit.
To maximize the performance of the unit, we recommend connecting a TV with an HDMI
cable.
■HDMI connection
Connect the TV to the unit with an HDMI cable and a digital optical cable.
•You do not make a digital optical cable connection between the TV and the unit in the following cases:
– If your TV supports Audio Return Channel (ARC)
– If you will receive TV broadcasts only from the set-top box
•If you connect a TV that supports HDMI Control to the unit with an HDMI cable, you can control the unit’s
power and volume with the TV’s remote control.
To use HDMI Control and ARC, you need to configure the HDMI settings on the unit. For
details on the settings, see “Information on HDMI” (p.111).
■Component / composite video connection
When connecting any video device with a component video cable, connect the TV to
the MONITOR OUT (COMPONENT VIDEO) jacks.
When connecting any video device with a video pin cable, connect the TV to the
MONITOR OUT (VIDEO) jack.
•If you connect your TV to the unit with a cable other than HDMI, video input to the unit via HDMI cannot be
output to the TV.
•Operations with TV screen are available only when your TV is connected to the unit via HDMI.
•If you will receive TV broadcasts only from the set-top box, you do not need to make an audio cable
connection between the TV and the unit.
❑COMPONENT VIDEO connection (with a component video cable)
3Connecting a TV
About Audio Return Channel (ARC)
•ARC allows audio signals to travel both ways. If you connect a TV that supports ARC to the unit with a
single HDMI cable, you can output video/audio to the TV or input TV audio to the unit.
•When using ARC, connect a TV with an HDMI cable that supports ARC.
AV 1
AV 2
AV 3
AV 5
OPTICALCOAXIALCOAXIAL
(
TV
)
COMPONENT
VIDEO
P
B
Y
VIDEO
AV 4
P
R
A
M
HDMI 1
(
BD/DVD
)
HDMI 2
HDMI
3
HDMI
OUT
ARC
HDMI
HDMI
HDMI
AV 1
(
TV
)
OPTICAL
OPTICAL
OO
HDMI
OUT
ARC
The unit (rear)
HDMI OUT jack
AV 1 (OPTICAL) jack
Audio output
(digital optical)
TV
HDMI input
AV 1
AV 2
AV 3
AV 5
AV 6
OPTICALCOAXIALCOAXIAL
(
TV
)
COMPONENT
VIDEO
COMPONENT
VIDEO
P
B
Y
VIDEO
AV
MONITOR OUT
OUT
AV 4
P
R
P
B
Y
P
R
FM
ANTENNA
AM
HDMI 1
(
BD/DVD
)
HDMI 2
HDMI 3
HDMI 4
(
RADIO
)
SUBWOOFER
PRE OUT
2
1
HDMI 5
DC O
U
5V0.
5
HDMI 6
HDMI
OUT
ARC
AV 1
(
TV
)
OPTICAL
OPTICAL
PR
PB
Y
COMPONENT
VIDEO
OO
P
R
P
B
Y
P
R
P
B
Y
COMPONENT
VIDEO
MONITOR OUT
PR
PB
Y
The unit (rear)
MONITOR OUT
(COMPONENT VIDEO) jacks
Video input
(component video)
AV 1 (OPTICAL) jack
Audio output
(digital optical)
TV
1234567891011
00_HTR-4067_5067_om_En.book Page 19 Monday, November 18, 2013 12:50 AM
PREPARATIONS➤Connecting a TVEn20
❑VIDEO (composite video) connection (with a video pin cable)
AV 1
AV 2
AV 3
AV 5
AV 6
OPTICALCOAXIALCOAXIAL
(
TV
)
COMPONENT
VIDEO
COMPONENT
VIDEO
P
B
Y
VIDEO
AV
MONITOR OUT
OUT
AV 4
P
R
P
B
Y
P
R
FM
ANTENNA
AM
HDMI 1
(
BD/DVD
)
HDMI 2
HDMI 3
HDMI 4
(
RADIO
)
SUBWOOFER
PRE OUT
2
1
HDMI 5
DC O
U
5V0.
5
HDMI 6
HDMI
OUT
ARC
VIDEO
V
V
AV 1
(
TV
)
OPTICAL
OPTICAL
OO
MONITOR OUT
The unit (rear)
MONITOR OUT
(VIDEO) jack
Video input
(composite video)
Audio output
(digital optical)
TV
AV 1 (OPTICAL) jack
1234567891011
00_HTR-4067_5067_om_En.book Page 20 Monday, November 18, 2013 12:50 AM
PREPARATIONS➤Connecting playback devicesEn21
The unit is equipped with a variety of input jacks including HDMI input jacks to allow
you to connect different types of playback devices. For information on how to connect
an iPod or a USB storage device, see the following pages.
–Connecting an iPod (p.53)
–Connecting a USB storage device (p.57)
Connecting video devices (such as BD/DVD players)
Connect video devices such as BD/DVD players, set-top boxes (STBs) and game
consoles to the unit. Depending on the video/audio output jacks available on your video
device, choose one of the following connections. We recommend using an HDMI
connection if the video device has an HDMI output jack.
•If the combination of video/audio input jacks available on the unit does not match your video device, change
its combination according to the output jacks of your device (p.22).
■HDMI connection
Connect a video device to the unit with an HDMI cable.
If you select the input source by pressing HDMI 1–6, the video/audio played back on
the video device will be output from the unit.
•To watch videos input to the HDMI 1–6 jacks, you need to connect your TV to the HDMI OUT jack of the
unit (p.19 to 21).
■Component video connection
Connect a video device to the unit with a component video cable and an audio cable
(digital optical or digital coaxial). Choose a set of input jacks (on the unit) depending on
the audio output jacks available on your video device.
If you select the input source by pressing AV 1–2, the video/audio played back on the
video device will be output from the unit.
•To watch videos input to the AV 1–2 (COMPONENT VIDEO) jacks, you need to connect your TV to the
MONITOR OUT (COMPONENT VIDEO) jacks of the unit (p.21).
4Connecting playback devices
AV 1
AV 2
AV 3
AV 5
AV 6
OPTICALCOAXIALCOAXIAL
(
TV
)
COMPONENT
VIDEO
COMPONENT
VIDEO
P
B
Y
VIDEO
AV
MONITOR OUT
OUT
AV 4
P
R
P
B
Y
P
R
FM
ANTENNA
AM
HDMI 1
(
BD/DVD
)
HDMI 2
HDMI 3
HDMI 4
(
RADIO
)
SUBWOOFER
PRE OUT
2
1
HDMI 5
DC OUT
5V0.5A
HDMI 6
HDMI
OUT
ARC
HDMI
HDMI
HDMI
HDMI 1
(
BD/DVD
)
HDMI 2HDMI 3HDMI 4
HDMI 5HDMI 6
The unit (rear)
HDMI output
Video device
HDMI 1–6 jacks
Output jacks on video device
Input jacks on the unit
VideoAudio
Component video
Digital opticalAV 1 (COMPONENT VIDEO + OPTICAL)
Digital coaxialAV 2 (COMPONENT VIDEO + COAXIAL)
Analog Stereo
You need to change the combination of
video/audio input jacks (p.22).
AV 1
AV 2
AV 3
AV 5
OPTICALCOAXIALCOAXIAL
(
TV
)
COMPONENT
VIDEO
P
B
Y
VIDEO
AV 4
P
R
A
M
HDMI 1
(
BD/DVD
)
HDMI 2
HDMI
3
HDMI
OUT
ARC
COAXIAL
OPTICAL
PR
PB
Y
COMPONENT
VIDEO
OPTICAL
( TV )
COAXIAL
COMPONENT
VIDEO
P
R
P
B
Y
AV 1
AV 2
O
O
C
C
P
R
P
B
Y
P
R
P
B
Y
The unit (rear)
AV 1–2
(COMPONENT VIDEO)
jacks
Video output
(component video)
Video device
Audio output
(digital optical or digital coaxial)
AV 1 (OPTICAL) jack or
AV 2 (COAXIAL) jack
1234567891011
00_HTR-4067_5067_om_En.book Page 21 Monday, November 18, 2013 12:50 AM
PREPARATIONS➤Connecting playback devicesEn22
■Composite video connection
Connect a video device to the unit with a video pin cable and an audio cable (digital
coaxial or stereo pin cable). Choose a set of input jacks (on the unit) depending on the
audio output jacks available on your video device.
If you select the input source by pressing AV 3–6, the video/audio played back on the
video device will be output from the unit.
•To watch videos input to the AV 3–6 (VIDEO) jacks, you need to connect your TV to the MONITOR OUT
(VIDEO) jack of the unit (p.21).
■Changing the combination of video/audio input jacks
If the combination of video/audio input jacks available on the unit does not match your
video device, change its combination according to the output jacks of your device. You
can connect a video device that has the following video/audio output jacks.
❑Necessary setting
For example, if you have connected a video device to AV 2 (COMPONENT VIDEO) and
AV 5 (AUDIO) jacks of the unit, change the combination setting as follows.
Output jacks on video device
Input jacks on the unit
VideoAudio
Composite video
Digital coaxialAV 3 (VIDEO + COAXIAL)
Analog stereoAV 4–6 (VIDEO + AUDIO)
Digital optical
You need to change the combination of
video/audio input jacks (p.22).
AV 1
AV 2
AV 3
AV 5
AV 6
OPTICALCOAXIALCOAXIAL
(
TV
)
COMPONENT
VIDEO
COMPONENT
VIDEO
P
B
Y
VIDEO
AV
MONITOR OUT
OUT
AV 4
P
R
P
B
Y
P
R
FM
ANTENNA
AM
HDMI 1
(
BD/DVD
)
HDMI 2
HDMI 3
HDMI 4
(
RADIO
)
SUBWOOFER
PRE OUT
2
1
HDMI 5
HDMI
OUT
ARC
R
L
COAXIAL
R
L
COAXIAL
VIDEO
VIDEO
CC
L
R
L
R
V
V
The unit (rear)
AV 3–6 (VIDEO) jack
Video output
(composite video)
Video device
Audio output
(digital coaxial or analog stereo)
Any of AV 3(COAXIAL) jack,
AV 4–6 (AUDIO) jacks
Output jacks on video deviceInput jacks on the unit
Use this program to output sound from all speakers. When you play back
multichannel sources, the unit mixes down the source to 2 channels, and
then outputs the sound from all speakers. This program creates a larger
sound field and is ideal for background music at parties.
00_HTR-4067_5067_om_En.book Page 46 Monday, November 18, 2013 12:50 AM
PLAYBACK➤Selecting the sound modeEn47
1234
56
FM
INFO
MEMORY
AM
PRESET
TUNING
SCENE
RETURN
TOP
MENU
POP-UP
MENU
VOLUME
BD
DVD
TV
NET
RADIO
MUTE
DISPLAY
ENTER
TRANSMIT
RECEIVER
HDMI
AV
SLEEP
AUXUSB
56
NET
ZONE B
ZONE A
MOVIEMUSIC
SUR. DECODESTRAIGHT
ENHANCER
BASSDIRECT
MODE
SETUP
OPTION
2341
1
2
3
4
5
6
FM
INFO
MEM
O
R
Y
AM
P
RE
S
E
T
T
U
NIN
G
S
CEN
E
RETURN
TO
P
MENU
PO
P-
U
P
MENU
VOLUME
B
D
DVD
TV
NET
RADI
O
MUTE
D
I
S
PLAY
ENTER
TRANSMI
T
R
ECEIVER
HDMI
AV
S
LEE
P
AU
X
USB
5
6
NET
ZO
NE B
Z
O
NE
A
M
O
VI
E
MU
S
I
C
E
NHAN
C
ER
B
A
SS
DIRE
C
T
M
OD
E
S
ETU
P
OPTIO
N
2
3
4
1
SUR. DECODE
STRAIGHT
Enjoying unprocessed playback
You can play back input sources without any sound field effect
processing.
■Playing back in original channels
(straight decode)
When the straight decode mode is enabled, the unit produces
stereo sound from the front speakers for 2-channel sources such as
CDs, and produces unprocessed multichannel sounds for
multichannel sources.
1
Press STRAIGHT.
Each time you press the key, the straight decode mode is
enabled or disabled.
•(HTR-5067/TSR-5770 only)
To enable 6.1/7.1-channel playback from 5.1-channel sources when surround
back speakers are used, set “Extended Surround” (p.73) in the “Option” menu to a
setting other than “Off”.
■Playing back 2-channel sources in
multichannel (surround decoder)
The surround decoder enables unprocessed multichannel
playback from 2-channel sources. When a multichannel source is
input, it works the same way as the straight decode mode.
For details on each decoder see “Glossary” (p.107).
1
Press SUR.DECODE to select a surround decoder.
Each time you press the key, the surround decoder
changes.
* HTR-5067/TSR-5770 only
•(HTR-5067/TSR-5770 only)
You cannot select the Dolby Pro Logic IIx decoders when headphones are
connected or when “Surround Back” in the “Setup” menu is set to “None”.
•You can adjust the surround decoder parameters in “DSP Parameter” (p.85)
in the “Setup” menu.
MUTE
ENHANCER
STEREO
TUNED
SLEEP
OUT
ECO
CHARGE
ADAPTIVE DRC
VIRTUAL
STRAIGHT
VOL.
bPro Logic
Uses the Dolby Pro Logic decoder suitable for all
sources.
bPLII Movie
Use the Dolby Pro Logic II decoder (or Dolby Pro
Logic IIx decoder) suitable for movies.
bPLIIx Movie*
bPLII Music
Use the Dolby Pro Logic II decoder (or Dolby Pro
Logic IIx decoder) suitable for music.
bPLIIx Music*
bPLII Game
Use the Dolby Pro Logic II decoder (or Dolby Pro
Logic IIx decoder) suitable for games.
bPLIIx Game*
Neo: 6 CinemaUses the DTS Neo: 6 decoder suitable for movies.
Neo: 6 MusicUses the DTS Neo: 6 decoder suitable for music.
MUTE
ENHANCER
STEREO
TUNED
SLEEP
OUT
ECO
CHARGE
ADAPTIVE DRC
VIRTUAL
†‡Pro Logic
VOL.
00_HTR-4067_5067_om_En.book Page 47 Monday, November 18, 2013 12:50 AM
PLAYBACK➤Selecting the sound modeEn48
1234
56
FM
INFO
MEMORY
AM
PRESET
TUNING
SCENE
RETURN
TOP
MENU
POP-UP
MENU
VOLUME
BD
DVD
TV
NET
RADIO
MUTE
DISPLAY
ENTER
TRANSMIT
RECEIVER
HDMI
AV
SLEEP
AUXUSB
56
NET
ZONE B
ZONE A
MOVIEMUSIC
SUR. DECODESTRAIGHT
ENHANCER
BASSDIRECT
MODE
SETUP
OPTION
2341
1
2
3
4
5
6
FM
INFO
MEM
O
R
Y
AM
P
RE
S
ET
T
U
NIN
G
S
CEN
E
RETURN
TO
P
MENU
PO
P-
U
P
MENU
VOLUME
B
D
DVD
TV
NET
RADI
O
MUTE
D
I
S
PLA
Y
ENTER
TRANSMI
T
R
ECEIVER
HDMI
AV
S
LEE
P
AU
X
USB
5
6
NET
ZO
NE B
Z
O
NE
A
M
O
VI
E
MU
S
I
C
S
UR. DE
CO
DE
S
TRAI
G
HT
M
OD
E
S
ETU
P
OPTIO
N
2
3
4
1
BASS
DIRECT
ENHANCER
Enjoying pure high fidelity sound
(direct playback)
When the direct playback mode is enabled, the unit plays back the
selected source with the least circuitry in order to reduce the
electrical noise from other circuitry (such as the front display). It
allows you to enjoy Hi-Fi sound quality.
1
Press DIRECT.
Each time you press the key, the direct playback mode is
enabled or disabled.
•When the direct playback mode is enabled, the following functions are not
available.
– Selecting sound programs
– Adjusting the tone control
– Operating the on-screen and “Option” menus
– Viewing information on the front display (when not in operation)
Enhancing the bass (Extra Bass)
Extra Bass allows you to enjoy enhanced bass sounds, regardless
of the size of the front speakers and the presence or absence of the
subwoofer.
1
Press BASS.
Each time you press the key, Extra Bass is enabled or
disabled.
•You can also use “Extra Bass” (p.80) in the “Setup” menu to enable/disable
Extra Bass.
Enjoying compressed music with enhanced
sound (Compressed Music Enhancer)
Compressed Music Enhancer adds depth and breadth to the
sound, allowing you to enjoy a dynamic sound close to the original
sound before it was compressed. This function can be used along
with any other sound modes.
1
Press ENHANCER.
Each time you press the key, Compressed Music Enhancer
is enabled or disabled.
•Compressed Music Enhancer does not work on the following audio sources.
– Signals whose sampling rate is over 48 kHz
– High-definition streaming audio
•You can also use “Enhancer” (p.74) in the “Option” menu to enable/disable
Compressed Music Enhancer.
MUTE
ENHANCER
STEREO
TUNED
SLEEP
OUT
ECO
CHARGE
ADAPTIVE DRC
VIRTUAL
DIRECT
VOL.
MUTE
STEREO
TUNED
SLEEP
OUT
ECO
CHARGE
ADAPTIVE DRC
VIRTUAL
Enhancer On
VOL.
ENHANCER
“ENHANCER” lights up
00_HTR-4067_5067_om_En.book Page 48 Monday, November 18, 2013 12:50 AM
PLAYBACK➤Listening to FM/AM radioEn49
You can tune into a radio station by specifying its frequency or
selecting from registered radio stations.
•The radio frequencies differ depending on the country or region where the unit is
being used. The explanation of this section uses a display with frequencies used
in U.K. and Europe models.
•If you cannot obtain good reception on the radio, adjust the direction of the FM/AM
antennas.
Setting the frequency steps
(Asia and General models only)
At the factory, the frequency step setting is set to 50 kHz for FM and
9 kHz for AM. Depending on your country or region, set the
frequency steps to 100 kHz for FM and 10 kHz for AM.
1
Set the unit to standby mode.
2
When holding down STRAIGHT on the front panel,
press z (power).
3
Press PROGRAM repeatedly to select “TU”.
4
Press STRAIGHT to select “FM100/AM10”.
5
Press z (power) to set the unit to standby mode
and turn it on again.
Selecting a frequency for reception
1
Press FM or AM to select a band.
“TUNER” is selected as the input source and then the
frequency currently selected is displayed.
2
Press TUNING repeatedly to set a frequency.
Hold down the key for about a second to search stations
automatically.
“TUNED” lights up when a signal is received from a radio
station.
“STEREO” also lights up when a stereo signal is received.
•You can switch between “Stereo” (stereo) and “Mono” (monaural) for FM
radio reception by pressing MODE. When the signal reception for an FM
radio station is unstable, switching to monaural may improve it.
•You can watch videos input from external devices while listening to radio by
selecting the video input jack in “Video Out” (p.75) in the “Option” menu.
Listening to FM/AM radio
z (power)
STRAIGHTPROGRAM
VOL.
MUTE
ENHANCER
STEREO
TUNED
SLEEP
OUT
ECO
CHARGE
ADAPTIVE DRC
VIRTUAL
TU••••FM50/AM9
MUTE
ENHANCER
STEREO
TUNED
SLEEP
OUT
ECO
CHARGE
ADAPTIVE DRC
VIRTUAL
FM 87.50MHz
VOL.
MUTE
ENHANCER
SLEEP
OUT
ECO
CHARGE
ADAPTIVE DRC
VIRTUAL
FM 98.50MHz
VOL.
STEREO
TUNED
1234
56
FM
INFO
MEMORY
AM
PRESET
TUNING
SCENE
RETURN
TOP
MENU
POP-UP
MENU
VOLUME
BD
DVD
TV
NET
RADIO
MUTE
DISPLAY
ENTER
TRANSMIT
RECEIVER
HDMI
AV
SLEEP
AUXUSB
56
NET
ZONE B
ZONE A
MOVIEMUSIC
SUR. DECODESTRAIGHT
ENHANCER
BASSDIRECT
MODE
SETUP
OPTION
2341
1
2
3
4
5
6
INFO
MEM
O
R
Y
P
RE
S
E
T
S
CEN
E
RETURN
TO
P
MENU
PO
P-
U
P
MENU
VOLUME
B
D
DVD
TV
NET
RADI
O
MUTE
D
I
S
PLAY
ENTER
TRANSMI
T
R
ECEIVER
HDMI
AV
S
LEE
P
AU
X
USB
5
6
NET
ZO
NE B
Z
O
NE
A
M
O
VI
E
MU
S
I
C
S
UR. DE
CO
DE
S
TRAI
G
HT
E
NHAN
C
ER
B
A
SS
DIRE
C
T
S
ETU
P
OPTIO
N
2
3
4
1
MODE
TUNING
FM
AM
00_HTR-4067_5067_om_En.book Page 49 Monday, November 18, 2013 12:50 AM
PLAYBACK➤Listening to FM/AM radioEn50
Registering favorite radio stations (presets)
You can register up to 40 radio stations as presets. Once you have
registered stations, you can easily tune into them by selecting their
preset numbers.
■Registering radio stations automatically
(Auto Preset)
Automatically register FM radio stations with strong signals (up to
40 stations).
•To register AM radio stations, follow “Registering a radio station manually”.
•(U.K. and Europe models only)
Only Radio Data System broadcasting stations are stored automatically by the
Auto Preset function.
1
Press FM or AM to select “TUNER” as the input
source.
2
Press OPTION.
3
Use the cursor keys to select “Auto Preset”.
4
To start the Auto Preset process, press ENTER.
The registration will start in 5 seconds. Press ENTER again
to start the registration immediately.
•To specify the preset number from which to start the registration, press
PRESET or cursor keys (q/w) to select a preset number within 5 seconds
after step 4 (while “READY” is displayed) and then press ENTER (or just
wait for 5 seconds).
•To cancel the Auto Preset process, press RETURN.
When the Auto Preset process finishes, “FINISH” appears and the
“Option” menu closes automatically.
■Registering a radio station manually
Select a radio station manually and register it to a preset number.
1
Follow “Selecting a frequency for reception” (p.49)
to tune into the desired radio station.
2
Hold down MEMORY for more than 2 seconds.
The first time that you do register a station, the selected
radio station will be registered to the preset number “01”.
Thereafter, each radio station you select will be registered
to the next empty (unused) preset number after the most
recently registered number.
•To select a preset number for registering, press MEMORY once after tuning
into the desired radio station, press PRESET to select a preset number, and
then press MEMORY again.
MUTE
ENHANCER
STEREO
TUNED
SLEEP
OUT
ECO
CHARGE
ADAPTIVE DRC
VIRTUAL
Auto Preset
VOL.
MUTE
ENHANCER
STEREO
TUNED
SLEEP
OUT
ECO
CHARGE
ADAPTIVE DRC
VIRTUAL
01:FM 87.50MHz
VOL.
“SEARCH” appears during Auto Preset
Preset number from which to start the registration
MUTE
ENHANCER
STEREO
TUNED
SLEEP
OUT
ECO
CHARGE
ADAPTIVE DRC
VIRTUAL
Auto Preset
VOL.
MUTE
ENHANCER
SLEEP
OUT
ECO
CHARGE
ADAPTIVE DRC
VIRTUAL
01:FM 98.50MHz
STEREO
TUNED
VOL.
Preset number
MUTE
ENHANCER
SLEEP
OUT
ECO
CHARGE
ADAPTIVE DRC
VIRTUAL
02:Empty
STEREO
TUNED
VOL.
“Empty” (not in use) or the frequency currently registered
1234
56
FM
INFO
MEMORY
AM
PRESET
TUNING
SCENE
RETURN
TOP
MENU
POP-UP
MENU
VOLUME
BD
DVD
TV
NET
RADIO
MUTE
DISPLAY
ENTER
TRANSMIT
RECEIVER
HDMI
AV
SLEEP
AUXUSB
56
NET
ZONE B
ZONE A
MOVIEMUSIC
SUR. DECODESTRAIGHT
ENHANCER
BASSDIRECT
MODE
SETUP
OPTION
2341
1
2
3
4
5
6
INFO
T
U
NIN
G
S
CEN
E
TO
P
MENU
PO
P-
U
P
MENU
VOLUME
B
D
DVD
TV
NET
RADI
O
MUTE
DISPLAY
TRANSMI
T
R
ECEIVER
HDMI
AV
S
LEE
P
AU
X
USB
5
6
NET
ZO
NE B
Z
O
NE
A
M
O
VI
E
MU
S
I
C
S
UR. DE
CO
DE
S
TRAI
G
HT
E
NHAN
C
ER
B
A
SS
DIRE
C
T
M
OD
E
S
ETU
P
2
3
4
1
ENTER
RETURN
MEMORY
PRESET
FM
AM
OPTION
Cursor keys
00_HTR-4067_5067_om_En.book Page 50 Monday, November 18, 2013 12:50 AM
PLAYBACK➤Listening to FM/AM radioEn51
■Selecting a preset station
Tune into a registered radio station by selecting its preset number.
1
Press FM or AM to select “TUNER” as the input
source.
2
Press PRESET repeatedly to select the desired radio
station.
•“No Presets” appears when no radio stations are registered.
■Clearing preset stations
Clear radio stations registered to the preset numbers.
1
Press FM or AM to select “TUNER” as the input
source.
2
Press OPTION.
3
Use the cursor keys to select “Clear Preset” and
press ENTER.
4
Use the cursor keys (q/w) to select a preset station
to be cleared and press ENTER.
If the preset station is cleared, “Cleared” appears and then
the next in-use preset number is displayed.
5
Repeat step 4 until all desired preset stations are
cleared.
6
To exit from the menu, press OPTION.
MUTE
ENHANCER
SLEEP
OUT
ECO
CHARGE
ADAPTIVE DRC
VIRTUAL
01:FM 98.50MHz
STEREO
TUNED
VOL.
MUTE
ENHANCER
STEREO
TUNED
SLEEP
OUT
ECO
CHARGE
ADAPTIVE DRC
VIRTUAL
Clear Preset
VOL.
MUTE
ENHANCER
SLEEP
OUT
ECO
CHARGE
ADAPTIVE DRC
VIRTUAL
01:FM 98.50MHz
STEREO
TUNED
VOL.
Preset station to be cleared
MUTE
ENHANCER
SLEEP
OUT
ECO
CHARGE
ADAPTIVE DRC
VIRTUAL
STEREO
TUNED
01:Cleared
VOL.
1234
56
FM
INFO
MEMORY
AM
PRESET
TUNING
SCENE
RETURN
TOP
MENU
POP-UP
MENU
VOLUME
BD
DVD
TV
NET
RADIO
MUTE
DISPLAY
ENTER
TRANSMIT
RECEIVER
HDMI
AV
SLEEP
AUXUSB
56
NET
ZONE B
ZONE A
MOVIEMUSIC
SUR. DECODESTRAIGHT
ENHANCER
BASSDIRECT
MODE
SETUP
OPTION
2341
1
2
3
4
5
6
INFO
MEM
O
R
Y
T
U
NIN
G
S
CEN
E
RETURN
TO
P
MENU
PO
P-
U
P
MENU
VOLUME
B
D
DVD
TV
NET
RADI
O
MUTE
DISPLAY
TRANSMI
T
R
ECEIVER
HDMI
AV
S
LEE
P
AU
X
USB
5
6
NET
ZO
NE B
Z
O
NE
A
M
O
VI
E
MU
S
I
C
S
UR. DE
CO
DE
S
TRAI
G
HT
E
NHAN
C
ER
B
A
SS
DIRE
C
T
M
OD
E
S
ETU
P
2
3
4
1
ENTER
PRESET
FM
AM
OPTION
Cursor keys
00_HTR-4067_5067_om_En.book Page 51 Monday, November 18, 2013 12:50 AM
PLAYBACK➤Listening to FM/AM radioEn52
Radio Data System tuning
(U.K. and Europe models only)
Radio Data System is a data transmission system used by FM
stations in many countries. The unit can receive various types of
Radio Data System data, such as “Program Service”, “Program
Type,” “Radio Text” and “Clock Time”, when it is tuned into a Radio
Data System broadcasting station.
■Displaying the Radio Data System
information
1
Tune into the desired Radio Data System
broadcasting station.
•We recommend using “Auto Preset” to tune into the Radio Data System
broadcasting stations (p.50).
2
Press INFO.
Each time you press the key, the displayed item changes.
About 3 seconds later, the corresponding information for
the displayed item appears.
•“Program Service”, “Program Type”, “Radio Text”, and “Clock Time” are not
displayed if the radio station does not provide the Radio Data System
service.
■Receiving traffic information
automatically
When “TUNER” is selected as the input source, the unit
automatically receives traffic information. To enable this function,
follow the procedure below to set the traffic information station.
1
When “TUNER” is selected as the input source,
press OPTION.
2
Use the cursor keys to select “Traffic Program”
(TrafficProgram) and press ENTER.
The traffic information station search will start in 5 seconds.
Press ENTER again to start the search immediately.
•To search upward/downward from the current frequency, press the cursor
keys (q/w) while “READY” is displayed.
•To cancel the search, press RETURN.
•Texts in parentheses denote indicators on the front display.
The following screen appears for about 3 seconds when the
search finishes.
•“TP Not Found” appears for about 3 seconds when no traffic information
stations are found.
Program ServiceProgram service name
Program TypeCurrent program type
Radio TextInformation on the current program
Clock TimeCurrent time
DSP ProgramSound mode name
Audio DecoderDecoder name
FrequencyFrequency
MUTE
ENHANCER
SLEEP
OUT
ECO
CHARGE
ADAPTIVE DRC
VIRTUAL
Program Type
STEREO
TUNED
VOL.
Item name
MUTE
ENHANCER
SLEEP
OUT
ECO
CHARGE
ADAPTIVE DRC
VIRTUAL
CLASSICS
STEREO
TUNED
VOL.
Information
MUTE
ENHANCER
SLEEP
OUT
ECO
CHARGE
ADAPTIVE DRC
VIRTUAL
TP FM101.30MHz
VOL.
STEREO
TUNED
Traffic information station (frequency)
1234
56
FM
INFO
MEMORY
AM
PRESET
TUNING
SCENE
RETURN
TOP
MENU
POP-UP
MENU
VOLUME
BD
DVD
TV
NET
RADIO
MUTE
DISPLAY
ENTER
TRANSMIT
RECEIVER
HDMI
AV
SLEEP
AUXUSB
56
NET
ZONE B
ZONE A
MOVIEMUSIC
SUR. DECODESTRAIGHT
ENHANCER
BASSDIRECT
MODE
SETUP
OPTION
2341
S
CEN
E
TO
P
MEN
U
PO
P-
U
P
MEN
U
V
O
L
U
ME
BD
DV
D
TV
NET
RADI
O
MU
TE
DISPLAY
TRANSMI
T
R
E
C
EIVER
S
LEE
P
FM
MEM
O
R
Y
AM
P
RESE
T
TUNING
1
2
3
4
5
6
HDMI
AV
AUX
USB
5
6
NET
ZO
NE B
Z
O
NE
A
MOVI
E
MUSI
C
SUR. DE
C
ODE
S
TRAIGHT
E
NHAN
C
ER
B
A
SS
DIRE
C
T
MO
D
E
S
ET
UP
2
3
4
1
ENTER
RETURN
INFO
OPTION
Cursor keys
00_HTR-4067_5067_om_En.book Page 52 Monday, November 18, 2013 12:50 AM
PLAYBACK➤Playing back iPod musicEn53
You can play back iPod music on the unit using a USB cable
supplied with the iPod.
•You cannot play back iPod video on the unit.
•For details on playable iPod devices, see “Supported devices and file formats”
(p.109).
Connecting an iPod
Connect your iPod to the unit with the USB cable supplied with the
iPod.
1
Connect the USB cable to the iPod.
2
Connect the USB cable to the USB jack.
•The iPod charges while it is connected to the unit. If you set the unit to standby
mode while the iPod is charging, the iPod continues to charge up to 4 hours.
If “Network Standby” (p.92) in the “Setup” menu is set to “On”, it continues to
change without limit.
•Disconnect the iPod from the USB jack when it is not in use.
Playback of iPod content
Follow the procedure below to operate the iPod contents and start
playback.
You can control the iPod with the menu displayed on the TV screen.
•Operations with TV screen are available only when your TV is connected to the
unit via HDMI. If not, carry out operations while viewing the front display, or directly
operate the iPod itself in the simple play mode (p.55).
•“_” (underscore) will be displayed for characters not supported by the unit.
1
Press USB to select “USB” as the input source.
The browse screen is displayed on the TV.
•If playback is ongoing on your iPod, the playback screen is displayed.
Playing back iPod music
RADIO
STRAIGHT
AUDIO
AUX
5V1A
The unit (front)
MUTE
ENHANCER
STEREO
TUNED
SLEEP
OUT
ECO
CHARGE
ADAPTIVE DRC
VIRTUAL
Connected
VOL.
1/2
Music
Videos
iPod
Top
1234
56
FM
INFO
MEMORY
AM
PRESET
TUNING
SCENE
RETURN
TOP
MENU
POP-UP
MENU
VOLUME
BD
DVD
TV
NET
RADIO
MUTE
DISPLAY
ENTER
TRANSMIT
RECEIVER
HDMI
AV
SLEEP
AUXUSB
56
NET
ZONE B
ZONE A
MOVIEMUSIC
SUR. DECODESTRAIGHT
ENHANCER
BASSDIRECT
MODE
SETUP
OPTION
2341
1
2
3
4
5
6
FM
INFO
MEM
O
R
Y
AM
P
RE
S
E
T
T
U
NIN
G
S
CEN
E
RETURN
TO
P
MENU
PO
P-
U
P
MENU
VOLUME
B
D
DVD
TV
NET
RADI
O
MUTE
D
I
S
PLAY
ENTER
TRANSMI
T
R
ECEIVER
HDMI
AV
S
LEE
P
AU
X
5
6
NET
ZO
NE B
Z
O
NE
A
M
O
VI
E
MU
S
I
C
S
UR. DE
CO
DE
S
TRAI
G
HT
E
NHAN
C
ER
B
A
SS
DIRE
C
T
M
OD
E
S
ETU
P
OPTIO
N
2
3
4
1
USBUSB
00_HTR-4067_5067_om_En.book Page 53 Monday, November 18, 2013 12:50 AM
PLAYBACK➤Playing back iPod musicEn54
2
Use the cursor keys to select an item and press
ENTER.
If a song is selected, playback starts and the playback
screen is displayed.
•To return to the previous screen, press RETURN.
•To switch between the browse and playback screens during playback, press
DISPLAY.
•To operate the iPod manually to select content or control playback, switch to
the simple play mode (p.55).
■Browse screen
1List name
2Contents list
Displays the list of iPod content. Use the cursor keys to select an item and
press ENTER to confirm the selection.
3Item number/total
4Status indicators
Display the current repeat/shuffle settings (p.56) and playback status
(such as play/pause).
5Operation menu
Press the cursor key (r) and then use the cursor keys (q/w) to select an
item. Press ENTER to confirm the selection.
Artist Name
Album Name
Song Title
2:30
iPod
Now Playing
5:10
[DISPLAY] to List Browse
IconFunction
Moves 10 pages backward.
Moves to the previous page of the list.
Moves to the next page of the list.
Moves 10 pages forward.
Moves to the playback screen.
1
4
5
2
3
Playlists
Artists
Albums
Songs
Genres
Composers
iPod
Music
[DISPLAY] to Now Playing
1/6
1234
56
FM
INFO
MEMORY
AM
PRESET
TUNING
SCENE
RETURN
TOP
MENU
POP-UP
MENU
VOLUME
BD
DVD
TV
NET
RADIO
MUTE
DISPLAY
ENTER
TRANSMIT
RECEIVER
HDMI
AV
SLEEP
AUXUSB
56
NET
ZONE B
ZONE A
MOVIEMUSIC
SUR. DECODESTRAIGHT
ENHANCER
BASSDIRECT
MODE
SETUP
OPTION
2341
SCENE
T
OP
MENU
PO
P-
UP
MENU
V
OLUM
E
B
D
DVD
TV
NET
R
ADI
O
MUTE
D
FM
MEM
O
RY
AM
PRE
S
E
T
TU
NIN
G
INF
O
1
2
3
4
5
6
T
RANSMI
T
RECEIVER
HDMI
AV
S
LEEP
A
UX
US
B
5
6
NET
Z
O
NE
B
ZO
NE A
MO
VI
E
M
U
S
I
C
S
UR. DE
CO
DE
S
TRAI
G
H
T
ENHAN
C
E
R
BA
SS
D
IRE
CT
MODE
SETU
P
O
PTION
2
3
4
1
ENTER
RETURN
DISPLA
Y
Cursor keys
00_HTR-4067_5067_om_En.book Page 54 Monday, November 18, 2013 12:50 AM
PLAYBACK➤Playing back iPod musicEn55
■Playback screen
1Status indicators
Display the current repeat/shuffle settings (p.56) and playback status
(such as play/pause).
2Playback information
Displays the artist name, album name, song title, and elapsed time/song
length.
Use the following remote control keys to control playback.
■Operating the iPod itself or remote control
(simple play)
1
Press MODE to switch to the simple play mode.
The TV menu screen turns off and iPod operations are
enabled.
To display the TV menu screen, press MODE again.
2
Operate your iPod itself or the remote control to
start playback.
External device
operation keys
Function
aResumes playback from pause.
sStops playback.
dStops playback temporarily.
f
Skips forward/backward.
g
h
Searches forward/backward (by holding down).
j
1
2
iPod
Now Playing
Artist Name
Album Name
Song Title
2:30
5:10
[DISPLAY] to List Browse
Operational remote control
keys
Function
Cursor keysSelect an item.
ENTERConfirms the selection.
RETURNReturns to the previous screen.
External device
operation keys
a
Starts playback or stops playback
temporarily.
d
sStops playback.
f
Skips forward/backward.
g
h
Searches forward/backward (while holding
down).
j
1234
56
FM
INFO
MEMORY
AM
PRESET
TUNING
SCENE
RETURN
TOP
MENU
POP-UP
MENU
VOLUME
BD
DVD
TV
NET
RADIO
MUTE
DISPLAY
ENTER
TRANSMIT
RECEIVER
HDMI
AV
SLEEP
AUXUSB
56
NET
ZONE B
ZONE A
MOVIEMUSIC
SUR. DECODESTRAIGHT
ENHANCER
BASSDIRECT
MODE
SETUP
OPTION
2341
S
CEN
E
TO
P
MENU
PO
P-
U
P
MENU
VOLUME
B
D
DVD
TV
NET
RADI
O
MUTE
DISPLAY
FM
MEM
O
R
Y
AM
P
RE
S
ET
T
U
NIN
G
INFO
1
2
3
4
5
6
TRANSMI
T
R
ECEIVER
HDMI
AV
S
LEE
P
AU
X
USB
5
6
NET
ZO
NE B
Z
O
NE
A
M
O
VI
E
MU
S
I
C
S
UR. DE
CO
DE
S
TRAI
G
HT
E
NHAN
C
ER
B
A
SS
DIRE
C
T
S
ETU
P
OPTIO
N
2
3
4
1
ENTER
RETURN
MODE
Cursor keys
External device
operation keys
00_HTR-4067_5067_om_En.book Page 55 Monday, November 18, 2013 12:50 AM
PLAYBACK➤Playing back iPod musicEn56
■Repeat/shuffle settings
You can configure the repeat/shuffle settings of your iPod.
•During simple play, configure the repeat/shuffle settings directly on your iPod or
press MODE to display the TV menu screen and then follow the procedure below.
1
When “USB” is selected as the input source, press
OPTION.
2
Use the cursor keys to select “Repeat” (Repeat) or
“Shuffle” (Shuffle) and press ENTER.
•To return to the previous screen during menu operations, press RETURN.
•Texts in parentheses denote indicators on the front display.
3
Use the cursor keys (e/r) to select a setting.
4
To exit from the menu, press OPTION.
ItemSettingFunction
Repeat
(Repeat)
Off (Off)Turns off the repeat function.
One (One)
Plays back the current song repeatedly.
“c” appears in the TV screen.
All (All)
Plays back all songs repeatedly.
“v” appears in the TV screen.
Shuffle
(Shuffle)
Off (Off)Turns off the shuffle function.
Songs (Songs)
Plays back songs in random order.
“x” appears in the TV screen.
Albums
(Albums)
Plays back albums in random order.
“x” appears in the TV screen.
1234
56
FM
INFO
MEMORY
AM
PRESET
TUNING
SCENE
RETURN
TOP
MENU
POP-UP
MENU
VOLUME
BD
DVD
TV
NET
RADIO
MUTE
DISPLAY
ENTER
TRANSMIT
RECEIVER
HDMI
AV
SLEEP
AUXUSB
56
NET
ZONE B
ZONE A
MOVIEMUSIC
SUR. DECODESTRAIGHT
ENHANCER
BASSDIRECT
MODE
SETUP
OPTION
2341
S
CEN
E
TO
P
MENU
PO
P-
U
P
MENU
VOLUME
B
D
DVD
TV
NET
RADI
O
MUTE
DISPLAY
FM
MEM
O
R
Y
AM
P
RE
S
E
T
TU
NIN
G
INFO
1
2
3
4
5
6
TRANSMI
T
R
ECEIVER
HDMI
AV
S
LEE
P
AU
X
USB
5
6
NET
ZO
NE
B
ZO
NE
A
M
O
VI
E
MU
S
I
C
S
UR. DE
CO
DE
S
TRAI
G
HT
E
NHAN
C
ER
B
A
SS
DIRE
C
T
S
ETU
P
2
3
4
1
ENTER
RETURN
MODE
OPTION
Cursor keys
00_HTR-4067_5067_om_En.book Page 56 Monday, November 18, 2013 12:50 AM
PLAYBACK➤Playing back music stored on a USB storage deviceEn57
You can play back music files stored on a USB storage device on
the unit.
•For details on playable USB devices, see “Supported devices and file formats”
(p.109).
Connecting a USB storage device
1
Connect the USB storage device to the USB jack.
•If the USB storage device contains many files, it may take time to load the them. In
this case, “Loading...” appears in the front display.
•Stop playback of the USB storage device before disconnect it from the USB jack.
•Connect a USB storage device directly to the USB jack of the unit. Do not use
extension cables.
Playback of USB storage device contents
Follow the procedure below to operate the USB storage device
contents and start playback.
You can control the USB memory device with the menu displayed
on the TV screen.
•Operations with TV screen are available only when your TV is connected to the
unit via HDMI. If not, carry out operations while viewing the front display.
•“_” (underscore) will be displayed for characters not supported by the unit.
1
Press USB to select “USB” as the input source.
The browse screen is displayed on the TV.
•If playback is ongoing on your USB storage device, the playback screen is
displayed.
Playing back music stored on a USB storage device
RADIO
STRAIGHT
AUDIO
AUX
5V1A
The unit (front)
USB storage device
MUTE
ENHANCER
STEREO
TUNED
SLEEP
OUT
ECO
CHARGE
ADAPTIVE DRC
VIRTUAL
Connected
VOL.
1/12
Blues
Classical
Electronica
Jazz
Pop
Rock
Soundtrack
Speaking
USB
Top
1234
56
FM
INFO
MEMORY
AM
PRESET
TUNING
SCENE
RETURN
TOP
MENU
POP-UP
MENU
VOLUME
BD
DVD
TV
NET
RADIO
MUTE
DISPLAY
ENTER
TRANSMIT
RECEIVER
HDMI
AV
SLEEP
AUXUSB
56
NET
ZONE B
ZONE A
MOVIEMUSIC
SUR. DECODESTRAIGHT
ENHANCER
BASSDIRECT
MODE
SETUP
OPTION
2341
1
2
3
4
5
6
FM
INFO
MEM
O
R
Y
AM
P
RE
S
E
T
T
U
NIN
G
S
CEN
E
RETURN
TO
P
MENU
PO
P-
U
P
MENU
VOLUME
B
D
DVD
TV
NET
RADI
O
MUTE
D
I
S
PLAY
ENTER
TRANSMI
T
R
ECEIVER
HDMI
AV
S
LEE
P
AU
X
5
6
NET
ZO
NE B
Z
O
NE
A
M
O
VI
E
MU
S
I
C
S
UR. DE
CO
DE
S
TRAI
G
HT
E
NHAN
C
ER
B
A
SS
DIRE
C
T
M
OD
E
S
ETU
P
OPTIO
N
2
3
4
1
USBUSB
00_HTR-4067_5067_om_En.book Page 57 Monday, November 18, 2013 12:50 AM
PLAYBACK➤Playing back music stored on a USB storage deviceEn58
2
Use the cursor keys to select an item and press
ENTER.
If a song is selected, playback starts and the playback
screen is displayed.
•To return to the previous screen, press RETURN.
•To switch between the browse and playback screens during playback, press
DISPLAY.
•Files not supported by the unit cannot be selected.
■Browse screen
1List name
2Contents list
Displays the list of USB storage device contents. Use the cursor keys to
select an item and press ENTER to confirm the selection.
3Item number/total
4Status indicators
Display the current repeat/shuffle settings (p.59) and playback status
(such as play/pause).
5Operation menu
Press the cursor key (r) and then use the cursor keys (q/w) to select an
item. Press ENTER to confirm the selection.
Artist Name
Album Name
Song Title
2:30
USB
Now Playing
[DISPLAY] to List Browse
IconFunction
Moves 10 pages backward.
Moves to the previous page of the list.
Moves to the next page of the list.
Moves 10 pages forward.
Moves to the playback screen.
14
5
2
3
[DISPLAY] to Now Playing
1/12
Blues
Classical
Electronica
Jazz
Pop
Rock
Soundtrack
Speaking
USB
Top
1234
56
FM
INFO
MEMORY
AM
PRESET
TUNING
SCENE
RETURN
TOP
MENU
POP-UP
MENU
VOLUME
BD
DVD
TV
NET
RADIO
MUTE
DISPLAY
ENTER
TRANSMIT
RECEIVER
HDMI
AV
SLEEP
AUXUSB
56
NET
ZONE B
ZONE A
MOVIEMUSIC
SUR. DECODESTRAIGHT
ENHANCER
BASSDIRECT
MODE
SETUP
OPTION
2341
S
CEN
E
TO
P
MENU
PO
P-
U
P
MENU
VOLUME
B
D
DVD
TV
NET
RADI
O
MUTE
D
FM
MEM
O
R
Y
AM
P
RE
S
E
T
T
U
NIN
G
INFO
1
2
3
4
5
6
TRANSMI
T
R
ECEIVER
HDMI
AV
S
LEE
P
AU
X
USB
5
6
NET
ZO
NE B
Z
O
NE
A
M
O
VI
E
MU
S
I
C
S
UR. DE
CO
DE
S
TRAI
G
HT
E
NHAN
C
ER
B
A
SS
DIRE
C
T
M
OD
E
S
ETU
P
OPTIO
N
2
3
4
1
ENTER
RETURN
DISPLAY
Cursor keys
00_HTR-4067_5067_om_En.book Page 58 Monday, November 18, 2013 12:50 AM
PLAYBACK➤Playing back music stored on a USB storage deviceEn59
■Playback screen
1Status indicators
Display the current repeat/shuffle settings (p.59) and playback status
(such as play/pause).
2Playback information
Displays the artist name, album name, song title, and elapsed time.
Use the following remote control keys to control playback.
■Repeat/shuffle settings
You can configure the repeat/shuffle settings for playback of USB
storage device contents.
1
When “USB” is selected as the input source, press
OPTION.
2
Use the cursor keys to select “Repeat” (Repeat) or
“Shuffle” (Shuffle) and press ENTER.
•To return to the previous screen during menu operations, press RETURN.
•Texts in parentheses denote indicators on the front display.
3
Use the cursor keys (e/r) to select a setting.
4
To exit from the menu, press OPTION.
External device
operation keys
Function
aResumes playback from pause.
sStops playback.
dStops playback temporarily.
f
Skips forward/backward.
g
1
2
USB
Now Playing
Artist Name
Album Name
Song Title
2:30
[DISPLAY] to List Browse
ItemSettingFunction
Repeat
(Repeat)
Off (Off)Turns off the repeat function.
One (One)
Plays back the current song repeatedly.
“c” appears on the TV screen.
All (All)
Plays back all songs in the current album
(folder) repeatedly.
“v” appears on the TV screen.
Shuffle
(Shuffle)
Off (Off)Turns off the shuffle function.
On (On)
Plays back songs in the current album
(folder) in random order.
“x” appears on the TV screen.
1234
56
FM
INFO
MEMORY
AM
PRESET
TUNING
SCENE
RETURN
TOP
MENU
POP-UP
MENU
VOLUME
BD
DVD
TV
NET
RADIO
MUTE
DISPLAY
ENTER
TRANSMIT
RECEIVER
HDMI
AV
SLEEP
AUXUSB
56
NET
ZONE B
ZONE A
MOVIEMUSIC
SUR. DECODESTRAIGHT
ENHANCER
BASSDIRECT
MODE
SETUP
OPTION
2341
SCENE
T
OP
MENU
PO
P-
UP
MENU
V
OLUME
B
D
DVD
TV
NET
R
ADI
O
MUTE
DISPLAY
FM
MEM
O
RY
AM
PRE
S
E
T
TU
NIN
G
INF
O
1
23
4
5
6
TRANSMI
T
RECEIVER
HDMI
AV
S
LEEP
A
UX
USB
5
6
NET
ZO
NE
B
ZO
NE
A
MO
VI
E
M
U
S
I
C
S
UR. DE
CO
DE
S
TRAI
G
HT
ENHAN
C
ER
B
A
SS
DIRE
CT
M
OD
E
S
ETU
P
2
3
4
1
ENTER
RETURN
OPTION
Cursor keys
External device
operation keys
00_HTR-4067_5067_om_En.book Page 59 Monday, November 18, 2013 12:50 AM
PLAYBACK➤Playing back music stored on media servers (PCs/NAS)En60
You can play back music files stored on your PC or DLNA-compatible NAS on the unit.
•To use this function, the unit and your PC must be connected to the same router (p.25). You can check
whether the network parameters (such as the IP address) are properly assigned to the unit in “Information”
(p.91) in the “Setup” menu.
•(HTR-5067/TSR-5770 only)
The audio may be interrupted while using the wireless network connection. In this case, use the wired
network connection.
•For details on playable file formats, see “Supported devices and file formats” (p.109).
Media sharing setup
To play back music files stored on your PC or DLNA-compatible NAS, first you need to
configure the media sharing setting on each music server.
■For a PC with Windows Media Player installed
❑For Windows Media Player 12
1
Start Windows Media Player 12 on your PC.
2
Select “Stream”, then “Turn on media streaming”.
3
Click “Turn on media streaming”.
4
Select “Allowed” from the drop-down list next to the unit’s model
name.
5
Click “OK” to exit.
❑For Windows Media Player 11
1
Start Windows Media Player 11 on your PC.
2
Select “Library”, then “Media Sharing”.
3
Check the “Share my media to” box, select the unit’s icon, and click
“Allow”.
4
Click “OK” to exit.
•For details on media sharing settings, refer to Windows Media Player help.
■For a PC or a NAS with other DLNA server software
installed
Refer to the instruction manual for the device or software and configure the media
sharing settings.
Playing back music stored on media servers (PCs/NAS)
00_HTR-4067_5067_om_En.book Page 60 Monday, November 18, 2013 12:50 AM
PLAYBACK➤Playing back music stored on media servers (PCs/NAS)En61
Playback of PC music contents
Follow the procedure below to operate the PC music contents and
start playback.
You can control the PC/NAS with the menu displayed on the TV
screen.
•Operations with TV screen are available only when your TV is connected to the
unit via HDMI. If not, carry out operations while viewing the front display.
•“_” (underscore) will be displayed for characters not supported by the unit.
1
Press NET repeatedly to select “SERVER” as the
input source.
The browse screen is displayed on the TV.
•If playback of a music file selected from the unit is ongoing on your PC, the
playback screen is displayed.
2
Use the cursor keys to select a music server and
press ENTER.
3
Use the cursor keys to select an item and press
ENTER.
If a song is selected, playback starts and the playback
screen is displayed.
•To return to the previous screen, press RETURN.
•To switch between the browse and playback screens during playback, press
DISPLAY.
•Files not supported by the unit cannot be selected.
1/4
DESKTOP
NAS A
NAS B
NOTE
SERVER
Top
Artist Name
Album Name
Song Title
2:30
SERVER
Now Playing
[DISPLAY] to List Browse
1234
56
FM
INFO
MEMORY
AM
PRESET
TUNING
SCENE
RETURN
TOP
MENU
POP-UP
MENU
VOLUME
BD
DVD
TV
NET
RADIO
MUTE
DISPLAY
ENTER
TRANSMIT
RECEIVER
HDMI
AV
SLEEP
AUXUSB
56
NET
ZONE B
ZONE A
MOVIEMUSIC
SUR. DECODESTRAIGHT
ENHANCER
BASSDIRECT
MODE
SETUP
OPTION
2341
S
CEN
E
TO
P
MENU
PO
P-
U
P
MENU
VOLUME
B
D
DVD
TV
NET
RADI
O
MUTE
D
FM
MEM
O
R
Y
AM
P
RE
S
E
T
T
U
NIN
G
INFO
1
2
3
4
5
6
TRANSMI
T
R
ECEIVER
HDMI
AV
S
LEE
P
AU
X
USB
5
6
ZO
NE B
Z
O
NE
A
M
O
VI
E
MU
S
I
C
S
UR. DE
CO
DE
S
TRAI
G
HT
E
NHAN
C
ER
B
A
SS
DIRE
C
T
M
OD
E
S
ETU
P
OPTIO
N
2
3
4
1
ENTER
RETURN
DISPLAY
NET
Cursor keys
00_HTR-4067_5067_om_En.book Page 61 Monday, November 18, 2013 12:50 AM
PLAYBACK➤Playing back music stored on media servers (PCs/NAS)En62
■Browse screen
1List name
2Contents list
Displays the list of PC content. Use the cursor keys to select an item and
press ENTER to confirm the selection.
3Item number/total
4Status indicators
Display the current repeat/shuffle settings (p.63) and playback status
(such as play/pause).
5Operation menu
Press the cursor key (r) and then use the cursor keys (q/w) to select an
item. Press ENTER to confirm the selection.
■Playback screen
1Status indicators
Display the current repeat/shuffle settings (p.63) and playback status
(such as play/pause).
2Playback information
Displays the artist name, album name, song title, and elapsed time.
Use the following remote control keys to control playback.
•You can also use a DLNA-compatible Digital Media Controller (DMC) to control
playback. For details, see “DMC Control” (p.92).
IconFunction
Moves 10 pages backward.
Moves to the previous page of the list.
Moves to the next page of the list.
Moves 10 pages forward.
Moves to the playback screen.
14
5
2
3
[DISPLAY] to Now Playing
1/14
Blues
Classical
Electronica
Jazz
Pop
Rock
Soundtrack
Speaking
SERVER
NAS A
External device
operation keys
Function
aResumes playback from pause.
sStops playback.
dStops playback temporarily.
f
Skips forward/backward.
g
1
2
SERVER
Now Playing
Artist Name
Album Name
Song Title
2:30
[DISPLAY] to List Browse
1234
56
FM
INFO
MEMORY
AM
PRESET
TUNING
SCENE
RETURN
TOP
MENU
POP-UP
MENU
VOLUME
BD
DVD
TV
NET
RADIO
MUTE
DISPLAY
ENTER
TRANSMIT
RECEIVER
HDMI
AV
SLEEP
AUXUSB
56
NET
ZONE B
ZONE A
MOVIEMUSIC
SUR. DECODESTRAIGHT
ENHANCER
BASSDIRECT
MODE
SETUP
OPTION
2341
S
CEN
E
RETURN
TO
P
MENU
PO
P-
U
P
MENU
VOLUME
B
D
DVD
TV
NET
RADI
O
MUTE
DISPLAY
FM
MEM
O
R
Y
AM
P
RE
S
ET
T
U
NIN
G
INFO
1
2
3
4
5
6
TRANSMI
T
R
ECEIVER
HDMI
AV
S
LEE
P
AU
X
USB
5
6
NET
ZO
NE B
Z
O
NE
A
M
O
VI
E
MU
S
I
C
S
UR. DE
CO
DE
S
TRAI
G
HT
E
NHAN
C
ER
B
A
SS
DIRE
C
T
M
OD
E
S
ETU
P
OPTIO
N
2
3
4
1
ENTER
Cursor keys
External device
operation keys
00_HTR-4067_5067_om_En.book Page 62 Monday, November 18, 2013 12:50 AM
PLAYBACK➤Playing back music stored on media servers (PCs/NAS)En63
■Repeat/shuffle settings
You can configure the repeat/shuffle settings for the playback of PC
music content.
1
When “SERVER” is selected as the input source,
press OPTION.
2
Use the cursor keys to select “Repeat” (Repeat) or
“Shuffle” (Shuffle) and press ENTER.
•To return to the previous screen during menu operations, press RETURN.
•Text in parentheses denotes indicators on the front display.
3
Use the cursor keys (e/r) to select a setting.
4
To exit from the menu, press OPTION.
ItemSettingFunction
Repeat
(Repeat)
Off (Off)Turns off the repeat function.
One (One)
Plays back the current song repeatedly.
“c” appears on the TV screen.
All (All)
Plays back all songs in the current album
(folder) repeatedly.
“v” appears on the TV screen.
Shuffle
(Shuffle)
Off (Off)Turns off the shuffle function.
On (On)
Plays back songs in the current album
(folder) in random order.
“x” appears on the TV screen.
1234
56
FM
INFO
MEMORY
AM
PRESET
TUNING
SCENE
RETURN
TOP
MENU
POP-UP
MENU
VOLUME
BD
DVD
TV
NET
RADIO
MUTE
DISPLAY
ENTER
TRANSMIT
RECEIVER
HDMI
AV
SLEEP
AUXUSB
56
NET
ZONE B
ZONE A
MOVIEMUSIC
SUR. DECODESTRAIGHT
ENHANCER
BASSDIRECT
MODE
SETUP
OPTION
2341
S
CEN
E
RETURN
TO
P
MENU
PO
P-
U
P
MENU
VOLUME
B
D
DVD
TV
NET
RADI
O
MUTE
DISPLAY
FM
MEM
O
R
Y
AM
P
RE
S
ET
T
U
NIN
G
INFO
1
2
3
4
5
6
TRANSMI
T
R
ECEIVER
HDMI
AV
S
LEE
P
AU
X
USB
5
6
NET
ZO
NE B
Z
O
NE
A
M
O
VI
E
MU
S
I
C
S
UR. DE
CO
DE
S
TRAI
G
HT
E
NHAN
C
ER
B
A
SS
DIRE
C
T
M
OD
E
S
ETU
P
2
3
4
1
ENTER
OPTION
Cursor keys
00_HTR-4067_5067_om_En.book Page 63 Monday, November 18, 2013 12:50 AM
PLAYBACK➤Listening to Internet radioEn64
You can listen to Internet radio stations from all over the world.
•Operations with TV screen are available only when your TV is connected to the
unit via HDMI. If not, carry out operations while viewing the front display.
•To use this function, the unit must be connected to the Internet (p.25). You can
check whether the network parameters (such as the IP address) are properly
assigned to the unit in “Information” (p.91) in the “Setup” menu.
•You may not be able to receive some Internet radio stations.
•The unit uses the vTuner Internet radio station database service.
•This service may be discontinued without notice.
Playback of Internet radio
Follow the procedure below to select an Internet radio station and
start playback.
You can control the Internet radio with the menu displayed on the
TV screen.
1
Press NET repeatedly to select “NET RADIO” as the
input source.
The browse screen is displayed on the TV.
2
Use the cursor keys to select an item and press
ENTER.
If an Internet radio station is selected, playback starts and
the playback screen is displayed.
•To return to the previous screen, press RETURN.
•To switch between the browse and playback screens during playback, press
DISPLAY.
Listening to Internet radio
1/7
Bookmarks
Locations
Genres
New Stations
Popular Stations
Podcasts
Help
NET RADIO
Top
Station Name
Album Name
Song Title
2:30
NET RADIO
Now Playing
[DISPLAY] to List Browse
1234
56
FM
INFO
MEMORY
AM
PRESET
TUNING
SCENE
RETURN
TOP
MENU
POP-UP
MENU
VOLUME
BD
DVD
TV
NET
RADIO
MUTE
DISPLAY
ENTER
TRANSMIT
RECEIVER
HDMI
AV
SLEEP
AUXUSB
56
NET
ZONE B
ZONE A
MOVIEMUSIC
SUR. DECODESTRAIGHT
ENHANCER
BASSDIRECT
MODE
SETUP
OPTION
2341
S
CEN
E
TO
P
MENU
PO
P-
U
P
MENU
VOLUME
B
D
DVD
TV
NET
RADI
O
MUTE
D
FM
MEM
O
R
Y
AM
P
RE
S
E
T
T
U
NIN
G
INFO
1
2
3
4
5
6
TRANSMI
T
R
ECEIVER
HDMI
AV
S
LEE
P
AU
X
USB
5
6
ZO
NE B
Z
O
NE
A
M
O
VI
E
MU
S
I
C
S
UR. DE
CO
DE
S
TRAI
G
HT
E
NHAN
C
ER
B
A
SS
DIRE
C
T
M
OD
E
S
ETU
P
OPTIO
N
2
3
4
1
ENTER
RETURN
DISPLAY
NET
Cursor keys
00_HTR-4067_5067_om_En.book Page 64 Monday, November 18, 2013 12:50 AM
PLAYBACK➤Listening to Internet radioEn65
■Browse screen
1List name
2Contents list
Displays the list of Internet radio content. Use the cursor keys to select an
item and press ENTER to confirm the selection.
3Item number/total
4Playback indicator
5Operation menu
Press the cursor key (r) and then use the cursor keys (q/w) to select an
item. Press ENTER to confirm the selection.
■Playback screen
1Playback indicator
2Playback information
Displays the station name, album name, song title, and elapsed time.
•Use the external device operation key (s) to stop playback.
•Some information may not be available depending on the station.
IconFunction
Moves 10 pages backward.
Moves to the previous page of the list.
Moves to the next page of the list.
Moves 10 pages forward.
Moves to the playback screen.
14
5
2
3
[DISPLAY] to Now Playing
1/7
Bookmarks
Locations
Genres
New Stations
Popular Stations
Podcasts
Help
NET RADIO
Top
1
2
Station Name
Album Name
Song Title
2:30
NET RADIO
Now Playing
[DISPLAY] to List Browse
1234
56
FM
INFO
MEMORY
AM
PRESET
TUNING
SCENE
RETURN
TOP
MENU
POP-UP
MENU
VOLUME
BD
DVD
TV
NET
RADIO
MUTE
DISPLAY
ENTER
TRANSMIT
RECEIVER
HDMI
AV
SLEEP
AUXUSB
56
NET
ZONE B
ZONE A
MOVIEMUSIC
SUR. DECODESTRAIGHT
ENHANCER
BASSDIRECT
MODE
SETUP
OPTION
2341
S
CEN
E
RETURN
TO
P
MENU
PO
P-
U
P
MENU
VOLUME
B
D
DVD
TV
NET
RADI
O
MUTE
DISPLAY
FM
MEM
O
R
Y
AM
P
RE
S
ET
T
U
NIN
G
INFO
1
2
3
4
5
6
TRANSMI
T
R
ECEIVER
HDMI
AV
S
LEE
P
AU
X
USB
5
6
NET
ZO
NE B
Z
O
NE
A
M
O
VI
E
MU
S
I
C
S
UR. DE
CO
DE
S
TRAI
G
HT
E
NHAN
C
ER
B
A
SS
DIRE
C
T
M
OD
E
S
ETU
P
OPTIO
N
2
3
4
1
ENTER
Cursor keys
External device
operation keys
00_HTR-4067_5067_om_En.book Page 65 Monday, November 18, 2013 12:50 AM
PLAYBACK➤Listening to Internet radioEn66
Registering favorite Internet radio stations (bookmarks)
You can register your favorite Internet radio stations to the
“Bookmarks” folder.
■Registering the station with the Option
menu
Follow the procedure below to register your favorite station to the
“Bookmarks” folder.
1
While listening to Internet radio, press OPTION.
2
Use the cursor keys to select “Bookmark On” and
press ENTER.
•On the playback screen, the current station is added to the “Bookmarks” folder. On
the browse screen, the station selected in the list is added to the “Bookmarks”
folder.
•To remove stations from the “Bookmarks” folder, select the station in the folder
and then “Bookmark Off”.
■Registering the station on the vTuner
website
You can also register your favorite Internet radio stations on the
vTuner website.
1
Select any of Internet radio stations on the unit.
This operation is necessary to register the radio station for
the first time.
2
Check the vTuner ID of the unit.
You can find the vTuner ID (MAC address of the unit) in
“Information” (p.91) in the “Setup” menu.
3
Access the vTuner website
(http://yradio.vtuner.com/) with the web browser on
your PC and enter the vTuner ID.
•To use this feature, you need to create your personal account. Create your
account using your e-mail address.
4
Register your favorite radio stations.
Click the “Add” icon (
❤
+) next to the station name.
•To remove the station from the “Bookmarks” folder, select “Bookmarks” in
the Home screen, and then click the “Remove” icon (
❤
–) next to the station
name.
You can switch the language.
Enter the vTuner ID in this area.
1234
56
FM
INFO
MEMORY
AM
PRESET
TUNING
SCENE
RETURN
TOP
MENU
POP-UP
MENU
VOLUME
BD
DVD
TV
NET
RADIO
MUTE
DISPLAY
ENTER
TRANSMIT
RECEIVER
HDMI
AV
SLEEP
AUXUSB
56
NET
ZONE B
ZONE A
MOVIEMUSIC
SUR. DECODESTRAIGHT
ENHANCER
BASSDIRECT
MODE
SETUP
OPTION
2341
S
CEN
E
RETURN
TO
P
MENU
PO
P-
U
P
MENU
VOLUME
B
D
DVD
TV
NET
RADI
O
MUTE
DISPLAY
FM
MEM
O
R
Y
AM
P
RE
S
ET
T
U
NIN
G
INFO
1
2
3
4
5
6
TRANSMI
T
R
ECEIVER
HDMI
AV
S
LEE
P
AU
X
USB
5
6
NET
ZO
NE B
Z
O
NE
A
M
O
VI
E
MU
S
I
C
S
UR. DE
CO
DE
S
TRAI
G
HT
E
NHAN
C
ER
B
A
SS
DIRE
C
T
M
OD
E
S
ETU
P
2
3
4
1
ENTER
OPTION
Cursor keys
00_HTR-4067_5067_om_En.book Page 66 Monday, November 18, 2013 12:50 AM
PLAYBACK➤Playing back music with AirPlayEn67
The AirPlay function allows you to play back iTunes or iPod touch/iPhone/iPad music on
the unit via network.”
•This section describes "iPod touch", "iPhone" and "iPad" as the "iPod". "iPod" refers to "iPod touch",
"iPhone" and "iPad", unless otherwise specified.
•To use this function, the unit and your PC or iPod must be connected to the same router (p.25). You can
check whether the network parameters (such as the IP address) are properly assigned to the unit in
“Information” (p.91) in the “Setup” menu.
•When using a multiple SSID router, access to the unit might be restricted depending on the SSID to
connect. Connect the iPod to the SSID which can access the unit.
•For details on supported iPod devices, see “Supported devices and file formats” (p.109).
Playback of iTunes/iPod music contents
Follow the procedure below to play back iTunes/iPod music contents on the unit.
1
Turn on the unit, and start iTunes on the PC or display the playback
screen on the iPod.
If the iTunes/iPod recognizes the unit, the AirPlay icon () appears.
•If the icon does not appear, check whether the unit and PC/iPod are connected to the router properly.
2
On the iTunes/iPod, click (tap) the AirPlay icon and select the unit
(network name of the unit) as the audio output device.
3
Select a song and start playback.
The unit automatically selects “AirPlay” as the input source and starts playback.
The playback screen is displayed on the TV.
•The playback screen is available only when your TV is connected to the unit via HDMI.
Playing back music with AirPlay
PC
iTunes
Router
(HTR-5067/TSR-5770 can be connected
wirelessly to a network.)
iPod
The unit
iTunes (example)iPod (example)
iTunes (example)iPod (example)
Network name of the unit
00_HTR-4067_5067_om_En.book Page 67 Monday, November 18, 2013 12:50 AM
PLAYBACK➤Playing back music with AirPlayEn68
•You can turn on the unit automatically when starting playback on iTunes or iPod by
setting “Network Standby” (p.92) in the “Setup” menu to “On”.
•You can edit the network name (the unit’s name on the network) displayed on
iTunes/iPod in “Network Name” (p.92) in the “Setup” menu.
•If you select the other input source on the unit during playback, playback on the
iTunes/iPod stops automatically.
•You can adjust the unit’s volume from the iTunes/iPod during playback. To disable
volume controls from iTunes/iPod, set “Volume Interlock” (p.75) in the “Option”
menu to “Off”.
■Playback screen
1Playback indicator
2Playback information
Displays the artist name, album name, song title, and elapsed time/song
length.
Use the following remote control keys to control playback.
•To control iTunes playback with the remote control of the unit, you need to
configure the iTunes preferences to enable iTunes control from remote speakers in
advance.
Caution
•When you use iTunes/iPod controls to adjust volume, the volume may be
unexpectedly loud. This could result in damage to the unit or speakers. If the
volume suddenly increases during playback, stop playback on the iTunes/iPod
immediately.
2
1
Artist Name
Album Name
Song Title
2:30
AirPlay
Now Playing
5:30
External device
operation keys
Function
aResumes playback from pause.
sStops playback.
dStops playback temporarily.
f
Skips forward/backward.
g
iTunes (example of English version)
Check this box
1234
56
FM
INFO
MEMORY
AM
PRESET
TUNING
SCENE
RETURN
TOP
MENU
POP-UP
MENU
VOLUME
BD
DVD
TV
NET
RADIO
MUTE
DISPLAY
ENTER
TRANSMIT
RECEIVER
HDMI
AV
SLEEP
AUXUSB
56
NET
ZONE B
ZONE A
MOVIEMUSIC
SUR. DECODESTRAIGHT
ENHANCER
BASSDIRECT
MODE
SETUP
OPTION
2341
S
CEN
E
RETURN
TO
P
MENU
PO
P-
U
P
MENU
VOLUME
B
D
DVD
TV
NET
RADI
O
MUTE
D
I
S
PLA
Y
ENTER
FM
MEM
O
R
Y
AM
P
RE
S
ET
T
U
NIN
G
INFO
1
2
3
4
5
6
TRANSMI
T
R
ECEIVER
HDMI
AV
S
LEE
P
AU
X
USB
5
6
NET
ZO
NE B
Z
O
NE
A
M
O
VI
E
MU
S
I
C
S
UR. DE
CO
DE
S
TRAI
G
HT
E
NHAN
C
ER
B
A
SS
DIRE
C
T
M
OD
E
S
ETU
P
OPTIO
N
2
3
4
1
External device
operation keys
00_HTR-4067_5067_om_En.book Page 68 Monday, November 18, 2013 12:50 AM
PLAYBACK➤Playing back music in multiple rooms (HTR-5067/TSR-5770 only)En69
The Zone A/B function allows you to play back an input source in the room where the
unit is installed (Zone A) and in another room (Zone B).
For example, you can turn on Zone A (turn off Zone B) when you are in the living room,
and turn on Zone B (turn off Zone A) when you are in the study room. Also, you can turn
on both zones when you want to enjoy the same input source in those rooms
simultaneously.
•Multichannel sources are mixed down to 2 channels and output to the zone B.
•The same input source is applied to both Zone A and Zone B.
•By default, the volume for Zone B changes in conjunction with the volume for Zone A. If there is volume
difference between Zone A/B, you can correct it in “ZoneB Trim” in the “Option” menu (p.70). Also, you can
adjust the volume for Zone B separately (p.70).
•You can automatically enable/disable the audio output to Zone A/B in conjunction with a scene selection
(p.43)
Preparing Zone B
Connect the device that will be used in Zone B to the unit.
Connect the speakers placed in Zone B to the unit with speaker cables.
To utilize the SURROUND BACK/BI AMP/ZONE B jacks for Zone B speakers, set
“Power Amp Assign” (p.79) in the “Setup” menu to “Zone B” after connecting the power
cable to an AC wall outlet.
Playing back music in multiple rooms (HTR-5067/TSR-5770 only)
Living room (Zone A)
Study room (Zone B)
Caution
•Remove the unit’s power cable from the AC wall outlet before connecting speakers.
•Ensure that the core wires of the speaker cable do not touch one another or come into contact with the
unit’s metal parts. Doing so may damage the unit or the speakers. If the speaker cables short circuit,
“Check SP Wires” will appear on the front display when the unit is turned on.
12
12
39
45
FRONTCENTERSURROUND
SINGLE
SURROUND BACK/BI AMP
/ZONE B
OR OUT
P
B
Y
SPEAKERS
SUBWOOFER
PRE OUT
2
1
DC OUT
5V0.5A
The unit (rear)
Zone A
Zone B
00_HTR-4067_5067_om_En.book Page 69 Monday, November 18, 2013 12:50 AM
PLAYBACK➤Playing back music in multiple rooms (HTR-5067/TSR-5770 only)En70
■Basic playback procedure
1
Press ZONE A or ZONE B to enable/disable audio
output to Zone A or Zone B.
2
Use the input selection keys to select an input
source.
3
Start playback on the external device or select a
radio station.
4
Press VOLUME to adjust the volume.
■Correcting volume difference between
Zone A and Zone B
If you are bothered by volume difference between Zone A/B, follow
the procedure below to adjust the volume for Zone B.
1
Press OPTION.
2
Use the cursor keys to select “Volume Trim”
(Volume Trim) and press ENTER.
•To return to the previous screen during menu operations, press RETURN.
•Text in parentheses denotes indicators on the front display.
3
Use the cursor keys (q/w) to select “ZoneB Trim”
(ZB.Trim) and the cursor keys (e/r) to adjust the
setting.
Setting range
-10.0 dB to +10.0 dB (0.5 dB increments)
Default
0.0 dB
4
To exit from the menu, press OPTION.
•This setting is not effective when “ZoneB Volume” (p.87) in the “Setup”
menu is set to “Async.”.
■Adjusting the volume for Zone B
separately
You can separately adjust the volume for Zone B using the remote
control when “ZoneB Volume” (p.87) in the “Setup” menu is set to
“Async.”.
1
To set the remote control to the Zone B operation
mode, while holding down the cursor key (r), hold
down SCENE (TV) for more than 3 seconds.
TRANSMIT blinks twice.
2
Press VOLUME to adjust the volume for Zone B.
•To mute the audio output to Zone B, press MUTE.
3
To set the remote control to the Zone A operation
mode, while holding down the cursor key (r), hold
down SCENE (BD/DVD) for more than 3 seconds.
TRANSMIT blinks twice.
12
PARTY
VIRTUAL
MUTE
ENHANCER
STEREO
TUNED
SLEEP
OUT
ECO
CHARGE
ADAPTIVE DRC
23
ZONE
A
ZONE
B
VOL.
HDMI1
“ZONE A” and/or “ZONE B” lights up
1234
56
FM
INFO
MEMORY
AM
PRESET
TUNING
SCENE
RETURN
TOP
MENU
POP-UP
MENU
VOLUME
BD
DVD
TV
NET
RADIO
MUTE
DISPLAY
ENTER
TRANSMIT
RECEIVER
HDMI
AV
SLEEP
AUXUSB
56
NET
ZONE B
ZONE A
MOVIEMUSIC
SUR. DECODESTRAIGHT
ENHANCER
BASSDIRECT
MODE
SETUP
OPTION
2341
FM
INFO
MEM
O
R
Y
AM
P
RE
S
E
T
T
U
NIN
G
SCENE
TO
P
MENU
PO
P-
U
P
MENU
NET
RADI
O
DISPLAY
R
ECEIVER
S
LEE
P
M
O
VI
E
MU
S
I
C
S
UR. DE
CO
DE
S
TRAI
G
HT
E
NHAN
C
ER
B
A
SS
DIRE
C
T
M
OD
E
S
ETU
P
ENTER
RETURN
VOLUME
SCENE (BD/DVD)
SCENE (TV)
MUTE
OPTION
TRANSMIT
ZONE A
ZONE B
Cursor keys
Input selection keys
00_HTR-4067_5067_om_En.book Page 70 Monday, November 18, 2013 12:50 AM
PLAYBACK➤Viewing the current statusEn71
Switching information on the front display
1
Press INFO.
Each time you press the key, the displayed item changes.
About 3 seconds later, the corresponding information for
the displayed item appears.
•Available items vary depending on the selected input source. The displayed
item can also be applied separately to each input source group.
*The name of the audio decoder currently activated is displayed. If no audio
decoder is activated, “Decoder Off” appears.
Viewing the current status
Input source groupItem
HDMI 1–6
AV 1–6
AUX
Input (input source name), DSP Program (sound
mode name), Audio Decoder (decoder name*)
USB
SERVER
AirPlay
Song (song title), Artist (artist name), Album (album
name), DSP Program (sound mode name), Audio
Decoder (decoder name*)
* During simple playback of iPod:
Input (input source name), DSP Program (sound mode
name), Audio Decoder (decoder name)
NET RADIO
Song (song title), Album (album name), Station
(station name), DSP Program (sound mode name),
Audio Decoder (decoder name*)
TUNER
Frequency (frequency), DSP Program (sound mode
name), Audio Decoder (decoder name*)
* (U.K. and Europe models only)
Radio Data System data is also available when the unit is
tuned into a Radio Data System broadcasting station (p.52).
MUTE
ENHANCER
STEREO
TUNED
SLEEP
OUT
ECO
CHARGE
ADAPTIVE DRC
VIRTUAL
Audio Decoder
VOL.
Item name
MUTE
ENHANCER
STEREO
TUNED
SLEEP
OUT
ECO
CHARGE
ADAPTIVE DRC
VIRTUAL
†‡Pro Logic
VOL.
Information
1234
56
FM
INFO
MEMORY
AM
PRESET
TUNING
SCENE
RETURN
TOP
MENU
POP-UP
MENU
VOLUME
BD
DVD
TV
NET
RADIO
MUTE
DISPLAY
ENTER
TRANSMIT
RECEIVER
HDMI
AV
SLEEP
AUXUSB
56
NET
ZONE B
ZONE A
MOVIEMUSIC
SUR. DECODESTRAIGHT
ENHANCER
BASSDIRECT
MODE
SETUP
OPTION
2341
1
23
4
5
6
FM
MEM
O
RY
AM
PRE
S
E
T
TU
NIN
G
SCENE
RETURN
T
OP
MENU
PO
P-
UP
MENU
V
OLUME
B
D
DVD
TV
NET
R
ADI
O
MUTE
DI
S
PLA
Y
ENTER
TRANSMI
T
RECEIVER
HDMI
AV
S
LEEP
A
UX
USB
5
6
NET
ZO
NE
B
ZO
NE
A
MO
VI
E
M
U
S
I
C
S
UR. DE
CO
DE
S
TRAI
G
HT
ENHAN
C
ER
B
A
SS
DIRE
CT
M
OD
E
S
ETU
P
O
PTION
2
3
4
1
INFO
00_HTR-4067_5067_om_En.book Page 71 Monday, November 18, 2013 12:50 AM
PLAYBACK➤Configuring playback settings for different playback sources (Option menu)En72
You can configure separate playback settings for different playback sources. This
menu is available on the front panel (or on the TV screen), allowing you to easily
configure settings during playback.
1
Press OPTION.
Front display
TV screen
2
Use the cursor keys to select an item and press ENTER.
•To return to the previous screen during menu operations, press RETURN.
3
Use the cursor keys (e/r) to select a setting.
4
To exit from the menu, press OPTION.
Option menu items
•Available items vary depending on the selected input source.
•Text in parentheses denotes indicators on the front display.
•Default settings are underlined.
•Depending on the region of purchase, some menu items for audio streaming services are also available.
For details, refer to each manual on the supplied CD-ROM.
Configuring playback settings for different playback sources (Option menu)
MUTE
ENHANCER
STEREO
TUNED
SLEEP
OUT
ECO
CHARGE
ADAPTIVE DRC
VIRTUAL
Tone Control
VOL.
Tone Control
DSP/Surround
Volume Trim
Lipsync
Signal Info
Audio In
Option
ItemFunctionPage
Tone Control (Tone Control)
Adjusts the high-frequency range and low-frequency
range of sounds.
73
DSP/Surround
(DSP/Surround)
DSP Level
(DSP Level)
Adjusts the sound field effect level.73
Adaptive DRC
(A.DRC)
Sets whether the dynamic range (from maximum to
minimum) is automatically adjusted when the volume
is adjusted.
73
Extended
Surround
(EXTD)
(HTR-5067/TSR-5770 only)
Selects how to play back 5.1- to 7.1-channel sources
when surround back speakers are used.
73
Enhancer
(Enhancer)
Enables/disables Compressed Music Enhancer.74
Volume Trim
(Volume Trim)
Input Trim
(In.Trim)
Corrects volume differences between input sources.74
Subwoofer Trim
(SW.Trim)
Fine-adjusts the subwoofer volume.74
ZoneB Trim
(ZB.Trim)
(HTR-5067/TSR-5770 only)
Corrects volume differences between Zone A/B.
70
Lipsync (Lipsync)
Enables/disables the “Lipsync” setting in the “Setup”
menu.
74
Signal Info (Signal Info)Displays information about the video/audio signal.74
Audio In (Audio In)
Combines the video jack of the selected input source
with an audio jack of others.
75
Video Out (Video Out)Selects a video to be output with radio sounds.75
Auto Preset (Auto Preset)
Automatically registers FM radio stations with strong
signals as presets.
50
Clear Preset (Clear Preset)Clear radio stations registered to preset numbers.51
00_HTR-4067_5067_om_En.book Page 72 Monday, November 18, 2013 12:50 AM
PLAYBACK➤Configuring playback settings for different playback sources (Option menu)En73
■Tone Control (Tone Control)
Adjusts the high-frequency range (Treble) and low-frequency range (Bass) of sounds.
Choices
Treble (Treble), Bass (Bass)
Setting range
-6.0 dB to Bypass (Bypass)
to +6.0 dB (0.5 dB increments)
•You can also adjust the tone with the front panel controls. Press TONE CONTROL to select "Treble" or
"Bass", then press PROGRAM to make an adjustment.
•If you set an extreme value, sounds may not match those from other channels.
■DSP/Surround (DSP/Surround)
Configures the sound field program and surround settings.
❑DSP Level (DSP Level)
Adjusts the sound field effect level.
Setting range
-6 dB to 0 dB
to +3 dB
❑Adaptive DRC (A.DRC)
Sets whether the dynamic range (from maximum to minimum) is automatically adjusted
when the volume level is adjusted. When it is set to “On”, it is useful for listening to
playback at a low volume at night.
Settings
If “On” is selected, the dynamic range becomes narrow at a low volume and wide at a
high volume.
❑Extended Surround (EXTD)
(HTR-5067/TSR-5770 only)
Selects how to play back 5.1- to 7.1-channel sources when surround back speakers
are used.
Settings
Traffic Program (TrafficProgram)
(U.K. and Europe models only)
Automatically searches for a traffic information
station.
52
Repeat (Repeat)
Configures the repeat setting for the iPod (p.56),
USB storage device (p.59), or media server (p.63).
—
Shuffle (Shuffle)
Configures the shuffle setting for the iPod (p.56),
USB storage device (p.59), or media server (p.63).
—
Volume Interlock (Interlock)
Enables/disables volume controls from iTunes/iPod
via AirPlay.
75
Bookmark On (Bookmark On)
Bookmark Off (Bookmark Off)
Adds your favorite Internet radio station to the
"Bookmarks" folder, or removes it from the
"Bookmarks" folder.
66
ItemFunctionPage
On (On)Automatically adjusts the dynamic range.
Off (Off)
The dynamic range is not automatically adjusted.
Auto (Auto)
Automatically selects the most suitable decoder if signals that contain
surround back channel signals are input, and reproduces the signals
in 6.1- or 7.1-channel. If two surround back speakers are connected,
the unit reproduces the 5.1-channel signals in 7.1-channel.
bPLIIx Movie
(bPLIIxMo)
Always reproduces signals in 7.1-channel using the Dolby Pro Logic
IIx Movie decoder. This setting is available only when two surround
back speakers are connected.
bPLIIx Music
(bPLIIxMu)
Always reproduces signals in 6.1- or 7.1-channel using the Dolby Pro
Logic IIx Music decoder. This setting is available only when one or two
surround back speakers are connected.
EX/ES (EX/ES)
Automatically selects the Dolby EX or DTS-ES decoder, and
reproduces signals in 6.1- or 7.1-channel.
Off (Off)
Always reproduces signals in their original channels. (Even when
DTS-ES or Dolby Digital Surround EX signal is input, the unit
reproduces the signal in 5.1-channel.)
Volume: lowVolume: high
Input levelInput level
On
Off
On
Off
Output level
Output level
00_HTR-4067_5067_om_En.book Page 73 Monday, November 18, 2013 12:50 AM
PLAYBACK➤Configuring playback settings for different playback sources (Option menu)En74
•Some early Dolby Digital Surround EX or DTS-ES sources do not contain a flag for reproducing surround
back channel. We recommend you set “Extended Surround” to “bPLIIx Movie” or “EX/ES” when playing
back those sources.
❑Enhancer (Enhancer)
Enables/disables Compressed Music Enhancer (p.48).
•This setting is applied separately to each input source.
•You can also use ENHANCER on the remote control to enable/disable Compressed Music Enhancer
(p.48).
Settings
Default
TUNER, USB, (network sources): On (On)
Others: Off (Off)
■Volume Trim (Volume Trim)
Fine-adjusts volume difference between input sources or subwoofer volume.
❑Input Trim (In.Trim)
Corrects volume differences between input sources. If you are bothered by volume
differences when switching between input sources, use this function to correct it.
•This setting is applied separately to each input source.
Setting range
-6.0 dB to 0.0 dB
to +6.0 dB (0.5 dB increments)
❑Subwoofer Trim (SW.Trim)
Fine-adjusts the subwoofer volume.
Setting range
-6.0 dB to 0.0 dB
to +6.0 dB (0.5 dB increments)
■Lipsync (Lipsync)
Enables/disables the adjustment configured in “Lipsync” (p.86) in the “Setup” menu.
•This setting is applied separately to each input source.
Settings
Default
AirPlay: Off (Off)
Others: On (On)
■Signal Info (Signal Info)
Displays information about the video/audio signal.
Choices
•To switch the information on the front display, press the cursor keys (q/w) repeatedly.
Off (Off)Disables Compressed Music Enhancer.
On (On)Enables Compressed Music Enhancer.
Off (Off)Disables the “Lipsync” adjustment.
On (On)Enables the “Lipsync” adjustment.
Format (FORMAT)Audio format of the input signal
Channel (CHAN)
The number of source channels in the input signal
(front/surround/LFE)
For example, “3/2/0.1” means 3 front channels, 2 surround channels,
and LFE.
Sampling (SAMPL)The number of samples per second of the input digital signal
Bitrate (B RATE)The amount of data per second of the input bitstream signal
Video In (V IN)Type and resolution of the input digital signal
Video Out (V OUT)Type and resolution of the output digital signal
00_HTR-4067_5067_om_En.book Page 74 Monday, November 18, 2013 12:50 AM
PLAYBACK➤Configuring playback settings for different playback sources (Option menu)En75
■Audio In (Audio In)
Combines the video jack of the selected input source (HDMI 1–6 or AV 1–6) with an
audio jack of others. For example, use this function in the following cases.
•Connecting a playback device that supports HDMI video output, but not HDMI audio
output
•Connecting a playback device that has component video jacks and analog stereo
jacks (such as game consoles)
Input sources
HDMI 1–6, AV 1–6
■Setup procedure
(To input audio through a digital optical jack)
Select “AV 1” and connect the device to the unit’s corresponding audio jacks with a
digital optical cable.
(To input audio through a digital coaxial jack)
Select “AV 2” or “AV 3” and connect the device to the unit’s corresponding audio jacks
with a digital coaxial cable.
(To input audio through analog audio jacks)
Select “AV 4”, “AV 5”, or “AV 6”, and connect the device to the unit’s corresponding
audio jacks with a stereo pin cable.
■Video Out (Video Out)
Selects a video to be output with the selected audio source. For example, you can
watching the video while listening to the radio.
Input sources
TUNER, USB, (network sources), AUX
Settings
■Volume Interlock (Interlock)
Enables/disables volume controls from iTunes/iPod via AirPlay.
Settings
Off (Off)
Does not output video.
HDMI 1–6, AV 1–6Outputs video input through the corresponding video input jacks.
Off (Off)Disables volume controls from iTunes/iPod.
Limited (Ltd)
Enables volume controls from iTunes/iPod within the limited range
(-80 dB to 0 dB and mute).
Full (Full)
Enables volume controls from iTunes/iPod in the full range
(-80 dB to +16.5 dB and mute).
00_HTR-4067_5067_om_En.book Page 75 Monday, November 18, 2013 12:50 AM
CONFIGURATIONS➤Configuring various functions (Setup menu)En76
CONFIGURATIONS
You can configure the unit’s various function with the menu displayed on the TV screen.
•Operations with TV screen are available only when your TV is connected to the unit via HDMI. If not, carry
out operations while viewing the front display.
•If new firmware is available, the envelope icon (p) appears in the screen (p.97).
1
Press SETUP.
2
Use the cursor keys to select a menu and press ENTER.
3
Use the cursor keys to select an item and press ENTER.
•To return to the previous screen during menu operations, press RETURN.
4
Use the cursor keys (e/r) to select a setting and press ENTER.
5
To exit from the menu, press SETUP.
Configuring various functions (Setup menu)
Setup
Speaker
HDMI
Sound
ECO
Function
Network
Language
Configuration
Distance
Level
Equalizer
Test Tone
Setup
Speaker
HDMI
Sound
ECO
Function
Network
Language
Configuration
Distance
Level
Equalizer
Test Tone
00_HTR-4067_5067_om_En.book Page 76 Monday, November 18, 2013 12:50 AM
CONFIGURATIONS➤Configuring various functions (Setup menu)En77
Setup menu items
MenuItemFunctionPage
Speaker
Configuration
Power Amp Assign
(HTR-5067/TSR-5770 only)
Selects a speaker system.
79
SubwooferSelects whether or not a subwoofer is connected.79
FrontSelects the size of the front speakers.79
CenterSelects whether or not a center speaker is connected and its size.79
SurroundSelects whether or not surround speakers are connected and their size.80
Surround Back
(HTR-5067/TSR-5770 only)
Selects whether or not surround back speakers are connected and their size.
80
CrossoverSets the lower limit of the low-frequency component that can be output from speakers whose size is set to “Small”.80
Subwoofer PhaseSets the phase of the subwoofer.80
Extra BassEnables/disables Extra Bass.80
Virtual CINEMA FRONTSelects whether to use the front 5-channel speaker (Virtual CINEMA FRONT) configuration.81
DistanceSets the distance between each speaker and listening position.81
LevelAdjusts the volume of each speaker.81
EqualizerAdjusts the tone with an equalizer.81
Test ToneEnables/disables the test tone output.82
HDMIConfiguration
HDMI ControlEnables/disables HDMI Control.83
Audio OutputSelects a device to output audio.83
Standby ThroughSelects whether to output videos/audio (input through HDMI jacks) to the TV when the unit is in standby mode.83
TV Audio InputSelects an audio input jack of the unit to be used for TV audio input.83
Standby SyncSelects whether to use HDMI control to link the standby behavior of the TV and the unit.83
ARCEnables/disables ARC.84
SCENEEnables/disables SCENE link playback.84
00_HTR-4067_5067_om_En.book Page 77 Monday, November 18, 2013 12:50 AM
CONFIGURATIONS➤Configuring various functions (Setup menu)En78
Sound
DSP Parameter
CINEMA DSP 3D ModeEnables/disables CINEMA DSP 3D.85
PanoramaEnables/disables the broadening effect of the front sound field.85
Center WidthAdjusts the broadening effect of the center sound field.85
DimensionAdjusts the difference in level between the front and surround sound fields.85
Center ImageAdjusts the center orientation level (broadening effect) of the front sound field.85
Lipsync
SelectSelects the method to adjust the delay between video and audio output.86
AdjustmentAdjusts the delay between video and audio output manually.86
Volume
ScaleSwitches the scale of the volume display.86
Dynamic RangeSelects the dynamic range adjustment method for bitstream audio (Dolby Digital and DTS signals) playback.86
Max VolumeSets the maximum volume to prevent excessive loudness.86
Initial VolumeSets the initial volume for when this receiver is turned on.86
ZoneB Volume
(HTR-5067/TSR-5770 only)
Selects whether to adjust the volume for Zone B in conjunction with the volume for Zone A.
87
ECO
Auto Power StandbySet the amount of time for the auto-standby function.88
ECO ModeEnables/disables the eco mode (power saving mode).88
Function
Input RenameChanges the input source name displayed on the front display.89
DimmerAdjusts the brightness of the front display.89
Memory GuardPrevents accidental changes to the settings.89
DC OUTPower ModeSelects how to supply power through the DC OUT jack.90
Network
InformationDisplays the network information on the unit.91
Network Connection
(HTR-5067/TSR-5770 only)
Selects the network connection method.
91
IP AddressConfigures the network parameters (such as IP address).91
MAC Address FilterSets the MAC address filter to limit access to the unit from other network devices.92
DMC ControlSelects whether to allow a DLNA-compatible Digital Media Controller (DMC) to control playback.92
Network StandbySelects whether to enable/disable the function that turns on the unit from other network devices.92
Network NameEdits the network name (the unit’s name on the network) displayed on other network devices.92
Network UpdateUpdates the firmware via the network.93
LanguageSelect an on-screen menu language.93
MenuItemFunctionPage
00_HTR-4067_5067_om_En.book Page 78 Monday, November 18, 2013 12:50 AM
CONFIGURATIONS➤Configuring various functions (Setup menu)En79
Speaker
Configures the speaker settings manually.
•Default settings are underlined.
■Configuration
Configures the output characteristics of the speakers.
•When you configure the speaker size, select “Large” if the woofer diameter of your speaker is 16 cm
(6-1/4”) or larger or “Small” if it is smaller than 16 cm (6-1/4”).
(HTR-5067/TSR-5770 only)
Selects a speaker system.
In addition to the 5.1- or 7.1-channel speaker system, various speaker
configurations are possible using the Zone B speakers or bi-amp connection.
Settings
Selects whether or not a subwoofer is connected.
Settings
Selects the size of the front speakers.
Settings
•“Front” is automatically set to “Large” when “Subwoofer” is set to “None”.
Selects whether or not a center speaker is connected and its size.
Settings
Power Amp Assign
Basic
Select this option when you use a normal speaker system (not using
Zone B speakers or a bi-amp connection).
BI-AMP
Select this option when you connect front speakers that support
bi-amp connections (p.17).
Zone B
Select this option when you use Zone B speakers (p.69) in addition to
the speaker system in the main zone (Zone A).
Subwoofer
Use
Select this option when a subwoofer is connected.
The subwoofer will produce LFE (low-frequency effect) channel audio
and low-frequency components from other channels.
None
Select this option when no subwoofer is connected.
The front speakers will produce LFE (low-frequency effect) channel
audio and low-frequency components from other channels.
Front
Small
Select this option for small speakers.
The subwoofer will produce front channel low-frequency components
(configurable in “Crossover”).
Large
Select this option for large speakers.
The front speakers will produce all of the front channel frequency
components.
Center
Small
Select this option for small speakers.
The subwoofer or front speakers will produce center channel
low-frequency components (configurable in “Crossover”).
Large
Select this option for large speakers.
The center speaker will produce all of the center channel frequency
components.
None
Select this option when no center speaker is connected.
The front speakers will produce center channel audio.
00_HTR-4067_5067_om_En.book Page 79 Monday, November 18, 2013 12:50 AM
CONFIGURATIONS➤Configuring various functions (Setup menu)En80
Selects whether or not surround speakers are connected and their sizes.
Settings
(HTR-5067/TSR-5770 only)
Selects whether or not surround back speakers are connected and their sizes.
Settings
•“Surround Back” is automatically set to “None” when “Power Amp Assign” is set to “BI-AMP” or “Zone
B”, or when “Surround” is set to “None”.
•"Surround Back" is not available when "Virtual CINEMA FRONT" is set to "On".
Sets the lower limit of the low-frequency components that can be output from a
speaker whose size is set to “Small”. A frequency sound lower than the specified
value will be produced from the subwoofer or front speakers.
Settings
40 Hz, 60 Hz, 80 Hz
, 90 Hz, 100 Hz, 110 Hz, 120 Hz, 160 Hz, 200 Hz
•If the volume and crossover frequency are adjustable on your subwoofer, set the volume to half and
crossover frequency to maximum.
Sets the phase of the subwoofer. When the bass sound is lacking or unclear,
switch the subwoofer phase.
Settings
Enables/disables Extra Bass. When Extra Bass is enabled, you can enjoy
enhanced bass sounds, regardless of the size of the front speakers and the
presence or absence of the subwoofer.
Settings
•You can also use BASS on the remote control to enable/disable Extra Bass (p.48).
Surround
Small
Select this option for small speakers.
The subwoofer or front speakers will produce surround channel
low-frequency components (configurable in “Crossover”).
Large
Select this option for large speakers.
The surround speakers will produce all of the surround channel
frequency components.
None
Select this option when no surround speakers are connected.
The front speakers will produce surround channel audio. Virtual
CINEMA DSP works when you select a sound program.
Surround Back
Small x1
Select this option when one small speaker is connected.
The subwoofer or front speakers will produce surround back channel
low-frequency components (configurable in “Crossover”).
Small x2
Select this option when two small speakers are connected.
The subwoofer or front speakers will produce surround back channel
low-frequency components (configurable in “Crossover”).
Large x1
Select this option when one large speaker is connected.
The surround back speaker will produce all of the surround back
channel frequency components.
Large x2
Select this option when two large speakers are connected.
The surround back speakers will produce all of the surround back
channel frequency components.
None
Select this option when no surround back speakers are connected.
The surround speakers and subwoofer (or front speakers) will produce
surround back channel audio.
Crossover
Subwoofer Phase
NormalDoes not reverse the subwoofer phase.
ReverseReverses the subwoofer phase.
Extra Bass
OffDisables Extra Bass.
OnEnables Extra Bass.
00_HTR-4067_5067_om_En.book Page 80 Monday, November 18, 2013 12:50 AM
CONFIGURATIONS➤Configuring various functions (Setup menu)En81
Selects whether to use the front 5-channel speaker (Virtual CINEMA FRONT)
configuration.
Settings
•Select "On" only when utilizing the Virtual CINEMA FRONT configuration (p.13).
•This setting is not available when “Surround” is set to “None”.
■Distance
Sets the distance between each speaker and listening position so that sounds from the
speakers reach the listening position at the same time. First, select the unit of distance
from “Meter” or “Feet”.
Choices
Front L, Front R, Center, Surround L, Surround R, Surround Back L (HTR-5067/TSR-5770 only),
Surround Back R (HTR-5067/TSR-5770 only), Subwoofer
Setting range
0.30 m to 24.00 m (1.0 ft to 80.0 ft), 0.05 m (0.2 ft) increments
Default
Front L, Front R, Subwoofer: 3.00 m (10.0 ft)
Center: 2.60 m (8.6 ft)
Others: 2.40 m (8.0 ft)
■Level
Adjusts the volume of each speaker.
Choices
Front L, Front R, Center, Surround L, Surround R, Surround Back L (HTR-5067/TSR-5770 only),
Surround Back R (HTR-5067/TSR-5770 only), Subwoofer
Setting range
-10.0 dB to +10.0 dB (0.5 dB increments)
Default
Front L, Front R, Subwoofer: 0.0 dB
Others: -1.0 dB
■Equalizer
Adjusts the tone with an equalizer.
Selects the type of equalizer to be used.
Settings
•“PEQ” is available only when the YPAO has been performed (p.38).
■Manual equalizer adjustment
1
Set “EQ Select” to “GEQ”.
2
Use the cursor keys (q/w) to select “Channel” and the cursor keys (e/r) to
select the desired speaker channel.
3
Use the cursor keys (q/w) to select the desired band (frequency) and the
cursor keys (e/r) to adjust the gain.
Setting range
-6.0 dB to +6.0 dB
4
To exit from the menu, press SETUP.
Virtual CINEMA FRONT
OffDisables the front 5-channel speaker configuration.
OnEnables the front 5-channel speaker configuration.
EQ Select
PEQ
Applies the parametric equalizer values obtained by the YPAO
measurement (p.38).
GEQ
Select this option when you want to adjust the equalizer manually.
For details, see “Manual equalizer adjustment”.
OffDoes not use the equalizer.
Equalizer
EQ Select
GEQ Edit
Channel
63Hz
160Hz
400Hz
1kHz
2.5kHz
6.3kHz
16kHz
GEQ
Front L
Back:RETURN
00_HTR-4067_5067_om_En.book Page 81 Monday, November 18, 2013 12:50 AM
CONFIGURATIONS➤Configuring various functions (Setup menu)En82
■Test Tone
Enables/disables the test tone output. Test tone output helps you to adjust the speaker
balance or equalizer while confirming its effect.
Settings
Off
Does not output test tones.
On
Outputs test tones automatically when you adjust the speaker balance
or equalizer.
00_HTR-4067_5067_om_En.book Page 82 Monday, November 18, 2013 12:50 AM
CONFIGURATIONS➤Configuring various functions (Setup menu)En83
HDMI
Configures the HDMI settings.
•Default settings are underlined.
■Configuration
Enables/disables HDMI Control (p.111).
Settings
•To use HDMI control, you need to perform the HDMI Control link setup (p.111) after connecting HDMI
Control-compatible devices.
Selects a device to output audio.
•This setting is available only when “HDMI Control” is set to “Off”.
Amp
Enables/disables the audio output from the speakers connected to the unit.
Settings
HDMI OUT (TV)
Enables/disables the audio output from a TV connected to the HDMI OUT jack.
Settings
Select whether to output videos/audio (input through HDMI jacks) to the TV when
the unit is in standby mode. If this function is set to “On”, you can use the input
selection keys (HDMI 1–6) to select an HDMI input even when the unit is in
standby mode (the standby indicator on the unit blinks).
Settings
Selects an audio input jack of the unit to be used for TV audio input when “HDMI
Control” is set to “On”. The unit’s input source automatically switches to TV audio
when the TV input is switched to its built-in tuner.
Settings
AV1–6
Default
AV4
•When using ARC to input TV audio to the unit, you cannot use the input jacks selected here for
connecting an external device because the input will be used for TV audio input.
Select whether to use HDMI control to link the standby behavior of the TV and the
unit when “HDMI Control” is set to “On”.
Settings
HDMI Control
OffDisables HDMI Control.
On
Enables HDMI Control.
Configure the settings in “TV Audio Input”, “Standby Sync”, “ARC”,
and “SCENE”.
Audio Output
OffDisables the audio output from the speakers.
On
Enables the audio output from the speakers.
Off
Disables the audio output from the TV.
OnEnables the audio output from the TV.
Standby Through
Off
(When “HDMI Control” is set to “Off”)
Does not output videos/audio to the TV.
Auto
(When “HDMI Control” is set to “On”)
Automatically selects whether to output videos/audio depending on
the status of the connected device.
On
Outputs videos/audio to the TV.
(The unit consumes more power than when “Off” is selected.)
TV Audio Input
Standby Sync
OffDoes not set the unit to standby mode when the TV is turned off.
OnSets the unit to standby mode when the TV is turned off.
Auto
Sets the unit to standby mode when the TV is turned off only when the
unit is receiving TV audio or HDMI signals.
00_HTR-4067_5067_om_En.book Page 83 Monday, November 18, 2013 12:50 AM
CONFIGURATIONS➤Configuring various functions (Setup menu)En84
Enables/disables ARC (p.21) when “HDMI Control” is set to “On”.
Settings
•You do not need to change this setting normally. In case noises are produced from the speakers
connected to the unit because TV audio signals input to the unit via ARC are not supported by the
unit, set “ARC” to “Off” and use the TV’s speakers.
Enables/disable SCENE link playback when “HDMI Control” is set to “On”.
When SCENE link playback is enabled, HDMI Control-compatible devices
connected to the unit via HDMI automatically works as follows, with a scene
selection.
•TV: turning on and displaying video from the playback device
•Playback device: starting playback
Choices (SCENE keys)
BD/DVD, TV, NET, RADIO
Settings
Default
BD/DVD, TV: On
NET, RADIO: Off
•SCENE link playback may not work properly due to the compatibility between devices. We
recommend using TV and playback devices from the same manufacturer so that HDMI Control works
more effectively.
ARC
OffDisables ARC.
On
Enables ARC.
SCENE
OffDisables SCENE link playback for the selected SCENE key.
OnEnables SCENE link playback for the selected SCENE key.
00_HTR-4067_5067_om_En.book Page 84 Monday, November 18, 2013 12:50 AM
CONFIGURATIONS➤Configuring various functions (Setup menu)En85
Sound
Configures the audio output settings.
•Default settings are underlined.
■DSP Parameter
Configures the surround decoder settings.
Enables/disables CINEMA DSP 3D (p.45). If this function is set to “On”, CINEMA
DSP 3D functions with the selected sound programs (except 2ch Stereo and
7ch/5ch Stereo).
Settings
Enables/disables the broadening effect of the front sound field. When this function
is enabled, you can wrap front left/right channel sounds around the field and
generate a spacious sound field in combination with the surround sound field. This
setting is effective when “bPLII Music” or “bPLIIx Music” (HTR-5067/TSR-5770
only) is selected.
Settings
Adjusts the broadening effect of the center sound field. Higher to enhance the
broadening effect, and lower to reduce it (closer to center). This setting is effective
when “bPLII Music” or “bPLIIx Music” (HTR-5067/TSR-5770 only) is selected.
Setting range
0 to 3
to 7
Adjusts the difference in level between the front and surround sound fields. Higher
to strengthen the front sound field and lower to strengthen the surround sound
field. This setting is effective when “bPLII Music” or “bPLIIx Music”
(HTR-5067/TSR-5770 only) is selected.
Setting range
-3 to 0
to +3
Adjusts the center orientation level (broadening effect) of the front sound field.
Higher to strengthen the center orientation level (less broadening effect) and lower
to weaken (more broadening effect). This setting is effective when “Neo:6 Music” is
selected.
Setting range
0.0 to 0.3
to 1.0
CINEMA DSP 3D Mode
OffDisables CINEMA DSP 3D.
On
Enables CINEMA DSP 3D.
Panorama
OffDisables the broadening effect of the front sound field.
OnEnables the broadening effect of the front sound field.
Center Width
Dimension
Center Image
00_HTR-4067_5067_om_En.book Page 85 Monday, November 18, 2013 12:50 AM
CONFIGURATIONS➤Configuring various functions (Setup menu)En86
■Lipsync
Adjusts the delay between video and audio output.
•You can enable/disable the Lipsync function by input sources in “Lipsync” (p.74) in the “Option” menu.
Selects the method to adjust the delay between video and audio output.
Setting range
•“Select” is automatically set to “Manual” depending on the TV connected to the unit.
Adjusts the delay between video and audio output manually when “Select” is set to
“Manual”. You can fine-adjust the audio output timing when “Select” is set to
“Auto”.
Setting range
0 ms
to 500 ms (1 ms increments)
■Volume
Configures the volume settings.
Switches the scale of the volume display.
Settings
Selects the dynamic range adjustment method for bitstream audio (Dolby Digital
and DTS signals) playback.
Settings
Sets the maximum volume to prevent excessive loudness.
Setting range
-30.0 dB to +15.0 dB (5.0 dB increments), +16.5 dB
[50.0 to 95.0 (5.0 increments), 97.0]
Sets the initial volume when the receiver is turned on.
Settings
Select
Manual
Select this option when you want to adjust the delay between video
and audio output manually.
Adjust the audio output timing in “Adjustment”.
Auto
Adjusts the delay between video and audio output automatically when
a TV that supports an automatic lipsync function is connected to the
unit via HDMI.
If necessary, you can fine-adjust the audio output timing in
“Adjustment”.
Adjustment
Scale
dBDisplays the volume in the “dB” unit.
0-97Displays the volume in the numeric value (0.5 to 97.0).
Dynamic Range
MaximumProduces audio without adjusting the dynamic range.
StandardOptimizes the dynamic range for regular home use.
Min/Auto
Sets the dynamic range for clear sound even at night or at low
volumes.
When playing back Dolby TrueHD signals, the dynamic range is
automatically adjusted based on the input signal information.
Max Volume
Initial Volume
Off
Sets the level to the volume level of the unit when it last entered
standby mode.
MuteSets the unit to mute the audio output.
-80.0 dB to +16.5 dB
(0.5 dB increments)
[0.5 to 97.0
(0.5 increments)]
Sets the level to the specified volume level.
00_HTR-4067_5067_om_En.book Page 86 Monday, November 18, 2013 12:50 AM
CONFIGURATIONS➤Configuring various functions (Setup menu)En87
(HTR-5067/TSR-5770 only)
Selects whether to adjust the volume for Zone B in conjunction with the volume for
Zone A.
Settings
•If “ZoneB Volume” is set to “Async.”, the volume for Zone B is temporarily set to -40 dB. As necessary,
adjust the volume using the remote control (p.70).
ZoneB Volume
Sync.
Adjusts the volume for Zone B in conjunction with the volume for
Zone A.
Async.
Does not adjust the volume for Zone B in conjunction with the volume
for Zone A. Adjust the volume for Zone B separately (p.70).
00_HTR-4067_5067_om_En.book Page 87 Monday, November 18, 2013 12:50 AM
CONFIGURATIONS➤Configuring various functions (Setup menu)En88
ECO
Configures the power supply settings.
•Default settings are underlined.
■Auto Power Standby
Set the amount of time for the auto-standby function.
Settings
Default
U.K. and Europe models: 20 minutes
Other models: Off
•Just before the unit enters standby mode, “AutoPowerStdby” appears and then countdown starts in
the front display.
■ECO Mode
Enables/disables the eco (power saving) mode.
When the eco mode is enabled, you can reduce the unit’s power consumption.
Settings
•Be sure to press ENTER to restart the unit after selecting a setting. The new setting will take effect after the
unit is restarted.
•When “ECO Mode” is set to “On”, the front panel display may become dark.
•If you want to play audio at high volume, set “ECO Mode” to “Off”.
OffDoes not set the unit to standby mode automatically.
20 minutes
Sets the unit to standby mode when you have not operated the unit
and the unit has not detected any input signal for the specified time.
2 hours, 4 hours,
8 hours, 12 hours
Sets the unit to standby mode when you have not operated the unit for
the specified time.
Off
Disables the eco mode.
OnEnables the eco mode.
00_HTR-4067_5067_om_En.book Page 88 Monday, November 18, 2013 12:50 AM
CONFIGURATIONS➤Configuring various functions (Setup menu)En89
Function
Configures the functions that make the unit easier to use.
•Default settings are underlined.
■Input Rename
Changes the input source name displayed on the front display.
Input sources
HDMI 1–6, AV 1–6, USB, AUX
■Procedure
1
Use the cursor keys (q/w) to select an input source to be renamed and press
ENTER.
•To select a name from the presets, use the cursor keys (q/w) to select an input source and the
cursor keys (e/r) to select a preset name.
2
Use the cursor keys (e/r) to move the edit position and the cursor keys (q/w) to
select a character.
3
To confirm the new name, press ENTER.
•To cancel the entry, press RETURN.
4
To change another input source name, repeat steps 1 to 3.
5
To exit from the menu, press SETUP.
■Dimmer
Adjusts the brightness of the front display.
Setting range
-4 to 0
(higher to brighten)
•The front display may become dark when “ECO Mode” (p.88) is set to “On”.
■Memory Guard
Prevents accidental changes to the settings.
Settings
•When “Memory Guard” is set to “On”, the lock icon (o) is displayed on the menu screen.
Input Rename
Blu-ray
HDMI1
OK:ENTER
CANCEL:RETURN
OffDoes not protect the settings.
OnProtects the settings until “Off” is selected.
o
Memory Guard
Memory GuardOn
Back:RETURN
Icon
00_HTR-4067_5067_om_En.book Page 89 Monday, November 18, 2013 12:50 AM
CONFIGURATIONS➤Configuring various functions (Setup menu)En90
■DC OUT
Configures the DC OUT jack setting.
Selects how to supply power to the Yamaha AV accessory connected to the DC
OUT jack.
Settings
Power Mode
Continuous
Supplies power through the DC OUT jack continuously regardless of
the power state (on/standby) of the unit.
Power Sync.
Supplies power through the DC OUT jack only when the unit is turned
on.
00_HTR-4067_5067_om_En.book Page 90 Monday, November 18, 2013 12:50 AM
CONFIGURATIONS➤Configuring various functions (Setup menu)En91
Network
Configures the network settings.
•Default settings are underlined.
■Information
Displays the network information on the unit.
* HTR-5067/TSR-5770 only
■Network Connection
(HTR-5067/TSR-5770 only)
Selects the network connection method.
Choices
■IP Address
Configures the network parameters (such as IP address).
Select whether to use a DHCP server.
Settings
■Manual network settings
1
Set “DHCP” to “Off”.
2
Use the cursor keys (q/w) to select a parameter type.
3
Use the cursor keys (e/r) to move the edit position and the cursor keys
(q/w) to select a value.
4
To exit from the menu, press SETUP.
StatusThe connection status of the NETWORK jack
Connection *Connection method
SSID *The access point to which the unit is connected
Security *The encryption method for your network
MAC AddressMAC address
IP AddressIP address
Subnet MaskSubnet mask
Default GatewayThe IP address of the default gateway
DNS Server (P)The IP address of the primary DNS server
DNS Server (S)The IP address of the secondary DNS server
vTuner IDThe ID of the Internet radio (vTuner)
Wired
Select this option when you want to connect the unit to a network with
a commercially-available network cable.
Wireless (Wi-Fi)
Select this option when you want to connect the unit to a network via
the wireless router (access point). For details on settings, see
“Connecting the unit to a wireless network” (p.30).
Wireless Direct
Select this option when you want to connect a mobile device to the
unit directly. For details on settings, see “Connecting a mobile device
to the unit directly (Wireless Direct)” (p.36).
DHCP
Off
Does not use a DHCP server. Configure the network parameters
manually. For details, see “Manual network settings”.
On
Uses a DHCP server to automatically obtain the unit’s network
parameters (such as IP address).
IP AddressSpecifies an IP address.
Subnet MaskSpecifies a subnet mask.
Default GatewaySpecifies the IP address of the default gateway.
DNS Server (P)Specifies the IP address of the primary DNS server.
DNS Server (S)Specifies the IP address of the secondary DNS server.
00_HTR-4067_5067_om_En.book Page 91 Monday, November 18, 2013 12:50 AM
CONFIGURATIONS➤Configuring various functions (Setup menu)En92
■MAC Address Filter
Sets the MAC address filter to limit access to the unit from other network devices.
•Operation of the AirPlay function (p.67) or the DMC is not limited by this setting.
Enables/disables the MAC address filter.
Settings
Specifies the MAC addresses (up to 10) of the network devices that will be
permitted access to the unit when “Filter” is set to “On”.
■Procedure
1
Use the cursor keys (q/w) to select an MAC address number (1 to 10).
2
Use the cursor keys (e/r) to move the edit position and the cursor keys
(q/w) to select a value.
3
To exit from the menu, press SETUP.
■DMC Control
Selects whether to allow DLNA-compatible Digital Media Controller (DMC) to control
playback.
Settings
•A Digital Media Controller (DMC) is a device that can control other network devices through the network.
When this function is enabled, you can control playback of the unit from DMCs (such as Windows Media
Player 12) on the same network.
■Network Standby
Selects whether the unit can be turned on from other network devices (network
standby).
Settings
■Network Name
Edits the network name (the unit’s name on the network) displayed on other network
devices.
■Procedure
1
Press ENTER to enter the name edit screen.
2
Use the cursor keys (e/r) to move the edit position and the cursor keys (q/w) to
select a character.
3
To confirm the new name, press ENTER.
4
To exit from the menu, press SETUP.
Filter
OffDisables the MAC address filter.
On
Enables the MAC address filter. In “MAC Address 1–10”, specify the
MAC addresses of the network devices that will be permitted access
to the unit.
MAC Address 1–10
DisableDoes not allow DMCs to control playback.
Enable
Allows DMCs to control playback.
OffDisables the network standby function.
On
Enables the network standby function.
(The unit consumes more power than when “Off” is selected.)
Network Name
Yamaha xxxxxx
Back:RETURN
00_HTR-4067_5067_om_En.book Page 92 Monday, November 18, 2013 12:50 AM
CONFIGURATIONS➤Configuring various functions (Setup menu)En93
■Network Update
Updates the firmware via the network.
Starts the process to update the unit’s firmware. For details, see “Updating the
unit’s firmware” (p.97).
Displays the version of the firmware installed on the unit.
Displays the system ID number.
Language
Select an on-screen menu language.
•Default settings are underlined.
Settings
•Japanese and Chinese characters used in content information (such as song titles) cannot be displayed.
•The information on the front display is provided in English only.
Perform Update
Firmware Version
System ID
EnglishEnglish
日本語
Japanese
French
German
Spanish
Russian
Italian
Chinese
Français
Deutsch
Español
Italiano
00_HTR-4067_5067_om_En.book Page 93 Monday, November 18, 2013 12:50 AM
CONFIGURATIONS➤Configuring the system settings (ADVANCED SETUP menu)En94
Configure the system settings of the unit while viewing the front display.
1
Set the unit to standby mode.
2
While holding down STRAIGHT on the front panel, press
z(power).
3
Press PROGRAM to select an item.
4
Press STRAIGHT to select a setting.
5
Press z(power) to set the unit to standby mode and turn it on again.
The new settings take effect.
ADVANCED SETUP menu items
•Default settings are underlined.
Changing the speaker impedance setting (SP IMP.)
(U.S.A. and Canada models only)
Change the unit’s speaker impedance settings depending on the impedance of the
speakers connected.
Settings
Configuring the system settings (ADVANCED SETUP menu)
z(power)
STRAIGHTPROGRAM
ItemFunctionPage
SP IMP.
(U.S.A. and Canada models only)
Changes the speaker impedance setting.
94
REMOTE IDSelects the unit’s remote control ID.95
TU
(Asia and General models only)
Changes the FM/AM tuning frequency setting.
95
TV FORMATSwitches the video signal type of HDMI output.95
INITRestores the default settings.95
UPDATEUpdates the firmware.96
VERSIONChecks the version of firmware currently installed on the unit.96
6 Ω MINSelect this option when you connect 6-ohm speakers to the unit.
8
Ω MIN
Select this option when you connect 8-ohm or higher speakers to the
unit.
VOL.
MUTE
ENHANCER
STEREO
TUNED
SLEEP
OUT
ECO
CHARGE
ADAPTIVE DRC
VIRTUAL
SP IMP.••8¬MIN
00_HTR-4067_5067_om_En.book Page 94 Monday, November 18, 2013 12:50 AM
CONFIGURATIONS➤Configuring the system settings (ADVANCED SETUP menu)En95
Selecting the remote control ID (REMOTE ID)
Change the unit’s remote control ID so that it matches the remote control’s ID (default:
ID1). When using multiple Yamaha AV receivers, you can set each remote control with a
unique remote control ID for its corresponding receiver.
Settings
ID1
, ID2
■Changing the remote control ID of the remote control
1
To select ID1, while holding down the cursor key (e), hold down SCENE (BD/DVD)
for more than 3 seconds.
To select ID2, while holding down the cursor key (e), hold down SCENE (TV) for
more than 3 seconds.
•Once the remote control ID is selected successfully, TRANSMIT indicator blinks twice. If it blinks six times,
selecting has failed.
Changing the FM/AM tuning frequency setting (TU)
(Asia and General models only)
Change the FM/AM tuning frequency setting of the unit depending on your country or
region.
Settings
Switching the video signal type (TV FORMAT)
Switch the video signal type of HDMI output so that it matches to the format of your TV.
Since the unit automatically selects the video signal type so that it matches to the TV, it
is unnecessary to change the setting normally. Change the setting only when images
on the TV screen do not appear correctly.
Settings
NTSC, PAL
Default
U.S.A., Canada, Korea and General models: NTSC
Other models: PAL
Restoring the default settings (INIT)
Restores the default settings for the unit.
Choices
FM100/AM10
Select this when you want to adjust the FM frequency by 100-kHz
steps and AM by 10-kHz steps.
FM50/AM9
Select this when you want to adjust the FM frequency by 50-kHz steps
and AM by 9-kHz steps.
VOL.
MUTE
ENHANCER
STEREO
TUNED
SLEEP
OUT
ECO
CHARGE
ADAPTIVE DRC
VIRTUAL
REMOTE ID••ID1
VOL.
MUTE
ENHANCER
STEREO
TUNED
SLEEP
OUT
ECO
CHARGE
ADAPTIVE DRC
VIRTUAL
TU••••FM50/AM9
ALLRestores the default settings for the unit.
CANCELDoes not perform an initialization.
VOL.
MUTE
ENHANCER
STEREO
TUNED
SLEEP
OUT
ECO
CHARGE
ADAPTIVE DRC
VIRTUAL
TV FORMAT•NTSC
VOL.
MUTE
ENHANCER
STEREO
TUNED
SLEEP
OUT
ECO
CHARGE
ADAPTIVE DRC
VIRTUAL
INIT••••CANCEL
00_HTR-4067_5067_om_En.book Page 95 Monday, November 18, 2013 12:50 AM
CONFIGURATIONS➤Configuring the system settings (ADVANCED SETUP menu)En96
Updating the firmware (UPDATE)
New firmware that provides additional features or product improvements will be
released as needed. Updates can be downloaded from our website. If the unit is
connected to the Internet, you can download the firmware via the network. For details,
refer to the information supplied with updates.
■Firmware update procedure
Do not perform this procedure unless firmware update is necessary. Also, make sure
you read the information supplied with updates before updating the firmware.
1
Press STRAIGHT repeatedly to select “USB” or “NETWORK” and press INFO to
start firmware update.
Choices
•If the unit detects newer firmware over the network, the envelope icon (p) will appear in the screen. In this
case, you can also update the unit’s firmware by following the procedure in “Updating the unit’s firmware”
(p.97).
Checking the firmware version (VERSION)
Check the version of firmware currently installed on the unit.
•You can also check the firmware version in “Network Update” (p.93) in the “Setup” menu.
•It may take a while until the firmware version is displayed.
USBUpdate the firmware using a USB memory device.
NETWORKUpdate the firmware via the network.
VOL.
MUTE
ENHANCER
STEREO
TUNED
SLEEP
OUT
ECO
CHARGE
ADAPTIVE DRC
VIRTUAL
UPDATE•••••USB
VOL.
MUTE
ENHANCER
STEREO
TUNED
SLEEP
OUT
ECO
CHARGE
ADAPTIVE DRC
VIRTUAL
VERSION••xx.xx
00_HTR-4067_5067_om_En.book Page 96 Monday, November 18, 2013 12:50 AM
CONFIGURATIONS➤Updating the unit’s firmware via the networkEn97
New firmware that provides additional features or product
improvements will be released as needed. If the unit is connected
to the Internet, you can download the firmware via the network and
update it.
•You can also update the firmware using the USB memory device from the
“ADVANCED SETUP” menu (p.96).
1
Press SETUP.
2
Use the cursor keys to select “Network” and press
ENTER.
3
Use the cursor keys to select “Network Update” and
press ENTER.
If new firmware is available, the envelope icon (p) appears
in the screen.
•To cancel the operation without updating the firmware, press SETUP.
4
Use the cursor keys to select “Perform Update” and
press ENTER.
The on-screen display turns off and the firmware update
starts.
5
If “UPDATE SUCCESS PLEASE POWER OFF!”
appears on the front display, press z (power) on the
front panel.
The firmware update is complete.
Updating the unit’s firmware via the network
Note
•Do not operate the unit or disconnect the power cable or network cable during
firmware update. Firmware update takes about 20 minutes or more
(depending on your Internet connection speed).
•If the Internet connection speed is slow, or the unit is connected to the
wireless network, network update may not be possible depending on the
condition of the wireless connection. In this case, update the firmware using
the USB memory device (p.96).
•To perform the following procedure, your TV must be connected to the unit via
HDMI. If not, perform the update from the “ADVANCED SETUP” menu (p.96).
•For details on update, visit the Yamaha website.
p
Update:ENTER
Network Update
Perform Update
Firmware Version
System ID
x.xx
xxxxxxxx
Back:RETURN
Icon
1234
56
FM
INFO
MEMORY
AM
PRESET
TUNING
SCENE
RETURN
TOP
MENU
POP-UP
MENU
VOLUME
BD
DVD
TV
NET
RADIO
MUTE
DISPLAY
ENTER
TRANSMIT
RECEIVER
HDMI
AV
SLEEP
AUXUSB
56
NET
ZONE B
ZONE A
MOVIEMUSIC
SUR. DECODESTRAIGHT
ENHANCER
BASSDIRECT
MODE
SETUP
OPTION
2341
S
CEN
E
RETURN
TO
P
MENU
PO
P-
U
P
MENU
VOLUME
B
D
DVD
TV
NET
RADI
O
MUTE
DISPLAY
FM
MEM
O
R
Y
AM
P
RE
S
E
T
T
U
NIN
G
INFO
1
2
3
4
5
6
TRANSMI
T
R
ECEIVER
HDMI
AV
S
LEE
P
AU
X
USB
5
6
NET
ZO
NE B
Z
O
NE
A
M
O
VI
E
MU
S
I
C
S
UR. DE
CO
DE
S
TRAI
G
HT
E
NHAN
C
ER
B
A
SS
DIRE
C
T
M
OD
E
OPTIO
N
2
3
4
1
ENTER
SETUP
Cursor keys
00_HTR-4067_5067_om_En.book Page 97 Monday, November 18, 2013 12:50 AM
APPENDIX➤Frequently asked questionsEn98
APPENDIX
The new speaker system does not provide an ideal sound
balance...
If you have changed speakers or have a new speaker system, use YPAO to optimize
the speaker settings again (p.38). If you want to adjust the speaker settings manually,
use “Speaker” in the “Setup” menu (p.79).
Since we have small children, we want to set limitations on the
volume control...
If a small child accidentally operates the controls on the main unit or remote control, the
volume may suddenly increase. This may also cause injury or damage the unit or
speakers. We recommend using “Max Volume” in the “Setup” menu to set the maximum
volume level for the unit in advance (p.86).
I am occasionally startled by a sudden loud sound when turning
on the unit...
By default, the volume level when the unit last entered standby mode is automatically
applied. If you want to fix the volume, use “Initial Volume” in the “Setup” menu to set the
volume to be applied when the receiver is turned on (p.86).
We are bothered by volume differences when switching
between input sources…
You can correct volume differences between input sources by utilizing “Input Trim” in
the “Option” menu (p.74).
I made HDMI connections but HDMI Control does not work at
all...
To use HDMI Control, you need to perform the HDMI Control link setup (p.111). After
connecting HDMI Control-compatible devices (such as BD/DVD players) to the unit,
enable HDMI Control on each device and perform the HDMI Control link setup. This
setup is required every time you add a new HDMI Control-compatible device to your
system. For information on how HDMI Control works between your TV and playback
devices, refer to the instruction manuals for each device.
I want to display a device name or a manufacture name on the
front display when selecting an input source...
By default, input source names (such as “HDMI 1” and “AV 1”) are displayed on the
front display when an input source is selected. If you want to rename them as you like,
use “Input Rename” (p.89) in the “Setup” menu. You can also select a name from the
presets (such as “Blu-ray” and “DVD”).
I want to prevent accidental changes to the settings...
You can protect the settings configured on the unit (such as speaker settings) by
utilizing “Memory Guard” in the “Setup” menu (p.89).
The unit’s remote control is simultaneously controlling another
Yamaha product as well as the unit...
When using multiple Yamaha products, the remote control may work on another
Yamaha product or another remote control may work on the unit. If this happens,
register different remote control IDs for the devices that you want to control with each
remote control (p.95).
I want to enjoy videos/audio played back on the video device
even when the unit is in standby mode…
If you have connected a video device to the unit with HDMI, you can output
videos/audio played back on the video device to the TV even when the unit is in
standby mode. To use this function, set “Standby Through” (p.83) in the “Setup” menu
to “On”. You can also switch the input source using the remote control of the unit when
this function is enabled.
Frequently asked questions
00_HTR-4067_5067_om_En.book Page 98 Monday, November 18, 2013 12:50 AM
APPENDIX➤TroubleshootingEn99
Refer to the table below when the unit does not function properly.
If the problem you are experiencing is not listed below or if the instructions below do not help, turn off the unit, disconnect the power cable, and contact the nearest authorized
Yamaha dealer or service center.
First, check the following:
aThe power cables of the unit, TV and playback devices (such as BD/DVD players) are connected to AC wall outlets
securely.
bThe unit, subwoofer, TV and playback devices (such as BD/DVD players) are turned on.
cThe connectors of each cable are securely inserted in to jacks on each device.
Power, system and remote control
Troubleshooting
ProblemCauseRemedy
The power does not turn on.
The protection circuitry has been activated three times
consecutively. If the unit is in this condition, the standby indicator
on the unit blinks when you try to turn on the power.
As a safety precaution, capability to turn on the power is disabled. Contact your
nearest Yamaha dealer or service center to request repair.
The power does not turn off.
The internal microcomputer has frozen, due to an external electric
shock (such as lightning or excessive static electricity) or to a drop
in the power supply voltage.
Hold down z(power) on the front panel for more than 10 seconds to initialize
and reboot the unit. (If the problem persists, disconnect the power cable from the
AC wall outlet and plug it again.)
The power turns off (standby mode) immediately.The unit was turned on while a speaker cable was shorted.
Twist the bare wires of each speaker cable firmly and reconnect to the unit and
speakers (p.17).
The unit enters standby mode automatically.
The sleep timer worked.Turn on the unit and start playback again.
The auto-standby function kicked in because the unit was not used
for the specified time.
To disable the auto-standby function, set “Auto Power Standby” in the “Setup”
menu to “Off” (p.88).
The speaker impedance setting is incorrect.Set the speaker impedance to match your speakers (p.94).
The protection circuitry has been activated because of a short
circuit.
Twist the bare wires of each speaker cable firmly and reconnect to the unit and
speakers (p.17).
The unit is not reacting.
The internal microcomputer is frozen, due to an external electric
shock (such as lightning or excessive static electricity) or to a drop
in the power supply voltage.
Hold down z(power) on the front panel for more than 10 seconds to initialize
and reboot the unit. (If the problem persists, disconnect the power cable from the
AC wall outlet and plug it again.)
00_HTR-4067_5067_om_En.book Page 99 Monday, November 18, 2013 12:50 AM
APPENDIX➤TroubleshootingEn100
The unit cannot be controlled using the remote
control.
The unit is out of the operating range.Use the remote control within the operating range (p.4).
The batteries are weak.Replace with new batteries.
The unit’s remote control sensor is exposed to direct sunlight or
strong lighting.
Adjust the lighting angle, or reposition the unit.
The remote control IDs of the unit and the remote control are not
identical.
Change the remote control ID of the unit or the remote control (p.95).
The remote control is set to the Zone B operation mode.Set the remote control to the Zone A operation mode (p.70).
ProblemCauseRemedy
00_HTR-4067_5067_om_En.book Page 100 Monday, November 18, 2013 12:50 AM
APPENDIX➤TroubleshootingEn101
Audio
ProblemCauseRemedy
No sound.
Another input source is selected.Select an appropriate input source with the input selection keys.
Signals that the unit cannot reproduce are being input.
Some digital audio formats cannot be played back on the unit. To check the audio
format of the input signal, use “Signal Info” in the “Option” menu (p.74).
(HTR-5067/TSR-5770 only)
Audio output to Zone A (or Zone B) is disabled.
Press ZONE A (ZONE B) to enable audio output to Zone A (or Zone B).
The cable connecting the unit and playback device is defective.If there is no problem with the connection, replace with another cable.
The volume cannot be increased.
The maximum volume is set.Use “Max Volume” in the “Setup” menu to adjust the maximum volume (p.86).
A device connected to the output jacks of the unit is not turned on.
(This may happen due to the nature of AV receivers.)
Turn on all devices connected to the output jacks of the unit.
No sound is coming from a specific speaker.
The playback source does not contain a signal for the channel.To check it, use “Signal Info” in the “Option” menu (p.74).
The currently selected sound program/decoder does not use the
speaker.
To check it, use “Test Tone” in the “Setup” menu (p.82).
Audio output of the speaker is disabled.
Perform YPAO (p.38) or use “Configuration” in the “Setup” menu to change the
speaker settings (p.79).
The volume of the speaker is set too low.
Perform YPAO (p.38) or use “Level” in the “Setup” menu to adjust the speaker
volume (p.81).
(HTR-5067/TSR-5770 only)
Audio output to Zone A (or Zone B) is disabled.
Press ZONE A (ZONE B) to enable audio output to Zone A (or Zone B).
The speaker cable connecting the unit and the speaker is
defective.
If there is no problem with the connection, replace with another speaker cable.
The speaker is malfunctioning.
To check it, replace with another speaker. If the problem persists, the unit may be
malfunctioning.
(HTR-5067/TSR-5770 only)
No sound is coming from the surround back
speaker.
The extended surround is disabled.
Use “Extended Surround” in the “Option” menu to select a decoder to be used
(p.73).
“Power Amp Assign” is set to “BI-AMP” or “Zone B”.
When “Power Amp Assign” in the “Setup” menu is set to “BI-AMP” or “Zone B”,
you cannot use the surround back speakers. To use the surround back speakers,
set “Power Amp Assign” to “Basic” (p.79).
No sound is coming from the subwoofer.
The playback source does not contain LFE or low-frequency
signals.
To check it, set “Extra Bass” in the “Setup” menu to “On”, in order to output the
front channel low-frequency components from the subwoofer (p.80).
Subwoofer output is disabled.Perform YPAO (p.38) or set “Subwoofer” in the “Setup” menu to “Use” (p.79).
The volume of the subwoofer is too low.Adjust the volume on the subwoofer.
The subwoofer has been turned off by its auto-standby function.Disable the auto-standby function of the subwoofer or adjust its sensitivity level.
00_HTR-4067_5067_om_En.book Page 101 Monday, November 18, 2013 12:50 AM
APPENDIX➤TroubleshootingEn102
No sound from the playback device (connected to
the unit with HDMI).
The TV does not support HDCP (High-bandwidth Digital Content
Protection).
Refer to the instruction manuals for the TV and check the TV’s specifications.
The unit is set not to output audio input through HDMI jacks from
the SPEAKERS terminals.
In “Audio Output” in the “Setup” menu, set “Amp” to “On” (p.83).
The number of devices connected to the HDMI OUT jack exceeds
the limit.
Disconnect some of the HDMI devices.
No sound from the TV (when HDMI Control is
used).
The TV is set to output audio from the TV speakers.
Change the audio output setting on your TV so that the TV audio is output from the
speakers connected to the unit.
A TV that does not support ARC is connected to the unit only with
an HDMI cable.
Use a digital optical cable to make an audio connection (p.19).
(If the TV is connected to the unit with an audio cable)
The TV audio input setting does not match the actual connection.
Use “TV Audio Input” in the “Setup” menu to select the correct audio input jack
(p.83).
(If you are trying to use ARC)
ARC is disabled on the unit or TV.
Set “ARC” in the “Setup” menu to “On” (p.84). Also, enable ARC on the TV.
Only the front speakers work on multichannel
audio.
The playback device is set to output 2-channel audio (such as
PCM) only.
To check it, use “Signal Info” in the “Option” menu (p.74). If necessary, change
the digital audio output setting on the playback device.
Noise/hum is heard.
The unit is too close to another digital or radio frequency device.Move the unit further away from the device.
The cable connecting the unit and playback device is defective.If there is no problem with the connection, replace with another cable.
The sound is distorted.
The volume of the unit is too high.Turn down the volume. If “ECO Mode” is set to “On”, set it to “Off” (p.88).
A device connected to the unit’s output jacks is not turned on. Turn on all devices connected to the unit’s output jacks.
ProblemCauseRemedy
00_HTR-4067_5067_om_En.book Page 102 Monday, November 18, 2013 12:50 AM
APPENDIX➤TroubleshootingEn103
Video
FM/AM radio
ProblemCauseRemedy
No video.
Another input source is selected on the unit.Select an appropriate input source with the input selection keys.
Another input source is selected on the TV.Switch the TV input to display the video from the unit.
The video signal output from the unit is not supported by the TV.
Check the video output setting of the playback device. For information about
video signals supported by the TV, refer to the instruction manuals for the TV.
The cable connecting the unit and TV (or playback device) is
defective.
If there is no problem with the connection, replace with another cable.
No video from the playback device (connected to
the unit with HDMI).
The input video signal (resolution) is not supported by the unit.
To check the information about the current video signal (resolution), use “Signal
Info” in the “Option” menu (p.74). For information about video signals supported
by the unit, see “HDMI signal compatibility” (p.113).
The TV does not support HDCP (High-bandwidth Digital Content
Protection).
Refer to the instruction manuals for the TV and check the TV’s specifications.
The number of devices connected to the HDMI OUT jack is over
the limit.
Disconnect some of the HDMI devices.
The menu of the unit is not displayed on the TV.
The TV is not connected to the unit via HDMI.
You can display the menu of the unit on the TV only when they are connected with
an HDMI cable. If necessary, use an HDMI cable to connect them (p.19 to 21).
Another input source is selected on the TV.Switch the TV input to display the video from the unit (HDMI OUT jack).
ProblemCauseRemedy
FM radio reception is weak or noisy.
There is multi-path interference.Adjust the FM antenna height or orientation, or place it in a different location.
Your area is too far from the FM station transmitter.
Press MODE to select monaural FM radio reception (p.49).
Use an outdoor FM antenna. We recommend using a sensitive multi-element
antenna.
AM radio reception is weak or noisy.
The noises may be caused by fluorescent lamps, motors,
thermostats, or other electrical equipment.
It is difficult to completely eliminate noise. It may be reduced by using an outdoor
AM antenna.
Radio stations cannot be selected automatically.
Your area is too far from the FM station transmitter.
Select the station manually (p.49).
Use an outdoor antenna. We recommend using a sensitive multi-element
antenna.
The AM radio signal is weak.
Adjust the AM antenna orientation.
Select the station manually (p.49).
Use an outdoor AM antenna. Connect it to the ANTENNA (AM) jack together with
the supplied AM antenna.
AM radio stations cannot be registered as
presets.
Auto Preset has been used.
Auto Preset is for registering FM radio stations only. Register AM radio stations
manually (p.50).
00_HTR-4067_5067_om_En.book Page 103 Monday, November 18, 2013 12:50 AM
APPENDIX➤TroubleshootingEn104
USB and network
ProblemCauseRemedy
The unit does not detect the USB device.
The USB device is not connected to the USB jack securely.Turn off the unit, reconnect your USB device, and turn the unit on again.
The file system of the USB device is not FAT16 or FAT32.Use a USB device with FAT16 or FAT32 format.
Folders and files in the USB device cannot be
viewed.
The data in the USB device is protected by the encryption.Use a USB device without an encryption function.
The network feature does not function.
The network parameters (IP address) have not been obtained
properly.
Enable the DHCP server function on your router and set “DHCP” in the “Setup”
menu to “On” on the unit (p.91). If you want to configure the network parameters
manually, check that you are using an IP address which is not used by other
network devices in your network (p.91).
The unit does not detect the PC.
The media sharing setting is not correct.
Configure the sharing setting and select the unit as a device to which music
contents are shared (p.60).
Some security software installed on your PC is blocking the access
of the unit to your PC.
Check the settings of security software installed on your PC.
The unit and PC are not in the same network.
Check the network connections and your router settings, and then connect the
unit and the PC to the same network.
The MAC address filter is enabled on the unit.
In “MAC Address Filter” in the “Setup” menu, disable the MAC address filter or
specify the MAC address of your PC to allow it to access to the unit (p.92).
The files in the PC cannot be viewed or played
back.
The files are not supported by the unit or the media server.
Use the file format supported by both the unit and the media server. For
information about the file formats supported by the unit, see “Playing back music
stored on media servers (PCs/NAS)” (p.60).
The Internet radio cannot be played.
The selected Internet radio station is currently not available.
There may be a network problem at the radio station, or the service may have
been stopped. Try the station later or select another station.
The selected Internet radio station is currently broadcasting
silence.
Some Internet radio stations broadcast silence at certain of times of the day. Try
the station later or select another station.
Access to the network is restricted by the firewall settings of your
network devices (such as the router).
Check the firewall settings of your network devices. The Internet radio can be
played only when it passes through the port designated by each radio station.
The port number varies depending on the radio station.
The application for smartphone/tablet "AV
CONTROLLER" does not detect the unit.
The MAC address filter is enabled on the unit.
In “MAC Address Filter” in the “Setup” menu, disable the MAC address filter or
specify the MAC address of your smartphone/tablet to allow it to access to the
unit (p.92).
The unit and smartphone/tablet are not in the same network.
Check the network connections and your router settings, and then connect the
unit and smartphone/tablet to the same network.
Firmware update via the network is failed.It may not be possible depending on the condition of the network.Update the firmware via the network again or use a USB memory device (p.96).
The iPod does not recognize the unit when using
AirPlay.
The unit is connected to a multiple SSID router.
Access to the unit might be restricted by the network separation function on the
router. Connect the iPod to the SSID which can access the unit.
(HTR-5067/TSR-5770 only)
The unit cannot connect to the Internet via a
wireless router (access point).
The wireless router (access point) is turned off.Turn on the wireless router.
The unit and the wireless router (access point) are too far apart.Place the unit and the wireless router (access point) closer to each other.
There is an obstacle between the unit and the wireless router
(access point).
Move the unit and the wireless router (access point) in a location where there are
no obstacles between them.
00_HTR-4067_5067_om_En.book Page 104 Monday, November 18, 2013 12:50 AM
APPENDIX➤TroubleshootingEn105
(HTR-5067/TSR-5770 only)
Wireless network is not found.
Microwave ovens or other wireless devices in your neighborhood
might disturb the wireless communication.
Turn off these devices.
Access to the network is restricted by the firewall settings of the
wireless router (access point).
Check the firewall setting of the wireless router (access point).
ProblemCauseRemedy
00_HTR-4067_5067_om_En.book Page 105 Monday, November 18, 2013 12:50 AM
APPENDIX➤Error indications on the front displayEn106
Error indications on the front display
MessageCauseRemedy
Access deniedAccess to the PC is denied.
Configure the sharing settings and select the unit as a device to which music contents are shared
(p.60).
Access error
The unit cannot access the USB device.Turn off the unit and reconnect your USB device. If the problem persists, try another USB device.
The unit cannot access the iPod.Turn off the iPod and turn it on again.
The connected iPod is not supported by the unit.Use an iPod supported by the unit (p.53).
There is a problem with the signal path from the network to the unit.
Make sure your router and modem are turned on.
Check the connection between the unit and your router (or hub) (p.25).
Check SP WiresThe speaker cables short circuit.Twist the bare wires of the cables firmly and connect to the unit and speakers properly.
DC Overloaded
An overcurrent is flowing through the AV accessory connected to
the DC OUT jack.
Turn off the unit and reconnect your AV accessory.
Internal ErrorAn internal error has occurred.Contact the nearest authorized Yamaha dealer or service center.
No contentThere are no playable files in the selected folder.Select a folder that contains files supported by the unit.
No device
The unit cannot detect the USB device.Turn off the unit and reconnect your USB device. If the problem persists, try another USB device.
The unit cannot detect the iPod.Turn off the iPod and then turn it on again.
Not available
(HTR-5067/TSR-5770 only)
Internet radio has been selected as the input source when using
Wireless Direct.
You cannot use Internet radio when using Wireless Direct. To listen to Internet radio, connect the unit to
a router.
The DHCP server is not found.Make sure the DHCP server function on your router is enabled.
Not connected
The network cable is not connected.Connect the network cable properly.
(HTR-5067/TSR-5770 only)
The wireless router (access point) is not found.
Make sure the wireless router (access point) is turned on.
Please waitThe unit is preparing for connecting to the network.
Wait until the message disappears. If the message stays more than 3 minutes, turn off the unit and turn
it on again.
RemID Mismatch
The remote control IDs of the unit and the remote control are not
identical.
Change the remote control ID of the unit or the remote control (p.95).
Unable to play
The unit cannot play back the songs stored on the iPod for some
reason.
Check the song data. If it cannot be played on the iPod itself, the song data or storage area may be
defective.
The unit cannot play back the songs stored on the PC for some
reason.
Check if the format of files you are trying to play is supported by the unit. For information about the
formats supported by the unit, see “Playing back music stored on media servers (PCs/NAS)” (p.60). If
the unit supports the file format, but still cannot play back any files, the network may be overloaded with
heavy traffic.
USB OverloadedAn overcurrent is flowing through the USB device.Turn off the unit and reconnect your USB device. If the problem persists, try another USB device.
Version errorFirmware update is failed.Update the firmware again.
00_HTR-4067_5067_om_En.book Page 106 Monday, November 18, 2013 12:50 AM
APPENDIX➤GlossaryEn107
Audio information
■Audio decoding format
Dolby Digital
Dolby Digital is a compressed digital audio format developed by Dolby Laboratories, Inc. that supports
5.1-channel audio. This technology is used for audio on most DVD discs.
Dolby Digital EX
Dolby Digital EX creates total 6.1-channel audio from 5.1-channel sources that are recorded with Dolby
Digital Surround EX. This decoder adds a surround back sound to the original 5.1-channel sound.
Dolby Digital Plus
Dolby Digital Plus is a compressed digital audio format developed by Dolby Laboratories, Inc. that supports
7.1-channel audio. Dolby Digital Plus remains fully compatible with the existing multichannel audio systems
that support Dolby Digital. This technology is used for audio on BD (Blu-ray discs).
Dolby Pro Logic II
Dolby Pro Logic II enables 5-channel playback from 2-channel sources. There are three modes available:
“Music mode” for music sources, “Movie mode” for movie sources, and “Game mode” for game sources.
Dolby Pro Logic IIx
Dolby Pro Logic IIx enables 7-channel playback from 2-channel or multichannel sources. There are three
modes available: “Music mode” for music sources, “Movie mode” for movie sources and “Game mode” for
game sources (for 2-channel sources only).
Dolby TrueHD
Dolby TrueHD is an advanced lossless audio format developed by Dolby Laboratories, Inc. to offer a
high-definition home theater experience with the quality of the studio master. Dolby TrueHD can carry up to
eight channels of 96 kHz/24-bit audio (up to six channels of 192 kHz/24-bit audio) simultaneously. This
technology is used for audio on BD (Blu-ray discs).
DTS 96/24
DTS 96/24 is a compressed digital audio format that supports 5.1-channel and 96 kHz/24-bit audio. This
format remains fully compatible with the existing multichannel audio systems that support DTS Digital
Surround. This technology is used for music DVDs, etc.
DTS Digital Surround
DTS Digital Surround is a compressed digital audio format developed by DTS, Inc. that supports
5.1-channel audio. This technology is used for audio on most DVD discs.
DTS-ES
DTS-ES creates total 6.1-channel audio from 5.1-channel sources that are recorded with DTS-ES. This
decoder adds a surround back sound to the original 5.1-channel sound. In the DTS-ES Matrix 6.1 format, a
surround back sound is recorded in the surround channels, and in the DTS-ES Discrete 6.1 format, a
discrete surround back channel is recorded.
DTS Express
DTS Express is a compressed digital audio format that supports 5.1-channel audio and allows a higher
compression rate than the DTS Digital Surround format developed by DTS, Inc. This technology is
developed for audio streaming services on the Internet and secondary audio on BD (Blu-ray discs).
DTS-HD High Resolution Audio
DTS-HD High Resolution Audio is a compressed digital audio format developed by DTS, Inc. that supports
7.1-channel and 96 kHz/24-bit audio. DTS-HD High Resolution Audio remains fully compatible with the
existing multichannel audio systems that support DTS Digital Surround. This technology is used for audio on
BD (Blu-ray discs).
DTS-HD Master Audio
DTS-HD Master Audio is an advanced lossless audio format developed to offer a high-definition home
theater experience with the quality of the studio master by DTS, Inc. DTS-HD Master Audio can carry up to
eight channels of 96 kHz/24-bit audio (up to six channels of 192 kHz/24-bit audio) simultaneously. This
technology is used for audio on BD (Blu-ray discs).
DTS Neo:6
DTS Neo:6 enables 6-channel playback from 2-channel sources. There are two modes available: “Music
mode” for music sources and “Cinema mode” for movie sources. This technology provides discrete
full-bandwidth matrix channels of surround sound.
DSD (Direct Stream Digital)
DSD (Direct Stream Digital) technology stores audio signals on digital storage media, such as SACD (Super
Audio CDs). The signals are stored at a high-frequency sampling rate of 2.8224 MHz. The highest
frequency response is equal to or higher than 100 kHz, with a dynamic range of 120 dB. This technology
offers better audio quality than that used for CDs.
FLAC
FLAC is a file format for lossless audio data compression. FLAC is inferior to lossy compressed audio
formats in compression rate but provides higher audio quality.
MP3
One of the compressed digital audio format used by MPEG. With psychoacoustic technologies, this
compression method achieves a high compression rate. Reportedly, it is capable of compressing data
quantity by about 1/10 maintaining a certain level of audio quality.
MPEG-4 AAC
An MPEG-4 audio standard. It is used for mobile telephones, portable audio players, and audio streaming
services on Internet because it allows a high compression rate of data while maintaining better audio quality
than MP3.
PCM (Pulse Code Modulation)
PCM is a signal format under which an analog audio signal is digitized, recorded, and transmitted. This
technology is the basis of all other audio format. This technology is used as a lossless audio format called
Linear PCM for audio on a variety of media, including CDs and BD (Blu-ray discs).
Glossary
00_HTR-4067_5067_om_En.book Page 107 Monday, November 18, 2013 12:50 AM
APPENDIX➤GlossaryEn108
Sampling frequency/Quantization bit
Sampling frequency and quantization bits indicate the quantity of information when an analog audio signal
is digitized. These values are noted as in the following example: “48 kHz/24-bit”.
•Sampling frequency
Sampling frequency (the number of times the signal is sampled per second) is called the sampling rate.
When the sampling frequency is higher, the range of frequencies that can be played back are wider.
•Quantization bit
The number of quantization bits indicate the degree of accuracy when converting the sound level into a
numeric value. When the number of quantized bits is higher, the expression of the sound level is more
accurate.
WAV
Windows standard audio file format, which defines the method of recording the digital data obtained by
converting audio signals. By default, the PCM method (no compression) is used, but you can also use other
compression methods.
WMA (Windows Media Audio)
One of the compressed digital audio formats developed by Microsoft Corporation. With psychoacoustic
technologies, this compression method achieves a high compression rate. Reportedly, it is capable of
compressing data quantity by about 1/20 maintaining a certain level of audio quality.
■Others
Bi-amplification connection (Bi-amp)
A bi-amplification connection uses two amplifiers for a speaker. When you use the bi-amplification
connection, the unit drives the tweeter and woofer in a speaker with the discrete amplifiers. As a
consequence, the tweeter and woofer provide clear audio signal without the interference.
LFE (Low Frequency Effects) 0.1 channel
This channel reproduces low-frequency bass signals and has a frequency range from 20 Hz to 120 Hz. This
channel is added to the channels for all bands with Dolby Digital or DTS to enhance low frequency audio
effects. This channel is labeled 0.1 because it is limited to only low frequency audio.
Lip sync
Video output sometimes lags behind audio output due to the complexity of signal processing caused by an
increase in video signal capacity. Lip sync is a technique for automatically correcting the timing lag
between audio and video output.
HDMI and video information
Component video signal
With the component video signal system, the video signal is separated into the Y signal for luminance and
the Pb and Pr signals for chrominance. Color can be reproduced more faithfully with this system because
each of these signals is independent.
Composite video signal
With the composite video signal system, color, brightness, and synchronization data signals are combined
and transmitted with a single cable.
Deep Color
Deep Color is a technology that HDMI specification supports. Deep Color increases the number of available
colors within the boundaries defined by the RGB or YCbCr color space. Conventional color systems
process the color using 8 bits. Deep Color processes the color with 10, 12, or 16 bits. This technology
allows HDTVs and other displays to increase from millions of colors to billions of colors and eliminate
on-screen color banding for smooth tonal transitions and subtle gradations between colors.
HDMI
HDMI (High-Definition Multimedia Interface) is the world-wide standard interface for digital audio/video
signal transmission. This interface transmits both digital audio and digital video signals using a single cable
without any loss. HDMI complies with HDCP (High-bandwidth Digital Content Protection) and provides a
secure audio/video interface. For further information on HDMI, visit the HDMI website at
“http://www.hdmi.org/”.
x.v.Color
“x.v.Color” is a technology that the HDMI specification supports. It is a more extensive color space than
sRGB and allows the expression of colors that were not hitherto possible. While remaining compatible with
the color gamut of sRGB standards, “x.v.Color” expands the color space, and thus can produce more vivid,
natural images.
Network information
SSID
SSID (Service Set Identifier) is a name that identifies a particular wireless LAN access point.
Wi-Fi
Wi-Fi (Wireless Fidelity) is a technology that allows an electronic device to exchange data or connect to the
Internet wirelessly using radio waves. Wi-Fi offers the advantage of eliminating the complexity of making
connections with LAN cables by using wireless connection. Only products that complete Wi-Fi Alliance
interoperability tests can carry the “Wi-Fi Certified” trademark.
WPS
WPS (Wi-Fi Protected Setup) is a standard established by the Wi-Fi Alliance, which allows easy
establishment of a wireless home network.
00_HTR-4067_5067_om_En.book Page 108 Monday, November 18, 2013 12:50 AM
APPENDIX➤Supported devices and file formatsEn109
Yamaha technologies
CINEMA DSP (Digital Sound Field Processor)
Since the Dolby Surround and DTS systems were originally designed for use in movie theaters, their effect is
best experienced in a theater that has many speakers designed for acoustic effects. Since home conditions
(such as room size, wall material, and number of speakers) can differ so widely, it is inevitable that there are
differences in the sound that you hear. Based on a wealth of actually measured data, CINEMA DSP,
Yamaha’s original DSP technology provides the audiovisual experience of a movie theater in your own
home.
CINEMA DSP 3D
The actually measured sound field data contain the information of the height of the sound images. CINEMA
DSP 3D mode achieves the reproduction of the accurate height of the sound images so that it creates the
accurate and intensive 3D sound fields in a listening room.
Compressed Music Enhancer
The Compressed Music Enhancer feature compensates for missing harmonics in compression music
formats (such as MP3). As a result, this technology provides improved performance for the overall sound
system.
SILENT CINEMA
Yamaha has developed a natural, realistic sound effect DSP algorithm for headphones. Parameters for
headphones have been set for each sound program, so that accurate representations of all the sound
programs can be enjoyed on headphones.
Virtual CINEMA DSP
Virtual CINEMA DSP allows the system to virtually reproduce the sound field of the surround speakers with
front left and right speakers. Even if the surround speakers are not connected, the unit creates the realistic
sound field in a listening room.
Virtual Presence Speaker (VPS)
Virtual Presence Speaker allows the system to virtually reproduce the height of the 3D sound field without
front presence speakers. Even if the front presence speakers are not connected, the unit creates the 3D
sound field in your room.
■Supported devices
❑USB devices
•This unit supports USB mass storage class devices (e.g., flash memories or portable
audio players) using FAT16 or FAT32 format.
•Do not connect devices other than USB mass storage class devices (such as USB
chargers or USB hubs), PCs, card readers, an external HDD, etc.
•USB devices with encryption cannot be used.
•Some features may not be compatible, depending on the model or manufacturer of
the USB storage device.
❑iPod
•An iPod may not be detected by the unit or some features may not be compatible,
depending on the model or software version of the iPod.
❑AirPlay
AirPlay works with iPhone, iPad, and iPod touch with iOS 4.3.3 or later, Mac with OS X
Mountain Lion, and Mac and PC with iTunes 10.2.2 or later.
(as of January 2014)
Supported devices and file formats
Made for.
iPod touch (2nd, 3rd, 4th and 5th generation)
iPod classic
iPod nano (2nd, 3rd, 4th, 5th, 6th and 7th generation)
Ik ben op een leeftijd van 78. Ben in bezit van een Yamaha 3072 radio.Tijdens mijn verhuizing heb ik het handleiding boekje per ongeluk weggegooid met het oud papier. Wie helpt mij uit de brand met de installatie ???.
Gesteld op 21-7-2020 om 12:41
Gebruikershandleiding.com neemt misbruik van zijn services uitermate serieus. U kunt hieronder aangeven waarom deze vraag ongepast is. Wij controleren de vraag en zonodig wordt deze verwijderd.
Product:
Spelregels forum
Om tot zinvolle vragen te komen hanteren wij de volgende spelregels:
lees eerst de handleiding door;
controleer of uw vraag al eerder door iemand anders is gesteld;
probeer uw vraag zo duidelijk mogelijk te stellen;
heeft u een probleem en al geprobeerd om dit op te lossen, vermeld dit erbij aub;
heeft u een oplossing gekregen van een bezoeker dan horen wij dat graag in dit forum;
wilt u een reactie geven op een vraag of antwoord, gebruik dan niet dit formulier maar klik op de knop 'reageer op deze vraag';
uw vraag wordt direct op de website gezet; vermijd daarom persoonlijke gegevens in te vullen;
Belangrijk! Als er een antwoord wordt gegeven op uw vraag, dan is het voor de gever van het antwoord nuttig om te weten als u er wel (of niet) mee geholpen bent! Wij vragen u dus ook te reageren op een antwoord.
Belangrijk! Antwoorden worden ook per e-mail naar abonnees gestuurd. Laat uw emailadres achter op deze site, zodat u op de hoogte blijft. U krijgt dan ook andere vragen en antwoorden te zien.
Abonneren
Abonneer u voor het ontvangen van emails voor uw Yamaha HTR-4067 bij:
nieuwe vragen en antwoorden
nieuwe handleidingen
U ontvangt een email met instructies om u voor één of beide opties in te schrijven.
Ontvang uw handleiding per email
Vul uw emailadres in en ontvang de handleiding van Yamaha HTR-4067 in de taal/talen: Engels als bijlage per email.
De handleiding is 9,03 mb groot.
U ontvangt de handleiding per email binnen enkele minuten. Als u geen email heeft ontvangen, dan heeft u waarschijnlijk een verkeerd emailadres ingevuld of is uw mailbox te vol. Daarnaast kan het zijn dat uw internetprovider een maximum heeft aan de grootte per email. Omdat hier een handleiding wordt meegestuurd, kan het voorkomen dat de email groter is dan toegestaan bij uw provider.
Uw handleiding is per email verstuurd. Controleer uw email
Als u niet binnen een kwartier uw email met handleiding ontvangen heeft, kan het zijn dat u een verkeerd emailadres heeft ingevuld of dat uw emailprovider een maximum grootte per email heeft ingesteld die kleiner is dan de grootte van de handleiding.
Er is een email naar u verstuurd om uw inschrijving definitief te maken.
Controleer uw email en volg de aanwijzingen op om uw inschrijving definitief te maken
U heeft geen emailadres opgegeven
Als u de handleiding per email wilt ontvangen, vul dan een geldig emailadres in.
Uw vraag is op deze pagina toegevoegd
Wilt u een email ontvangen bij een antwoord en/of nieuwe vragen? Vul dan hier uw emailadres in.