699947
71
Verklein
Vergroot
Pagina terug
1/88
Pagina verder
AV Receiver
Owner's Manual
This unit is a product for enjoying video and music at home.
This manual explains preparations and operations for everyday users of the unit.
Read the supplied booklet “Quick Start Guide” before using the unit.
EN
CONTENTS
BEFORE USING THE UNIT 4
Accessories................................................................................................ 4
How to use this manual............................................................................ 4
Remote control.......................................................................................... 4
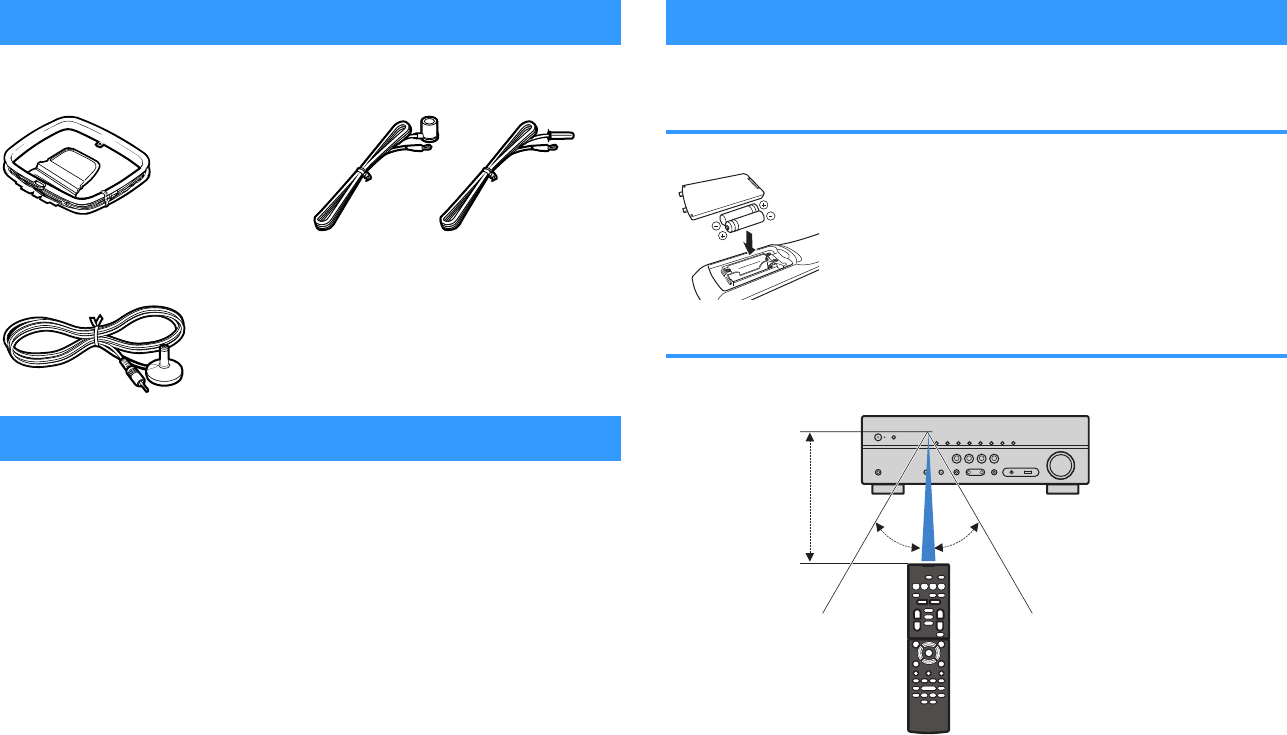
Insert the batteries................................................................................................................................................................... 4
Operating range of the remote control........................................................................................................................... 4
FEATURES 5
What you can do with the unit................................................................. 5
Part names and functions......................................................................... 7
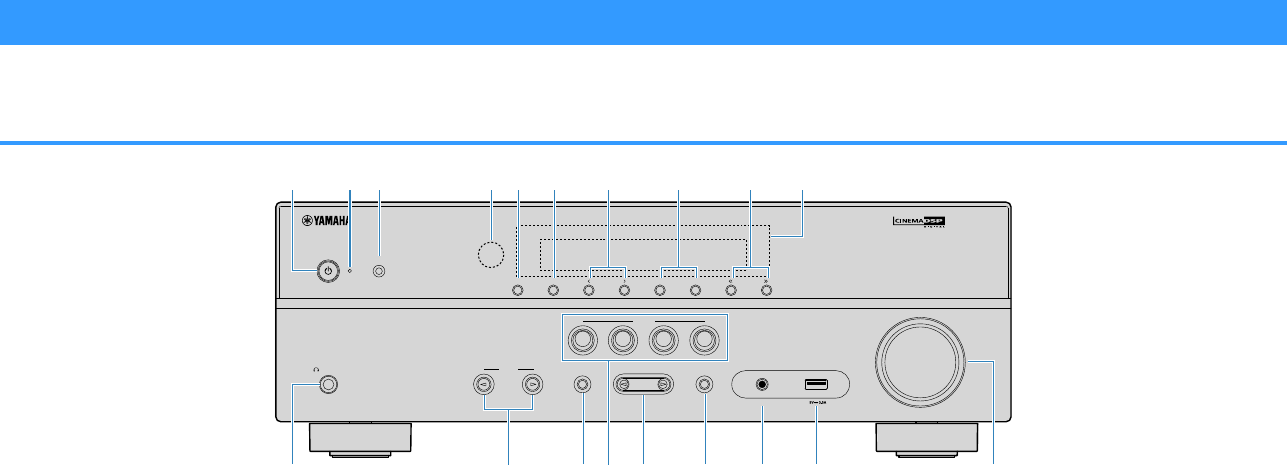
Front panel................................................................................................................................................................................. 7
Front display (indicators)....................................................................................................................................................... 8
Rear panel................................................................................................................................................................................... 9
Remote control....................................................................................................................................................................... 10
PREPARATIONS 11
1 Placing speakers............................................................................... 12
Typical speaker layouts....................................................................................................................................................... 13
Other speaker layouts.......................................................................................................................................................... 14
Setting the speaker impedance....................................................................................................................................... 15
2 Connecting speakers........................................................................ 16
Connecting speaker cables................................................................................................................................................ 17
Connecting the subwoofer (with built-in amplifier)................................................................................................. 17
3 Connecting a TV/playback devices.................................................. 18
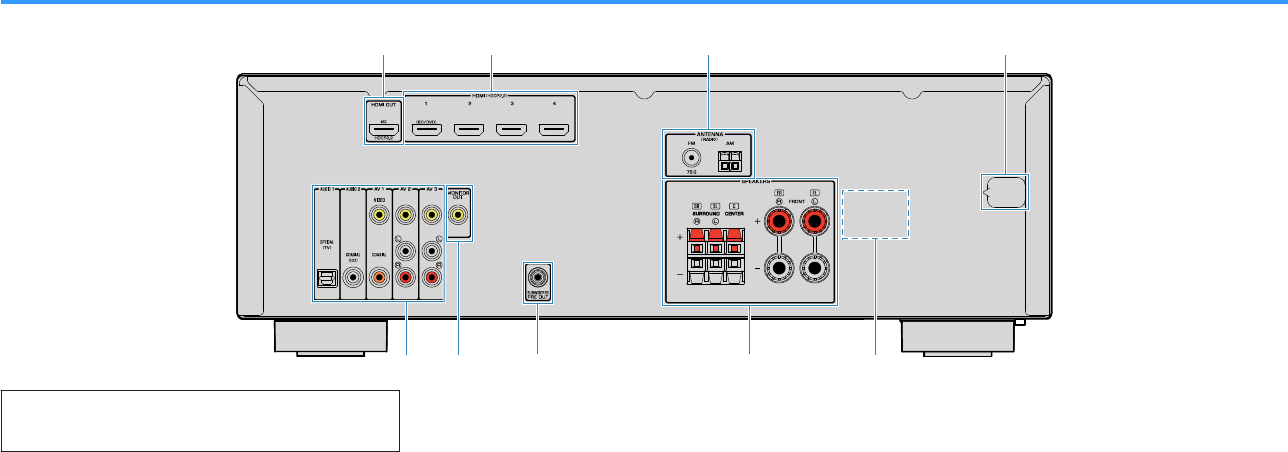
Input/output jacks and cables.......................................................................................................................................... 18
Connecting a TV..................................................................................................................................................................... 19
Connecting video devices (such as BD/DVD players).............................................................................................. 20
Connecting audio devices (such as CD players)......................................................................................................... 22
Connecting to the jack on the front panel................................................................................................................... 22
4 Connecting the FM/AM antennas.................................................... 23
5 Connecting the power cable............................................................ 23
6 Selecting an on-screen menu language.......................................... 24
7 Optimizing the speaker settings automatically (YPAO)................ 25
Error messages....................................................................................................................................................................... 27
Warning messages................................................................................................................................................................ 28
PLAYBACK 29
Basic playback procedure...................................................................... 29
Enjoying playback................................................................................................................................................................. 29
Switching information on the front display................................................................................................................. 30
Selecting the input source and favorite settings with one touch
(SCENE).................................................................................................... 31
Selecting a registered scene.............................................................................................................................................. 31
Registering a scene............................................................................................................................................................... 31
Selecting the sound mode..................................................................... 32
Enjoying sound field effects (CINEMA DSP)................................................................................................................. 33
Enjoying unprocessed playback...................................................................................................................................... 35
Enhancing the bass (Extra Bass)....................................................................................................................................... 36
Playing back digitally compressed formats (such as MP3, etc.) with enriched sound (Compressed
Music Enhancer)
..................................................................................................................................................................... 36
Listening to FM/AM radio....................................................................... 37
Setting the frequency steps............................................................................................................................................... 37
Selecting a frequency for reception............................................................................................................................... 37
Registering favorite radio stations (presets)................................................................................................................ 38
Radio Data System tuning.................................................................................................................................................. 41
Playing back music stored on a Bluetooth® device.............................. 42
Connecting a Bluetooth® device (pairing).................................................................................................................... 42
Playback of Bluetooth® device contents....................................................................................................................... 43
Enjoying audio using Bluetooth® speakers/headphones....................................................................................... 43
Playing back music stored on a USB storage device............................ 44
Connecting a USB storage device................................................................................................................................... 44
Playback of USB storage device contents..................................................................................................................... 44
En
2
Configuring playback settings for different playback sources
(Option menu)......................................................................................... 47
Option menu items............................................................................................................................................................... 47
CONFIGURATIONS 51
Configuring various functions (Setup Menu)....................................... 51
Setup menu items................................................................................................................................................................. 52
Speaker...................................................................................................................................................................................... 54
HDMI........................................................................................................................................................................................... 57
Sound......................................................................................................................................................................................... 59
ECO............................................................................................................................................................................................. 61
Function.................................................................................................................................................................................... 62
Bluetooth.................................................................................................................................................................................. 64
Language.................................................................................................................................................................................. 65
Configuring the system settings (ADVANCED SETUP menu).............. 66
ADVANCED SETUP menu items........................................................................................................................................ 66
Changing the speaker impedance setting (SP IMP.)................................................................................................. 66
Selecting the remote control ID (REMOTE ID)............................................................................................................. 67
Changing the FM/AM tuning frequency setting (TU)............................................................................................... 67
Switching the video signal type (TV FORMAT)............................................................................................................ 67
Selecting the HDMI 4K signal format (4K MODE)....................................................................................................... 68
Restoring the default settings (INIT)............................................................................................................................... 68
Updating the firmware (UPDATE).................................................................................................................................... 68
Checking the firmware version (VERSION)................................................................................................................... 68
APPENDIX 69
Frequently asked questions................................................................... 69
Troubleshooting..................................................................................... 70
First, check the following:................................................................................................................................................... 70
Power, system and remote control................................................................................................................................. 70
Audio.......................................................................................................................................................................................... 71
Video.......................................................................................................................................................................................... 73
FM/AM radio............................................................................................................................................................................ 74
USB.............................................................................................................................................................................................. 74
Bluetooth®................................................................................................................................................................................ 75
Error indications on the front display................................................... 76
Glossary................................................................................................... 77
Audio information................................................................................................................................................................. 77
HDMI and video information............................................................................................................................................. 78
Yamaha technologies.......................................................................................................................................................... 78
Supported devices and file formats...................................................... 79
Supported devices................................................................................................................................................................ 79
File formats.............................................................................................................................................................................. 79
Video signal flow.................................................................................... 79
Information on HDMI.............................................................................. 80
HDMI Control.......................................................................................................................................................................... 80
Audio Return Channel (ARC)............................................................................................................................................. 82
HDMI signal compatibility.................................................................................................................................................. 82
Trademarks............................................................................................. 83
Specifications.......................................................................................... 84
En
3
BEFORE USING THE UNIT
Accessories
Check that the following accessories are supplied with the product.
£ AM antenna £ FM antenna
* One of the above is supplied depending on
the region of purchase.
£ YPAO microphone £ Remote control
£ Batteries (AAA, R03, UM-4) (x2)
£ CD-ROM (Owner's Manual
)
£ Quick Start Guide
How to use this manual
Some features are not available in certain regions.
Due to product improvements, specifications and appearance are subject to
change without notice.
This manual explains operations using the supplied remote control.
Notice:
Indicates precautions for use to avoid the possibility of malfunction/damage to the unit.
Note:
Indicates instructions and supplementary explanations for optimum use.
Remote control
The supplied remote control is used as follows.
Insert the batteries
Insert the batteries the right way round.
Operating range of the remote control
Point the remote control at the remote control sensor on the unit and remain within the
operating range shown below.
Within 6 m (20 ft)
30° 30°
En
4
FEATURES
What you can do with the unit
The unit is equipped with full of useful functions.
Supports 2- to 5.1-channel speaker system
You can enjoy your favorite acoustic spaces in various styles.
YPAO automatically optimizes the speaker settings to suit your room.
“Optimizing the speaker settings automatically (YPAO)” (p.25)
CINEMA DSP allows you to create stereo or multichannel sounds with
the sound fields like actual movie theaters and concert halls in your
own room.
“Enjoying sound field effects (CINEMA DSP)” (p.33)
You can enjoy compressed music with enhanced sound (Compressed
Music Enhancer).
“Playing back digitally compressed formats (such as MP3, etc.) with enriched sound
(Compressed Music Enhancer)”
(p.36)
Change the input source and favorite settings with
one touch (SCENE)
The SCENE function allows you to select the input source and settings registered to
the corresponding scene, such as sound program and Compressed Music Enhancer
on/off, with just one touch.
“Selecting the input source and favorite settings with one touch (SCENE)” (p.31)
4K Ultra HD signal and HDCP 2.2 supported
You can enjoy the high definition video quality of 4K with HDCP 2.2 that complies with
the latest copyright protection.
“Selecting the HDMI 4K signal format (4K MODE)” (p.68)
The ECO mode (power saving function) allows you to
create an eco-friendly home theater system
When the ECO mode is enabled, you can reduce the unit's power consumption.
“ECO Mode” (p.61)
Sequential operation of a TV, AV receiver, and
BD/DVD player (HDMI Control)
When the unit is connected to an HDMI Control-compatible TV and BD/DVD player
with each HDMI cable, you can control the unit (such as power and volume) and
BD/DVD player with TV remote control operations.
“HDMI Control” (p.80)
Supports Bluetooth® devices
You can play back music stored on a Bluetooth device.
“Playing back music stored on a Bluetooth
®
device” (p.42)
Supports USB storage devices
You can play back music stored on a USB storage device.
“Playing back music stored on a USB storage device” (p.44)
Connecting various devices
A number of HDMI jacks and various input/output jacks on the unit allow you to
connect video devices (such as BD/DVD players), audio devices (such as CD
players), game consoles, portable audio player, and other devices.
“Connecting a TV/playback devices” (p.18)
En
5
Playing back TV audio in surround sound with a
single HDMI cable connection (Audio Return
Channel: ARC)
When using an ARC-compatible TV, you only need one HDMI cable to enable video
output to the TV, audio input from the TV, and the transmission of HDMI Control
signals.
“Connecting a TV” (p.19)
Surround playback with 5 speakers placed in front
You can enjoy the surround sound even when the surround speakers are placed in
front.
“Enjoying sound field effects without surround speakers (Virtual CINEMA
DSP)” (p.34)
Enhanced bass reproduction
Extra Bass allows you to enjoy enhanced bass reproduction that does not depend on
the speakers used.
“Enhancing the bass (Extra Bass)” (p.36)
Listening to FM/AM radio
The unit is equipped with a built-in FM/AM tuner. You can register up to 40 favorite
radio stations as presets.
“Listening to FM/AM radio” (p.37)
Easy operation with a TV screen
You can operate the USB storage device, view information, or easily configure the
settings using the on-screen menu.
Auto Rename function
The unit creates an input source name, displayed on the front display, automatically
according to the connected HDMI-compatible device.
“Input Rename” (p.62)
Useful applications
The useful application for connections and operations of the unit is as follows.
n
Application for tablets “AV SETUP GUIDE”
AV SETUP GUIDE is an application that assists you with cable connections
between AV Receiver
and source devices as well as AV Receiver setup. This
app guides you through the various settings such as speaker connections, TV
and source device connections.
Functions:
1) Connection support guide
– Speaker connection
– TV/source devices connection
2) Setup support guide
– Various setup assistance with illustrations.
– YPAO setting guidance
3) View Owner's Manual
* This application is for tablets only.
For details, search for “AV SETUP GUIDE” on the App Store or Google Play™.
En
6
Part names and functions
The part names and functions of the unit and the supplied remote control are as follows.
Front panel
YPAO MIC
INFO
MEMORY
(
PAIRING
)
PRESET
FM AM
TUNING
PHONES
SILENT
CINEMA
VOLUME
AUX
TONE
CONTROL
STRAIGHT
TV
BD
DVD
CD
RADIO
INPUT
PROGRAM
SCENE
AUDIO
USB
4 05 631 7 8 9
A
C E F
IG HB D
2
1
z (power) key
Turns on/off (standby) the unit.
2
Standby indicator
Lights up when the unit is in Bluetooth Standby enable
condition (p.64).
3
YPAO MIC jack
For connecting the supplied YPAO microphone (p.25).
4
Remote control sensor
Receives remote control signals (p.4).
5
INFO key
Selects the information displayed on the front display
(p.30).
6
MEMORY (PAIRING) key
Registers FM/AM radio stations as preset stations (p.38).
Starts pairing with a Bluetooth device by holding down for 3
seconds (p.42).
7
PRESET keys
Select a preset FM/AM radio station (p.40).
8
FM and AM keys
Switch between FM and AM (p.37).
9
TUNING keys
Select the radio frequency (p.37).
:
Front display
Displays information (p.8).
A
PHONES jack
For connecting headphones.
B
INPUT keys
Select an input source.
C
TONE CONTROL key
Adjusts the level of high-frequency range (Treble) and low-
frequency range (Bass
) individually (p.48).
D
SCENE keys
Select the registered input source and sound program with
one touch. Also, turns on the unit when it is in standby
mode (p.31).
E
PROGRAM keys
Select a sound program or a surround decoder (p.32).
F
STRAIGHT key
Enables/disables the straight decode mode (p.35).
G
AUX jack
For connecting devices, such as portable audio players
(p.22).
H
USB jack
For connecting a USB storage device (p.44).
I
VOLUME knob
Adjusts the volume.
En
7
Front display (indicators)
-
R
es
Hi
YPAO
VOL.
PARTY
ZONE
FPR
SBL SB SBR
FPL
VIRTUAL
3 B2 A
LINK
MASTER
2
ENHANCER
ECO
OUT
A
-
DRC
SLEEP
STEREO
TUNED
VOL.
SL
SW
SR
MUTE
1 3 5 6
2 74
98 9
A0 B C
1
HDMI
Lights up when HDMI signals are being input or output.
OUT
Lights up when HDMI signals are being output.
2
Bluetooth indicator
Light up while the unit is connected to a Bluetooth device.
3
CINEMA DSP
Lights up when CINEMA DSP (p.33) is working.
4
SLEEP
Lights up when the sleep timer is on.
5
STEREO
Lights up when the unit is receiving a stereo FM radio
signal.
TUNED
Lights up when the unit is receiving an FM/AM radio station
signal.
6
A-DRC
Lights up when Adaptive DRC (p.48) is working.
7
Volume indicator
Indicates the current volume.
8
ECO
Lights up when the eco mode (p.61) is enabled.
9
Cursor indicators
Indicate the remote control cursor keys currently
operational.
:
Information display
Displays the current status (such as input name and sound
mode name). You can switch the information by pressing
INFO (p.
30).
A
ENHANCER
Lights up when Compressed Music Enhancer (p.36) is
working.
B
Speaker indicators
Indicate speaker terminals from which signals are output.
A Front speaker (L)
S Front speaker (R)
D Center speaker
F Surround speaker (L)
G Surround speaker (R)
L Subwoofer
C
MUTE
Blinks when audio is temporarily muted.
En
8
Rear panel
The area around the video/audio output jacks is marked in white
on the actual product to prevent improper connections.
1
HDMI OUT jack
For connecting to an HDMI-compatible TV and outputting
video/audio signals (
p.18). When using ARC, TV audio
signal can also be input through the HDMI OUT jack.
2
HDMI 1–4 jacks
For connecting to HDMI-compatible playback devices and
inputting video/audio signals (
p.20).
3
ANTENNA jacks
For connecting to FM and AM antennas (p.23).
4
Power cable
For connecting to an AC wall outlet (p.23).
5
AV jacks
AUDIO jacks
For connecting to video/audio playback devices and
inputting video/audio signals (
p.20).
6
MONITOR OUT jacks
For connecting to a TV and outputting video signals
(p.18).
7
SUBWOOFER PRE OUT jack
For connecting to a subwoofer (with built-in amplifier)
(p.16).
8
SPEAKERS terminals
For connecting to speakers (p.16).
9
VOLTAGE SELECTOR
(Taiwan, Brazil and General models only)
Selects the switch position according to your local voltage
(p.23).
En
9
Remote control
TUNING
PRESET
MUTE
TUNING
MEMORY
TOP MENU
HOME
POP-UP/MENU
DISPLAYRETURN
SETUP
OPTION
ENTER
FM/AM
VOLUME
PROG RAM
USB
STRAIGHT
ENHANCER BASS
BLUETOOTH
INPUT
BD
DVD
TV
CD
S C E NE
RADIO
SLEEP
BLUE
YELLOWGREEN
RED
1
3
2
6
4
5
7
B
C
9
0
A
8
D
1
Remote control signal transmitter
Transmits infrared signals.
2
z (receiver power) key
Turns on/off (standby) the unit.
3
SLEEP key
Pressing this key repeatedly will specify the time (120 min,
90 min, 60 min, 30 min, off), in which the unit switches to
the standby mode.
4
SCENE keys
Select the registered input source and sound program with
one touch. Also, turn on the unit when it is in standby mode
(p.31).
5
Sound mode keys
Select a sound mode (p.32).
6
Input selection keys
Select an input source for playback.
7
SETUP key
Displays the setup menu (p.51).
8
Menu operation keys
Cursor keys
Select a menu or the parameter.
ENTER
Confirms a selected item.
RETURN
Returns to the previous screen.
89: External device operation keys
Let you perform playback operations when “USB” is
selected as the input source, or control playback of the
HDMI Control-compatible playback device.
Note
The playback devices must support HDMI Control. Some
HDMI Control-compatible devices cannot be used.
You can assign the unit's functions to the RED/GREEN/
YELLOW/BLUE keys (
p.64).
:
Radio keys
Operate the FM/AM radio when “TUNER” is selected as the
input source (p.37).
MEMORY
Registers FM/AM radio stations as
presets.
PRESET
Select a preset station.
TUNING
Select the radio frequency.
A
VOLUME keys
Adjust the volume.
B
MUTE key
Mutes the audio output.
C
OPTION key
Displays the option menu (p.47).
D
DISPLAY key
Turns on/off the browse screen, playback screen, etc.
En
10
PREPARATIONS
General setup procedure
1 Placing speakers................................................................................................................................ (p.12)
2 Connecting speakers........................................................................................................................ (p.16)
3 Connecting a TV/playback devices.................................................................................................. (p.18)
4 Connecting the FM/AM antennas.................................................................................................... (p.23)
5 Connecting the power cable............................................................................................................ (p.23)
6 Selecting an on-screen menu language.......................................................................................... (p.24)
7 Optimizing the speaker settings automatically (YPAO)................................................................ (p.25)
This completes all the preparations. Enjoy playing movies, music, radio and other content with the unit!
En
11
Typical speaker layouts
n
5.1-channel system
We recommend this speaker layout which can maximize the performance of the unit.
4 5
1 2
39
1 to 30° 1 to 30°
Speaker type Abbr. Function
Front (L/R)
1/2
Produce front left/right channel sounds (stereo sounds).
Center
3
Produces center channel sounds (such as movie dialogue
and vocals).
Surround (L/R)
4/5
Produce surround left/right channel sounds.
Subwoofer
9
Produces LFE (low-frequency effect) channel sounds and
reinforces the bass parts of other channels.
This channel is counted as “0.1”.
Note
You can enjoy surround sound even without the center speaker (4.1-channel system).
You can place the subwoofer either in the left or right side.
n
5.1-channel system (Virtual CINEMA FRONT)
We recommend this speaker layout when the speakers can't be placed in back of the
room.
1 2
39
4 5
Speaker type Abbr. Function
Front (L/R)
1/2
Produce front left/right channel sounds (stereo sounds).
Center
3
Produces center channel sounds (such as movie dialogue
and vocals).
Surround (L/R)
4/5
Produce surround left/right channel sounds. By this
system, place the surround speakers in front.
Subwoofer
9
Produces LFE (low-frequency effect) channel sounds and
reinforces the bass parts of other channels.
This channel is counted as “0.1”.
Note
To utilize this configuration, set “Virtual CINEMA FRONT” (p.55) in the “Setup” menu to “On”.
You can enjoy surround sound even without the center speaker (front 4.1-channel system).
You can place the subwoofer either in the left or right side.
En
13
Other speaker layouts
The following speaker layouts are also available.
n
3.1-channel system
1 2
39
n
2.1-channel system
1 2
9
En
14
Connecting a TV
Connect a TV to the unit so that video input to the unit can be output to the TV. You
can also enjoy playback of TV audio on the unit.
To maximize the performance of the unit, we recommend connecting a TV with an
HDMI cable.
n
HDMI connection
Connect the TV to the unit with an HDMI cable and a digital optical cable.
HDMI
OPTICAL
HDMI
OPTICAL
OPTICAL
HDMI
HDMI
HDMI
HDMI
O OO O
The unit (rear)
AUDIO 1 (OPTICAL) jack
HDMI OUT jack HDMI input
Audio output
(digital optical)
TV
Note
A digital optical cable connection allows audio from the TV to be played back on the unit. A digital optical
cable connection is not needed in the following cases:
If your TV supports Audio Return Channel (ARC)
If you will receive TV broadcasts only from the set-top box
If you connect a TV that supports HDMI Control to the unit with an HDMI cable, you can control the unit’s
power and volume with the TV’s remote control.
To use HDMI Control and ARC, you need to configure the HDMI settings on the unit.
For details on the settings, see “Information on HDMI”
(p.80).
About Audio Return Channel (ARC)
ARC allows audio signals to travel both ways. If you connect a TV that supports ARC to the unit with a
single HDMI cable, you can output video/audio to the TV or input TV audio to the unit.
When using ARC, connect a TV with an HDMI cable that supports ARC.
n
Composite video connection
When connecting any video device with a video pin cable, connect the TV to the
MONITOR OUT
(VIDEO) jack.
Note
If you connect your TV to the unit with a cable other than HDMI, video input to the unit via HDMI cannot be
output to the TV.
Operations with TV screen are available only when your TV is connected to the unit via HDMI.
If you will receive TV broadcasts only from the set-top box, you do not need to make an audio cable
connection between the TV and the unit.
VIDEO (composite video) connection
Connect the TV to the unit with a video pin cable and a digital optical cable.
VIDEO
OPTICAL
O O
MONITOR
OUT
V
V
The unit (rear)
AUDIO 1 (OPTICAL) jack
MONITOR OUT (VIDEO) jack
Video input
(composite video)
Audio output
(digital optical)
TV
En
19
Connecting video devices (such as BD/DVD players)
Connect video devices such as BD/DVD players, set-top boxes (STBs) and game
consoles to the unit. Depending on the video/audio output jacks available on your
video device, choose one of the following connections. We recommend using an
HDMI connection if the video device has an HDMI output jack.
Note
If the combination of video/audio input jacks available on the unit does not match your video device, change
its combination according to the output jacks of your device (p.21).
n
HDMI connection
Connect a video device to the unit with an HDMI cable.
HDMI
HDMI
HDMI
The unit (rear)
HDMI OUT jack
HDMI 1–4 jacks
Video device
If you select HDMI 1–4 as the input source by pressing INPUT, the video/audio played
back on the video device will be output from the unit.
Note
To watch videos input to the HDMI 1–4 jacks, you need to connect your TV to the HDMI OUT jack of the unit
(p.19).
n
Composite video connection
Connect a video device to the unit with a video pin cable and an audio cable (digital
coaxial or stereo pin cable). Choose a set of input jacks (on the unit) depending on the
audio output jacks available on your video device.
Output jacks on video device
Input jacks on the unit
Video Audio
Composite video
Digital coaxial AV 1 (VIDEO + COAXIAL)
Analog stereo AV 2–3 (VIDEO + AUDIO)
Digital optical
You need to change the combination
of video/audio input jacks (p.21).
R
L
R
L
COAXIAL
VIDEO
VIDEO
C C
L
R
L
R
V
V
COAXIAL
The unit (rear)
AV 1 (COAXIAL) jack or AV 2–3
(AUDIO) jacks
AV 1–3 (VIDEO) jacks
Video output
(composite video)
Audio output
(digital coaxial or analog
stereo)
Video device
If you select AV 1-3 as the input source by pressing INPUT, the video/audio played
back on the video device will be output from the unit.
Note
To watch videos input to the AV 1–3 (VIDEO) jacks, you need to connect your TV to the MONITOR OUT
(VIDEO) jack of the unit (p.19).
En
20
Connecting audio devices (such as CD players)
Connect audio devices such as CD players and MD players to the unit. Depending on
the audio output jacks available on your audio device, choose one of the following
connections.
Audio output jacks on audio device Audio input jacks on the unit
Digital optical AUDIO 1 (OPTICAL)
Digital coaxial
AUDIO 2 (COAXIAL)
AV 1 (COAXIAL)
Analog stereo AV 2–3 (AUDIO)
R
L
COAXIAL
OPTICAL
(TV)
R
L
COAXIAL
OPTICAL
C C
L
R
L
R
O O
The unit (rear)
AV 1–3 jacks
AUDIO 1–2 jacks
Audio output
(either digital optical, digital coaxial,
or analog stereo)
Audio device
If you select AV 1-3 or AUDIO 1-2 as the input source by pressing INPUT, the audio
played back on the audio device will be output from the unit.
Connecting to the jack on the front panel
Use the AUX jack on the front panel to temporarily connect devices such as portable
audio players to the unit.
Before making a connection, stop playback on the device and turn down the volume
on the unit.
AUX
TONE
CONTROL
STRAIGHT
TV
BD
DVD
CD
RADIO
INPUT
PROGRAM
AUDIO
USB
The unit (front)
Portable audio player
If you select “AUX” as the input source by pressing INPUT, the audio played back on
the device will be output from the unit.
Note
You need to prepare the audio cable that matches the output jacks on your device.
For details on how to connect a USB storage device, see “Connecting a USB storage device” (p.44).
En
22
4 Connecting the FM/AM antennas
Connect the supplied FM/AM antennas to the unit.
Fix the end of the FM antenna to a wall, and place the AM antenna on a flat surface.
The unit (rear)
FM antenna
AM antenna
Assembling and connecting the AM antenna
ReleaseHold down Insert
Note
Unwind only the length of cable needed from the AM antenna unit.
The wires of the AM antenna have no polarity.
5 Connecting the power cable
Warning
(Taiwan, Brazil and General models only)
Make sure you set VOLTAGE SELECTOR of the unit BEFORE plugging the power cable into an AC wall
outlet. Improper setting of
VOLTAGE SELECTOR
may cause damage to the unit and create a potential
fire hazard.
Before connecting the power cable
Set the switch position of VOLTAGE SELECTOR according to your local voltage. Voltages are AC 110–
120/220–240 V, 50/60 Hz.
VOLTAGE
SELECTOR
110V
120V
220V
240V
The unit (rear) VOLTAGE SELECTOR
After all the connections are complete, plug in the power cable.
The unit (rear)
To an AC wall outlet
En
23
6 Selecting an on-screen menu language
Select the desired on-screen menu language.
1
Press z (receiver power) to turn on the unit.
2
Turn on the TV and switch the TV input to display video from the
unit (HDMI OUT jack).
Note
Operations with TV screen are available only when your TV is connected to the unit via HDMI. If
not, carry out operations while viewing the front display.
3
Press SETUP.
4
Use the cursor keys to select “Language” and press ENTER.
5
Use the cursor keys to select the desired language.
6
To exit from the menu, press SETUP.
Note
The information on the front display is provided in English only.
En
24
7 Optimizing the speaker settings automatically (YPAO)
The Yamaha Parametric room Acoustic Optimizer (YPAO) function detects speaker
connections, measures the distances from them to your listening position(s), and then
automatically optimizes the speaker settings, such as volume balance and acoustic
parameters, to suit your room.
Note
When you use the front 5.1-channel speaker (Virtual CINEMA FRONT) configuration (p.13), set “Virtual
CINEMA FRONT” (p.55) in the “
Setup
” menu to “On” beforehand.
Please note the following when using YPAO.
Use YPAO after connecting a TV and speakers to the unit.
During the measuring process, test tones are output at high volume. Ensure that the test tones do not
frighten small children.
During the measuring process, you cannot adjust the volume.
During the measuring process, keep the room as quiet as possible.
Do not connect headphones.
Do not stand between the speakers and the YPAO microphone during the measurement process (about
3 minutes).
1
Press z (receiver power) to turn on the unit.
2
Turn on the TV and switch the TV input to display video from the
unit (HDMI OUT jack).
Note
Operations with TV screen are available only when your TV is connected to the unit via HDMI. If
not, carry out operations while viewing the front display.
3
Turn on the subwoofer and set the volume to half. If the crossover
frequency is adjustable, set it to maximum.
VOLUME HIGH CUT
CROSSOVER/
MIN MAXMIN MAX
9
4
Place the YPAO microphone at your listening position and
connect it to the YPAO MIC jack on the front panel.
Note
Place the YPAO microphone at your listening position (same height as your ears). We recommend
the use of a tripod as a microphone stand. You can use the tripod screws to stabilize the
microphone.
1 2
3
9
4 5
The unit (front)
Ear height
The following screen appears on the TV.
En
25
5
To start the measurement, use the cursor keys to select “Start”
and press ENTER.
The measurement will start in 10 seconds. Press ENTER to start the
measurement immediately.
Note
To stop the measurement temporarily, press RETURN and follow the procedure in “Error
messages”
(p.27).
The following screen appears on the TV when the measurement finishes.
1
2
3
4
1
The number of speakers (front side/rear side/subwoofer)
2
Speaker distance (nearest/farthest)
3
Adjustment range of speaker output level
4
Warning message (if available)
Note
If any error message (such as E-1) or warning message (such as W-1) appears, see “Error
messages”
(p.27)
or “Warning messages” (p.28).
A speaker with a problem is indicated by blinking of the speaker indicators in the front display.
If multiple warnings are given (when operating with the front display), use the cursor keys (q/w)
to check the other warning messages.
6
Confirm the results displayed on the screen and press ENTER.
7
Use the cursor keys (e/r) to select “SAVE” and press ENTER.
The adjusted speaker settings are applied.
Note
To finish the measurement without saving the result, select “CANCEL”.
8
Disconnect the YPAO microphone from the unit.
This completes optimization of the speaker settings.
Notice
The YPAO microphone is sensitive to heat, so should not be placed anywhere where it could be
exposed to direct sunlight or high temperatures (such as on top of AV equipment).
En
26
Error messages
If any error message is displayed during the measurement, resolve the problem and
perform YPAO again.
Error message
TV screen
ENHANCER
LINK
ECO
MASTER
OUT
2
-
R
es
Hi
YPAO
VOL.
A
-
DRC
SLEEP
STEREO
PARTY
TUNED
ZONE
3 B2 A
FPR
SBL SB SBR
FPL
MUT E V IRT UAL
E-5:NOISY
VOL .
SL
SW
SR
E-5:NOISY
Front display
n
Procedure to handle errors
1
Check the content of error message and press ENTER.
2
Use the cursor keys (e/r) to select the desired operation.
To exit the YPAO measurement:
1
Select “EXIT” and press ENTER.
2
Use the cursor keys (q/w) to select “Exit” and press ENTER.
3
Disconnect the YPAO microphone from the unit.
To retry the YPAO measurement from beginning:
1
Select “RETRY” and press ENTER.
To proceed with the current YPAO measurement (for E-5 and E-9
only):
1
Select “PROCEED” and press ENTER.
Error message Cause Remedy
E-1:No Front SP
(E-1:NO FRNT SP)
Front speakers are not
detected.
Exit YPAO, turn off the unit, and then
check the speaker connections.
E-2:No Sur. SP
(E-2:NO SUR SP)
One of the surround
speakers cannot be
detected.
E-5:Noisy
(E-5:NOISY)
The noise is too loud.
Keep the room quiet and retry YPAO. If
you select “PROCEED”, YPAO takes the
measurement again and ignores any
noise detected.
E-7:No MIC
(E-7:NO MIC)
The YPAO microphone has
been removed.
Connect the YPAO microphone to the
YPAO MIC
jack firmly and retry YPAO.
E-8:No Signal
(
E-8:NO SIGNAL)
The YPAO microphone
cannot detect test tones.
Connect the YPAO microphone to the
YPAO MIC
jack firmly and retry YPAO. If
this error occurs repeatedly, contact the
nearest authorized Yamaha dealer or
service center.
E-9:User Cancel
(E-9:CANCEL)
The measurement has been
canceled.
Retry or exit YPAO as necessary.
E-10:Internal Err.
(E-10:INTERNAL)
An internal error has
occurred.
Exit YPAO, and turn off and on the unit. If
this error occurs repeatedly, contact the
nearest authorized Yamaha dealer or
service center.
Note
Texts in parentheses denote indicators on the front display.
En
27
Warning messages
If a warning message is displayed after the measurement, you can still save the
measurement results by following on-screen instructions.
However, we recommend you perform YPAO again in order to use the unit with the
optimal speaker settings.
Warning message
TV screen
ENHANCER
LINK
ECO
MASTER
OUT
2
-
R
es
Hi
YPAO
VOL.
A
-
DRC
SLEEP
STEREO
PARTY
TUNED
ZONE
3 B2 A
FPR
SBL SB SBR
FPL
MUT E V IRT UAL
VOL .
SL
SW
SR
W-1:PHASE
Problem speaker (blinks)
Front display
n
Procedure to handle warnings
1
Check the content of warning message and press ENTER.
2
Use the cursor keys (e/r) to select the desired operation.
To save the measurement results:
1
Select “SAVE” and press ENTER.
To discard the measurement result:
1
Select “CANCEL” and press ENTER.
3
Disconnect the YPAO microphone from the unit.
Warning message Cause Remedy
W-1:Out of Phase
(W-1:PHASE)
A speaker cable may be
connected with the reverse
polarity (+/-).
Check the cable connections (+/-) of the
problem speaker.
If the speaker is connected incorrectly:
Turn off the unit, reconnect the speaker
cable.
If the speaker is connected correctly:
Depending on the type of speakers or
room environment, this message may
appear even if the speakers are
connected correctly. In this case, you
can ignore the message.
W-2:Over Distance
(W-2:DISTANCE)
A speaker is placed more
than 24 m (80 ft) from the
listening position.
Exit YPAO, turn off the unit, and place the
problem speaker within 24 m (80 ft) of the
listening position.
W-3:Level Error
(W-3:LEVEL)
There are significant volume
differences between the
speakers.
Check the usage environment and cable
connections (+/-) of each speaker, and
the volume of the subwoofer. If there is
any problem, exit YPAO, turn off the unit,
and then reconnect speaker cable or
correct the speaker positions. We
recommend using the same speakers or
speakers with specifications that are as
similar as possible.
Note
Texts in parentheses denote indicators on the front display.
En
28
PLAYBACK
Basic playback procedure
Enjoying playback
1
Turn on the external devices (such as a TV or BD/DVD player)
connected to the unit.
2
Use the input selection keys to select an input source.
MUTE
FM/AM
VOLUME
PROG RAM
USB
BLUETOOTH
INPUT
TUNING
PRESET
MUTE
TUNING
MEMORY
TOP MENU
HOME
POP-UP/MENU
DISPLAYRETURN
SETUP
OPTION
ENTER
FM/AM
VOLUME
PROGR AM
USB
STRAIGHT
ENHANCER BASS
BLUETOOTH
INPU T
BD
DVD
TV
CD
SC ENE
RADIO
SLEEP
BLUE
YELLOWGREEN
RED
PR
OG R
AM
VOLUME
MUTE
Input selection keys
3
Start playback on the external device or select a radio station.
Refer to the instruction manual for the external device.
For details on the following operations, see the corresponding pages.
“Listening to FM/AM radio” (p.37)
“Playing back music stored on a Bluetooth
®
device” (p.42
)
“Playing back music stored on a USB storage device” (p.44)
4
Press VOLUME to adjust the volume.
Note
To mute the audio output, press MUTE. Press MUTE again to unmute.
To adjust the treble/bass settings, use the “Option” menu or TONE CONTROL on the front panel
(p.48).
En
29
Switching information on the front display
1
Press INFO repeatedly to select between the various display
items.
ENHANCER
LINK
ECO
MASTER
OUT
2
-
R
es
Hi
YPAO
VOL.
A
-
DRC
SLEEP
STEREO
PARTY
TUNED
ZONE
3 B2 A
FPR
SBL SB SBR
FPL
MUT E V IRT UAL
VOL .
SL
SW
SR
Audio Decoder
Item name
About 3 seconds after a display item is selected, its corresponding
information appears.
ENHANCER
LINK
ECO
MASTER
OUT
2
-
R
es
Hi
YPAO
VOL.
A
-
DRC
SLEEP
STEREO
PARTY
TUNED
ZONE
3 B2 A
FPR
SBL SB SBR
FPL
MUT E V IRT UAL
VOL .
SL
SW
SR
DPL
Information
Note
Available items vary depending on the selected input source. The displayed item can also be
applied separately to each input source.
Currently input source Item
HDMI
AV
AUDIO
AUX
Bluetooth
Input (input source name), DSP Program (sound mode name), Audio
Decoder (decoder name*)
USB
Song (song title), Artist (artist name), Album (album name), DSP
Program (sound mode name), Audio Decoder (decoder name*)
TUNER
Frequency (frequency), DSP Program (sound mode name), Audio
Decoder (decoder name*)
(U.K. and Europe models only)
Radio Data System data is also available when the unit is tuned into a
Radio Data System broadcasting station (p.41).
* The name of the audio decoder currently activated is displayed. If no audio decoder
is activated, “Decoder Off” appears.
En
30
Selecting the input source and favorite settings with one touch (SCENE)
The SCENE function allows you to select the assigned input source, sound program,
and Compressed Music Enhancer on/off with just one touch.
Selecting a registered scene
1
Press SCENE.
The input source and settings registered to the corresponding scene are
selected. The unit turns on automatically when it is in standby mode.
TUNING
PRESET
MUTE
TUNING
MEMORY
TOP MENU
HOME
POP-UP/MENU
DISPLAYRETURN
SETUP
OPTION
ENTER
FM/AM
VOLUME
PROGR AM
USB
STRAIGHT
ENHANCER BASS
BLUETOOTH
INPU T
BD
DVD
TV
CD
SC ENE
RADIO
SLEEP
BLUE
YELLOWGREEN
RED
PROG RAM
STRAIGHT
ENHANCER BASS
BD
DVD
TV
CD
S C E NE
RADIO
SLEEP
PR
OG R
AM
ST
RA
IGHT
ENHANCER
BA
SS
SLEE
P
SCENE
By default, the following settings are registered for each scene.
SCENE
Input
HDMI1 AUDIO1 AUDIO2 TUNER
Sound program
MOVIE (Sci-Fi) STRAIGHT STRAIGHT
STEREO
(5ch Stereo
)
Compressed Music
Enhancer
Off On Off On
SCENE link playback
On On Off Off
Note
The SCENE link playback function allows you to automatically turn on the TV or start playback of an external
device connected to the unit via HDMI, in conjunction with a scene selection. To enable
SCENE link
playback, set “SCENE” (p.58) in the “Setup” menu to “On”.
Registering a scene
1
Perform the following operations to prepare the settings you want
to assign to a scene.
Select an input source (p.29)
Select a sound program (p.32) or straight decode (p.35)
Enable/disable Compressed Music Enhancer (p.36)
2
Hold down the desired SCENE key until “SET Complete” appears
on the front display.
ENHANCER
LINK
ECO
MASTER
OUT
2
-
R
es
Hi
YPAO
VOL.
A
-
DRC
SLEEP
STEREO
PARTY
TUNED
ZONE
3 B2 A
FPR
SBL SB SBR
FPL
MUT E V IRT UAL
VOL .
SL
SW
SR
SET Complete
En
31
n
Sound programs suitable for music (MUSIC)
The following sound programs are optimized for listening to music sources.
Hall in Munich
This program simulates a Munich concert hall with approximately 2,500
seats that uses stylish wood for the interior finishing. Fine, beautiful
reverberations spread richly, creating a calming atmosphere. The
listener’s virtual seat is at the center left of the arena.
Hall in Vienna
This program simulates a 1700-seat, middle-sized concert hall with a
shoebox shape that is traditional in Vienna. Pillars and ornate carvings
create extremely complex reverberations from all around the audience,
producing a very full, rich sound.
Chamber
This program creates a relatively wide space with a high ceiling, like an
audience hall in a palace. It offers pleasant reverberations that are
suitable for courtly music and chamber music.
Cellar Club
This program simulates an intimate concert venue with a low ceiling and
homey atmosphere. A realistic, live sound field delivers powerful sounds
that make you feel as if you are sitting in the front row in front of a small
stage.
The Roxy Theatre
This program creates the sound field of a 460-seat rock music concert
venue in Los Angeles. The listener’s virtual seat is at the center left of the
hall.
The Bottom Line
This program creates the sound field at stage front in The Bottom Line, a
famous New York jazz club once. The floor can seat 300 people to the
left and right in a sound field offering real and vibrant sound.
Music Video
This program allows you to enjoy videos of pop, rock, and jazz concerts,
as if you were there yourself. Immerse yourself in the hot concert
atmosphere thanks to the vividness of the singers and solos on stage, a
presence sound field that emphasizes the beat of rhythm instruments,
and a surround sound field that reproduces the space of a big live hall.
n
Sound programs suitable for stereo playback (STEREO)
You can select stereo playback.
2ch Stereo
Use this program to mix down multichannel sources to 2 channels. When
multichannel signals are input, they are down mixed to 2 channels and
output from the front speakers (this program does not utilize CINEMA
DSP).
5ch Stereo
Use this program to output sound from all speakers. When you play back
multichannel sources, the unit mixes down the source to 2 channels, and
then outputs the sound from all speakers. This program creates a larger
sound field and is ideal for background music at parties.
n
Enjoying sound field effects without surround speakers
(Virtual CINEMA DSP)
If you select one of the sound programs (except 2ch Stereo and 5ch Stereo) when no
surround speakers are connected, the unit automatically creates the surround sound
field using the front-side speakers.
n
Enjoying surround sound with 5 speakers placed in
front (Virtual CINEMA FRONT)
You can enjoy the surround sound even when the surround speakers are placed in
front.
n
Enjoying surround sound with headphones (SILENT
CINEMA)
You can enjoy surround or sound field effects, like a multichannel speaker system, with
stereo headphones by connecting the headphones to the
PHONES jack and selecting
a sound program or a surround decoder.
En
34
Enjoying unprocessed playback
You can play back input sources without any sound field effect processing.
n
Playing back in original channels (straight decode)
When the straight decode mode is enabled, the unit produces stereo sound from the
front speakers for 2-channel sources such as CDs, and produces unprocessed
multichannel sounds for multichannel sources.
1
Press STRAIGHT.
Each time you press the key, the straight decode mode is enabled or
disabled.
LINK
ECO
MASTER
OUT
2
A
-
DRC
ZONE
3 B2 A
FPR
SBL SB SBR
FPL
MUT E V IRT UAL
-
SLEEP
STEREO
PARTY
TUNED
R
es
Hi
YPAO
VOL.
ENHANCER
VOL .
SL
SW
SR
STRAIGHT
n
Playing back 2-channel sources in multichannel
(surround decoder)
The surround decoder enables unprocessed multichannel playback from 2-channel
sources. When a multichannel source is input, it works the same way as the straight
decode mode.
For details on each decoder see “Glossary” (p.77).
1
Press PROGRAM repeatedly to select a surround decoder.
The previously selected surround decoder is selected. You can change
the surround decoder in “Sur.Decode
” (p.47) in the “Option” menu.
TUNING
PRESET
MUTE
TUNING
MEMORY
TOP MENU
HOME
POP-UP/MENU
DISPLAYRETURN
SETUP
OPTION
ENTER
FM/AM
VOLUME
PROGR AM
USB
STRAIGHT
ENHANCER BASS
BLUETOOTH
INPU T
BD
DVD
TV
CD
SC ENE
RADIO
SLEEP
BLUE
YELLOWGREEN
RED
PROG RAM
STRAIGHT
ENHANCER BASS
BD
DVD
TV
CD
S C E NE
RADIO
SLEEP
ST
RA
IGHT
ENHANCER
BA
SS
BD
DV
D
TV
CD
S C E N
E
R
ADIO
SLEE
P
PROGRAM
ENHANCER
LINK
ECO
MASTER
OUT
2
-
R
es
Hi
YPAO
VOL.
A
-
DRC
SLEEP
STEREO
PARTY
TUNED
ZONE
3 B2 A
FPR
SBL SB SBR
FPL
MUT E V IRT UAL
VOL .
SL
SW
SR
DPL
“SUR. DECODE” appears
DPL
Uses the Dolby Pro Logic decoder suitable for all sources.
DPL Movie
Uses the Dolby Pro Logic II decoder suitable for movies.
DPL Music
Uses the Dolby Pro Logic II decoder suitable for music.
DPL Game
Uses the Dolby Pro Logic II decoder suitable for games.
Neo:6 Cinema
Uses the DTS Neo: 6 decoder suitable for movies.
Neo:6 Music
Uses the DTS Neo: 6 decoder suitable for music.
Note
You can adjust the surround decoder parameters in “DSP Parameter” (p.59) in the “Setup” menu.
En
35
Enhancing the bass (Extra Bass)
Extra Bass allows you to enjoy enhanced bass sounds, regardless of the size of the
front speakers and the presence or absence of the subwoofer.
1
Press BASS.
Each time you press the key, Extra Bass is enabled or disabled.
Note
You can also use “Extra Bass” (p.55) in the “Setup” menu to enable/disable Extra Bass.
Playing back digitally compressed formats (such as
MP3, etc.) with enriched sound (Compressed Music
Enhancer)
Compressed Music Enhancer adds depth and breadth to the sound, allowing you to
enjoy a dynamic sound close to the original sound before it was compressed. This
function can be used along with any other sound modes.
1
Press ENHANCER.
Each time you press the key, Compressed Music Enhancer is enabled or
disabled.
LINK
ECO
MASTER
OUT
2
-
A
-
DRC
SLEEP
STEREO
PARTY
TUNED
ZONE
3 B2 A
FPR
SBL SB SBR
FPL
MUT E V IRT UAL
R
es
Hi
YPAO
VOL.
VOL .
SL
SW
SR
Enhancer On
ENHANCER
“ENHANCER” lights up
Note
Compressed Music Enhancer does not work on the following audio sources.
Signals whose sampling frequency is over 48 kHz
High-definition streaming audio
You can also use “Enhancer (Enhancer)” (p.48) in the “Option” menu to enable/disable
Compressed Music Enhancer.
En
36
Listening to FM/AM radio
You can tune into a radio station by specifying its frequency or selecting from
registered radio stations.
Note
The radio frequencies differ depending on the country or region where the unit is being used. The
explanation of this section uses a display with frequencies used in U.K. and Europe models.
If you cannot obtain good reception on the radio, adjust the direction of the FM/AM antennas.
Setting the frequency steps
(Asia, Taiwan, Brazil and General models only)
At the factory, the frequency step setting is set to 50 kHz for FM and 9 kHz for AM.
Depending on your country or region, set the frequency steps to 100 kHz for FM and
10 kHz for AM.
1
Set the unit to standby mode.
2
When holding down STRAIGHT on the front panel, press z
(power).
(power)
z
STRAIGHTPROGRAM
3
Press PROGRAM repeatedly to select “TU”.
ENHANCER
LINK
ECO
MASTER
OUT
2
-
R
es
Hi
YPAO
VOL.
A
-
DRC
SLEEP
STEREO
PARTY
TUNED
ZONE
3 B2 A
VOL .
FPR
SL
SW
SR
SBL SB SBR
FPL
MUT E V IRT UAL
TU••FM50/AM9
4
Press STRAIGHT to select “FM100/AM10”.
5
Press z (power) to set the unit to standby mode and turn it on
again.
Selecting a frequency for reception
1
Press FM/AM to select a band.
“TUNER” is selected as the input source and then the frequency currently
selected is displayed.
ENHANCER
LINK
ECO
MASTER
OUT
2
-
R
es
Hi
YPAO
VOL.
A
-
DRC
SLEEP
STEREO
PARTY
TUNED
ZONE
3 B2 A
MUT E V IRT UAL
VOL .
FM 87.50MHz
En
37
2
Press TUNING repeatedly to set a frequency.
Hold down the key for about a second to search stations automatically.
TUNING
PRESET
MUTE
TUNING
MEMORY
TOP MENU
HOME
POP-UP/MENU
DISPLAYRETURN
SETUP
OPTION
ENTER
FM/AM
VOLUME
PROGR AM
USB
STRAIGHT
ENHANCER BASS
BLUETOOTH
INPU T
BD
DVD
TV
CD
SC ENE
RADIO
SLEEP
BLUE
YELLOWGREEN
RED
TUNING
PRESET
TUNING
MEMORY
BLUE
YELLOWGREEN
RED
PRESET
MEMO
RY
BLUE
YEL
LO
W
LO
LO
GREEN
RE
D
TUNING
ENHANCER
LINK
ECO
MASTER
OUT
2
-
R
es
Hi
YPAO
VOL.
A
-
DRC
SLEEP
PARTY
ZONE
3 B2 A
FPR
SBL SB SBR
FPL
MUT E V IRT UAL
VOL .
SL
SW
SR
STEREO
TUNED
FM 98.50MHz
“TUNED” lights up when the unit is receiving an FM/AM radio station
signal.
“STEREO” lights up when the unit is receiving a stereo FM radio signal.
Note
You can switch between “Stereo” (stereo) and “Mono” (monaural) for FM radio reception by
selecting “
FM Mode” in the “Option” menu. When the signal reception for an FM radio station is
unstable, switching to monaural may improve it.
You can watch videos input from external devices while listening to radio by selecting the video
input jack in
“Video Out (Video Out)” (p.50) in the “Option” menu.
Registering favorite radio stations (presets)
You can register up to 40 radio stations as presets. Once you have registered stations,
you can easily tune into them by selecting their preset numbers.
n
Registering radio stations automatically (Auto Preset)
Automatically register FM radio stations with strong signals (up to 40 stations).
Note
To register AM radio stations, follow “Registering a radio station manually” (p.39).
(U.K. and Europe models only)
Only Radio Data System broadcasting stations are registered automatically by the Auto Preset function.
1
Press FM/AM to select “TUNER” as the input source.
2
Press OPTION.
3
Use the cursor keys to select “Preset” and press ENTER.
ENHANCER
LINK
ECO
MASTER
OUT
2
-
R
es
Hi
YPAO
VOL.
A
-
DRC
SLEEP
STEREO
PARTY
TUNED
ZONE
3 B2 A
FPR
SL
SW
SR
SBL SB SBR
FPL
MUT E V IRT UAL
VOL .
Preset
En
38
4
To start the Auto Preset process, press ENTER.
ENHANCER
LINK
ECO
MASTER
OUT
2
-
R
es
Hi
YPAO
VOL.
A
-
DRC
SLEEP
PARTY
ZONE
3 B2 A
MUT E V IRT UAL
STEREO
TUNED
FPR
SBL SB SBR
FPL
SL
SW
SR
VOL .
01:FM 87.50MHz
“SEARCH” appears during Auto Preset
Preset number from which to start the registration
Note
To specify the preset number from which to start the registration, press cursor keys (e/r) or
PRESET to select a preset number.
To cancel the Auto Preset process, press RETURN.
When the Auto Preset process finishes, “FINISH” appears and the “Option” menu
closes automatically.
ENHANCER
LINK
ECO
MASTER
OUT
2
-
R
es
Hi
YPAO
VOL.
A
-
DRC
SLEEP
STEREO
PARTY
TUNED
ZONE
3 B2 A
FPR
SL
SW
SR
SBL SB SBR
FPL
MUT E V IRT UAL
VOL .
Auto Preset
n
Registering a radio station manually
Select a radio station manually and register it to a preset number.
1
Follow “Selecting a frequency for reception” (p.37) to tune into
the desired radio station.
2
Hold down MEMORY for a few seconds.
The first time that you do register a station, the selected radio station will
be registered to the preset number “01”. Thereafter, each radio station
you select will be registered to the next empty (unused) preset number
after the most recently registered number.
TUNING
PRESET
MUTE
TUNING
MEMORY
TOP MENU
HOME
POP-UP/MENU
DISPLAYRETURN
SETUP
OPTION
ENTER
FM/AM
VOLUME
PROGR AM
USB
STRAIGHT
ENHANCER BASS
BLUETOOTH
INPU T
BD
DVD
TV
CD
SC ENE
RADIO
SLEEP
BLUE
YELLOWGREEN
RED
TUNING
PRESET
TUNING
MEMORY
BLUE
YELLOWGREEN
RED
TUNING
PRESET
TUNING
BLUE
YEL
LO
W
LO
LO
GREEN
RE
D
MEMORY
ENHANCER
LINK
ECO
MASTER
OUT
2
-
R
es
Hi
YPAO
VOL.
A
-
DRC
SLEEP
PARTY
ZONE
3 B2 A
MUT E V IRT UAL
FPR
SBL SB SBR
FPL
VOL .
SL
SW
SR
01:FM 98.50MHz
STEREO
TUNED
Preset number
Note
To select a preset number for registering, press MEMORY once after tuning into the desired radio
station, press PRESET to select a preset number, and then press MEMORY again.
ENHANCER
LINK
ECO
MASTER
OUT
2
-
R
es
Hi
YPAO
VOL.
A
-
DRC
PARTY
ZONE
3 B2 A
FPR
SBL SB SBR
FPL
MUT E V IRT UAL
SLEEP
VOL .
SL
SW
SR
02:Empty
TUNED
STEREO
“Empty” (not in use) or the frequency currently registered
En
39
n
Selecting a preset station
Tune into a registered radio station by selecting its preset number.
1
Press FM/AM to select “TUNER” as the input source.
2
Press PRESET repeatedly to select the desired radio station.
TUNING
PRESET
MUTE
TUNING
MEMORY
TOP MENU
HOME
POP-UP/MENU
DISPLAYRETURN
SETUP
OPTION
ENTER
FM/AM
VOLUME
PROGR AM
USB
STRAIGHT
ENHANCER BASS
BLUETOOTH
INPU T
BD
DVD
TV
CD
SC ENE
RADIO
SLEEP
BLUE
YELLOWGREEN
RED
TUNING
PRESET
TUNING
MEMORY
BLUE
YELLOWGREEN
RED
TUNING
TUNING
MEMO
RY
BLUE
YEL
LO
W
LO
LO
GREEN
RE
D
PRESET
ENHANCER
-
R
es
Hi
YPAO
VOL.
A
-
DRC
SLEEP
PARTY
ZONE
3 B2 A
MUT E V IRT UAL
FPR
SBL SB SBR
FPL
LINK
ECO
MASTER
OUT
2
VOL .
SL
SW
SR
STEREO
TUNED
01:FM 98.50MHz
Note
“No Presets” appears when no radio stations are registered.
n
Clearing preset stations
Clear radio stations registered to the preset numbers.
1
Press FM/AM to select “TUNER” as the input source.
2
Press OPTION.
3
Use the cursor keys to select “Preset” and press ENTER.
ENHANCER
LINK
ECO
MASTER
OUT
2
-
R
es
Hi
YPAO
VOL.
A
-
DRC
SLEEP
STEREO
PARTY
TUNED
ZONE
3 B2 A
FPR
SL
SW
SR
SBL SB SBR
FPL
MUT E V IRT UAL
VOL .
Preset
4
Use the cursor keys (q/w) to select “CLEAR”.
5
Use the cursor keys (e/r) to select a preset station to be cleared
and press ENTER.
ENHANCER
LINK
ECO
MASTER
OUT
2
-
R
es
Hi
YPAO
VOL.
A
-
DRC
SLEEP
PARTY
ZONE
3 B2 A
MUT E V IRT UAL
FPR
SBL SB SBR
FPL
VOL .
SL
SW
SR
STEREO
TUNED
01:FM 98.50MHz
Preset station to be cleared
If the preset station is cleared, “Cleared” appears and then the next in-use
preset number is displayed.
01:Cleared
6
Repeat step 5 until all desired preset stations are cleared.
7
To exit from the menu, press OPTION.
En
40
Radio Data System tuning
(U.K. and Europe models only)
Radio Data System is a data transmission system used by FM stations in many
countries. The unit can receive various types of Radio Data System data, such as
“Program Service”, “Program Type”, “Radio Text
” and “Clock Time”, when it is tuned
into a Radio Data System broadcasting station.
n
Displaying the Radio Data System information
1
Tune into the desired Radio Data System broadcasting station.
Note
We recommend using “Auto Preset” to tune into the Radio Data System broadcasting stations
(p.38).
2
Press INFO repeatedly to select between the various display
items.
ENHANCER
LINK
ECO
MASTER
OUT
2
-
R
es
Hi
YPAO
VOL.
A
-
DRC
SLEEP
PARTY
ZONE
3 B2 A
MUT E V IRT UAL
FPR
SBL SB SBR
FPL
VOL .
SL
SW
SR
STEREO
TUNED
Program Type
Item name
About 3 seconds after a display item is selected, its corresponding
information appears.
ENHANCER
LINK
ECO
MASTER
OUT
2
-
R
es
Hi
YPAO
VOL.
A
-
DRC
SLEEP
PARTY
ZONE
3 B2 A
MUT E V IRT UAL
FPR
SBL SB SBR
FPL
VOL .
SL
SW
SR
STEREO
TUNED
CLASSICS
Information
Program Service
Program service name
Program Type
Current program type
Radio Text
Information on the current program
Clock Time
Current time
DSP Program
Sound mode name
Audio Decoder
Decoder name
Frequency
Frequency
Note
“Program Service”, “Program Type”, “Radio Text”, and “Clock Time” are not displayed if the radio
station does not provide the Radio Data System service.
n
Receiving traffic information automatically
When “TUNER” is selected as the input source, the unit automatically receives traffic
information. To enable this function, follow the procedure below to set the traffic
information station.
1
When “TUNER” is selected as the input source, press OPTION.
2
Use the cursor keys to select “Traffic Program” (TrafficProgram)
and press ENTER.
The traffic information station search will start in 5 seconds. Press ENTER
again to start the search immediately.
Note
To search upward/downward from the current frequency, press the cursor keys (q/w) while
“READY” is displayed.
To cancel the search, press RETURN.
Texts in parentheses denote indicators on the front display.
The following screen appears for about 3 seconds when the search
finishes.
ENHANCER
LINK
ECO
MASTER
OUT
2
-
R
es
Hi
YPAO
VOL.
A
-
DRC
SLEEP
PARTY
ZONE
3 B2 A
MUT E V IRT UAL
FPR
SBL SB SBR
FPL
VOL .
SL
SW
SR
STEREO
TUNED
TP FM101.30MHz
Traffic information station (frequency)
Note
“TP Not Found” appears for about 3 seconds when no traffic information stations are found.
En
41
Playing back music stored on a Bluetooth® device
You can play back music files stored on a Bluetooth device (such as smartphones) on
the unit. Also, you can enjoy audio played back on the unit using Bluetooth speakers/
headphones.
Please also refer to the owner’s manual of your Bluetooth device.
Bluetooth device
(such as smartphones)
The unit
Bluetooth speakers/headphones
The unit
Note
The Bluetooth device must support A2DP.
To use the BLUETOOTH function, set “Bluetooth” (p.64) in the “Setup” menu to “On”.
You cannot make Bluetooth connections to a Bluetooth device (such as smartphones) and Bluetooth
speakers/headphones at the same time.
Connecting a Bluetooth® device (pairing)
When connecting a Bluetooth device to the unit for the first time, a pairing operation is
required. Pairing is an operation that registers the Bluetooth devices with each other
beforehand. Once pairing has been completed, subsequent reconnection will be easy
even after the Bluetooth connection is disconnected.
1
Press BLUETOOTH to select “Bluetooth” as the input source.
2
Hold down MEMORY on the front panel or the remote control for
more than 3 seconds.
“Searching…” appears on the front display.
Note
You can also use the “Option” menu to pair a Bluetooth device. Press OPTION, and then use the
cursor keys to select “Pairing
”.
If another Bluetooth device is already connected, disconnect the Bluetooth connection before
you perform a pairing operation.
To cancel pairing, press MEMORY.
3
Turn on the Bluetooth function on your device.
4
From the Bluetooth device list on your device, select “*******
Yamaha” (*******: model name of the unit).
After pairing has been completed and the unit is connected to the
Bluetooth device, “
Connected” appears on the front display. While a
Bluetooth connection is established, the Bluetooth indicators light up.
ENHANCER
LINK
ECO
MASTER
OUT
2
-
R
es
Hi
YPAO
VOL.
A
-
DRC
SLEEP
PARTY
ZONE
3 B2 A
MUT E V IRT UAL
SBL SB SBR
FPRFPL
STEREO
TUNED
VOL .
SL
SW
SR
Connected
Note
If you are prompted to input a passkey during a pairing procedure, input the numerals “0000”.
Complete a pairing procedure within 30 seconds.
If no Bluetooth devices are found, “Not found” appears.
En
42
Playback of Bluetooth® device contents
Connect a paired Bluetooth device and start playback. Check the following
beforehand:
Pairing has been completed.
Bluetooth function on the Bluetooth device is turned on.
1
Operate the Bluetooth device to establish a Bluetooth connection.
Select the model name of the unit from the Bluetooth device list on your
device.
When a connection is established, the unit’s input source automatically
switches to “
Bluetooth”.
Note
If you do not want the input source to switch automatically when a connection is established, set
“Input Interlock” (
p.47) to “Off” in the “Option” menu.
You can operate the unit to search and connect the Bluetooth device (only the most recently
connected device). In that case, follow one of the procedures below.
Switch the input source to “Bluetooth”.
Press ENTER while the input source is “Bluetooth”. Otherwise, press OPTION and use the
cursor keys to select “Connect”.
If you cannot connect the device, please perform pairing again.
2
Operate the Bluetooth device to play back music.
Note
You cannot operate the unit to select or play back music, or display informations such as song
names.
Follow one of the procedures below to disconnect a Bluetooth connection.
Perform the disconnect operation on the Bluetooth device.
Press ENTER.
Press OPTION and use the cursor keys to select “Disconnect”.
Switch the unit's input source to other than “Bluetooth”.
Press the SETUP key, then use the cursor keys to select "Bluetooth", then "Disconnect".
Enjoying audio using Bluetooth® speakers/
headphones
Follow the procedure below to establish a Bluetooth connection between Bluetooth
speakers/headphones and the unit.
1
Use the input selection keys on the remote control to select an
input source.
Select an input source other than Bluetooth.
2
Press SETUP.
3
Use the cursor keys to select “Bluetooth” and press ENTER.
4
Use the cursor keys to set “Bluetooth” to “On”, and then set
Transmitter” to “On” in the same way.
5
Use the cursor keys to select “Device Search” to search the
Bluetooth devices.
The list of Bluetooth devices is displayed.
6
Select the Bluetooth speakers/headphones to be connected with
the unit and press ENTER.
When the connection process finishes, audio played back on the unit will
be reproduced from the Bluetooth speakers/headphones.
Note
If the desired Bluetooth device is not displayed on the list, set the Bluetooth device to the pairing
mode and then select “
Device Search”.
Follow one of the procedures below to terminate the Bluetooth connection.
Perform the disconnect operation on the Bluetooth speakers/headphones.
Press the SETUP key, then use the cursor keys to select "Bluetooth", then "Transmitter", and
then "Off".
En
43
Item Function Page
Repeat
(Repeat)
Configures the repeat setting for the USB storage
device.
p.46
Pairing
(Pairing)
Performs a pairing operation between the unit and
your Bluetooth device.
p.42
Connect/Disconnect (Connect/
Disconnect)
Connects/disconnects the Bluetooth device. p.42
Input Interlock (Interlock)
Sets whether the input source automatically switches
to "Bluetooth" when a Bluetooth connection is
established.
p.43
n
Input Select (Input Select)
Switches the input source. Press ENTER to switch to the selected input source.
n
Tone Control (Tone Control)
Adjusts the level of high-frequency range (Treble) and low-frequency range (Bass)
individually.
Choices
Treble (Treble), Bass (Bass)
Setting range
-6.0 dB to 0.0 dB to +6.0 dB (0.5 dB increments)
Note
When both “Treble” and “Bass” are 0.0 dB, “Bypass” appears.
You can also adjust the tone with the front panel controls. Press TONE CONTROL to select “Treble” or
“Bass”, then press PROGRAM to make an adjustment.
If you set an extreme value, sounds may not match those from other channels.
n
DSP/Surround (DSP/Surround)
Configures the sound field program and surround settings.
DSP Level (DSP Level)
Adjusts the sound field effect level.
Setting range
-6 dB to
0 dB to +3 dB (1 dB increments)
Adaptive DRC (A.DRC)
Sets whether the dynamic range (from maximum to minimum) is automatically
adjusted when the volume level is adjusted. When it is set to “On”, it is useful for
listening to playback at a low volume at night.
Settings
On (On) Automatically adjusts the dynamic range.
Off (Off) The dynamic range is not automatically adjusted.
If “On” is selected, the dynamic range becomes narrow at a low volume and wide
at a high volume.
Enhancer (Enhancer)
Enables/disables Compressed Music Enhancer (p.36).
Note
This setting is applied separately to each input source.
You can also use ENHANCER on the remote control to enable/disable Compressed Music Enhancer
(p.36).
Settings
Off (Off) Disables Compressed Music Enhancer.
On (On) Enables Compressed Music Enhancer.
Default
Bluetooth, USB, TUNER: On (On)
Others: Off (Off)
En
48
n
Volume Trim (Volume Trim)
Fine-adjusts volume difference between input sources or subwoofer volume.
Input Trim (In.Trim)
Corrects volume differences between input sources. If you are bothered by volume
differences when switching between input sources, use this function to correct it.
Note
This setting is applied separately to each input source.
Setting range
-6.0 dB to
0.0 dB to +6.0 dB (0.5 dB increments)
Subwoofer Trim (SW.Trim)
Fine-adjusts the subwoofer volume.
Setting range
-6.0 dB to
0.0 dB to +6.0 dB (0.5 dB increments)
n
Lipsync (Lipsync)
Enables/disables the adjustment configured in “Lipsync” (p.59) in the “Setup” menu.
Note
This setting is applied separately to each input source.
Settings
Off (Off) Disables the “Lipsync” adjustment.
On (On) Enables the “Lipsync” adjustment.
n
Signal Info. (Signal Info.)
Displays information about the video/audio signal.
Choices
Format (FORMAT) Audio format of the input signal
Channel (CHANNEL)
The number of source channels in the input signal (front/surround/LFE)
For example, “3/2/0.1” means 3 front channels, 2 surround channels, and
LFE.
Sampling (SAMPLING) The number of samples per second of the input digital signal
Video In (VIDEO IN) Type and resolution of the input digital signal
Video Out
(VIDEO OUT
)
Type and resolution of the output digital signal
Note
To switch the information on the front display, press the cursor keys (q/w) repeatedly.
n
Audio In (Audio In)
Combines the video jack of the selected input source with an audio jack of others. For
example, use this function in the following cases.
Connecting a playback device that supports HDMI video output, but not HDMI
audio output
Input sources
HDMI 1-4, AV 1-3
Settigns
AV 1-3, AUDIO 1-2
Setup procedure
See “Changing the combination of video/audio input jacks” (p.21).
En
49
n
Video Out (Video Out)
Selects a video to be output with the selected audio source. For example, you can
watch the video while listening to the radio.
Input sources
AUDIO, TUNER, USB, Bluetooth, AUX
Settings
Off (Off) Does not output video.
HDMI 1-4, AV 1-3 Outputs video input through the corresponding video input jacks.
En
50
CONFIGURATIONS
Configuring various functions (Setup Menu)
You can configure the unit’s various function with the menu displayed on the TV
screen.
Note
Operations with TV screen are available only when your TV is connected to the unit via HDMI. If not, carry out
operations while viewing the front display.
1
Press SETUP.
2
Use the cursor keys to select a menu and press ENTER.
3
Use the cursor keys to select an item and press ENTER.
Note
To return to the previous screen during menu operations, press RETURN.
4
Use the cursor keys (e/r) to select a setting and press ENTER.
5
To exit from the menu, press SETUP.
En
51
Setup menu items
Menu Item Function Page
Speaker
Configuration
Subwoofer
Selects whether or not a subwoofer is connected. p.54
Front
Selects the size of the front speakers. p.54
Center
Selects whether or not a center speaker is connected and its size. p.54
Surround
Selects whether or not surround speakers are connected and their size. p.55
Crossover
Sets the lower limit of the low-frequency component that can be output from speakers whose size is set to “Small”. p.55
Subwoofer Phase
Sets the phase of the subwoofer. p.55
Extra Bass
Enables/disables Extra Bass. p.55
Virtual CINEMA FRONT
Selects whether to use the front 5-channel speaker (Virtual CINEMA FRONT) configuration. p.55
Distance
Sets the distance between each speaker and listening position. p.55
Level
Adjusts the volume of each speaker. p.56
Equalizer
Adjusts the tone with an equalizer. p.56
Test Tone
Enables/disables the test tone output. p.56
HDMI
HDMI Control
Enables/disables HDMI Control. p.57
Audio Output
Enables/disables the audio output from a TV. p.57
4K Upscaling
Enables/disables the upscaling function. p.57
TV Audio Input
Selects an audio input jack of the unit to be used for TV audio input. p.57
Standby Sync
Selects whether to use HDMI control to link the standby behavior of the TV and the unit. p.58
ARC
Enables/disables ARC. p.58
SCENE
Enables/disables SCENE link playback. p.58
Sound
DSP Parameter
Panorama
Enables/disables the broadening effect of the front sound field. p.59
Center Width
Adjusts the broadening effect of the center sound field. p.59
Dimension
Adjusts the difference in level between the front and surround sound fields. p.59
Center Image
Adjusts the center localization (broadening effect) of the front sound field. p.59
Lipsync
Select
Selects the method to adjust the delay between video and audio output. p.59
Adjustment
Adjusts the delay between video and audio output manually. p.60
Dialogue Dialogue Level
Adjusts the volume of dialogue sounds. p.60
Volume
Scale
Switches the scale of the volume display. p.60
Dynamic Range
Selects the dynamic range adjustment method for bitstream audio (Dolby Digital and DTS signals) playback. p.60
Max Volume
Sets the limit value of the volume. p.60
Initial Volume
Sets the initial volume for when this receiver is turned on. p.60
En
52
Menu Item Function Page
ECO
Auto Power Standby
Set the amount of time for the auto-standby function. p.61
ECO Mode
Enables/disables the eco mode (power saving mode). p.61
Function
Input Rename
Changes the input source name displayed on the front display. p.62
Input Skip
Set which input source is skipped when operating the INPUT key. p.63
Dimmer
Adjusts the brightness of the front display. p.63
Memory Guard
Prevents accidental changes to the settings. p.63
Remote Color Key
Set the unit's functions for the RED/GREEN/YELLOW/BLUE key of the remote control. p.64
Bluetooth
Bluetooth
Enables/disables the Bluetooth functions. p.64
Audio Receive
Disconnect
Terminates the Bluetooth connection between the Bluetooth device (such as smartphones) and the unit. p.42
Bluetooth Standby
Selects whether to enable/disable the function that turns on the unit from Bluetooth devices (Bluetooth standby). p.64
Audio Send
Transmitter
Enables/disables the Bluetooth audio transmitter function. p.65
Device Search
Searches available Bluetooth devices (speakers/headphones) when the unit is used as a Bluetooth audio transmitter. p.43
Language
Select an on-screen menu language. p.65
En
53
Speaker
Configures the speaker settings manually.
Note
Default settings are underlined.
n
Configuration
Configures the output characteristics of the speakers.
Note
When configuring the speaker size, as a general guideline, select “Large” if the woofer diameter of your
speaker is 16 cm (61/4”) or larger, or “Small
” if it is smaller than 16 cm (61/4”).
Subwoofer
Selects whether or not a subwoofer is connected.
Settings
Use
Select this option when a subwoofer is connected.
The subwoofer will produce LFE (low-frequency effect) channel audio
and low-frequency components from other channels.
None
Select this option when no subwoofer is connected.
The front speakers will produce LFE (low-frequency effect) channel
audio and low-frequency components from other channels.
Front
Selects the size of the front speakers.
Settings
Small
Select this option for small speakers.
The subwoofer will produce front channel low-frequency components
(configurable in “
Crossover”).
Large
Select this option for large speakers.
The front speakers will produce all of the front channel frequency
components.
Note
“Front” is automatically set to “Large” when “Subwoofer” is set to “None”.
Center
Selects whether or not a center speaker is connected and its size.
Settings
Small
Select this option for small speakers.
The subwoofer or front speakers will produce center channel low-
frequency components (configurable in “
Crossover”).
Large
Select this option for large speakers.
The center speaker will produce all of the center channel frequency
components.
None
Select this option when no center speaker is connected.
The front speakers will produce center channel audio.
En
54
Surround
Selects whether or not surround speakers are connected and their sizes.
Settings
Small
Select this option for small speakers.
The subwoofer or front speakers will produce surround channel low-
frequency components (configurable in “
Crossover”).
Large
Select this option for large speakers.
The surround speakers will produce all of the surround channel
frequency components.
None
Select this option when no surround speakers are connected.
The front speakers will produce surround channel audio. Virtual
CINEMA DSP works when you select a sound program.
Crossover
Sets the lower limit of the low-frequency components that can be output from a
speaker whose size is set to “
Small”. A frequency sound lower than the specified
value will be produced from the subwoofer or front speakers.
Settings
40 Hz, 60 Hz,
80 Hz, 90 Hz, 100 Hz, 110 Hz, 120 Hz, 160 Hz, 200 Hz
Note
If the volume and crossover frequency are adjustable on your subwoofer, set the volume to half and
crossover frequency to maximum.
Subwoofer Phase
Sets the phase of the subwoofer. When the bass sound is lacking or unclear,
switch the subwoofer phase.
Settings
Normal Does not reverse the subwoofer phase.
Reverse Reverses the subwoofer phase.
Extra Bass
Enables/disables Extra Bass. When Extra Bass is enabled, you can enjoy
enhanced bass sounds, regardless of the size of the front speakers and the
presence or absence of the subwoofer.
Settings
Off Disables Extra Bass.
On Enables Extra Bass.
Note
You can also use BASS on the remote control to enable/disable Extra Bass (p.36).
Virtual CINEMA FRONT
Selects whether to use the front 5-channel speaker (Virtual CINEMA FRONT)
configuration.
Settings
Off Disables the front 5-channel speaker configuration.
On Enables the front 5-channel speaker configuration.
Note
Select “On” only when utilizing the Virtual CINEMA FRONT configuration (p.13).
This setting is not available when “Surround” is set to “None”.
n
Distance
Sets the distance between each speaker and listening position so that sounds from the
speakers reach the listening position at the same time. First, select the unit of distance
from “Meter” or “Feet”.
Choices
Front L, Front R, Center, Surround L, Surround R, Subwoofer
Setting range
0.30 m to 24.00 m (1.0 ft to 80.0 ft), 0.05 m (0.2 ft) increments
Default
Front L, Front R, Subwoofer: 3.00 m (10.0 ft)
Center: 2.60 m (8.6 ft)
Others: 2.40 m (8.0 ft)
En
55
n
Level
Adjusts the volume of each speaker.
Choices
Front L, Front R, Center, Surround L, Surround R, Subwoofer
Setting range
-10.0 dB to +10.0 dB (0.5 dB increments)
Default
Front L, Front R, Subwoofer: 0.0 dB
Others: -1.0 dB
n
Equalizer
Adjusts the tone with an equalizer.
EQ Select
Selects the type of equalizer to be used.
Settings
PEQ
Applies the parametric equalizer values obtained by the YPAO
measurement (
p.25).
GEQ
Select this option when you want to adjust the equalizer manually.
For details, see “Manual equalizer adjustment”.
Off Does not use the equalizer.
Note
“PEQ” is available only when the YPAO has been performed (p.25).
n
Manual equalizer adjustment
1
Set “EQ Select” to “GEQ”.
2
Use the cursor keys (q/w) to select “Channel” and the cursor
keys (e/r) to select the desired speaker channel.
3
Use the cursor keys (q/w) to select the desired band
(frequency) and the cursor keys (e/r) to adjust the gain.
Setting range
-6.0 dB to +6.0 dB
4
To exit from the menu, press SETUP.
n
Test Tone
Enables/disables the test tone output. Test tone output helps you to adjust the speaker
balance or equalizer while confirming its effect.
Settings
Off Does not output test tones.
On
Outputs test tones automatically when you adjust the speaker balance or
equalizer.
En
56
HDMI
Configures the HDMI settings.
Note
Default settings are underlined.
n
HDMI Control
Enables/disables HDMI Control (p.80).
Settings
Off Disables HDMI Control.
On
Enables HDMI Control.
Configure the settings in “TV Audio Input”, “Standby Sync”, “ARC”, and
“SCENE”.
Note
To use HDMI control, you need to perform the HDMI Control link setup (p.80) after connecting HDMI
Control-compatible devices.
n
Audio Output
Enables/disables the audio output from a TV connected to the HDMI OUT jack.
Settings
Off Disables the audio output from the TV.
On Enables the audio output from the TV.
Note
This setting is available only when “HDMI Control” is set to “Off”.
n
4K Upscaling
Enables/disables the upscaling function. When it is enabled, 1080p content is
displayed at 4K resolution.
Settings
Off Disables the upscaling function.
On Enables the upscaling function.
n
TV Audio Input
Selects an audio input jack of the unit to be used for TV audio input when “HDMI
Control” is set to “On”. The unit’s input source automatically switches to TV audio when
the TV input is switched to its built-in tuner.
Settings
AV 1–3, AUDIO 1–2
Default
AV 2
Note
When using ARC to input TV audio to the unit, you cannot use the input jacks selected here for connecting an
external device because the input will be used for TV audio input.
En
57
n
Standby Sync
Select whether to use HDMI control to link the unit's standby mode to the TV's power
when “HDMI Control
” is set to “On”.
Settings
Off Does not set the unit to standby mode when the TV is turned off.
On Sets the unit to standby mode when the TV is turned off.
Auto
Sets the unit to standby mode when the TV is turned off only when the unit
is receiving TV audio or HDMI signals.
n
ARC
Enables/disables ARC (p.19) when “HDMI Control” is set to “On”.
Settings
Off Disables ARC.
On Enables ARC.
Note
You do not need to change this setting normally. In case noises are produced from the speakers connected
to the unit because TV audio signals input to the unit via ARC are not supported by the unit, set “ARC” to “Off”
and use the TV’s speakers.
n
SCENE
Enables/disable SCENE link playback when “HDMI Control” is set to “On”.
When SCENE link playback is enabled, HDMI Control-compatible devices connected
to the unit via HDMI automatically works as follows, with a scene selection.
TV: turning on and displaying video from the playback device
Playback device: starting playback
Choices (SCENE keys)
BD / DVD, TV, CD, RADIO
Settings
Off Disables SCENE link playback for the selected SCENE key.
On Enables SCENE link playback for the selected SCENE key.
Default
BD / DVD, TV: On
CD, RADIO: Off
Note
SCENE link playback may not work properly due to the compatibility between devices. We recommend using
TV and playback devices from the same manufacturer so that HDMI Control works more effectively.
En
58
Sound
Configures the audio output settings.
Note
Default settings are underlined.
n
DSP Parameter
Configures the surround decoder settings.
Panorama
Enables/disables the broadening effect of the front sound field. When this function
is enabled, you can wrap front left/right channel sounds around the sound field
and generate a spacious sound field in combination with the surround sound field.
This setting is effective when “
DPL Music” is selected.
Settings
Off Disables the broadening effect of the front sound field.
On Enables the broadening effect of the front sound field.
Center Width
Adjusts the broadening effect of the center sound field. Higher to enhance the
broadening effect, and lower to reduce it (closer to center). This setting is effective
when “DPL Music” is selected.
Setting range
0 to 3 to 7
Dimension
Adjusts the difference in level between the front and surround sound fields. Higher
to strengthen the front sound field and lower to strengthen the surround sound
field. This setting is effective when “
DPL Music” is selected.
Setting range
-3 to
0 to +3
Center Image
Adjusts the center localization (broadening effect) of the front sound field. Adjust
this higher to strengthen the center localization (less broadening effect) or lower to
weaken it (more broadening effect). This setting is effective when “
Neo:6 Music” is
selected.
Setting range
0.0 to
0.3 to 1.0
n
Lipsync
Adjusts the delay between video and audio output.
Note
You can enable/disable the Lipsync function by input sources in “Lipsync (Lipsync)” (p.49) in the “Option”
menu.
Select
Selects the method to adjust the delay between video and audio output.
Setting range
Manual
Select this option when you want to adjust the delay between video
and audio output manually.
Adjust the audio output timing in “Adjustment”.
Auto
Adjusts the delay between video and audio output automatically when
a TV that supports an automatic lipsync function is connected to the
unit via HDMI.
If necessary, you can fine-adjust the audio output timing in
“Adjustment”.
Note
“Select” is automatically set to “Manual” depending on the TV connected to the unit.
En
59
Adjustment
Adjusts the delay between video and audio output manually when “Select” is set to
“Manual
”. You can fine-adjust the audio output timing when “Select” is set to
“Auto”.
Setting range
0 ms to 500 ms (1 ms increments)
n
Dialogue
Adjusts the volume of dialogue sounds.
Dialogue Level
Adjusts the volume of the center orientation sounds such as dialogue.
Setting range
0 to 3 (higher to strengthen)
n
Volume
Configures the volume settings.
Scale
Switches the scale of the volume display.
Settings
dB Displays the volume in the “dB” unit.
0-97 Displays the volume in the numeric value (0.5 to 97.0).
Dynamic Range
Selects the dynamic range adjustment method for bitstream audio (Dolby Digital
and DTS signals) playback.
Settings
Maximum Produces audio without adjusting the dynamic range.
Standard Optimizes the dynamic range for regular home use.
Min/Auto
Sets the dynamic range for clear sound even at night or at low
volumes.
When playing back Dolby TrueHD signals, the dynamic range is
automatically adjusted based on the input signal information.
Max Volume
Sets the limit value of the volume.
Setting range
-30.0 dB to +15.0 dB (5.0 dB increments),
+16.5 dB [50.0 to 95.0 (5.0 increments),
97.0]
Initial Volume
Sets the initial volume when the receiver is turned on.
Settings
Off
Sets the level to the volume level of the unit when it last entered
standby mode.
Mute Sets the unit to mute the audio output.
-80.0 dB to +16.5 dB
(0.5 dB increments)
[0.5 to 97.0
(0.5 increments)]
Sets the level to the specified volume level.
En
60
ECO
Configures the power supply settings.
Note
Default settings are underlined.
n
Auto Power Standby
Set the amount of time for the auto-standby function.
Settings
Off Does not set the unit to standby mode automatically.
20 minutes
Sets the unit to standby mode when you have not operated the unit and
the unit has not detected any input signal for the specified time.
2 hours, 4 hours,
8 hours, 12 hours
Sets the unit to standby mode when you have not operated the unit for the
specified time.
Default
U.K. and Europe models: 20 minutes
Other models: Off
Note
Just before the unit enters standby mode, “AutoPowerStdby” appears and then countdown starts in the front
display.
n
ECO Mode
You can reduce the unit’s power consumption by setting the eco mode to “On”. After
setting, be sure to press ENTER to restart the unit.
When the eco mode is enabled, you can reduce the unit’s power consumption.
Settings
Off Disables the eco mode.
On Enables the eco mode.
Note
When “ECO Mode” is set to “On”, the front panel display may become dark.
If you want to play audio at high volume, set “ECO Mode” to “Off”.
En
61
Function
Configures the functions that make the unit easier to use.
Note
Default settings are underlined.
n
Input Rename
Changes the input source name displayed on the front display. You can also select a
name created by the Auto Rename function.
Input sources
HDMI 1-4, AUDIO 1-2, AV 1-3, USB, Bluetooth, AUX
Default
HDMI 1-4: Auto
Others: Manual (For USB, Bluetooth, AUX only “Manual” can be selected.)
Procedure to rename automatically
1
Use the cursor keys (q/w) to select an input source to be
renamed.
2
Use the cursor keys (e/r) to select “Auto”.
The unit creates a name automatically according to the connected
device.
3
To change another input source, repeat steps 1 to 2.
4
To exit from the menu, press SETUP.
Note
During selecting “Auto”, the created name is saved even after the device connection is terminated. To
reset to the default setting, switch the setting to “Manual
” at once and then set it again to “Auto”.
Procedure to rename manually
1
Use the cursor keys (q/w) to select an input source to be
renamed.
2
Use the cursor keys (e/r) to select “Manual” and press
ENTER.
The edit screen is displayed.
3
Use the cursor keys and ENTER key to edit the name, and then
select “OK” and press ENTER.
Note
To cancel the entry, select “CANCEL”.
If you select "RESET", the default input name will be inserted into the editing area.
4
To change another input source name, repeat steps 1 to 4.
5
To exit from the menu, press SETUP.
En
62
n
Input Skip
Set which input source is skipped when operating the INPUT key.
You can select the desired input source quickly by using this function.
Input sources
HDMI 1-4, AUDIO 1-2, AV 1-3, TUNER, USB, Bluetooth, AUX
Settings
Off Does not skip the selected input source.
On Skips the selected input source.
n
Dimmer
Adjusts the brightness of the front display.
Setting range
-4 to
0 (higher to brighten)
Note
The front display may become dark when “ECO Mode” (p.61) is set to “On”.
n
Memory Guard
Prevents accidental changes to the settings.
Settings
Off Does not protect the settings.
On Protects the settings until “Off” is selected.
Note
When “Memory Guard” is set to “On”, the lock icon (o) is displayed on the menu screen.
En
63
n
Remote Color Key
Set the unit's functions for the RED/GREEN/YELLOW/BLUE key of the remote control.
Settings
Default
Assigns the functions of playback devices connected to the unit with an
HDMI cable.
Input
Assigns the unit's input sources to each key. The assigned input sources
can be set separately.
Input sources
HDMI 1-4, AUDIO 1-2, AV 1-3, TUNER, USB, Bluetooth, AUX
Default
RED: HDMI2, GREEN: HDMI4, YELLOW: AV 2, BLUE: AUX
Program
Assigns the functions of sound mode to each key.
RED: MOVIE
GREEN: MUSIC
YELLOW: STEREO
BLUE: SUR.DECODE
For example, if you press the RED key repeatedly, you can select your
favorite sound program from the sound programs (MOVIE
) (p.33) suitable
for the video source.
Bluetooth
Configures the Bluetooth settings.
n
Bluetooth
Enables/disables the Bluetooth function (p.42).
Settings
Off Disables the Bluetooth function.
On Enables the Bluetooth function.
n
Audio Receive
Configures the Bluetooth settings when the unit is used as the Bluetooth audio
receiver.
Bluetooth Standby
Selects whether to enable/disable the function that turns on the unit from Bluetooth
devices (Bluetooth standby). If this function is set to “On”, the unit automatically
turns on when a connect operation is performed on the Bluetooth device.
Settings
Off Disables the Bluetooth standby function.
On
Enables the Bluetooth standby function.
(The unit consumes more power than when “
Off” is selected.)
En
64
n
Audio Send
Configures the Bluetooth settings when the unit is used as the Bluetooth audio
transmitter.
Transmitter
Enables/disables the Bluetooth audio transmitter function.
When this function is enabled, you can enjoy audio played back on the unit using
Bluetooth speakers/headphones (
p.43).
Settings
Off Disables the Bluetooth audio transmitter function.
On Enables the Bluetooth audio transmitter function.
Language
Select an on-screen menu language.
Note
Default settings are underlined.
Settings
English English
日本語 Japanese
Français French
Deutsch German
Español Spanish
Русский Russian
Italiano Italian
中文 Chinese
Note
The information on the front display is provided in English only.
En
65
Problem Cause Remedy
The unit cannot be controlled using the remote
control.
The unit is out of the operating range. Use the remote control within the operating range (p.4).
The batteries are weak. Replace with new batteries.
The unit’s remote control sensor is exposed to direct sunlight or
strong lighting.
Adjust the lighting angle, or reposition the unit.
The remote control IDs of the unit and the remote control are not
identical.
Change the remote control ID of the unit or the remote control (p.67).
Cannot select the desired input source even if
“INPUT” is pressed.
The function which skips some input sources is set. Set “Input Skip” of the desired input source in the “Setup” menu to “Off” (p.63).
The RED/GREEN/YELLOW/BLUE keys of the
remote control do not operate.
The device which is connected to the unit via HDMI does not
support the operation of the RED/GREEN/
YELLOW/BLUE keys.
Use a device which supports the operation of the RED/GREEN/YELLOW/BLUE
keys.
The settings of the RED/GREEN/YELLOW/BLUE keys of the unit's
remote control have been changed.
Set the “Remote Color Key” settings in the “Setup” menu to “Default” (p.64).
Audio
Problem Cause Remedy
No sound.
Another input source is selected. Select an appropriate input source with the input selection keys.
Signals that the unit cannot reproduce are being input.
Some digital audio formats cannot be played back on the unit. To check the
audio format of the input signal, use “Signal Info.” in the “Option” menu (
p.49).
The cable connecting the unit and playback device is defective. If there is no problem with the connection, replace with another cable.
The volume cannot be increased.
The maximum volume is set. Use “Max Volume” in the “Setup” menu to adjust the maximum volume (p.60).
A device connected to the output jacks of the unit is not turned on. Turn on all devices connected to the output jacks of the unit.
No sound is coming from a specific speaker.
The playback source does not contain a signal for the channel. To check it, use “Signal Info.” in the “Option” menu (p.49).
The currently selected sound program/decoder does not use the
speaker.
To check it, select “5ch Stereo” (p.32).
Audio output of the speaker is disabled.
Perform YPAO (p.25) or use “Configuration” in the “Setup” menu to change the
speaker settings (p.54).
The volume of the speaker is set too low.
Perform YPAO (p.25) or use “Level” in the “Setup” menu to adjust the speaker
volume (
p.56).
The speaker cable connecting the unit and the speaker is
defective.
If there is no problem with the connection, replace with another speaker cable.
The speaker is malfunctioning.
To check it, replace with another speaker. If the problem persists, the unit may be
malfunctioning.
En
71
71

Hulp nodig? Stel uw vraag in het forum

Spelregels
1

Forum

Yamaha-HTR-3071-(RX-V-383)
  • Ik heb een Yamaha HTR-3071 (RX-V 383) receiver. Bij het luisteren naar de radio hoor ik steeds een bromgeluid van de achtergrond muziek,voornamelijk de bassen, voornamelijk bij muziek en niet bij ste,mmen. Weet iemand waar dat aanligt en wat ik er aan kan doen. Gesteld op 27-1-2021 om 14:22

    Reageer op deze vraag Misbruik melden
  • Ik heb de Yamaha 383 receiver en het werkt goed. Ik heb echter ook nog een platenspeler, een cassettedeck en een cd wisselaar. Op mijn oude audio installatie had ik deze ook aangesloten en het werkte goed. Ik had de drie genoemde apparaten dmv een splitterjte aangesloten waar de drie in konden en waar een draad uitging met een wit en een rood kabeltje met tulpstekkertje. Analoog dus. Hetzelfde wil ik bij de Yamaha ook. De drie apparaten zitten in het splitterjte en als ik de ene draaf met het rode en witte stekkertje in de achterkant van de receiver bevestig, krijg ik geen signalen van een van de apparaten binnen. Ik ben maar een simpele leek, dus mijn terechte vraag is wat ik fout doe of misschien vergeet? Ik ben 71 jaar en wil die drie apparaten gewoon blijven gebruiken. Ik hoop dat mijn vraagstelling duidelijk is. Graag reactie Gesteld op 20-12-2020 om 15:12

    Reageer op deze vraag Misbruik melden

Misbruik melden

Gebruikershandleiding.com neemt misbruik van zijn services uitermate serieus. U kunt hieronder aangeven waarom deze vraag ongepast is. Wij controleren de vraag en zonodig wordt deze verwijderd.

Product:

Bijvoorbeeld antisemitische inhoud, racistische inhoud, of materiaal dat gewelddadige fysieke handelingen tot gevolg kan hebben.

Bijvoorbeeld een creditcardnummer, een persoonlijk identificatienummer, of een geheim adres. E-mailadressen en volledige namen worden niet als privégegevens beschouwd.

Spelregels forum

Om tot zinvolle vragen te komen hanteren wij de volgende spelregels:

Belangrijk! Als er een antwoord wordt gegeven op uw vraag, dan is het voor de gever van het antwoord nuttig om te weten als u er wel (of niet) mee geholpen bent! Wij vragen u dus ook te reageren op een antwoord.

Belangrijk! Antwoorden worden ook per e-mail naar abonnees gestuurd. Laat uw emailadres achter op deze site, zodat u op de hoogte blijft. U krijgt dan ook andere vragen en antwoorden te zien.

Abonneren

Abonneer u voor het ontvangen van emails voor uw Yamaha HTR-3071 (RX-V 383) bij:


U ontvangt een email met instructies om u voor één of beide opties in te schrijven.


Ontvang uw handleiding per email

Vul uw emailadres in en ontvang de handleiding van Yamaha HTR-3071 (RX-V 383) in de taal/talen: Engels als bijlage per email.

De handleiding is 17,62 mb groot.


U ontvangt de handleiding per email binnen enkele minuten. Als u geen email heeft ontvangen, dan heeft u waarschijnlijk een verkeerd emailadres ingevuld of is uw mailbox te vol. Daarnaast kan het zijn dat uw internetprovider een maximum heeft aan de grootte per email. Omdat hier een handleiding wordt meegestuurd, kan het voorkomen dat de email groter is dan toegestaan bij uw provider.

Stel vragen via chat aan uw handleiding

Stel uw vraag over deze PDF

Andere handleiding(en) van Yamaha HTR-3071 (RX-V 383)

Yamaha HTR-3071 (RX-V 383) Gebruiksaanwijzing - Nederlands - 88 pagina's


Uw handleiding is per email verstuurd. Controleer uw email

Als u niet binnen een kwartier uw email met handleiding ontvangen heeft, kan het zijn dat u een verkeerd emailadres heeft ingevuld of dat uw emailprovider een maximum grootte per email heeft ingesteld die kleiner is dan de grootte van de handleiding.

Er is een email naar u verstuurd om uw inschrijving definitief te maken.

Controleer uw email en volg de aanwijzingen op om uw inschrijving definitief te maken

U heeft geen emailadres opgegeven

Als u de handleiding per email wilt ontvangen, vul dan een geldig emailadres in.

Uw vraag is op deze pagina toegevoegd

Wilt u een email ontvangen bij een antwoord en/of nieuwe vragen? Vul dan hier uw emailadres in.


Info