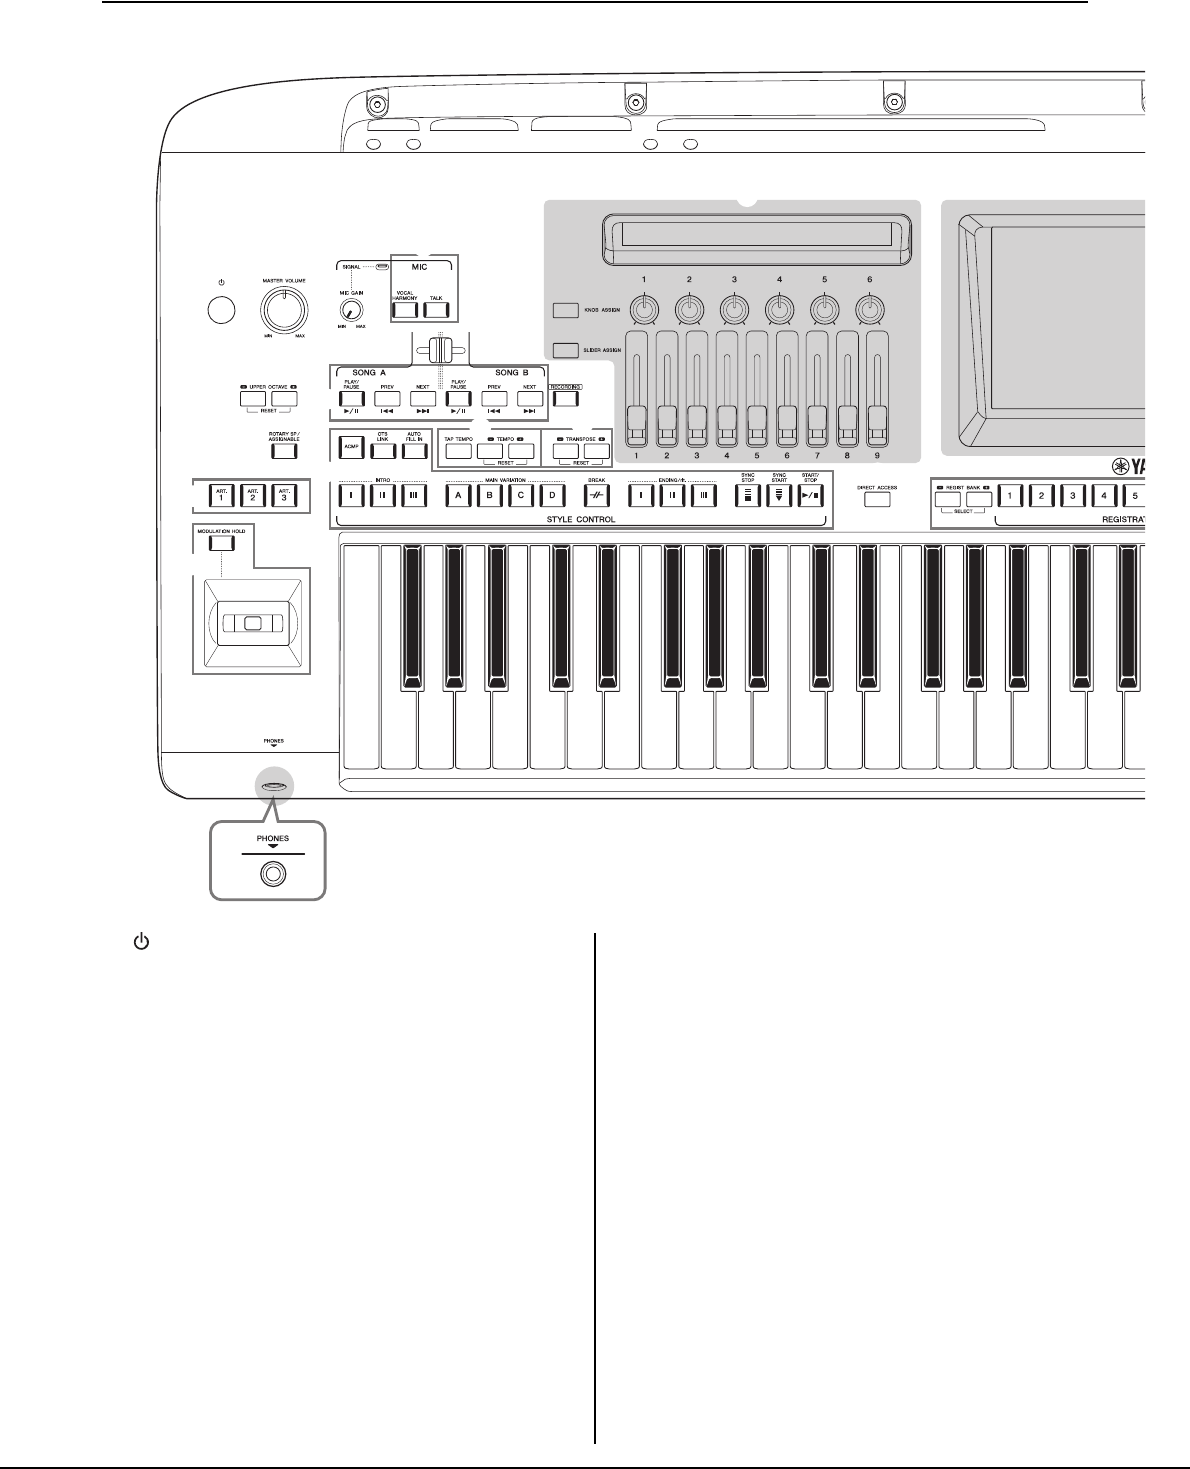
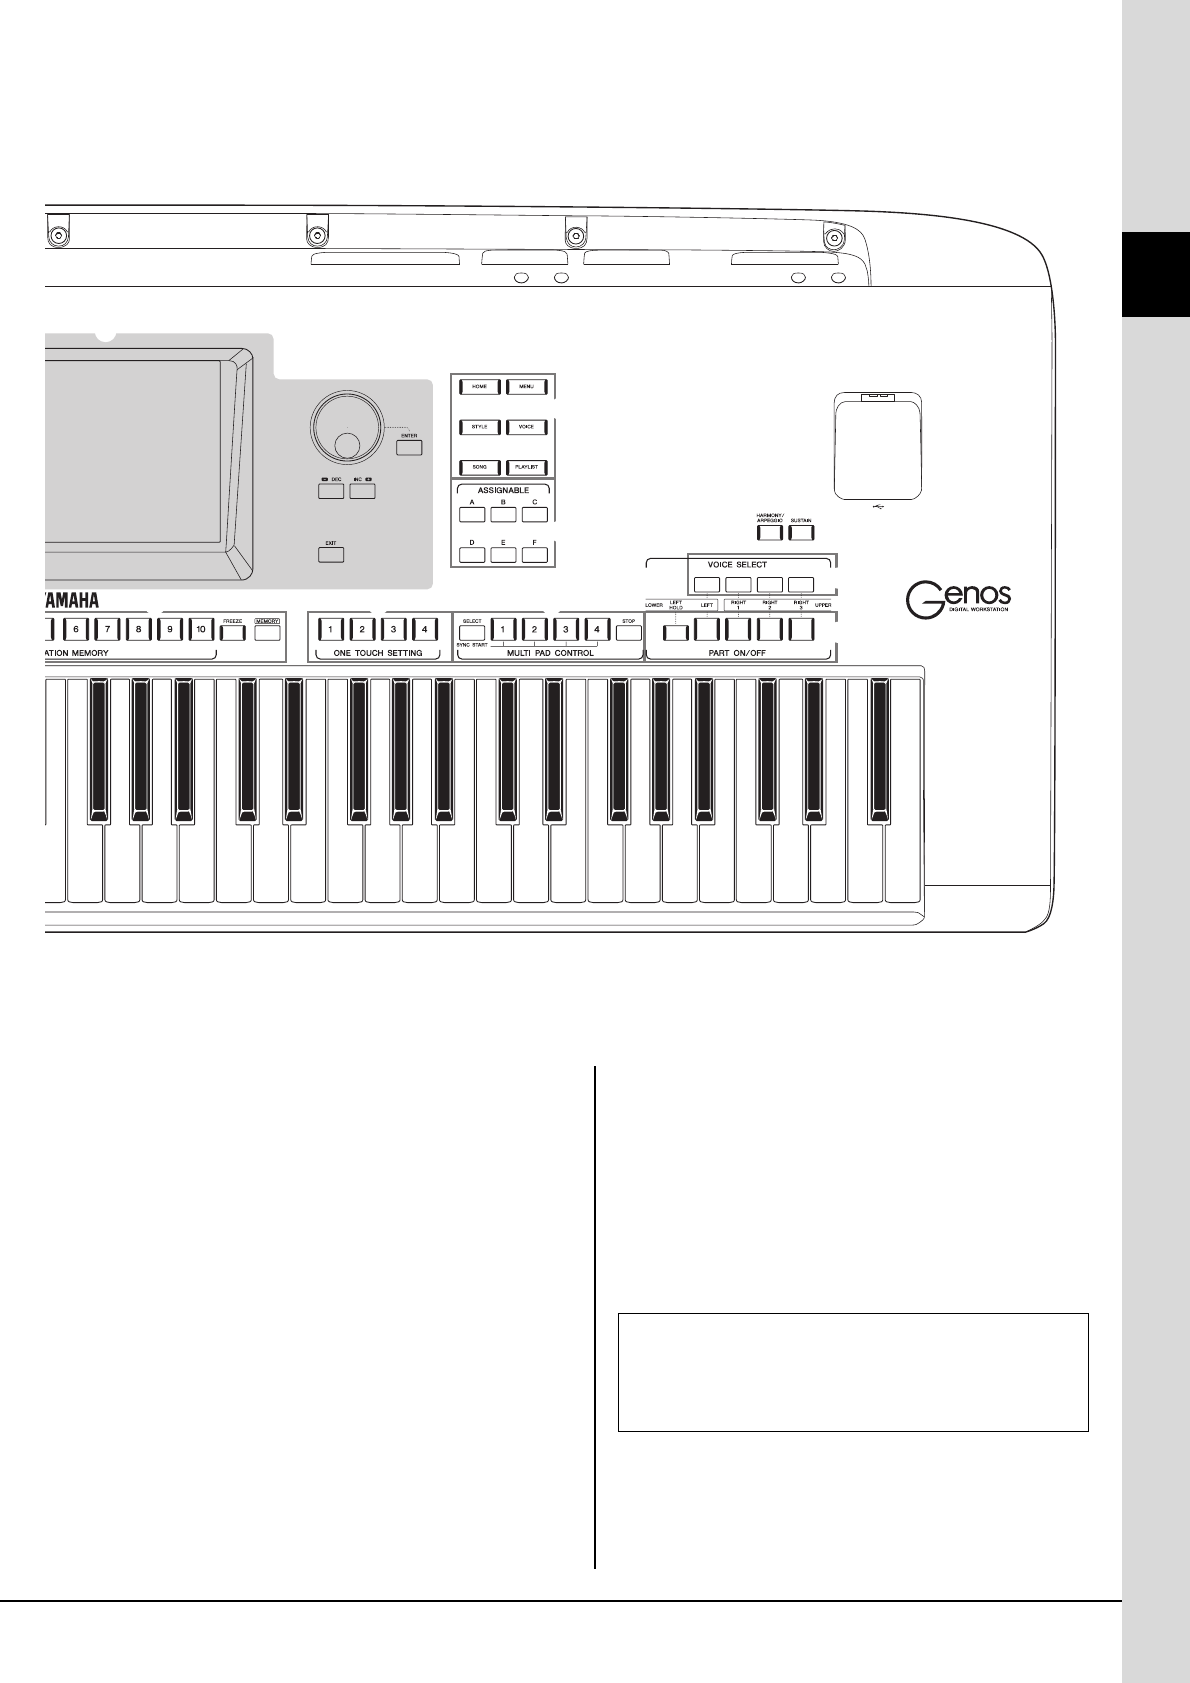
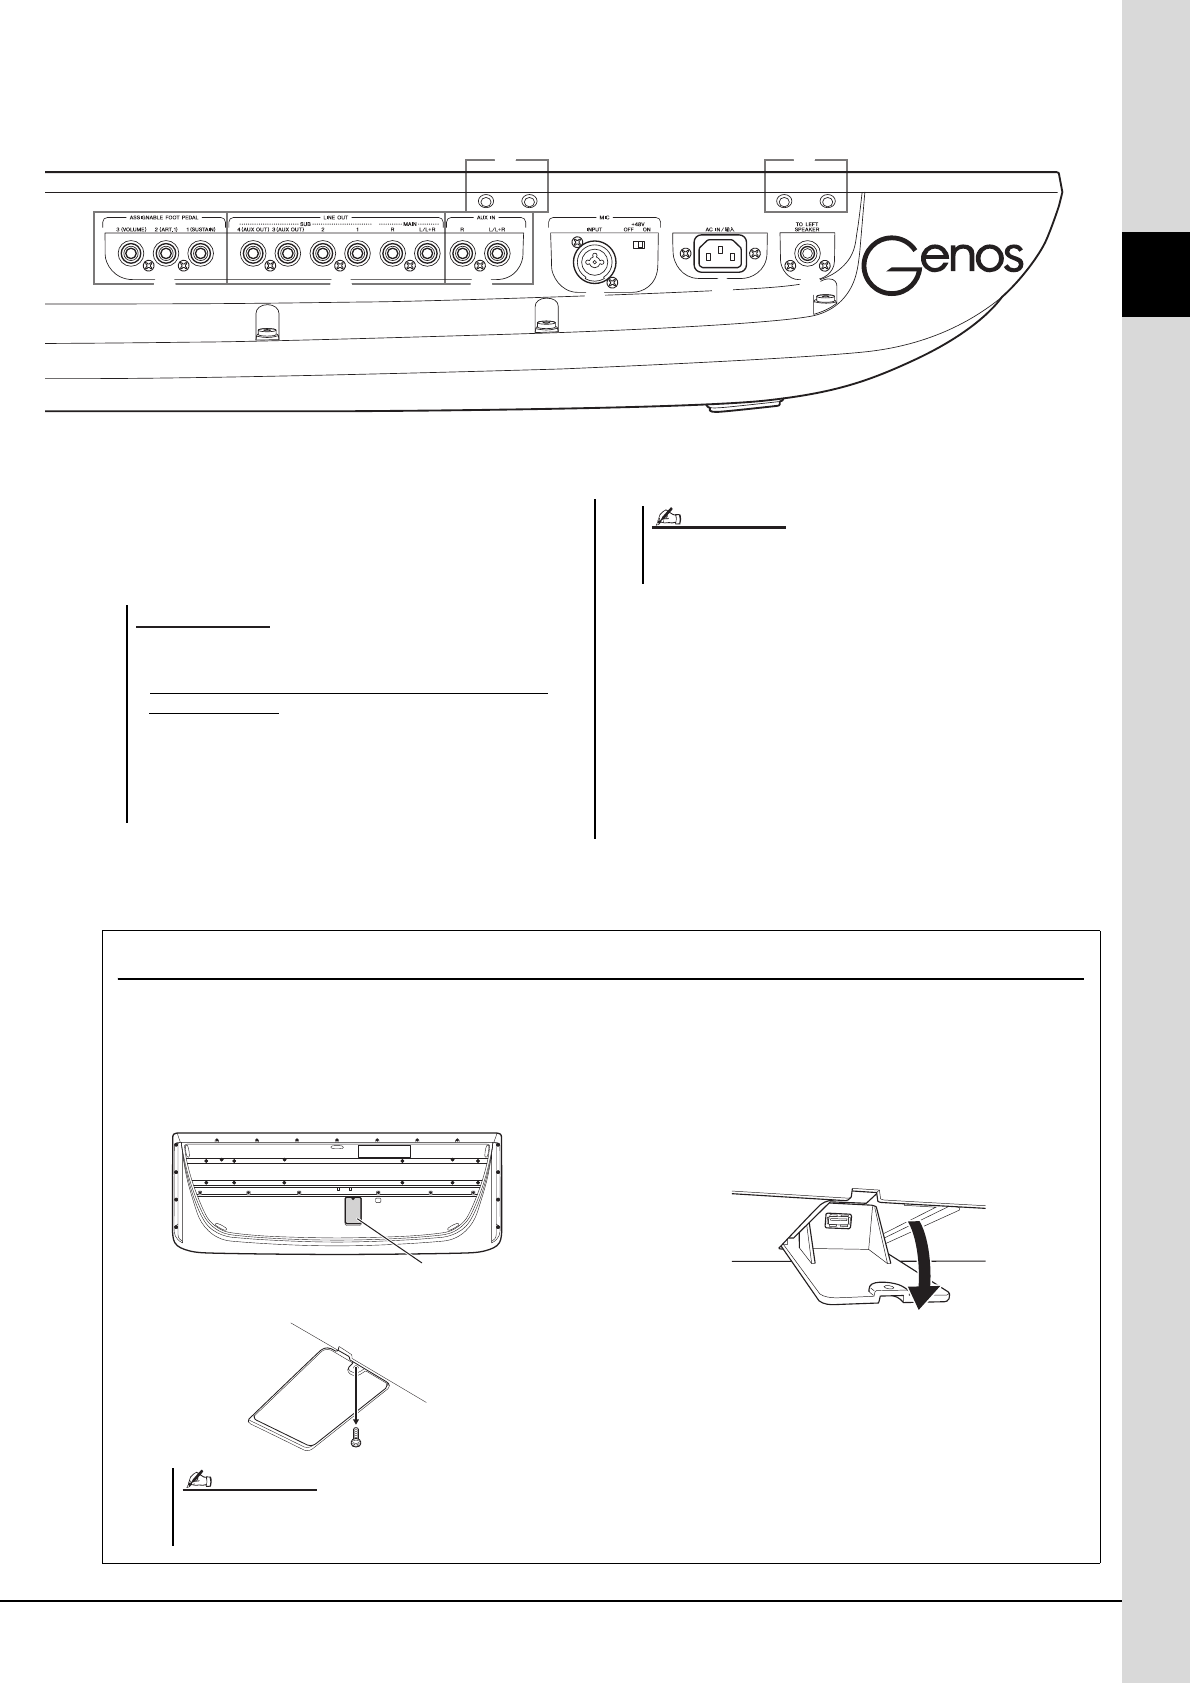
Before using the instrument, be sure to read “PRECAUTIONS” on page 5.
2Genos Owner’s Manual
SPECIAL MESSAGE SECTION
PRODUCT SAFETY MARKINGS: Yamaha electronic
products may have either labels similar to the graphics
shown below or molded/stamped facsimiles of these graph-
ics on the enclosure. The explanation of these graphics
appears on this page. Please observe all cautions indicated
on this page and those indicated in the safety instruction sec-
tion.
See bottom of Keyboard enclosure for graphic symbol markings.
The exclamation point within the equi-
lateral triangle is intended to alert the
user to the presence of important operat-
ing and maintenance (servicing) instruc-
tions in the literature accompanying the
product.
The lightning flash with arrowhead sym-
bol, within the equilateral triangle, is
intended to alert the user to the presence
of uninsulated “dangerous voltage”
within the product’s enclosure that may
be of sufficient magnitude to constitute a
risk of electrical shock.
IMPORTANT NOTICE: All Yamaha electronic products
are tested and approved by an independent safety testing
laboratory in order that you may be sure that when it is prop-
erly installed and used in its normal and customary manner,
all foreseeable risks have been eliminated. DO NOT modify
this unit or commission others to do so unless specifically
authorized by Yamaha. Product performance and/or safety
standards may be diminished. Claims filed under the
expressed warranty may be denied if the unit is/has been
modified. Implied warranties may also be affected.
SPECIFICATIONS SUBJECT TO CHANGE: The
information contained in this manual is believed to be cor-
rect at the time of printing. However, Yamaha reserves the
right to change or modify any of the specifications without
notice or obligation to update existing units.
ENVIRONMENTAL ISSUES: Yamaha strives to produce
products that are both user safe and environmentally
friendly. We sincerely believe that our products and the pro-
duction methods used to produce them, meet these goals. In
keeping with both the letter and the spirit of the law, we
want you to be aware of the following:
Battery Notice: This product MAY contain a small non-
rechargeable battery which (if applicable) is soldered in
place. The average life span of this type of battery is approx-
imately five years. When replacement becomes necessary,
contact a qualified service representative to perform the
replacement.
Warning: Do not attempt to recharge, disassemble, or
incinerate this type of battery. Keep all batteries away from
children. Dispose of used batteries promptly and as regu-
lated by applicable laws. Note: In some areas, the servicer is
required by law to return the defective parts. However, you
do have the option of having the servicer dispose of these
parts for you.
Disposal Notice: Should this product become damaged
beyond repair, or for some reason its useful life is consid-
ered to be at an end, please observe all local, state, and fed-
eral regulations that relate to the disposal of products that
contain lead, batteries, plastics, etc.
NOTICE: Service charges incurred due to lack of knowl-
edge relating to how a function or effect works (when the
unit is operating as designed) are not covered by the manu-
facturer’s warranty, and are therefore the owners responsi-
bility. Please study this manual carefully and consult your
dealer before requesting service.
NAME PLATE LOCATION: The graphic below indicates
the location of the name plate. The model number, serial
number, power requirements, etc., are located on this plate.
You should record the model number, serial number, and the
date of purchase in the spaces provided below and retain this
manual as a permanent record of your purchase.
Model _____________________________________
Serial No. __________________________________
Purchase Date______________________________
CAUTION
RISK OF ELECTRIC SHOCK
DO NOT OPEN
CAUTION: TO REDUCE THE RISK OF ELECTRIC SHOCK.
DO NOT REMOVE COVER (OR BACK).
NO USER-SERVICEABLE PARTS INSIDE.
REFER SERVICING TO QUALIFIED SERVICE PERSONNEL.
92-469- q(bottom)
Genos Owner’s Manual3
1. IMPORTANT NOTICE: DO NOT MODIFY THIS UNIT!
This product, when installed as indicated in the instructions con-
tained in this manual, meets FCC requirements. Modifications not
expressly approved by Yamaha may void your authority, granted by
the FCC, to use the product.
2. IMPORTANT: When connecting this product to accessories and/
or another product use only high quality shielded cables. Cable/s
supplied with this product MUST be used. Follow all installation
instructions. Failure to follow instructions could void your FCC
authorization to use this product in the USA.
3. NOTE: This product has been tested and found to comply with the
requirements listed in FCC Regulations, Part 15 for Class “B” digital
devices. Compliance with these requirements provides a reason-
able level of assurance that your use of this product in a residential
environment will not result in harmful interference with other elec-
tronic devices. This equipment generates/uses radio frequencies
and, if not installed and used according to the instructions found in
the users manual, may cause interference harmful to the operation
of other electronic devices. Compliance with FCC regulations does
* This applies only to products distributed by YAMAHA CORPORATION OF AMERICA.
not guarantee that interference will not occur in all installations. If
this product is found to be the source of interference, which can be
determined by turning the unit “OFF” and “ON”, please try to elimi-
nate the problem by using one of the following measures:
Relocate either this product or the device that is being affected by
the interference.
Utilize power outlets that are on different branch (circuit breaker or
fuse) circuits or install AC line filter/s.
In the case of radio or TV interference, relocate/reorient the
antenna. If the antenna lead-in is 300 ohm ribbon lead, change the
lead-in to co-axial type cable.
If these corrective measures do not produce satisfactory results,
please contact the local retailer authorized to distribute this type of
product. If you can not locate the appropriate retailer, please con-
tact Yamaha Corporation of America, Electronic Service Division,
6600 Orangethorpe Ave, Buena Park, CA90620
The above statements apply ONLY to those products distributed by
Yamaha Corporation of America or its subsidiaries.
FCC INFORMATION (U.S.A.)
FCC and IC Information
For U.S.A.
This transmitter must not be co-located or operated in conjunction with
any other antenna or transmitter.
For CANADA
This device complies with Industry Canada’s applicable licenceexempt
RSSs. Operation is subject to the following two conditions:
(1) This device may not cause interference; and
(2) This device must accept any interference, including interference
that may cause undesired operation of the device.
For U.S.A. and CANADA
FCC/IC RF Radiation Exposure Statement
This equipment complies with FCC/IC radiation exposure limits set
forth for an uncontrolled environment and meets the FCC radio
frequency (RF) Exposure Guidelines and RSS-102 of the IC radio
frequency (RF) Exposure rules. This equipment should be installed
and operated keeping the radiator at least 20cm or more away from
person’s body.
Information for users on collection and disposal of old equipment:
This symbol on the products, packaging, and/or accompanying documents means that used electrical and electronic products should not be
mixed with general household waste.
For proper treatment, recovery and recycling of old products, please take them to applicable collection points, in accordance with your
national legislation.
By disposing of these products correctly, you will help to save valuable resources and prevent any potential negative effects on human health
and the environment which could otherwise arise from inappropriate waste handling.
For more information about collection and recycling of old products, please contact your local municipality, your waste disposal service or
the point of sale where you purchased the items.
For business users in the European Union:
If you wish to discard electrical and electronic equipment, please contact your dealer or supplier for further information.
Information on Disposal in other Countries outside the European Union:
This symbol is only valid in the European Union. If you wish to discard these items, please contact your local authorities or dealer and ask for
the correct method of disposal.
(weee_eu_en_02)
(FCC DoC)
COMPLIANCE INFORMATION STATEMENT
(DECLARATION OF CONFORMITY PROCEDURE)
Responsible Party :Yamaha Corporation of America
Address :6600 Orangethorpe Ave., Buena Park, Calif.
90620
Telephone :714-522-9011
Type of Equipment :DIGITAL KEYBOARD
Model Name :Genos
This device complies with Part 15 of the FCC Rules.
Operation is subject to the following two conditions:
1)this device may not cause harmful interference, and
2)this device must accept any interference received including
interference that may cause undesired operation.
See user manual instructions if interference to radio reception is
suspected.
* This applies only to products distributed by
YAMAHA CORPORATION OF AMERICA.
(class B)
4Genos Owner’s Manual
The model number, serial number, power requirements, etc., may
be found on or near the name plate, which is at the bottom of the
unit. You should note this serial number in the space provided
below and retain this manual as a permanent record of your
purchase to aid identification in the event of theft.
Model No.
Serial No.
(bottom_en_01)
The above warning is located on the bottom of the unit.
Explanation of Graphical Symbols
The lightning flash with arrowhead symbol
within an equilateral triangle is intended to alert
the user to the presence of uninsulated “danger-
ous voltage” within the product’s enclosure that
may be of sufficient magnitude to constitute a
risk of electric shock to persons.
The exclamation point within an equilateral tri-
angle is intended to alert the user to the presence
of important operating and maintenance (servic-
ing) instructions in the literature accompanying
the product.
IMPORTANT SAFETY INSTRUCTIONS
1Read these instructions.
2Keep these instructions.
3Heed all warnings.
4Follow all instructions.
5Do not use this apparatus near water.
6Clean only with dry cloth.
7Do not block any ventilation openings. Install in
accordance with the manufacturer’s instructions.
8Do not install near any heat sources such as radiators,
heat registers, stoves, or other apparatus (including
amplifiers) that produce heat.
9Do not defeat the safety purpose of the polarized or
grounding-type plug. A polarized plug has two blades
with one wider than the other. A grounding type plug
has two blades and a third grounding prong. The wide
blade or the third prong are provided for your safety. If
the provided plug does not fit into your outlet, consult
an electrician for replacement of the obsolete outlet.
10Protect the power cord from being walked on or pinched
particularly at plugs, convenience receptacles, and the
point where they exit from the apparatus.
11Only use attachments/accessories specified by the
manufacturer.
12Use only with the cart, stand,
tripod, bracket, or table specified
by the manufacturer, or sold with
the apparatus. When a cart is
used, use caution when moving
the cart/apparatus combination
to avoid injury from tip-over.
13Unplug this apparatus during
lightning storms or when unused for long periods of
time.
14Refer all servicing to qualified service personnel.
Servicing is required when the apparatus has been
damaged in any way, such as power-supply cord or plug
is damaged, liquid has been spilled or objects have
fallen into the apparatus, the apparatus has been
exposed to rain or moisture, does not operate normally,
or has been dropped.
(UL60065_03)
CAUTION: TO REDUCE THE RISK OF
ELECTRIC SHOCK, DO NOT REMOVE
COVER (OR BACK). NO USER-SERVICEABLE
PARTS INSIDE. REFER SERVICING TO
QUALIFIED SERVICE PERSONNEL.
CAUTION
RISK OF ELECTRIC SHOCK
DO NOT OPEN
WARNING
TO REDUCE THE RISK OF FIRE OR ELECTRIC SHOCK, DO NOT EXPOSE THIS APPARATUS TO RAIN OR MOISTURE.
OBSERVERA!
Apparaten kopplas inte ur växelströmskällan (nätet) så länge som
den ar ansluten till vägguttaget, även om själva apparaten har
stängts av.
ADVARSEL: Netspændingen til dette apparat er IKKE afbrudt,
sålænge netledningen sidder i en stikkontakt, som er tændt —
også selvom der er slukket på apparatets afbryder.
VAROITUS: Laitteen toisiopiiriin kytketty käyttökytkin ei irroita
koko laitetta verkosta.
(standby)
Genos Owner’s Manual5
PRECAUTIONS
PLEASE READ CAREFULLY BEFORE PROCEEDING
Please keep this manual in a safe and handy place for future reference.
WARNING
Always follow the basic precautions listed below to avoid the possibility of serious injury or even death from electrical shock, short-
circuiting, damages, fire or other hazards. These precautions include, but are not limited to, the following:
•Do not place the power cord near heat sources such as heaters or radiators. Also, do not
excessively bend or otherwise damage the cord, or place heavy objects on it.
•Only use the voltage specified as correct for the instrument. The required voltage is printed on the
name plate of the instrument.
•Use only the supplied power cord/plug.
•Check the electric plug periodically and remove any dirt or dust which may have accumulated on it.
•Be sure to connect to an appropriate outlet with a protective grounding connection. Improper
grounding can result in electrical shock.
•This instrument contains no user-serviceable parts. Do not attempt to disassemble or modify the
internal components in any way. If it should appear to be malfunctioning, discontinue use
immediately and have it inspected by qualified Yamaha service personnel.
•Radio waves may affect electro-medical devices.
-Do not use this product near medical devices or inside areas in which the use of radio waves is
restricted.
-Do not use this product within 15cm (6 in.) of persons with a heart pacemaker implant.
•Do not expose the instrument to rain, use it near water or in damp or wet conditions, or place on it
any containers (such as vases, bottles or glasses) containing liquids which might spill into any
openings. If any liquid such as water seeps into the instrument, turn off the power immediately
and unplug the power cord from the AC outlet. Then have the instrument inspected by qualified
Yamaha service personnel.
•Never insert or remove an electric plug with wet hands.
•Do not put burning items, such as candles, on the unit. A burning item may fall over and cause a
fire.
•When one of the following problems occur, immediately turn off the power switch and disconnect
the electric plug from the outlet. Then have the device inspected by Yamaha service personnel.
-The power cord or plug becomes frayed or damaged.
-It emits unusual smells or smoke.
-Some object has been dropped into the instrument.
-There is a sudden loss of sound during use of the instrument.
CAUTION
Always follow the basic precautions listed below to avoid the possibility of physical injury to you or others, or damage to the instrument or
other property. These precautions include, but are not limited to, the following:
•Do not connect the instrument to an electrical outlet using a multiple-connector. Doing so can
result in lower sound quality, or possibly cause overheating in the outlet.
•When removing the electric plug from the instrument or an outlet, always hold the plug itself and
not the cord. Pulling by the cord can damage it.
•Remove the electric plug from the outlet when the instrument is not to be used for extended
periods of time, or during electrical storms.
•Do not place the instrument in an unstable position where it might accidentally fall over.
•Before moving the instrument, remove all connected cables, to prevent damage to the cables or
injury to anyone who might trip over them.
•When setting up the product, make sure that the AC outlet you are using is easily accessible. If
some trouble or malfunction occurs, immediately turn off the power switch and disconnect the
plug from the outlet. Even when the power switch is turned off, electricity is still flowing to the
product at the minimum level. When you are not using the product for a long time, make sure to
unplug the power cord from the wall AC outlet.
•Use only the stand specified for the instrument. When attaching it, use the provided screws only.
Failure to do so could cause damage to the internal components or result in the instrument falling over.
•Before connecting the instrument to other electronic components, turn off the power for all
components. Before turning the power on or off for all components, set all volume levels to
minimum.
•Be sure to set the volumes of all components at their minimum levels and gradually raise the
volume controls while playing the instrument to set the desired listening level.
•Do not insert a finger or hand in any gaps on the instrument.
•Never insert or drop paper, metallic, or other objects into the gaps on the panel. This could cause
physical injury to you or others, damage to the instrument or other property, or operational
failure.
•Do not rest your weight on, or place heavy objects on the instrument, and do not use excessive
force on the buttons, switches or connectors.
•Do not use the instrument/device or headphones for a long period of time at a high or
uncomfortable volume level, since this can cause permanent hearing loss. If you experience any
hearing loss or ringing in the ears, consult a physician.
Always turn the power off when the instrument is not in use.
Even when the [] (Standby/On) switch is in standby status (display is off), electricity is still flowing to the instrument at the minimum level.
When you are not using the instrument for a long time, make sure you unplug the power cord from the wall AC outlet.
Power supply/Power cord
Do not open
Location
Water warning
Fire warning
If you notice any abnormality
Power supply/Power cord
Location
Connections
Handling caution
Yamaha cannot be held responsible for damage caused by improper use or modifications to the instrument, or data that is lost or destroyed.
DMI-5 1/1
6Genos Owner’s Manual
Notices and Information
NOTICE
To avoid the possibility of malfunction/ damage to the product, damage to data, or damage to other property, follow the notices below.
Handling
•Do not use the instrument in the vicinity of a TV, radio, stereo equipment, mobile phone, or other electric devices. Otherwise, the instrument,
TV, or radio may generate noise. When you use the instrument along with an application on your iPad, iPhone or iPod touch, we recommend
that you set “Airplane Mode” to “ON” on that device in order to avoid noise caused by communication.
• Do not expose the instrument to excessive dust or vibrations, or extreme cold or heat (such as in direct sunlight, near a heater, or in a car
during the day) to prevent the possibility of panel disfiguration, damage to the internal components or unstable operation. (Verified operating
temperature range: 5° – 40°C, or 41° – 104°F.)
• Do not place vinyl, plastic or rubber objects on the instrument, since this might discolor the panel or keyboard.
Maintenance
•When cleaning the instrument, use a soft cloth. Do not use paint thinners, solvents, alcohol, cleaning fluids, or chemical-impregnated wiping
cloths.
Saving data
• Edited Song/Style/Voice/MIDI setup data, etc. are lost when you turn off the power to the instrument without saving. This also occurs when
the power is turned off by the Auto Power Off function (page 24). Save the data to the instrument, or to USB flash drive/an external device
such as a computer (page 37). Saving the data to USB flash drive/an external device is even more secure, since the data in the instrument
may be lost due to some failure, an operation mistake, etc. Before using a USB flash drive, make sure to refer to page 111.
•To protect against data loss through USB flash drive damage, we recommend that you save your important data onto spare USB flash drive or
an external device such as a computer as backup data.
•System Setup data (data other than the edited Song/Style/Voice/MIDI setup data, etc.) is automatically stored, when you change the settings
in a display page and then exit from that page. However, the data is lost if you turn off the power without properly exiting from the relevant
display. For information about the System Setup data, refer to the Parameter Chart of the Data List on the website.
• If the power switch is not turned on for longer than about a week, the time (clock) setting may be lost.
Genos Owner’s Manual7
Information
About copyrights
•Copying of the commercially available musical data including but not limited to MIDI data and/or audio data is strictly prohibited except for your personal
use.
•This product incorporates and bundles contents in which Yamaha owns copyrights or with respect to which Yamaha has license to use others’ copyrights.
Due to copyright laws and other relevant laws, you are NOT allowed to distribute media in which these contents are saved or recorded and remain virtually
the same or very similar to those in the product.
*The contents described above include computer applications, Accompaniment Style data, MIDI data, WAVE data, voice recording data, a score, score data,
etc.
*You are allowed to distribute media in which your performance or music production using these contents is recorded, and the permission of Yamaha Cor-
poration is not required in such cases.
About functions/data bundled with the instrument
•Some of the preset songs have been edited for length or arrangement, and may not be exactly the same as the original.
•This device is capable of using various types/formats of music data by optimizing them to the proper format music data for use with the device in advance.
As a result, this device may not play them back precisely as their producers or composers originally intended.
•The bitmap fonts used in this instrument have been provided by and are the property of Ricoh Co., Ltd.
Yamaha may from time to time update firmware of the product without notice for improvement in functions and usability. To take full advantage of this
instrument, we recommend that you upgrade your instrument to the latest version. The latest firmware can be downloaded from the website below:
https://download.yamaha.com/
8Genos Owner’s Manual
Copyright Notice
The followings are the titles, credits and copyright notices for the songs pre-installed in this instrument.
Eye Of The Tiger
Theme from ROCKY III
Words and Music by Frank Sullivan and Jim Peterik
Copyright (c) 1982 Sony/ATV Music Publishing LLC, Rude
Music, Three Wise Boys LLC, WB Music Corp. and Easy Action
Music
All Rights on behalf of Sony/ATV Music Publishing LLC, Rude
Music and Three Wise Boys LLC Administered by Sony/ATV
Music Publishing LLC, 424 Church Street, Suite 1200, Nashville,
TN 37219
All Rights on behalf of Easy Action Music Administered by WB
Music Corp.
International Copyright Secured All Rights Reserved
Game Of Thrones
Theme from the HBO Series GAME OF THRONES
By Ramin Djawadi
Copyright (c) 2011 TL MUSIC PUBLISHING
All Rights Administered by UNIVERSAL MUSIC CORP.
All Rights Reserved Used by Permission
The Girl From Ipanema (Garôta De Ipanema)
Music by Antonio Carlos Jobim
English Words by Norman Gimbel
Original Words by Vinicius de Moraes
Copyright (c) 1963 ANTONIO CARLOS JOBIM and VINICIUS
DE MORAES, Brazil
Copyright Renewed 1991 and Assigned to SONGS OF
UNIVERSAL, INC. and WORDS WEST LLC
English Words Renewed 1991 by NORMAN GIMBEL for the
World and Assigned to WORDS WEST LLC (P.O. Box 15187,
Beverly Hills, CA 90209 USA)
All Rights Reserved Used by Permission
Living Next Door To Alice
Words and Music by Nicky Chinn and Mike Chapman
Copyright (c) 1977 by Universal Music - MGB Songs
Copyright Renewed
International Copyright Secured All Rights Reserved
Love Really Hurts Without You
Words and Music by Ben Findon and Les Charles
(c) 1984 EMI MUSIC PUBLISHING LTD.
All Rights in the U.S. and Canada Controlled and Administered
by EMI LONGITUDE MUSIC
All Rights Reserved International Copyright Secured Used by
Permission
Moon River
from the Paramount Picture BREAKFAST AT TIFFANY’S
Words by Johnny Mercer
Music by Henry Mancini
Copyright (c) 1961 Sony/ATV Music Publishing LLC
Copyright Renewed
All Rights Administered by Sony/ATV Music Publishing LLC,
424 Church Street, Suite 1200, Nashville, TN 37219
International Copyright Secured All Rights Reserved
More Than Words
Words and Music by Nuno Bettencourt and Gary Cherone
Copyright (c) 1990 COLOR ME BLIND MUSIC
All Rights Administered by ALMO MUSIC CORP.
All Rights Reserved Used by Permission
A Sky Full Of Stars
Words and Music by Guy Berryman, Jon Buckland, Will
Champion, Chris Martin and Tim Bergling
Copyright (c) 2014 by Universal Music Publishing MGB Ltd. and
EMI Blackwood Music Inc.
All Rights for Universal Music Publishing MGB Ltd. in the
United States and Canada
Administered by Universal Music - MGB Songs
All Rights for EMI Blackwood Music Inc. Administered by
Sony/ATV Music Publishing LLC, 424 Church Street, Suite
1200, Nashville, TN 37219
International Copyright Secured All Rights Reserved
Wake Me Up!
Words and Music by Aloe Blacc, Tim Bergling and Michael
Einziger
(c) 2013 WB MUSIC CORP., ALOE BLACC PUBLISHING,
EMI MUSIC PUBLISHING SCANDINAVIA AB, UNIVERSAL
MUSIC CORP. and ELEMENTARY PARTICLE MUSIC
All Rights on behalf of itself and ALOE BLACC PUBLISHING
Administered by WB MUSIC CORP.
All Rights on behalf of EMI MUSIC PUBLISHING
SCANDINAVIA AB Administered by SONY/ATV MUSIC
PUBLISHING LLC, 424 Church Street, Suite 1200, Nashville,
TN 37219
All Rights on behalf of ELEMENTARY PARTICLE MUSIC
Controlled and Administered by UNIVERSAL MUSIC CORP.
Included Accessories...............................................................................................................................9
About the Manuals.................................................................................................................................10
Main Features........................................................................................................................................11
Power Supply......................................................................................................................................... 23
Turning the Power On/Off...................................................................................................................... 23
Making Basic Settings............................................................................................................................24
Changing the Brightness of Lighting Buttons.........................................................................................25
Display Structure26
LIVE CONTROL View (Sub Display) Structure...................................................................................... 27
Main Display Structure—Using the Gateway Buttons............................................................................ 28
Locking the Panel Settings (Panel Lock)...............................................................................................41
Using the Metronome.............................................................................................................................41
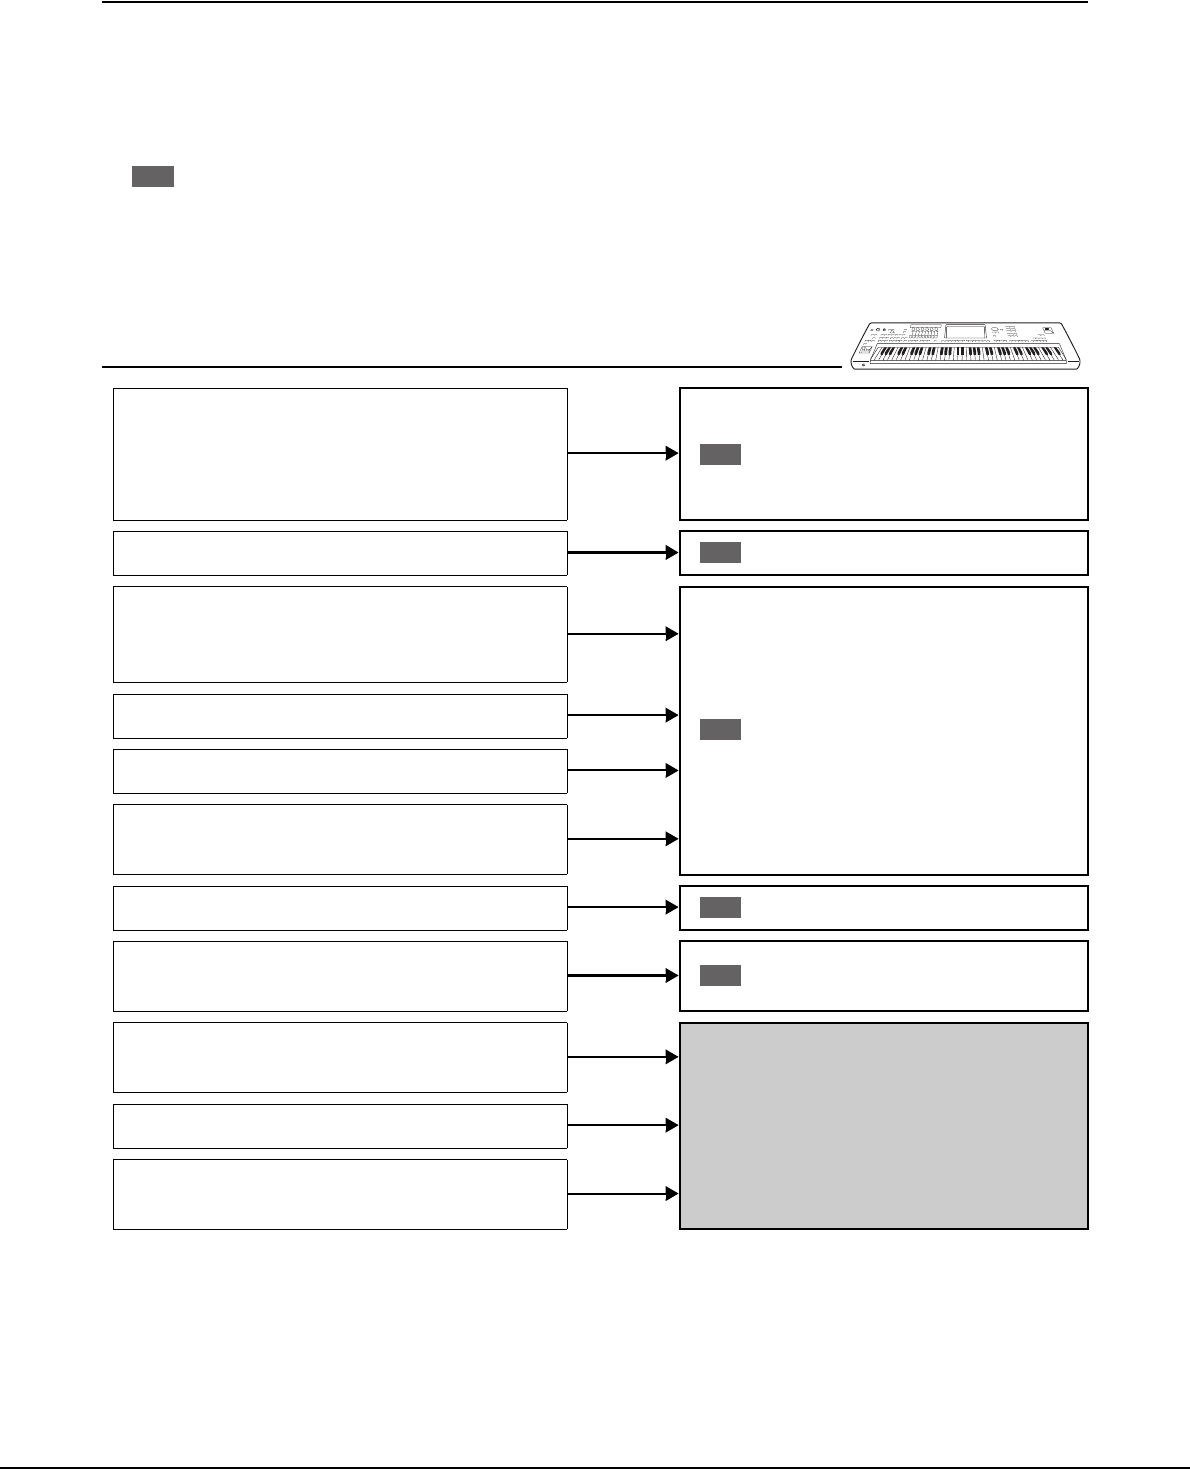
Quick Guide—For Performing on Genos42
Operation Guide
1Playing with Styles—Setups44
Setting up Styles.................................................................................................................................... 44
Optimum Panel Settings for the Current Style (One Touch Setting)......................................................47
Setting up Keyboard Parts.....................................................................................................................48
Selecting a Voice for Each Keyboard Part............................................................................................. 52
Creating Original Organ Flutes Voices .................................................................................................. 53
Using Ensemble Voices......................................................................................................................... 54
Setting up Keyboard Harmony/Arpeggio...............................................................................................56
Setting up Multi Pads.............................................................................................................................59
Memorizing Original Panel Settings to One Touch Setting....................................................................60
Changing the Pitch of the Keyboard......................................................................................................61
Setting up Assignable Controllers..........................................................................................................62
Operation Guide
2Playing with Styles—Operations While Performing64
The example above describes a four step operation:
1) Press the [MENU] button to call up the Menu display.
2) From the Menu display, Touch [Utility].
3) Touch [System].
4) Touch [Language].
Closing the Current Display
34Genos Owner’s Manual
The display of this instrument is a special touch screen that allows you to select or change the desired parameter by sim-
ply touching the corresponding setting on the display. You can also decrease/increase the value in small steps by rotating
the Data dial or pressing the [DEC]/[INC] button.
Using the display (touch screen)
Touch
To select an item, lightly touch the corresponding indication on the display.
Slide
Hold down the display slider, then slide your finger vertically or horizontally to change the
parameter value.
Rotate
Touch and hold the display knob, and rotate your finger around the knob to change the
parameter value.
Touch and hold
This instruction means to touch the object in the display and hold it for a while.
When setting values by using the []/[] buttons, a slider or a knob, you can restore the default value by touching and
holding the value on the display.
Display-based Controls
Do not use any sharp or hard tools to operate the touch screen. Doing so may damage the display.
NOTICE
Keep in mind that operation by simultaneously touching two or more points on the display is not possible.
NOTE
If you find the system sounds (produced
when touching the display) distracting,
you can turn them on/off from
[MENU] [Utility] [Display/Touch
Screen] Touch Screen [Sound]
NOTE
In the case of a vertical slider, the slide
operation is only effective for the slider
when it is selected. To select a slider,
touch it once. The selected state is indi-
cated by a surrounding orange frame.
NOTE
The rotate operation is only effective for
the knob when it is selected. To select a
knob, touch it once. The selected state
is indicated by a surrounding orange
frame.
NOTE
Genos Owner’s Manual35
Basic Operations
Using the Data dial, [ENTER] button, and [DEC]/[INC] buttons
Depending on the display, the Data dial and the buttons can be used in the following three ways.
Adjusting the parameter values
After selecting the desired parameter, use the Data dial or the [DEC]/[INC] buttons to adjust the value. This is useful if
you have difficulty adjusting by touching on the display, or want finer control over the adjustment.
Selecting an item from a list without a cursor
When a list not having a cursor, such as pop-up windows for setting parameters, use the Data dial and the [DEC]/[INC]
buttons to select an item.
Data dial
Rotate the dial or press the
[DEC]/[INC] buttons to actually
select the item. The selected item
is highlighted.
36Genos Owner’s Manual
With the convenient Direct Access function, you can instantly call up the desired display—with just a single additional
button press. Refer to the “Direct Access Chart” on page120 for a list of the displays that can be called up with the Direct
Access function.
1Press the [DIRECT ACCESS] button.
A message appears in the display prompting you to press the appropriate button.
2Press the button (or move the knob, slider, joystick or con-
nected pedal) corresponding to the desired setting display to
instantly call up that display.
For example, pressing one of the REGISTRATION MEMORY [1]–[10] buttons
calls up the Regist Bank Info display (page 95).
The Demos provide dynamic demonstrations of the high-quality sounds.
1Call up the Demo display via [MENU] [Demo].
2Touch the display to show and play the desired Demo.
3Press the [EXIT] button to exit from the Demo display.
Calling up the Desired Display Instantly—Direct Access
Playing the Demos
To return to the higher level menu,
touch [Menu] on the display.
NOTE
Genos Owner’s Manual37
Basic Operations
Data you have created such as recorded Song and edited Voice can be saved as files to the
instrument (referred to as “User drive”) and a USB flash drive. If you’ve saved a lot of
files, you may have trouble finding the desired file quickly. To make operation easier, you
can organize your files in folders, rename the files, delete unnecessary files, etc. These
operations are done in the File Selection display.
Saving a file
You can save your original data (such as Songs you’ve recorded and Voices you’ve edited) as a file to the User drive or
the USB drive in the File Selection display (page 32).
1In the relevant File Selection display (*), touch (File Edit) to
call up the File Edit pop-up window.
*For example, the display shown below (Voice Selection) is called up via VOICE
SELECT [RIGHT 1] button.
2Touch [Save] to call up the display for selecting the saving des-
tination.
3Select the location to which you want to save the file.
To show the next higher level folder, touch (Up).
4Touch [Save here] to call up the Character Entry window.
5Enter the file name (page 40).
Even if you skip this step, you can rename the file at any time (page 38) after sav-
ing.
File Management
Before using a USB flash drive, be sure
to read “Connecting USB Devices” on
page 111.
NOTE
Restrictions for Preset Songs
Preset Songs are copy protected to prevent illegal copying or accidental erasure. These cannot be copied, moved, and
saved to any other place, and cannot be deleted.
To cancel the file operation, press the
[EXIT] button.
NOTE
1
2
4
To cancel this operation, touch [Can-
cel].
NOTE
NEXT PAGE
38Genos Owner’s Manual
6Touch [OK] in the Character Entry window to actually save the
file.
The saved file will be automatically located at the appropriate position among the
files in alphabetical order.
Creating a new folder
Folders can be created, named and organized as desired, making it easier to find and select
your original data.
1In the File Selection display, touch the User tab (page 32) then
select the location to which you want to create a new folder.
To show the next higher level folder, touch (Up).
2Touch (File Edit) to call up the File Edit pop-up window.
3Touch [New Folder] to call up the Character Entry window.
4Input the name of the new folder (page 40).
Renaming a file/folder
You can rename files/folders.
1Call up the File Selection display, on which the desired file/
folder is shown.
2Touch (File Edit) to call up the File Edit pop-up window.
3Touch [Rename] in the File Management menu, to call up the
display for selecting the desired file/folder.
4Select the desired file or folder by touching it.
5Touch [Rename] at the top of the display to call up the Charac-
ter Entry window.
6Input the name of the selected file or folder (page 40).
Copying or moving files
You can copy or cut a file and paste it to another location (folder). You can also copy a
folder (without move it) by using the same procedure.
1Call up the appropriate File Selection display, on which the
desired files/folders are shown.
2Touch (File Edit) to call up the File Edit pop-up window.
3Touch [Copy] or [Move] in the File Management menu, to call
up the display for selecting the desired files/folders.
•The maximum number of files/folders
which can be stored in a folder is
2500.
A new folder cannot be created in the
Preset tab or the “Expansion” folder
(page 103) in the User tab.
NOTE
NOTE
Files in the Preset tab or the “Expan-
sion” folder (page 103) in the User tab
cannot be renamed.
NOTE
Only one file or folder can be renamed
at a time.
NOTE
•Files in the Preset tabs cannot be
copied/moved.
•Files in the “Expansion” folder
(page 103) in the User tab cannot be
copied/moved.
NOTE
Genos Owner’s Manual39
Basic Operations
4Select the desired files/folders by touching each item.
One or more files/folders can be selected (highlighted). To cancel the selection,
touch the same item again.
Touch [Select All] to select all items indicated on the current display including the
other pages. To cancel the selection, touch [All Off].
5Touch [Copy] or [Move] at the top of the display, to call up the
display for selecting the destination.
6Select the desired destination (path) to paste the files/folders.
7Touch [Copy here] or [Move here] to paste the files/folders
you’ve selected in step 4.
The pasted file/folder appears on the display at the appropriate position among the
files in alphabetical order.
Deleting files/folders
You can delete files/folders.
1Call up the appropriate File Selection display, on which the
desired files/folders are shown.
2Touch (File Edit) to call up the File Edit pop-up window.
3Touch [Delete] in the File Management menu, to call up the dis-
play for selecting the desired files/folders.
4Select the desired files/folders by touching each item.
One or more files/folders can be selected (highlighted). To cancel the selection,
touch the same item again.
Touch [Select All] to select all items indicated on the current display including the
other pages. To cancel the selection, touch [All Off].
5Touch [Delete] at the top of the display.
A confirmation message appears. To cancel this operation, touch [No] before
going to step 6.
6Touch [Yes] to actually delete the files/folders you’ve selected
in step 3.
Registering files to the Favorite tab
You can call up your favorite or often used Style or Voice files quickly by registering them to the Favorite tab. For details,
refer to the Reference Manual on the website (page 10).
Searching for files
You can search for desired files by name, on the display called up via touching (File Search). In the case of Registra-
tion Memory Bank files, you can also search for them by specifying other detailed properties. For details, refer to the
Reference Manual on the website (page 10).
To cancel this operation, touch [Cancel]
before going to step 7.
NOTE
Files in the Preset tabs or the “Expan-
sion” folder (page 103) in the User tab
cannot be deleted.
NOTE
40Genos Owner’s Manual
This section covers how to enter characters for naming your files/folders, inputting keywords on searching file, etc.
Entering characters is done in the display shown below.
1Touch the character type.
Touching [Symbol] (or [abc]) switches between entering symbols or Roman letters
(and numbers).
To switch between entering capital letters or small letters, touch (Shift).
2Touch []/[], rotate the Data dial or the press [DEC]/[INC] but-
tons to move the cursor to the desired location.
3Input the desired character one by one.
To delete a single character, touch [Delete]; to delete all characters at once, touch
and hold [Delete]. To enter a space, touch the space key indicated in the illustra-
tion above.
4Touch [OK] to finalize the characters (name, keywords, etc.)
you have input.
Entering Characters
2, 3
1
•Depending on the display for charac-
ter entry you are working in, some
types of characters cannot be entered.
•A file name can contain up to 46
characters and a folder name can
contain up to 50 characters.
•The following characters (half size)
cannot be used: \ / : * ? " < > I
To cancel this operation, touch [Cancel]
before going on to step 4.
NOTE
NOTE
To input letters with auxiliary symbols:
You can input letters with auxiliary symbols such as an umlaut by touching
and holding a letter to call up a list. For example, touch and hold “E” to enter
“Ë” from the list.
To select custom icons for files (shown at left of file name):
You can select custom icons for the file. Touch [Icon] to call up the pop-up
window, then select the desired icon.
Genos Owner’s Manual41
Basic Operations
When the panel settings are locked, nothing happens if you press any panel buttons. For example, when you take a break
during your performance and leave the instrument unattended, this feature protects the panel settings from being
accessed by others.
1Call up the Panel Lock display via [MENU] [Panel Lock].
The numeric keypad for PIN code entry is called up.
2Input a four-number PIN code by touching the numeric keypad,
then touch [OK] to enter it.
The panel settings are locked. The main display is also in a lock mode during the
panel lock.
3To unlock the instrument, touch the display, then input the
same PIN code you entered in step 2.
The metronome provides a click sound, giving you an accurate tempo guide when you practice, or letting you hear and
check how a specific tempo sounds. When recording without Style playback, turning the metronome on makes your
recording sessions much more efficient.
1Call up the Metronome display via [MENU] [Metronome].
2Touch the icon to turn the metronome On/Off.
For information on the other items on the display, refer to “Metronome Settings”
of the Reference Manual on the website.
Locking the Panel Settings (Panel Lock)
If you have forgotten the PIN code, sim-
ply turn the power off and back on again
to unlock the instrument.
NOTE
Using the Metronome
2
The Metronome can also be turned on/
off by touching the Metronome On/Off
button on each recording display.
(page 90)
NOTE
42Genos Owner’s Manual
Quick Guide—For Performing on Genos
Manual panel settings and performing a single song
Playing the keyboard with Styles (Auto Accompaniment)
Singing with Song playback
Storing the song’s panel settings for easy recall
Calling up the stored panel settings for your performance
Recording your keyboard performance
Setting up the
Style
... p. 44
Optimum panel settings for the current Style (One
Touch Setting)
... p. 47
Calling up the most appropriate panel settings (Keyboard Parts,
Harmony/Arpeggio, or Multi Pads) for the selected Style.
Setting up the Voices
... p. 48
(Setting up keyboard parts)
Making Song playback settings ...
p. 72
Setting up Harmony/
Arpeggio
...
p. 56
Storing the song’s panel settings to Registration Memory ... p. 93
For details about Registration Memory and Registration Banks, refer to page 92.
Selecting the desired Registration Bank file
Calling up the Registration Memories 1–10 for the Bank file. (p. 94)
Calling up the desired song’s panel settings from the Playlist in a single step
Selecting the desired Playlist Record for calling up the corresponding linked Registration Memory. (p. 97)
Recording setup: Calling up a Registration Memory from the Playlist,
etc.
or
Genos Owner’s Manual43
Quick Guide—For Performing on Genos
Assigning
functions to
controllers
... p. 62
Setting up Multi
Pads
... p. 59
Setting up
Vocal Harmony
... p. 76
Assigning
functions to
controllers
... p. 62
Setting up
Vocal Harmony
... p. 76
Singing with Song
playback
Operations during perfor-
mance: p. 78
Playing with Styles
Operations during perfor-
mance: p. 64
Registering the Registration Memory in
a Playlist
... p. 96
Creating a Playlist Record as a shortcut to the Regis-
tration Memory.
Editing the Playlist for your live
performance set list
...
p. 98
Creating a new Playlist for your live performance by
selecting Songs from a preset Playlist.
Selecting the desired Registration Memory
Calling up the desired panel settings by pressing the Registration Memory 1–10. (p. 94)
Playing with Styles
or
Singing with Song
playback
Further recording setup
MIDI Quick Recording ... p. 90
Audio Quick Recording ... p. 91
Recording Your
performance
Recording your playing
and/or singing.
1
1
44Genos Owner’s Manual
Operation Guide
Playing with Styles—Setups
This section gives you basic steps on how to enhance your keyboard performance with Styles (Rhythm and Auto
Accompaniment). Go through the various instructions below to completely set up your performance of a single
song: Style, Keyboard Part (Voice), Multi Pad, and various types of controllers.
The settings made in this section can be collectively stored in the Registration Memory as one song setting
(page 92).
Selecting the desired Style and turning Auto Accompaniment (ACMP) on
1Press the [STYLE] button to call up the Style Selection display.
2Touch the desired Style.
For example, touch the category [Country], and then [Country Folk 8beat].
3Make sure that the STYLE CONTROL [ACMP] button is turned
on.
When the button is turned on, both the rhythm part and auto accompaniment can
be played back during Style playback.
At the same time, the specific left-hand section of the keyboard can be used as the
Chord section, and chords played in this section are automatically detected and
used as a basis for fully automatic accompaniment with the selected Style.
4If necessary, try out the selected Style.
Press the STYLE CONTROL [] (SYNC START) button, then play chords with
your left hand.
To stop Style Playback, press the STYLE CONTROL [] (START/STOP) but-
ton.
Setting up Styles
You can also call up the Style Selection
display via the Home display (page 30).
NOTE
For basic operations of the Style Selec-
tion display, refer to “File Selection Dis-
play” (page 32).
NOTE
The Split Point can be changed as
desired (page 49).
NOTE
Chord section
Split Point (F#2 as default)
For more details on operating Style
playback, refer to page 64.
NOTE
Genos Owner’s Manual45
1
Playing with Styles—Setups
A Style generally consists of eight parts (channels): rhythm, bass, etc. You can add variations and change the feeling of a
Style by selectively turning channels on/off or by changing the Voices (page 88).
Style Characteristics
The particular type of Style is indicated the upper left of the Style name in the Style Selection display. The defining
characteristics of these Styles and their performance advantages are described below.
•Session: These Styles provide even greater realism and authentic backing by mixing in original chord types and
changes, as well as special riffs with chord changes, with the Main sections. These have been programmed to add
“spice” and a professional touch to your performances of certain songs and in certain genres. Keep in mind, how-
ever, that the Styles may not necessarily be appropriate—or even harmonically correct—for all songs and for all
chord playing. In some cases for example, playing a simple major triad for a country song may result in a “jazzy”
seventh chord, or playing an on-bass chord may result in inappropriate or unexpected accompaniment.
•Free Play: These Styles are characterized by rubato performance. You can perform freely with remarkably expres-
sive accompaniment, without being constrained by a strict tempo.
•DJ: These contain their own special chord progressions, so you can add chord changes to your performance simply
by changing the root key. The Multi Pad (page 59) data in the “DJ Phrase” category are specially created for these
Styles. You can call up the suitable Multi Pads by using the One Touch Setting function (page 47).
For the Preset Style List, refer to the Data List on the website.
Style File Compatibility
This instrument uses the SFF GE file format (page 11) and can play back existing SFF files; however, they will be
saved in the SFF GE format when the file is saved (or loaded) in this instrument. Keep in mind that the saved file can
only be played back on instruments that are compatible with the SFF GE format.
•You cannot specify the chord type, such as major and minor, when using the DJ Styles.
NOTE
46Genos Owner’s Manual
Adjusting the tempo
The TEMPO [-] and [+] buttons let you change the playback tempo of the Metronome,
Style and MIDI Song. The tempo of the Style and MIDI Song can also be adjusted via the
[TAP TEMPO] button.
TEMPO [-]/[+] buttons
Press the TEMPO [-] or [+] button to call up the Tempo pop-up display. Use the TEMPO
[-]/[+] buttons to decrease or increase the tempo over a range of 5–500 beats per minute.
Holding down either button changes the value continuously. Pressing both TEMPO [-]
and [+] buttons calls up the default tempo of the last selected Style or Song.
[TAP TEMPO] button
During playback of a Style or MIDI Song, you can change the tempo by tapping the [TAP TEMPO] button twice at the
desired tempo. When Style and Song are stopped, tapping the [TAP TEMPO] button (four times for a 4/4 time signature)
starts playback of the rhythm part of the Style at the tempo you tapped.
Changing the Chord Fingering type
By changing the Chord Fingering type, you can automatically produce appropriate accompaniment even if you don’t
press all of the notes which comprise a chord. Chord fingering type can be changed via the Split Point/Fingering window:
[MENU] [Split & Fingering].
The following types can be selected, for example.
Single Finger
This method lets you easily play chords in the accompaniment range of the keyboard using only one, two or three fingers.
Fingered
This lets you finger your own chords on the chord section of the keyboard, while the instrument supplies appropriately
orchestrated rhythm, bass, and chord accompaniment in the selected Style. The Fingered type recognizes the various
chord types which are listed on the Data List on the website (page 10), and can be looked up using the Chord Tutor func-
tion called up via [MENU] [Chord Tutor].
AI Full Keyboard
This lets you play just about anything, anywhere on the keyboard using both hands—like
conventional playing of a piano—and still have appropriate accompaniment. You don’t
have to worry about specific ways to play/indicate the chords. (Depending on the song
arrangement, AI Full Keyboard may not always produce appropriate accompaniment.)
For other types, refer to the Reference Manual on the website (page 10).
If you want to adjust the tempo of an
Audio Song, use the Time Stretch func-
tion on page 80.
NOTE
Major chord
Press the root key only.
Minor chord
Simultaneously press the root
key and a black key to its left.
Seventh chord
Simultaneously press the
root key and a white key to
its left.
Minor seventh chord
Simultaneously press the root
key and both a white and
black key to its left.
When the chord detection area is set to
“Upper” (page 51), only “Fingered*”is
available.
NOTE
In the case of a specific fingering type (Fingered, Fingered On Bass, AI Fingered), you can create a state in which no chord is input by entering a special chord named
“Cancel.” This is called as “Chord Cancel.” For more information on entering chords including “Cancel,” refer to the “Chord Types Recognized in the Fingered Mode” in
the Data List on the website.
NOTE
Genos Owner’s Manual47
1
Playing with Styles—Setups
One Touch Setting is a powerful and convenient feature that automatically calls up the
most appropriate panel settings (Voices, effects, etc.) for the currently selected Style, with
the touch of a single button. If you’ve already decided which Style you wish to use, you
can have One Touch Setting automatically select the appropriate Voice for you.
1Select the Desired Style (steps 1–2 on page 44).
2Press one of the ONE TOUCH SETTING [1]–[4] buttons.
Not only does this instantly call up all the settings (Voices, effects, etc.) that match
and are most commonly used with the current Style, it also automatically turns on
ACMP and SYNC START, so that you can immediately start playing the Style.
3As soon as you play a chord with your left hand, the selected
Style starts.
Each Style has four One Touch Setting setups. Press any other of the ONE
TOUCH SETTING [1]–[4] buttons to try out other setups.
Optimum Panel Settings for the Current Style (One Touch Setting)
For information on panel settings that
are called up by One Touch Setting,
refer to the OTS section of “Parameter
Chart” in the Data List on the website
(page 10).
NOTE
Confirming the One Touch Setting Contents
In the Style Selection display, touch (Menu) then [Style Information] to
call up the Information window that shows what Voices are assigned to the
ONE TOUCH SETTING [1]–[4] buttons for the current Style. You can call up
the desired settings also by touching one of the One Touch Settings numbers
1–4 directly on the Information window.
You can automatically have the One
Touch Settings change when you select
a Main section (A–D) of the selected
Style. For details, refer to “OTS LINK”
(page 65).
NOTE
48Genos Owner’s Manual
There are four keyboard parts for your manual performance: LEFT, RIGHT 1, RIGHT 2 and RIGHT 3, and each part has
one Voice. You can combine these parts by using the PART ON/OFF buttons to create luscious instrument textures and
convenient performance combinations.
Creating combinations of keyboard parts (Layer, Split)
To play one single Voice over the entire keyboard:
Turn on the RIGHT 1, 2 or 3 part. Make sure the LEFT part is turned off.
To play two or three different Voices simultaneously (Layer):
Turn on two or more parts from RIGHT 1, 2 and 3.
To play different Voices in the right- and left-hand sections of the keyboard (Split):
Turn on the LEFT part and at least one of the RIGHT 1–3 parts. The F#2 and lower keys are used for the LEFT part while
the upper keys (excluding F#2) are used for the RIGHT 1, 2 and 3 parts. The key which divides the keyboard into the left-
hand and right-hand sections is referred to as the “Split Point.”
Turning each keyboard part on/off from the display
You can also turn parts on/off via the Home display, or the Voice Part Setup display. For details, see “Home Display”
(page 30), or “Voice Part Setup Display” (Reference Manual on the web site).
Genos Owner’s Manual49
1
Playing with Styles—Setups
Setting the Split Point
The key which divides the keyboard into two areas is referred to as “Split Point.” There are three types of Split Point:
Split Point (Style), Split Point (Left), and Split Point (Right 3). You can set them individually (as shown).
• Split Point (Style):........Divides the left-hand (LOWER) section into the Chord section and the LEFT part section.
• Split Point (Left):.........Divides the keyboard into the left-hand (LOWER) section and the right-hand (UPPER) sec-
tion.
• Split Point (Right 3):....Divides the right-hand (UPPER) section into the RIGHT 1, 2 parts section and the RIGHT 3
part section.
1Call up the Split Point/Fingering window.
[MENU] [Split & Fingering]
2Set the Split Point.
Holding the LEFT part Voice (Left Hold)
By turning on the PART ON/OFF [LEFT HOLD] button when the LEFT part is ON, the
LEFT part Voice is held even when the keys are released.
Non-decaying Voices such as strings are held continuously, while decay-type Voices such
as piano decay more slowly (as if the sustain pedal has been pressed). This function is
convenient when used along with Style playback since the sound of the chords matching
Style playback are maintained.
To stop the LEFT part Voice which is sounding, stop Style or Song playback, or turn the
[LEFT HOLD] button off.
Split Point
(Right 3)
Split Point
(Left)
Split Point
(Style)
Chord section
LEFT part section
RIGHT 1, 2
parts section
RIGHT 3
part
section
Left-hand (LOWER) section
Right-hand (UPPER) section
w
w
q
NEXT PAGE
50Genos Owner’s Manual
You can also specify each Split Point by note name, touching the []/[] controls. Split Point (Style) is indicated
by “Style,” Split Point (Left) is indicated by “Left,” and Split Point (Right 3) is indicated by “Right 3.”
qSplit Point
(Style + Left)
Sets Split Point (Style) and Split Point (Left) to the same note. In this case, the Chord Section
and the LEFT part section occupy the same area.
Specify the Split Point directly from the keyboard by simultaneously holding [Style + Left] on
the display and pressing the desired key on the keyboard.
wSplit Point
(Style, Left, Right
3)
Sets each Split Point individually.
Specify the Split Point directly from the keyboard by simultaneously holding the correspond-
ing item on the display and pressing the desired key on the keyboard.
Chord + LEFT
part section
Split Point
(Style + Left)
Right-hand section
(Left-hand section)
Once you have touched []/[], the Split Point type you are controlling is focused (corresponding indicator is colored). In this condition, you can change the
value of the focused Split Point type by rotating the Data dial.
Split Point (Left) cannot be set lower than Split Point (Style), and Split Point (Right 3) cannot be set lower than Split Point (Left).
NOTE
NOTE
Genos Owner’s Manual51
1
Playing with Styles—Setups
Specifying chords with your right hand for Style playback
By changing the Chord Detection area from the left-hand section to the right-hand section, you can play a bass line with
your left hand while using your right hand to play chords for controlling Style playback.
1Call up the Split Point/Fingering window.
[MENU] [Split & Fingering]
2Make the necessary settings by touching the display.
Chord Detection
Area
Select “Upper.” The Chord section is set to the right of the left Split Point. Fingering type is
set to “Fingered*” automatically.
Manual BassWhen this is set to “On”, the bass part of the current Style is muted and the Voice of the muted
bass part is assigned to the left part.
Split Point
(Right 3)
Split Point
(Left)
Split Point
(Style)
LEFT Voice section
(Left-hand section)
RIGHT 1, 2
parts section
RIGHT 3
part
section
Right-hand section
Chord section
•“Fingered*” is basically same as “Fingered,” except that “1+5,” “1+8” and Chord Cancel are not available.
•For information about when the “Chord Detection Area” is set to “Lower,” refer to “Setting the Split Point” (page 49).
•This parameter is set to “Lower” automatically when the Ensemble Voice is selected.
NOTE
•Manual Bass is set to “On” automatically by the default settings when you select “Upper” in the Chord Detection Area
above.
•This parameter is available only when the “Chord Detection Area” is set to “Upper.”
NOTE
52Genos Owner’s Manual
1Press the VOICE SELECT button corresponding to the desired
part.
The Voice Selection display (for the desired part) appears.
2Touch the desired Voice.
3If necessary, try out the selected Voice.
Make sure that the desired keyboard part is turned on, and play the keyboard.
Selecting a Voice for Each Keyboard Part
You can also call up the Voice Selection
display via the Home display (page 30)
or the Voice Part Setup display (Refer-
ence Manual on the web site).
NOTE
•For basic operations of the Voice
Selection display, refer to “File Selec-
tion Display” (page 32).
NOTE
To hear the characteristics of the Voices:
Touch (Demo) to start demo playback of the selected Voice. Touch
(Demo) again to stop playback.
Voice Characteristics
The Voice type and its defining characteristics are indicated above the Voice name. There are various Voice character-
istics; however, only the following ones are covered here. For detailed explanations, refer to the Reference Manual on
Lets you create subtle, very realistic expressive nuances, simply by how you play, and by pressing a single button
to add nuances.
•Organ Flutes Voices (page 53)
Lets you recreate all of the classic organ sounds by adjusting the flute footage levels and the percussive sounds,
just like on conventional organs.
•Revo Drum, Revo SFX Voices
The Drum and SFX Voices let you play various drums and percussion instruments or SFX (sound effects) sounds
on the keyboard. Especially, Revo Drum Voices recreate the natural sound of drums, even when playing the same
key multiple times. Details are given in the Drum/Key Assignment List of the separate Data List.
Genos Owner’s Manual53
1
Playing with Styles—Setups
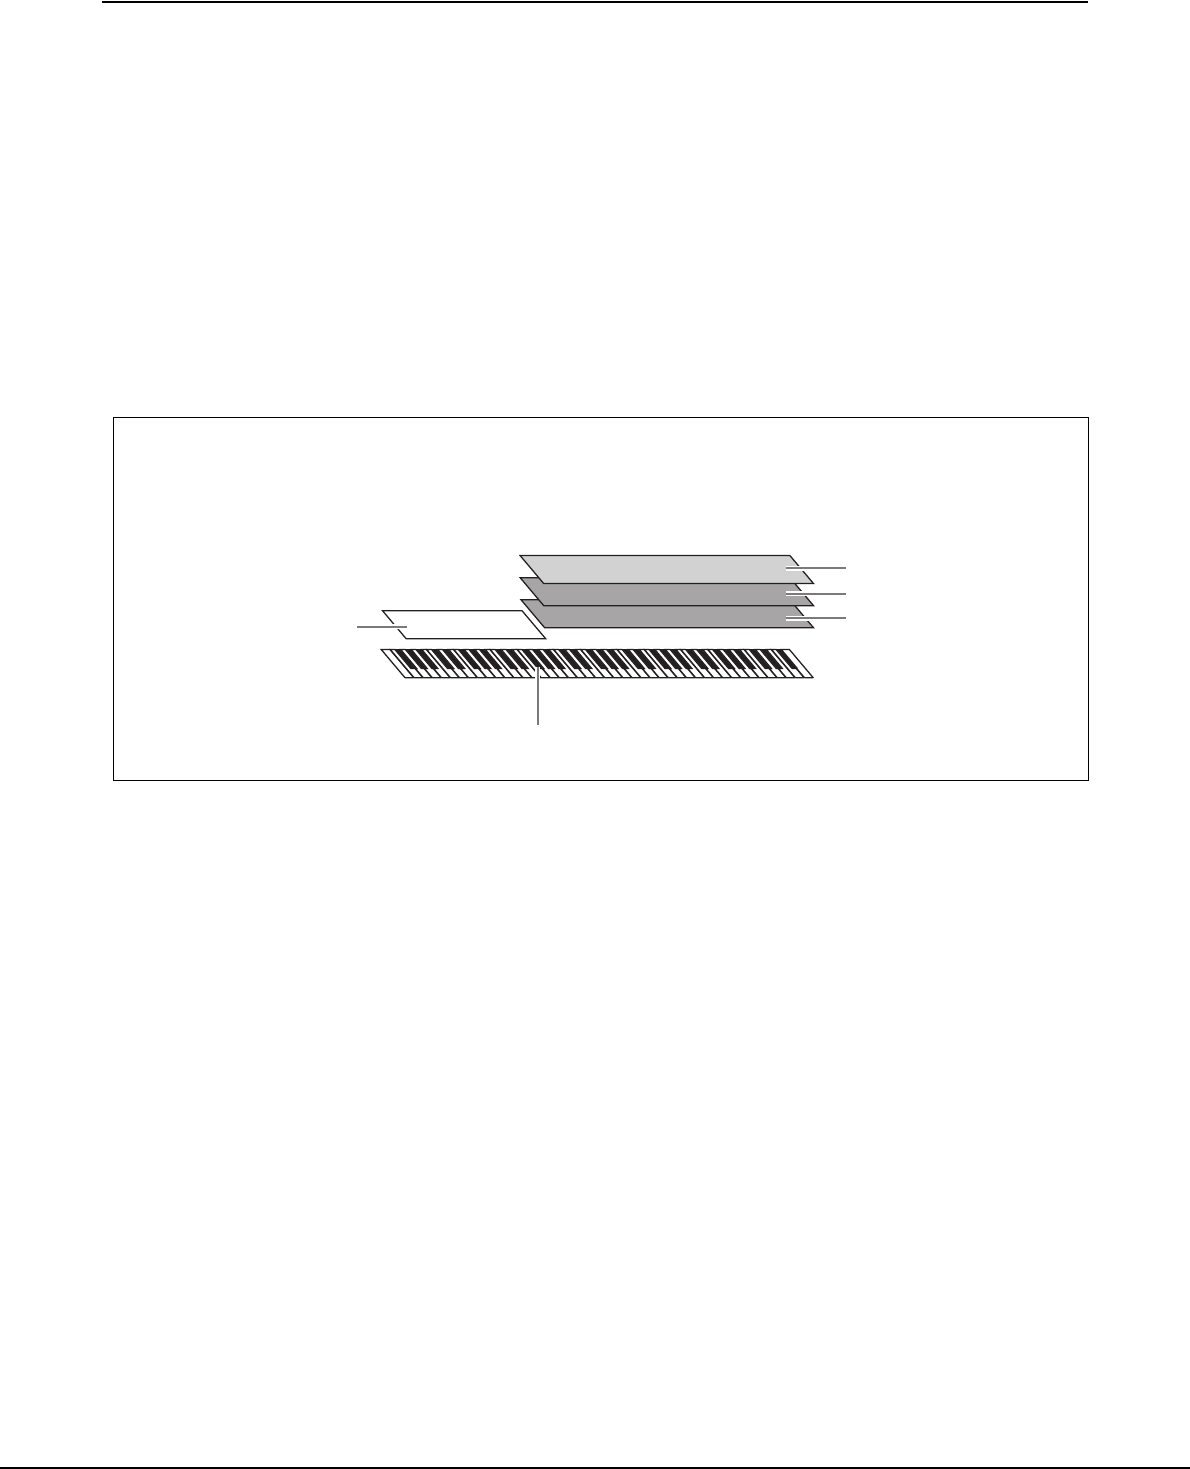
Genos uses advanced digital technology to recreate the legendary sound of vintage organs.
Just as on a traditional electronic organ, you can create your own sound by increasing and
decreasing the levels of the flute footages. The created Voice can be saved for future recall.
1On the Voice Selection display, select the desired Organ Flutes
Voice.
Touch the [Organ] in the sub categories, then select the desired Organ Flutes
Voice.
2Return to the Home display, then touch (Organ Flutes)
located at the lower right of the Voice name to call up the Organ
Flutes Voice Edit display.
3Slide the Footage levers to adjust the footage settings.
The footage settings determine the basic sound of the Organ Flutes.
You can also change other settings here, such as Rotary Speaker and Vibrato.
4Touch (Save) and save the created Organ Voice.
For instructions on saving, refer to “File Management” (page 37).
Creating Original Organ Flutes Voices
The term “footage” is a reference to the
sound generation of traditional pipe
organs, in which the sound is produced
by pipes of different lengths (in feet).
NOTE
•The available parameters differ
depending on the Organ type.
•You can also make Effects and EQ
settings. For details, refer to the Ref-
erence Manual on the website
(page 10).
NOTE
wqert
3
qVolumeDetermines the volume of the entire Organ Flutes sound.
wRotary SpeakerAlternately switches between the slow and fast rotary speaker speeds. This parameter is avail-
able only when an effect which contains “Rotary” or “Rot” in its name is applied.
eVibratoTurns the vibrato on or off, and allows you to adjust the vibrato depth and vibrato speed.
rResponseAdjusts the response speed of both the Attack and Release portions of the sound.
tAttackSwitches between two different Attack modes: First and Each, and determines the length of
the Attack sound.
The settings will be lost if you
select another Voice or turn the
power to the instrument off with-
out executing the Save operation.
NOTICE
54Genos Owner’s Manual
These are special settings of the keyboard parts that feature multiple Voices, used in realistic ensemble combinations,
such as brass section and string quartet. Up to four special parts or instruments are provided within a single Voice. But
rather than just being a combination, the parts are dynamically assigned to the notes, and are distributed among the inter-
vals you play in exceptionally natural, musical ways—as if four different players were actually playing the parts live.
Moreover, the discrepancy between each instrument—the pitch, timing, etc.—can be controlled and “humanized,” mak-
ing the overall sound amazingly authentic and expressive.
In this mode, the Keyboard parts (L, R1, R2 and R3) are changed into special Ensemble Parts 1–4 respectively. Since all
the Ensemble Parts are handled as Right parts, the Left hand part is not available in this mode, although the Auto Accom-
paniment can be turned on and Styles can be played with the left hand.
Entering the Ensemble Voice mode
1Press any one of the VOICE SELECT buttons to call up the
Voice Selection display.
2Touch [Ensemble] to enter the Ensemble Voice mode.
3Touch to select the desired Ensemble Voice preset.
4Play the keyboard.
Using Ensemble Voices
Chord section
Split Point
(Style)
Ensemble 1–4 parts section
(Right-hand section)
Split Point
(Left)
Split Point
(Right 3)
Entering the Ensemble Voice mode erases any Voice combination settings (L, R1, R2 and R3) you have made.
Important panel settings should be memorized to Registration Memory (page 92).
NOTICE
You can edit settings, such as changing
each of the Voices that make up the
Ensemble Voice and change how the
Voices are assigned the notes of the
chords you play. For details, refer to the
Reference Manual on the website.
NOTE
Genos Owner’s Manual55
1
Playing with Styles—Setups
Exiting from the Ensemble Voice mode
1Press any one of the VOICE SELECT buttons to call up the
Voice Selection display.
2Select a Voice other than an Ensemble Voice.
After you’ve selected another Voice, you can confirm that the Ensemble Voice
mode is no longer active. To do this, press the [Home] button to return to the
Home display and check that the Voice area shows four different Voice names.
To return to the Home display
Press the [EXIT] button or the [HOME] button. The Voice area shows the Ensemble Voice name. To call up the Voice
Selection display again to select other presets, touch the Voice area of the Home display.
56Genos Owner’s Manual
You can apply the Keyboard Harmony or Arpeggio features to enhance or change the
sound of the Right-hand parts (RIGHT 1–3). Keyboard Harmony applies performance
effects such as harmony (duet, trio, etc.), echo, tremolo and trill to the notes played in the
Right-hand section. The Arpeggio function lets you play arpeggios (broken chords) by
simply pressing the notes of the chord. For example, you could play the notes C, E and G
to trigger interesting and rhythmically dynamic phrases. This feature can be used for
music production as well as live performance.
Using Keyboard Harmony
1Call up the operation display.
[MENU] [Kbd Harmony/Arp]
2Set the Keyboard Harmony/Arpeggio function to “On.”
When this is set to “On,” Keyboard Harmony is applied to your keyboard perfor-
mance automatically.
3Touch to select the category “Harmony” or “Echo.”
4Touch the desired Harmony or Echo type.
Touching (detailed settings) calls up the detailed settings popup window. For
more information, refer to the Reference Manual on the web site.
5Play the keyboard.
The effect selected in step 4 is applied to the right-hand melody.
To turn off the effect, turn the [HARMONY/ARPEGGIO] button off.
Keyboard Harmony category types (Harmony/Echo)
Harmony Category
Standard Duet—Strum
These types apply the harmony effect to notes played in the right-hand section of the key-
board according to the chord specified in the left-hand section of the keyboard. (Note that
the “1+5” and “Octave” settings are not affected by the chord.)
• When the [ACMP] button is on and the LEFT part is off:
Setting up Keyboard Harmony/Arpeggio
When you select another Voice for the
RIGHT 1 part, the Keyboard Harmony/
Arpeggio type is automatically set to the
type which is memorized as the Voice
Set. For details on the Voice Set func-
tion, refer to the Reference Manual on
the website.
NOTE
2
You can also set the function to “On” by
turning the [HARMONY/ARPEGGIO]
button on.
NOTE
For details on the Split Point, refer to
page 49.
NOTE
Chord section for Style playback and Harmony effect
Split Point
(Style)
Genos Owner’s Manual57
1
Playing with Styles—Setups
• When the [ACMP] button is off and the LEFT part is on:
• When both the [ACMP] button and the LEFT part are on:
Multi Assign
The Multi Assign effect automatically assigns the notes of chords you play on the right-
hand section of the keyboard to separate parts (Voices). For example, if you play a three-
note chord, the first note you press is played by the RIGHT 1 Voice, the second by the
RIGHT 2 Voice, and the third by the RIGHT 3 Voice. The Multi Assign effect is not
affected by the [ACMP] and LEFT part on/off status.
Echo Category (Echo, Tremolo, Trill)
The Echo, Tremolo or Trill effect is applied to the note played in the right-hand section of
the keyboard in time with the currently set tempo, regardless of the [ACMP] and the LEFT
part on/off status. Keep in mind that Trill works only when you hold down two notes on
the keyboard simultaneously (or the last two notes, if more than two notes are held), and it
plays those notes alternately.
Using Arpeggio
1Call up the operation display.
[MENU] [Kbd Harmony/Arp]
2Set the Keyboard Harmony/Arpeggio function to “On.”
When this is set to “On,” Keyboard Harmony is applied to your keyboard perfor-
mance automatically.
3Touch to select a category other than “Harmony” or “Echo.”
4Touch the desired Arpeggio type.
Touching (detailed settings) calls up the detailed settings popup window. For
more information, refer to reference manual on the web site.
LEFT part and chord section for Harmony effect
Split Point
(Left)
RIGHT 1–3 parts
Chord section for Style playback and Harmony effect
Split Point
(Style)
LEFT part
Split Point
(Left)
RIGHT 1–3 parts
2
You can also set the function to “On” by
turning the [HARMONY/ARPEGGIO]
button on.
NOTE
NEXT PAGE
58Genos Owner’s Manual
5Play a note or notes to trigger the Arpeggio.
The arpeggiated phrase differs depending on the notes played.
To turn off the effect, turn the [HARMONY/ARPEGGIO] button off.
•By using the Arpeggio Quantize func-
tion, Arpeggio playback can be syn-
chronized with Song/Style playback,
allowing any slight imperfections in
the timing to be corrected. This can
be set in the display: [MENU]
[VoiceSetting] [S.Art2/Arpeggio].
•Arpeggio playback can be continued
even after the note has been released,
by assigning the Arpeggio Hold func-
tion to the footswitch. For instruc-
tions, refer to page 63.
NOTE
Genos Owner’s Manual59
1
Playing with Styles—Setups
Selecting Multi Pads
1Press the MULTI PAD CONTROL [SELECT] button to call up the
Multi Pad Bank Selection display.
2Touch the desired Multi Pad Bank.
3If necessary, try out the selected Multi Pad(s).
Simply press the MULTI PAD CONTROL [1]–[4] buttons to start playback of the
corresponding phrase. To stop playback, press the [STOP] button.
For more information on Multi Pad playback control, refer to “Controlling Multi
Pad Playback” (page 70).
Setting up Multi Pads
You can also call up the Multi Pad
Selection display via the Home display
(page 30).
NOTE
For basic operations of the Multi Pad
Selection display, refer to “File Selec-
tion Display” (page 32).
NOTE
Creating and Editing Multi Pads
You can create your original Multi Pads in one of three ways:
•Recording new phrases
•Editing existing Multi Pad phrases
•Linking with audio files (Audio Link Multi Pad)
Also, you can make your original Multi Pad Bank by managing each Multi Pad.
For details, refer to the Reference Manual on the web site (page 10).
60Genos Owner’s Manual
You can memorize your original panel settings (mainly Style, Voices, and Multi Pads) to a
One Touch Setting (OTS). The newly created One Touch Setting will be saved in the User
drive or a USB flash drive as a Style, and you can call up the One Touch Setting as a part
of the Style.
1Select the desired Style to memorize your One Touch Setting.
2Make the desired panel settings, such as those for Voices and
Effects.
3Press the [MEMORY] button in the REGISTRATION MEMORY
section.
A message appears. However, you do not need to make any settings here, since the
On/Off settings in this display do not affect the One Touch Setting function.
4Press the desired ONE TOUCH SETTING [1]–[4] button to which
you wish to memorize your panel settings.
A message appears prompting you to save the panel settings at this time. To go on
and memorize various panel settings to other buttons, touch [No], then repeat steps
2–4 as necessary, finally saving all your new settings in Step 5 below.
5Touch [Yes] to call up the Style Selection display for saving
your data, then save the current settings as a User Style.
For instructions on saving, refer to “File Management” (page 37).
Memorizing Original Panel Settings to One Touch Setting
For information on which panel settings
are memorized to One Touch Setting,
refer to “Parameter Chart” in the Data
List on the website (page 10).
NOTE
34
For OTS buttons to which your panel
settings have not been memorized, the
OTS settings of the original Style will be
maintained.
NOTE
The memorized One Touch Setting
will be lost if you change the Style
or turn the power off without car-
rying out the Save operation.
NOTICE
Genos Owner’s Manual61
1
Playing with Styles—Setups
Transposing the pitch in semitones (TRANSPOSE [-]/[+]buttons)
The TRANSPOSE [-]/[+] buttons transpose the overall pitch of the instrument (the key-
board sound, Style playback, MIDI Song playback, and so on) in semitone steps (from -12
to 12). To instantly reset the transpose value to 0, press the [-] and [+] buttons simultane-
ously.
You can independently select the part to be transposed as desired. Touch the Transpose
pop-up several times until the desired part appears, then use the TRANSPOSE [-]/[+] but-
tons to transpose it.
Transposing the pitch in octave (UPPER OCTAVE [-]/[+] buttons)
The UPPER OCTAVE [-]/[+] buttons allow you to shift the pitch of the Right 1–3 parts up or down by one octave. To
instantly reset the octave value to 0, press the [-] and [+] buttons simultaneously.
Changing the Pitch of the Keyboard
•If you want to transpose the pitch of
the Audio Song, use the Pitch Shift
parameter on page 80.
•The Transpose functions do not affect
the Drum Kit or SFX Kit Voices.
NOTE
Transpose can be done on the display
also via [MENU] [Transpose]. For
details, refer to the Reference Manual on
the website.
NOTE
MasterTransposes the pitch of the entire sound, with the exception of the Audio
Song and input sound from a microphone or the AUX IN jacks.
KeyboardTransposing the keyboard pitch including the chord root for triggering
Style Playback.
SongTransposes the pitch of the MIDI Song.
Fine Tuning the Pitch
By default, the pitch of the entire instrument is set to 440.0 Hz according to equal tem-
perament. This setup can be changed from the display called up via [MENU] [Mas-
ter Tune]. For details, refer to the Reference Manual on the website.
62Genos Owner’s Manual
You can assign parameters and functions to the LIVE CONTROL knobs/sliders, the [ROTARY SP/ASSIGNABLE] but-
ton, or optional footswitches for quick operations and expressive control during your keyboard performance. The setup
of assignable controllers is stored/recalled from the registration memory so you can change them all together.
Selecting the Assign Types of the LIVE CONTROL knobs/sliders
Each setup of assigned parameters for knobs is called “Knob Assign Type” and for sliders, it is called “Slider Assign
Type.” There are three Knob Assign Types (1–3) and they can be switched in sequence by pressing the [KNOB ASSIGN]
button. There are normally three Slider Assign Types (Balance and Assign Types 1 and 2), and they can be switched in
sequence by pressing the [SLIDER ASSIGN] button. The selected Assign Types for knobs and sliders will be reset when
the power is turned off.
Setting up Assignable Controllers
Assign Type 1
Assign Type 2
Assign Type 3
Balance
Assign Type 1
Assign Type 2
When Organ Flutes Voice is selected for
each Keyboard Part, additional Slider
Assign Types can be specially selected
for operating footage levers corre-
sponding to each Part, letting you
adjust the sound with much the same
feel as on an actual instrument.
NOTE
Editing the Assign Type of the knobs/sliders
Knob Assign Types 1–3 and Slider Assign Types 1–2 can be edited in the Edit display
which is called up as follows: [MENU] [Live Control]. For details of editable items,
refer to the Reference Manual on the website.
Genos Owner’s Manual63
1
Playing with Styles—Setups
Assigning functions to the [ROTARY SP/ASSIGNABLE] button
Various functions can be assigned to the [ROTARY SP/ASSIGNABLE] button.
1To call up the Edit display, touch [MENU] [Assignable].
2Double-tap (touch twice) the “Rotary Sp/Assignable” item on
the display.
The function selection pop-up window appears.
3Touch the desired function.
Assigning functions to footswitches/foot controllers
You can assign various functions to optional footswitches/foot controllers.
1To call up the Edit display, touch [MENU] [Assignable].
2Double-tap (touch twice) the desired item in the “Foot Pedals”
area (shown above).
The function selection pop-up window appears.
3Touch the desired function.
2
For details on assignable parameters
and functions, refer to the Reference
Manual on the website.
NOTE
2
•For details on assignable parameters
and functions, refer to the Reference
Manual on the website.
•For connecting footswitches/foot
controllers, refer to “Connecting
Footswitches/Foot Controllers”
(page 110).
NOTE
2
2
64Genos Owner’s Manual
Operation Guide
Playing with Styles—Operations While
Performing
If you’ve made all desired settings for a single song (in the previous sections), now you’re ready to play the key-
board. This section mainly explains the various Style-related operations you’ll use during your keyboard perfor-
mance: Style playback, applying expressive effects, and Multi Pad playback.
Starting and stopping Style playback
[START/STOP] button
Starts playback of the rhythm part of the current Style. To stop playback, press the button
again.
[SYNC START] button
This puts the Style playback in “standby.” The Style starts playing back when you press
any note on the keyboard (when [ACMP] is off) or you play a chord with your left hand
(when [ACMP] is on). While a Style is playing back, pressing this button stops the Style
and puts playback in standby.
[SYNC STOP] button
You can start and stop the Style any time you want by simply playing or releasing the keys
in the chord section of the keyboard. Make sure that the [ACMP] button is on, press the
[SYNC STOP] button, then play the keyboard.
INTRO [I]–[III] buttons
Genos features three different Intro sections that let you add an introduction before starting
the Style playback. After pressing one of the INTRO [I]–[III] buttons, start playback of the
Style. When the Intro finishes playing, the Style playback automatically shifts to the Main
section.
ENDING/rit. [I]–[III] buttons
Genos features three different Ending sections that let you add an ending before stopping
Style playback. When you press one of the Ending [I]–[III] buttons while Style is playing
back, the Style will automatically stop after the ending is played. You can have the ending
gradually slow down (ritardando) by pressing the same ENDING button once again, while
the ending is playing.
Operating Style Playback
Playing back both rhythm and auto accompaniment (ACMP)
If the [ACMP] button is turned on, both the rhythm part and auto accompaniment can be
played back when playing chords in the chord section during Style playback.
When the Fingering type (page 46) is
set to “Full Keyboard” or “AI Full Key-
board,” Sync Stop cannot be turned on.
NOTE
Genos Owner’s Manual65
2
Playing with Styles—Operations While Performing
Changing pattern variations (Sections) during Style playback
Each Style features four different Main sections, four Fill-in sections and a Break section.
By using these sections effectively, you can easily make your performance sound more
dynamic and professional. The section can be freely changed while the Style is playing
back.
MAIN VARIATION [A]–[D] buttons
Press one of the MAIN VARIATION [A]–[D] buttons to select the desired Main section
(the button lights in red). Each is an accompaniment pattern of a few measures or more and
it plays indefinitely. Pressing the selected MAIN VARIATION button again plays an
appropriate fill-in pattern to spice up the rhythm and break the repetition. After the fill-in
finishes playing, it leads smoothly into the Main section.
Fading In/Out
The Fade In/Out function produces smooth fade-ins and fade-outs when starting/stopping the playback of a Style or
Song. You can assign this function to the [ROTARY SP./ASSIGNABLE] button, footswitches, or the ASSIGNABLE
[A]–[F] buttons.
•To start playback with a fade in:
When playback is stopped, press the button to which this function has been assigned. Then press the [START/
STOP] button for Style (or the [PLAY/PAUSE] button for MIDI Song).
•To stop playback with a fade out:
During playback, press the button to which this function has been assigned.
AUTO FILL IN function
When the [AUTO FILL IN] button is turned on, pressing any of the MAIN VARIATION
[A]–[D] buttons as you play automatically plays a fill-in section for a smooth, dynamic
transition into the next (or same) section.
Style Section Reset
During playback of a Style, you can rewind to the top of the section (“reset” the playback position, for stutter repeat
effects) by pressing the [TAP TEMPO] button (page 46).
Automatically changing One Touch Settings with the Main sections (OTS LINK)
The convenient OTS (One Touch Setting) Link function lets you automatically have One
Touch Settings change when you select a different Main section (A–D). The Main sections
A, B, C and D correspond to One Touch Settings 1, 2, 3 and 4 respectively. To use the OTS
Link function, turn the [OTS LINK] button on.
For information on assigning functions to each controller, refer to “Setting up Assignable Controllers” (page 62) and “Setting the Functions or Shortcuts to the ASSIGN-
ABLE Buttons” (page 100).
NOTE
Press the selected
Main section (lit in
red) again.
The fill-in of the
selected Main sec-
tion plays (flashes in
red).
You can set the behavior to change the tempo instead of “reset” of the section, even when tapping the button during playback of a Style. The setting is made on the dis-
play called up via [MENU] [Metronome] [Tap Tempo]. For details, refer to the Reference Manual on the website.
NOTE
You can change the timing in which the One Touch Settings change with the MAIN VARIATION [A]–[D] changes. To do this, call up the display via [MENU] [Style Set-
ting] [Setting], then set the OTS Link Timing parameter. For details, refer to the Reference Manual on the website (page 10)
NOTE
66Genos Owner’s Manual
[BREAK] button
This lets you add dynamic breaks in the rhythm of the accompaniment. Press the [BREAK]
button during Style playback. When the one-measure Break pattern finishes playing, Style
playback automatically shifts to the Main section.
Using the Joystick
By moving the joystick in a horizontal (X) or vertical (Y) direction, you can bend the notes up or down, or apply modu-
lation effects. Move the joystick to control the sound while playing the keyboard.
X: Pitch Bend
Bends notes up (by moving the joystick to the right) or down (by moving the joystick to
the left) while playing the keyboard. This is applied to all keyboard parts (RIGHT 1–3 and
LEFT).
Y: Modulation
The Modulation function applies a vibrato effect to notes played on the keyboard. By
default, this is applied to the keyboard parts RIGHT 1–3. You can set whether the modula-
tion effects produced by the joystick will be applied or not to each keyboard part indepen-
•For a general overview of MIDI and how you can effectively use it, refer to “MIDI Basics” on the website (page 10).
•For information on compatible MIDI formats, refer to page 11.
NOTE
The Song playback mode cannot be
switched during Song playback.
NOTE
Press the [SONG] button, or
tap [List] on the display.
Press the [SONG] button, or
tap [Dual] on the display.
Dual Player mode (SONG A, SONG B)Song List mode (SONG B)
74Genos Owner’s Manual
Selecting Songs (Dual Player mode)
1Press the [SONG] button to call up the Song Playback display.
Make sure that Dual Player mode is selected.
2Touch the Song name in the Song A or Song B area.
The Song Selection display appears.
3Select the desired Song for each, A and B.
For selecting from Audio Songs, touch [Audio].
For selecting from MIDI Songs, touch [MIDI].
For detailed playback operations and the crossfade function, refer to pages 78, 85.
2
•For basic operations of the Song
Selection display, refer to “File Selec-
tion Display” (page 32).
•You can select two Audio Songs or
one Audio Song and one MIDI Song
for SONG A and SONG B. Two MIDI
Songs cannot be selected.
•You can call up the display of Song
playback related settings, via
(Menu) [Song Setting].
NOTE
Viewing Audio Information
When an Audio Song is selected on the Song Selection display, touching (Menu)
then [Audio Information] calls up the information window.
Genos Owner’s Manual75
3
Singing with Song Playback—Setting Up
Selecting Songs (Song List mode)
1Press the [SONG] button to call up the Song Playback display.
Make sure that Song List mode is selected.
2Prepare a Song List
When creating a new Song List
Touching (New) on the display allows you to create a new Song List.
For details on how to edit the Song List, refer to the Reference Manual on the web-
site.
When selecting an existing Song List
2-1
Call up the Song List File Selection display by touching the Song List name.
2-2Touch the desired Song List file.
3Touch the desired Song from the selected Song List.
The selected Song is highlighted.
For detailed playback controls, refer to page 78.
For information on controlling continuous playback of the Songs on the list, refer to the
Reference Manual on the website.
2
76Genos Owner’s Manual
You can automatically apply various Vocal Harmony effects to your voice as you sing, or
you can use Synth Vocoder to graft the unique characteristics of your voice onto synthe-
sizer and other sounds.
Using Vocal Harmony
1Call up the Vocal Harmony display via [MENU] button [Vocal-
Harmony].
2Make sure that Harmony is set to “On.”
If necessary, touch the display or press the [VOCAL HARMONY] button to turn
the Harmony “On.”
3Touch the Vocal Harmony name to call up the Vocal Harmony
Type Selection display.
4Touch the desired Vocal Harmony Type to select it.
The Vocal Harmony features three different Modes which can be selected auto-
matically by selecting a Vocal Harmony Type.
Vocal Harmony Modes
Icons shown in the Vocal Harmony Type Selection display indicate the following
usage cases.
Applying Effects to the Microphone Sound (Vocal Harmony)
Make sure to connect a microphone
before using Vocal Harmony and Synth
Vocoder. For instructions on connecting
a microphone and making necessary
settings, refer to page 106.
NOTE
2
3
5
Mode
Vocal Harmony type name
(When the Mode is set to “Vocoder” or “Vocoder Mono”)
ChordalThe harmony notes are determined by the chords you play in the
chord section (with [ACMP ON/OFF] turned on), the left hand
section (with [ACMP ON/OFF] turned off and the Left part
turned on) or the chord data of a Song.
VocoderThe microphone sound is output via the notes you play on the
keyboard or the Song playback notes.
Vocoder-monoBasically the same as Vocoder; however, in this mode, only sin-
gle-note melodies or lines can be played back (with last-note pri-
ority).
(Blue)
Vocal Harmony Type of Chordal Mode
(Brown)
Vocal Harmony Type of Vocoder Mode
(Green)
Vocal Harmony Type having unusual effects, such as a robotic
voice.
(Gray)
Vocal Harmony Type without any effect.
Genos Owner’s Manual77
3
Singing with Song Playback—Setting Up
5Follow the steps below, depending on which Type (and mode)
you selected.
If you selected the Chordal Type:
5-1
Make sure that the [ACMP] button is turned on.
5-2Play back a Style while playing chords, or play back a Song which contains
chords.
Vocal harmonies based on the chords are applied to your singing.
If you selected the Vocoder or Vocoder-Mono Type:
5-1
As necessary, change the “Keyboard” setting to “Off,” “Upper,” or “Lower.”
When “Upper” or “Lower” is selected, playing the right-hand or left-hand
section of the keyboard will control the Vocoder effect. When “Off” is
selected, playing the keyboard will not control the Vocoder effect.
5-2Play melodies on the keyboard or play back a Song, and sing into the micro-
phone.
You’ll notice that you don’t actually have to sing pitched notes. The
Vocoder effect takes the words you say and applies them to the pitch of the
instrument sounds.
Using Synth Vocoder
These are special effects that graft the characteristics of your voice onto synthesizer and other sounds, for unusual
machine‐like or robotic effects, as well as unique choir sounds, which you can control with your own singing and play-
ing.
1Execute steps 1–3 in “Using Vocal Harmony” on page 76.
2From the Vocal Harmony Type Selection display, select the
Synth Vocoder category from the sub categories.
3Touch the desired Synth Vocoder Type to select it.
4Try holding down a note on the keyboard and speak or sing
into the microphone.
Also, try changing notes as you say/sing different words, hitting a separate note for
each word.
For Vocoder Types, the effect is applied
to a maximum of three notes of the
chord you play; for Vocoder-Mono, the
effect is only applied to single notes
(last note applied).
NOTE
You can change the Keyboard setting
(Off/Upper/Lower), determining which
part of the keyboard (or Song) controls
the effect. For details, refer to the Refer-
ence manual on the website.
NOTE
4
4
78Genos Owner’s Manual
Operation Guide
Singing with Song Playback—Operations
While Performing
This section explains operations you can do during your singing performance with Songs: Song playback, dis-
playing score and lyrics, adjusting the volume between two Songs, and switching microphone-related functions.
Song playback can be controlled by pressing buttons on the panel or from the Song playback display which is called up
by pressing the [SONG] button. The control displays for SONG A and SONG B (if used) appear, allowing you to control
the currently selected MIDI/Audio Song(s) on the screen.
Song Playback display
Basic playback operations (for MIDI and Audio Songs)
Play/Pause ([PLAY/PAUSE] button)
Press (or touch) [PLAY/PAUSE] () button to start Song playback of the corresponding side (SONG A or SONG B).
During playback, pressing it pauses playback. Pressing it again resumes Song playback from the current position.
Selecting previous/next Song ([PREV] or [NEXT] button)
Press (or touch) the [PREV] or [NEXT] ( or ) button to select the previous/next Song. In the Dual player mode,
this operation selects the previous/next Song file in the same folder. At the Song List mode, this operation selects the pre-
vious/next Song on the Song List.
Rewind/Fast Forward ([PREV] or [NEXT] button)
Hold the [PREV] or [NEXT] ( or ) button to move backward/forward continuously through the current file.
Controlling Song Playback
•For details on MIDI Song/Audio
Song, switching between Song play-
back modes, and Song selection,
refer to page 72.
•In the Song List mode, only basic
playback operations are possible. On
the other hand, you can play back
multiple Songs continuously. For
details, refer to the Reference Manual
on the website.
NOTE
Dual Player mode (SONG A, SONG B)Song List mode (SONG B only)
Genos Owner’s Manual79
4
Singing with Song Playback—Operations While Performing
Playback Operations exclusively for MIDI Song
Synchro Start
You can conveniently start playback of a MIDI Song as soon as you start playing the keyboard. Touching (Synchro
start) puts Synchro Start in standby status, regardless of whether the Song is currently playing or stopped. To cancel the
Synchro Start function, repeat the same operation.
Playback Using Song Position Markers ([M], [1]–[4], [Loop])
Using Song Position markers, you can not only navigate quickly and easily through the MIDI Song data, but also set up
convenient playback loops, for ease in song arranging. For details, refer to “Using Song Position Markers” (page 81).
Moving the Song Playback Position (Song Position pop-up window)
When you press and hold the [PREV] or [NEXT] button, a setting dis-
play appears showing the current position of the Song. When the win-
dow is shown on the display, you can also use the Data dial to move
backward/forward continuously through the current file.
The Phrase Mark number appears only when a MIDI Song containing
Phrase Marks is selected. You can select whether the Song playback
position moves backward or forward in Bar or Phrase Mark units by
touching the setting display beforehand.
For MIDI Songs
Current measure
number
For Audio Songs
Elapsed time
Current measure
number
Phrase Mark
number
Phrase Mark is a pre-programmed marker in certain MIDI Song data, which specifies a specific
location in the Song.
NOTE
Moving the Song Playback Position (progress bar on the display)
In each Song area, the current position of the Song playback is shown. This can be moved forward or backward by
moving the slider on the display.
Queuing the next Song for playback
While a MIDI Song is playing back, you can queue up the next MIDI Song for playback. This is convenient for chain-
ing it to the next Song smoothly during live performance. To queue up, select the Song you want to play next in the
Song Selection display, while a Song is playing back. The “Next” indication appears at the upper right of the corre-
sponding Song name. To cancel this setting, touch (Next Cancel) on the Song Selection display.
You can also queue up the next Audio Song for playback while a Audio Song is playing back, in the same way as for a
MIDI Song.
When the Recording function is used, the queue for playback is canceled.
NOTE
80Genos Owner’s Manual
Playback Operations exclusively for Audio Song
Vocal Cancel
This let you cancel or attenuate the center position of the stereo sound in Audio Song play-
back. This lets you sing “karaoke” style with just instrumental backing, or play the melody
part on the keyboard, since the vocal sound is usually at the center of the stereo image in
most recordings.
To turn the Vocal Cancel function on/off, first select an Audio Song, then turn on/off
(Vocal Cancel).
Time Stretch
Like Tempo adjustment of a MIDI Song, this lets you adjust the playback speed of an
Audio Song by stretching or compressing it. To do this, touch (Time Stretch) to
call up the setup window. Touch []/[] in this window to set the value (from 70% to
160%). Higher values result in a faster tempo.
Pitch Shift
Like the Transpose function of the MIDI Song, this lets you shift the pitch of an Audio
Song in semitone steps (from -12 to 12).
A-B Repeat Playback
This lets you repeatedly play back a specified range (between points A and B).
1Touch (Play/Pause) to start playback.
2Specify the repeat range.
When playback reaches the point you want to specify as the starting point (A), turn
on (A-B Repeat). When playback reaches the point you want to specify as
the ending point (B), touch (A-B Repeat) again. The range from Point A to
Point B will be played back repeatedly.
3To cancel A-B repeat playback, turn off (A-B Repeat).
The time of point A and B are cleared, and Repeat Playback is canceled.
Though the Vocal Cancel function is
highly effective on most audio record-
ings, the vocal sound on some songs
may not be completely cancelled.
NOTE
•Specifying only Point A results in
repeat playback between Point A and
the end of Song.
NOTE
Top of the SongEnd of the SongAB
Specifying the repeat range while Song playback is stopped
1. Fast-forward the Song to Point A then turn on (A-B Repeat).
2. Fast-forward the Song to Point B then touch (A-B Repeat) again.
Genos Owner’s Manual81
4
Singing with Song Playback—Operations While Performing
Song Position markers (SP1–SP4) can be placed in the MIDI Song data. This not only lets you navigate quickly and eas-
ily through the MIDI Song data, but also lets you set up convenient playback loops—allowing you to create dynamic
Song arrangements “on the fly,” as you perform.
Entering Song Position Markers
1Select the desired MIDI Song (page 74), and start playback
(page 78).
2Enter the Song Position markers.
2-1
Touch (Song Position Memorize) to turn it on.
2-2When the Song reaches the point at which you wish to enter a marker, touch
the desired marker number ([1]–[4]) on the display.
The corresponding Song Position marker is entered, and Song Position
Memorize is automatically turned off.
3As desired, enter other markers in the same way as step 2.
4Pause Song Playback (page 78).
5Save the Song.
5-1
Touch the Song name to call up the Song Selection Display.
5-2Save the Song file (page 37).
Jumping to a Song Position Marker during playback
Simply touching the one of the Song Position [1]–[4] during Song playback jumps to the corresponding position, after
the current played measure reaches its end. (The button will flash in red, indicating that playback jump is ready.) You can
cancel the jump by touching the same Song Position again before the actual jump.
Starting playback from a specific Marker
First, touch one of Song Position [1]–[4] while Song playback is stopped, and then start playback (page78).
Using Song Position Markers (MIDI Song only)
The entered marker settings will
be lost if you change to another
Song or you turn the power off
without executing the Save opera-
tion.
NOTICE
About the status of Song Position [1]–[4]
•Off: Song Position is not entered to the button.
•Green: Song Position is entered to the button.
•Red (flashes): Playback jump is ready. See below (“Jumping to a Song Position Marker during playback”).
•Red: The Song Position has been passed and Song playback continues to the next Song button.
82Genos Owner’s Manual
Using Markers in loop playback
In this section, we’ll explain loop playback by the example of looping between markers [1] and [2].
1Touch (Play/Pause) to start playback from the top of the
Song.
2After passing the [1] point, touch (Loop) to turn the loop
function on.
The Song plays back up to the [2] point, then goes back to [1] and loops between
the two points.
3To stop the loop and continue normal playback, touch
(Loop) again.
When this is turned off, playback continues past the [2] point.
Top of
the song
[1]
End of
the song
[2][3][4]
Song Positions
Genos Owner’s Manual83
4
Singing with Song Playback—Operations While Performing
Displaying Music Notation (Score) of the MIDI Song
You can view the music notation (score) of the selected MIDI Song. We suggest that you read through the music notation
before starting to practice.
1Select a MIDI Song (page 74).
2Touch (Score) on the Song Playback display to call up
the Score display.
You can look through the entire notation by touching [] or [] when Song play-
back is stopped. While the Song is playing back, the “ball” bounces along through
the score, indicating the current position.
Displaying Score, Lyrics, and Text files during Playback
•You can call up the Score display as
well, via [MENU] [Score].
•The instrument can display the music
notation of commercially available
music data or your recorded Songs.
•The displayed notation is generated
by the instrument based on the Song
data. As a result, it may not be exactly
the same as commercially available
sheet music of the same song—
especially when displaying notation
of complicated passages or many
short notes.
NOTE
For changing
the page.
For changing the
settings of the
Score display.
Changing the Size of the Score and Displaying Lyrics in a Score
By touching the note icon shown on the lower right of the display, you can change the settings of the Score display,
such as changing the size of the score, or displaying note names or lyrics within the score, and so on. For details on the
Score display, refer to the Reference Manual on the website.
Lyrics can be shown only when the Song contains lyric data.
NOTE
84Genos Owner’s Manual
Displaying Lyrics of the MIDI Song
When the selected Song contains lyric data, you can view it on the instrument’s display during playback.
1Select a MIDI Song (page 74).
2Touch (Lyrics) on the Song Playback display to call up
the Lyrics display.
When the Song data contains lyrics data, the lyrics are shown on the display. You
can look through the entire lyrics by touching [] or [] when Song playback is
stopped. While the Song is playing back, the color of the lyrics changes, indicating
the current position.
For details on the Lyrics display, refer to the Reference Manual on the website.
Displaying Text
Regardless of whether a Song is selected or not, you can view computer-created text files (.txt) on the instrument’s dis-
play. To call up the display, touch (Text) on the Song Playback display. This feature enables various useful pos-
sibilities, such as the showing of lyrics, chord charts and performance notes. For details on the Text display, refer to the
Reference Manual on the website.
You can call up the Score display as
well, via [MENU] [Lyrics].
NOTE
For changing the page.
Genos Owner’s Manual85
4
Singing with Song Playback—Operations While Performing
In the Dual Player mode of Song playback, the Cross Fader lets you adjust the volume balance between SONG A and
SONG B playback. Moving the fader leftward increases the volume of SONG A playback, and moving rightward
increases the volume of SONG B playback.
Turning Vocal Harmony On/Off
Pressing the [VOCAL HARMONY] button turns the Vocal Harmony function on/off. By using this button, you can
quickly switch whether Vocal Harmony effects are applied to your voice through a microphone or not. For details on the
Vocal Harmony function, including Harmony type selection, refer to page 76.
Using the Talk function
Turning the Talk function on by pressing the [TALK] button lets you instantly change the
microphone settings for speaking to your audience. Vocal Harmony is not available when
this function is on. This is useful when you want to make announcements between song
performances without distracting reverb effects, etc.
Adjusting the Volume Balance between SONG A and SONG B (Cross Fader)
Controlling the Microphone Functions
You can also adjust the Talk settings to
suit your preferences on the “Mic Set-
ting” display. For details, refer to the
Reference Manual on the website.
NOTE
5
5
86Genos Owner’s Manual
Operation Guide
Adjusting the Parameters of Each Part—
Mixer
The Mixer gives you intuitive control over aspects of the keyboard parts and Song/Style channels, including vol-
ume balance and the timbre of the sounds. It lets you adjust the levels and stereo position (pan) of each Voice to
set the optimum balance and stereo image, and lets you set how the effects are applied.
This section covers the basic procedures for the Mixer. For details, refer to the Reference Manual on the website.
1Call up the Mixer display via [MENU] [Mixer].
2Touch the appropriate tab for editing the balance between the
desired parts.
Basic Procedure for the Mixer
PanelUse this display when you want to adjust the balance among the
entire Style part, entire Multi Pad part, Left part, Right 1–3
parts, entire Song A part, entire Song B part, Mic part, Aux In
Audio part, and the Wireless LAN Audio part.
StyleUse this display when you want to adjust the balance between
the channels of the Style. About each channel, refer to “Style
Channels” (page 88).
M.PadUse this display when you want to adjust the balance among the
four Audio Link Multi Pads.
SongUse this display when you want to adjust the balance between all
the parts of the MIDI Song.
MasterUnlike the other displays, use this display when you want to
adjust the tonal characteristics of the entire sound (except for
Audio Songs) of this instrument. For details on this display, refer
to page 102.
3
2
A wireless LAN function may not be included depending on your area.
NOTE
Genos Owner’s Manual87
5
Adjusting the Parameters of Each Part—Mixer
3Touch a tab for editing the desired parameters.
4Set the value of each parameter.
5Save your Mixer settings.
To save the Panel Mixer settings:
Register them to Registration Memory (page 93).
To save the Style Mixer Settings:
Save them as a Style file to the User drive or USB flash drive. If you want to recall
the settings for future use, select the Style file saved here.
1Call up the operation display via [MENU] [Style Creator].
2Touch [Save] to call up the Style Selection display, then save as a Style file
(page 37).
To save the MIDI Song Mixer Settings:
When editing and saving the MIDI Song Channel settings, a different operation is
needed. For details, see “Editing and Saving the MIDI Song Mixer Settings”
below.
Editing and Saving the MIDI Song Mixer Settings
First select a MIDI Song, and edit the parameters. Second, register the edited settings as part of the MIDI Song data
(Setup), then save the Song to the User drive or USB flash drive. If you want to recall the settings for future use, select
the Song file saved here.
1Call up the operation display via [RECORDING] MIDI [Multi
Recording].
2Touch the Song name “New Song” to call up the Song Selec-
tion display, then select the desired Song.
3Edit the desired parameters, according to “Basic Procedure for
the Mixer” (page 86) steps 1–4.
4Press the [RECORDING] button to call up the MIDI Multi
Recording display again.
5Register the edited settings to the MIDI Song.
5-1
Touch [Setup] to call up the Setup display.
5-2Touch [Execute] to register the edited settings as part of the MIDI Song
data.
6Touch [Save] to call up the Song Selection display, then save as
a Song file (page 37).
FilterFor adjusting Resonance, and Cutoff (sound brightness).
EQFor adjusting equalization parameters to correct the tone or tim-
bre of the sound.
EffectFor selecting an Effect type and adjusting its depth for each part.
Chorus/ReverbFor selecting a Chorus/Reverb type and adjusting its depth for
each part.
Pan/VolumeFor adjusting panning and volume for each part.
•To reset each parameter to the default
value, touch the number value or set-
ting and hold it.
NOTE
88Genos Owner’s Manual
You can add variations and change the feeling of a Style or a MIDI Song by selectively turning channels on/off.
1In the Mixer display, touch the [Style] tab or [Song] tab.
2Touch the Channel which you want to turn on/off.
If you want to play back only one particular channel (solo playback), touch and
hold the desired channel until the number is highlighted in purple. To cancel solo,
simply touch the (purple) channel number again.
3As necessary, make other settings then save them as a Style
file or Song file (step 5 on page 87).
Turning Each Channel of the Style or MIDI Song On/Off
Style Channels
Each Style contains the channels listed below.
•Rhythm 1/2: These are the basic parts of the Style, containing the drum and percussion rhythm patterns.
•Bass: The bass part uses various appropriate instrument sounds to match the Style.
•Chord 1/2: These are the rhythmic chord backing, commonly consisting of piano or guitar Voices.
•Pad: This part is used for sustained instruments such as strings, organ, choir, etc.
•Phrase 1/2: These parts are used for punchy brass stabs, arpeggiated chords, and other extras that make the accom-
paniment more interesting.
Channel
Genos Owner’s Manual89
5
Adjusting the Parameters of Each Part—Mixer
You can change the Voice for each channel via the Mixer display.
1In the Mixer display, touch the [Style] tab or [Song] tab.
2Touch the instrument icon below the channel name to call up
the Voice Selection display, then select the desired Voice.
3As necessary, make other settings then save them as a Style
file or Song file (step 5 on page 87).
Changing the Voice for Each Channel of the Style or MIDI Song
Voice
6
6
90Genos Owner’s Manual
Operation Guide
Song Recording
This instrument allows you to record your performance in two ways: MIDI recording and Audio recording. In
addition, each way of recording features two different methods: Quick Recording, which is the easiest, most con-
venient way to record, and Multi Recording, which allows you to record each channel or each track indepen-
dently. In this section, we’ll take a look at MIDI Quick Recording and Audio Quick Recording.
MIDI Quick Recording
With this method, recorded performances are saved to the instrument or a USB flash drive as an SMF (format 0)
MIDI file. If you want to re-record a specific section or change Voices and edit other parameters, use this
method. This instrument allows you to record approximately 3 MB per Song.
Audio Quick Recording
With this method, recorded performances are saved to the instrument as an Audio file. Recording is done without
designating the recorded part. Since it is saved in stereo WAV format of normal CD quality resolution (44.1kHz/
16-bit) by default, it can be transmitted to and played on portable music players by using a computer. This instru-
ment allows you to record up to 80 minutes per single recording.
Before recording, make the necessary settings such as Voice/Style selection. As necessary,
connect the USB flash drive to the [USB TO DEVICE] terminal. With this type of record-
ing, each part will be recorded to the following channels.
•Keyboard parts: channels 1–4
•Multi Pad parts: channels 5–8
•Style parts: channels 9–16
1Call up the MIDI Quick Recording display via [RECORDING]
MIDI [Quick Recording].
The display appears and a new blank Song is automatically set to record standby
status.
Multi Recording
•MIDI Multi Recording: This lets you create a MIDI Song consisting of 16 channels by recording your performance
to each channel one by one.
•Audio Multi Recording: This lets you record your performance several times to make up the complete song, or
record additional performances to an existing Audio file.
For details on Multi Recording, refer to the Reference Manual on the website.
MIDI Quick Recording
•Audio data such as the rhythm chan-
nels created via the audio data of
Audio Link Multi Pad and Audio
Songs cannot be recorded to the
MIDI Songs.
•Before using a USB flash drive, be
sure to read “Connecting USB
Devices” on page 111.
NOTE
To cancel the recording, touch [Stop] on
the display, and then press the [EXIT]
button, before going on to step 2.
NOTE
Genos Owner’s Manual91
6
Song Recording
2Start recording.
You can start recording by playing the keyboard, starting the Style, playing a Multi
Pad or touching [Play/Pause].
3After you finish your performance, touch [Stop] to stop record-
ing.
4Touch [Save] to call up the Song Selection display, then save
the recorded performance as a file (page 37).
Before recording, make the necessary settings such as Voice/Style selection and the microphone connection (if you want
to record your singing).
1Call up the Audio Quick Recording display via [RECORDING]
Audio [Quick Recording].
The display appears and a new empty audio file is created, with record standby
status enabled. However, unlike MIDI Quick Recording, recording does not start
automatically with keyboard performance, Style playback, or Multi pad playback.
2Before recording, check the recording levels on the Rec Moni-
tor meter by playing the keyboard, Style, etc., and adjust them
accordingly by using the corresponding slider.
Adjust the control so that the volume doesn’t constantly go into the “red” and light
up the indicator.
3Touch [Play/Pause] to start recording.
Immediately after this operation, start and record your performance.
4After you finish performance, touch [Stop] to stop recording.
Recorded data is automatically saved to User drive as a file with the name auto-
matically set. The recorded Audio Song appears in the User category on the Song
Selection display.
The recorded Song will be lost if
you close the display or you turn
the power off without executing
the save operation.
NOTICE
Audio Quick Recording
To cancel the recording, touch [Stop] on
the display, and then press the [EXIT]
button, before going on to step 2.
NOTE
2
7
7
92Genos Owner’s Manual
Operation Guide
Storing and Calling up Custom Panel Set-
ups—Registration Memory, Playlist
The Registration Memory function and the Playlist function allow you to save (or “register”) virtually all panel
settings, and then instantly recall your custom panel settings for your performances by a simple, one-touch oper-
ation. The Playlist is especially useful for managing your repertoire, letting you select only the desired panel set-
tings from the huge repertoire in the Registration Memory and create a new list.
Registration Memory
This function allows you to save (register) your custom panel settings to one of the Registration Memory buttons
for easy recall.
There are ten Registration Memory buttons on the panel. You can save all ten registered panel setups as a Single
Registration Memory Bank file.
Playlist
The Playlist function allows you to create your own live performance set list. You can select only the desired
files from the huge number of the Registration Memory Bank files without changing the bank file configuration.
Each Playlist Record can directly recall a specified Registration Memory in the selected Registration Memory
Bank file. You can collectively store the Playlist Records as a single Playlist file.
Virtually all panel settings can be saved to a single button.
Registration
Memory Bank file
Save
Recall
For information on the parameters that can be registered with the Registration Memory function, refer to the Registration section of the “Parameter Chart” in the Data List on
the website.
NOTE
Playlist file 01Registration Memory Bank files
Playlist Record 01
Playlist Record 02
Playlist Record 03
Bank 01
Bank 02
: Link to call up
Genos Owner’s Manual93
7
Storing and Calling up Custom Panel Setups—Registration Memory, Playlist
Registering Your Panel Setups
1Make the desired panel Settings, such as those for Voices,
Styles and Effects.
2Press the [MEMORY] button in the REGISTRATION MEMORY
section to call up the Registration Memory window.
3Press the desired REGISTRATION MEMORY [1]–[10] button to
which you wish to memorize the panel setup.
The memorized button lights in red, which indicates that the button contains data
and its number is selected.
4Register various panel setups to other buttons by repeating
steps 1–3.
The registered panel setup can be recalled by simply pressing the desired number
button.
Saving and Recalling Custom Panel Setups with Registration Memory
The list of items to be registered to
Registration Memory
Selecting the items to be registered
The Registration Memory window contains the list for selecting the items to
be registered. Before going on to step 3, enter or remove checkmarks by
touching the desired items. Items having checkmarks will be registered.
If you selected a button whose
lamp is lit in red or blue here, the
panel setup previously memo-
rized to the button will be erased
and replaced by the new settings.
NOTICE
About the lamp status
•Red: Data registered and currently selected
•Blue: Data registered but not currently selected
•Off: No data registered
The panel setups registered in the num-
bered buttons are maintained even when
you turn off the power. If you want to
delete all ten current panel setups, turn
the power on while holding the F# 6 key
(second right-most key) on the key-
board.
NOTE
94Genos Owner’s Manual
Saving the Registration Memory as a Bank file
You can save all ten registered panel setups as a Single Registration Memory Bank file.
1Press the REGIST BANK [-] and [+] buttons simultaneously to
call up the Registration Bank Selection display.
2Touch (File Edit) to call up the pop-up window, and then
touch [Save] to save the Bank file.
For instructions on saving, refer to “File Management” (page 37).
Recalling a Registered Panel Setup from a Bank file
The saved Registration Memory Bank files can be recalled by using the REGIST BANK
[-]/[+] buttons or the following procedure.
1Press the REGIST BANK [-] and [+] buttons simultaneously to
call up the Registration Bank Selection display.
2Touch and select the desired Bank on the display.
You can also use the REGIST BANK [-]/[+] buttons to select a Bank.
3Press one of the blue-lit numbered buttons ([1]–[10]) in the Reg-
istration Memory section.
The selected button lights in red.
2
You can tag Registration Memory Bank
files for easy search. For details, refer to
the Reference Manual on the website.
NOTE
•When recalling setups that include
Song, Style or text files selected from
a USB flash drive, make sure that the
appropriate USB flash drive contain-
ing the registered Song, Style or text
is connected into the [USB TO
DEVICE] terminal.
•Before using a USB flash drive, be
sure to read “Connecting USB
Devices” on page 111.
NOTE
Turning the [FREEZE] button on lets you
disable recall of specific item(s) as
desired. For instructions, refer to the
Reference Manual on the website.
NOTE
You can also call up the ten setups by
using pedals or Assignable buttons in
any order you specify via [MENU]
[Regist Sequence]. For details, refer to
the Reference Manual on the website.
NOTE
Genos Owner’s Manual95
7
Storing and Calling up Custom Panel Setups—Registration Memory, Playlist
Confirming the Registration Memory Bank Information
You can call up the information display to confirm which Voices, Style and Songs are memorized to the [1]–[10] buttons
of a Registration Memory Bank.
1Call up the Registration Bank Selection display, then select the
desired Bank.
2Touch (Menu) then [Regist Bank Info] to call up the Regist
Bank Information display.
This display consists of two pages: Voice-related, and Style-related. You can
switch between the two via [Voice]/[Style] on the display.
Touch to select the desired Registration Memory. The selected Registration is
automatically loaded.
3Press the [EXIT] button to close the information display.
Editing a Registration Memory Bank
You can edit a Registration Memory Bank (delete or rename each Registration Memory, etc.) in the Regist Bank Edit dis-
play.
1Call up the Registration Bank Selection display, then select the
desired Bank.
2Touch (Menu) then [Regist Bank Edit] to call up the Regist
Bank Edit display.
3Edit the Registration Memory Bank information.
Touch to select the desired Registration Memory. The Registration Memory is
selected as a editing target, but not actually loaded.
• To change the name of the selected Registration, touch [Rename].
• To delete the selected Registration, touch [Delete].
4Touch (Save) to save the edited Registration Memory Bank
file.
If a certain Voice part is set to off, the
Voice name for the corresponding part
is shown in gray.
NOTE
For switching pages.
3
96Genos Owner’s Manual
The Playlist is useful for managing multiple set lists for your live performances. You can select only the desired files
from a large repertoire (the huge number of the Registration Memory Bank files) and create a new set list for each perfor-
mance.
Adding a Record to the Playlist
By adding a Record to the Playlist, you can directly recall your desired Registration Memory.
1Press the [PLAYLIST] button to call up the Playlist display.
The Playlist file which was selected the last time appears. (The sample preset
Playlist will appear for the first time.)
2Add a Record to the Playlist.
To add a Record via the Registration Bank Selection display:
2-1
Touch Add Record [List] on the display.
The Registration Bank Select display appears.
2-2Select the desired Registration Bank file to register as a Playlist Record.
Touching [Add to Playlist] closes the display, and the new Playlist Record is
added to the Playlist.
To add a Record by using the search function:
Touching Add Record [Search] on the display calls up the operation display for
searching the desired Registration Bank file. For details on searching for files,
refer to the Reference Manual on the website.
From the search result, select the desired file and then touch [Add to Playlist] to
close the display, and the new Playlist Record is added.
3If necessary, edit the Playlist Record.
The newly added Playlist Record simply recalls the selected registration Bank file.
If you want to set more detailed settings (such as directly recalling a specified
Registration Memory and automatically switching the screen view), you can edit
the Playlist Record.
3-1Touch [Edit] to call up the Record Edit display.
Managing a Large Repertoire by Using the Playlist
File path of the Registration Memory Bank file
linked to the Record. This file will be recalled by
selecting the Record. (This is only displayed,
and cannot be changed.)
Record Name
Genos Owner’s Manual97
7
Storing and Calling up Custom Panel Setups—Registration Memory, Playlist
3-2Touch to edit the Record.
3-3Close the display.
4Touch (Save) to save the added Record to the current Play-
list file.
To recall the registered Record, touch the desired Record on the Playlist display.
Recalling custom panel setups via the Playlist
1Press the [PLAYLIST] button to call up the Playlist display.
2Touch the Playlist file name to call up the Playlist File Selection
display.
3Touch the desired Playlist file, and then close the display.
4Touch the Record name on the Playlist display, and then touch
[Load].
The Registration Memory Bank registered as the Playlist Record is recalled and
the Action you’ve made is executed (page 96.)
Record NameDetermines the name of the Record. Touching [Rename] calls up the Character Entry win-
dow.
ActionAdditional actions after selecting the Record and recalling the Bank.
•Load Regist Memory: Recalls the Registration Memory corresponding to the selected
number. When no item is selected, no Registration Memory is recalled.
•View: Displays the selected view. When no item is selected, no view is displayed.
2
98Genos Owner’s Manual
Creating a new Playlist
1Press the [PLAYLIST] button to call up the Playlist display.
2Touch (New) on the display.
A new Playlist file is created.
Copying the Playlist Records (Append Playlist)
“Append Playlist” allows you to copy the existing Playlist file as a new Playlist file.
1Press the [PLAYLIST] button to call up the Playlist display.
2Touch [Append Playlist] on the display.
The Playlist File Selection display appears.
3Touch the desired Playlist file to append.
All Records in the selected Playlist file are added at the bottom of the current Play-
list.
4Touch (Save) to save the appended Records to the current
Playlist file.
2
Genos Owner’s Manual99
7
Storing and Calling up Custom Panel Setups—Registration Memory, Playlist
Changing the order of the Records in the Playlist
1Press the [PLAYLIST] button to call up the Playlist display.
2Change the order of the Records.
2-1
Touch the desired Record you want to move.
2-2Touch (Up)/ (Down) to move the Record you selected in Step
2-1.
3Touch (Save) to save the edited Playlist file.
Deleting the Playlist Record from the Playlist
1On the Playlist display, touch the desired Record to select it.
2Touch [Delete] on the display.
A confirmation message appears here. To cancel the deletion, touch [No].
3Touch [Yes].
4Touch (Save) to save the edited Playlist file.
Sorting the Playlist in alphabetical order
1Press the [PLAYLIST] button to call up the Playlist display.
2Touch on the display.
The Playlist items are sorted in alphabetical order. To cancel sorting, touch
again.
8
8
100Genos Owner’s Manual
Operation Guide
Customizing for Optimum Performance
You can customize the instrument for your own personal preferences and optimum performance. This section
covers how to edit shortcuts on the Home display, set ASSIGNABLE buttons, make global settings, adjust the
sound at the final output, and add expansion contents, such as Voices and Styles.
You can register an often used function to a shortcut on the Home display. Although six shortcuts are registered by
default, you can customize them as necessary. Registered shortcuts are shown in the Shortcut area (page 30) at the bot-
tom of the Home display, allowing you to quickly call up the desired function from the Home display.
1Call up the Assignable display via [MENU] [Assignable].
2Double-tap (touch twice) the desired item from the six locations
of the “Home Shortcuts” area.
The function selection pop-up window appears.
3Touch the desired function.
The function will be registered to the location selected in step 2.
You can assign various control functions or shortcuts to the ASSIGNABLE [A]–[F] buttons, allowing you to quickly
operate or call up the desired function.
1Call up the Assignable display via [MENU] [Assignable].
2Double-tap (touch twice) the desired item from the “Assignable
Buttons” area.
The function selection pop-up window appears.
3Touch the desired function.
The function will be registered to the location selected in step 2.
Customizing the Shortcuts on the Home Display
2
Setting the Functions or Shortcuts to the ASSIGNABLE Buttons
2
For details on assignable parameters
and functions, refer to the Reference
Manual on the website.
NOTE
Genos Owner’s Manual101
8
Customizing for Optimum Performance
The Utility function provides a variety of convenient tools and settings for Genos. These include general settings that
affect the entire instrument, as well as detailed settings for specific functions. Also included are data reset functions and
storage media control, such as disk formatting.
Basic Procedure
1Call up the operation display.
[MENU] [Utility]
2Touch the desired tab to call up the desired page, and change
the settings or execute the operation.
For more information of each tabs, refer to the “Utility” of the Reference Manual
on the website.
Making Global Settings (Utility)
Speaker/Connectiv-
ity
Determines how the sound is output from the speaker, and the
digital output volume. It also determines the display out setting
when a USB display adaptor is connected (page114).
Display/Touch
Screen
Contains display-related settings such as brightness, display
speed, and touch sound On/Off settings.
Parameter LockSpecifies the parameters to make them selectable only via the
panel control.
StorageLets you execute the Format operation or check the memory
capacity (approximate value) of the USB flash drive connected
to this instrument. (page 112)
SystemIndicates the firmware version and the hardware ID of this
instrument, and lets you make basic settings, such as the lan-
guage for the display, Auto Power Off function On/Off. (pages
24, 104)
Factory Reset/
Backup
Backs up/restores whole or a part of the instrument or initializes
the instrument to the factory default. (page 105)
102Genos Owner’s Manual
You can adjust the sound quality and the volume at the final output from Genos by making the Master Compressor and
the Master EQ settings.
1Call up the Mixer display via [MENU] [Mixer].
2Touch the “Master” tab.
3Touch a tab for editing the desired parameters.
4Set the value of each parameter.
5Save the settings.
Your original edits can be stored as a Master Compressor type and Master EQ
type. If you want to recall the settings for future use, select the corresponding type
at the upper right of each display.
5-1Touch (Save) in the “Compressor” display or “EQ” display.
5-2Select one of User1–User30 in the “Compressor” display or User1–User30
in the “EQ” display, then touch [Save] to call up the Character Entry win-
dow.
5-3In the Character Entry window, change the name as necessary, then touch
[OK] to save the data.
Adjusting the Sound at the Final Output (Master Compressor, Master EQ)
3
2
For more information about these
parameters, refer to the Reference Man-
ual on the website.
NOTE
CompressorLets you turn the Master Compressor (which is applied to the
entire sound except audio playback) on or off, select the Master
Compressor type, and edit the related parameter Your original
edits can be saved as the Master Compressor type.
EQLets you select the Master EQ type applied to the entire sound
except audio playback and edit the related parameters. Your
original edits can be saved as the Master EQ type.
To reset each parameter to the default
value, touch the number value or setting
and hold it.
NOTE
Genos Owner’s Manual103
8
Customizing for Optimum Performance
By installing Expansion Packs, you can add a variety of optional Voices and Styles to the “Expansion” folder in the User
drive. The installed Voices and Styles can be selected via the User tab in the Voice or Style Selection displays, allowing
you to expand your music performance and creation possibilities. You can get high quality Expansion Pack data created
by Yamaha, or create your own original Expansion Pack data by using the “Yamaha Expansion Manager” software on
your computer. For instructions on how to install the Expansion Packs, refer to the Reference Manual on the website.
For more information about Expansion Packs, access the Sound & Expansion Libraries page at the Yamaha MusicSoft
To obtain the Yamaha Expansion Manager software and its manuals, access the following website, and search by the
model name “Genos.”
https://download.yamaha.com/
Adding New Contents—Expansion Packs
9
9
104Genos Owner’s Manual
Operation Guide
System Settings
This section explains how to make important overall, system-related settings, including backup/restore of set-
tings and file data.
You can check the firmware version and hardware ID of this instrument.
1Call up the operation display via [MENU] [Utility].
2Touch [System].
The program version and the hardware ID are shown in the display.
While holding the right-most key on the keyboard, turn the power on. This restores all set-
tings to the factory default.
Confirming the Firmware Version and Hardware ID
Restoring the Factory-programmed Settings
•You can also restore the factory
default value of specified settings or
delete all files/folders in the User
drive on the display called up via
[MENU] [Utility] [Factory
Reset/Backup] page 1/2. For
details, refer to the “Utility” of the
Reference Manual on the website.
•If you simply want to restore the
default value of any parameter you’ve
changed, touch and hold the value on
the display (page 34).
NOTE
Right-most key
Genos Owner’s Manual105
9
System Settings
Data Backup
You can back up all data in the User drive of this instrument (except for Expansion Voices/
Styles) and all settings to the USB flash drive as a single file. This procedure is recom-
mended for data security and backup in case of damage.
1Connect the USB flash drive to the [USB TO DEVICE] terminal
as backup destination.
2Call up the display via [MENU] [Utility] [Factory Reset/
Backup] page 2/2.
If you want to include the audio files to the backup file:
Before going on to step 3, enter a checkmark by touching the “Include Audio
files” checkbox.
3Touch [Backup] to save the backup file to the USB flash drive.
Restoring the Backup file
To do this, touch [Restore] in step 3 above. When the operation is complete, the instrument
will be restarted automatically.
Data Backup and Restore
•Before using a USB flash drive, be
sure to read “Connecting USB
Devices” on page 111.
•You can back up User data such as
Voice, Song, Style, and Registration
Memory by copying them individu-
ally to a USB flash drive. For instruc-
tions, refer to page 37.
•If the total size of the target data for
backup exceeds 3.9 GB (excluding
Audio files), the backup function is
not available. If this happens, back up
the User data by copying the items
individually.
•You can save the System settings,
MIDI settings, User Effect settings,
and Playlist Records individually.
NOTE
3
•Completing the backup/restore
operation may take a few min-
utes. Do not turn off the power
during backup or restoring. If
you turn off the power during
backup or restoring, data may
be lost or damaged.
NOTICE
106Genos Owner’s Manual
Connections—Using Your Instrument with
Other Devices
This chapter covers the connections of this instrument to other devices. To see where the connectors are located
on the instrument, refer to pages 18–21.
By connecting a microphone, you can sing along with your keyboard performance or with Song playback, as well as
record your vocal performance to an Audio Song. Make sure you have a dynamic microphone or a condenser micro-
phone.
Connecting a microphone to the instrument
1Set the [MASTER VOLUME] knob and the [MIC GAIN] knob to
the minimum position.
2Set the [+48V] switch to off.
Before connecting the instrument to other electronic components, turn off the power of all components. Also,
before turning any components on or off, make sure to set all volume levels to minimum (0). Otherwise, dam-
age to the components, electrical shock, or even permanent hearing loss may occur.
Connecting a Microphone ([MIC INPUT] jack)
CAUTION
About Dynamic and Condenser Microphones
•A dynamic microphone reduces vibration noise, making it good for live performances. Power is not required.
•A condenser microphone is mainly used for vocals and other instruments in environments such as a recording studio,
since it is more sensitive to delicate sounds. For this reason, you need to take greater care to minimize vibrations than
with a dynamic microphone. The condenser microphone requires phantom power supply (+48V), which it receives
from Genos by connecting with an XLR connector.
Genos Owner’s Manual107
Connections—Using Your Instrument with Other Devices
3Connect a microphone to the [MIC INPUT] jack.
For dynamic microphone connection, use the XLR connector or a standard 1/4”
phone plug connector. For a condenser microphone, use the XLR connector.
4When using a condenser microphone, turn the [+48V] switch
on.
5Return the [MASTER VOLUME] dial to the original level.
Adjusting the input level of the microphone
1If necessary, turn on the microphone.
2Call up the Mic Setting display via [MENU] [Mic Setting].
3Adjust the [MIC GAIN] knob while singing into the microphone.
Adjust the [MIC GAIN] knob so that the input level meter on the display lights in
green or yellow. Make sure that the meter does not light in orange or red, since this
indicates that the input level is too high.
4Adjust the volume balance between the microphone sound and
the instrument sound on the Mixer display (page 86).
The combo jack accepts
either XLR or 1/4” phone
plug connectors.
•Do not connect or disconnect
any cables while turning on the
[+48V] switch. Doing so can
damage the connected device
and/or the instrument itself.
•When using the devices not
requiring phantom power such
as a dynamic microphone,
make sure to set the [+48V]
switch to OFF.
When the [+48V] switch is turned on
and off, the input from the [MIC IN] jack
will be muted for a few seconds.
NOTICE
NOTE
Input level meter
You can also check the input level on
the SIGNAL lamp on the panel. Make
sure that the lamp does not light in red.
NOTE
108Genos Owner’s Manual
Disconnecting the microphone
1Set the [MASTER VOLUME] knob and the [MIC GAIN] knob to
the minimum position.
2Set the [+48V] switch to off.
3When using a condenser microphone, wait more than 10 sec-
onds.
4Disconnect the microphone from the [MIC INPUT] jack.
Use the [TO RIGHT SPEAKER], [TO LEFT SPEAKER] and [TO SUB WOOFER] jacks. Refer to page 118.
Using external audio devices for playback (LINE OUT jacks)
The LINE OUT jacks are used to send Genos output to a keyboard amplifier, stereo sound
system or mixing console. If you are connecting Genos to a mono sound system, use only
the LINE OUT MAIN [L/L+R] jack. When only this jack is connected (using a standard
phone plug), the left and right channels are combined and output through this jack—pro-
viding a convenient mono mix of Genos’s stereo sound.
Disconnecting immediately can
damage the condenser micro-
phone and/or the instrument
itself.
NOTICE
Connecting the Optional Yamaha GNS-MS01 Speaker
Connecting Audio Devices (LINE OUT jacks, AUX IN jacks, [DIGITAL OUT]
jack)
Since Genos has no built-in speakers, you need to monitor its sound output via external audio equipment.
Alternatively, you can use a pair of headphones (page 22).
IMPORTANT
•You can send a specific part to any
desired LINE OUT SUB jack. The
operation display can be called up
via: [MENU] [Line Out]. For
details, refer to the Reference Manual
on the website.
•You can also use the [DIGITAL OUT]
jack instead of the LINE OUT MAIN
jacks. However, the output volume
from [DIGITAL OUT] cannot be con-
trolled by MASTER VOLUME.
To avoid possible damage, first
turn on the power to the instru-
ment, then to the external device.
When turning off the power, first
turn off the power to the external
device, then to the instrument.
Since this instrument’s power
may automatically be turned off
due to the Auto Power Off function
(page 24), turn off the power to
the external device, or disable
Auto Power Off when you do not
intend to operate the instrument.
NOTE
NOTICE
Phone plug
(standard)
Phone plug
(standard)
Input jack
Audio cable
Powered speakers
Genos Owner’s Manual109
Connections—Using Your Instrument with Other Devices
Playing External Audio Devices with Genos (AUX IN jacks)
You can connect the output jacks of an external device (such as CD player, portable audio
player, tone generator, etc.) to the instrument’s AUX IN [L/L+R]/[R] jacks, letting you
hear the sound of that device through the headphones or the optional Yamaha GNS-MS01
speakers of Genos.
Using the LINE OUT SUB [3]–[4] jacks as AUX OUT jacks
You can switch the function of the LINE OUT SUB [3]–[4] jacks to AUX OUT jacks from the instrument’s display
called up via [MENU] [Line Out]. For details, refer to the Reference Manual on the website.
Do not route the output from the AUX OUT jacks to the AUX IN jacks. If you make this connection, the signal input at the AUX IN jacks is output
from the AUX OUT jacks, possibly resulting in a feedback loop that will make normal performance impossible, and may even damage the
equipment.
NOTICE
The output volume from AUX OUT jacks cannot be controlled by the MASTER VOLUME control.
NOTE
Using the [DIGITAL OUT] jack
The [DIGITAL OUT] jack has the same output signal as the LINE OUT MAIN jacks.
By using this jack, you can record the keyboard performance or Song playback of this instrument to external media
(e.g., a computer or CD recorder) with exceptionally high-quality sound—thanks to the direct digital connection.
Use this connector to output digital signals via a coaxial (RCA-pin) cable. The digital signal format is CD/DAT (S/
PDIF). This connector outputs a digital signal of 44.1 kHz/24 bit.
The output volume from the [DIGITAL OUT] jack cannot be controlled by the MASTER VOLUME control. To control the digital output volume, adjust the Digital Out
Level on the following display: (called up via [MENU] [Utility] [Speaker/Connectivity]).
NOTE
To avoid damage to the devices,
first turn on the power to the
external device, then to the
instrument. When turning off the
power, first turn off the power to
the instrument, then to the exter-
nal device.
•Use only the [L/L+R] jack for connec-
tion with a monaural device.
•The input signal from the AUX IN
jacks is affected by the setting of the
instrument’s [MASTER VOLUME]
dial, and the volume balance with
other parts such as entire keyboard
can be adjusted by the Mixer display
(page 86).
NOTICE
NOTE
Phone plug
(standard)
LINE OUT
Audio cable
CD player, portable audio player,
tone generator
110Genos Owner’s Manual
One or two optional Yamaha FC4A or FC5 Footswitches and an optional Yamaha FC7
Foot Controller can be connected to these ASSIGNABLE FOOT PEDAL jacks. A foot-
switch can be used for switching functions on and off, while a foot controller can be used
to control continuous parameters, such as volume.
With the initial factory settings, each jack features the following function.
• 1 (SUSTAIN)................Controls sustain.
• 2 (ART. 1).....................Controls an articulation effect on a Super Articulation/Super Articulation 2 Voice.
• 3 (VOLUME) ...............Controls volume.
You can also change the function assignments to the pedals as desired.
Example: Controlling SONG A start/stop by footswitch
Connect a footswitch (FC4A or FC5) to one of the ASSIGNABLE FOOT PEDAL jacks.
To assign the function to the connected pedal, select “Song A Play/Pause” in the operation
* The contents of this manual apply to the latest specifications as of the publishing date. To obtain the latest manual, access the Yamaha website then down-
load the manual file. Since specifications, equipment or separately sold accessories may not be the same in every locale, please check with your Yamaha
dealer.
Multi PadsNumber of Multi Pad Banks448 Banks x 4 Pads
Audio LinkYe s
FunctionsVoicesHarmonyYes
ArpeggioYes
Panel SustainYes
Mono/PolyYes
StylesStyle CreatorYes
OTS InformationYes
SongsScore Display FunctionYes
Lyrics Display FunctionYes
Lesson/GuideFollow Lights, Any Key, Karao-Key, Your Tempo
Multi PadsMulti Pad CreatorYes
Registration MemoryNumber of Buttons10
ControlRegistration Sequence, Freeze
PlaylistNumber of Records2,500 (max.) Records per Playlist file
druk op knop C van ASSIGNABLE , er verschijnt Keyboard / Joystick , doe alle groene vinkjes uitzetten , aanslaggevoeligheid staat nu uit. denk er wel aan als je de genos weer opnieuw opstart dit weer opnieuw moet doen of het opslaan in de registratie dan blijven de instellingen bewaard zoals jij het wil hebben. succes.
Geantwoord op 10-11-2021 om 17:01
Gebruikershandleiding.com neemt misbruik van zijn services uitermate serieus. U kunt hieronder aangeven waarom deze vraag ongepast is. Wij controleren de vraag en zonodig wordt deze verwijderd.
Product:
Spelregels forum
Om tot zinvolle vragen te komen hanteren wij de volgende spelregels:
lees eerst de handleiding door;
controleer of uw vraag al eerder door iemand anders is gesteld;
probeer uw vraag zo duidelijk mogelijk te stellen;
heeft u een probleem en al geprobeerd om dit op te lossen, vermeld dit erbij aub;
heeft u een oplossing gekregen van een bezoeker dan horen wij dat graag in dit forum;
wilt u een reactie geven op een vraag of antwoord, gebruik dan niet dit formulier maar klik op de knop 'reageer op deze vraag';
uw vraag wordt direct op de website gezet; vermijd daarom persoonlijke gegevens in te vullen;
Belangrijk! Als er een antwoord wordt gegeven op uw vraag, dan is het voor de gever van het antwoord nuttig om te weten als u er wel (of niet) mee geholpen bent! Wij vragen u dus ook te reageren op een antwoord.
Belangrijk! Antwoorden worden ook per e-mail naar abonnees gestuurd. Laat uw emailadres achter op deze site, zodat u op de hoogte blijft. U krijgt dan ook andere vragen en antwoorden te zien.
Abonneren
Abonneer u voor het ontvangen van emails voor uw Yamaha Genos bij:
nieuwe vragen en antwoorden
nieuwe handleidingen
U ontvangt een email met instructies om u voor één of beide opties in te schrijven.
Ontvang uw handleiding per email
Vul uw emailadres in en ontvang de handleiding van Yamaha Genos in de taal/talen: Engels als bijlage per email.
De handleiding is 9,19 mb groot.
U ontvangt de handleiding per email binnen enkele minuten. Als u geen email heeft ontvangen, dan heeft u waarschijnlijk een verkeerd emailadres ingevuld of is uw mailbox te vol. Daarnaast kan het zijn dat uw internetprovider een maximum heeft aan de grootte per email. Omdat hier een handleiding wordt meegestuurd, kan het voorkomen dat de email groter is dan toegestaan bij uw provider.
Uw handleiding is per email verstuurd. Controleer uw email
Als u niet binnen een kwartier uw email met handleiding ontvangen heeft, kan het zijn dat u een verkeerd emailadres heeft ingevuld of dat uw emailprovider een maximum grootte per email heeft ingesteld die kleiner is dan de grootte van de handleiding.
Er is een email naar u verstuurd om uw inschrijving definitief te maken.
Controleer uw email en volg de aanwijzingen op om uw inschrijving definitief te maken
U heeft geen emailadres opgegeven
Als u de handleiding per email wilt ontvangen, vul dan een geldig emailadres in.
Uw vraag is op deze pagina toegevoegd
Wilt u een email ontvangen bij een antwoord en/of nieuwe vragen? Vul dan hier uw emailadres in.